Embed Size (px)
Citation preview

USER MANUALMinistry of
Rural Development
National Remote Sensing CentreISRO, Department of Space,
Government of IndiaHyderabad
April 2017
Manual for Field Data Collection using Smart phone application using Android
Version 2.3

‐ 2 ‐
Version 2.3
Manual for Field Data Collection using
Smart phone application using Android

‐ 3 ‐
NATIONAL REMOTE SENSING CENTRE
DOCUMENT CONTROL SHEET
1. Security Classification Unrestricted
2. Distribution For use by State Level Nodal Agencies, Watershed Cell cum Data Centres, Watershed Development Teams and Project Implementing Agencies and Project Teams
3. Report / Document Type Technical Document
4. Document Control Number NRSC-RSAA-LRUMG-RDWMD-APRIL-2017-TR-1010
5. Title Drishti v2.3 - Manual for Field Data Collection using Smart phone application using ANDROID
6. Particulars of collation Pages 34
Figures 31
Tables -
References-
7. Author(s) Project Team, NRSC
8. Affiliation of authors NRSC
9. Scrutiny mechanism Compiled by Reviewed by Approved Project Team Head, RDMWD GD, LRUMG
10. Originating unit Rural Development and Watershed Monitoring Division
11. Sponsor(s) / Name and Address
Department of Land Resources, Ministry of Rural Development, Nirman Bhawan, New Delhi – 110011
12. Date of Publication April. 2017
13. Abstract (with Keywords)
Drishti is the Android based App designed exclusively for the Field Data Collection under the project "Monitoring of the IWMP Watersheds using Geospatial technologies" for the Ministry of Rural Development, Govt of India. This App based interface developed by the National Remote Sensing Centre, ISRO, Dept. of Space, Govt of India, is a tool for field data capture of the development activities undertaken for the IWMP Projects and also supports revisits for monitoring the status of the activity and includes a facility to upload photos on to the Bhuvan IWMP Server. The Manual also includes a Frequently Asked Questions (FAQ’s) section. Keywords: IWMP Bhuvan; Drishti App, Monitoring, Watersheds, Field Data Collection

‐ 4 ‐
Project Team
Dr P V Krishna Rao, Scientist SG, RDMWD
M A Fyzee, Scientist SG, RDWMD
Dr Girish S Pujar, Scientist SF, RDWMD
B Shyamsunder, Scientist SF, RDWMD
Lesslie A, Scientist SE, ASD & CI Group
M Arul Raj, Scientist SF& Manager , Bhuvan Web Services
Ms Mobina Shaik, Sr. Scientific Assistant, Bhuvan
Manual Prepared by:
B. Shyamsunder, Scientist SF, RDMWD/ LRUMG/ RSA
Supervision and Technical Guidance
Dr. K. Mruthyunjaya Reddy , Head, RDWMD/ GH, PPEG
Overall Guidance Dr. T. Ravisankar, Group Director, LRUMG
Dr. M.V. Ravi Kumar, Group Head, ASD & CIG

‐ 5 ‐
Mobile Software Application for Field Data Collection - Monitoring IWMP activities
1. Overview: The watershed development programme is multi-disciplinary in nature with
integration of many inter-related activities to achieve restoration of ecological
balance by harnessing, conserving and developing degraded natural resources such
as soil, vegetative cover and water. Understanding and monitoring the different
stages of numerous watershed development activities covering a huge area on
regular basis is a big challenge. Remote sensing technology can play a major role in
monitoring such activities. The high resolution satellite data (images) gives large
perspective view of the ground situation and it can be monitored at periodic time
intervals. Monitoring with satellite data at short time intervals may not be an optimal
method to adopt. For such projects, field data collection using smart phone can be a
good complementary solution. The collected field attributes with photographs
information can be overlaid over the satellite data to give a good perspective of
activities in the field.
The field data collection for monitoring activities was traditionally done using a
manual approach like visiting field with hard copy form entry, consolidating the
collected data at later date involving substantial delay. The recent technological
advances in field of mobile devices, web solutions, and network connectivity have
made it possible to design and develop innovative smart phone based solutions for
field data collection to replace traditional methods and enhance productivity and data
management.
2. Modernized Field Data Collection:
Towards realizing the objective of modernizing the field data collection process for
monitoring watershed activities, the smart phone based application was suitably
designed and developed. The application effectively utilizes free and open source
technologies and leverages the power of geo-visualization and data management
capabilities of the existing Bhuvan platform.

‐ 6 ‐
The requirements of the solution were envisaged in two parts. 1) A device based
software solution to collect field data and send to central servers. 2) A server side
software solution to archive received data in centralized storage system, geo-
visualization of archived data, provision to review each observation by technical
experts on existing Bhuvan platform.
3. Description of developed solution:
The developed software is deployed on Android OS based smart phone. The rich
and user friendly Graphical User Interfaces (GUI), which facilitates observer/user to
collect data with ease, predominantly reduces data entry errors, reduces data
organization and data retrieving difficulties. The collected information can be sent in
near real time using GPRS / WiFi facility for analysis at office at near real time. The
captured photograph enables user at office to understand and analyze the ground
condition in pictorial form. The facilities are provided to send collected data in near
real time if internet connectivity is available in field. There is provision to send it later
in case of no internet connectivity is available on field.
4. Operating Procedure
This Android App is designed for use in phones with Android v4.0 (Ice Cream
Sandwich) or above and with a RAM of more than 2 gb.
This version supports geotagging of assets for all the projects in a particular district
(Project list as drop down is predefined) and the new features in the App is a Map
interface which is created to show a satellite image at a particular location. This
location can be seen along with a point where one is standing, and also shows the
already collected geotags in that particular project. Incase a geotag is already
collected, the same can be revisited again and a fresh geotag and photos also can
be collected and the status changed thus facilitating periodic monitoring.
The following are screenshots representing the features in the mobile application
and step by step working procedure to collect field data using the software.

‐ 7 ‐
4.1 Download the app using browser in the android mobile:
Figure 1: Open the browser and type URL to download the app.
The above screenshots in Figure 1 indicates procedure to open browser and entering URL for downloading the Drishti smart phone application from Bhuvan Portal.
Figure 2: Screenshot showing downloading the app from Playstore.
The above screenshots in Figure 2 indicates procedure to download the Bhuvan
Download Smart Phone Application from Bhuvan Portal
URL: http://bhuvan3.nrsc.gov.in/bhuvanapp/bhuvanapp_iwmp_v1.php

‐ 8 ‐
Drishti smart phone application from Google Playstore.
Step 1: Indicates icon of browser to open the browser in the smart phone. Step 2: Entering URL in the browser and click on Go button. Step 3: Tap top of smart phone screen and swipe down to open and visualize downloading of app. Step 4: Once the download completes, Click on apk file to initiate installation.
4.2 Install the downloaded application in the android mobile:
Figure 3: Installing the App.
Figure 4: Installation of the s/w and Drishti icon in the smart phone
The above screenshots indicate procedure to install the android application in the smart phone.
Step 1: Starts installation.
Bhuvan Drishti App
Bhuvan Drishti App
Installation of the Bhuvan Drishti App

‐ 9 ‐
Step 2: Completes installation procedure.
4.3 Open the app and setting up user profile (One Time Activity - OTA):
Figure 5: Open the Bhuvan Drishti app & Entering user profile and save
Figure 6: Filling the User profile
Alert
Please fill your profile first
OK
Open Bhuvan Drishti app and set user configuration

‐ 10 ‐
Figure 7: Selection of State and District name in user profile
Figure 8: Selection of Project Name in the user profile and save
The above screenshots indicate steps to open the Bhuvan Drishti app, enter the user profile and save.
Step 1: Click on Bhuvan Drishti app icon to open the smart phone app. Step 2: Open the app with provision to enter user's profile.
Step 3: There are 7 user profile parameters to enter. i) Bhuvan User Name (User can define his / her own identification code (Alf- numeric code), ii) Name & Designation, iii) Mobile number, iv) Organisation of the user, v) State Name vi) District Name and vii) Project Name.
Step 4: Save the entered parameters.
‐ 11 ‐
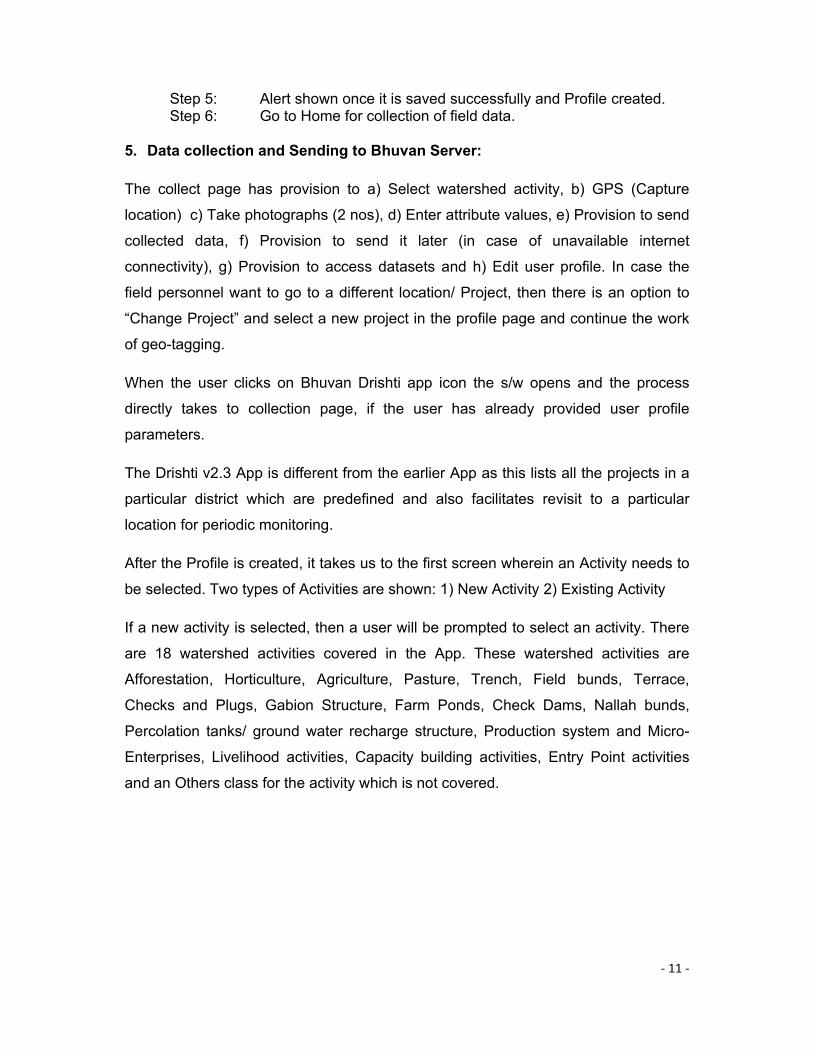
Step 5: Alert shown once it is saved successfully and Profile created. Step 6: Go to Home for collection of field data. 5. Data collection and Sending to Bhuvan Server:
The collect page has provision to a) Select watershed activity, b) GPS (Capture
location) c) Take photographs (2 nos), d) Enter attribute values, e) Provision to send
collected data, f) Provision to send it later (in case of unavailable internet
connectivity), g) Provision to access datasets and h) Edit user profile. In case the
field personnel want to go to a different location/ Project, then there is an option to
“Change Project” and select a new project in the profile page and continue the work
of geo-tagging.
When the user clicks on Bhuvan Drishti app icon the s/w opens and the process
directly takes to collection page, if the user has already provided user profile
parameters.
The Drishti v2.3 App is different from the earlier App as this lists all the projects in a
particular district which are predefined and also facilitates revisit to a particular
location for periodic monitoring.
After the Profile is created, it takes us to the first screen wherein an Activity needs to
be selected. Two types of Activities are shown: 1) New Activity 2) Existing Activity
If a new activity is selected, then a user will be prompted to select an activity. There
are 18 watershed activities covered in the App. These watershed activities are
Afforestation, Horticulture, Agriculture, Pasture, Trench, Field bunds, Terrace,
Checks and Plugs, Gabion Structure, Farm Ponds, Check Dams, Nallah bunds,
Percolation tanks/ ground water recharge structure, Production system and Micro-
Enterprises, Livelihood activities, Capacity building activities, Entry Point activities
and an Others class for the activity which is not covered.

‐ 12 ‐
Figure 9: User to select an Activity
i) New Watershed activity:
The process of collecting field data starts with selection of the watershed activity.
The observer must choose appropriate watershed activity in the field.
Figure 10: Select appropriate watershed activity
Selecting Watershed Activity

‐ 13 ‐
The user must select watershed activity from the drop down menu. Once it is selected, the buttons below select option gets activated and additional GUI options with provision to enter appears.
Step 1: Click on "Select the Activity" Step 2: Select any one activity from drop down menu. Here example:
"Afforestation". Step 3: Once Activity is selected, the GPS, Photo and attribute feature
activates and additional fields appear.
ii) Capture location information:
The user must switch on the GPS / Location on his mobile and for this go to Setting
>> Location and security >> Enable use GPS satellite and choose location accurate
to street level / High accuracy.
To capture the location, the user must go to the centre of the structure / feature
under the open sky. Wait till GPS lat-Lon position accuracy is displayed (in blue
colour text above "GPS" button). If the mobile has GPRS / 3G connectivity, initial
tracking of GPS will be fast. The accuracy of the position slowly improves with the
time. The user must wait till the value reaches 10 meters or below and click on
"GPS" button. After Capture Location, an alert message appears in textbox below
with "GPS location captured with 10 meters of Accuracy".
Figure 11: Capturing location information
Wait till GPS Accuracy info appears and
its value reaches 10 meters or below
Location captured can be updated by
click on GPS button before sending
GPS (Capture Location)

‐ 14 ‐
ii) Map interface on the App:
Figure 12: Map Interface on the Drishti App
A map interface is a new feature introduced in this version of the Drishti App. On
selecting the map button a window opens on the mobile which dynamically shows
the current location of the user, as a marker button in orange colour. As the user
moves from one location to other, there is also a current location refresh enabled
which can be configured in milliseconds in the Profile Page while registering the App.
If the mobile is enabled with data connection then a high resolution satellite image
gets loaded showing the location in the window. In case there is no data connection
on the mobile, a white window is displayed with an orange marker. A user can use
this option if data connection is enabled for accurate location information in field.
Map showing the location of the user

‐ 15 ‐
iii) Take photographs:
The "Photo" button in the application uses native camera application of the android
mobile. This enables user to capture photograph and save. Along with photographs,
it also captures latitude, Longitude, accuracy, orientation and time stamp. The user
also will be provided with textbox to key-in about the photo captured. A preview of
captured photo is display in the collection page.
Figure 13: Take photo using mobile native camera
Figure 14: Save the photo, preview and addition of text tag to the photo
Note: The user can also reduce the resolution to the lowest possible for optimizing the data transfer load from mobile to Bhuvan server.
Take Photo
Click on Photo button again to take 2nd photo

‐ 16 ‐
iv) Enter attribute values:
The appropriate attribute values are selected from drop down menu for watershed
activity and its status, while the Village, Survey no, Beneficiary Name, Date of
Completion and Details are to be keyed-in.
Figure 15: Attribute values
v) Provision to send collected data:
The send feature of the Bhuvan Drishti app enables user to send collected data to
Bhuvan server. This send requires internet/ data connectivity in the field through
GPRS /3G/ WiFi. The sent data consist of information depicted in figure 14 and
users profile information is also tagged such as user id, observer name, phone
number and organisation. An alert is displayed once the data is received at Bhuvan
server. However it is suggested that all users “Save” the observation details first
rather than sending the information from the field. This data can be sent later to the
Bhuvan server as some other details also may be added in the office and then after
checking the correctness of the data entered. Thus there is a further chance to edit/
modify the data before sending.
Fill the observations
Watershed activity and its status can be selected
from drop down menu and details can be keyed‐in

‐ 17 ‐
Figure 16: The Collected data initialized to send to Bhuvan server. Alert message received after data reaching the server
vi) Provision to save observation (send later):
The “Save” feature of the Bhuvan Drishti app allows user to store collected data in
send later location of the mobile. This feature is generally used when mobile data/
internet connectivity is not available in the field. The collected data can be sent when
mobile data/ internet connectivity is available in the mobile.
Figure 17: The collected data is Saved to send it later
Save (Send Later) Option
Collected data Send to Bhuvan Server

‐ 18 ‐
vii) Provision to access datasets:
The datasets feature “Manage” button of the software allows user to access all
collected data. The datasets under “Manage” button are organized in 3 categories (a.
Send later data, b. Sent failed data and c. Sent data). If the user chooses to send
data immediately to Bhuvan server and data successfully stored in the server then
these datasets are reflected in “view sent” data component. In case, if it fails to reach
server due to communication problem (internet connectivity failure) then it reflects in
“sent failed” component. If the user chooses to send it later then it reflects in “send
later” component. Figure 18.
In send later and sent failed components, the user can select an observation and
send it to Bhuvan server, this requires internet connectivity at a later time (through
GPRS/3G/4G/WiFi). Important feature here is that the user has facility to edit or
modify the observed attribute values before sending. The observation also can be
deleted, if it is not required in the mobile. Figure 19
Figure 18: GUI to view collected dataset in smart phone
All the sent data will be seen in pink colour marker in the Map interface of the App.
Managing the Datasets

‐ 19 ‐
Figure 19: The selected dataset to Edit, Send and Delete
The View option of sent datasets enable user to visualize the attribute value of the
observation with photographs taken. This is an un-editable feature since the
observation is already sent to Bhuvan server. Figure 20, 21
Figure 20: View sent datasets
Note: Here user can send selected dataset
to Bhuvan Server, edit / modify or delete
dataset from mobile
Only attribute value can be
changed, saved and sent
View Option for sent datasets

‐ 20 ‐
Figure 21: View sent datasets (Photographs and Attribute values)
viii) For Existing Activity monitoring
This is another new feature introduced in v2.3 of the Drishti App which allows monitoring/ updating the existing activity already captured on the mobile. In case of a second visit / revisit to a particular location of the asset, any user can capture the GPS location again along with 2 more photos which shows the latest development or represent the changed status of the asset on the ground. The App also allows to change the status from the drop down list from Not Initiated >Initiated > In progress > Completed.
Figure 22: Selecting an Existing activity
Viewing Sent data displays the
2 photos captured, the status of
the activity and also lists the
details filled. This information is
not editable once it has been
sent to the Bhuvan Server but
only may be viewed on the App.

‐ 21 ‐
On selection of the Existing Activity, a form window opens on the App where the existing or already captured Asset code/ work code needs to be selected. (Figure 22) Once in the field the user can select or view the asset code. To view the code, user needs to press on the form which opens the keyboard. Then the user needs to press the space bar on the keyboard. Once the space bar is selected, the list of already captured assets is displayed on the phone. (Figure 23)
Figure 23: Viewing the existing asset/ work codes
Figure 24: Selecting the existing asset/ work codes
Viewing the Asset/ work code

‐ 22 ‐
The user can select the asset code or open the map to view and update the asset information. On selection of the Asset/ work code an alert appears on the screen showing the details of that particular asset like date of Completion; Status of Activity; No of Visits; and Status of Moderation (Figure 24). If all details are found correct then the user may press ok to confirm and proceed to check the same on the high resolution satellite map and update the asset details by capturing the GPS location, taking 2 new photos and editing the status or the details of the asset.
Figure 25: Map showing the existing geotag locations in three different colours on Satellite Map
New features include: Color of marker of the present location is Orange colour. (In
this example, the present location is Hyderabad while the Project selected in the
Profile is from Chittoor District, Andhra Pradesh). The existing asset geotags are
seen Pink colour and the selected geotag for updating is seen in Blue colour. (Figure
25)
The orange icon represents current location with popup info on the map. The pink
icon represents already geo-tagged works with work code in popup info for both New
activity and Existing activity.

‐ 23 ‐
Figure 26: Selected geotag and the existing asset geotags on Satellite Map
The selected asset geotag can be seen in Blue colour and the other existing geotags can be seen in pink colour as seen in Figure 26. To confirm the asset/ work code of the asset, the user may touch the asset in blue colour and the asset code is displayed on the satellite map. The user during a revisit may collect the GPS location again, take 2 new photos and modify/ change the “Status of activity” and the “details” following the same steps as mentioned in step 5 ii), 5 iii) and 5 iv) given above.
Figure 27: Modifying/ Updating the data for the existing asset geotags

‐ 24 ‐
New information may be added to the “details” about the asset and saved. The
status of the existing activity may be updated from Initiated> In progress or
In Progress> Completed during the revisit to the field even for a second revisit or
third revisit to monitor the progress of the Activity. (Figure 27). After this step an user
may either “Send” the information or Save it for “Send Later” and follow the same
steps as mentioned in step 5 v), 5 vi) and 5 vii) given earlier.
Figure 28: Viewing the Asset/ Work code for the existing asset geotags
The blue icon represents selected work location on the map with work code in popup
info for existing activity. The pink icon represents already geo-tagged works with
work code in popup info for both New activity and Existing activity.
The selection of geotag points also can be done from the map interface. Touching
the other points is pink colour displays the work codes of the respective geotag
points. Figure 28.

‐ 25 ‐
ix) Edit user profile.
The user profile is mandatory fields feature in the software, without which user will
not be allowed to enter into data collection page. The editing of user profile is
enabled to change in Bhuvan User name, observer name and designation, phone
number and organization name of the observer. In addition to this the user can
change the project by selecting state name, district name and project name (Figure
29).
To Change Project
“Change Project” feature is useful if the field staff are transferred or incase they
move to another Project to another Project. After the Project is changed the user
may also touch the “Update Work Data” button which then updates the Work codes
for the new Project selected. This way the information gets updated from the Bhuvan
Server to the App which facilitates changing districts and changing projects. Another
feature is the dynamic updation of current location of the user. As the user moves
from one location to other, there is also a current location refresh rate enabled which
can be configured in milliseconds to be specified at the time of profile creation. Thus
even the movement of the user is captured by the App.
Figure 29: Editing of user profile and Changing Project
User Profile ‐ Editing
User profile
info can be
changed and
saved. The
district and
project
names also
can be
changed by
editing the
user profile

‐ 26 ‐
(x) Clearing the memory from the Drishti App
The information along with photos that are successfully sent to Bhuvan server still
reside in the Drishti App under the “Sent Data”. To clear this data from the mobile,
the user need to go to the Profile page and select the Software maintenance Activity.
On selecting this new screen appears with three buttons. Touching the “Clear
Space” option clears all the “Sent data” from the mobile thus freeing the mobile
memory also (Figure 30). Selecting the “Reset Profile” allows the user to create
profile again to register the mobile.
Figure 30: Clearing Space to free memory from the Mobile
The Home button take us back to the screen from which the geo-tagging of the
assets can be started again by following the steps as given in 5 i) to vii) for any “New
Activity” and from 5 viii) for any “Existing Activity”
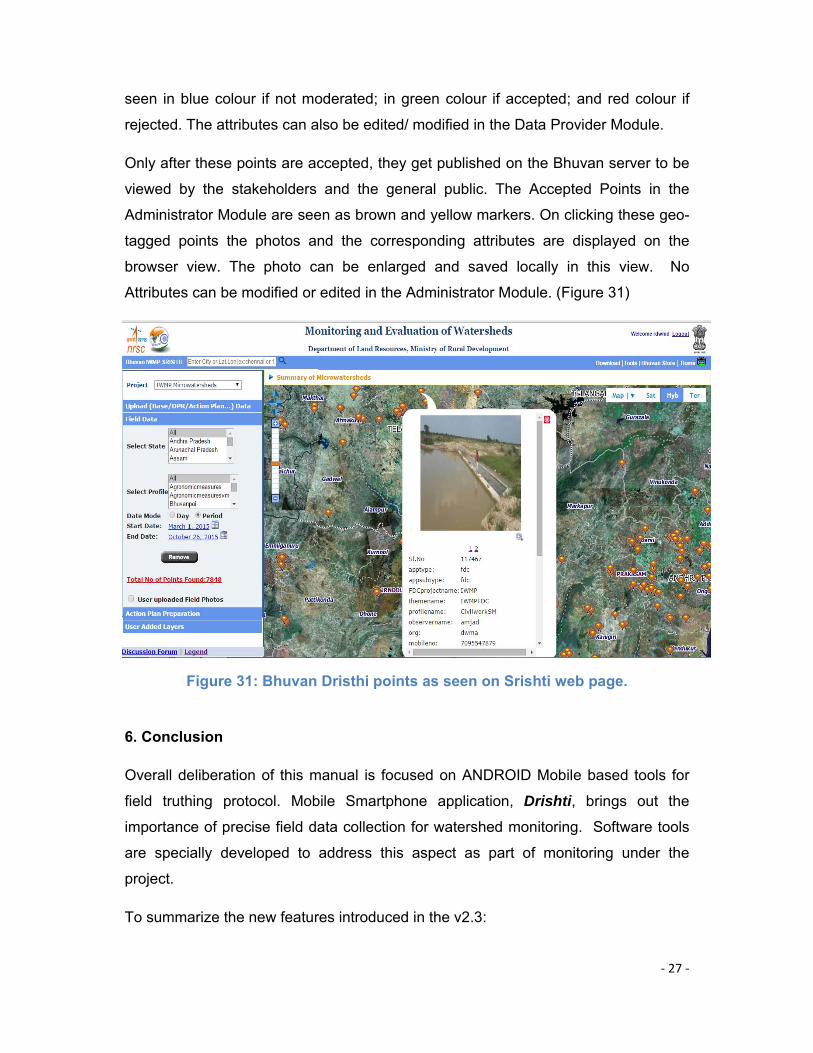
(xi) Viewing the geo-tagged points on Bhuvan Server
The Drishti app collected points are in an intermediary state and can be viewed on
the Bhuvan Srishti Web portal under the “Field Photos” link which displays all the
points collected. These points are subject to Photo Moderation process to be done
by the respective State SLNA’s. Under the Data Provider Module, these points are
‐ 27 ‐
seen in blue colour if not moderated; in green colour if accepted; and red colour if
rejected. The attributes can also be edited/ modified in the Data Provider Module.
Only after these points are accepted, they get published on the Bhuvan server to be
viewed by the stakeholders and the general public. The Accepted Points in the
Administrator Module are seen as brown and yellow markers. On clicking these geo-
tagged points the photos and the corresponding attributes are displayed on the
browser view. The photo can be enlarged and saved locally in this view. No
Attributes can be modified or edited in the Administrator Module. (Figure 31)
Figure 31: Bhuvan Dristhi points as seen on Srishti web page.
6. Conclusion
Overall deliberation of this manual is focused on ANDROID Mobile based tools for
field truthing protocol. Mobile Smartphone application, Drishti, brings out the
importance of precise field data collection for watershed monitoring. Software tools
are specially developed to address this aspect as part of monitoring under the
project.
To summarize the new features introduced in the v2.3:

‐ 28 ‐
1) The app extended to geo-tag all the projects under IWMP.
2) The app has dynamically showing the current location on the map and also
has provision to specify current location refresh rate in milliseconds. The
provision of defining current location refresh rate is in the profile page. This
need to defined while profile filling itself.
3) In Existing Activity, the work code change is managed in the map also
effectively.
4) The time stamp is retrieved from GPS receiver not the mobile device.
5) The GPS based time stamp is captured on the photo capture and also
separately captured in attribute data.
6) The orange icon represents current location with popup info on the map.
7) The blue icon represents selected work location on the map with work code in
popup info for existing activity.
8) The pink icon represents already geo-tagged works with work code in popup
info for both New activity and Existing activity.
9) In earlier version user need to capture GPS to visualize the current location
on the map. In the 2.3 version user need to only select activity and directly go
to map to visualize current location with already geo-tagged works.
Information collection when beamed to central server turns in to a value added
service and builds a comprehensive database for evaluation. Satellite image based
change detection, coupled with field information helps to evaluate the progress on
the ground. Integration of 3 streams of information, namely, Satellite imaging, Mobile
smartphone based field information and Geospatial technology would help in
unbiased and reliable monitoring of watersheds across the country on a continuous
and consistent basis.
Android tool hence enables a comprehensive field truthing of the micro-watershed
activities. It can expedite vast field information collection and real time updating on
the web portal. This would help decision makers to assess the condition of
implementation at the earliest.

‐ 29 ‐
FREQUENTLY ASKED QUESTIONS (FAQ’S)
1) From where can I install the Drishti v2.3 mobile application?
Ans: Key in the URL
http://bhuvan3.nrsc.gov.in/bhuvanapp/bhuvanapp_iwmp_v1.php on mobile browser or visit the home page http://bhuvan.nrsc.gov.in/projects/iwmp/ for the latest link. The mobile application (.apk) file gets downloaded in the download folder. Click on the file to start installing. User will be required to enable unknown sources option in security setting of android.
2) Is the Drishti v2.3 application available in Google Play store?
Ans: Yes. You need to search in Google play store as Bhuvan Drishti and the latest version will be available for installation.
3) Is the mobile App is available for Apple and Windows devices?
Ans: No, the application is currently only available for Android platform.
4) What is the minimum specification required for Android device?
Ans: Android 4.0 or above, 2GB RAM or above, 8GB local storage or above, GPS sensor with A-GPS facility, 2G/3G/4G and WiFi facility.
5) What to do if there is insufficient storage in my mobile?
Ans: Either change the mobile to one with larger local storage or create space in the local storage by removing other applications.
6) What should I do if I need to change my mobile?
Ans: You need to register again using new mobile.
7) What to do if my mobile get stolen / lost?
Ans: Install Bhuvan Drishti mobile App in the new mobile and register again.
8) Can I use the mobile application without 3G?
Ans: Yes, you can use 2G or 4G or WiFi with internet facility.
9) Can the mobile application work without 2G/ 3G/ 4G?
Ans: Yes, Internet is not required to geo-tag an asset but it required to send the captured geotag data. You can connect broadband service at office or home through WiFi facility and send data.

‐ 30 ‐
10) What is the difference in the Profile page in this newer version of the App?
Ans: The major difference in the earlier version and this version (v2.3) is that all the projects in a district are available for geo-tagging. The project names are precoded and are seen under a drop down list in the Profile creation page.
11) Where do I view the collected asset information and geotags?
Ans: The Asset geotags will be visible on the Bhuvan IWMP (Srishti) portal. SLNA can login with the bhuvan username and password and view the Assets geotags in the respective State while the WCDC can login with the bhuvan username and password and view the Asset geotags in the respective District. Any citizen also can view the moderated geotags at National, State and District level.
12) What is the role of the SLNA in Bhuvan?
Ans: After the Asset geotags are collected the SLNA need to register and login to Bhuvan Srishti and moderate the Geotags collected and either approve/ accept or reject any geotag.
13) How should the SLNA’s register to use Bhuvan Srishti?
Ans: The user name and passwords are created at NRSC for all the state SLNA’s. In case the username and passwords for a particular states are not known, the concerned SLNA need to contact the the Project Coordinator from the project team at NRSC.
14) How should the WCDC’s register to use Bhuvan Srishti?
Ans: The user name and passwords for WCDC’s for every District are created at NRSC for all the states. For creation of username and passwords at WCDC level, the concerned SLNA need to contact the Project Coordinator from the project team at NRSC.
15) What if the Field personnel/ WDT’s are transferred to different District/ Project areas?
Ans: The Field functionaries need to change their District and Project name by editing the Profile under “Change project” option. After this they may again resume their task of geotagging.
16) Does the App support revisit to any particular asset?
Ans: Yes, the App supports revisit to any existing activity to update the information and photos of the activity. The user needs to select “Existing Activity” first before starting the work.

‐ 31 ‐
17) How to display all assets in drop down menu of the mobile App?
Ans: Use spacebar key to display all assets under the “Existing Activity”
18) How many pictures can I take for one asset?
Ans: Two pictures are to be mandatorily taken for each asset. No more than two pictures can be uploaded for one asset.
19) What is the GPS Accuracy required?
Ans: Switch on ‘High accuracy’ mode. The GPS accuracy recommended is less than 10m and most of the new generation mobiles support even less than 5m.
To get the best possible signal, one needs to be prepared to use a bit more battery than normal. It’s a necessary sacrifice, and you can always reverse it later when you don’t need to use GPS. Enabling this is easy; just follow a couple of steps and you’ll be on your way.
Go into android Settings and tap Location and ensure that location services are on. One should be able to toggle it at the top right hand of your screen. It should be green and the button to the right.
Now the first category under Location should be Mode, tap that and make sure it’s set to High accuracy. This uses your GPS as well as your Wi-Fi and mobile networks to estimate your location. This will use more battery, but will utilise all available methods to give you the most accurate location possible.
Keep the GPS signal active.
One of the main problems that is encountered when going from one App to another is that the GPS is turned off to save battery. If for example you are navigating and want to take a look at your latest messages, your GPS could be turned off. However it is suggested to keep the GPS signal active.
Refresh your GPS Data.
Sometimes a device will get ‘stuck’ on certain GPS satellites, even if they’re not within range, causing it not to work properly. User may exit the App and open the application again.
If the above doesn’t work, probably, one should try with another GPS Android Phone.
20) How far can I move to take the picture after locking the GPS?
Ans: You can move to an extent of covering full asset in the camera. The first photo should represent extent of the work or asset and Second photo should represent

‐ 32 ‐
intensity of work or show the beneficiary incase of activity is involving an individual beneficiary.
21) What are the multiple ways in which an asset can be geotagged and uploaded?
Ans: The user has to use features provided in the mobile App only to geo-tag an asset.
22) Can I use two mobiles for geo-tagging at the same time?
Ans: Yes, you can do it. But ensure you are not geotagging the same asset with both mobiles.
23) What to do if I get the alert ‘Please wait... GPS fetching Lat-Lon’?
Ans: User need to ensure that location in Android setting is switched on, remove the mobile App if it is running in background and restart the mobile App.
24) What happens if there is a communication failure while uploading the data?
An: The mobile App shows the message ‘Data sent successfully’ only after receiving response from Bhuvan Server. If there is any communication failure, the data gets automatically organised in ‘Send Later’ option and the user can upload it again.
25) What is the option of ‘reset configuration’?
Ans: User can reset the mobile App without any data loss in Send later option. However the User needs to register again for only mobile.
26) Can I change the details of asset from mobile application?
Ans: Yes, Some fields on the mobile App may be edited/ modified when the asset geo-tags are saved and viewed under the “send later” option. The editable fields are “Status of Activity” and the “Details” which may be modified.
27) What are the data available for identified asset details in the mobile application?
Ans: User can key in the any one of the following to begin with: Activity (New or Existing). For New Activity a) Watershed Activity, b) Village c) Survey No. d) Benificiary Name e) Status of Activity, f) Date of Completion g) Details. For Existing Activity a) Work code, b) Status of Activity c) Details. On selecting the asset the mobile App will display additional info such as 1. Work Code, 2. Type of Activity, 3. Date of Completion, 4.Status of Activity, 5. No. of visits, 6. Status of Moderation.

‐ 33 ‐
28) Who can moderate the geo-tags?
Ans: Concerned SLNA’s can do the moderation after logging into the Bhuvan Srishti geoportal.
29) How is the geotagged assets get validated / moderated?
Ans: A geo-tagged asset can be moderated by the concerned SLNA by logging into http://bhuvan.nrsc.gov.in/projects/iwmp under the Data Provider option. To perform moderation operation click on ‘Enable Moderation’ icon. Select any asset by clicking on it. After selecting the asset a pop up will display the information of geotagged assets along with the photos. From here the asset can be accepted or rejected or modified/updated.
30) What should the SLNA do when the Asset information or the photographs are not correct?
Ans: SLNA may view the Photos and information for quality and reject the asset geotag if not found satisfactory.
31) What is meant by ‘Rejection of an Asset’?
Ans: If the asset details captured by the WDT/ Field personnel are wrong, then the SLNA should reject the asset. Such rejected assets need to be geotagged again.
32) How to reject the geo tagged asset?
Ans: The geo-tag details of an asset captured by WDT/ Field functionary can be moderated by respective SLNA by logging into the Bhuvan Srishti portal http://bhuvan.nrsc.gov.in/projects/iwmp under the Data Provider module. To perform rejection operation click on ‘Enable Moderation’ icon under the “Field Data” option to moderate the assets. Select any asset by clicking on it. After selecting the asset, a pop up will display the information of geotagged assets along with the photos. To reject the geo-tagged IWMP Assets click on reject button on bottom of pop up. After clicking on reject button a new box will open asking ‘Reason for reject’. Enter the reason for rejection and select the reject button, asset will be rejected successfully.
33) What are the improvements in this version of the App?
Ans:
(a) The App is extended to geo-tag all the projects in all districts under IWMP.
(b) The app has dynamically showing the current location on the map and also has provision to specify current location refresh rate in milliseconds. The provision of defining current location refresh rate in the profile page. This need to defined while profile filling itself.
(c) In Existing Activity, the work code change is managed in the map also

‐ 34 ‐
effectively.
(d) In earlier version user need to capture GPS to visualize the current location on the map. In the version 2.3, user need to only select activity and directly go to map to visualize current location with already geo-tagged works.
(e) The time stamp is retrieved from GPS receiver not the mobile device.
(f) The GPS based time stamp is captured on the photo capture and also separately captured in attribute data.
(g) The orange icon represents current location with popup info on the map.
(h) The blue icon represents selected work location on the map with work code in popup info for existing activity.
(i) The pink icon represents already geo-tagged works with work code in popup info for both New activity and Existing activity.
34) I am facing a few issues with the mobile App. With whom can I raise my doubts?
Ans: Any user may contact their respective SLNA’s who in turn may report/ send such issues to the Project Team at NRSC.
o---------------------------------------------------------o-------------------------------------------------------o