Embed Size (px)
Citation preview

Version 7.1.0Double-Take Availability for vSphere User's Guide
Double-Take® AVAILABILITY™

Notices
Double-Take Availability for vSphere User's Guide Version 7.1.0, Thursday, January 29, 2015
l Product Updates—Check your service agreement to determine which updates and new releasesyoumay be eligible for. Product updates can be obtained from the support web site athttp://www.VisionSolutions.com/SupportCentral.
l Sales—If you needmaintenance renewal, an upgrade license key, or other sales assistance, contactyour reseller/distributor or a Vision Solutions sales representative. Contact information is available onthe Vision SolutionsWorldwide Locations and Contacts web page athttp://www.VisionSolutions.com/Company/Vision-HA-Locations.aspx.
l Technical Support—If you need technical assistance, you can contact CustomerCare. All basicconfigurations outlined in the online documentation will be supported through CustomerCare. Yourtechnical support center is dependent on the reseller or distributor you purchased your product fromand is identified on your service agreement. If you do not have access to this agreement, contactCustomerCare and theywill direct you to the correct service provider. To contact CustomerCare, youwill need your serial number and license key. Contact information is available on the Vision SolutionsCustomerCare web page at http://www.VisionSolutions.com/Support/Support-Overview.aspx .
l Professional Services—Assistance and support for advanced configurationsmay be referred to aPre-Sales SystemsEngineer or to Professional Services. For more information, see theWindowsand Linux tab on the Vision SolutionsConsulting Servicesweb page athttp://www.VisionSolutions.com/Services/Consulting-Services.aspx .
l Training—Classroom and computer-based training are available. For more information, see theDouble-Take Product Training web page at http://www.VisionSolutions.com/Services/DT-Education.aspx.
This documentation is subject to the following: (1) Change without notice; (2) Furnished pursuant to alicense agreement; (3) Proprietary to the respective owner; (4) Not to be copied or reproduced unlessauthorized pursuant to the license agreement; (5) Provided without any expressed or implied warranties, (6)Does not entitle Licensee, End User or any other party to the source code or source code documentation ofanything within the documentation or otherwise provided that is proprietary to Vision Solutions, Inc.; and (7)All Open Source and Third-Party Components (“OSTPC”) are provided “AS IS” pursuant to that OSTPC’slicense agreement and disclaimers of warranties and liability.
Vision Solutions, Inc. and/or its affiliates and subsidiaries in the United States and/or other countriesown/hold rights to certain trademarks, registered trademarks, and logos. Hyper-V andWindows areregistered trademarks of Microsoft Corporation in the United States and/or other countries. Linux is aregistered trademark of Linus Torvalds. vSphere is a registered trademark of VMware. All other trademarksare the property of their respective companies. For a complete list of trademarks registered to othercompanies, please visit that company’s website.
© 2015 Vision Solutions, Inc. All rights reserved.

ContentsChapter 1 Agentless vSphere overview 4
Replication process 5
Chapter 2 Agentless vSphere requirements 7
Chapter 3 Creating an agentless vSphere job 12
Chapter 4 Managing and controlling agentless vSphere jobs 30Viewing agentless vSphere job details 37Validating an agentless vSphere job 40Editing an agentless vSphere job 41Viewing an agentless vSphere job log 42Updating to a new controller appliance 44Failing over agentless vSphere jobs 45
Chapter 5 Double-Take Console 46Double-Take Console requirements 48Console options 49
Chapter 6 Managing servers 51Adding controller appliances 57Adding replication appliances 58Providing server credentials 60Viewing server details 61Editing server properties 63Controller appliance associations properties 64Server licensing 65E-mail notification configuration 67
Viewing server logs 69
Contents 3
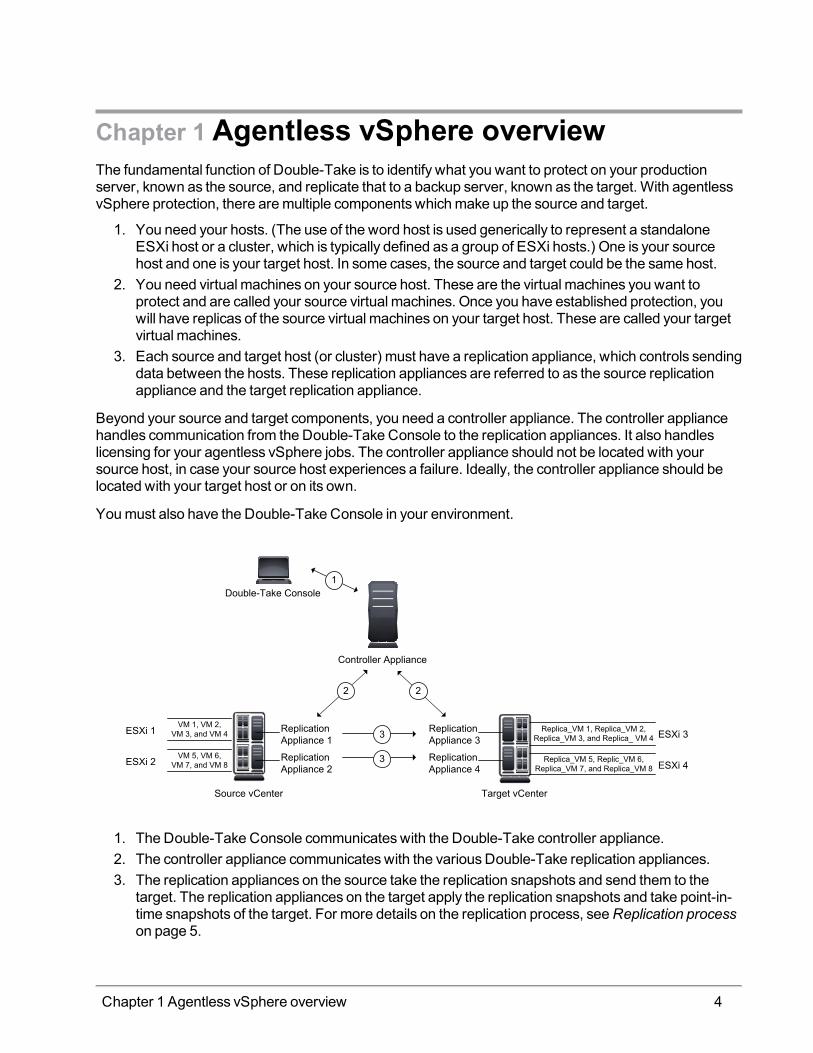
Chapter 1 Agentless vSphere overviewThe fundamental function of Double-Take is to identify what you want to protect on your productionserver, known as the source, and replicate that to a backup server, known as the target. With agentlessvSphere protection, there aremultiple components whichmake up the source and target.
1. You need your hosts. (The use of the word host is used generically to represent a standaloneESXi host or a cluster, which is typically defined as a group of ESXi hosts.) One is your sourcehost and one is your target host. In some cases, the source and target could be the same host.
2. You need virtual machines on your source host. These are the virtual machines you want toprotect and are called your source virtual machines. Once you have established protection, youwill have replicas of the source virtual machines on your target host. These are called your targetvirtual machines.
3. Each source and target host (or cluster) must have a replication appliance, which controls sendingdata between the hosts. These replication appliances are referred to as the source replicationappliance and the target replication appliance.
Beyond your source and target components, you need a controller appliance. The controller appliancehandles communication from the Double-Take Console to the replication appliances. It also handleslicensing for your agentless vSphere jobs. The controller appliance should not be located with yoursource host, in case your source host experiences a failure. Ideally, the controller appliance should belocated with your target host or on its own.
Youmust also have the Double-Take Console in your environment.
1. The Double-Take Console communicateswith the Double-Take controller appliance.2. The controller appliance communicateswith the variousDouble-Take replication appliances.3. The replication appliances on the source take the replication snapshots and send them to the
target. The replication appliances on the target apply the replication snapshots and take point-in-time snapshots of the target. For more details on the replication process, seeReplication processon page 5.
Chapter 1 Agentless vSphere overview 4

Replication processAgentless vSphere protection is different than other Double-Take job types because it is reliant on ESXitechnology. Instead of real-time replication, agentless vSphere protection takes snapshots of yoursource virtual machine and replicates those snapshots to the target host where they are applied to thetarget virtual machine. The following diagram illustrates a typical agentless vSphere protection job. Inthis example, the replication interval is 15minutes. Additionally, the example accounts for taking point-in-time snapshots of the target virtual machine. The example point-in-time snapshot interval is one hour.The job is started at 8:00.
1. This is your first replication interval. It occurs between 8:00 and 8:15.
1.1. Double-Take takes a replication snapshot of the source virtual machine.
1.2. Double-Take checks to see if a scheduled point-in-time snapshot is due to run. Since this isyour first replication interval and scheduled snapshots are enabled, a point-in-timesnapshot of the target virtual machine will be triggered.
1.3. Double-Take replicates and applies the replication snapshot of the source virtual machineto the target virtual machine.
1.4. Double-Take takes a point-in-time snapshot of the target virtual machine.
1.5. Because the 15minute replication interval has not been exhausted, Double-Take waitsuntil the next replication interval is scheduled.
2. This is your second replication interval. It occurs between 8:15 and 8:35.
2.1. Again, Double-Take takes a replication snapshot of the source virtual machine.
2.2. Double-Take checks to see if a scheduled point-in-time snapshot is due to run. Becausethe point-in-time snapshot schedule of one hour has not elapsed, a point-in-time snapshotof the target virtual machine will not be triggered.
2.3. Double-Take replicates and applies the replication snapshot of the source virtual machineto the target virtual machine.
In this replication interval, the process took longer than the 15minutes allocated, so there is nodelay before the next replication interval starts. Double-Take logs amessage when this occurs.
3. This is your third replication interval. It occurs between 8:35 and 8:50.
3.1. Double-Take takes a replication snapshot of the source virtual machine.
3.2. Double-Take checks to see if a scheduled point-in-time snapshot is due to run, but it is nottime yet.
3.3. Double-Take replicates and applies the replication snapshot of the source virtual machineto the target virtual machine.
3.4. Double-Take waits until the next replication interval is scheduled.
Chapter 1 Agentless vSphere overview 5
4. This is your fourth replication interval. It occurs between 8:50 and 9:05.
4.1. Double-Take takes a replication snapshot of the source virtual machine.
4.2. Double-Take checks to see if a scheduled point-in-time snapshot is due to run, but it is notyet because it has only been 50minutes since the job started.
4.3. Double-Take replicates and applies the replication snapshot of the source virtual machineto the target virtual machine.
4.4. Double-Take waits until the next replication interval is scheduled.
5. This is your fifth replication interval. It occurs between 9:05 and 9:20.
5.1. Double-Take takes a replication snapshot of the source virtual machine.
5.2. Double-Take checks to see if a scheduled point-in-time snapshot is due to run. At thispoint, it has been one hour since the job started, so a point-in-time snapshot of the targetvirtual machine will be triggered.
5.3. Double-Take replicates and applies the replication snapshot of the source virtual machineto the target virtual machine.
5.4. Double-Take takes a point-in-time snapshot of the target virtual machine.
5.5. Double-Take waits until the next replication interval is scheduled.
6. This is your sixth replication interval. It occurs between 9:20 and 10:25.
6.1. Double-Take takes a replication snapshot of the source virtual machine.
6.2. Double-Take checks to see if a scheduled point-in-time snapshot is due to run. There is notbecause it has not been one hour since the last point-in-time snapshot.
6.3. Double-Take replicates and applies the replication snapshot of the source virtual machineto the target virtual machine.
This replication interval took one hour and fiveminutes. Notice that the replication interval is setfor every 15minutes, but a new interval will not be started while a current interval is running.
7. This is your seventh replication interval. It occurs between 10:25 and 10:40.
7.1. Double-Take takes a replication snapshot of the source virtual machine.
7.2. Double-Take checks to see if a scheduled point-in-time snapshot is due to run. It has beenone hour since the last point-in-time snapshot, so a new point-in-time snapshot of thetarget virtual machine will be triggered.
7.3. Double-Take replicates and applies the replication snapshot of the source virtual machineto the target virtual machine.
7.4. Double-Take takes a point-in-time snapshot of the target virtual machine.
7.5. Double-Take waits until the next replication interval is scheduled.
Chapter 1 Agentless vSphere overview 6
Chapter 2 Agentless vSphere requirementsThe configuration of an agentless vSphere job is different than other Double-Take jobs. Review theAgentless vSphere overview on page 4 first and thenmake sure your environment meets the followingrequirements.
l ESXi hosts—Your source and target hostsmust be running one of the following ESXi versions.Note that this is ESXi that is supported. ESX is not supported.
l ESXi 5.0 Update 2 Essentials, Essentials Plus, Standard, Enterprise, or Enterprise Plus
l ESXi 5.1 Essentials, Essentials Plus, Standard, Enterprise, or Enterprise Plus
l ESXi 5.5 Essentials, Essentials Plus, Standard, Enterprise, or Enterprise Plus
l vCenter—vCenter is not required, but if you are using it, then youmust use version 5.0 or later.
l Permissions—If you want to limit the permissions required for the account that you will be usingfor your agentless vSphere job, your account must have at aminimum the permissions listedbelow. These permissions can be set at the vCenter, Datacenter, Cluster, or host level.
l Datastore—Allocate space, Browse datastore, Low level file operations, Remove file, andUpdate virtual machine files
l Global—Act as vCenter server and Licensesl Host, Local Operations—Create virtual machine, Delete virtual machine, Reconfigurevirtual machine, and Relayout snapshots
l Network—Assign Networkl Resource—Assign virtual machine to resource pooll Virtual Machine—All virtual machine permissions are required.
Make sure if you also define permissions at the VMs and Templates level in vCenter that you havenot denied any of the required permissions listed above.
l vMotion and DRS
l Host vMotion—Host vMotion is only supported if you are using vCenter.l Storage vMotion—Storage vMotion is only supported if you are using vCenter, with theexception of the caveats listed under DRS.
l DRS (Distributed Resource Scheduler)—DRS is supported with Host vMotion andStorage vMotion, with the exception of the following caveats.
l Due to a VMware issue with orphaned disk files, you should disable AutomaticStorage vMotion using DRS.
l Also due to the same issue, you should onlymanually vMotion after pausing youragentless vSphere jobs.
See VMware Knowledge Base article 2055943 for more details on this issue.
l ESXi and vCenter interoperability—Any combination of ESXi and vCenter or ESXistandalone host is supported, with the following exceptions.
l VMware does not support 5.1ESXi hosts on a 5.0 vCenter.l VMware does not support 5.5 ESXi hosts on a 5.0 vCenter.
Chapter 2 Agentless vSphere requirements 7

l Double-Take does not support the following source to target combations.l 5.1 ESXi standalone host to a 5.0 ESXi standalone hostl 5.1 ESXi standalone host to a 5.0 ESXi host on a 5.0 vCenterl 5.1 ESXi host on a 5.1 vCenter to a 5.0 ESXi standalone hostl 5.1 ESXi host on a 5.1 vCenter to a 5.0 ESXi host on a 5.0 vCenter
l Source virtual machines—Your source virtual machinesmust meet the following requirementsand limitations.
l Hardware version—Each virtual machinemust be hardware version 8 or later. If yourvirtual machine is using hardware version 9, you will not be able to use ESXi version 5.0.This is a VMware limitation. If your virtual machine is using hardware version 10, you willnot be able to use ESXi version 5.0 or 5.1. This is a VMware limitation.
l Operating system—The guest operating system can be any operating system supportedby VMware.
l Advanced network support, such as WAN support—If you want Double-Take toautomatically update networking on the replica during failover, for example for WANsupport, youmust have one of the following guest operating systems. If you choose not tohave Double-Take automatically update networking on the replica during failover, you willhave to update the networkmanually, but you can use any operating system supported byVMware.
l Windows—Windows 2003,Windows 2003 R2,Windows 2008,Windows 2008 R2,Windows 2012, andWindows 2012 R2
l Linux—Ubuntu 10.04 and 12.04, Redhat and CentOS 5 and 6, and SuSE 10 and 11l Queiscing—If you want to create quiescent replication snapshots (snapshots that areguaranteed to provide consistent application data), the following limitations apply.
l The guest operating systemmust beWindows 2003 or laterl VMware Toolsmust be installed on the guestl The guest must be powered on
l Raw device mapping—You cannot use raw devicemapping (RDM).l Change block tracking—Change block trackingmust be supported on the source virtualmachines, specifically the changeTrackingSupported flagmust be set to true. See yourVMware documentation for details on change block tracking.
l Independent disks—Independent disks are not supported because VMware cannot takea snapshot of an independent disk, and Double-Take agentless vSphere replicationtechnology is based on VMware snapshots.
l Controllers—IDE controllers are not supported. Youmust use SCSI controllers.l Appliances—Your controller appliance and your replication applianceswill be anOVF (OpenVirtualization Format) virtual machine included with Double-Take. Youmust install theseappliances before you can establish protection. Keep inmind the following caveats for controllerand replication appliances.
l The appliances are pre-configured for optimal performance for most typical environments.While not required, you canmodifymemory, CPU, and other configurations to fit yourspecific environment.
l You should not install or run anything else on these appliances. Theymust be dedicated toDouble-Take processing only. Do not use them for any other activity (web server, databaseserver, and so on).
Chapter 2 Agentless vSphere requirements 8

l The firewall is disabled and should remain disabled.l A single replication appliance can protect amaximumof 59 virtual disk files (.vmdk files).For example, if your virtual machines each have four disk files, you can protect 14 virtualmachines (14*4=56). Youmaywant to balance the replication amongmultiple replicationappliances, depending on various factors such as the number of virtual machines you areprotecting and the replication interval for your jobs.
l Because the controller appliance controls licensing for all of your replication appliances, thedate and time (relative to UTC) on all of the appliances should be the same or within a fewseconds of each other. Time differences could cause license invalidation.
l Protocols and networking—Your serversmust meet the following protocol and networkingrequirements.
l Your servers and appliancesmust have TCP/IP with static IP addressing.l IPv4 is the only supported version.
l If you use DNS, youmust have the appliances names and IP addresses in a forward lookupzone in DNS. Additionally, youmust have the subnet the applianceswill be using in areverse lookup zone in DNS.
l If you are not using DNS, youmust configure the hosts file on each controller appliance andreplication appliance to includemappings for all other replication appliances, controllerappliances, vCenters, and ESXi servers.
l Ports—Youmust have TCP access for the following ports.
l 22—This port is for ssh (secure shell). Youmust have both inbound and outbound TCPaccess.
l 443—This port is required to add andmanage the controller and replication appliances invSphere. Youmust have outbound TCP access.
l 5480—This port is for accessing a controller or replication appliance using the webinterface. Youmust have inbound TCP access.
l 6320—This port is for Java RMI (remotemethod invocation) communication for replicationdata between replication appliances. Youmust have both inbound and outbound TCPaccess.
l 6325—This port is for SOAP communication using http between the console and thecontroller appliance. Youmust have both inbound and outbound TCP access.
l 6326—This port is for SOAP communication using https between the controller applianceand the replication appliance. Youmust have both inbound and outbound TCP access.
l Snapshots—You can use third party tools to take snapshots of the source. Keep inmind theVMware snapshot limits for your version and that Double-Take requires one snapshot of thesource, otherwise Double-Take replication will not work. Double-Take will delete its ownsnapshot on the source at the end of each replication interval.
Third party snapshots of the replica on the target is not supported. You can take Double-Takepoint-in-time snapshots on the target if needed. Again, keep inmind the VMware snapshot limitfor your version and that Double-Take requires at least two replication snapshots on the target inorder for replication to work. Double-Take will account for the two replication snapshots by limitingthemaximumnumber of point-in-time snapshots. Also Double-Take will delete anymore than tworeplication snapshots on the target.
l Supported configurations—The following tables identify the supported host and virtual
Chapter 2 Agentless vSphere requirements 9

machine configurations for an agentless vSphere job.
Host to HostConfiguration Description Supported Not
Supported
One to oneactive/standby
You can protect virtual machines on an activehost to a standby host. The standby host has noactive virtual machines, only the replica virtualmachines. Replication will occur in only onedirection.
X
One to oneactive/active
You can protect virtual machines on an activehost to another active host. Each host hasactive virtual machines in addition to replicavirtual machines. Replication will be bi-directional between the hosts.
X
Many to oneYou can protect virtual machines onmultiplehosts to one single host. This will consolidateyour replica virtual machines to a single host.
X
One tomany
You can protect virtual machines on a singlehost to multiple target hosts, although individualvirtual machines can only be protected once toa single target host. The will allow you toseparate your replica virtual machines acrossmultiple target hosts.
X
Chained
You can protect virtual machines on host 1 tohost 2, and you can protect virtual machines onhost 2 to host 3, however, the virtual machinesyou are protecting on host 2 cannot be thereplica virtual machines from host 1. Theymustbe unique virtual machines that you areprotecting.
X
Single server You can protect virtual machineswithin thesame host or cluster. X
Standalone tostandalone
Your hosts can be in a standalone tostandalone configuration. X
Standalone tocluster
Your hosts can be in a standalone to clusterconfiguration. X
Cluster tostandalone
Your hosts can be in a cluster to standaloneconfiguration. X
Cluster tocluster
Your hosts can be in a cluster to clusterconfiguration. X
Chapter 2 Agentless vSphere requirements 10

VirtualMachine toVirtualMachine
Configuration
Description Supported NotSupported
One to oneactive/standby
You can protect a single virtual machine to asingle, standby replica virtual machine. Thereplica virtual machine is not active whilereplication is occurring. The replica virtualmachine will become active after failover.
X
One to oneactive/active
You cannot protect a single virtual machine to asingle, active replica virtual machine. Thereplica virtual machine is not active until afterfailover.
X
Many to one
You cannot protect amultiple virtual machinesto a single virtual machine. Each virtualmachine you protect creates only one replicavirtual machine.
X
One tomany
You cannot protect a single virtual machine tomultiple virtual machines. A virtual machine canonly be protected once, creating a single replicavirtual machine.
X
Chained
You cannot protect a single virtual machine to areplica virtual machine to another replica virtualmachine. The first replica virtual machine is notactive, and therefore cannot be protected, untilafter failover.
X
Single server You cannot protect a single virtual machine toitself. X
Chapter 2 Agentless vSphere requirements 11

Chapter 3 Creating an agentless vSphere jobUse these instructions to create an agentless vSphere job.
1. Make sure you have added your controller and replication appliances. See Adding controllerappliances on page 57 andAdding replication appliances on page 58.
2. ClickGet Started from the toolbar.
3. SelectDouble-Take Availability and clickNext.
4. Select Protect virtual servers on vSphere with agentless replication and clickNext.
5. Choose your source ESXi server. This is the ESXi server or cluster that contains the virtualmachines that you want to protect. This is also where your source replication appliance is located.The list shows the ESXi servers or clusters currently associated with your controller appliance.
6. ClickNext to continue.
Chapter 3 Creating an agentless vSphere job 12

7. Select the virtual machines on your source that you want to protect. A separate job will be createdfor each source that you select for protection. You can only select the number of virtual machinesequal to the number of unused licenses you have available.
8. ClickNext to continue.
9. Choose your target ESXi server. This is the ESXi server or cluster where the replica virtualmachineswill be hosted. This is also where your target replication appliance is located. The listshows the ESXi servers or clusters currently associated with your controller appliance.
10. ClickNext to continue.
11. You havemany options available for your agentless vSphere job. Configure those options that are
Chapter 3 Creating an agentless vSphere job 13

applicable to your environment.
All agentless vSphere jobswill have the following sections available on theSet Optionspage.
l Replica Virtual Machine Network Settingsl Virtual Switch Mappingsl Replication Settingsl Encryptionl Failover Optionsl Snapshotsl CompressionIf you are protecting just one virtual machine, you will also have the following sections.
l Generall Replica Virtual Machine Locationl Replica Host and Replication AppliancesIf you are protectingmore than one virtual machine, you will have the Virtual MachinesMappings section instead, which is similar to the location and appliances sections.
As you can see, if you are protectingmore than one virtual machine, there are a fewsettings that you will not have access to during job creation. In this case, default valueswillbe used. You canmodify the default values after the jobs have been created.
Chapter 3 Creating an agentless vSphere job 14

General
For the Job name, specify a unique name for your job.
Chapter 3 Creating an agentless vSphere job 15

Replica Virtual Machine Location
l Replica virtual machine display name—Specify the name of the replica virtual machine.This will be the display name of the virtual machine on the host system.
l Select the target datastore for the virtual machine configuration files—Select oneof the datastores from the list to indicate where on the target you want to store the replicavirtual machine configuration files. Make sure the selected datastore has enough freespace. The datastore you select here will become the selected datastore in the next table.
l Target Datastore—Bydefault, the datastore you selected in the first table will be selectedin the second table. If desired, specify a different datastore from the Target Datastore listto indicate where on the target you want to store each of the replica virtual machine diskfiles. Make sure the selected datastore has enough free space for the size of your source(plus growth) and the source's disk format (thick, thin, or flat). Additionally, if you are goingto be enabling snapshots of the replica on the target, make sure you select a datastore thathas enough space for the replica virtual machine disks and the snapshots.
l Virtual Disk—Specify if you want Double-Take to create a new disk for your replica virtualmachine or if you want to use an existing disk.
Reusing a virtual disk can be useful for pre-staging data on a LAN and then relocating thevirtual disk to a remote site after the initial mirror is complete. You save time by skipping thevirtual disk creation steps and performing a differencemirror instead of a full mirror. Withpre-staging, less data will need to be sent across the wire initially. In order to use anexisting virtual disk, it must be a valid virtual disk, it cannot be attached to any other virtualmachine, and it cannot have any associated snapshots.
Each pre-existing diskmust be located on the target datastore specified. If you have copiedthe .vmdk file to this locationmanually, be sure you have also copied the associated -flat.vmdk file too. If you have used vCenter to copy the virtual machine, the associated filewill automatically be copied. There are no restrictions on the file name of the .vmdk, but theassociated -flat.vmdk file must have the same base name and the reference to that flat filein the .vmdkmust be correct. Double-Take will move, not copy, the virtual disk files to theappropriate folders created by the replica, somake sure the selected target datastore iswhere you want the replica virtual disk to be located. Additionally, you cannot reuse a virtualdisk if it has snapshots associated with it. Youmust delete all snapshots to reuse the virtualdisk.
Chapter 3 Creating an agentless vSphere job 16

In aWAN environment, youmaywant to take advantage of using an existing disk by using aprocess similar to the following.
a. Create a job in a LAN environment, letting Double-Take create the virtual disk foryou.
b. Complete themirror process locally.c. Delete the job and when prompted, do not delete the replica.d. Delete all snapshots on the replica virtual machine.e. Remove the replica virtual machine from the ESX inventory, which will delete the
virtual machine configuration but will keep the associated .vmdk files.f. Move the virtual disk files to the desired target datastore. Do not forget to move the
associated -flat.vmdk file if youmove the filesmanually.g. Create a new protection job for the same source and reuse your existing disk.
If you have reused some existing disks and created some new disks, the numberingof the hard disks will not be identical on the source and the replica virtual machine.New diskswill be created first and then existing disks will be attached. VMwareassigns the hard disk numbers in order of creation and then those that areattached. The Virtual Device Node SCSI IDswill still be correct and there will be noimpact within the guest of the replica virtual machine.
l Pre-existing Disk Path—This is the location on the selected Target Datastore of yourexisting virtual disks that you want to reuse.
Chapter 3 Creating an agentless vSphere job 17

Virtual Machines Mappings
l For each virtual machine, select the target host, target datastore for the virtualmachine configuration files and the replication appliances—The first table allowsyou to configure each virtual machine.
l Replica Virtual Machine—Specify the name of the replica virtual machine. This willbe the display name of the virtual machine on the host system.
l Target Host—Select the specific server that you want to use, if your target is acluster. If your target is not a cluster, this field will automatically be populated withyour target.
l Target Datastore—Specify the datastore on the target where you want to store thereplica virtual machine configuration files. Make sure the selected datastore hasenough free space. The datastore you select here will become the selecteddatastore in the next table.
l Source Replication Appliance—You can specify a source replication appliance orselectAuto Select to have Double-Take select a replication appliance for you basedon the current load on all of your replication appliances.
l Target Replication Appliance—You can specify a target replication appliance orselectAuto Select to have Double-Take select a replication appliance for you basedon the current load on all of your replication appliances.
l Select a virtual machine above and then select the target datastore for the virtualmachine hard disk files—The second table is dynamically linked to the first. Select avirtual machine in the first table and configure the virtual disks for that virtual machine. Thenselect another virtual machine in the first table and configure the virtual disks for that virtualmachine. Continue until you have configured the virtual disks for each virtual machine.
l Target Datastore—Bydefault, the datastore you selected in the first table will beselected in this table. If desired, specify a different datastore on the target where youwant to store the replica virtual machine disk files. Make sure the selected datastorehas enough free space for the size of your source (plus growth) and the source's diskformat (thick, thin, or flat). Additionally, if you are going to be enabling snapshots ofthe replica on the target, make sure you select a datastore that has enough space forthe replica virtual machine disks and the snapshots.
l Virtual Disk—Specify if you want Double-Take to create a new disk for your replicavirtual machine or if you want to use an existing disk.
Chapter 3 Creating an agentless vSphere job 18
Reusing a virtual disk can be useful for pre-staging data on a LAN and thenrelocating the virtual disk to a remote site after the initial mirror is complete. You savetime by skipping the virtual disk creation steps and performing a differencemirrorinstead of a full mirror. With pre-staging, less data will need to be sent across the wireinitially. In order to use an existing virtual disk, it must be a valid virtual disk, it cannotbe attached to any other virtual machine, and it cannot have any associatedsnapshots.
Each pre-existing diskmust be located on the target datastore specified. If you havecopied the .vmdk file to this locationmanually, be sure you have also copied theassociated -flat.vmdk file too. If you have used vCenter to copy the virtual machine,the associated file will automatically be copied. There are no restrictions on the filename of the .vmdk, but the associated -flat.vmdk file must have the same base nameand the reference to that flat file in the .vmdkmust be correct. Double-Take willmove, not copy, the virtual disk files to the appropriate folders created by the replica,somake sure the selected target datastore is where you want the replica virtual diskto be located. Additionally, you cannot reuse a virtual disk if it has snapshotsassociated with it. Youmust delete all snapshots to reuse the virtual disk.
In aWAN environment, youmaywant to take advantage of using an existing disk byusing a process similar to the following.
a. Create a job in a LAN environment, letting Double-Take create the virtual diskfor you.
b. Complete themirror process locally.c. Delete the job and when prompted, do not delete the replica.d. Delete all snapshots on the replica virtual machine.e. Remove the replica virtual machine from the ESX inventory, which will delete
the virtual machine configuration but will keep the associated .vmdk files.f. Move the virtual disk files to the desired target datastore. Do not forget to move
the associated -flat.vmdk file if youmove the filesmanually.g. Create a new protection job for the same source and reuse your existing disk.
If you have reused some existing disks and created some new disks, thenumbering of the hard disks will not be identical on the source and the replicavirtual machine. New diskswill be created first and then existing disks will beattached. VMware assigns the hard disk numbers in order of creation andthen those that are attached. The Virtual Device Node SCSI IDswill still becorrect and there will be no impact within the guest of the replica virtualmachine.
l Pre-existing Disk Path—This is the temporary location of your existing virtual disksthat you want to reuse.
l Show additional target datastores information—Click this link to see storageinformation for the datastores on your target. This will help you select the appropriatedatastore for your replica virtual machines.
Chapter 3 Creating an agentless vSphere job 19

Replica Virtual Machine Network Settings
The appearance and fields in this section will vary depending on if you have chosen toprotect a single virtual machine or multiple virtual machines.
If your virtual machines are powered on and have VMware Tools version 8.3.8.9 (ESX 5.0Update 1) or later installed, you can configure network settings for the replica virtual machines.This option is primarily used for WAN support.
l Change—If you have selected to protect a single virtual machine, click this button andspecify credentials for the virtual machine.
l Provide Credentials—If you have selected to protect multiple virtual machines, you canselect one or more virtual machines, click this button and specify credentials for the virtualmachines. If necessary, use the credentials button again until all of the virtual machines that
Chapter 3 Creating an agentless vSphere job 20
you want to configure network settings for have credentials specified. You can right-click onany virtual machine in the list to access aSelect All shortcut which will highlight all of thevirtual machines in the list.
l Use advanced settings for replica virtual machine network configuration—Selectthis option to enable the replica virtual machine network setting configuration.
l Advanced Network—Select the virtual machines that you want to enable the replicavirtual machine network setting configuration for.
l Set Gateway—If you are protectingmultiple virtual machines, click this button to apply thesame gateway settings that each source is using to its replica virtual machine. This is like aglobal update to quickly populate your replica virtual machine network settings. You canmake additional modifications to each replica virtual machine's network settings if needed.
l Set DNS—If you are protectingmultiple virtual machines, click this button to apply thesameDNS settings that each source is using to its replica virtual machine. This is like aglobal update to quickly populate your replica virtual machine network settings. You canmake additional modifications to each replica virtual machine's network settings if needed.
l Network adapters—Select a network adapter from the source and specify theReplicaIP addresses,Replica Default Gateways, andReplica DNS Server addresses to beused after failover. If you addmultiple gateways or DNS servers, you can sort them byusing the arrow up and arrow down buttons. Repeat this step for each network adapter onthe source.
Updatesmade during failover will be based on the network adapter namewhenprotection is established. If you change that name, you will need to delete the joband re-create it so the new namewill be used during failover.
If you update one of the advanced settings (IP address, gateway, or DNS server),then youmust update all of them. Otherwise, the remaining itemswill be left blank.If you do not specify any of the advanced settings, the replica virtual machine will beassigned the same network configuration as the source.
By default, the source IP addresswill be included in the target IP address list as thedefault address. If you do not want the source IP address to be the default addresson the target after failover, remove that address from theReplica IP addresseslist.
Chapter 3 Creating an agentless vSphere job 21

Replica Host and Replication Appliances
l Select the replica host—If you target is a cluster, select the specific server that you wantto use. If your target is not a cluster, this field will automatically be populated with yourtarget.
l Source replication appliance—You can specify a source replication appliance or selectAuto Select to have Double-Take select a replication appliance for you based on thecurrent load on all of your replication appliances.
l Target replication appliance—You can specify a target replication appliance or selectAuto Select to have Double-Take select a replication appliance for you based on thecurrent load on all of your replication appliances.
Chapter 3 Creating an agentless vSphere job 22

Virtual Switch Mappings
Map source VSwitches to the target VSwitches—Identify how you want to handle thenetworkmapping after failover. Map each source host VSwitch to a target host VSwitch. If youreconfigure your virtual switches after you have created your job, you will need to edit the job toupdate your mappings, if you want to use the new configuration.
Chapter 3 Creating an agentless vSphere job 23

Replication Settings
l Transmit data after this interval—Specify the interval (in days, hours, or minutes) fortransmitting the replication snapshot. For more details on how the replication intervalworks, seeReplication process on page 5.
l Enable VMware Tools quiescing—Select this option if you want quiescent replicationsnapshots (snapshots that are guaranteed to provide consistent application data). Youmust have VMware Tools installed on the source, your sourcemust be powered on, andyour sourcemust beWindows 2003 or later. Linux operating systems do not supportquiescing.
Quiescingmay impact performance on the source because disk operationswill besuspended during the snapshot .VMware Tools instructs the applications running on theguest operating system that have registered for quiescing to suspend activity after theyreach a good state. Depending on the type of applications you are running, for example alarge transaction to a SQL server database, theremay be a delay as applications quiesce,then the operating system quiesces, then the snapshot is taken. (Applications that are notregistered for quiescing will have their disk write buffers flushed when the snapshot istaken.)
Chapter 3 Creating an agentless vSphere job 24

Encryption
Enable encryption—Enable this option if you want to encrypt themirroring and replication databefore it is sent to the target.
Chapter 3 Creating an agentless vSphere job 25

Failover Options
If you want the replica virtual machine to be powered on automatically after failover, enablePower on replica virtual machine after failover. The replica virtual machinemust be on toapply any advanced network settings.
Chapter 3 Creating an agentless vSphere job 26

Snapshots
A snapshot is an image of the source replica data on the target taken at a single point in time. Youcan failover to a snapshot. However, you cannot access the snapshot to recover specific files orfolders.
Turn onEnable scheduled snapshots if you want Double-Take to take snapshots automaticallyat set intervals.
l Take snapshots on this interval—Specify the interval (in days, hours, or minutes) fortaking snapshots.
l Maximum number of snapshots—Because of VMware snapshot limitations andDouble-Take replication processing, themaximumnumber of snapshots that you can retainis 29. At this point, the oldest snapshot will be deleted when a new snapshot needs to becreated. If desired, you can decrease the number of snapshots that will be retained.
Snapshots are stored on the target datastore, so be sure that you have selected adatastore that has enough space for the replica virtual machine and the snapshots.
SeeReplication process on page 5 for details on how the snapshot of the source replicaon the target workswith the replication process.
Chapter 3 Creating an agentless vSphere job 27

Compression
To help reduce the amount of bandwidth needed to transmit Double-Take data, compressionallows you to compress data prior to transmitting it across the network. In aWAN environment thisprovides optimal use of your network resources. If compression is enabled, the data iscompressed before it is transmitted from the source.When the target receives the compresseddata, it decompresses it and then writes it to disk. You can set the level fromMinimum toMaximum to suit your needs.
Keep inmind that the process of compressing data impacts processor usage on the source. If younotice an impact on performance while compression is enabled in your environment, either adjustto a lower level of compression, or leave compression disabled. Use the following guidelines todetermine whether you should enable compression.
l If data is being queued on the source at any time, consider enabling compression.l If the server CPU utilization is averaging over 85%, be cautious about enablingcompression.
l The higher the level of compression, the higher the CPU utilization will be.l Do not enable compression if most of the data is inherently compressed. Many image (.jpg,.gif) andmedia (.wmv, .mp3, .mpg) files, for example, are already compressed. Someimages files, such as .bmp and .tif, are decompressed, so enabling compression would bebeneficial for those types.
l Compressionmay improve performance even in high-bandwidth environments.l Do not enable compression in conjunction with aWAN Accelerator. Use one or the other tocompressDouble-Take data.
All jobs from a single source connected to the same IP address on a target will share thesame compression configuration.
12. ClickNext to continue.
13. Double-Take validates that your source and target are compatible. The Summary page displaysyour options and validation items.
Errors are designated by a white X inside a red circle. Warnings are designated by a blackexclamation point (!) inside a yellow triangle. A successful validation is designated by a whitecheckmark inside a green circle. You can sort the list by the icon to see errors, warnings, orsuccessful validations together. Click on any of the validation items to see details. Youmustcorrect any errors before you can continue. Depending on the error, youmay be able to click Fixor Fix All and let Double-Take correct the problem for you. For those errors that Double-Takecannot correct automatically, you will need tomodify the source or target to correct the error, oryou can select a different target. Youmust revalidate the selected servers, by clickingRecheck,until the validation check passeswithout errors.
Chapter 3 Creating an agentless vSphere job 28

After a job is created, the results of the validation checks are logged to the job log. See theDouble-TakeReferenceGuide for details on the variousDouble-Take log files.
14. Once your servers have passed validation and you are ready to establish protection, click Finish,and you will automatically be taken to theManage Jobs page.
Chapter 3 Creating an agentless vSphere job 29

Chapter 4Managing and controlling agentlessvSphere jobsTheManage Jobs page allows you to view status information about your jobs. You can also controlyour jobs from this page.
The jobs displayed in the right pane depend on the server group folder selected in the left pane. Everyjob for each server in your console session is displayed when the Jobs on All Servers group isselected. If you have created and populated server groups (seeManaging servers on page 51), thenonly the jobs associated with the server or target servers in that server group will be displayed in the rightpane.
Overview job information displayed in the top paneThe top pane displays high-level overview information about your jobs.
Column 1 (Blank)
The first blank column indicates the state of the job.
The job is in a healthy state.
The job is in a warning state. This icon is also displayed on any server groups thatyou have created that contain a job in a warning state.
The job is in an error state. This icon is also displayed on any server groups that youhave created that contain a job in an error state.
The job is in an unknown state.
Job
The name of the job
Source Server
The name of the source. This could be the name or IP address of your source.
Target Server
The name of the target. This could be the name or IP address of your target.
Job Type
Each job type has a unique job type name. This job is an Agentless vSphere job. For acomplete list of all job type names, press F1 to view the Double-Take Console onlinehelp.
Chapter 4Managing and controlling agentless vSphere jobs 30

Activity
There aremany differentActivitymessages that keep you informed of the job activity.Most of the activitymessages are informational and do not require any administratorinteraction. If you see error messages, check the job details. Keep inmind that Idleindicates console to server activity is idle, not that your servers are idle.
Mirror Status
l In Progress—Data is currently beingmirrored.l Idle—Data is not beingmirrored.l Unknown—The console cannot determine the status.
Replication Status
l In Progress—Data is being replicated to the target.l Ready—There is no data to replicate.l Unknown—The console cannot determine the status.
Transmit Mode
l Active—Data is being transmitted to the target.l Unknown—The console cannot determine the status.
Chapter 4Managing and controlling agentless vSphere jobs 31
Detailed job information displayed in the bottom paneThe details displayed in the bottom pane of theManage Jobs page provide additional information forthe job highlighted in the top pane. If you select multiple jobs, the details for the first selected job will bedisplayed.
Name
The name of the job
Target data state
This field is not applicable to agentless vSphere jobs.
Mirror remaining
The total number of mirror bytes that are remaining to be sent from the source to thetarget. This field is only used when using pre-existing disks.
Mirror skipped
The total number of bytes that have been skipped when performing a difference. Thesebytes are skipped because the data is not different on the source and target. This fieldis only used when using pre-existing disks.
Replication queue
This field is not applicable to agentless vSphere jobs.
Disk queue
This field is not applicable to agentless vSphere jobs.
Bytes sent
The total number of mirror and replication bytes that have been transmitted to thetarget. If you reset the target replication appliance, this value will be reset.
Bytes sent (compressed)
The total number of compressedmirror and replication bytes that have beentransmitted to the target. If compression is disabled, this statistic will be the same asBytes sent.
Connected since
This field is not applicable to agentless vSphere jobs.
Recent activity
Displays themost recent activity for the selected job, along with an icon indicating thesuccess or failure of the last initiated activity. Click the link to see a list of recent activitiesfor the selected job. You can highlight an activity in the list to display additional detailsabout the activity.
Chapter 4Managing and controlling agentless vSphere jobs 32

Controller appliance
The controller appliance used by the replication appliances for this job
Source vCenter/ESXi host
The vCenter or ESXi server that the source is running on
Source virtual machine
The source virtual machine that is being protected
Target vCenter/ESXi host
The vCenter or ESXi server that the replica virtual machine is running on
Target datastore
The datastore on the target where the replica virtual machine is located
Additional information
Depending on the current state of your job, youmay see additional informationdisplayed to keep you informed about the progress and status of your job. If there is noadditional information, you will see (None) displayed.
Chapter 4Managing and controlling agentless vSphere jobs 33

Job controlsYou can control your job through the toolbar buttons available on theManage jobs page. If you selectmultiple jobs, some of the controls will apply only to the first selected job, while others will apply to all ofthe selected jobs. For example, View Job Detailswill only show details for the first selected job, whileStopwill stop protection for all of the selected jobs.
If you want to control just one job, you can also right click on that job and access the controls from thepop-upmenu.
Create a New Job
This button leaves theManage Jobs page and opens theGet Started page.
View Job Details
This button leaves theManage Jobs page and opens theView Job Details page.
Delete
Stops (if running) and deletes the selected jobs.
If you no longer want to protect the source and no longer need the replica of the sourceon the target, select to delete the associated replica virtual machine. Selecting thisoption will remove the job and completely delete the replica virtual machine on thetarget.
If you no longer want to mirror and replicate data from the source to the target but stillwant to keep the replica of the source on the target, select to keep the associatedreplica virtual machine.
Provide Credentials
Job credentials do not apply to agentless vSphere jobs.
View Recent Activity
Displays the recent activity list for the selected job. Highlight an activity in the list todisplay additional details about the activity.
Start
Starts the selected jobs.
Pause
Agentless vSphere jobs cannot be paused.
Chapter 4Managing and controlling agentless vSphere jobs 34

Stop
Stops the selected jobs. The jobs remain available in the console, but there will be nomirroring or replication data transmitted from the source to the target.
Take Snapshot
Snapshots are not applicable to agentless vSphere jobs.
Manage Snapshots
Snapshots are not applicable to agentless vSphere jobs.
Failover, Cutover, or Recover
Starts the failover process. See Failing over agentless vSphere jobs on page 45 for theprocess and details of failing over an agentless vSphere job.
Failback
Starts the failback process. Failback does not apply to agentless vSphere jobs.
Restore
Starts the restoration process. Restore does not apply to agentless vSphere jobs.
Reverse
Reverses protection. Reverse protection does not apply to agentless vSphere jobs.
Recover
Recovers the selected DR job. Recovery does not apply to agentless vSphere jobs.
Undo Failover or Cutover
Cancels failover by undoing it. Undo does not apply to agentless vSphere jobs.
View Job Log
Opens the job log. On the right-clickmenu, this option is calledView Logs, and youhave the option of opening the job log, source server log (which is the source replicationappliance), or target server log (which is the target replication appliance).
If you need tomanually collect agentless vSphere job logs, perform the following stepson each controller and replication appliance.
1. Connect to the appliance using an ssh client, like Putty.2. Change to the doubletake directory using cd /opt/visionsolutions/doubletake.
Chapter 4Managing and controlling agentless vSphere jobs 35
3. Run the following command (exactly as below without substitutions) to create anarchive called server.tgz in the doubletake directory.
tar czvf $(hostname).tgz bin data etc log
4. You can then copy (using a tool likeWinSCP) or FTP the file to another location, ifneeded.
Other Job Actions
Opens a small menu of other job actions. These job actions are not available foragentless vSphere jobs.
Filter
Select a filter option from the drop-down list to only display certain jobs. You can displayHealthy jobs, Jobs with warnings, or Jobs with errors. To clear the filter, selectAll jobs. If you have created and populated server groups, then the filter will only applyto the jobs associated with the server or target servers in that server group. SeeManaging servers on page 51.
Type a server name
Displays only jobs that contain the text you entered. If you have created and populatedserver groups, then only jobs that contain the text you entered associated with theserver or target servers in that server group will be displayed. SeeManaging serverson page 51.
Overflow Chevron
Displays any toolbar buttons that are hidden from view when the window size isreduced.
Chapter 4Managing and controlling agentless vSphere jobs 36

Viewing agentless vSphere job detailsFrom theManage Jobs page, highlight the job and clickView Job Details in the toolbar.
Review the following table to understand the detailed information about your job displayed on the ViewJob Details page.
Job name
The name of the job
Job type
Each job type has a unique job type name. This job is an Agentless vSphere job. For acomplete list of all job type names, press F1 to view the Double-Take Console onlinehelp.
Health
The job is in a healthy state.
The job is in a warning state.
The job is in an error state.
The job is in an unknown state.
Activity
There aremany differentActivitymessages that keep you informed of the job activity.Most of the activitymessages are informational and do not require any administratorinteraction. If you see error messages, check the rest of the job details.
Connection ID
The incremental counter used to number connections. The number is incrementedwhen a connection is created. It is also incremented by internal actions, such as anauto-disconnect and auto-reconnect. The lowest available number (as connections arecreated, stopped, deleted, and so on) will always be used. The counter is reset to oneeach time the Double-Take service is restarted.
Transmit mode
l Active—Data is being transmitted to the target.l Unknown—The console cannot determine the status.
Target data state
This field is not applicable to agentless vSphere jobs.
Target route
This field is not applicable to agentless vSphere jobs.
Chapter 4Managing and controlling agentless vSphere jobs 37

Compression
l On / Level—Data is compressed at the level specified.l Off—Data is not compressed.
Encryption
l On—Data is being encrypted before it is sent from the source to the target.l Off—Data is not being encrypted before it is sent from the source to the target.
Bandwidth limit
This field is not applicable to agentless vSphere jobs.
Connected since
This field is not applicable to agentless vSphere jobs.
Additional information
Depending on the current state of your job, youmay see additional informationdisplayed to keep you informed about the progress and status of your job. If there is noadditional information, you will see (None) displayed.
Mirror status
l In Progress—Data is currently beingmirrored.l Idle—Data is not beingmirrored.l Unknown—The console cannot determine the status.
Mirror percent complete
The percentage of themirror that has been completed
Mirror remaining
The total number of mirror bytes that are remaining to be sent from the source to thetarget
Mirror skipped
The total number of bytes that have been skipped when performing a difference. Thesebytes are skipped because the data is not different on the source and target. This fieldis only used when using pre-existing disks.
Replication status
l In Progress—Data is being replicated to the target.l Ready—There is no data to replicate.l Unknown—The console cannot determine the status.
Replication queue
This field is not applicable to agentless vSphere jobs.
Chapter 4Managing and controlling agentless vSphere jobs 38

Disk queue
This field is not applicable to agentless vSphere jobs.
Bytes sent
The total number of mirror and replication bytes that have been transmitted to thetarget
Bytes sent compressed
The total number of compressedmirror and replication bytes that have beentransmitted to the target. If compression is disabled, this statistic will be the same asBytes sent.
Chapter 4Managing and controlling agentless vSphere jobs 39

Validating an agentless vSphere jobOver time, youmaywant to confirm that any changes in your network or environment have not impactedyour Double-Take job. Use these instructions to validate an existing job.
1. From theManage Jobs page, highlight the job and clickView Job Details in the toolbar.
2. In the Tasks area on the right on theView Job Details page, clickValidate job properties.
3. Errors are designated by a white X inside a red circle. Warnings are designated by a blackexclamation point (!) inside a yellow triangle. A successful validation is designated by a whitecheckmark inside a green circle. You can sort the list by the icon to see errors, warnings, orsuccessful validations together. Click on any of the validation items to see details. Youmustcorrect any errors before you can continue. Depending on the error, youmay be able to click Fixor Fix All and let Double-Take correct the problem for you. For those errors that Double-Takecannot correct automatically, you will need tomodify the source or target to correct the error, oryou can select a different target. Youmust revalidate the selected servers, by clickingRecheck,until the validation check passeswithout errors.
4. Once your servers have passed validation, clickClose.
Chapter 4Managing and controlling agentless vSphere jobs 40

Editing an agentless vSphere jobUse these instructions to edit an agentless vSphere job.
1. From theManage Jobs page, highlight the job and clickView Job Details in the toolbar.
2. In the Tasks area on the right on theView Job Details page, clickEdit job properties.
3. You will see the same options for your agentless vSphere job aswhen you created the job, butyou will not be able to edit all of them. If desired, edit those options that are configurable for anexisting job. SeeCreating an agentless vSphere job on page 12 for details on each job option.
Changing some optionsmay require Double-Take to automatically disconnect,reconnect, and remirror the job.
4. ClickNext to continue.
5. Double-Take validates that your source and target are compatible. The Summary page displaysyour options and validation items.
Errors are designated by a white X inside a red circle. Warnings are designated by a blackexclamation point (!) inside a yellow triangle. A successful validation is designated by a whitecheckmark inside a green circle. You can sort the list by the icon to see errors, warnings, orsuccessful validations together. Click on any of the validation items to see details. Youmustcorrect any errors before you can continue. Depending on the error, youmay be able to click Fixor Fix All and let Double-Take correct the problem for you. For those errors that Double-Takecannot correct automatically, you will need tomodify the source or target to correct the error, oryou can select a different target. Youmust revalidate the selected servers, by clickingRecheck,until the validation check passeswithout errors.
After a job is created, the results of the validation checks are logged to the job log. See theDouble-TakeReferenceGuide for details on the variousDouble-Take log files.
6. Once your servers have passed validation and you are ready to update your job, click Finish.
Chapter 4Managing and controlling agentless vSphere jobs 41

Viewing an agentless vSphere job logYou can view a job log file through the Double-Take Console by selectingView Job Log from thetoolbar on theManage Jobs page. Separate logging windows allow you to continue working in theDouble-Take Console while monitoring logmessages. You can openmultiple logging windows formultiple jobs. When the Double-Take Console is closed, all logging windowswill automatically close.
The following table identifies the controls and the table columns in the Job logswindow.
Start
This button starts the addition and scrolling of new messages in the window.
Pause
This button pauses the addition and scrolling of new messages in the window. This isonly for the Job logswindow. Themessages are still logged to their respective files onthe server.
Copy
This button copies themessages selected in the Job logswindow to theWindowsclipboard.
Chapter 4Managing and controlling agentless vSphere jobs 42
Clear
This button clears the Job logswindow. Themessages are not cleared from therespective files on the server. If you want to view all of themessages again, close andreopen the Job logswindow.
Time
This column in the table indicates the date and time when themessage was logged.
Description
This column in the table displays the actual message that was logged.
Chapter 4Managing and controlling agentless vSphere jobs 43

Updating to a new controller applianceUse the following process to update an existing job to a new controller appliance.
1. Deploy a new controller appliance using a new name and IP address.2. Make sure your old controller appliance is powered off.3. Remove the old controller appliance from the Double-Take Console using theRemove Server
button on theManage Servers page.4. Add the new controller appliance to the Double-Take Console. See Adding controller appliances
on page 57.5. Complete a host transfer of the license from the old controller appliance, adding that transferred
license to the new controller appliance. See theDouble-Take Installation, Licensing, andActivation document for details on a host transfer.
6. Associate your replication applianceswith the new controller appliance. See Adding replicationappliances on page 58.
After you have associated your replication applianceswith your new controller appliance, your existingjob will appear in the console.
Chapter 4Managing and controlling agentless vSphere jobs 44
Failing over agentless vSphere jobsWhen you are ready to failover, you can start it manually from the console.
1. On theManage Jobs page, highlight the job that you want to failover and click Failover,Cutover, or Recover in the toolbar.
2. Select the type of failover to perform.l Failover to live data—Select this option to initiate a full, live failover using the lastcomplete replication cycle. This option will shutdown the sourcemachine (if it is online),stop the protection job, and start the replica virtual machine on the target with full networkconnectivity.
l Perform test failover—This option is not available for agentless vSphere jobs.l Failover to a snapshot—Select this option to initiate a full, live failover without using thelast replication cycle. Instead, select a snapshot and the data on the target will be revertedto that snapshot. This option will not be available if there are no snapshots on the target.
3. Normally, you would select how you want to handle the data in the target queue. However, theseoptions are not currently available.
4. When you are ready to begin failover, click Failover.
Chapter 4Managing and controlling agentless vSphere jobs 45

Chapter 5 Double-Take ConsoleAfter you have installed the console, you can launch it by selectingDouble-Take,Double-TakeConsole from your Programs,All Programs, orApps, depending on your operating system.
The Double-Take Console is used to protect andmonitor your servers and jobs. Each time you open theDouble-Take Console, you start at theHome page. This page provides a high-level overview of thestatus of your jobs.
The appearance of theHome page is the same for all users. However, other console pagesmay havevariances in the appearance depending on the Double-Take products that you have installed, theDouble-Take license keys on your servers, and the type of job you are working with.
l Headlines—The top section gives a quick overview of any jobs that require attention aswell asproviding quick access buttons.
l These jobs require attention—Any jobs that require attention (those in an error state)are listed. You will see the source and target server names listed, as well as a shortdescription of the issue that requires your attention. If the list is blank, there are no jobs that
Chapter 5 Double-Take Console 46

require immediate attention.l View—If you highlight a job in the list and clickView, you will go to theView Job Detailspage where you can seemore detailed information about the job.
l Tools—Select this drop-down list to launch other Vision Solutions consoles.l Servers Summary—Themiddle section summarizes the servers in your console.
l Total number of servers—This field displays the number of servers that you have beenadded to the console.
l View all servers—Select this link to go to theManage Servers page where you can view,edit, add, remove, or manage the servers in your console. SeeManaging servers on page51.
l Jobs Summary—The bottom section summarizes the jobs in your console.l Total number of jobs—This field displays the number of jobs running on the servers inyour console.
l View jobs with errors—Select this link to go to theManage Jobs page, where theFilter: Jobs with errorswill automatically be applied.
l View jobs with warnings—Select this link to go to theManage Jobs page, where theFilter: Jobs with warningswill automatically be applied.
l View all jobs—Select this link to go to theManage Jobs page and view all jobs.
At the bottom of the Double-Take Console, you will see a status bar. At the right side, you will find linksfor Jobs with warnings and Jobs with errors. This lets you see quickly, nomatter which page of theconsole you are on, if you have any jobs that need your attention. Select this link to go to theManageJobs page, where the appropriate Filter: Jobs with warnings or Filter: Jobs with errorswillautomatically be applied.
Chapter 5 Double-Take Console 47

Double-Take Console requirementsYoumust meet the following requirements for the Double-Take Console.
l Operating system—TheDouble-Take Console can be run from aWindows source or target. Itcan also be run from a 32-bit or 64-bit physical or virtual machine runningWindows 8,Windows 7,WindowsVista, or WindowsXP Service Pack 2 or later.
l Microsoft .NET Framework—Microsoft .NET Framework version 4.0 Update 3 or later isrequired. (The full .NET 4.0.3 is required, not just the Client Profile.)
l Screen resolution—For best results, use a 1024x768 or higher screen resolution.
The Double-Take installation prohibits the console from being installed on Server Core.BecauseWindows 2012 allows you to switch back and forth between Server Core and a fullinstallation, youmay have the console files available on Server Core, if you installed Double-Take while running in full operating systemmode. In any case, you cannot run the Double-TakeConsole on Server Core.
Chapter 5 Double-Take Console 48

Console optionsThere are several options that you can set that are specific to the Double-Take Console. To accessthese console options, selectOptions from the toolbar.
l Monitoring—This section is used to determine how the consolemonitors your Double-Takeservers.
l Monitoring interval—Specifies how often, in seconds, the console refreshes themonitoring data. The servers will be polled at the specified interval for information to refreshthe console.
l Automatic retry—This option will have the console automatically retry server logincredentials, after the specified retry interval, if the server login credentials are not accepted.Keep inmind the following caveats when using this option.
l This is only for server credentials, not job credentials.l A set of credentials provided for or used bymultiple servers will not be retried for thespecified retry interval on any server if it fails on any of the servers using it.
l Verify your environment's security policy when using this option. Check your policiesfor failed login lock outs and resets. For example, if your policy is to reset the failedlogin attempt count after 30minutes, set this auto-retry option to the same or aslightly larger value as the 30minute security policy to decrease the chance of alockout.
l Restarting the Double-Take Console will automatically initiate an immediate login.l Entering new credentials will initiate an immediate login using the new credentials.
l Retry on this interval—If you have enabled the automatic retry, specify the length of time,in minutes, to retry the login.
l Server Communication—This section is used to determine how the console communicateswith your Double-Take servers.
l Default port for XML web services protocol—Specifies the port that the console willuse when sending and receiving data to Double-Take servers. By default, the port is 6325.Changes to the console port will not take effect until the console is restarted.
l Default port for legacy protocol—If you are using an older Double-Take version, youwill need to use the legacy protocol port. This applies to Double-Take versions 5.1 orearlier.
l Diagnostics—This section assists with console troubleshooting.
l Export Diagnostic Data—This button creates a raw data file that can be used fordebugging errors in the Double-Take Console. Use this button as directed by technicalsupport.
l View Log File—This button opens the Double-Take Console log file. Use this button asdirected by technical support. You can also select View, View Console Log File to openthe Double-Take Console log file.
l View Data File—This button opens the Double-Take Console data file. Use this button asdirected by technical support. You can also select View, View Console Data File to openthe Double-Take Console data file.
l Automatic Updates—This section is for automatically updating your console.
Chapter 5 Double-Take Console 49

l Automatically check for updates—Bydefault, each time the console is started, it willautomatically check the Vision Solutionsweb site to see if there is updated consolesoftware available. If there is updated console software available, anAutomatic Updatessection will appear on theHome page. ClickGet the latest update to download and installthe updated console software.
If you want to disable the automatic check for updates, clickChange automatic updatesor selectOptions from the toolbar. On theOptions page, deselectAutomatically checkfor updates to disable the automatic check.
You can alsomanually check for updates by selectingHelp,Check for Updates.
l Update available—If there is an update available, clickGet Update. The dialog boxwill close and your web browser will open to the Vision Solutionsweb site where youcan download and install the update.
l No update available—If you are using themost recent console software, that willbe indicated. ClickClose.
l No connection available—If the console cannot contact the update server of ifthere is an error, the console will report that information. The console log contains amore detailed explanation of the error. ClickCheck using Browser if you want toopen your browser to check for console software updates. You will need to use yourbrowser if your Internet access is through a proxy server.
l License Inventory—This section controls if the console contains a license inventory. Thisfeaturemay not appear in your console if your service provider has restricted access to it.
l Enable license inventory—This option allows you to use this console tomanage theDouble-Take licenses assigned to your organization.When this option is enabled, theManage License Inventory page is also enabled.
l Default Installation Options—These fields are not used for agentless vSphere protection.l Default Windows Installation Options—These fields are not used for agentless vSphereprotection.
l Default Linux Installation Options—These fields are not used for agentless vSphereprotection.
Chapter 5 Double-Take Console 50

Chapter 6Managing serversTomanage the servers in your console, selectManage Servers from the toolbar. TheManageServers page allows you to view, edit, add, remove, or manage the servers in your console.
You can also organize the servers that are in your console into groups, allowing you to filter the serversyou are viewing based on your organization. The servers displayed in the right pane depend on theserver group folder selected in the left pane. Every server in your console session is displayed when theAll Servers group is selected. If you have created and populated server groups underMy Servers,then only the servers in the selected group will displayed in the right pane.
If you have uninstalled and reinstalled Double-Take on a server, youmay see the server twiceon theManage Servers page because the reinstall assigns a new unique identifier to theserver. One of the servers (the original version) will show with the red X icon. You can safelyremove that server from the console.
Right pane displayThe following table identifies the columns displayed in the right pane of theManage Servers page.
Column 1 (Blank)
The first blank column indicates themachine type.
Double-Take source or target server which could be a physical server, virtualmachine, or a cluster node
Double-Take source or target server which is aWindows cluster
VMware server which could be a vCenter server or an ESX or ESXi host.
Double-Take controller appliance
Double-Take replication appliance
Double-Take Reporting Service server
Offline server whichmeans the console cannot communicate with thismachine.
Server error whichmeans the console can communicate with themachine, but itcannot communicate with Double-Take on it.
Column 2 (Blank)
The second blank column indicates the security level
Chapter 6Managing servers 51

Processing—The console is attempting to communicate with machine.
Administrator access—This level grants full control.
Monitor only access—This level grantsmonitoring privileges only.
No security access—This level does not allow monitoring or control.
Server
The name or IP address of the server. If you have specified a reserved IP address, itwill be displayed in parenthesis.
Activity
There aremany differentActivitymessages that keep you informed of the serveractivity. Most of the activitymessages are informational and do not require anyadministrator interaction. If you see error messages, check the server details. SeeViewing server details on page 61.
Version
The product version information
Licensing Status
The status of the license on the server. If your license is expired, any jobs using thatserver will be in an error state.
Product
The Double-Take products licensed for the server or the Double-Take role for theserver.
License Key
The license keys associated with the products licensed for the server. If your license isnot valid for the operating system on your server, the license keywill be identified asInvalid License Key. There will be no license key listed for those servers that are notlicensed, like a VMware server.
Serial Number
The serial number associated with the license key
Chapter 6Managing servers 52

Main toolbar and right-click menuThe following options are available on themain toolbar of theManage Servers page and the right-clickmenu. Some of the options are only available in the right-clickmenu. Some options are only available fora single selected server and others are available for multiple selected servers.
Add Servers
Adds a new server. This button leaves theManage Servers page and opens theAddServers page. SeeAdding controller appliances on page 57.
Add Replication Appliance
Adds a new replication appliance. Youmust have a controller appliance alreadyinserted in your console before you can add any replication appliances. This buttonleaves theManage Servers page and opens theAdd Replication Appliances page.You can also add replication appliances by editing a controller appliance's serverproperties. SeeController appliance associations properties on page 64.
View Server Details
Views detailed information about a server. This button leaves theManage Serverspage and opens theView Server Details page. SeeViewing server details on page61.
Remove Server
Removes the server from the console. For agentless vSphere jobs, you cannot removereplication appliances from theManage Servers page. Youmust remove thereplication appliance from the controller appliance's server properties (seeControllerappliance associations properties on page 64) or from the Add Replication Appliancepage (seeAdding replication appliances on page 58). Keep inmind, if you remove acontroller appliance from the console without removing the replication applianceassociations, the replication applianceswill still be associated with that controllerappliance if you add the controller appliance back into this or into another console.
Provide Credentials
Changes the login credentials that the Double-Take Console use to authenticate to aserver. This button opens theProvide Credentials dialog boxwhere you can specifythe new account information. SeeProviding server credentials on page 60. You willremain on theManage Servers page after updating the server credentials.
Chapter 6Managing servers 53
Manage Group Assignments
Allows you to assign, move, and remove the selected server from specific servergroups. This buttons opens theManageGroup Assignments dialog boxwhere you canassign and unassign the server to specific server groups. The server will appear inserver groupsmarked with a checkmark, and will not appear in groupswithout acheckmark. Servers assigned to a server group will automatically appear in parentserver groups.
Install
Installs or upgradesDouble-Take on the selected server. This option is not applicableto agentless vSphere protection.
Uninstall
Uninstalls Double-Take on the selected server. This option is not applicable toagentless vSphere protection.
Copy
Copies the information for the selected servers. You can then paste the serverinformation as needed. Each server is pasted on a new line, with the server informationbeing comma-separated.
Paste
Pastes a new-line separated list of servers into the console. Your copied list of serversmust be entered on individual lineswith only server names or IP addresses on eachline.
View Server Events
Views event messages for a server. The option is not applicable to agentless vSphereprotection.
View Server Logs
Views the Double-Take logsmessages for a server. This button opens the Logswindow. This separate window allows you to continue working in the Double-TakeConsole while monitoring logmessages. You can openmultiple logging windows formultiple servers. When the Double-Take Console is closed, all logging windowswillautomatically close.
Activate Online
Activates licenses and applies the activation keys to servers in one step. Youmust haveInternet access for this process. You will not be able to activate a license that has
Chapter 6Managing servers 54

already been activated but has not been deactivated. In that case, you will be promptedto complete a host transfer. Ideally, you should deactivate the license instead of doing ahost transfer See the Double-Take Console online help for details on deactivatinglicenses and host transfers.
Gather Support Diagnostics
Executes the diagnostic DTInfo utility which collects configuration data for use whenreporting problems to technical support. It gathers Double-Take log files; Double-Takeand system settings; network configuration information such as IP,WINS, and DNSaddresses; and other data whichmay be necessary for technical support totroubleshoot issues. You will be prompted for a location to save the resulting file whichis created with the information gathered. Because this utility is gathering several piecesof information, across the network to your consolemachine, it may take severalminutes to complete the information gathering and sending the resulting file to theconsolemachine.
This option is disabled for replication appliances. That data will be collected when datais collected for a controller appliance.
View Replication Service Details
Views the replication service details for a server. This option is not applicable toagentless vSphere servers.
Refresh
Refreshes the status of the selected servers.
Overflow Chevron
Displays any toolbar buttons that are hidden from view when the window size isreduced.
Chapter 6Managing servers 55

Left pane toolbarBetween themain toolbar and the left pane is a smaller toolbar. These toolbar options control the servergroups in the left pane.
Create New Server Group
Creates a new server group below the selected group
Rename Server Group
Allows you to rename the selected server group
Delete Server Group
Deletes the selected server group. This will not delete the servers in the group, only thegroup itself.
Overflow Chevron
Displays any toolbar buttons that are hidden from view when the window size isreduced.
Chapter 6Managing servers 56

Adding controller appliancesThe first time you start the console, theManage Servers page is empty. In order to protect andmonitoryour virtual machines, youmust insert your controller appliance in the console.
1. SelectGet Started from the toolbar.2. SelectAdd servers and clickNext.3. On theManual Entry tab, specify the controller appliance information.
l Server—This is the name or IP address of the controller appliance to be added to theconsole.
l User name—Specify the root user or another user that has the administrator role on theappliance.
l Password—Specify the password associated with theUser name you entered.l Domain—If you are working in a domain environment, specify theDomain.
4. After you have specified the appliance information, clickAdd.5. Do not insert your replication appliances. The replication applianceswill be inserted into the
console using the Add Replication Appliances pages. SeeAdding replication appliances on page58.
6. If you need to remove appliances from the list of Servers to be added, highlight it and clickRemove. You can also remove all of themwith theRemove All button.
7. When your list of Servers to be added is complete, clickOK.
Chapter 6Managing servers 57

Adding replication appliancesYou can add a replication appliance by selectingGet Started,Add replication appliances or on theManage Servers page, clickAdd Replication Appliance from the toolbar.
From theAdd Replication Appliances page, you can associate replication appliances to controllerappliances.
l Controller appliance—Select a controller appliance from the list. The replication appliances youadd on this page will be associated with the controller appliance you select.
l vCenter/ESXi server—Specify the IP address of the vCenter or ESXi server that is hosting thereplication appliance the selected controller appliance will communicate with. If you are usingvCenter, specify your vCenter. Only specify your ESXi server if it is a standalone server. If you arenot using the default vCenter/ESXi port, you can specify the port number that you are using byentering IP_address:port_number. For example, youmight enter 172.31.139.10:1124.
l User name—Specify the root user or another user that has the administrator role on thespecified server.
l Password—Specify the password associated with theUser name that you entered.l Replication appliance—Specify the IP address of the replication appliance.
l User name—Specify the root user or another user that has the administrator role on thespecified replication appliance.
l Password—Specify the password associated with theUser name that you entered.
After you have configured your replication appliance to controller appliance association, clickAdd.Repeat the process to associate additional replication appliances to your controller appliance. If youneed to remove any replication appliance associations from a controller appliance, highlight theappliance in the list and clickRemove. You can also remove all of the associated replication appliancesby clickingRemove All. Keep inmind that you cannot remove appliance associations if a job is using the
Chapter 6Managing servers 58

appliance. You can alsomanage your appliance associations through the controller appliance's serverproperties. SeeController appliance associations properties on page 64.
Chapter 6Managing servers 59

Providing server credentialsTo update the security credentials used for a specific server, select Provide Credentials from thetoolbar on theManage Servers page.When prompted, specify theUser name, Password, andDomain of the account you want to use for this server. ClickOK to save the changes.
This process is not applicable to Double-Take replication appliances. To update the credentialsfor replication appliances, use the controller appliance's server properties. SeeControllerappliance associations properties on page 64.
Chapter 6Managing servers 60

Viewing server detailsHighlight a server on theManage Servers page and clickView Server Details from the toolbar. TheView Server Details page allows you to view details about that particular server. The server detailsvary depending on the type of server or appliance you are viewing.
Server name
The name or IP address of the server. If you have specified a reserved IP address, itwill be displayed in parenthesis.
Operating system
The server's operating system version
Roles
The role of this server in your Double-Take environment. In some cases, a server canhavemore than one role.
l Engine Role—Source or target serverl Image Repository Role—A target for a DR protection job or a source for aDR recovery job
l Controller Role—Controller appliance for an agentless vSphere jobl Replication Appliance Role—Replication appliance for an agentless vSphere jobl Reporting Service—Double-Take Reporting Service server
Status
There aremany different Statusmessages that keep you informed of the serveractivity. Most of the statusmessages are informational and do not require anyadministrator interaction. If you see error messages, check the rest of the serverdetails.
Activity
There aremany differentActivitymessages that keep you informed of the serveractivity. Most of the activitymessages are informational and do not require anyadministrator interaction. If you see error messages, check the rest of the serverdetails.
Connected via
The IP address and port the server is using for communcations. You will also see theDouble-Take protocol being used to communicate with server. The protocol will beXMLweb services protocol (for servers running Double-Take version 5.2 or later) orLegacy protocol (for servers running version 5.1 or earlier).
Version
The product version information
Chapter 6Managing servers 61

Access
The security level granted to the specified user
User name
The user account used to access the server
Licensing quantity
The available and total license count for a Double-Take controller appliance
Licensing
Licensing information for the server
Source jobs
If you are viewing a replication appliance, you will see a list of any jobs from this server.Double-clicking on a job in this list will automatically open theView Job Details page.
Target jobs
If you are viewing a replication appliance you will see a list of any jobs to this server.Double-clicking on a job in this list will automatically open theView Job Details page.
Associated vCenter/ESXi servers and replication appliances
The vCenter or ESXi servers and the replication appliances that are associated withthe controller appliance. Tomodify the associated appliances, click on the Edit serverproperties link. SeeController appliance associations properties on page 64.
Chapter 6Managing servers 62

Editing server propertiesHighlight a server on theManage Servers page and clickView Server Details from the toolbar. UnderTasks, select Edit server properties. TheEdit Server Properties page allows you to view and editproperties for that server. Click on a heading on theEdit Server Properties page to expand or collapsea section of properties.
l Controller appliance associations properties on page 64—Establishes associations betweencontroller appliances, replication appliances, and vCenter/ESXi servers
l Server licensing on page 65—Views, adds, and removes license keysl E-mail notification configuration on page 67—Configures e-mail notification
Chapter 6Managing servers 63

Controller appliance associations propertiesThe Controller Appliance Associations properties allow you tomanage the replication appliancesassociated with your controller appliance.
l Provide credentials—Select this button to update the credentials for the selected vCenter/ESXiserver or the replication appliance.When prompted, specify theUser name, Password, and ifnecessary theDomain.
l Remove—Select this button to remove the selectedmachine. If you remove the vCenter/ESXiserver, any associated replication applianceswill also be removed. If you remove a replicationappliance, just that one appliance will be removed. Keep inmind that you cannot removeappliance associations if a job is using the appliance.
Chapter 6Managing servers 64
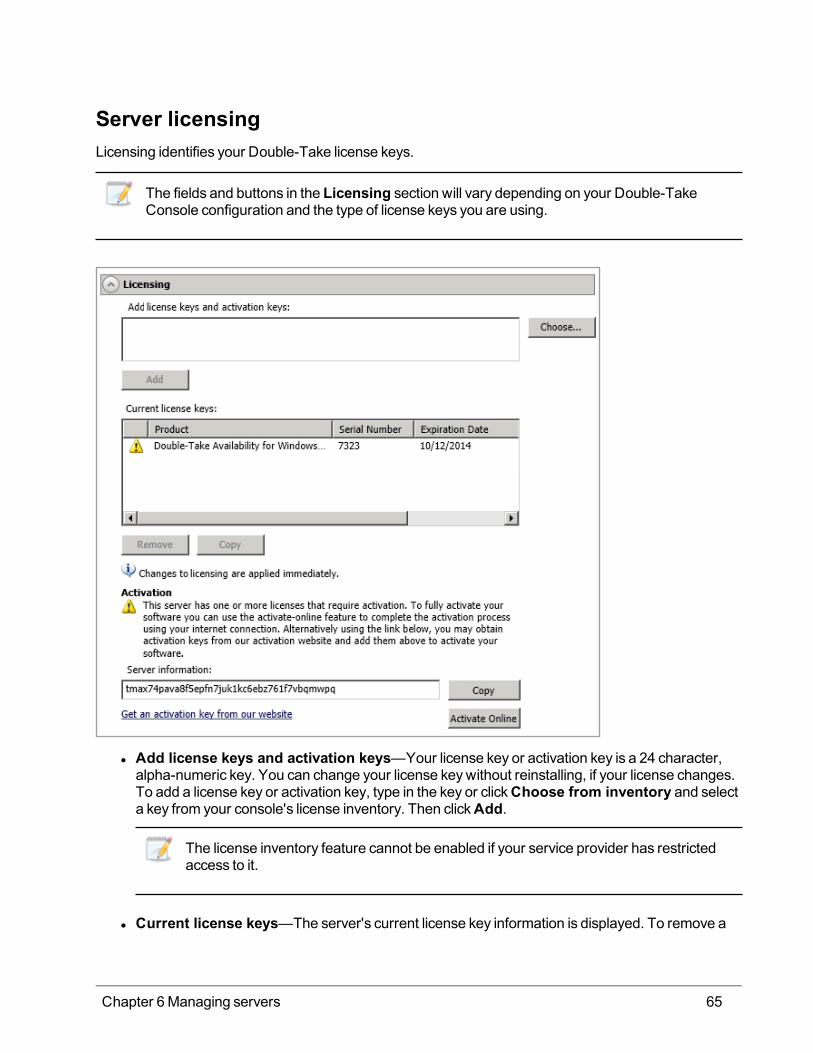
Server licensingLicensing identifies your Double-Take license keys.
The fields and buttons in the Licensing section will vary depending on your Double-TakeConsole configuration and the type of license keys you are using.
l Add license keys and activation keys—Your license key or activation key is a 24 character,alpha-numeric key. You can change your license keywithout reinstalling, if your license changes.To add a license key or activation key, type in the key or clickChoose from inventory and selecta key from your console's license inventory. Then clickAdd.
The license inventory feature cannot be enabled if your service provider has restrictedaccess to it.
l Current license keys—The server's current license key information is displayed. To remove a
Chapter 6Managing servers 65

key, highlight it and clickRemove. To copy a key, highlight it and clickCopy.
If you are replacing an existing license key that has already been activated, youmustremove both the old license key and the old activation key. Then you can add a newlicense key and activate it successfully. If you are updating an existing license key, do notremove the old license key or old activation key. Add the new license key on top of theexisting license key.
l Activation—If your activation code needs to be activated, you will see an additionalActivationsection at the bottom of the Licensing section. To activate your code, use one of the followingprocedures.
l Activate online—If you have Internet access, you can activate your license and apply theactivated license to the server in one step. SelectActivate Online. You will not be able toactivate a license that has already been activated but has not been deactivated. In thatcase, you will be prompted to complete a host transfer. Ideally, you should deactivate thelicense instead of doing a host transfer See the Double-Take Console online help for detailson deactivating licenses and host transfers.
l Obtain activation key online, then activate—If you have Internet access, click thehyperlink in theActivation section to take you to the web so that you can submit youractivation information. Complete and submit the activation form, and you will receive an e-mail with the activation key. Activate your server by entering the activation key in theAddactivation codes and activations keys field and clickingAdd.
l Obtain activation key offline, then activate—If you do not have Internet access, go tohttps://activate.doubletake.com from another machine that has Internet access. Completeand submit the activation form, and you will receive an e-mail with the activation key.Activate your server by entering the activation key in theAdd activation codes andactivations keys field and clickingAdd.
The permanent code is specific to this server. It cannot be used on any other server. If theactivation code and server do not match, Double-Take will not run.
If your activation codes needs to be activated, you will have 14 days to do so.
If you rename a server that has already has a Double-Take license applied to it, forexample if you rebuild a server, you will have to perform a host-transfer to continue usingthat license. This includes changing the case (capitalization) of the server name (upper orlower case or any combination of case).
l Total licenses quantity—If your server is a Double-Take controller appliance, you will see theavailable and total license count displayed. The controller appliance handles all licensemanagement for your agentless vSphere jobs. Each agentless vSphere job will use one licensefrom your available quantity. If you create jobs for five virtual machines at one time, five licenseswill be used.When you delete a job, the license associated with the job will be released to beavailable for another job. Stopping a job will not delete the license associated with the job. If youhave no additional licenses available, you cannot create any new jobs. You can add to youravailable license quantity by purchasing additional licenses.
Chapter 6Managing servers 66

E-mail notification configurationYou can email Double-Take event messages to specific addresses, using an SMTPmail server. Thesubject of the email will contain an optional prefix, the event type (information, warning or error), the jobname, and the controller appliance name. The body of themessage will contain configuration info (date,time, virtual machine names, and so on) and the text of the event messages.
l Enable e-mail notification—This option enables the e-mail notification feature. Any specifiednotification settingswill be retained if this option is disabled.
l E-mail server—Specify the name of your SMTPmail server. If necessary, after the e-mail servername, you can include a colon followed by the outgoing e-mail requests port number. Forexample, youmight use gmail.com:465.
l Connection Security—Select the type of security for your email server. Checkwith your e-mailservice provider if you do not know your security type.
Chapter 6Managing servers 67

l Log on to e-mail server—If your SMTP server requires authentication, enable this option andspecify theUser name andPassword to be used for authentication.
l From address—Specify the e-mail address that you want to appear in the From field of eachDouble-Take e-mail message. The address is limited to 256 characters.
l Send to—Specify the e-mail addresses that each Double-Take e-mail message should be sentto. Enter the addresses as a comma or semicolon separated list. Each address is limited to 256characters. You can add up to 256 e-mail addresses.
l Subject prefix—The subject of each e-mail notification will be in the format Subject Prefix -Event Type, Job=Job_Name, Controller=Controller_Appliance_Name. The subject prefix isoptional. The subject line is limited to 255 characters.
If desired, enter unique text for theSubject prefixwhich will be inserted at the front of the subjectline for each Double-Take e-mail message. This will help distinguish Double-Takemessages fromother messages. This field is optional.
l Notify when these event occur—Select each of the events that you want to receive an e-mailnotification for. Selecting or deselecting a top level check box (Information,Warning, or Error) willselect or deselect all of the items in that category. If desired, you can also select or deselect eventsindividually.
Chapter 6Managing servers 68
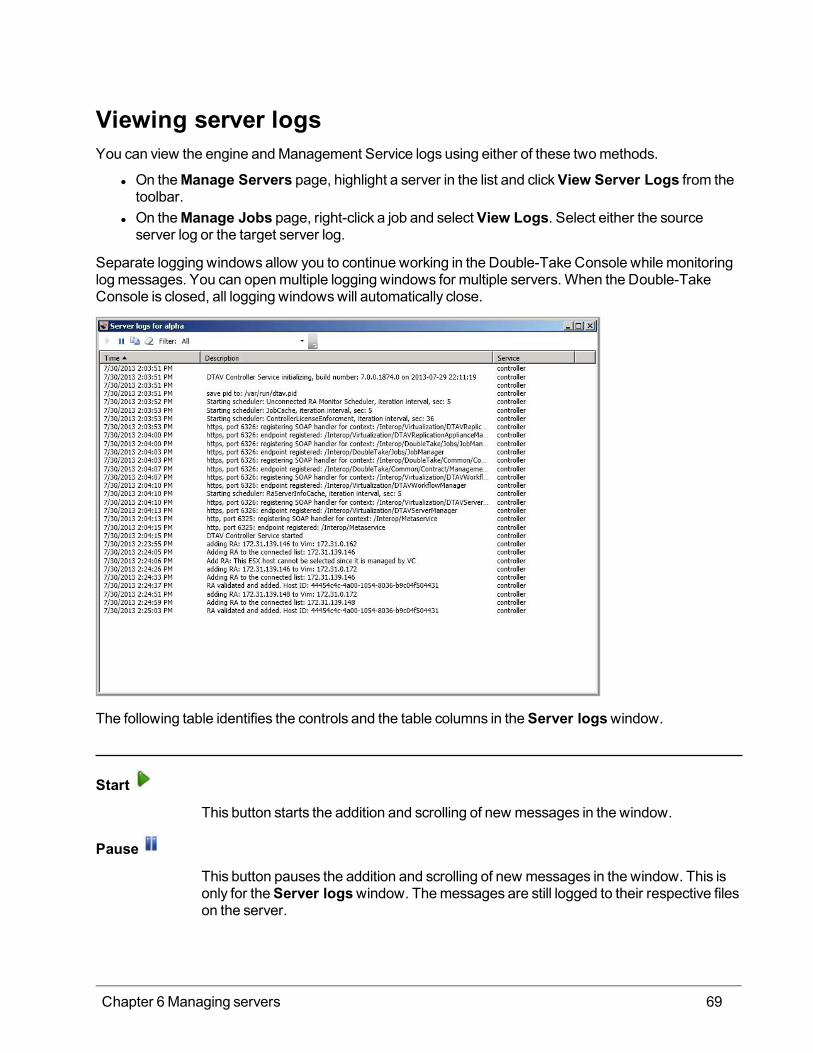
Viewing server logsYou can view the engine andManagement Service logs using either of these twomethods.
l On theManage Servers page, highlight a server in the list and clickView Server Logs from thetoolbar.
l On theManage Jobs page, right-click a job and select View Logs. Select either the sourceserver log or the target server log.
Separate logging windows allow you to continue working in the Double-Take Console while monitoringlogmessages. You can openmultiple logging windows for multiple servers. When the Double-TakeConsole is closed, all logging windowswill automatically close.
The following table identifies the controls and the table columns in theServer logswindow.
Start
This button starts the addition and scrolling of new messages in the window.
Pause
This button pauses the addition and scrolling of new messages in the window. This isonly for theServer logswindow. Themessages are still logged to their respective fileson the server.
Chapter 6Managing servers 69
Copy
This button copies themessages selected in theServer logswindow to theWindowsclipboard.
Clear
This button clears theServer logswindow. Themessages are not cleared from therespective files on the server. If you want to view all of themessages again, close andreopen theServer logswindow.
Filter
For controller appliances, there is only one log to view so filtering is not applicable.
Time
This column in the table indicates the date and time when themessage was logged.
Description
This column in the table displays the actual message that was logged.
Service
This column in the table indicates themessage is from the controller log file.
Chapter 6Managing servers 70