Embed Size (px)
Citation preview

Global Medical Device Co. DOORS Work Instruction 0000000-002
1 of 31 COMPANY CONFIDENTIAL 05/19/2013
DOORS WORK INSTRUCTION
Document Title DOORS Work Instruction
Scope DIAG. CARD. DEPT.
Keywords DOORS, Documentation, Requirements
Document File name DOORS Work Instruction.doc
Document Number: 0000000-002

Global Medical Device Co. DOORS Work Instruction 0000000-002
2 of 31 COMPANY CONFIDENTIAL 05/19/2013
Table of Contents
1. Introduction .................................................................................................................................................... 4
1.1. Purpose ........................................................................................................................................................ 4
1.2. Scope ........................................................................................................................................................... 4
1.3. Definition of Terms ....................................................................................................................................... 4
2. Overview ......................................................................................................................................................... 4
2.1. DOORS Accounts ........................................................................................................................................ 4
2.2. DOORS Structure ........................................................................................................................................ 4
2.3. Accessing Modules ...................................................................................................................................... 4
2.4. Object Identifiers .......................................................................................................................................... 5
2.5. Explanation of Objects ................................................................................................................................. 5
2.5.1. Object Properties .................................................................................................................................. 5
3. Create a New Project Folder in DOORS ...................................................................................................... 6
4. Adding a Document ....................................................................................................................................... 6
4.1. Formatting a Document in MS Word ............................................................................................................ 6
4.1.1. Master Template ................................................................................................................................... 6
4.1.2. Creating a New Document in Word (for DOORS) ................................................................................ 7
4.2. Importing ...................................................................................................................................................... 7
4.2.1. Importing from Word ............................................................................................................................. 7
4.2.2. Importing from Excel ........................................................................................................................... 10
5. Objects in DOORS ....................................................................................................................................... 10
5.1. Object Level ............................................................................................................................................... 11
5.1.1. Fixing Object Levels in DOORS Module ............................................................................................. 11
5.2. Editing Objects ........................................................................................................................................... 12
5.2.1. Inserting .............................................................................................................................................. 13
5.2.2. Cutting ................................................................................................................................................. 13
5.2.3. Copying ............................................................................................................................................... 14
5.2.4. Pasting ................................................................................................................................................ 14
5.2.5. Deleting ............................................................................................................................................... 15
5.2.6. Purging ................................................................................................................................................ 15
6. Manipulating Modules ................................................................................................................................. 15
6.1. Cutting ........................................................................................................................................................ 15
6.2. Copying/Pasting ......................................................................................................................................... 15
6.3. Deleting ...................................................................................................................................................... 15
6.3.1. Viewing Deleted Modules ................................................................................................................... 16
6.3.2. Undeleting Modules ............................................................................................................................ 16
6.4. Purging ....................................................................................................................................................... 16
6.5. Unlocking Modules ..................................................................................................................................... 16
7. Attributes ...................................................................................................................................................... 16
7.1. Displaying Attribute Columns ..................................................................................................................... 16
7.2. Attributes .................................................................................................................................................... 17
7.2.1. Attributes and Attribute Types ............................................................................................................. 17
8. Views ............................................................................................................................................................. 18
9. Filtering ......................................................................................................................................................... 19
10. Baseline/Revision Control .......................................................................................................................... 20

Global Medical Device Co. DOORS Work Instruction 0000000-002
3 of 31 COMPANY CONFIDENTIAL 05/19/2013
11. Linking Requirements in Modules ............................................................................................................. 20
11.1. Link Module Types ..................................................................................................................................... 20
11.2. Requesting Linksets ................................................................................................................................... 21
11.3. Creating Links ............................................................................................................................................ 21
11.4. Clearing or Deleting Links .......................................................................................................................... 22
12. Exporting Modules ...................................................................................................................................... 22
12.1. Exporting to Word ...................................................................................................................................... 22
12.2. Exporting to Excel ...................................................................................................................................... 22
13. DIAG. CARD. DEPT. Tools Menu ................................................................................................................ 22
13.1. Join selected objects .................................................................................................................................. 22
13.2. Convert Heading to Text ............................................................................................................................ 23
13.3. Convert Text to Heading ............................................................................................................................ 23
13.4. Link By Key ................................................................................................................................................ 23
13.5. Armstrong Word Export ............................................................................................................................. 25
14. Traceability ................................................................................................................................................... 26
15. Appendix A ................................................................................................................................................... 29
15.1. Definition of Terms ..................................................................................................................................... 29
Global Medical Device Co. DOORS Work Instruction 0000000-002
4 of 31 COMPANY CONFIDENTIAL 05/19/2013
1. Introduction
1.1. Purpose This Work Instruction (WI) provides the process for using “DOORS”. This tool provides a solution for Requirements Management and Traceability.
1.2. Scope This document provides the process for using DOORS 7.1 and above, as it applies to global Diagnostic Cardiology (DIAG. CARD. DEPT.). This work instruction covers Requirements Management in DOORS and how to best format requirements in DOORS.
This document does not cover Quality Center.
This document does not cover the DOORS/Quality Center Integration.
This document does not cover Defect Tracking in QC.
1.3. Definition of Terms See Appendix A for definition of terms.
2. Overview
2.1. DOORS Accounts To obtain a DOORS account, go to the Diagnostic Cardiology Engineering Quality website (http://supportcentral.<Global Medical Device Co.>.com/products/sup_products.asp?prod_id=42392) and select the following document: Request a DOORS account.
2.2. DOORS Structure DOORS uses a database structure, which contains all of the data. This data is organized in the following ways:
Folders
Projects
Modules
Modules are collections of Objects, which may be used for the following pieces of data:
Requirement text
Headings
Graphics
OLE Objects
Any other information
Note: An object is an object, no matter what information it contains.
2.3. Accessing Modules Open a module in DOORS in one of three ways:
Read-only: Read-only access allows others to edit the module simultaneously (not recommended)
Shareable Edit: Allows controlled, multi-user editing (only recommended for very large modules, e.g. approximately 10,000 objects or more)
Exclusive Edit: Exclusive read-write access (recommended)
It is recommended that users open modules in Exclusive Edit when working in a module. Using Exclusive Edit makes sure that any changes made and saved by the user are preserved.

Global Medical Device Co. DOORS Work Instruction 0000000-002
5 of 31 COMPANY CONFIDENTIAL 05/19/2013
IMPORTANT: Save often in DOORS. If DOORS crashes, then anything unsaved will be lost. Unsaved information appears with a red bar next to it.
2.4. Object Identifiers The Object ID is a system-supplied attribute that is present for each object in a module. This section describes the naming convention to be followed when entering the user-supplied segment (prefix) of the object identifiers. The object identifier should appear as follows: (prefix format) XXX_YYYY_<system-supplied number>.
Where XX = (user-supplied)
PRS or PPP for User Requirements
SRS for System Requirements
DR for Design Requirements
UV for User Validation
SV for System Verification
DV for Design Verification
YYYY = (user-supplied)
It consists of 3 to 5 characters that uniquely identify the module (optional, but recommended).
<number>= (system-supplied)
This number is DOORS-generated. This number does not dynamically change; it will always be associated with that object. If the object is deleted, that number will not be used again (unless the object is undeleted).
Examples: PRS_562 SRS_76 DR_ACIN_373 DV_AO_264
To change xxx in Object ID Prefix, go to File -> Module Properties and locate the prefix in the list of module attributes. Double click on the prefix (or highlight the prefix and click Edit button) to open dialog where change can be made. Save module after completing the change.
2.5. Explanation of Objects Objects include a lot of information within them. This information is stored in Object Properties and can be accessed by right-clicking on a particular object and selecting Properties.
2.5.1. Object Properties By accessing Object Properties, you can view information from the following tabs:
General
Access
History
Attributes
Links
Each tab is explained in detail in the following sections.
2.5.1.1. General
The information in the General tab includes the Heading, Short Text, and Object Text fields.
Typically, you will see text in either the Heading field or the Object Text field. However, text should not appear in both fields. The Short Text field is not used by DIAG. CARD. DEPT..
You can edit the Object Heading or Text through this Properties window.
2.5.1.2. Access
The information in the Access tab shows who has access to a particular object. The access to an object defaults to Inherit from Parent.

Global Medical Device Co. DOORS Work Instruction 0000000-002
6 of 31 COMPANY CONFIDENTIAL 05/19/2013
If you have Administrative permissions for a given object in DOORS, you can change the Access within an object.
2.5.1.3. History
The information in the History tab includes the history of the object after the last baseline. If the change bar of an object is green, then that object will not show any history before the object was baselined (refer to the Baselining section for more information on Baselines).
2.5.1.4. Attributes
The Attributes for a given Object appear as a list under the Attributes tab.
2.5.1.5. Links
The Links for a given Object appear as a list under the Links tab. Links can be deleted through this dialog box.
3. Create a New Project Folder in DOORS In order to be consistent across DIAG. CARD. DEPT., a DIAG. CARD. DEPT. Project Template folder has been created for users who need to set up new project folders. Within the DIAG. CARD. DEPT. Project Template folder, you will find templates for each level of documentation in the requirements hierarchy (For more information on the requirements necessary for each level of documentation, refer to 2016211-003 Design Inputs Process Description, DOC0001343).
Each of these templates has the initial set of attributes and views necessary to use DOORS effectively in DIAG. CARD. DEPT..
To create a new project folder in DOORS, perform the following steps:
1. Highlight and Copy the DIAG. CARD. DEPT. Project Template folder.
2. Paste the DIAG. CARD. DEPT. Project Template folder.
3. Rename the DIAG. CARD. DEPT. Project Template folder with the name of your project (e.g., Armstrong, MUSE, MARS, Discovery, etc.).
4. Read the “Read Me” file in the project file folder.
5. Per the “Read Me” file’s instructions, create a DOORS Links link module in each project. As each link module is created, it will open automatically. Close each link module and delete it, as you go through each requirements folder in your new project folder. (For instructions on deleting a module, refer to Section 6.3)
Important: It is recommended that the LSD, DOORS Administrator, or LPI familiar with the project structure and linkset rules creates new projects or modules.
4. Adding a Document
4.1. Formatting a Document in MS Word Typically, documents are begun in DOORS or imported from MS Word. If the document has been started in Word and imported into DOORS, follow the Armstrong.dot template. This template is necessary for importing Word documents into DOORS.
4.1.1. Master Template Documents imported from MS Word into DOORS need to follow a certain set of styles. A master template has been created and is called Armstrong.dot. You should download this file onto your hard drive the first time you prepare a Word document for DOORS. You will find the Armstrong.dot template at this location, under Tools/Requirements Tools: http://supportcentral.<Global Medical Device Co.>.com/products/sup_products.asp?prod_id=42392
Initially, you can save this document to your desktop, but you will need to move it to the right location to apply it to your documents.
Download Armstrong.dot to your computer:

Global Medical Device Co. DOORS Work Instruction 0000000-002
7 of 31 COMPANY CONFIDENTIAL 05/19/2013
1. Unhide the Application Data folder by clicking the Unhide option under Tools and Folder Options (in the Windows Explorer browser).
2. Put the Armstrong.dot template in these two places:
D:\Documents and Settings\<SSO Number>\Application Data\Microsoft\Template
D:\Documents and Settings\<SSO Number>\Application Data\Microsoft\Word\STARTUP
4.1.2. Creating a New Document in Word (for DOORS)
New requirements documents should be created in DOORS; not Word. However, if it is necessary to create the new document in Word, use the Armstrong.dot (when starting a new document, select the Armstrong template).
4.2. Importing New documents can be created in Word or Excel. Either of these formats can be imported into DOORS.
Important: If the document already exists in DOORS, then make the necessary changes to it in DOORS.
4.2.1. Importing from Word
To import the document from Word into DOORS, perform the following steps:
1. Right-click on the original document in Windows Explorer and click Read-Only.
2. Open the document and apply the Armstrong.dot template by selecting Templates and Add-ins from the Tools menu. Attach the correct template and make sure that the Automatically update document styles box is checked.
3. Delete all of the Header, Footer, and Front Matter (TOC, cover page, revision history) information.
4. Apply the styles (Heading 1, Normal Level 1, etc.) in the Word document, using the Formatting toolbar in Word. The headings and text will have parent-child relationships.
5. Use the MS Word bullets (if they are in the document) as a placeholder for the DOORS bullets.
6. Do not use numbered lists. Replace those numbers manually.
7. Convert any possible tables to text. If a table needs to remain in the tabular form, go to section 4.2.1.1.1 for information on formatting a table (in MS Word) for DOORS.
Note: When information is converted from table to text, make sure that it is in the correct order.
Note: Tables are strongly discouraged in DOORS. Any tables should be converted to text. If a table is not converted to text, it must be created in Word first. DO NOT use the DOORS-formatted tables!
8. Save the document as an .rtf file (Rich Text File); use underscores instead of blank spaces (e.g., ADC_Driver.rtf).
9. In DOORS, go to the correct project folder, and find the template module.

Global Medical Device Co. DOORS Work Instruction 0000000-002
8 of 31 COMPANY CONFIDENTIAL 05/19/2013
10. Copy and paste the template. The new module will be named “Copy of <template>”; change the name of the module.
11. Right-click on the copy of the template and select Properties.
12. Rename the module in the Name field and delete the word “Template” in the Description field. Click OK.
13. Click twice on the module to open it.
14. From the File menu, select Import, then Rich Text File.
15. Click Browse to find the correct pathname for the document. Click Import. The following screen should appear:
16. Click Import again. It will take a moment for the document to populate the module.
Note: If the above screen does not appear, the pathname is incorrect. Go back to Browse and try again. Make sure that any blank spaces are replaced with underscores and the file is saved as an .rtf file.
17. In DOORS, delete the tabs (which appear as a long blank space between the numbering and text in the heading) in the Heading level objects. If these tabs are not deleted, the document will appear with two tabs in the output document.
18. All of the bullets (and their tabs) from Word need to be deleted; apply the DOORS’ bullets to the bulleted lines.
Global Medical Device Co. DOORS Work Instruction 0000000-002
9 of 31 COMPANY CONFIDENTIAL 05/19/2013
4.2.1.1. Tables
4.2.1.1.1. Tables to Text
No requirements should appear in a table. ALL requirements that appear in a table must be converted to text; use the following steps:
1. Use the table move handle to select the whole table ( ).
2. From the Table menu, select Convert, then Table to Text. In the Separate text with section, leave the default at Paragraph marks. Make sure the information appears in the correct order (i.e., the right heading above the right text).
3. Apply the correct style to each line to format them accordingly. The table heading stays Heading x, and so on; the text should continue to reflect the parent-child relationship.
4.2.1.1.2. Tables to OLE Objects
Tables are strongly discouraged as reference information.
However, if a table is absolutely necessary, then:
It must be formatted a certain way (see the instructions below)
It cannot include any Requirements, nor can it be marked as a “Requirement” in DOORS
Reference tables need to be formatted very carefully. Tables need to go into DOORS as OLE objects to be readable in the export document and editable in the DOORS object.
Use the following steps to format a reference table in Word for DOORS:
1. In Word, select the whole table by selecting the table move handle at the top left corner of the table ( ).
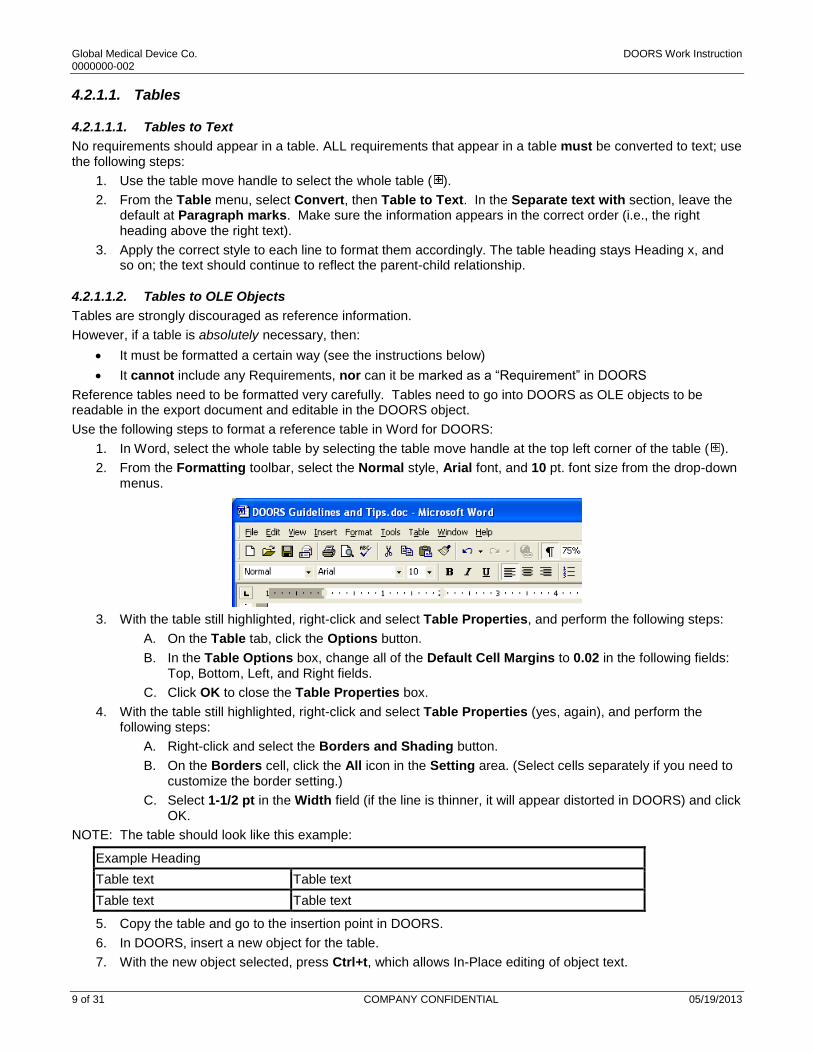
2. From the Formatting toolbar, select the Normal style, Arial font, and 10 pt. font size from the drop-down menus.
3. With the table still highlighted, right-click and select Table Properties, and perform the following steps:
A. On the Table tab, click the Options button.
B. In the Table Options box, change all of the Default Cell Margins to 0.02 in the following fields: Top, Bottom, Left, and Right fields.
C. Click OK to close the Table Properties box.
4. With the table still highlighted, right-click and select Table Properties (yes, again), and perform the following steps:
A. Right-click and select the Borders and Shading button.
B. On the Borders cell, click the All icon in the Setting area. (Select cells separately if you need to customize the border setting.)
C. Select 1-1/2 pt in the Width field (if the line is thinner, it will appear distorted in DOORS) and click OK.
NOTE: The table should look like this example:
Example Heading
Table text Table text
Table text Table text
5. Copy the table and go to the insertion point in DOORS.
6. In DOORS, insert a new object for the table.
7. With the new object selected, press Ctrl+t, which allows In-Place editing of object text.

Global Medical Device Co. DOORS Work Instruction 0000000-002
10 of 31 COMPANY CONFIDENTIAL 05/19/2013
8. Under the DOORS Edit menu, select Paste Special. The Paste Special dialog box will appear.
9. In the Paste Special dialog box: make sure that Paste is selected, highlight Microsoft Word Document Object, and click OK.
Important: If the following error message appears:
Make note of the location of the new object (use the Object ID number or heading number, etc.), save and close the module, and close DOORS. Upon reopening DOORS, the OLE object can be created. This is a DOORS bug and happens randomly.
10. Apply the Product Version attribute to the new object.
Example:
Important:
Unlike other information in DOORS, a table that is made an OLE Object must originate from MS Word.
Because the table becomes an OLE Object, it takes on the characteristics of a graphic. If the table is longer than one page, then the whole table will not appear. For each page of the table, the table needs to be split. To split a table, perform the following substeps: a. Put your cursor in the row that will be your top line on the next page. b. From the Table menu, select Split Table. Repeat these steps for as many pages as the table needs to be.
Important: Once a table is pasted into DOORS as an OLE object, it can be edited in DOORS. To edit the table, double-click the table. When a user is in the table, the table menu will appear in the toolbar (instead of the DOORS’ menu).
4.2.2. Importing from Excel
To import the document from Excel to DOORS, perform the following steps:
1. Right-click on the original document in Windows Explorer and click Read-Only.
2. Make sure that the correct headings are above the correct text and numbered appropriately. Excel files will become flat when they are converted for the Import, so numbering the headings helps with correct placement after importing the file.
3. The columns need to be named. All of the columns will become attribute columns in DOORS. The main text column must be named “Object text” in order to appear in the correct column in DOORS.
4. Using the DIAG. CARD. DEPT. Tools menu in DOORS, select Convert Text to Heading to change any text to a heading. If necessary, select Convert Heading to Text to change any headings to text.
5. Arrange the levels to correctly reflect the hierarchy of the document.
5. Objects in DOORS Once a document is imported into a DOORS module, it can be edited. As needed, you can add, edit, or delete the following information in DOORS:
Object Headings (through In-Place editing or the Properties dialog box)

Global Medical Device Co. DOORS Work Instruction 0000000-002
11 of 31 COMPANY CONFIDENTIAL 05/19/2013
Object Text (through In-Place editing or the Properties dialog box)
Important: You need to make special considerations for objects with links, especially if you need to cut or delete the object. Refer to the Linking section.
Important: DO NOT edit documents in Word if they are already in DOORS; edit these documents in DOORS to minimize revision control problems!
5.1. Object Level The attribute called Object Level shows the level of the Object. The level determines the correct mapping into the output Word document.
The text levels must be one level lower than the headings.
If the next object heading is the same level, it needs to be the same level as the object heading preceding it.
If the next object heading is the next level down, it needs to be the same level as the object text preceding it.
If the next object heading is the next level up, it needs to be one level up from the object heading preceding it.
5.1.1. Fixing Object Levels in DOORS Module
For inserting a new column into the current module view:
1. Select the column left of where you want to insert the column.
2. From the DOORS menus, select Insert, then Column.

Global Medical Device Co. DOORS Work Instruction 0000000-002
12 of 31 COMPANY CONFIDENTIAL 05/19/2013
3. From the drop-down list in the Contents area, select Object Level.
4. Click OK.
6. The Object Level column will appear as the furthest right column. Scroll to the right to view it. Use the numbers in the Object Level attribute column to guide you when determining the levels of the objects in the module.
5.1.1.1. Same Level
For making the object heading or text the same as the preceding one:
1. Highlight the object heading or text whose level is to be duplicated.
2. Right-click and select Copy.
NOTE: If you want to copy the text and subsequent headings under the heading being copied, select Copy objects with hierarchy.
3. With the object heading or text still highlighted, right-click and select Paste/Paste.
4. The copied object heading or text (and subsequent sub-headings and text, if applicable) will appear at the same level (if object heading, with the appropriate autonumbering visible).
5.1.1.2. One Level Down
For making the object heading or text one level down from the preceding one:
1. Highlight the object heading or text for which you want to paste the object one level down.
2. Right-click and select Copy.
NOTE: If you want to copy the text and subsequent headings under the heading being copied, select Copy objects with hierarchy.
3. With the object heading still highlighted, right-click and select Paste/Paste objects one level down.
4. The copied object heading or text (and subsequent sub-headings and text, if applicable) will appear one level down (if object heading, with the appropriate autonumbering visible).
5.2. Editing Objects Editing objects in place can be accomplished by doing one of the following actions:
In the current object, just type to add text
Double-click on an object to put cursor on left margin of the first line of an object
Double-click on an object, then click in desired position to insert text

Global Medical Device Co. DOORS Work Instruction 0000000-002
13 of 31 COMPANY CONFIDENTIAL 05/19/2013
In addition to editing, you can insert, cut, copy, paste, and delete objects as necessary in a module.
5.2.1. Inserting
When you need to add data to a module that is already in DOORS, you can insert an object at any point in the module. Due to the way that object levels dictate document generation, you need to pay attention to the object level when you insert it.
Depending on where you need to insert the new object, you may need to insert the object at the same level or one level below.
For example: If you need to insert a level 3 Object Heading (e.g., 3 numbers in the subheading), then find the closest previous level 3 heading within the same level 2 subheading.
If you need to insert a level 3 Object Heading directly beneath a level 2 Object, you need to insert the Object Below.
To insert an object in DOORS at the same level, perform the following steps:
1. Highlight the object of the same level, beneath which you need to insert the new object.
2. Right-click and select Insert/Object. The empty object will appear with subheading autonumbering already visible.
NOTE: If the new object is NOT a heading, perform these sub-steps:
A. With the object highlighted, right-click the object and select Properties.
B. Delete the autonumbering in the Object Heading field.
C. Type your text in the Object Text field.
To insert an object in DOORS one level down, perform the following steps:
1. Highlight the object one level higher than the object you need to insert.
2. Right-click and select Insert/Object Below.
NOTE: If the new object is NOT a heading, perform these sub-steps:
A. With the object highlighted, right-click the object and select Properties.
B. Delete the autonumbering in the Object Heading field.
C. Type your text in the Object Text field.
5.2.2. Cutting You can cut objects in DOORS. When you cut an object, you can paste it at another point in the module at either the Same Level or One Level Below.
NOTE: If the object you cut had a link, the link will still be there when you paste it within the same module.
Important: DO NOT cut an object to delete a link. Delete any necessary links through the Properties window before you cut the object (if you do not plan on pasting the object).
Important: DO NOT cut an object that HAS a link until the link has been deleted through the Properties window of the object.
Because of the parent-child relationship of object levels, cutting an object causes all of the objects in the level directly below it to be cut also.
To cut an object, perform the following steps:
1. Select insertion point.
2. Highlight the object that you need to cut.
3. Right-click and select Cut. The object will be cut.
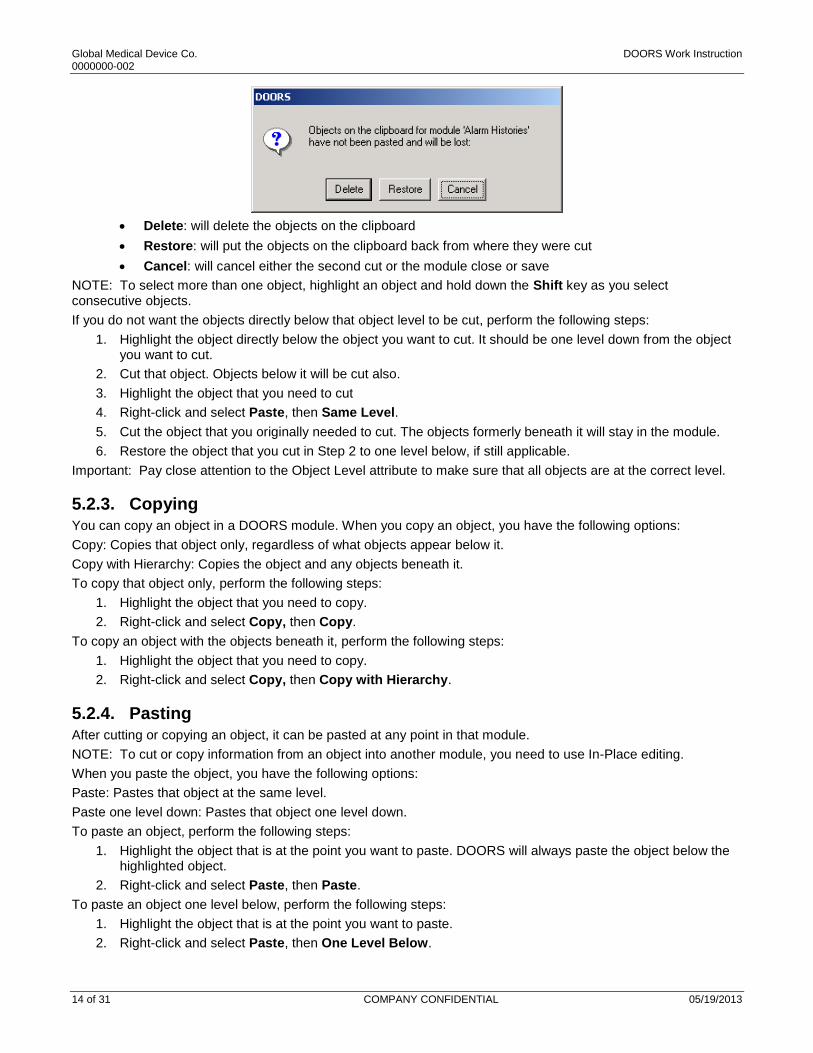
Note: Remember to Paste the Cut Objects! If an object is cut but never pasted, then the following message will appear upon performing a subsequent cut operation or upon closing or saving the module (this is especially important if there are links in the cut object):
Global Medical Device Co. DOORS Work Instruction 0000000-002
14 of 31 COMPANY CONFIDENTIAL 05/19/2013
Delete: will delete the objects on the clipboard
Restore: will put the objects on the clipboard back from where they were cut
Cancel: will cancel either the second cut or the module close or save
NOTE: To select more than one object, highlight an object and hold down the Shift key as you select consecutive objects.
If you do not want the objects directly below that object level to be cut, perform the following steps:
1. Highlight the object directly below the object you want to cut. It should be one level down from the object you want to cut.
2. Cut that object. Objects below it will be cut also.
3. Highlight the object that you need to cut
4. Right-click and select Paste, then Same Level.
5. Cut the object that you originally needed to cut. The objects formerly beneath it will stay in the module.
6. Restore the object that you cut in Step 2 to one level below, if still applicable.
Important: Pay close attention to the Object Level attribute to make sure that all objects are at the correct level.
5.2.3. Copying
You can copy an object in a DOORS module. When you copy an object, you have the following options:
Copy: Copies that object only, regardless of what objects appear below it.
Copy with Hierarchy: Copies the object and any objects beneath it.
To copy that object only, perform the following steps:
1. Highlight the object that you need to copy.
2. Right-click and select Copy, then Copy.
To copy an object with the objects beneath it, perform the following steps:
1. Highlight the object that you need to copy.
2. Right-click and select Copy, then Copy with Hierarchy.
5.2.4. Pasting
After cutting or copying an object, it can be pasted at any point in that module.
NOTE: To cut or copy information from an object into another module, you need to use In-Place editing.
When you paste the object, you have the following options:
Paste: Pastes that object at the same level.
Paste one level down: Pastes that object one level down.
To paste an object, perform the following steps:
1. Highlight the object that is at the point you want to paste. DOORS will always paste the object below the highlighted object.
2. Right-click and select Paste, then Paste.
To paste an object one level below, perform the following steps:
1. Highlight the object that is at the point you want to paste.
2. Right-click and select Paste, then One Level Below.

Global Medical Device Co. DOORS Work Instruction 0000000-002
15 of 31 COMPANY CONFIDENTIAL 05/19/2013
5.2.5. Deleting
When you delete an object, you can undelete it (as long as it has not been purged).
Important: As with cutting objects, DO NOT delete a link by deleting an object. Delete any necessary links through the Properties window before you delete the object.
5.2.5.1. Viewing Deleted Objects
After an object has been deleted, it can still be viewed. To view deleted objects, select Show -> Deletions from the View menu.
Deleted objects are shown in red with a black change bar, with their original Object Identifier. Additionally, any attribute values that were applied to the object appear in the deleted object.
5.2.5.2. Undeleting Objects
If an object has been deleted, then it can be undeleted. To undelete an object, perform the following steps:
1. Show deleted objects (refer to section 5.2.5.1).
2. Select object to be undeleted.
3. From the Edit menu, select Object -> Undelete. The object text will appear in black with a yellow change bar.
5.2.6. Purging Once an object is purged, it is unrecoverable.
6. Manipulating Modules
6.1. Cutting Cutting a module in DOORS is not recommended. However, if you do cut and paste a module in DOORS, make sure that the links were not damaged, corrupted, or changed in any way.
6.2. Copying/Pasting Formal modules can be copied and pasted using the DOORS Explorer clipboard. However, formal modules should only be copied in the following situations:
The module is being copied from the DIAG. CARD. DEPT. Project Template folder.
The module being copied does NOT have any links.
To copy a module in DOORS, perform the following steps:
In the right-hand pane of the explorer window, select the module to be copied.
Right-click and select Copy.
Important: You must have Create access in the destination folder/project to paste copied modules.
Important: Whenever a module is copied and pasted, change the module name and change the Object Identifier Prefix via the Module Properties box.
6.3. Deleting When you delete a module, you can undelete it (as long as it has not been purged).
Important: Do NOT delete a module to delete links. If you delete a module and its links, those links will still exist and be orphans. Therefore, do NOT delete a module if it still has links. Delete the links within the module before deleting the module.
To delete a module, perform the following steps:
In the right-hand pane of the explorer window, select the module to be deleted.
Right-click and select Delete. If you have enabled Show Deleted Items, then the module will still appear with a red “X” through it. You cannot open a deleted module.
Important: You cannot delete a module if any user is accessing the module.

Global Medical Device Co. DOORS Work Instruction 0000000-002
16 of 31 COMPANY CONFIDENTIAL 05/19/2013
Important: To delete, undelete or purge a module, you must have delete access to the module.
6.3.1. Viewing Deleted Modules After a module has been deleted, it can still be viewed. To view deleted objects, select Show Deleted Items from the View menu. If enabled, Show Deleted Items will appear with a checkmark next to it.
Deleted modules are shown with a red “X” through them and cannot be opened. However, deleted modules can be undeleted.
6.3.2. Undeleting Modules
If a module has been deleted, then it can be undeleted. To undelete an object, perform the following steps:
1. Show deleted modules (refer to section 6.3.1).
2. Select module to be undeleted.
3. Right-click and select Undelete. The module will no longer have a red “X” through it.
6.4. Purging Unless it is necessary, do not purge modules. The only case in which purging a module is absolutely necessary is if you need to recreate or paste a module of the same name as the one that was deleted. This is a rare situation and an exception to the rule.
Once a module is purged, it is unrecoverable. If a module is not purged, then it can be undeleted.
If you must purge a module, then perform the following steps:
1. Show deleted modules (refer to section 6.3.1).
2. Select the deleted module.
3. From the File menu, select Purge.
6.5. Unlocking Modules When a module is opened by DOORS, it is locked so that other users cannot open it simultaneously. If DOORS terminates abnormally, such as system failure, power cut, or software crash, modules can remain locked even though they are not being edited.
Unlock Modules allows:
DOORS administrators to unlock all locked modules
Users to unlock only their locked modules
Unlocking modules that are genuinely in use could lead to loss of data. When in doubt about your module being locked, ask a DOORS administrator.
To unlock a module that you know is not in use, perform the following steps:
1. Select Manage Locks from the Tools menu.
2. Deselect Current folder only.
3. Highlight the document that is locked and click Unlock. The document should be unlocked.
7. Attributes
7.1. Displaying Attribute Columns Every attribute within a module can be displayed in a column format. You can display the attributes that display Object ID, Object Level, <Product>, and many other values.
Displaying these values will help you organize information within the module and determine what to generate in the output document.
For inserting a new column into the current module view:
1. Select the column left of where you want to insert the column.
2. From the DOORS menus, select Insert, then Column.

Global Medical Device Co. DOORS Work Instruction 0000000-002
17 of 31 COMPANY CONFIDENTIAL 05/19/2013
3. From the drop-down list in the Contents area, select Object Level.
4. Click OK.
5. The Object Level column will appear as the furthest right column. Scroll to the right to view it.
7.2. Attributes
7.2.1. Attributes and Attribute Types
Both modules and objects have Attributes associated with them. Attributes improve the management of requirements within a program and—over time—between programs.
Through manipulation of Attributes, you can control what portion of the document is generated.
The following table lists the most often used Attributes in DIAG. CARD. DEPT. projects:
Attribute Attribute Type Information Auto generated Module or Object
Created By String Who created this object or module. Yes Both
Created On Date When this object or module was created.
Yes Both
Earliest Version
Text Pulls information from the <Product> version Attribute and shows the earliest version selected.
Yes Object
Last Modified By
String Who last modified this object or module. Yes Both
Last Modified On
Date When this object or module was created.
Yes Both
Object Heading String Contains the Heading for a section; uses auto numbering.
Auto numbering is auto generated; text is not auto generated
Object
Object Text Text Contains the primary text for the document.
No Object
Object Type Enumeration Categorizes how this object is handled within requirements management (i.e., Should this object be designated as a “Requirement”?).
No Object

Global Medical Device Co. DOORS Work Instruction 0000000-002
18 of 31 COMPANY CONFIDENTIAL 05/19/2013
Prefix String Abbreviation of title in Object Identifier Attribute.
No Module
<Product> Version
Enumeration List of product versions for the specific product; product name (e.g., MUSE, Armstrong) needs to replace “<Product>” in the Attribute name.
No Object
Req ID Text Pulls information from the Object Identifier Attribute, depending on what value was entered in the Object Type Attribute. This Attribute becomes populated when “Requirement” is entered in the Object Type Attribute.
Yes Object
The Object Heading and Object Text Attributes can be in the same object; however, this is not recommended. Object Heading information should be in a separate object- from Object Text information.
You can add values to the <Product> Version Attribute. In addition, you can change the product version value, rather than deleting an object (be sure to update links as necessary).
Attribute and Attribute Type definition should be limited to the LSD, LPI, or System Requirements Specialist familiar with process and project organization.
8. Views The following views are already in the module templates in each project folder: Standard, Compose, and Print View. The Standard view comes with each DOORS module; DIAG. CARD. DEPT. module templates include the Compose and Print Views, which have preset Attributes.
You can add different views to the module for a variety of reasons:
Setting a filter
Running traceability analysis
Displaying different attribute columns
To create a new view, perform the following steps:
1. Click View, then Save As. The Save As dialog box appears.

Global Medical Device Co. DOORS Work Instruction 0000000-002
19 of 31 COMPANY CONFIDENTIAL 05/19/2013
2. Give your view a unique name in the Name field.
3. Check what settings that you want for this view. If you select a view as Private, then you will be the only user who has access to that view. If you select For Module under the Default section, then the module will always open to your new view (until a different view is selected as the default For Module).
9. Filtering Filters let you control what information is displayed on your screen.
Using a Simple filter, you can filter:
The contents of every attribute of type text or string
The Object Heading number
The contents of any column
The value of a single attribute of any type
The basis of whether the object has links
The basis of whether the object is either the current object or a leaf object (an object is a “leaf” object if it doesn’t have any children)
Using an Advanced filter, you can combine multiple simple filters to narrow down what information you want to display.

Global Medical Device Co. DOORS Work Instruction 0000000-002
20 of 31 COMPANY CONFIDENTIAL 05/19/2013
To create an Advanced filter, perform the following steps:
1. Click Tools, then Filter. The Filtering dialog box appears.
2. Select the correct filter(s) using the top three-drop-down selections. These selections will appear in the Rules window.
3. If you have multiple selections, then highlight all of the applicable selections and the correct operators (listed on the right side). Repeat this step for combinations of different operators.
4. Click Apply.
5. Check the module to make sure that the correct information was filtered.
6. If the correct filter was applied, click OK.
7. To save this filter, create a view to save it and make sure that Filtering is selected.
10. Baseline/Revision Control DOORS offers the opportunity to baseline modules. Baselining modules offers a way to save the module at a certain point in its development. Regardless of any changes/updates that happen to a module, these updates will not affect previous baselines.
Use the baseline feature at the discretion of the program. The recommended method for baselining a module is to baseline it when it is uploaded into the Design History File (DHF).
11. Linking Requirements in Modules Through DOORS, you can link different levels of requirements. Linking these requirements offers traceability, which satisfies certain regulatory standards (refer to the Traceability section).
In DIAG. CARD. DEPT., the link modules are organized to best leverage accurate Traceability analysis and avoid duplication of effort. The project folders are set up specifically to ensure good link management.
11.1. Link Module Types Currently, DIAG. CARD. DEPT. uses the following link modules, which reside in the DIAG. CARD. DEPT. Project Template Link Modules Folder:
NOTE: These module types need to be copied and pasted into each new Project folder.

Global Medical Device Co. DOORS Work Instruction 0000000-002
21 of 31 COMPANY CONFIDENTIAL 05/19/2013
Requirement Links module – contain linkset information for all requirement links for all levels of requirements.
Test Links module – contain linkset information for all test links between all levels of requirements and applicable test documentation.
Hazard Links module – contain linkset information for all links between the Risk Analysis/Assessment module and any other applicable module.
Important: Each sub-folder in each project MUST contain a deleted DOORS Links module. However, this module cannot be copied over when you copy and paste the new Project folder. When the new Project folder, the LPI, LSD, or DOORS Administrator must go into each sub-folder and create the DOORS Links module, then delete it. Use the following graphic as a reference for assigning properties to this module:
NOTE: To view Link Modules, select View, then Show Link Modules. To view Deleted items, select View, then Show Deleted Items. A checkmark will appear beside any item you can view in DOORS.
11.2. Requesting Linksets When you need to request a linkset, contact your LPI or LSD for the project, or the DOORS Administrator in DIAG. CARD. DEPT.. Do NOT attempt to create a linkset on your own.
Important: If you are linking documents and a pop-up window appears, asking if you would like to create a Default Linkset, click No.
11.3. Creating Links Once the linksets have been created, you can begin linking modules. When linking modules in DIAG. CARD. DEPT., link up from the lower level requirements to the higher level requirements.
To create a link, perform the following steps:
1. Open the source and target modules in Exclusive Edit.
2. Highlight the source object. Right-click and select Link -> Start Link. The object will appear pink.
3. Highlight the target object. Right-click and select Link -> Make Link from Start. An out-link arrow will appear in the linked object in the source module; an in-link arrow will appear in the linked object in the target module.

Global Medical Device Co. DOORS Work Instruction 0000000-002
22 of 31 COMPANY CONFIDENTIAL 05/19/2013
11.4. Clearing or Deleting Links To clear a link, perform the following steps:
1. Open the Source and Target modules.
Note: You can delete the link in either module, but both modules must be open. These steps will use the Source module as the example.
2. In the Source module, select the object that has the link that will be deleted.
3. Right-click and select Properties.
4. Go to the Links tab. A list of links should be displayed in the window.
5. Highlight the link you want to delete. The Object Identifier, which links it to the Target module, should appear in the ID column.
6. Click Delete.
7. Click OK.
Important: A Link cannot be Undeleted once it has been deleted.
12. Exporting Modules
12.1. Exporting to Word For exporting your module to Word, refer to the Armstrong Word Export section.
12.2. Exporting to Excel To export a document from DOORS in Excel, select File -> Export -> Spreadsheet. The .csv file will appear in the default file folder.
13. DIAG. CARD. DEPT. Tools Menu The DIAG. CARD. DEPT. Tools Menu offers five customized functions that can increase efficiency and productivity.
This menu has been created specifically for DIAG. CARD. DEPT. DOORS’ users and can be downloaded at the following site: http://supportcentral.<Global Medical Device Co.>.com/products/sup_products.asp?prod_id=42392
To download the DIAG. CARD. DEPT. Tools Menu, perform the following steps:
1. Download the file to your desktop.
2. Extract the zipped files to your C drive. The files will go to the correct place.
3. Open a module in DOORS to make sure that DIAG. CARD. DEPT. Tools appear in the menu bar.
The following items should appear under the DIAG. CARD. DEPT. Tools Menu and are explained briefly in the following sections:
Join selected objects
Convert Heading to Text
Convert Text to Heading
Link By Key
Armstrong Word Export
13.1. Join selected objects The DIAG. CARD. DEPT. Tools menu item called Join selected objects allows users to easily join objects. You can select as many objects as needed and join them together.
When joining selected objects, keep the following things in mind:
Only the Object Heading and Object Text will be able to joined
Only the attributes from the first object will be retained
If a parent is chosen when selecting text, all of its children will also be chosen

Global Medical Device Co. DOORS Work Instruction 0000000-002
23 of 31 COMPANY CONFIDENTIAL 05/19/2013
13.2. Convert Heading to Text The DIAG. CARD. DEPT. Tools menu item called Convert Heading to Text allows users to change the selected heading to text. After this conversion has been applied, the affected text will have the properties of Object Text in DOORS.
13.3. Convert Text to Heading The DIAG. CARD. DEPT. Tools menu item called Convert Heading to Text allows users to change the selected text to heading. After this conversion has been applied, the affected text will have the properties of Object Heading in DOORS.
13.4. Link By Key The DIAG. CARD. DEPT. Tools menu item called Link By Key allows users to link modules using unique identifiers within either the source or target module. One module needs to use a user-given unique identifier and the other module needs to use the Object Identifier attribute.
Through the Link By Key function, you can quickly create links.
To create links using Link By Key, perform the following steps:
1. Select DIAG. CARD. DEPT. Tools, then Link By Key. The Link By Key Attribute dialog will appear. The Source module field will be populated with the current module name.
2. For the Target module field, select Browse to find the target module.
3. Select the correct module for linking to.
4. Click OK. You will go back to the Link By Key Attribute dialog.

Global Medical Device Co. DOORS Work Instruction 0000000-002
24 of 31 COMPANY CONFIDENTIAL 05/19/2013
5. For the Link module field, select Browse to find the link module.
6. Select the correct link module. Only link modules should appear for this selection.
7. Click OK. You will go back to the Link By Key Attribute dialog.

Global Medical Device Co. DOORS Work Instruction 0000000-002
25 of 31 COMPANY CONFIDENTIAL 05/19/2013
8. Select the Source reference attribute from the left pane.
9. Select the Target key attribute from the right pane.
10. Click Create Links. A window will pop up to show how many links were created.
11. Make sure that both modules (source and target) show in-links and out-links.
13.5. Armstrong Word Export The DIAG. CARD. DEPT. Tools menu item called Armstrong Word Export allows users to export the module to Word using pre-defined parameters. You can export the module using the Export selection under the File menu; however, it is recommended that you use the Armstrong Word Export because the template and mapping are set correctly for DIAG. CARD. DEPT..
To export the module using the Armstrong Word Export, perform the following steps:
1. Select DIAG. CARD. DEPT. Tools, then Armstrong Word Export. The following screen will appear:

Global Medical Device Co. DOORS Work Instruction 0000000-002
26 of 31 COMPANY CONFIDENTIAL 05/19/2013
NOTE: The standard view to export is the Print View; this view includes the formatting (column width) and attributes needed for most output documents. However, the Armstrong Word Export will work for any view.
2. Verify that this is the view you want to export. Click Confirm.
14. Traceability One of the biggest benefits of DOORS is the Traceability it offers. You can create separate traceability views for your Requirements links and Test links.
To add a traceability column to your current view, perform the following steps:
1. Click Analysis, then Wizard.
2. You see the wizard’s welcome screen. Click Next to start the wizard.
3. For the Select formal module field, click All modules to analyze linked objects in all formal modules in the selected link module (see next step).
4. For the Select link module field, click Specific to select the necessary link module.
5. Click Browse to locate the correct link module. The correct link module will be in the project’s Link Modules folder.
6. Click Next to display the next wizard screen.

Global Medical Device Co. DOORS Work Instruction 0000000-002
27 of 31 COMPANY CONFIDENTIAL 05/19/2013
7. Use the radio buttons to select whether you want to analyze in-links (yellow) or out-links (dark pink). Whether you choose to analyze in-links or out-links depends on which requirements document you need to analyze.
8. Click Next.
9. In the Module and object attributes field, select the information needed in the traceability column. Click an item to select it; click it again to de-select it.
10. In the Link attributes field, select any link attributes that you want in the traceability column.
11. Click Next.

Global Medical Device Co. DOORS Work Instruction 0000000-002
28 of 31 COMPANY CONFIDENTIAL 05/19/2013
12. The number is the Depth of analysis field displays how deep you want to go in analyzing the links. The default number is four, which will give you four new columns in the Traceability view.
13. Click Next.
14. This second last screen will display the words “FINISH” and name of the target module. If this screen does not display that information, then you need to redo the Traceability Analysis.
15. If this screen displays the information, then click Next.

Global Medical Device Co. DOORS Work Instruction 0000000-002
29 of 31 COMPANY CONFIDENTIAL 05/19/2013
16. Click Finish. The Traceability information will appear in columns in the current view.
17. Rename the Traceability column with a meaningful name.
18. To save the Traceability column, create a new view and save it.
NOTE: If any of the links within a Traceability column change, then the information in the Traceability columns dynamically updates.
15. Appendix A
15.1. Definition of Terms Many of terms used for documenting information in DOORS are known to the technical audience; however, some of these terms are used in a very specific way for DOORS. The following list contains certain terms that are helpful when working in DOORS (or preparing documentation for DOORS):
Attribute: Attributes appear in the column format in DOORS. Except for the main column, each column allows one attribute. In the main, two attributes are allowed: Object Text and Object Heading.

Global Medical Device Co. DOORS Work Instruction 0000000-002
30 of 31 COMPANY CONFIDENTIAL 05/19/2013
Baseline: A read-only version of module that captures a point in the module’s history and preserves it. Users can access previous baselines and compare them to each other or the current module.
CSV File: A CSV file can contain data from any table so that the table can be conveyed as input to another table-oriented application, such as a relational database application (such as DOORS). When importing documents from Excel into DOORS, they must be saved as .csv files before importing.
DIAG. CARD. DEPT. Tools Selection in the menu bar that offers customized functionality within each module once it has been downloaded.
DOORS: Requirements management application that provides all of the features needed to capture, track, and manage requirements (user, system, and design level).
DXL Script: DXL (DOORS eXtension Language) is a scripting language specially developed for DOORS. DXL scripts allow DOORS’ users to customize DOORS. To the end user, DXL-developed applications appear as seamless extensions to the graphical user interface.
Filter: Function that lets you control what information appears in a view.
Folder: Container used to organize modules.
Formal Module: Container used to store information; it is similar to a spreadsheet.
Link Module: Container used to store information about links via linksets.
Linking: The act of connecting an object in one module to an object in another module.
Linkset: Linksets are stored in the Link Module; each linkset contains information about links from one module to another.
Module: Container within DOORS that stores information.
Object Heading: This attribute is shown in bold, and has a heading number that is automatically generated by DOORS. One of the two types of attribute that can appear in the main column (the column that shows the status bar).
Object ID A system-supplied attribute that is present for each object in a module
Object Text: This attribute is shown in normal font. One of the two types of attribute that can appear in the main column (the column that shows the status bar).
Object: Objects appear as rows in DOORS. They contain the attributes, history, link information, etc. for each row of information within a module.
Project: Container used to organize modules for a specific project.
RTF File: An RTF (Rich Text File) file contains no control characters; .rtf files only contain printable letters, numbers and symbols (usually from the ASCII character set. When importing documents from Word into DOORS, they must be saved as .rtf files immediately before importing.

Global Medical Device Co. DOORS Work Instruction 0000000-002
31 of 31 COMPANY CONFIDENTIAL 05/19/2013
Change Bar: Allows you to track changes to objects. The following list shows what each color means: Green – Object hasn’t been changed since the module was baselined Yellow – Object has been changed since the module was baselined; the changes have been saved Red – Object has been edited and the changes have not been saved yet Black (with red text) – Object has been deleted, but not purged
Template: Each folder within the Project folder contains a template for a given type of document. Copy and paste this template to create a new module within the folder. Each template has predefined attributes and views that are specific for that project.
View: Determines what attributes and other information appear in the module. Filters can be applied to views; attributes can be added to or removed from views. Views can be made public, private, or the default view for the module and/or a particular user.