Embed Size (px)
Citation preview

az1747
Do-it-yourself construction guide: Rugged accumulation precipitation gauge for remote monitoring
Michael A. Crimmins, Mitchel McClaran, Julie Brugger, Ashley Hall and Douglas Tolleson
September 2017
IntroductionPrecipitation is the key variable in assessing drought status
and tracking changes in drought conditions. Precipitation is also highly variable in space and time and having your own rain gauge ensures you have data specifically for your location. Backyard rain gauges are inexpensive and easy to use, but what if your monitoring location is at a remote,
unattended site? A simple and inexpensive accumulation gauge can help in this situation. These gauges are typically open containers like PVC pipes, capped on one end, containing a small amount of oil to stop evaporation. As precipitation falls into the gauge it collects below the thin film of oil and continues to accumulate until the gauge is emptied. This

2 The University of Arizona Cooperative Extension
allows a gauge to be deployed at a remote site and read many months or even years later.
Accumulation gauges are easy to construct on your own with materials and tools easily available at any local hardware store. These directions provide guidance on constructing a gauge with some added features that are particularly useful for remote monitoring (Figure 1). One particular feature of this gauge is the use of a clear PVC which allows the design to mimic the ease of use of typical plastic backyard gauges, but has the ruggedness to be deployed in remote locations and harsh environments. This pipe is not as readily available at hardware stores, but available through online retailers.
Before you beginThe first decision to make before constructing a gauge or
several gauges is deciding how tall it should be. This largely depends on two factors 1) How often you intend to visit the gauge and empty it, and 2) how much precipitation typically falls over this period, be it a season or a year. An online tool called the Precipitation Logbook Generator (https://goo.gl/JswZJJ) can help you decide on the height of a gauge based on the historical climate at that location. Go to ‘Choose Location’ and click on the map where you intend to install your gauge and then click ‘Download data’. Wait for the data to download and then proceed to the ‘Generate Logbook’ page. To assess the typical annual amount of precipitation at your location set Start Month to 1, Start Day to 1 and Chart length to 365 and click Generate Chart. The black line represents the median accumulation of daily precipitation observed at this location (based on 1981-2015 PRISM climate data). The chart below lists the values used in the creation of the chart. The last value in the Normal (50th %) column is the median
total precipitation for this location. That means that half of the years in the historical record were wetter and half were drier than this value. If you want your gauge to hold a year’s worth of precipitation then choosing a depth greater than the 50th line, but less than the 98th will ensure you have a good chance of not having your gauge overfill. This chart can also be used directly as a logbook to track precipitation with your new gauge. Click on the ‘Download’ button and print out a logbook customized for your site..
Parts neededThis gauge design includes the use of standard schedule 40
PVC parts, clear PVC pipe, and the installation of a drainage valve to support ease of use and maintenance in the field. A simpler design would be to use standard schedule 40 white PVC and no valve. This would require the use of a dipstick to measure precipitation levels and also would require removing the gauge to empty it. The rest of this publication has guidance on building and using a clear PVC gauge with valve. The screened cap will work on any PVC gauge. Also, this design uses 2” PVC pipe and fittings which keep the cost relatively low (larger pipe and fittings are more expensive). Look for furniture grade or UV resistant clear PVC tubes (see Appendix A for a list of online retailers). These will last longer in direct sunlight without becoming brittle and cracking. Narrower pipe sizes can be used (e.g. 1” PVC pipe), but may be more prone to error caused by wind (see http://www.bom.gov.au/climate/cdo/about/rain-measure.shtml and Guo, James C.Y., Urbonas, Ben. and Stewart, Kevin. (2001). “Rain Catch under Wind and Vegetal Effects,” ASCE J. of Hydrologic Engineering, Vol 6, No.1, in Jan for more information on tradeoffs with gauge sizes).
Part Picture Notes2” clear schedule 40 PVC pipe (often available in 5 and 10 ft sections)
Available online through various retailers. Look for UV resistant or furniture grade for outdoor use. (See Appendix A for a list of online retailers)
Cost: ~ $7-8/foot
2” schedule 40 PVC slip cap (1 per gauge)
Available at any hardware or plumbing supply store.
Cost: ~ $1
3The University of Arizona Cooperative Extension
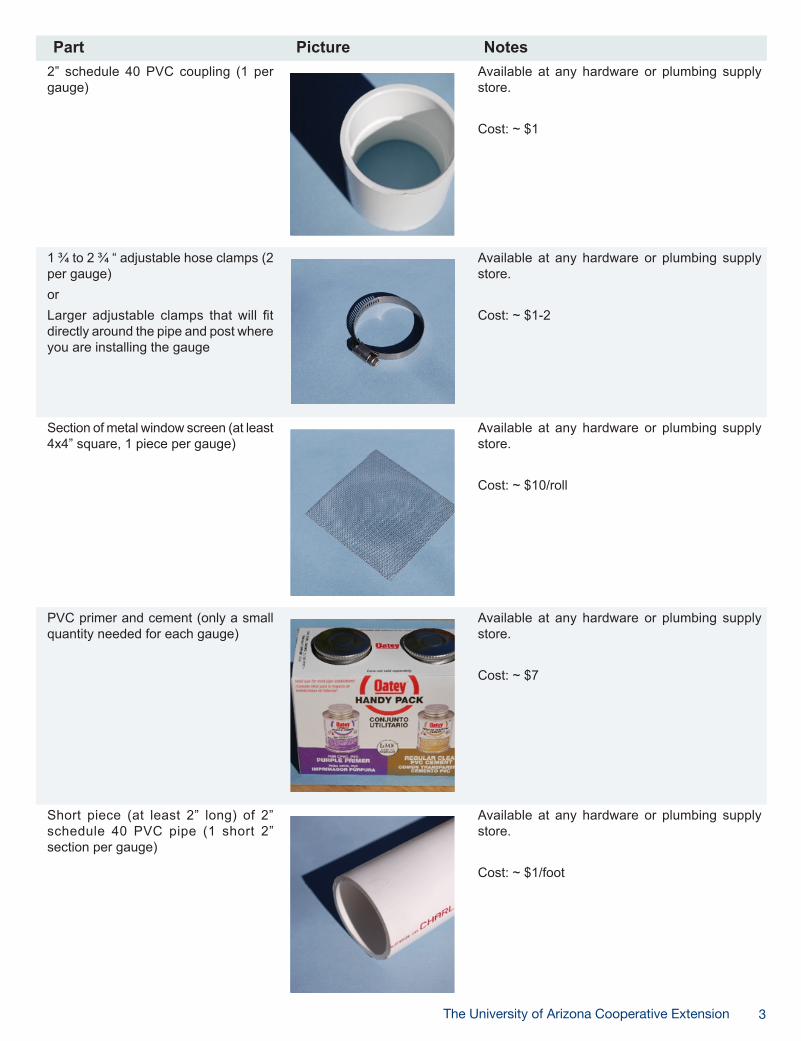
Part Picture Notes2” schedule 40 PVC coupling (1 per gauge)
Available at any hardware or plumbing supply store.
Cost: ~ $1
1 ¾ to 2 ¾ “ adjustable hose clamps (2 per gauge)orLarger adjustable clamps that will fit directly around the pipe and post where you are installing the gauge
Available at any hardware or plumbing supply store.
Cost: ~ $1-2
Section of metal window screen (at least 4x4” square, 1 piece per gauge)
Available at any hardware or plumbing supply store.
Cost: ~ $10/roll
PVC primer and cement (only a small quantity needed for each gauge)
Available at any hardware or plumbing supply store.
Cost: ~ $7
Short piece (at least 2” long) of 2” schedule 40 PVC pipe (1 short 2” section per gauge)
Available at any hardware or plumbing supply store.
Cost: ~ $1/foot

4 The University of Arizona Cooperative Extension
Part Picture Notes¼” Needle drain cock (1 per gauge)
Available at any hardware or plumbing supply store.
Cost: ~ $3
¼” by 18NPT pipe tap Available at any hardware or plumbing supply store. Size and threading match valve.
Cost: ~ $10
Aluminum yardstick ruler (or adhesive ruler, 1 per gauge)
Rulers available at any hardware or plumbing supply store. Adhesive rulers with different scales (metric, 0.1”…) are also available through different online retailers [for example see https://stop-painting.com/)Cost: ~ $5
Thread sealing tape(only short length needed per gauge)
Available at any hardware or plumbing supply store.
Cost: ~ $4
Light, household multi-purpose oil (like 3-1 Oil) or mineral oil. (1 container can be used for multiple gauges). Automatic transmission fluid (ATF) can also be used as an evaporation barrier.
Available at any hardware or plumbing supply store.
Cost: ~ $5

5The University of Arizona Cooperative Extension
A gauge 2’ high will cost roughly $30 in materials. Some of these materials can be found at reduced cost online and when purchased in bulk. Several of the parts on the list including the window screen, pipe tap, sealing tape, and PVC cement can be used to construct many gauges. Most of these parts are also readily available at hardware stores.
Tools needed▪ Hack saw that can cut PVC and metal ruler▪ Utility knife (to trim window screen)▪ Drill and 7/16” drill bit (to drill out drain hole - size
depends on tap size; use drill press if available)
▪ Socket wrench to drive pipe tap▪ Rubber mallet or hammer (to construct screened cap)▪ Marker (for marking measurements)▪ Adjustable Wrench (to tighten drain valve and hose
clamps)▪ WD40 or silicone spray (to construct screened cap)▪ File or sand paper (to clean off burrs on cut PVC)▪ Rag for cleaning off tools and parts
Gather parts and tools and find a safe and well ventilated workspace. It will take about one hour to assemble one gauge.
TOOLS NEEDED
1. Cut PVC pipe to desired length
a. Measure desired length and mark PVC with marker. Use pipe clamp make a mark around diameter of pipe. This will help you make a square cut.
b. Secure the pipe to a bench using clamps or bench vise and cut through the pipe following the mark you made around the pipe. Tip: Use two pipe clamps on either side of the cut line to guide saw to ensure straight cut
c. Use a file or some sand paper to remove the burrs around the cut.
Step 1a – Mark and cut pipe to length
2. Prepare end cap for drain valve
a. Secure end cap to work bench using clamp or bench vise or secure to drill press. Drill hole through center of end cap and clean off burrs with file or sand paper.
b. Keep end cap secured and place tap into drilled out hole. Start turning tap by hand and then use socket wrench to continue turning tap through hole. Turn all the way until threads on tap are not visible. Back out pipe tap and clean away burrs by hand, making sure not to damage newly created threads in to PVC cap.
Step 2a – Drill out drain hole
Step 2a – Create threads with tag

6 The University of Arizona Cooperative Extension
TOOLS NEEDED
3. Glue end cap to PVC pipe
a. Clean inside of end cap and end of PVC tube with a dry, clean rag making sure no burrs or debris are present where glue will be applied.
b. Dry fit the end cap to the PVC pipe to ensure snug fit. Note how far end cap covers PVC tube
c. Apply PVC primer to inside of end cap (keep away from threads in drain hole) and to outside end of PVC pipe where end cap will cover. Then apply PVC cement to all areas covered in primer. Slide end cap onto PVC pipe and turn (quarter turn) to create seal. Allow seal to cure for 15 minutes.
Step 3c – Glue end cap to PVC pipe
4. Install drain valve
a. With the valve pointing down, wrap thread sealing tape counter clockwise 5-7 times around the threads. Keep tape away from bottom valve seat to prevent interfering with seal. This thick layer of sealing tape will serve as a gasket when threaded into the gauge.
b. Hand tighten the valve into the drain hole in the end cap. Use a wrench to tighten further until the valve is fully seated against the end cap. Be careful not to overtighten with the wrench (overtightening will damage the plastic threads in the end cap).
c. Close valve, hold gauge upright and fill with some water. Check to see if valve leaks around collar. Carefully tighten until leaking stops. If leaking does not stop, remove valve and repeat steps with new thread sealing tape. More tape may be necessary to create tight seal around valve. Tip: Using thread sealing tape allows you to remove and replace the valve if necessary. The valve could also be more permanently installed and sealed using a silicone glue.
Step 4a – Wrap valve with thread sealing tape
Step 4b – Thread valve into drain hole and tighten

7The University of Arizona Cooperative Extension
TOOLS NEEDED
5. Build screened cap
a. Take white PVC pipe and measure 1 5/8th “ length. Use pipe clamps to make a straight line mark around the diameter of the tube. Cut off piece and remove burrs with file or sand paper.
b. Cut 4” by 4” square out of steel or aluminum window screen. c. Take PVC coupler and apply a light coating of lubricant like WD-40
or silicone spray using a rag to the inside of the coupler. d. Place square of window screen on 2” coupler, centering over
opening. e. Place short 1.5” PVC section on top of screen and lightly tap into
place with hammer or rubber mallet. This step is a bit tricky and may require a couple of attempts to seat the pipe into the coupler. Go slowly to prevent tearing the screen as the pipe piece is pounded into place.
f. Once the PVC pipe is fully seated, trim excess screen using utility knife.
g. PVC piece is slightly longer than coupler and is intended to stick up slightly above opening to prevent rain drops from splashing into gauge.
Step 5e – Tap PVC section into coupler
Step 5f – Trim excess using utility knife
6. Secure ruler to gauge
a. Cut ruler to length of exposed PVC on gauge above glued end cap and just below where screened end cap will slide on. Use hacksaw for steel ruler cut to appropriate length
b. Hold cut ruler to side of gauge and slide two pipe clamps over pipe and ruler. Tighten to secure ruler.
c. Pipe clamps also serve as means to wire gauge to fence posts in field installations.
7. Test gauge for leaks
a. Wrap some baling wire around the pipe clamp to make hook for hanging the gauge.
b. Hang the gauge on a wall in your workshop or on a fence outside, fill the gauge up at least half way with water and leave to sit for at least an hour. Mark the level of the water with a piece of tape for reference.
c. After sitting for some time, check to see if the water level has dropped below the level of the tape. Check the gauge for leaks around the glued seam between slip cap and pipe and also around the valve. If a leak forms around the glued cap, it is best to saw this section off and start over by gluing a new cap on. If the valve is leaking, remove it and clean off the existing thread sealing tape. Re-wrap the valve with a thicker layer and reinstall. Check for leaks again.
8 The University of Arizona Cooperative Extension
Installing gauge1. Survey intended gauge location and try to find a spot
that is relatively open and away from trees and other overhanging obstructions (like telephone poles and/or wires) that could impact precipitation accumulations.
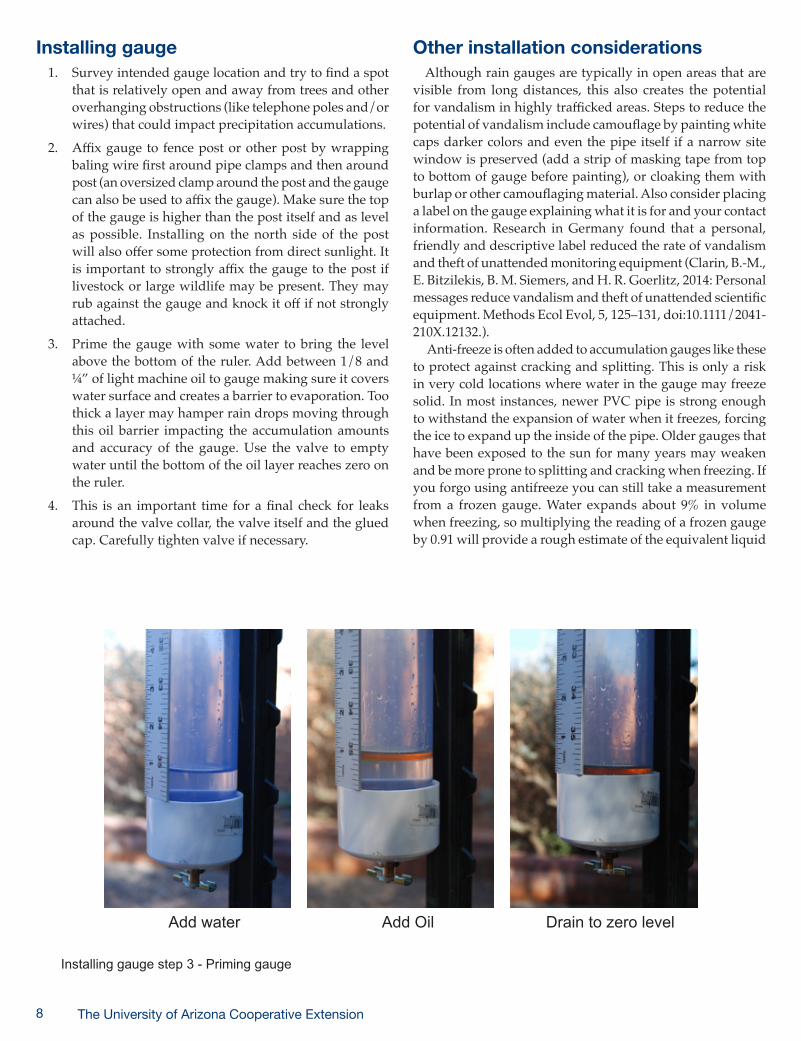
2. Affix gauge to fence post or other post by wrapping baling wire first around pipe clamps and then around post (an oversized clamp around the post and the gauge can also be used to affix the gauge). Make sure the top of the gauge is higher than the post itself and as level as possible. Installing on the north side of the post will also offer some protection from direct sunlight. It is important to strongly affix the gauge to the post if livestock or large wildlife may be present. They may rub against the gauge and knock it off if not strongly attached.
3. Prime the gauge with some water to bring the level above the bottom of the ruler. Add between 1/8 and ¼” of light machine oil to gauge making sure it covers water surface and creates a barrier to evaporation. Too thick a layer may hamper rain drops moving through this oil barrier impacting the accumulation amounts and accuracy of the gauge. Use the valve to empty water until the bottom of the oil layer reaches zero on the ruler.
4. This is an important time for a final check for leaks around the valve collar, the valve itself and the glued cap. Carefully tighten valve if necessary.
Other installation considerationsAlthough rain gauges are typically in open areas that are
visible from long distances, this also creates the potential for vandalism in highly trafficked areas. Steps to reduce the potential of vandalism include camouflage by painting white caps darker colors and even the pipe itself if a narrow site window is preserved (add a strip of masking tape from top to bottom of gauge before painting), or cloaking them with burlap or other camouflaging material. Also consider placing a label on the gauge explaining what it is for and your contact information. Research in Germany found that a personal, friendly and descriptive label reduced the rate of vandalism and theft of unattended monitoring equipment (Clarin, B.-M., E. Bitzilekis, B. M. Siemers, and H. R. Goerlitz, 2014: Personal messages reduce vandalism and theft of unattended scientific equipment. Methods Ecol Evol, 5, 125–131, doi:10.1111/2041-210X.12132.).
Anti-freeze is often added to accumulation gauges like these to protect against cracking and splitting. This is only a risk in very cold locations where water in the gauge may freeze solid. In most instances, newer PVC pipe is strong enough to withstand the expansion of water when it freezes, forcing the ice to expand up the inside of the pipe. Older gauges that have been exposed to the sun for many years may weaken and be more prone to splitting and cracking when freezing. If you forgo using antifreeze you can still take a measurement from a frozen gauge. Water expands about 9% in volume when freezing, so multiplying the reading of a frozen gauge by 0.91 will provide a rough estimate of the equivalent liquid
Installing gauge step 3 - Priming gauge
Add water Add Oil Drain to zero level

9The University of Arizona Cooperative Extension
Rain gauge for range monitoring please do not disturb - Please contact me if you have any
questions and would like to know more:
Name/phone number
_____________________________________
level. If the gauge is full of snow, then it is necessary to wait until all of the frozen precipitation melts to get an accurate precipitation reading.
If you use antifreeze to protect your gauge try and use a non-toxic formulation. Antifreeze formulations containing ethylene glycol are toxic and can be harmful to animals and wildlife if the gauge leaks or is tipped over and emptied on the ground. Antifreeze containing propylene glycol which is non-toxic and biodegradable can be found auto parts and hardware stores. A concentrated form (look for 100% and not pre-mixed 50/50 formulations) of this type of antifreeze can be used to charge the gauge and will help prevent freezing. Consider resetting and charging the gauge in the fall with antifreeze before the winter season. The antifreeze will dilute as precipitation accumulates in the gauge, but should still be concentrated enough to protect from freezing. The amount of antifreeze ultimately needed will be a function of how much precipitation is expected during the winter season and how cold the temperatures may ultimately reach.
Using the gaugeNo rain gauge is perfect and this gauge design is no
exception. All rain gauges are prone to error which is typically expressed in lower than actually occurring total precipitation amounts. Some sources of error include (Brock and Richardson, 2001: Meteorological Measurement Systems. Oxford University Press, New York, 290 p.):
▪ Wind: Wind can cause ‘undercatch’ where drops are blown across the opening of the gauge erratically during precipitation events.
▪ Splash out: Large drops can strike the top of the cap and splash out rather than in. The slightly raised PVC collar on the screened cap is designed to minimize this impact.
▪ Wetting and Evaporation: Drops from light precipitation events can be caught up in the screen in the cap and along the sides of the gauge. If these drops don’t accumulate below the oil layer, they will most likely evaporate in between rain events and won’t contribute to the total. Adding a simple plastic funnel to the top
of the gauge below the cap can help guide drops away from the sides, improving the collection of the rain water. See Appendix B for instructions on how to build a funnel for a 2 inch PVC gauge.
▪ Snow: Snow and its liquid water contribution to running precipitation totals is notoriously difficult to measure. Removing the screened cap in the winter will allow some but most likely not all snow to accumulate in the gauge. This snow will eventually melt and accumulate below the oil layer, but will most likely be only fraction of the total snow that fell over the measurement period. (Note: A frozen gauge will read higher than the liquid amount, wait until the gauge is completely thawed to get an accurate reading)
Even with these potential sources of error the precipitation data afforded by these gauges provide a better representation of the local site than estimates based on gauges located some distance away.
Logging observationsReading this clear PVC accumulation gauge is simple, just
note the level of the water at the bottom of the oil layer when visiting the gauge. Note this observation in a field book with date and any other observations of field conditions that may be useful in interpreting this precipitation amount at a later time. The observation that you log will grow over time until the gauge is reset by emptying it to a zero level. Subtract subsequent observations from each other to get the total precipitation that occurred between the observation dates. More frequent observations will give you more insight into the timing and frequency of precipitation events. Set up a schedule to visit gauges and log observations that match key decision points in your management schedule (e.g. grazing rotations, water availability in tanks, etc.).
Several tools exist to help manage accumulation gauge type data.
▪ The Precipitation Logbook Generator (https://goo.gl/JswZJJ) allows you to create a printable logbook with reference climate information for any gauge location in the continental U.S..
▪ The myRAINge web application (https://myraingelog.arizona.edu) allows you to manage data for multiple gauges in the field with reference climate information, precipitation alerts, and summary tools.
MaintenanceThe materials used in these gauges are very durable
and should last many years, but they may require some maintenance from time to time. The screened top will need to be inspected regularly to clear out debris that has accumulated. Also, having spare parts to repair damage that may occur from vandalism or wear and tear is a good idea when visiting a gauge. Some spare parts to have on hand include:
10 The University of Arizona Cooperative Extension
▪ Thread sealing tape and spare valve in case the existing one is leaking; silicone grease in case valve is sticky
▪ Spare screened cap (built earlier) if the existing one is missing or damaged
▪ Replacement ruler in case existing one is damaged▪ Baling wire to reattach gauge if it is has fallen off post▪ Water (and/or antifreeze) and oil to reset a gauge
The clear PVC tube may need to be cleaned out after several years if it is difficult to read. A long handled brush and some soapy water will clean out the inside of the tube. Bring additional baling wire as well to reattach the gauge if removed.
ContributorsRangeland Precipitation Monitoring Working Group
consisting of members of the Gila County Cattle Growers Association, ranchers with permits on the Tonto National Forest and staff with the U.S. Forest Service-Tonto National Forest.
AcknowledgementsSpecial thanks to D. Crimmins for help in constructing rain
gauges, T. Crimmins for photographing steps in construction process and B. Benne, R. Tanner, and M. Hemovich for providing initial project ideas and guidance and K. Wolff-Krauter for providing feedback and testing of initial gauge design. Funding provided by Western Extension Risk Management Education program.
Appendix A: Clear PVC SuppliersClear PVC pipes are not readily available at most hardware
or plumbing stores. They can be found online through different distributors. Look for schedule 40 pipe dimensions to ensure that standard PVC fittings will work and ‘furniture grade’ or ‘UV resistant’ to ensure it is durable for outdoor use. A web search will yield many different distributors including:
▪ https://www.clearpvcpipe.com/▪ http://www.usplastic.com/▪ https://flexpvc.com/▪ https://formufit.com/

11The University of Arizona Cooperative Extension
Appendix B: Do-it-yourself plastic funnel for 2” PVC Rain Gauge
A small plastic funnel that fits inside the PVC gauge underneath the cap can be made using a thin, flexible sheet of plastic and the template below. This funnel will help guide drops to the bottom of the gauge below the thin oil evaporation barrier, helping to minimize evaporative losses that occur
when drops stick to the side of the gauge. Overall, this should help improve the accuracy of your gauge by capturing more rain drops falling during precipitation events.
Materials needed: printer, thin sheet of plastic (plastic poster board from craft store, plastic folder from office supply store, plastic milk jug…), hard stock cardboard like from cereal box, and strong adhesive like Krazy Glue.
Instructions:
1. Print out this page at full size and cut out template below2. Glue the template to a piece of hard stock cardboard and trim to edge of
template. This will create firm template you can tracearound.3. Place the template on the plastic sheet, trace and cut out. Mark line B on the
plastic piece.4. Roll the cut out plastic piece into a funnel by aligning line A with line B (on
template below). Glue the ends in place by placing a thin bead of adhesive down the length of the overlapping ‘glue here’ area.
5. Let the glue set and the funnel is ready to be placed in the gauge. Plastic will break down over time, periodically inspect the funnel and replace when necessary.
This template will create a 2” deep funnel that is 2-1/8th “ wide at the top with a ¼” opening at the bottom. Template was generated www.blocklayer.com/cone-patternseng.aspx

12 The University of Arizona Cooperative Extension
The UniversiTy of ArizonACollege of AgriCUlTUre And life sCienCesTUCson, ArizonA 85721
MiChAel A. CriMMins Associate Professor & Extension Specialist - Climate ScienceDepartment of Soil, Water, & Environmental Sciences
MiTChel MCClArAn Director for Research, Santa Rita Experiment Range
JUlie BrUgger Research Scientist, School of Natural Resources and the Environment
Ashley hAll Area Assistant Agent, Agriculture and Natural Resources
doUglAs Tolleson Associate Extension Specialist & Research Scientist
ConTACT:MiChAel A. [email protected] (520)626-4244 fax (520)621-1647
This information has been reviewed by University faculty.extension.arizona.edu/pubs/az1747-2017.pdfOther titles from Arizona Cooperative Extension can be found at:extension.arizona.edu/pubs
Any products, services or organizations that are mentioned, shown or indirectly implied in this publication do not imply endorsement by The University of Arizona.
Issued in furtherance of Cooperative Extension work, acts of May 8 and June 30, 1914, in cooperation with the U.S. Department of Agriculture, Jeffrey C. Silvertooth, Associate Dean & Director, Extension & Economic Development, College of Agriculture Life Sciences, The University of Arizona.
The University of Arizona is an equal opportunity, affirmative action institution. The University does not discriminate on the basis of race, color, religion, sex, national origin, age, disability, veteran status, or sexual orientation in its programs and activities.