Embed Size (px)
Citation preview
Disk Imaging with KnoppixIntroductionThis document explains how to use the CD-ROM bootable version of Linux, named Knoppix, to makeand restore images of computer hard drives.
Knoppix makes a very good system recovery tool for these reasons:
• It boots a graphical environment in as little as 128 MB of RAM and works with almost any PChardware. Smaller configurations down to 64 MB can use command line mode if necessary (howeverwe won't cover command line imaging).
• Even if you don't have an image, it is good at recovery of damaged hard drives allowing you to copythe data to another network drive.
• It is free open source software.
Knoppix has the following drawbacks:
• It is somewhat intimidating to use because most operations are from the command line.
• You must shut the computer down to perform an image.
• It is not very easy to write an image to a CD-R drive unless you do it later from the networked drivewhere it was saved.
• The Windows NTFS file system support is experimental, but this is not a real problem because theexperimental part is the ability to write files and not the image. The partimage program giveswarnings that are not really as serious as they sound.
The new Norton Ghost Version 9 imaging program offers these advantages over Knoppix:
• Images can be made while the computer is running Windows.
• There are more options for making images and the interface is easier to use.
However, Norton Ghost has the following disadvantages:
• Recovery requires a computer with at least 256 MB of RAM and supported hardware.
• The .NET environment, used by the runtime Ghost program, requires at least 512 MB of RAM to runsmoothly.
• If the computer won't run Windows, an image can't be made and files can't be recovered.
• While open files can be imaged, their copy on the image may contain corrupt data. It is necessary toshut down database servers and other applications with open files when making the image to avoidcorruption of data. This is also a problem when using other backup software that supports open filebackups and is a limitation of Windows.
01/20/05 Copyright © 2005, Ventek, Inc. Page 1 of 23
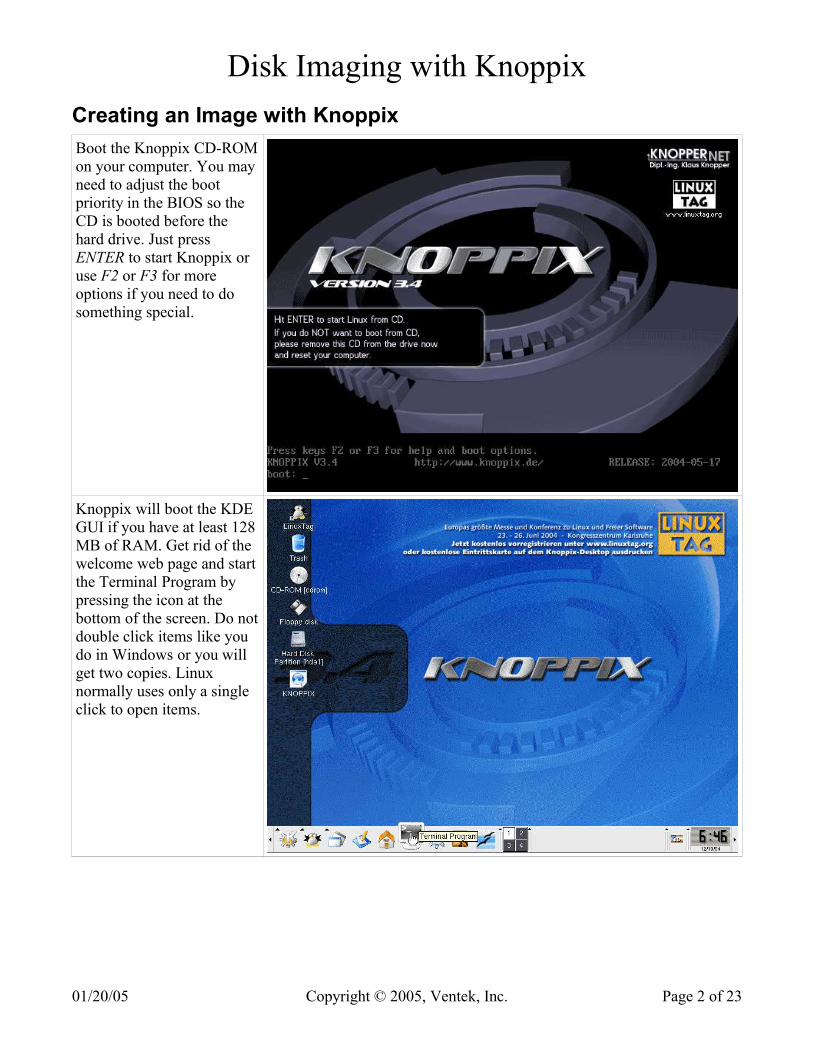
Disk Imaging with KnoppixCreating an Image with KnoppixBoot the Knoppix CD-ROMon your computer. You mayneed to adjust the bootpriority in the BIOS so theCD is booted before thehard drive. Just pressENTER to start Knoppix oruse F2 or F3 for moreoptions if you need to dosomething special.
Knoppix will boot the KDEGUI if you have at least 128MB of RAM. Get rid of thewelcome web page and startthe Terminal Program bypressing the icon at thebottom of the screen. Do notdouble click items like youdo in Windows or you willget two copies. Linuxnormally uses only a singleclick to open items.
01/20/05 Copyright © 2005, Ventek, Inc. Page 2 of 23
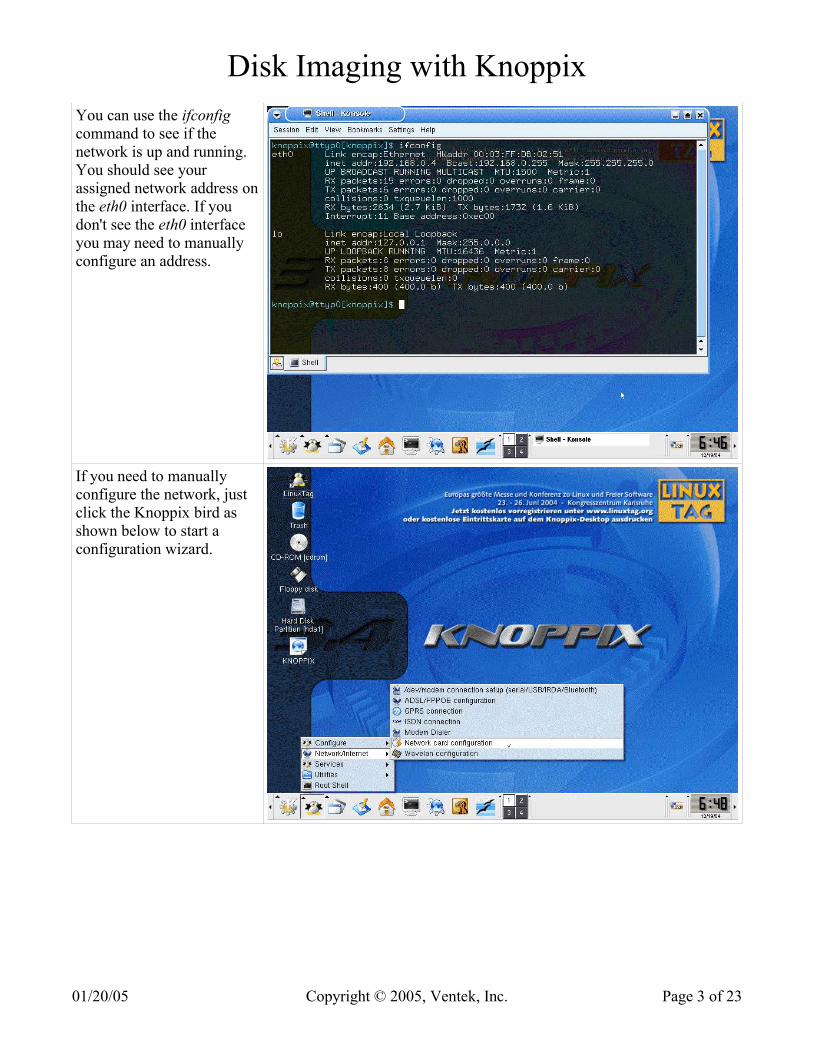
Disk Imaging with KnoppixYou can use the ifconfigcommand to see if thenetwork is up and running.You should see yourassigned network address onthe eth0 interface. If youdon't see the eth0 interfaceyou may need to manuallyconfigure an address.
If you need to manuallyconfigure the network, justclick the Knoppix bird asshown below to start aconfiguration wizard.
01/20/05 Copyright © 2005, Ventek, Inc. Page 3 of 23
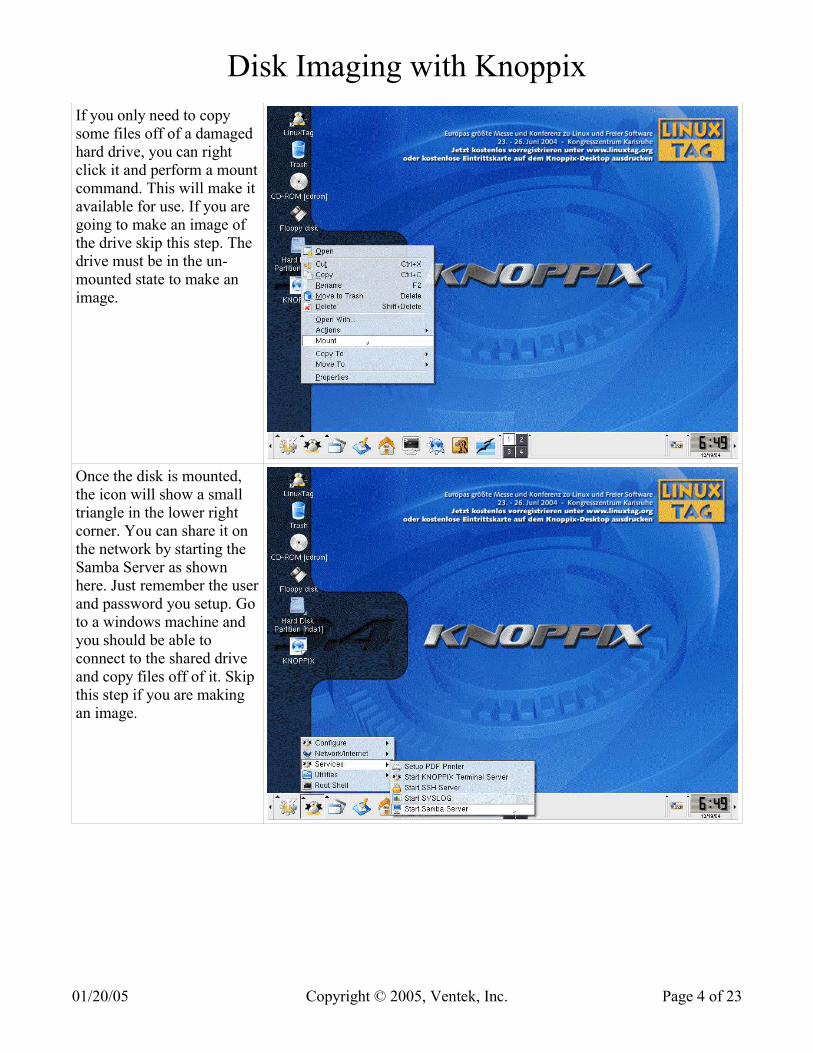
Disk Imaging with KnoppixIf you only need to copysome files off of a damagedhard drive, you can rightclick it and perform a mountcommand. This will make itavailable for use. If you aregoing to make an image ofthe drive skip this step. Thedrive must be in the un-mounted state to make animage.
Once the disk is mounted,the icon will show a smalltriangle in the lower rightcorner. You can share it onthe network by starting theSamba Server as shownhere. Just remember the userand password you setup. Goto a windows machine andyou should be able toconnect to the shared driveand copy files off of it. Skipthis step if you are makingan image.
01/20/05 Copyright © 2005, Ventek, Inc. Page 4 of 23
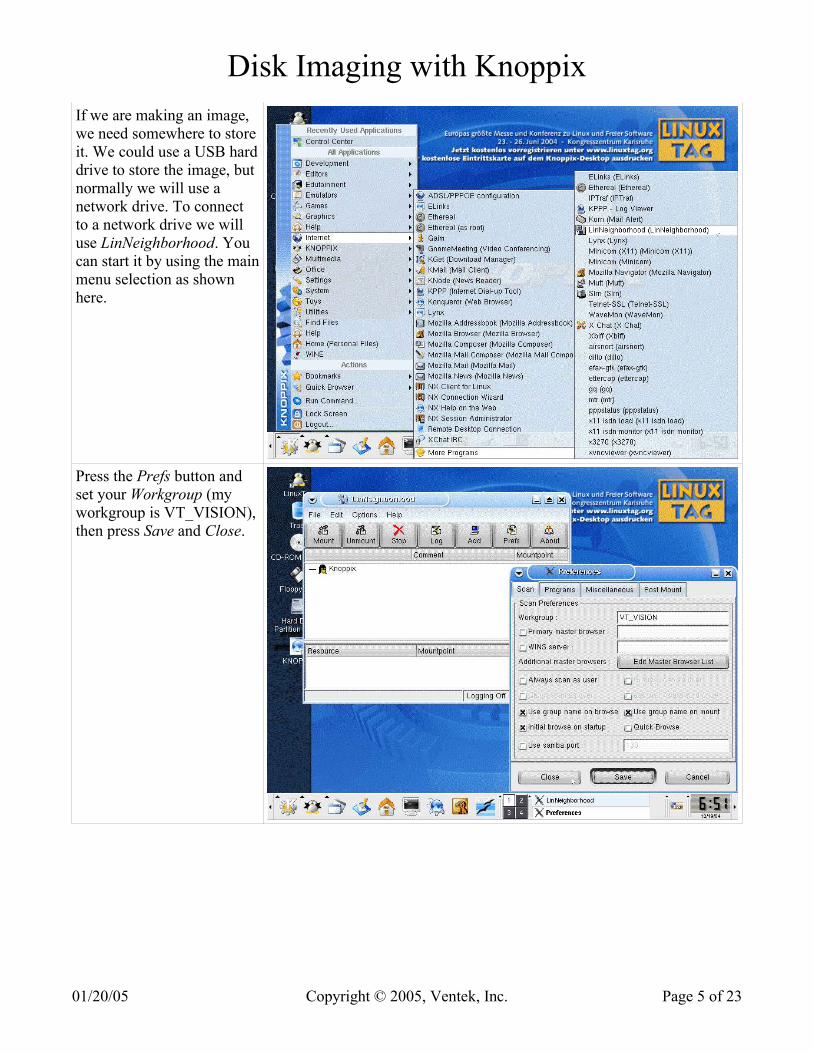
Disk Imaging with KnoppixIf we are making an image,we need somewhere to storeit. We could use a USB harddrive to store the image, butnormally we will use anetwork drive. To connectto a network drive we willuse LinNeighborhood. Youcan start it by using the mainmenu selection as shownhere.
Press the Prefs button andset your Workgroup (myworkgroup is VT_VISION),then press Save and Close.
01/20/05 Copyright © 2005, Ventek, Inc. Page 5 of 23

Disk Imaging with KnoppixRight click the Knoppixitem and select rescangroups.
This should open yourgroup. Right click it andagain select rescan group.
01/20/05 Copyright © 2005, Ventek, Inc. Page 6 of 23

Disk Imaging with KnoppixThis should show thecomputers in yourworkgroup. If you haveproblems getting this far,you can press the Log buttonto show the actualcommands being issued andany errors they return.
Right click the computeryou want to store the imagefile on and select scan asuser.
You will need to enter yourWindows user name andpassword or you will not beable to access the shares.
01/20/05 Copyright © 2005, Ventek, Inc. Page 7 of 23
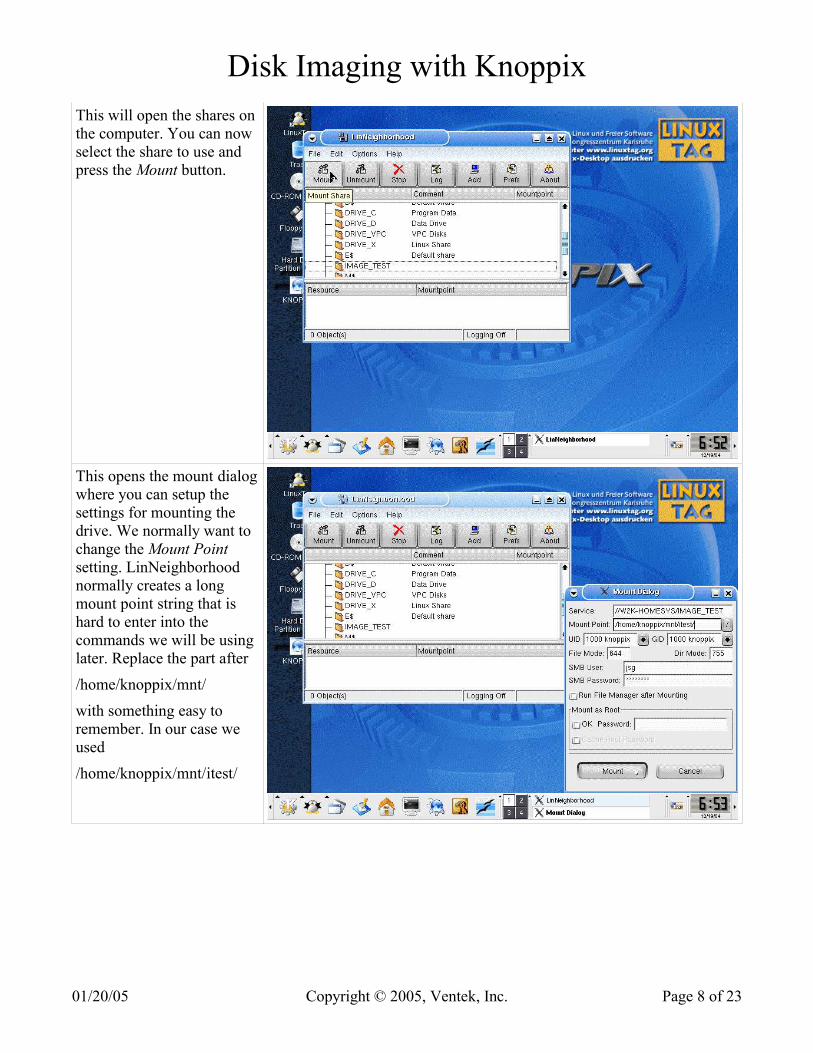
Disk Imaging with KnoppixThis will open the shares onthe computer. You can nowselect the share to use andpress the Mount button.
This opens the mount dialogwhere you can setup thesettings for mounting thedrive. We normally want tochange the Mount Pointsetting. LinNeighborhoodnormally creates a longmount point string that ishard to enter into thecommands we will be usinglater. Replace the part after
/home/knoppix/mnt/
with something easy toremember. In our case weused
/home/knoppix/mnt/itest/
01/20/05 Copyright © 2005, Ventek, Inc. Page 8 of 23

Disk Imaging with KnoppixThe drive is now mounted.We can click the PersonalFiles button to open a fileexplorer to see if thenetwork drive is working.
This puts you in your homeuser knoppix folder.
01/20/05 Copyright © 2005, Ventek, Inc. Page 9 of 23

Disk Imaging with KnoppixOpen the mnt folder and youcan see your network drive.
If we mounted our harddrive as shown before, wecould now copy files to thenetwork drive. You need toopen up the hard drive inanother file explorerwindow or press the RootFolder button on the lowerleft to get at the files. Yournetwork drive is now in thehome folder. The Linux filestructure can be a littleconfusing at first, butshouldn't be too hard tofigure out. Just forget aboutthe DOS drives used inWindows.
01/20/05 Copyright © 2005, Ventek, Inc. Page 10 of 23

Disk Imaging with KnoppixTo perform a disk image, wewill use the consolewindow. Press the Terminalbutton below to get into aconsole. Use the sucommand to obtain rootprivileges. We can use fdiskto check our partitionssimilar to using it underDOS. However, be carefulas the commands areslightly different. It is bestto image the drive before wetry to mess it up.
We will use the commandline version of partimagebecause it is easy to type thesetup parameters on thecommand line. Theparameters are explainedbelow.
partimage Starts the partimage program.-z1 Specifies gzip compression of the image.-d Avoids having to enter a description.save Specifies to save an image.
01/20/05 Copyright © 2005, Ventek, Inc. Page 11 of 23
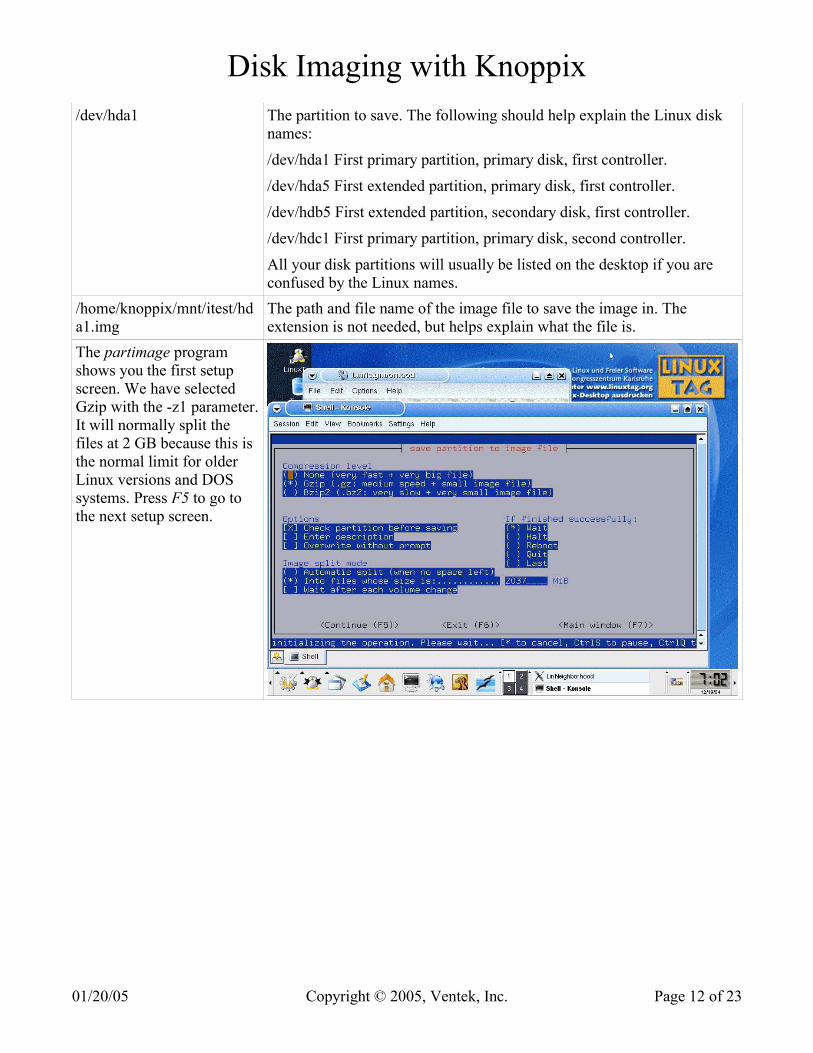
Disk Imaging with Knoppix/dev/hda1 The partition to save. The following should help explain the Linux disk
names:
/dev/hda1 First primary partition, primary disk, first controller.
/dev/hda5 First extended partition, primary disk, first controller.
/dev/hdb5 First extended partition, secondary disk, first controller.
/dev/hdc1 First primary partition, primary disk, second controller.
All your disk partitions will usually be listed on the desktop if you areconfused by the Linux names.
/home/knoppix/mnt/itest/hda1.img
The path and file name of the image file to save the image in. Theextension is not needed, but helps explain what the file is.
The partimage programshows you the first setupscreen. We have selectedGzip with the -z1 parameter.It will normally split thefiles at 2 GB because this isthe normal limit for olderLinux versions and DOSsystems. Press F5 to go tothe next setup screen.
01/20/05 Copyright © 2005, Ventek, Inc. Page 12 of 23
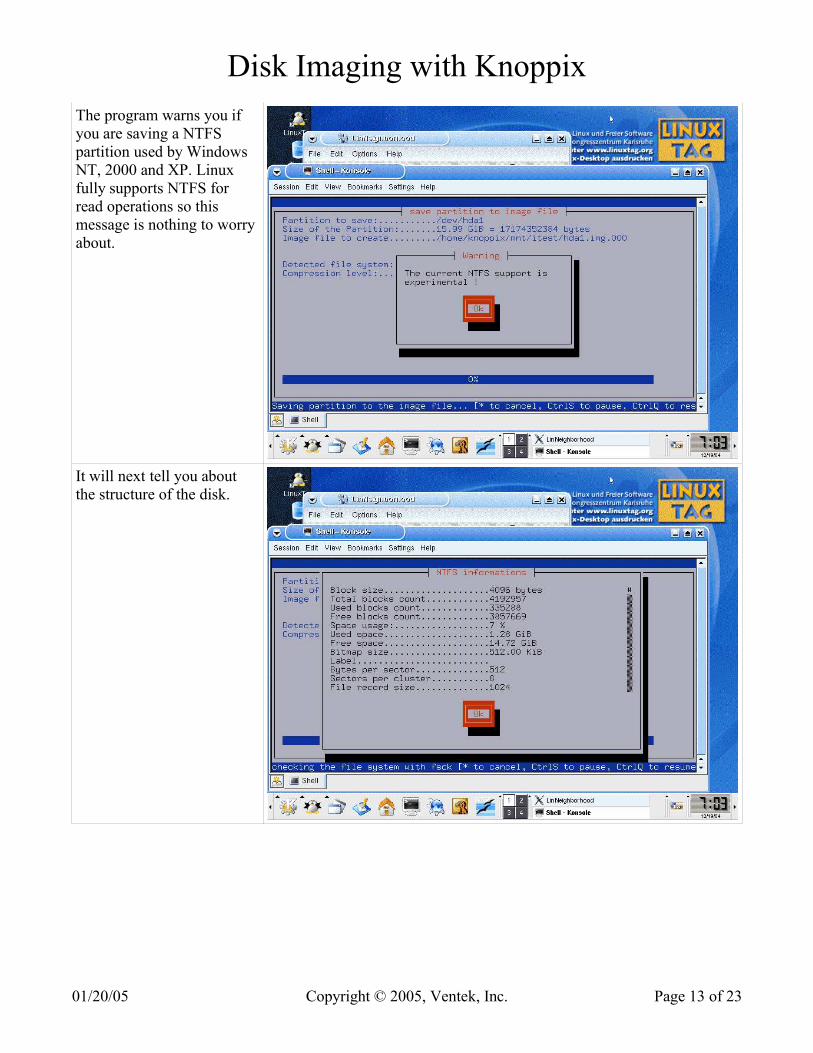
Disk Imaging with KnoppixThe program warns you ifyou are saving a NTFSpartition used by WindowsNT, 2000 and XP. Linuxfully supports NTFS forread operations so thismessage is nothing to worryabout.
It will next tell you aboutthe structure of the disk.
01/20/05 Copyright © 2005, Ventek, Inc. Page 13 of 23
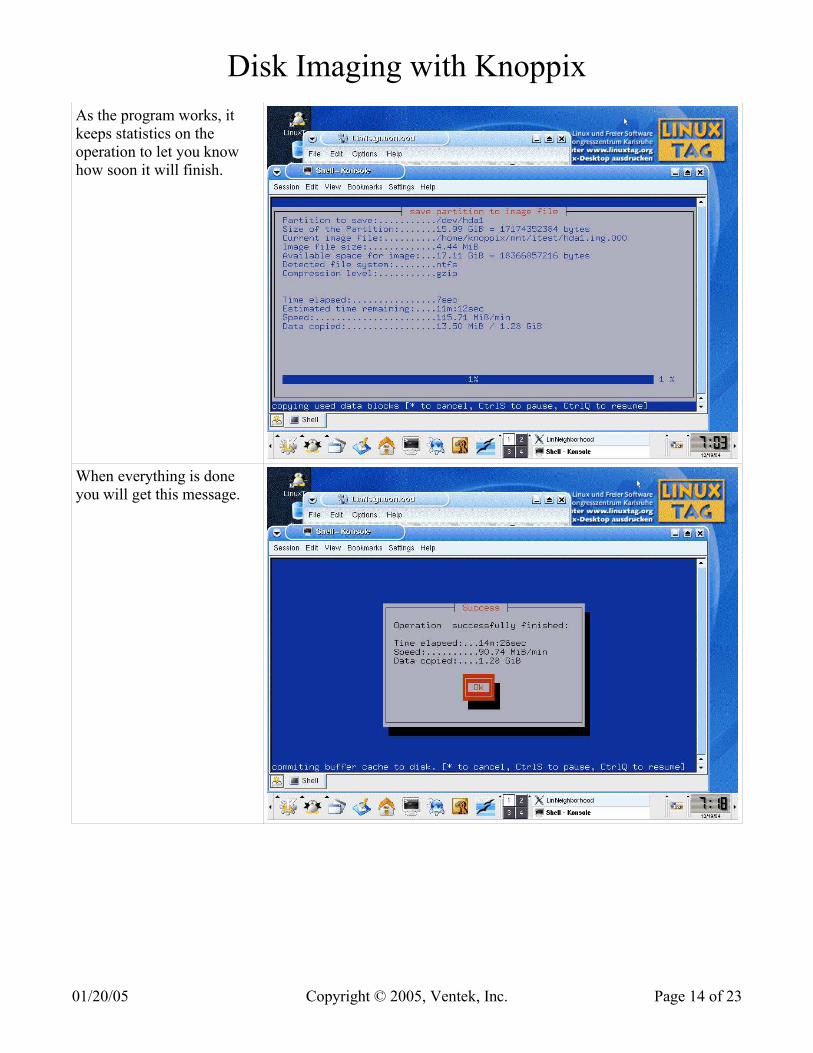
Disk Imaging with KnoppixAs the program works, itkeeps statistics on theoperation to let you knowhow soon it will finish.
When everything is doneyou will get this message.
01/20/05 Copyright © 2005, Ventek, Inc. Page 14 of 23
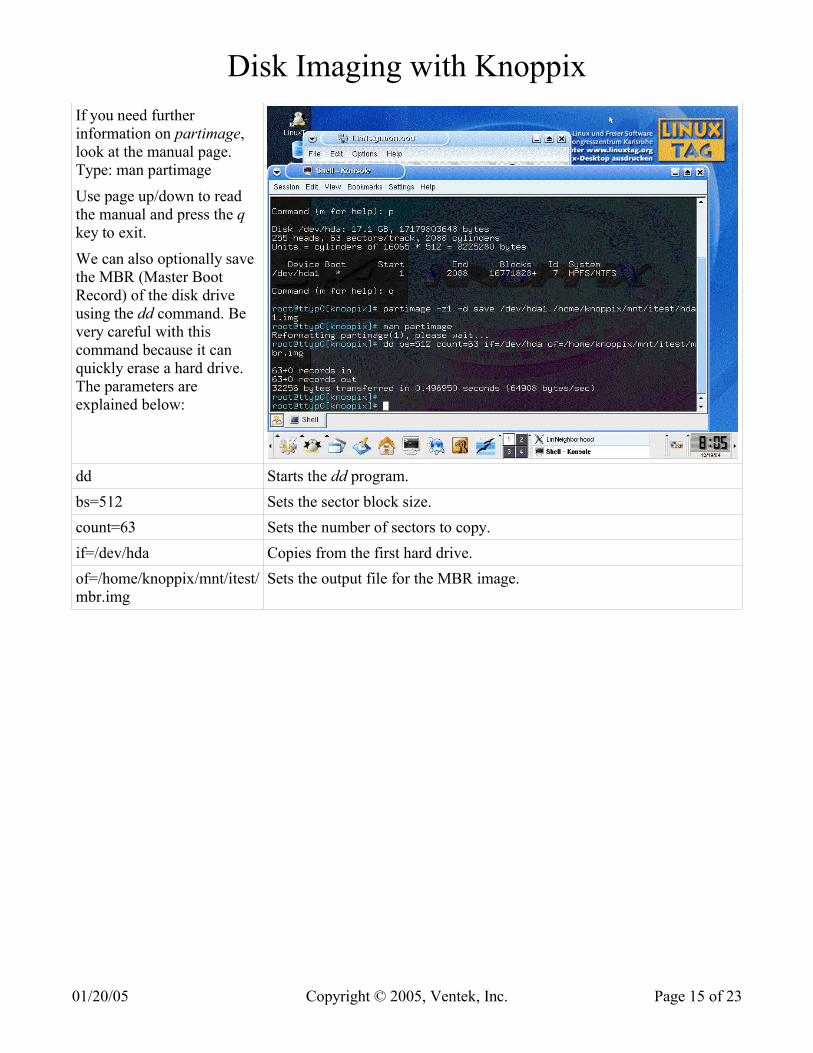
Disk Imaging with KnoppixIf you need furtherinformation on partimage,look at the manual page.Type: man partimage
Use page up/down to readthe manual and press the qkey to exit.
We can also optionally savethe MBR (Master BootRecord) of the disk driveusing the dd command. Bevery careful with thiscommand because it canquickly erase a hard drive.The parameters areexplained below:
dd Starts the dd program.bs=512 Sets the sector block size.count=63 Sets the number of sectors to copy.if=/dev/hda Copies from the first hard drive.of=/home/knoppix/mnt/itest/mbr.img
Sets the output file for the MBR image.
01/20/05 Copyright © 2005, Ventek, Inc. Page 15 of 23
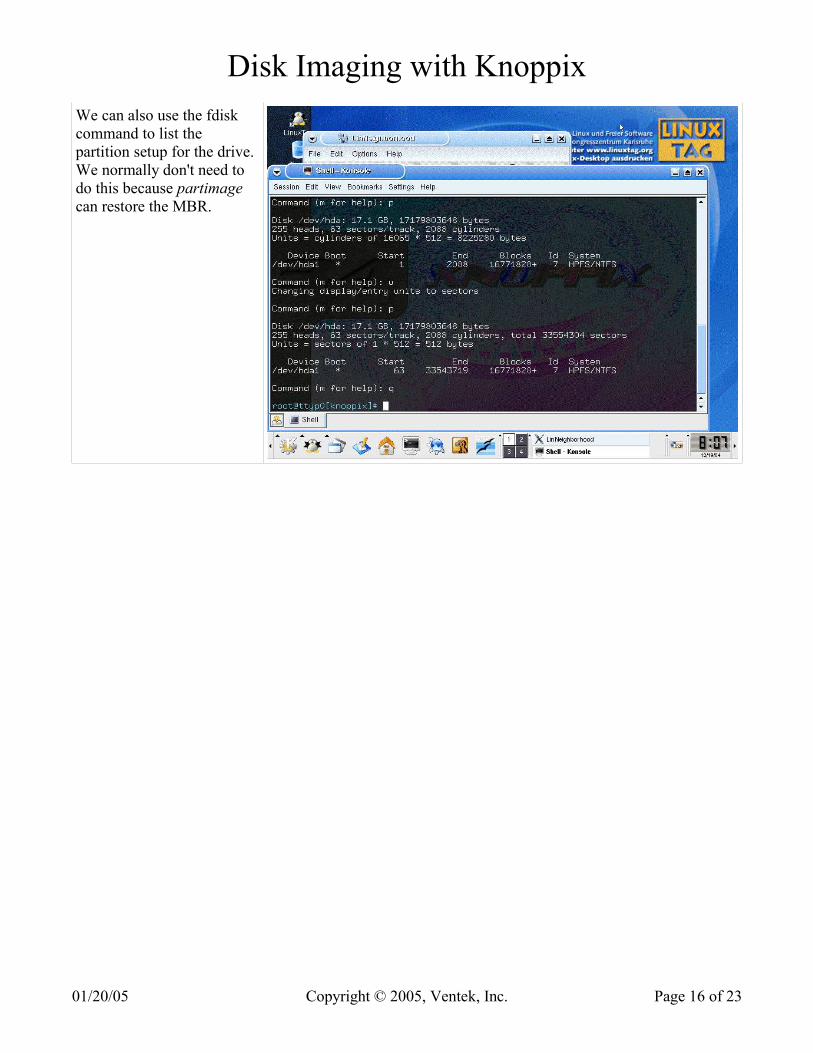
Disk Imaging with KnoppixWe can also use the fdiskcommand to list thepartition setup for the drive.We normally don't need todo this because partimagecan restore the MBR.
01/20/05 Copyright © 2005, Ventek, Inc. Page 16 of 23
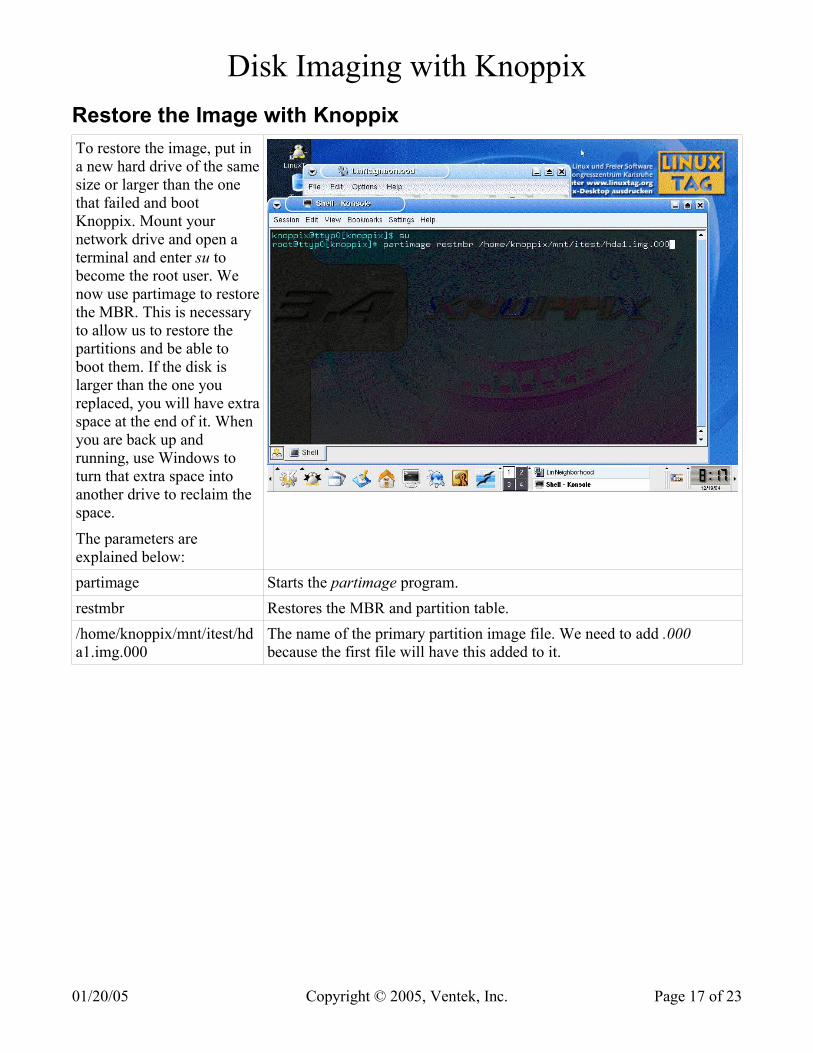
Disk Imaging with KnoppixRestore the Image with KnoppixTo restore the image, put ina new hard drive of the samesize or larger than the onethat failed and bootKnoppix. Mount yournetwork drive and open aterminal and enter su tobecome the root user. Wenow use partimage to restorethe MBR. This is necessaryto allow us to restore thepartitions and be able toboot them. If the disk islarger than the one youreplaced, you will have extraspace at the end of it. Whenyou are back up andrunning, use Windows toturn that extra space intoanother drive to reclaim thespace.
The parameters areexplained below:partimage Starts the partimage program.restmbr Restores the MBR and partition table./home/knoppix/mnt/itest/hda1.img.000
The name of the primary partition image file. We need to add .000because the first file will have this added to it.
01/20/05 Copyright © 2005, Ventek, Inc. Page 17 of 23
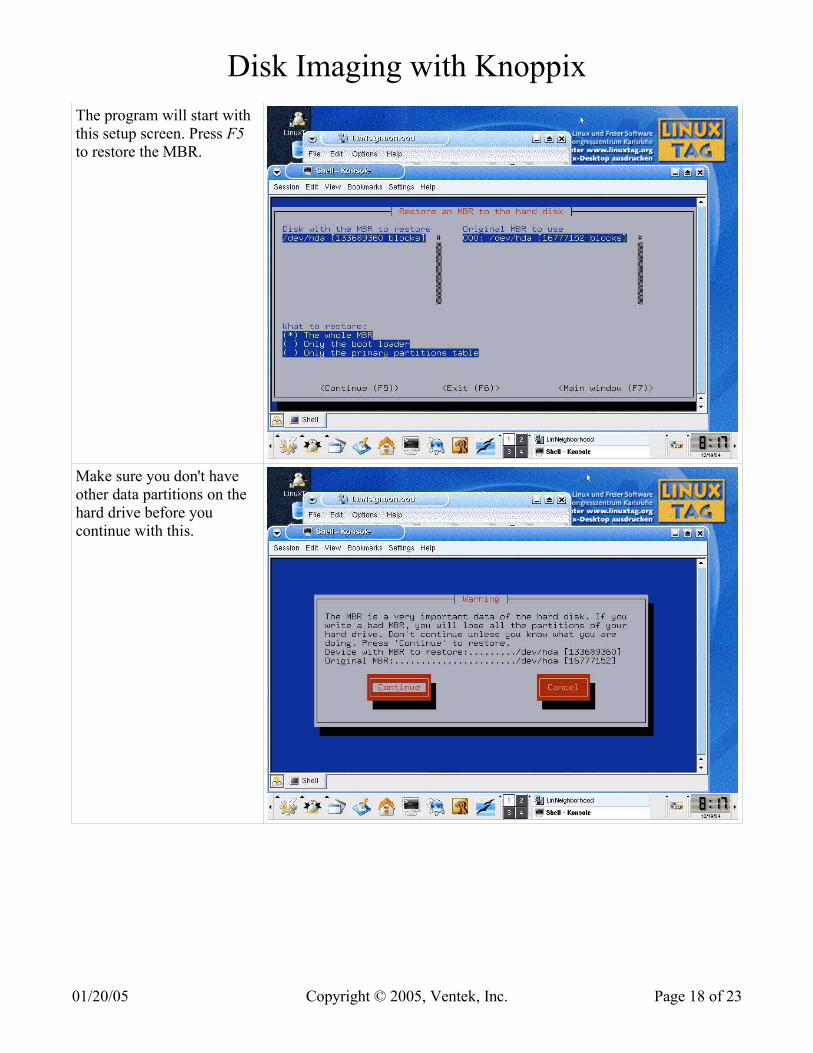
Disk Imaging with KnoppixThe program will start withthis setup screen. Press F5to restore the MBR.
Make sure you don't haveother data partitions on thehard drive before youcontinue with this.
01/20/05 Copyright © 2005, Ventek, Inc. Page 18 of 23
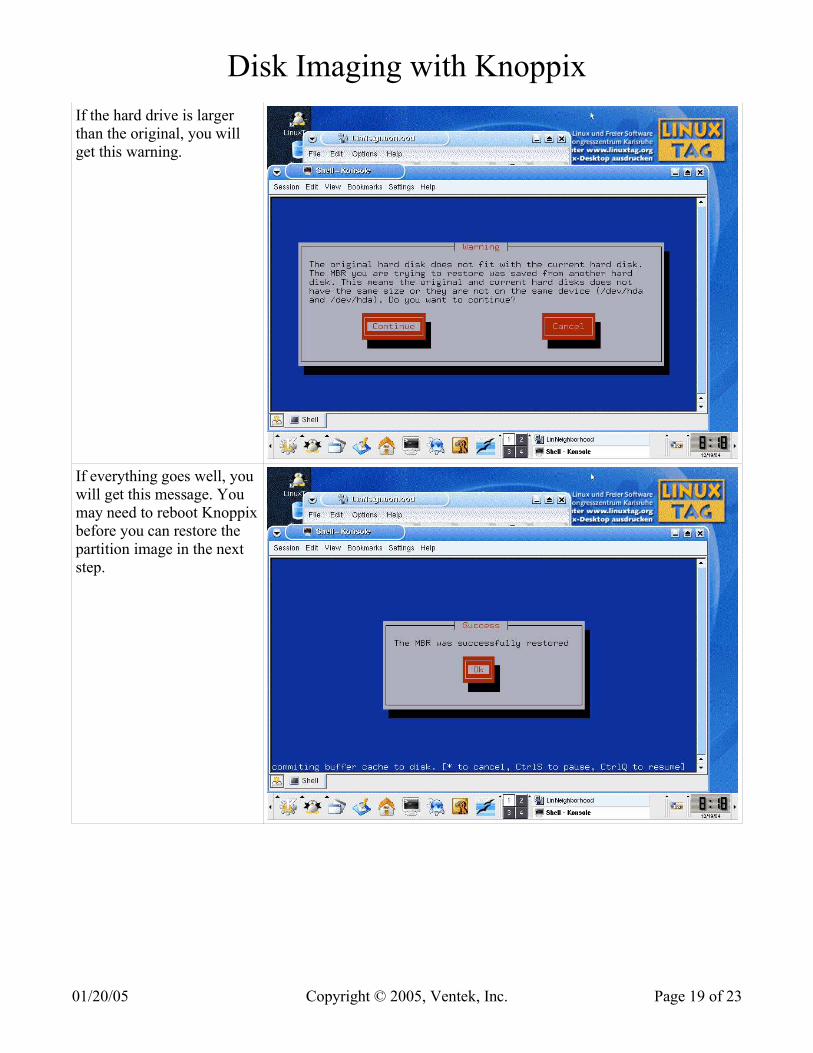
Disk Imaging with KnoppixIf the hard drive is largerthan the original, you willget this warning.
If everything goes well, youwill get this message. Youmay need to reboot Knoppixbefore you can restore thepartition image in the nextstep.
01/20/05 Copyright © 2005, Ventek, Inc. Page 19 of 23
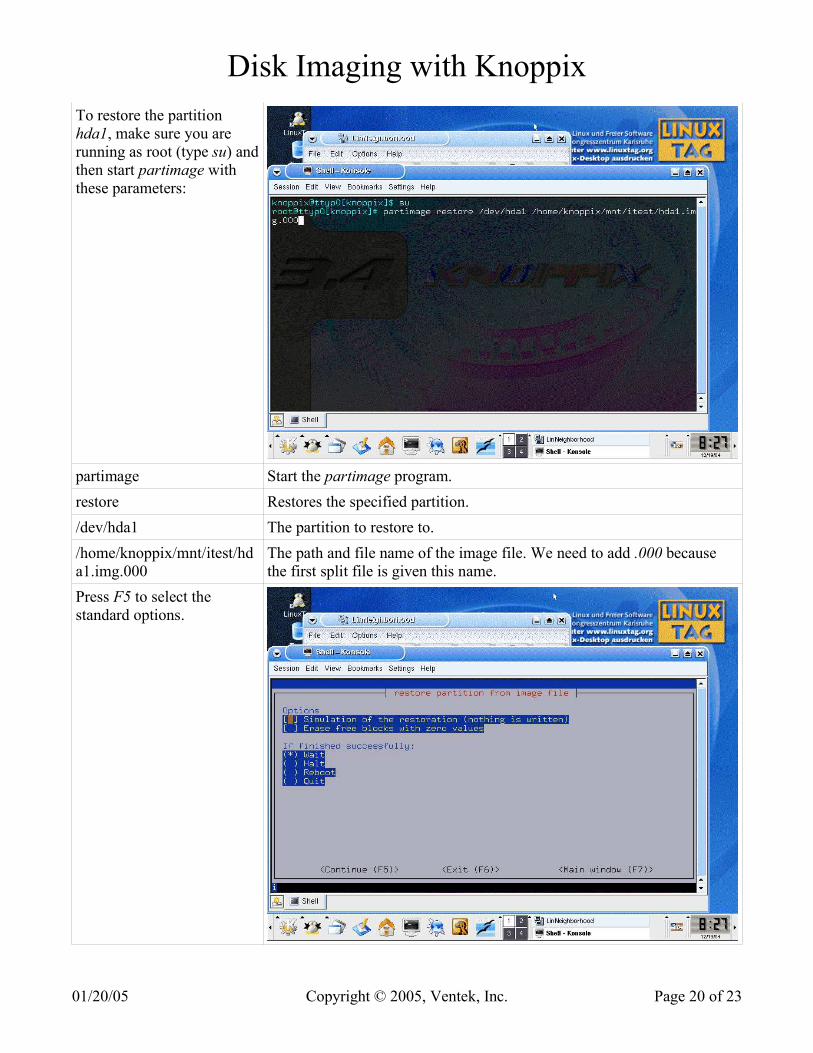
Disk Imaging with KnoppixTo restore the partitionhda1, make sure you arerunning as root (type su) andthen start partimage withthese parameters:
partimage Start the partimage program.restore Restores the specified partition./dev/hda1 The partition to restore to./home/knoppix/mnt/itest/hda1.img.000
The path and file name of the image file. We need to add .000 becausethe first split file is given this name.
Press F5 to select thestandard options.
01/20/05 Copyright © 2005, Ventek, Inc. Page 20 of 23

Disk Imaging with KnoppixYou will again get thiswarning if the partition is oftype NTFS. Don't worryabout it.
A status dialog will showthe statistics for thepartition.
01/20/05 Copyright © 2005, Ventek, Inc. Page 21 of 23
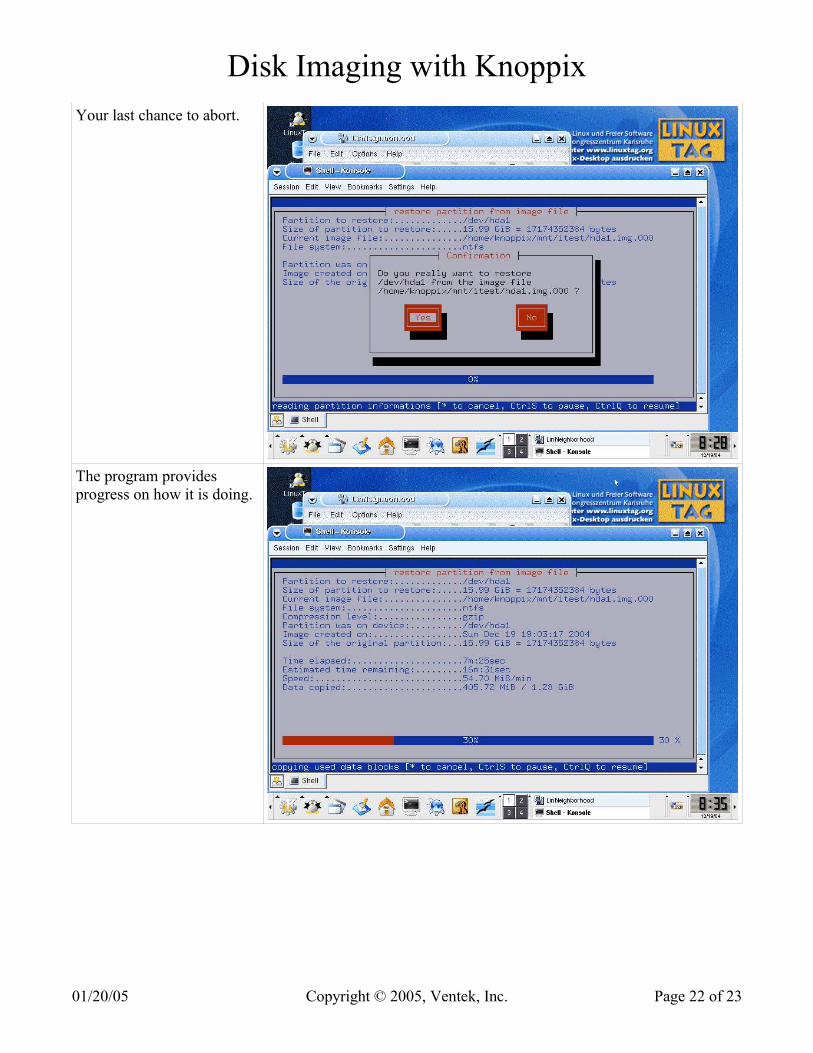
Disk Imaging with KnoppixYour last chance to abort.
The program providesprogress on how it is doing.
01/20/05 Copyright © 2005, Ventek, Inc. Page 22 of 23
Disk Imaging with KnoppixCopy Your Disk to USB Flash Drive with KnoppixHere is a simple guide for using a USB Flash Drive to copy data from a damaged hard drive:
1. Make sure the USB Flash Drive is formatted as FAT or FAT32. Knoppix will not write correctly toNTFS partitions.
2. Insert the USB Flash Drive into the problem computer.
3. Boot the problem computer with the Knoppix CD-ROM.
4. Your desktop should show at least two disk drives: hda1 is your Windows disk, sda1 is the USBFlash Drive. Adjust the following commands if they are different. If you can't find the USB FlashDrive it is possible that your version of Knoppix doesn't support it.
5. Right-click hda1 and select the Mount command.
6. Right-click sda1 and select the Mount command.
7. Right-click sda1 and select the Actions->Change read/write mode command. Knoppix alwaysmounts drives in the read-only mode so we must enable write mode to write the USB Flash Drive.
8. You can now left-click both drives and copy files from hda1 to sda1.
9. Logoff Knoppix and you now have the files on your USB Flash Drive.
10.You can also use the sda1 device to make disk images with the partimage program. Write your imagefile to the /mnt/sda1/ path.
01/20/05 Copyright © 2005, Ventek, Inc. Page 23 of 23