Embed Size (px)
Citation preview

Surgical Technique
Digital Compression Screw

Contents
ProductThe BioPro Digital Compression Screw is a stainless steel lag screw designed for digital fusions.
Contact informationWebsite:www.bioproimplants.com
Email:[email protected]@bioproimplants.com
Phone: (810) 982-7777
Fax: (810) 982-7794
Address: 2929 Lapeer Rd, Port Huron, MI 48060
Table of contentsIndications & Contraindications 1Implant Specifications 2Instrument Specifications 3Surgical Technique 4-8Removal Procedure 9Implant Ordering 10K-wire & Instrument Ordering 11
1
Indications & Contraindications
Indications for use:
1. Digital fusion for the correction of hammertoe deformities in the foot and osteoarthritis, degenerative arthritis and post traumatic arthritis.
2. Digital fusion in the hand for osteoarthritis, rheumatoid arthritis, degenerative arthritis, post traumatic arthritis and chronic mallet finger.
Contraindications:
1. A general health problem that might pose a significant threat to the life of the patient if subjected to a major surgical procedure.
2. An active infection or a previous infection that has not been quiescent for at least six months.
3. A local or systemic infection.4. Significant deficiency in the vascular supply to
the extremity.

2
Implant Specifications
The Ø1.5 & 1.8mm solid digital compression screws are specifically designed to address digital fusions.
The Digital Compression Screw has several key features that allow for compressive, buried fixation, while allowing easy removal.
The small shaft and larger thread design create a lag effect and provides compression across the joint, due to the over-drilling technique.
The Digital Compression Screw is available in two diameters with lengths ranging from 20mm to 55mm.
Ø1.5mm Ø1.8mmMaterial Stainless SteelLength 20mm to 55mm (5mm increments)
Low profile head reduces irritation
1.5mm & 1.8mm thread diameter allows for fusion of
digits 2 through 5
Threads are ≈ 30% of overall length
≈ 1.0mm shaft diameter

InstrumentSpecifications
3
Tracker deviceA tracker device is included with every sterile packed screw. The tracker allows for easy introduction of the screw into the drill hole.
DriverA reusable driver instrument (ref 18032) features etched lines for screw measurement and a detachable screw retainer to secure the screw head onto the driver.
Removal driverA reusable driver is also provided for removal of the digital compression screw once fusion has been achieved. (ref 17550)
K-wiresSterile packed K-wires are not included but can be purchased separately. BioPro offers .045” and .062” K-wires that are recommended to complete the over-drilling technique. (ref 19108,19110)

4
SurgicalTechnique
Fig 1
Step One:A skin incision of choice is made over the proximal interphalangeal joint and all soft tissue dissection is performed to expose the articular surface of the head of the proximal phalanx and base of the intermediate phalanx. The cartilaginous surfaces are removed (remove cartilage only and maintain subchondral bone) using either a sagittal or oscillating saw.
Step Two:Using an 0.045 in. K-wire, a hole is drilled through the center of the intermediate phalanx, continuing through the center of the distal phalanx, out through the end of the digit. (Fig 1)
Step Three:Using the same 0.045” K-wire, a hole is drilled centered in the proximal phalanx approximately 3mm to 4mm in length. (Fig 3) This drill hole acts as a guide path for the screw.
CautionFailure to perform the proper pre-drilling and over-drilling can result in tight screw fit. The additional interference in the cortical bone can cause difficulty in screw insertion, potentially resulting in screw heads breaking off due to the excessive force required or in malpositioning of the screw.
Fig 2

5
Fig 4
Step Four:Using an 0.062 in. K-wire, the previous hole is now over drilled with the larger K-wire, through the intermediate and distal phalanx, out through the end of the digit. (Fig 2)
Important Note If you choose to step up to the 1.8mm screw during the procedure, the 0.062” hole must be over-drilled again using a 1.8mm drill bit. This will accommodate the larger outer thread diameter of the 1.8mm screw. (All hospitals should have a 1.8mm drill bit in their screw sets.) A 2.0mm Steinmann pin can also be used.
Step Five:A small transverse incision (approximately 5mm) is made at the end of the toe using the identifiable K-wire hole as the center of the incision. The soft tissue is dissected about the distal tuft.
Step Six:While approximating the proximal and intermediate phalanx in its final position, place the screwdriver on top of the toe, abutting the inside of the handle against the end of the toe, to find the desired screw length. (Fig 4) Choosing the correct screw length is very important to obtain optimal thread purchase and tightness.
For preferred positioning of threads: measure the screw so the threads are in the joint itself or just past the joint. (Fig 5) This allows more threads to grab the subchondral and metaphyseal bone. Since the distal bone has been over-drilled this will still produce the lag effect.
Fig 3
Fig 5

6
Fig 7
Step Seven:Once the proper screw length is determined, open the sterile packaged screw and remove the enclosed tracker device. Pass the tracker through the base of the intermediate phalanx out through the end of the toe. (Fig 6)
The screw tip is inserted into the tracker (Fig 7) and with combined pressure, the tracker allows the screw to find the drill hole easily and as the screw is implanted, the tracker is retrograded out of the surgical site.
Fig 6
7
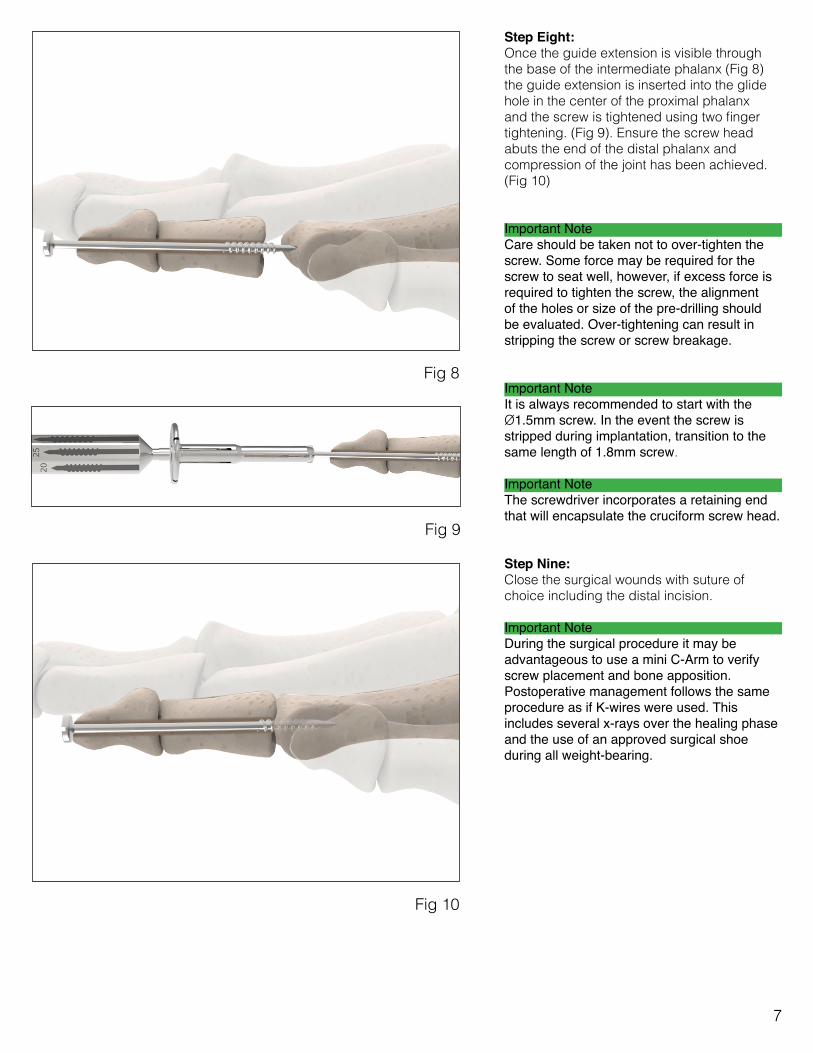
Step Eight:Once the guide extension is visible through the base of the intermediate phalanx (Fig 8) the guide extension is inserted into the glide hole in the center of the proximal phalanx and the screw is tightened using two finger tightening. (Fig 9). Ensure the screw head abuts the end of the distal phalanx and compression of the joint has been achieved. (Fig 10)
Important NoteCare should be taken not to over-tighten the screw. Some force may be required for the screw to seat well, however, if excess force is required to tighten the screw, the alignment of the holes or size of the pre-drilling should be evaluated. Over-tightening can result in stripping the screw or screw breakage.
Important NoteIt is always recommended to start with the Ø1.5mm screw. In the event the screw is stripped during implantation, transition to the same length of 1.8mm screw.
Important NoteThe screwdriver incorporates a retaining end that will encapsulate the cruciform screw head.
Step Nine:Close the surgical wounds with suture of choice including the distal incision.
Important NoteDuring the surgical procedure it may be advantageous to use a mini C-Arm to verify screw placement and bone apposition. Postoperative management follows the same procedure as if K-wires were used. This includes several x-rays over the healing phase and the use of an approved surgical shoe during all weight-bearing.
Fig 8
Fig 10
Fig 9

8
Important NoteTo avoid bending or breaking the screw, the patient must remain in an approved post-operative surgical shoe during all weight bearing until screw removal.
Note (surgical suggestion for Positional Mallet Toe)If the surgeon is fusing the PIPJ and has an accompanying positional mallet toe deformity, an intra-articular flexor tenotomy can be done prior to all K-wire drilling, to align the DIPJ. After the screw is in place the soft tissue will heal in the new position.
Note (suggestion for Structural Mallet Toe without PIPJ Fusion)Measure the screw length so that the threads are centered in the PIPJ. This will allow excellent purchase and tightness encompassing the subchondral and metaphyseal bone from the proximal and intermediate phalanx. Even though the screw traverses a non-fused joint, this is no different than when a K-Wire is used and passes through the PIPJ. For easier screw positioning and placement for DIPJ fusion, use a 0.045 K-wire to drill the guide hole (through the intermediate phalanx) into the PIPJ.

9
The Digital Compression Screw is a non-permanent fixation device which should normally be removed in six to eight weeks. Removal is an easy surgical procedure that may be performed in a hospital, surgery center, or an in-office setting. The following is an example of in-office procedures:
1. A digital block is performed with anesthetic of choice.2. A penrose drain may be used for hemostasis.3. A prep is performed or a Betadine paint is applied to the end of the toe.4. Palpate the screw head to identify the incision location. 5. A small transverse incision is made and soft tissue is dissected free about the screw head and its grooves.6. Using the BioPro Removal Screwdriver, the screw is retrograded from the site. If the screw just turns, use
pick-ups to pry behind the screwhead, causing retrograde pressure assisting the screwdriver.7. One nylon suture may be used, followed by a sterile dressing.8. Suture may be removed at the first week post-op.
RemovalProcedure

ITEM # DESCRIPTION LENGTH17201 DIGITAL COMPRESSION SCREW 1.5MM 20MM17202 DIGITAL COMPRESSION SCREW 1.5MM 25MM17110 DIGITAL COMPRESSION SCREW 1.5MM 30MM17111 DIGITAL COMPRESSION SCREW 1.5MM 35MM17112 DIGITAL COMPRESSION SCREW 1.5MM 40MM17113 DIGITAL COMPRESSION SCREW 1.5MM 45MM17114 DIGITAL COMPRESSION SCREW 1.5MM 50MM17115 DIGITAL COMPRESSION SCREW 1.5MM 55MM17203 DIGITAL COMPRESSION SCREW 1.8MM 20MM17204 DIGITAL COMPRESSION SCREW 1.8MM 25MM17116 DIGITAL COMPRESSION SCREW 1.8MM 30MM17117 DIGITAL COMPRESSION SCREW 1.8MM 35MM17118 DIGITAL COMPRESSION SCREW 1.8MM 40MM17119 DIGITAL COMPRESSION SCREW 1.8MM 45MM17120 DIGITAL COMPRESSION SCREW 1.8MM 50MM17121 DIGITAL COMPRESSION SCREW 1.8MM 55MM
ImplantOrdering
10

11
ITEM # DESCRIPTION19106 K-WIRE STERILE SINGLE TROCHAR .03519108 K-WIRE STERILE SINGLE TROCHAR .04519110 K-WIRE STERILE SINGLE TROCHAR .06217550 DC SCREW REMOVER18032 DC SCREW DRIVER
K-wire & InstrumentOrdering

12
Notes