Embed Size (px)
Citation preview

Nortel CallPilot
Desktop Messaging User Guidefor My CallPilot
ATTENTIONClicking on a PDF hyperlink takes you to the appropriate page. If necessary,
scroll up or down the page to see the beginning of the referenced section.
NN44200-109.

Document status: StandardDocument version: 01.01Document date: 26 February 2007
Copyright © 2007, Nortel NetworksAll Rights Reserved.
Sourced in Canada
Information is subject to change without notice. Nortel Networks reserves the right to make changes in design orcomponents as progress in engineering and manufacturing may warrant.
The process of transmitting data and call messaging between CallPilot and its servers, switches or system isproprietary to Nortel Networks. Any other use of the data and the transmission process is a violation of the userlicense unless specifically authorized in writing by Nortel Networks prior to such use. Violations of the license byalternative usage of any portion of this process or the related hardware constitutes grounds for an immediatetermination of the license and Nortel Networks reserves the right to seek all allowable remedies for such breach.
Nortel Networks and third-party trademarks appear on the following pages:
*Nortel, the Nortel logo, the Globemark, and Unified Networks, BNR, CallPilot, DMS, DMS-100, DMS-250,DMS-MTX, DMS-SCP, DPN, Dualmode, Helmsman, IVR, MAP, Meridian, Meridian 1, Meridian Link, Meridian Mail,Norstar, SL-1, SL-100, Succession, Supernode, Symposium, Telesis, and Unity are trademarks of Nortel Networks.
3COM is a trademark of 3Com Corporation.
ACCENT is a trademark of Accent Software International Ltd.
ADOBE is a trademark of Adobe Systems Incorporated.
AMDEK is a trademark of Amdek Corporation.
AT&T is a trademark of American Telephone and Telegraph Corporation.
ATLAS is a trademark of Quantum Corporation.
ATRIA is a trademark of Pure Atria Corporation.
BLACKBERRY is a trademark of Research in Motion Limited.
CASEWARE is a trademark of Caseware International, Inc.
CONTINUUS is a trademark of Continuus Software Corporation.
CRYSTAL REPORTS is a trademark of Seagate Software Inc.
DEFINITY is a trademark of Avaya Inc.
DIALOGIC, INTEL and VOICEBRIDGE are trademarks of Intel Corporation.
DIVX is a trademark of DivXNetworks, Inc.
EUDORA and QUALCOMM are trademarks of Qualcomm, Inc.
eTrust and InoculateIT are trademarks of Computer Associates Think Inc.
DIRECTX, EXCHANGE.NET, FRONTPAGE, INTERNET EXPLORER, LINKEXCHANGE, MICROSOFT,MICROSOFT EXCHANGE SERVER, MS-DOS, NETMEETING, OUTLOOK, POWERPOINT, VISUAL STUDIO,WINDOWS, WINDOWS MEDIA, and WINDOWS NT are trademarks of Microsoft Corporation.
GROUPWISE and NOVELL are trademarks of Novell Inc.

HITACHI is a trademark of Hitachi Limited.
LOGITECH is a trademark of Logitech, Inc.
LUCENT is a trademark of Lucent Technologies, Inc.
MATRA is a trademark of Matra Hachette.
MCAFFEE and NETSHIELD are trademarks of McAfee Associates, Inc.
MYLEX is a trademark of Mylex Corporation.
NET2PHONE is a trademark of Net2Phone, Inc.
NETOPIA is a trademark of Netopia, Inc.
NETSCAPE COMMUNICATOR is a trademark of Netscape Communications Corporation.
NOTES is a trademark of Lotus Development Corporation.
NORTON ANTIVIRUS and PCANYWHERE are trademarks of Symantec Corporation.
POWERQUEST is a trademark of PowerQuest Corporation.
PROMARK and RHOBOT are trademarks of DMI Promark, Inc.
QUICKTIME is a trademark of Apple Computer, In.
RADISYS is a trademark of Radisys Corporation.
ROLM is a trademark of Siemens ROLM Communications Inc.
SLR4, SLR5, and TANDBERG are trademarks of Tandberg Data ASA.
SONY is a trademark of Sony Corporation.
SYBASE is a trademark of Sybase, Inc.
TEAC is a trademark of TEAC Corporation.
UNIX is a trademark of X/Open Company Limited.
US ROBOTICS, the US ROBOTICS logo, and SPORTSTER are trademarks of US Robotics.
WINAMP is a trademark of Nullsoft, Inc.
WINRUNNER is a trademark of Mercury Interactive Corporation.
WINZIP is a trademark of Nico Mark Computing, Inc.


5
Contents
How to get help 7
Using My CallPilot 9Getting started 10Logging on 12Accessing your CallPilot messages 16Playing voice messages 17Viewing fax messages 19Composing voice messages 20Composing fax and text messages 23Calling the sender of a message 25Forwarding and replying to messages 26Adding attachments to messages 27Setting message options 28Addressing messages 29Using the Message Waiting Indicator 32CallPilot Features tab 34Working with greetings 34Setting up message notification 37Setting up message forwarding 39Managing personal distribution lists 42Changing your CallPilot password 43Changing your telephone options 44Setting up telephone access to e-mail 46Changing fax printing options 47Setting up links to your e-mail accounts 48Setting messaging preferences 53Choosing a home page for My CallPilot 54Useful Information tab 54Transcribing voice forms 55Protecting the security of your mailbox 56
Appendix A Remote Text Notification for Microsoft Outlook andBlackBerry Devices 57
Nortel CallPilotDesktop Messaging User Guide for My CallPilot
NN44200-109 01.01 Standard5.0 26 February 2007
Copyright © 2007, Nortel Networks Nortel Networks Confidential
.

6 Contents
Nortel CallPilotDesktop Messaging User Guide for My CallPilot
NN44200-109 01.01 Standard5.0 26 February 2007
Copyright © 2007, Nortel Networks Nortel Networks Confidential
.

7
How to get help
This section explains how to get help for Nortel products and services.
Getting help from the Nortel Web siteThe best way to get technical support for Nortel products is from the NortelTechnical Support Web site:
http://www.nortel.com/support
This site provides quick access to software, documentation, bulletins, andtools to address issues with Nortel products. More specifically, you canuse the site to:
• download software, documentation, and product bulletins
• search the Technical Support Web site and the Nortel Knowledge Basefor answers to technical issues
• sign up for automatic notification of new software and documentationfor Nortel equipment
• open and manage technical support cases
Getting help over the phone from a Nortel Solutions CenterIf you don’t find the information you require on the Nortel Technical SupportWeb site, and have a Nortel support contract, you can also get help over thephone from a Nortel Solutions Center.
In North America, call 1-800-4NORTEL (1-800-466-7835).
Outside North America, go to the following Web site to obtain the phonenumber for your region:
http://www.nortel.com/callus
Getting help from a specialist by using an Express Routing CodeTo access some Nortel Technical Solutions Centers, you can use an ExpressRouting Code (ERC) to quickly route your call to a specialist in your Nortelproduct or service. To locate the ERC for your product or service, go to:
Nortel CallPilotDesktop Messaging User Guide for My CallPilot
NN44200-109 01.01 Standard5.0 26 February 2007
Copyright © 2007, Nortel Networks Nortel Networks Confidential
.

8 How to get help
http://www.nortel.com/erc
Getting help through a Nortel distributor or resellerIf you purchased a service contract for your Nortel product from a distributoror authorized reseller, contact the technical support staff for that distributoror reseller.
Nortel CallPilotDesktop Messaging User Guide for My CallPilot
NN44200-109 01.01 Standard5.0 26 February 2007
Copyright © 2007, Nortel Networks Nortel Networks Confidential
.
9
Using My CallPilot
My CallPilot* from Nortel is a Web-based messaging system that offersexceptional flexibility for managing your messaging needs.
You can work with My CallPilot from any computer that has network accessand a Web browser configured for My CallPilot. Here are some of the manyways you can use My CallPilot:
• Record, edit, and delete greetings that callers hear when they reachyour mailbox.
• Receive, forward, reply to, and send voice messages, faxes, and e-mails.
• Address messages to CallPilot users on local and remote servers, aswell as to non-CallPilot users.
• Set up message forwarding to another CallPilot mailbox or to an externale-mail address.
• Configure e-mail-by-phone.
• Set up links to your e-mail.
• Change your CallPilot mailbox password.
• Create personal distribution lists.
• Set up remote notification to a telephone or pager.
• Set up text message notification for a wireless e-mail device. SeeAppendix A for details.
• Transcribe voice forms, if your site uses voice forms to collectinformation.
Some features mentioned in this guide are optional. For details, refer to theFeature availability topic in the CallPilot Player online Help, or ask youradministrator.
Note: The screen images of dialog boxes shown in this guideare those displayed when operating My CallPilot in the Windowsenvironment, unless otherwise specified. Users of the Macintosh or
Nortel CallPilotDesktop Messaging User Guide for My CallPilot
NN44200-109 01.01 Standard5.0 26 February 2007
Copyright © 2007, Nortel Networks Nortel Networks Confidential
.
10 Using My CallPilot
Linux environments might see altered versions of these dialog boxes,depending on specific feature and functionality support.
Getting startedAbout this guide
This user guide describes how to use the Web-based resources of MyCallPilot. The instructions and screen images shown in this guide providegeneral information for using My CallPilot through a Web client. Specificdetails can vary, depending on your computer operating system and thefeatures available for your CallPilot mailbox.
Hardware and software requirementsYou can access My CallPilot from any computer with network access anda Web browser configured for My CallPilot. Before you start to use MyCallPilot, ensure that the computer you are using is set up according tothe following requirements.
Note: Support for additional hardware and software may be added inthe future as it becomes available (for example, new browser releases).For more information, contact your CallPilot administrator.
Windows-based hardware and software
• Operating systems: Windows 2000 Professional, Windows XPProfessional, or Windows Vista
• Browsers: Internet Explorer 6.0 and 7.0, Firefox 2.0 for Windows
• TCP/IP network connection of at least 56 Kbit/s
• Sound card and speakers for playing voice messages on your computer
• A microphone connected to your computer, or a telephone situated nearyour computer, for recording voice messages
Macintosh-based hardware and software
• PowerPC G3 processor or newer (PowerPC G4 preferred)
• Operating system: Mac OS X v10.3
• Browser: Safari 1.3.2
• TCP/IP network connection of at least 56 Kbit/s
• Speakers for playing voice messages on your computer
• A microphone connected to your computer, or a telephone situated nearyour computer, for recording voice messages
Nortel CallPilotDesktop Messaging User Guide for My CallPilot
NN44200-109 01.01 Standard5.0 26 February 2007
Copyright © 2007, Nortel Networks Nortel Networks Confidential
.
Getting started 11
Note: The type of microphone to use depends on the type of Macintoshyou have; a microphone designed for a Windows-based PC does notalways work.
Linux-based software
• Red Hat Linux 9
• Browsers: Mozilla 1.7.x, Firefox 2.0
• TCP/IP network connection of at least 56 Kbit/s
• A microphone connected to your computer, or a telephone situated nearyour computer, for recording voice messages
Peripheral hardware and software (including audio player)
• Video display and monitor with 8-bit (256-color) 800 x 600 capability(1024 x 768 16-bit color preferred)
• A network connection to the My CallPilot server, and to the CallPilotserver where applicable, for accessing CallPilot messages
• To create faxes:
— For Windows systems, the Nortel Fax Driver and CallPilot desktopmessaging.
— For Macintosh and Linux systems, you must provide your ownsoftware for creating faxes.
• To play and record voice messages: CallPilot Player, or another audioplayer that can play WAV files.
— For Windows systems: If you are using Internet Explorer, you canuse the CallPilot Player that is conveniently embedded inside thebrowser to play and record voice messages. Otherwise, you can usethe CallPilot Player as a browser helper application (stand-aloneversion of the CallPilot Player). If you choose not to use the CallPilotPlayer, you can use the Microsoft Windows Media Player, or anotherWAV-compatible media player. These players do not function inexactly the same way as the CallPilot Player described in this guide.
— For Macintosh and Linux systems, you must provide your own audioplayer to play and record voice messages.
Requirements for the embedded CallPilot PlayerFor Windows systems, My CallPilot includes an embedded audio player thatconveniently appears on the page you use to compose and listen to voicemessages, as shown here:
Nortel CallPilotDesktop Messaging User Guide for My CallPilot
NN44200-109 01.01 Standard5.0 26 February 2007
Copyright © 2007, Nortel Networks Nortel Networks Confidential
.

12 Using My CallPilot
For the embedded player to automatically appear in My CallPilot, yourworkstation and My CallPilot must meet the following requirements:
• your browser must be Internet Explorer
• the CallPilot Player must be installed (for instructions, see "To downloadaudio players" (page 15))
• you must have VBK set as your audio type in your My CallPilotpreferences (for instructions, see "Setting messaging preferences"(page 53))
Logging onYour administrator provides you with the URL for My CallPilot. Bookmarkthis address in your Web browser for easy access.
To log on to My CallPilot
Step Action
1 In your Web browser, navigate to the My CallPilot address.
Example:http://serverABC/mycallpilot
2 On the Welcome page, in the Mailbox box, type your mailboxnumber. This number is usually your office telephone extensionnumber.
Nortel CallPilotDesktop Messaging User Guide for My CallPilot
NN44200-109 01.01 Standard5.0 26 February 2007
Copyright © 2007, Nortel Networks Nortel Networks Confidential
.

Logging on 13
3 In the Password box, type the password for this mailbox.
4 Click Login.
—End—
Logging on to environments with multiple CallPilot serversIf your site has more than one CallPilot server to which you can connect, aLocation list containing multiple CallPilot servers appears in the Welcomepage.
Nortel CallPilotDesktop Messaging User Guide for My CallPilot
NN44200-109 01.01 Standard5.0 26 February 2007
Copyright © 2007, Nortel Networks Nortel Networks Confidential
.

14 Using My CallPilot
Selecting a server from this list lets you select (and log on to) your CallPilotserver without needing to know any of your server-specific settings beyondyour mailbox and password.
To configure or update the settings to connect to My CallPilotUnder normal circumstances, your CallPilot administrator configures thesettings that allow you to log on to My CallPilot. If this is not the case, youmight need to add or update the settings so that you can log on successfully.
Step Action
1 In your Web browser, navigate to the My CallPilot address.
2 On the Welcome page, click Configure.
The Configure dialog box appears. The information shown in thefollowing illustration is an example only.
3 Type or update the configuration information. If you do not have thisinformation, contact your CallPilot administrator.
4 Click OK.
The system attempts to connect you using the information youentered.
5 If the connection is successful, click OK on the confirmationmessages, and then try logging on again. If the connection is notsuccessful, contact your CallPilot administrator for assistance.
—End—
Nortel CallPilotDesktop Messaging User Guide for My CallPilot
NN44200-109 01.01 Standard5.0 26 February 2007
Copyright © 2007, Nortel Networks Nortel Networks Confidential
.

Logging on 15
To change to another serverIf you have a mailbox on another CallPilot server, you can log on to thatserver from My CallPilot. Click Configure, type the server details, then clickOK until you return to the Welcome page. When you log on again from thesame computer, CallPilot accesses the new server. To change back to yourdefault server, click Configure, then click Restore Defaults.
To change to another languageIf language buttons are available on your My CallPilot log on page, you canclick one to change from your default language to another language.
To log on using secure loginIf the Enable Secure Login link is available on your login page, click it toenable SSL encryption. The Login Securely button appears. Bookmarkthe link for future use.
To log on remotelyYou can log on to My CallPilot from any computer that has Internet accessand supported browser configuration. You can use the pre-installed audioplayer for voice messages, or you can download the CallPilot Player forfull feature capability.
To log outTo log out from My CallPilot, click Logout on any My CallPilot page.
To download audio playersYou need an audio player to play and record voice messages. If you donot have the CallPilot Player installed, the first time you log on to MyCallPilot, you are prompted to download it. Follow the instructions to startthe download and installation process. If you choose to use a different audioplayer, arrange to install it if it is not already installed.
If you choose not to download the player when you first log on, you can doso later on using the following procedure.
Step Action
1 Log on to My CallPilot.
2 Click the CallPilot Features tab, and then click the Downloads item.
3 Select CallPilot Player & MWI icon or another audio player fromthe list.
4 Follow the instructions to download and install the audio player.
The stand-alone version of the CallPilot Player is shown here:
Nortel CallPilotDesktop Messaging User Guide for My CallPilot
NN44200-109 01.01 Standard5.0 26 February 2007
Copyright © 2007, Nortel Networks Nortel Networks Confidential
.

16 Using My CallPilot
—End—
Note: The CallPilot Player software is bundled with software for aMessage Waiting Indicator (MWI). When installed, the Message WaitingIndicator appears as an icon in the Windows taskbar, and it notifies youwhen you have new CallPilot messages. For more information, see"Using the Message Waiting Indicator" (page 32).
Accessing your CallPilot messagesYou can access your CallPilot messages from the CallPilot Messages tab.You can play voice messages and view faxes, delete, forward, and reply tomessages, and compose new messages.
Your message listTo check for new messages
To see new messages, click Refresh. New messages appear in bold.
To sort your messages, click on a column heading, for example, Subjector Received.
Nortel CallPilotDesktop Messaging User Guide for My CallPilot
NN44200-109 01.01 Standard5.0 26 February 2007
Copyright © 2007, Nortel Networks Nortel Networks Confidential
.

Playing voice messages 17
Note: Only the messages currently displayed are sorted, which mightnot be the entire message list.
To open a messageTo open a CallPilot message, click the voice, fax, or text icon in theattachments column beside the message, or click any underlined part ofthe message line. See "Playing voice messages" (page 17), and "Viewingfax messages" (page 19).
To select a messageTo select a CallPilot message, check the box at the far left of the messageline. When a message is selected, you can delete, forward, or reply to it.
To delete a messageTo delete a CallPilot message, select the message and click Delete orDelete Now. If you click Delete, the message temporarily moves to yourDeletable Items folder, and then it is permanently deleted when you log out.If you click Delete Now, all selected messages, and items in your DeletableItems folder, are permanently deleted immediately.
If you want to keep items in your Deletable Items folder after you log out,you can change this setting on the My CallPilot Preferences page. See "Tochange environment settings" (page 54).
Note: To view items in your Deletable Items folder, from the CallPilotMessages tab, select Deletable Items from the Folder list.
To select your telephone or computer to play and record voice messagesYou can choose to play and record voice messages through your telephoneor your computer. Click the telephone or computer icon in the embedded ordownloaded CallPilot Player. If you have any problems using your telephonefor this purpose, contact your CallPilot administrator.
See "Setting messaging preferences" (page 53), to change the audio settingand the number that CallPilot dials for playing and recording messages.
Playing voice messagesBefore playing voice messages, see "To select your telephone or computerto play and record voice messages" (page 17).
To play a voice message the quick way (Windows only)Use the embedded CallPilot Player, if available, to play your voice messagesquickly. If you cannot see the embedded player in your message list, see"Requirements for the embedded CallPilot Player" (page 11).
Nortel CallPilotDesktop Messaging User Guide for My CallPilot
NN44200-109 01.01 Standard5.0 26 February 2007
Copyright © 2007, Nortel Networks Nortel Networks Confidential
.

18 Using My CallPilot
Step Action
1 In your message list, click the voice icon in the attachments columnbeside the message you want to play (see the following illustration).
Note that this icon appears as a telephone instead of a black arrow ifyour audio format is set to WAV in your My CallPilot preferences.
2 If you are not using the embedded player, follow the prompts to openthe audio file. When the audio player appears, press the play button.
The controls on the embedded CallPilot player are shown here:
If you select the computer for playback, the audio player plays yourmessage from your computer speakers. If you select the telephonefor playback, your telephone rings and plays the message whenyou answer.
3 Use the player buttons to stop or replay the message, or to callthe sender. You can use the slider control on the player to skip toanother part of the message.
4 If you are using the telephone, when finished, click the disconnecticon or hang up the telephone.
5 To return to your messages, click Message List.
—End—
To play a voice message in a mixed voice, fax, or text messageCallPilot messages can have more than one type of attachment. In yourmessage list, each attachment appears as a different icon beside themessage in the attachment column.
Nortel CallPilotDesktop Messaging User Guide for My CallPilot
NN44200-109 01.01 Standard5.0 26 February 2007
Copyright © 2007, Nortel Networks Nortel Networks Confidential
.

Viewing fax messages 19
Step Action
1 In your message list, click any underlined part of the message toopen it.
The mixed message appears with each attachment shown on theleft.
2 To play the voice message, click the Voice icon. For more details onplaying a voice message, see the preceding procedure.
—End—
Viewing fax messagesTo view faxes on your computer you must have appropriate software.
• For Windows systems, you can use the viewer included with theWindows operating system, or install your own software.
• For Macintosh systems, QuickTime Viewer can display faxes.
• For Linux systems, Eye of GNOME or kfax software can display faxes.
To view a fax message
Step Action
1 In your message list, click the fax icon in the attachments columnbeside the fax message you want to view, or click any underlinedpart of the message.
If the Open/Save dialog box appears, select Open to display theimage.
2 Use the controls supplied with the fax viewing software to work withthe fax.
Nortel CallPilotDesktop Messaging User Guide for My CallPilot
NN44200-109 01.01 Standard5.0 26 February 2007
Copyright © 2007, Nortel Networks Nortel Networks Confidential
.

20 Using My CallPilot
3 When you finish, close the fax image to return to your messages.
—End—
Composing voice messagesIf you use Internet Explorer for Windows, you can compose a voice messageusing one of two methods:
• You can use the embedded CallPilot Player to record the voice message(VBK format only) and automatically attach it to the message. If youcannot see the embedded player when you compose a message, see"Requirements for the embedded CallPilot Player" (page 11).
• You can use the stand-alone CallPilot Player to record your messageand then save it as a stand-alone file. You can then attach it to one ormore messages and send it.
These procedures are described in the following sections.
If you are using a different browser or player, or if you are using a Macintoshor Linux system, you must first record the message in your audio player andthen attach it to the CallPilot message before sending it. For informationabout adding an attachment to a message, see "Adding attachments tomessages" (page 27).
Note: You cannot add additional audio to audio files that exist in yourinbox.
To record and send a new voice message using the embedded CallPilotPlayer
Step Action
1 In your message list, click Compose. A new message page appears.
2 Address the message. For more information, see "Addressingmessages" (page 29).
3 In the Subject box, type a subject for the message.
4 Choose how you want to record the voice message: in theembedded Windows CallPilot Player, select either the telephone orthe computer icon.
Nortel CallPilotDesktop Messaging User Guide for My CallPilot
NN44200-109 01.01 Standard5.0 26 February 2007
Copyright © 2007, Nortel Networks Nortel Networks Confidential
.

Composing voice messages 21
Note: If you select the telephone to record the message, ensureyou have your telephone number configured in My CallPilot. Tocheck, click the My CallPilot Features tab, and then click theMy CallPilot Preferences item. In the Environment Settings,ensure your telephone number is entered in the Number to callfor telset playback (ie. your phone) box.
5 To begin recording your message, click the record button.
6 Do one of the following:
• If you are recording from a computer, speak into the microphone.
• If you are recording from a telephone, answer when the telephonerings. At the tone, record your message into the handset.
7 When you finish speaking:
• To end the recording, click the stop button.
• To review the recording, click the play button.
• To add to the recording, click the record button, speak again,and then click the stop button.
8 If you are using the telephone, when finished, click the disconnecticon or hang up the telephone.
Nortel CallPilotDesktop Messaging User Guide for My CallPilot
NN44200-109 01.01 Standard5.0 26 February 2007
Copyright © 2007, Nortel Networks Nortel Networks Confidential
.

22 Using My CallPilot
9 When you are satisfied with the message, click Save Audio. Thisautomatically adds the recording as an attachment to the message.
10 Click Send.
—End—
To record and save a message using the stand-alone CallPilot PlayerTo save a copy of your voice recording as a stand-alone file you must usethe stand-alone CallPilot Player, not the embedded CallPilot Player.
Step Action
1 Open the stand-alone CallPilot Player (from the Windows Startmenu, choose Programs > Nortel > CallPilot Desktop Messaging> Audio Player).
2 Choose how you want to record the voice message: in CallPilotPlayer, select either the telephone or the computer icon.
Note: If you select the telephone to record the message, ensureyou have your telephone number configured in My CallPilot. Tocheck, click the My CallPilot Features tab, and then click theMy CallPilot Preferences item. In the Environment Settings,ensure your telephone number is entered in the Number to callfor telset playback (ie. your phone) box.
3 To begin recording your message, click the record button.
4 Do one of the following:
• If you are recording from a computer, speak into the microphone.
• If you are recording from a telephone, answer when the telephonerings. At the tone, record your message into the handset.
5 When you finish speaking:
Nortel CallPilotDesktop Messaging User Guide for My CallPilot
NN44200-109 01.01 Standard5.0 26 February 2007
Copyright © 2007, Nortel Networks Nortel Networks Confidential
.

Composing fax and text messages 23
• To end the recording, click the stop button.
• To review the recording, click the play button.
• To add to the recording, click the record button, speak again,and then click the stop button.
6 If you are using the telephone, when finished, click the disconnecticon or hang up the telephone.
7 On the CallPilot Player File menu, click Save or Save As.
8 In the File name box, type a name for the file, select a folder to keepthe file in, and then click Save. Save voice files as VBK files.
Note: My CallPilot automatically converts VBK files to WAV fileswhen sending to non-CallPilot users.
9 Add the saved recording as an attachment to one or more CallPilotmessages. For instructions, see "Adding attachments to messages"(page 27).
—End—
Composing fax and text messagesTo create a fax file, your CallPilot mailbox must have fax capability, and yourcomputer must have desktop messaging installed. After you save the faxfile, you can add the fax to a message as an attachment. Your CallPilotrecipients must have fax capability to view your fax on their computer. If yourrecipients access their messages from their telephone, they can view thefax only by printing it. You can also send your fax to a fax machine.
For Macintosh and Linux systems, Nortel does not supply software forcreating faxes. You must supply your own software to do this, and thenattach the fax message to a CallPilot message before sending it. The faxfile must be TIF-F format. For information about adding an attachment to amessage, see "Adding attachments to messages" (page 27).
To create and save a fax file
Step Action
1 Start the application you want to use to compose the fax, forexample, Microsoft Word. The document you open or create must be8.5 in. (21.5 cm) wide or less. Multiple page documents are allowed.
2 When the document is ready, from the File menu, click Print orwhichever option opens the dialog box to allow you to select a printer.
Nortel CallPilotDesktop Messaging User Guide for My CallPilot
NN44200-109 01.01 Standard5.0 26 February 2007
Copyright © 2007, Nortel Networks Nortel Networks Confidential
.
24 Using My CallPilot
3 From the list of printers, select Nortel Fax.
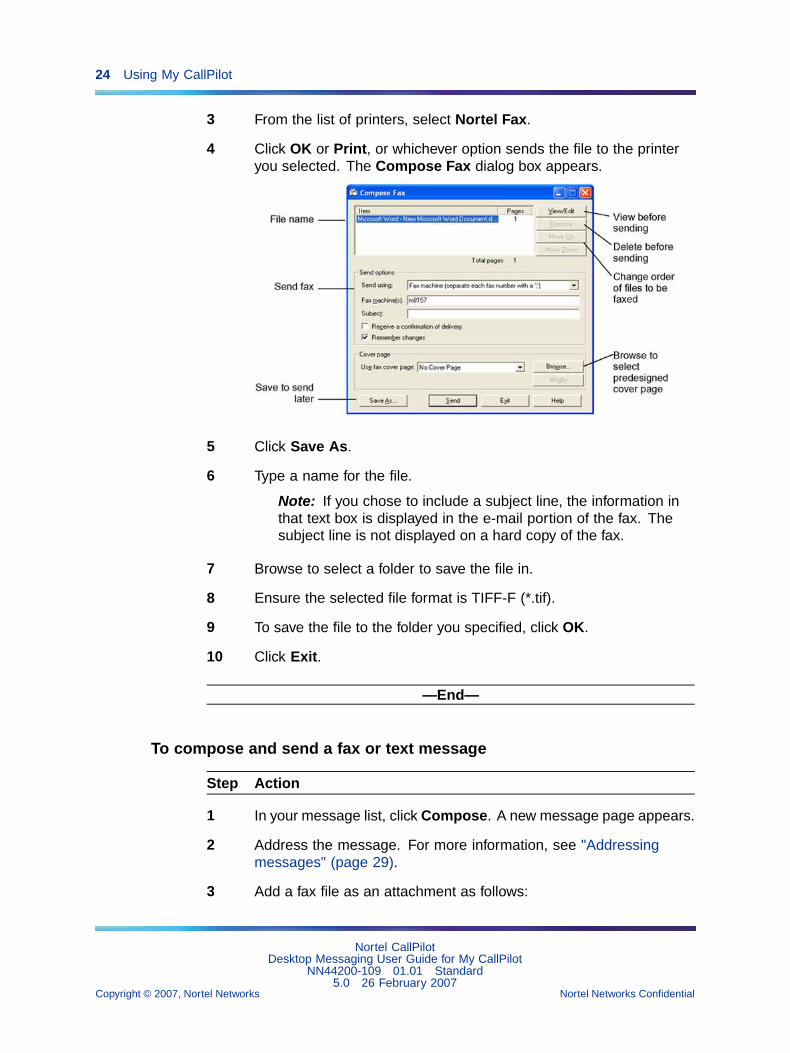
4 Click OK or Print, or whichever option sends the file to the printeryou selected. The Compose Fax dialog box appears.
5 Click Save As.
6 Type a name for the file.
Note: If you chose to include a subject line, the information inthat text box is displayed in the e-mail portion of the fax. Thesubject line is not displayed on a hard copy of the fax.
7 Browse to select a folder to save the file in.
8 Ensure the selected file format is TIFF-F (*.tif).
9 To save the file to the folder you specified, click OK.
10 Click Exit.
—End—
To compose and send a fax or text message
Step Action
1 In your message list, click Compose. A new message page appears.
2 Address the message. For more information, see "Addressingmessages" (page 29).
3 Add a fax file as an attachment as follows:
Nortel CallPilotDesktop Messaging User Guide for My CallPilot
NN44200-109 01.01 Standard5.0 26 February 2007
Copyright © 2007, Nortel Networks Nortel Networks Confidential
.

Calling the sender of a message 25
a. Click Attach Files.
b. In the File to attach box, click Browse, navigate to and select thefile that you want to attach, and then click Open. Alternatively,you can type the path and file name in the File to attach box.
c. To attach additional files, repeat the previous step.
d. Click OK. An icon representing each attached file appearsbeside the Attach Files button on the message.
4 If you want to include a message with the fax attachments, typethe message.
5 Click Send.
—End—
Calling the sender of a messageYou can respond to a message with a telephone call instead of a recordedmessage. My CallPilot includes a Call Sender button that appears in boththe message list and when you are in an open message. Clicking theCall Sender button calls the sender of the currently selected message,regardless of whether or not the message contains an audio attachment.
To use the Call Sender feature, ensure you have your telephone numberconfigured in My CallPilot. To check, click the My CallPilot Features tab,and then click the My CallPilot Preferences item. In the EnvironmentSettings, ensure your telephone number is entered in the Number to callfor telset playback (ie. your phone) box.
Nortel CallPilotDesktop Messaging User Guide for My CallPilot
NN44200-109 01.01 Standard5.0 26 February 2007
Copyright © 2007, Nortel Networks Nortel Networks Confidential
.
26 Using My CallPilot
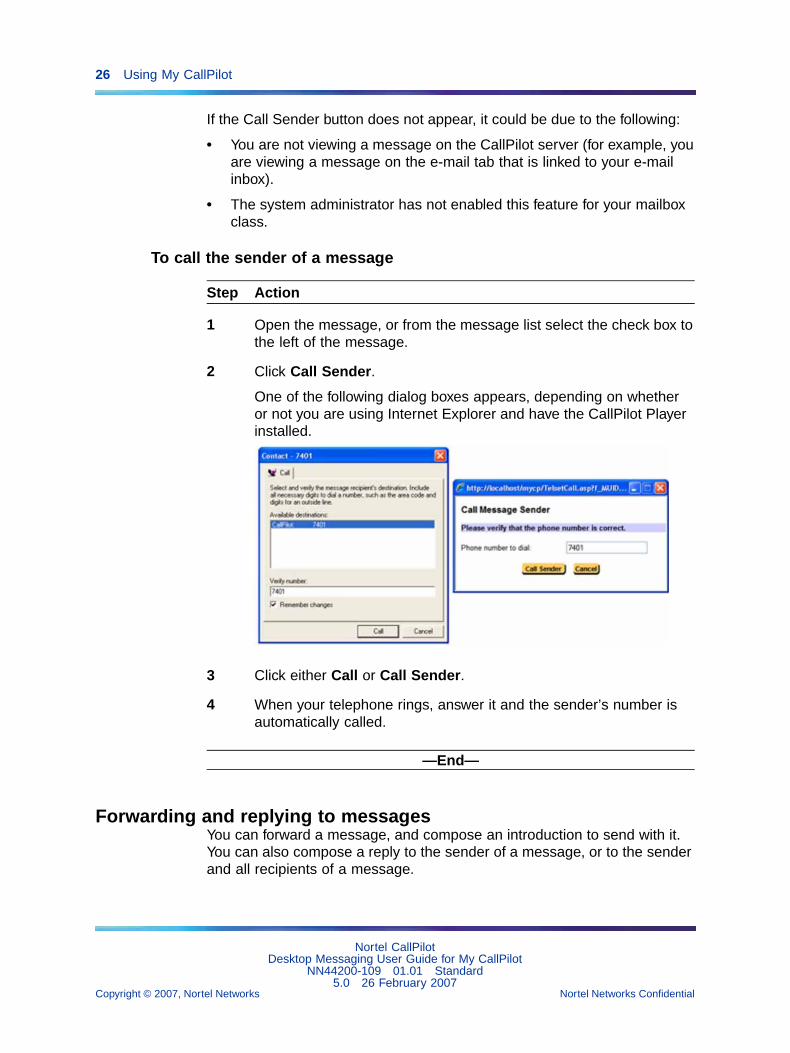
If the Call Sender button does not appear, it could be due to the following:
• You are not viewing a message on the CallPilot server (for example, youare viewing a message on the e-mail tab that is linked to your e-mailinbox).
• The system administrator has not enabled this feature for your mailboxclass.
To call the sender of a message
Step Action
1 Open the message, or from the message list select the check box tothe left of the message.
2 Click Call Sender.
One of the following dialog boxes appears, depending on whetheror not you are using Internet Explorer and have the CallPilot Playerinstalled.
3 Click either Call or Call Sender.
4 When your telephone rings, answer it and the sender’s number isautomatically called.
—End—
Forwarding and replying to messagesYou can forward a message, and compose an introduction to send with it.You can also compose a reply to the sender of a message, or to the senderand all recipients of a message.
Nortel CallPilotDesktop Messaging User Guide for My CallPilot
NN44200-109 01.01 Standard5.0 26 February 2007
Copyright © 2007, Nortel Networks Nortel Networks Confidential
.

Adding attachments to messages 27
To forward or reply to a message
Step Action
1 In an open message, click Reply, Reply All, or Forward.
2 On the new message page, compose a voice, fax, or text message.
3 Address forwarded messages the same way as a new message.Replies are addressed automatically.
4 Add attachments, set options, and change the subject line if required.
5 Click Send.
—End—
Adding attachments to messagesBefore sending a message, you can attach one or more voice, fax, ortext files to it. Voice files can be either VBK or WAV format. My CallPilotautomatically converts VBK files to WAV files when sending to systemsthat do not support VBK. Fax files must be TIF format. Text files must beTXT format.
To attach a file to a message
Step Action
1 On a new message page, click Attach Files.
2 In the File to attach box, click Browse, navigate to and select thefile that you want to attach, and then click Open. Alternatively, youcan type the path and file name in the File to attach box.
Nortel CallPilotDesktop Messaging User Guide for My CallPilot
NN44200-109 01.01 Standard5.0 26 February 2007
Copyright © 2007, Nortel Networks Nortel Networks Confidential
.

28 Using My CallPilot
3 To attach additional files, repeat the previous step.
4 Click OK. An icon representing each attached file appears besidethe Attach Files button on the new message.
5 Continue to compose, address, and send the message as usual.
—End—
Setting message optionsBefore sending a message, you can set options for handling and delivery.
To set message options
Step Action
1 On a new message page, select Priority, Sensitivity, and readreceipt options, as required.
• For Priority, select Low, High, or leave the setting as Normal.
• For Sensitivity, select Private, or leave the setting as Public.
You cannot forward messages that are marked Private to otherCallPilot addresses. However, be aware that when you senda message marked Private, your recipient can still forwardthe message to someone else, if the recipient does not have
Nortel CallPilotDesktop Messaging User Guide for My CallPilot
NN44200-109 01.01 Standard5.0 26 February 2007
Copyright © 2007, Nortel Networks Nortel Networks Confidential
.

Addressing messages 29
a CallPilot address. Also, recipients in non-CallPilot systemsare not informed of Private settings. In your message, tell therecipient that the message is private.
• For Notify me when message is read, select the check boxto request acknowledgment that your recipient opened themessage.
2 Continue to compose, address, and send the message as usual.
—End—
Addressing messagesYou can address a CallPilot message in two ways:
• You can select a name from the CallPilot Address Book that ismaintained by your organization on the server. The CallPilot AddressBook contains the addresses of the CallPilot users and shareddistribution lists that you can use.
• You can manually enter addresses using the Enter a Special Addressdialog box.
Accessing CallPilot addresses from other networked CallPilot serversIf your site has more than one CallPilot server, your CallPilot administratorcan provide you access to additional CallPilot Address Books on networkedservers. In this case, you can choose which CallPilot Address Book youwant to search when addressing a message (see the Available AddressBooks list in the following illustration).
Alternatively, your CallPilot administrator can create a central directoryof addresses drawn from multiple CallPilot servers. In this case, you donot have to choose the address book to search, but you automaticallyhave access to an expanded list of CallPilot addresses to search whenaddressing a message.
If you do not need access to CallPilot addresses on other networkedservers, you can configure your CallPilot Address Book to include onlyaddresses from your local server using a check box on the My CallPilotPreferences page. For more information, see "To change environmentsettings" (page 54).
Nortel CallPilotDesktop Messaging User Guide for My CallPilot
NN44200-109 01.01 Standard5.0 26 February 2007
Copyright © 2007, Nortel Networks Nortel Networks Confidential
.

30 Using My CallPilot
To address a message from the CallPilot Address Book
Step Action
1 In a new CallPilot message, click To (or Address Book).
The Select recipients from the Address Book dialog box appears.
2 If the Available Address Books list appears, you must choosewhich CallPilot server’s Address Book or directory you wantto search to address the message. The system administratordetermines what you see in this list.
3 In the Enter Last Name (or *) box, do one of the following:
• To look up a single address, type the recipient’s last name (orjust the first letter or first few letters), and then click Find.
• To get a list of all entries in the Address Book, type an asterisk(*), and then click Find.
4 In the list of names, select the name of the recipient or distributionlist, and then click To.
5 You can look up additional names as required. To add more names,select the name, and then click either To, Cc, or Bcc. (Bcc standsfor blind carbon copy; the recipient gets a copy of the message, butthe recipient’s name is not visible to other recipients of the message.
Nortel CallPilotDesktop Messaging User Guide for My CallPilot
NN44200-109 01.01 Standard5.0 26 February 2007
Copyright © 2007, Nortel Networks Nortel Networks Confidential
.

Addressing messages 31
6 To return to the new CallPilot message, click OK.
—End—
To address a message in Special Addresses
Step Action
1 In a new CallPilot message, click Special Addresses.
The Enter a Special Address dialog box appears.
2 Select an address format from the drop-down list (for example:Network mailbox or Personal Distribution List). Note thatPersonal Distribution List entries appear alphabetically sorted whendoing an Address Book search.
3 Type the number and any other information required. Refer to theonline Help for the correct addressing formats.
4 Click either To, Cc, or Bcc.
—End—
Nortel CallPilotDesktop Messaging User Guide for My CallPilot
NN44200-109 01.01 Standard5.0 26 February 2007
Copyright © 2007, Nortel Networks Nortel Networks Confidential
.

32 Using My CallPilot
Using the Message Waiting IndicatorMy CallPilot includes a Message Waiting Indicator (MWI) that appears asa telephone handset icon in the lower-right corner of your screen, in theWindows taskbar or system tray. The Message Waiting Indicator notifies youif you have new messages and provides you with quick access to your inbox.
A red telephone handset icon indicates that you have new messages:
The appearance of the Message Waiting Indicator icon changes to give youadditional information about your connection to the server as follows:
To download and install the Message Waiting IndicatorIf you have desktop messaging installed on your workstation, or if you havealready downloaded the stand-alone CallPilot Player, you should alreadysee the Message Waiting Indicator in your taskbar. If you do not, you candownload and install it as follows:
Step Action
1 In My CallPilot, click the CallPilot Features tab.
2 Click the Downloads item.
3 Click CallPilot Player & MWI icon, and then follow the instructionsto save and install the player and Message Waiting Indicator.
—End—
To configure the Message Waiting IndicatorUse the CallPilot MWI Configuration dialog box to
• show or hide the Message Waiting Indicator
• enable and disable its pop-up balloon text
• control how long the balloon text stays on the screen
Nortel CallPilotDesktop Messaging User Guide for My CallPilot
NN44200-109 01.01 Standard5.0 26 February 2007
Copyright © 2007, Nortel Networks Nortel Networks Confidential
.

Using the Message Waiting Indicator 33
Step Action
1 In the Windows taskbar, right-click the Message Waiting Indicatoricon.
2 Click CallPilot MWI Configuration.
3 If you want to be able to open My CallPilot by double-clicking theicon, ensure that the My CallPilot URL box contains the correctURL.
Ask your CallPilot administrator for the correct URL. Typically, theURL appears in one of these formats:
http://prefix.hostname.com/mycallpilot/
http://IP address/mycallpilot/
4 To show or hide the icon, select or clear the Show MWI Icon ontaskbar check box.
Note: If you hide the icon and then decide you want to show itagain, from the Windows Start menu, choose Programs > Nortel> CallPilot MWI Icon. It reappears in the taskbar.
5 To enable or disable the balloon text, select or clear the Displaypop-up balloon for x seconds check box. You can also changethe number of seconds.
6 To save your changes, click OK.
—End—
To use the Message Waiting IndicatorHere are some helpful tips for using the Message Waiting Indicator.
• To open your latest CallPilot message, double-click the Message WaitingIndicator icon.
Note: If this does not work, ensure that the My CallPilot URL boxcontains the correct URL in the CallPilot MWI Configuration dialogbox. To open it, right-click the Message Waiting Indicator icon, andthen click CallPilot MWI Configuration.
• To display your mailbox number, the address of the server, and thenumber of messages waiting in your inbox, move your pointer over theicon.
• Right-click the icon to display a shortcut menu with options to:
Nortel CallPilotDesktop Messaging User Guide for My CallPilot
NN44200-109 01.01 Standard5.0 26 February 2007
Copyright © 2007, Nortel Networks Nortel Networks Confidential
.

34 Using My CallPilot
— open My CallPilot (if a URL for My CallPilot is defined in theconfiguration settings for the Message Waiting Indicator)
— configure the Message Waiting Indicator
— log on to or off from your CallPilot mailbox
— exit from the Message Waiting Indicator so it no longer appears
CallPilot Features tabClick the CallPilot Features tab to change the settings for your CallPilotfeatures and telephone options, and to set preferences for Web-basedaccess.
The main CallPilot Features page displays only the features that areavailable for you to use. Click any item to open its settings page.
Working with greetingsUsing My CallPilot, you can record and manage your voice greetings andpersonal verification.
If you use Internet Explorer on a Windows system, you can use the CallPilotPlayer to record and play greetings or personal verification from My CallPilot.Alternatively, you can import WAV files recorded on other audio devices forgreetings and personal verification messages.
Nortel CallPilotDesktop Messaging User Guide for My CallPilot
NN44200-109 01.01 Standard5.0 26 February 2007
Copyright © 2007, Nortel Networks Nortel Networks Confidential
.

Working with greetings 35
You can record external, internal, and temporary greetings. Callers fromoutside your organization hear your external greeting, and callers withinyour organization hear your internal greeting. If you do not record aninternal greeting, all callers hear your external greeting. If you record atemporary greeting, it is played to all callers in place of your external andinternal greetings until it expires or you delete it.
To access greetings
• Click the CallPilot Features tab, and then click the Greetings item.
The Greetings page appears.
To record or change a greeting using your telephoneEnsure you have your telephone number configured in My CallPilot.
• To check, click the My CallPilot Features tab, and then click the MyCallPilot Preferences item. In the Environment Settings, ensure yourtelephone number is entered in the Number to call for telset playback(ie. your phone) box.
Note: If you want to record greetings using the stand-alone CallPilotPlayer or another audio device instead of the telephone, see "Importinga greeting recorded with a standalone audio device" (page 36)
Nortel CallPilotDesktop Messaging User Guide for My CallPilot
NN44200-109 01.01 Standard5.0 26 February 2007
Copyright © 2007, Nortel Networks Nortel Networks Confidential
.

36 Using My CallPilot
Step Action
1 Click the CallPilot Features tab, and then click the Greetings item.
2 To start recording, click the Edit icon beside the greeting type.
3 When your telephone rings, answer it. At the tone, record yourmessage into the handset.
4 When you finish speaking:
• To end the recording, click the stop button.
• To review the recording, click the play button.
5 When you are satisfied with the greeting, click Save Greeting.
6 When you are finished, click the disconnect icon or hang up thetelephone.
7 If you recorded a temporary greeting and you want to revert back toyour regular greeting by a certain date and time, under Expiry date,click the date option, and then select a date and time.
—End—
Importing a greeting recorded with a stand-alone audio deviceYou can record and then import a new or changed greeting using thestand-alone CallPilot Player or any other audio device that supports WAVformat.
Step Action
1 Open your audio device and record a voice greeting or personalverification.
To open the stand-alone CallPilot Player, from the Windows Startmenu, choose Programs > Nortel > CallPilot Desktop Messaging> Audio Player.
2 Save the recording. For the CallPilot Player, save in VBK format. Forother audio devices, save in WAV format.
3 Click the CallPilot Features tab, and then click the Greetings item.
4 Click the Import icon beside the greeting type.
5 Click Browse, select the audio file, and then click Open.
6 Click Save.
Nortel CallPilotDesktop Messaging User Guide for My CallPilot
NN44200-109 01.01 Standard5.0 26 February 2007
Copyright © 2007, Nortel Networks Nortel Networks Confidential
.

Setting up message notification 37
7 If you recorded a temporary greeting and you want to revert back toyour regular greeting by a certain date and time, under Expiry date,click the date option, and then select a date and time.
8 Click OK.
—End—
To delete greetings
Step Action
1 Click the CallPilot Features tab, and then click the Greetings item.
2 Click the Delete icon beside the greeting.
3 Click OK.
—End—
Setting up message notificationCallPilot can notify you of new messages when you are away from theoffice. Your administrator defines whether these devices and services areavailable to you:
• Remote Text Notification to a wireless e-mail device. See Appendix"Remote Text Notification for Microsoft Outlook and BlackBerry Devices"(page 57).
• Remote Notification to a telephone or pager. This type of remotenotification can be set up and turned on or off from your telephoneas well. You can set up two time periods for notification, and choosewhether you want to be notified of all messages or urgent messagesonly.
You can have the two types of notification turned on simultaneously.
To access message notification options
• Click the CallPilot Features tab, and then click the MessageNotification item. The Message Notification page appears.
Nortel CallPilotDesktop Messaging User Guide for My CallPilot
NN44200-109 01.01 Standard5.0 26 February 2007
Copyright © 2007, Nortel Networks Nortel Networks Confidential
.

38 Using My CallPilot
Nortel CallPilotDesktop Messaging User Guide for My CallPilot
NN44200-109 01.01 Standard5.0 26 February 2007
Copyright © 2007, Nortel Networks Nortel Networks Confidential
.

Setting up message forwarding 39
Setting up message forwardingYou can forward your CallPilot messages to a CallPilot mailbox or to anexternal e-mail address. To do this you must create a message forwardingrule, which is a set of criteria defining which messages to forward andwhere to forward them.
When you enable a message forwarding rule, you can then access allincoming messages that meet the criteria from another location, such as anInternet mailbox or a Personal Digital Assistant (PDA). You can enable anddisable message forwarding as required. Voice messages can be forwardedin the format in which they are received or converted to WAV.
In My CallPilot, you can set up your own message forwarding rule using thefollowing procedures, or you can have the CallPilot administrator set it up foryou. For security reasons, you must enable it yourself.
Nortel CallPilotDesktop Messaging User Guide for My CallPilot
NN44200-109 01.01 Standard5.0 26 February 2007
Copyright © 2007, Nortel Networks Nortel Networks Confidential
.
40 Using My CallPilot
To set up message forwarding
Step Action
1 Click the CallPilot Features tab, and then click the MessageForwarding Rule item.
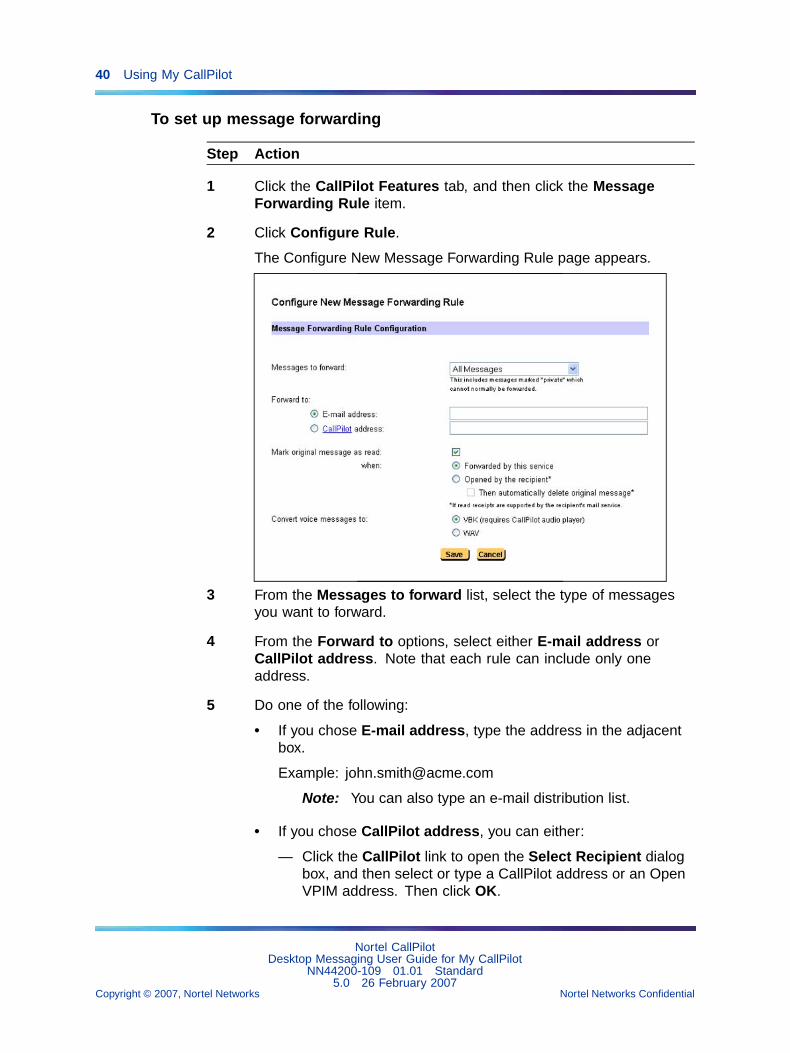
2 Click Configure Rule.
The Configure New Message Forwarding Rule page appears.
3 From the Messages to forward list, select the type of messagesyou want to forward.
4 From the Forward to options, select either E-mail address orCallPilot address. Note that each rule can include only oneaddress.
5 Do one of the following:
• If you chose E-mail address, type the address in the adjacentbox.
Example: [email protected]
Note: You can also type an e-mail distribution list.
• If you chose CallPilot address, you can either:
— Click the CallPilot link to open the Select Recipient dialogbox, and then select or type a CallPilot address or an OpenVPIM address. Then click OK.
Nortel CallPilotDesktop Messaging User Guide for My CallPilot
NN44200-109 01.01 Standard5.0 26 February 2007
Copyright © 2007, Nortel Networks Nortel Networks Confidential
.

Setting up message forwarding 41
— Manually type a CallPilot mailbox or Open VPIM address.Note that CallPilot distribution lists, telephone numbers, andfax addresses are not accepted. Use the following addressformats:
Local mailbox:
<local VPIM prefix><mailbox>@<local FQDN>
Remote mailbox:
<remote location VPIM prefix><mailbox>@<local FQDN>
Open VPIM:
VPIM=<VPIM shortcut><mailbox>/<remote FQDN>@<localFQDN>
6 If you want the original CallPilot message to appear as read (forexample, not bold) in your mailbox under certain circumstances (seethe next step), select the Mark original message as read check box.
7 If you checked the Mark original message as read check box,select one of the following options:
• Forwarded by this service: As soon as a message isautomatically forwarded, it appears as read in your CallPilotinbox.
• Opened by the recipient: The message appears as readin your CallPilot inbox only after it is opened in the locationto which it is forwarded. This option works only if the e-mailserver to which the message is forwarded supports read receiptcapability. This option is not supported if you forward messagesto a CallPilot address.
For this option, you can also select Then automatically deleteoriginal message. This way, only the forwarded copy of themessage is kept and you have only one copy to keep trackof. Note that this option is not available if Forwarded by thisservice is selected, because there is no guarantee the messagewill ever be received by the remote e-mail server.
8 If you want to convert outgoing voice messages to WAV format,select the WAV option. You might want to do this if the CallPilotPlayer is not available to play VBK messages at the forwardingaddress.
9 To create this rule, click Save. Note that the rule is automaticallyenabled. To disable it until you are ready to use it, clear the Enablecheck box.
Nortel CallPilotDesktop Messaging User Guide for My CallPilot
NN44200-109 01.01 Standard5.0 26 February 2007
Copyright © 2007, Nortel Networks Nortel Networks Confidential
.

42 Using My CallPilot
10 Click OK.
—End—
To enable or disable message forwarding
Step Action
1 Click the CallPilot Features tab, and then click the MessageForwarding Rule item. The Message Forwarding Rule pageappears.
2 In the Enable column, select or clear the check box.
3 Click OK.
—End—
Managing personal distribution listsA distribution list saves you time when you send messages to the samegroup of addresses. You can create up to 99 personal distribution lists, andenter a number and name to identify each list. Each personal distributionlist can contain up to 200 entries.
A personal distribution list can contain any addresses to which you cansend a message, except other personal distribution lists. An entry can bea mailbox number, shared distribution list number, network mailbox, opennetwork mailbox, or telephone number.
Nortel CallPilotDesktop Messaging User Guide for My CallPilot
NN44200-109 01.01 Standard5.0 26 February 2007
Copyright © 2007, Nortel Networks Nortel Networks Confidential
.
Changing your CallPilot password 43
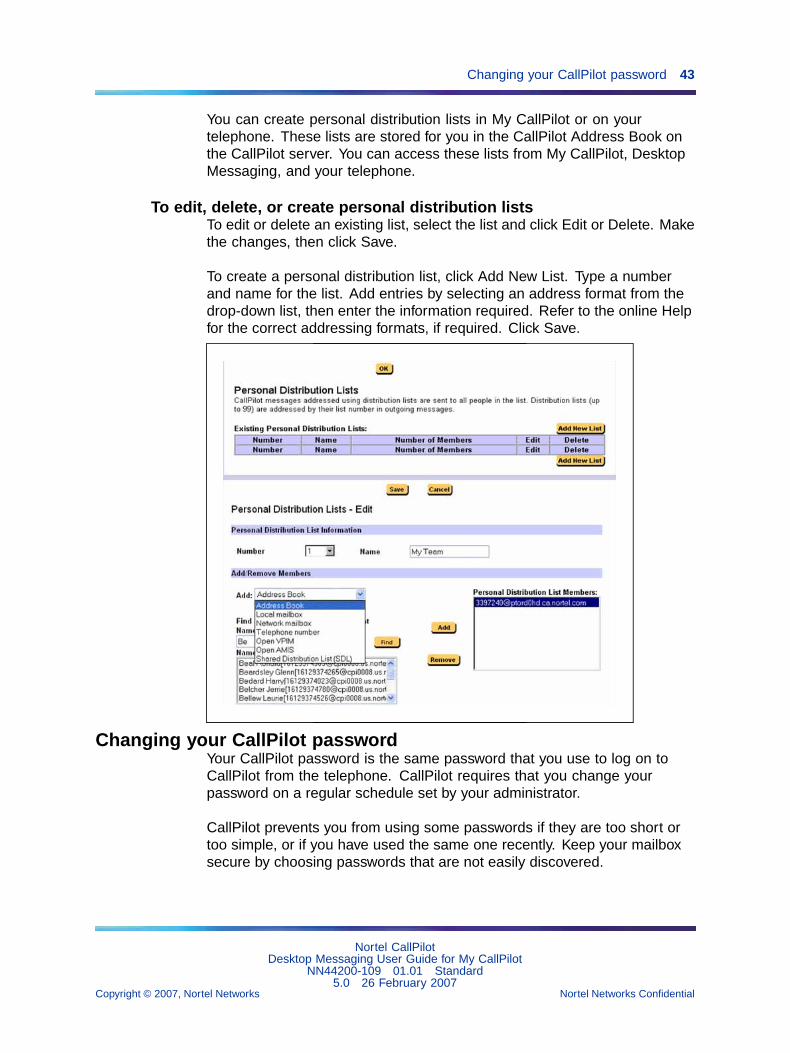
You can create personal distribution lists in My CallPilot or on yourtelephone. These lists are stored for you in the CallPilot Address Book onthe CallPilot server. You can access these lists from My CallPilot, DesktopMessaging, and your telephone.
To edit, delete, or create personal distribution listsTo edit or delete an existing list, select the list and click Edit or Delete. Makethe changes, then click Save.
To create a personal distribution list, click Add New List. Type a numberand name for the list. Add entries by selecting an address format from thedrop-down list, then enter the information required. Refer to the online Helpfor the correct addressing formats, if required. Click Save.
Changing your CallPilot passwordYour CallPilot password is the same password that you use to log on toCallPilot from the telephone. CallPilot requires that you change yourpassword on a regular schedule set by your administrator.
CallPilot prevents you from using some passwords if they are too short ortoo simple, or if you have used the same one recently. Keep your mailboxsecure by choosing passwords that are not easily discovered.
Nortel CallPilotDesktop Messaging User Guide for My CallPilot
NN44200-109 01.01 Standard5.0 26 February 2007
Copyright © 2007, Nortel Networks Nortel Networks Confidential
.
44 Using My CallPilot
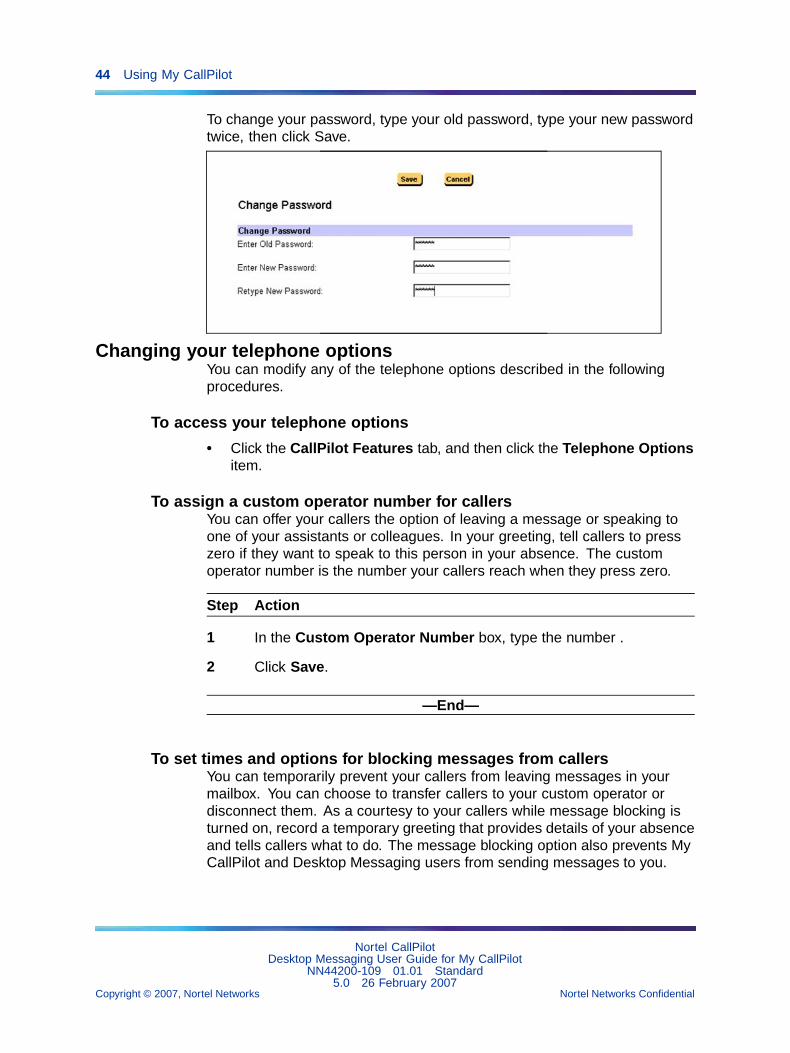
To change your password, type your old password, type your new passwordtwice, then click Save.
Changing your telephone optionsYou can modify any of the telephone options described in the followingprocedures.
To access your telephone options
• Click the CallPilot Features tab, and then click the Telephone Optionsitem.
To assign a custom operator number for callersYou can offer your callers the option of leaving a message or speaking toone of your assistants or colleagues. In your greeting, tell callers to presszero if they want to speak to this person in your absence. The customoperator number is the number your callers reach when they press zero.
Step Action
1 In the Custom Operator Number box, type the number .
2 Click Save.
—End—
To set times and options for blocking messages from callersYou can temporarily prevent your callers from leaving messages in yourmailbox. You can choose to transfer callers to your custom operator ordisconnect them. As a courtesy to your callers while message blocking isturned on, record a temporary greeting that provides details of your absenceand tells callers what to do. The message blocking option also prevents MyCallPilot and Desktop Messaging users from sending messages to you.
Nortel CallPilotDesktop Messaging User Guide for My CallPilot
NN44200-109 01.01 Standard5.0 26 February 2007
Copyright © 2007, Nortel Networks Nortel Networks Confidential
.

Changing your telephone options 45
Step Action
1 In the Block callers from leaving messages list, specify when toblock message reception:
• Never: Allow callers to leave messages.
• Always: Do not allow callers to leave messages.
• Only when temporary greeting recorded: Do not allow callersto leave messages when the temporary greeting is recorded.
2 For Blocked callers will be played the greeting, then, choose oneof the following options:
• Transferred to custom operator: When message reception isblocked, play the mailbox greeting and then transfer the caller tothe number specified in the Customer Operator Number box.
• Disconnected: When message reception is blocked, play themailbox greeting and then disconnect the call.
3 Click Save.
—End—
To turn Auto Login on or offWhen Auto Login is turned on, you do not have to enter your mailbox andpassword when you log on from a defined number. Your administratordefines secure numbers for Auto Login, such as your office or hometelephone. When Auto Login is turned on, you access your mailbox bydialing the CallPilot access number or pressing the message key at one ofyour defined Auto Login numbers.
Step Action
1 To enable Auto Login, select the Turn on Auto Login for allowednumbers check box.
2 Click Save.
3 Use your telephone to complete activation of Auto Logon. Log onto your mailbox from the telephone, and then enable Auto Logon bypressing 804.
—End—
Nortel CallPilotDesktop Messaging User Guide for My CallPilot
NN44200-109 01.01 Standard5.0 26 February 2007
Copyright © 2007, Nortel Networks Nortel Networks Confidential
.

46 Using My CallPilot
To hide your name and number in CallPilot Address BooksYou can keep your personal information from being listed in any CallPilotAddress Book or the address book of any desktop client, and ensure thatyour mailbox is not name dialable or name addressable from the telephone.
Even with this setting turned on, your name and address
• still appears in any messages you send
• still appears in any messages you receive and is therefore viewable byothers on the distribution list for that message
Step Action
1 Select the Hide my name and number in all CallPilot addressbooks, including Name Dial check box.
2 Click Save.
—End—
To select which directory numbers are associated to your MessageWaiting Indicator
Message Waiting Indicator Directory Numbers (MWI DN) are assigned bythe administrator. You cannot change the numbers; however, you cansee these MWI DNs in your telephone options and identify which ones toassociate to your Message Waiting Indicator.
Step Action
1 In the Message Waiting Indicator at telephone section, selectthe check box beside each DN that you want associated with yourMessage Waiting Indicator.
2 Click Save.
—End—
Setting up telephone access to e-mailIf you have a linked e-mail account set up, you can configure it for telephoneaccess. You can check for new e-mail messages while logged in to CallPilotfrom your telephone. You can have the text content of any new e-mailmessages read to you over the telephone. If you have not yet set up accessto your e-mail accounts from CallPilot, see "Setting up links to your e-mailaccounts" (page 48).
Nortel CallPilotDesktop Messaging User Guide for My CallPilot
NN44200-109 01.01 Standard5.0 26 February 2007
Copyright © 2007, Nortel Networks Nortel Networks Confidential
.

Changing fax printing options 47
To set up an e-mail account for telephone access
Step Action
1 Click the CallPilot Features tab, and then click the E-mail ByPhone item. The E-mail By Phone page appears, listing any mailboxlinks you currently have set up.
Note: If you need to set up or edit a mailbox link first, clickConfigure New Mailbox Link. See To set up an e-mail link.
2 From the Use voice of list, select a female or male voice to readyour e-mail.
3 In the Enable column, select one e-mail account for access bytelephone.
4 Click OK.
You can now access your e-mail by logging on to your CallPilotmessages using the telephone and then switching to your e-mailmessage list by pressing 8-9.
—End—
Changing fax printing optionsIf your CallPilot mailbox has fax messaging capability, you can receive a faxmessage in your mailbox and print the fax at a selected fax number. Setoptions for default fax number, Auto printing, and print cover page on theFax Printing page.
Nortel CallPilotDesktop Messaging User Guide for My CallPilot
NN44200-109 01.01 Standard5.0 26 February 2007
Copyright © 2007, Nortel Networks Nortel Networks Confidential
.

48 Using My CallPilot
To access fax printing options
• Click the CallPilot Features tab, and then click the Fax Printing item.
To change the default printerYou must set a default fax number. If you are not using Auto printing, adefault fax number is the simplest way to print. The default number canbe any fax number that CallPilot can dial, including any normally requiredprefixes.
To turn Auto printing on or offWhen Auto printing is turned on, any faxes that arrive at your mailbox areautomatically printed at a specified default fax number. A message thathas been auto printed remains in your mailbox so that you can reprintthe message or forward the message. Your printed faxes can be deletedautomatically from your mailbox on a schedule set by your administrator.
Auto printing is the most convenient way to handle fax messages while youare in one location. If you are away from your office, you can turn Autoprinting off and print your faxes at another fax number.
To turn fax separator page printing on or offYou can select whether to print a fax separator page when you print a faxmessage. A separator page identifies you and gives details of the print job,such as the number of pages. Separator pages are useful if you receivefaxes without cover pages. If the sender of the fax includes a header pagewith the fax, the header page also prints.
Setting up links to your e-mail accountsYou can set up links in My CallPilot so that you can check your e-mail fornew messages. You can also forward and reply to messages, and sendnew e-mails.
You can define up to five e-mail accounts. One of these accounts can beset up for access from your telephone. See "Setting up telephone accessto e-mail" (page 46).
Nortel CallPilotDesktop Messaging User Guide for My CallPilot
NN44200-109 01.01 Standard5.0 26 February 2007
Copyright © 2007, Nortel Networks Nortel Networks Confidential
.

Setting up links to your e-mail accounts 49
To set up a link to your e-mail accountMy CallPilot supports various settings when configuring an external e-mailserver. Some of these settings are configured in CallPilot Manager, whileothers are specified in My CallPilot. This way, My CallPilot can workcorrectly in situations where your corporate IMAP, SMTP and LDAP serversare on different hosts.
Consult your administrator if you are required to enter or change thesesettings and are uncertain of the appropriate entries.
Note: In the following procedure, the check boxes for This serverrequires a secure connection will appear automatically selectedand dimmed if the CallPilot administrator has specified that only SSLconnections can be used.
Step Action
1 Click the CallPilot Features tab, and then click the Mailbox Linksitem.
2 Click Configure New Mailbox Link. The Configure New MailboxLink page appears.
Nortel CallPilotDesktop Messaging User Guide for My CallPilot
NN44200-109 01.01 Standard5.0 26 February 2007
Copyright © 2007, Nortel Networks Nortel Networks Confidential
.

50 Using My CallPilot
3 Select your e-mail server from the Mailbox server drop-down list.Your CallPilot administrator creates this list.
4 Type a name for this account to display on the tab.
5 Type the name of the folder to access for your e-mail messages,such as INBOX.
6 Type your e-mail address.
7 Type your mailbox user name (the user ID of your e-mail account).
8 Type the password for this e-mail account.
9 Retype the password for this e-mail account to verify it.
10 If the mail server for this e-mail account requires a secureconnection, click This server requires a secure connection.
11 In the Outgoing mail server (SMTP) settings, complete thefollowing steps if the SMTP server requires authentication:
a. Select the This server requires a user name and passwordcheck box.
b. Type your mailbox user name (the User ID of your e-mailaccount).
c. Type the password for this e-mail account.
d. Retype the password for this e-mail account to verify it.
12 In the Directory service (LDAP) section, complete the followingsteps if the LDAP server requires authentication:
a. Select the This server requires a user name and passwordcheck box.
b. Type your mailbox user name (the User ID of your e-mailaccount).
c. Type the password for this e-mail account.
d. Type the password again to verify it.
13 Click Save.
14 On the Mailbox Links page, click OK. A new tab appears in MyCallPilot with a link to the e-mail account you just configured.
—End—
Nortel CallPilotDesktop Messaging User Guide for My CallPilot
NN44200-109 01.01 Standard5.0 26 February 2007
Copyright © 2007, Nortel Networks Nortel Networks Confidential
.

Setting up links to your e-mail accounts 51
These settings allow My CallPilot to be configured easily to work in nearlyany corporate e-mail environment.
Note: To log on anonymously, clear This server requires a user nameand password, for both SMTP and IMAP. Note that some serversrequire authentication and do not allow logging on anonymously.
Searching external e-mail address books (LDAP databases)You might have access to an external address book if there is one definedfor your e-mail server and it is configured by your administrator in CallPilotManager. In the preceding procedure, completing the fields in the DirectoryService (LDAP) section allows you to search external LDAP databasesif the LDAP server requires authentication. This means you can searchthe external address book when composing a new external e-mail servermessage, just as you do when composing a CallPilot message. Note thatyou do not have the ability to specify the port numbers; these are defined bythe administrator in CallPilot Manager.
Note: The administrator must enter the correct search base, host/IPand port number for the external LDAP server in CallPilot Manager whenthe external e-mail server is defined.
The following shows an example of an external e-mail server address bookin My CallPilot:
Nortel CallPilotDesktop Messaging User Guide for My CallPilot
NN44200-109 01.01 Standard5.0 26 February 2007
Copyright © 2007, Nortel Networks Nortel Networks Confidential
.

52 Using My CallPilot
When you address a message, the address book that appears dependson the inbox you are working from. For example, when you compose anew CallPilot message, the address book displays addresses only fromthe CallPilot server. When you compose a new Exchange message, theaddress book displays addresses only from the Exchange server, and so on.
Distribution lists may appear in the results.
Using your linked e-mail accountsWhen you have completed configuring your linked e-mail accounts, you cancheck your e-mail messages. You can also forward and reply to messages,and send new e-mails.
You can also set up access to a second CallPilot mailbox, which can be onanother server. For setup details, refer to the online Help.
For each linked e-mail account, a tab appears in your My CallPilot session.Your linked e-mail accounts look similar to your message list on the CallPilotMessages tab, and they work in a similar way. Here is an example:
To open a messageTo open an e-mail message in My CallPilot, click the icon in the Attachmentscolumn beside the message, or click any underlined part of the messageline.
To delete a messageTo mark an e-mail message for deletion, select the message and clickDelete. To ensure that deleted messages are permanently deleted, openthe My CallPilot Preferences page, and in Environment Settings, check theRemove Deletable items on logout check box.
To compose and send a new messageTo compose a new e-mail message, click Compose, type the message, andsend the message the same way as a CallPilot message. The AddressBook is not available.
Nortel CallPilotDesktop Messaging User Guide for My CallPilot
NN44200-109 01.01 Standard5.0 26 February 2007
Copyright © 2007, Nortel Networks Nortel Networks Confidential
.

Setting messaging preferences 53
To forward and reply to messagesYou can forward and reply to e-mails in the same way as CallPilot messages.You might have access to an external address book if there is one definedfor your e-mail server and it is configured by your administrator in CallPilotManager.
Setting messaging preferencesYou can set preferences for your message list displays and behavior, optionsfor message editing, and your default audio format for voice messaging.
To access messaging preferences
• Click the CallPilot Features tab, and then click the My CallPilotPreferences item.
To change message list columnsYou can change the columns in your message list. The Attachmentsoption must be in the Displayed Columns list to see the embedded player(Windows only) in your message list.
To add a signatureType or paste your signature and other information, and then select thecheck box if you want this signature added automatically to outgoing textmessages.
Nortel CallPilotDesktop Messaging User Guide for My CallPilot
NN44200-109 01.01 Standard5.0 26 February 2007
Copyright © 2007, Nortel Networks Nortel Networks Confidential
.

54 Using My CallPilot
To change environment settingsChange any of these My CallPilot settings to your preferences.
Note: The Remove Deletable items on logout check box applies toboth CallPilot and regular e-mail messages, as well as messages youaccess when using E-mail-by-Phone.
Choosing a home page for My CallPilotChoose the page that you want to display automatically when you log onto My CallPilot.
Useful Information tabClick the Useful Information tab to:
• View status and details about your mailbox.
Nortel CallPilotDesktop Messaging User Guide for My CallPilot
NN44200-109 01.01 Standard5.0 26 February 2007
Copyright © 2007, Nortel Networks Nortel Networks Confidential
.

Transcribing voice forms 55
• View online user guides.
• Print online user guide files on your laser printer.
Transcribing voice formsYou can use My CallPilot to transcribe voice forms, if your systemadministrator has granted you this capability. If so, your My CallPilot sessionincludes a tab called Voice Forms Transcription.
A voice form is an electronic equivalent of a paper form or questionnaire.Voice forms can be used for services such as credit card applications,registration forms, and customer complaints. Using My CallPilot, you canretrieve and play back the responses left by callers to a voice form.
For detailed procedures for using My CallPilot to transcribe voice forms, seeVoice Forms Transcriber User Guide (NN44200-110), or refer to the MyCallPilot online Help.
Nortel CallPilotDesktop Messaging User Guide for My CallPilot
NN44200-109 01.01 Standard5.0 26 February 2007
Copyright © 2007, Nortel Networks Nortel Networks Confidential
.

56 Using My CallPilot
Protecting the security of your mailboxBecause My CallPilot is a Web-based product, it is important to takeprecautions to protect the security of your mailbox.
• If your administrator has enabled SSL encryption, you can use theSecure Login feature for greater security. See "To log in using securelogin" (page 15).
• When you finish using My CallPilot, make sure that you log out. If yougo to a Web site outside of My CallPilot without logging out, you remainlogged in until your My CallPilot session times out. This can make yourCallPilot information vulnerable to hackers. If you want to visit a Website without exiting My CallPilot, use a separate browser window toview the other site.
• You can set CallPilot to log out automatically after a short time, such as5 or 10 minutes. See "Setting messaging preferences" (page 53).
• If you use a public or shared workstation, avoid using the RememberPassword option when you log on to My CallPilot. If this option isselected, others can access your CallPilot mailbox.
• If you use a public or shared workstation, empty the browser cacheafter a CallPilot session. For information about your browser cache, seeyour browser online Help.
Nortel CallPilotDesktop Messaging User Guide for My CallPilot
NN44200-109 01.01 Standard5.0 26 February 2007
Copyright © 2007, Nortel Networks Nortel Networks Confidential
.

57
Appendix ARemote Text Notification for MicrosoftOutlook and BlackBerry Devices
Remote text notification can be configured to send a message to yourSMTP e-mail account when a new voice, fax, or text message arrives inyour CallPilot mailbox. You can set up notification to any e-mail server thatsupports SMTP. These include most e-mail accounts, wireless handheldorganizers, mobile phones, or PDAs like the Research In Motion BlackBerry.
To set up My CallPilot for remote telephone or pager notification, see"Setting up message notification" (page 37). If you want to forward theactual messages to a PDA that supports e-mail, you or your administratorcan configure a message forwarding rule to do this. See "Setting upmessage forwarding" (page 39).
This section describes how to set up remote text notification for MicrosoftOutlook and BlackBerry devices. Any device or portal with a serviceprovider that supports SMTP can receive e-mail notification messages. Ifyou plan to use another type of device to receive remote text notification,ask your CallPilot administrator about any additional setup that is requiredfor your device.
To receive notification messages on a Research In Motion (RIM) BlackBerryInternet Edition device, you must configure Microsoft Outlook andBlackBerry Desktop Manager (version 2 or later) to forward CallPilotnotification messages to your BlackBerry device.
If you use a BlackBerry Enterprise Edition device, your administrator can setup notification message forwarding for you on the e-mail server or configureBlackBerry Desktop Manager to redirect CallPilot notification messages.
Note: If you set up My CallPilot to send CallPilot notification to yourOutlook Inbox, and set up BlackBerry Desktop Manager to send allincoming messages to your BlackBerry device, your CallPilot notification
Nortel CallPilotDesktop Messaging User Guide for My CallPilot
NN44200-109 01.01 Standard5.0 26 February 2007
Copyright © 2007, Nortel Networks Nortel Networks Confidential
.
58 Appendix A Remote Text Notification for Microsoft Outlook and BlackBerry Devices
messages appear in your list of e-mails on your BlackBerry device withno additional configuration required.
Notification message formatAn e-mail notification message can show the:
• type of message
• name of the person who left the message, if available
• telephone number, if available
For example, John Smith calls from extension 1234 and leaves a voicemessage for Andrew Jones. An e-mail message is sent to Andrew Joneswith the following text:
You have a voice message from John Smith [1234]
Microsoft Outlook forwards this e-mail message to Andrew’s BlackBerrydevice. The message appears with the subject CallPilot Notification. WhenAndrew receives the message, he can decide whether to retrieve themessage from CallPilot or to call John immediately, using a telephone.
Getting started with remote text notificationRequirements
• You need a BlackBerry device. Ensure that e-mail service on yourBlackBerry device is working.
• Microsoft Outlook must be installed. Currently, BlackBerry DesktopManager works only with Microsoft Outlook. Consult your BlackBerrydocumentation for information about other e-mail clients.
• BlackBerry Desktop Manager 2 or later must be installed and running onyour computer.
• Remote text notification capability must be enabled and set up for yourmailbox by your CallPilot administrator.
• Remote text notification must be configured and enabled in My CallPilot.For more information, see "Setting up message notification" (page 37).
Nortel CallPilotDesktop Messaging User Guide for My CallPilot
NN44200-109 01.01 Standard5.0 26 February 2007
Copyright © 2007, Nortel Networks Nortel Networks Confidential
.

Creating a notification holding folder 59
Configuration stepsComplete the following steps to effectively manage e-mail notificationmessages.
Step Reference
Create a holding folder for your e-mailnotification messages so that they are storedseparately from your other messages.
If you want to forward all messages in yourOutlook inbox to your BlackBerry device, youcan skip this step.
"Creating a notificationholding folder" (page 59)
Configure BlackBerry Desktop Manager toforward messages to your BlackBerry device.
"Configuring BlackBerryDesktop Manager" (page 62)
If desired, configure Outlook to delete oldCallPilot notification messages automaticallyfrom the holding folder.
Alternatively, you can manually deletenotification messages from the holding folder.
"Automatically removingnotification messages" (page63)
Creating a notification holding folderYou can create a holding folder for your CallPilot e-mail notificationmessages so that they are stored separately from your other messages. Tostore messages in the folder, follow these steps:
Step Action
1 Create an Outlook folder for the notification messages.
2 Configure Outlook to route CallPilot notification e-mail messages tothe folder using the Rules Wizard.
—End—
To create a notification folder
Step Action
1 Start Outlook.
2 In the Folder List, select Outlook Today.
3 From the File menu, choose New > Folder. The Create New Folderdialog box appears.
Nortel CallPilotDesktop Messaging User Guide for My CallPilot
NN44200-109 01.01 Standard5.0 26 February 2007
Copyright © 2007, Nortel Networks Nortel Networks Confidential
.

60 Appendix A Remote Text Notification for Microsoft Outlook and BlackBerry Devices
4 In the Name box, type CallPilot Notification, and then click OK. TheCallPilot Notification folder appears in the Folder List.
—End—
To route notification messages to the holding folder
Step Action
1 Choose Tools > Rules Wizard. The Rules Wizard dialog boxappears.
2 Click New. The first panel of the Rules Wizard appears.
3 In the list of rule types, select Check messages when they arrive,and then click Next.
4 In the list of rule conditions, check With Specific words in thesubject box.
5 In the Rule description box, click Specific Words. The Search Textdialog box appears.
6 In the Add new box, type CallPilot Notification.
Nortel CallPilotDesktop Messaging User Guide for My CallPilot
NN44200-109 01.01 Standard5.0 26 February 2007
Copyright © 2007, Nortel Networks Nortel Networks Confidential
.

Creating a notification holding folder 61
7 Click Add. The text "CallPilot Notification" is added to the Searchlist box.
8 Click OK. The search text "CallPilot Notification" appears in the ruledescription.
9 Click Next.
10 In the list of actions, check the move it to the specified folder box.
11 In the Rule description box, click Specified. A list of Outlook foldersappears.
12 In the folder list, choose CallPilot Notification, and then click OK.The folder name appears in the rule description.
13 Click Finish. The finished rule is shown in the following illustration:
14 Click OK to close the Rules Wizard.
—End—
Nortel CallPilotDesktop Messaging User Guide for My CallPilot
NN44200-109 01.01 Standard5.0 26 February 2007
Copyright © 2007, Nortel Networks Nortel Networks Confidential
.

62 Appendix A Remote Text Notification for Microsoft Outlook and BlackBerry Devices
Configuring BlackBerry Desktop ManagerThis section explains how to configure BlackBerry Desktop Manager toredirect your e-mail notification messages.
If you did not create a holding folder for notification messages, and if youalready configured BlackBerry Desktop Manager to forward messages inyour Outlook inbox, you can skip this section.
To configure e-mail redirection
Step Action
1 From the Windows Start menu, choose Programs > BlackBerry >Desktop Manager. BlackBerry Desktop Manager appears.
2 In the application list, double-click Redirector Settings. TheRedirector Settings dialog box appears.
3 Click the Advanced tab.
4 In the Folder redirection section, choose Selected folders.
5 Click Choose Folders... .The Choose Folders dialog box appears.
6 Select the folders where you receive messages that you want toredirect to your BlackBerry device.
• To redirect messages in your holding folder, select the CallPilotNotification folder.
• To redirect all messages in your Outlook inbox, select the Inboxfolder.
Nortel CallPilotDesktop Messaging User Guide for My CallPilot
NN44200-109 01.01 Standard5.0 26 February 2007
Copyright © 2007, Nortel Networks Nortel Networks Confidential
.

Automatically removing notification messages 63
7 Click Save to save your folder selection.
8 Click OK to save your redirection options.
9 Exit BlackBerry Desktop Manager.
—End—
Automatically removing notification messagesThis section explains how to configure Outlook to remove messagesautomatically from the CallPilot Notifications holding folder using theAutoArchive feature. If you do not want Outlook to delete notificationmessages automatically, you can manually delete them from the folder.
ATTENTIONIf you currently do not use AutoArchive, ensure that you become familiar with thisfeature before you activate it. You can have existing folders with AutoArchivesettings that have never been activated. If you activate AutoArchive to deletemessages automatically from the CallPilot Notifications folder, you might find thatmessages in other folders are being archived as well.
If you are unsure about what to do, check with your local Microsoft Outlooksupport group.
Step Action
You must perform two steps to configure automatic deletion of notificationmessages:
1 Set up AutoArchive to delete messages from the CallPilotNotifications folder.
2 Activate the AutoArchive feature.
—End—
To set up deletion of notification messages
Step Action
1 In the Outlook Folder List, right-click the CallPilot Notificationsfolder, and then choose Properties. The CallPilot NotificationProperties dialog box appears.
2 Click the AutoArchive tab.
Nortel CallPilotDesktop Messaging User Guide for My CallPilot
NN44200-109 01.01 Standard5.0 26 February 2007
Copyright © 2007, Nortel Networks Nortel Networks Confidential
.

64 Appendix A Remote Text Notification for Microsoft Outlook and BlackBerry Devices
3 Select the Clean out items older than check box.
4 Set the time to 1 day.
5 Select Permanently delete old items.
6 Click OK.
—End—
To activate AutoArchive
Step Action
1 In Outlook, choose Tools > Options.
2 Click the Other tab.
3 Click AutoArchive. The AutoArchive dialog box appears.
4 Check the AutoArchive every... box and set the frequency to 1 day.
5 Click OK to close the dialog box.
Nortel CallPilotDesktop Messaging User Guide for My CallPilot
NN44200-109 01.01 Standard5.0 26 February 2007
Copyright © 2007, Nortel Networks Nortel Networks Confidential
.

Automatically removing notification messages 65
6 Click OK to close the Options dialog box.
—End—
Nortel CallPilotDesktop Messaging User Guide for My CallPilot
NN44200-109 01.01 Standard5.0 26 February 2007
Copyright © 2007, Nortel Networks Nortel Networks Confidential
.

66 Appendix A Remote Text Notification for Microsoft Outlook and BlackBerry Devices
Nortel CallPilotDesktop Messaging User Guide for My CallPilot
NN44200-109 01.01 Standard5.0 26 February 2007
Copyright © 2007, Nortel Networks Nortel Networks Confidential
.


Nortel CallPilot
Desktop Messaging User Guide for My CallPilotCopyright © 2007, Nortel NetworksAll Rights Reserved.
Publication: NN44200-109Document status: StandardDocument version: 01.01Document date: 26 February 2007
To provide feedback or to report a problem in this document, go to http://www.nortel.com/documentfeedback
Sourced in Canada
The information in this document is subject to change without notice. The statements, configurations, technical data, andrecommendations in this document are believed to be accurate and reliable, but are presented without express or impliedwarranty. Users must take full responsibility for their applications of any products specified in this document. The information inthis document is proprietary to Nortel Networks.
Nortel, the Nortel logo, and the Globemark are trademarks of Nortel Networks.