Embed Size (px)
Citation preview
Nortel Page 1 of 120
Product Bulletin
Bulletin Number: P-2006-0227-Global Issue 1.1g Date: 19 July 2007
CallPilot 4 JITC Hardened Configuration
Introduction
Security is a requirement for all computers connected to a network used by an organization worried about being the target of computer network attacks. A new, enhanced-security configuration has been introduced for CallPilot 4.0 to allow CallPilot to meet strict U.S. Dept of Defense (DoD) JITC (Joint Interoperability Test Command) security requirements. This bulletin introduces this compelling enhancement, highlighting its values and benefits, limitations, and implementation process.
Security and Certification
CallPilot has long since incorporated a number of security-related capabilities directly within the application itself to ensure it operates in a secure manner as an “IT” friendly solution. As CallPilot has evolved, Nortel continues to leverage the latest technologies to further this offering, including support for and recommended use of industry-leading anti-virus applications as well as direct application of approved Microsoft security updates. JITC Certification for CallPilot 4.0 enhances the solution’s ability to operate in an elevated security-sensitive environment meeting strict guidelines for customers in government, military, banking, healthcare, legal, and other sectors.
References and Related Documents
This document provides detailed information regarding the CallPilot DoD configuration. The standard CallPilot 4 NTPs, coupled with the following documents, provide additional OS and application security-related information for properly securing a CallPilot server: Type/Number Title Description P-2007-0010-Global CallPilot Server
Security Update Detailed information regarding OS security including Microsoft updates.
P-2007-0101-Global CallPilot Support for Anti-Virus Applications
Installation/configuration information for the use of anti-virus applications.
Nortel Page 2 of 120
* Nortel, the Nortel logo and the Globemark are trademarks of Nortel. CallPilot is a trademark of Nortel. Nortel is a recognized leader in delivering communications capabilities that enhance the human experience, ignite and power global commerce, and secure and protect the world’s most critical information. Serving both service provider and enterprise customers, Nortel delivers innovative technology solutions encompassing end-to-end broadband, Voice over IP, multimedia services and applications, and wireless broadband designed to help people solve the world’s greatest challenges. Nortel does business in more than 150 countries. For more information, visit Nortel on the Web at www.nortel.com.
Nortel Page 3 of 120
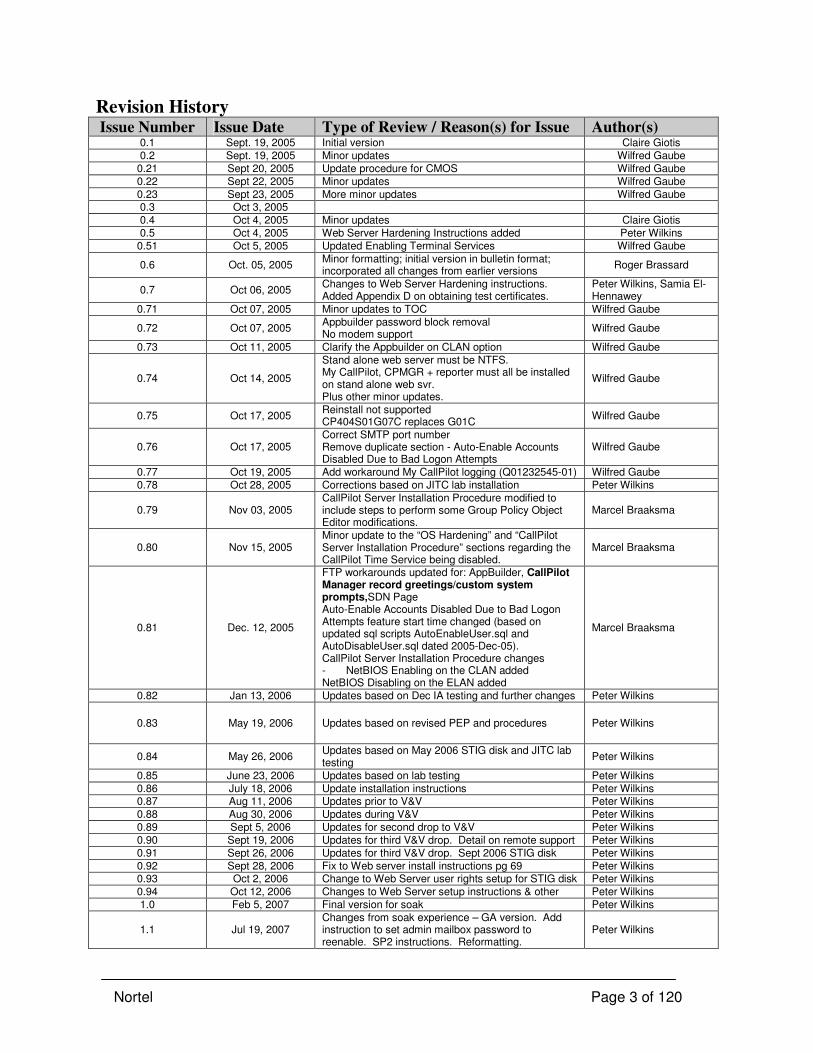
Revision History Issue Number Issue Date Type of Review / Reason(s) for Issue Author(s)
0.1 Sept. 19, 2005 Initial version Claire Giotis
0.2 Sept. 19, 2005 Minor updates Wilfred Gaube
0.21 Sept 20, 2005 Update procedure for CMOS Wilfred Gaube
0.22 Sept 22, 2005 Minor updates Wilfred Gaube
0.23 Sept 23, 2005 More minor updates Wilfred Gaube 0.3 Oct 3, 2005
0.4 Oct 4, 2005 Minor updates Claire Giotis
0.5 Oct 4, 2005 Web Server Hardening Instructions added Peter Wilkins
0.51 Oct 5, 2005 Updated Enabling Terminal Services Wilfred Gaube
0.6 Oct. 05, 2005 Minor formatting; initial version in bulletin format; incorporated all changes from earlier versions
Roger Brassard
0.7 Oct 06, 2005 Changes to Web Server Hardening instructions. Added Appendix D on obtaining test certificates.
Peter Wilkins, Samia El-Hennawey
0.71 Oct 07, 2005 Minor updates to TOC Wilfred Gaube
0.72 Oct 07, 2005 Appbuilder password block removal No modem support
Wilfred Gaube
0.73 Oct 11, 2005 Clarify the Appbuilder on CLAN option Wilfred Gaube
0.74 Oct 14, 2005
Stand alone web server must be NTFS. My CallPilot, CPMGR + reporter must all be installed on stand alone web svr. Plus other minor updates.
Wilfred Gaube
0.75 Oct 17, 2005 Reinstall not supported CP404S01G07C replaces G01C
Wilfred Gaube
0.76 Oct 17, 2005 Correct SMTP port number Remove duplicate section - Auto-Enable Accounts Disabled Due to Bad Logon Attempts
Wilfred Gaube
0.77 Oct 19, 2005 Add workaround My CallPilot logging (Q01232545-01) Wilfred Gaube
0.78 Oct 28, 2005 Corrections based on JITC lab installation Peter Wilkins
0.79 Nov 03, 2005 CallPilot Server Installation Procedure modified to include steps to perform some Group Policy Object Editor modifications.
Marcel Braaksma
0.80 Nov 15, 2005 Minor update to the “OS Hardening” and “CallPilot Server Installation Procedure” sections regarding the CallPilot Time Service being disabled.
Marcel Braaksma
0.81 Dec. 12, 2005
FTP workarounds updated for: AppBuilder, CallPilot Manager record greetings/custom system prompts,SDN Page Auto-Enable Accounts Disabled Due to Bad Logon Attempts feature start time changed (based on updated sql scripts AutoEnableUser.sql and AutoDisableUser.sql dated 2005-Dec-05). CallPilot Server Installation Procedure changes - NetBIOS Enabling on the CLAN added NetBIOS Disabling on the ELAN added
Marcel Braaksma
0.82 Jan 13, 2006 Updates based on Dec IA testing and further changes Peter Wilkins
0.83 May 19, 2006 Updates based on revised PEP and procedures Peter Wilkins
0.84 May 26, 2006 Updates based on May 2006 STIG disk and JITC lab testing
Peter Wilkins
0.85 June 23, 2006 Updates based on lab testing Peter Wilkins
0.86 July 18, 2006 Update installation instructions Peter Wilkins 0.87 Aug 11, 2006 Updates prior to V&V Peter Wilkins
0.88 Aug 30, 2006 Updates during V&V Peter Wilkins
0.89 Sept 5, 2006 Updates for second drop to V&V Peter Wilkins
0.90 Sept 19, 2006 Updates for third V&V drop. Detail on remote support Peter Wilkins
0.91 Sept 26, 2006 Updates for third V&V drop. Sept 2006 STIG disk Peter Wilkins
0.92 Sept 28, 2006 Fix to Web server install instructions pg 69 Peter Wilkins 0.93 Oct 2, 2006 Change to Web Server user rights setup for STIG disk Peter Wilkins
0.94 Oct 12, 2006 Changes to Web Server setup instructions & other Peter Wilkins
1.0 Feb 5, 2007 Final version for soak Peter Wilkins
1.1 Jul 19, 2007 Changes from soak experience – GA version. Add instruction to set admin mailbox password to reenable. SP2 instructions. Reformatting.
Peter Wilkins

Nortel Page 4 of 120
Table of Contents Security and Certification ..................................................................................................... 1
References and Related Documents...................................................................................... 1
1. Overview........................................................................................................................... 5
Supported Switch Configurations ......................................................................................... 6
2. Limitations ........................................................................................................................ 7
3. Operating System Hardening.......................................................................................... 10
4. CallPilot Mailbox Password Encryption......................................................................... 11
5. Workarounds: File Transfer Operations requiring FTP.................................................. 12
6. Desktop Messaging and My CallPilot User Logon / Logoff Event Logging ................. 16
7. Telset User Logon Event Logging.................................................................................. 19
8. Auto-Enable Mailboxes Disabled Due to Bad Logon Attempts..................................... 22
9. Automatically Disable Unused Mailboxes ..................................................................... 23
10. CallPilot Server Installation Procedure....................................................................... 24
11. CallPilot Web Server Installation Procedure .............................................................. 35
12. SSL Security on CallPilot Server................................................................................ 64
Appendix A: Enabling / Disabling Remote Support............................................................... 67
Appendix B: The Master Key Change Utility ........................................................................ 94
Appendix C: How to obtain a Verisign test certificate ........................................................... 95
Appendix D: Creating certificates using Windows Certification Authority......................... 109
Appendix E: Creating a Hotfix CD....................................................................................... 110
Appendix F: Enabling more than 96 channels on 1002rp..................................................... 115
Appendix G: Changing Computer Name of the CP Server .................................................. 117
Appendix H: Troubleshooting Tips ...................................................................................... 118
References............................................................................................................................. 120
Nortel Page 5 of 120
1. Overview A new configuration of CallPilot Release 4 is being introduced that increases the security of the CallPilot system and prepares it for deployment in a JITC Certified secure environment. This document describes the steps required to install the new JITC Hardened configuration, which features it makes available and what restrictions it has. The installation of the DoD configuration of CallPilot involves the installation of a special restricted PEP (CP404S01R05S) onto the CallPilot server. This PEP can only be installed onto a specific release level of CallPilot 4 based on SU01. In addition, specific manual steps are required to be carefully followed as described in this document. Because of these restrictions, the DoD configuration of CallPilot must be installed from scratch using the CallPilot 4 GA image CDs. Any pre-existing production CallPilot 4 system cannot be directly upgraded to the DoD configuration. However, it is still possible to do a user archive on the pre-existing CallPilot 4 system, reinstall the system from the CallPilot 4 GA image CDs and then restore the data prior to applying the DoD PEP (CP404S01R05S). In a secure customer network, different servers are placed in different parts of the network, according to the security risk associated with the particular server. Firewalling rules govern communications between the more secure and the less secure parts of the network. Critical equipment such as telephone switches and associated messaging servers will be placed in a high-security core part of the network. Web servers, which inherently require broader access, must be located in a separate part of the network. This requirement to separate the web server and messaging server components of CallPilot means that a CallPilot “stand-alone web server” configuration must be used and the web server that usually runs on the CallPilot server itself must be disabled. In order to facilitate the security qualification process, only a subset of the entire CallPilot feature set has been submitted for JITC qualification. The following features have not been submitted for JITC qualification:
• Email-By-Phone (this feature requires that CallPilot store a user’s email password in reversible encrypted format)
• CallPilot Desktop (however, note that My CallPilot web messaging is qualified)
• SCCS integration
• CallPilot platforms other than the 201i and 1002rp Note that the above features are not blocked and could still be made available for security-conscious customers who do not require full official JITC certification. The JITC Security PEP (CP404S01R05S) provides procedures to harden the Windows 2003 Server Operating System (OS) on the CallPilot Server as well as the CallPilot Manager Stand-alone Web Server. As a result of the OS hardening, Terminal Services used for remote access of the server are disabled. These services can be temporarily re-enabled for support access (as described in a later section). Also as a result of the OS hardening, the FTP service is disabled. Procedural workarounds to provide equivalent functionality without the use of FTP are provided (as described in a later section). Some of the new features/procedures include:
• Improved Password Encryption compliant with FIPS-140 • Desktop/My CallPilot user logon / logoff event logging • Telset user logon event logging • Additional security audit logs
Nortel Page 6 of 120
• Automatic re-enabling of accounts disabled due to bad logon attempts • Automatic disabling of unused accounts. • Legal warning text displayed during all screen-based login dialogs
The CallPilot Server and CallPilot stand-alone Web server machines are set up so that they will stop functioning when the event logs become full. Therefore, it is important for customer organizations to set up a regular process to collect event logs for off-line storage and clear them on the servers. A new userid Auditor is created for this log management role. The feature enhancements are provided to meet the needs of security-conscious customers.
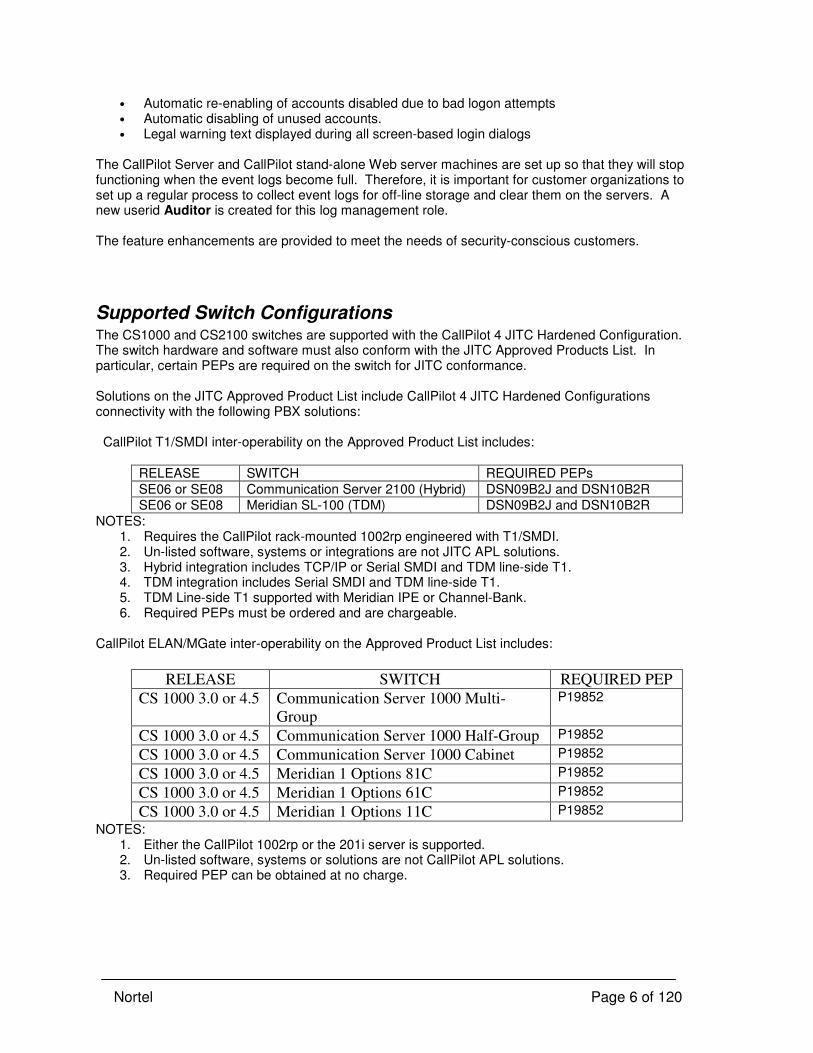
Supported Switch Configurations The CS1000 and CS2100 switches are supported with the CallPilot 4 JITC Hardened Configuration. The switch hardware and software must also conform with the JITC Approved Products List. In particular, certain PEPs are required on the switch for JITC conformance. Solutions on the JITC Approved Product List include CallPilot 4 JITC Hardened Configurations connectivity with the following PBX solutions: CallPilot T1/SMDI inter-operability on the Approved Product List includes:
RELEASE SWITCH REQUIRED PEPs
SE06 or SE08 Communication Server 2100 (Hybrid) DSN09B2J and DSN10B2R
SE06 or SE08 Meridian SL-100 (TDM) DSN09B2J and DSN10B2R
NOTES: 1. Requires the CallPilot rack-mounted 1002rp engineered with T1/SMDI. 2. Un-listed software, systems or integrations are not JITC APL solutions. 3. Hybrid integration includes TCP/IP or Serial SMDI and TDM line-side T1. 4. TDM integration includes Serial SMDI and TDM line-side T1. 5. TDM Line-side T1 supported with Meridian IPE or Channel-Bank. 6. Required PEPs must be ordered and are chargeable.
CallPilot ELAN/MGate inter-operability on the Approved Product List includes:
RELEASE SWITCH REQUIRED PEP
CS 1000 3.0 or 4.5 Communication Server 1000 Multi-
Group
P19852
CS 1000 3.0 or 4.5 Communication Server 1000 Half-Group P19852
CS 1000 3.0 or 4.5 Communication Server 1000 Cabinet P19852
CS 1000 3.0 or 4.5 Meridian 1 Options 81C P19852
CS 1000 3.0 or 4.5 Meridian 1 Options 61C P19852
CS 1000 3.0 or 4.5 Meridian 1 Options 11C P19852
NOTES: 1. Either the CallPilot 1002rp or the 201i server is supported. 2. Un-listed software, systems or solutions are not CallPilot APL solutions. 3. Required PEP can be obtained at no charge.

Nortel Page 7 of 120
2. Limitations CallPilot Server: 1. PEP CP404S01R05S requires CallPilot 4.0 GA software with Service Update 1 (SU01) 2. The PEP cannot be un-installed once it is applied to a CallPilot system. 3. CallPilot Server Reinstall operations (also known as a “dummy upgrade”) are not supported. 4. Upgrades from previous CallPilot releases are not supported in the normal CallPilot 4 manner. 5. Meridian Mail migration is not supported directly. 6. Changes to Database/LDAP schemas are introduced in the PEP. A full-system backup on a
CallPilot system with this security enhancement can not be used to restore on a CallPilot system without the security enhancement and vice versa.
7. Additional fields are added to the user profiles. User archives on a CallPilot system without the PEP can not be restored on a CallPilot system with the PEP.
8. pcAnywhere is not supported on a hardened server, it must be uninstalled before the hardening scripts are run.
9. After OS Hardening the following features are disabled: o Remote Desktop (RDC) and dial-up Remote Access (RRAS) are no longer available.
See Appendix-A for instructions on how to temporarily enable them for support purposes. o Support accounts (NGenDist, NGenSys, NGenDesign) are no longer available. o The Administrator account is renamed to “xAdministrator”. The customer may rename
this to a different name of the customer’s choosing. o A new dummy account named “Administrator” is created which is disabled.
10. The following services are disabled: o IIS Admin service, o World Wide Web Publishing service o FTP Publishing service. o CallPilot Time Service
11. After OS hardening, legacy systems (i.e. Windows 98, NT, and 2000) are no longer able to communicate with the CallPilot Server using Remote Desktop (RDC). (since those OS’s do not support required encryption capabilities)
12. After OS hardening there is no support for modem connections into the CallPilot server for any applications (i.e. remote support or application builder). If required, modem access can be temporarily enabled. It can be configured for Call-Back for two-factor security.
13. After OS hardening, CallPilot servers will no longer synchronize their time-of-day setting with an M1 switch.
14. Capacities on the 1002rp greater than 96 channels require a workaround. See Appendix F. 15. SMTP Challenge-Response authentication is not supported with this PEP and must not be
enabled.
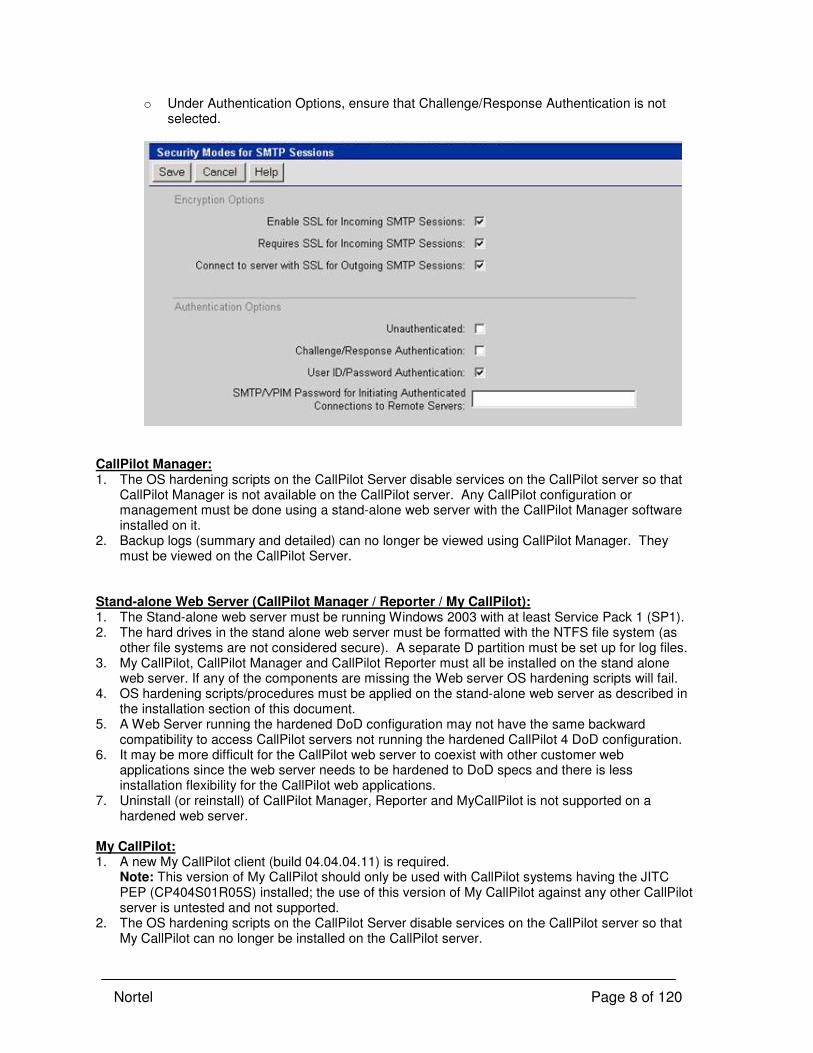
o In CallPilot Manager> Messaging> Message Delivery Configuration, select “Security Modes for SMTP Sessions”.
Nortel Page 8 of 120
o Under Authentication Options, ensure that Challenge/Response Authentication is not selected.
CallPilot Manager: 1. The OS hardening scripts on the CallPilot Server disable services on the CallPilot server so that
CallPilot Manager is not available on the CallPilot server. Any CallPilot configuration or management must be done using a stand-alone web server with the CallPilot Manager software installed on it.
2. Backup logs (summary and detailed) can no longer be viewed using CallPilot Manager. They must be viewed on the CallPilot Server.
Stand-alone Web Server (CallPilot Manager / Reporter / My CallPilot): 1. The Stand-alone web server must be running Windows 2003 with at least Service Pack 1 (SP1). 2. The hard drives in the stand alone web server must be formatted with the NTFS file system (as
other file systems are not considered secure). A separate D partition must be set up for log files. 3. My CallPilot, CallPilot Manager and CallPilot Reporter must all be installed on the stand alone
web server. If any of the components are missing the Web server OS hardening scripts will fail. 4. OS hardening scripts/procedures must be applied on the stand-alone web server as described in
the installation section of this document. 5. A Web Server running the hardened DoD configuration may not have the same backward
compatibility to access CallPilot servers not running the hardened CallPilot 4 DoD configuration. 6. It may be more difficult for the CallPilot web server to coexist with other customer web
applications since the web server needs to be hardened to DoD specs and there is less installation flexibility for the CallPilot web applications.
7. Uninstall (or reinstall) of CallPilot Manager, Reporter and MyCallPilot is not supported on a hardened web server.
My CallPilot: 1. A new My CallPilot client (build 04.04.04.11) is required.
Note: This version of My CallPilot should only be used with CallPilot systems having the JITC PEP (CP404S01R05S) installed; the use of this version of My CallPilot against any other CallPilot server is untested and not supported.
2. The OS hardening scripts on the CallPilot Server disable services on the CallPilot server so that My CallPilot can no longer be installed on the CallPilot server.
Nortel Page 9 of 120
3. My CallPilot must be installed on the same stand-alone web server with CallPilot Manager and Reporter in order for the Web server hardening scripts to work correctly.
Application Builder (AppBuilder): 1. The OS hardening scripts on the CallPilot Server disable services that are required for AppBuilder
to function correctly. See the workarounds section for the procedures for using AppBuilder (in the FTP section).
2. The OS hardening scripts on the CallPilot Server disables all modem connections into the CallPilot server, as such connecting from CallPilot the application builder client to the CallPilot server via modem is not supported.
3. The ‘Password Check’ block in the ‘Basic’ palette of the AppBuilder client has been removed. Desktop Messaging: (NOTE: the Desktop Messaging feature has not been JITC certified) 1. Desktop Messaging Clients prior to 4.04.04.03 will work but password change will fail. 2. Download of Personal Distribution Lists and System Distribution Lists from the Desktop will not
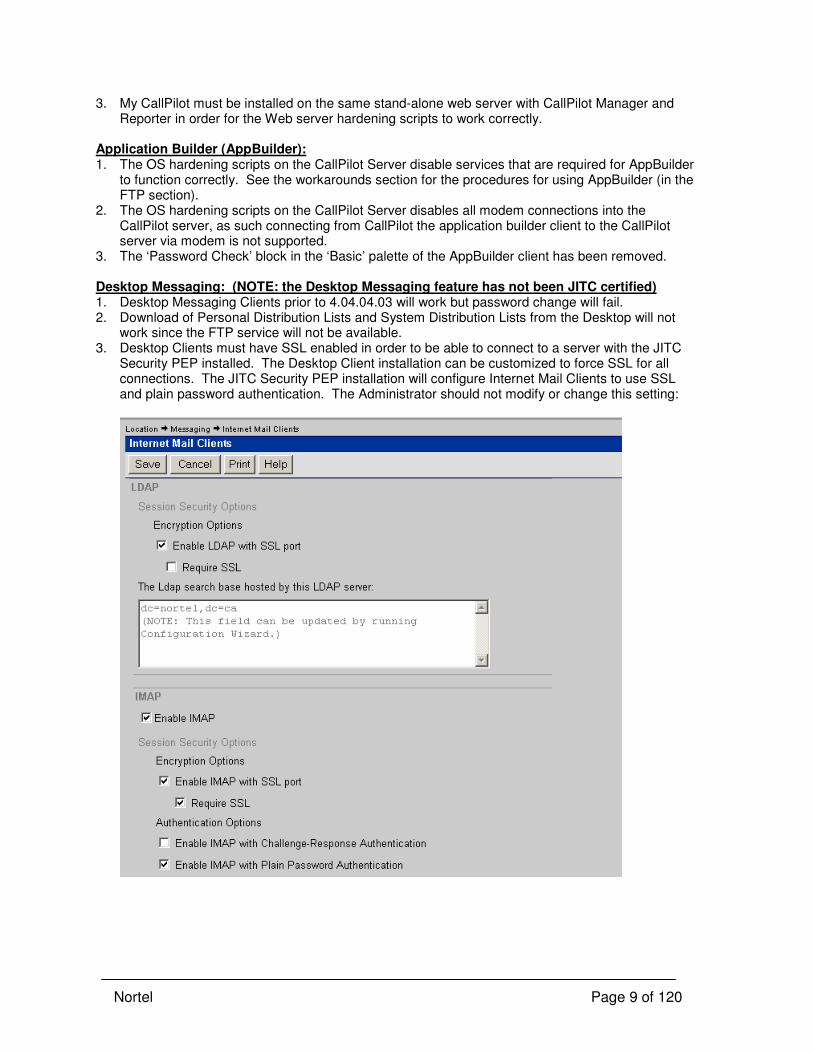
work since the FTP service will not be available. 3. Desktop Clients must have SSL enabled in order to be able to connect to a server with the JITC
Security PEP installed. The Desktop Client installation can be customized to force SSL for all connections. The JITC Security PEP installation will configure Internet Mail Clients to use SSL and plain password authentication. The Administrator should not modify or change this setting:
Nortel Page 10 of 120
3. Operating System Hardening Overview The Security Technical Implementation Guides (STIGs) guidelines are configuration standards by the U.S. Department of Defense that CallPilot is required to conform to in order to be connected onto their network. This includes both the CallPilot Server and the CallPilot stand-alone web server. Following a security checklist (sometimes referred to as a lockdown guide, hardening guide, or benchmark configuration) specifically for the Windows 2003 Operating System (OS), the documents outline instructions or procedures to ensure compliance to a baseline level of security. As such, the instructions outline procedures on configuring policies for: Passwords, Account Lockout, Auditing, User Rights, Event Log Configurations, Registry Key Permissions, File & Directory Permissions, Terminal Services, Network Services, etc. to meet the STIG Platinum criteria. This feature enhancement ensures that all the CallPilot features remain operational (with some workarounds) once the OS hardening has taken place and documents any discrepancies and/or functionality that may be affected The CallPilot Server hardening procedure outlines the additional manual steps to be performed after the JITC Security (OS Hardening) PEP and scripts has been installed to ensure that the OS has been locked down according to: WINDOWS SERVER 2003 SECURITY CHECKLIST Version 5, Release 1.4 May 2006: http://iase.disa.mil/stigs/checklist/ After the OS hardening script and manual procedures have been executed it should be noted that: � The “administrator” account has been renamed to “xAdministrator” � A new decoy account named “Administrator” is created. It is disabled. � The following support accounts NGenDist, NGenSys and NGenDesign have been deleted. � Terminal Services is disabled and thus Remote Desktop capabilities are no longer functional.
Routing and Remote Access is also disabled; therefore dial-up is not functional. Batch files are provided to re-enable these when remote support is required.
� As a result of the OS hardening, legacy systems are not able to communicate with the CallPilot
Windows Server 2003 based server. Only Windows XP and Windows Server 2003 or newer systems will work.
� All subsequent CallPilot Server configurations and administration are done using CallPilot
Manager and CallPilot Configuration Wizard on a Windows 2003 / XP Client via a Windows 2003 CallPilot Web Server.
� It will take significantly longer to shut down a CallPilot server or CallPilot Web server since the
page file must be overwritten to clear it. � The production CallPilot normally synchronizes itself to the PBX time by using the CallPilot Time
Service. In the JITC Certified CallPilot we will disable the CallPilot Time Service and let the system make use of the server system clock. This will also allow the customer to make use of the Windows 2003 Network Time Service directed to a local time server as desired.

Nortel Page 11 of 120
4. CallPilot Mailbox Password Encryption CallPilot cryptographic libraries prior to the JITC Security PEP are not compliant with the Security Requirements of the Federal Information Processing Standards (FIPS). Specifically, the passwords are encrypted using the RC4 algorithm and a variant of DES algorithm. The JITC Security PEP enhancement encrypts passwords using FIPS-140-2 approved algorithms already provided in the Windows Server 2003 Operating System. The CallPilot cryptographic libraries are enhanced to use the following FIPS-140-2 approved algorithms:
• SHA-1 algorithm is used for hashing.
• AES algorithm with a key length of 256 bits is used for encryption. These algorithms are accessed via the Microsoft CryptoAPI and the Windows Server 2003 Enhanced Cryptographic Provider. CallPilot mailbox passwords are stored in a database on the CallPilot server along with a flag which identifies whether the old or new (stronger) encryption algorithm has been used. For any mailboxes that already exist on the system at the time the DoD PEP (CP404S01R05S) is applied, the passwords will continue to be encrypted using the weaker algorithm. When these passwords expire and are changed, the new password will be stored using the new strong algorithm. The flag indicating encryption algorithm does not exist in the database until PEP CP404S01R05S has been applied. This feature change is transparent to external users; however, the new algorithm is used during login, password validation and change.

Nortel Page 12 of 120
5. Workarounds: File Transfer Operations requiring FTP
Overview The FTP service needs to be disabled on CallPilot systems because FTP passes user-ids and passwords in clear text. The solution for the CallPilot 4.0 DoD configuration is to provide workarounds to all features that use FTP to ensure that FTP is never enabled at the same time as when the CLAN connection is up. This ensures that sniffers monitoring the network from outside are not able to pick up FTP user-ids and passwords. The following operations within CallPilot use FTP and require workarounds:
i. Audio player download
The Audio player can not be downloaded using FTP from either the CallPilot server or the CallPilot web server. Workaround: The Audio Player can be installed using either the My CallPilot or the Desktop installation CD. CallPilot components that use the CallPilot Audio Player include: Application Builder, CallPilot Manager, Desktop Messaging, and MyCallPilot. Customers can distribute the Audio Player using whatever mechanisms they usually use to distribute desktop software, including the use of a network share. Note: Since the CallPilot server is configured to use SSL, the Audio Player must also be configured to use SSL. Launch the stand-alone audio player. From the View Menu, select “Options”. Click “Advanced”. Select “Use SSL”, then Save.
ii. AppBuilder The only way to create a consistent application is to connect the AppBuilder client to the CallPilot Server. Even when an Application is restored from archive using backup and restore, it must be opened and saved in AppBuilder. Installing AppBuilder on the CallPilot Server is prohibited. AppBuilder requires a separate client PC running Windows XP Pro (not Windows Server 2003). The AppBuilder client PC can be installed either on the ELAN or CLAN. Since the AppBuilder client uses FTP to communicate to the server, the following precautions should be taken. Workarounds: NOTE: While the CallPilot server is disconnected from the CLAN, users using My CallPilot and CallPilot Desktop Messaging client software will not be able to connect to the server. Additionally any inter CallPilot Networking (ie VPIM or NMS) will not be functional while the CLAN is disconnected. AppBuilder client PC is on the ELAN: 1. Disconnect CLAN cable from the CallPilot server. 2. Execute “IISEnabled.bat” script (found in the D:\Nortel\CallPilotServerHardening folder)
The above script will relax some user rights and start the following services:
• IIS Admin Service • HTTP SSL Service • FTP Publishing Service • World Wide Web Publishing Service
3. Connect AppBuilder to the server, create/edit applications, and close AppBuilder.

Nortel Page 13 of 120
4. Execute “IISDisabled.bat” script (found in the D:\Nortel\CallPilotServerHardening folder) The above script will stop the following services as well as restrict user rights back to their secure settings:
• World Wide Web Publishing Service • FTP Publishing Service • HTTP SSL Service • IIS Admin Service
5. Re-connect CLAN cable to the CallPilot server. AppBuilder client PC is on the CLAN: 1. Disconnect the CallPilot Server and the AppBuilder client PC network from the CLAN. 2. Connect the CallPilot Server CLAN and the Appbuilder Client PC using a hub, switch or crossover LAN cable so that the CallPilot server and the client PC are connected, but are isolated from the rest of the CLAN. 3. Execute “IISEnabled.bat” script (found in the D:\Nortel\CallPilotServerHardening folder) 4. Connect AppBuilder to the server, create/edit apps, and close AppBuilder. 5. Execute “IISDisabled.bat” script (found in the D:\Nortel\CallPilotServerHardening folder) 6. Remove the temporary LAN connections from step 2 and restore the CLAN connections for the CallPilot server, AppBuilder client PC to the rest of the CLAN network.
iii. Backup/Restore log files The backup/restore log files can not be downloaded using FTP from the CallPilot server to another PC. Attempting to view them using CallPilot Manager will result in error 12029. Workaround: View the log files on the CallPilot server. Use Notepad, or if log files are large use WordPad. Backup log files are in: D:\Nortel\Data\Backup\BackupLogs Restore log files are in: D:\Nortel\Data\Backup\RestoreLogs The file names for backup/restore are as follows: System backup/restore: For IPE platform:
• Backup customer log file: custIPESystemBackup <date/time of backup>.log • Backup detailed log file: IPESystemBackup <date/time of backup>.log • Restore customer log file: custIPESystemBackup <date/time of backup> <date/time of
restore>.log • Restore detailed log file: IPESystemBackup <date/time of backup> <date/time of restore>.log
For TRP platform: • Backup customer log file: custTRPSystemBackup <date/time of backup>.log • Backup detailed log file: TRPSystemBackup <date/time of backup>.log • Restore customer log file: custTRPSystemBackup <date/time of backup> <date/time of
restore>.log • Restore detailed log file: TRPSystemBackup <date/time of backup> <date/time of
restore>.log User archive/restore:
• Backup customer log file: custuser_<archive name><internal tag><date/time of b/r>.log • Backup detailed log file: user_<archive name><internal tag><date/time of b/r>.log
Nortel Page 14 of 120
• Restore customer log file: custuser_<archive name><internal tag><date/time of b/r> <date/time of restore>.log
• Restore detailed log file: user_<archive name><internal tag><date/time of b/r> <date/time of restore>.log
AppBuilder archive/restore:
• Backup customer log file: custappb_<archive name><internal tag><date/time of b/r>.log • Backup detailed log file: appb_<archive name><internal tag><date/time of b/r>.log • Restore customer log file: custappb_<archive name><internal tag><date/time of b/r>
<date/time of restore>.log • Restore detailed log file: appb_<archive name><internal tag><date/time of b/r> <date/time of
restore>.log Prompt archive/restore:
• Backup customer log file: custpromp_<archive name><internal tag><date/time of b/r>.log • Backup detailed log file: promp_<archive name><internal tag><date/time of b/r>.log • Restore customer log file: custpromp_<archive name><internal tag><date/time of b/r>
<date/time of restore>.log • Restore detailed log file: promp_<archive name><internal tag><date/time of b/r> <date/time
of restore>.log
iv. Directory Sync log files The Directory Sync log files cannot be downloaded from the CallPilot Server to another PC using FTP. Workaround: View the log files on the CallPilot server. Use Notepad, or if log files are large use WordPad. The log files for Dir Sync are under d:\Nortel\data\log\DirSync. The format of the names of the files are "NMSync_Job<job id>_<date>_<start time of sync>.log"
v. Importing greetings using My CallPilot On My CallPilot, recorded greetings can not be uploaded using FTP. My CallPilot displays an error message (“Fail to upload file”) if FTP is shut down and the user tries to upload a greeting. Workarounds:
• User can still record greetings on My CallPilot via the telephone as long as the Windows Audio player is used (Windows only, no support for Mac or Linux recording of greetings from My CallPilot). Note: Set “Use SSL” in the audio player as described above.
• User can record greetings the traditional way using the telephone.
vi. CallPilot Manager record greetings/custom system prompts On CallPilot Manager, user can not record greetings and custom system prompts by importing .wav files (error 12029 results). You can still use the telset to record from a telephone which is not affected by the FTP service. (if you use the telset, you must have the audio player installed and it must be set to Use SSL). Workaround: For importing .wav files.
1. Disconnect the CLAN cable. 2. Copy the file onto the CallPilot Server using a CD.

Nortel Page 15 of 120
3. Execute “IISEnabled.bat” script (found in the D:\Nortel\CallPilotServerHardening folder). 4. Login to CallPilot Manager using the browser on the CallPilot Server. 5. Go to the page for the greeting or prompt. 6. Click on the "Import" button. 7. A new window pops up. Use the "Browse" button or enter the path to the .wav file. 8. Press Save (on the new pop-up window). 9. Press Save on the CallPilot Manager screen. 10. Logout from CallPilot Manager. 11. Execute “IISDisabled.bat” script (found in the D:\Nortel\CallPilotServerHardening folder) 12. Re-connect the CLAN cable.
vii. SDN page User can not upload a fax cover page background and fax sponsor pages. Workaround:
1. Disconnect CLAN cable. 2. Copy the file onto the CallPilot Server using a CD. 3. Execute “IISEnabled.bat” script (found in the D:\Nortel\CallPilotServerHardening folder). 4. Login to CallPilot Manager using the browser on the CallPilot Server. 5. Add/Modify SDNs from System -> Service Directory Numbers. 6. Use the "Browse" button or enter the path to the .bmp file for fax cover page backgrounds or the .tif file for sponsor fax pages. 7. Press Save to save the SDN. 8. Logout from CallPilot Manager. 9. Execute “IISDisabled.bat” script (found in the D:\Nortel\CallPilotServerHardening folder) 10. Re-connect CLAN cable.
Nortel Page 16 of 120
6. Desktop Messaging and My CallPilot User Logon / Logoff Event Logging
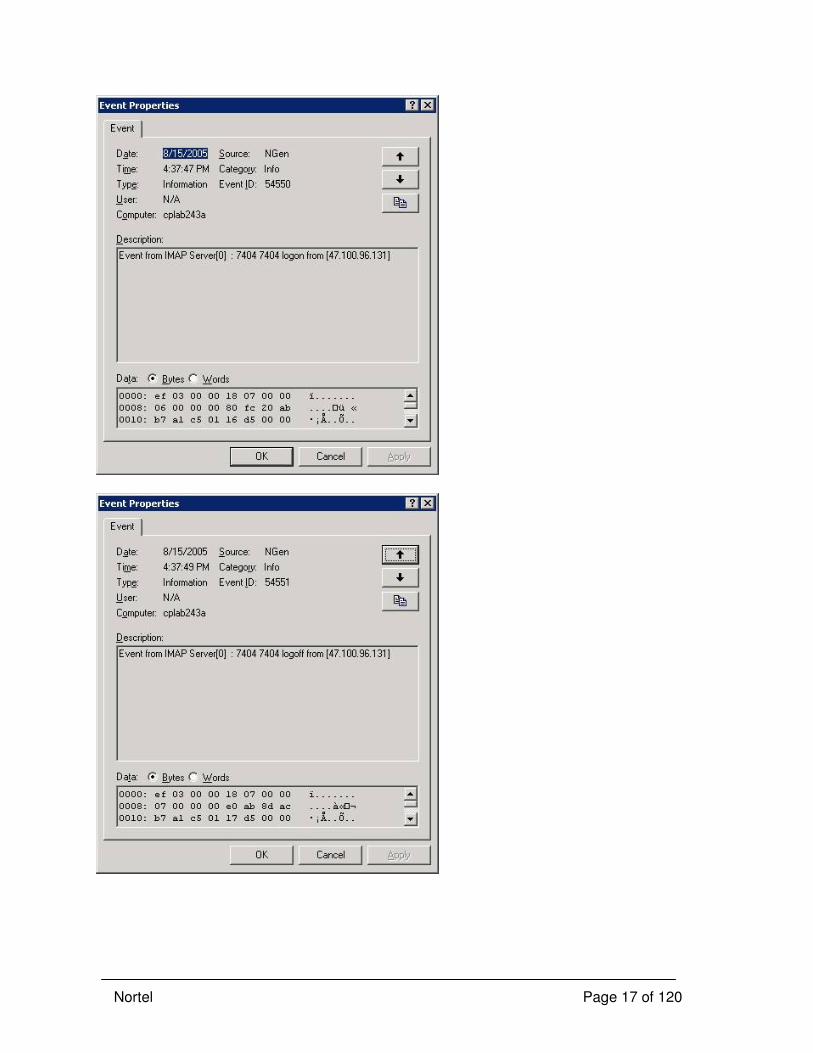
Overview This section describes an enhancement that has been added that allow logs to be generated when users logon / logoff from Desktop Messaging/My CallPilot. The logs are generated in the Application Event log of the CallPilot Server and My CallPilot Server. Event logs include the CallPilot Mailbox and TCP/IP address of the user performing the logon / logoff. The system administrator is able to enable and disable logon / logoff event logging. NOTE: since My CallPilot logins are already logged by the LDAP server, it is not necessary to enable this additional logging unless explicit logging of logouts is also required. Also note the existence of IIS logging of all web page views. Feature Implementation CallPilot server: Two new registry keys have been created to enable logon / logoff event logging. [HKEY_LOCAL_MACHINE\SOFTWARE\Nortel\mpcx\NMIMAP] "UserLogonEvent"="No" "UserLogoffEvent"="No" Changing a value to “Yes” and then stopping / restarting the CallPilot IMAP service enables logging for that corresponding event. Changing a value to “No” and then stopping / restarting the CallPilot IMAP service disables logging for that corresponding event. String values are initially set to “No” which disables logon / logoff event logging. When logging is enabled, the CallPilot IMAP server will use CallPilot’s built in event logging code to log user logon (54550) and / or logoff (54551) events. This is the IP Address of the My CallPilot Server only when the user is logging in from My CallPilot. Otherwise, it’s the IP address of the Desktop client / internet mail client. An example of each event follows:
Nortel Page 17 of 120
Nortel Page 18 of 120
IIS Logging of CallPilot Manager and My CallPilot page accesses The IIS web server (used by both the CallPilot Manager and My CallPilot web applications) is configured to log all page views. These logs are stored on the CallPilot stand-alone Web Server under folder D:\www\logs\W3SVC1\ . The log files have names based on the date, for example ex060831.log for Aug 31, 2006. All page views are logged here. The IP address of the browser requesting the page is also logged. Note that times in the IIS log files are stored in Greenwich Mean Time (GMT – Universal Time)

Nortel Page 19 of 120
7. Telset User Logon Event Logging Overview This procedure describes how to monitor telset logins. The Hacker Monitor tool is used to perform the monitoring. This information also exists in NTP 555-7101-301 Administrator’s Guide. 1 On the CallPilot Manager toolbar, navigate to Messaging > Security Administration.
Nortel Page 20 of 120
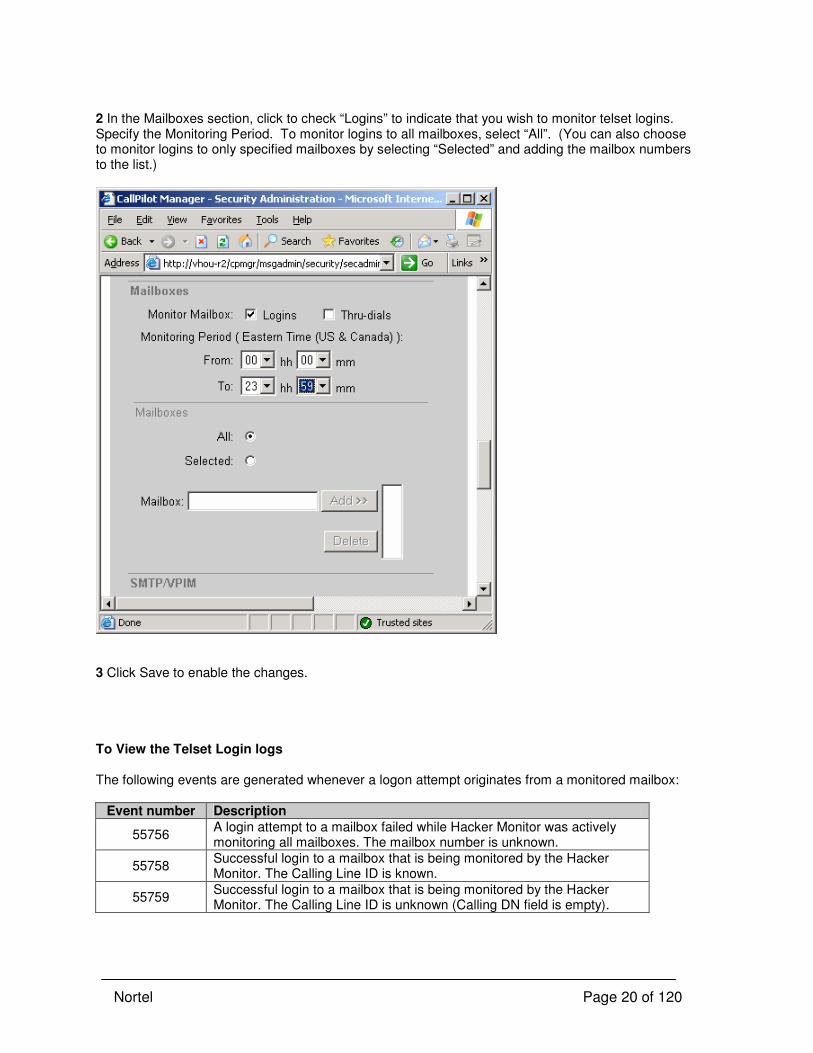
2 In the Mailboxes section, click to check “Logins” to indicate that you wish to monitor telset logins. Specify the Monitoring Period. To monitor logins to all mailboxes, select “All”. (You can also choose to monitor logins to only specified mailboxes by selecting “Selected” and adding the mailbox numbers to the list.)
3 Click Save to enable the changes. To View the Telset Login logs The following events are generated whenever a logon attempt originates from a monitored mailbox:
Event number Description
55756 A login attempt to a mailbox failed while Hacker Monitor was actively monitoring all mailboxes. The mailbox number is unknown.
55758 Successful login to a mailbox that is being monitored by the Hacker Monitor. The Calling Line ID is known.
55759 Successful login to a mailbox that is being monitored by the Hacker Monitor. The Calling Line ID is unknown (Calling DN field is empty).
Nortel Page 21 of 120
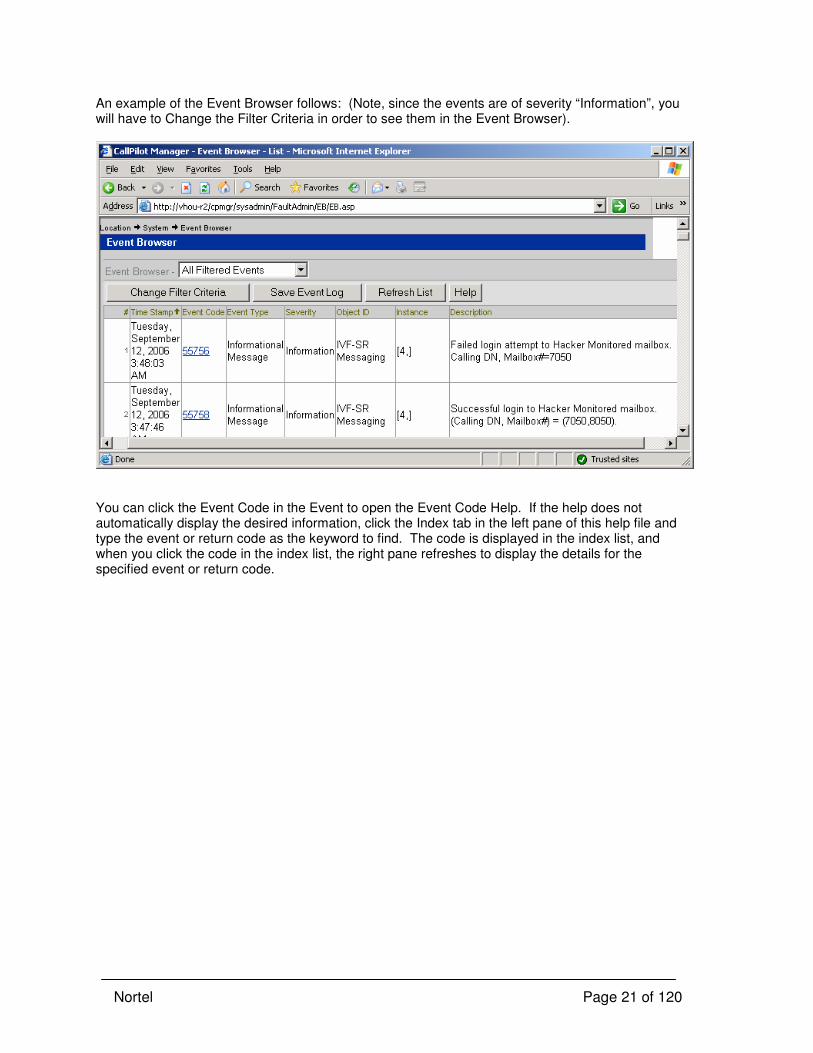
An example of the Event Browser follows: (Note, since the events are of severity “Information”, you will have to Change the Filter Criteria in order to see them in the Event Browser).
You can click the Event Code in the Event to open the Event Code Help. If the help does not automatically display the desired information, click the Index tab in the left pane of this help file and type the event or return code as the keyword to find. The code is displayed in the index list, and when you click the code in the index list, the right pane refreshes to display the details for the specified event or return code.

Nortel Page 22 of 120
8. Auto-Enable Mailboxes Disabled Due to Bad Logon Attempts
Overview In the normal CallPilot configuration, mailboxes are disabled after an excessive number of bad login attempts. Administrator action is required to re-enable the mailbox. This creates a simple “denial of service” vulnerability – an attacker could knock out mailboxes by repeatedly trying to log in to them. This is unacceptable in the DoD configuration.
This feature is an enhancement which automatically re-enables CallPilot mailbox users who are disabled due to excessive bad login attempts. The algorithm runs every 10 minutes starting at 12:01AM on the day it is installed, continuing indefinitely (so 12:01AM, 12:11AM, 12:21AM, etc). During this period, the user can only try the allowed number of bad logins (as configured in CallPilot Manager). Once the user is disabled, the user has to wait between 0 to 10 minutes to be re-enabled (i.e. the user has to wait until the algorithm runs at the next 10 minute interval). The feature can be turned off by Nortel Support.
Feature Implementation The AutoEnableUser.sql script is used to enable this feature. This script is installed and run by the CP404S01R05S (JITC Security) PEP. The script is copied to the D:\Nortel\MPCX\Data directory and imported into the database using the dbisqlc.exe (ISQL) application. If you want to terminate the feature, please contact Nortel Support for assistance. They can use the ISQL utility (dbisqlc) from the CallPilot 4 JITC CD, log in as the database administrator (“dba”) and execute the command read D:\Nortel\MPCX\Data\DropAutoEnableUser.sql To reinstall the event: read D:\Nortel\ MPCX\Data \AutoEnableUser.sql To see currently installed events: select * from sys.sysschedule Note: The script can only be registered once. If you want to register it again, you have to terminate the feature first. This script will not reenable administrator mailboxes (e.g. 000000). To ensure that administrator mailboxes are automatically reenabled, use CallPilot Manager – Messaging – Security Administration and check the box “Disabled Administrators will be Enabled … after 15 minutes”.
Nortel Page 23 of 120
9. Automatically Disable Unused Mailboxes
Overview
This feature is an enhancement which disables those mailboxes which have not logged on for more than 30 days. The time calculation is based on GMT and ignores the time zone and daylight savings time and therefore the interval could be off by up to a day. In order to re-enable those users, the administrator has to run CallPilot Manager to re-enable them manually. The algorithm runs daily at 1:00AM. The feature can be turned off by Nortel Support.
Feature Implementation The AutoDisableUser.sql script is used to enable this feature. The script is copied to the D:\Nortel\MPCX\Data directory and imported automatically during installation of the PEP into the database using the dbisqlc.exe application. If you want to terminate the feature, please contact Nortel Support for assistance. They can use the ISQL utility (dbisqlc) from the CallPilot 4 JITC CD, log in as the database administrator (“dba”) and execute the command read D:\Nortel\MPCX\Data\DropAutoDisableUser.sql To reinstall the event: read D:\Nortel\ MPCX\Data \AutoDisableUser.sql To see currently installed events: select * from sys.sysschedule Note: The script can only be registered once. If you want to register it again, you have to terminate the feature first. Changing Interval According to DSN13.04 (Cat III), the inactivity timeout must be 30 days (DoD Telecommunications and Defense Switched Network Security Technical Implementation Guide version 2, Release 2). For sites that have permission to use a longer interval, a script is provided that uses a 60 day inactivity timeout: AutoDisableUser60days.sql. This can be installed by Nortel Support instead of AutoDisableUser.sql.
Nortel Page 24 of 120
10. CallPilot Server Installation Procedure Requirements:
• Sufficient food and rest to make it through the maintenance window. (DoD escort too.)
• Familiarity with normal CallPilot 4 procedures and NTPs is assumed, including SU and PEP installation.
• Server running CallPilot 4.0 server GA image (build 04.04.04.00)
• All installation instructions in hard-copy form. A pencil to check off steps as they are completed.
• Suitable keycode
• Suitable language prompt CD
• The following are found on the CallPilot 4 JITC Hardened Configuration (DoD) CD (NTUB43DA) o CallPilot 4.0 Service Update 1 (SU01) CP40404SU01S on CD o The CallPilot Manager update for SU01, CP404S01G11C on CD o PEP CP404S01R05S – Restricted DoD JITC Security PEP on CD o SQL Anywhere 9 software file SQL9.exe on CD o The most recent CallPilot Security PEP on CD (CPSECPEP006S at the time of writing) o Updates for the Adobe Acrobat Reader software.
• Any applicable Microsoft hotfixes for CallPilot 4 released after the most recent CallPilot Security PEP. (See Bulletin P-2007-0010 Global CallPilot Server Security Update on CD – check for later version on Partner Information Center). NOTE: this CD is not part of the CallPilot product. It must be prepared using patches downloaded from the Microsoft web site and must be updated every month as new security patches are released by Microsoft. It is recommended that a simple batch file also be provided on the CD to conveniently install all needed hotfixes without uninstallation folders and without intervening reboots. A sample of such a CD can be provided by Nortel. See Appendix E for more information.
• Approved AntiVirus software and the latest available virus definition updates for this software on CD. This is also not part of the CallPilot product. Antivirus software must be provided by the customer. Please refer to bulletin P-2007-0101-Global_CallPilot Support for Anti-virus Applications on CD – check for a later version on Partner Information Center.
Procedure: (This procedure will require 3 to 4 hours) Please perform all steps in order. Please read each step carefully before attempting to perform it.
1. Ensure that the CallPilot Server is NOT connected to the CLAN since it is not secure until fully hardened. (It is acceptable for the CallPilot Server to be connected to an isolated, protected network “island”, for example using a hub or cross-over cable.) Note: DoD systems must not have the dial-up modem connected unless specifically authorized.
2. Install the CallPilot 4.0 GA image onto the CallPilot server by booting from the first image CD.
(on a 201i, Type Y when prompted to boot into ROMDOS, select SCSI CD, run IMAGE.BAT batch file).
Note: for T1/SMDI systems a PEP is required (CP404PEPG15S) before the setup wizard. See PAA-2007-0076 for details.
3. Go through the CallPilot Setup Wizard. Do not install any updates, PEPs or SU’s. Do not
restore any data. 4. Run the CallPilot Configuration Wizard to configure the server as usual. . (Initial logon uses
mailbox 000000 password 124578 server localhost). Also set up all the site-specific LAN networking settings (including DNS and WINS servers) using the normal Windows Network Connections applet. Fill in the DNS domain suffix in Control Panel – System – Computer Name tab. (click Change, then More and fill in the suffix). Then reboot the server
Nortel Page 25 of 120
5. Test the server to verify that it can connect to the switch, etc
NOTE: Any users added before the DoD PEP is applied will not use the stronger password encryption provided when the DoD PEP is installed. The passwords of such users can be changed after installing the PEP to ensure they are strongly encrypted.
6. Uninstall Symantec pcAnywhere (if it is installed – it will not be installed on a 201i):
a) Launch the ‘Add / Remove Programs’ applet from the Control Panel. b) Select ‘Symantec pcAnywhere’ from the list of installed applications and click ‘Remove’. c) You will be prompted to confirm that you want to uninstall pcAnywhere, click on ‘Ok’ to
continue. d) Once the uninstall operation is complete, exit from the ‘Add/Remove Programs’ control
panel applet. e) If you uninstalled pcAnywhere, reenable DCOM by adding a registry value:
a) Start – Run. Type “regedit” and hit Enter b) In the left pane, expand the tree
“HKEY_LOCAL_MACHINE\SOFTWARE\Microsoft\Ole” c) With “Ole” selected in the left pane, Use the New command under the
“Edit” menu to add a String Value. d) Fill in “EnableDCOM” as the value name (replacing “New Value #1”. e) Double click the value and fill in Y as the Value data. Click OK. Exit out of
the Registry Editor 7. Install CallPilot 4.0 PEPs CP40404SU01S from CD. Select CP40404SU01S_C from the
install wizard but do NOT select PEPs CP404S01G12S, CP404S01G17S or CP404S01G18S. You do not need to reboot after this step. (Ignore and close “CallPilot booting” popup if it appears.)
8. Install CallPilot Manager update CP404S01G11C from CD, and then reboot the server. Wait
long enough for IIS to start 9. Install the most recent CallPilot Security PEP (CPSECPEP006S at the time of writing) from
CD. Reboot when done. 10. Install Antivirus software from CD (install it on the D drive), update the virus definitions from
CD. Follow instructions in the most recent version of bulletin P-2007-0101-Global_CallPilot Support for Anti-virus applications. Note: to meet DoD requirements, it may be necessary to configure a “Startup Scan” so that a complete AV scan is done after every system startup and also to automatically re-enable File System “auto-protect” after 5 minutes.
11. Install from CD any more recent Microsoft HotFixes that have been authorized for CallPilot 4
according to the most recent revision of bulletin P-2007-Global-0010- CallPilot Server Security Update. Reboot when done. (See Appendix E for more information).
At this point, the system is still a normal CallPilot 4 SU01 system. It is possible to restore a CallPilot 4 user archive. It is also possible to install AppBuilder apps (such as an auto attendant) in the normal fashion. Once the next step is performed, the system becomes subject to the restrictions of the DoD configuration. Note also that the next step will take longer if a large number of user mailboxes have been restored onto the system since some conversion is required. If an existing, operational CP4 SU01 system is being hardened, be sure to perform a backup and/or use RAID splitting to allow the operational system to be recovered in case of problems during the JITC hardening. If the existing system has any later PEPs or SU’s, these must be uninstalled prior to continuing with the hardening.
12. Install the DoD JITC Security PEP, CP404S01R05S from CD. Ignore “CallPilot booting” popup. When prompted, reboot the server (ignore nmaos exception). Log back in and wait for CallPilot to come into service. Note: the changes made by this PEP cannot be
Nortel Page 26 of 120
uninstalled. If you later use the PEP Maintenance utility to uninstall the PEP, the PEP will be removed from the PEP database (CallPilot PEP Viewer) but the changes will not be undone.
13. Upgrade the SQL Anywhere database to release 9 from CD by running self-extracting file
SQL9.exe. Then browse to D:\TEMP\SQL9 and run batch file CPSetup.bat. Click Yes if you get a popup asking if you wish to remove the Java Runtime Environment. Reboot the server and log back in.
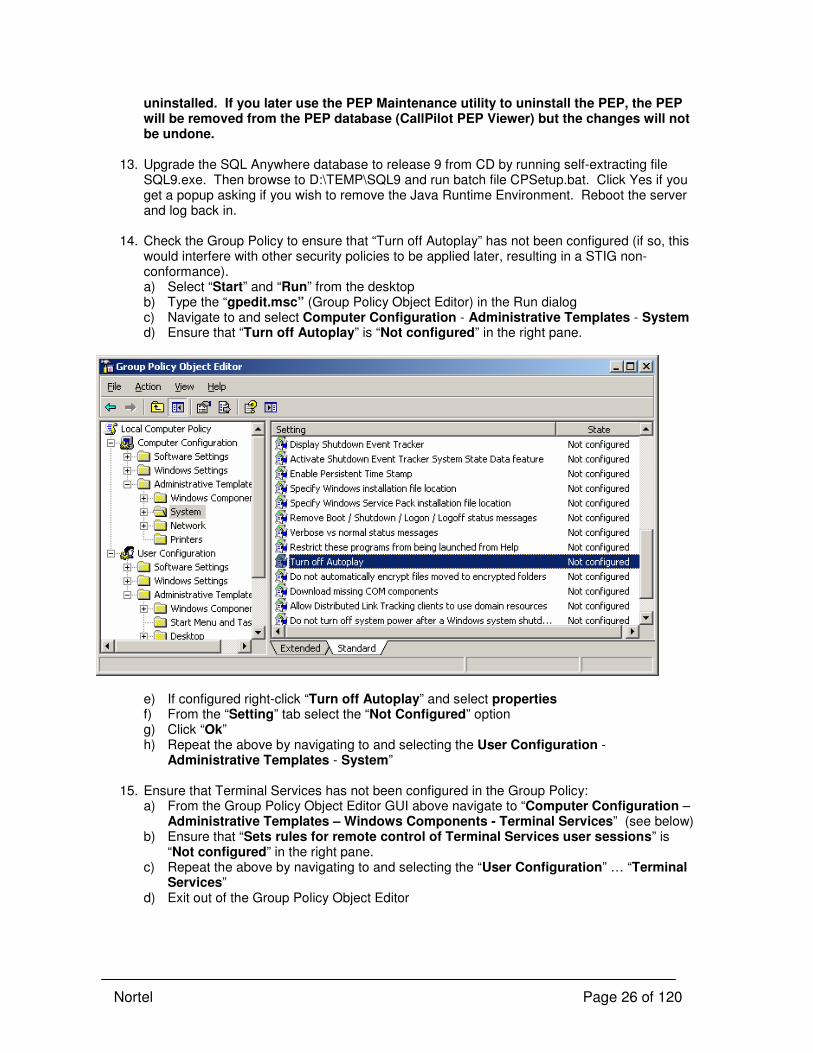
14. Check the Group Policy to ensure that “Turn off Autoplay” has not been configured (if so, this
would interfere with other security policies to be applied later, resulting in a STIG non-conformance). a) Select “Start” and “Run” from the desktop b) Type the “gpedit.msc” (Group Policy Object Editor) in the Run dialog c) Navigate to and select Computer Configuration - Administrative Templates - System d) Ensure that “Turn off Autoplay” is “Not configured” in the right pane.
e) If configured right-click “Turn off Autoplay” and select properties f) From the “Setting” tab select the “Not Configured” option g) Click “Ok” h) Repeat the above by navigating to and selecting the User Configuration -
Administrative Templates - System”
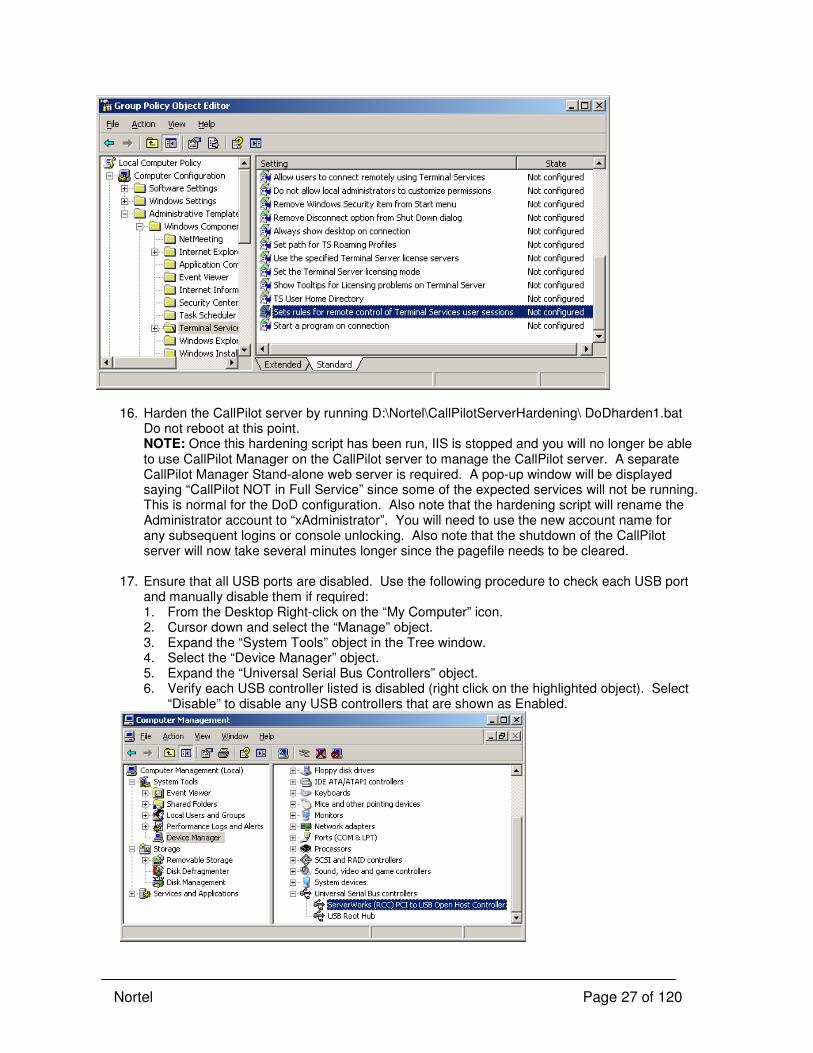
15. Ensure that Terminal Services has not been configured in the Group Policy: a) From the Group Policy Object Editor GUI above navigate to “Computer Configuration –
Administrative Templates – Windows Components - Terminal Services” (see below) b) Ensure that “Sets rules for remote control of Terminal Services user sessions” is
“Not configured” in the right pane. c) Repeat the above by navigating to and selecting the “User Configuration” … “Terminal
Services” d) Exit out of the Group Policy Object Editor
Nortel Page 27 of 120
16. Harden the CallPilot server by running D:\Nortel\CallPilotServerHardening\ DoDharden1.bat Do not reboot at this point. NOTE: Once this hardening script has been run, IIS is stopped and you will no longer be able to use CallPilot Manager on the CallPilot server to manage the CallPilot server. A separate CallPilot Manager Stand-alone web server is required. A pop-up window will be displayed saying “CallPilot NOT in Full Service” since some of the expected services will not be running. This is normal for the DoD configuration. Also note that the hardening script will rename the Administrator account to “xAdministrator”. You will need to use the new account name for any subsequent logins or console unlocking. Also note that the shutdown of the CallPilot server will now take several minutes longer since the pagefile needs to be cleared.
17. Ensure that all USB ports are disabled. Use the following procedure to check each USB port
and manually disable them if required: 1. From the Desktop Right-click on the “My Computer” icon. 2. Cursor down and select the “Manage” object. 3. Expand the “System Tools” object in the Tree window. 4. Select the “Device Manager” object. 5. Expand the “Universal Serial Bus Controllers” object. 6. Verify each USB controller listed is disabled (right click on the highlighted object). Select
“Disable” to disable any USB controllers that are shown as Enabled.
Nortel Page 28 of 120
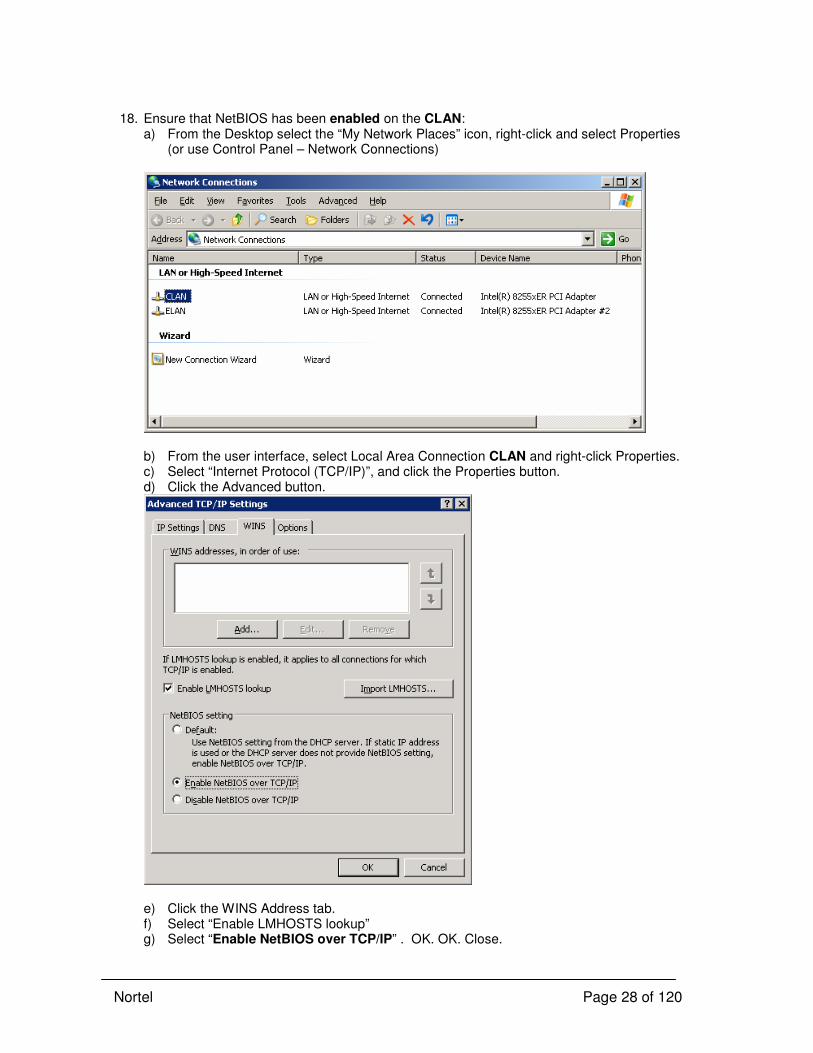
18. Ensure that NetBIOS has been enabled on the CLAN:
a) From the Desktop select the “My Network Places” icon, right-click and select Properties (or use Control Panel – Network Connections)
b) From the user interface, select Local Area Connection CLAN and right-click Properties. c) Select “Internet Protocol (TCP/IP)”, and click the Properties button. d) Click the Advanced button.
e) Click the WINS Address tab. f) Select “Enable LMHOSTS lookup” g) Select “Enable NetBIOS over TCP/IP” . OK. OK. Close.
Nortel Page 29 of 120
19. On a T1/SMDI –connected CallPilot, Disable the ELAN (right-click, Disable). On an M1-
connected CallPilot, ensure that NetBIOS has been disabled on the ELAN: a) From the Desktop select the “My Network Connections” icon, right-click and select
Properties b) From the user interface, select Local Area Connection ELAN and right-click Properties. c) Select “Internet Protocol (TCP/IP)”, and click the Properties button. d) Click the Advanced button. e) Click the WINS Address tab. f) Select “Disable NetBIOS over TCP/IP” OK. OK. Close.
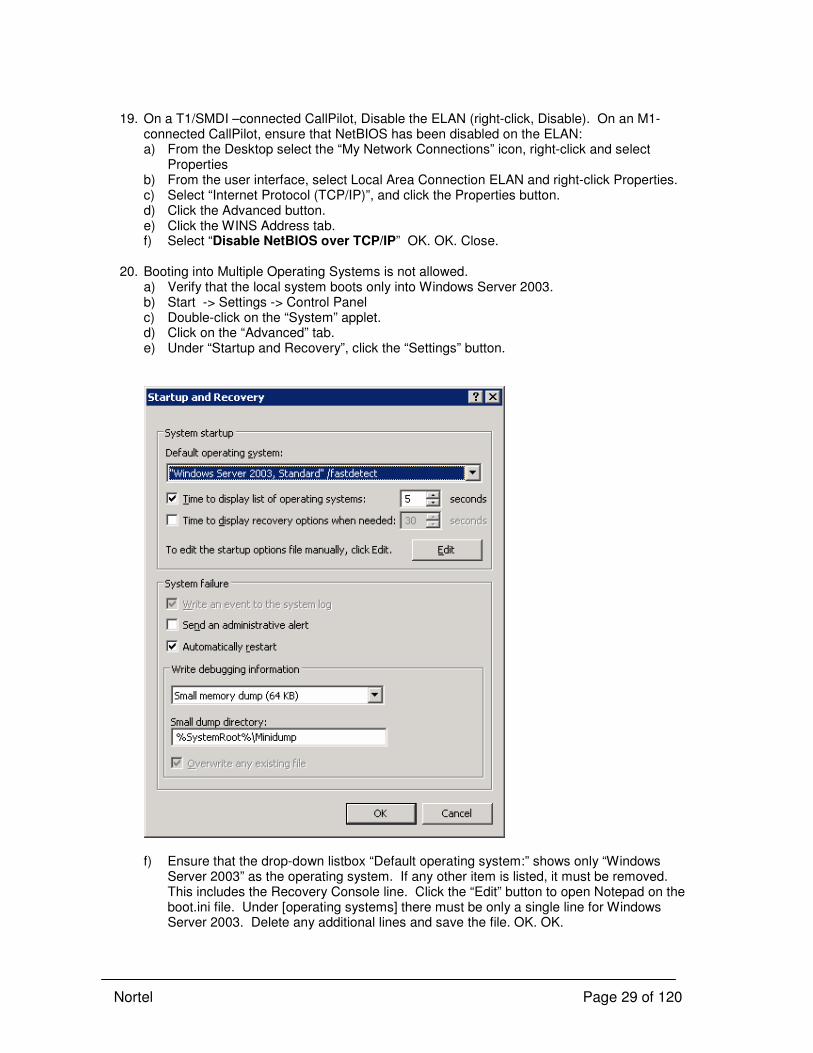
20. Booting into Multiple Operating Systems is not allowed.
a) Verify that the local system boots only into Windows Server 2003. b) Start -> Settings -> Control Panel c) Double-click on the “System” applet. d) Click on the “Advanced” tab. e) Under “Startup and Recovery”, click the “Settings” button.
f) Ensure that the drop-down listbox “Default operating system:” shows only “Windows
Server 2003” as the operating system. If any other item is listed, it must be removed. This includes the Recovery Console line. Click the “Edit” button to open Notepad on the boot.ini file. Under [operating systems] there must be only a single line for Windows Server 2003. Delete any additional lines and save the file. OK. OK.
Nortel Page 30 of 120
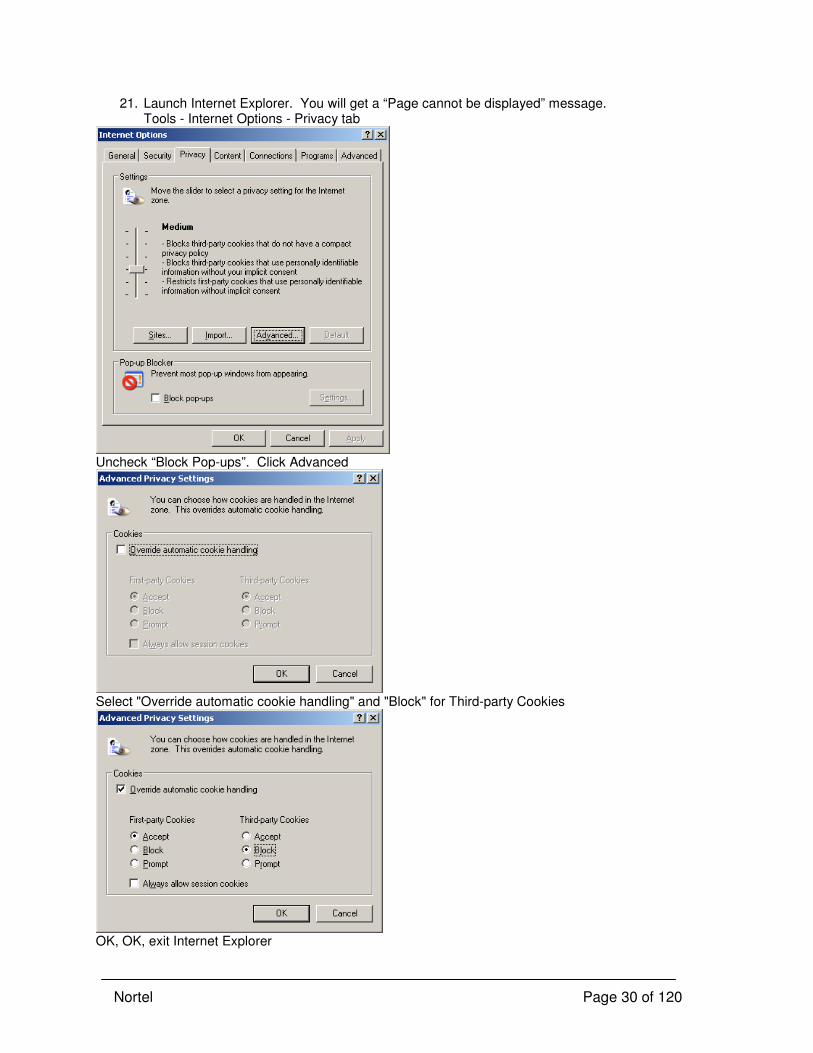
21. Launch Internet Explorer. You will get a “Page cannot be displayed” message. Tools - Internet Options - Privacy tab
Uncheck “Block Pop-ups”. Click Advanced
Select "Override automatic cookie handling" and "Block" for Third-party Cookies
OK, OK, exit Internet Explorer
Nortel Page 31 of 120
22. Connect the CLAN. Reboot the CallPilot Server. Perform the next step during reboot. 23. CMOS Configuration (performed on the reboot):
1. Verify that the CMOS configuration, often treated synonymously with the term “BIOS configuration”, provides a mechanism to restrict how the system may be booted.
2. Ensure that the CMOS “Boot Device Priority” is set such that the “Hard Drive” is the first device in the list.
3. Set the CMOS password (not applicable to CallPilot 201i platform)
201i Server (BIOS has no password protection capability): 1. On server boot hit [F2] key to enter the PhoenixBIOS Setup Utility. 2. Wait to boot into the BIOS Setup Utility 3. Right-arrow to the “Boot” tab 4. Down-arrow to the “Hard Drive” 5. Hit the <+> key until the “Hard Drive” is top of the list 6. Down/Up-arrow to the other devices and disable them by hitting <shift 1> for each
device. 7. Right-arrow to the “Exit” tab. 8. Down-arrow to “Exit Saving Changes” and hit <enter> 9. At the pop-up “Save configuration changes and exit now?” arrow over to [Yes] and hit
<enter>
1002rp server (Disabling boot order device not applicable) 1. On server boot hit [Del] key to enter the AMI BIOS Setup Utility 2. Wait to boot into the BIOS Setup Utility 3. Right-arrow to the “Security” tab 4. Down-arrow to the “Change Supervisor Password” and Hit <enter> key 5. At the pop-up “Enter New Password:” enter 123123 as a temporary password (Tip: use
the regular keyboard, not the numeric keypad to enter a BIOS password) 6. At the pop-up “Confirm New Password: enter 123123 7. At the pop-up “Password Installed” hit <enter> key 8. Right-arrow to the “Boot” tab 9. Down-arrow to “Boot Device Priority” and hit <enter> 10. Down-arrow to “1st Boot Device” <enter> 11. From the pull-down menu select “Hard Drive” <enter> 12. Down-arrow to “2nd Boot Device” <enter> 13. From the pull-down menu select “Removable Device” <enter> 14. Down-arrow to “3rd Boot Device” <enter> 15. From the pull-down menu select “ATAPI CDROM” <enter> 16. Hit <esc> key to revert back to top menu 17. Right-arrow to the “Exit” tab. 18. Down-arrow to “Exit Saving Changes” and hit <enter>
At the pop-up “Save configuration changes and exit now?” arrow over to [Ok] and hit <enter> 24. After hardening it is normal to get a message box saying “CallPilot is running and is able to
accept calls, however the following services are not fully operational:” and stating that the IIS Admin Service, FTP Publishing Service, World Wide Web Publishing Service and CallPilot Terminal Services are not running. Just dismiss this message box.
25. Ensure the xAdministrator user has a password protected ScreenSaver set up: Start ->
Control Panel -> Display -> Screen Saver tab. In the Screen saver list box, select “Windows Server 2003”. Set it to wait 15 minutes. “On resume, password protect” must be checked.
Nortel Page 32 of 120
26. Set the Guest account password to expire: Start -> Programs -> Administrative Tools -> Computer Management. Expand “Local Users and Groups”. Click User folder. Double-click user “GuestNotAllowed”. Uncheck the box “Password never expires” and click “Apply”. OK.
27. Log off as xAdministrator and Log in as the Auditor userid using the default password
DoDAudPWcp3. Set a password protected Blank screen saver, Set IE home page to Blank, Then log off. (Avoids a non-conformance due to dormant userid). Log in as xAdministrator.
Note: It is bad practice to leave the server with the default password for the Auditor userid.
28. Set the Internet Explorer Home Page to Blank. (Start IE, Tools – Internet Options – Use Blank, OK).
29. Update Acrobat Reader from version 6.0 to 6.0.6 using incremental updates found on JITC
CD. Run AdbeRdr60_enu_full.exe to upgrade to 6.0.1 (Next, Next, Next, Install, Finish). Then run Acro-Reader_6.0.2_Update.exe (Next, Install, Finish). Then run Acro-Reader_603_Update.exe, Acro-Reader_604_Update.exe, Acro-Reader_605_Update.exe and Acro-Reader_606_Update.exe
30. Ensure File Auditing is set properly on all drives. Using Windows Explorer, select C:, right-
click, Sharing and Security. On the Security tab, click the “Advanced” button, then select the Auditing tab. It should show auditing for “Everyone”, “Fail”, “Full Control”. (If it does not, add auditing for the Everyone group and select Fail, Full Control – Use Add, Advanced, Find Now). Check the box “Replace auditing entries on all child objects with entries shown here…”. OK. Click “Continue” if you get “Error Applying Security”. Repeat this for the roots of all hard disk partitions on the server.
31. As with any CallPilot release, Nortel may occasionally release PEPs to fix problems and
improve system performance. Install any applicable PEPs that have been released for the DoD configuration. (Standard CallPilot 4 PEPs are not supported on this configuration unless specifically stated.). At the time of writing, only PEPs CP404S01R33S and CP404S01R34S have been released. Be sure to read readme.txt files before installing PEPs. PEP CP404S01R35S is needed only for systems installed using the original v1.0 CP4 JITC CD dated Feb 5,2007. It is not to be installed for systems that used the v1.1 CD.
32. Run CPFinal.exe from the DoD CD. It will unzip and install itself. If you see a “Windows File
Protection” message, Click “Cancel”, then to the “Are You Sure?” prompt, click Yes.
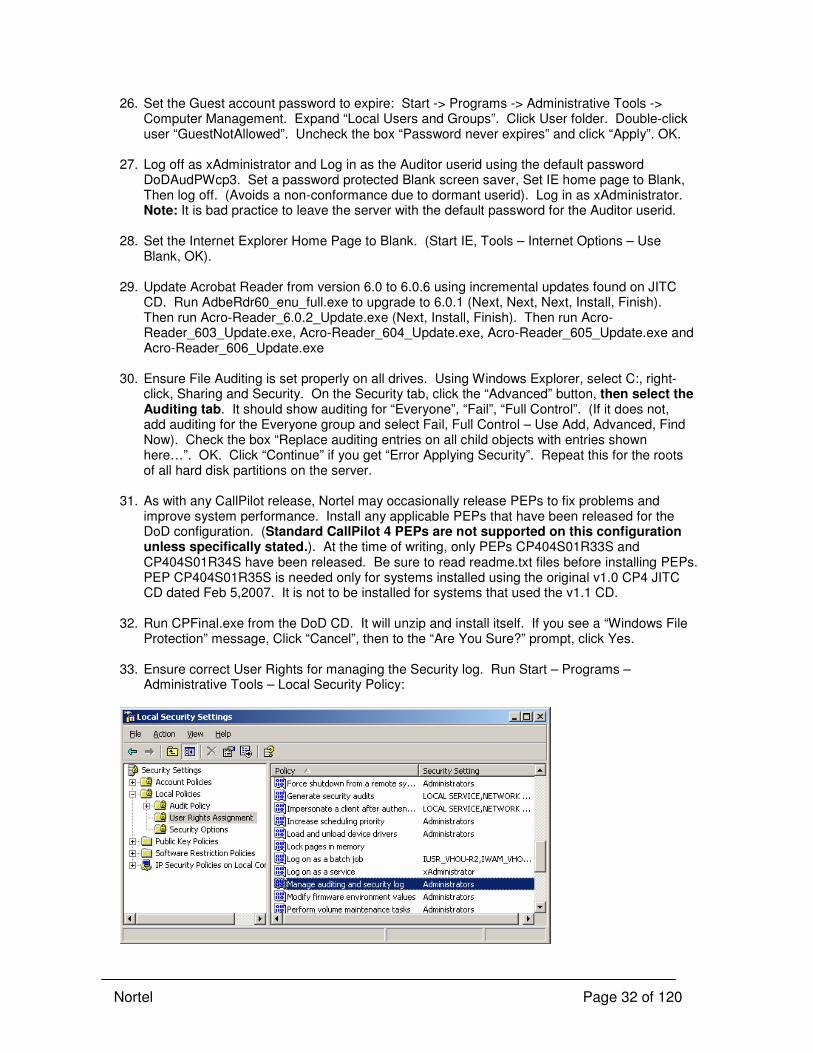
33. Ensure correct User Rights for managing the Security log. Run Start – Programs – Administrative Tools – Local Security Policy:
Nortel Page 33 of 120
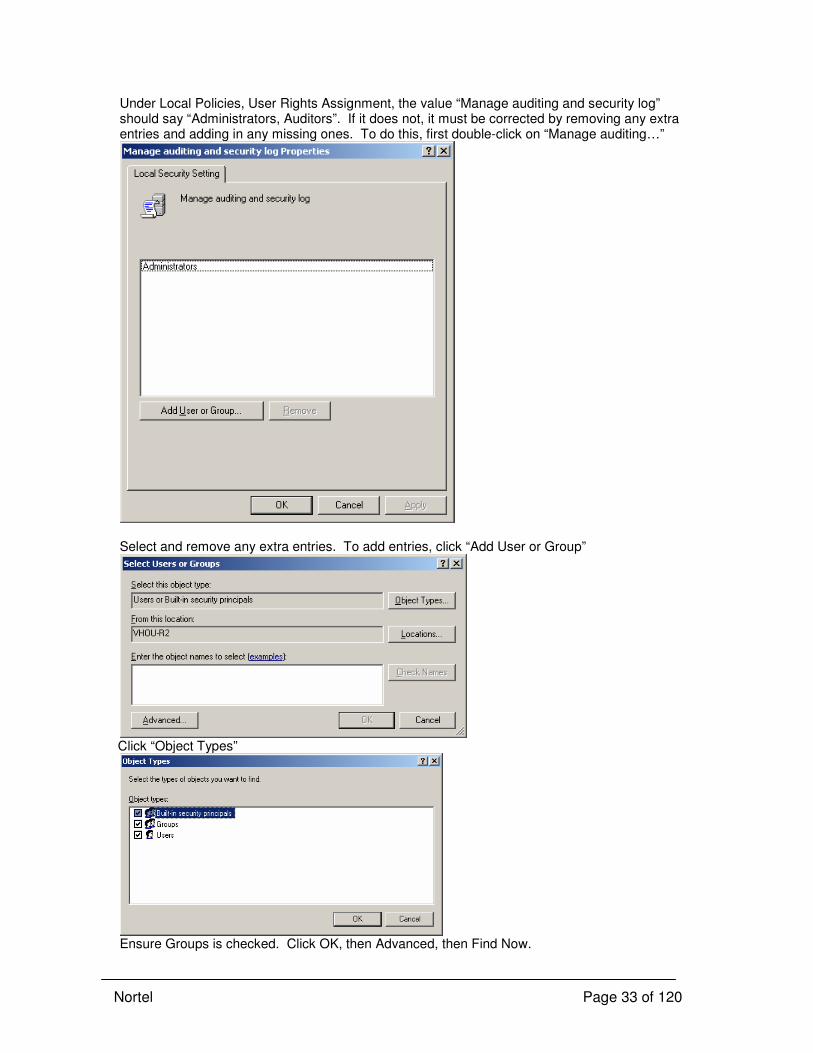
Under Local Policies, User Rights Assignment, the value “Manage auditing and security log” should say “Administrators, Auditors”. If it does not, it must be corrected by removing any extra entries and adding in any missing ones. To do this, first double-click on “Manage auditing…”
Select and remove any extra entries. To add entries, click “Add User or Group”
Click “Object Types”
Ensure Groups is checked. Click OK, then Advanced, then Find Now.
Nortel Page 34 of 120
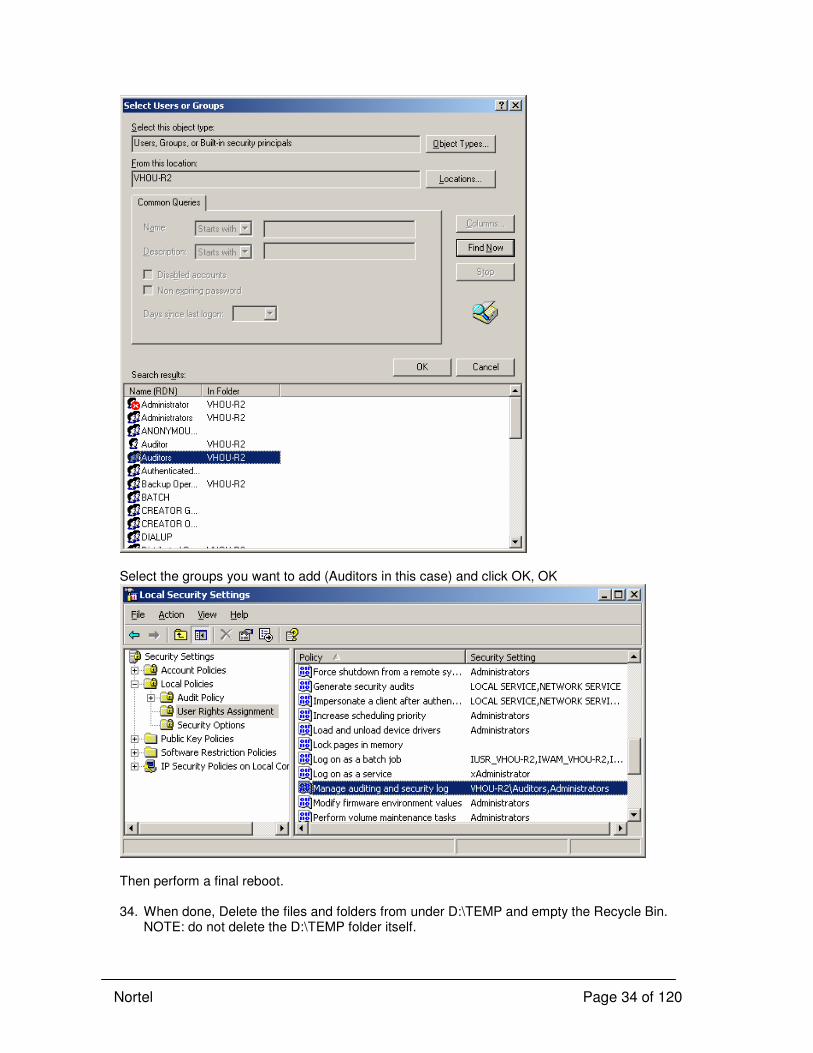
Select the groups you want to add (Auditors in this case) and click OK, OK
Then perform a final reboot.
34. When done, Delete the files and folders from under D:\TEMP and empty the Recycle Bin.
NOTE: do not delete the D:\TEMP folder itself.
Nortel Page 35 of 120
11. CallPilot Web Server Installation Procedure Note: if desired, the Web Server may be installed prior to the CallPilot Server.
Requirements:
• Familiarity with normal CallPilot 4 procedures and NTPs is assumed.
• Stand-alone web server running Windows 2003 OS with at least Service Pack 1 (SP1). OS CD required.
• All applicable Microsoft security hotfixes on CD (This is not part of the CallPilot product – see Appendix E)
• Anti-virus software and recent virus definition files on CD (This is not part of the CallPilot product)
• The following are found on the CallPilot 4 JITC Hardened Configuration (DoD) CD (NTUB43DA) o CallPilot 4 SU02 CallPilot Manager PEP (CP404S02G08C) on CD. o My CallPilot client (build 04.04.04.11 DoD build) on CD. o Java 2 Run Time Engine 1.3.1.11 on CD o SQL Anywhere 9 software file SQL9.exe on CD o CallPilot stand-alone web server hardening scripts DoDWebServerHardening.exe on CD
• If the customer requires use of web server and/or client certificates, the necessary certificates must be available.
• A PS/2 keyboard and PS/2 mouse must be used since USB ports will be disabled by hardening. Please perform all steps in order. Please read each step carefully before attempting to perform it.
1. Disconnect all Ethernet connections from the Web Server machine. (It is acceptable for the Web
Server to be connected to an isolated, protected network “island”, for example using a hub or cross-over cable.)
Note: DoD systems must not have any dial-up modem connected unless specifically authorized. 2. Install Windows Server 2003 Standard Edition. Use NTFS partitions only. Leave space on disk
for a second D partition in which web server log files will be stored. The system disk needs to be at least 5 GB. Also consider the space needed for Reporter files. Configure all Networking parameters (including DNS and WINS according to site-specific guidelines). (Note: Only static IP addresses may be used since the hardening will disable DHCP). Set the correct Computer Name – this cannot be changed later. If the “Manage Your Server” window appears after install, click “Don’t display this page at logon” and dismiss it. You do not need to activate Windows immediately, you have 30 days. See step 41 below. The .NET Framework is not required and should be uninstalled if it is present. If a modem is authorized, connect it to the web server and install the appropriate driver for the modem.
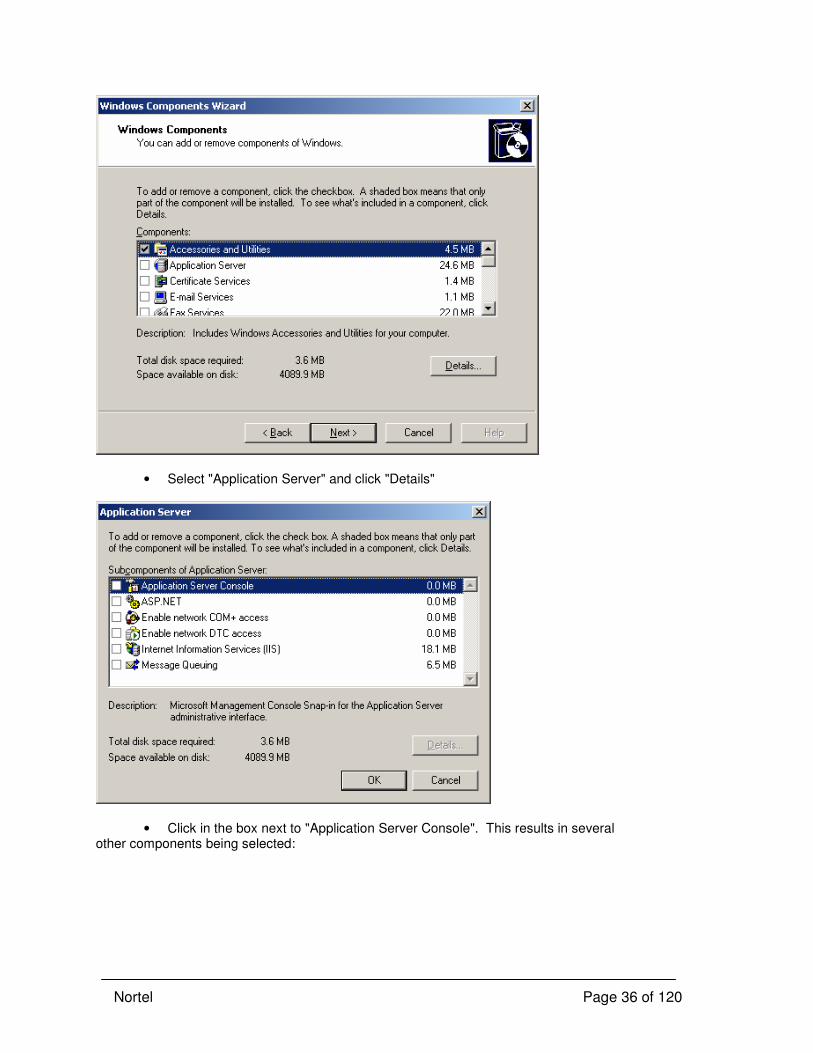
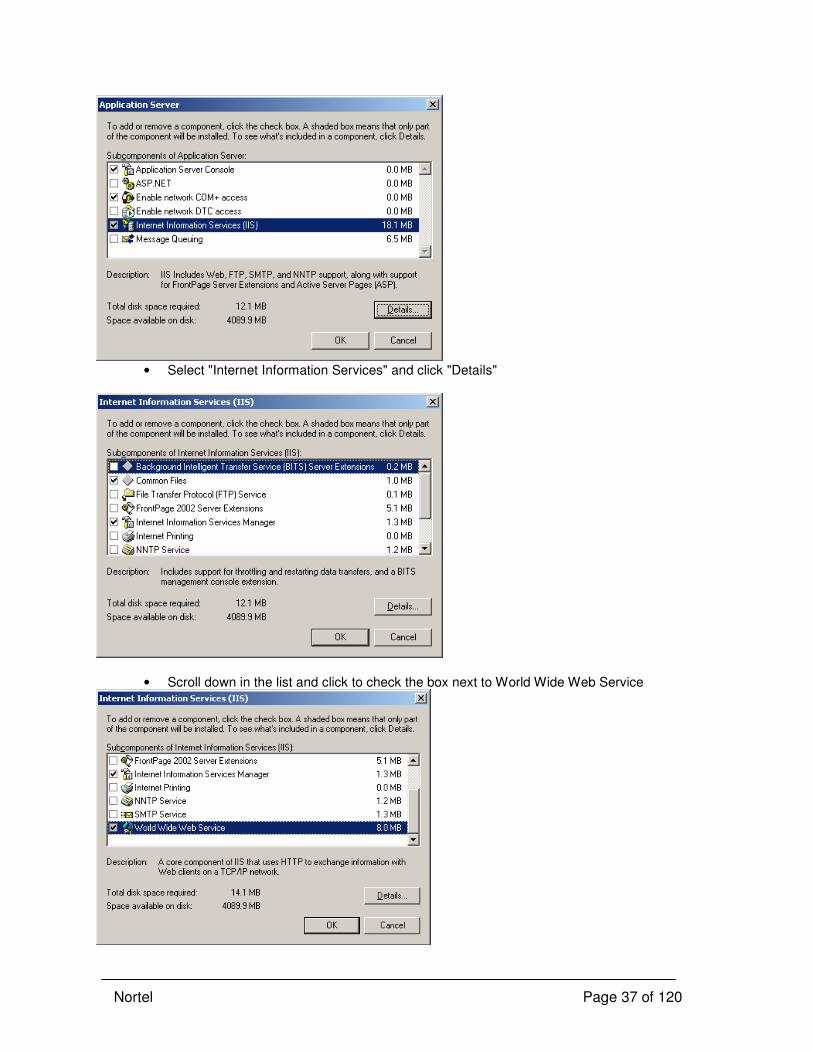
3. Install IIS on the Web Server as follows (This requires the Windows Server 2003 CD):
• Control Panel - Add or Remove Programs
• Add/Remove Windows Components
Nortel Page 36 of 120
• Select "Application Server" and click "Details"
• Click in the box next to "Application Server Console". This results in several other components being selected:
Nortel Page 37 of 120
• Select "Internet Information Services" and click "Details"
• Scroll down in the list and click to check the box next to World Wide Web Service
Nortel Page 38 of 120
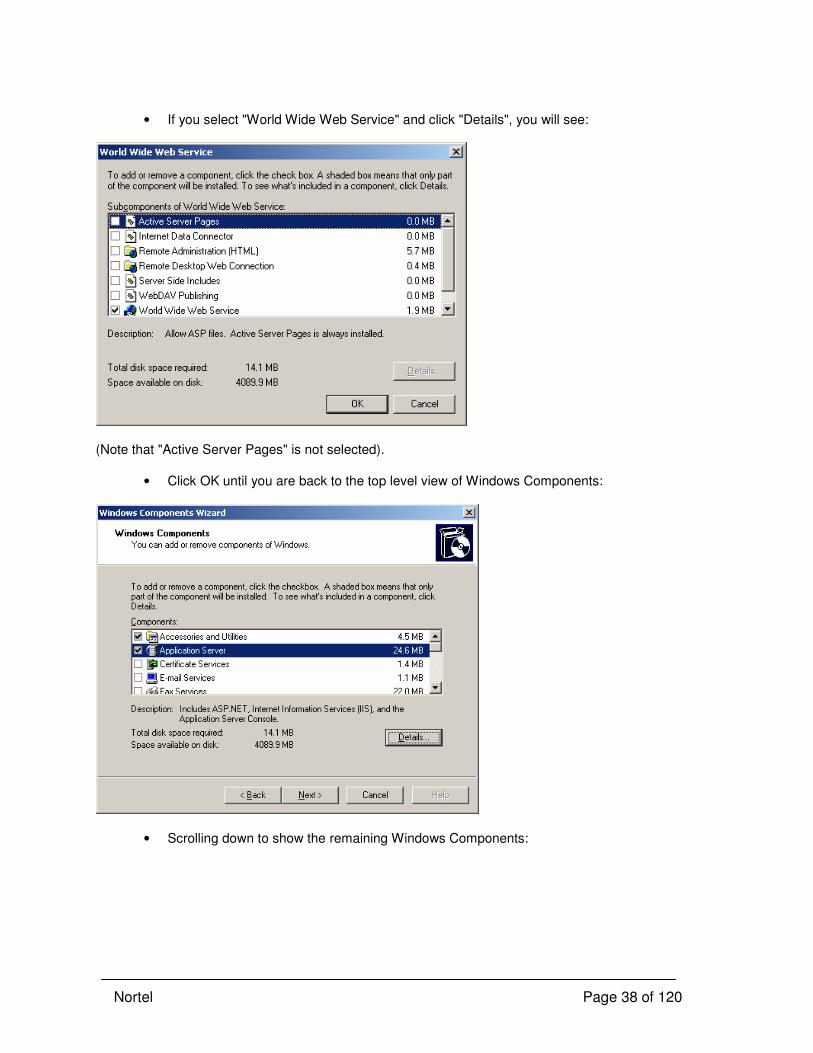
• If you select "World Wide Web Service" and click "Details", you will see:
(Note that "Active Server Pages" is not selected).
• Click OK until you are back to the top level view of Windows Components:
• Scrolling down to show the remaining Windows Components:

Nortel Page 39 of 120
Nortel Page 40 of 120
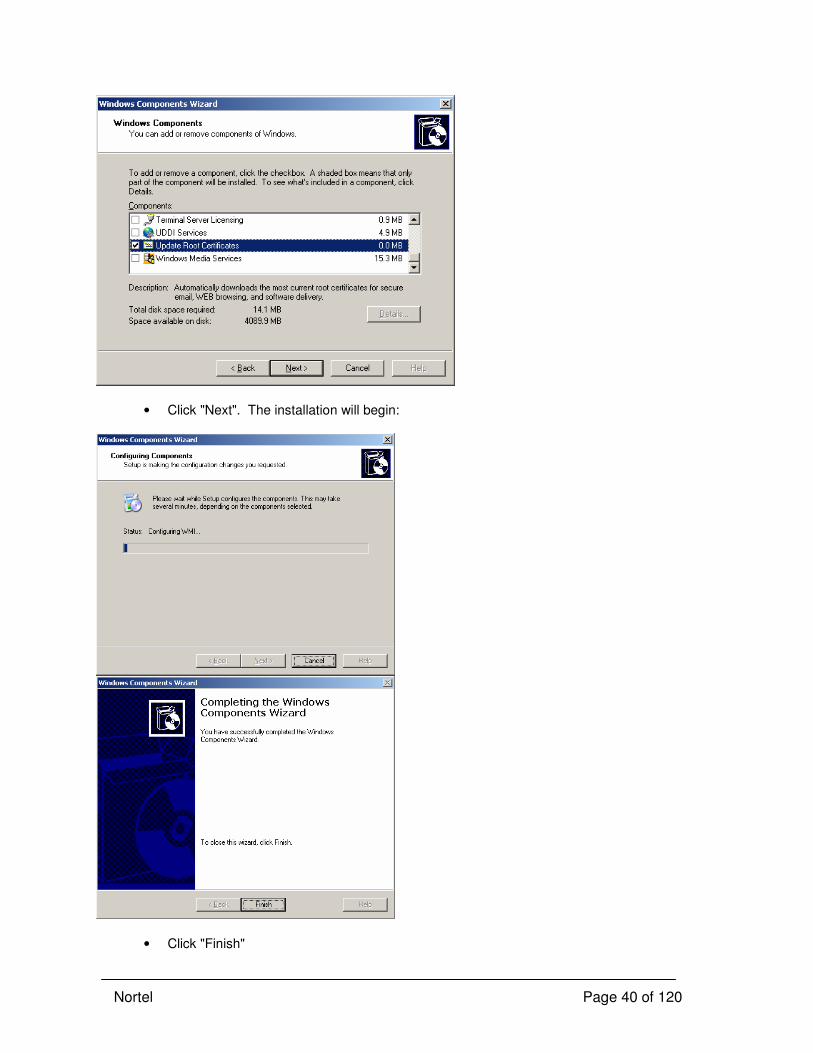
• Click "Next". The installation will begin:
• Click "Finish"
Nortel Page 41 of 120
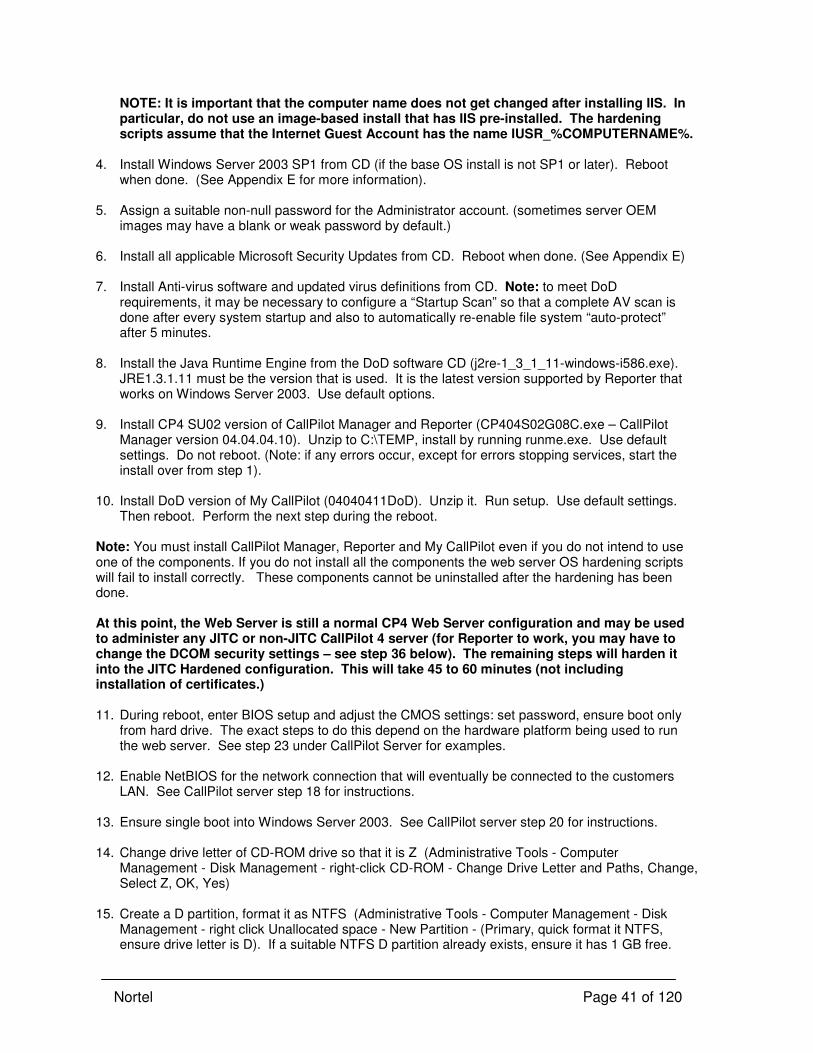
NOTE: It is important that the computer name does not get changed after installing IIS. In particular, do not use an image-based install that has IIS pre-installed. The hardening scripts assume that the Internet Guest Account has the name IUSR_%COMPUTERNAME%.
4. Install Windows Server 2003 SP1 from CD (if the base OS install is not SP1 or later). Reboot
when done. (See Appendix E for more information). 5. Assign a suitable non-null password for the Administrator account. (sometimes server OEM
images may have a blank or weak password by default.) 6. Install all applicable Microsoft Security Updates from CD. Reboot when done. (See Appendix E) 7. Install Anti-virus software and updated virus definitions from CD. Note: to meet DoD
requirements, it may be necessary to configure a “Startup Scan” so that a complete AV scan is done after every system startup and also to automatically re-enable file system “auto-protect” after 5 minutes.
8. Install the Java Runtime Engine from the DoD software CD (j2re-1_3_1_11-windows-i586.exe).
JRE1.3.1.11 must be the version that is used. It is the latest version supported by Reporter that works on Windows Server 2003. Use default options.
9. Install CP4 SU02 version of CallPilot Manager and Reporter (CP404S02G08C.exe – CallPilot
Manager version 04.04.04.10). Unzip to C:\TEMP, install by running runme.exe. Use default settings. Do not reboot. (Note: if any errors occur, except for errors stopping services, start the install over from step 1).
10. Install DoD version of My CallPilot (04040411DoD). Unzip it. Run setup. Use default settings.
Then reboot. Perform the next step during the reboot. Note: You must install CallPilot Manager, Reporter and My CallPilot even if you do not intend to use one of the components. If you do not install all the components the web server OS hardening scripts will fail to install correctly. These components cannot be uninstalled after the hardening has been done. At this point, the Web Server is still a normal CP4 Web Server configuration and may be used to administer any JITC or non-JITC CallPilot 4 server (for Reporter to work, you may have to change the DCOM security settings – see step 36 below). The remaining steps will harden it into the JITC Hardened configuration. This will take 45 to 60 minutes (not including installation of certificates.) 11. During reboot, enter BIOS setup and adjust the CMOS settings: set password, ensure boot only
from hard drive. The exact steps to do this depend on the hardware platform being used to run the web server. See step 23 under CallPilot Server for examples.
12. Enable NetBIOS for the network connection that will eventually be connected to the customers
LAN. See CallPilot server step 18 for instructions. 13. Ensure single boot into Windows Server 2003. See CallPilot server step 20 for instructions. 14. Change drive letter of CD-ROM drive so that it is Z (Administrative Tools - Computer
Management - Disk Management - right-click CD-ROM - Change Drive Letter and Paths, Change, Select Z, OK, Yes)
15. Create a D partition, format it as NTFS (Administrative Tools - Computer Management - Disk
Management - right click Unallocated space - New Partition - (Primary, quick format it NTFS, ensure drive letter is D). If a suitable NTFS D partition already exists, ensure it has 1 GB free.
Nortel Page 42 of 120
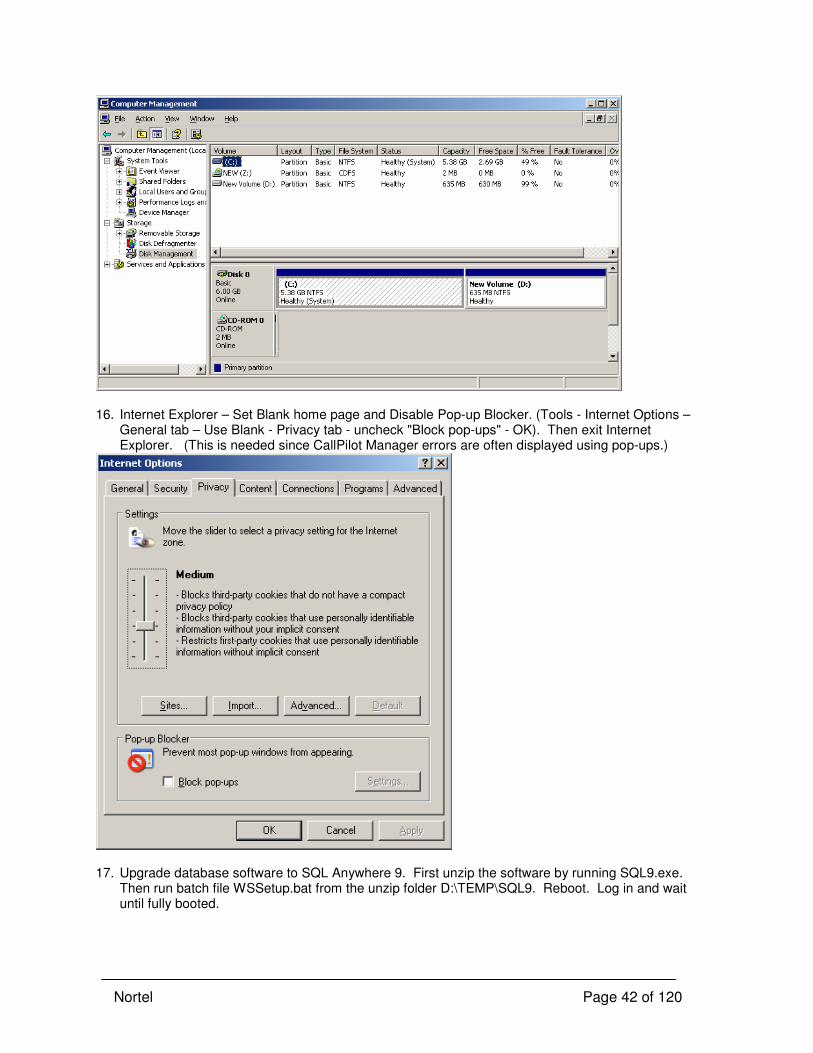
16. Internet Explorer – Set Blank home page and Disable Pop-up Blocker. (Tools - Internet Options –
General tab – Use Blank - Privacy tab - uncheck "Block pop-ups" - OK). Then exit Internet Explorer. (This is needed since CallPilot Manager errors are often displayed using pop-ups.)
17. Upgrade database software to SQL Anywhere 9. First unzip the software by running SQL9.exe.
Then run batch file WSSetup.bat from the unzip folder D:\TEMP\SQL9. Reboot. Log in and wait until fully booted.
Nortel Page 43 of 120
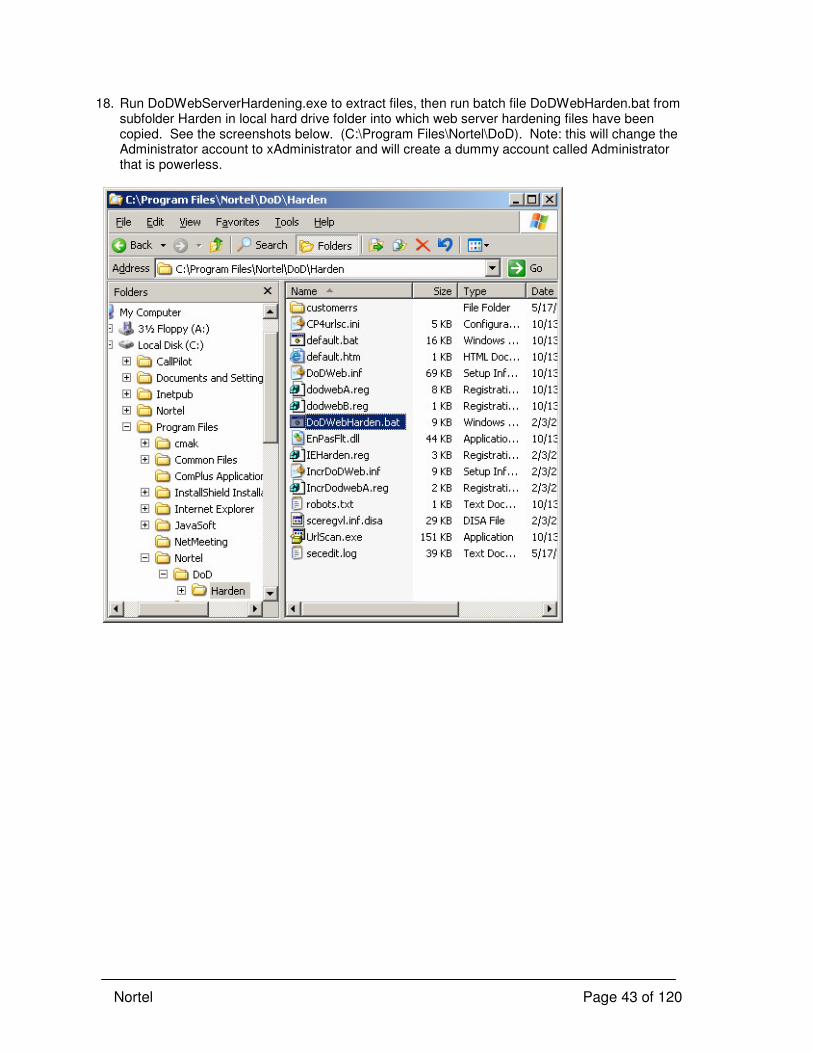
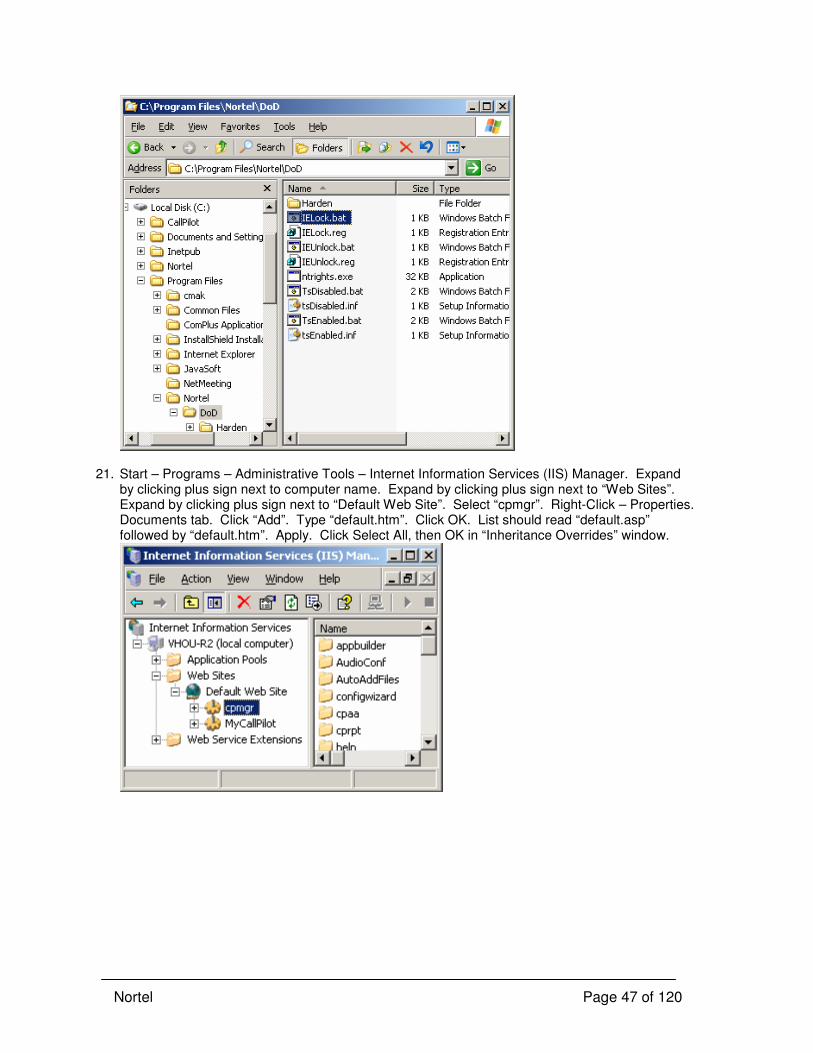
18. Run DoDWebServerHardening.exe to extract files, then run batch file DoDWebHarden.bat from subfolder Harden in local hard drive folder into which web server hardening files have been copied. See the screenshots below. (C:\Program Files\Nortel\DoD). Note: this will change the Administrator account to xAdministrator and will create a dummy account called Administrator that is powerless.
Nortel Page 44 of 120
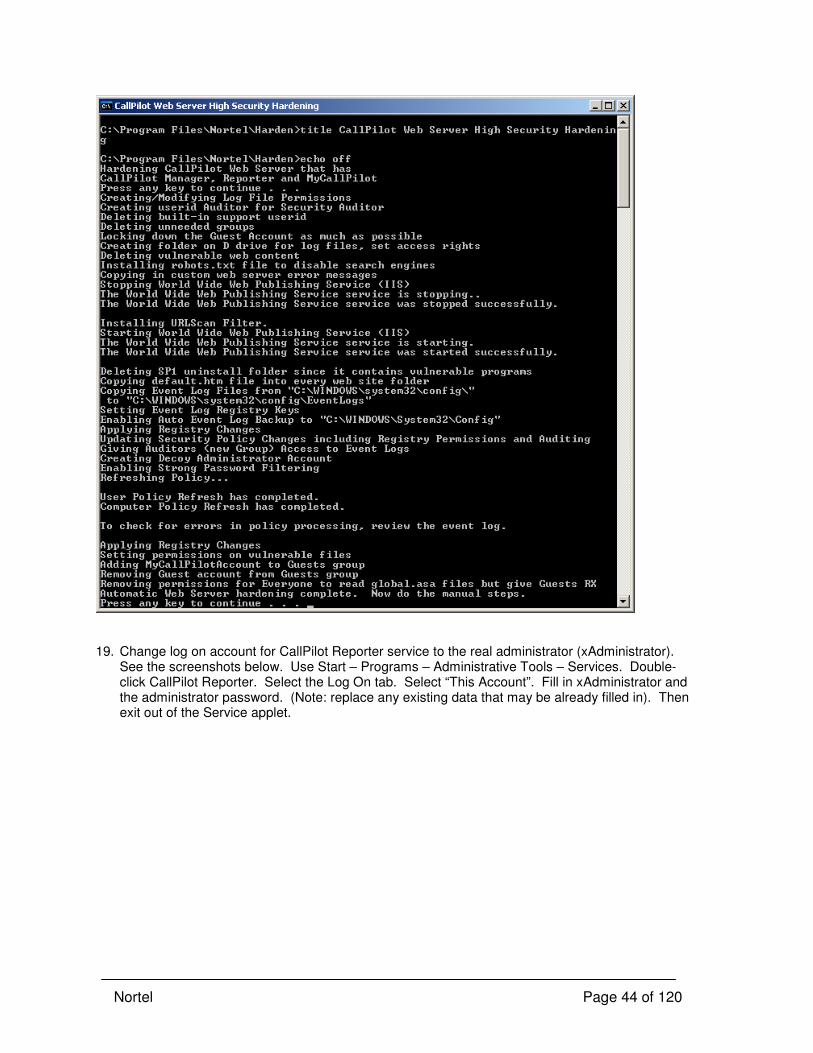
19. Change log on account for CallPilot Reporter service to the real administrator (xAdministrator).
See the screenshots below. Use Start – Programs – Administrative Tools – Services. Double-click CallPilot Reporter. Select the Log On tab. Select “This Account”. Fill in xAdministrator and the administrator password. (Note: replace any existing data that may be already filled in). Then exit out of the Service applet.

Nortel Page 45 of 120
Apply
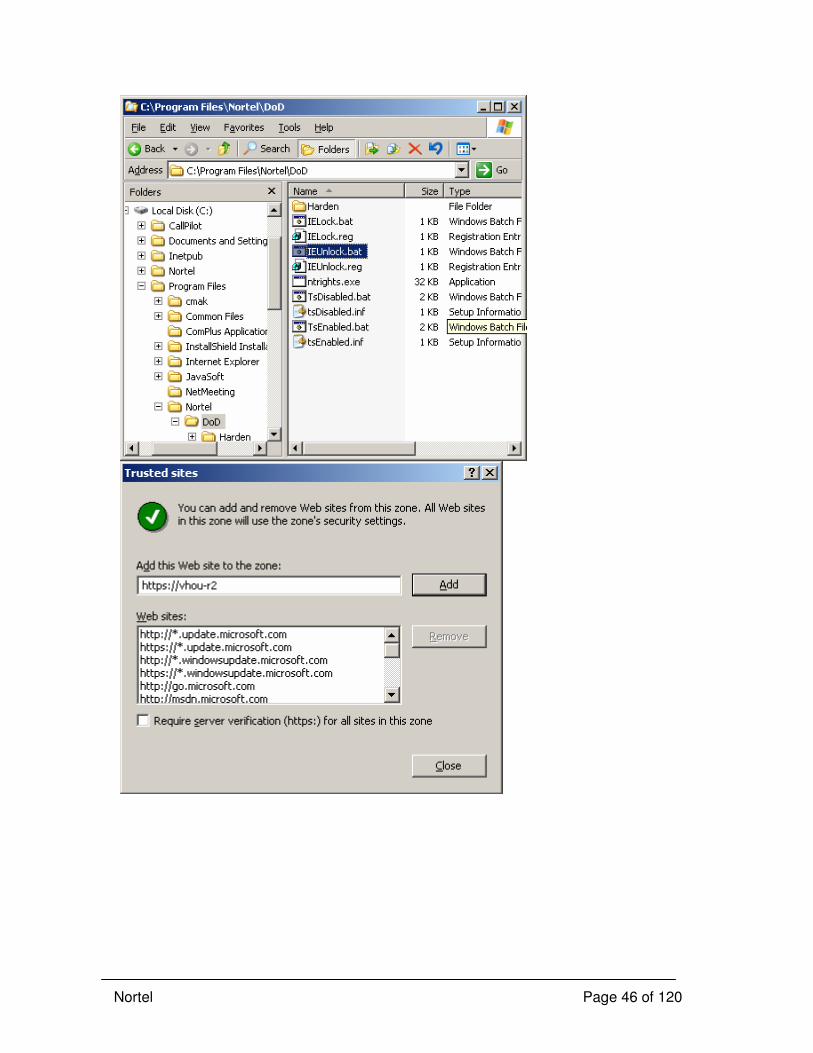
20. Internet Explorer - Add local system's name to Trusted Sites. First, unlock the IE settings by
running batch file IEUnlock.bat in C:\Program Files\Nortel\DoD. Then start Internet Explorer and use Tools - Internet Options - Security tab - Select "Trusted Sites" - "Sites" button - uncheck "Require server verification (https:) for all sites in this zone - type site name “http://<computername>”- Click Add – then type site name “https://<computername> - Click Add - Close - OK. Quit IE.. Then lock the IE settings by running batch file IELock.bat.
Nortel Page 46 of 120
Nortel Page 47 of 120
21. Start – Programs – Administrative Tools – Internet Information Services (IIS) Manager. Expand
by clicking plus sign next to computer name. Expand by clicking plus sign next to “Web Sites”. Expand by clicking plus sign next to “Default Web Site”. Select “cpmgr”. Right-Click – Properties. Documents tab. Click “Add”. Type “default.htm”. Click OK. List should read “default.asp” followed by “default.htm”. Apply. Click Select All, then OK in “Inheritance Overrides” window.

Nortel Page 48 of 120
22. Select “Virtual Directory” tab. Check the box “Log visits”. Then click OK to close cpmgr
Properties.
Nortel Page 49 of 120
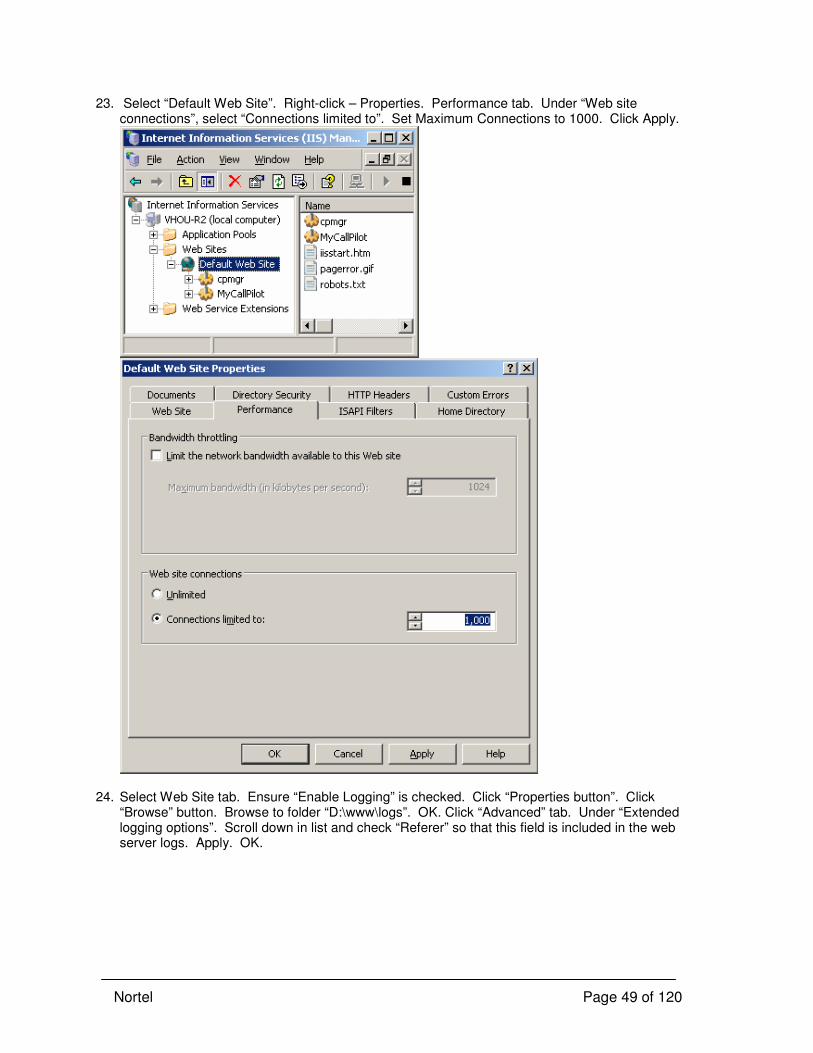
23. Select “Default Web Site”. Right-click – Properties. Performance tab. Under “Web site connections”, select “Connections limited to”. Set Maximum Connections to 1000. Click Apply.
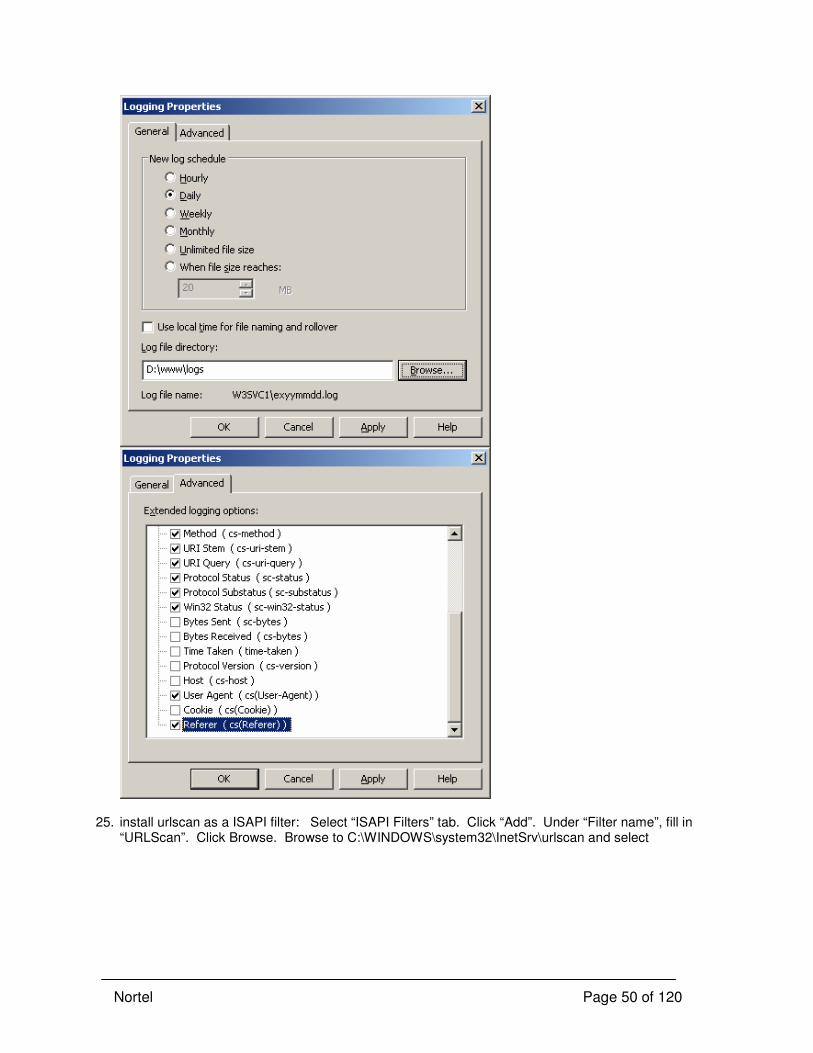
24. Select Web Site tab. Ensure “Enable Logging” is checked. Click “Properties button”. Click
“Browse” button. Browse to folder “D:\www\logs”. OK. Click “Advanced” tab. Under “Extended logging options”. Scroll down in list and check “Referer” so that this field is included in the web server logs. Apply. OK.
Nortel Page 50 of 120
25. install urlscan as a ISAPI filter: Select “ISAPI Filters” tab. Click “Add”. Under “Filter name”, fill in
“URLScan”. Click Browse. Browse to C:\WINDOWS\system32\InetSrv\urlscan and select
Nortel Page 51 of 120
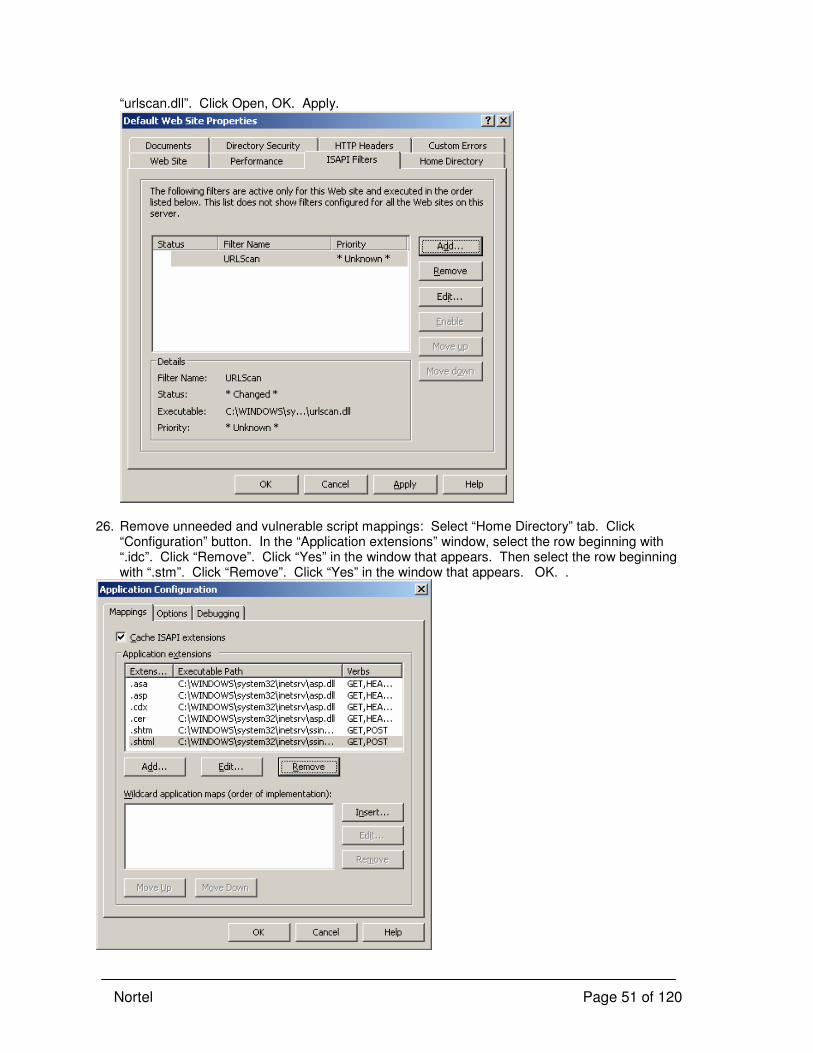
“urlscan.dll”. Click Open, OK. Apply.
26. Remove unneeded and vulnerable script mappings: Select “Home Directory” tab. Click
“Configuration” button. In the “Application extensions” window, select the row beginning with “.idc”. Click “Remove”. Click “Yes” in the window that appears. Then select the row beginning with “.stm”. Click “Remove”. Click “Yes” in the window that appears. OK. .
Nortel Page 52 of 120
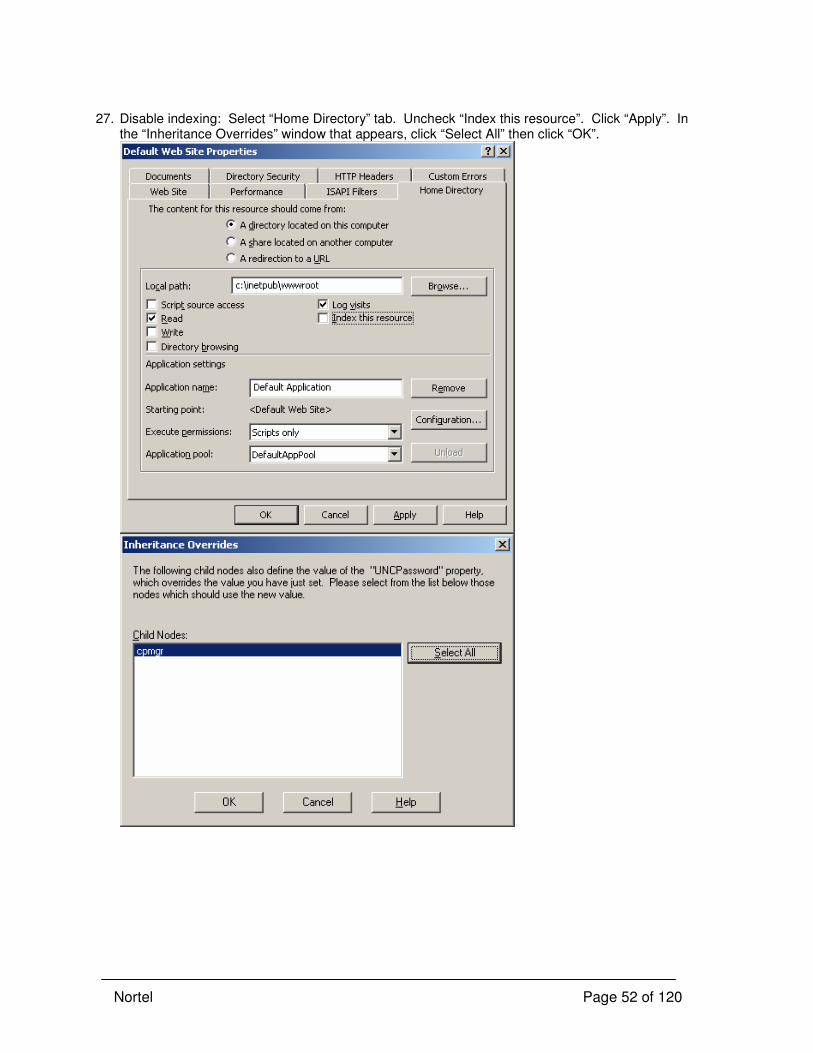
27. Disable indexing: Select “Home Directory” tab. Uncheck “Index this resource”. Click “Apply”. In
the “Inheritance Overrides” window that appears, click “Select All” then click “OK”.
Nortel Page 53 of 120
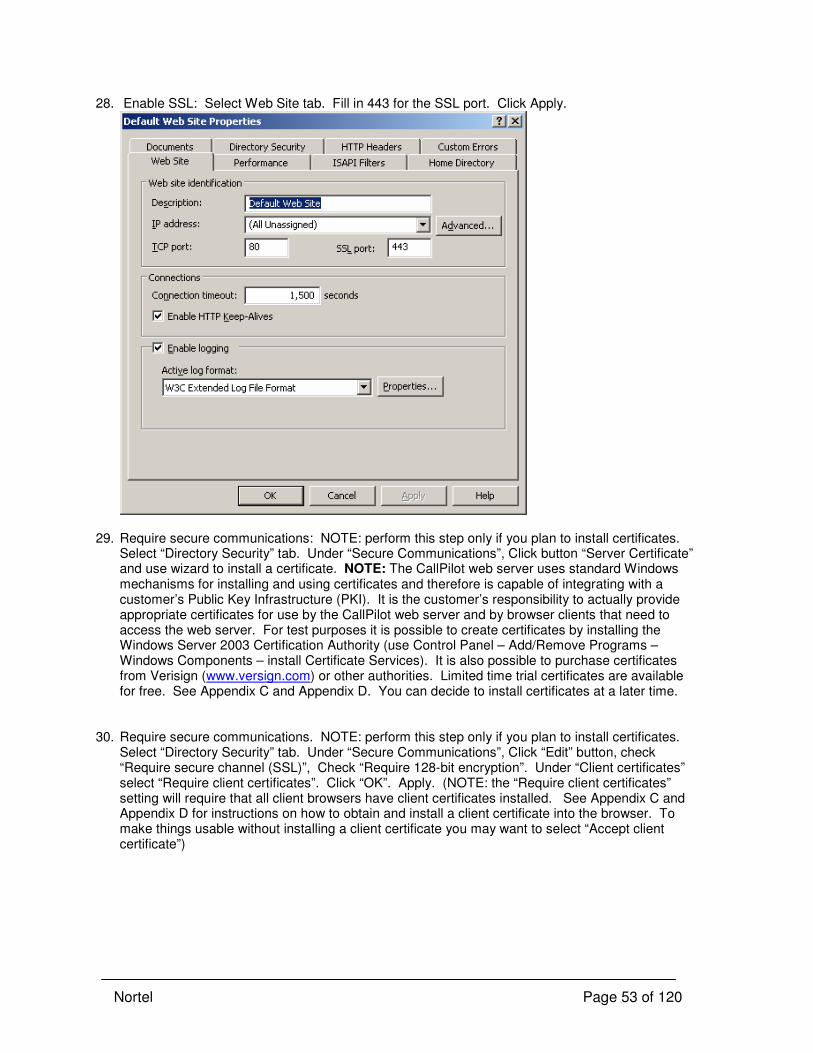
28. Enable SSL: Select Web Site tab. Fill in 443 for the SSL port. Click Apply.
29. Require secure communications: NOTE: perform this step only if you plan to install certificates.
Select “Directory Security” tab. Under “Secure Communications”, Click button “Server Certificate” and use wizard to install a certificate. NOTE: The CallPilot web server uses standard Windows mechanisms for installing and using certificates and therefore is capable of integrating with a customer’s Public Key Infrastructure (PKI). It is the customer’s responsibility to actually provide appropriate certificates for use by the CallPilot web server and by browser clients that need to access the web server. For test purposes it is possible to create certificates by installing the Windows Server 2003 Certification Authority (use Control Panel – Add/Remove Programs – Windows Components – install Certificate Services). It is also possible to purchase certificates from Verisign (www.versign.com) or other authorities. Limited time trial certificates are available for free. See Appendix C and Appendix D. You can decide to install certificates at a later time.
30. Require secure communications. NOTE: perform this step only if you plan to install certificates.
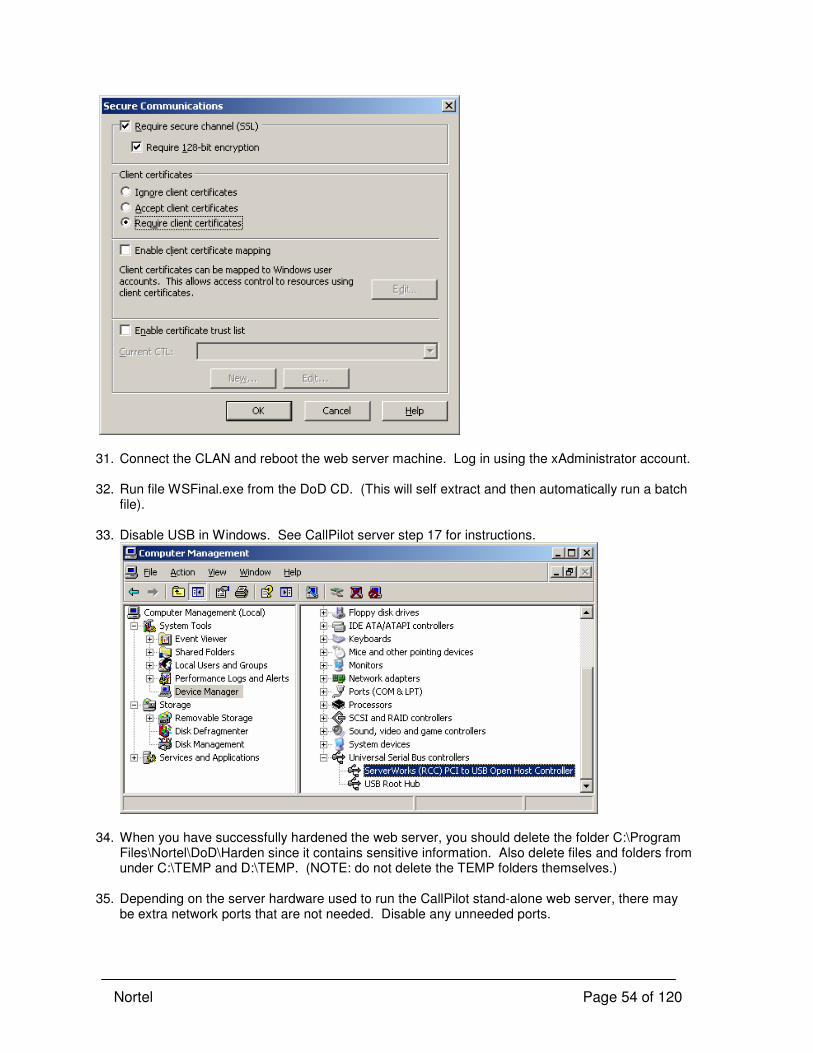
Select “Directory Security” tab. Under “Secure Communications”, Click “Edit” button, check “Require secure channel (SSL)”, Check “Require 128-bit encryption”. Under “Client certificates” select “Require client certificates”. Click “OK”. Apply. (NOTE: the “Require client certificates” setting will require that all client browsers have client certificates installed. See Appendix C and Appendix D for instructions on how to obtain and install a client certificate into the browser. To make things usable without installing a client certificate you may want to select “Accept client certificate”)
Nortel Page 54 of 120
31. Connect the CLAN and reboot the web server machine. Log in using the xAdministrator account. 32. Run file WSFinal.exe from the DoD CD. (This will self extract and then automatically run a batch
file). 33. Disable USB in Windows. See CallPilot server step 17 for instructions.
34. When you have successfully hardened the web server, you should delete the folder C:\Program
Files\Nortel\DoD\Harden since it contains sensitive information. Also delete files and folders from under C:\TEMP and D:\TEMP. (NOTE: do not delete the TEMP folders themselves.)
35. Depending on the server hardware used to run the CallPilot stand-alone web server, there may
be extra network ports that are not needed. Disable any unneeded ports.
Nortel Page 55 of 120
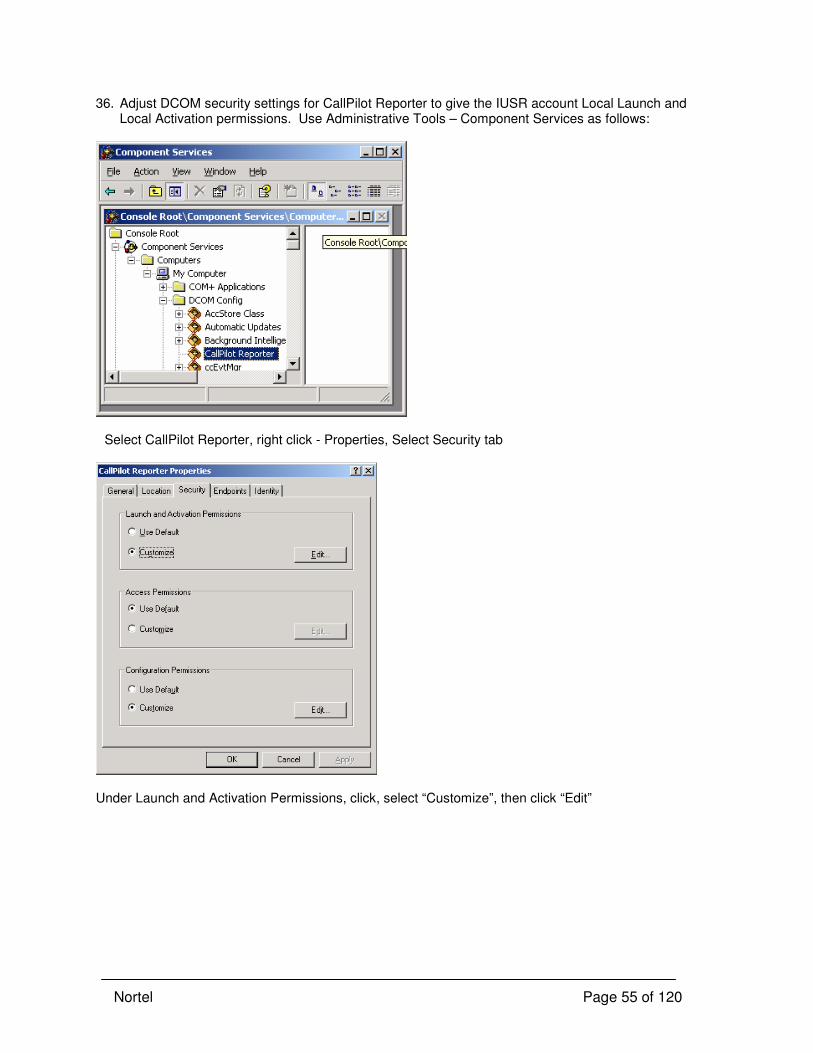
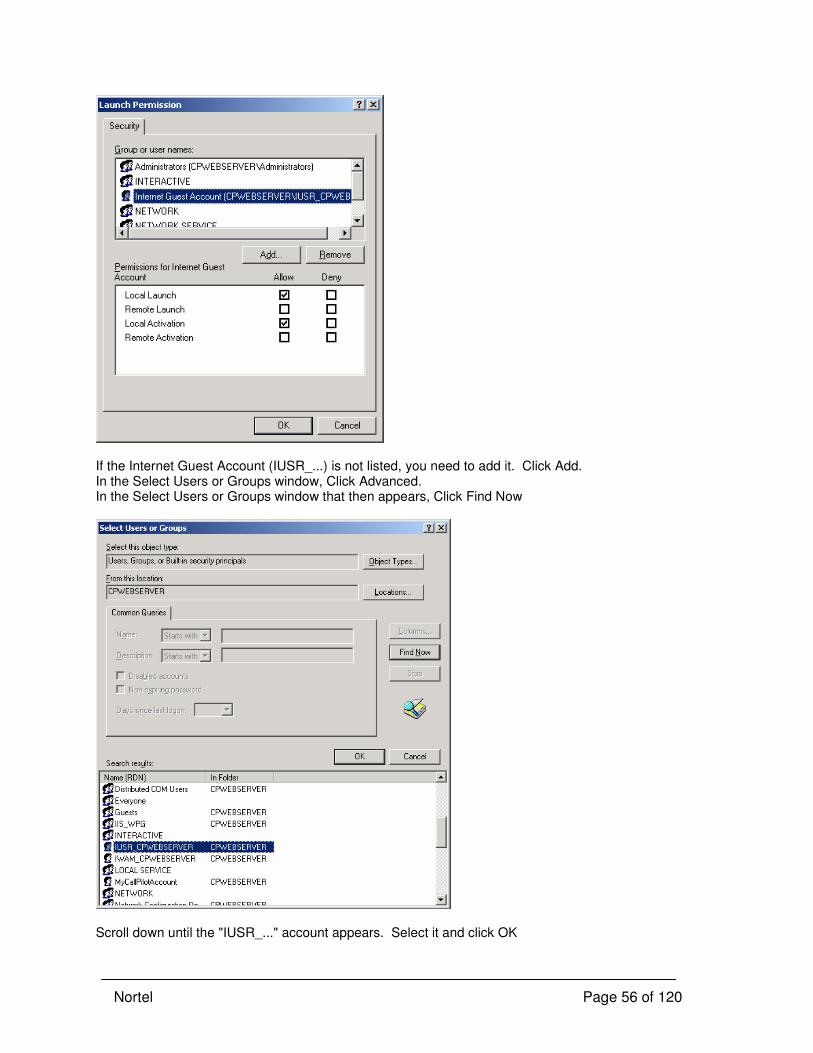
36. Adjust DCOM security settings for CallPilot Reporter to give the IUSR account Local Launch and Local Activation permissions. Use Administrative Tools – Component Services as follows:
Select CallPilot Reporter, right click - Properties, Select Security tab
Under Launch and Activation Permissions, click, select “Customize”, then click “Edit”
Nortel Page 56 of 120
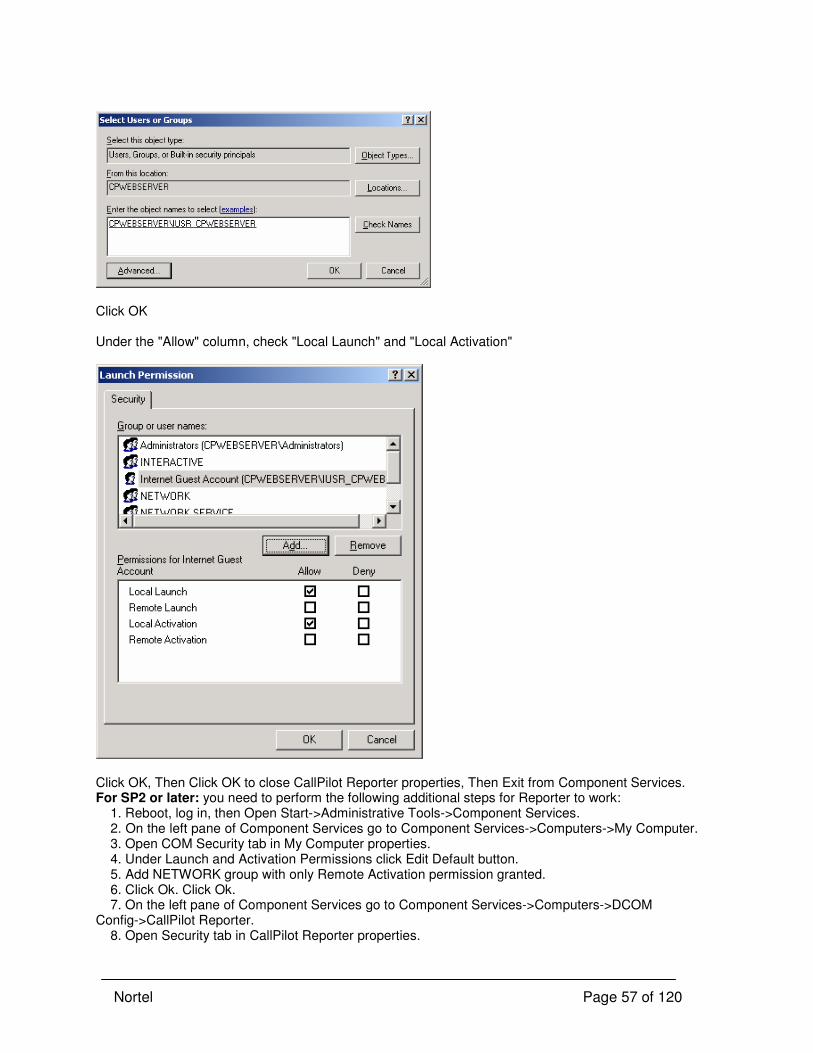
If the Internet Guest Account (IUSR_...) is not listed, you need to add it. Click Add. In the Select Users or Groups window, Click Advanced. In the Select Users or Groups window that then appears, Click Find Now
Scroll down until the "IUSR_..." account appears. Select it and click OK
Nortel Page 57 of 120
Click OK Under the "Allow" column, check "Local Launch" and "Local Activation"
Click OK, Then Click OK to close CallPilot Reporter properties, Then Exit from Component Services. For SP2 or later: you need to perform the following additional steps for Reporter to work: 1. Reboot, log in, then Open Start->Administrative Tools->Component Services. 2. On the left pane of Component Services go to Component Services->Computers->My Computer. 3. Open COM Security tab in My Computer properties. 4. Under Launch and Activation Permissions click Edit Default button. 5. Add NETWORK group with only Remote Activation permission granted. 6. Click Ok. Click Ok. 7. On the left pane of Component Services go to Component Services->Computers->DCOM Config->CallPilot Reporter. 8. Open Security tab in CallPilot Reporter properties.
Nortel Page 58 of 120
9. Under Launch and Activation Permissions click Customize, and then click edit. 10. Add NETWORK group with Remote Activation permission granted. 11. Add NETWORK SERVICE group with Local Launch and Local Activation permission granted. 12. Click Ok. Click Ok. 13. Reboot. 37. Set the xGuest account so that its password expires. (Administrative Tools – Computer
Management – Local Users, Select xGuest, Properties, Uncheck password never expires.) 38. Logoff, then log on using the Auditor userid (default password DoDAudPWcp3). Set a password
protected screen saver, set IE home page to Blank. Log off and log back on as xAdministrator. (This is just so the userid will not be considered “dormant” when the STIG disk is run.) Note: It is bad practice to leave the server with the default password for the Auditor userid.
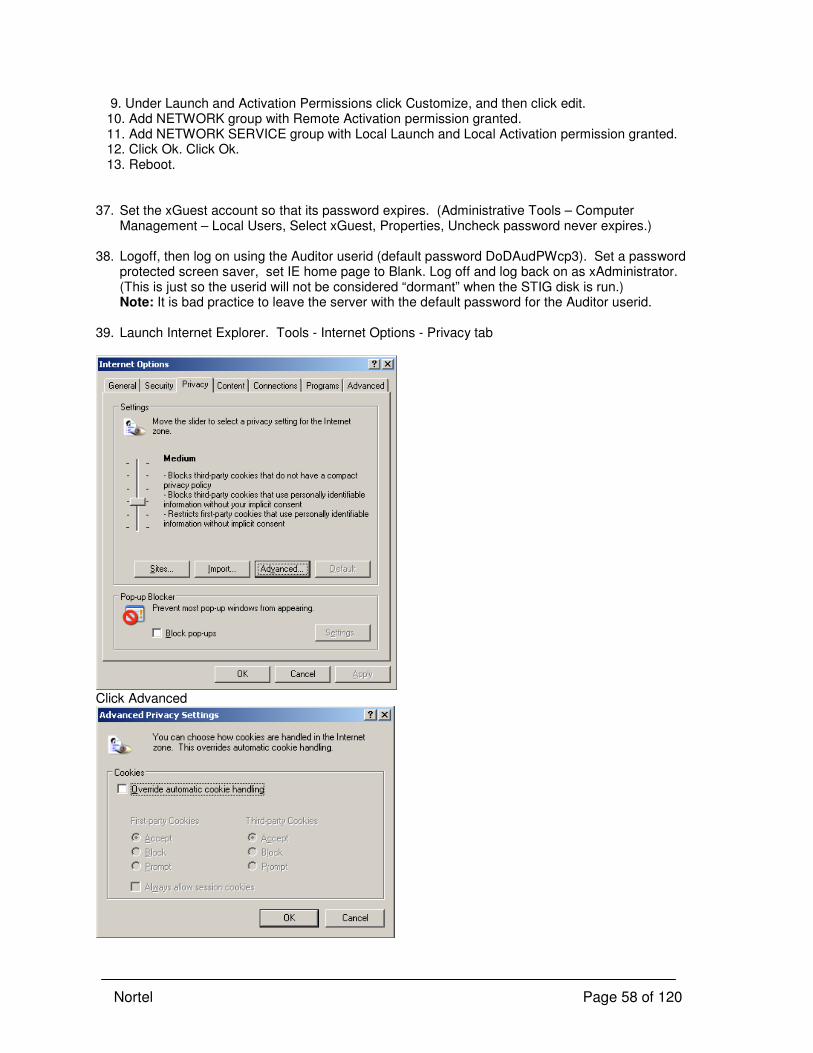
39. Launch Internet Explorer. Tools - Internet Options - Privacy tab
Click Advanced
Nortel Page 59 of 120
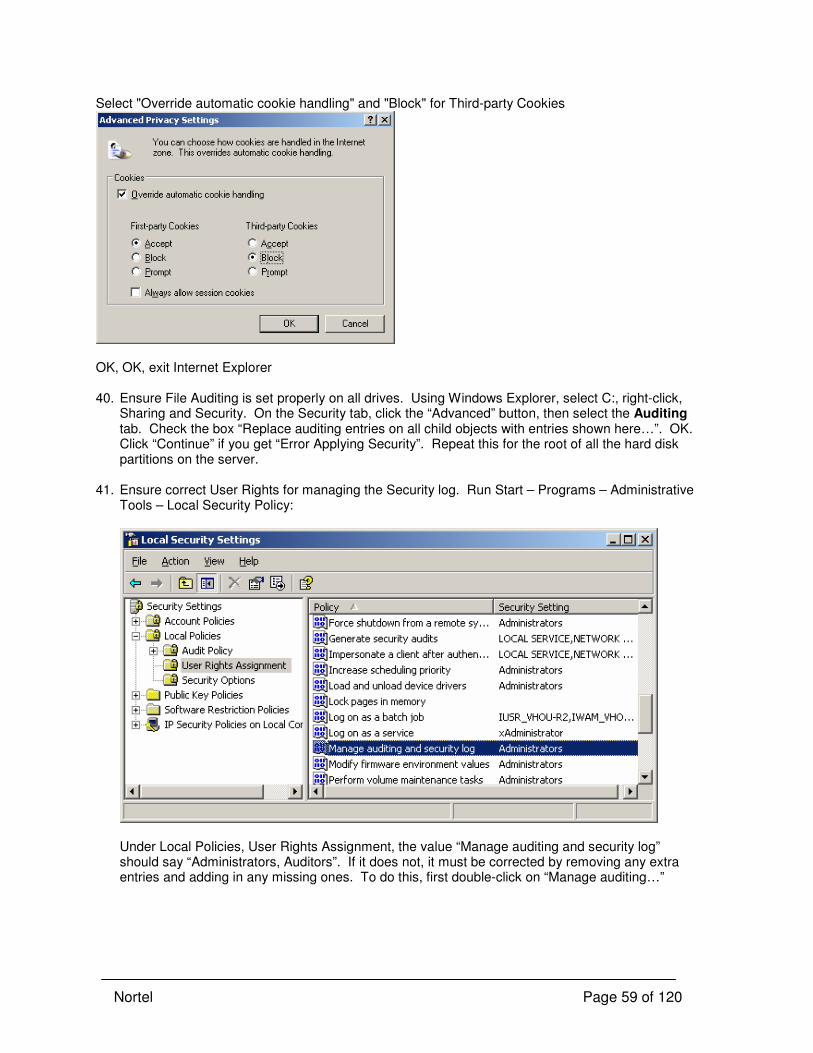
Select "Override automatic cookie handling" and "Block" for Third-party Cookies
OK, OK, exit Internet Explorer 40. Ensure File Auditing is set properly on all drives. Using Windows Explorer, select C:, right-click,
Sharing and Security. On the Security tab, click the “Advanced” button, then select the Auditing tab. Check the box “Replace auditing entries on all child objects with entries shown here…”. OK. Click “Continue” if you get “Error Applying Security”. Repeat this for the root of all the hard disk partitions on the server.
41. Ensure correct User Rights for managing the Security log. Run Start – Programs – Administrative
Tools – Local Security Policy:
Under Local Policies, User Rights Assignment, the value “Manage auditing and security log” should say “Administrators, Auditors”. If it does not, it must be corrected by removing any extra entries and adding in any missing ones. To do this, first double-click on “Manage auditing…”
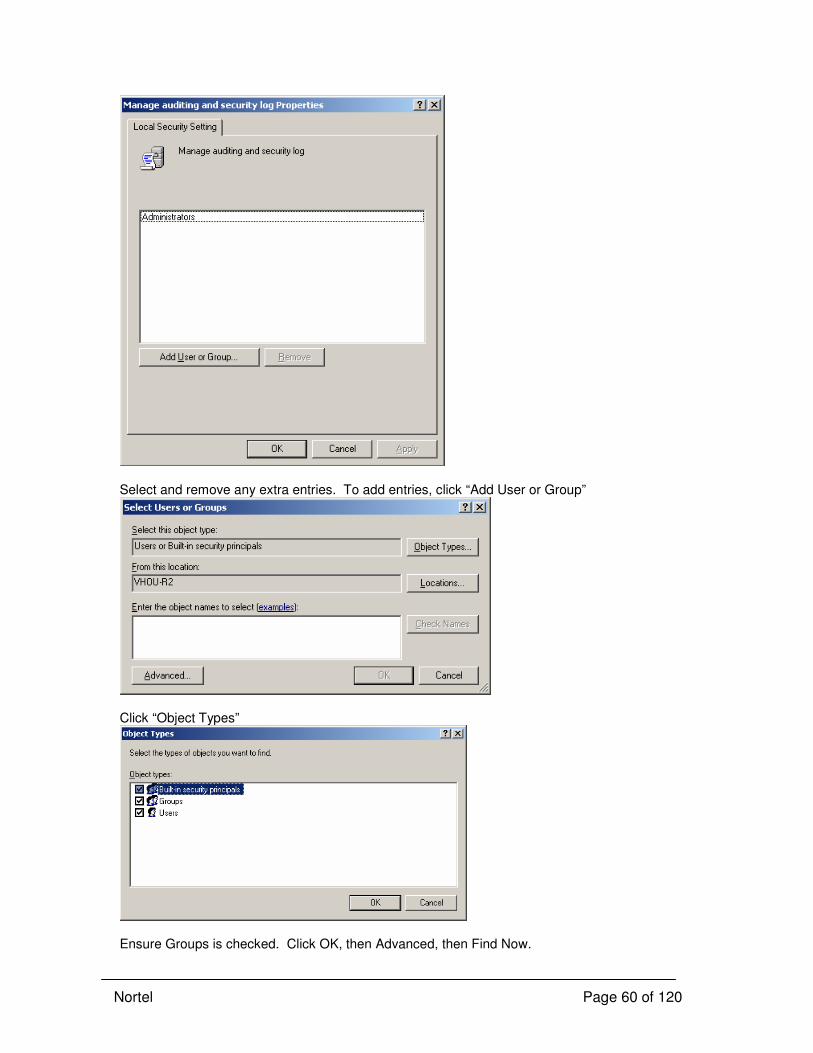
Nortel Page 60 of 120
Select and remove any extra entries. To add entries, click “Add User or Group”
Click “Object Types”
Ensure Groups is checked. Click OK, then Advanced, then Find Now.
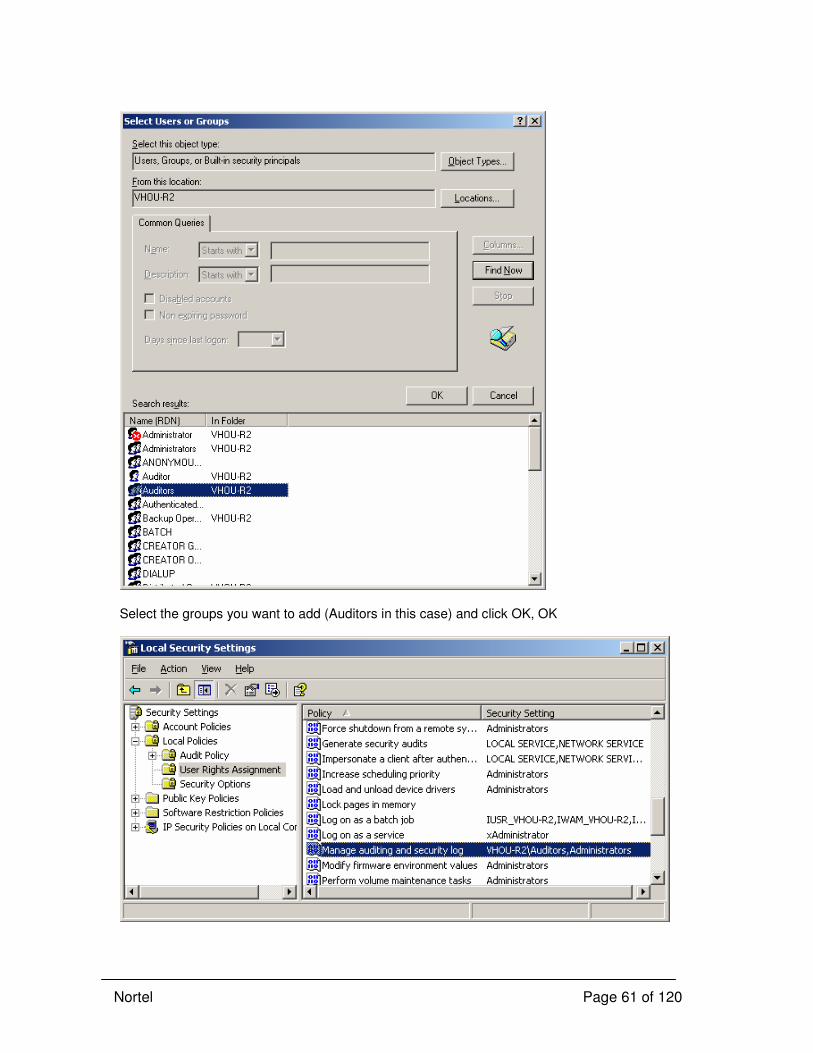
Nortel Page 61 of 120
Select the groups you want to add (Auditors in this case) and click OK, OK
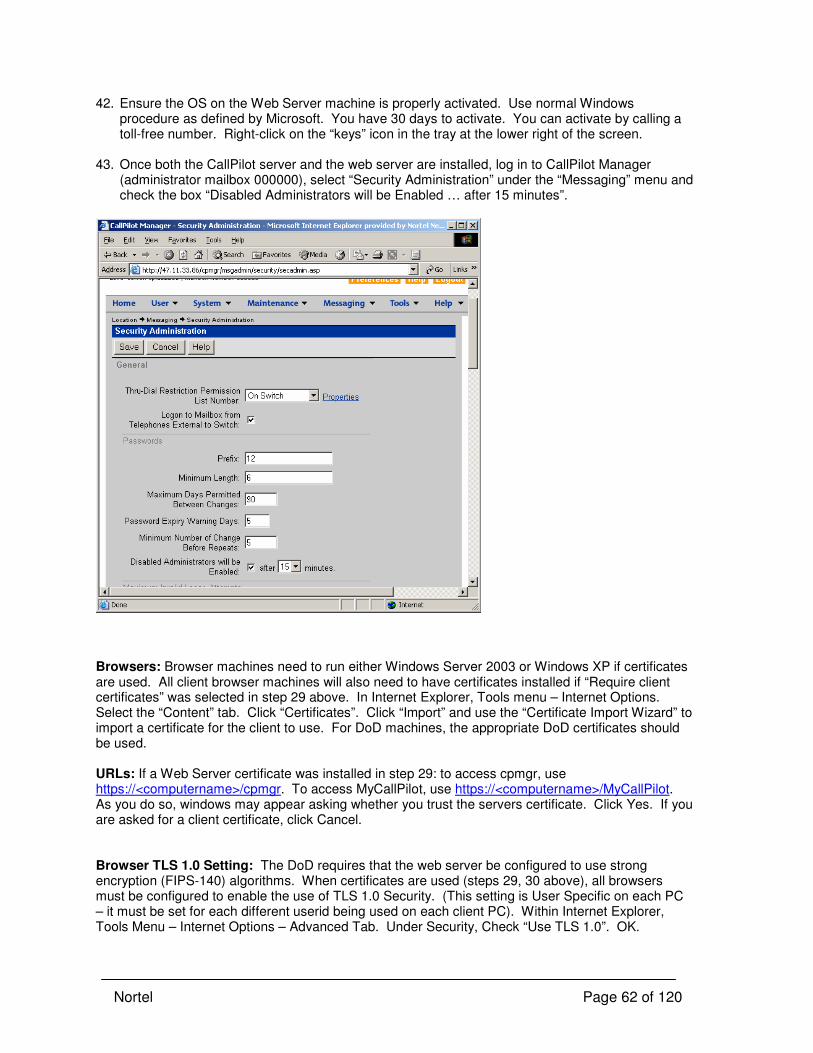
Nortel Page 62 of 120
42. Ensure the OS on the Web Server machine is properly activated. Use normal Windows procedure as defined by Microsoft. You have 30 days to activate. You can activate by calling a toll-free number. Right-click on the “keys” icon in the tray at the lower right of the screen.
43. Once both the CallPilot server and the web server are installed, log in to CallPilot Manager
(administrator mailbox 000000), select “Security Administration” under the “Messaging” menu and check the box “Disabled Administrators will be Enabled … after 15 minutes”.
Browsers: Browser machines need to run either Windows Server 2003 or Windows XP if certificates are used. All client browser machines will also need to have certificates installed if “Require client certificates” was selected in step 29 above. In Internet Explorer, Tools menu – Internet Options. Select the “Content” tab. Click “Certificates”. Click “Import” and use the “Certificate Import Wizard” to import a certificate for the client to use. For DoD machines, the appropriate DoD certificates should be used. URLs: If a Web Server certificate was installed in step 29: to access cpmgr, use https://<computername>/cpmgr. To access MyCallPilot, use https://<computername>/MyCallPilot. As you do so, windows may appear asking whether you trust the servers certificate. Click Yes. If you are asked for a client certificate, click Cancel. Browser TLS 1.0 Setting: The DoD requires that the web server be configured to use strong encryption (FIPS-140) algorithms. When certificates are used (steps 29, 30 above), all browsers must be configured to enable the use of TLS 1.0 Security. (This setting is User Specific on each PC – it must be set for each different userid being used on each client PC). Within Internet Explorer, Tools Menu – Internet Options – Advanced Tab. Under Security, Check “Use TLS 1.0”. OK.
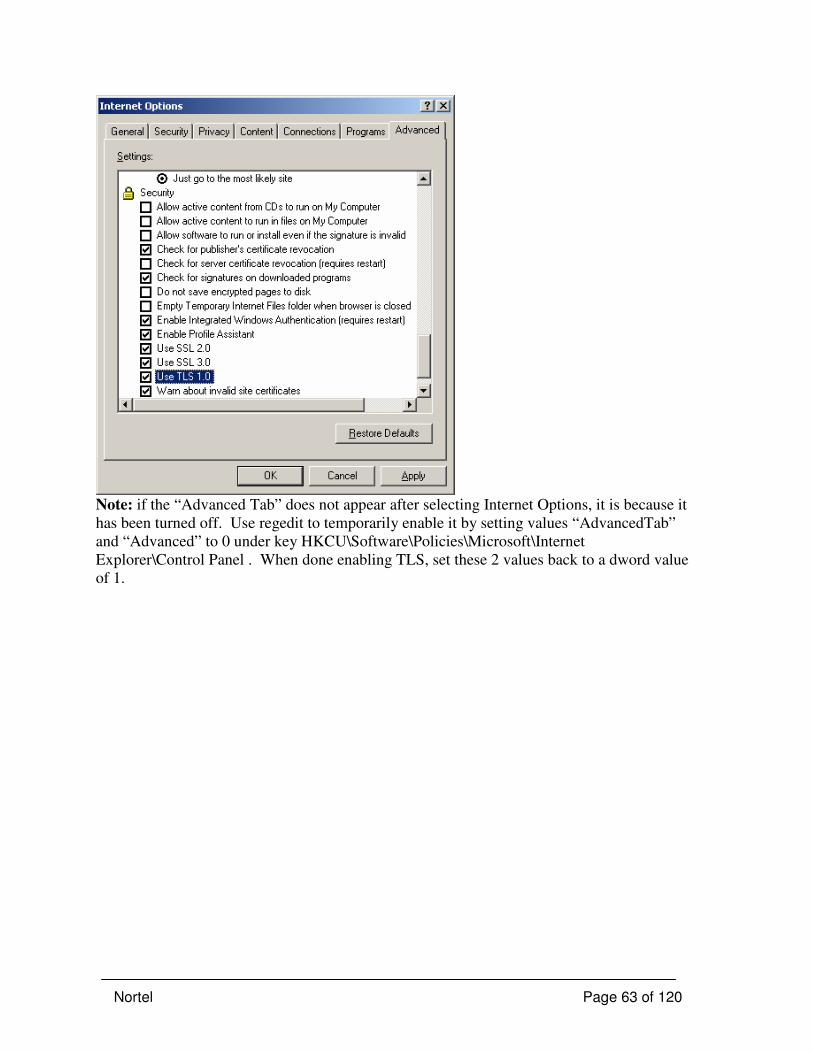
Nortel Page 63 of 120
Note: if the “Advanced Tab” does not appear after selecting Internet Options, it is because it
has been turned off. Use regedit to temporarily enable it by setting values “AdvancedTab”
and “Advanced” to 0 under key HKCU\Software\Policies\Microsoft\Internet
Explorer\Control Panel . When done enabling TLS, set these 2 values back to a dword value
of 1.

Nortel Page 64 of 120
12. SSL Security on CallPilot Server
There are 4 protocols that can be involved in SSL
1) HTTP : between web client ( broswer) and web server link. For this protocol to be
secure, customer has to purchase a certificate from IIS Authority ( for example Versign )and install it on the webserver.
2) LDAP (Lightweight Directory Access Protocol): for login, PDL, to retreive addressbook
…. Other features. For this protocol to be secure, it has to be turned on on both callpilot server and Clients (CPMgr, MyCallPilot, Outlook, ...)
3) IMAP ( Internet Message Access Protocol): Used to retreive message from callpilot
server. 4) SMTP (Simple Mail Transfere Protocol): Used to send message to callpilot server.
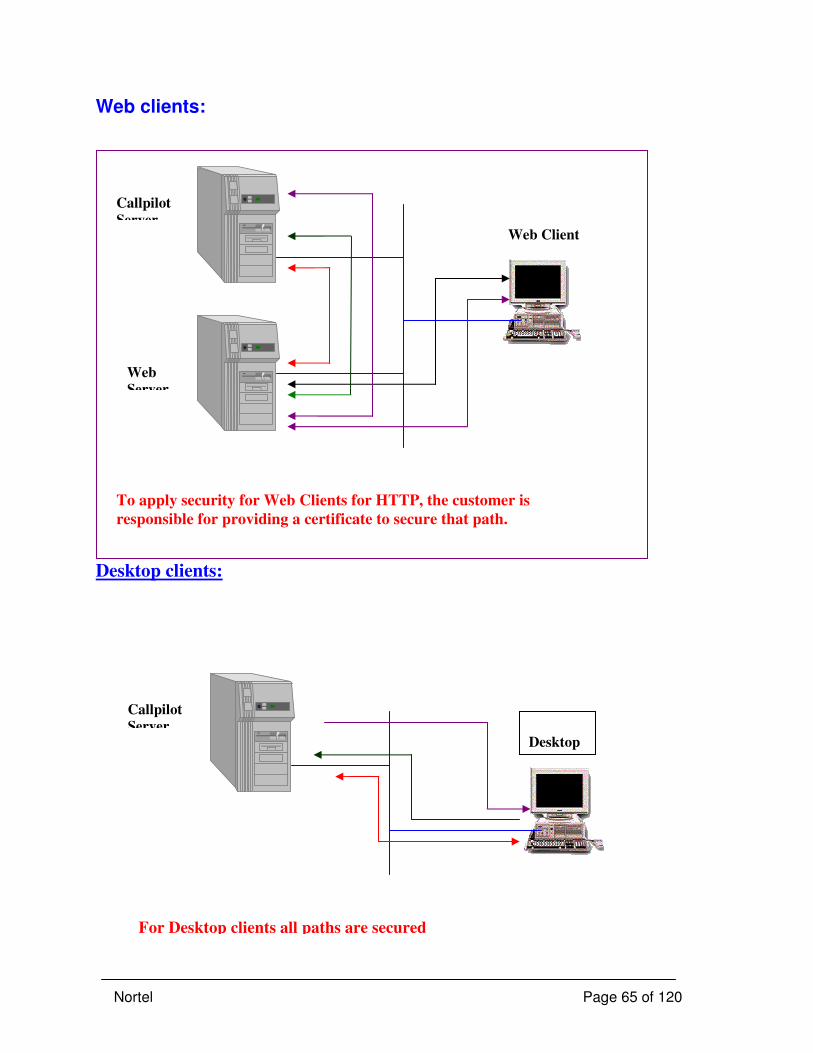
Nortel Page 65 of 120
Web clients:
Desktop clients:
Callpilot
Server
Web
Server
Web Client
To apply security for Web Clients for HTTP, the customer is
responsible for providing a certificate to secure that path.
Callpilot
Server
Desktop
For Desktop clients all paths are secured
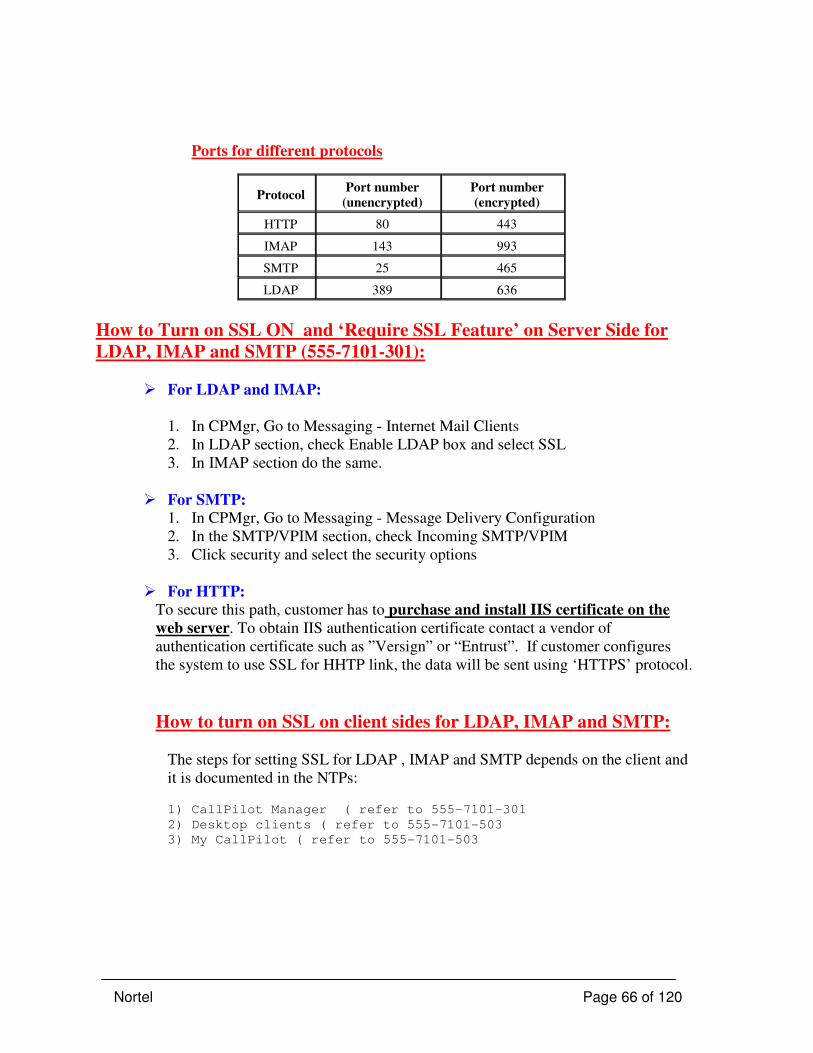
Nortel Page 66 of 120
Ports for different protocols
Protocol Port number
(unencrypted)
Port number
(encrypted)
HTTP 80 443
IMAP 143 993
SMTP 25 465
LDAP 389 636
How to Turn on SSL ON and ‘Require SSL Feature’ on Server Side for
LDAP, IMAP and SMTP (555-7101-301):
� For LDAP and IMAP:
1. In CPMgr, Go to Messaging - Internet Mail Clients
2. In LDAP section, check Enable LDAP box and select SSL
3. In IMAP section do the same.
� For SMTP:
1. In CPMgr, Go to Messaging - Message Delivery Configuration
2. In the SMTP/VPIM section, check Incoming SMTP/VPIM
3. Click security and select the security options
� For HTTP:
To secure this path, customer has to purchase and install IIS certificate on the
web server. To obtain IIS authentication certificate contact a vendor of
authentication certificate such as ”Versign” or “Entrust”. If customer configures
the system to use SSL for HHTP link, the data will be sent using ‘HTTPS’ protocol.
How to turn on SSL on client sides for LDAP, IMAP and SMTP:
The steps for setting SSL for LDAP , IMAP and SMTP depends on the client and
it is documented in the NTPs:
1) CallPilot Manager ( refer to 555-7101-301 2) Desktop clients ( refer to 555-7101-503 3) My CallPilot ( refer to 555-7101-503
Nortel Page 67 of 120
Appendix A: Enabling / Disabling Remote Support
NOTE: Remote access from a non-DoD location is not permitted for CallPilot systems
installed at the U.S. Dept of Defense unless specifically authorized Modems should not
be connected to systems installed at U.S. Dept of Defense locations unless specifically
authorized. For other customers, customer-specific restrictions on remote access must
be obeyed.
All remote access is disabled by default on both the CallPilot Server and the CallPilot stand-alone Web Server. In the event that remote support needs to be provided to a CallPilot installation by either Nortel or its distributor/partner, it will have to be manually enabled (at 3 distinct levels) by an on-site system administrator. For better security, two-factor authentication can be employed to access the system via a Windows Remote Access Service connection configured with Call-Back in addition to a userid/password login. Here is an overview of the entire process of enabling remote support: 1. The remote support person will communicate with the on-site, responsible administrator for
the CallPilot system. The administrator will confirm that the support person is authorized. 2. The administrator will add a Windows userid on the CallPilot server for this remote support
session and will assign that userid remote access privileges. The new userid needs to be added to the local Administrators group.
3. The administrator will configure the correct Call-Back number for that userid 4. The administrator will run a command to enable the Windows Terminal Services and Remote
Access Service to enable remote access via the modem 5. The administrator will physically connect an externally dialable analog phone line to the dial-
up modem on the CallPilot server. NOTE: the analog phone line must not have Call-Forward No Answer enabled since CallPilot will wait 5 rings before answering. (NOTE: Nortel recommends that the modem be always connected to the CallPilot server and always powered on. Otherwise, Plug-and-Play for serial port devices in Windows Server 2003 may require a system reboot to get the modem working.)
6. The administrator will communicate the phone line DN and userid/password to the authorized support person.
7. The remote support person will use normal Windows Dial-Up networking to dial the specified DN and will authenticate using the userid/password pair provided. Windows will immediately drop the connection and will call back to the configured Call-Back DN.
8. The remote support client PC will automatically answer the call back and will re-authenticate using the userid/password.
9. The remote support person will use Microsoft’s Remote Desktop Client (Windows Server 2003 version) to control the maintenance console of the CallPilot server. This client is provided on the Windows Server 2003 CD. Look for file MSRDPCLI.exe under folder SUPPORT\TOOLS. It may be installed on a Windows XP client PC. (Note that the Remote Desktop client built in to Windows XP will not work with JITC hardened systems.)
10. After the remote support activity is complete, the on-site DoD administrator will physically unplug the analog phone line from the modem.
11. The on-site administrator will then run a command to disable the Windows Remote Access Service and to disable Windows Remote Desktop Access. This command will re-establish the secure system configuration to conform with the OS STIG. (Note, a system reboot is required to re-establish full STIG compliance since the Terminal Services service cannot be stopped.)
12. The on-site administrator will delete the userid added for the remote support person.
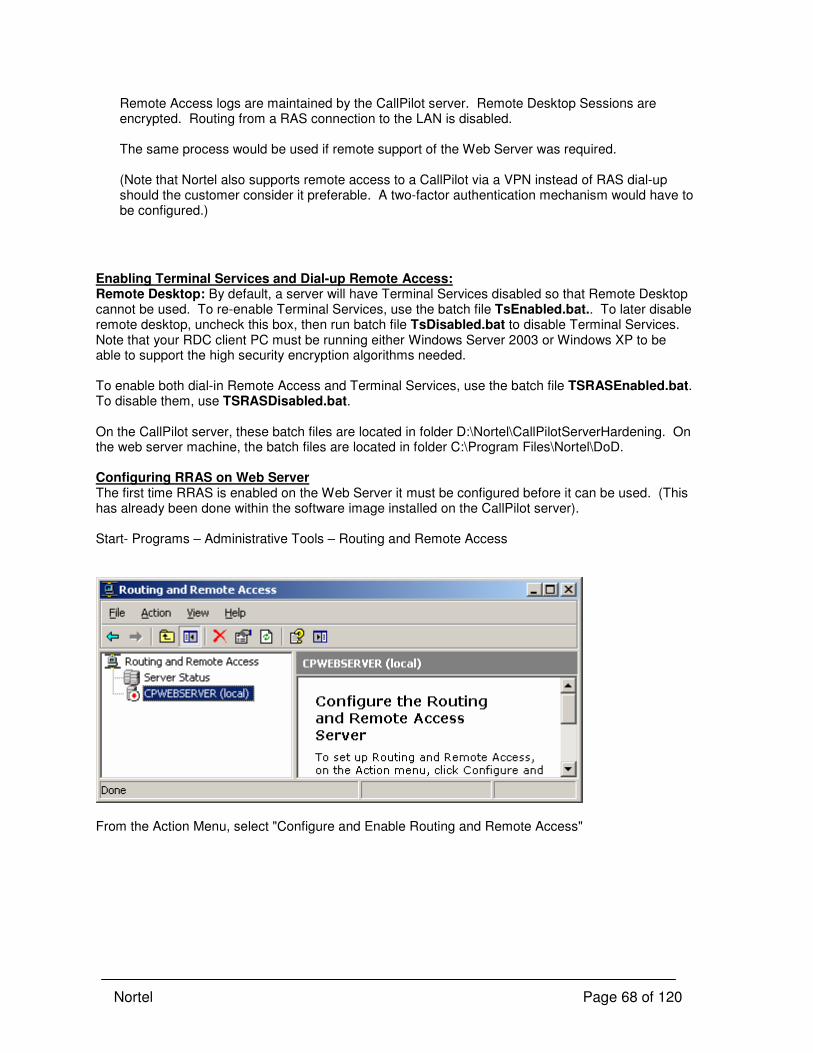
Nortel Page 68 of 120
Remote Access logs are maintained by the CallPilot server. Remote Desktop Sessions are encrypted. Routing from a RAS connection to the LAN is disabled. The same process would be used if remote support of the Web Server was required. (Note that Nortel also supports remote access to a CallPilot via a VPN instead of RAS dial-up should the customer consider it preferable. A two-factor authentication mechanism would have to be configured.)
Enabling Terminal Services and Dial-up Remote Access: Remote Desktop: By default, a server will have Terminal Services disabled so that Remote Desktop cannot be used. To re-enable Terminal Services, use the batch file TsEnabled.bat.. To later disable remote desktop, uncheck this box, then run batch file TsDisabled.bat to disable Terminal Services. Note that your RDC client PC must be running either Windows Server 2003 or Windows XP to be able to support the high security encryption algorithms needed. To enable both dial-in Remote Access and Terminal Services, use the batch file TSRASEnabled.bat. To disable them, use TSRASDisabled.bat. On the CallPilot server, these batch files are located in folder D:\Nortel\CallPilotServerHardening. On the web server machine, the batch files are located in folder C:\Program Files\Nortel\DoD. Configuring RRAS on Web Server The first time RRAS is enabled on the Web Server it must be configured before it can be used. (This has already been done within the software image installed on the CallPilot server). Start- Programs – Administrative Tools – Routing and Remote Access
From the Action Menu, select "Configure and Enable Routing and Remote Access"
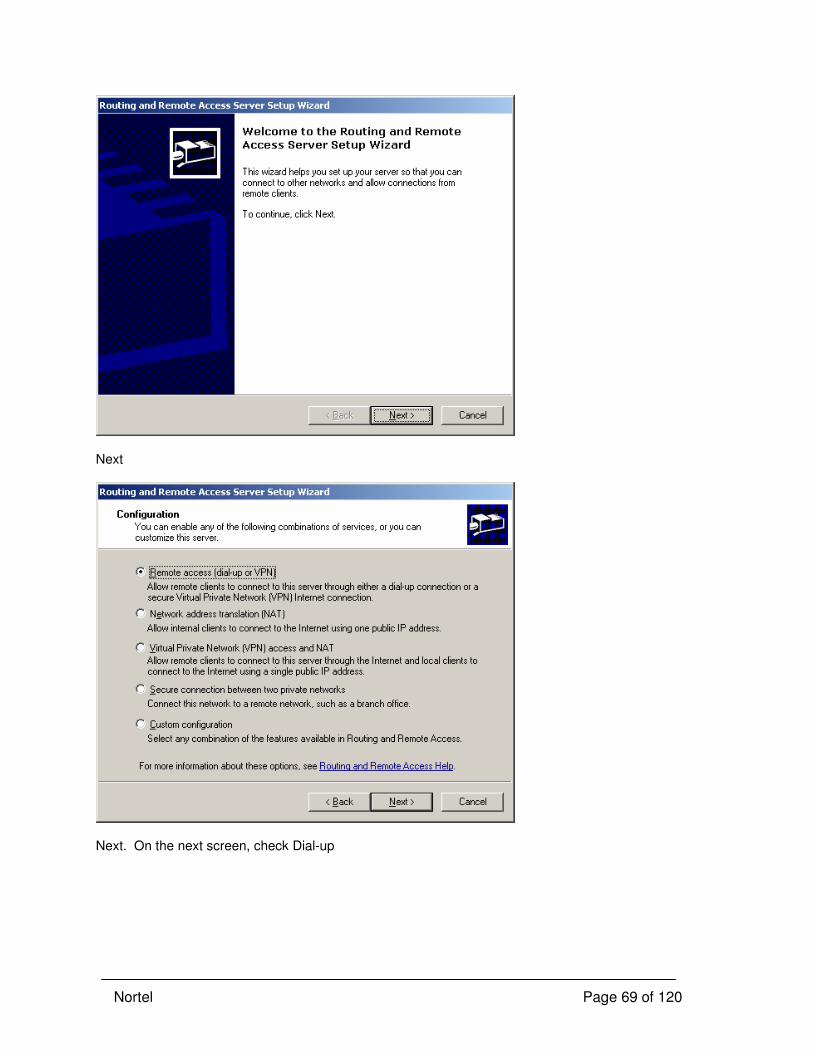
Nortel Page 69 of 120
Next
Next. On the next screen, check Dial-up
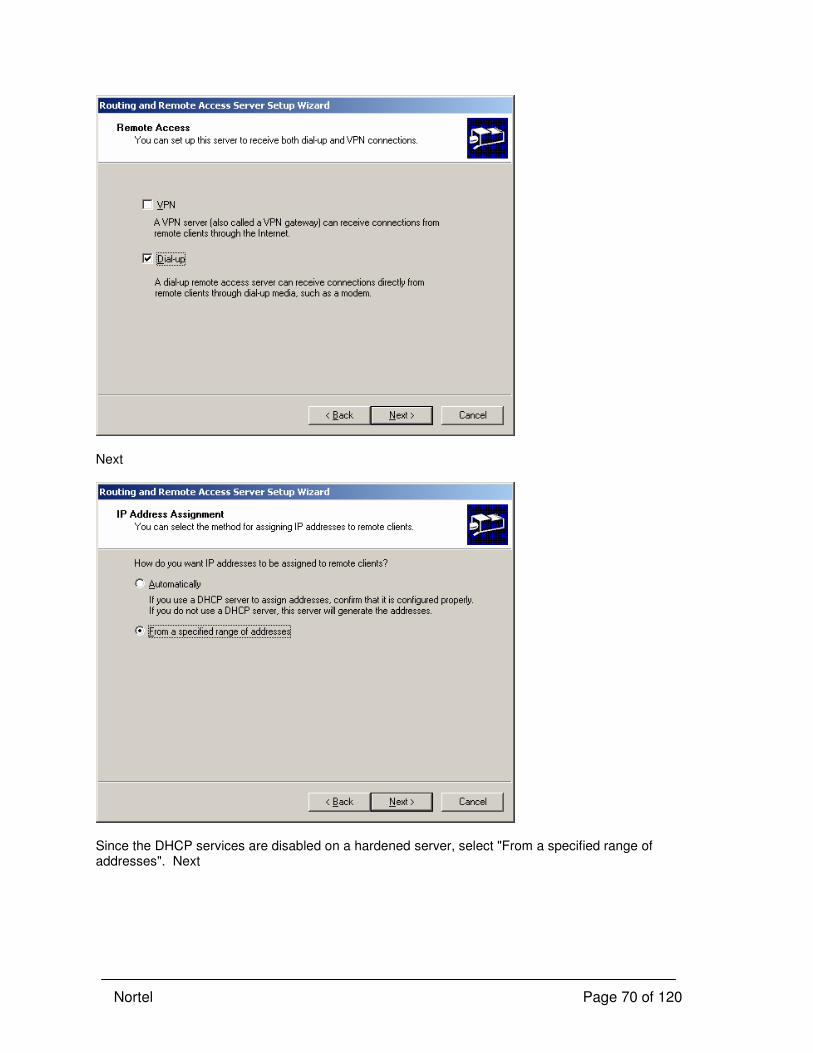
Nortel Page 70 of 120
Next
Since the DHCP services are disabled on a hardened server, select "From a specified range of addresses". Next

Nortel Page 71 of 120
Use the "New" button to configure a range of IP addresses. You probably specify a range that does not conflict with real IP addresses used for any of the network adapters. Next.
Next
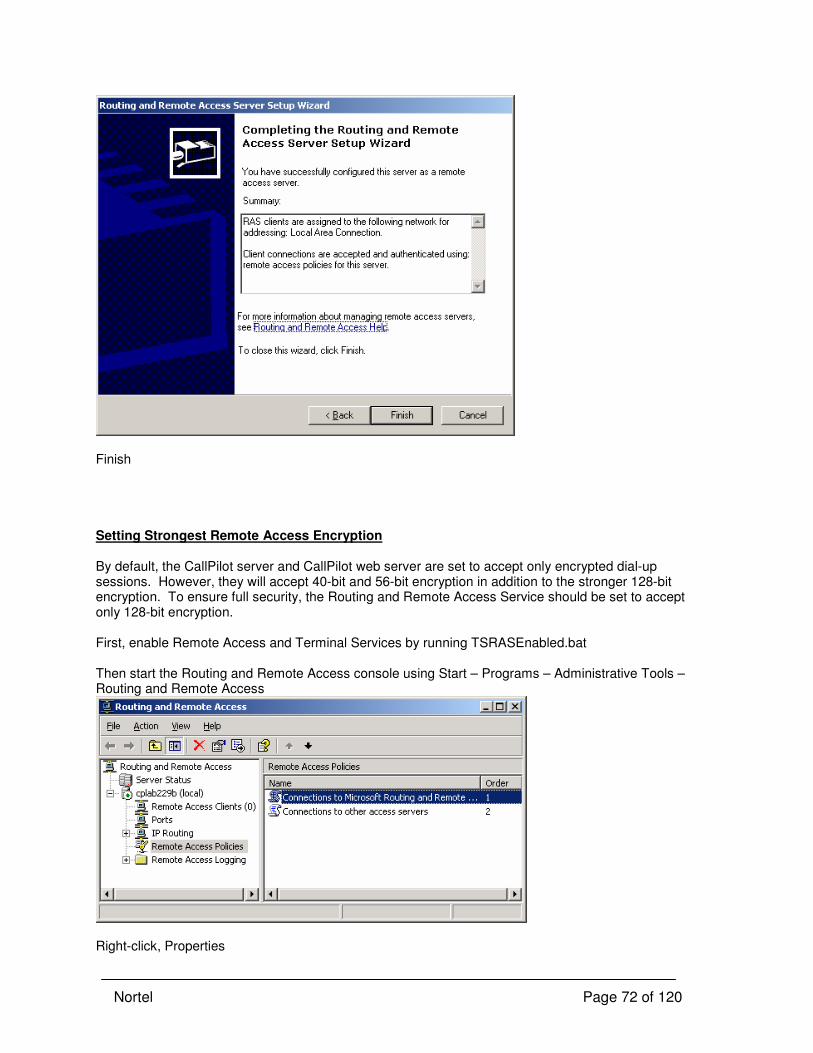
Nortel Page 72 of 120
Finish Setting Strongest Remote Access Encryption By default, the CallPilot server and CallPilot web server are set to accept only encrypted dial-up sessions. However, they will accept 40-bit and 56-bit encryption in addition to the stronger 128-bit encryption. To ensure full security, the Routing and Remote Access Service should be set to accept only 128-bit encryption. First, enable Remote Access and Terminal Services by running TSRASEnabled.bat Then start the Routing and Remote Access console using Start – Programs – Administrative Tools – Routing and Remote Access
Right-click, Properties

Nortel Page 73 of 120
Edit Profile

Nortel Page 74 of 120
Encryption tab
Uncheck "Basic" and "Strong". Apply
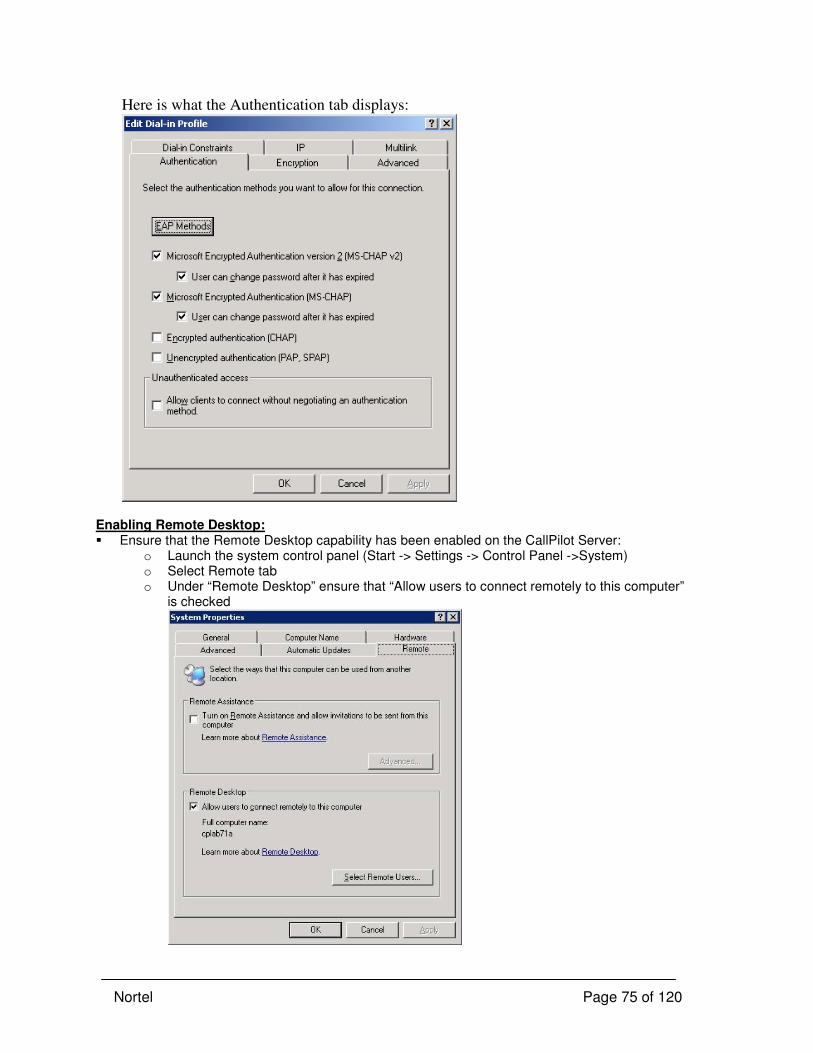
Nortel Page 75 of 120
Here is what the Authentication tab displays:
Enabling Remote Desktop: � Ensure that the Remote Desktop capability has been enabled on the CallPilot Server:
o Launch the system control panel (Start -> Settings -> Control Panel ->System) o Select Remote tab o Under “Remote Desktop” ensure that “Allow users to connect remotely to this computer”
is checked
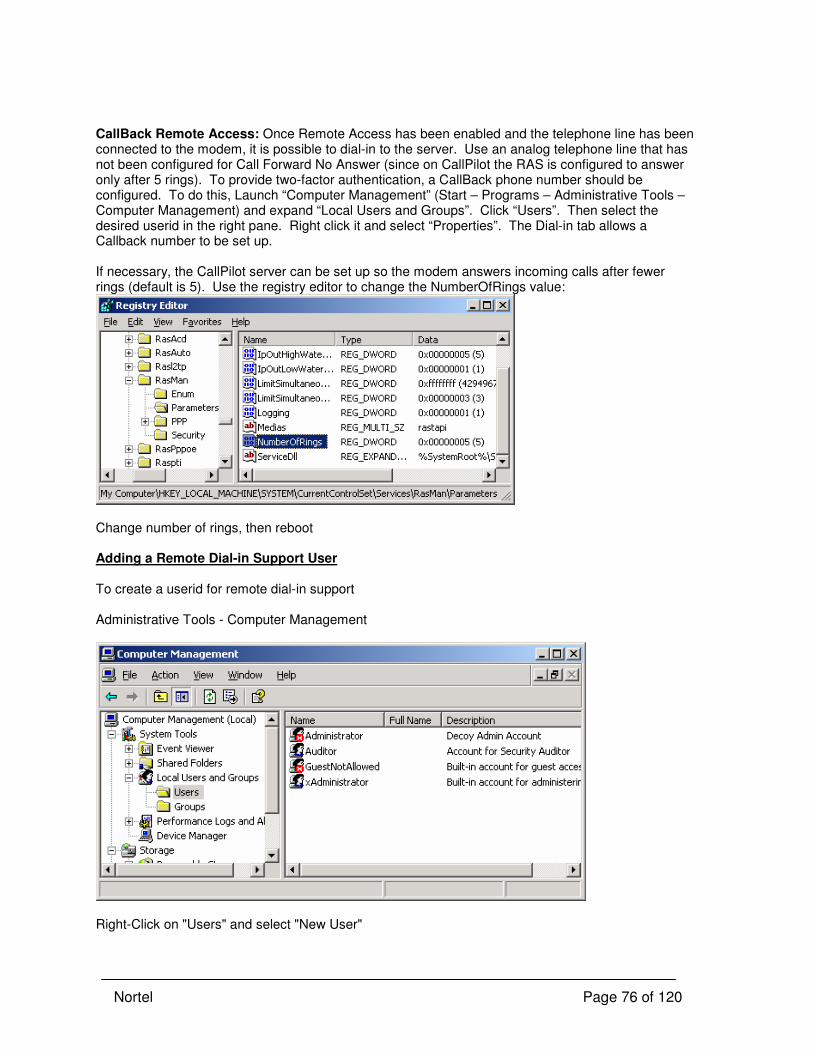
Nortel Page 76 of 120
CallBack Remote Access: Once Remote Access has been enabled and the telephone line has been connected to the modem, it is possible to dial-in to the server. Use an analog telephone line that has not been configured for Call Forward No Answer (since on CallPilot the RAS is configured to answer only after 5 rings). To provide two-factor authentication, a CallBack phone number should be configured. To do this, Launch “Computer Management” (Start – Programs – Administrative Tools – Computer Management) and expand “Local Users and Groups”. Click “Users”. Then select the desired userid in the right pane. Right click it and select “Properties”. The Dial-in tab allows a Callback number to be set up. If necessary, the CallPilot server can be set up so the modem answers incoming calls after fewer rings (default is 5). Use the registry editor to change the NumberOfRings value:
Change number of rings, then reboot Adding a Remote Dial-in Support User To create a userid for remote dial-in support Administrative Tools - Computer Management
Right-Click on "Users" and select "New User"

Nortel Page 77 of 120
Create, Close (NOTE: Nortel recommends using a personal account rather than a generic account for the role. This provides better accountability.).
Right-click, Properties

Nortel Page 78 of 120
Dial-in tab
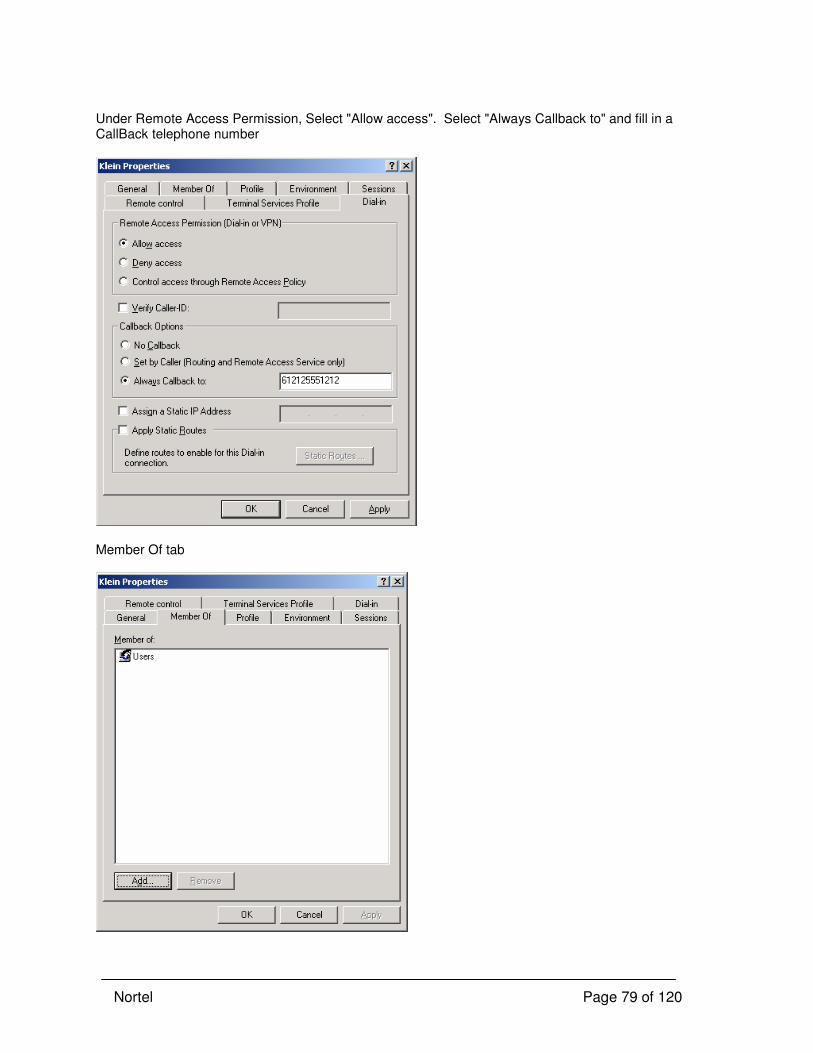
Nortel Page 79 of 120
Under Remote Access Permission, Select "Allow access". Select "Always Callback to" and fill in a CallBack telephone number
Member Of tab
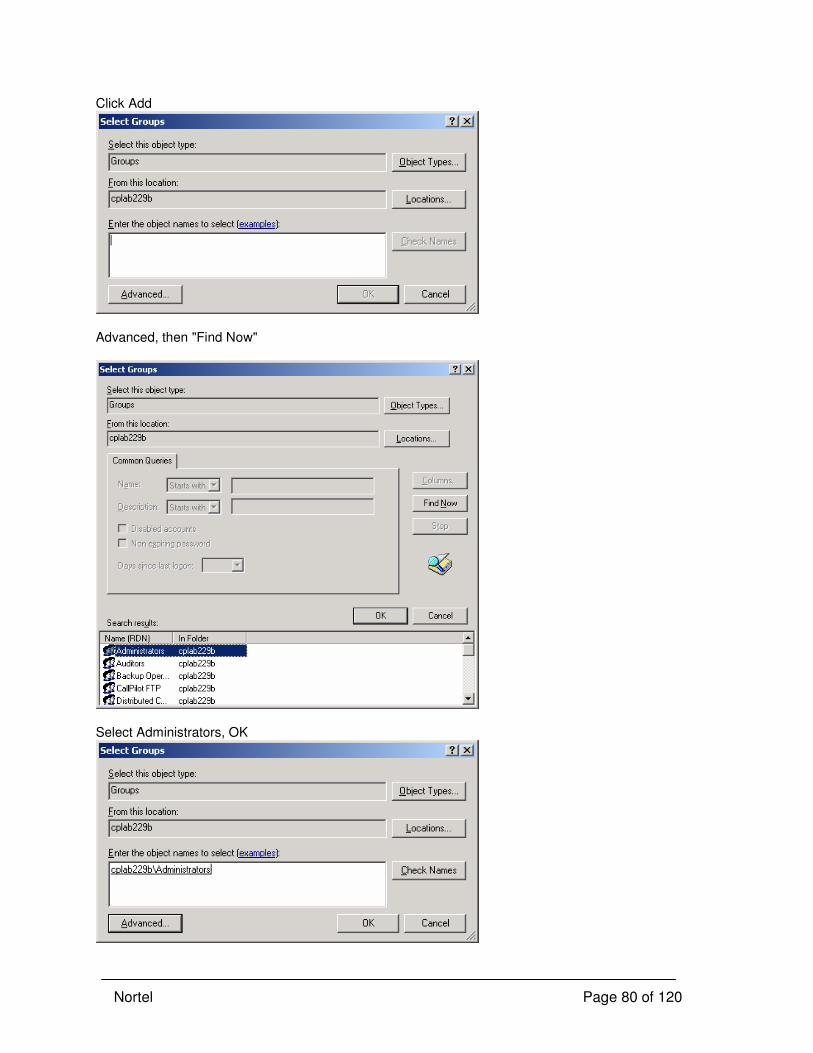
Nortel Page 80 of 120
Click Add
Advanced, then "Find Now"
Select Administrators, OK
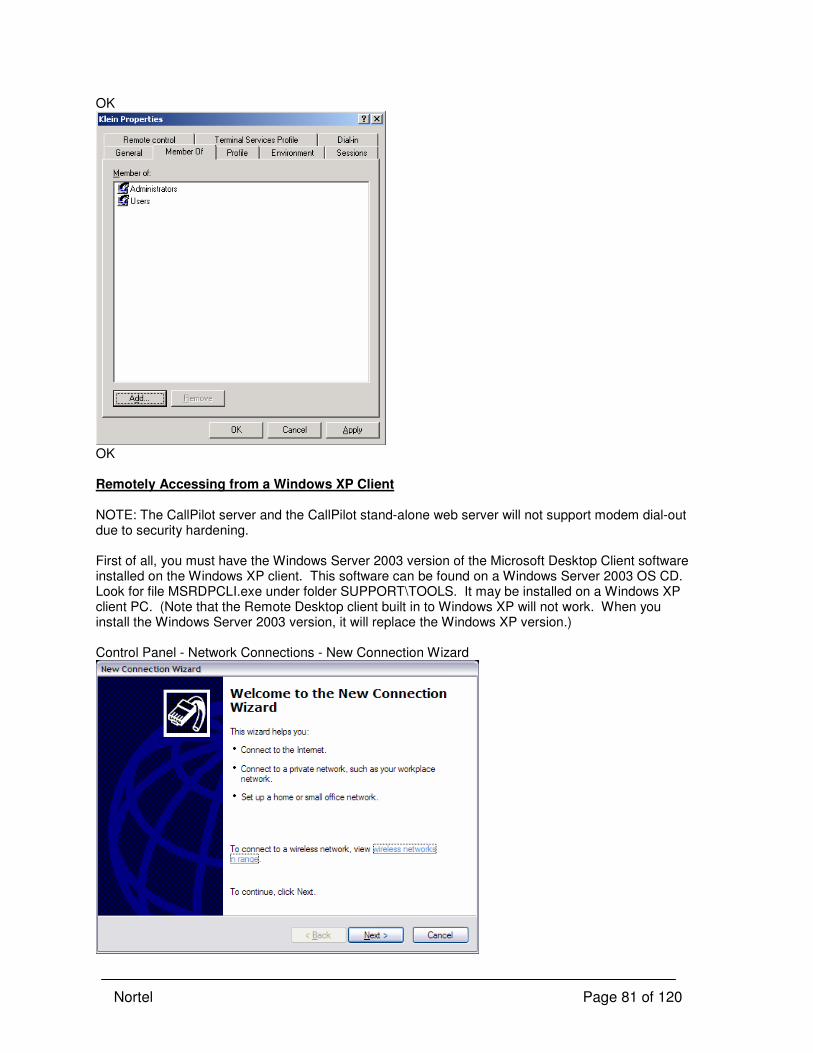
Nortel Page 81 of 120
OK
OK Remotely Accessing from a Windows XP Client NOTE: The CallPilot server and the CallPilot stand-alone web server will not support modem dial-out due to security hardening. First of all, you must have the Windows Server 2003 version of the Microsoft Desktop Client software installed on the Windows XP client. This software can be found on a Windows Server 2003 OS CD. Look for file MSRDPCLI.exe under folder SUPPORT\TOOLS. It may be installed on a Windows XP client PC. (Note that the Remote Desktop client built in to Windows XP will not work. When you install the Windows Server 2003 version, it will replace the Windows XP version.) Control Panel - Network Connections - New Connection Wizard
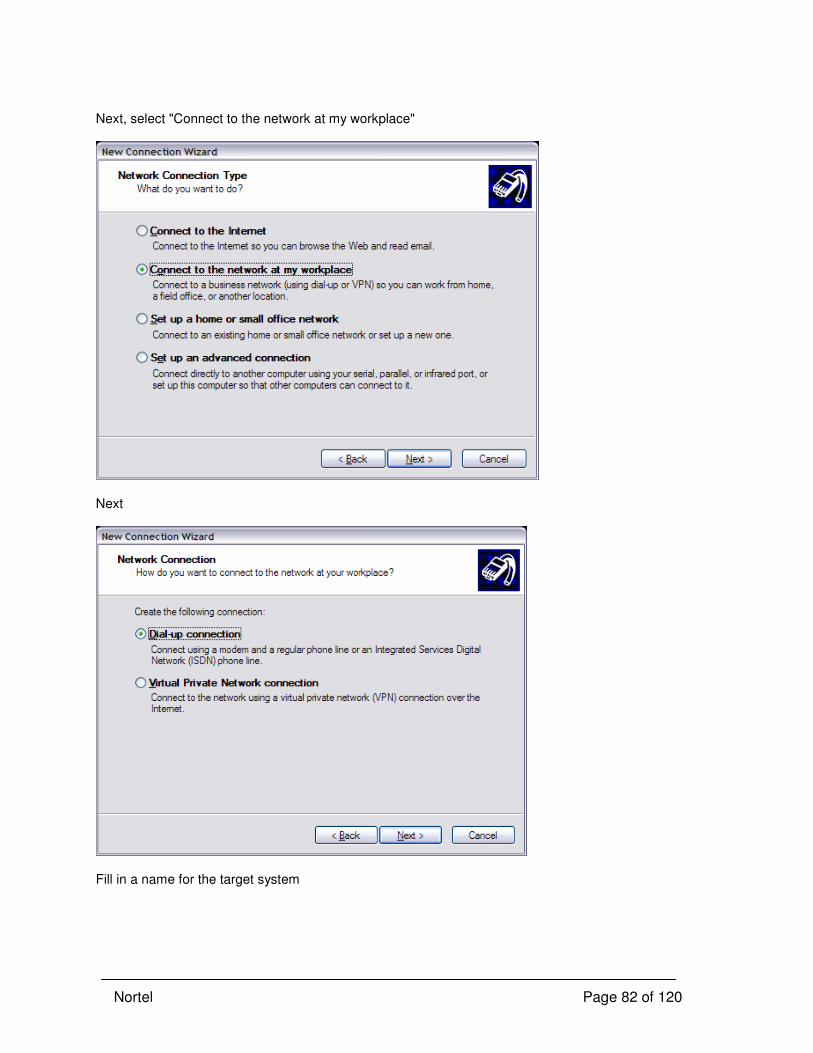
Nortel Page 82 of 120
Next, select "Connect to the network at my workplace"
Next
Fill in a name for the target system

Nortel Page 83 of 120
Next, fill in the phone number
If desired, select "add a shortcut to the desktop" and click finish
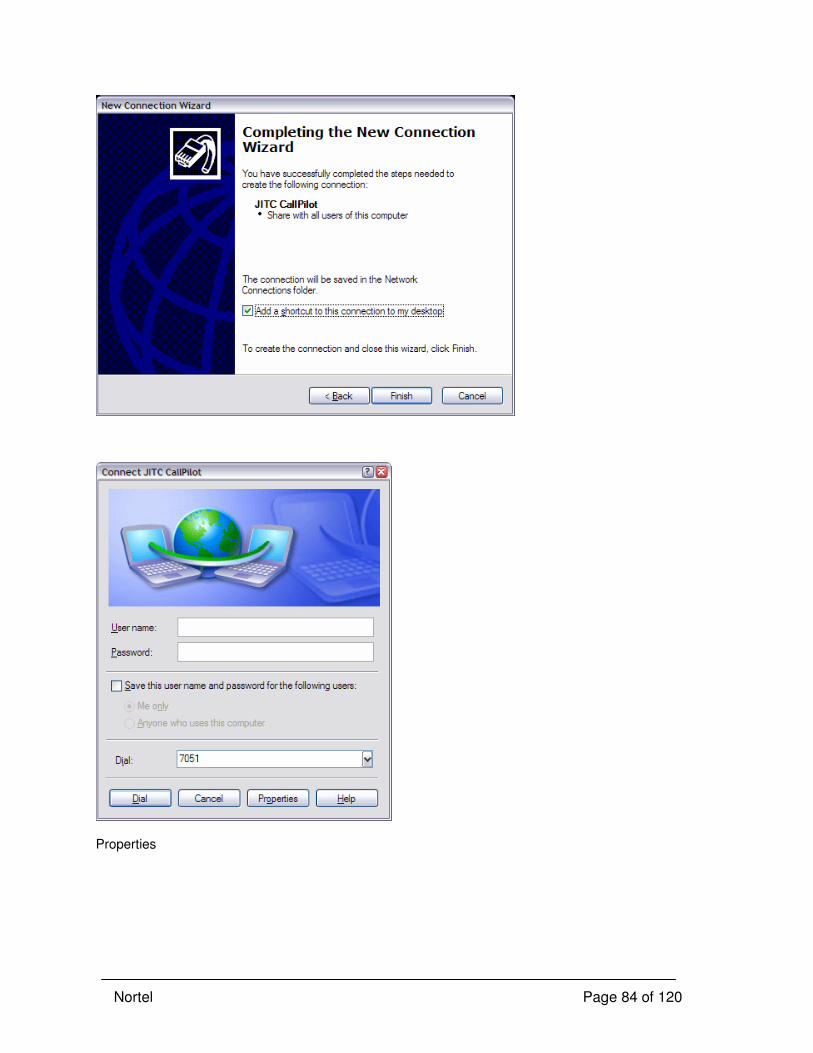
Nortel Page 84 of 120
Properties
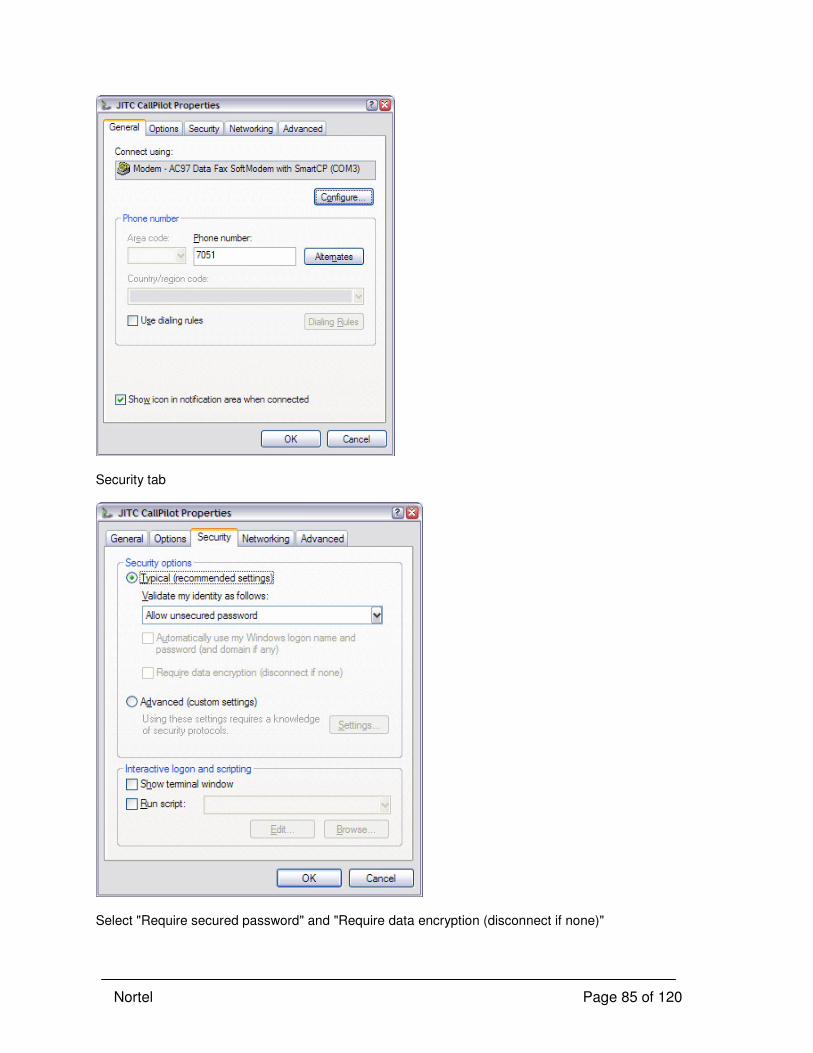
Nortel Page 85 of 120
Security tab
Select "Require secured password" and "Require data encryption (disconnect if none)"
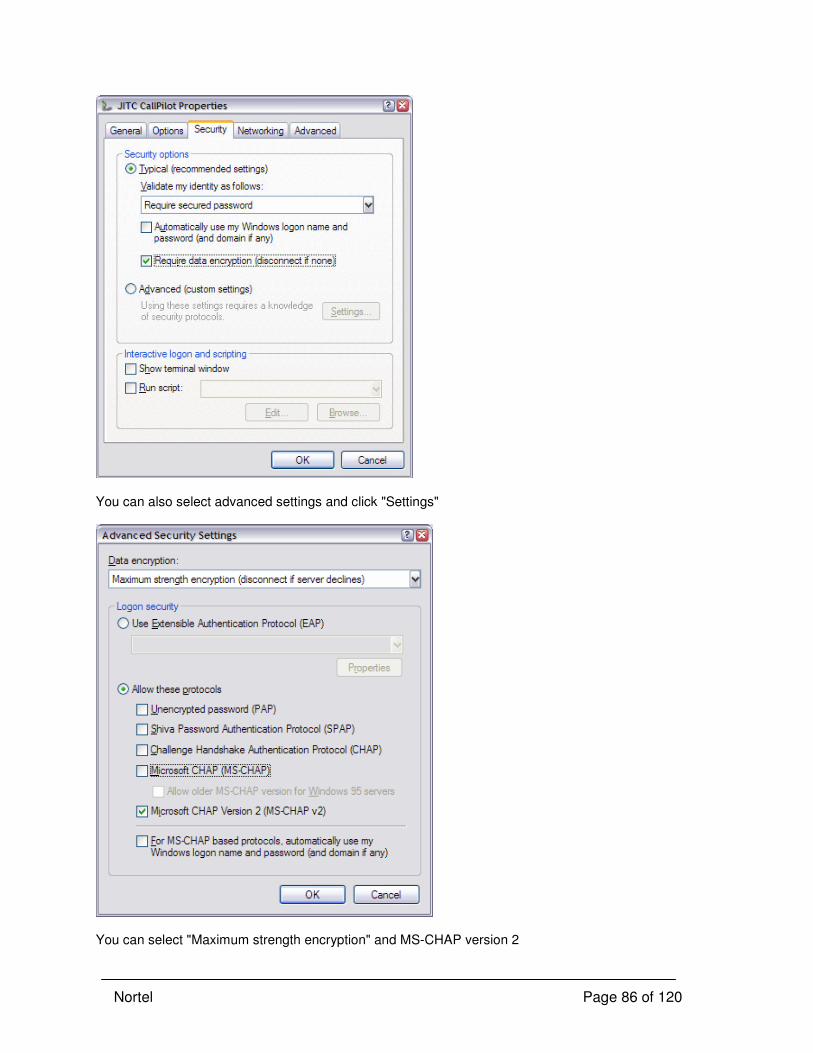
Nortel Page 86 of 120
You can also select advanced settings and click "Settings"
You can select "Maximum strength encryption" and MS-CHAP version 2

Nortel Page 87 of 120
Click Dial. It will call, connect, then disconnect
Then it will automatically call back and connect. Once a RAS dial-up connection has been established Use Programs – Accessories – Communications – Remote Desktop Connection to launch the RDC client.
Options, Local Resources tab. To be able to transfer files, you need to connect local disk drives.
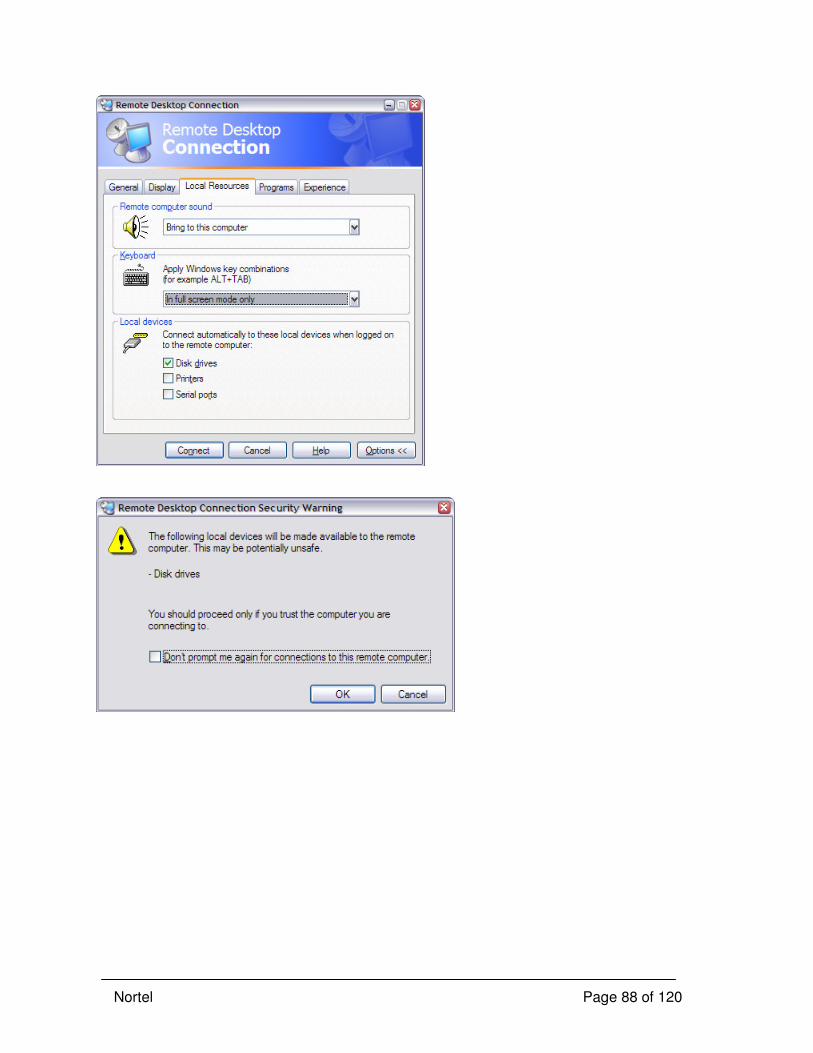
Nortel Page 88 of 120
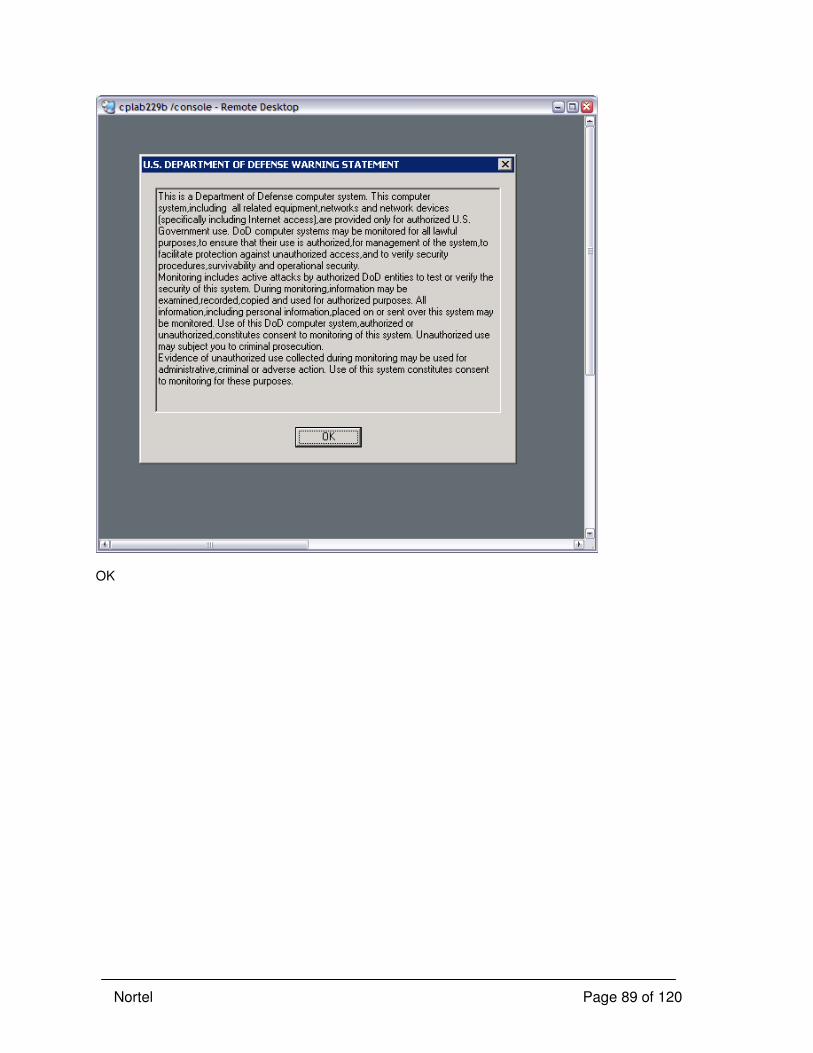
Nortel Page 89 of 120
OK

Nortel Page 90 of 120
If a user is still logged on locally, the message above will appear. Click Yes to terminate the local session and start the remote session.
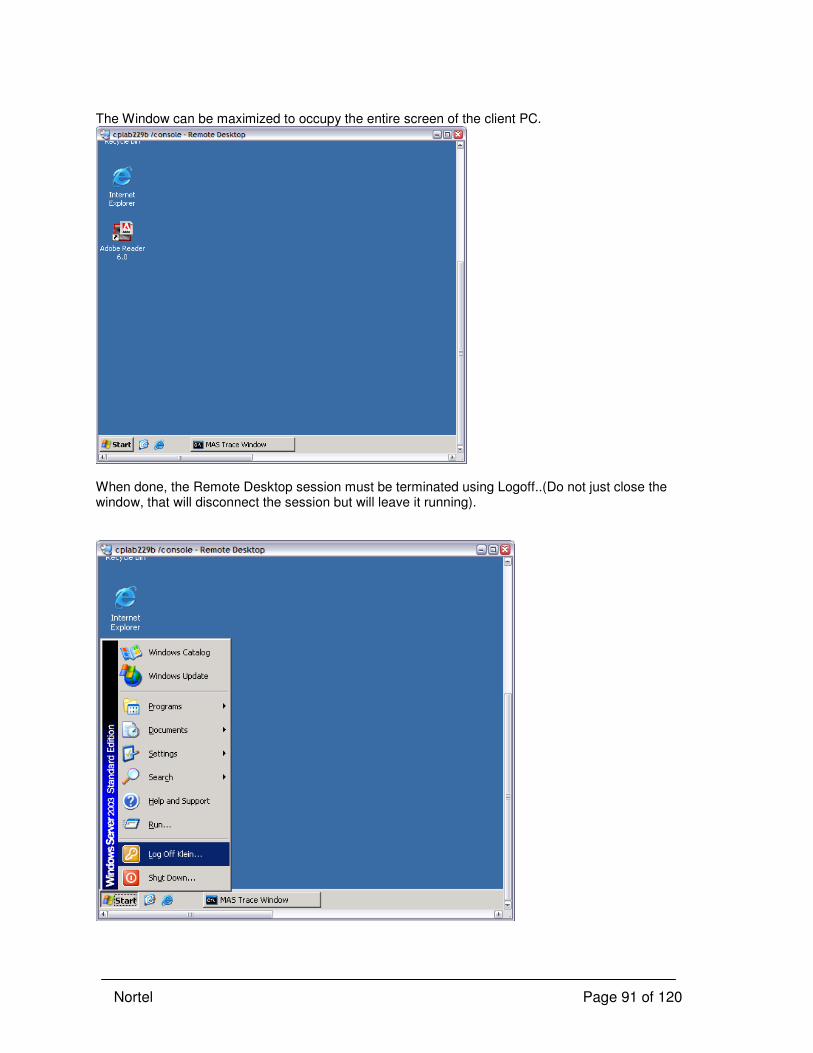
Nortel Page 91 of 120
The Window can be maximized to occupy the entire screen of the client PC.
When done, the Remote Desktop session must be terminated using Logoff..(Do not just close the window, that will disconnect the session but will leave it running).
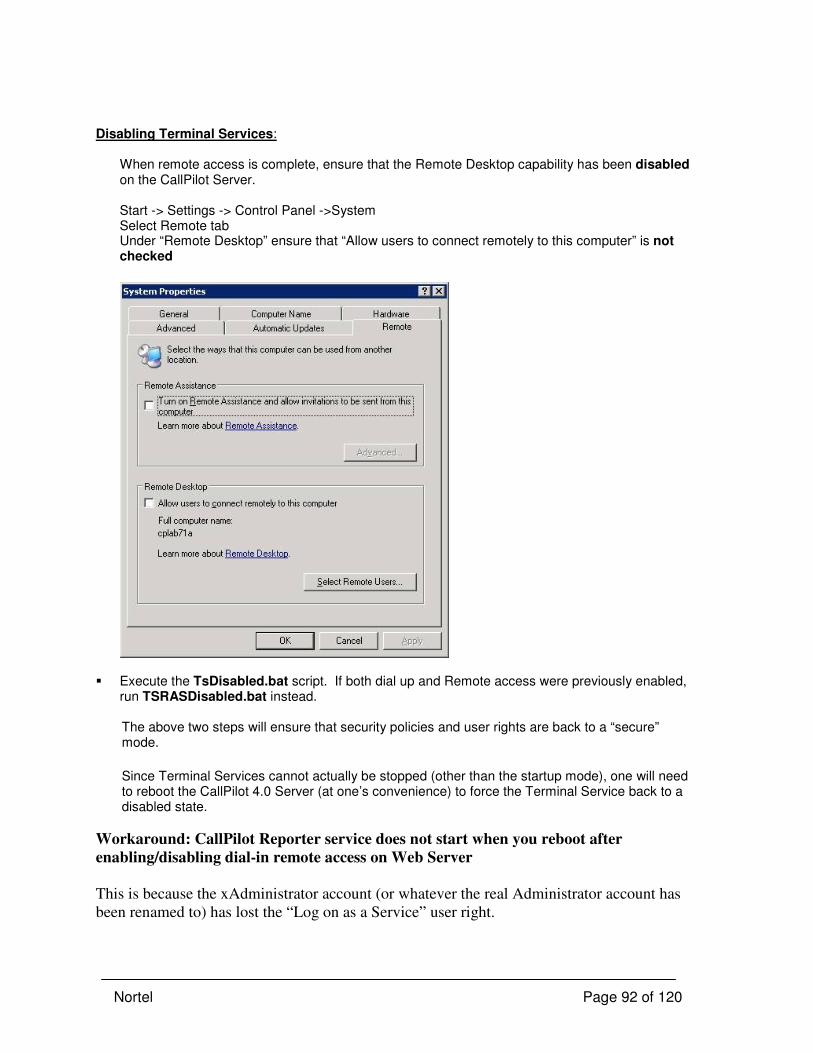
Nortel Page 92 of 120
Disabling Terminal Services:
When remote access is complete, ensure that the Remote Desktop capability has been disabled on the CallPilot Server. Start -> Settings -> Control Panel ->System Select Remote tab Under “Remote Desktop” ensure that “Allow users to connect remotely to this computer” is not checked
� Execute the TsDisabled.bat script. If both dial up and Remote access were previously enabled,
run TSRASDisabled.bat instead.
The above two steps will ensure that security policies and user rights are back to a “secure” mode. Since Terminal Services cannot actually be stopped (other than the startup mode), one will need to reboot the CallPilot 4.0 Server (at one’s convenience) to force the Terminal Service back to a disabled state.
Workaround: CallPilot Reporter service does not start when you reboot after
enabling/disabling dial-in remote access on Web Server
This is because the xAdministrator account (or whatever the real Administrator account has
been renamed to) has lost the “Log on as a Service” user right.
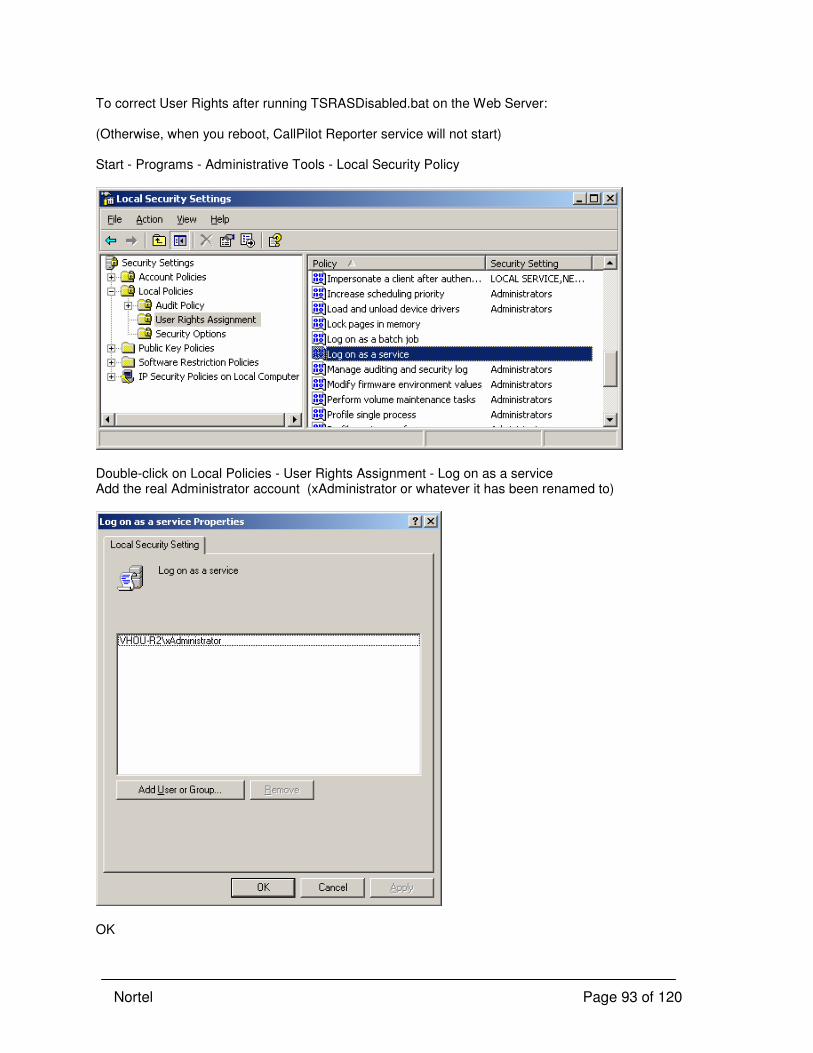
Nortel Page 93 of 120
To correct User Rights after running TSRASDisabled.bat on the Web Server: (Otherwise, when you reboot, CallPilot Reporter service will not start) Start - Programs - Administrative Tools - Local Security Policy
Double-click on Local Policies - User Rights Assignment - Log on as a service Add the real Administrator account (xAdministrator or whatever it has been renamed to)
OK

Nortel Page 94 of 120
Appendix B: The Master Key Change Utility The MasterKey change utility is an executable file: nmcrypt_updtkey.exe and stored at D:\Nortel\mpcx\bin directory. When the utility is run, three steps are performed:
1. Create a new MasterKey and set it as the latest key. 2. Re-encrypt all passwords on the CallPilot system with the new MasterKey.
Note: only passwords which were encrypted with the new algorithm (in DoD PEP) are re-encrypted. Existing passwords encrypted with the old algorithm are not re-encrypted.
3. Delete the oldest key if the number of MasterKeys on the CallPilot system is equal to or greater than 12.
The impact of running the utility depends on the number of mailboxes on the CallPilot system and how long the CallPilot system has been in service. This impact is mainly due to the requirement to re-encrypt all passwords with the new MasterKey. The passwords which will be re-encrypted are: Mailbox passwords, OldMailbox passwords (5 OldMailbox passwords per mailbox), EmailByPhone password, Initiating passwords, Responding passwords, STMP/VPIM passwords, UserPassword for DirSync servers, Update passwords, Access passwords, and ICL_Passwords. The amount of time and the impact of the utility to re-encrypt passwords other than Mailbox passwords, OldMailbox passwords, and email passwords are negligible. Re-encrypting Mailbox passwords, OldMailbox passwords, and email passwords is taking the majority of time and has the most impact. For example: if there are 10,000 mailboxes on the CallPilot system and the CallPilot system has been in service for a while (so that all mailboxes have changed passwords at least 5 times), assume all mailboxes have EBP passwords setup, then we would expect to re-encrypt: = 10,000 current Mailbox passwords + 5 x 10,000 OldMailbox passwords + 10,000 EBP passwords = 70,000 passwords The customers can run the utility on a schedule according to their security requirements and it is recommended that the utility is run during off-hours. The utility must be run from the command line so that the result can be viewed, steps are:
• Open a command window
• In the command window, go to D:\Nortel\mpcx\bin directory
• Run nmcrypt_updtkey.exe
Nortel Page 95 of 120
Appendix C: How to obtain a Verisign test certificate
Note: See also Appendix D for a procedure allowing you to create your own certificates
without using VeriSign.
Note: the details of using the Verisign web site are subject to change beyond Nortel’s
control.
Connect to VeriSign
http://www.verisign.com/products-services/security-services/ssl/ssl-information-center/ssl-
enrollment-process/index.html
Some definitions to help filling the SSL certificate order:
1) Common Name
The Common Name is the Host + Domain Name. It looks like "www.company.com" or
"company.com".
VeriSign certificates can only be used on Web servers using the Common Name specified
during enrollment. For example, a certificate for the domain "domain.com" will receive a
warning if accessing a site named "www.domain.com" or "secure.domain.com", because
"www.domain.com" and "secure.domain.com" are different from "domain.com".
2) Organization Information
If your company or department has an &, @, or any other symbol using the shift key in its
name, you must spell out the symbol or omit it to enroll.
The “Org Unit” field is the name of the department or organization unit making the request.
The Locality field is the city or town name, for example: Berkeley.
Do not abbreviate the state or province name, for example: California.
Use the two-letter code without punctuation for country, for example: US or CA.
3) Contact Information
During the verification process, VeriSign may need to contact your organization. Be sure to
provide an email address, phone number, and fax number that will be checked and responded
to quickly. These fields are not part of the certificate.
A) Step-by-Step on obtaining and installing the Server Trial certificate
Step-by-Step Overview
Step 1 Generate a CSR >> The CSR is a string of text generated by your server software. You
provide this string of text to VeriSign during the enrollment process.
To generate a CSR, you will need to know what kind of server software
is running on your Web server to choose the correct instructions.
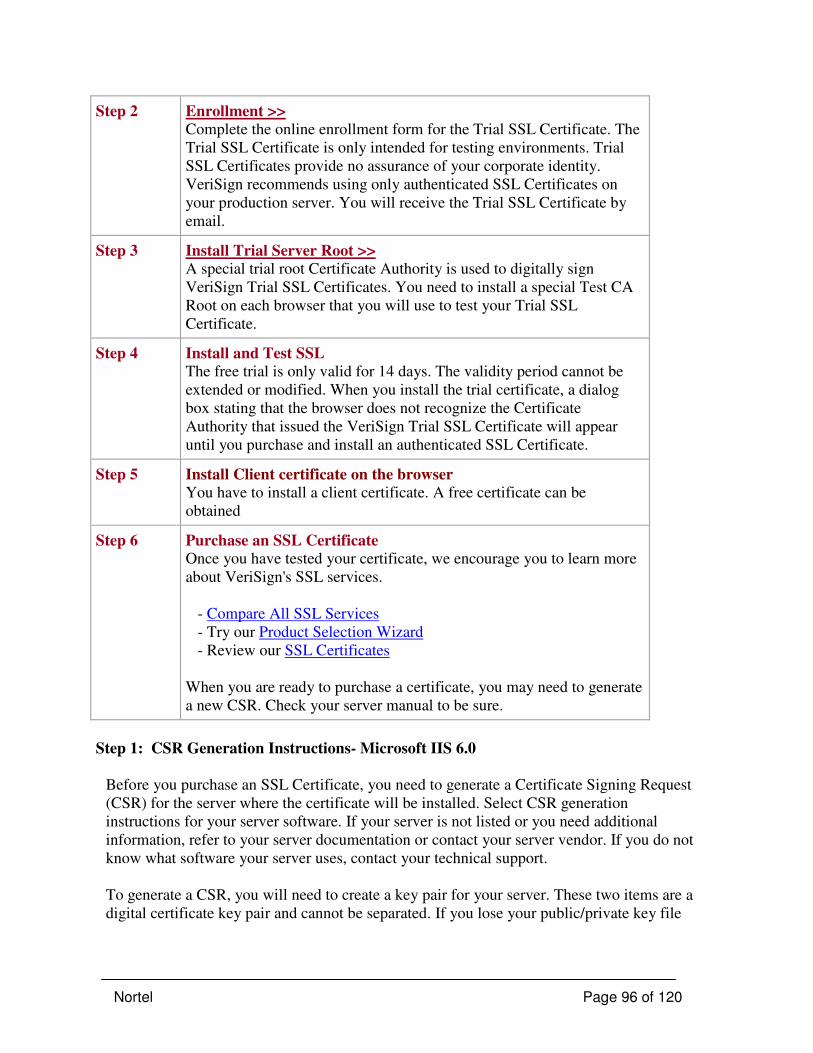
Nortel Page 96 of 120
Step 2 Enrollment >> Complete the online enrollment form for the Trial SSL Certificate. The
Trial SSL Certificate is only intended for testing environments. Trial
SSL Certificates provide no assurance of your corporate identity.
VeriSign recommends using only authenticated SSL Certificates on
your production server. You will receive the Trial SSL Certificate by
email.
Step 3 Install Trial Server Root >> A special trial root Certificate Authority is used to digitally sign
VeriSign Trial SSL Certificates. You need to install a special Test CA
Root on each browser that you will use to test your Trial SSL
Certificate.
Step 4 Install and Test SSL The free trial is only valid for 14 days. The validity period cannot be
extended or modified. When you install the trial certificate, a dialog
box stating that the browser does not recognize the Certificate
Authority that issued the VeriSign Trial SSL Certificate will appear
until you purchase and install an authenticated SSL Certificate.
Step 5 Install Client certificate on the browser
You have to install a client certificate. A free certificate can be
obtained
Step 6 Purchase an SSL Certificate Once you have tested your certificate, we encourage you to learn more
about VeriSign's SSL services.
- Compare All SSL Services
- Try our Product Selection Wizard
- Review our SSL Certificates
When you are ready to purchase a certificate, you may need to generate
a new CSR. Check your server manual to be sure.
Step 1: CSR Generation Instructions- Microsoft IIS 6.0
Before you purchase an SSL Certificate, you need to generate a Certificate Signing Request
(CSR) for the server where the certificate will be installed. Select CSR generation
instructions for your server software. If your server is not listed or you need additional
information, refer to your server documentation or contact your server vendor. If you do not
know what software your server uses, contact your technical support.
To generate a CSR, you will need to create a key pair for your server. These two items are a
digital certificate key pair and cannot be separated. If you lose your public/private key file
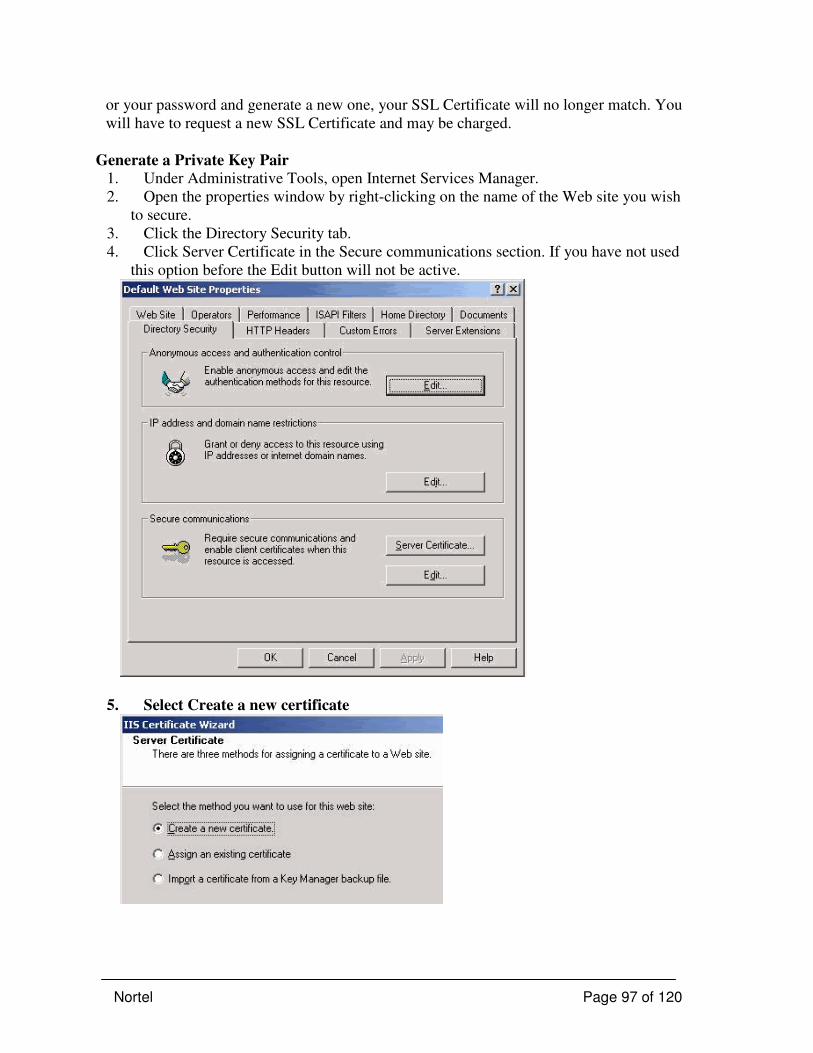
Nortel Page 97 of 120
or your password and generate a new one, your SSL Certificate will no longer match. You
will have to request a new SSL Certificate and may be charged.
Generate a Private Key Pair
1. Under Administrative Tools, open Internet Services Manager.
2. Open the properties window by right-clicking on the name of the Web site you wish
to secure.
3. Click the Directory Security tab.
4. Click Server Certificate in the Secure communications section. If you have not used
this option before the Edit button will not be active.
5. Select Create a new certificate
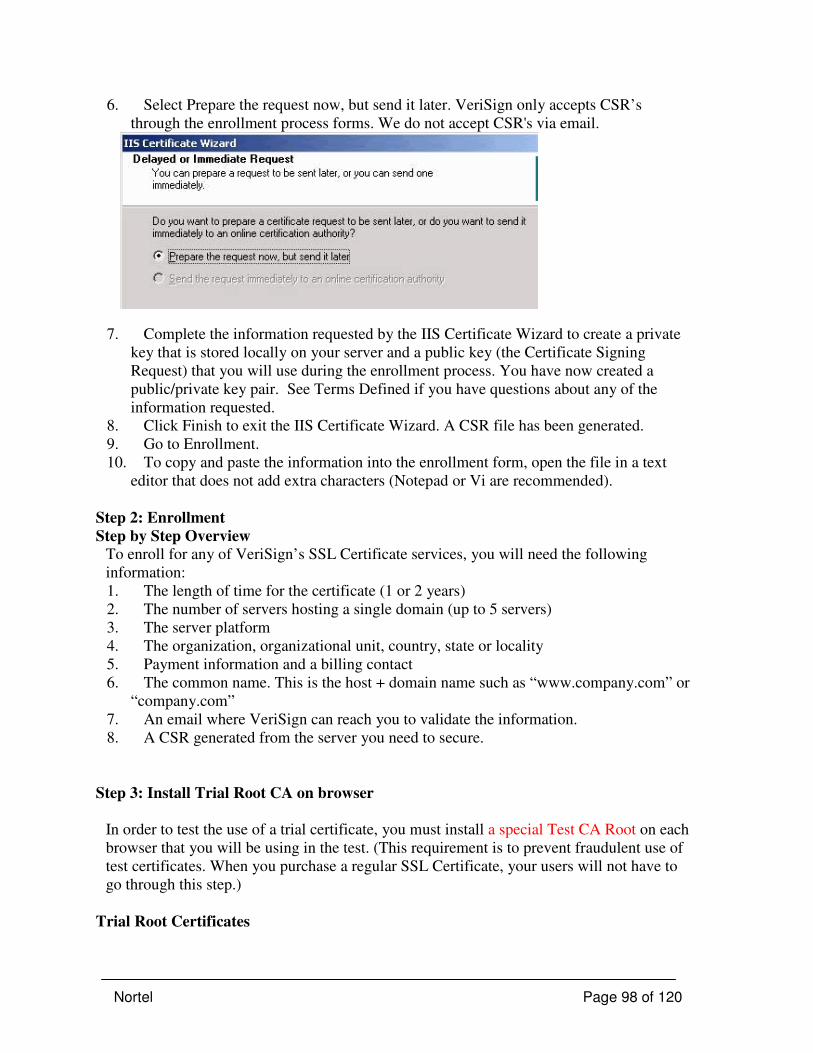
Nortel Page 98 of 120
6. Select Prepare the request now, but send it later. VeriSign only accepts CSR’s
through the enrollment process forms. We do not accept CSR's via email.
7. Complete the information requested by the IIS Certificate Wizard to create a private
key that is stored locally on your server and a public key (the Certificate Signing
Request) that you will use during the enrollment process. You have now created a
public/private key pair. See Terms Defined if you have questions about any of the
information requested.
8. Click Finish to exit the IIS Certificate Wizard. A CSR file has been generated.
9. Go to Enrollment.
10. To copy and paste the information into the enrollment form, open the file in a text
editor that does not add extra characters (Notepad or Vi are recommended).
Step 2: Enrollment
Step by Step Overview
To enroll for any of VeriSign’s SSL Certificate services, you will need the following
information:
1. The length of time for the certificate (1 or 2 years)
2. The number of servers hosting a single domain (up to 5 servers)
3. The server platform
4. The organization, organizational unit, country, state or locality
5. Payment information and a billing contact
6. The common name. This is the host + domain name such as “www.company.com” or
“company.com”
7. An email where VeriSign can reach you to validate the information.
8. A CSR generated from the server you need to secure.
Step 3: Install Trial Root CA on browser
In order to test the use of a trial certificate, you must install a special Test CA Root on each
browser that you will be using in the test. (This requirement is to prevent fraudulent use of
test certificates. When you purchase a regular SSL Certificate, your users will not have to
go through this step.)
Trial Root Certificates

Nortel Page 99 of 120
Secure Site Trial Root CA Certificate >>
This Root CA Certificate is used during the testing phase of the Trial VeriSign Secure Site
SSL Certificate. This will need to be installed into each browser that will be used to test the
SSL Certificate.
For Microsoft Browsers
1. Click on the “Secure Site Trial Root Certificate” link above.
2. Save each certificate into a file with a .cer extension.
3. Open a Microsoft IE Browser.
4. Go to Tools > Internet Options > Content > Certificates
5. Click Import. A certificate manager Import Wizard will appear. Click Next.
6. Browse to the location of the recently stored root (done in step 2). Select ALL files
for file type.
7. Select one of the certificates and click Open.
8. Click Next.
9. Select “Automatically select the certificate store based on the type of the certificate”.
Click Ok.
10. Click Next then Finish.
11. When prompted and asked if you wish to add the following certificate to the root
store, click Yes.
For Netscape Browsers
1. Click on the “Secure Site Trial Root Certificate link” above.
2. Save each certificate into a file with a .cer extension.
3. Open a Netscape browser.
4. Go to Edit > Preferences > Privacy & Security > Certificates > Manage Certificates >
Authorities.
5. Click Import
6. A dialog box appears that says, “Are you willing to accept this Certificate Authority
for the purposes of certifying other Internet sites, email users, or software developers?”.
Check “Trust this CA to identify web sites”. Click Next.
7. Click Ok.
Step 4: Installation of Server certificate
VeriSign offers two types of SSL Certificates: one with Server Gated Cryptography (SGC)
and one without. SGC enables 128-bit SSL encryption for over 99.9% of site visitors.
Without an SGC-enabled certificate in place, many site visitors (those using older browsers
and a significant portion of Windows 2000 users) will only receive 40- or 56-bit encryption.
SGC-enabled certificates are more expensive than non-SGC certificates.
Server Certificate Installation Instructions- Microsoft IIS 6.0
This document provides instructions for installing SSL Certificates. If you are unable to use
these instructions for your server, VeriSign recommends that you contact either the vendor
of your software or an organization that supports Microsoft IIS servers.
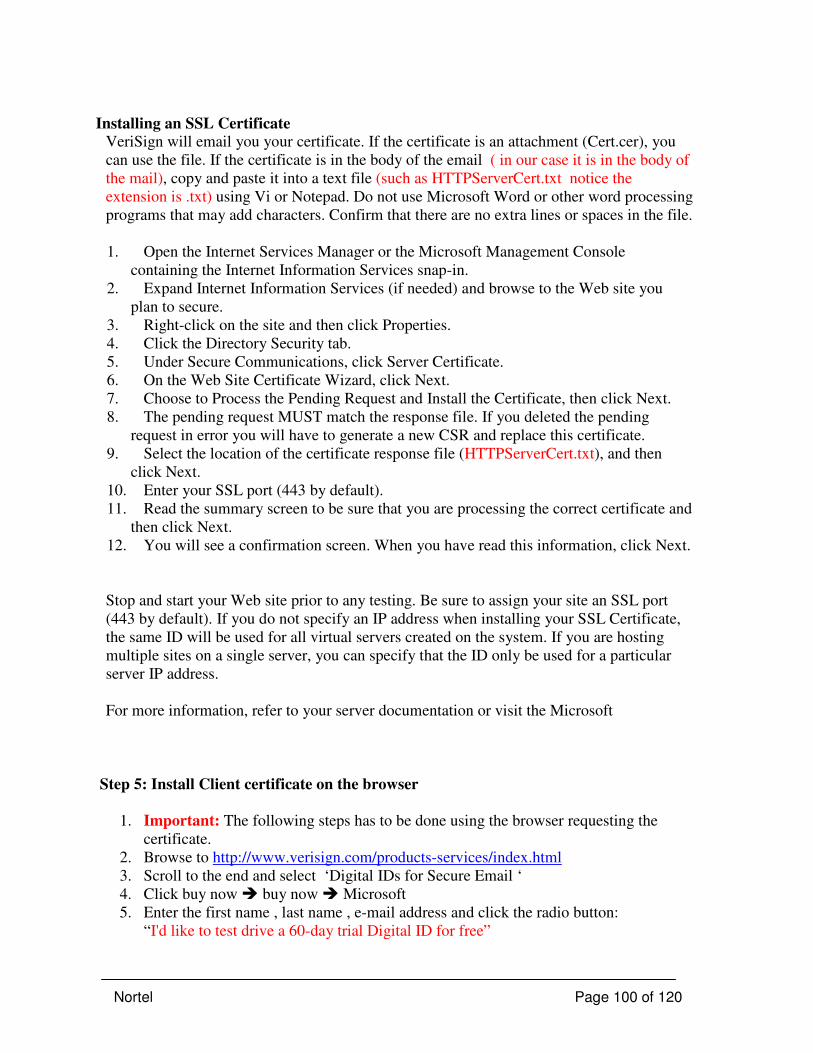
Nortel Page 100 of 120
Installing an SSL Certificate
VeriSign will email you your certificate. If the certificate is an attachment (Cert.cer), you
can use the file. If the certificate is in the body of the email ( in our case it is in the body of
the mail), copy and paste it into a text file (such as HTTPServerCert.txt notice the
extension is .txt) using Vi or Notepad. Do not use Microsoft Word or other word processing
programs that may add characters. Confirm that there are no extra lines or spaces in the file.
1. Open the Internet Services Manager or the Microsoft Management Console
containing the Internet Information Services snap-in.
2. Expand Internet Information Services (if needed) and browse to the Web site you
plan to secure.
3. Right-click on the site and then click Properties.
4. Click the Directory Security tab.
5. Under Secure Communications, click Server Certificate.
6. On the Web Site Certificate Wizard, click Next.
7. Choose to Process the Pending Request and Install the Certificate, then click Next.
8. The pending request MUST match the response file. If you deleted the pending
request in error you will have to generate a new CSR and replace this certificate.
9. Select the location of the certificate response file (HTTPServerCert.txt), and then
click Next.
10. Enter your SSL port (443 by default).
11. Read the summary screen to be sure that you are processing the correct certificate and
then click Next.
12. You will see a confirmation screen. When you have read this information, click Next.
Stop and start your Web site prior to any testing. Be sure to assign your site an SSL port
(443 by default). If you do not specify an IP address when installing your SSL Certificate,
the same ID will be used for all virtual servers created on the system. If you are hosting
multiple sites on a single server, you can specify that the ID only be used for a particular
server IP address.
For more information, refer to your server documentation or visit the Microsoft
Step 5: Install Client certificate on the browser
1. Important: The following steps has to be done using the browser requesting the
certificate.
2. Browse to http://www.verisign.com/products-services/index.html
3. Scroll to the end and select ‘Digital IDs for Secure Email ‘
4. Click buy now � buy now � Microsoft
5. Enter the first name , last name , e-mail address and click the radio button:
“I'd like to test drive a 60-day trial Digital ID for free”
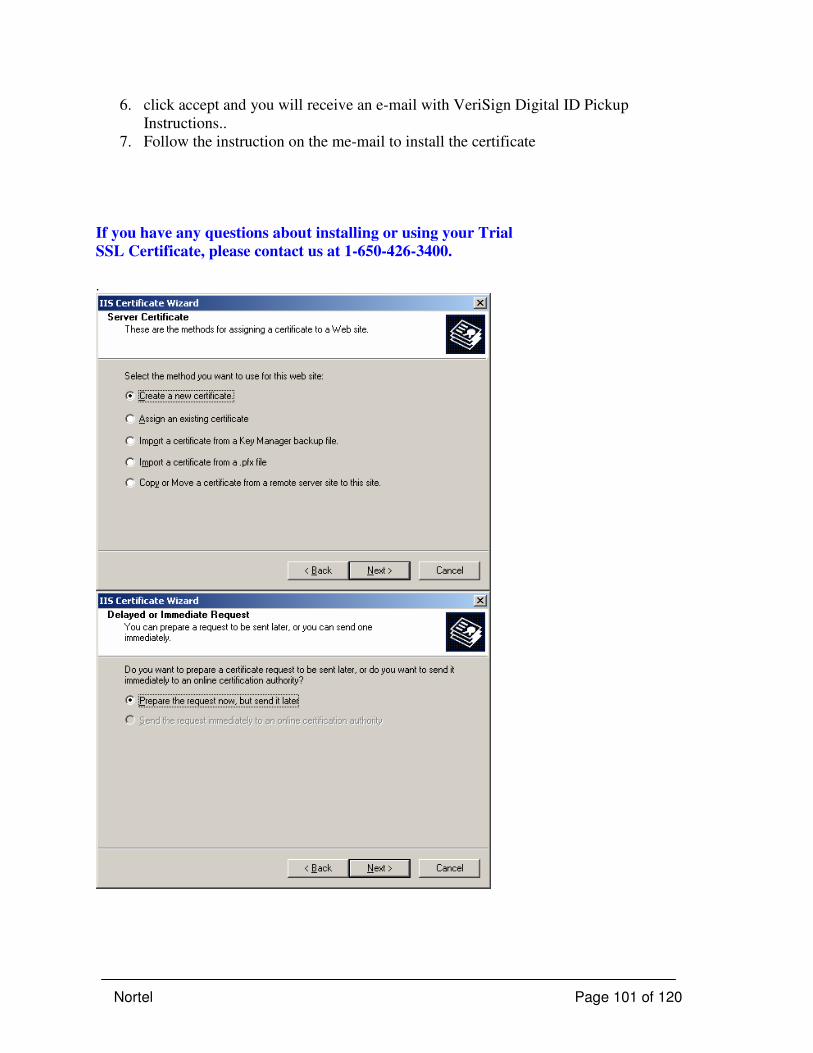
Nortel Page 101 of 120
6. click accept and you will receive an e-mail with VeriSign Digital ID Pickup
Instructions..
7. Follow the instruction on the me-mail to install the certificate
If you have any questions about installing or using your Trial
SSL Certificate, please contact us at 1-650-426-3400.
.
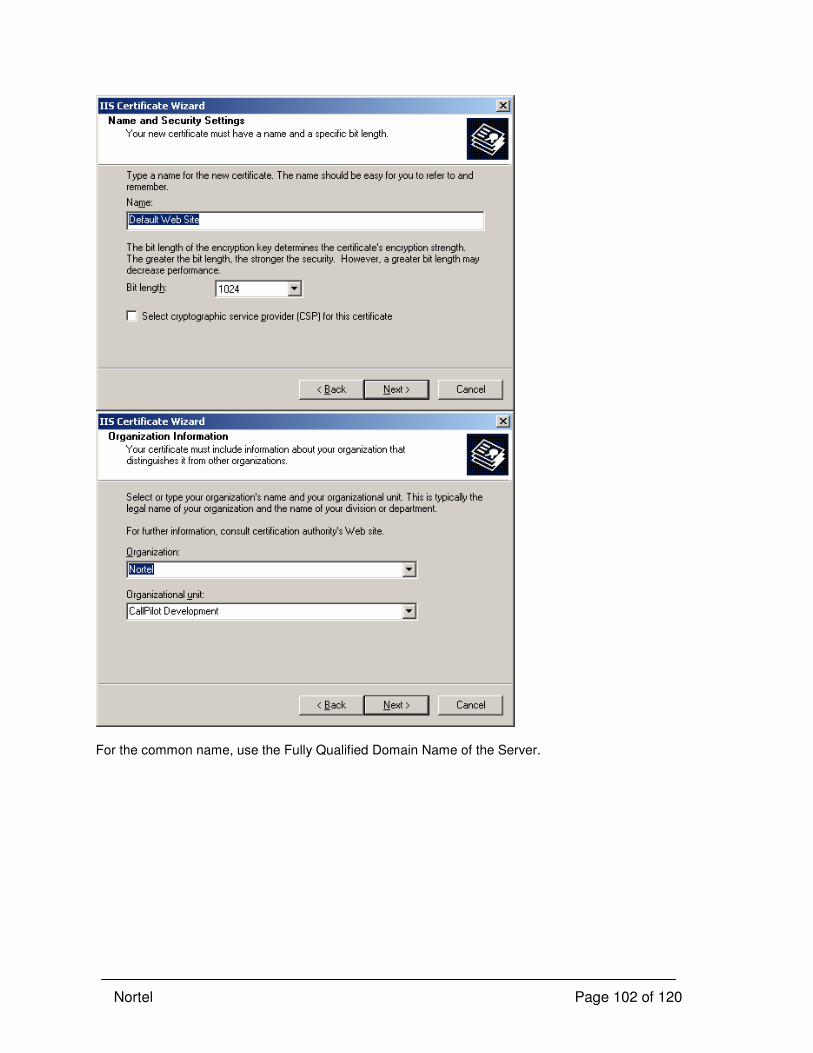
Nortel Page 102 of 120
For the common name, use the Fully Qualified Domain Name of the Server.
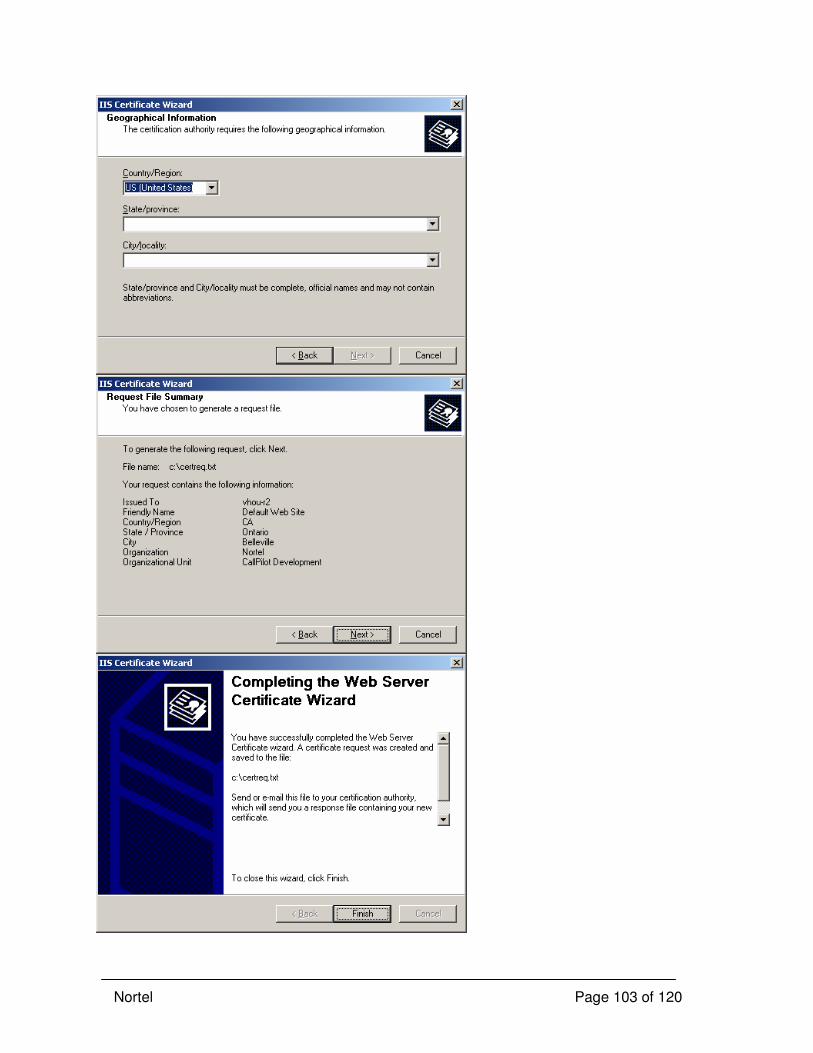
Nortel Page 103 of 120
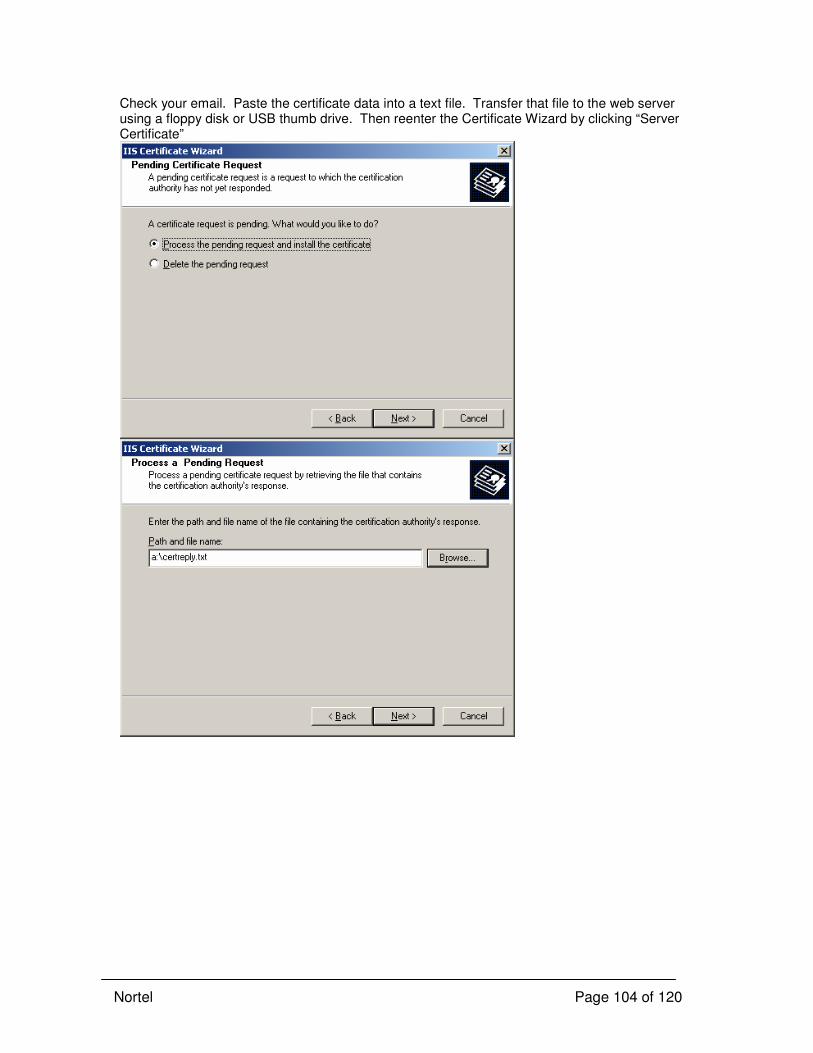
Nortel Page 104 of 120
Check your email. Paste the certificate data into a text file. Transfer that file to the web server using a floppy disk or USB thumb drive. Then reenter the Certificate Wizard by clicking “Server Certificate”
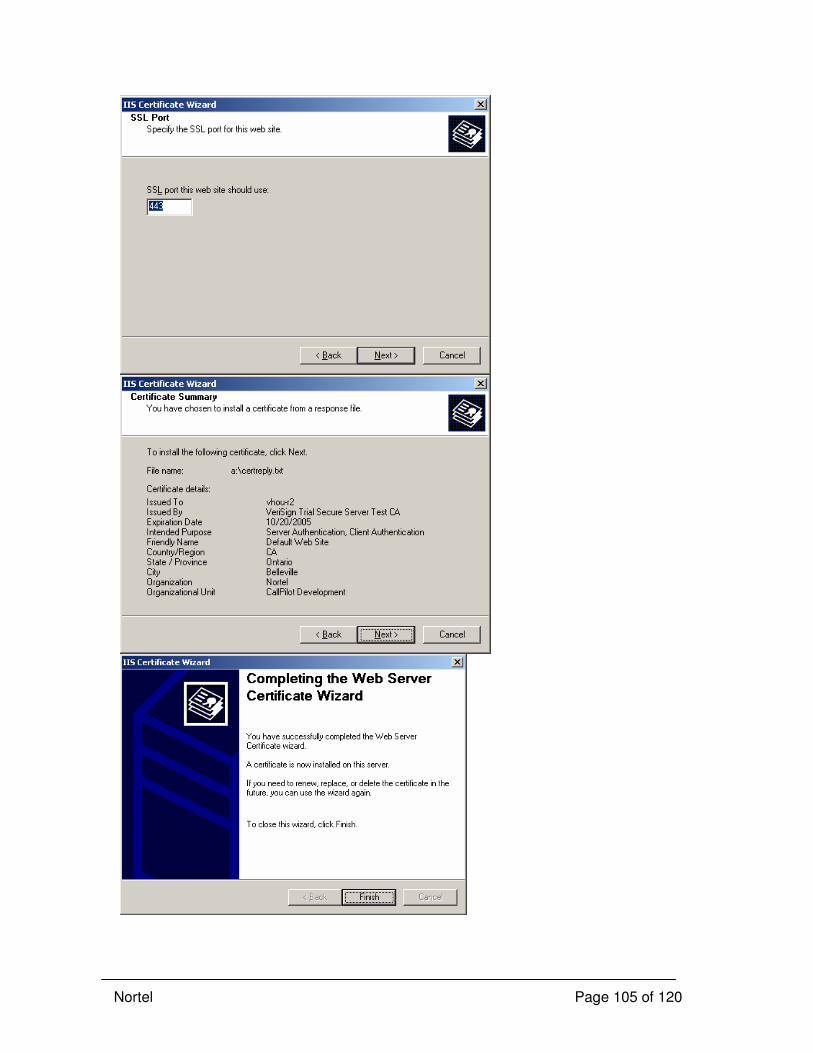
Nortel Page 105 of 120
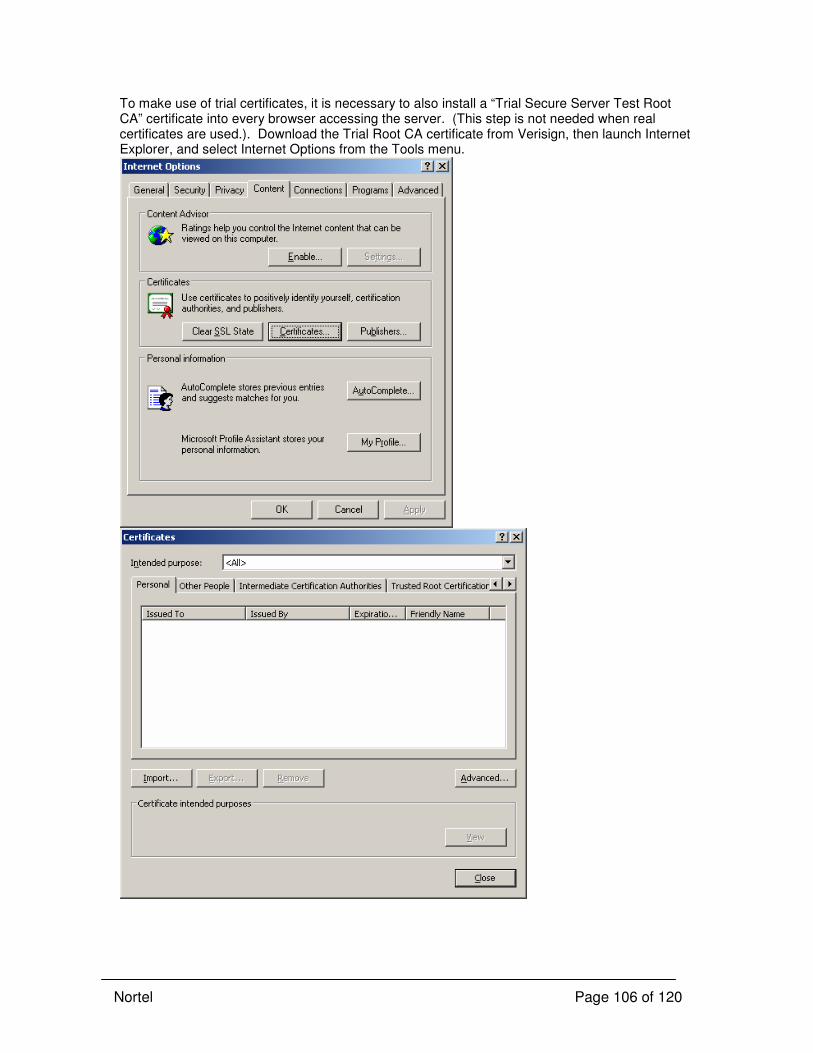
Nortel Page 106 of 120
To make use of trial certificates, it is necessary to also install a “Trial Secure Server Test Root CA” certificate into every browser accessing the server. (This step is not needed when real certificates are used.). Download the Trial Root CA certificate from Verisign, then launch Internet Explorer, and select Internet Options from the Tools menu.

Nortel Page 107 of 120
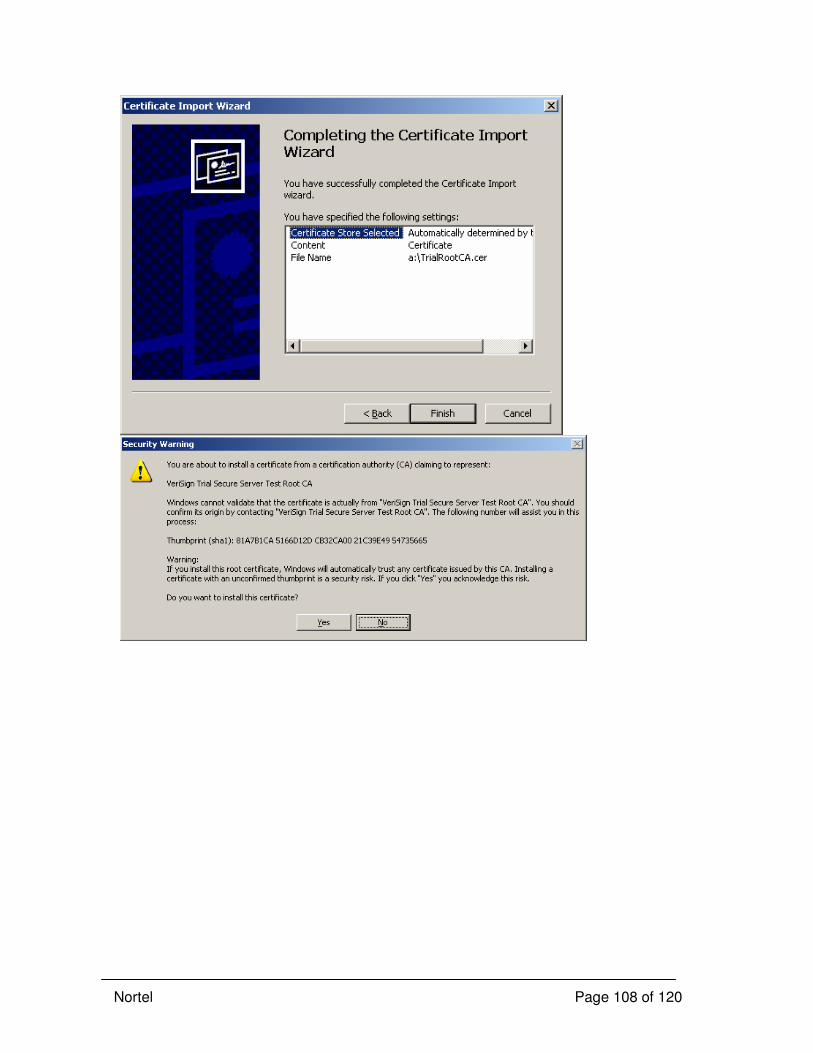
Nortel Page 108 of 120
Nortel Page 109 of 120
Appendix D: Creating certificates using Windows Certification Authority
It is possible to use the Certification Authority software provided with Windows Server 2003 to create certificates for test purposes. The basic steps are (see Appendix C for more detail on certificate installation): Install the Certificate Services feature using Control Panel – Add or Remove Programs – Add/Remove Windows Components (this must be done on a server running Windows Server 2003 and IIS). For simplicity, you can make the Certification Authority a “Stand-alone root CA”. You will need to choose an appropriate Common Name. You will need the Windows Server 2003 OS CD. Browse to http://localhost/certsrv and use the web application to request a certificate. For a “client certificate”, request a “Web Browser Certificate”. This is used to identify an end user to a web site. For a web server certificate, select “Advanced Certificate Request”, then select the second option to submit a certificate request you have previously created using the Internet Information Services Manager on the web server you want to install the certificate on. (Within IIS Manager, select the web site – Properties – Directory Security tab – Server Certificate to launch a wizard to create the certificate request). Paste the encrypted text of the request (include the start and end text) into the “Saved Request” box (or browse to the file to insert). Then click Submit. Run MMC (Start – Run – mmc) and load the Certification Authority snap-in. Use this snap-in to view and approve the pending certificate request Go back to the web application to pick up your certificate. If it is a Web Server Certificate, use the IIS Manager wizard to install the certificate you previously created a request for.
Nortel Page 110 of 120
Appendix E: Creating a Hotfix CD
Every month, on the 2nd
Tuesday of the month, Microsoft releases security bulletins and
security patches for its Windows Operating System and other products. On the following
Friday, Nortel reissues CallPilot bulletin P-2007-0010 CallPilot Server Security Update to
describe which of the new Microsoft security patches (“hotfixes”) apply to CallPilot and to
give instructions to customers on how to protect themselves from any newly discovered
vulnerabilities.
For the CallPilot DoD configuration, it is important that the CallPilot server and CallPilot
web server machines are kept disconnected from the CLAN until they are fully installed,
hardened, updated and protected. In some cases, viruses, Trojans and worms can infect an
unprotected computer within minutes of it being put on the network. Therefore it is
important to be able to fully install and update a system from CD media.
In the case of hotfixes, this means that a new CD must be prepared every month containing
the complete set of applicable hotfixes, including those just released. This CD is not a part of
the Nortel CallPilot product. It can easily be prepared by downloading the patches from the
Microsoft web site. Note that it is safe to reinstall hotfixes that have already been installed.
For purposes of internal testing and verification, the CallPilot design team has prepared a
sample CD containing hotfixes up to and including June 2007. The CD contains batch files
which allow multiple hotfixes to be installed with a single reboot. Those batch files also use
parameters to specify that uninstallation folders should not be created. (Otherwise a lot of
system drive disk space will get consumed). Use this CD as an example hotfix CD.
Several times a year, Nortel releases a new CallPilot Security PEP which bundles up all
applicable hotfixes released since the GA of that CallPilot release. The Security PEP also
usually includes additional security improvements. At the time of writing (July 2007), the
most recent security PEP for CP 4 is CPSECPEP006S. When a new security PEP is released,
the hotfix CD should be changed so it has a batch file that installs only the hotfixes released
since that newer PEP. Note that CallPilot security PEPs must not be applied to a CP4 JITC
system that has already been JITC hardened. Doing so will cause incorrect security settings.
In addition, the CD contains Service Pack 1 (SP1) for Windows Server 2003. SP1 is already
included in the CallPilot 4 GA image for CallPilot servers, however it may be needed for the
CallPilot web server (if the base OS used to install the web server does not have SP1 built-in).
The CD contains a batch file to install SP1 – again, that batch file uses parameters to avoid
uninstallation folders. At the time of writing SP2 is not supported on the CallPilot server.
Microsoft Security Bulletins (and hotfix downloads) can be found at URLs like:
http://www.microsoft.com/technet/security/bulletin/MS06-035.mspx
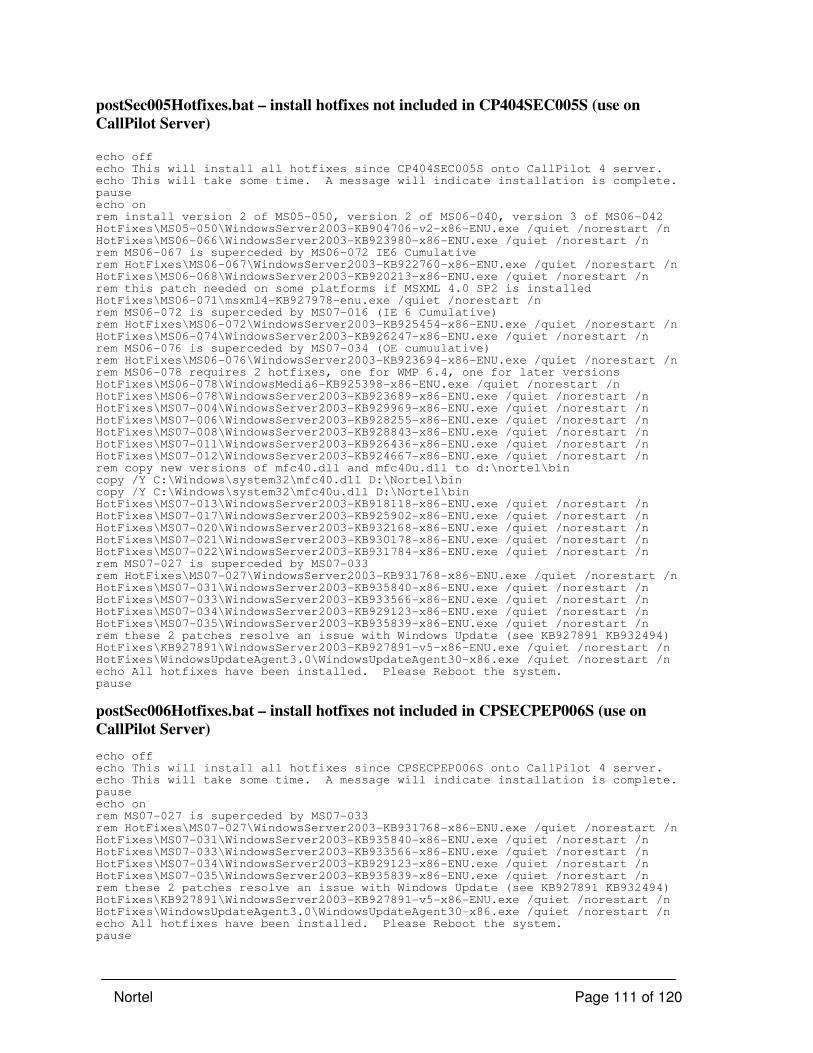
Nortel Page 111 of 120
postSec005Hotfixes.bat – install hotfixes not included in CP404SEC005S (use on
CallPilot Server)
echo off echo This will install all hotfixes since CP404SEC005S onto CallPilot 4 server. echo This will take some time. A message will indicate installation is complete. pause echo on rem install version 2 of MS05-050, version 2 of MS06-040, version 3 of MS06-042 HotFixes\MS05-050\WindowsServer2003-KB904706-v2-x86-ENU.exe /quiet /norestart /n HotFixes\MS06-066\WindowsServer2003-KB923980-x86-ENU.exe /quiet /norestart /n rem MS06-067 is superceded by MS06-072 IE6 Cumulative rem HotFixes\MS06-067\WindowsServer2003-KB922760-x86-ENU.exe /quiet /norestart /n HotFixes\MS06-068\WindowsServer2003-KB920213-x86-ENU.exe /quiet /norestart /n rem this patch needed on some platforms if MSXML 4.0 SP2 is installed HotFixes\MS06-071\msxml4-KB927978-enu.exe /quiet /norestart /n rem MS06-072 is superceded by MS07-016 (IE 6 Cumulative) rem HotFixes\MS06-072\WindowsServer2003-KB925454-x86-ENU.exe /quiet /norestart /n HotFixes\MS06-074\WindowsServer2003-KB926247-x86-ENU.exe /quiet /norestart /n rem MS06-076 is superceded by MS07-034 (OE cumuulative) rem HotFixes\MS06-076\WindowsServer2003-KB923694-x86-ENU.exe /quiet /norestart /n rem MS06-078 requires 2 hotfixes, one for WMP 6.4, one for later versions HotFixes\MS06-078\WindowsMedia6-KB925398-x86-ENU.exe /quiet /norestart /n HotFixes\MS06-078\WindowsServer2003-KB923689-x86-ENU.exe /quiet /norestart /n HotFixes\MS07-004\WindowsServer2003-KB929969-x86-ENU.exe /quiet /norestart /n HotFixes\MS07-006\WindowsServer2003-KB928255-x86-ENU.exe /quiet /norestart /n HotFixes\MS07-008\WindowsServer2003-KB928843-x86-ENU.exe /quiet /norestart /n HotFixes\MS07-011\WindowsServer2003-KB926436-x86-ENU.exe /quiet /norestart /n HotFixes\MS07-012\WindowsServer2003-KB924667-x86-ENU.exe /quiet /norestart /n rem copy new versions of mfc40.dll and mfc40u.dll to d:\nortel\bin copy /Y C:\Windows\system32\mfc40.dll D:\Nortel\bin copy /Y C:\Windows\system32\mfc40u.dll D:\Nortel\bin HotFixes\MS07-013\WindowsServer2003-KB918118-x86-ENU.exe /quiet /norestart /n HotFixes\MS07-017\WindowsServer2003-KB925902-x86-ENU.exe /quiet /norestart /n HotFixes\MS07-020\WindowsServer2003-KB932168-x86-ENU.exe /quiet /norestart /n HotFixes\MS07-021\WindowsServer2003-KB930178-x86-ENU.exe /quiet /norestart /n HotFixes\MS07-022\WindowsServer2003-KB931784-x86-ENU.exe /quiet /norestart /n rem MS07-027 is superceded by MS07-033 rem HotFixes\MS07-027\WindowsServer2003-KB931768-x86-ENU.exe /quiet /norestart /n HotFixes\MS07-031\WindowsServer2003-KB935840-x86-ENU.exe /quiet /norestart /n HotFixes\MS07-033\WindowsServer2003-KB933566-x86-ENU.exe /quiet /norestart /n HotFixes\MS07-034\WindowsServer2003-KB929123-x86-ENU.exe /quiet /norestart /n HotFixes\MS07-035\WindowsServer2003-KB935839-x86-ENU.exe /quiet /norestart /n rem these 2 patches resolve an issue with Windows Update (see KB927891 KB932494) HotFixes\KB927891\WindowsServer2003-KB927891-v5-x86-ENU.exe /quiet /norestart /n HotFixes\WindowsUpdateAgent3.0\WindowsUpdateAgent30-x86.exe /quiet /norestart /n echo All hotfixes have been installed. Please Reboot the system. pause
postSec006Hotfixes.bat – install hotfixes not included in CPSECPEP006S (use on
CallPilot Server) echo off echo This will install all hotfixes since CPSECPEP006S onto CallPilot 4 server. echo This will take some time. A message will indicate installation is complete. pause echo on rem MS07-027 is superceded by MS07-033 rem HotFixes\MS07-027\WindowsServer2003-KB931768-x86-ENU.exe /quiet /norestart /n HotFixes\MS07-031\WindowsServer2003-KB935840-x86-ENU.exe /quiet /norestart /n HotFixes\MS07-033\WindowsServer2003-KB933566-x86-ENU.exe /quiet /norestart /n HotFixes\MS07-034\WindowsServer2003-KB929123-x86-ENU.exe /quiet /norestart /n HotFixes\MS07-035\WindowsServer2003-KB935839-x86-ENU.exe /quiet /norestart /n rem these 2 patches resolve an issue with Windows Update (see KB927891 KB932494) HotFixes\KB927891\WindowsServer2003-KB927891-v5-x86-ENU.exe /quiet /norestart /n HotFixes\WindowsUpdateAgent3.0\WindowsUpdateAgent30-x86.exe /quiet /norestart /n echo All hotfixes have been installed. Please Reboot the system. pause

Nortel Page 112 of 120
InstallSP1.bat – install Service Pack 1 for Windows Server 2003 with no uninstall
folders (may be needed for web server machine)
echo off echo Installing SP1 quietly. Please wait. A message will appear when done... SP1\WindowsServer2003-KB889101-SP1-x86-ENU.exe /quiet /norestart /n echo SP1 install complete. Please reboot the system then install postSP1 hotfixes pause
postSP1Hotfixes.bat – install all hotfixes released since SP1 (use on web server with
SP1)
rem install hotfixes onto Windows Server 2003 SP1 echo off echo This will install all Windows Server 2003 hotfixes released since SP1 echo This will take some time. A message will indicate installation is complete. pause echo on HotFixes\MS05-026\WindowsServer2003-KB896358-x86-enu.exe /quiet /norestart /n rem MS05-027 is superceded by MS06-035 rem HotFixes\MS05-027\WindowsServer2003-KB896422-x86-enu.exe /quiet /norestart /n rem MS05-032 is superceded by MS06-068 rem HotFixes\MS05-032\WindowsServer2003-KB890046-x86-enu.exe /quiet /norestart /n HotFixes\MS05-033\WindowsServer2003-KB896428-x86-enu.exe /quiet /norestart /n HotFixes\MS05-036\WindowsServer2003-KB901214-x86-ENU.exe /quiet /norestart /n HotFixes\MS05-038\WindowsServer2003-KB896727-x86-ENU.exe /quiet /norestart /n HotFixes\MS05-039\WindowsServer2003-KB899588-x86-ENU.exe /quiet /norestart /n HotFixes\MS05-040\WindowsServer2003-KB893756-x86-ENU.exe /quiet /norestart /n HotFixes\MS05-041\WindowsServer2003-KB899591-x86-ENU.exe /quiet /norestart /n HotFixes\MS05-042\WindowsServer2003-KB899587-x86-ENU.exe /quiet /norestart /n HotFixes\MS05-045\WindowsServer2003-KB905414-x86-ENU.exe /quiet /norestart /n HotFixes\MS05-046\WindowsServer2003-KB899589-x86-ENU.exe /quiet /norestart /n HotFixes\MS05-048\WindowsServer2003-KB901017-x86-ENU.exe /quiet /norestart /n HotFixes\MS05-049\WindowsServer2003-KB900725-x86-ENU.exe /quiet /norestart /n HotFixes\MS05-050\WindowsServer2003-KB904706-v2-x86-ENU.exe /quiet /norestart /n HotFixes\MS05-051\WindowsServer2003-KB902400-x86-ENU.exe /quiet /norestart /n HotFixes\MS05-052\WindowsServer2003-KB896688-x86-ENU.exe /quiet /norestart /n rem MS05-053 replaced by MS07-017 rem HotFixes\MS05-053\WindowsServer2003-KB896424-x86-ENU.exe /quiet /norestart /n HotFixes\MS05-054\WindowsServer2003-KB905915-x86-ENU.exe /quiet /norestart /n rem MS06-001 replaced by MS07-017 rem HotFixes\MS06-001\WindowsServer2003-KB912919-x86-ENU.exe /quiet /norestart /n HotFixes\MS06-002\WindowsServer2003-KB908519-x86-ENU.exe /quiet /norestart /n HotFixes\MS06-006\WindowsMedia-KB911564-x86-ENU.exe /quiet /norestart /n HotFixes\MS06-007\WindowsServer2003-KB913446-x86-ENU.exe /quiet /norestart /n HotFixes\MS06-008\WindowsServer2003-KB911927-x86-ENU.exe /quiet /norestart /n HotFixes\MS06-013\WindowsServer2003-KB912812-x86-ENU.exe /quiet /norestart /n HotFixes\MS06-014\WindowsServer2003-KB911562-x86-ENU.exe /quiet /norestart /n HotFixes\MS06-015\WindowsServer2003-KB908531-v2-x86-ENU.exe /quiet /norestart /n rem MS06-016 is superceded by MS06-076 Outlook Express cumulative rem HotFixes\MS06-016\WindowsServer2003-KB911567-x86-ENU.exe /quiet /norestart /n rem MS06-021 is superceded by MS06-042 rem HotFixes\MS06-021\WindowsServer2003-KB916281-x86-ENU.exe /quiet /norestart /n HotFixes\MS06-022\WindowsServer2003-KB918439-x86-ENU.exe /quiet /norestart /n HotFixes\MS06-023\WindowsServer2003-KB917344-x86-ENU.exe /quiet /norestart /n HotFixes\MS06-024\WindowsServer2003-KB917734-x86-ENU.exe /quiet /norestart /n HotFixes\MS06-025\WindowsServer2003-KB911280-v2-x86-ENU.exe /quiet /norestart /n HotFixes\MS06-030\WindowsServer2003-KB914389-x86-ENU.exe /quiet /norestart /n HotFixes\MS06-032\WindowsServer2003-KB917953-x86-ENU.exe /quiet /norestart /n HotFixes\MS06-034\WindowsServer2003-KB917537-x86-ENU.exe /quiet /norestart /n rem MS06-035 is superceded by MS06-063 rem HotFixes\MS06-035\WindowsServer2003-KB917159-x86-ENU.exe /quiet /norestart /n HotFixes\MS06-036\WindowsServer2003-KB914388-x86-ENU.exe /quiet /norestart /n HotFixes\MS06-040\WindowsServer2003-KB921883-v2-x86-ENU.exe /quiet /norestart /n HotFixes\MS06-041\WindowsServer2003-KB920683-x86-ENU.exe /quiet /norestart /n rem MS06-042 is superceded by MS06-067 rem HotFixes\MS06-042\WindowsServer2003-KB918899-v3-x86-ENU /quiet /norestart /n
Nortel Page 113 of 120
rem MS06-043 is superceded by MS06-076 Outlook Express cumulative rem HotFixes\MS06-043\WindowsServer2003-KB920214-x86-ENU.exe /quiet /norestart /n rem MS06-045 is superceded by MS07-006 rem HotFixes\MS06-045\WindowsServer2003-KB921398-x86-ENU.exe /quiet /norestart /n rem MS06-046 is superceded by MS07-008 rem HotFixes\MS06-046\WindowsServer2003-KB922616-x86-ENU.exe /quiet /norestart /n HotFixes\MS06-050\WindowsServer2003-KB920670-x86-ENU.exe /quiet /norestart /n rem MS06-051 is superceded by MS07-035 rem HotFixes\MS06-051\WindowsServer2003-KB917422-x86-ENU.exe /quiet /norestart /n HotFixes\MS06-053\WindowsServer2003-KB920685-x86-ENU.exe /quiet /norestart /n rem MS06-055 is superceded by MS07-004 for IE 6 rem HotFixes\MS06-055\WindowsServer2003-KB925486-x86-ENU.exe /quiet /norestart /n HotFixes\MS06-057\WindowsServer2003-KB923191-x86-ENU.exe /quiet /norestart /n HotFixes\MS06-061\WindowsServer2003-KB924191-x86-ENU.exe /quiet /norestart /n HotFixes\MS06-063\WindowsServer2003-KB923414-x86-ENU.exe /quiet /norestart /n HotFixes\MS06-064\WindowsServer2003-KB922819-x86-ENU.exe /quiet /norestart /n HotFixes\MS06-065\WindowsServer2003-KB924496-x86-ENU.exe /quiet /norestart /n HotFixes\MS06-066\WindowsServer2003-KB923980-x86-ENU.exe /quiet /norestart /n rem MS06-067 is superceded by MS06-072 IE6 Cumulative rem HotFixes\MS06-067\WindowsServer2003-KB922760-x86-ENU.exe /quiet /norestart /n HotFixes\MS06-068\WindowsServer2003-KB920213-x86-ENU.exe /quiet /norestart /n rem MS06-072 is superceded by MS07-016 (IE 6 Cumulative) rem HotFixes\MS06-072\WindowsServer2003-KB925454-x86-ENU.exe /quiet /norestart /n HotFixes\MS06-074\WindowsServer2003-KB926247-x86-ENU.exe /quiet /norestart /n rem MS06-076 is superceded by MS07-034 (OE cumuulative) rem HotFixes\MS06-076\WindowsServer2003-KB923694-x86-ENU.exe /quiet /norestart /n rem MS06-078 requires 2 hotfixes, one for WMP 6.4, one for later versions HotFixes\MS06-078\WindowsMedia6-KB925398-x86-ENU.exe /quiet /norestart /n HotFixes\MS06-078\WindowsServer2003-KB923689-x86-ENU.exe /quiet /norestart /n HotFixes\MS07-004\WindowsServer2003-KB929969-x86-ENU.exe /quiet /norestart /n HotFixes\MS07-006\WindowsServer2003-KB928255-x86-ENU.exe /quiet /norestart /n HotFixes\MS07-008\WindowsServer2003-KB928843-x86-ENU.exe /quiet /norestart /n HotFixes\MS07-011\WindowsServer2003-KB926436-x86-ENU.exe /quiet /norestart /n HotFixes\MS07-012\WindowsServer2003-KB924667-x86-ENU.exe /quiet /norestart /n HotFixes\MS07-013\WindowsServer2003-KB918118-x86-ENU.exe /quiet /norestart /n rem install the hotfix for World Daylight Savings Time changes for March 2007 HotFixes\KB931836DST\WindowsServer2003-KB931836-x86-ENU.exe /quiet /norestart /n HotFixes\MS07-017\WindowsServer2003-KB925902-x86-ENU.exe /quiet /norestart /n HotFixes\MS07-020\WindowsServer2003-KB932168-x86-ENU.exe /quiet /norestart /n HotFixes\MS07-021\WindowsServer2003-KB930178-x86-ENU.exe /quiet /norestart /n HotFixes\MS07-022\WindowsServer2003-KB931784-x86-ENU.exe /quiet /norestart /n rem MS07-027 is superceded by MS07-033 rem HotFixes\MS07-027\WindowsServer2003-KB931768-x86-ENU.exe /quiet /norestart /n HotFixes\MS07-031\WindowsServer2003-KB935840-x86-ENU.exe /quiet /norestart /n HotFixes\MS07-033\WindowsServer2003-KB933566-x86-ENU.exe /quiet /norestart /n HotFixes\MS07-034\WindowsServer2003-KB929123-x86-ENU.exe /quiet /norestart /n HotFixes\MS07-035\WindowsServer2003-KB935839-x86-ENU.exe /quiet /norestart /n rem these 2 patches resolve an issue with Windows Update (see KB927891 KB932494) HotFixes\KB927891\WindowsServer2003-KB927891-v5-x86-ENU.exe /quiet /norestart /n HotFixes\WindowsUpdateAgent3.0\WindowsUpdateAgent30-x86.exe /quiet /norestart /n echo All hotfixes have been installed. Please Reboot the system. pause
postSP2Hotfixes.bat – install all hotfixes released since SP2 (use on web server with
SP2) rem install hotfixes onto Windows Server 2003 SP2 echo off echo This will install all Windows Server 2003 hotfixes released since SP2 echo This will take some time. A message will indicate installation is complete. pause echo on HotFixes\MS07-017\WindowsServer2003-KB925902-x86-ENU.exe /quiet /norestart /n HotFixes\MS07-020\WindowsServer2003-KB932168-x86-ENU.exe /quiet /norestart /n HotFixes\MS07-021\WindowsServer2003-KB930178-x86-ENU.exe /quiet /norestart /n HotFixes\MS07-022\WindowsServer2003-KB931784-x86-ENU.exe /quiet /norestart /n rem MS07-027 is superceded by MS07-033 rem HotFixes\MS07-027\WindowsServer2003-KB931768-x86-ENU.exe /quiet /norestart /n HotFixes\MS07-031\WindowsServer2003-KB935840-x86-ENU.exe /quiet /norestart /n HotFixes\MS07-033\WindowsServer2003-KB933566-x86-ENU.exe /quiet /norestart /n

Nortel Page 114 of 120
HotFixes\MS07-034\WindowsServer2003-KB929123-x86-ENU.exe /quiet /norestart /n HotFixes\MS07-035\WindowsServer2003-KB935839-x86-ENU.exe /quiet /norestart /n rem these 2 patches resolve an issue with Windows Update (see KB927891 KB932494) HotFixes\KB927891\WindowsServer2003-KB927891-v5-x86-ENU.exe /quiet /norestart /n HotFixes\WindowsUpdateAgent3.0\WindowsUpdateAgent30-x86.exe /quiet /norestart /n echo All hotfixes have been installed. Please Reboot the system. pause
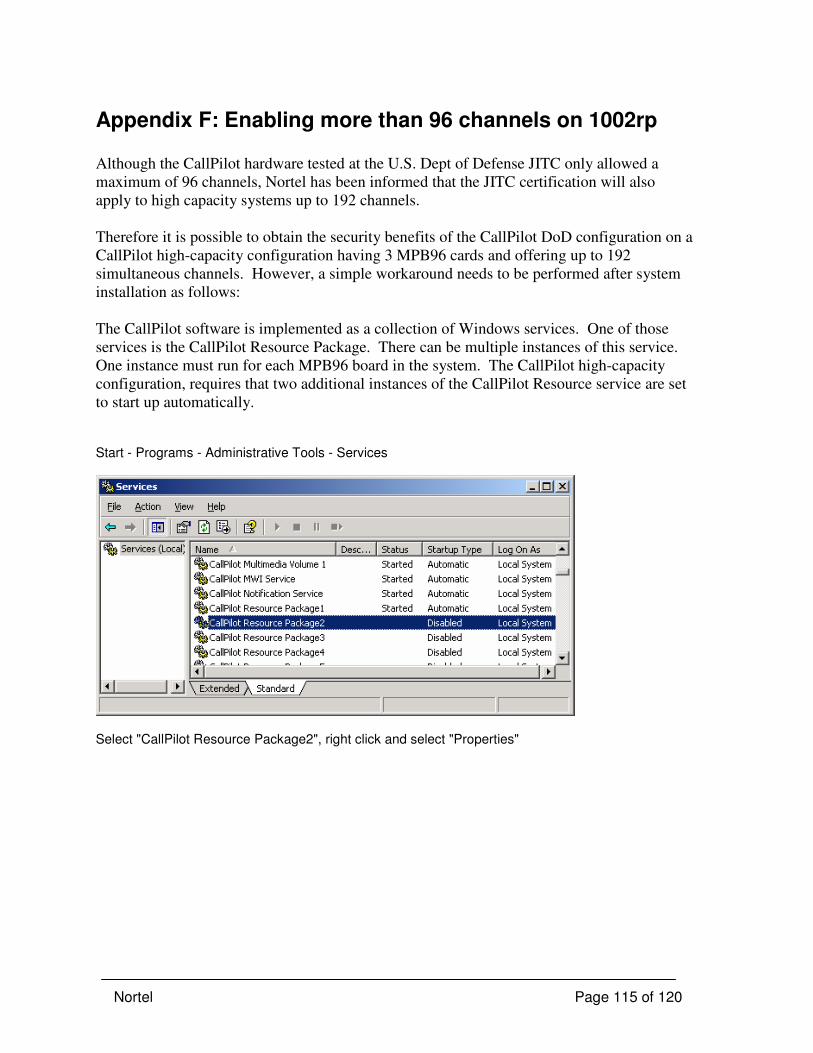
Nortel Page 115 of 120
Appendix F: Enabling more than 96 channels on 1002rp
Although the CallPilot hardware tested at the U.S. Dept of Defense JITC only allowed a
maximum of 96 channels, Nortel has been informed that the JITC certification will also
apply to high capacity systems up to 192 channels.
Therefore it is possible to obtain the security benefits of the CallPilot DoD configuration on a
CallPilot high-capacity configuration having 3 MPB96 cards and offering up to 192
simultaneous channels. However, a simple workaround needs to be performed after system
installation as follows:
The CallPilot software is implemented as a collection of Windows services. One of those
services is the CallPilot Resource Package. There can be multiple instances of this service.
One instance must run for each MPB96 board in the system. The CallPilot high-capacity
configuration, requires that two additional instances of the CallPilot Resource service are set
to start up automatically.
Start - Programs - Administrative Tools - Services
Select "CallPilot Resource Package2", right click and select "Properties"
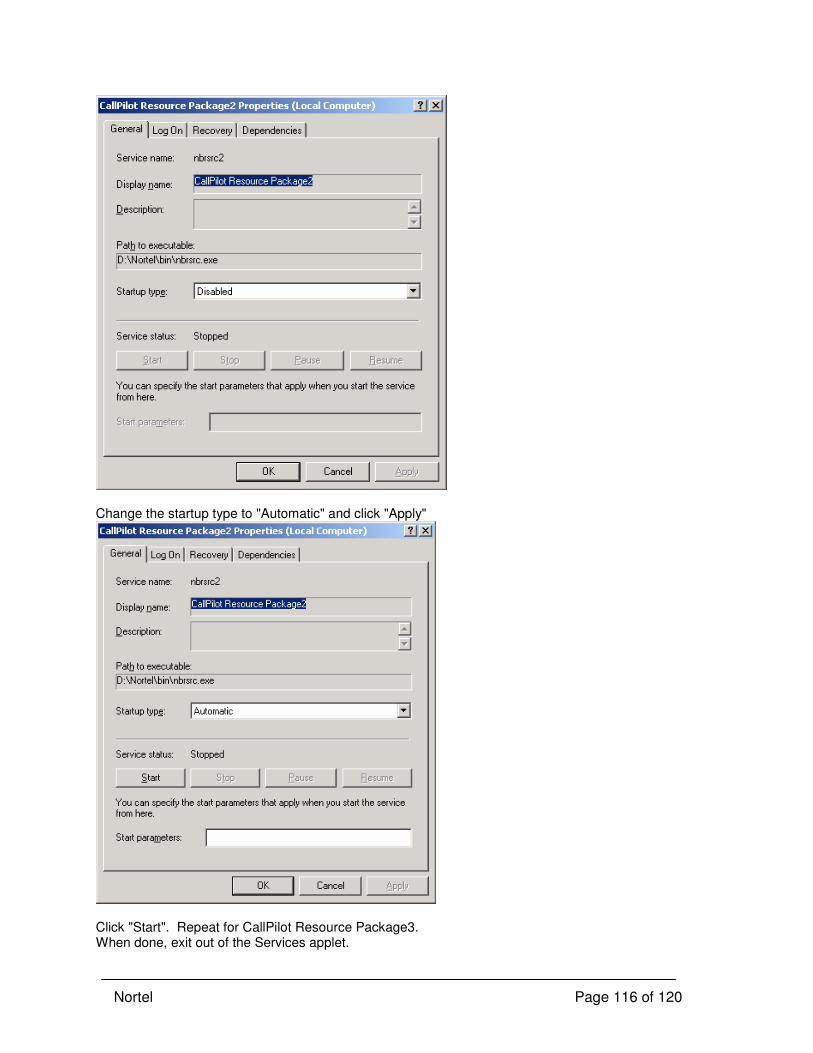
Nortel Page 116 of 120
Change the startup type to "Automatic" and click "Apply"
Click "Start". Repeat for CallPilot Resource Package3. When done, exit out of the Services applet.

Nortel Page 117 of 120
Appendix G: Changing Computer Name of the CP Server
If it becomes necessary to change the computer name of the CallPilot server after it has been
JITC hardened, use the following steps:
1. Change the ComputerName of the CallPilot Server using the usual CP4 technique using Config Wizard
2. You do not need to reboot yet. 3. Start regedit (Start - Run - regedit, OK) 4. Navigate to key HKEY_LOCAL_MACHINE\SYSTEM\CurrentControlSet\Services\ASANYs_ComputerName_SQLANY 5. Double-Click on the "ImagePath" value 6. Change the value from "D"\SQLANY\win32\dbsrv7.exe" to "C:\Program Files\Sybase\SQL Anywhere 9\win32\dbsrv9.exe". Click OK 7. Use the services applet (Start - Programs - Administrative Tools - Services) to manually start the "Adaptive Server Anywhere" service to see if it can be started 8. If step 7 is OK, then reboot the system into service
Nortel Page 118 of 120
Appendix H: Troubleshooting Tips
Web Server logon to CallPilot Server fails
• check network settings and ping both ways
• check DCOM registry setting on CP Server (see step 6, chapter 10)
Javascript not enabled message on CallPilot Manager logon page
• ensure URL uses Web Server computer name, not IP address
• ensure Web Server computer name is in browser trusted sites list (step 20, chapter 11)
Remote support via modem problems (consult Appendix A)
• dial-up client cannot be Windows 2000 or earlier
• must use Remote Desktop Client from Windows Server 2003
• check needed services are running: Telephony, Routing & Remote Access, Terminal
Services
• Firewall on client PC might block access – try disabling or reconfiguring it
• If modem has been turned off or disconnected from the server, you will have to either
reboot the server or restart the Routing and Remote Access service in order to get the
modem to answer.
Cannot change BIOS settings – boot order or other settings
• on 1002rp, if you have a password set but have not entered it correctly, some of the
BIOS menus and settings will not appear. You do not get a “bad password” message.
Be sure you have correctly entered the BIOS password. Do not use the numeric
keypad to enter any numbers in the password.
Cannot browse to Web Server when certificates installed and required
• Ensure the Internet Explorer browser has “Use TLS 1.0” enabled. (Internet Options,
Advanced Tab).
CallPilot Reporter service fails to start on Web Server
• Use Services applet to correctly set the logon of the CallPilot Reporter service to use
the real administrator userid and password (i.e. xAdministrator unless customer has
renamed it again.) The xAdministrator account will be granted the “log on as a
service” user right.
“You do not have the proper encryption level to access this Session”
• You may see this when you try to log on to the CP Server or Web server after the
server has been accessed remotely. Just try again and it will work.
Auditor account cannot save and clear security event log
• to fix: Log on as xAdministrator, use Local Security Policy and change the security
policy user right "User Rights: manage auditing and security log" to specify

Nortel Page 119 of 120
Administrators and Auditors groups. See step 33 of chapter 10 and step 41 of chapter
11 of v1.1 of the P-2006-0227 bulletin.
Nortel Page 120 of 120
References
1. Security Requirements for Cryptographic Modules - FIPS PUB 140-2:
http://csrc.nist.gov/publications/fips/fips140-2/fips1402.pdf
2. Microsoft MSDN resources: MSDN Home->MSDN Library->Win32 and COM
Development->Security->Cryptography
3. Security Policy document for Windows Server 2003 Enhanced Cryptographic
Provider: http://csrc.nist.gov/cryptval/140-1/140sp/140sp382.pdf
4. Web site for standards and related documents: http://csrc.nist.gov/cryptval
5. WINDOWS 2003/XP/2000 ADDENDUM Version 5, Release 1.0 Sept 2005:
http://iase.disa.mil/stigs/stig/windows-2k-xp-2003-addendum-v5r0.3.pdf
6. WINDOWS SERVER 2003 SECURITY CHECKLIST Version 5, Release 1.4 May
2006: http://iase.disa.mil/stigs/checklist/


