Embed Size (px)
Citation preview
Designer's Guide to YardMaster (Versions y2 and y3)AN INTRODUCTION TO YARDMASTER (y2 and y3)
YardMaster y2 is an upgraded subroutine driven system of Freight Forwarding which seeks to improve on the pattern of car movements generated by our original YardMaster subroutines. The earlier YardMaster subroutines and layouts will continue to function as before but if you are a layout designer we would strongly recommend that you use version y2 of YardMaster as the basis for any future layout plans.
YardMaster y3 is an enhancement of y2 which allows you to run your trains in a predefined sequence to simulate a day’s work on your railroad. With YardMaster y3 you can also deliver a car from A to C via B using two trains neither of which is authorised to visit both the point of origin (A) and the final destination (C). The first train can move the car from A to B so that in a later session a different train can pickup the car at B and move it on to C. This is an advanced topic which we will come to later in this document but the initial procedure for setting up a y3 layout is identical to that for a y2 layout. The procedure is to design a y2 layout first and convert it to y3 in an additional step.
YardMaster y2 Layouts are identified by the suffix _y2 in their filename while YardMaster y3 layouts use the suffix _y3. This enables you to distinguish them from the original series of YardMaster layouts which used the _ym suffix.
With YardMaster all car destinations are clearly shown on the car tops and as coded track labels on the layout plan. There is no need to refer to a switchlist, all the operator needs to do is to move the cars which are displaying their labels to the tracks which are displaying identical labels. Only the cars which need to be moved will show a label, once a car is correctly spotted its label will no longer be displayed. Progress is monitored and the number of cars still to be spotted is displayed in a note above the layout window. Any cars obstructing other movements should be moved away temporarily, this will automatically switch on their labels so they can be returned to their original spots.
THE LAYOUT INTRODUCTION AND CAR MONITOR SUBROUTINES
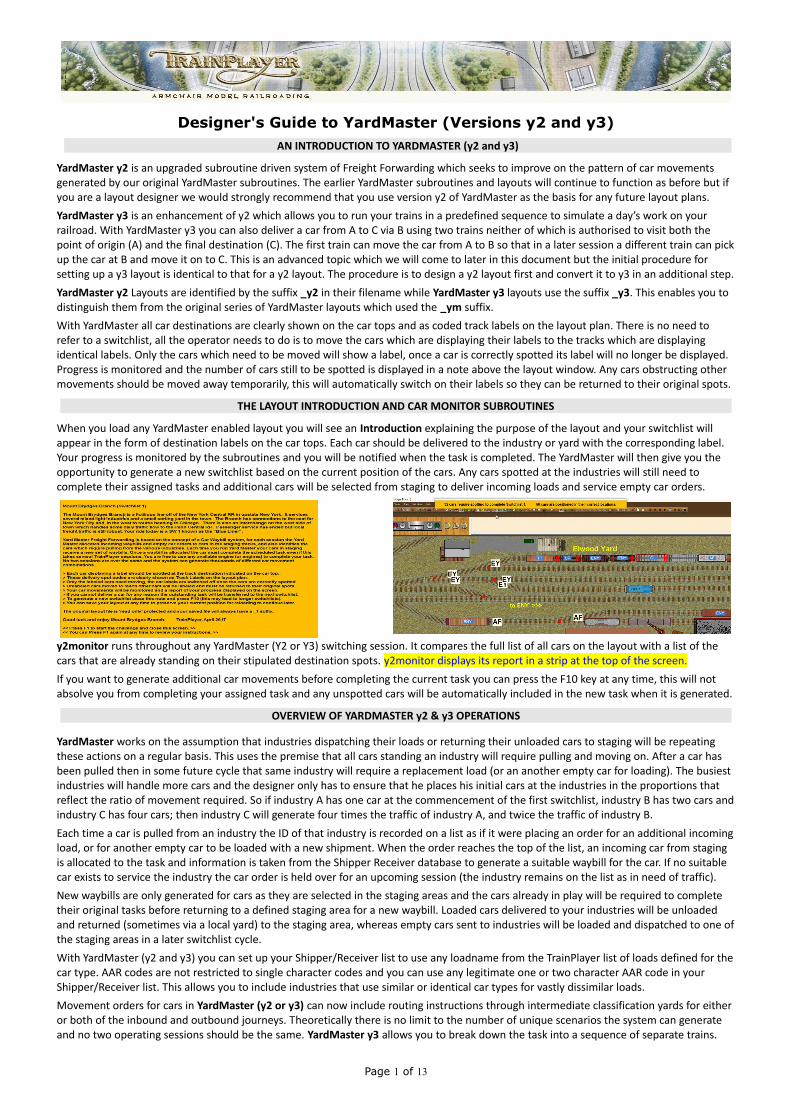
When you load any YardMaster enabled layout you will see an Introduction explaining the purpose of the layout and your switchlist will appear in the form of destination labels on the car tops. Each car should be delivered to the industry or yard with the corresponding label. Your progress is monitored by the subroutines and you will be notified when the task is completed. The YardMaster will then give you the opportunity to generate a new switchlist based on the current position of the cars. Any cars spotted at the industries will still need to complete their assigned tasks and additional cars will be selected from staging to deliver incoming loads and service empty car orders.
y2monitor runs throughout any YardMaster (Y2 or Y3) switching session. It compares the full list of all cars on the layout with a list of the cars that are already standing on their stipulated destination spots. y2monitor displays its report in a strip at the top of the screen.
If you want to generate additional car movements before completing the current task you can press the F10 key at any time, this will not absolve you from completing your assigned task and any unspotted cars will be automatically included in the new task when it is generated.
OVERVIEW OF YARDMASTER y2 & y3 OPERATIONS
YardMaster works on the assumption that industries dispatching their loads or returning their unloaded cars to staging will be repeating these actions on a regular basis. This uses the premise that all cars standing an industry will require pulling and moving on. After a car has been pulled then in some future cycle that same industry will require a replacement load (or an another empty car for loading). The busiest industries will handle more cars and the designer only has to ensure that he places his initial cars at the industries in the proportions that reflect the ratio of movement required. So if industry A has one car at the commencement of the first switchlist, industry B has two cars andindustry C has four cars; then industry C will generate four times the traffic of industry A, and twice the traffic of industry B.
Each time a car is pulled from an industry the ID of that industry is recorded on a list as if it were placing an order for an additional incomingload, or for another empty car to be loaded with a new shipment. When the order reaches the top of the list, an incoming car from staging is allocated to the task and information is taken from the Shipper Receiver database to generate a suitable waybill for the car. If no suitable car exists to service the industry the car order is held over for an upcoming session (the industry remains on the list as in need of traffic).
New waybills are only generated for cars as they are selected in the staging areas and the cars already in play will be required to complete their original tasks before returning to a defined staging area for a new waybill. Loaded cars delivered to your industries will be unloaded and returned (sometimes via a local yard) to the staging area, whereas empty cars sent to industries will be loaded and dispatched to one ofthe staging areas in a later switchlist cycle.
With YardMaster (y2 and y3) you can set up your Shipper/Receiver list to use any loadname from the TrainPlayer list of loads defined for thecar type. AAR codes are not restricted to single character codes and you can use any legitimate one or two character AAR code in your Shipper/Receiver list. This allows you to include industries that use similar or identical car types for vastly dissimilar loads.
Movement orders for cars in YardMaster (y2 or y3) can now include routing instructions through intermediate classification yards for either or both of the inbound and outbound journeys. Theoretically there is no limit to the number of unique scenarios the system can generate and no two operating sessions should be the same. YardMaster y3 allows you to break down the task into a sequence of separate trains.
Page 1 of 13

A Step by Step Guide to setting up your layout for YardMaster y2 or y3
Step 1. - LABEL YOUR INDUSTRIES, YARD TRACKS AND STAGING AREAS
For technical reasons Codes XO and XX must not be used.
Use the track selection tool to highlight one or more tracks to represent a single destination, then right click on one of the highlighted tracks and select Properties from the Context Menu.
Add a simple two or three character alphabetic or alpha numeric code tothe 'Label' field in the top right corner of the Track Properties dialog.
Repeat this procedure for every delivery and pick up spot on your layout.These codes are crucial to YardMaster and each code used should be short enough to also be carried on the top of a car as a destination label.
Each track which is part of the industry must have the same code but it isacceptable to tick the “Hide label” box for some tracks to reduce the number of displayed track labels. In the example on the left only the twoouter labels of the three DC labeled tracks have been left visible. The label code can comprise alphabetical, alpha numeric, or numeric alpha characters; but it cannot be solely numeric.
Step 2. - ADD YOUR MASTER SCRIPT.
Adding the Master Script
[1] Click the Script Central toolbar icon.
[2] Select the Scripts Tab.
[3] Right click in the blank list section and select: 'Add Master Script'.
[4] Type in your Master Script using the illustration text as an example.
[5] Click the Apply button
Note: The Master Script text format differs from that used in YardMaster 1.
Brief explanation of the code used in the Master Script
call stopscript is optional, this prevents scripts running while developing a layout but this first line should be removed before publication.
Call y2start is essential, as are the first three arguments which follow it, 2 3 4. The fourth argument is optional, it can be omitted entirely but if present it must be enclosed in quotes. This represents the name of the layout author and date of its release. If present this information is displayed automatically as part of the Introduction when the layout opens (see Intro image on page 1).
call y2monitor is essential, this starts the y2monitor subroutine which runs continuously until you close the layout. This line must be the very last entry in the Master Script. Any commands placed after this call will not be executed.
Note: This example Master Script should be suitable to copy for all Standard Gauge railroad designs but occasionally for Narrow Gauge designs some additional code may be needed to reduce the text size of track labels or car top labels, when this is necessary you should insert the extra code below the y2start line and above the y2monitor line (see “Modifying the Basic Master Script” on page 8).
Step 3. - ADD THE NOTE FOR THE LAYOUT INTRODUCTION AND THE NOTE FOR DISPLAYING THE TRAIN ORDERS.
[1] Right click in the list section and select 'Add Note'. [2] Type in the text to be displayed at the top of your introductory note.[3] Click the [Apply] button.
Repeat this procedure to add a further note which will be displayed whenever a user presses the F1 key to check his orders for the task.
Note: To prevent unwanted white space in the displayed note you should ensure that you do not include any blank lines or a carriage return character after the end of the text.
Page 2 of 13

Step 4. - ADD A LIST OF INDUSTRIES & CAR TYPES USED FOR RECEIVING AND SHIPPING LOADS (Data used for Waybill Generation).
[1] Right click once again in the list section and select 'Add Note'. [2] Type in ** followed by a title for your Shipper/Receiver information.
Any line commencing with a * is taken to be a comment and is ignored. Lines commencing with a space and blank lines are also ignored.
You should now add data for all industries on your layout, each industrylabel starts at the left margin with a separate line for each car type, if a car type is used for both shipping and receiving there will be at least two lines for that car type (more if different load names are involved).
There should be a minimum of one line for each industry on the layout unless the industry is solely to be used for handling cars with XO flags (uses for XO flagged cars are explained on Page 6). Tracks with labels which are intended only for XO cars can be omitted from the data list.
Each line must comprise seven fields of data with each field separated by a comma. Example: KM,XM,S,Machinery,WC,EY,EY
Kendall Machinery uses XM boxcars to Ship Machinery to West Chicago,both the incoming and outgoing car travels via Elwood Yard.
It is important that there are no duplicated load names for the individual S or R entries relating to the same industry and car type.
The data (left to right) on each line is interpreted by y2 as follows:
1. KM is the Industry that requires the car (as shown on the track plan).
2. XM is the AAR code for the car type. (Two characters or one). Two character codes will only match identically coded cars, single character codes will match any car type which starts with the same code.
3. S = industry ships the named load in this car type R = industry receives the named load in this car type.
4. is the Load Name to be shipped or received by the industry. The load name must be a legitimate TP load name for the specified cartype.
5. is the track label of the staging yard where the car ends its journey. A ~ character here means the car can be dispatched to any staging area.
6. an optional Via destination where the incoming car may be classified. A ~ character means the car travels direct with no intermediate switching.
7. an optional Via destination where the outgoing car may be classified. A ~ character means the car travels direct with no intermediate switching.
6 & 7. A Via destination must be a classification yard but not staging or industry.
Step 5. - CHECK THE MASTER SCRIPT AND ADJUST THE DEFAULT ARGUMENTS IF NECESSARY
Reselect the Master Script to check the arguments on the y2start line.
99% of the time these will already be correct and the 2 3 4 you originally entered will match the numbers for thethree notes in the left column.
If the notes in the left column are anything other than 2, 3 and 4 then you should adjust the arguments in theMaster Script to match them. Then “Apply” the changes.
Step 6. - CALL THE 'Y2AGENT' SUBROUTINE TO GENERATE THE DEFAULT START SITUATION FOR THE LAYOUT.
First ensure you have the YardMaster suite of subroutines installed in your Subroutines tree.Ensure all engines or cabooses are positioned on their usual ready tracks.Open the Script Command Prompt dialog and type in the command: call y2agent 4 (assuming 4 is the ID of the note containing your Shipper/Receiver list – see step 5 above).Follow the prompts to enable the y2agent subroutine to analyze and set up the layout.The y2agent will also automatically "call y2" (the YardMaster) to prepare the first Switchlist.When y2agent is finished you should "Save" the layout to preserve the variable values.
That's it, job done, you can now reload your saved layout (File > "Revert to Saved") and tackle your first Y2 Switching Challenge.
Page 3 of 13

FULL PROCEDURE FOR SETTING UP A YARDMASTER 2 LAYOUT WITH THE Y2AGENT SUBROUTINE
[1] Ensure that the built in scripts are not running by clicking the “Stop All Scripts” button.
[2] Open the Script Command Prompt dialog (SCP).
[3] Type in the command “call y2agent 4” (without the quotes).
This command relates to YardMaster y2 layouts only, the argument 4 refers to the note containing the Shipping/Receiving data for the industry as shown in Step 4 above.
[4] Click the OK button.
For YardMaster y3 layouts the command is different because y3 needs an extra argument to access additional data in a fifth $note field. For y3 the command to use is “call y2agent 4 5” Detailed information can be found in the YardMaster y3 section of this document on Page 9.
When you start the y2agent from the Script Command Prompt (SCP) you will see an introductory screen which is followed by just three Q&A input boxes to gather key data about your layout. Once the third question is answered the layout will be set up automatically.
Here you enter the codes for your Staging yards with a comma separating each code.
There must be at least one staging yard, but you can have 2, 3 or 4 if you wish.
Staging is often (but not always) off stage, all cars start and end their movements in staging.
Cars in staging areas are considered to be elsewhere on the Railroad system, staging yards can also be considered as Divisional Yards or as Interchanges with other railroads. An on stage yardwhich includes TrainPlayer scenery can also be defined as staging if you wish.
The key factor about staging is that all car movements start and end in the staging areas.
Classification yards are optional. You can leave this dialog blank on a small layout which does not include an on stage yard. For layouts with a single classification yard enter the label of the yard here. A large layout may have more than one classification yard and if so the codes should be entered as a comma separated list. In YardMaster the classification yards are never final destinations but they can be used as Via destinations when routing cars through the information in the Shipper / Receiver list.Their main purpose is to provide you with space for blocking and sorting your cars and making up your trains. Cars cannot be loaded or unloaded in classification yards.
The figure you enter here signifies the approximate number of cars to be pulled from your industries in each session. This figure will be adjusted by + / - one car for each switchlist.As YardMaster 2 keeps track of the vacated car spots in an attempt to balance the inbound andoutbound traffic a similar number of cars will also be selected to move onto the layout from the staging areas, to maintain the balance in the first round we would recommend that the figure entered here does not exceed the number of industries which exist on the layout.If there is more than one staging area YardMaster will generate Bridge Traffic between staging yards unless you change the value of the Mode variable from 0 to 1 (see Page 8).
Once the above data has been entered the initialization process should only take a couple of minutes but on very large layouts this may take a little longer.if there are no errors notified you are unlikely to need to run this process again and you will see a prompt to save your layout.After saving, use "Revert to Saved" from the File Menu to start your YardMaster challenge.
If you have not already done so, we recommend that you set the Advanced tab of the Layout Properties dialog to "Open for read only" and resave the layout to protect the values of the variables and preserve the integrity of the first switchlist.This flag will remain in place on the master copy but will be automatically removed from any progressive copies when they are reloaded (Copies which are saved with a _1 suffix) .
WHEN YOU SHOULD (OR NEED NOT) RUN THE Y2AGENT SET UP PROCEDURE
You must run the y2agent setting up procedure:On completion of Steps 1 to 5 detailed on pages 2 and 3 above.After correcting errors highlighted by previously running y2agent.After adding additional cars to the industries or class yards.After adding a completely new car type to any part of the layout.If you make any changes to the SR list or the y3 Schedule list.Remember to resave your layout after running y2agent.
There is no need to run the y2agent again if you:Add new cars (of existing types) to the staging areas only.Add XO flagged cars to the layout and then call y2xo to register them.
Remember to save your layout after making any of the above changes.
Page 4 of 13
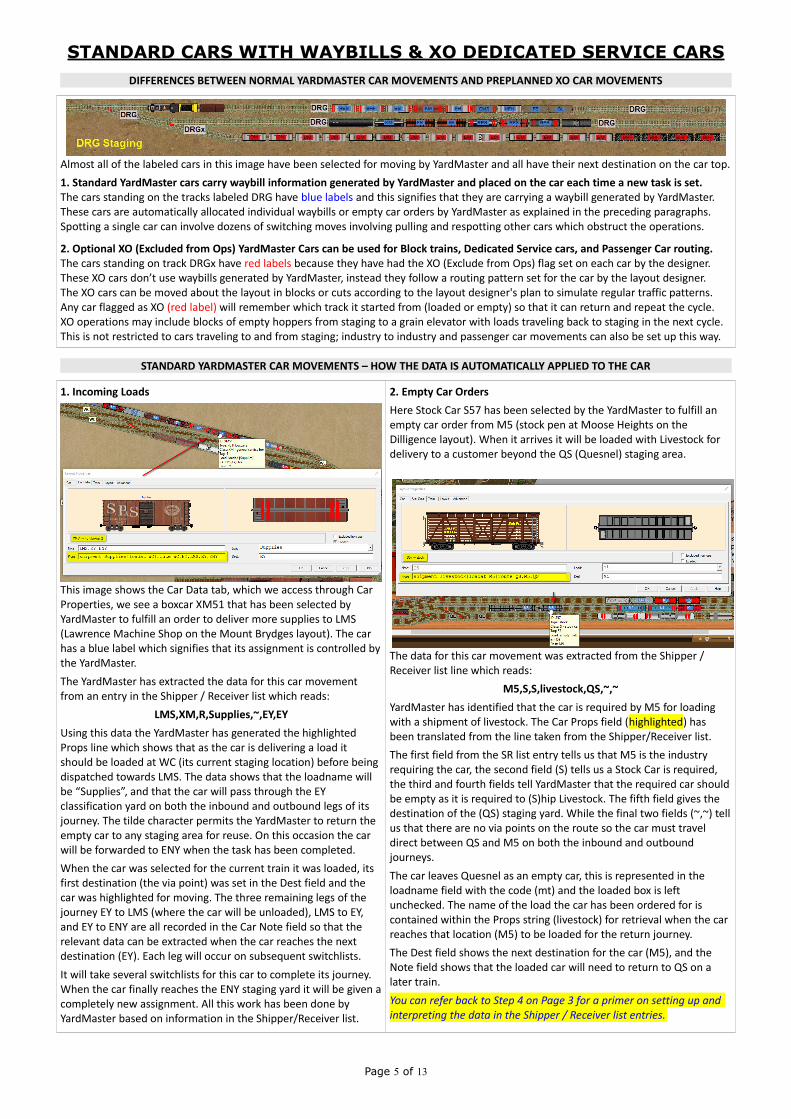
STANDARD CARS WITH WAYBILLS & XO DEDICATED SERVICE CARSDIFFERENCES BETWEEN NORMAL YARDMASTER CAR MOVEMENTS AND PREPLANNED XO CAR MOVEMENTS
Almost all of the labeled cars in this image have been selected for moving by YardMaster and all have their next destination on the car top.
1. Standard YardMaster cars carry waybill information generated by YardMaster and placed on the car each time a new task is set.The cars standing on the tracks labeled DRG have blue labels and this signifies that they are carrying a waybill generated by YardMaster.These cars are automatically allocated individual waybills or empty car orders by YardMaster as explained in the preceding paragraphs.Spotting a single car can involve dozens of switching moves involving pulling and respotting other cars which obstruct the operations.
2. Optional XO (Excluded from Ops) YardMaster Cars can be used for Block trains, Dedicated Service cars, and Passenger Car routing.The cars standing on track DRGx have red labels because they have had the XO (Exclude from Ops) flag set on each car by the designer.These XO cars don’t use waybills generated by YardMaster, instead they follow a routing pattern set for the car by the layout designer.The XO cars can be moved about the layout in blocks or cuts according to the layout designer's plan to simulate regular traffic patterns.Any car flagged as XO (red label) will remember which track it started from (loaded or empty) so that it can return and repeat the cycle.XO operations may include blocks of empty hoppers from staging to a grain elevator with loads traveling back to staging in the next cycle.This is not restricted to cars traveling to and from staging; industry to industry and passenger car movements can also be set up this way.
STANDARD YARDMASTER CAR MOVEMENTS – HOW THE DATA IS AUTOMATICALLY APPLIED TO THE CAR
1. Incoming Loads
This image shows the Car Data tab, which we access through Car Properties, we see a boxcar XM51 that has been selected by YardMaster to fulfill an order to deliver more supplies to LMS (Lawrence Machine Shop on the Mount Brydges layout). The car has a blue label which signifies that its assignment is controlled bythe YardMaster.
The YardMaster has extracted the data for this car movement from an entry in the Shipper / Receiver list which reads:
LMS,XM,R,Supplies,~,EY,EY
Using this data the YardMaster has generated the highlighted Props line which shows that as the car is delivering a load it should be loaded at WC (its current staging location) before being dispatched towards LMS. The data shows that the loadname will be “Supplies”, and that the car will pass through the EY classification yard on both the inbound and outbound legs of its journey. The tilde character permits the YardMaster to return the empty car to any staging area for reuse. On this occasion the car will be forwarded to ENY when the task has been completed.
When the car was selected for the current train it was loaded, its first destination (the via point) was set in the Dest field and the car was highlighted for moving. The three remaining legs of the journey EY to LMS (where the car will be unloaded), LMS to EY, and EY to ENY are all recorded in the Car Note field so that the relevant data can be extracted when the car reaches the next destination (EY). Each leg will occur on subsequent switchlists.
It will take several switchlists for this car to complete its journey. When the car finally reaches the ENY staging yard it will be given acompletely new assignment. All this work has been done by YardMaster based on information in the Shipper/Receiver list.
2. Empty Car Orders
Here Stock Car S57 has been selected by the YardMaster to fulfill an empty car order from M5 (stock pen at Moose Heights on the Dilligence layout). When it arrives it will be loaded with Livestock for delivery to a customer beyond the QS (Quesnel) staging area.
The data for this car movement was extracted from the Shipper / Receiver list line which reads:
M5,S,S,livestock,QS,~,~
YardMaster has identified that the car is required by M5 for loading with a shipment of livestock. The Car Props field (highlighted) has been translated from the line taken from the Shipper/Receiver list.
The first field from the SR list entry tells us that M5 is the industry requiring the car, the second field (S) tells us a Stock Car is required, the third and fourth fields tell YardMaster that the required car shouldbe empty as it is required to (S)hip Livestock. The fifth field gives the destination of the (QS) staging yard. While the final two fields (~,~) tellus that there are no via points on the route so the car must travel direct between QS and M5 on both the inbound and outbound journeys.
The car leaves Quesnel as an empty car, this is represented in the loadname field with the code (mt) and the loaded box is left unchecked. The name of the load the car has been ordered for is contained within the Props string (livestock) for retrieval when the car reaches that location (M5) to be loaded for the return journey.
The Dest field shows the next destination for the car (M5), and the Note field shows that the loaded car will need to return to QS on a later train.
You can refer back to Step 4 on Page 3 for a primer on setting up and interpreting the data in the Shipper / Receiver list entries.
Page 5 of 13

SETTING UP DEDICATED SERVICE CARS FOR XO DIRECTED OPERATIONS
Block Trains and Dedicated Service Cars
The Red Wing Mill at Meafurst ships flour in bulk to customersthroughout the US. You can simulate this type of movementwith a cut of dedicated service cars. These cars will be markedas XO (Excluded from Ops) and they will carry Red labels toshow that they are not affected by any of the WaybillGeneration algorithms which only apply to normal Blue labeledcars.
To set up a cut of XO cars, first connect all cars in the cuttogether, ensure all the cars are of the type required (noengines) and then select just one of the cars. Here we haveselected LO46.
Open the Car Properties dialog, select the Car Data tab and select a loadname for the car from the drop down loads combo list.
Next put a tick in the "Excluded from Ops" box to show that we want to control what happens to this car and that we want to prevent the YardMaster subroutines from modifying our data. Then pause for a minute or two and think about this car.
Initially we want to set the Car Data to reflect the state the car would have been in when it arrived at its current location. In the case of the Red Wing Mill this car is here to be loaded, we want to reflect how it arrived, so we ensure the Loaded box is not checked (had the car been here for unloading we would have needed to check the box).
Whether the car is loaded or not, it needs a loadname (for an empty car this information will be moved by the subroutines later, but we still need to provide it). So we need to select a loadname from the Load combo box. Next we enter the current location of the car as its Destination (RWM in this instance).
Finally we need to enter some data in the Note Field to show how we want the car to move, and where we want to load and unload it. This data is provided in the form of a comma separated list of locations from our layout. It is important to realise that this list is to some extent endless and when the car reaches the last location on the list it will move from there (in a later switchlist) to the location at the front of the list. At any location where we want the car to be loaded we add _L to the entry, and for any location where we want to unloadthe car we add _U The _L and _U suffixes should only be used on the locations in the list in the Note field. They must not be used in the Dest field. If the _L and _U are omitted the car will still be moved but it will not change its load status.
In our example the car will be loaded at RWM then move to ESx to be unloaded then return to RWM to repeat the sequence, making only one of these moves in each switchlist.
There is no need to restrict these moves to two locations and a car could be routed from A to B to C to D to C to B but when it reaches the end of the provided list its next location will always be its point of origin (the first entry, its current location).
That's all we need to enable YardMaster and the y2monitor to control the movements of this car. When we are satisfied the data we have added to our car is correct we can click the Apply button.
However we usually have a large cut of cars that all require the same treatment and it would be very laborious to repeat this process for every car. So with the newly edited car still selected just open the Script Command Prompt dialog and type
in the command call y2xo to imediately copy all the data from the selected car and duplicate it onto every car that is attached to it.
Now would be a good time to save your layout to preserve the new settings for these cars. There is no need to run the y2agent but you should still call y2xo to register your XO edited car even if it is not connected to any other cars.
In addition to copying the data to all cars in the current cut, the y2xo routine makes some changes to the details you entered in the Car Data dialog (on all cars in the cut).
The loadname has been copied into the Props box so it can be used each time the car is loaded. As our example car is not currently loaded the Load has been changed to reflect the fact that the car is currently empty (mt).
When you are ready to run the y2agent subroutine to finally set up the start situation for your layout this Car Data information may be updated again dependent on whether you are running a y2 or y3 YardMaster layout. If the layout a y3 layout the data will not change until a suitable train is running to pick up the car. If the layout is a y2 layout then all the XO cars will move in every switchlist so the data will be immediately updated to set the next destination for the car, and load or unload the car as required.
In the case of our Red Wing Mill example at Meafurst the YardMaster willupdate the Car Data immediately because Meafurst is a y2 layout in whichthe XO cars move on to their next destination in every operating cycle.
If for any reason you need to run the y2agent again it is not necessary torework any of the data on the XO cars once the y2xo subroutine has updatedthem. If the data has changed so that a car is showing a destination label onthe car top different to its current location, the data will be retained and thecar will need to be moved in the first switchlist.
y3 layouts will only update the Car Dest field if the cars are scheduled to bemoved in the first switchlist. Otherwise the change will be deferred until asuitable train is running which will visit the car location and its destination.
Page 6 of 13

EXTENDING THE XO DIRECTED OPS SYSTEM
Engines with fixed storage spots.
You may have XO cars on your layout that you don’t want to move atall, YardMaster and y2agent automatically apply an XO flag to all engines and cabooses found on a layout.
Here we have an engine marked as “Excluded from Ops”, it is placed on track EHs (Engine House) and both the Note field and the Dest field in the car props box have been marked with this location.
This results in the car never being selected because it is already located in its stipulated spot. However if you move this engine off spot to use it in your switching, it will be selected and labeled to ensure that you return it to the Engine House when you are done.
You are not confined to a single location in the Note field and if you use two locations with a comma between them the engine will shuttle from one location to the other on alternate switchlists.
Idler cars with fixed storage spots.
This same technique can be used to place idler flat cars on a labeled track adjacent to a car ferry. The idler cars must be marked as XO and the label of the storage track must appear in both the car Note and Dest fields of the Car Data tab under Layout Properties.
This car (FM1) was located in the yard (Y) when the layout was originally set up. Setting the car as XO and placing the label for the yard Y in the Dest field and the Note field we ensured that when thecar is removed from the yard to service the ferry its label switches on so we are reminded to respot it in the yard when we are done.
Quick turnround for "Routed" Passenger and Freight Cars.
On the previous page we saw how to set up a route for an XO freightcar or a block of XO freight cars. Cars set up in this way will only move along their route by one location in each switchlist cycle.
If we were to apply this same principle to the Combine standing in our coach siding at Farmington on the "Maine Scenic Route"
F_L,S,P,M,D,R,RL,R,D,M,P,S,F_U,FCS,F_L,S,Z,K,Z,S,F_U,FCS
It would take 22 switchlist cycles for the Combine to make one round trip to Rangeley Lake (RL) and one round trip to Kingfield (K). This would be unacceptable as we need to do this in two Ops cycles.
By placing ]] markers in the list (between commas) at each point where we want the car to finally stop and wait for another switchlistto be generated we can force the destination on the car top to change automatically to the next destination in the list as the car arrives at each intermediate location.
F_L,S,P,M,D,R,RL,R,D,M,P,S,F_U,FCS,]],F_L,S,Z,K,Z,S,F_U,FCS,]]
If YardMaster detects the existence of ]] characters within any XO car listed route it will automatically advance the destination to the next location on the route as each labeled spot is reached.
Then when it reaches the location which precedes the ]] marker the run ends and the car is finally considered to have been spotted. Its label will then remain hidden until the next switchlist is generated.
So our car on the "Maine Scenic Route" will be selected and sent to Farmington (F) for loading (passengers). As soon as it gets there the next destination will be set for Strong (S) and this process will continue all in the same switchlist until the car returns to Farmington, is unloaded, and returned to the FCS coach siding where it will stop -- because the code following FCS is a ]]
When a new switchlist is generated this car will be reactivated and follow a similar process for the next round trip to Kingfield.
In this second example the box car at Lincoln L2 on the Elkhart y3 plan will remain at L2 until a train is selected which visits both L2 and Howland H1 when the car will be selected and its destination changed to H1, when it reaches H1 it will be immediately forwardedto E9 where the run will terminate and the car will be deselected and held until a suitable train is returning in the other direction.
HINTS FOR INITIAL DISTRIBUTION OF YARDMASTER CARS
As a rule of thumb when setting up a new YardMaster layout each staging yard should start with a minimum of one and a half times the number and type of standard (blue label) cars indicated for pulling from the industries in each cycle. This is because each staging yard must be capable of fulfilling the loaded car and empty car orders received from the industries.
Staging yards should have enough empty tracks to accept the cars pulled from the industries plus any Bridge Traffic and any XO Block Train movements. Classification Yards should have very few cars placed in them at the design stage as this space will be needed for processing the switchlists. Class yards will need more space on layouts where the Shipper / Receiver list routes its cars through the yard as this will leave cars sitting in the yard between switchlists. Industries should have sufficient extra space to handle any XO cars directed to them.
To avoid overloading industries, each Industry should have at least one vacant spot available to accept an inbound car. Industry spots which are intended to handle only a single car should be left vacant to allow them to accept an incoming car allocated by the YardMaster.
Page 7 of 13

ADVANCED TOPICSMODIFYING THE BASIC MASTER SCRIPT
The suggested Master Script which uses only two subroutine calls will normally beall that is needed for a layout representing a standard gauge prototype. However there may be times when you want to modify some of the basic settings. For example, you might want to change the basic crash settings to allow trains to bounce rather than crash, or change the size of text used on the car tops or track labels. Perhaps you want to disable hand drag, or set and display the system clock.If you are familiar with the TrainPlayer Scripting Language you can achieve any of this by inserting additional script code (or a call to a subroutine containing your code) between the two lines shown in the example on the left.If you place your code above the y2start line it will be overwritten by the y2start procedures, and if you place it after the y2monitor line it will not be executed.
YARDMASTER MODE VARIABLE
If more than one staging yard has been defined then YardMaster can operate in either one of two different modes. The default is Mode 0 and the layout will be automaticallyset up to use this mode.
In Mode 0 the cars being pulled from the industries will be dispatched to a different staging yard than the one supplying the incoming cars to the layout. This allows simulation of East to West traffic patterns and vice versa. The YardMaster will also generate Bridge Traffic between the “startfrom” staging and the “finishat” staging in this situation.
The alternative Mode 1 ensures that cars being pulled from industries are the cars destined for the staging yard which supplied the inbound cars. This allows you to simulate “Turn” trains; staging to layout, or layout to staging. In Mode 1 there is no Bridge Traffic. The staging yard used for each session alternates if there are two stagingareas, or cycles through them in turn if more than two.
Changing the Mode variable value will have no effect if there is only one staging area.
You can also change the value of the Mode variable from the Script Command Prompt dialog by typing in the command: let mode = 1 and thenresaving the layout.
TWEAKING THE PATTERN OF CAR MOVEMENTS BY EDITING THE CONTROL VARIABLES
Tstaging and Tsequence
A layout only needs one staging track but there can be more to allow Bridge Traffic between staging areas. Changing the sequence of the track labels in the Tstaging variable will change the sequence of the movement of the cars or trains on those tracks.
Adding a second occurrence of a track label in this list increases the frequency of use of that staging area in relation to the others.
Tsequence retains the original setting for Tstaging in case you findit necessary to rerun the y2agent set up procedure.
Ncarstopull
If you want to modify the number of cars being selected for each session, you can change the value of Ncarstopull in the Script Central Variables list.
This signifies the number of cars (+/- one car) that will be selected for pulling from the industries in each switchlist session, it also indirectly affects the number of cars selected in staging to come onto the layout so modifying this value should change the number of cars to move by approximately twice as much as the increase or decrease.
The change will not be effective until the next switchlist is generated.
SETTING AN ENGINE PULLVALUE
YardMaster y2 and y3 allow you to increase or decrease the pulling power of individual engines. The PullValue (one word) is simply the number of cars the engine can haul, this isnot very sophisticated and takes no account of whether the cars are loaded or unloaded. If no value is set the engine will be assumed capable of hauling 50 cars.
If an engine attempts to move more than its stipulated PullValue the y2monitor routine will stop the train and request that you set down some cars or add another engine.
You can set the value for any individual engine by typing it directly into the Car Data Propsbox (see illustration). If you have several engines requiring a PullValue you can use the utility y2loco which is called from the Script Command Prompt "call y2loco".
Remember to save your layout to lock the Pull Values into each engine's Props string.
Page 8 of 13

KEYBOARD MONITORING
In addition to tracking the positions of the cars and identifying which cars are correctly spotted, the y2monitor subroutine is also continuously monitoring to detect if the user has pressed any keys to initiate specific actions.
There are four such keys that can currently be detected if they are pressed:[F1] used when a task is in progress interrupts the task and displays your Train Orders to remind you of the purpose of your current task.[F1] used when a task has been completed updates the destinations for cars already on route and selects new inbound cars from staging.[F3] used when a task is in progress displays a Switchlist to identify the locations and destinations for the remaining unspotted cars.[F10] used when the task is in progress increases the switchlist by selecting more inbound cars from staging and pulls from industries.[Backspace] will flip the direction of a selected train but only if it is located in a staging area. The effect is the same as if you picked it up andturned it around to face the other way. This key has no effect outside the staging areas.
AN INTRODUCTION TO YARDMASTER VERSION Y3KEY DIFFERENCES BETWEEN Y2 AND Y3 LAYOUTS
Advantages of y2 layout designs.Best suited to shelf or room size layouts with no separate branches.Usually (but not always) best for layouts with only a single engine.Newly generated switchlists always start and end in a staging area.Incoming cars travel from staging to industry (can be via yard).Outgoing cars travel from industry to staging (can be via yard).Start and End staging area can be same staging yard or different.Cars to pull will always be destined for the End At staging yard.Cars can be routed direct between staging and industries.Cars can be routed via local yards in either or both directions.The staging areas are always used in a predefined sequence.
Advantages of y3 layout designs.Retains all the advantages of a y2 design without the shortcomings.Best suited to room or club size layouts with choice of routes.Cars for same locality can be split for handling by Pedlar or Hot Shot.Sessions can start and end in predefined staging or in local yards.Sessions can be confined to work between local yard and industries.Sessions can move XO blocks from one staging area to another.Sessions can start in local yards and not visit any staging areas.Sessions can be filtered to prevent visits to specified industries.Sessions can be confined to selecting and moving XO cars only.Sessions can leave XO blocks of cars behind for a later train.Cars can be moved from A to C via B using different trains.
Shortcomings of y2 layout designs.Work cannot be split up into separate tasks for separate trains.All switchlists must generate new inbound and outbound traffic.Passenger trains cannot be separated from freight train movements.All industries are used as potential destinations in every sesion.All industries are used as possible sources to supply cars for pulling.Unable to prevent diversions to industries on separate branch lines.All XO designated cars must be moved in every switchlist cycle.
S hortcomings of y3 layout desi gns.A little more complicated to set up compared to the y2 system.I'm sure we'll think of something else which requires a y4 later. :-)
SETTING UP THE TRAIN SEQUENCE FOR A Y3 LAYOUT
Introducing the Train Sequence
A y3 layout is initially set up in exactly the same way as a y2 layout.
See Pages 2 and 3 of this document, Steps 1 to 4.
Step 1. Label your Industries, Classification Yards and Staging areas.Step 2. Open Script Central and add your Master Script.Step 3. Add the notes for the Layout Introduction and the Train Orders.Step 4. Add a list of Industries and Car Codes which receive and ship loads.
Right click in the list view and select 'Add Note' to create a new note for your Train Sequence data. See the above illustration and detailed data analysis in the adjoining panel (right).
When you are satisfied with your new Sequence Data you can complete the setting up process in the same way as for a y2 layout.
See Pages 2 and 3 of this document, Steps 5 and 6.
Step 5. Check the master script and adjust the default arguments.Step 6. Call the 'y2agent' to create the default start position for the layout.
Note: As we have an additional Note for the Train Sequence the syntax differs from that on Page 3 and requires two arguments. call y2agent 4 5
Brief summary of what the Train Sequence represents.
Lines commencing with * are comments which will be ignored by YardMaster. Blank lines are also ignored.
Each of the other lines represent a single train, or task, the top line will be the first train to run and the others will followin sequence each time a new Switchlist is generated.
When the last train has run the sequence will start again withthe first train.
Each line comprises a sequence of codes which are separatedby commas.
The first entry on any line is an ID descriptor for the train.
The second entry on a line must either be a Staging Yard or a Classification Yard code. If it is a Staging Yard it will be used as the source for any inbound cars joining the layout. If it is a Classification Yard there will be no new cars joining the layout in the upcoming session.
The third entry on a line should be a Staging Yard or a Classification Yard. If it is a Staging Yard then only cars destined for that yard will be pulled from the industries and Yards. If it is a Classification Yard then only cars routed to travel through that yard will be pulled from the industries.
The remaining entries can only be Industries or Classification Yards. For any car to be selected both its current location andits destination must be included in the list
Page 9 of 13

UNDERSTANDING THE DATA TO ENTER IN THE Y3 TRAIN SEQUENCE LIST
Packers Bay Example
** Express Freight to Chicago (First train to run)CHX,MY,CY,MYx,CYx,2GG,3AC,XXCHX The train IDMY Staging supplying inbound cars.CY....Staging receiving pulled cars from Industries.Myx XO track positioned to supply inbound XO cars.Cyx XO track positioned to receive outbound XO cars.2GG Industry track to receive and dispatch XO cars.3AC...Industry track to receive and dispatch XO cars.XX Special code, forces Y2 to check all industries
Only XO Block Trains and Bridge Traffic will be moved by this train.
The XO closed hoppers at MYx are routed like this:2GG_L,CYx_U,MYx
As the current position(MYx) and the destination (2GG) are both included in the Sequence List for this first train they will be selected for delivery, as will the similar rake for 3AC.Note 1: As the location receiving cars and the location supplying cars are both Staging Yards, this will also generate Bridge Traffic.
Note 2: Although MY could supply inbound cars and CY could receiveoutbound cars it will not do so because there are no industries in thislist that are also listed in the Shipper and Receiver list [$note(4)]
Note 3: The only industries receiving and dispatching cars will be 2GG and 3AC and these are restricted to handling only XO traffic because their codes do not appear in the Shipper Receiver list.
** Express Freight to Minneapolis (Third train to run)MNX,CY,MY,MYx,CYx,XXMNX The train IDCY Staging supplying inbound cars.MY....Staging receiving cars pulled from Industries.Myx XO track positioned to supply inbound XO cars.Cyx XO track positioned to receive outbound XO cars.XX Special code, forces Y2 to check all industries
Only XO Block Trains and Bridge Traffic will be moved by this train.
Note 1: As the CY location supplying cars and MY location receiving cars are both Staging Yards, this will generate Bridge Traffic for MY.
Note 2: XO block traffic will move from Cyx to Myx as both locations are included on this list. (XO cars need both their current position and their destination to be in this list in order to be selected).
There will be no waybills generated for regular traffic because their are no industries in this list other than those dedicated to XO traffic.
When this train runs we have XO cars standing at 2GG and 3AC destined for Cyx but these cars will not be selected because their locations are not listed in the Sequence line and the train is traveling in the wrong direction. However theXO cars at CYx will be selected for delivery to Myx because both of these locations are included in the Sequence List.
** Westbound Pedlar Turn from BY to MY (Second train to run)pedlar,MY,MY,BY,TT,1BW,2GG,3AC,4AO,5ES,EHpedlar The train IDMY Staging Yard supplying inbound cars. See note below.MY....Staging Yard receiving pulled cars from Industries.BY....Class Yard exchanging cars with staging and industries.TT....]1BW ] List of industries authorised to dispatch or receive2GG ] cars direct from staging in this switchlist cycle.3AC ]4AO ] All other industries not on this list will dispatch and5ES ] receive cars via the BY yard as per the SR list entries.EH ]
** Eastbound Pedlar Turn from BY to MY (Fourth train to run)pedlar,CY,CY,BY,6MCS,7HM,8AL,9LS,10MT,BWP1,BWP2,BWP3,BWP5,BWP4pedlar The train IDCY Staging Yard supplying inbound cars. See note below.CY....Staging Yard receiving pulled cars from Industries.BY....Class Yard exchanging cars with staging and industries.6MCS ]7HM ] List of industries authorised to dispatch or receive8AL ] cars direct from staging in this switchlist cycle.9LS ]10MT ] All other industries not on this list will dispatch andBWP1 ] receive cars via the BY yard as per the SR list entries.BWP2 ] BWP3 ] Note: When the staging supplying the inbound cars is the same as the stagingBWP5 ] receiving the pulled cars you can run the Turn Train from either the stagingBWP4 ] area or the local yard. In this case MY>BY>MY or BY>MY>BY
There will be no XO traffic on either of these Pedlar trains as none of the listed locations will contain or accept XO cars. The switchlists generated will be based on entries in the SR list. Some movements will be direct between staging and industry, while others will be between staging and yard, yard and industry, industry and yard, and yard back to staging. This requires careful choreography between SR list and Train Sequence but can produce very realistic operating patterns.
Example of how the SR list is set out for some of the Gondolas:TT,GB,R,tarp,CY,BY,BYTT,GB,S,covered load,CY,BY,BY5ES,GB,S,scrap,CY,BY,BY5ES,GB,R,mixed load,CY,BY,BYTT,GB,R,tarp,MY,~,~TT,GB,S,covered load,MY,~,~5ES,GB,S,scrap,MY,~,~5ES,GB,R,mixed load,MY,~,~
Cars traveling to and from TT or 5ES, will travel direct on inbound or outbound journeys when connecting to MY staging, but will be routed via BY yard when connecting with CY staging. This is because Pedlar connecting with CY is not authorised to visit either TT or 5ES but the Pedar working to and from MY does visit both of these industries.
7HM,GB,R,ingots,CY,~,~7HM,GB,S,mixed load,CY,~,~BWP2,GBH,R,pulpwood,CY,~,~7HM,GB,R,ingots,MY,BY,BY7HM,GB,S,mixed load,MY,BY,BYBWP2,GBH,R,pulpwood,MY,BY,BY
Cars for 7HM and all BWP destinations are visited by the Pedlar turning at CY, but as they are not serviced by the MY Pedlar all cars to these locations from MY are routed via the BY yard.
A FURTHER Y3 EXAMPLE
There are four trains in the Sequence at Ajax Junction:43,NYC,Y,Y Staging to Class Yard44,Y,NYC,EP,FM,SS,DP,BL,AC,EFM Yard & Industries to Staging401,PRR,Y,Y Staging to Class Yard402,Y,PRR,NF,OBS,PFF,QS,RB,MP,LT,EFM Yard & Industries to Staging
Incoming trains from NYC terminate in the Ajax Yard.Outbound trains to NYC switch the Southside industries first, taking pulls to NYC and setting out pulls for the PRR in the Ajax Yard.Incoming trains from PRR terminate in the Ajax Yard.Outbound trains to PRR switch the Northside industries first, taking pulls to PRR and setting out pulls for NYC in the Ajax Yard.
One example car of each type as it appears in the SR list.
** Southside industry cars to and from NYCAC,LO,S,phosphates,NYC,Y,~ Inbound via yard, Outbound direct.
** Southside industry cars to and from PRRAC,LO,S,phosphates,PRR,Y,Y Inbound & Outbound both via Yard.
** Northside industry cars to and from PRRLT,XM,R,supplies,PRR,Y,~ Inbound via yard, Outbound direct.
** Northside industry cars to and from NYCLT,XM,R,supplies,NYC,Y,Y Inbound & Outbound both via Yard
Page 10 of 13

THE RELATIONSHIP BETWEEN THE SR LIST AND THE TRAIN SCHEDULE
There are three trains in the sequence at Ffarquhar:Quarry Turn,KY,KY,AQ,AQb,XOPassenger,KY,KY,EP,FP,XODaily Goods,KY,KY,Aqg,FO,FC,FE,FG,FH,FL,ED,EL,EG,EC
All entries in the SR List are similar to these two examples:FG,X,S,goods,~,~,~ There are no class yards so thereFG,X,R,supplies,~,~,~ are no Via destinations in the list.
Analysing the data:
This layout has only one Staging Yard (KY) and no Classification Yards
The Quarry Turn provides inbound cars at KY staging, and returns pulled cars to KY staging. The train is authorised to set down and pull cars from the AQ industry, and also the AQb track which is set up to reroute the XO brake van back to staging. The special code XO in the Sequence line for this train tells the YardMaster not to generate waybills for these industries as these trains will only handle XO blocks.
The Passenger train starts and ends at KY, it is authorised to visit the stations at EP and FP, and comprises three XO flagged coaches. It has a route which will update the destination as each via point is reached. KY,]],EP,FP,EP See Page 7 for how to set up "Routed Cars".
The Daily Goods generates waybills for inbound cars from KY, it is authorised to deliver and pull cars at all the industries, and to return the pulled cars to KY staging. In addition to this traffic the train also exchanges two rakes of XO milk tankers at the ED dairy.
The y3 version of the "Maine Scenic Route" has one Staging Yard and five Classification Yards, there are 27 industries.To move a car from the Staging Yard Interchange at Farmington (FX) to Carrabassett Team Track (CT) requires two trains because there are no direct trains between Farmington and any Industry beyond Kingfield. To reach Carrabassett our car has to travel on the Kingfield Turn from Farmington to Kingfield Junction where it ends the first part of its journey to await the Bigelow Pedlar which runs from Kingfield.
The entries in the Shipper Receiver list for all the Industries on the Bigelow Branch look like these examples:BS,X,S,lumber,~,KJ,KJCF,X,R,food,~,KJ,KJCT,F,R,crated load,~,KJ,KJ
The via destination (KJ) is needed on all loads intended for Industries at Bigelowand Carrabassett because none of these industries are serviced by a direct trainfrom Farmington (FX). To demonstrate how these cars are delivered over twoswitchlist cycles we will follow the progress of a single Flat Car between theinterchange (staging) at Farmington (FX) and the Team Track at Carrabassett (CT).
The Train Schedule for the "Maine Scenic Route" looks like this:Rangeley Turn,FX,FX,PW,PE,DF,DT,RT,RF,RE,MT,M,MF,MP,MB,SS,ST,SF,RL,GF,FF,PP,P,D,R,F,S,FE,FC,FM,PF,PM,PT,PY,RY,SY,FCSKingfield Turn,FX,FX,KT,KS,K,KJ,KE,KY,S,SW,SS,ZT,Z,ST,SF,SY,ZM,FF,F,FE,FC,FM,FCS,XXBigelow Pedlar,KJ,KJ,CT,CF,C,KT,KS,K,KP,KY,BF,B,BT,BE,BS,CP,KJ,KE,BY
On the completion of the first train / switchlist, and after generating the new switchlist for the Kingfield Turn we find that our example car (FM185) at Farmington has been selected to fulfil an order to deliver a "crated load" to Carrabasset Team Track via Kingfield Junction.
YardMaster y3 was only able to select this car and allocate a waybill to fulfil this order from CT because. > Its current staging location FX is the staging yard designated to supply cars for the Kingfield Turn.> The Kingfield Turn data includes the code XX. This is a special code which allows the train to check cars for destinations it is not visiting.> The CT destination can only be selected for FM185 because the SR list entry for CT,F includes KJ and KJ is also present in the train data.
Had any of these conditions been false, the car would not be selected. The data for the train in the sequence list must include both the current position of the car and the via destination, and the SR list entry for the industry and car type must also include the via destination. Furthermore the line in the Sequence list must include the special code XX if the final destination of the car is not included.
In this instance we can't include CT in the Sequence data for this train or YardMaster y3 would be able to highlight cars in CT for it to pull and return to FX. It would then need to leave its route to complete its switchlist (formerly a disadvantage when using y2 on a large layout).
Once the car (FM185) is selected its Props string is generated from the data in the SR list: shipment=crated load|loadat=FX|route=FX,KJ,CT,KJ,FX
Once the Switchlist for the "Kingfield Turn" has been completed we will find FM185 at Kingfield Junction, with its label off because the firstleg of the journey has been completed. Generating the next switchlist will set up the cars for the "Bigelow Pedlar" which runs between Kingfield and Bigelow, via Carrabassett. This train will be tasked to move FM185 on the next leg of its journey.
The "Bigelow Pedlar" will move FM185 to Carrabassett Team Track (CT) for unloading where it will wait for a later "Bigelow Pedlar" to Pull it and return it to Kingfield Junction (KJ).
On arrival at Kingfield Junction the empty car will wait for a train to Farmington (FX). When the next "Kingfield Turn" operates it will be tasked to pull FM185 from KJ and return it to Farmington (FX).
If you have any questions about YardMaster feel free to put us to the test on the TrainPlayer web forum.Once again I would like to thank Bruno for his support and his enthusiasm in developing new layouts for the YardMaster subroutine system.
Any errors in the way these subroutines interpret the prototypical practices are all mine.
With special thanks to Jim Dill for giving us the TrainPlayer Programming Language and for providing the additional tools we needed for the project.
Richard Fletcher, October 2017.
Page 11 of 13

Appendix A – Setting Up the Y3 “Train Sequence” DataThe data provided for any individual train should be a comma delimited list starting with the Train ID (name or code), followed by a list of Track ID Labels from the layout. The first two of these labels must be either a Staging Yard, a Classification Yard, or a track used by XO cars only (if the train only handles XO cars). The remaining track labels in the list can be either Industries or Classification Yards (they must not be Staging Yards). In addition these remaining labels can also include two special codes, XO and XX the purpose of which will be explained in the examples below.
In the following reference table we have used the abbreviation SY for Staging Yard, CY for Classification Yard and IN for Industry.Train Name and Codes as used in Sequence List (Substitute your own codes) Details of how the train will operate
A-Train,SY1,SY2,CY1,IN1,IN2,IN3,IN4,IN5,IN6,IN7,IN8,IN9> Layout must have more than one Staging Yard and at least one Class Yard.> CY1 can appear in any position in this list after the two Staging Yards.> An engine must be in (or adjacent to) SY1 with its note set to SY1,SY2 so it can be returned on a later train operating in the other direction.> To return the engine to SY1 operate a similar train in the other direction: Z-Train,SY2,SY1,CY1,IN1,IN2,IN3,IN4,IN5,IN6,IN7,IN8,IN9
Runs from SY1 to SY2 in a single direction only.> Train cannot be returned to SY1 in this switchlist cycle.> SY1 will supply inbound cars for the listed industries> SY2 will receive the outbound cars pulled from the listed Industries.> Train will also service CY1 for both inbound and outbound traffic.> Train will also carry Bridge Traffic from SY1 to SY2.> Cars routed via the CY1 yard in the SRlist will use this as a via destination.> XO cars will be moved if both their current spot and destination are listed.
B-Train,SY1,SY2,IN1,IN2,IN3,IN4,IN5,IN6,IN7,IN8,IN9> Layout must have more than one Staging Yard. > It need not include a Classification Yard as this train will not select CY cars.> An engine must be available in (or adjacent to) SY1 with its note showing SY1,SY2 so it can be returned by a train operating in the other direction.
Runs from SY1 to SY2 in a single direction only.> Train cannot be returned to SY1 in this switchlist cycle.> SY1 will supply inbound cars for the listed industries> SY2 will receive the outbound cars pulled from the listed Industries.> Train will not service any Classification Yards (if there are any).> Train will also carry Bridge Traffic from SY1 to SY2.> Any cars routed via a Classification Yard in the SRlist will not be selected.> XO cars will be moved if both their current spot and destination are listed.
C-Train,SY1,SY1,CY1,IN1,IN2,IN3,IN4,IN5,IN6,IN7,IN8,IN9> Layout must have one or more staging yards (this train type uses only one).> Layout must have at least one Classification Yard.
Operates as a Turn from SY1 to CY1 returning to SY1.> Alternatively operates as a Turn CY1 to SY1 returning to CY1.> SY1 will supply inbound cars for the listed industries> SY1 will also receive outbound cars pulled from the listed industries.> Train will also service CY1 for both inbound and outbound traffic.> There will be no Bridge Traffic.> XO cars will be moved if both their current spot and destination are listed.
D-Train,SY1,SY1,IN1,IN2,IN3,IN4,IN5,IN6,IN7,IN8,IN9> Layout must have one or more staging yards (this train type uses only one).> Layout does not need a Classification Yard as this train does not visit one.
Operates as a Turn from SY1 to the listed industries returning to SY1.> Or can operate as a Turn from an industry to SY1 returning to the industry.> SY1 will supply inbound cars for the listed industries> SY1 will also receive outbound cars pulled from the listed industries.> Train will not service any Classification Yards (if there are any).> There will be no Bridge Traffic.> XO cars will be moved if both their current spot and destination are listed.
E-Train,SY1,SY2,CY1> Layout must have more than one Staging Yard and at least one Class Yard.> There should be no industries included in the list.> Trains run through as Hot Shots, stopping only to service the Class Yard.> All industries in the SR list will be checked for cars routed via the CY1 yard.> The XX code is not needed provided that there are no industries listed.> An engine must be available in (or adjacent to) SY1 with its note showing SY1,SY2 so it can be returned by a train operating in the other direction.Requires a later local train to distribute the cars from CY1 yard – see 'I-Train'.
Operates as a through train from SY1 to SY2 in a single direction only.> Train cannot be returned to SY1 in this switchlist cycle.> Train will not service any Industries> Train calls at CY1 to set down cars from SY1 and pick up cars for SY2.> SY1 will supply inbound cars only if they are routed via CY1 in the SRlist.> SY2 will receive cars from CY1 only if routed via CY1 in the SRlist.> Cars for industries not routed via CY1 in the SRlist will not be selected.> Train will also carry Bridge Traffic from SY1 to SY2.> XO cars will be moved if both their current spot and destination are listed.
F-Train,SY1,SY1,CY1> Layout must have one or more staging yards (this train type uses only one).> Layout must have at least one Classification Yard.> All industries in the SR list will be checked for cars routed via the CY1 yard.> The XX code is not needed provided that there are no industries listed.Requires a later local train to distribute the cars from CY1 yard – see 'I-Train'.
Operates as a Turn between SY1 and CY1, returning to SY1.> Same code can operate as a Turn between CY1 and SY1, returning to CY1> Train will not service any Industries> Cars for industries not routed via CY1 in the SRlist will not be selected.> There will be no Bridge Traffic.> XO cars will be moved if both their current spot and destination are listed.
G-Train,SY1,SY2,CY1,IN1,IN2,XX> Layout must have more than one Staging Yard and at least one Class Yard.> Trains stop only to service the Classifation Yard and the listed industries.> If the XX is present all industries will be checked for traffic routed via CY1.> If the XX is absent only industries listed will be checked for traffic via CY1.
Requires a later local train to distribute the cars from CY1 yard – see 'I-Train'.
Operates as a through train from SY1 to SY2 in a single direction only.> Stops at CY1 to set down cars from SY1 and pick up cars for SY2.> SY1 will supply inbound cars to listed industries without via destinations.> SY1 will supply inbound cars to CY1 if the SRlist routes them that way.> SY2 will receive cars pulled from listed industries if they have no via dest.> SY2 will receive cars destined to SY2 only if they are standing in CY1.> Train cannot return to SY1 in this switchlist cycle.> Train will also carry Bridge Traffic between SY1 and SY2.> XO cars will be moved if their current spot and destination are both listed.
H-Train,SY1,SY1,CY1,IN3,IN4,XX> Layout must have one or more staging yards (this train type uses only one).> Layout must have at least one Classification Yard.> If the XX is present all industries will be checked for traffic routed via CY1.> If the XX is absent only industries listed will be checked for traffic via CY1.
Requires a later local train to distribute the cars from CY1 yard – see 'I-Train'.
Operates as a Turn between SY1 and CY1, returning to SY1.> Same code can operate as a Turn between CY1 and SY1, returning to CY1> SY1 will supply inbound cars to listed industries without via destinations.> SY1 will supply inbound cars to CY1 if the SRlist routes them that way.> SY1 will receive cars pulled from listed industries if they have no via dest.> SY1 will receive cars destined to SY2 only if they are standing in CY1.> There will be no Bridge Traffic.> XO cars will be moved if both their current spot and destination are listed.
Page 12 of 13

I-Train,CY1,CY1,IN1,IN2,IN3,IN4,IN5,IN6,IN7,IN8,IN9> You will need at least one of these trains if your incoming cars have been moved to a Class Yard from Staging by any E, F, G-or H Train listed above.> Using more than one of this train type lets you divide up the workload.> One train can service industries to the West of your Classification Yard:
X-Train,CY1,CY1,IN1,IN2,IN3,IN4> While another train can service industries to the East of the Yard.
X-Train,CY1,CY1,IN5,IN6,IN7,IN8,IN9
Operates as a Local Pedlar between CY1 and the listed Industries.> Does not generate any inbound traffic from staging.> Does not generate any outbound traffic to staging.> Only pulls cars from industries which are destined for stipulated yard (CY1)> Also moves XO cars if their current spot and destination are both listed.
J-Train,SY1,CY1,IN1,IN2,IN3,IN4,IN5,IN6,IN7,IN8,IN9> Layout must have one or more staging yards (this train type uses only one).> Layout must have at least one Classification Yard.> Should be used with care, can upset the inbound/outbound car balance.> If used a matching train of type K (below) should be used for balance.
Operates as a local train traveling between SY1 and CY1 >. Can also operate as a Turn from CY1 to SY1 and back to CY1.> SY1 will supply inbound cars for the listed industries> No outbound traffic will be generated for staging in this switchlist.> Also moves XO cars if their current spot and destination are both listed.
K-Train,CY1,SY1,IN1,IN2,IN3,IN4,IN5,IN6,IN7,IN8,IN9> Layout must have one or more staging yards (this train type uses only one).> Layout must have at least one Classification Yard.> Should be used with care, can upset the inbound/outbound car balance.> If used a matching train of type J (above) should be used for balance.
Operates as a local train traveling between CY1 and SY1.>.Can also operate as a Turn from SY1 to CY1 and back to SY1.> No inbound cars will be supplied to the layout.> Outbound cars will be pulled from the listed industries for SY1 Staging.> Also moves XO cars if their current spot and destination are both listed.
LXO-Train,SY1,SY2,CY1,IN1,IN2,IN3,IN4,IN5,IN6,IN7,IN8,XO> Layout must have at least two Staging Yards and one Classification Yard.> Classification Yard can be in any position on the industry section of list.> Industries used for XO cars are better kept different from those in SRlist.
Operates as a through train from SY1 to SY2 for XO Blocks only> Pulls and delivers XO cars with both their current spot and dest on this list.> Can also process XO cars routed through CY1 Classification Yard.> Removing the XO code will add Bridge Traffic to this train.>Removing the XO code will add normal traffic if industries are in SR list.
MXO-Train,SY1,SY1,IN1,IN2,IN3,IN4,IN5,IN6,IN7,IN8,IN9,XO> Layout must have at least one Staging Yard.> Layout does not need a Classification Yard to run this train type.> Removing the XO code allows selection of normal cars matching the codes.
Operates as an XO Turn train from SY1 to any or all of the listed industries.> Can also be operated as a Turn from one or all of the Industries to SY1.> Moves all XO which have both their current spot and next dest on this list.> Does not move any normal cars even if their location and dest are listed.
NXO-Train,IN1,IN6,IN2,IN3,IN4,IN5,XO> XO only trains can omit codes for Staging and Classification Yards.> XO blocks to move must have both their current spot and next dest listed.> If XO code is omitted selection takes longer as other cars are also checked.> Non XO cars on same industry tracks should not be selected.
Runs a Block Train of XO cars between any two industries on the list.> Does not service any Staging Yards or Classification Yards.> Selects all XO cars with both their current spot and next destination listed.> Does not move any normal cars even if their location and dest are listed.
PXO-Train,IN1,IN6,IN2,IN3,IN4,IN5,XO> XO Routed Trains such as Passenger Trains also use the above sequence.> It is important that the Industry codes for each stop are not in the SRlist.See Page 7 for information on Routing an XO Passenger or Fast Freight Train.
Runs a "Routed" XO train from IN1 to IN6 via the other labels.> The sequence of the labels is not critical but all stops should be included.> Any XO car spotted on and destined to an industry on the list will move.> The cars will move on as each destination is reached until they end the run.
Appendix B – Adjusting the SRlist for Y3 OperationsTypical SRlist entries for Y2 Layouts:
Industry, AAR, Ships/Receives, Loadname, Dest Staging, In Via, Out Via
Send outbound car to any staging area, no via routing, inbound or outbound:IN1,LO,S,phosphates,~,~,~IN1,XM,R,supplies,~,~,~IN1,TA,R,acids,~,~,~IN1,TM,R,liquids,~,~,~IN1,TG,R,chemicals,~,~,~
Receive car Via CY1, send car direct from industry to SY1:IN3,XM,R,supplies,SY1,CY1,~IN3,FL,R,timber,SY1,CY1,~IN3,GB,R,timber,SY1,CY1,~
Receive car direct from Staging, send car from industry to SY2 via CY1:IN5,LO,S,plastic pellets,SY2,~,CY1IN5,XM,R,supplies,SY2,~,CY1IN5,TG,R,chemicals,SY2,~,CY1IN5,TM,R,liquids,SY2,~,CY1
Receive car from Staging via CY1, send car from industry to SY2 via CY1:IN7,FM,S,fan assembly,SY2,CY1,CY1IN7,FM,R,covered load,SY2,CY1,CY1IN7,GB,R,mixed load,SY2,CY1,CY1IN7,GB,S,tarp,SY2,CY1,CY1
No changes are needed for Y3 layouts with no Classification Yards or for Y3 layouts that don't use Train Schedule data based on the E, F, G or H type trains which route their cars through Classification Yards (see Appendix A).
Recommended adjustments for Y3 layouts with Classification Yards:
Industry, AAR, Ships/Receives, Loadname, Dest Staging, In Via, Out Via
Can't use this with Y3 if the inbound cars use any of Train Types E, F, G or H IN1,LO,S,phosphates,~,~,~IN1,XM,R,supplies,~,~,~IN1,TA,R,acids,~,~,~IN1,TM,R,liquids,~,~,~IN1,TG,R,chemicals,~,~,~
Can't use this with Y3 if the inbound cars use any of Train Types E, F, G or H IN3,XM,R,supplies,SY1,CY1,~IN3,FL,R,timber,SY1,CY1,~IN3,GB,R,timber,SY1,CY1,~
Can't use this with Y3 if the inbound cars use any of Train Types E, F, G or H IN5,LO,S,plastic pellets,SY2,~,CY1IN5,XM,R,supplies,SY2,~,CY1IN5,TG,R,chemicals,SY2,~,CY1IN5,TM,R,liquids,SY2,~,CY1
The only safe method for routing Y3 cars in or out through Class Yards.IN7,FM,S,fan assembly,SY2,CY1,CY1IN7,FM,R,covered load,SY2,CY1,CY1IN7,GB,R,mixed load,SY2,CY1,CY1IN7,GB,S,tarp,SY2,CY1,CY1
If in doubt avoid using Tildes and provide full routing data in the SR list for each car. The tilde should only be used if no cars use Via destinations and allcars move direct between staging and industries in both directions.
Page 13 of 13


![CADASTRE SURVEY PRACTICE (SGHU 4323)...2018/11/13 · High-water mark of ordinary spring tides SEA BED [ X1,Y1, H1 ] [ X2,Y2, H1] [ X2,Y2, H2 ] [ X3,Y3, H1] [ X3,Y3, H2 ] [ X4,Y4,](https://img.dokumen.tips/doc/110x75/5fbc7b38fe1918776c7d22b0/cadastre-survey-practice-sghu-4323-20181113-high-water-mark-of-ordinary.jpg)