Embed Size (px)
Citation preview

Abstract—This paper deals with the design, development &
implementation of a temperature sensor using zigbee. The
main aim of the work undertaken in this paper is to sense the
temperature and to display the result on the LCD using the
zigbee technology. ZigBee operates in the industrial,
scientific and medical (ISM) radio bands; 868 MHz in Europe,
915 MHz in the USA and 2.4 GHz in most jurisdictions
worldwide. The technology is intended to be simpler and
cheaper than other WPANs such as Bluetooth. The most
capable ZigBee node type is said to require only about 10 %
of the software of a typical Bluetooth or Wireless Internet
node, while the simplest nodes are about 2 %. However,
actual code sizes are much higher, more like 50 % of the
Bluetooth code size. ZigBee chip vendors have announced
128-kilobyte devices. In this work undertaken in the design &
development of the temperature sensor, it senses the
temperature and after amplification is then fed to the micro
controller, this is then connected to the zigbee module, which
transmits the data and at the other end the zigbee reads the
data and displays on to the LCD. The software developed is
highly accurate and works at a very high speed. The method
developed shows the effectiveness of the scheme employed.
Keywords—Zigbee, Microcontroller, PIC, Transmitter, Receiver,
Synchronous, Blue tooth, Communication.
I. INTRODUCTION
HIS section gives a brief introduction about the work,
which describes all the components namely Zigbee,
temperature sensor, PIC16F873. Zigbee is a wireless network
protocol specifically designed for low data rate sensors and
control networks. Also, a brief literature survey of the work
related to the research topic is also presented in the following
paragraphs.
T.C. Manjunath, a Ph.D. from IIT Bombay is currently, Professor
& Head in Electronics and Communications Engg. Dept. of New
Horizon College of Engg., Bangalore-87, Karnataka, India.
E-mail: [email protected] ; [email protected].
Ashok Kusagur is currently, Assistant Professor in HMS Institute
of Tech., in the department of E & C Engg., Tumkur, Karnataka,
C. Ardil is with the National Academy of Aviation, AZ 1056
Baku, Azerbaijan.
Zigbee is a consortium of software, hardware and services
companies that have developed a common standard for
wireless, networking of sensors and controllers. While other
wireless standards are concerned with exchanging large
amounts of data, Zigbee is for devices that have smaller
throughout needs.
The other driving factors are low cost, high reliability, high
security, low battery usage, simplicity and interoperability
with other Zigbee devices. Compared to other wireless
protocols, Zigbee wireless protocol offers low complexity. It
also offers three frequency bands of operation along with a
number of network configurations and optional security
capability. It requires a supply voltage in the range of 2.8V to
3.3V. Hence, we design a power supply, which converts 230V
to 3.3V. Here, we use a whip antenna to transmit the
temperature sensed by LM35 temperature sensor to the
receiving section. The LM35 series are precision integrated
circuit temperature sensor whose output voltage is linearly
proportional to the Celsius temperature [1].
The LM35 thus has an advantage over the linear
temperature sensors calibrated in Kelvin, as the user is not
required to subtract a large constant voltage from its output to
obtain convenient centigrade scaling. The microcontroller
used here is PIC16F873. It belongs to a class of eight-bit
microcontrollers of RISC architecture & a Program Memory
(FLASH) for storing a written program. Since the memory is
made in FLASH technology, it can be programmed and
cleared more than once & makes this microcontroller suitable
for device development. It has inbuilt ADC and USART. In
the receiving section, the temperature is displayed on 16 2
backlit LCD. If the temperature displayed exceeds 40 degree
Celsius, then the buzzer goes on.
The paper is organized in the following sequence. A brief
introduction about the work undertaken in this paper and the
relevant literatures were presented in the previous paragraphs.
Introduction about the microcontroller & its design is
considered in the section 2. Section 3 depicts about the
background literature about the temperature sensor. The
transmitter & receiver part is presented in section 4. Section 5
describes about the zigbee concepts & its design. The design
and development of the temperature sensor is presented in
section 6. Working principle is presented in the next section.
This is followed by the conclusions in section 8, followed by
the references.
Design, Development & Implementation of a
Temperature Sensor using Zigbee Concepts
T.C.Manjunath, Ph.D. ( IIT Bombay ) & Fellow IETE, Ashok Kusagur , Shruthi Sanjay,
Saritha Sindushree, C. Ardil
T

II.DESCRIPTION ABOUT THE MICROCONTROLLER
This section gives a brief idea about the PIC
microcontroller, its advantages over microprocessors, its core
features, block diagram, pin diagram and its description.
A. INTRODUCTION
Circumstances that we find ourselves today in the field of
microcontrollers had their beginnings in the development of
technology of integrated circuits. This development had made
it possible to store hundreds of thousands of transistors into
one chip. That was a prerequisite for production of
microcontrollers, and adding external peripherals such as
memory, input-output lines, timers and other made the first
computers. Further increasing of the volume of the package
resulted in creation of integrated circuits. These integrated
circuits contained both processor and peripherals. That is how
the first chip containing a microcomputer, or what would later
be known as a microcontroller came out [2].
B. MICROCONTROLLER VERSUS MICROPROCESSORS
Microcontroller differs from a microprocessor in many
ways. First and the most important is its functionality. In
order for a microprocessor to be used, other components such
as memory, or components for receiving and sending data
must be added to it. In sort that means that microprocessor is
the very heart of the computer. On the other hand,
microcontroller is designed to be all of that in one. No other
external components are needed for its application because all
necessary peripherals are already built in to it. Thus, we save
the time and space needed to construct devices.
C. PIC16F873
It belongs to a class of eight bit microcontrollers of RISC
architecture.
1) Program Memory (FLASH)
This concept is used for storing a written program. Since
memory is made use of in FLASH technology, it can be
programmed and cleared more than once, it makes this
microcontroller suitable for device development.
2) EEPROM
It is that device wherein the data memory needs to be
saved when there is no supply. It is usually used for storing
important data that must not be lost if supply suddenly stops.
For instance, one such data is an assigned temperature in
temperature regulators. If during a loss of supply this data is
lost, we would have to make the adjustment once again upon
return of supply. Thus our device looses on self reliance.
3) RAM
Data memory used by a program during its execution. In
RAM are stored all inter-results on temporary data that are not
crucial to running a device during a loss of supply.
4) PORTA, PORTB AND PORTC
These are physical connections between the
microcontroller and the outside world. PORTA has five pins,
PORTB and PORTC has eight pins.
5) FREE TIMER
It is an eight-bit register inside a microcontroller that
works independently of the program. On every fourth clock
of the oscillator, it increments its value until it reaches the
maximum, and then its starts counting over again from zero.
As we know the exact timing between each two increments of
the timer contents, timer can be used for measuring the time,
which is very useful with some devices.
6) CENTERAL PROCESSING UNIT
It has a role of connective elements between other blocks
in the microcontroller. It coordinates that work of other
blocks and executes the user program.
D. CISC AND RISC
It has already been said that PIC16F873 has RISC
architecture. This term is often found in computer literature.
Harvard architecture is a newer concept than von-Neumann’s.
It rose out of the need to speed up the work of a
microcontroller. In Harvard architecture, data bus and address
bus are separate. Thus, a greater flow of data is possible
through the central processing unit, and of course, a greater
speed of work. Microcontrollers with Harvard architecture
are also called “RISC microcontrollers.” RISC stands for
reduced instruction set computer. Microcontrollers with
von-Neumann’s architecture are called as the “CISC
microcontrollers”. The title CISC stands for ‘complex
instruction set computer’. Since PIC16F873 is a RISC
microcontroller that means that it has a reduced set of
instructions, more precisely 35 instructions.
E. MICROCONTROLLER CORE FEATURES
High performance RISC CPU
Only 35 Instructions to learn
All Single cycle instructions except for program
branches, which are two cycles
Operating speed : DC-20MHz clock input
DC-200ns instruction cycle
Up to 8K 14 words of FLASH program memory
Up to 368 8 bytes of data memory (RAM)
Up to 256 8 bytes of EEPROM data memory
Power-on reset (POR)
Power saving SLEEP mode
Low-power, high-speed CMOS FLASH / EEPROM
technology
Wide operating voltage range: 2V TO 5.5 V
Low power consumption:
< 2mA typical @ 5V, 4MHz, 20 A typical @ 3V, 32
kHz, < 1 A typical standby current
F. PIN DIAGRAM
The pin diagram of PIC16F873 is as shown in the Fig. 1.
G. DEVICE OVERVIEW
PIC16F873 device comes in 28-pin package. This does not
have a parallel slave port implemented.
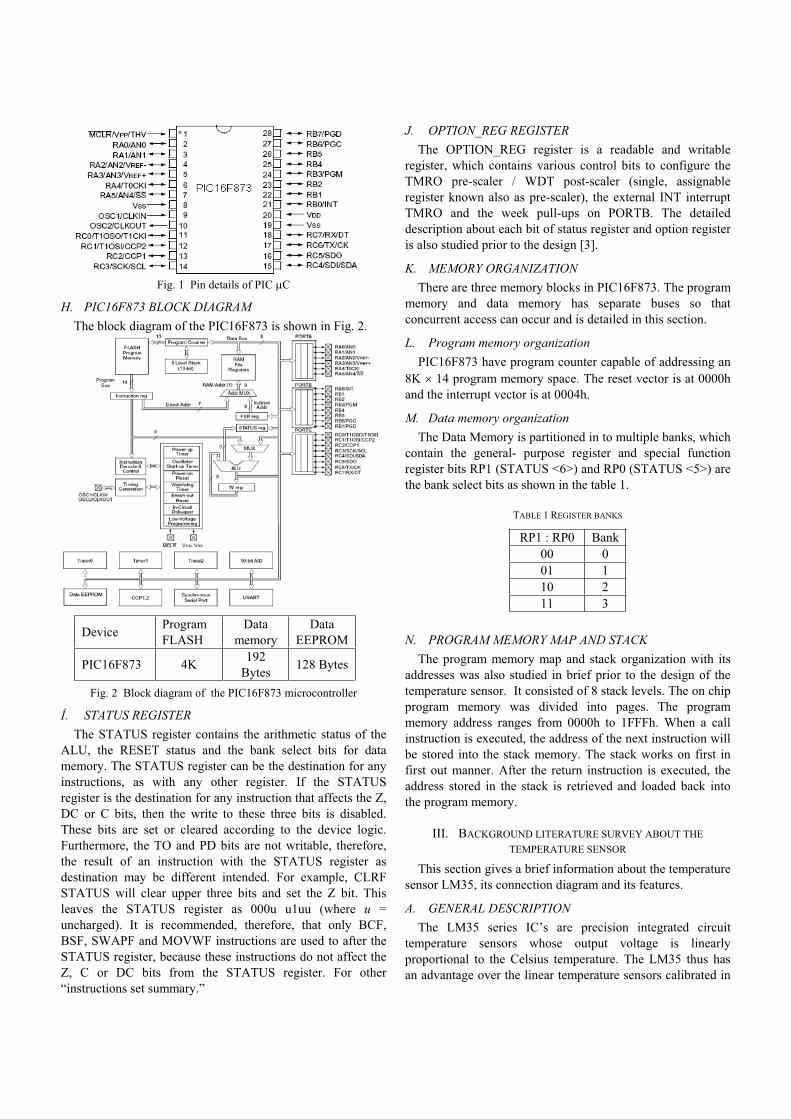
Fig. 1 Pin details of PIC C
H. PIC16F873 BLOCK DIAGRAM
The block diagram of the PIC16F873 is shown in Fig. 2.
Fig. 2 Block diagram of the PIC16F873 microcontroller
. STATUS REGISTER
The STATUS register contains the arithmetic status of the
ALU, the RESET status and the bank select bits for data
memory. The STATUS register can be the destination for any
instructions, as with any other register. If the STATUS
register is the destination for any instruction that affects the Z,
DC or C bits, then the write to these three bits is disabled.
These bits are set or cleared according to the device logic.
Furthermore, the TO and PD bits are not writable, therefore,
the result of an instruction with the STATUS register as
destination may be different intended. For example, CLRF
STATUS will clear upper three bits and set the Z bit. This
leaves the STATUS register as 000u u1uu (where u =
uncharged). It is recommended, therefore, that only BCF,
BSF, SWAPF and MOVWF instructions are used to after the
STATUS register, because these instructions do not affect the
Z, C or DC bits from the STATUS register. For other
“instructions set summary.”
J. OPTION_REG REGISTER
The OPTION_REG register is a readable and writable
register, which contains various control bits to configure the
TMRO pre-scaler / WDT post-scaler (single, assignable
register known also as pre-scaler), the external INT interrupt
TMRO and the week pull-ups on PORTB. The detailed
description about each bit of status register and option register
is also studied prior to the design [3].
K. MEMORY ORGANIZATION
There are three memory blocks in PIC16F873. The program
memory and data memory has separate buses so that
concurrent access can occur and is detailed in this section.
L. Program memory organization
PIC16F873 have program counter capable of addressing an
8K 14 program memory space. The reset vector is at 0000h
and the interrupt vector is at 0004h.
M. Data memory organization
The Data Memory is partitioned in to multiple banks, which
contain the general- purpose register and special function
register bits RP1 (STATUS <6>) and RP0 (STATUS <5>) are
the bank select bits as shown in the table 1.
TABLE 1 REGISTER BANKS
RP1 : RP0 Bank
00 0
01 1
10 2
11 3
N. PROGRAM MEMORY MAP AND STACK
The program memory map and stack organization with its
addresses was also studied in brief prior to the design of the
temperature sensor. It consisted of 8 stack levels. The on chip
program memory was divided into pages. The program
memory address ranges from 0000h to 1FFFh. When a call
instruction is executed, the address of the next instruction will
be stored into the stack memory. The stack works on first in
first out manner. After the return instruction is executed, the
address stored in the stack is retrieved and loaded back into
the program memory.
III. BACKGROUND LITERATURE SURVEY ABOUT THE
TEMPERATURE SENSOR
This section gives a brief information about the temperature
sensor LM35, its connection diagram and its features.
A. GENERAL DESCRIPTION
The LM35 series IC’s are precision integrated circuit
temperature sensors whose output voltage is linearly
proportional to the Celsius temperature. The LM35 thus has
an advantage over the linear temperature sensors calibrated in
DeviceProgram
FLASH
Data
memory
Data
EEPROM
PIC16F873 4K 192
Bytes128 Bytes

Kelvin as the as the user is not required to subtract a large
constant voltage from its output to obtain convent centigrade
scaling. The LM35 does not require any external calibration
to provide typical accuracies of + or – ¼ C at room
temperature and + or – ¾ C over a full –55 to +150 C
temperature range.
The LM35’s low output impedance linear output and
precise inherent calibration make interfacing to readout or
control circulatory especially easy. It can be used with single
power supplies, or with plus and minus supply; it has very low
self-heating less than 0.1 degrees Celsius in still air. The
LM35 is rated to operate over a –55 to +150 C temperature
range, while the LM35 is rated for a –40 to +110 C range.
The LM35 series is available packaged in hermetic TO-46
transistor packages. The LM35D is also available in an 8 lead
surface mount small outline package and a plastic TO-220
package.
B. FEATURES
Calibrated directly in Celsius (centigrade).
Linear + 10.0 m V / C scale factor.
0.5 C accuracy guarantee able (at +25 C).
Rated for full -55 to +150 C range.
Operates from 4 to 30 volts.
Low self-heating, 0.08 C in still air.
Low impedance out put, 0.1 for 1 mA load.
C. CONNECTION DIAGRAM
The connection diagram for LM35 packages is shown in
Fig. 3. Here we are using TO-220 plastic package temperature
sensor. It has three leads namely +Vs, ground and Vout.
Fig 3 LM35 Connection diagram
ABSOLUTE MAXIMUM RATINGS
Supply voltage +35V to 0.2V
Output voltage +6V to 1V
Output current 10 mill amperes
STORAGE TEMPERATURE
TO 46 package 60 C to +180 C
TO 92 package 60 C to +150 C
SO-8 package 65 C to +150 C
TO-220 package 65 C to +150 C
LEAD TEMPERATURE
TO-46 package 300 C
TO-92 and TO-220 package 260 C
Vapor phase 215 C
Infra red 220 C
IV. UNIVERSAL SYNCHRONOUS ASYNCHRONOUS
RECEIVER AND TRAMSMITTER
This section gives a brief description of the USART and the
registers used for its operation at the transmitter and receiver
section. The universal synchronous asynchronous receiver and
transmitter (USART) module is one of the two serial input or
output modules. USART is also known as a serial
communications interface or SCI. The USART can be
configured as a full duplex asynchronous system that can
communicate with peripheral devices such as CRT terminals
and personal computers, or it can be configured as a half
duplex synchronous system that can communicate with
peripheral devices such as analog to digital or digital to analog
integrated circuits. The USART used here is inbuilt in the PIC
microcontroller. The USART can be configured in the
following modes [4].
Asynchronous (full duplex)
Synchronous-master (half duplex)
Synchronous - slave (half duplex)
The registers used in the operation of USART are
TXSTA (TRANSMIT CONTROL AND STATUS
REGISTER)
RCSTA (RECEIVE CONTROL AND STATUS
REGISTER)
The TXSTA is used to control the transmission of data.
The RCSTA is used to control the reception of data.
A. REGISTERS
TXSTA transmit status and control register (Add 98h) was
also studied from the data manuals. RCSTA receive status
and control register (Add 18h) was also studied from the data
manuals.
B. USART BAUD RATE GENERATOR (BRG)
Baud rate supports both asynchronous and synchronous
moods of the USAIT. The SPBRG register controls the
period of a free running 8-bit timer. In asynchronous mode,
bit BRGH (TXSTA <2>) also controls the baud rate. In
asynchronous mode, bit BRGH is ignored.
TABLE II BAUD RATE TABLE
SYNCBRGH = 0
(Low Speed)
BRGH = 1
(High Speed)

0
1
(Asynchronous) Baud rate
= Fosc / (64(X+1))
(Synchronous) Baud rate
= Fosc / (4(X+1))
Baud rate
=Fosc/(16(X+1))
NA
Given the desired baud rate and FOSC, the nearest integer
value for the SPBRG registers can be calculated using the
formula shown in the table. From this, the error is baud rate
can be determined. The table 2 gives the formula to calculate
the Baud rate.
C. USART ASYNCHRONOUS MODE
In this mode, the USART uses standard non-return to zero
(NRZ) format (one start bit, eight or nine data bits and one
stop bit). The most common data format is eight bits. The
USART transmits and receives the LSB first. The USART’S
transmitter and receiver are functionally independent; but use
the same data format and baud rate. Asynchronous mode is
stopped during SLEEP. Asynchronous mode is selected by
clearing bit synchronous (TXSTA<4>).
D. USART ASYNCHRONOUS TRANSMITTER
The USART transmitter block diagram is as shown in Fig.
4. The heart of the transmitter is the transmit (serial) shift
register (TSR). The shift register obtains its data from the read
/ write transmit buffer, TXREG. The TXREG register is
loaded with data in soft wear. The TSR register is not loaded
until the STOP bit has been transmitted from the previous
load. As soon as the stop bit is transmitted the TSR is loaded
with new data from the TXREG register (if available).
Fig. 4 USART asynchronous transmitter
Once the TXREG registers transfers the data to the TSR
register (occurs in 1 T cycle), the TXREG register is empty
and flag bit TXIF (PIR1 <4>) is set. This interrupt can be
enabled / disabled by setting / clearing enable bit TXIE
(PIE1<4>). flag bit TXIF will be set regardless of the state of
enable bit TXIE and cannot be cleared in software.
It will reset only when new data is loaded in to the TXREG
register while the flag bit TXIF indicates the states of the
TXREG register, another bit TRMT (TXSTA<1>) shows the
status of the TSR register. Status bit TRMT is a read only bit,
which is set when the TSR register is empty.
Note that the TSR register is not mapped in data memory so
it is not available to the user. Flag bit TXIF is set when
enable bit TXEN is set. TXIF is cleared by loading the
TXREG.
Transmission is enabled by setting enable bit TXEN
(TXSTA<5>).The actual transmission will not occur until
TXREG register has been loaded with data and the baud rate
generator (BRG) has produced a shift clock. The transmission
can also be started by first loading the TXREG register and
then setting enable bit TXEN. Normally, when transmission
is first started, the TSR register is empty. At that point,
transfer to the TXREG register will result in an immediate
transfer to TSR, resulting in an empty TXREG [5].
A back-to-back transfer is thus possible. Clearing enable
bit TXEN during a transmission will cause the transmission to
be aborted and will reset the transmitter. As a result, the RC6
/ TX / CK pin will revert to hi-impedance. In order to select 9-
bit transmission, transmit bit TX9 (TXSTA <6>) should be set
and the ninth bit should be written before writing the 8-bit
data to the TXREG register. This is because of a data write to
the TXREG register can result in an immediate transfer of the
data to the TSR register (if the TSR is empty). In such a case,
an incorrect ninth data bit may be loaded in the TSR register.
E. STEPS FOLLOWED IN ASYNCHRONOUS
TRANSMISSION
Initialize the SPBRG register for the appropriate baud
rate. If a high speed baud rate is desired, set bit BRGH.
Enable the asynchronous serial port by clearing bit
synchronous and setting bit SPEN.
If interrupts are desired, then set enable bit TXIE.
If 9-bit transmission is desired, then set transmit bit
TX9.
Enable the transmission by setting bit TXEN, which will
also set bit TXIF.
If 9-bit transmission is selected the ninth bit should be
loaded in bit TX9D.
Load data to the TXREG register (starts transmission)
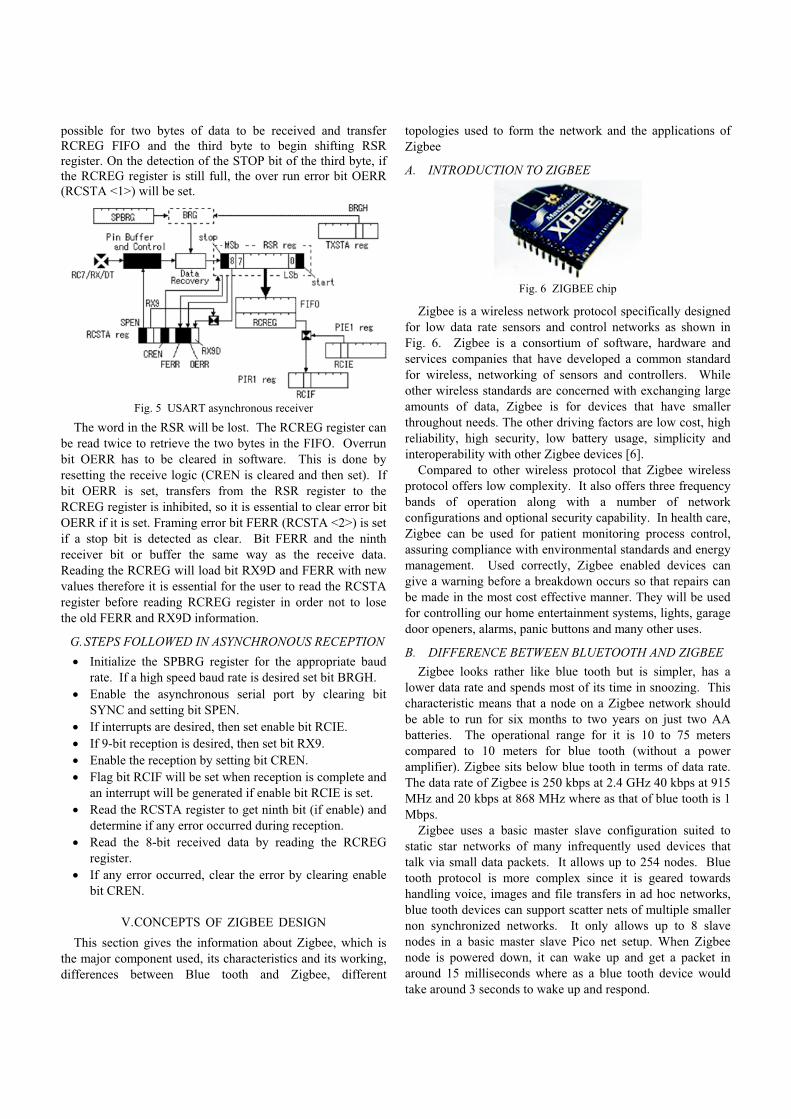
F. USART ASYNCHRONOUS RECEIVER
The receiver block diagram is as shown in the Fig. 5. The
data is received on the RC7 / RX / DT pin and drives the data
recovery block. The data recovery block is actually high
speed shifter operating at 16 times the baud rate, where as
the main receive serial shifter operates at the bit rate or at
FOSC. Once asynchronous mode is selected, reception is
enabled by setting bit CREN (RCSTA <4>). The heart of the
receiver is the receive (serial) the received data in the RSR is
transferred to the RCREG register (if it is empty). If the
transfer is complete, flag bit RCIF (PIR1<5>) is set.
The actual interrupt can be enabled / disabled by
setting/clearing enable bit RCIE (PIE1<5>) flag bit is a read
only bit which is cleared by the hardware. It is cleared when
the RCREG register has been read and is empty. The RCREG
is a double-buffered register (i.e., it is a two deep FIFO). It is
possible for two bytes of data to be received and transfer
RCREG FIFO and the third byte to begin shifting RSR
register. On the detection of the STOP bit of the third byte, if
the RCREG register is still full, the over run error bit OERR
(RCSTA <1>) will be set.
Fig. 5 USART asynchronous receiver
The word in the RSR will be lost. The RCREG register can
be read twice to retrieve the two bytes in the FIFO. Overrun
bit OERR has to be cleared in software. This is done by
resetting the receive logic (CREN is cleared and then set). If
bit OERR is set, transfers from the RSR register to the
RCREG register is inhibited, so it is essential to clear error bit
OERR if it is set. Framing error bit FERR (RCSTA <2>) is set
if a stop bit is detected as clear. Bit FERR and the ninth
receiver bit or buffer the same way as the receive data.
Reading the RCREG will load bit RX9D and FERR with new
values therefore it is essential for the user to read the RCSTA
register before reading RCREG register in order not to lose
the old FERR and RX9D information.
G.STEPS FOLLOWED IN ASYNCHRONOUS RECEPTION
Initialize the SPBRG register for the appropriate baud
rate. If a high speed baud rate is desired set bit BRGH.
Enable the asynchronous serial port by clearing bit
SYNC and setting bit SPEN.
If interrupts are desired, then set enable bit RCIE.
If 9-bit reception is desired, then set bit RX9.
Enable the reception by setting bit CREN.
Flag bit RCIF will be set when reception is complete and
an interrupt will be generated if enable bit RCIE is set.
Read the RCSTA register to get ninth bit (if enable) and
determine if any error occurred during reception.
Read the 8-bit received data by reading the RCREG
register.
If any error occurred, clear the error by clearing enable
bit CREN.
V.CONCEPTS OF ZIGBEE DESIGN
This section gives the information about Zigbee, which is
the major component used, its characteristics and its working,
differences between Blue tooth and Zigbee, different
topologies used to form the network and the applications of
Zigbee
A. INTRODUCTION TO ZIGBEE
Fig. 6 ZIGBEE chip
Zigbee is a wireless network protocol specifically designed
for low data rate sensors and control networks as shown in
Fig. 6. Zigbee is a consortium of software, hardware and
services companies that have developed a common standard
for wireless, networking of sensors and controllers. While
other wireless standards are concerned with exchanging large
amounts of data, Zigbee is for devices that have smaller
throughout needs. The other driving factors are low cost, high
reliability, high security, low battery usage, simplicity and
interoperability with other Zigbee devices [6].
Compared to other wireless protocol that Zigbee wireless
protocol offers low complexity. It also offers three frequency
bands of operation along with a number of network
configurations and optional security capability. In health care,
Zigbee can be used for patient monitoring process control,
assuring compliance with environmental standards and energy
management. Used correctly, Zigbee enabled devices can
give a warning before a breakdown occurs so that repairs can
be made in the most cost effective manner. They will be used
for controlling our home entertainment systems, lights, garage
door openers, alarms, panic buttons and many other uses.
B. DIFFERENCE BETWEEN BLUETOOTH AND ZIGBEE
Zigbee looks rather like blue tooth but is simpler, has a
lower data rate and spends most of its time in snoozing. This
characteristic means that a node on a Zigbee network should
be able to run for six months to two years on just two AA
batteries. The operational range for it is 10 to 75 meters
compared to 10 meters for blue tooth (without a power
amplifier). Zigbee sits below blue tooth in terms of data rate.
The data rate of Zigbee is 250 kbps at 2.4 GHz 40 kbps at 915
MHz and 20 kbps at 868 MHz where as that of blue tooth is 1
Mbps.
Zigbee uses a basic master slave configuration suited to
static star networks of many infrequently used devices that
talk via small data packets. It allows up to 254 nodes. Blue
tooth protocol is more complex since it is geared towards
handling voice, images and file transfers in ad hoc networks,
blue tooth devices can support scatter nets of multiple smaller
non synchronized networks. It only allows up to 8 slave
nodes in a basic master slave Pico net setup. When Zigbee
node is powered down, it can wake up and get a packet in
around 15 milliseconds where as a blue tooth device would
take around 3 seconds to wake up and respond.
(a) (b) (c) Fig. 7 Antenna types for Zigbee
C. HOW DOES ZIGBEE WORK ?
Zigbee hardware typically consist of an eight bit
microcontroller combined with a miniature transceiver a small
amount (example 32 KB) of flash memory and RAM. Most of
the Zigbee stack is provided in ASIC. Zigbee operates with
ISM 2.4 GHz frequency band and is pin for pin compatible
with maxstream’s Zigbee product.
There are three radio frequencies used for Zigbee radio
frequency communications 2.4 GHz with 16 channels and a
data rate of 250 kbps for world wide coverage, 868 MHz with
a single channel and a data rate of 20 kbps in Europe and 915
MHz with 10 channels and a data rate of 40 kbps in America.
For comparison even at 250 kbps the data throughput is only
about one tenth that of blue tooth.
Another wireless networking solution but more than
sufficient for monitoring and controlling usage. Broadcast
range for Zigbee is approximately 70 meters. Theoretically
Zigbee networks can contain up to 64 k (65,536) network
nodes. Current testing has not reached anywhere near that
level. The name zigbee is said to come from the domestic
honeybee, which uses a zigzag type of dance to communicate
important information to other hive members.
D. DIFFERENT TYPES OF ANTENNA OF ZIGBEE
The 3 different antennas for Zigbee are as shown in the Fig.
7 such as the Whip antenna, UFL RF connector & the Chip
antenna. The chip and integrated whip antennas are suited for
any application, but are especially useful in embedded
applications. Since the radios do not have any issue radiating
through plastic cases or housings, the antennas can be
completely enclosed in those types of applications.
The UFL Connector is used in conjunction with an adaptor
cable that can be connected to a dipole or gain antenna if the
housing is metal or if that solution is more desirable
mechanically. Range can differ somewhat with different
antenna types, so that should be a consideration when
choosing what type of antenna you want to use.
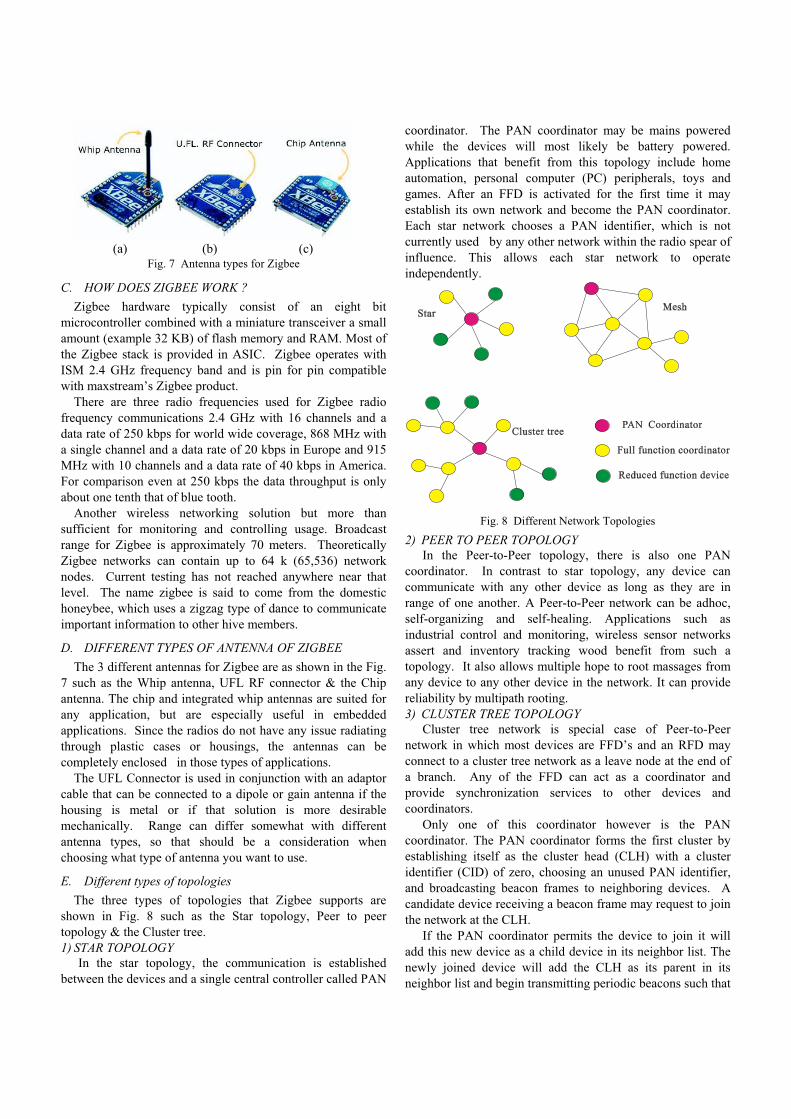
E. Different types of topologies
The three types of topologies that Zigbee supports are
shown in Fig. 8 such as the Star topology, Peer to peer
topology & the Cluster tree.
1) STAR TOPOLOGY
In the star topology, the communication is established
between the devices and a single central controller called PAN
coordinator. The PAN coordinator may be mains powered
while the devices will most likely be battery powered.
Applications that benefit from this topology include home
automation, personal computer (PC) peripherals, toys and
games. After an FFD is activated for the first time it may
establish its own network and become the PAN coordinator.
Each star network chooses a PAN identifier, which is not
currently used by any other network within the radio spear of
influence. This allows each star network to operate
independently.
Fig. 8 Different Network Topologies
2) PEER TO PEER TOPOLOGY
In the Peer-to-Peer topology, there is also one PAN
coordinator. In contrast to star topology, any device can
communicate with any other device as long as they are in
range of one another. A Peer-to-Peer network can be adhoc,
self-organizing and self-healing. Applications such as
industrial control and monitoring, wireless sensor networks
assert and inventory tracking wood benefit from such a
topology. It also allows multiple hope to root massages from
any device to any other device in the network. It can provide
reliability by multipath rooting.
3) CLUSTER TREE TOPOLOGY
Cluster tree network is special case of Peer-to-Peer
network in which most devices are FFD’s and an RFD may
connect to a cluster tree network as a leave node at the end of
a branch. Any of the FFD can act as a coordinator and
provide synchronization services to other devices and
coordinators.
Only one of this coordinator however is the PAN
coordinator. The PAN coordinator forms the first cluster by
establishing itself as the cluster head (CLH) with a cluster
identifier (CID) of zero, choosing an unused PAN identifier,
and broadcasting beacon frames to neighboring devices. A
candidate device receiving a beacon frame may request to join
the network at the CLH.
If the PAN coordinator permits the device to join it will
add this new device as a child device in its neighbor list. The
newly joined device will add the CLH as its parent in its
neighbor list and begin transmitting periodic beacons such that

other candidate devices may then join the network at that
device. The advantage of this clustered structure is the
increased coverage area at the cost of increased message
latency.
Fig. 9 Top View of Zigbee
F. PRODUCT SUMMARY
ISM 2.4 GHz operating frequency.
1 milli watt (0dBm) power output (up to 100 m range).
U.FL RF connector, chip or whip antenna options.
Industrial (-40 to 85 degree Celsius) temperature rating.
Approved for use in the United States, Canada and
Europe.
Advanced networking and low power modes supported.
G. TOP VIEW OF ZIGBEE
The top view of the Zigbee is as shown in the Fig. 9.
H.PERFORMANCE, NETWORKING, POWER, GENERAL
AND PHYSICAL PROPERTIES OF ZIGBEE & KEY
FEATURES
Price to performance value.
Low power consumption.
Receiver sensitivity.
Worldwide acceptance in USA, CANADA & EUROPE.
Systems that contain Zigbee modules can operate under the
certifications obtained by maxstream. Further testing is not
required.
. RANGES FOR ZIGBEE
Indoor / urban range up to 100 (30m)
Outdoor line-of-sight range up to 300 (100m)
Transmit power output 1mw (0dBm)
Power – down current <10
Operating frequency 2.4 GHz
J. ZIGBEE ALSO OFFERS
Low power consumption : optimized for low battery
operation.
License free operation in the 2.4GHz band.
Simple protocol definition – can be implemented on low –
cost micro controllers.
Hundreds of devices per network.
Network flexibility – star, cluster tree or mesh
configuration.
Data rate up to 250 kbps.
Small size – The developed solution will be less than 9mm
9mm.
K. APPLICATIONS OF ZIGBEE
There are a number of applications that can benefit from the
Zigbee protocol: Building automation networks, home
security systems, industrial control networks, remote metering
and PC peripherals are some of the many possible
applications.
Security systems and lighting controls.
Home automation and building control.
Home appliances and fire alarms.
Monitoring of remote systems.
Sensor data capture in embedded
networks.
VI. DESIGN OF TEMPERATURE SENSOR UNIT
This section gives a brief description about the design,
implementation & operation of the different components used
for the design and fabrication of temperature sensor unit,
namely ADC, power supply, amplifier and LCD.
A. ANALOG TO DIGITAL CONVERTER MODULE
The analog to digital converter module has five inputs for
the 28-pin devices. The analog input charges a sample and
hold capacitor. The output of the sample and hold is the input
into the converter. The converter then generates a digital
result of this analog level via successive approximation. The
analog to digital conversion of the analog input signal results
in a corresponding 10-bit digital number. The analog to digital
converter has a unique feature of being able to operate while
the device is in SLEEP mode. To operate in SLEEP mode,
the analog to digital clock must be derived from the analog to
digital internal RC oscillator. The A/D module has four
registers. These registers are
1. A/D result high register (ADRESH)
2. A/D result low register (ADRESL)
3. A/D control register 0 (ADCON0)
4. A/D control register 1 (ADCON1)

B. ADCON0 Register (Address : 1Fh)
ADCON0 register controls the operation of the A/D
module. The ADCON1 register, configures the functions of
the port pins. The port pins can be configured as analog inputs
are as digital input or output.
C. ADCON1 Register (Address 9Fh)
The ADRESH and ADRESL registers contain the 10-bit
result of the A/D conversion. When the A/D conversion is
complete, the result is loaded in to this A/D result register
pair, the GO/DONE bit (ADCON0 (second bit)) is cleared and
the A/D interrupt flag bit ADIF is set. After the A/D module
has been configured as desired the selected channel must be
acquired before the conversion is started. The analog input
channels must have there corresponding TRIS bits selected as
a input.
D. Steps to be followed for doing the analog to digital
conversion
Configure the A/D module
Configure analog pins / voltage reference and digital
input or output (ADCON1)
Select analog to digital input channel (ADCON0).
Select analog to digital conversion clock (ADCON0).
Turn on analog to digital module (ADCON0).
Configure analog to digital interrupt (If desired)
Clear ADIF bit.
Set ADIE bit.
Wait the required acquisition time.
Start conversion
Set GO / DONE bit (ADCON0)
Wait for analog to digital conversion to complete by
either:
Polling for the GO / DONE bit to be cleared OR
Waiting for the analog to digital interrupt
Read A/D result register pair (ADRESH : ADRESL),
clear bit ADIF if required.
For next conversion go to step1 or step 2 as required. the
analog to digital conversion time per bit is defined as
TAD. A minimum wait of 2TAD is required before next
acquisition starts.
E. POWER SUPPLY USED FOR ZIGBEE
There are four sections in the design of the regulated power
supply for the sensing units, viz., first we have step down
transformer, bridge rectifier, RC filter and amplifier. The step
down transformer reduces the voltage to 12V. Bridge rectifier:
In which we use four diodes (IN4007).
Fig. 10 Schematic circuit diagram of the power supply
This section cut-offs the AC and gives only DC output. The
output of the bridge rectifier is given to the RC filter to
remove noise. The output of this section is given to voltage
regulator LM317. It controls the voltage to 3V. There is an
LED, which indicates the turn on and turn off of power
supply, The Fig. 10 shows the power supply module used for
Zigbee along with the photographic view of the power supply
in Fig. 11 respectively.
Fig. 11 Circuit diagram of power supply
F. AMPLIFIER
Fig. 12 Amplifier circuit
The Fig. 12 shows the amplifier circuit designed for the
unit. LM35 Temperature sensor, senses the temperature and
gives the output in terms of voltage. This output voltage is in
terms of milli-volt.
For room temperature we get 0.3V output, which needs to
be amplified to 0.5V to display 25 degree Celsius. Hence this
weak output signal is fed to the amplifier. The feedback
resistor is designed so as to obtain required voltage.
G. LIQUID CRYSTAL DISPLAY (LCD)
LCD-liquid crystal display is shown in Fig. 13 along with
their photographic views.
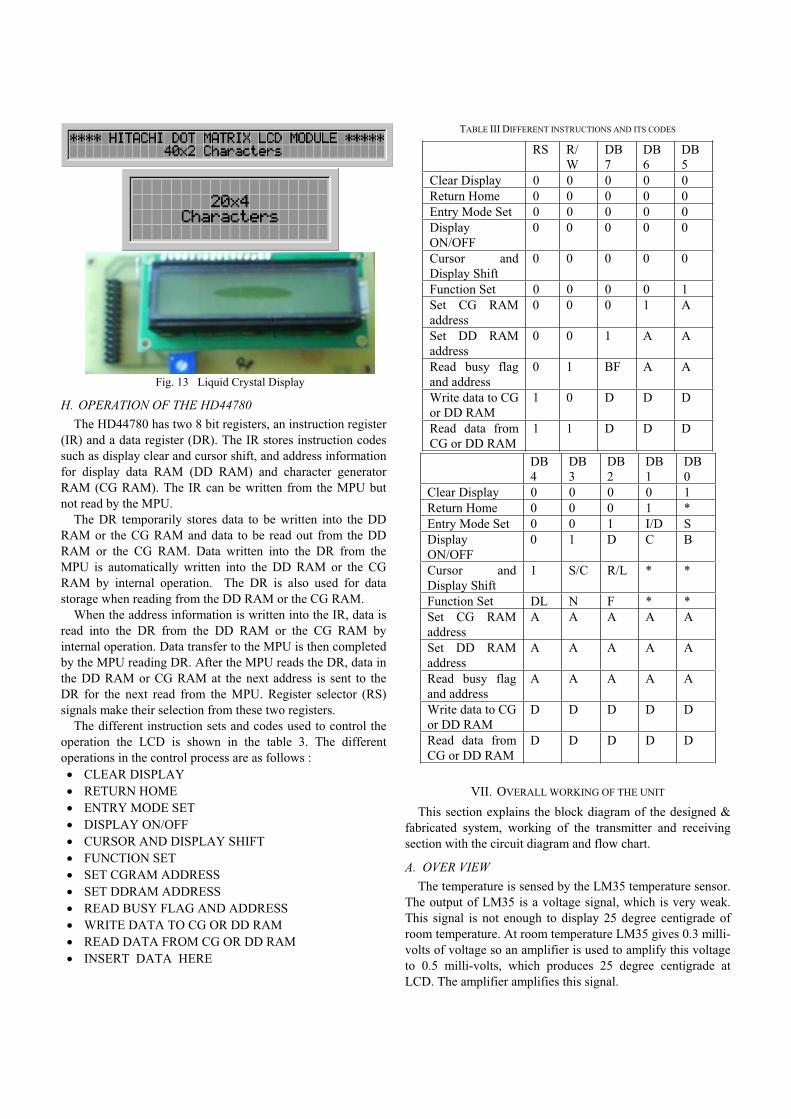
Fig. 13 Liquid Crystal Display
H. OPERATION OF THE HD44780
The HD44780 has two 8 bit registers, an instruction register
(IR) and a data register (DR). The IR stores instruction codes
such as display clear and cursor shift, and address information
for display data RAM (DD RAM) and character generator
RAM (CG RAM). The IR can be written from the MPU but
not read by the MPU.
The DR temporarily stores data to be written into the DD
RAM or the CG RAM and data to be read out from the DD
RAM or the CG RAM. Data written into the DR from the
MPU is automatically written into the DD RAM or the CG
RAM by internal operation. The DR is also used for data
storage when reading from the DD RAM or the CG RAM.
When the address information is written into the IR, data is
read into the DR from the DD RAM or the CG RAM by
internal operation. Data transfer to the MPU is then completed
by the MPU reading DR. After the MPU reads the DR, data in
the DD RAM or CG RAM at the next address is sent to the
DR for the next read from the MPU. Register selector (RS)
signals make their selection from these two registers.
The different instruction sets and codes used to control the
operation the LCD is shown in the table 3. The different
operations in the control process are as follows :
CLEAR DISPLAY
RETURN HOME
ENTRY MODE SET
DISPLAY ON/OFF
CURSOR AND DISPLAY SHIFT
FUNCTION SET
SET CGRAM ADDRESS
SET DDRAM ADDRESS
READ BUSY FLAG AND ADDRESS
WRITE DATA TO CG OR DD RAM
READ DATA FROM CG OR DD RAM
INSERT DATA HERE
TABLE III DIFFERENT INSTRUCTIONS AND ITS CODES
RS R/
W
DB
7
DB
6
DB
5
Clear Display 0 0 0 0 0
Return Home 0 0 0 0 0
Entry Mode Set 0 0 0 0 0
Display
ON/OFF
0 0 0 0 0
Cursor and
Display Shift
0 0 0 0 0
Function Set 0 0 0 0 1
Set CG RAM
address
0 0 0 1 A
Set DD RAM
address
0 0 1 A A
Read busy flag
and address
0 1 BF A A
Write data to CG
or DD RAM
1 0 D D D
Read data from
CG or DD RAM
1 1 D D D
DB
4
DB
3
DB
2
DB
1
DB
0
Clear Display 0 0 0 0 1
Return Home 0 0 0 1 *
Entry Mode Set 0 0 1 I/D S
Display
ON/OFF
0 1 D C B
Cursor and
Display Shift
1 S/C R/L * *
Function Set DL N F * *
Set CG RAM
address
A A A A A
Set DD RAM
address
A A A A A
Read busy flag
and address
A A A A A
Write data to CG
or DD RAM
D D D D D
Read data from
CG or DD RAM
D D D D D
VII. OVERALL WORKING OF THE UNIT
This section explains the block diagram of the designed &
fabricated system, working of the transmitter and receiving
section with the circuit diagram and flow chart.
A. OVER VIEW
The temperature is sensed by the LM35 temperature sensor.
The output of LM35 is a voltage signal, which is very weak.
This signal is not enough to display 25 degree centigrade of
room temperature. At room temperature LM35 gives 0.3 milli-
volts of voltage so an amplifier is used to amplify this voltage
to 0.5 milli-volts, which produces 25 degree centigrade at
LCD. The amplifier amplifies this signal.
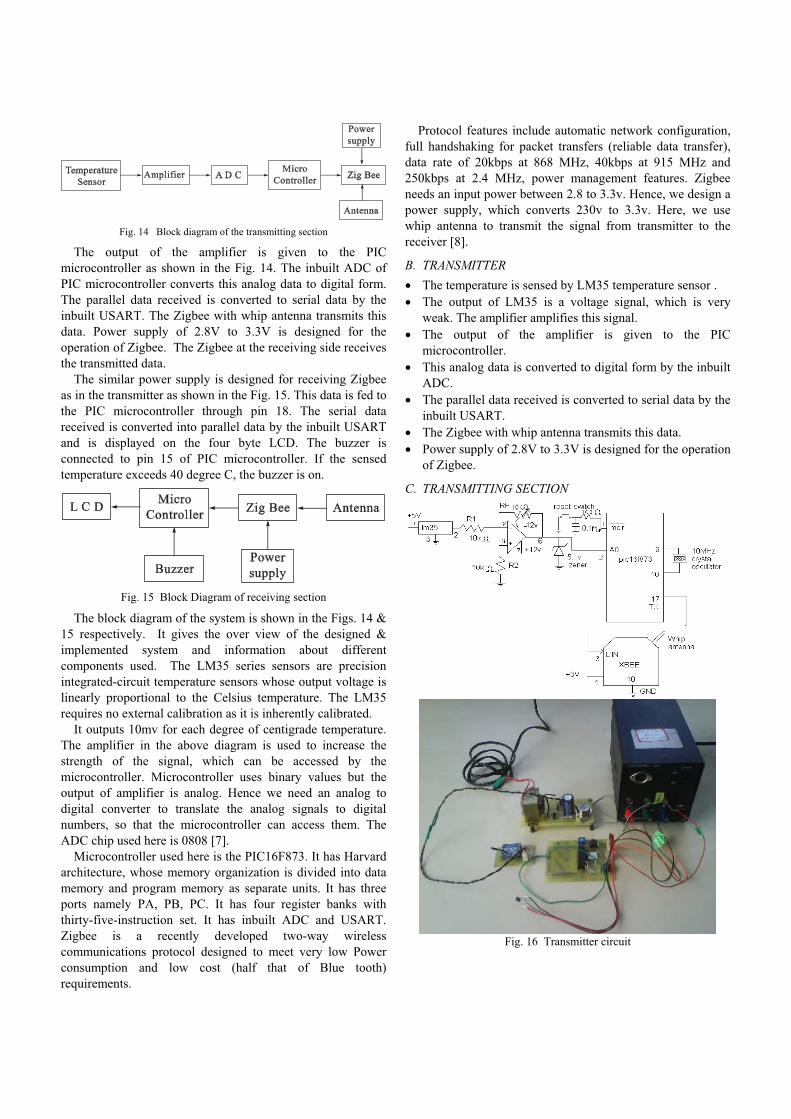
Fig. 14 Block diagram of the transmitting section
The output of the amplifier is given to the PIC
microcontroller as shown in the Fig. 14. The inbuilt ADC of
PIC microcontroller converts this analog data to digital form.
The parallel data received is converted to serial data by the
inbuilt USART. The Zigbee with whip antenna transmits this
data. Power supply of 2.8V to 3.3V is designed for the
operation of Zigbee. The Zigbee at the receiving side receives
the transmitted data.
The similar power supply is designed for receiving Zigbee
as in the transmitter as shown in the Fig. 15. This data is fed to
the PIC microcontroller through pin 18. The serial data
received is converted into parallel data by the inbuilt USART
and is displayed on the four byte LCD. The buzzer is
connected to pin 15 of PIC microcontroller. If the sensed
temperature exceeds 40 degree C, the buzzer is on.
Fig. 15 Block Diagram of receiving section
The block diagram of the system is shown in the Figs. 14 &
15 respectively. It gives the over view of the designed &
implemented system and information about different
components used. The LM35 series sensors are precision
integrated-circuit temperature sensors whose output voltage is
linearly proportional to the Celsius temperature. The LM35
requires no external calibration as it is inherently calibrated.
It outputs 10mv for each degree of centigrade temperature.
The amplifier in the above diagram is used to increase the
strength of the signal, which can be accessed by the
microcontroller. Microcontroller uses binary values but the
output of amplifier is analog. Hence we need an analog to
digital converter to translate the analog signals to digital
numbers, so that the microcontroller can access them. The
ADC chip used here is 0808 [7].
Microcontroller used here is the PIC16F873. It has Harvard
architecture, whose memory organization is divided into data
memory and program memory as separate units. It has three
ports namely PA, PB, PC. It has four register banks with
thirty-five-instruction set. It has inbuilt ADC and USART.
Zigbee is a recently developed two-way wireless
communications protocol designed to meet very low Power
consumption and low cost (half that of Blue tooth)
requirements.
Protocol features include automatic network configuration,
full handshaking for packet transfers (reliable data transfer),
data rate of 20kbps at 868 MHz, 40kbps at 915 MHz and
250kbps at 2.4 MHz, power management features. Zigbee
needs an input power between 2.8 to 3.3v. Hence, we design a
power supply, which converts 230v to 3.3v. Here, we use
whip antenna to transmit the signal from transmitter to the
receiver [8].
B. TRANSMITTER
The temperature is sensed by LM35 temperature sensor .
The output of LM35 is a voltage signal, which is very
weak. The amplifier amplifies this signal.
The output of the amplifier is given to the PIC
microcontroller.
This analog data is converted to digital form by the inbuilt
ADC.
The parallel data received is converted to serial data by the
inbuilt USART.
The Zigbee with whip antenna transmits this data.
Power supply of 2.8V to 3.3V is designed for the operation
of Zigbee.
C. TRANSMITTING SECTION
Fig. 16 Transmitter circuit
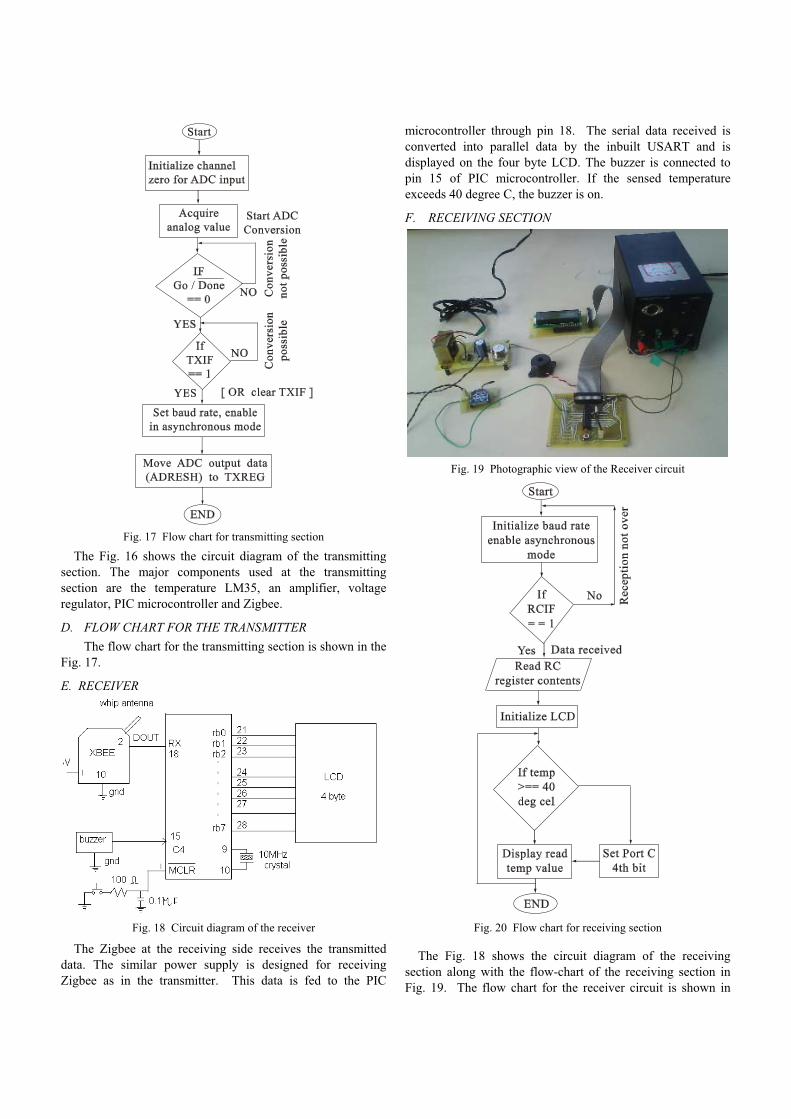
Fig. 17 Flow chart for transmitting section
The Fig. 16 shows the circuit diagram of the transmitting
section. The major components used at the transmitting
section are the temperature LM35, an amplifier, voltage
regulator, PIC microcontroller and Zigbee.
D. FLOW CHART FOR THE TRANSMITTER
The flow chart for the transmitting section is shown in the
Fig. 17.
E. RECEIVER
Fig. 18 Circuit diagram of the receiver
The Zigbee at the receiving side receives the transmitted
data. The similar power supply is designed for receiving
Zigbee as in the transmitter. This data is fed to the PIC
microcontroller through pin 18. The serial data received is
converted into parallel data by the inbuilt USART and is
displayed on the four byte LCD. The buzzer is connected to
pin 15 of PIC microcontroller. If the sensed temperature
exceeds 40 degree C, the buzzer is on.
F. RECEIVING SECTION
Fig. 19 Photographic view of the Receiver circuit
Fig. 20 Flow chart for receiving section
The Fig. 18 shows the circuit diagram of the receiving
section along with the flow-chart of the receiving section in
Fig. 19. The flow chart for the receiver circuit is shown in
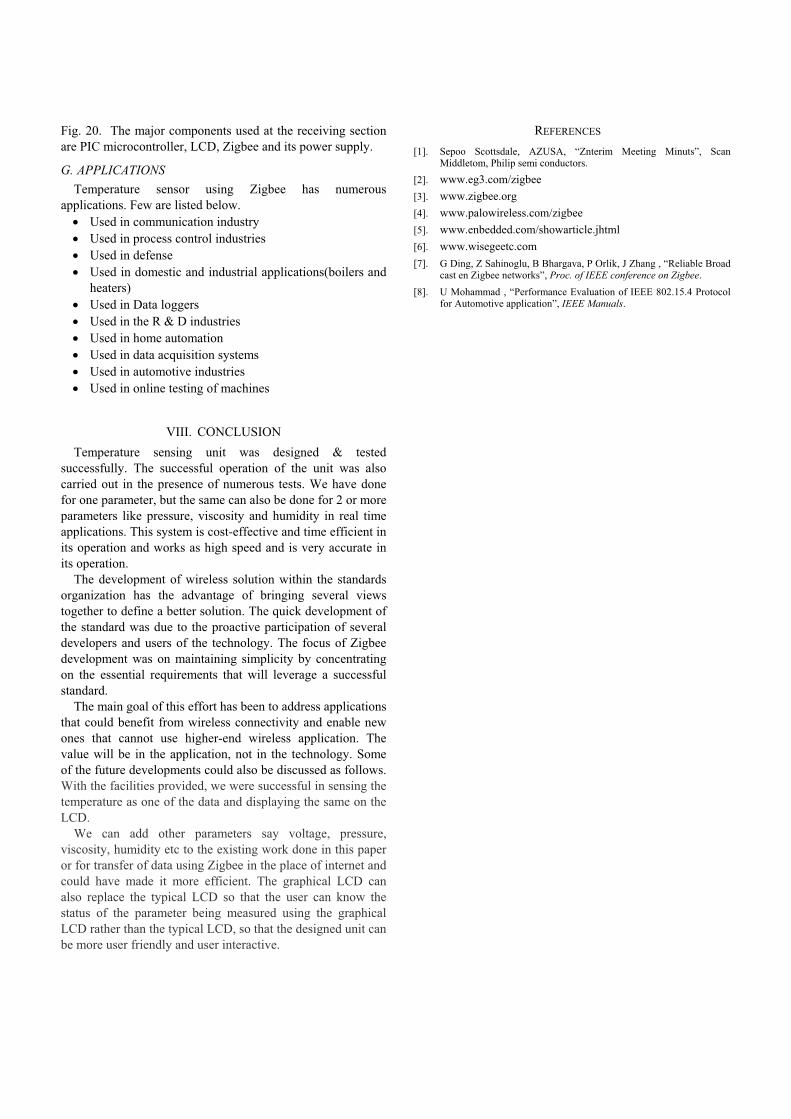
Fig. 20. The major components used at the receiving section
are PIC microcontroller, LCD, Zigbee and its power supply.
G. APPLICATIONS
Temperature sensor using Zigbee has numerous
applications. Few are listed below.
Used in communication industry
Used in process control industries
Used in defense
Used in domestic and industrial applications(boilers and
heaters)
Used in Data loggers
Used in the R & D industries
Used in home automation
Used in data acquisition systems
Used in automotive industries
Used in online testing of machines
VIII. CONCLUSION
Temperature sensing unit was designed & tested
successfully. The successful operation of the unit was also
carried out in the presence of numerous tests. We have done
for one parameter, but the same can also be done for 2 or more
parameters like pressure, viscosity and humidity in real time
applications. This system is cost-effective and time efficient in
its operation and works as high speed and is very accurate in
its operation.
The development of wireless solution within the standards
organization has the advantage of bringing several views
together to define a better solution. The quick development of
the standard was due to the proactive participation of several
developers and users of the technology. The focus of Zigbee
development was on maintaining simplicity by concentrating
on the essential requirements that will leverage a successful
standard.
The main goal of this effort has been to address applications
that could benefit from wireless connectivity and enable new
ones that cannot use higher-end wireless application. The
value will be in the application, not in the technology. Some
of the future developments could also be discussed as follows.
With the facilities provided, we were successful in sensing the
temperature as one of the data and displaying the same on the
LCD.
We can add other parameters say voltage, pressure,
viscosity, humidity etc to the existing work done in this paper
or for transfer of data using Zigbee in the place of internet and
could have made it more efficient. The graphical LCD can
also replace the typical LCD so that the user can know the
status of the parameter being measured using the graphical
LCD rather than the typical LCD, so that the designed unit can
be more user friendly and user interactive.
REFERENCES
[1]. Sepoo Scottsdale, AZUSA, “Znterim Meeting Minuts”, Scan Middletom, Philip semi conductors.
[2]. www.eg3.com/zigbee
[3]. www.zigbee.org
[4]. www.palowireless.com/zigbee
[5]. www.enbedded.com/showarticle.jhtml
[6]. www.wisegeetc.com
[7]. G Ding, Z Sahinoglu, B Bhargava, P Orlik, J Zhang , “Reliable Broad cast en Zigbee networks”, Proc. of IEEE conference on Zigbee.
[8]. U Mohammad , “Performance Evaluation of IEEE 802.15.4 Protocol for Automotive application”, IEEE Manuals.