Embed Size (px)
Citation preview
www.citrix.com
DEPLOYMENT GUIDE | Citrix XenApp, Amazon VPC
Deployment Guide
Citrix XenApp Amazon VPC

DEPLOYMENT GUIDE | Citrix XenApp, Amazon VPC
Table of ContentsIntroduction .........................................................................................................................................3Solution Requirements ........................................................................................................................4Prerequisites ........................................................................................................................................4Network Diagram ................................................................................................................................5VPC Network .......................................................................................................................................9
Create the VPC Network Infrastructure ..........................................................................................9Security Groups .................................................................................................................................11
Add NAT Security Group ..............................................................................................................11Add Public Security Group ...........................................................................................................13Add Private Security Group ..........................................................................................................15
DHCP Options ...................................................................................................................................17Create a DHCP Options set ..........................................................................................................17
XenApp Farm Servers .......................................................................................................................19Launching a XenApp AMI .............................................................................................................19Launch Remaining XenApp Farm AMIs ........................................................................................23
Elastic IP Addresses ..........................................................................................................................25Create and Assign IP Addresses ..................................................................................................25Hosts file .......................................................................................................................................26
Test ....................................................................................................................................................27Test the XenApp Farm .................................................................................................................27
IntroductionSince early 2006, Amazon Web Services (AWS) has provided companies of all sizes with an infrastructure web services platform in the cloud. With AWS you can requisition compute power, storage, and other services–gaining access to a suite of elastic IT infrastructure services as your business demands them. You pay only for what you use, with no up-front expenses or long-term commit-ments, making AWS the most cost-effective way to deliver your application to your customers and clients. And, with AWS, you can take advantage of Ama-zon.com’s global computing infrastructure that is the backbone of Amazon.com’s multi-billion retail business and transactional enterprise whose scalable, reliable, and secure distributed computing infrastructure has been honed for over a decade.
Amazon Web Services cost effective, dependable, flexible and comprehensive. With Amazon Web Services, you pay only for what you use, with no up-front expenses or long-term commitments. The Amazon cloud is scalable with mas-sive compute capacity and storage. It is reliable, redundant and secure.
Amazon Virtual Private Cloud (Amazon VPC) lets you provision a private, isolated section of the Amazon Web Services (AWS) Cloud where you can launch AWS resources in a virtual network that you define. With Amazon VPC, you can define a virtual network topology that closely resembles a tra-ditional network that you might operate in your own datacenter. You have complete control over your virtual networking environment, including selec-tion of your own IP address range, creation of subnets, and configuration of route tables and network gateways.
You can easily customize the network configuration for your Amazon VPC. For example, you can create a public-facing subnet for your webservers that has access to the Internet, and place your backend systems such as databases or application servers in a private-facing subnet with no Internet access. You can leverage multiple layers of security, including security groups and network access control lists, to help control access to Amazon EC2 instances in each subnet.
Citrix XenApp is an on-demand application delivery solution that enables any Windows® application to be virtualized, centralized, and managed in the datacenter and instantly delivered as a service to users anywhere on any de-vice. Compared to traditional application deployment technology, virtual ap-plication delivery with XenApp enables organizations to improve application management by centralizing applications in the datacenter to reduce costs, controlling and encrypting access to data and applications to improve secu-rity, and delivering applications instantly to users anywhere, anytime on any device.
This guide will show you how to create a XenApp farm in Amazon VPC, allowing you to further reduce cost while securely delivering applications to anyone, anywhere, anytime, on any device.
3

DEPLOYMENT GUIDE | Citrix XenApp, Amazon VPC
4
Solution Requirements• Citrix XenApp 6.0 Farm in Amazon VPC
Prerequisites• Amazon Web Services Account
• Microsoft Windows Terminal Services Licnces
• Citrix XenApp License
• Internet Browser

5
The following is the Network that was used to develop this deployment guide.
Network Diagram
Domain Controller
Citrix XenApp Farm“Amazon VPC”
Logical Network Diagram
Secure Gateway AppServer
XenApp
NAT
Bastion
public subnet 10.0.0.0 private subnet 10.0.1.0
Internet
xenapp.xencloud.net
appserver.xencloud.netsg.xencloud.net
bastion.xencloud.net
dc.xencloud.net
IP Address10.0.1.5
Web InterfaceXML Broker
Data CollectorSQL DatabaseLicense Server
XenApp WorkerApplication Server
IP Address10.0.0.6bastion.xencloud.net
IP Address10.0.0.202
IP Address10.0.0.5sg.xencloud.net
IP Address10.0.1.7
Public IP Address184.72.106.11
Public IP Address184.72.106.112
Public IP Address184.76.106.170
https://sg.xencloud.net
IP Address10.0.1.6
Fire
wal
l
Fire
wal
l

DEPLOYMENT GUIDE | Citrix XenApp, Amazon VPC
6
Inbound
Type Traffic SourceAll All privateSG
TCP 22 (SSH) 0.0.0.0/0
Inbound
Type Traffic SourceAll All publicSG
All publicSG
ICMP All 0.0.0.0/0
TCP 22 (SSH) 0.0.0.0/0
80 (HTTP) 0.0.0.0/0
443 (HTTPS) 0.0.0.0/0
1494 (ICA) 0.0.0.0/0
2598 (Sess) 0.0.0.0/0
3389 (RDP) 0.0.0.0/0
Outbound
Type Traffic SourceAll All 0.0.0.0/0
Outbound
Type Traffic SourceAll All 0.0.0.0/0
All privateSG
ICMP All 0.0.0.0/0
Security/Firewall MappingsNAT Security Group (NATSG)
Public Network Security Group (publicSG)
7
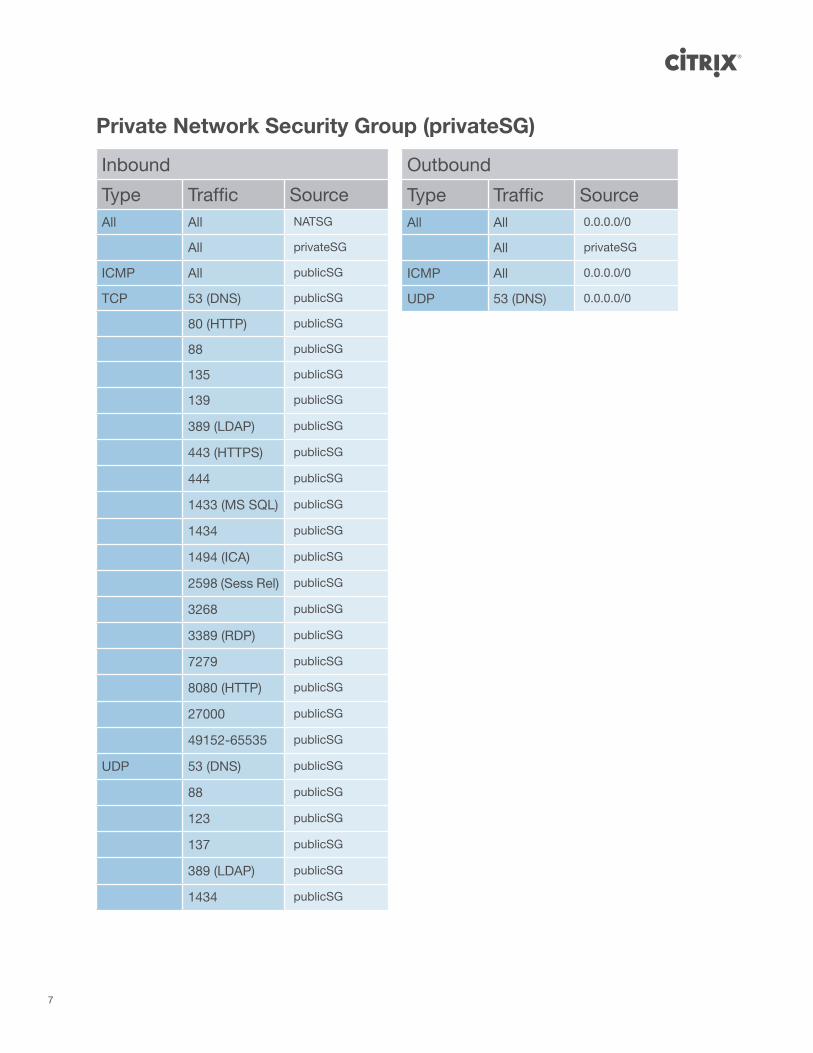
Inbound
Type Traffic SourceAll All NATSG
All privateSG
ICMP All publicSG
TCP 53 (DNS) publicSG
80 (HTTP) publicSG
88 publicSG
135 publicSG
139 publicSG
389 (LDAP) publicSG
443 (HTTPS) publicSG
444 publicSG
1433 (MS SQL) publicSG
1434 publicSG
1494 (ICA) publicSG
2598 (Sess Rel) publicSG
3268 publicSG
3389 (RDP) publicSG
7279 publicSG
8080 (HTTP) publicSG
27000 publicSG
49152-65535 publicSG
UDP 53 (DNS) publicSG
88 publicSG
123 publicSG
137 publicSG
389 (LDAP) publicSG
1434 publicSG
Outbound
Type Traffic SourceAll All 0.0.0.0/0
All privateSG
ICMP All 0.0.0.0/0
UDP 53 (DNS) 0.0.0.0/0
Private Network Security Group (privateSG)
DEPLOYMENT GUIDE | Citrix XenApp, Amazon VPC
8
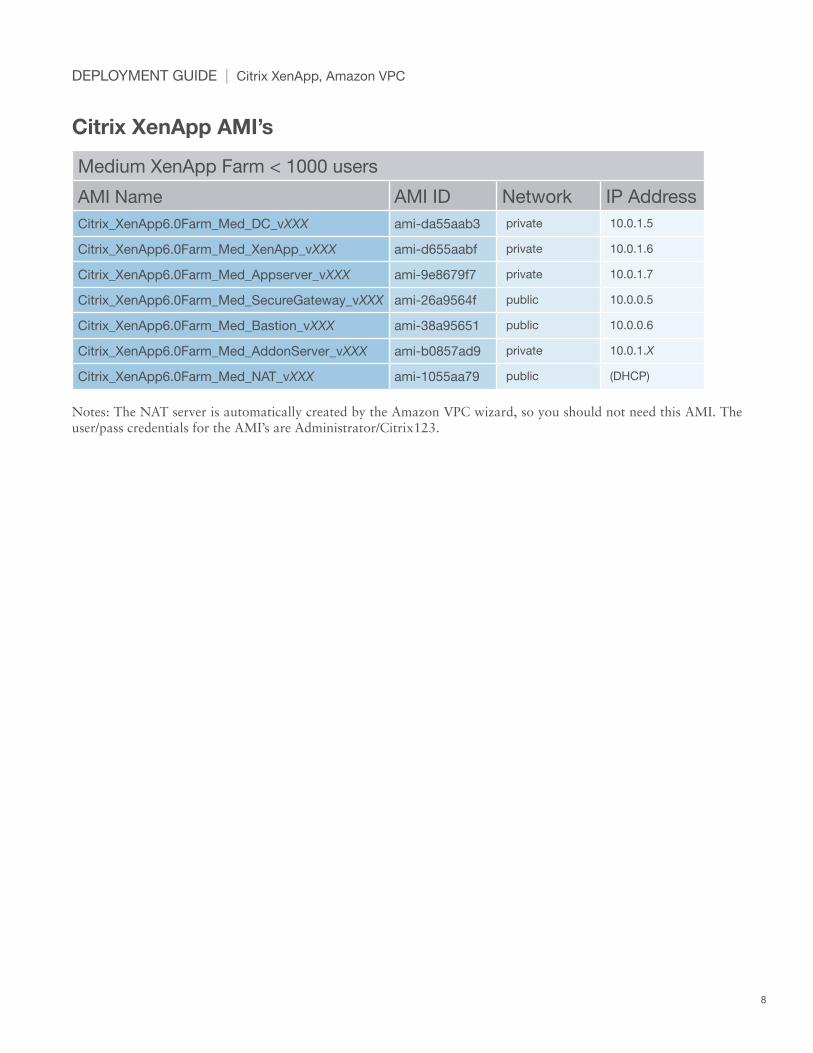
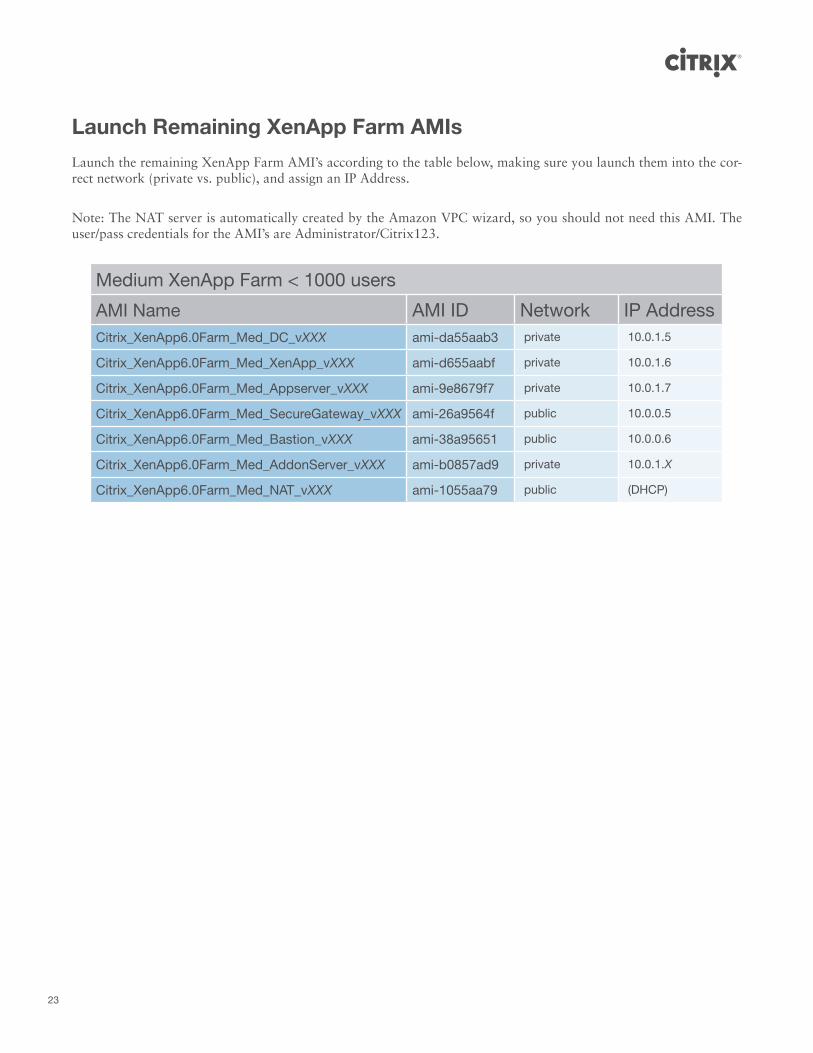
Medium XenApp Farm < 1000 users
AMI Name AMI ID Network IP AddressCitrix_XenApp6.0Farm_Med_DC_vXXX ami-da55aab3 private 10.0.1.5
Citrix_XenApp6.0Farm_Med_XenApp_vXXX ami-d655aabf private 10.0.1.6
Citrix_XenApp6.0Farm_Med_Appserver_vXXX ami-9e8679f7 private 10.0.1.7
Citrix_XenApp6.0Farm_Med_SecureGateway_vXXX ami-26a9564f public 10.0.0.5
Citrix_XenApp6.0Farm_Med_Bastion_vXXX ami-38a95651 public 10.0.0.6
Citrix_XenApp6.0Farm_Med_AddonServer_vXXX ami-b0857ad9 private 10.0.1.X
Citrix_XenApp6.0Farm_Med_NAT_vXXX ami-1055aa79 public (DHCP)
Citrix XenApp AMI’s
Notes: The NAT server is automatically created by the Amazon VPC wizard, so you should not need this AMI. The user/pass credentials for the AMI’s are Administrator/Citrix123.
9
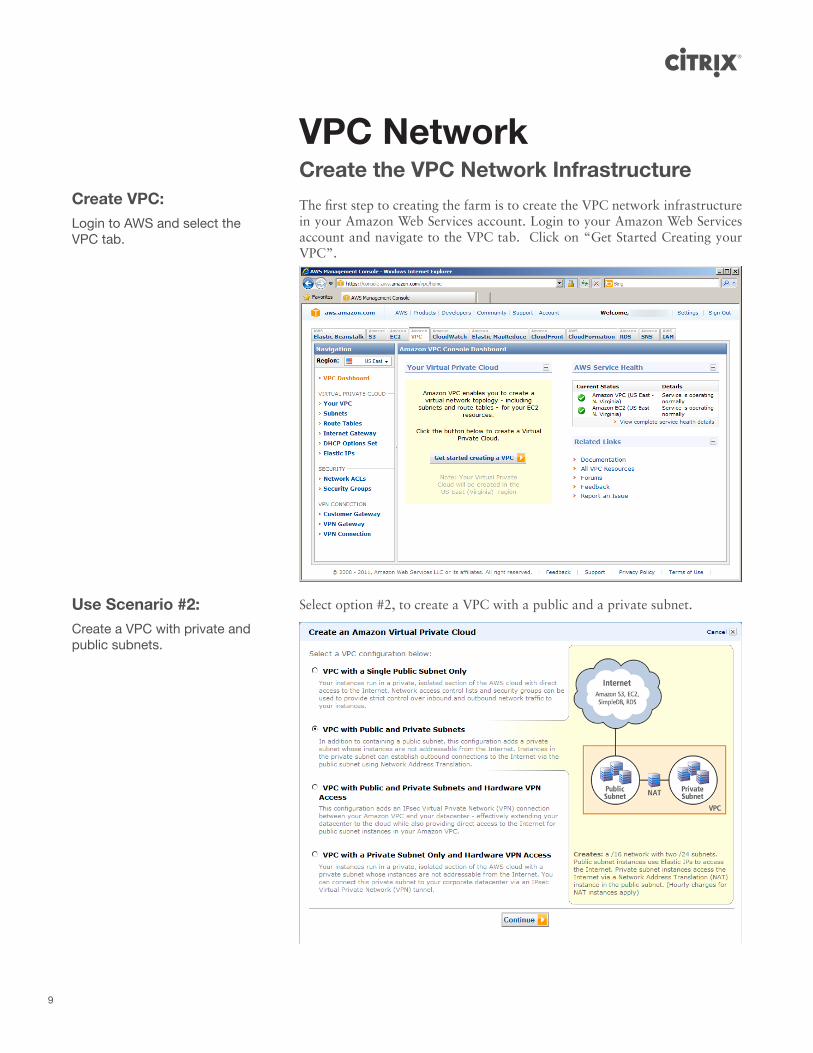
VPC NetworkCreate the VPC Network Infrastructure
The first step to creating the farm is to create the VPC network infrastructure in your Amazon Web Services account. Login to your Amazon Web Services account and navigate to the VPC tab. Click on “Get Started Creating your VPC”.
Select option #2, to create a VPC with a public and a private subnet.
Create VPC:Login to AWS and select the VPC tab.
Use Scenario #2:Create a VPC with private and public subnets.

DEPLOYMENT GUIDE | Citrix XenApp, Amazon VPC
10
Keep the default networking settings.
Use Defaults:Keep the default network settings.
VPC is created:When the wizard is finished, you will receive a message that your VPC has been created.
VPC is created:Things included in the automatically created VPC are the public and private subnets, the router, NAT gateway and the internet gateway.
11
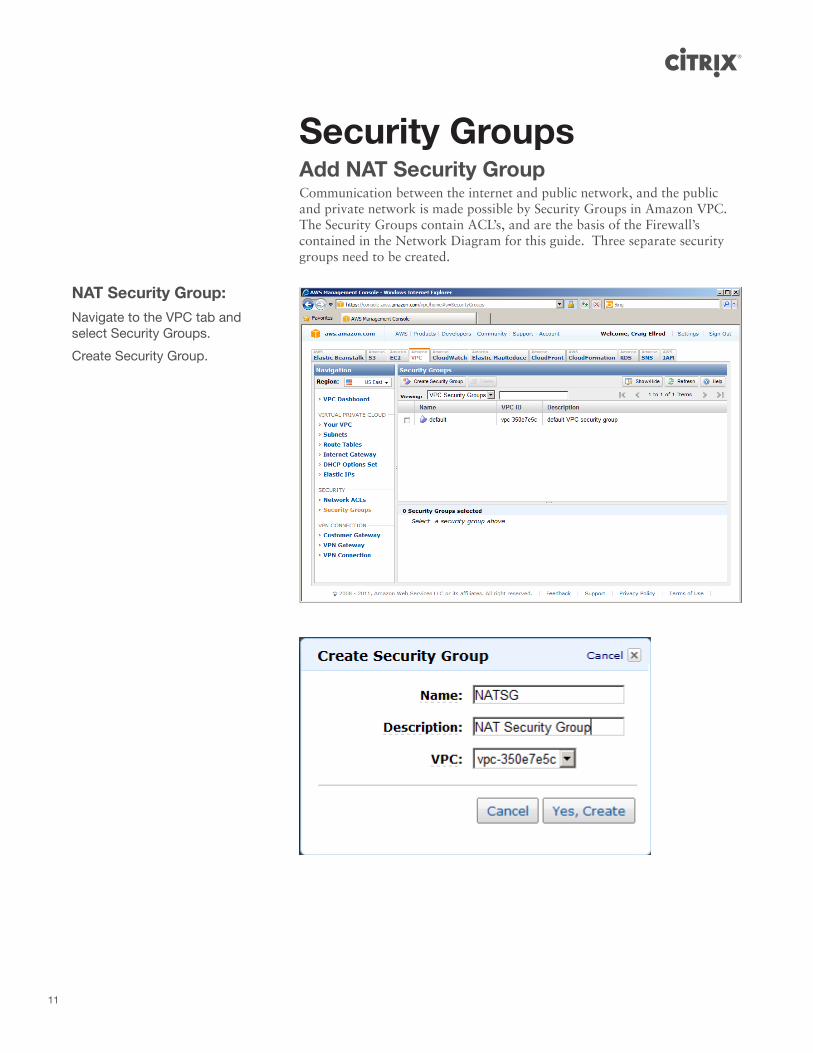
NAT Security Group:Navigate to the VPC tab and select Security Groups.
Create Security Group.
Security GroupsAdd NAT Security GroupCommunication between the internet and public network, and the public and private network is made possible by Security Groups in Amazon VPC. The Security Groups contain ACL’s, and are the basis of the Firewall’s contained in the Network Diagram for this guide. Three separate security groups need to be created.
DEPLOYMENT GUIDE | Citrix XenApp, Amazon VPC
12
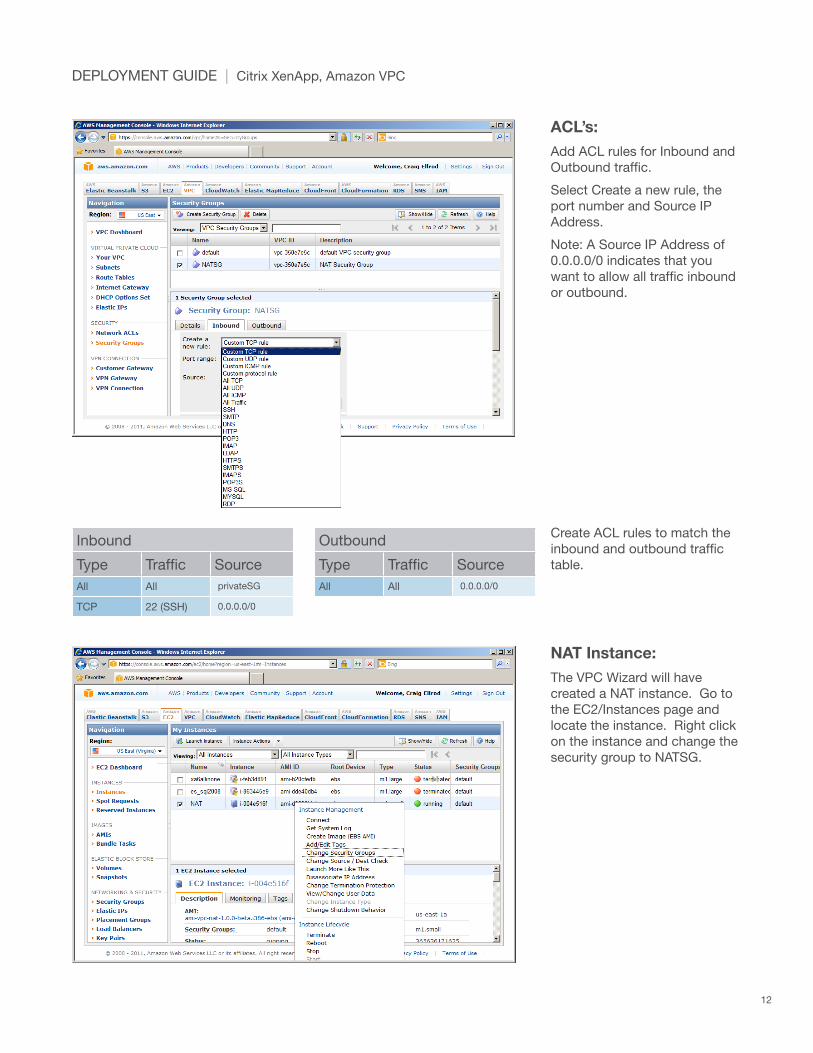
ACL’s:Add ACL rules for Inbound and Outbound traffic.
Select Create a new rule, the port number and Source IP Address.
Note: A Source IP Address of 0.0.0.0/0 indicates that you want to allow all traffic inbound or outbound.
NAT Instance:The VPC Wizard will have created a NAT instance. Go to the EC2/Instances page and locate the instance. Right click on the instance and change the security group to NATSG.
Create ACL rules to match the inbound and outbound traffic table.
Inbound
Type Traffic SourceAll All privateSG
TCP 22 (SSH) 0.0.0.0/0
Outbound
Type Traffic SourceAll All 0.0.0.0/0

13
Public Security Group:Navigate to the VPC tab and select Security Groups.
Create Security Group.
Add Public Security Group
ACL’s:Add ACL rules for Inbound and Outbound traffic.
Select Create a new rule, the port number and Source IP Address.
Note: A Source IP Address of 0.0.0.0/0 indicates that you want to allow all traffic inbound or outbound.
Create ACL rules to match the table.

DEPLOYMENT GUIDE | Citrix XenApp, Amazon VPC
14
Create ACL rules to match the Inbound and Outbound traffic table.
Inbound
Type Traffic SourceAll All publicSG
All publicSG
ICMP All 0.0.0.0/0
TCP 22 (SSH) 0.0.0.0/0
80 (HTTP) 0.0.0.0/0
443 (HTTPS) 0.0.0.0/0
1494 (ICA) 0.0.0.0/0
2598 (Sess) 0.0.0.0/0
3389 (RDP) 0.0.0.0/0
Outbound
Type Traffic SourceAll All 0.0.0.0/0
All privateSG
ICMP All 0.0.0.0/0
15
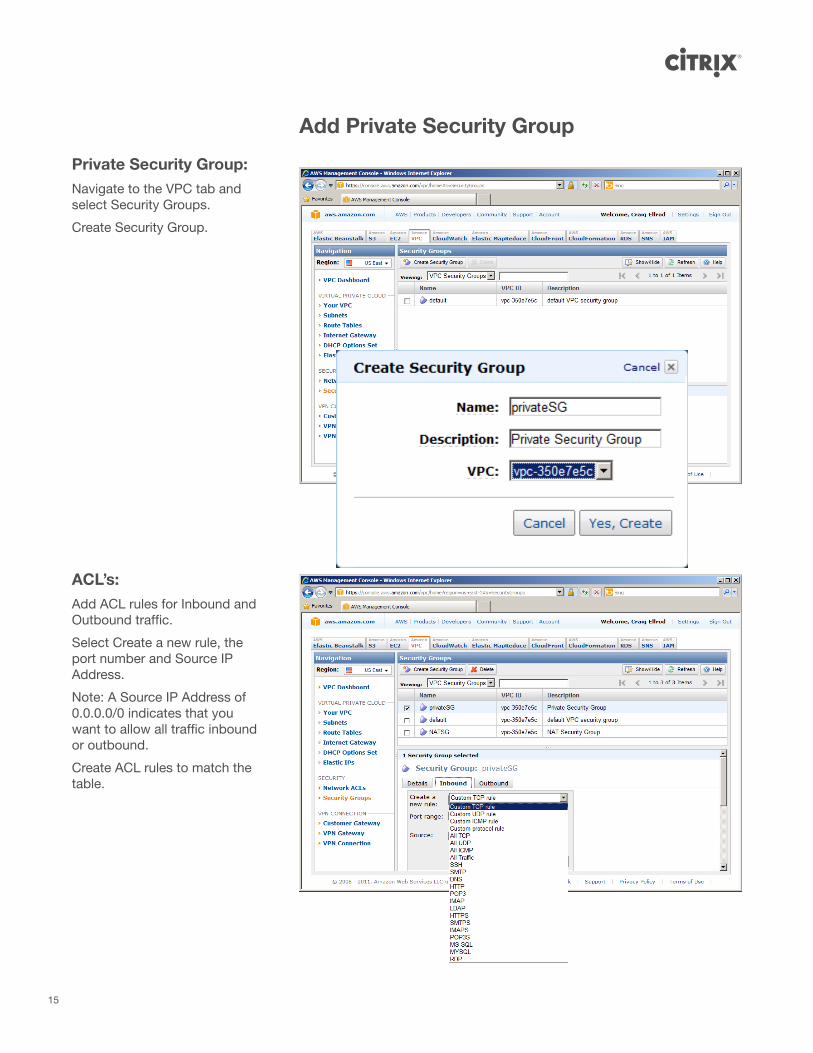
Private Security Group:Navigate to the VPC tab and select Security Groups.
Create Security Group.
Add Private Security Group
ACL’s:Add ACL rules for Inbound and Outbound traffic.
Select Create a new rule, the port number and Source IP Address.
Note: A Source IP Address of 0.0.0.0/0 indicates that you want to allow all traffic inbound or outbound.
Create ACL rules to match the table.

DEPLOYMENT GUIDE | Citrix XenApp, Amazon VPC
16
Create ACL rules to match the Inbound and Outbound traffic table.
Inbound
Type Traffic SourceAll All NATSG
All privateSG
ICMP All publicSG
TCP 53 (DNS) publicSG
80 (HTTP) publicSG
88 publicSG
135 publicSG
139 publicSG
389 (LDAP) publicSG
443 (HTTPS) publicSG
444 publicSG
1433 (MS SQL) publicSG
1434 publicSG
1494 (ICA) publicSG
2598 (Sess Rel) publicSG
3268 publicSG
3389 (RDP) publicSG
7279 publicSG
8080 (HTTP) publicSG
27000 publicSG
49152-65535 publicSG
UDP 53 (DNS) publicSG
88 publicSG
123 publicSG
137 publicSG
389 (LDAP) publicSG
1434 publicSG
Outbound
Type Traffic SourceAll All 0.0.0.0/0
All privateSG
ICMP All 0.0.0.0/0
UDP 53 (DNS) 0.0.0.0/0
17
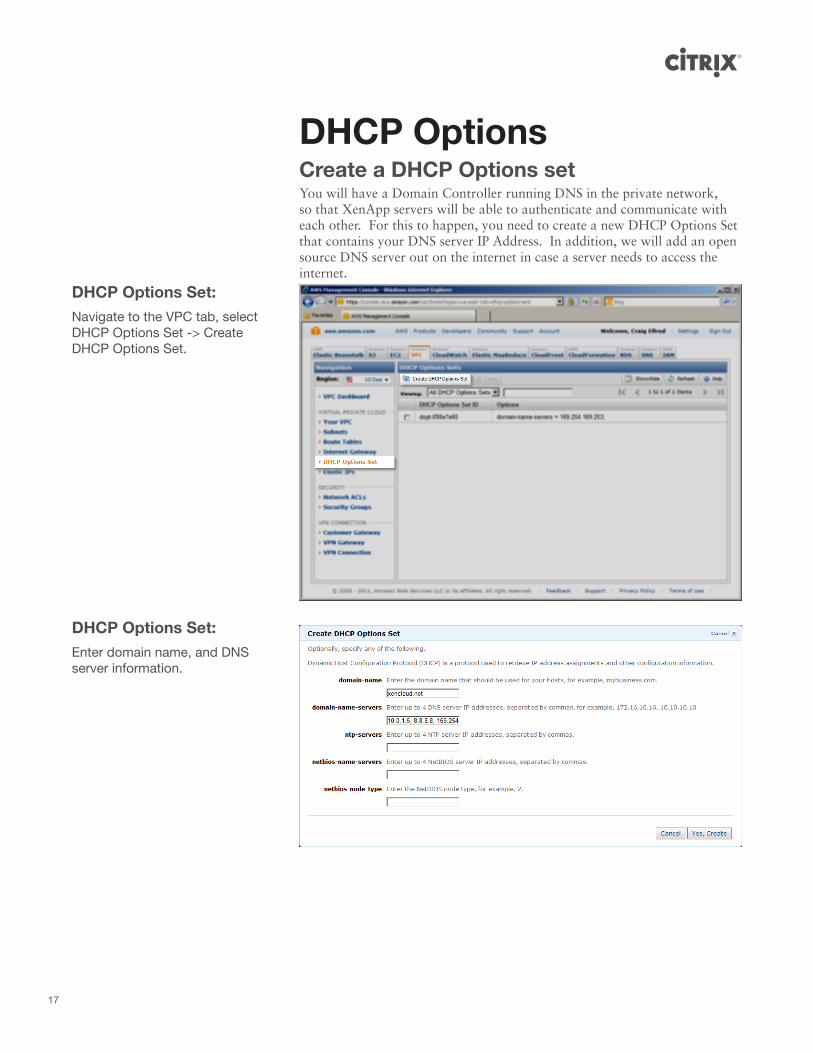
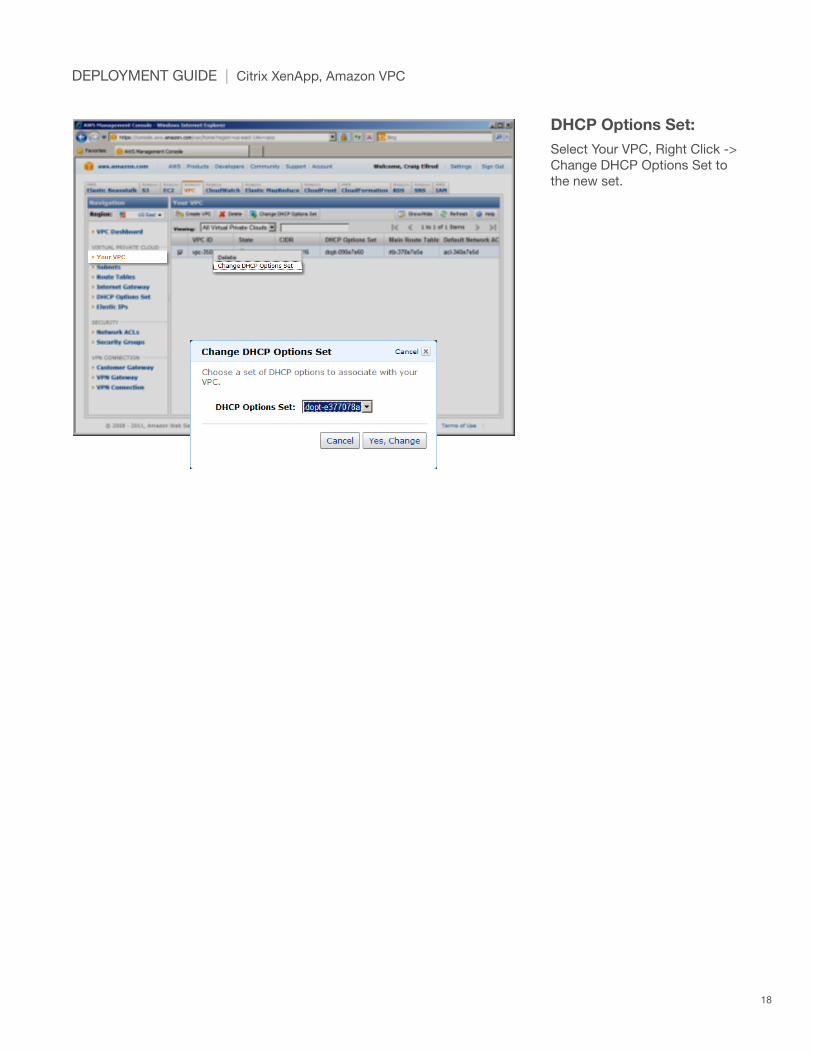
DHCP Options Set:Navigate to the VPC tab, select DHCP Options Set -> Create DHCP Options Set.
DHCP Options Set:Enter domain name, and DNS server information.
DHCP OptionsCreate a DHCP Options setYou will have a Domain Controller running DNS in the private network, so that XenApp servers will be able to authenticate and communicate with each other. For this to happen, you need to create a new DHCP Options Set that contains your DNS server IP Address. In addition, we will add an open source DNS server out on the internet in case a server needs to access the internet.
DEPLOYMENT GUIDE | Citrix XenApp, Amazon VPC
18
DHCP Options Set:Select Your VPC, Right Click -> Change DHCP Options Set to the new set.

19
Launch AMIs:Navigate to the EC2 tab, AMIs.
Perform a serach in Public AMIs for “Citrix_XenApp6.0Farm_Med*”.
This will list all of the AMIs prepared for building this farm.
Launch DC AMI:You must first create a Domain Controller for the farm.
Select Citrix_XenApp6.0Farm_Med_DC_vXXX, Right Click -> Launch Instance.
XenApp Farm ServersLaunching a XenApp AMINow we will create the servers that make up the XenApp farm. For this we have created some pre-configured Amazon Machine Images (AMIs) for use in this type of farm.

DEPLOYMENT GUIDE | Citrix XenApp, Amazon VPC
20
Select Subnet:Select “Launch Instances Into Your Virtual Private Cloud”.
For the Domain Controller, you want it to be in the Private Subnet 10.0.1.0/24.
Assign IP Address:Assign the IP Address for this server.

21
Friendly Name:Give the AMI a friendly name to make it easily identifiable in the Amazon Console.
Keypair:Choose an existing AWS keypair or create a new one.

DEPLOYMENT GUIDE | Citrix XenApp, Amazon VPC
22
Network Placement:Launch the AMI into the appropriate network.
We are going to place the Domain Controller into the Private Network.
Review:Review settings and Launch.
23
Medium XenApp Farm < 1000 users
AMI Name AMI ID Network IP AddressCitrix_XenApp6.0Farm_Med_DC_vXXX ami-da55aab3 private 10.0.1.5
Citrix_XenApp6.0Farm_Med_XenApp_vXXX ami-d655aabf private 10.0.1.6
Citrix_XenApp6.0Farm_Med_Appserver_vXXX ami-9e8679f7 private 10.0.1.7
Citrix_XenApp6.0Farm_Med_SecureGateway_vXXX ami-26a9564f public 10.0.0.5
Citrix_XenApp6.0Farm_Med_Bastion_vXXX ami-38a95651 public 10.0.0.6
Citrix_XenApp6.0Farm_Med_AddonServer_vXXX ami-b0857ad9 private 10.0.1.X
Citrix_XenApp6.0Farm_Med_NAT_vXXX ami-1055aa79 public (DHCP)
Launch Remaining XenApp Farm AMIs
Launch the remaining XenApp Farm AMI’s according to the table below, making sure you launch them into the cor-rect network (private vs. public), and assign an IP Address.
Note: The NAT server is automatically created by the Amazon VPC wizard, so you should not need this AMI. The user/pass credentials for the AMI’s are Administrator/Citrix123.

DEPLOYMENT GUIDE | Citrix XenApp, Amazon VPC
24
25
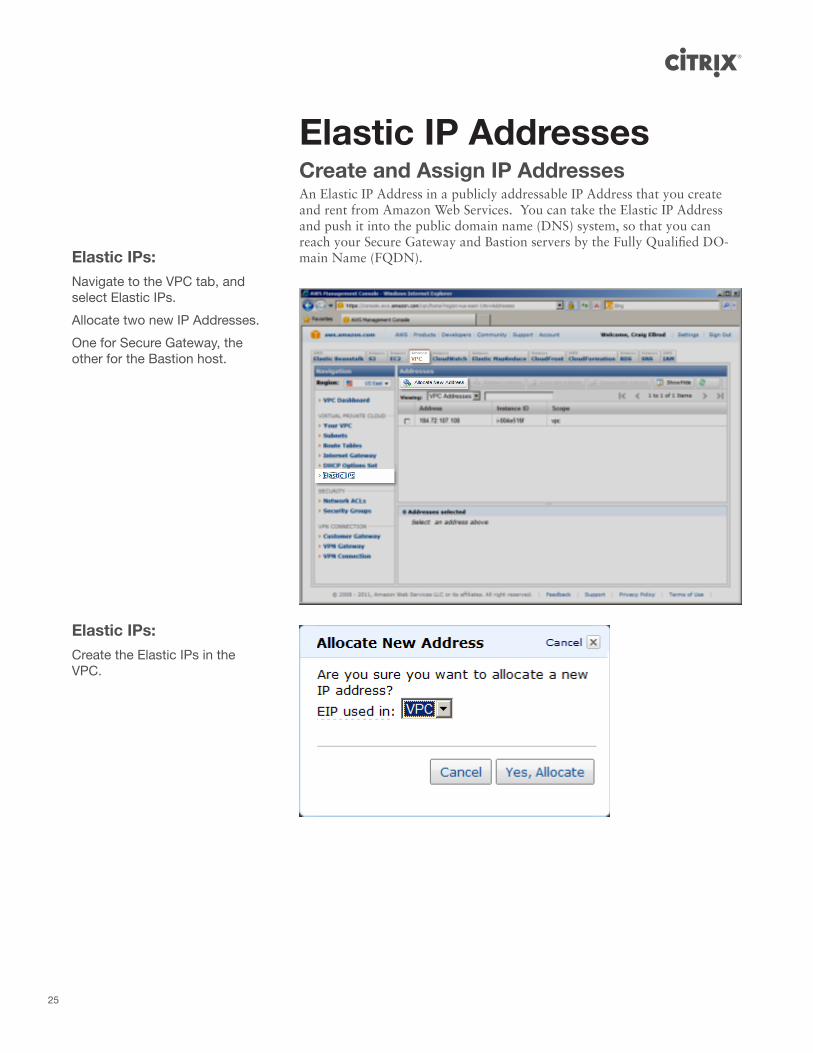
Elastic IPs:Navigate to the VPC tab, and select Elastic IPs.
Allocate two new IP Addresses.
One for Secure Gateway, the other for the Bastion host.
Elastic IPs:Create the Elastic IPs in the VPC.
Elastic IP AddressesCreate and Assign IP AddressesAn Elastic IP Address in a publicly addressable IP Address that you create and rent from Amazon Web Services. You can take the Elastic IP Address and push it into the public domain name (DNS) system, so that you can reach your Secure Gateway and Bastion servers by the Fully Qualified DO-main Name (FQDN).

DEPLOYMENT GUIDE | Citrix XenApp, Amazon VPC
26
Associate IPs:Right Click the new IP Address, Associate the IP Address to your instance.
Hosts file:On your local computer (client) to be used for testing this farm, open the “hosts” file located in C:\Windows\System32\drivers\etc.
Open the file with notepad, and make an entry for the Secure Gateway and Bastion host.
Save the file.
Try ping’ing the FQDN of each host.
Hosts fileIn a XenApp Farm where you have created your own Domain Controller with your own domain, ex: <yourdomain.com>, you would use the Elastic IP Address of the Secure Gateway, and optionally the Bastion host, in the public DNS system so that you can reach the XenApp Secure Gateway by FQDN, so that your certificate will be valid.
In this demo farm, you should simply make an entry in your local “hosts” file, to resolve the XenApp Secure Gateway FQDN manually.

27
Test:On a client machine, open a browser, and navigate to http://citrix.com -> Downloads -> XenApp, and download and install the Online Plugin for Windows.
Test:On a client machine, open a browser, and enter https://sg.xencloud.net into the URL Field.
You will see the XenApp login screen.
Several test accounts have been created:
user1/Citrix123
user2/Citrix123
user3/Citrix123
user4/Citrix123
user5/Citrix123
TestTest the XenApp Farm To access the XenApp Farm, you will use an internet browser to connect to the XenApp Secure Gateway.

DEPLOYMENT GUIDE | Citrix XenApp, Amazon VPC
28
Test:The applications that are installed in the XenApp farm should enumerate in the browser. Select one and launch it, it will be delivered from the farm in the cloud to your client machine.

Worldwide HeadquartersCitrix Systems, Inc. 851 West Cypress Creek Road Fort Lauderdale, FL 33309, USAT +1 800 393 1888 T +1 954 267 3000
AmericasCitrix Silicon Valley 4988 Great American Parkway Santa Clara, CA 95054, USAT +1 408 790 8000
EuropeCitrix Systems International GmbH Rheinweg 9 8200 Schaffhausen, SwitzerlandT +41 52 635 7700
Asia PacificCitrix Systems Hong Kong Ltd. Suite 3201, 32nd Floor One International Finance Centre 1 Harbour View Street Central, Hong KongT +852 2100 5000
Citrix Online Division6500 Hollister Avenue Goleta, CA 93117, USAT +1 805 690 6400
www.citrix.com
About Citrix
Citrix Systems, Inc. (NASDAQ:CTXS) is the leading provider of virtualization, networking and software as a service technologies for more than 230,000 organizations worldwide. Its Citrix Delivery Center, Citrix Cloud Center (C3) and Citrix Online Services product families radically simplify computing for millions of users, delivering applications as an on-demand service to any user, in any location on any device. Citrix customers include the world’s largest Internet companies, 99 percent of Fortune Global 500 enterprises, and hundreds of thousands of small businesses and prosumers worldwide. Citrix partners with over 10,000 companies worldwide in more than 100 countries. Founded in 1989, annual revenue in 2008 was $1.6 billion.The information in this publication is subject to change without notice.
THIS PUBLICATION IS PROVIDED “AS IS” WITHOUT WARRANTIES OF ANY KIND, EXPRESS OR IMPLIED, INCLUDING ANY WARRANTIES OF MERCHANTABILITY, FITNESS FOR A PARTICULAR PURPOSE OR NONINFRINGEMENT. CITRIX SYSTEMS, INC. (“CITRIX”), SHALL NOT BE LIABLE FOR TECHNICAL OR EDITORIAL ERRORS OR OMISSIONS CONTAINED HEREIN, NOR FOR DIRECT, INCIDENTAL, CONSEQUENTIAL OR ANY OTHER DAMAGES RESULTING FROM THE FURNISHING, PERFORMANCE, OR USE OF THIS PUBLICATION, EVEN IF CITRIX HAS BEEN ADVISED OF THE POSSIBILITY OF SUCH DAMAGES IN ADVANCE.
This publication contains information protected by copyright. Except for internal distribution, no part of this publication may be photocopied or reproduced in any form without prior written consent from Citrix.
The exclusive warranty for Citrix products, if any, is stated in the product documentation accompanying such products. Citrix does not warrant products other than its own.
Product names mentioned herein may be trademarks and/or registered trademarks of their respective companies.
© 2009 Citrix Systems, Inc., 851 West Cypress Creek Road, Ft. Lauderdale, Florida 33309-2009 U.S.A. All rights reserved.