Embed Size (px)
Citation preview
Technology Compatibility Kit Reference
Guide for JSR-299: Context and
Dependency Injection for Java EE
Specification
Lead: Red Hat Inc.
Gavin King
JSR-299: Contexts and Dependency Injection
(CDI) for Java EE specification lead (Red Hat, Inc.)
Pete Muir
CDI TCK lead (Red Hat, Inc.)
Dan Allen
CDI TCK developer (Red Hat, Inc.)

iii
Preface ............................................................................................................................. v
1. Who Should Use This Book ................................................................................... v
2. Before You Read This Book ................................................................................... v
3. How This Book Is Organized .................................................................................. v
I. Getting Acquainted with the TCK .................................................................................... 1
1. Introduction (CDI TCK) ........................................................................................ 3
1.1. TCK Primer ................................................................................................ 3
1.2. Compatibility Testing ................................................................................... 3
1.2.1. Why Compatibility Is Important .......................................................... 4
1.3. About the CDI TCK ..................................................................................... 4
1.3.1. CDI TCK Specifications and Requirements ........................................ 4
1.3.2. CDI TCK Components ...................................................................... 5
2. Appeals Process .................................................................................................. 7
2.1. Who can make challenges to the TCK? ....................................................... 7
2.2. What challenges to the TCK may be submitted? ........................................... 7
2.3. How these challenges are submitted? .......................................................... 7
2.4. How and by whom challenges are addressed? ............................................. 8
2.5. How accepted challenges to the TCK are managed? .................................... 8
3. Installation ........................................................................................................... 9
3.1. Obtaining the Software ................................................................................ 9
3.2. The TCK Environment ................................................................................ 9
3.3. Eclipse Plugins ......................................................................................... 11
3.3.1. TestNG Plugin ............................................................................... 11
3.3.2. Maven 2 Plugin (m2eclipse) ............................................................ 11
4. Configuration ..................................................................................................... 13
4.1. TCK Harness Properties ............................................................................ 13
4.2. The Porting Package ................................................................................ 14
4.3. Using the CDI TCK with the Java EE Web Profile ....................................... 14
4.4. Using custom deployment descriptors ........................................................ 15
4.5. Configuring TestNG to execute the TCK ..................................................... 15
4.6. Configuring your build environment to execute the TCK ............................... 16
4.7. Configuring your application server to execute the TCK ............................... 16
5. Reporting ........................................................................................................... 17
5.1. CDI TCK Coverage Metrics ....................................................................... 17
5.2. CDI TCK Coverage Report ........................................................................ 17
5.2.1. CDI TCK Assertions ....................................................................... 17
5.2.2. Producing the Coverage Report ...................................................... 18
5.2.3. TestNG Reports ............................................................................. 19
II. Executing and Debugging Tests ................................................................................... 27
6. Running the Signature Test ............................................................................... 29
6.1. Obtaining the sigtest tool ........................................................................... 29
6.2. Running the signature test ......................................................................... 29
6.3. Forcing a signature test failure ................................................................... 29
7. Executing the Test Suite ................................................................................... 31
Technology Compatibility Kit ...
iv
7.1. The Test Suite Runner .............................................................................. 31
7.2. Running the Tests In Standalone Mode ...................................................... 31
7.3. Running the Tests In the Container ............................................................ 32
7.4. Dumping the Test Artifacts ........................................................................ 32
8. Running Tests in Eclipse ................................................................................... 35
8.1. Leveraging Eclipse's plugin ecosystem ....................................................... 35
8.2. Readying the Eclipse workspace ................................................................ 35
8.3. Running a test in standalone mode ............................................................ 37
8.4. Running integration tests ........................................................................... 38
9. Debugging Tests in Eclipse ............................................................................... 41
9.1. Debugging a standalone test ..................................................................... 41
9.2. Debugging an integration test .................................................................... 41
9.2.1. Attaching the IDE debugger to the container .................................... 42
9.2.2. Launching the test in the debugger ................................................. 42
III. JBoss Test Harness .................................................................................................... 43
10. Introduction (JBoss Test Harness) .................................................................. 45
10.1. Negotiating the execution of an in-container test ....................................... 46
11. Configuration ................................................................................................... 49
11.1. JBoss Test Harness Properties ................................................................ 49
12. Executing a Test Suite ..................................................................................... 53
12.1. Building a test suite runner using Maven 2 ............................................... 53
12.2. Dumping the Test Artifacts to Disk ........................................................... 55
v
Preface
This guide describes how to download, install, configure, and run the Technology Compatibility
Kit (TCK) used to verify the compatibility of an implementation of the JSR-299: Context and
Dependency Injection for Java EE (CDI) specification.
The CDI TCK is built atop the JBoss Test Harness, a portable and configurable automated test
suite for authoring unit and integration tests in a Java EE environment. The CDI TCK 1.0.0 uses
the JBoss Test Harness version 1.0.0 to execute the test suite.
The CDI TCK is provide under the Apache Public License 2.0 [http://www.apache.org/licenses/
LICENSE-2.0].
1. Who Should Use This Book
This guide is for implementors of the Context and Dependency Injection for Java EE 1.0
technology to assist in running the test suite that verifies the compatibility of their implementation.
2. Before You Read This Book
Before reading this guide, you should familiarize yourself with the Java EE programming model,
specifically the Enterprise JavaBeans (EJB) 3.0 and the Contexts and Dependency Injection for
Java EE 1.0 specifications. A good resource for the Java EE programming model is the JCP [http://
jcp.org] web site.
The CDI TCK is based on the Context and Dependency Injection for Java EE technology
specification 1.0 (JSR-299). Information about the specification, including links to the specification
documents, can be found on the JSR-299 JCP page [http://jcp.org/en/jsr/detail?id=299].
Before running the tests in the CDI TCK, read and become familiar with the JBoss Test Harness
Reference Guide (pending), which describes how the test harness functions.
3. How This Book Is Organized
If you are running the CDI TCK for the first time, read Chapter 1, Introduction (CDI TCK)
and Chapter 10, Introduction (JBoss Test Harness) completely for the necessary background
information about the TCK and the JBoss Test Harness, respectively. Once you have reviewed
that material, perform the steps outlined in the remaining chapters.
• Chapter 1, Introduction (CDI TCK) gives an overview of the principles that apply generally to all
Technology Compatibility Kits (TCKs), outlines the appeals process and describes the CDI TCK
architecture and components. It also includes a broad overview of how the TCK is executed
and lists the platforms on which the TCK has been tested and verified.
• Chapter 2, Appeals Process explains the process to be followed by an implementor should they
wish to challenge any test in the TCK.
Preface
vi
• Chapter 3, Installation explains where to obtain the required software for the CDI TCK and how
to install it. It covers both the primary TCK components as well as tools useful for troubleshooting
tests.
• Chapter 4, Configuration details the configuration of the JBoss Test Harness, how to create a
TCK runner for the TCK test suite and the mechanics of how an in-container test is conducted.
• Chapter 5, Reporting explains the test reports that are generated by the TCK test suite and
introduces the TCK audit report as a tool for measuring the completeness of the TCK in testing
the JSR-299 specification and in understanding how testcases relate to the specification.
• Chapter 7, Executing the Test Suite documents how the TCK test suite is executed. It covers
both modes supported by the TCK, standalone and in-container, and shows how to dump the
generated test artifacts to disk.
• Chapter 8, Running Tests in Eclipse shows how to run individual tests in Eclipse and advises
the best way to setup your Eclipse workspace for running the tests.
• Chapter 9, Debugging Tests in Eclipse builds on Chapter 8, Running Tests in Eclipse by detailing
how to debug individual tests in Eclipse.
• Part III, “JBoss Test Harness” includes excerpts from the JBoss Test Harness Reference Guide.
How to configure the JBoss Test Harness as it relates to the CDI TCK is presented in Chapter 4,
Configuration. However, to aid in debugging or configuring the TCK in your environment, you
may want to read in more detail how to use the JBoss Test Harness.
Part I. Getting
Acquainted with the TCKThe CDI TCK must be used to ensure that your implementation conforms to the CDI specification.
This part introduces the TCK, gives some background about its purpose, states the requirements
for passing the TCK and outlines the appeals process.
In this part you will learn where to obtain the CDI TCK and supporting software. You are then
presented with recommendations of how to organize and configure the software so that you are
ready to execute the TCK.
Finally, it discusses the reporting provided by the TCK.

Chapter 1.
3
Introduction (CDI TCK)This chapter explains the purpose of a TCK and identifies the foundation elements of the CDI TCK.
1.1. TCK Primer
A TCK, or Technology Compatibility Kit, is one of the three required pieces for any JSR (the other
two being the specification document and the reference implementation). The TCK is a set of
tools and tests to verify that an implementation of the technology conforms to the specification.
The tests are the primary component, but the tools serve an equally critical role of providing a
framework and/or set of SPIs for executing the tests.
The tests in the TCK are derived from assertions in the written specification document. The
assertions are itemized in an XML document, where they each get assigned a unique identifier,
and materialize as a suite of automated tests that collectively validate whether an implementation
complies with the aforementioned assertions, and in turn the specification. For a particular
implementation to be certified, all of the required tests must pass (i.e., the provided test suite must
be run unmodified).
A TCK is entirely implementation agnostic. Ideally, it should validate assertions by consulting the
specficiation's public API. However, when the information returned by the public API is not low-
level enough to validate the assertion, the implementation must be consulted directly. In this case,
the TCK provides an independent API as part of a porting package that enables this transparency.
The porting package must be implemented for each CDI implementation. Section 1.3.4 introduces
the porting package and section 4.1 covers the requirements for implementing it.
Note
Sun Microsystems, Inc. will implement the porting package for the CDI RI and test
the CDI RI on the Java EE Reference Implementation.
1.2. Compatibility Testing
The goal of any specification is to eliminate portability problems so long as the program which
uses the implementation also conforms to the rules laid out in the specification.
Executing the TCK is a form of compatibility testing. It's important to understand that compatibility
testing is distinctly different from product testing. The TCK is not concerned with robustness,
performance or ease of use, and therefore cannot vouch for how well an implementation meets
these criteria. What a TCK can do is to ensure the exactness of an implementation as it relates
to the specification.
Compatibility testing of any feature relies on both a complete specification and a complete
reference implementation. The reference implementation demonstrates how each test can
Chapter 1. Introduction (CDI TCK)
4
be passed and provides additional context to the implementor during development for the
corresponding assertion.
1.2.1. Why Compatibility Is Important
Java platform compatibility is important to different groups involved with Java technologies for
different reasons:
• Compatibility testing is the means by which the JCP ensures that the Java platform does not
become fragmented as it's ported to different operating systems and hardware.
• Compatibility testing benefits developers working in the Java programming language,
enabling them to write applications once and deploy them across heterogeneous computing
environments without porting.
• Compatibility testing enables application users to obtain applications from disparate sources
and deploy them with confidence.
• Conformance testing benefits Java platform implementors by ensuring the same extent of
reliability for all Java platform ports.
The CDI specification goes to great lengths to ensure that programs written for Java EE are
compatible and the TCK is rigorous about enforcing the rules the specification lays down.
1.3. About the CDI TCK
The CDI TCK is designed as a portable, configurable and automated test suite for verifying the
compatibility of an implementation of the JSR-299: Contexts and Dependency Injection for Java
EE specification. The test suite is built atop TestNG and provides a series of extensions that allow
runtime packaging and deployment of JEE artifacts for in-container testing (JBoss Test Harness).
Note
The CDI TCK harness is based on the JBoss Test harness, which provides most
of the aforementioned functionality.
Each test class in the suite acts as a deployable unit. The deployable units, or artifacts, are defined
declaratively using annotations. The artifact produced can be either a WAR or an EAR.
The declarative approach allows many of the tests to be executed in a standalone implementation
of CDI, accounting for a boast in developer productivity. However, an implementation is only valid if
all tests pass using the in-container execution mode. The standalone mode is merely a developer
convenience.
1.3.1. CDI TCK Specifications and Requirements
This section lists the applicable requirements and specifications for the CDI TCK.
CDI TCK Components
5
• Specification requirements - Software requirements for a CDI implementation are itemized in
section 1.2, "Relationship to other specifications" in the CDI specification, with details provided
throughout the specification. Generally, the CDI specification targets the Java EE 6 platform
and is aligned with its specifications.
• Contexts and Dependency Injection for Java EE 1.0 API - The Java API defined in the CDI
specification and provided by the reference implementation.
• JBoss Test Harness - The CDI TCK requires version 1.1.0-CR3 of the JBoss Test Harness.
The Harness is based on TestNG 5.x (http://testng.org). You can read more about the harness
in Part III, “JBoss Test Harness”.
• Porting Package - An implementation of SPIs that are required for the test suite to run the in-
container tests and at times extend the CDI 1.0 API to provide extra information to the TCK.
• TCK Audit Tool - An itemization of the assertions in the specification documents which are
cross referenced by the individual tests. Describes how well the TCK covers the specification.
• Reference runtime - The designated reference runtimes for compatibility testing of the CDI
specification is the Sun Java Platform, Enterprise Edition (Java EE) 6 reference implementation
(RI). See details at Java EE 6 (http://java.sun.com/javaee/6/docs/api/).
• JSR-330 - CDI builds on JSR-330, and as such JSR-299 implementations must additionally
pass the JSR-330 TCK.
Tip
The TCK distribution includes weld/porting-package-lib/weld-inject-
tck-runner-X.Y.Z-Q-tests.jar which contains two classes showing how
the CDI RI passes the JSR-330 TCK. The source for these classes
is available from http://anonsvn.jboss.org/repos/weld/tags/1.0.0-CR2/inject-tck-
runner/src/test/java/org/jboss/weld/atinject/tck/
1.3.2. CDI TCK Components
The CDI TCK includes the following components:
• JBoss Test Harness 1.0.0 and related documentation.
• TestNG 5.9, the testing framework on which the JBoss Test Harness is based and which
provides the extension points for selecting an executing the tests in the test suite.
• Porting Package SPIs - Extensions to the CDI SPIs to allow testing of a container.
• The test suite, which is a collection of TestNG tests, the TestNG test suite descriptor and
supplemental resources that configure CDI and other software components.
Chapter 1. Introduction (CDI TCK)
6
• The TCK audit is used to list out the assertions identified in the CDI specification. It matches
the assertions to testcases in the test suite by unique identifier and produces a coverage report.
The audit document is provided along with the TCK; at least 75% of assertions are tested. Each
assertion is defined with a reference to a chapter, section and paragraph from the specification
document, making it easy for the implementor to locate the language in the specification
document that supports the feature being tested.
• TCK documentation accompanied by release notes identifying updates between versions.
Note
Sun Microsystems, Inc. will implement the porting package for the CDI RI and test
the CDI RI on the Java EE Reference Implementation .
The CDI TCK has been tested run on following platforms:
• JBoss AS 5.2.0.Beta1 using Sun Java SE 6 on Red Hat Enterprise Linux 5.2
CDI supports Java EE 5, Java EE 6, Java EE 6 Web Profile and the Embeddable EJB 3.1. The
TCK will execute on any of these runtimes, but is only part of the CTS for Java EE 6 and Java
EE 6 Web Profile.
Chapter 2.
7
Appeals ProcessWhile the CDI TCK is rigourous about enforcing an implementation's conformance to the JSR-299
specification, it's reasonable to assume that an implementor may discover new and/or better ways
to validate the assertions. This chapter covers the appeals process, defined by the Specification
Lead, Red Hat Middleware LLC., which allows implementors of the JSR-299 specification to
challenge one or more tests defined by the CDI TCK.
The appeals process identifies who can make challenges to the TCK, what challenges to the
TCK may be submitted, how these challenges are submitted, how and by whom challenges are
addressed and how accepted challenges to the TCK are managed.
Following the recent adoption of transparency in the JCP, implementors are encouraged to
make their appeals public, which this process facilitates. The JCP community should recognize
that issue reports are a central aspect of any good software and it's only natural to point out
shortcomings and strive to make improvements. Despite this good faith, not all implementors will
be comfortable with a public appeals process. Instructions about how to make a private appeal
are therefore provided.
2.1. Who can make challenges to the TCK?
Any implementor may submit an appeal to challenge one or more tests in the CDI TCK. In fact,
members of the JSR-299 Expert Group (EG) encourage this level of participation.
2.2. What challenges to the TCK may be submitted?
Any test case (e.g., @Artifact class, @Test method), test case configuration (e.g., beans.xml),
test beans, annotations and other resources may be challenged by an appeal.
What is generally not challengable are the assertions made by the specification. The specification
document is controlled by a separate process and challenges to it should be handled
through the JSR-299 EG by sending an e-mail to [email protected] [mailto:jsr299-
2.3. How these challenges are submitted?
To submit a challenge, a new issue should be created in the CDITCK project [https://jira.jboss.org/
jira/browse/CDITCK] of the JBoss JIRA using the Issue Type: Bug. The appellant should
complete the Summary, Component (TCK Appeal), Environment and Description Field only. Any
communication regarding the issue should be pursed in the comments of the filed issue for
accurate record.
To submit an issue in the JBoss JIRA, you must have a (free) JBoss.com member account.
You can create a member account using the on-line registration [http://www.jboss.org/index.html?
op=checkage&module=user].
Chapter 2. Appeals Process
8
If you wish to make a private challenge, you should follow the above procedure, setting the Security
Level to Private. Only the issue reporter, TCK Project Lead and designates will be able to view
the issue.
2.4. How and by whom challenges are addressed?
The challenges will be addressed in a timely fashion by the CDI TCK Project Lead, as designated
by Specification Lead, Red Hat Middleware LLC. or his/her designate. The appellant can also
monitor the process by following the issue report filed in the WBTCK project [https://jira.jboss.org/
jira/browse/WBTCK] of the JBoss JIRA.
The current TCK Project Lead is listed on the CDITCK Project Summary Page [https://
jira.jboss.org/jira/browse/CDITCK] on the JBoss JIRA.
2.5. How accepted challenges to the TCK are managed?
Accepted challenges will be acknowledged via the filed issue's comment section. Communication
between the CDI TCK Project Lead and the appellant will take place via the issue comments.
The issue's status will be set to "Resolved" when the TCK project lead believes the issue to be
resolved. The appellant should, within 30 days, either close the issue if they agree, or reopen the
issue if they do not believe the issue to be resolved.
Resolved issue not addressed for 30 days will be closed by the TCK Project Lead. If the TCK
Project Lead and appellant are unable to agree on the issue resolution, it will be referred to the
JSR-299 specification lead or his/her designate.
Periodically, an updated TCK will be released containing tests altered due to challenges. No new
tests will be added. Implementations are required to pass the updated TCK. This release stream
is named 1.0.z where z will be incremented.
Additionally, new tests will be added to the TCK improving coverage of the specification. We
encourage implementations to pass this TCK, however it is not required. This release stream is
named 1.y.z where y > 0.
Chapter 3.
9
InstallationThis chapter explains how to obtain the TCK and supporting software and provides
recommendations for how to install/extract it on your system.
3.1. Obtaining the Software
You can obtain a release of the CDI TCK project from the from the download page [http://
seamframework.org/Download] on Seam Framework website. The CDI TCK is distributed as a
ZIP file, which contains the TCK artifacts (the test suite binary and source, porting package API
binary and source, the test suite descriptor, the audit source and report) in /artifacts, the TCK
library dependencies in /lib and documentation in /lib.
You can also download the current source code from JBoss SVN repository [http://
anonsvn.jboss.org/repos/weld/cdi-tck/trunk].
The TCK project is available in the JBoss Maven 2 repository as
org.jboss.jsr299.tck:jsr299-tck-impl; the POM defines all dependencies required to run
the TCK.
Executing the TCK requires a Java EE 5 or better runtime environment (i.e., application server),
to which the test artifacts are deployed and the individual tests are invoked. The TCK does not
depend on any particular Java EE implementation.
The JSR-299: Contexts and Dependency Injection for Java EE 1.0 reference implementation
(RI) project is named Weld. You can obtain the latest release from the download page [http://
seamframework.org/Download] on Seam Framework website.
Note
Weld is not required for running the CDI TCK, but it can be used as a reference for
familiarizing yourself with the TCK before testing your own CDI implementation.
Naturally, to execute Java programs, you must have a Java SE runtime environment. The TCK
requires Java 5 or better, which you can obtain from the Java Software [http://java.sun.com]
website.
3.2. The TCK Environment
The TCK requires the following two Java runtime environments:
• Java 5 or better
Chapter 3. Installation
10
• Java EE 6 preview or better (e.g., JBoss AS 5.2.x or GlassFish V3)
You should refer to vendor instructions for how to install the runtime.
The rest of the TCK software can simply be extracted. It's recommended that you create a folder
named jsr299 to hold all of the jsr299-related projects. Then, extract the TCK distribution into a
subfolder named tck. If you have downloaded the Weld distribution, extract it into a sibling folder
named weld. The resulting folder structure is shown here:
Note
This layout is assumed through all descriptions in this reference guide.
jsr299/
weld/
tck/
Each test class is treated as an individual artifact (hence the @Artifact annotation on the class).
All test methods (i.e., methods annotated with @Test) in the test class are run in the application,
meaning bean discovery occurs exactly once per artifact and the same BeanManager is used by
each test method in the class.
Running the TCK against the CDI RI (Weld) and JBoss AS
JBoss AS 6.0.0 M1 and above releases bundle Weld. To run the TCK with JBoss
AS, you must use JBoss AS 6.0.0.M1 or above.
To install JBoss AS 6:
• First, you should download JBoss AS 6 from the JBoss AS project page [http://
jboss.org/jbossas/downloads].
• Set the JBOSS_HOME environment variable to the location of the JBoss AS
software.
• Change to the weld directory in the TCK.
• Create a file called local.build.properties in weld/jboss-as and make sure
the jboss.home property references a JBoss AS 5.2 installation:
jboss.home=/path/to/jboss-as-5.2
Eclipse Plugins
11
The CDI TCK includes a TCK runner that executes the TCK using Weld as the CDI
implementation and JBoss AS as the Java EE runtime. To run the tck:
• You need to install Maven 2.0.10. You can find documention on how to install
Maven 2 in the Maven: The Definitive Guide [http://www.sonatype.com/books/
maven-book/reference/installation-sect-maven-install.html] book published by
Sonatype.
• Next, instruct Maven to run the TCK:
cd weld/jboss-tck-runner
mvn test -Dincontainer
• TestNG will report, via Maven, the outcome of the run, and report any
failures on the console. Details can be found in target/surefire-reports/
TestSuite.txt.
3.3. Eclipse Plugins
Eclipse, or any other IDE, is not required to execute or pass the TCK. However an implementor
may wish to execute tests in an IDE to aid debugging the tests. This section introduces two
essential Eclipse plugins, TestNG and Maven 2, and points you to resources explaining how to
install them.
3.3.1. TestNG Plugin
The TCK is built on the JBoss Test Harness, which is in turn built on TestNG. Therefore, having
the TestNG plugin installed in Eclipse is essential. Instructions for using the TestNG update site to
add the TestNG plugin to Eclipse are provided on the TestNG download page [http://testng.org/
doc/download.html]. You can find a tutorial that explains how to use the TestNG plugin on the
TestNG Eclipse page [http://testng.org/doc/eclipse.html].
3.3.2. Maven 2 Plugin (m2eclipse)
Another useful plugin is m2eclipse. Both the TCK project and are use Maven 2. Therefore, to
work with these projects in Eclipse, you may wish to have native support for Maven 2 projects,
which the m2eclipse plugin provides. Instructions for using the m2eclipse update site to add
the m2eclipse plugin to Eclipse are provided on the m2eclipse home page. For more, read the
m2eclipse reference guide [http://www.sonatype.com/books/m2eclipse-book/reference].
m2eclipse is still a rather young project dealing with a complex domain and you may run into
problems using it. If that is the case, you can alternatively use the Eclipse plugin for Maven 2 to
generate native Eclipse projects from Maven 2 projects.
Chapter 3. Installation
12
If you have Maven 2 installed, you have everything you need. Just execute the following command
from any Maven 2 project to produce the Eclipse project files.
mvn eclipse:eclipse
Again, the Eclipse plugins are not required to execute the TCK, but can be very helpful when
validating an implementation against the TCK test suite and especially when using the modules
from the project.
Chapter 4.
13
ConfigurationThis chapter lays out how to configure the TCK Harness by specifying the SPI implementation
classes, defining the target container connection information, and various other switches. You
then learn how to setup a TCK runner project that executes the the TCK test suite, putting these
settings into practice. Finally, a detailed account of how the JBoss Test Harness negotiates the
execution of the tests in the container is given.
This chapter does not discuss in detail how to use the TCK in standalone mode. The JBoss Test
Harness guide provides more on running in standalone mode.
4.1. TCK Harness Properties
The JBoss Test Harness allows the test suite to be launched in a pluggable fashion. In order to
execute the TCK, the JBoss Test Harness must be configured by specifying implementations of
the test launcher and container APIs.
System properties and/or the resource META-INF/jboss-test-harness.properties, a Java
properties file, are used to configure the JBoss Test Harness. You can read more about configuring
the JBoss Test Harness in Section 11.1, “JBoss Test Harness Properties”.
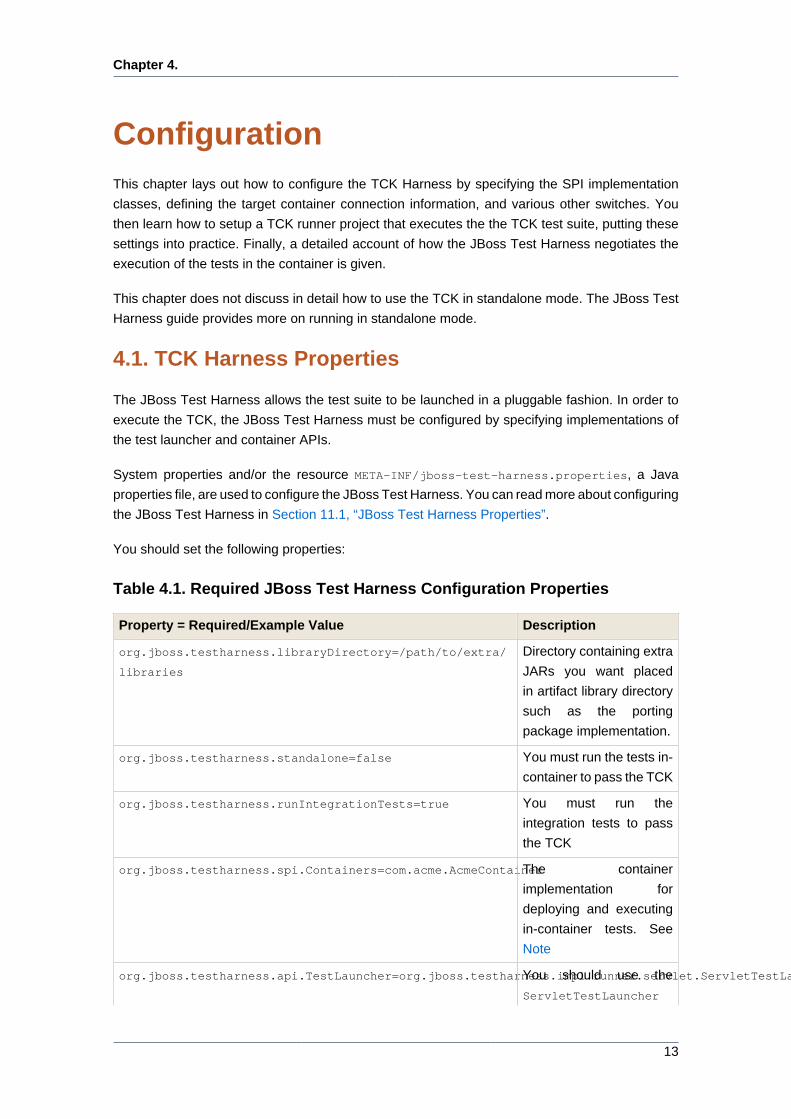
You should set the following properties:
Table 4.1. Required JBoss Test Harness Configuration Properties
Property = Required/Example Value Description
org.jboss.testharness.libraryDirectory=/path/to/extra/
libraries
Directory containing extra
JARs you want placed
in artifact library directory
such as the porting
package implementation.
org.jboss.testharness.standalone=false You must run the tests in-
container to pass the TCK
org.jboss.testharness.runIntegrationTests=true You must run the
integration tests to pass
the TCK
org.jboss.testharness.spi.Containers=com.acme.AcmeContainerThe container
implementation for
deploying and executing
in-container tests. See
Note
org.jboss.testharness.api.TestLauncher=org.jboss.testharness.impl.runner.servlet.ServletTestLauncherYou should use the
ServletTestLauncher
Chapter 4. Configuration
14
Property = Required/Example Value Description
for Java EE 6 and Java
EE 6 Web Profile.
To run the full TCK you must additionally implement org.jboss.testharness.spi.Containers,
which handles deploying the test artifact to the container. An implementations of this API is already
available for JBoss AS 5.2. Therefore, you only need to implement this part of the porting package
if you wish to use another container.
Note
Red Hat Middleware LLC encourages CDI implementators to contribute JBoss
Test Harness Deployment API implementations for other containers under the ASL
license. Please contact the CDI TCK lead.
4.2. The Porting Package
The CDI TCK relies on an implementation of the porting package to function. The porting package
can be divided into two parts. The first part is comprised of extensions to the CDI SPIs to
allow testing of a container. The second part must implement the JBoss Test Harness artifact
deployment APIs for deploying artifacts to the Java EE container.
As mentioned earlier, there are times when the tests need to tap directly into the CDI
implementation to manipulate behavior or verify results. The porting package includes a set of
SPIs that provide the TCK this level of access without tying the tests to a given implementation.
The four SPI classes in the CDI TCK are as follows:
• org.jboss.jsr299.tck.spi.Beans
• org.jboss.jsr299.tck.spi.Contexts
• org.jboss.jsr299.tck.spi.EL
• org.jboss.jsr299.tck.spi.Managers
Please consult the JavaDoc for these interfaces for the implementation requirements.
4.3. Using the CDI TCK with the Java EE Web Profile
You can configure the CDI TCK to just run tests appropriate to the Java EE Web Profile by adding
the WebProfileMethodSelector to TestNG XML configuration file:
<method-selectors>
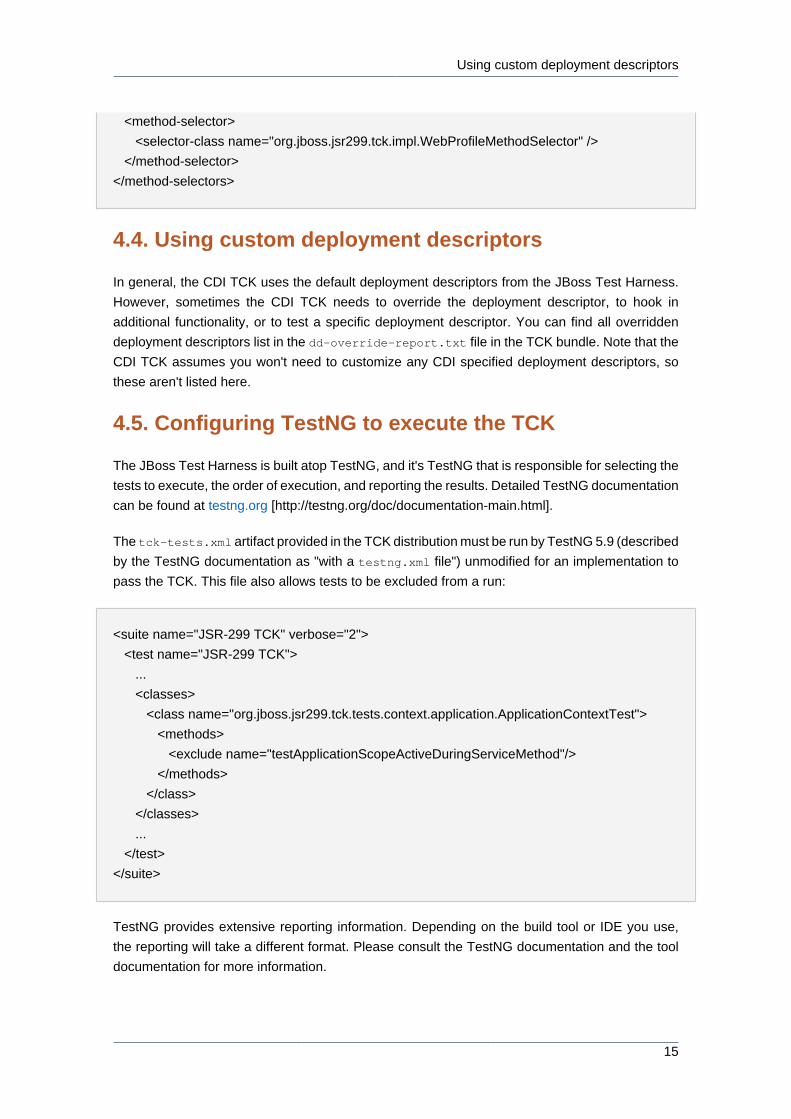
Using custom deployment descriptors
15
<method-selector>
<selector-class name="org.jboss.jsr299.tck.impl.WebProfileMethodSelector" />
</method-selector>
</method-selectors>
4.4. Using custom deployment descriptors
In general, the CDI TCK uses the default deployment descriptors from the JBoss Test Harness.
However, sometimes the CDI TCK needs to override the deployment descriptor, to hook in
additional functionality, or to test a specific deployment descriptor. You can find all overridden
deployment descriptors list in the dd-override-report.txt file in the TCK bundle. Note that the
CDI TCK assumes you won't need to customize any CDI specified deployment descriptors, so
these aren't listed here.
4.5. Configuring TestNG to execute the TCK
The JBoss Test Harness is built atop TestNG, and it's TestNG that is responsible for selecting the
tests to execute, the order of execution, and reporting the results. Detailed TestNG documentation
can be found at testng.org [http://testng.org/doc/documentation-main.html].
The tck-tests.xml artifact provided in the TCK distribution must be run by TestNG 5.9 (described
by the TestNG documentation as "with a testng.xml file") unmodified for an implementation to
pass the TCK. This file also allows tests to be excluded from a run:
<suite name="JSR-299 TCK" verbose="2">
<test name="JSR-299 TCK">
...
<classes>
<class name="org.jboss.jsr299.tck.tests.context.application.ApplicationContextTest">
<methods>
<exclude name="testApplicationScopeActiveDuringServiceMethod"/>
</methods>
</class>
</classes>
...
</test>
</suite>
TestNG provides extensive reporting information. Depending on the build tool or IDE you use,
the reporting will take a different format. Please consult the TestNG documentation and the tool
documentation for more information.
Chapter 4. Configuration
16
4.6. Configuring your build environment to execute the
TCK
It's beyond the scope of this guide to describe in how to set up your build environment to run
the TCK. The JBoss Test Harness guide describes how Weld uses Maven 2 to execute the CDI
TCK. See Section 12.1, “Building a test suite runner using Maven 2”. The TestNG documentation
provides extensive information on launching TestNG using the Java, Ant, Eclipse or IntellJ IDEA.
4.7. Configuring your application server to execute the
TCK
The TCK makes use of the Java 1.4 keyword assert; you must ensure that the JVM used to
run the application server is started with assertions enabled. See Programming With Assertions
[http://java.sun.com/j2se/1.4.2/docs/guide/lang/assert.html#enable-disable] for more information
on how to enable assertions.
Chapter 5.
17
ReportingThis chapter covers the two types of reports that can be generated from the TCK, an assertion
coverage report and the test execution results. The chapter also justifies why the TCK is good
indicator of how accurately an implementation conforms to the JSR-299 specification.
5.1. CDI TCK Coverage Metrics
The CDI TCK coverage has been measured as follows:
• Assertion Breadth Coverage
The CDI TCK provides at least 75% coverage of identified assertions with test cases.
• Assertion Breadth Coverage Variance
The coverage of specification sub-sections shows at 75% of sections with greater than 75%
coverage.
• Assertion Depth Coverage
The assertion depth coverage has not been measured, as, when an assertion requires more
than one testcase, these have been enumerated in an assertion group and so are adequately
described by the assertion breadth coverage.
• API Signature Coverage
The CDI TCK covers 100% of all API public methods using the Java CTT Sig Test tool.
5.2. CDI TCK Coverage Report
A specification can be distilled into a collection of assertions that define the behavior of the
software. This section introduces the CDI TCK coverage report, which documents the relationship
between the assertions that have been identified in the JSR-299 specification document and the
tests in the TCK test suite.
The structure of this report is controlled by the assertion document, so we'll start there.
5.2.1. CDI TCK Assertions
The CDI TCK developers have analyzed the JSR-299 specification document and identified the
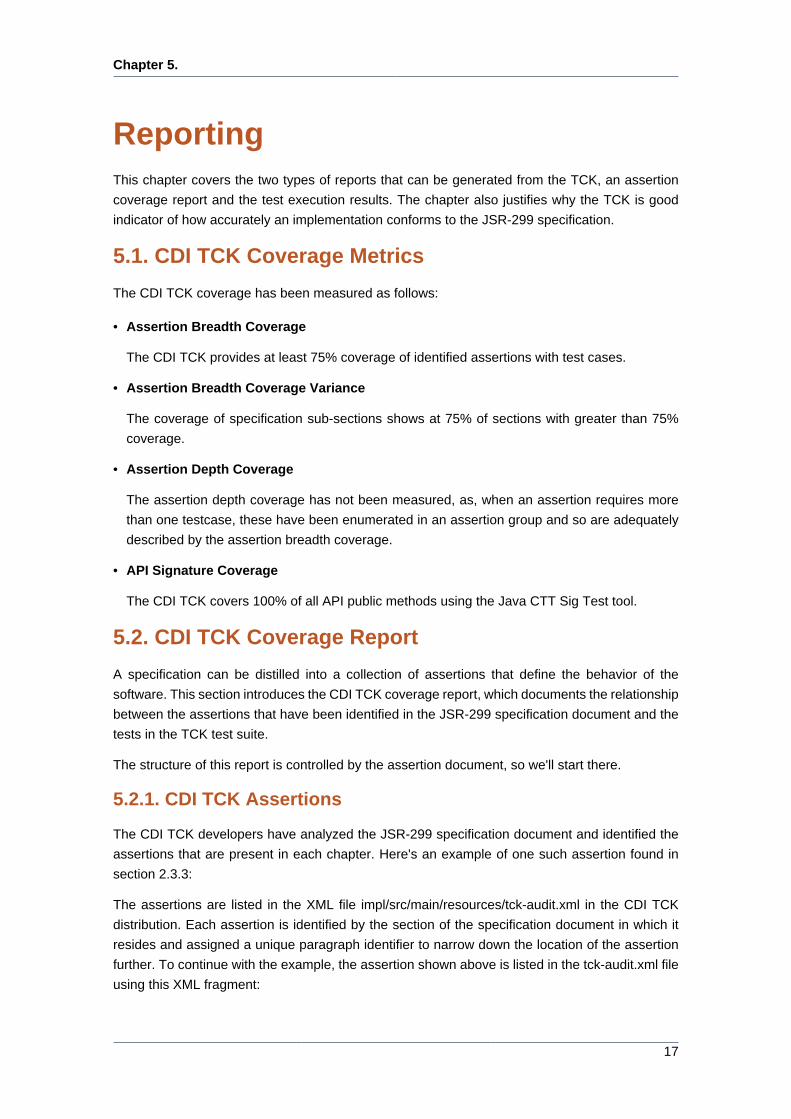
assertions that are present in each chapter. Here's an example of one such assertion found in
section 2.3.3:
The assertions are listed in the XML file impl/src/main/resources/tck-audit.xml in the CDI TCK
distribution. Each assertion is identified by the section of the specification document in which it
resides and assigned a unique paragraph identifier to narrow down the location of the assertion
further. To continue with the example, the assertion shown above is listed in the tck-audit.xml file
using this XML fragment:
Chapter 5. Reporting
18
<section id="2.3.3" title="Declare the bindings of a bean">
...
<assertion id="d">
<text>A bean may declare multiple binding types.</type>
</assertion>
...
</section>
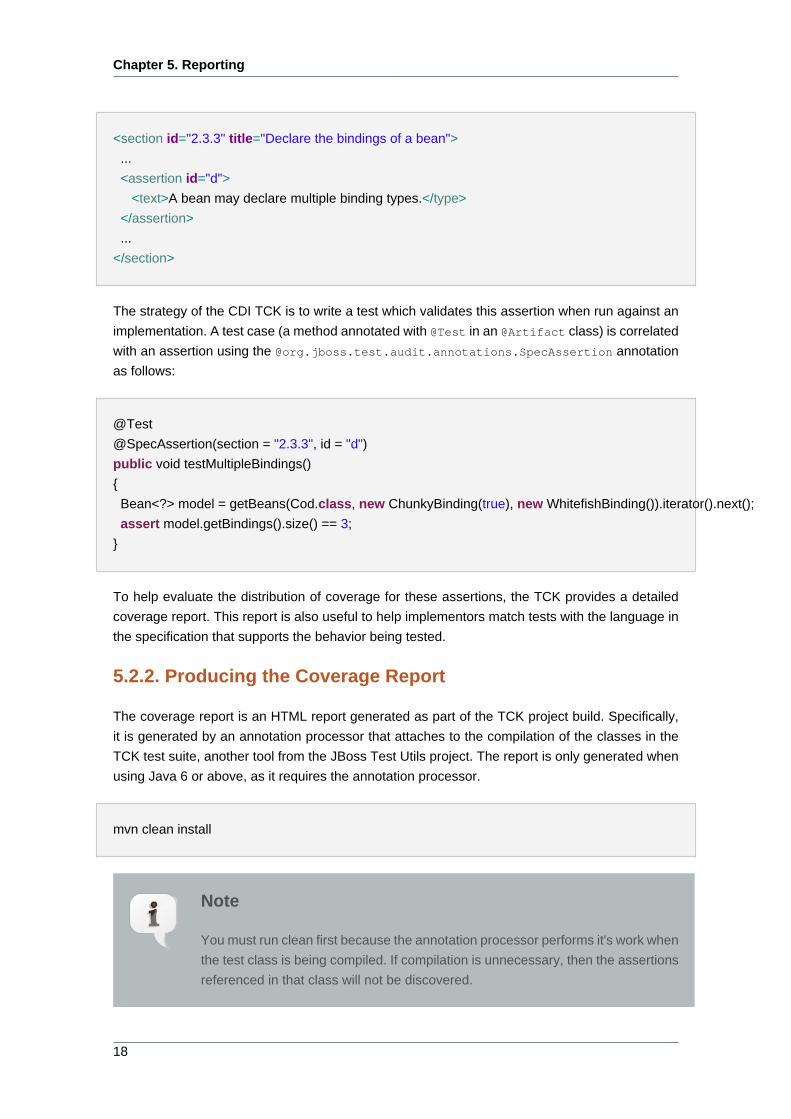
The strategy of the CDI TCK is to write a test which validates this assertion when run against an
implementation. A test case (a method annotated with @Test in an @Artifact class) is correlated
with an assertion using the @org.jboss.test.audit.annotations.SpecAssertion annotation
as follows:
@Test
@SpecAssertion(section = "2.3.3", id = "d")
public void testMultipleBindings()
{
Bean<?> model = getBeans(Cod.class, new ChunkyBinding(true), new WhitefishBinding()).iterator().next();
assert model.getBindings().size() == 3;
}
To help evaluate the distribution of coverage for these assertions, the TCK provides a detailed
coverage report. This report is also useful to help implementors match tests with the language in
the specification that supports the behavior being tested.
5.2.2. Producing the Coverage Report
The coverage report is an HTML report generated as part of the TCK project build. Specifically,
it is generated by an annotation processor that attaches to the compilation of the classes in the
TCK test suite, another tool from the JBoss Test Utils project. The report is only generated when
using Java 6 or above, as it requires the annotation processor.
mvn clean install
Note
You must run clean first because the annotation processor performs it's work when
the test class is being compiled. If compilation is unnecessary, then the assertions
referenced in that class will not be discovered.
TestNG Reports
19
The report is written to the file target/coverage.html in the same project. The report has five
sections:
1. Chapter Summary - List the chapters (that contain assertions) in the specification document
along with total assertions, tests and coverage percentage.
2. Section Summary - Lists the sections (that contain assertions) in the specification document
along with total assertions, tests and coverage percentage.
3. Coverage Detail - Each assertion and the test that covers it, if any.
4. Unmatched Tests - A list of tests for which there is no matching assertion (useful during TCK
development).
5. Unversioned Tests - A list of tests for which there is no @SpecVersion annotation on the test
class (useful during TCK development).
The coverage report is color coded to indicate the status of an assertion, or group of assertions.
The status codes are as follows:
• Covered - a test exists for this assertion
• Not covered - no test exists for this assertion
• Problematic - a test exists, but is currently disabled. For example, this may be because the
test is under development
• Untestable - the assertion has been deemed untestable, a note, explaining why, is normally
provided
For reasons provided in the tck-audit.xml document and presented in the coverage report,
some assertions are not testable.
The coverage report does not give any indication as to whether the tests are passing. That's where
the TestNG reports come in.
5.2.3. TestNG Reports
As you by now, the CDI TCK test suite is really just a TestNG test suite. That means an execution
of the CDI TCK test suite produces all the same reports that TestNG produces. This section will
go over those reports and show you were to go to find each of them.
5.2.3.1. Maven 2, Surefire and TestNG
When the CDI TCK test suite is executed during the Maven 2 test phase of the TCK runner
project, TestNG is invoked indirectly through the Maven Surefire plugin. Surefire is a test execution
abstraction layer capable of executing a mix of tests written for JUnit, TestNG, and other supported
test frameworks.
Chapter 5. Reporting
20
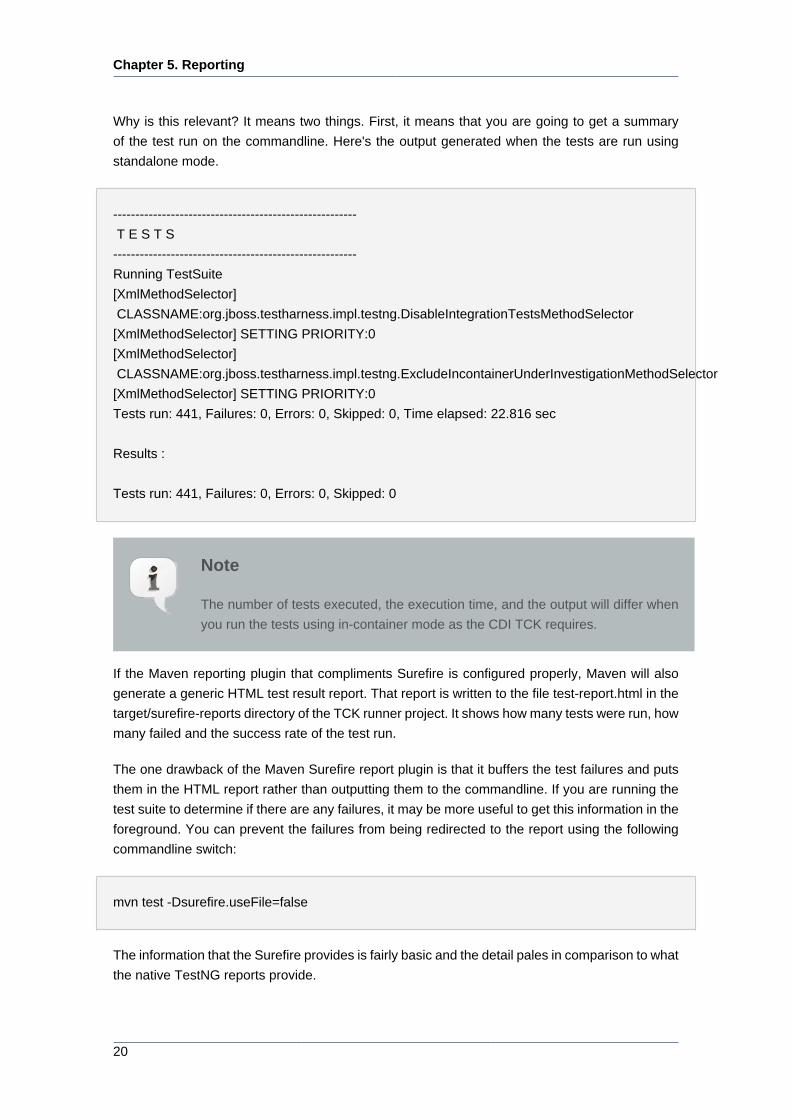
Why is this relevant? It means two things. First, it means that you are going to get a summary
of the test run on the commandline. Here's the output generated when the tests are run using
standalone mode.
-------------------------------------------------------
T E S T S
-------------------------------------------------------
Running TestSuite
[XmlMethodSelector]
CLASSNAME:org.jboss.testharness.impl.testng.DisableIntegrationTestsMethodSelector
[XmlMethodSelector] SETTING PRIORITY:0
[XmlMethodSelector]
CLASSNAME:org.jboss.testharness.impl.testng.ExcludeIncontainerUnderInvestigationMethodSelector
[XmlMethodSelector] SETTING PRIORITY:0
Tests run: 441, Failures: 0, Errors: 0, Skipped: 0, Time elapsed: 22.816 sec
Results :
Tests run: 441, Failures: 0, Errors: 0, Skipped: 0
Note
The number of tests executed, the execution time, and the output will differ when
you run the tests using in-container mode as the CDI TCK requires.
If the Maven reporting plugin that compliments Surefire is configured properly, Maven will also
generate a generic HTML test result report. That report is written to the file test-report.html in the
target/surefire-reports directory of the TCK runner project. It shows how many tests were run, how
many failed and the success rate of the test run.
The one drawback of the Maven Surefire report plugin is that it buffers the test failures and puts
them in the HTML report rather than outputting them to the commandline. If you are running the
test suite to determine if there are any failures, it may be more useful to get this information in the
foreground. You can prevent the failures from being redirected to the report using the following
commandline switch:
mvn test -Dsurefire.useFile=false
The information that the Surefire provides is fairly basic and the detail pales in comparison to what
the native TestNG reports provide.
TestNG Reports
21
5.2.3.2. TestNG HTML Reports
TestNG produces several HTML reports for a given test run. All the reports can be found in the
target/surefire-reports directory in the TCK runner project. Below is a list of the three types of
reports:
• Test Summary Report
• Test Suite Detail Report
• Emailable Report
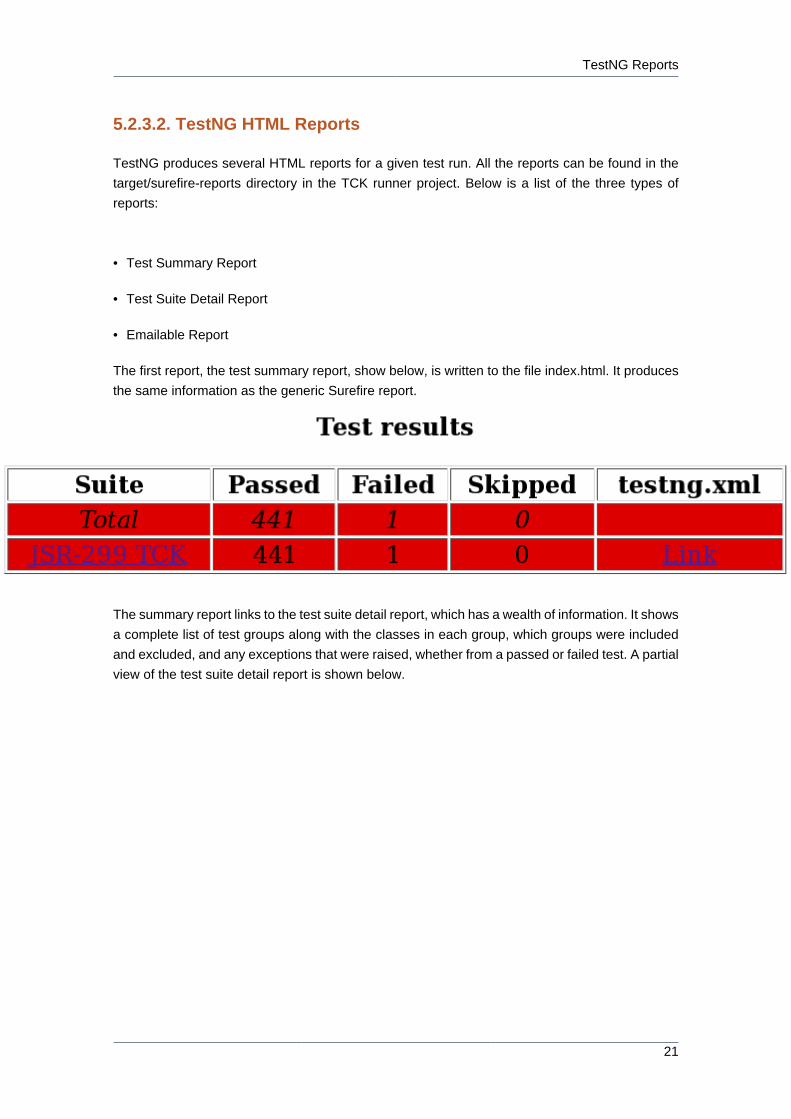
The first report, the test summary report, show below, is written to the file index.html. It produces
the same information as the generic Surefire report.
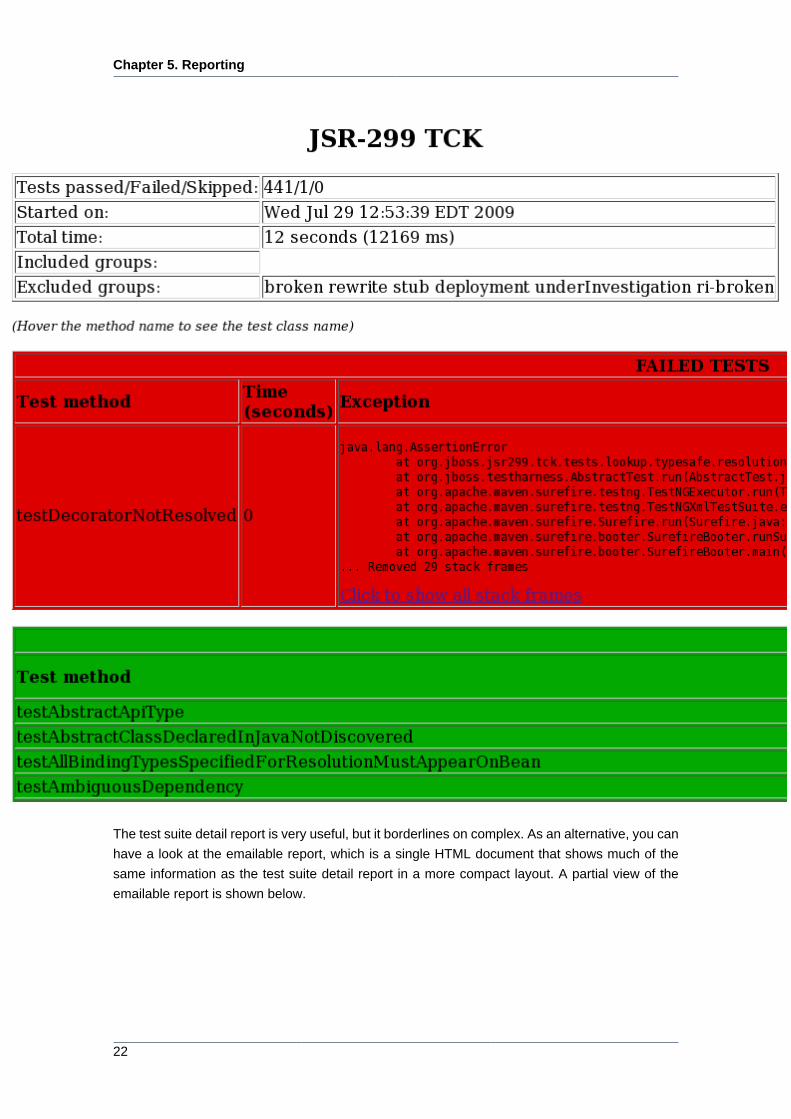
The summary report links to the test suite detail report, which has a wealth of information. It shows
a complete list of test groups along with the classes in each group, which groups were included
and excluded, and any exceptions that were raised, whether from a passed or failed test. A partial
view of the test suite detail report is shown below.
Chapter 5. Reporting
22
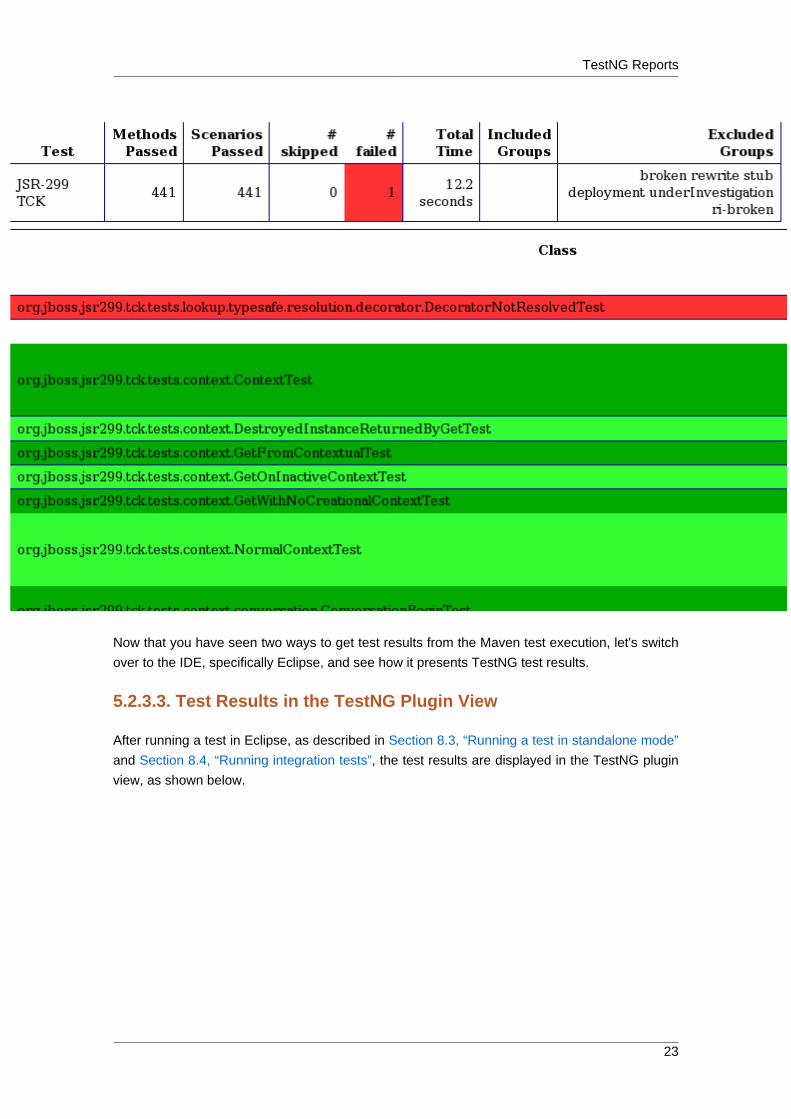
The test suite detail report is very useful, but it borderlines on complex. As an alternative, you can
have a look at the emailable report, which is a single HTML document that shows much of the
same information as the test suite detail report in a more compact layout. A partial view of the
emailable report is shown below.
TestNG Reports
23
Now that you have seen two ways to get test results from the Maven test execution, let's switch
over to the IDE, specifically Eclipse, and see how it presents TestNG test results.
5.2.3.3. Test Results in the TestNG Plugin View
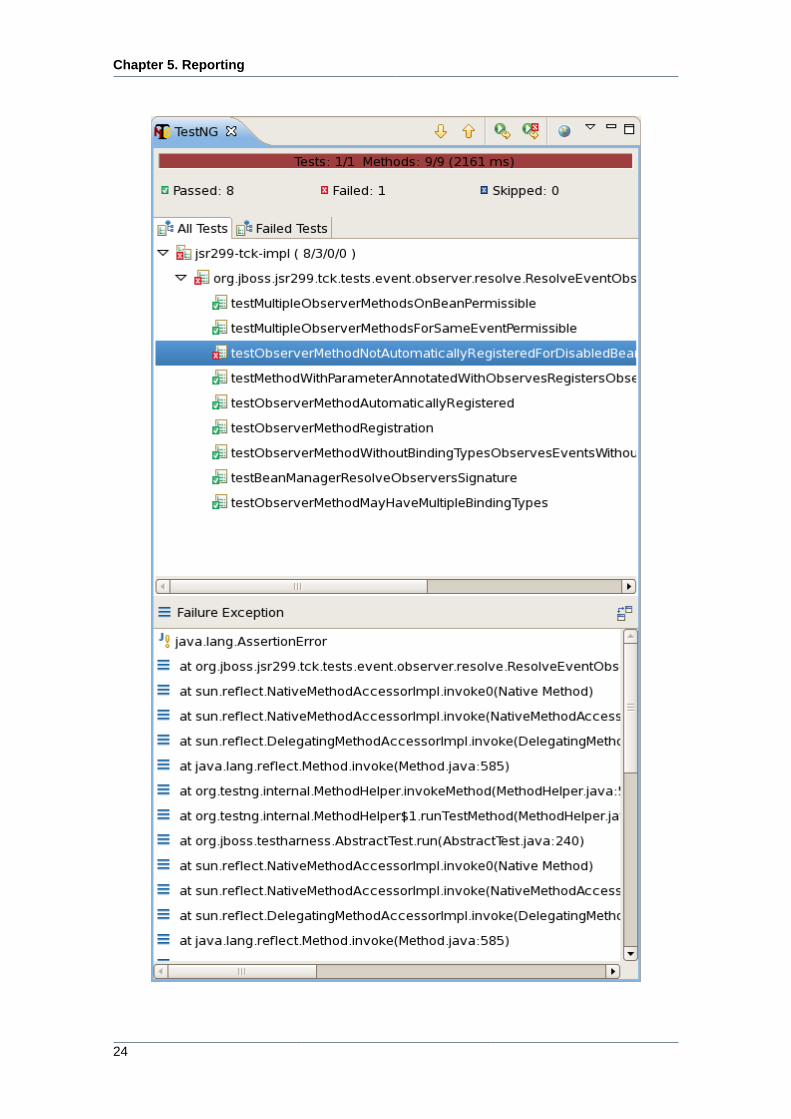
After running a test in Eclipse, as described in Section 8.3, “Running a test in standalone mode”
and Section 8.4, “Running integration tests”, the test results are displayed in the TestNG plugin
view, as shown below.
Chapter 5. Reporting
24
TestNG Reports
25
The view offers two lists. The first is a list of all methods (tests) in the class flagged as either
passed or failed. The second is a list of methods (tests) in the class that failed. If there is a test
failure, you can click on the method name to get the stacktrace leading up to the failure to display
in the lower frame.
You can also find the raw output of the TestNG execution in the IDE console view. In that view,
you can click on a test in the stacktrace to open it in the editor pane.
One of the nice features of TestNG is that it can keep track of which tests failed and offer to run
only those tests again. You can also rerun the entire class. Buttons are available for both functions
at the top of the view.

26
Part II. Executing
and Debugging TestsIn this part you learn how to execute the CDI TCK on the CDI reference implementation (Weld).
First, you are walked through the steps necessary to execute the test suite on Weld. Then you
discover how to modify the TCK runner to execute the test suite on your own implementation.
Finally, you learn how to debug tests from the test suite in Eclipse.

Chapter 6.
29
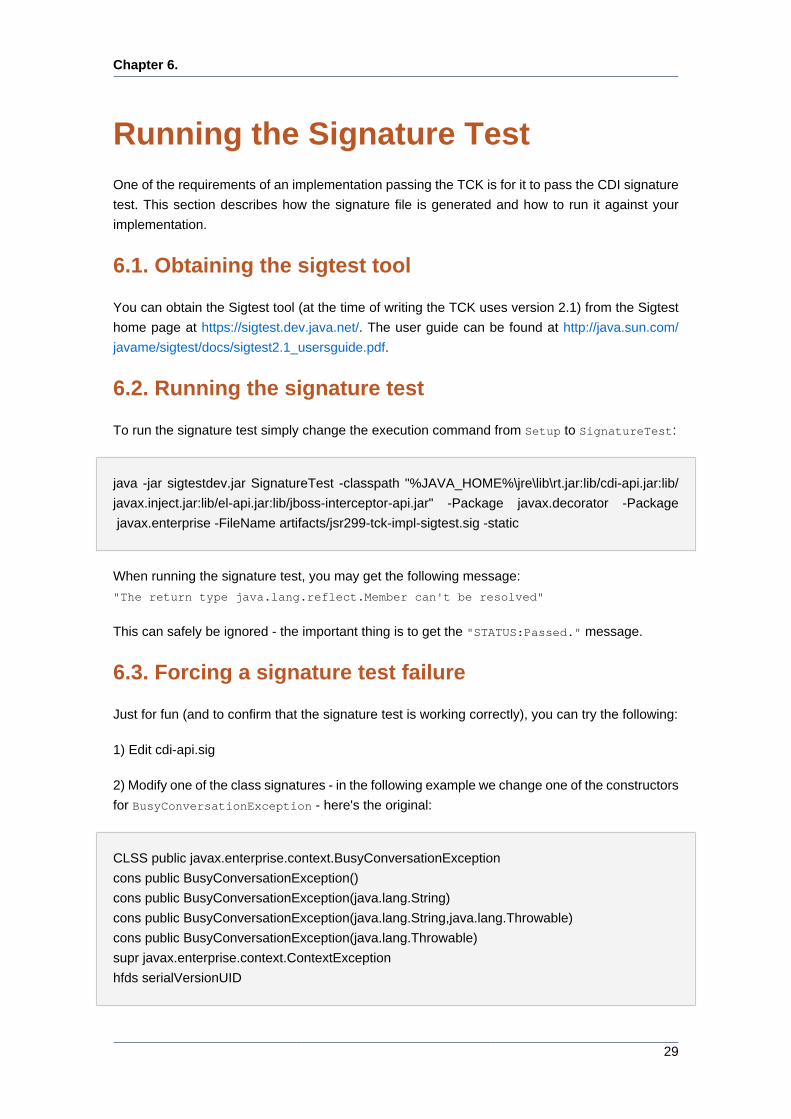
Running the Signature TestOne of the requirements of an implementation passing the TCK is for it to pass the CDI signature
test. This section describes how the signature file is generated and how to run it against your
implementation.
6.1. Obtaining the sigtest tool
You can obtain the Sigtest tool (at the time of writing the TCK uses version 2.1) from the Sigtest
home page at https://sigtest.dev.java.net/. The user guide can be found at http://java.sun.com/
javame/sigtest/docs/sigtest2.1_usersguide.pdf.
6.2. Running the signature test
To run the signature test simply change the execution command from Setup to SignatureTest:
java -jar sigtestdev.jar SignatureTest -classpath "%JAVA_HOME%\jre\lib\rt.jar:lib/cdi-api.jar:lib/
javax.inject.jar:lib/el-api.jar:lib/jboss-interceptor-api.jar" -Package javax.decorator -Package
javax.enterprise -FileName artifacts/jsr299-tck-impl-sigtest.sig -static
When running the signature test, you may get the following message:
"The return type java.lang.reflect.Member can't be resolved"
This can safely be ignored - the important thing is to get the "STATUS:Passed." message.
6.3. Forcing a signature test failure
Just for fun (and to confirm that the signature test is working correctly), you can try the following:
1) Edit cdi-api.sig
2) Modify one of the class signatures - in the following example we change one of the constructors
for BusyConversationException - here's the original:
CLSS public javax.enterprise.context.BusyConversationException
cons public BusyConversationException()
cons public BusyConversationException(java.lang.String)
cons public BusyConversationException(java.lang.String,java.lang.Throwable)
cons public BusyConversationException(java.lang.Throwable)
supr javax.enterprise.context.ContextException
hfds serialVersionUID
Chapter 6. Running the Signat...
30
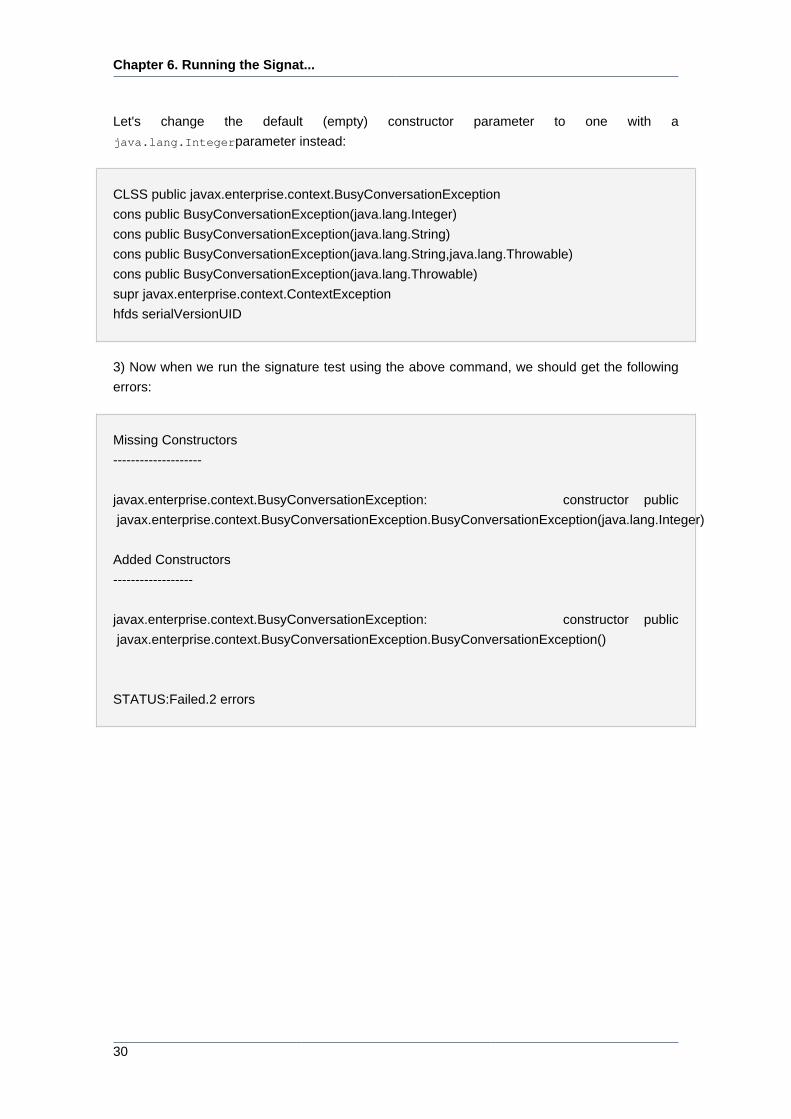
Let's change the default (empty) constructor parameter to one with a
java.lang.Integerparameter instead:
CLSS public javax.enterprise.context.BusyConversationException
cons public BusyConversationException(java.lang.Integer)
cons public BusyConversationException(java.lang.String)
cons public BusyConversationException(java.lang.String,java.lang.Throwable)
cons public BusyConversationException(java.lang.Throwable)
supr javax.enterprise.context.ContextException
hfds serialVersionUID
3) Now when we run the signature test using the above command, we should get the following
errors:
Missing Constructors
--------------------
javax.enterprise.context.BusyConversationException: constructor public
javax.enterprise.context.BusyConversationException.BusyConversationException(java.lang.Integer)
Added Constructors
------------------
javax.enterprise.context.BusyConversationException: constructor public
javax.enterprise.context.BusyConversationException.BusyConversationException()
STATUS:Failed.2 errors
Chapter 7.
31
Executing the Test SuiteThis chapter explains how to run the TCK on Weld as well as your own implementation. The CDI
TCK uses the Maven 2 TestNG plugin and the JBoss Test Harness to execute the test suite.
Learning to execute the test suite from Maven 2 is prerequisite knowlege for running the tests in
an IDE, such as Eclipse.
7.1. The Test Suite Runner
The test suite is executed by the Maven 2 TestNG plugin during the test phase of the Maven 2
life cycle. The execution happens within a TCK runner project (as opposed to the TCK project
itself). Weld includes a TCK runner project that executes the CDI TCK on Weld running inside
JBoss AS 5.2. To execute the CDI TCK on your own CDI implementation, you could modify the
TCK runner project included with Weld to use your CDI implementation as described in Chapter 4,
Configuration.
7.2. Running the Tests In Standalone Mode
To execute the TCK test suite against Weld, first switch to the jboss-tck-runner directory in the
extracted Weld distribution:
cd weld/jboss-tck-runner
Note
These instructions assume you have extracted the CDI-related software according
to the recommendation given in Section 3.2, “The TCK Environment”.
Then execute the Maven 2 life cycle through the test phase:
mvn test
Without any command-line flags, the test suite is run in standalone mode, which means that any
test class with the @org.jboss.testharness.impl.packaging.IntegrationTest annotation
is skipped. This mode uses the StandaloneContainers SPI to invoke the test artifact within a
mock Java EE life cycle and capture the results of the test. However, passing the suite in this
mode is not sufficient to pass the TCK as a whole. The suite must be passed while executing
using the in-container mode.
Chapter 7. Executing the Test...
32
7.3. Running the Tests In the Container
To execute the test suite using in-container mode with the JBoss TCK runner, you first have to
setup JBoss AS as described in the Running the TCK against the CDI RI (Weld) and JBoss AS
callout.
Then, execute the TCK runner with Maven 2 as follows:
mvn test -Dincontainer
The presence of the incontainer property activates a Maven 2 profile that
assigns the org.jboss.testharness.standalone system property to false and the
org.jboss.testharness.runIntegrationTests system property to true, hence activating the
in-container test mode. This time, all the test artifacts in the test suite are executed.
The in-container profile will also start and stop the application server automatically, a feature which
the profile activates by setting the org.jboss.testharness.container.forceRestart to true.
The in-container mode uses the Containers SPI to deploy the test artifact to the container and
execute the test in a true Java EE life cycle. The JBoss TCK runner has a dependency on the
library that provides an implementation of this interface for JBoss AS 5.2.
Since in-container tests are executed in a remote JVM, the results of the test must be
communicated back to the runner over a container-supported protocol. The JBoss Test Harness
provides servlet-based communication over HTTP as described in ???.
7.4. Dumping the Test Artifacts
As you have learned, when the test suite is executing using in-container mode, each test class
is packaged as a deployable artifact and deployed to the container. The test is then executed
within the context of the deployed application. This leaves room for errors in packaging. When
investigating a test failure, you may find it helpful to inspect the artifact after it's generated. The
TCK can accommodate this type of inspection by "dumping" the generated artifact to disk.
The feature just described is activated in the jboss-tck-runner project by appending the
dumpArtifacts command line property to the end of the command that invokes the Maven 2 test
phase.
mvn test-compile -DdumpArtifacts
The directory where the artifacts get written is configured using the
org.jboss.testharness.outputDirectory property. The dumpArtifacts profile in the jboss-
tck-runner project sets this value to the relative directory path target/jsr299-artifacts.
Dumping the Test Artifacts
33
However, if you are using Ant, you will be pleased to see the lib/, containing all dependencies
required to run the TCK - just add every jar to your classpath. Further if you are using Weld, and
wish to use Weld's implementation of the porting package, you should add every jar in weld/
porting-package-lib to your classpath.

34
Chapter 8.
35
Running Tests in EclipseThis chapter explains how to run individual tests using the Eclipse TestNG plugin. It covers running
non-integration tests in standalone mode and integration tests (as well as non-integration tests)
in in-container mode. You should be able to use the lessons learned here to debug tests in an
alternate IDE as well.
8.1. Leveraging Eclipse's plugin ecosystem
Using an existing test harness (TestNG) allows the tests to be executed and debugged in an
Integrated Development Environment (IDE) using available plugins. Using an IDE is also the
easiest way to execute a test class in isolation.
The TCK can be executed in any IDE for which there is a TestNG plugin available. Running a
test from the CDI TCK test suite using the Eclipse TestNG plugin is almost as simple as running
any other TestNG test. You can also use the plugin to debug a test, which is described in the
next chapter.
Before running a test from the TCK test suite in Eclipse, you must have the Eclipse TestNG
plugin [http://testng.org] and either the m2eclipse plugin or an Eclipse project generated use the
Maven 2 Eclipse plugin (maven-eclipse-plugin). Refer to Section 3.3, “Eclipse Plugins” for more
information on these plugins.
With the m2eclipse plugin installed, Eclipse should recognize the CDI TCK projects as valid
Eclipse projects (or any Weld project for that matter). Import them into the Eclipse workspace at
this time. You should also import the Weld projects if you want to debug into that code, which
is covered later.
Note
If you choose to use the Maven 2 Eclipse plugin (maven-eclipse-plugin), you
should execute the plugin in both the tck and weld projects:
cd tck
mvn clean eclipse:clean eclipse:eclipse -DdownloadSources -
DdownloadJavadocs
cd ../weld
mvn clean eclipse:clean eclipse:eclipse -DdownloadSources -
DdownloadJavadocs
8.2. Readying the Eclipse workspace
When setting up your Ecilpse workspace, we recommended creating three workings sets:
Chapter 8. Running Tests in E...
36
1. Weld - Groups the CDI API and the CDI RI (i.e., Weld) projects
2. CDI TCK - Groups the CDI TCK API and the test suite projects
3. Weld JBoss TCK Runner - Groups the porting package implementation and TCK runner
projects that are configured to certify Weld deployed on JBoss AS 5.2
The dependencies between the projects will either be established automatically by the m2eclipse
plugin, based on the dependency information in the pom.xml files, or as generated by the mvn
eclipse:eclipse command.
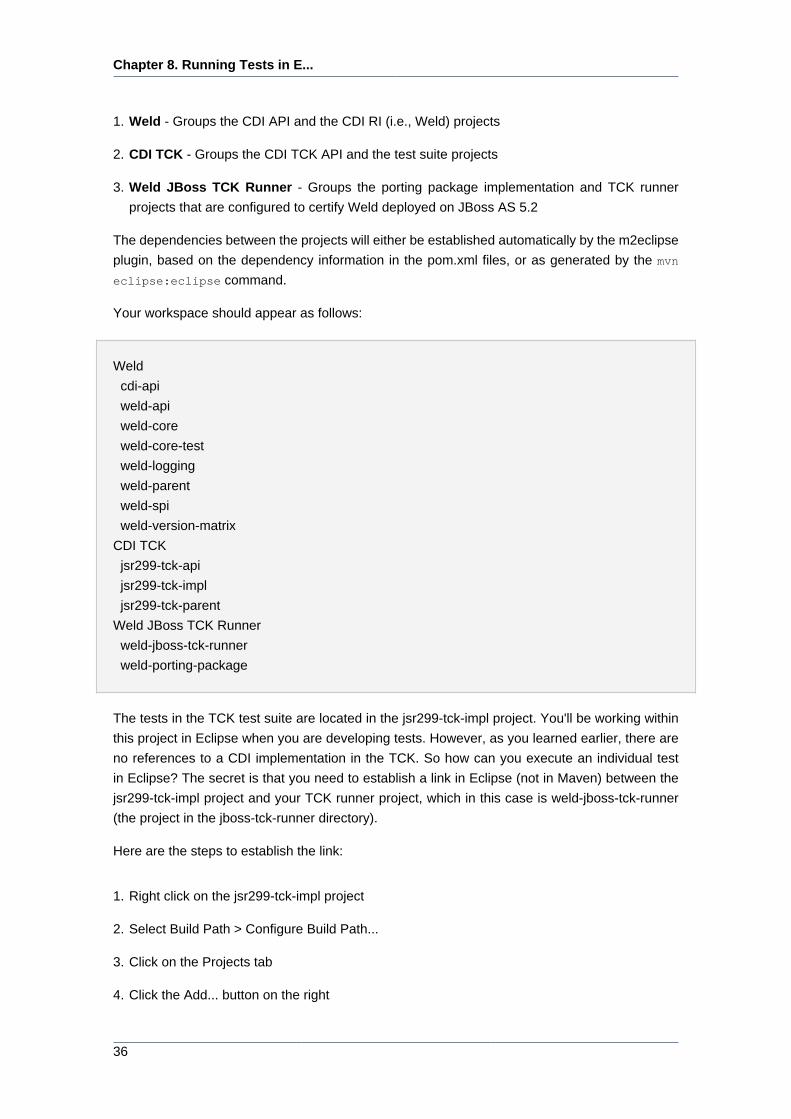
Your workspace should appear as follows:
Weld
cdi-api
weld-api
weld-core
weld-core-test
weld-logging
weld-parent
weld-spi
weld-version-matrix
CDI TCK
jsr299-tck-api
jsr299-tck-impl
jsr299-tck-parent
Weld JBoss TCK Runner
weld-jboss-tck-runner
weld-porting-package
The tests in the TCK test suite are located in the jsr299-tck-impl project. You'll be working within
this project in Eclipse when you are developing tests. However, as you learned earlier, there are
no references to a CDI implementation in the TCK. So how can you execute an individual test
in Eclipse? The secret is that you need to establish a link in Eclipse (not in Maven) between the
jsr299-tck-impl project and your TCK runner project, which in this case is weld-jboss-tck-runner
(the project in the jboss-tck-runner directory).
Here are the steps to establish the link:
1. Right click on the jsr299-tck-impl project
2. Select Build Path > Configure Build Path...
3. Click on the Projects tab
4. Click the Add... button on the right
Running a test in standalone mode
37
5. Check the TCK runner project (e.g., weld-jboss-tck-runner)
6. Click the OK button on the Required Project Selection dialog window
7. Click the OK button on the Java Build Path window
Of course, the weld-jboss-tck-runner also depends on the jsr299-tck-impl at runtime (so it can
actually find the tests to execute). But Eclipse doesn't distinguish between build-time and runtime
dependencies. As a result, we've created a circular dependency between the projects. In all
likelihood, Eclipse will struggle (if not fail) to compile one or more projects. How can we break
this cycle?
As it turns out, the TCK runner doesn't need to access the tests to build. It only needs its classes,
configurations and other dependenices at runtime (when the TestNG plugin executes). Therefore,
we can remove the TCK runner's dependence on the jsr299-tck-impl project by following these
steps:
1. Right click on the weld-jboss-tck-runner project
2. Select Build Path > Configure Build Path...
3. Click on the Projects tab
4. Select the TCK tests project (jsr299-tck-impl)
5. Click the Remove button on the right
6. Click the OK button on the Java Build Path window
You are now ready to execute an individual test class (or artifact). Let's start with a test artifact
capable of running in standalone mode.
8.3. Running a test in standalone mode
A standalone test artifact is a class which extends AbstractJSR299Test, is annotated with
@Artifact, but is not annotated with @IntegrationTest. Select a standalone test artifact and
open it in the Eclipse editor. Now right click in the editor view and select Run As > TestNG Test.
The TestNG view should pop out and you should see all the tests in that artifact pass (if all goes
well).
Note
If the TCK complains that there is a property missing, close all the projects, open
them again, and rebuild. The m2eclipse plugin can be finicky getting everything
built correctly the first time.
So far you have executed a test in standalone mode. That's not sufficient to pass the TCK. The
test must be executed using in-container mode. Using in-container mode is also the only way to
Chapter 8. Running Tests in E...
38
execute a test annotated with @IntegrationTest (that's what the annotation means) as it requires
container resources.
Let's see what has to be done to execute an integration test. This will result in the artifact being
deployed to the container, which is JBoss AS 5.2 if you are using the JBoss TCK runner.
8.4. Running integration tests
As you have learned, the JBoss test harness determines how to behave based on the values
of numerous system properties or properties defined in META-INF/jboss-test-harness.properties
classpath resources. If the property named org.jboss.testharness.standalone is not defined,
the harness assumes that the test is to be run in standalone mode. In order to run the tests in the
container, you need to add a properties file to the classpath that sets the standalone property to
false and provides values for other properties required to run an in-container test.
The JBoss TCK runner project conveniently provides the properties file src/test/debug-
resources/META-INF/jboss-test-harness.properties that contains all of the necessary properties
for in-container testing in Eclipse. Assuming you followed the directory structure
recommended in Section 3.2, “The TCK Environment”, you are good to go. Otherwise,
you may have to tune the org.jboss.testharness.container.extraConfigurationDir and
org.jboss.testharness.libraryDirectory properties to point to the relative location of the
related projects. The properties should be defined as follows:
• org.jboss.testharness.container.extraConfigurationDir - the relative path from the
jboss-tck-impl project to a directory that contains a build.properties or local.build.properties file
defining the location of a JBoss AS 5.2 installation in the jboss.home property
• org.jboss.testharness.libraryDirectory - the relative path from the jboss-tck-impl project
to the target/dependency/lib directory in the TCK runner project.
The other properties in that file are defined as follows:
org.jboss.testharness.standalone=false
orjboss.testharness.container.forceRestart=false
orjboss.testharness.runIntegrationTests=true
You're now ready to execute an integration test. Select an integration test (a class that extends
AbstractJSR299Test and is annotated with both @Artifact and @IntegrationTest) and open
it in your Eclipse editor. Follow these steps to execute the class with the TestNG plugin:
1. Right click in the editor view and select Run As > TestNG Test
2. Observe the test fail because of missing dependencies
3. Select the Run > Run Configurations... menu from the main menubar
Running integration tests
39
4. Select the name of the test class under the TestNG category
5. Select the Classpath tab
6. Select User Entries in the tree
7. Click the Advanced... button on the right
8. Select Add Folders and click the OK button
9. Select the weld-jboss-tck-runner/src/test/debug-resources folder
10.Click the OK button on the Folder Selection dialog window
11.Click on the weld-jboss-tck-runner entry
12.Move the weld-jboss-tck-runner to the first entry using the Up button
13.Click the Run button on the Run Configurations dialog window
When you run the test this time, it should pass. If you get a failure that the container (e.g., JBoss
AS 5.2) must be run with assertions enabled, you need to stop the container and start it with the
-ea flag (or just leave it stopped and the test will start it appropriately).
You can simply right click and select Run As > TestNG Test for all subsequent runs for the reason
cited earlier, the run configuration for a class is retained indefinitely.
Alternatively, you can configure TestNG to execute all tests in-container by default by adding the
properties file in the debug-resources folder to the project's classpath as follows:
1. Right click on the jsr299-tck-impl project
2. Select Build Path > Configure Build Path...
3. Click on the Libraries tab
4. Click the Add Class Folder... button on the right
5. Check the weld-jboss-tck-runner/src/test/debug-resources folder
6. Click the OK button on the Class Folder Selection dialog window
7. Click the OK button on the Java Build Path window
Now you don't have to do any special configuration per test class.
You can stop the individual tests from running in-container by reversing the steps above to remove
the debug-resources folder from the Eclipse classpath.
You have now mastered running the CDI TCK against Weld using both Maven 2 and within Eclipse.
Now you're likely interested in how to debug a test so that you can efficiently investigate test
failures.

40
Chapter 9.
41
Debugging Tests in EclipseThis chapter explains how to debug standalone and integration tests from the TCK test suite in
Eclipse. You should be able to use the lessons learned here to debug tests in an alternate IDE
as well.
9.1. Debugging a standalone test
There is almost no difference in how you debug a standalone test from how you run it. With the
test class open in the Eclipse editor, simply right click in the editor view and select Debug As >
TestNG Test. Eclipse will stop at any breakpoints you set just like it would with any other local
debug process.
If you plan to step into a class in the Weld implementation (or any other dependent library), you
must ensure that the source is properly associated with the library. Below are the steps to follow
to associate the source of Weld with the TestNG debug configuration:
1. Select the Run > Debug Configurations... menu from the main menubar
2. Select the name of the test class in the TestNG category
3. Select the Source tab
4. Click the Add... button on the right
5. Select Java Project
6. Check the project the contains the class you want to debug (e.g., weld-core)
7. Click OK on the Project Selection window
8. Click Close on the Debug Configurations window
You'll have to complete those steps for any test class you are debugging, though you only have
to do it once (the debug configuration hangs around indefinitely).
Again, running a test in standalone isn't enough to pass the TCK and cannot be used to run or
debug an integration test. Let's look at how to debug a test running in the context of the container.
9.2. Debugging an integration test
In order to debug an integration test, or any test run using in-container mode, the test must be
configured to run in-container, as described in Section 8.4, “Running integration tests”, and you
must attach the IDE debugger to the container. That puts the debugger on both sides of the fence,
so to speak.
Since setting up a test to run in-container has already been covered, we'll look at how to attach
the IDE debugger to the container, and then move on launching the test in debug mode.
Chapter 9. Debugging Tests in...
42
9.2.1. Attaching the IDE debugger to the container
There are two ways to attach the IDE debugger to the container. You can either start the container
in debug mode from within the IDE, or you can attach the debugger over a socket connection to
a standalone container running with JPDA enabled.
The Eclipse Server Tools, a subproject of the Eclipse Web Tools Project (WTP), has support
for launching most major application servers, including JBoss AS 5. However, if you are using
JBoss AS, you should consider using JBoss Tools instead, which offers tighter integration with
JBoss technologies. See either the Server Tools documentation [http://www.eclipse.org/webtools/
server/server.php] or the JBoss Tools documentation [http://docs.jboss.org/tools/3.0.1.GA/en/as/
html/index.html] for how to setup a container and start it in debug mode.
See this blog entry [http://maverikpro.wordpress.com/2007/11/26/remote-debug-a-web-
application-using-eclipse] to learn how to start JBoss AS with JPDA enabled and how to get the
Eclipse debugger to connect to the remote process.
9.2.2. Launching the test in the debugger
Once Eclipse is debugging the container, you can set a breakpoint in the test and debug it just
like a standalone test. Let's give it a try.
Open a test annotated with @IntegrationTest in the Eclipse editor, right click in the editor view,
and select Debug As > TestNG Test. This time when the IDE hits the breakpoint, it halts the JVM
thread of the container rather than the thread that launched the test.
Remember that if you need to debug into dependent libraries, the source code for those libraries
will need to be registered with the TestNG debug configuration as described in the first section
in this chapter.
Part III. JBoss Test HarnessIn this part you learn about the JBoss Test Harness through selected chapters from the JBoss
Test Harness Reference Guide. You can view the entire JBoss Test Harness Reference Guide
at TODO [].

Chapter 10.
45
Introduction (JBoss Test Harness)This chapter explains the purpose of the test harness and describes its key features.
The JBoss Test Harness is a testing framework based on TestNG that provides a series of
extensions that allow runtime packaging and deployment of Java EE artifacts (EAR or WAR) for
in-container testing. It's important to note that the JBoss Test Harness has no relation with, or
dependency on, the JBoss Application Server (JBoss AS).
Note
You'll often see the term in-container used in this reference guide. This term
refers to running the test suite in any of the aforementioned environments, whilst
standalone refers to running the tests outside the container via an implementation-
specific standalone bootstrap. The standalone mode only runs those tests which
the CDI RI can run without deployment in a Java EE container.
The last thing Java developers want is yet another testing framework to make their life more
complicated. That's why the JBoss Test Harness is built entirely upon TestNG. TestNG is one of
two prominent test frameworks for Java (the other being JUnit). Furthermore, what developers
want is a good integration with their Integrated Development Environment (IDE). These days,
if a tool doesn't have an IDE plugin, then it won't get the attention it deserves. TestNG plugins
are available for all major IDEs and build tools (Ant and Maven 2). Again, a motivating factor for
extending TestNG.
Because it leverages the existing TestNG ecosystem, there is no need for a special test launcher
for the JBoss Test Harness. You simply use the IDE or build tool of your choice (so long as it
has TestNG support). You also get reporting and debugging for free (various reporting plugins
are provided for TestNG).
You can read more about TestNG at testng.org [http://testng.org/doc/documentation-main.html].
The JBoss Test Harness supports the following features:
• Test activation via any method supported by the TestNG configuration descriptor (package,
group, class)
• Exclusion of in-container tests in standalone mode
• Exclusion of individual tests labeled as under investigation
• Integration with any TestNG plugin (Eclipse, IntelliJ, Ant, Maven)
• Automated reporting capability as provided by TestNG
• Standalone and in-container test mode
Chapter 10. Introduction (JBo...
46
• Container pluggability
• Declarative packaging of additional resources and classes in artifact
• Declarative deployment exception trapping
• Artifact dumping for failure and packaging analysis
A test is designated by a method annotated with @org.testng.annotations.Test in
a class which extends org.jboss.testharness.AbstractTest and is annotated with
@org.jboss.testharness.impl.packaging.Artifact.
Note
Test suites may often choose to extend AbstractTest and require tests to extend
that base class. In fact, both the CDI TCK and the Bean Validation TCK provide
base classes that extend AbstractTest to provide functionality specific to the
needs of the TCK.
The @Test annotation is provided by TestNG, the @Artifact annotation is provided by the JBoss
Test Harness and the AbstractTest is part of the JBoss Test Harness. There is a one-to-one
mapping between a TestNG test class and an artifact. The packaging type is defined by the
@org.jboss.testharness.impl.packaging.Packaging annotation on the test class, defaulting
to a WAR if not specified.
Prior to executing the tests for a given class, the JBoss Test Harness packages the class as
a deployable artifact (EAR or WAR), along with any extra resources specified, and deploys the
artifact to the container. The harness provides test execution and result reporting via HTTP
communication to a simple Servlet using a thin layer over the TestNG test launcher. The test
harness can also catch and enforce expected deployment exceptions. This setup and tear down
activity is provided by the super class org.jboss.testharness.AbstractTest, which all test
classes must extend (directly or indirectly).
If the annotation @org.jboss.testharness.impl.packaging.IntegrationTest is not present
on the test class, then it means the test class can be executed in standalone mode. In standalone
mode, the deployable artifact is assembled on the local classpath and the tests execute in the
same JVM as the launcher, just as though it were a regular TestNG test case. The standalone
mode is provided for convenience and efficiency, allowing you the speed of mock-based testing
and the confidence of an in-container test, using the same test objects and tests.
10.1. Negotiating the execution of an in-container test
The basic procedure of an in-container test is as follows. The JBoss Test Harness produces a
deployable artifact from an @Artifact test class and any declared dependent classes, descriptors
or other resources. Then it deploys the artifact to the container using the Containers SPI,
negotiates with the container to execute the test and return the result and, finally, undeploys the
artifact. TestNG collects the results of all the tests run in the typical way and produces a report.
Negotiating the execution of an in-container test
47
The question is, how does the JBoss Test Harness negotiate with the container to execute the test
when TestNG is being invoked locally? Technially the mechanism is pluggable, but JBoss Test
Harness provides a default implementation that uses HTTP communication that you will likely use.
Here's how the default implementation works.
The artifact generator bundles and registers (in the web.xml descriptor) an HttpServlet,
org.jboss.testharness.impl.runner.servlet.ServletTestRunner, that responds to test
execution GET requests. TestNG running on the client side delegates to a test launcher (more on
that in a moment) which originates these text execution requests to transfer control to the container
JVM. The name of the test method to be executed is specified in a request query parameter
named methodName.
When the test execution request is received, the servlet delegates to an instance of
org.jboss.testharness.impl.runner.TestRunner, passing it the name of the test method.
TestRunner reads the name of the test class from the resource META-INF/jboss-test-
harness.properties, which is bundled in the artifact by the artifact generator. It then combines the
class name and the method name to produce a TestNG test suite and runs the suite (within the
context of the container).
TestNG returns the results of the run as an ITestResult object. ServletTestRunner translates
this object into a org.jboss.testharness.api.TestResult and passes it back to the test
launcher on the client side by encoding the translated object into the response. The object gets
encoded as either html or a serialized object, depending on the value of the outputMode request
parameter that was passed to the servlet. Once the result has been transfered to the client-side
TestNG, TestNG wraps up the run of the test as though it had been executed in the same JVM.
There's one piece missing. How does TestNG on the client side know to submit a request to the
ServletTestRunner servlet to get TestNG to execute the test in the container JVM? That's the
role of the test launcher.
The test launcher is the API that allows test suite to launch the test in a pluggable fashion.
AbstractTest, the super class of AbtractJSR299Test, implements IHookable, a TestNG
interface which allows the execution of the test method to be intercepted. Using that mechanism,
AbstractTest delegates execution of the test method (a method annotated with @Test in
an @Artifact class) to an implementation of org.jboss.testharness.api.TestLauncher
if the tests are being executed in-container. As you might anticipate, the implementation is
specified using a property with the same name as the interface in a META-INF/jboss-test-
launcher.properties resource. The JBoss Test Harness provides a default implementation,
org.jboss.testharness.impl.runner.servlet.ServletTestLauncher, that hooks into the
HTTP communication infrastructure described above. It invokes the ServletTestRunner servlet
for each method annotated with @Test in the @Artifact that is not otherwise disabled.
If you wish to implement the runner yourself, you must return a TestResult as a result of
executing the method in the container. You must also ensure that any exception which occurs
during deployment is wrapped as a org.jboss.testharness.api.DeploymentException,
Chapter 10. Introduction (JBo...
48
and that any communication problem is rethrown as an IOException. The
deployment exception may be transformed by an implementation of the
org.jboss.testharness.api.DeploymentExceptionTransformer interface, which is
specified using the org.jboss.testharness.container.deploymentExceptionTransformer
property. The default implementation passes on the original exception unchanged. The
implementation for JBoss AS used with the CDI TCK, on the other hand, deciphers the exception
thrown by the JBoss deployer and converts it to one of the catagory exceptions defined in the
CDI TCK API.
So in short, JBoss Test Harness takes care of all the interfaces you need to execute tests in-
container except for the implementation of the Containers SPI. That is, unless you are deploying
to one of the containers supported by the JBoss Test Harness (TODO we need a table showing
supported containers).
Chapter 11.
49
ConfigurationThis chapter lays out how to configure the JBoss Test Harness by specifying the API
implementation classes, defining the target container connection information, and various other
switches. Finally, a detailed account of how the JBoss Test Harness negotiates the execution of
the tests in the container is given.
11.1. JBoss Test Harness Properties
The JBoss Test Harness allows the test suite to be launched in a pluggable fashion. In order to
execute a test suite, the JBoss Test Harness must be configured by specifying implementations
of the test launcher and container APIs.
System properties and/or the resource META-INF/jboss-test-harness.properties, a Java
properties file, are used to configure the JBoss Test Harness. The bootstrap configuration builder
looks to the property org.jboss.testharness.api.ConfigurationBuilder, the first property
listed in table 3.1, for the fully qualified class name (FQCN) of a concrete configuration builder
implementation to get started. This implementation loads the remaining configuration settings and
produces a JBoss Test Harness configuration.
For you convenience, the default configuration builder implementation
org.jboss.testharness.impl.PropertiesBasedConfigurationBuilder is provided, which
collates all the JBoss Test Harness configuration settings from system and Java properties. It
does so by aggregating the system properties with the properties defined in the META-INF/jboss-
test-harness.properties resource in any classpath entry under a single properties map, allowing
you to partition the configuration settings as needed.
A complete list of configuration properties for the JBoss Test Harness has been itemized in
Table 11.1, “JBoss Test Harness Configuration Properties”, accompanied by the default value (if
any) and a description for each property.
Table 11.1. JBoss Test Harness Configuration Properties
Property = Default Value Description
org.jboss.testharness.api.ConfigurationBuilder=
org.jboss.testharness.impl.PropertiesBasedConfigurationBuilder
The configuration
bootstrap class for the
JBoss Test Harness.
org.jboss.testharness.testPackage= The top-level Java
package containing
classes to be tested.
Used to determine which
artifacts to dump to disk
only; not used during
running of a suite.
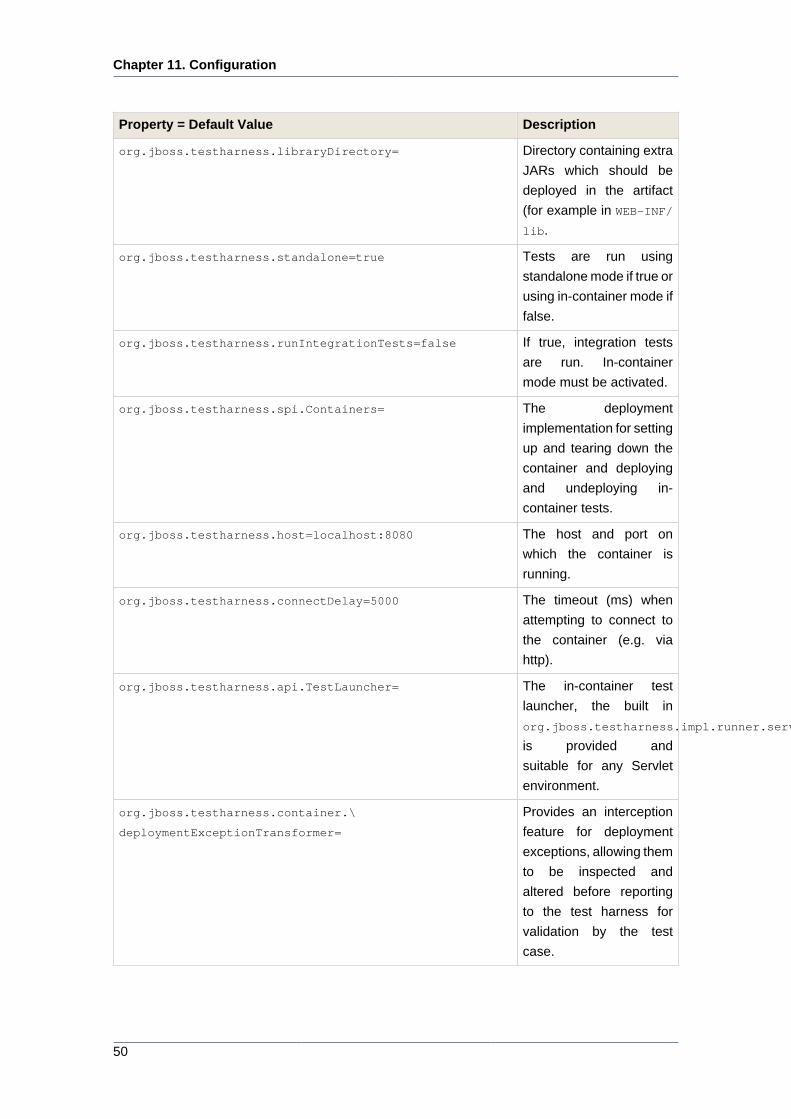
Chapter 11. Configuration
50
Property = Default Value Description
org.jboss.testharness.libraryDirectory= Directory containing extra
JARs which should be
deployed in the artifact
(for example in WEB-INF/
lib.
org.jboss.testharness.standalone=true Tests are run using
standalone mode if true or
using in-container mode if
false.
org.jboss.testharness.runIntegrationTests=false If true, integration tests
are run. In-container
mode must be activated.
org.jboss.testharness.spi.Containers= The deployment
implementation for setting
up and tearing down the
container and deploying
and undeploying in-
container tests.
org.jboss.testharness.host=localhost:8080 The host and port on
which the container is
running.
org.jboss.testharness.connectDelay=5000 The timeout (ms) when
attempting to connect to
the container (e.g. via
http).
org.jboss.testharness.api.TestLauncher= The in-container test
launcher, the built in
org.jboss.testharness.impl.runner.servlet.ServletTestLauncher
is provided and
suitable for any Servlet
environment.
org.jboss.testharness.container.\
deploymentExceptionTransformer=
Provides an interception
feature for deployment
exceptions, allowing them
to be inspected and
altered before reporting
to the test harness for
validation by the test
case.
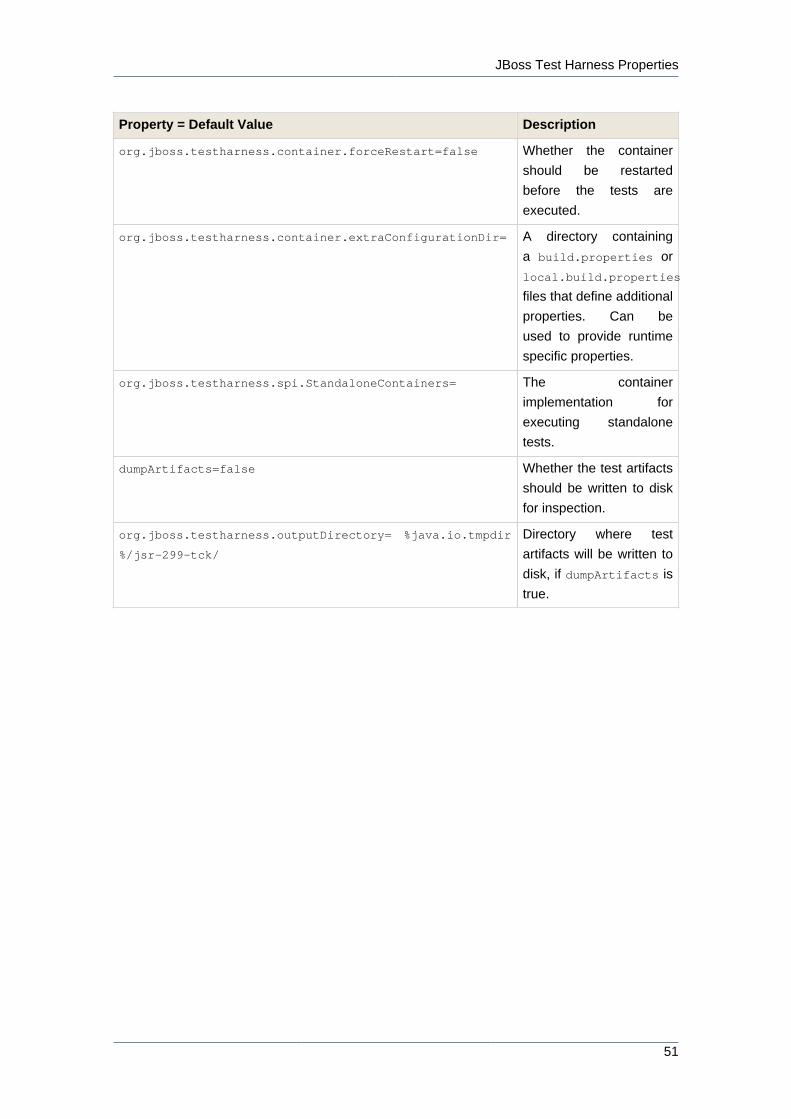
JBoss Test Harness Properties
51
Property = Default Value Description
org.jboss.testharness.container.forceRestart=false Whether the container
should be restarted
before the tests are
executed.
org.jboss.testharness.container.extraConfigurationDir= A directory containing
a build.properties or
local.build.properties
files that define additional
properties. Can be
used to provide runtime
specific properties.
org.jboss.testharness.spi.StandaloneContainers= The container
implementation for
executing standalone
tests.
dumpArtifacts=false Whether the test artifacts
should be written to disk
for inspection.
org.jboss.testharness.outputDirectory= %java.io.tmpdir
%/jsr-299-tck/
Directory where test
artifacts will be written to
disk, if dumpArtifacts is
true.

52
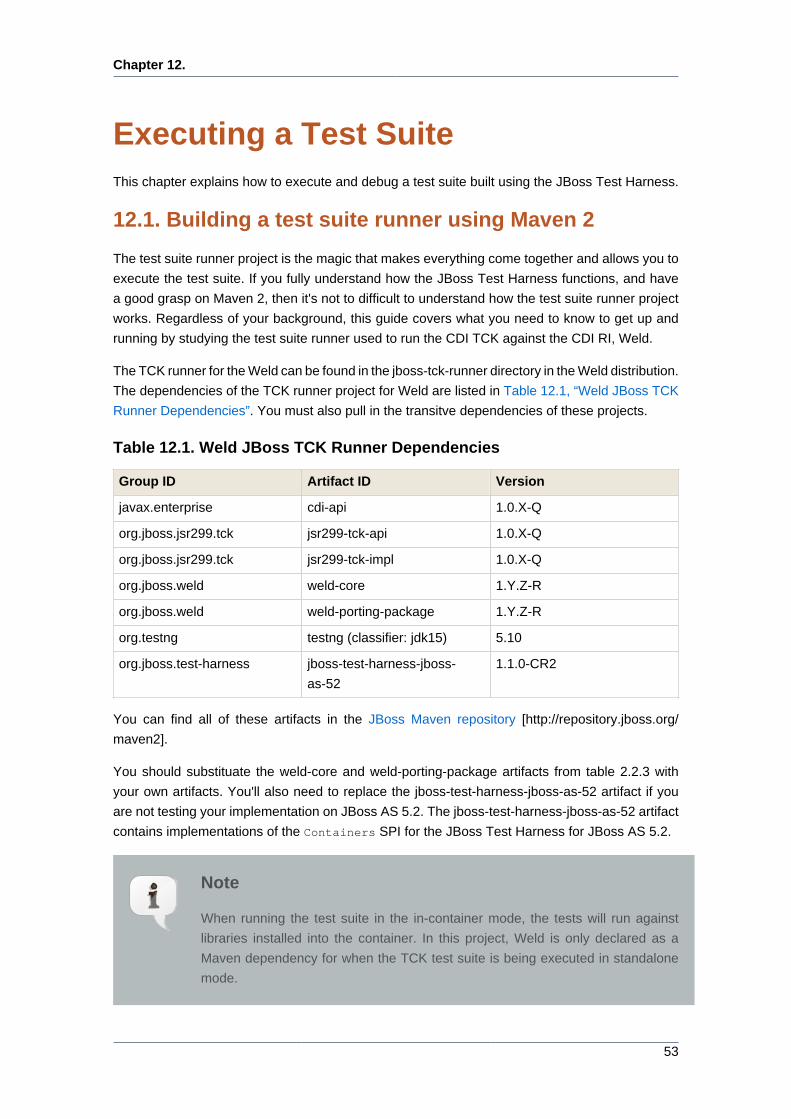
Chapter 12.
53
Executing a Test SuiteThis chapter explains how to execute and debug a test suite built using the JBoss Test Harness.
12.1. Building a test suite runner using Maven 2
The test suite runner project is the magic that makes everything come together and allows you to
execute the test suite. If you fully understand how the JBoss Test Harness functions, and have
a good grasp on Maven 2, then it's not to difficult to understand how the test suite runner project
works. Regardless of your background, this guide covers what you need to know to get up and
running by studying the test suite runner used to run the CDI TCK against the CDI RI, Weld.
The TCK runner for the Weld can be found in the jboss-tck-runner directory in the Weld distribution.
The dependencies of the TCK runner project for Weld are listed in Table 12.1, “Weld JBoss TCK
Runner Dependencies”. You must also pull in the transitve dependencies of these projects.
Table 12.1. Weld JBoss TCK Runner Dependencies
Group ID Artifact ID Version
javax.enterprise cdi-api 1.0.X-Q
org.jboss.jsr299.tck jsr299-tck-api 1.0.X-Q
org.jboss.jsr299.tck jsr299-tck-impl 1.0.X-Q
org.jboss.weld weld-core 1.Y.Z-R
org.jboss.weld weld-porting-package 1.Y.Z-R
org.testng testng (classifier: jdk15) 5.10
org.jboss.test-harness jboss-test-harness-jboss-
as-52
1.1.0-CR2
You can find all of these artifacts in the JBoss Maven repository [http://repository.jboss.org/
maven2].
You should substituate the weld-core and weld-porting-package artifacts from table 2.2.3 with
your own artifacts. You'll also need to replace the jboss-test-harness-jboss-as-52 artifact if you
are not testing your implementation on JBoss AS 5.2. The jboss-test-harness-jboss-as-52 artifact
contains implementations of the Containers SPI for the JBoss Test Harness for JBoss AS 5.2.
Note
When running the test suite in the in-container mode, the tests will run against
libraries installed into the container. In this project, Weld is only declared as a
Maven dependency for when the TCK test suite is being executed in standalone
mode.
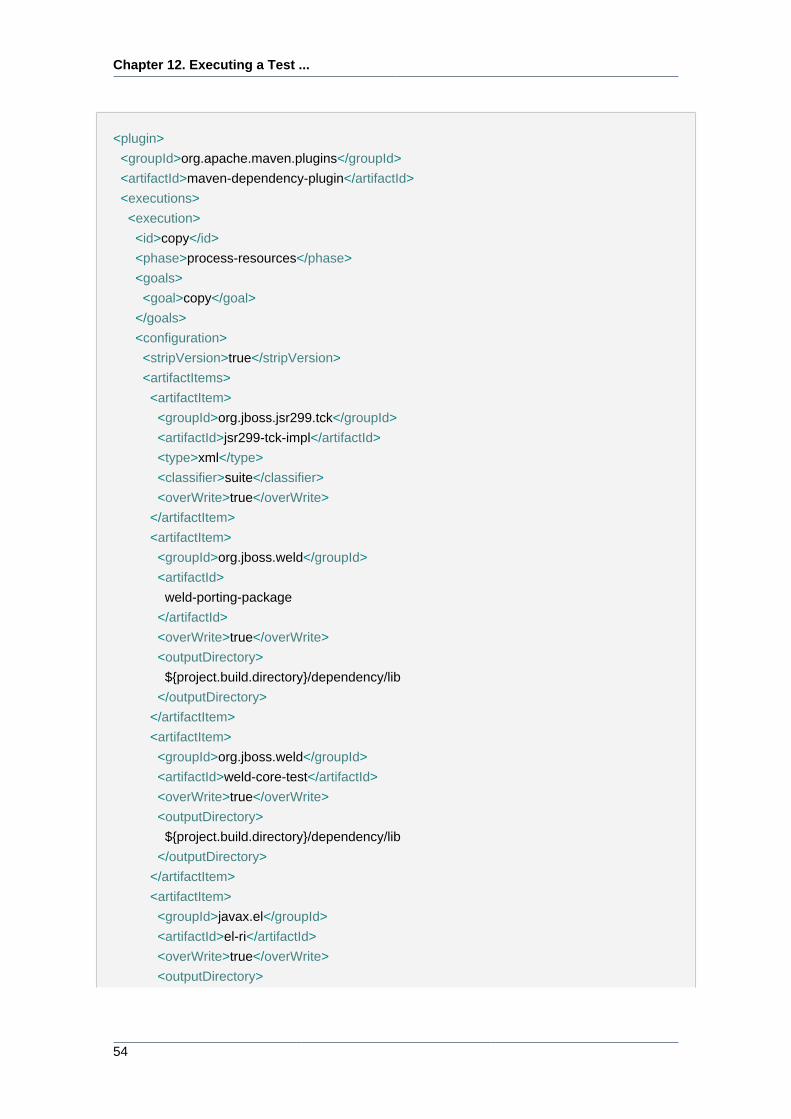
Chapter 12. Executing a Test ...
54
<plugin>
<groupId>org.apache.maven.plugins</groupId>
<artifactId>maven-dependency-plugin</artifactId>
<executions>
<execution>
<id>copy</id>
<phase>process-resources</phase>
<goals>
<goal>copy</goal>
</goals>
<configuration>
<stripVersion>true</stripVersion>
<artifactItems>
<artifactItem>
<groupId>org.jboss.jsr299.tck</groupId>
<artifactId>jsr299-tck-impl</artifactId>
<type>xml</type>
<classifier>suite</classifier>
<overWrite>true</overWrite>
</artifactItem>
<artifactItem>
<groupId>org.jboss.weld</groupId>
<artifactId>
weld-porting-package
</artifactId>
<overWrite>true</overWrite>
<outputDirectory>
${project.build.directory}/dependency/lib
</outputDirectory>
</artifactItem>
<artifactItem>
<groupId>org.jboss.weld</groupId>
<artifactId>weld-core-test</artifactId>
<overWrite>true</overWrite>
<outputDirectory>
${project.build.directory}/dependency/lib
</outputDirectory>
</artifactItem>
<artifactItem>
<groupId>javax.el</groupId>
<artifactId>el-ri</artifactId>
<overWrite>true</overWrite>
<outputDirectory>
Dumping the Test Artifacts to Disk
55
${project.build.directory}/dependency/lib
</outputDirectory>
</artifactItem>
</artifactItems>
</configuration>
</execution>
</executions>
</plugin>
The target folder for the copies of the dependencies (i.e., the JAR files) is declared as the JBoss
Test Harness library directory; this results in these libraries being added to the test artifact using
the following property assignment:
org.jboss.testharness.libraryDirectory=target/dependency/lib
We also copy the test suite configuration from the local Maven
repository (groupId=org.jboss.jsr299.tck, artifactId=jsr299-tck-impl, classifier=suite, type=xml,
version=1.0.0-SNAPSHOT) to a local repository as the TestNG Maven plugin expects a local file.
The TCK is executed using the Maven TestNG plugin. Maven 2 profiles are used to control the
properties that are set at the time of the execution. For instance, the incontainer profile enables
integration tests and disables standalone mode, changing the default settings.
The jboss-tck-runner project also defines the JBoss Test Harness extra configuration directory
using the following property:
org.jboss.testharness.container.extraConfigurationDir=../jboss-as
The JBoss Test Harness looks in this directory for either a build.properties or local.build.properties
file that declares additional configuration properties. In particular, the JBoss AS Containers
implementation looks here to find the jboss.home property so it knows where the scripts are
located to start and stop JBoss AS.
12.2. Dumping the Test Artifacts to Disk
As you have learned, when the test suite is executing using in-container mode, each test class
is packaged as a deployable artifact and deployed to the container. The test is then executed
within the context of the deployed application. This leaves room for errors in packaging. When
investigating a test failure, it's helpful to be able to inspect the artifact after it is generated. The
JBoss Test Harness can accommodate this type of inspection by "dumping" the generated artifact
to disk.
Chapter 12. Executing a Test ...
56
If you want to write the artifacts to disk, and avoid executing the test suite, you can simply execute
the main method of the class org.jboss.testharness.api.TCK. For example you could use a
Maven profile that is activated when the dumpArtifacts command line property is defined:
mvn test-compile -DdumpArtifacts
The output directory where the artifacts are written is defined by the property
org.jboss.testharness.outputDirectory.
Once the artifact is written to disk, you have an option of manually deploying it to the container. You
can execute the tests in the artfact by requesting the context path of the application in the browser.
If you want to execute an individual test method, specify the method name in the methodName
request parameter (e.g., ?methodName=testMethodName).


![The First IoT JSR: Units of Measurement JSR-363 [BOF5981]](https://img.dokumen.tips/doc/110x75/58d0b3331a28ab1d3a8b5249/the-first-iot-jsr-units-of-measurement-jsr-363-bof5981.jpg)