Embed Size (px)
Citation preview
Page | 1
Day and Night Year 3 Earth & Space Sciences
Earth’s rotation on its axis causes regular changes, including night and day (ACSSU048)
Created by Ashleigh Shinnie & Matthew Parkinson

Page | 2
1.0 Content Page
Table of Contents 1.0 Content Page ..................................................................................................................................... 2
2.0 Backward Design Unit Planner Table ................................................................................................ 3
3.0 Unit at a glance table ........................................................................................................................ 5
4.0 Australian Curriculum ....................................................................................................................... 6
4.1 Science .......................................................................................................................................... 6
4.2 General Capabilities ...................................................................................................................... 7
4.3 Cross Curriculum Priorities ........................................................................................................... 8
5.0 Assessment Overview ....................................................................................................................... 9
6.0 Teacher Background Information ................................................................................................... 10
7.0 Student Misconceptions ................................................................................................................. 11
8.0 Five E Approach—Lessons .............................................................................................................. 12
8.1- Lesson One ................................................................................................................................. 12
8.2- Lesson Two: Session One ........................................................................................................... 14
8.2- Lesson Two: Session Two ........................................................................................................... 16
8.3- Lesson Three: Session One ........................................................................................................ 18
8.3- Lesson Three: Session Two ........................................................................................................ 20
8.4- Lesson Four ................................................................................................................................ 22
8.5- Lesson Five ................................................................................................................................. 24
8.6- Lesson Six ................................................................................................................................... 26
8.7- Lesson Seven .............................................................................................................................. 28
9.0 References ...................................................................................................................................... 29
10.0 Appendix ....................................................................................................................................... 30
10.1 Equipment ................................................................................................................................. 30
10.2 Assessment Rubric .................................................................................................................... 31
10.3 Lesson One Worksheet ............................................................................................................. 32
10.4 Lesson Two: Session One .......................................................................................................... 34
10.5 Lesson Three: Session Two ....................................................................................................... 36
10.6 Lesson Four Articles .................................................................................................................. 37
10.7 Lesson Six Activity ..................................................................................................................... 41
10.8 Emu Dreaming Article ............................................................................................................... 42

Page | 3
2.0 Backward Design Unit Planner Table
Unit Title: Day and Night Strand: Earth and Space Sciences Stage: Year Three
Outcome: Understand the relationships between the Earth, Sun and Moon and how it relates to the day and night that humans experience on Earth.
Phase Activities
Evaluate What do you want the students to know? What representations will provide evidence that they understand the concepts?
By the end of the evaluate stage of this unit students will know:
- That day and night is caused by the relationship and movements of the Earth, Moon and Sun
- The rotations and revolutions of the Earth and Moon
- The Moon orbits the Earth every 27 days (once a month) and orbits the Sun once a year
- The Earth revolves (orbits) around the Sun once a year and rotates (spins) around an axis every 24 hours
- The Sun stays in a fixed position
- The timeframes within the Earth and Moons movements
- The size and distance of the planets
What do you want the students to be able to do? How will they demonstrate this?
Students new knowledge and understanding will be evidenced by:
An oral presentation where the students displays their new knowledge through a:
- 3D diorama representation of the Sun, Moon and Earth system
- Letter to an alien explaining the positions and movements of the Earth and Moon
Elaborate What student investigation/s or application of knowledge would extend their understanding? Representations?
During the elaborate stage of this unit students will further investigate the shapes of the Moon we see in the sky to elaborate on the causes of night
time as well as what causes day and night from an Indigenous perspective. This will be achieved through the use of hands on material comparisons,
Ipad apps and online resources. Students will reflect on their new knowledge in their science journals.

Page | 4
Explain What are the current scientific explanations? How best can the students represent their understanding?
During the explain stage students seek further clarification of current scientific explanations of the relationships between the Sun, Earth and Moon
by investigating articles and watching videos to enhance their understanding. Students work in small groups to represent the different timeframes of
how long it takes the Earth and Moon to orbit the Sun to support what makes day and night. Students will also use hands on materials to make
comparisons between the sizes of the Earth, Moon and Sun and the distance between them.
Current Scientific Explanations include:
- The Earth orbits the Sun once a year which gives us our seasons - The Earth spins on its axis every 24 hours which causes day and night - The Moon orbits the Earth every 27 days (roughly once a month)
Students represent their understanding by:
- Writing a short, concise summary about the relationship between the Sun, Earth and Moon and their details of their movements
Explore What hands-on, shared experiences of the phenomenon are appropriate? Representations?
Students take part in hands-on experience to investigate the relationship between shadows and the position of the Sun at different times of the day.
Students explore the cause of the different phases of the Moon. They then explore the movements and relationship of the Sun, Moon and Earth
through role play. Students are given the opportunity to explain their understandings by using materials to represent each planet and drawing a
diagram to highlight the system.
Students represent their new findings through participating in oral presentations, group discussions as well as writing predictions, observations and findings in their science journals.
Engage How can we engage students and elicit their prior knowledge? Representations?
During the engage stage the focus is to purely discover what students already think they know about the causes of day and night. In this phase no
new information or explanations are provided.
To elicit students prior knowledge them will
- Investigate images of the Sun, Moon and Earth as well as different parts of the day (night time, day time, Sunrise, Sunset)
- Discuss ideas about the causes of day and night and how it occurs
- Form a ‘Investigation Questions’ poster about what they would like to learn

Page | 5
3.0 Unit at a glance table
Unit at a glance
-Day and night
Phase Lesson At a glance
Engage
1. Space & Earth What causes day and night? Teacher captivates student’s
interest about this topic by covering what they know and
introducing new ideas.
Explore
2. Sun up, Sun down
Session 1: Sun up
Session 2: Sun down
Students use hands on investigations and activities to
explore how the spinning Earth impacts the Sun’s position
at different parts of the day as well as investigate the
cause of the different phases of the Moon.
3. Rotations and
Revolutions
Session 1: Role play
Session 2: lamp activity
Students partake in hands-on, activity based experiences
to explore the Sun-Earth-Moon system and their relating
movements. This will include how the rotations and
revolutions of the Earth and Moon impact day and night.
Explain
4. Spinning in space
Further explanation of current scientific understandings
about the relationship of the Sun, Earth and Moon.
Students are exposed to timeframes to enhance what they
know about day and night
5. Space Explorers Students use ICT resources to help put into perspective
the actual sizes of the Sun, Moon and Earth as well as the
distance in between them.
Elaborate
6. Moon Shadows Students elaborate on what they know about day and
night and the movements of the planets to explain the
different shapes of the Moon we see in the sky.
Evaluate
7. Diorama Madness Students display their new understandings of what causes
day and night through a diorama presentation and
explanation of the positions and movements of the Sun,
Earth and Moon.

Page | 6
4.0 Australian Curriculum
4.1 Science
Australian Curriculum: Science Strand Content Descriptor Lesson Number Content Code
Science Understanding
Earth and space sciences
1-7 Earth’s rotation on its axis causes regular changes, including night and day
(ACSSU048)
Science as a human endeavour
Nature and development of
science
2,3,5,6 Science involves making predictions and describing patterns and relationships
(ACSHE050)
Science Inquiry Skills Questioning and predicting
1-7 With guidance, identify questions in familiar contexts that can be investigated scientifically and predict what might happen based on prior knowledge
(ACSIS053)
Planning and conducting
1,2,3,4,5,6 Suggest ways to plan and conduct investigations to find answers to
questions
(ACSIS054)
Communicating 1-7 Represent and communicate ideas and findings in a variety of ways
such as diagrams, physical representations and simple reports
(ACSIS060)
Page | 7
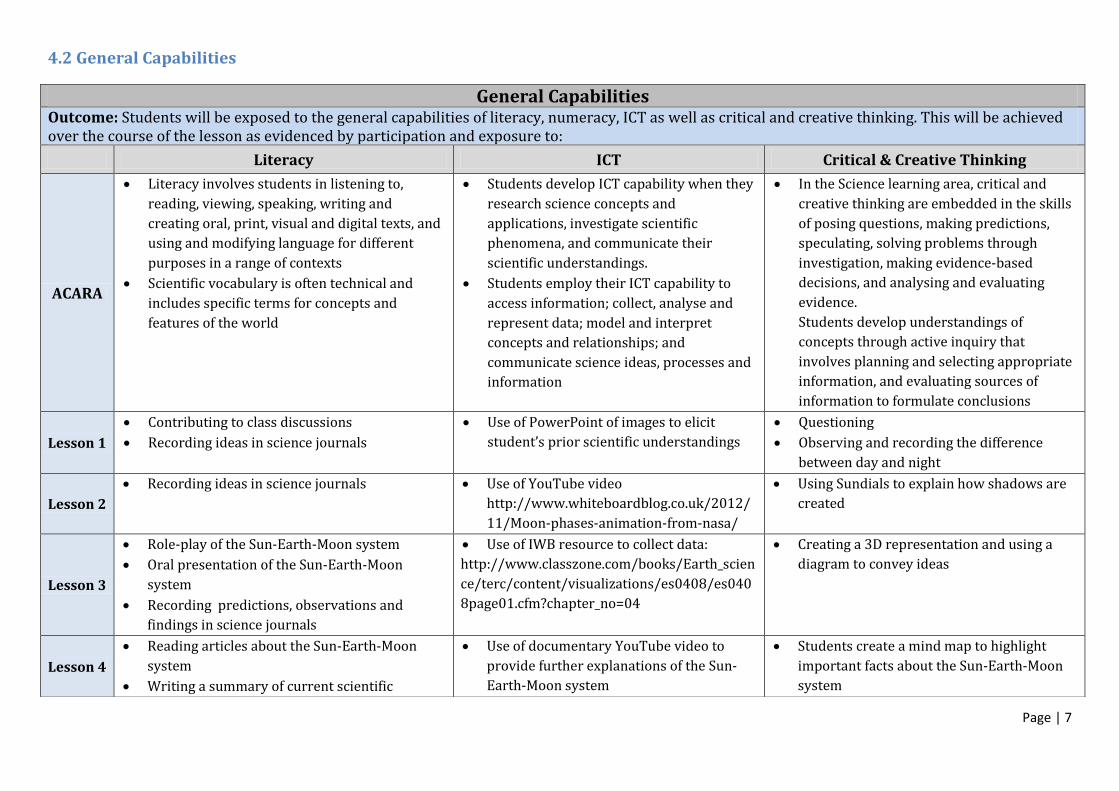
4.2 General Capabilities
General Capabilities Outcome: Students will be exposed to the general capabilities of literacy, numeracy, ICT as well as critical and creative thinking. This will be achieved over the course of the lesson as evidenced by participation and exposure to:
Literacy ICT Critical & Creative Thinking
ACARA
Literacy involves students in listening to,
reading, viewing, speaking, writing and
creating oral, print, visual and digital texts, and
using and modifying language for different
purposes in a range of contexts
Scientific vocabulary is often technical and
includes specific terms for concepts and
features of the world
Students develop ICT capability when they
research science concepts and
applications, investigate scientific
phenomena, and communicate their
scientific understandings.
Students employ their ICT capability to
access information; collect, analyse and
represent data; model and interpret
concepts and relationships; and
communicate science ideas, processes and
information
In the Science learning area, critical and
creative thinking are embedded in the skills
of posing questions, making predictions,
speculating, solving problems through
investigation, making evidence-based
decisions, and analysing and evaluating
evidence.
Students develop understandings of
concepts through active inquiry that
involves planning and selecting appropriate
information, and evaluating sources of
information to formulate conclusions
Lesson 1
Contributing to class discussions
Recording ideas in science journals
Use of PowerPoint of images to elicit
student’s prior scientific understandings
Questioning
Observing and recording the difference
between day and night
Lesson 2
Recording ideas in science journals Use of YouTube video
http://www.whiteboardblog.co.uk/2012/
11/Moon-phases-animation-from-nasa/
Using Sundials to explain how shadows are
created
Lesson 3
Role-play of the Sun-Earth-Moon system
Oral presentation of the Sun-Earth-Moon
system
Recording predictions, observations and
findings in science journals
Use of IWB resource to collect data:
http://www.classzone.com/books/Earth_scien
ce/terc/content/visualizations/es0408/es040
8page01.cfm?chapter_no=04
Creating a 3D representation and using a
diagram to convey ideas
Lesson 4
Reading articles about the Sun-Earth-Moon
system
Writing a summary of current scientific
Use of documentary YouTube video to
provide further explanations of the Sun-
Earth-Moon system
Students create a mind map to highlight
important facts about the Sun-Earth-Moon
system

Page | 8
4.3 Cross Curriculum Priorities
explanations about the Sun-Earth-Moon system
Lesson 5 Use of the ’Solar Walk’ App for Ipads
Lesson 6
Reading literature to elaborate on Indigenous
perspectives of the causes of day and night
Recording new understandings in science
journals
Use of websites to collect and analyze
information about the phases of the Moon
Use of the ’Solar Walk’ App for Ipads
Creating the phases of the Moon using hands
on materials
Lesson 7 Oral presentation of new understandings to
teacher and peers
Creating a 3D representation of the Sun-
Earth-Moon system
Cross Curriculum Priorities
Aboriginal & Torres Strait Islander Histories & Cultures
Lesson 6
This lesson will feature a short elaboration of what causes day and night according to Aboriginal culture. The teacher will briefly cover parts of the
article ‘Emu Dreaming’ in order to convey new ideas about the Sun-Earth-Moon relationship according to the original owners of this land. The
teacher will elaborate on ideas that the Sun is a female and the Moon is a male as well as briefly cover the Aboriginal’s fascination with the night
sky and what constellations and the milky way meant to their culture.
A Helpful resource for Aboriginal Astronomy is : http://www.atnf.csiro.au/research/AboriginalAstronomy/whatis.htm

Page | 9
5.0 Assessment Overview
Assessment Lessons 5 E What will be assessed How it will be assessed Diagnostic 1-3 Engage
Explore Students ability to: Elicit their prior knowledge about what causes day and night Consider the movements of the Earth during the day and position
of the Sun in the sky and the impact it has on shadows Describe the Sun-Earth-Moon system and make links to how this
causes day and night
Observation and anecdotal records of student: o Reflections o Role-play o Diagrams
Formative 4-6 Explain Elaborate
Students ability to: Explain the rotations and revolutions of the Earth and the Moon Identify the time frames of the movements of the Earth and Moon Describe new understandings of what causes day and night Make comparisons between the size and distance between the Sun,
Earth and Moon Identify and describe the eight key phases of the moon
Observation and feedback to students on their: o Summary of understandings o Reflections in their science journals o Posters and diagrams
Summative 7 Evaluate Students ability to: Re-create the movements of the Earth and Moon around the sun Describe the rotations and revolutions of the Earth and Moon Identify and explain the cause of day and night Present findings to their peers
Marked against a simple 3 point criteria (See Appendix 10.2)
Description of final culminating assessment task Date due 3D Representation
Students will individually respond to the new content they have been learning about by creating a 3D representation of the Sun-Earth-Moon
system. Each student will be required to draw on the prior learning of this unit to help them recreate the movements of the Sun, Earth and Moon
and explain the timeframes associated with their rotations and revolutions. Students will be required to present their representation to the class
with a short elaboration on how the Sun-Earth-Moon system causes day and night.
The 3D representation and presentation will be assessed on:
1. The diorama 2. The presentation skills 3. The explanation (the letter to alien)
Friday 3rd May, 2013
Page | 10
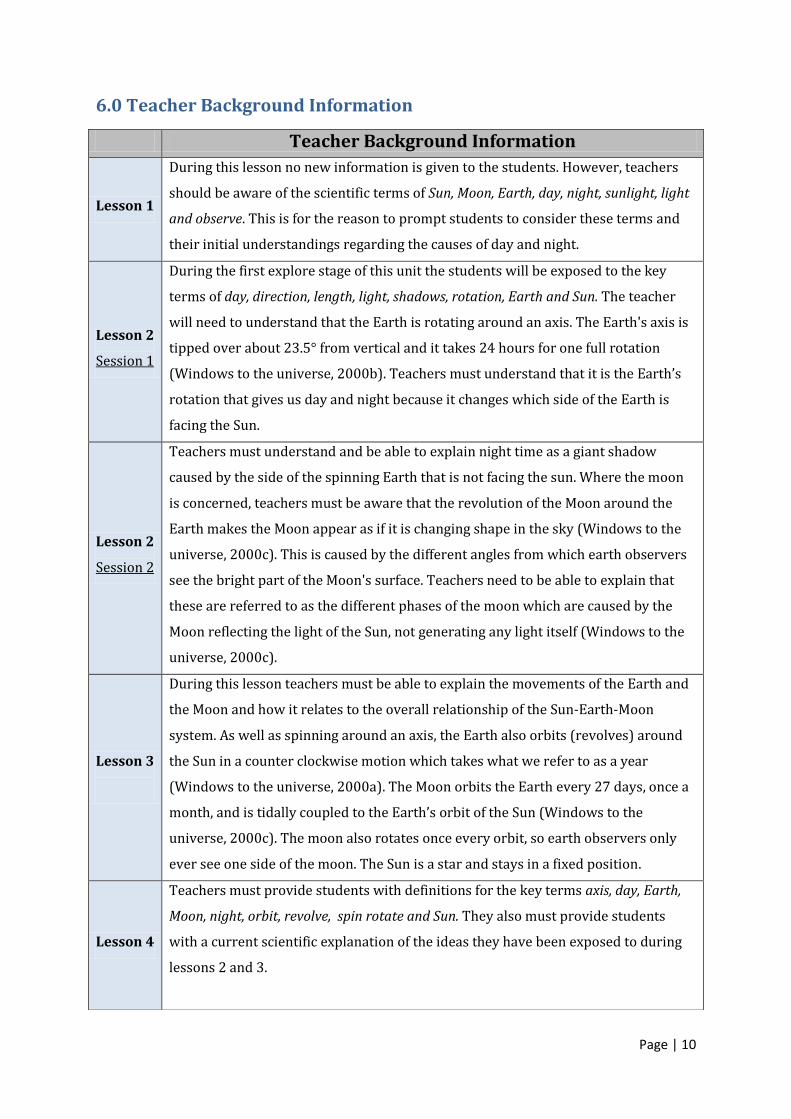
6.0 Teacher Background Information
Teacher Background Information
Lesson 1
During this lesson no new information is given to the students. However, teachers
should be aware of the scientific terms of Sun, Moon, Earth, day, night, sunlight, light
and observe. This is for the reason to prompt students to consider these terms and
their initial understandings regarding the causes of day and night.
Lesson 2
Session 1
During the first explore stage of this unit the students will be exposed to the key
terms of day, direction, length, light, shadows, rotation, Earth and Sun. The teacher
will need to understand that the Earth is rotating around an axis. The Earth's axis is
tipped over about 23.5° from vertical and it takes 24 hours for one full rotation
(Windows to the universe, 2000b). Teachers must understand that it is the Earth’s
rotation that gives us day and night because it changes which side of the Earth is
facing the Sun.
Lesson 2
Session 2
Teachers must understand and be able to explain night time as a giant shadow
caused by the side of the spinning Earth that is not facing the sun. Where the moon
is concerned, teachers must be aware that the revolution of the Moon around the
Earth makes the Moon appear as if it is changing shape in the sky (Windows to the
universe, 2000c). This is caused by the different angles from which earth observers
see the bright part of the Moon's surface. Teachers need to be able to explain that
these are referred to as the different phases of the moon which are caused by the
Moon reflecting the light of the Sun, not generating any light itself (Windows to the
universe, 2000c).
Lesson 3
During this lesson teachers must be able to explain the movements of the Earth and
the Moon and how it relates to the overall relationship of the Sun-Earth-Moon
system. As well as spinning around an axis, the Earth also orbits (revolves) around
the Sun in a counter clockwise motion which takes what we refer to as a year
(Windows to the universe, 2000a). The Moon orbits the Earth every 27 days, once a
month, and is tidally coupled to the Earth’s orbit of the Sun (Windows to the
universe, 2000c). The moon also rotates once every orbit, so earth observers only
ever see one side of the moon. The Sun is a star and stays in a fixed position.
Lesson 4
Teachers must provide students with definitions for the key terms axis, day, Earth,
Moon, night, orbit, revolve, spin rotate and Sun. They also must provide students
with a current scientific explanation of the ideas they have been exposed to during
lessons 2 and 3.

Page | 11
7.0 Student Misconceptions
Student Misconceptions
Lesson One-
Students will have different ideas about what causes day and night such as:
the Sun disappears at night
the Sun goes behind hills, clouds, the Moon or the Earth which causes night time
More advanced students may believe the Earth travels around the Sun once a
day.
Lesson Two- You can't see the Moon in the daytime
The Sun is moving
Lesson Three
The Moon goes around the Earth in a single day
Night time occurs because the sun goes behind the moon
The Moon creates its own light
Lesson Four Earth rotates while the Sun and Moon are fixed
The Sun moves
Lesson Five
The Sun is the same size as Earth and the Moon
The Sun, Earth and Moon are all close to one another
Lesson Six
The Moon changes its shape
Clouds/night/something blocks the moon
Lesson 5
Teachers must be able to identify that the combination of size and distance from the
Earth causes the Moon and Sun to appear the same size in the sky to Earth
observers. (Windows to the universe, 2000c)
Lesson 6
The Moon passes through eight major shapes during a cycle that repeats itself every
27 days. The phases always follow one another in the same order. The eight
common phases include new moon, waxing crescent, first quarter, waxing
gibbous, full moon, waning gibbous, third quarter, waning crescent (Moon phases,
2010). It is important here to note that ‘waxing’ means growing which highlights
that the illuminated part of the moon is increasing where as ‘waning’ means
shrinking which highlights that the illuminated part of the moon is decreasing
(Moon phases, 2010). Alternatively, crescent, gibbous, quarter, new and full refer to
the actual shape of the moon.

Page | 12
8.0 Five E Approach—Lessons
8.1- Lesson One
Lesson One: Space & Earth
Stage of 5 E’s: Engage Time: 45 minutes
Overview
The purpose of this learning experience is to discover what students already think they know
about what causes day and night and prompt them to consider the role that the Sun, Moon and
Earth play in the process. This is achieved through questioning, discussing and investigating
different ideas with the use of ICT and hands on materials. Students will record their initial
ideas and theories about the causes of day and night in their science journals.
Assessment Focus
Diagnostic- To assess student’s prior knowledge about the causes of day and night.
Key Outcomes
1. Pose questions about the causes of day and night
2. Discuss ideas about the role of the Moon, Earth and Sun regarding day and night
3. Record and justify initial ideas about day and night
Required Equipment
- Science journals -Teacher’s laptop
- IWB -PowerPoint of images
- Worksheet
Lesson Procedure
Step 1 Ask students to look outside the window and discuss if it is day or night and to justify
how they know. Prompt students to use the appropriate observation skills (ears, eyes
and nose). Ask students to explain how they would know if it was nighttime and what
they would see. Also consider if it was nighttime in QLD would it also be nighttime in
other parts of the country? The world?
Step 2 As a class, view a PowerPoint of different images of day and night. Students will
complete the relevant questions on the worksheet as each image is shown. The
PowerPoint includes images of day, night, sunset and sunrise. Students will discuss
what has happened to cause this in our sky. (See Appendix 10.3 for images and
worksheet)

Page | 13
Step 3 Ask students to write a reflection in their science journals about their own ideas
about what causes day and night, new understandings from the activity and any
questions they might have.
Step 4 As a class form an ‘Investigation Questions’ poster based on any questions the
students still have which will be explored in future lessons. Display the poster on the
classroom wall.

Page | 14
8.2- Lesson Two: Session One
Lesson Two: Sun up, Sun Down
Stage of 5 E’s: Explore Time: 60 minutes Session One: Sun up
Overview
The purpose of this learning experience is for students to investigate the relationship between
shadows and the position of the Sun at different times of the day. Through hands on activities
students will observe what happens to the length and direction of shadows throughout the day
as well as conduct a short experiment about the shadows created by a variety of objects.
Students will record their new understandings with illustrations in their science journals.
Assessment Focus
Diagnostic- To assess student’s consideration of the relationship between the movements of
the Earth and position of the Sun in the sky. Students should be able to explain the impact it
has on shadows and what happens to the Sun at night.
Key Outcomes
1. Explain how the Earth spins and the light from the Sun creates different sized shadows
based on its position in the sky
2. Understand that the Earth orbits the Sun
Required Equipment
- Science journals - Globe
- 10-20cm Stick -Paper
- Materials (Ruler, plant, lego people) - Torch
Lesson Procedure
Step 1 Gather students outside and mark the shadow outline of the building with chalk. Ask
students if they think the shadow with change or remain the same throughout the
day. Bring students back inside the classroom and discuss what factors would
determine how and when a shadow is made. Ask students to write down how they
believe shadows are formed and when they are formed in their Science journals.
Step 2 Explain to students that today they will be creating a Sundial to see if the shadow will
change at different intervals throughout the day. Write student predictions on the
board. Every half hour one student will go outside and draw the shadow line of a stick
that has been placed in a fixed position on the piece of paper. When the student comes
back, write observations on the board. Through this process students should

Page | 15
complete the relevant worksheet (See Appendix 10.4)
Step 3 The teacher will shine a torch on a range of materials at different angles in order for
students to understand that light from the Sun causes shadows. Discuss with students
what they are seeing and why they think the angles change the shape of the shadow.
Also discuss how the position of the torch or the object is important in working out
the position of the shadow. Ask students to consider if the lamp was the Sun would it
have a similar affect on objects outside such as buildings, trees, people etc.
Step 4 Using a globe and a torch, ask a volunteer to shine the torch on the globe while
another volunteer slowly spins the globe. Discuss the idea that the Earth is actually
spinning and the Sun is staying in a fixed position. Ask students to consider what this
means for the causes of daytime and nighttime. What happens to the Sun at
nighttime? Prompt students to understand nighttime as a giant shadow.
Step 5 At the end of the day students will collect the piece of paper which will highlight how
the Earth has rotated. Ask students to predict where the shadow would be at 5pm and
5am.
Step 6 Take the students back outside to original chalk outline and ask them what has
changed? Based on the knowledge throughout this lesson ask them why they think
the shadow had changed and how? Take the students back inside and look at the
sundial they have observed throughout the day. Ask students to record this image in
their science journals.
Step 7 Students draw an example of a type of shadow they have seen throughout the day in
their science journals. They must also write a statement explaining what they have
drawn.
Page | 16
8.2- Lesson Two: Session Two
Lesson Two: Sun up, Sun Down
Stage of 5 E’s: Explore Time: 40 minutes Session One: Sun down
Overview
The purpose of this learning experience is for students to investigate the relationship between
shadows and night-time as well as for students to understand that the shape of the Moon we see
in the sky is a reflection.
Assessment Focus
Diagnostic- To assess student’s consideration of what causes the different phases of the Moon and the relationship it has with the Sun-Earth-Moon system
Key Outcomes
1. Identify and describe the cause of the different phases of the Moon
2. Justify what happens to the Sun at night
3. Understand that night time is a giant shadow and the Moon orbits the Earth
Required Equipment
- Science journals
- Images of the Moon
- http://www.whiteboardblog.co.uk/2012/11/Moon-phases-animation-from-nasa/
Lesson Procedure
Step 1 Begin the lesson by recapping on student’s new knowledge of nighttime from the
previous lesson. Reflect on the idea that the Earth is spinning which changes the
angle Earth observers see the Sun. Prompt students to understand night time as a
giant shadow as the Earth is no longer facing the Sun and the Earth is in darkness
Step 2 Show students a picture of a full Moon at nighttime. Ask students “What do you see?”
“How do you know it is night-time?’ “Does the Moon always look like this?” “Can you see
the Moon during the day?”
Step 3 As a class, explore the different phases of the Moon over the 27 day cycle.
Play the clip from the NASA website on the IWB that highlights the different phases of
the Moon for the whole year of 2013.
As a class discuss what they have just seen. Ask students ‘Do you have any new ideas
about what causes night time?’ ‘

Page | 17
Step 4 Point out to the students that the Moon always keeps the same side to us, but not
always the same face. Because of the tilt and shape of its orbit, Earth observers see the
Moon from slightly different angles over the course of a month.
Step 5 Ask students to write a short reflection on this new information and any questions
they still have.

Page | 18
8.3- Lesson Three: Session One
Lesson Three: Rotations and Revolutions
Stage of 5 E’s: Explore Time: 40 minutes Session One: Role Play
Overview
The purpose of this learning experience is to explore the movements and relationship of the
Sun, Moon and Earth and how they relate to the process of day and night. Through the use of
role play students will familiarize themselves with the rotation of the Earth and the Moon as
well as the revolution of the Moon around the Earth. The role play activity also includes how the
Earth and Moon revolve around the Sun. Students will record their predictions, observations
and findings in their science journals.
Assessment Focus
Diagnostic- To assess student’s knowledge of the movements of the Sun, Earth and Moon and
the timeframes associated with those movements.
Key Outcomes
1. Understand and explain that the:
- Moon rotates/spins on its axis
- Moon revolves/orbits around the Earth
- Moon and the Earth revolve around the Sun.
2. Explain that motion of the Sun, Earth, and Moon are constantly repeated.
3. Make links between the time frames of the Earth and Moon movements and measurements
of time (year, month, day)
Required Equipment
- Science journals -Chalk (Blue, Orange, White) x 10
Lesson Procedure
Step 1 Review the idea that the Earth spins which causes day and night. Ask students, ‘What
do you see in the sky?’ ‘What might revolve around the Earth?’
Take students to a large concreted area outside and split into groups of three.
Step 2 In their groups, ask one student to draw the Earth (a 30cm circle coloured with blue
chalk) and another student to draw the Sun (90cm circle coloured with orange or red
chalk). Ask students to draw the orbit of the Earth around the Sun. Note this scale is
not to size but for the purpose of this activity the importance rests upon the orbiting
motion
Step 3 Ask another group to draw the Moon (10cm coloured with white chalk). The Moon

Page | 19
should be about a meter away from the Earth so that students can move about easily.
Note: Orbit sizes not to scale for this activity. Remind students that distances in space
are vast and that this is a model to help understand motion. Ask that student to draw
the Moons orbit around the Earth
Step 4 Explain to students that one student will represent the Sun, one will represent the
Moon and the other will represent Earth.
Step 5 Ask students how long it takes for the Earth to spin around- 24 hours. Explain that the
Moon rotates much slower—it takes a little more than 27 days for the Moon to rotate
all the way around. Ask students, "Which spins faster, the Earth or the Moon?" Explain
that the Moon rotates and orbits around the Earth at the same time. Ask the “Moon”
how he or she should move. The Moon character will spin and revolve in a counter
clockwise direction as seen from above) Remind students that this is not a race and
the rate of speed is constant and steady.
Step 6 Ask the “Earth” how he or she should move. Get your Earth and Moon characters
moving in rotation/revolution. All three students (Sun, Earth and Moon) should have
a go at physically being each object in space.
Step 7 Gather the students back inside and ask them which was the hardest role to play and
why? Also get students to draw what they have just demonstrated in their role play in
their science journals.

Page | 20
8.3- Lesson Three: Session Two
Lesson Three: Rotations and Revolutions
Stage of 5 E’s: Explore Time: 45 minutes Session Two: Lamp Activity
Overview
The purpose of this learning experience is to explore the movements and relationship of the
Sun, Moon and Earth and how they relate to the process of day and night. Through the use of
hands on activities students are given the opportunity to explain their understandings by using
materials to represent the Sun, Earth and Moon then drawing a diagram to highlight the system.
Assessment Focus
Diagnostic- To assess student’s representations of the Sun Earth and Moon in terms of
demonstrating the rotation and revolution of the Earth around the Sun and the Moon around
the Earth. Also their reflections on what relationship this has with the causes of day and night.
Key Outcomes
1. Create a 3D representation of the Sun-Earth-Moon system 2. Understand and explain the relationship between the movements of the Sun, Earth and
Moon 3. Present findings to the class
Required Equipment
- Science journals -5 x torches
- 5 x large foam balls - 5 x small foam balls
- Texta pens - 15 x wooden skewers
- 5 x medium foam balls - 5 x flat pieces of Styrofoam
- http://www.classzone.com/books/Earth_science/terc/content/visualizations/es0408/es
0408page01.cfm?chapter_no=04
- http://sciencenetlinks.com/interactives/messenger/psc/PlanetSize.html
Lesson Procedure
Step 1 Begin by reviewing the previous lesson where students created a role play
scenario where they were physically representing the Sun, Moon and Earth. Ask
them what parts they remember and using their science journals how long did it
take for the Earth to rotate around the Sun and how long it took for the Moon to
revolve around the Earth.
Step 2 Using the website above, show students how the Earth rotates on its axis creating
day and night whilst at the same time revolving the Sun. Discuss with students
what the role of the Moon might be based on the role-play in previous lesson.
Use the other website to compare the sizes of the Earth, Moon and Sun.
Step 3 Split students into 5 small groups. Using the materials provided, students will

Page | 21
recreate the Sun-Earth-Moon system. Explain to students they can create their
Sun-Earth-Moon system any way they would like or follow the instruction sheet
but they must use all the materials provided to them (See Appendix 10.5).
Hint: an idea would be to use the skewers to hold items in place. Students are
also allowed to look back on what they have previously learnt in their science
journals.
Have students draw a diagram of the model on big sheets of paper including lines
to show which way the Earth and Moon are orbiting and spinning.
Step 4 Students present their 3D representation to the class and explain their findings.
Students could arrive at the conclusion to use the torch to represent the Sun, the
large ball as the Earth and the small ball to represent the Moon if they do not use
the worksheet instructions.

Page | 22
8.4- Lesson Four
Lesson Four: Spinning in Space
Stage of 5 E’s: Explain Time: 45 minutes
Overview
The purpose of this learning experience is for students to further investigate current scientific
explanations for what causes day and night. Through journal articles and videos, the students will
investigate how the Earth spins on its axis while revolving around the Sun and how the Moon
orbits the Sun and Earth. In addition to this, students will be exposed to timeframes for each cycle
e.g. 24 hours for the Earth to spin, 1 year to revolve around the Sun, 27 day cycle for the Moon.
Assessment Focus
Formative- To assess students expanding knowledge of the Sun-Earth-Moon relationship and their
ability to summarize and present their understandings in their own words.
Key Outcomes
1. Explain and justify how the Earth rotates the Sun around an axis
2. Create a summary based on new understandings
3. Explain and justify the orbit of the Moon around the Earth and Sun
4. Read and interpret a range of articles
Required Equipment
- Science journals -Journal articles
- http://www.bbc.co.uk/schools/scienceclips/ages/9_10/Earth_Sun_Moon.shtml
- IWB - Solar Walk App
Lesson Procedure
Step 1 Recap students’ knowledge from previous lessons by playing the clip of how the Earth
and Moon move around the Sun. As a class discuss what they see- Ask ‘How is the
Earth moving?’ ‘How is the Moon moving?’ ‘Is the Sun moving?’
Have students jot down their thoughts in their science journals.
Step 2 Explain to student’s that today we are going to be exploring the reasons why the
Earth and Moon move in these particular ways, how fast they are travelling and how
long it takes as well as the size of the Sun, Earth and Moon and the distances in
between them.
As a class view the ‘Earth Cycles video’ on the Solar Walk app for the Ipad
Ask key questions
How is spinning different from orbiting?
Can you describe what causes day and night?
Page | 23
Does everyone experience daytime at the same time across the world?
Can you work out how many times the Earth has orbited the Sun since you were
born?
Create a mind map on the board about the different explanations they just heard.
Step 3 In groups of 3, students will be given an article about the rotation of the Earth and an
article about the rotation of the Sun (See Appendix 10.6). Based on their findings,
students will write a summary about the Sun-Earth-Moon relationship in their science
journals. Students should come to the conclusions that
the spin of the Earth on its axis takes 24 hours
the orbit of the Earth around the Sun takes one year
the orbit of the Moon around the Earth takes 28 days
Day and night on Earth are caused by the spinning of the Earth on its axis.
The shapes of the Moon are a result of reflections from the light of the Sun
The Sun is the largest, followed by the Earth, then the Moon
The small groups share their summary of findings with the class.
Step 4 Ask each student to write a new reflection about what they now know about what
causes day and night, new understandings about spinning and orbiting based on the
questions on our investigation poster formed in lesson on. Allow time for students to
discuss and identify any questions they still might have.

Page | 24
8.5- Lesson Five
Lesson 5: Space Explorers
Stage of 5 E’s: Explain Time: 45 minutes
Overview
The purpose of this learning experience is for students to use ICT to collect and analyse
information about the size or the sun earth and moon as well as the distance between them.
Assessment Focus
Formative- To assess student’s knowledge based on their perception on the scale size and
distance between the sun, earth and moon.
Key Outcomes
1. To find and compare the sizes of the Earth, Moon and Sun 2. To discover the vast distance between the Sun and Earth as well as the Earth and Moon 3. To discuss why the sun and moon appear to be the same size in the sky
1.
Required Equipment
- Science journals -30 x Ipads with Solar Walk
- 7x Exercise Balls -7x Tennis Balls
- Interactive Whiteboard -http://www.youtube.com/watch?v=FjCKwkJfg6Y
Lesson Procedure
Step 1 Using the Solar Walk Application on the Ipad allow students 5-10 minutes perusal to
look through the solar system. Place a specific emphasis on looking at the Earth, Moon
and Sun and writing down the sizes of each.
Step 2 Ask students what they found through their perusal and if they noticed the sun, earth
and moon all in a close distance to one another like they have seen before in other
models. Re-iterate this knowledge by displaying your Solar Walk screen on the
interactive whiteboard projector. View the size statistics as well as a brief glance and
how far apart the earth, moon and sun are. Which is the biggest? Which is the
smallest? Which are closer together?
Step 3 Continuing on with Solar Walk ask students to click onto the extras tab in the bottom
right of screen. Ask students to tap the “Size Comparison” tab and to let it play out.
Once viewed ask students to explain what they have seen. Also ask students to draw
in their science learning journals how they see the Moon, Sun and Earth in relation to
their actual size
Page | 25
Step 4 Show students a tennis ball and exercise ball. Explain to students that for this activity
the tennis ball represents the moon and the exercise ball represents the sun. In real
life the sun and moon look the same size. Ask students how can we make it so they are
the same size? Take the students outside and split them into groups of four. Give each
group a tennis ball and an exercise ball. Students are to put the tennis ball on a flat
surface(desk, bench, etc) while another group member takes the medicine ball further
and further back until they look the same size. One group member will have to tell
them if they are getting off course and to straighten up. Each group member should
have a turn of looking at this sun and moon this way
Step 5 Gather students back inside and ask them to write in their science journals why they
now believe the sun and moon look the same size. Remind students the activity that
had just taken place and their new found knowledge on sizes of the moon and sun.
Step 6 Finish lesson by showing the YouTube clip above to give the students more
clarification on the scientific explanations they have just been provided with.

Page | 26
8.6- Lesson Six
Lesson 6: Moon Reflections
Stage of 5 E’s: Elaborate Time: 60 minutes
Overview
The purpose of this learning experience is for students to further elaborate on ideas of night
time as a giant shadow and the different sizes of the Moon that we see.
Assessment Focus
Formative- To assess student’s ability to determine the cause of night time and describe the
shape of the Moon we see in the sky as a reflection of the Moon’s orbit position around Earth.
Students should be able to identify the different phases of the Moon and their names.
Key Outcomes
Identify and describe the key phases of the Moon
Explain the terms waxing and waning
Recreate the phases of the Moon
Required Equipment
- Science journals - http://www.Moonphases.info/Moon_phases.html
- 1 x piece of black paper per student - White crayons
- 8 x Oreos per student - 1 x paper plate per student
- 1 x plastic spoon per student -Solar Walk app for Ipads
Lesson Procedure
Step 1 Begin the lesson by reflecting on the causes of day and night that we have covered so
far. Briefly explain to the students the perspective of Indigenous Australians when it
comes to the cause of day and night. Read the students relevant segments from the
article ‘Emu dreaming’ (See Appendix 10.8). In particular highlighting the dreamtime
story where Indigenous cultures describe the Sun as a female and the Moon as a male.
Step 2 Elaborate on the idea that the revolution of the Moon around the Earth makes the
Moon appear as if it is changing shape in the sky. This is caused by the different angles
from which we see the bright part of the Moon's surface.
These are called "phases" of the Moon. Of course, the Moon doesn't generate any light
itself; it just reflects the light of the Sun. The Moon passes through eight major shapes
during a cycle that repeats itself every 27 days. The phases always follow one another
in the same order.

Page | 27
Step 3 Using the solar walk app for the Ipad, play the students the clip of the moon phases.
To provide further elaboration, the teacher shows images of the different phases of
the Moon and explains that the Moon orbits the Earth in a counterclockwise direction.
Using the website above, provide elaborations on the different phases of the Moon
(quarter, new, full, gibbous and crescent) as well as the terms waxing and waning.
As you cover the different phases of the Moon, get the children to draw them with
white crayons on black paper and underneath label the different Moons they draw.
Display posters around the classroom.
Step 4 Students recreate the phases of the Moon through the ‘oreo activity’. Using their
plastic spoons, students dig out the cream of the oreo cookie to highlight the key
different phases of the Moon. Students place them in order around the edge of their
paper plate in a counterclockwise motion. Prompt students to draw Earth in the
middle of the plate to show what the Moon is orbiting. (See Appendix 10.7 for end
result)
Step 5 Students write an individual reflection about the phases of the Moon in their science
learning journals.

Page | 28
8.7- Lesson Seven
Lesson 7: Diorama Madness
Stage of 5 E’s: Evaluate Time: 45 minutes
Overview
The purpose of this learning experience is for students to demonstrate the knowledge they have
acquired throughout the unit through the use of a letter and diorama. These should have a
specific focus on describing the movements of the sun, earth and moon as well as describing day
and night
Assessment Focus
Summative- To assess students overall knowledge of the content taught and learned throughout
the unit based on a rubric
Key Outcomes
Explain the movements of sun, earth and moon
Provide reasoning for the causes of day and night
Represent the content taught throughout the unit through a diorama and letter
Presentation of the diorama to the class
2.
Required Equipment
- Assessment Rubric
- Student’s presentation letter
- Student’s diorama
Lesson Procedure
Step 1 Ask all students to take a seat on the floor in front of the presentation desk. Explain to
students that one at a time they will come up the presentation desk and place their
diorama on top. They will hand their written letter assessment piece to the teacher.
They will then present what they have learnt through the unit based on what the
diorama is representing.

Page | 29
9.0 References ACARA. (2013). Science: Year 3. Retrieved April 15, 2013, from
http://www.australiancurriculum.edu.au/Science/Curriculum/F-10
Australian Academy of Science. (2013). Primary Connections: Curriculum Resources. Retrieved
April 15, 2013, from http://science.org.au/primaryconnections/curriculum-
resources/spinning-in-space.html
Eye on the Sky. (2009). Our Star the Sun. Retrieved April 9, 2013, from
http://eyeonthesky.org/ourstarsun.html
Moon Phases. (2010). Learn about the Moon and Full Moon calendar. Retrieved April 15, 2013,
from http://www.moonphases.info/moon_phases.html
NASA. (2012). Eclipse Lessons Plans. Retrieved April 9, 2013, from
http://sunearthday.nasa.gov/2006/educators/lp_k5.php
NASA. (2012). New 2013 Phases of the Moon Animated Release. Retrieved April 12, 2013, from
http://www.nasa.gov/mission_pages/LRO/news/2013-moon-phases.html
Norris, R. (2007). Australian Aboriginal Astronomy. Retrieved April 15, 2013, from
http://www.atnf.csiro.au/research/AboriginalAstronomy/whatis.htm
Windows to the universe. (2000a). The Earth’s Orbit. Retrieved April 15, 2013, from
http://www.windows2universe.org/the_universe/uts/earth3.html
Windows to the universe. (2000b). The Earth’s Rotation. Retrieved April 15, 2013, from
http://www.windows2universe.org/the_universe/uts/earth2.html
Windows to the universe. (2000c). The Moon's Orbit and Rotation. Retrieved April 15, 2013,
from http://www.windows2universe.org/the_universe/uts/moon1.html

Page | 30
10.0 Appendix
10.1 Equipment
Equipment
Lesson 1 Science journals Teacher’s laptop IWB - PowerPoint of images Worksheet
Lesson 2 Session 1
Science journals Globe 10-20cm Stick Paper Materials (Ruler, plant, lego people) Torch
Lesson 2 Session 2
IWB Science journals
Lesson 3: Session 1
Science journals Chalk (Blue, Orange, White) x 10
Lesson 3: Session 2
Science journals 5 x torches 5 x large foam balls 5 x medium foam balls 5 x small foam balls Texta pens 15 x wooden skewers
Lesson 4 Science journals Journal articles IWB Ipad for teacher
Lesson 5 Science Journals IWB 30 x Ipads 7 x Exercise Balls 7x Tennis Balls
Lesson 6 Science Journals IWB Ipad for teacher 8 x Oreos per student 1 x Paper plate per student 1 x plastic spoon per student 1 x piece of black paper per student White crayons
Lesson 7 Assessment Rubric
Student’s presentation letter
Student’s diorama

Page | 31
10.2 Assessment Rubric
Evident Emerging Unsatisfactory
Letter to Alien (explanation)
Student provides an excellent
explanation of the movements of the
Moon and Earth
Student alternates terms to express
and excellent understanding
(orbiting/revolving, rotating/spinning)
The student clearly identifies the cause
of day and night
Student provides a satisfactory
explanation of the movements of the
Moon and Earth
Student uses simple terms to express
a satisfactory understanding
Student identifies the cause of day
and night
Student provides an
unsatisfactory explanation of the
Moon and Earth
Student confuses the terms
orbiting and revolving with
spinning and rotating
Student fails to identify the cause
of day and night
3D Representation
The student’s representation clearly
features correct planet comparisons
The representation excellently
highlights the correct movements of
the Sun, Earth and Moon
The student’s representation features correct planet comparisons
The representation highlights the correct movements of the Sun, Earth and Moon
The student’s representation does
not feature correct planet
comparisons
The representation incorrectly
highlights the movements of
either the Sun, Earth or Moon
Presentation Student speaks in a clear volume and a
fluent voice
Student uses eye contact and holds the
attention of audience throughout the
entire presentation
Student speaks with a satisfactory
volume and level of variation in tone
Student attempts to use eye contact
and engage the audience
Student speaks in a low volume
and monotone
Student uses minimal eye contact
and does not engage the audience

Page | 32
10.3 Lesson One Worksheet
Photo One- Sunrise
What can you see?
Do you think it is day or night? Why do you think so?
_________________________________________________________________________________
What time of day do you think this is? Why do you think so?
__________________________________________________________________________________
What questions do you have about this image?
__________________________________________________________________________
Photo Two: Sunny Day
What can you see?
Do you think it is day or night? Why do you think so?
_________________________________________________________________________________
What time of day do you think this is? Why do you think so?
__________________________________________________________________________________
What questions do you have about this image?
__________________________________________________________________________

Page | 33
Photo Three- Sunset
What can you see?
Do you think it is day or night? Why do you think so?
_________________________________________________________________________________
What time of day do you think this is? Why do you think so?
__________________________________________________________________________________
What questions do you have about this image?
__________________________________________________________________________
Photo Four- Night-time
What can you see?
Do you think it is day or night? Why do you think so?
_________________________________________________________________________________
What time of night do you think this is? Why do you think so?
__________________________________________________________________________________
What questions do you have about this image?
__________________________________________________________________________

Page | 34
10.4 Lesson Two: Session One
INVESTIGATING SHADOWS! Investigation Question:
What do shadows tell us about the movement of the Earth?
PREDICT
I predict that __________________________________________________________________________________________________
EXPLORE Explore the size of your shadows at different times during the day. Diagram: Draw a diagram of the investigation area and label to show:
the length and direction of each shadow the position of the Sun
USE DIFFERENT COLOURS FOR EACH OBSERVATION
N

Page | 35
Results: Time 1: Time 2: Time 3: Time 4: Time 5: Time Shadow length cm cm cm cm cm Sun’s height fists fists fist fist fist What else do you observe?
EXPLAIN
I claim that ______________________________________________________
From this investigation:
What do shadows tell us about the movement of the Earth?
_______________________________________________________________________
_______________________________________________________________________
_______________________________________________________________________
Reflect on your findings
What did you learn from conducting this investigation?
_______________________________________________________________________
_______________________________________________________________________
_______________________________________________________________________

Page | 36
10.5 Lesson Three: Session Two
3D Representation Worksheet
Follow the steps below to help you create your 3D system
1. Insert one end of the skewer into the “Sun” ball and the other end of the skewer into
the Styrofoam disk to keep it in place.
2. Place the ‘earth’ ball on bamboo skewer so that the Earth can be held from above
and rotated
3. Break a skewer in half and place it into the ‘moon’ (small) ball

Page | 37
10.6 Lesson Four Articles
The Moon's Orbit The Moon's orbit is tilted by 5° to the ecliptic,
ie it gets to 5° North and 5° South of the
ecliptic. Hence it is as much as 28.5° north or
south of the Celestial Equator and as little as
18.5° North or South. This means the Moon
can be higher or lower than the Sun. The
points where it crosses the Ecliptic are called
the Nodes. These points precess (move
backwards) with time.
Against the background stars the Moon
moves about its own width (0.5°) every hour
or a little over 13° per day. The Sun travels 1°
per day, so, with respect to the Sun, the Moon
travels 12° per day. Each month it moves all
the way around the sky and a little more. The
Moon moves around the Earth about 13 times
in one year.
The Sun is the main offender in disturbances
of the Moon's orbit, its gravitational influence
being twice that of the Earth on the Moon.
The Moon is affected by 150 direct periodic
variations and 500 smaller variations in its
passage.
The Moon arrives approximately 50 minutes
later per day on the meridian (between 38
and 66 minutes). The variations are due to
changes in orbital speed, variations in the
Sun's apparent speed along the ecliptic and
changes in the inclination of the Moon's orbit.
Rising times of the Moon can vary from 13
minutes to 80 minutes on latitude. Greatest
delay in rise is near Full Moon close to the
Spring Equinox. Least delay in Moonrise is
near the Autumn Equinox.
The Moon's distance from the Earth varies by
about 5.49%. The Moon is slightly larger and
moves faster when it is at perigee.
Due to the constant motion of the Moon
about the Earth, Full Moon is only an instant.
However, when we view the Moon it does
appear full a few days before and after the
exact time of the phase. Moon phases are
between 6 or 7 days apart due in part to the
Moon's elliptical orbit and that the Earth-
Moon system is in orbit around the Sun.
http://museumvictoria.com.au/discoverycentre/infosheets/planets/the-moon/
Page | 38
Making Sense of the Research
First of all, let's be sure we're clear on what the earth's axis is. Basically it's an imaginary stick going through the center of the earth, if we define the center as "the point around which it rotates." In other words, picture the earth spinning like a top, straight up and down. Now picture a stick going right through the center of the earth. If the earth weren't tilted, it would rotate like that as it revolved around the sun, and we wouldn't have seasons—only areas that were colder (near the poles) and warmer (near the Equator). But the earth is tilted, and that's why the seasons happen. When the Northern Hemisphere is pointed toward the sun, it gets more hours of sunlight. Temperatures rise, and you get summer in New York, while it's darker and cooler "down under" in Sydney. Six months later, the reverse is true, and it's the Southern Hemisphere that experiences summer. The 23-degree tilt also explains why changes in daylight during the seasons are very dramatic near the poles (which are flooded with sunlight all day long in summer and get virtually no light in mid-winter) but
barely perceptible near the equator (where the sun shines more or less equally throughout the year). Getting back to why the axis exists, it's mainly the result of the rough-and-tumble environment of the early solar system. Scientists believe that the sun and the eight planets formed by chunks of rock and debris that self-accumulated through gravity. In other words, objects collided and clumped together, which increased their gravitational pull, which in turn drew more objects in, which made the object even more gravitationally powerful, and so on until the solar system looks like a sun and eight fairly neat planets with not much stray junk flying around. Of course, occasionally these forming objects happen to attract something that's big enough to knock it off-kilter. That's what probably happened to the earth, after it was already large enough to start rotating. Actually, Wilson says it probably took several substantial impacts to whack the earth into the position it's in today. Incidentally, back in the "old days," the earth used to rotate a lot faster—once every 6 to 10 hours at the start of the solar system—and the moon's gravity has played a big role in slowing us down to 24. It's a good thing too, because a 6-hour day would certainly lead to an awfully hectic work week.
http://sciencenetlinks.com/science-news/science-updates/tilted-earth/

Page | 39
The Moon's Orbit
and Rotation The Earth's Moon is the fifth largest in the
whole solar system, and is bigger than the
planet Pluto. The Moon has a nearly circular
orbit (e=0.05) which is tilted about 5° to
the plane of the Earth's orbit. Its average
distance from the Earth is 384,400 km. The
combination of the Moon's size and its
distance from the Earth causes the Moon to
appear the same size in the sky as the Sun,
which is one reason we can have total solar
eclipses.
It takes the Moon 27.322 days to go around
the Earth once. Because of this motion, the
Moon appears to move about 13° against
the stars each day, or about one-half degree
per hour. If you watch the Moon over the
course of several hours one night, you will
notice that its position among the stars will
change by a few degrees. The changing
position of the Moon with respect to the Sun
leads to lunar phases.
Have you ever heard the term the 'far-side'
of the Moon? Because of the effect on the
Moon of tidal forces due to the Earth, the
same side of the moon always faces the
Earth. In other words, it takes the Moon the
same amount of time to rotate around once
as it does for the Moon to go around the
Earth once. Therefore, Earth-bound
observers can never see the 'far-side' of the
Moon. Tidal forces cause many of the moons
of our solar system to have this type of
orbit.
http://www.windows2universe.org/the_u
niverse/uts/moon1.html
Page | 40
The Earth's
Rotation The Earth is rotating around an axis (called
its rotational axis). Some objects rotate
about a horizontal axis, like a rolling log.
Some objects, such as a skater, rotate about
a vertical axis. The Earth's axis is tipped
over about 23.5° from vertical.
How do we define up and down in space?
What would "vertical" mean? For the Earth,
we can think of vertical as straight up and
down with respect to the plane in which the
Earth orbits the Sun (called the ecliptic).
Earth's rotational axis points in the same
direction relative to the stars, so that the
North Pole points towards the star Polaris.
Think of the Earth as a spinning top, tipped
over to one side. Over very long time
periods (thousands of years) the direction
of Earth's axis slowly changes due to
precession.
The Earth rotates around once in 24 hours -
that's a rate of 1000 miles per hour!. The
time it takes for the Earth to rotate
completely around once is what we call a
day. It's Earth's rotation that gives us night
and day.
The combined effect of the Earth's tilt and
its orbital motion result in the seasons.
The Earth's Orbit Like all planets in our solar system, the
Earth is in an elliptical orbit around our
Sun. In Earth's case, its orbit is nearly
circular, so that the difference between
Earth's farthest point from the Sun and its
closest point is very small. Earth's orbit
defines a two-dimensional plane which we
call the ecliptic.
It takes roughly 365 days for the Earth to go
around the Sun once. This means that the
Earth is rushing through space around the
Sun at a rate of about 67,000 miles per
hour! The time it takes for the Earth to go
around the Sun one full time is what we call
a year.
The combined effect of the Earth's orbital
motion and the tilt of its rotation axis result
in the seasons.

Page | 41
10.7 Lesson Six Activity
Photo One: Black paper and white crayon activity
Photo Two: Template for Oreo activity
Photo Three: Final result of Oreo activity

Page | 42
10.8 Emu Dreaming Article


![Day & night [autosaved]](https://img.dokumen.tips/doc/110x75/558bababd8b42a3d568b46f6/day-night-autosaved.jpg)