Embed Size (px)
Citation preview

CS1: Computer Science Level 1 Digital Technology
Study
Unit 2
Digital Literacy: Offline
Tools and Skills Needed
Digital Literacy: Offline
Tools and Skills
Needed Outline
Digital Literacy
Offline Digital Tools
Creating Digital
Contents
MS Word
MS Excel
MS PowerPoint
Multimedia Creation
Videos and
Animations
Skits and Vlogs
Computer Shortcuts
Study Unit Duration
This Study Session requires a
4 hours of formal study time.
You may spend an additional
2-3 hours for revision
Preamble
Increased usage and access to the Internet coupled with affordability of
digital devices has paved way for the development of a digital economy
across the world. However, there are major shortcomings to the usage
efficiency due to the inadequacies of digital skills in both developed and
developing countries. With new and emerging technologies such as Data
Science and Artificial Intelligence taking over mundane jobs, acquiring
digital skills has become imperative.
In this Study Unit, you will be availed the meaning of digital literacy as well
as the importance of being digitally literate. You will then be exposed to
the digital skills every digitally literate person must-have, beginning with
the offline tools that you should be proficient in using such as the MS
Office Packages - MS Word, MS Excel, MS PowerPoint etc. You will also
be introduced to how to create multimedia and the tools that can be used
in making short videos, animations and skits.
Learning Outcomes of Study Unit 2
Upon completion of this study unit, you are expected to be able to:
2.1 Describe Digital Literacy and the skills needed.
2.2 Create Digital Contents using MS Office Packages
2.3 Use Notepad, Snipping Tool,
2.4 Create Multimedia using Simple Tools and Apps
2.5 Use Computer Shortcuts to navigate and perform tasks
CS1: Computer Science Level 1 Digital Technology
2.1 Digital Literacy
While the word "literacy" alone generally refers to reading and writing skills, when you tack on
the word "digital" before it, the term encompasses much, much more.
The American Library Association (ALA) defines digital literacy as “the ability to use information
and communication technologies to find, evaluate, create, and communicate information, requiring
both cognitive and technical skills.”
Students and even workers today can be asked to create, edit, collaborate, and share digital content
and to do so responsibly. For these reasons, any literate person should understand the importance
of digital literacy skills and the digital tools available at his or her disposal.
Reading online is not “digital literacy”
While Digital literacy refers to a particular set of competencies that allow you to function and
participate fully in a digital world, it is equally important to note that, just because you read does
not make you to be digitally literate. However, students who use both cognitive and technical skills
to find, evaluate, create, and communicate information are certainly on their way to becoming
digitally literate, savvy consumers of digital content. However, it’s important to note that simply
reading online or subscribing to an eBook service does not make a person digitally literate.
With the ALA digital literacy definition as a guiding light, it’s important to understand that even
digital natives who know how to send a text and post to social media are not considered “digitally
literate” by any means. Digital literacy in education encompasses so much more. For example,
students must have specific skills when reading online text that may contain embedded resources
such as hyperlinks, audio clips, graphs, or charts that require students to make choices.
CS1: Computer Science Level 1 Digital Technology
Hiller Spires, a professor of literacy and technology at North Carolina State University, USA views
digital literacy as having three buckets:
I. finding and consuming digital content;
II. creating digital content; and
III. communicating or sharing it.
In addition to these, digital literacy also includes the ability to edit and manipulate digital contents
and to be able to interconvert from one format to the other as deemed appropriate.
2.1.1 Digital Skills
Digital skills are defined as a range of abilities to use digital devices, communication applications,
and networks to access and manage information. They enable people to create and share digital
content, communicate and collaborate, and solve problems for effective and creative self-
fulfillment in life, learning, work, and social activities at large.
Entry-level digital skills, meaning basic functional skills required to make basic use of digital
devices and online applications, are widely considered a critical component of a new set of literacy
skills in the digital era, with traditional reading, writing, and numeracy skills.
At the advanced spectrum of digital skills are the higher-level abilities that allow users to make
use of digital technologies in empowering and transformative ways such as professions in ICT.
Major digital transformations such as Artificial Intelligence (AI), machine learning, big data
analytics, change skills requirements and, in turn, impact capacity building and skills development
for the 21st century digital economy.
To thrive in the connected economy and society, digital skills must also function together with
other abilities such as strong literacy and numeracy skills, critical and innovative thinking,
complex problem solving, an ability to collaborate, and socio-emotional skills.
2.1.2 Offline Digital Tools for Everyday Tasks
As highlighted in digital literacy, the first step towards digital literacy is the ability to find and
consume digital contents. With the internet, users can find digital contents online and consume

CS1: Computer Science Level 1 Digital Technology
for knowledge and skills development. However, it is not enough to just consume, you also need
to be able to create digital contents using digital tools.
Digital tools are programs, websites or online resources that can make tasks easier to complete. A
lot of these can be accessed in web browsers without needing to be downloaded, and you can
access them both at home and in work. Some of these tools are also available offline for offline
use, which can later now be moved online or even shared offline among peers and team mates.
Some of the popular offline digital contents making tools are:
● Microsoft Office Suite
o MS Word
o MS Excel
o MS PowerPoint
o MS Publisher
o MS Outlook
o MS Access
o MS OneNote
o MS Visio etc.
● Office 365
● Adobe Office Suite
● Corel WordPerfect Office
o CorelDraw
o WordPerfect
o Quattro Pro
o Presentations
o Paradox
o CorelCentral
● Multimedia Making Tools
o Snipping Tools
o Paint
o Camtasia and other recording software
o SmartArt in MS Word
● Notepad
● WordPad
● IBM Lotus Word Pro And so many more
Of all these tools, we will be examining MS Word, MS Excel, MS PowerPoint, Notepad and
WordPad Only. Feel free to explore others at your convenience.
CS1: Computer Science Level 1 Digital Technology
2.1.3 Creating Digital Contents
Learners striving to gain digital literacy skills learn to become responsible content creators in
addition to being content consumers. They move beyond finding, evaluating, and consuming
digital content to creating it, including both writing in digital formats and creating other forms of
media such as tweets, podcasts, videos, emails, blogs, etc.
Communication is also a key aspect of digital literacy. When communicating in virtual
environments, the ability to clearly express your ideas, ask relevant questions, maintain respect,
and build trust is just as important as when communicating in person.
For the creation of digital contents, in this study unit, we will start by looking at the offline tools
that can be used for:
● Creating and Editing Text Documents
● Creating and Editing Multimedia (Videos and Animations) etc.
2.2 Word Processing and Text Editing Tools
Word processing software is used to manipulate a text document, such as a resume or a report.
You typically enter text by typing, and the software provides tools for copying, deleting, and
various types of formatting. Some of the functions of word processing software include:
● Creating, editing, saving, and printing documents.
● Copying, pasting, moving, and deleting text within a document.
● Formatting text, such as font type, bolding, underlining, or italicizing.
● Creating and editing tables.
● Inserting elements from other software, such as illustrations or photographs.
● Correcting spelling and grammar.
Word processing software typically also contains features to make it easier for you to perform
repetitive tasks. For example, let's say you need to send a letter to all your customers regarding a
new policy. The letter is the same for all customers except for the name and address at the top of
the letter. A mail merge function allows you to produce all the letters using one template document
and a table with customer names and addresses in the database.

CS1: Computer Science Level 1 Digital Technology
Text editors shouldn't be confused with word processing software. While they do also allow you
to create, edit and save text documents, they only work on plain text. Text editors don't use any
formatting, such as underlined text or different fonts. Text editors serve a very different purpose
from word processing software. They are used to work with files in plain text format, such as
source code of computer programs or configuration files of an operating system. An example of a
text editor would be Notepad on the Windows platform.
2.2.1 Microsoft Office
Microsoft Office is a set of vital applications primarily known as Office Suite which was been
designed by Microsoft to carry out different office tasks smoothly and with ease. Bill Gates, the
Chairman of Microsoft Corporation first launched it on August 1 1988 at COMDEX in Las Vegas
US.
There are several packages that comes along in the Microsoft Office Suite. It is inclusive of
● Microsoft Word
● Microsoft Excel
● Microsoft PowerPoint
● Microsoft Access
● Microsoft Outlook
● Microsoft Visio etc.
2.2.2 Microsoft Word
Microsoft Word is the premier word processor. It enables users to create and edit documents. The
program offers enhanced word processing features such as templates, formatting, macros and
more. Out of all the different word processing software, the Microsoft Word Processor is the most
common and widely used application all throughout the world. You can easily open the application
on both Windows and Mac Operating Systems.
Microsoft Office Word first came into existence in 1983 initially for the MS-DOS OS. That was
when the mouse was added to the keyword, although there was no need for it. People could buy
Word 1.0 with a bundled mouse. The word for MAC OS was introduced a couple of years later in
1985. Previously, the Word Processor was in the Doc format but when the 2007 version was
released the format changed to Office Open XML. This was the time when the Portable Document

CS1: Computer Science Level 1 Digital Technology
Format (PDF) and Open Document Format were first introduced in the 2007 version. The MS
Word made typing of words and other documents very easy. Almost all content writing works and
official documents or letters are typed in MS Word. You can save your written document which
can serve as a record.
MS Word 16 Tutorial and Practical Demo
For this project, the version pf MS Word used is MS Word 16 and the demonstration used for the
training tutorial is adapted from CFG Global Tutorials on MS Word 16. Much appreciation to them
for the permission given to the DISH project to use their resources.
Additional resources
The full tutorial can be explored further at https://edu.gcfglobal.org/en/word/
This training work best when you (learner) practice with computers
as you learn. Because differences between computer operating
systems can greatly affect your learning experience, it is
recommended that all learners use computers with the same
operating system, preferably Windows 10 OS. However, which
operating system you choose to use matters less than the consistent
experience you should have from this training.
● Installing MS Word – Getting started with MS Word
● Word Basic Text - Formatting and Editing Texts
● Working with Objects
● Collaboration and Reviewing
● SmartArt Graphic

CS1: Computer Science Level 1 Digital Technology
If you're new to Microsoft Word, you'll need to learn the basics of typing, editing, and organizing
text. Basic tasks include the ability to add, delete, and move text in your document, as well as how
to cut, copy, and paste.
This tutorial is designed with the pre-notion that you have not used MS Word before or you are a
novice/beginner.
For better experience of this tutorial, follow the steps below as you
engage with MS Word
a) Download the practice document on the LMS
b) Practice each activity as they are introduced using the
practice document in (a) above.
c) Watch the video below to learn the basics of working with
text in Word.
As the contents of the tutorial is a bit lengthy, the tutorial has been saved and adapted into
another form of word document or Portable Document Format (pdf). Please, find the document
via this link
lms.kiu.ac.ug ……
2.2.3 Microsoft Excel
Excel is a spreadsheet program that allows you to store, organize, and analyze information.
While you may believe Excel is only used by certain people to process complicated data, anyone
can learn how to take advantage of the program's powerful features. Whether you're keeping a
budget, organizing a training log, or creating an invoice, Excel makes it easy to work with different
types of data.
Getting to know Excel

CS1: Computer Science Level 1 Digital Technology
If you have used Excel 2010 or Excel 2013 before, then Excel 2016 should feel familiar. If you
are new to Excel or have more experience with older versions, you should first take some time to
become familiar with the Excel interface.
The Excel interface
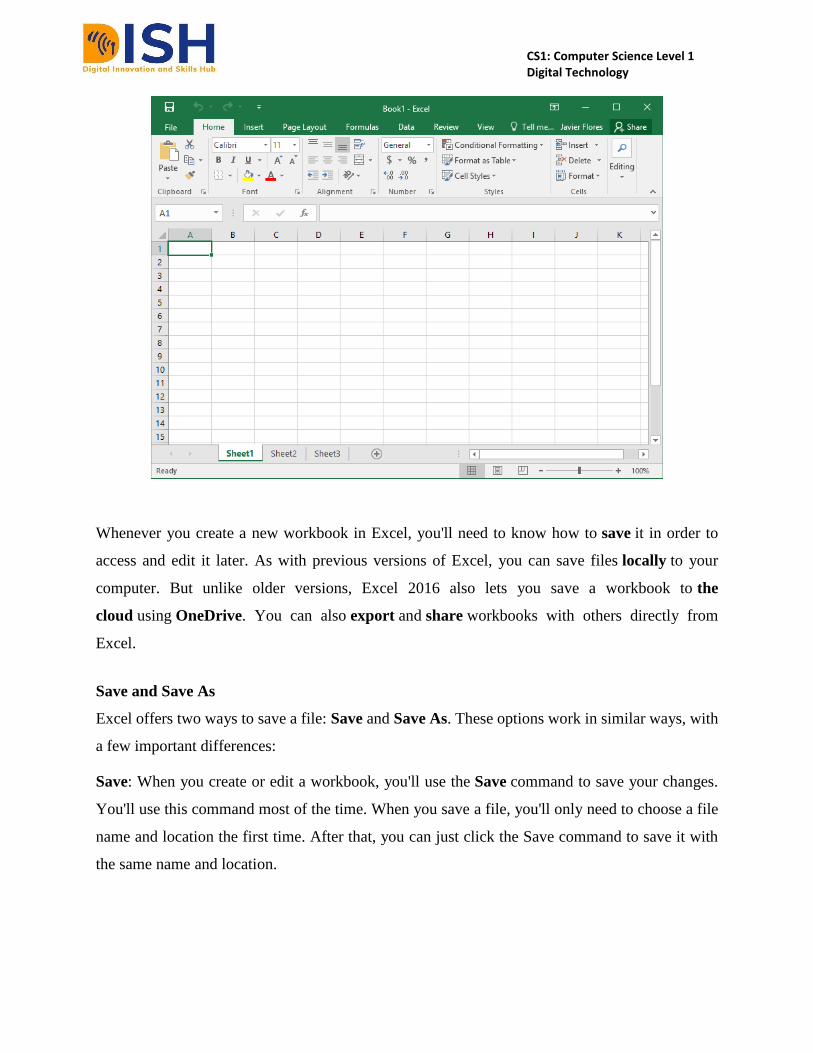
When you open Excel 2016 for the first time, the Excel Start Screen will appear. From here,
you'll be able to create a new workbook, choose a template, and access
your recently edited workbooks.
● From the Excel Start Screen, locate and select Blank workbook to access the Excel
interface.
CS1: Computer Science Level 1 Digital Technology
Whenever you create a new workbook in Excel, you'll need to know how to save it in order to
access and edit it later. As with previous versions of Excel, you can save files locally to your
computer. But unlike older versions, Excel 2016 also lets you save a workbook to the
cloud using OneDrive. You can also export and share workbooks with others directly from
Excel.
Save and Save As
Excel offers two ways to save a file: Save and Save As. These options work in similar ways, with
a few important differences:
Save: When you create or edit a workbook, you'll use the Save command to save your changes.
You'll use this command most of the time. When you save a file, you'll only need to choose a file
name and location the first time. After that, you can just click the Save command to save it with
the same name and location.
CS1: Computer Science Level 1 Digital Technology
Save As: You'll use this command to create a copy of a workbook while keeping the original.
When you use Save As, you'll need to choose a different name and/or location for the copied
version.
To save a workbook:
It's important to save your workbook whenever you start a new project or make changes to an
existing one. Saving early and often can prevent your work from being lost. You'll also need to
pay close attention to where you save the workbook so it will be easy to find later.
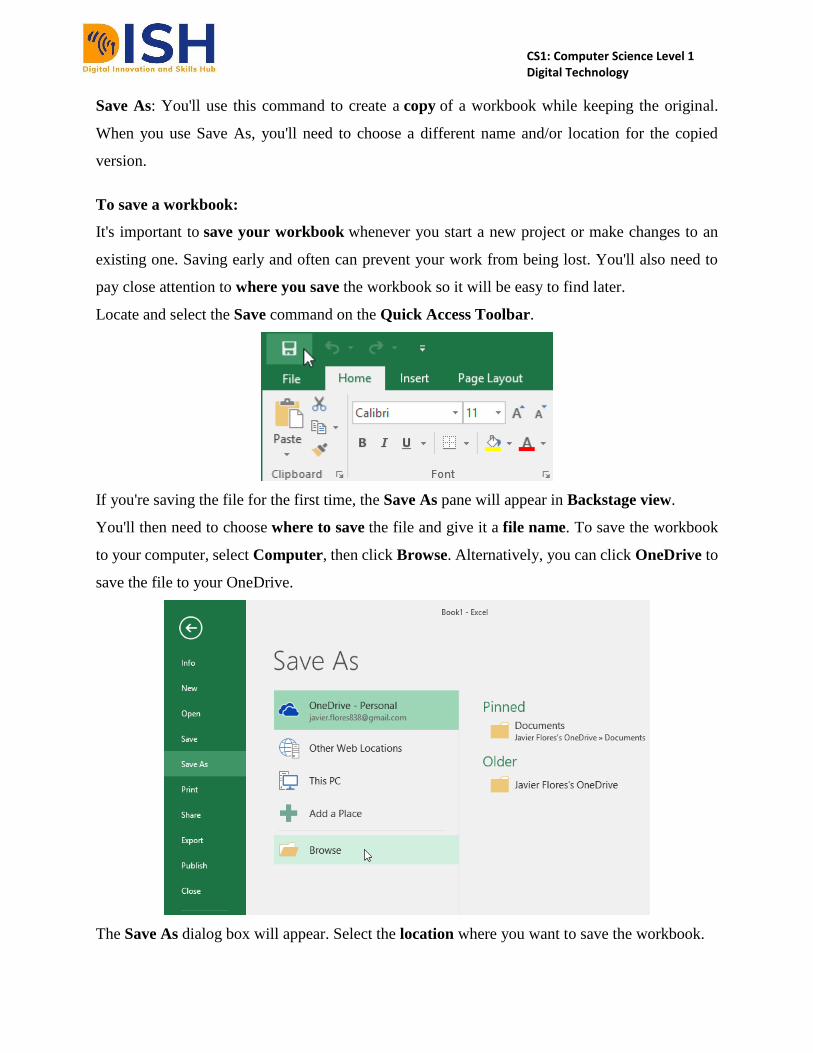
Locate and select the Save command on the Quick Access Toolbar.
If you're saving the file for the first time, the Save As pane will appear in Backstage view.
You'll then need to choose where to save the file and give it a file name. To save the workbook
to your computer, select Computer, then click Browse. Alternatively, you can click OneDrive to
save the file to your OneDrive.
The Save As dialog box will appear. Select the location where you want to save the workbook.
CS1: Computer Science Level 1 Digital Technology
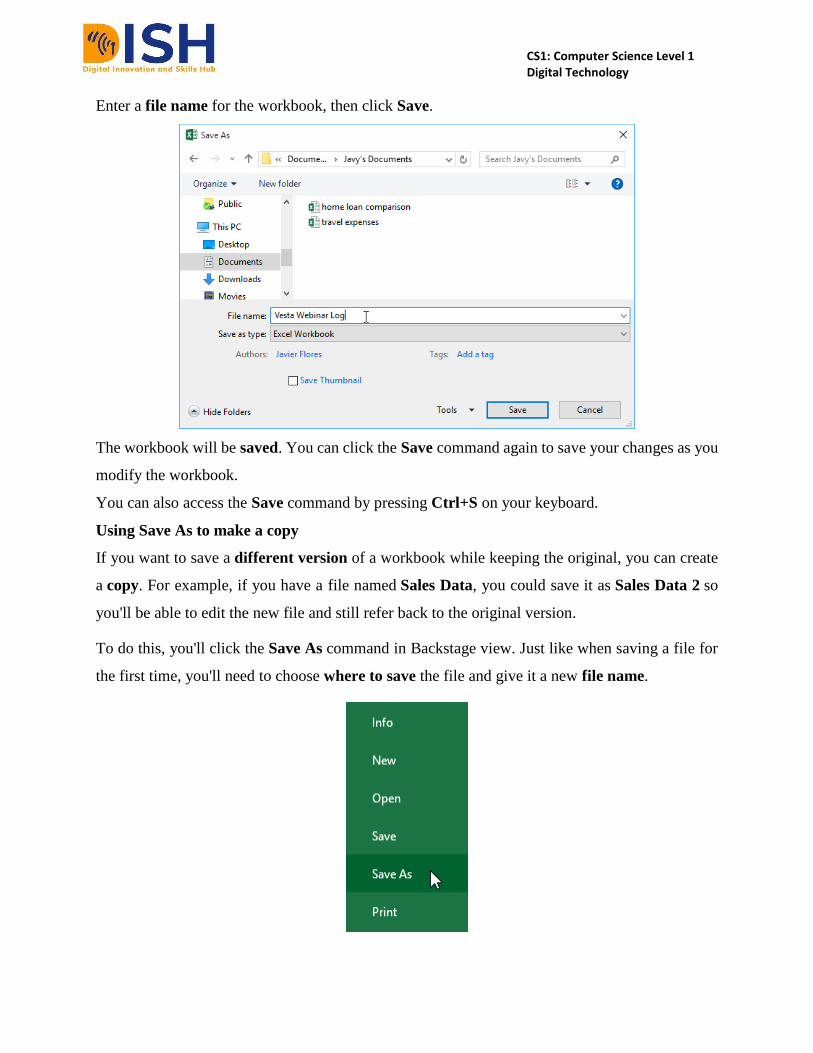
Enter a file name for the workbook, then click Save.
The workbook will be saved. You can click the Save command again to save your changes as you
modify the workbook.
You can also access the Save command by pressing Ctrl+S on your keyboard.
Using Save As to make a copy
If you want to save a different version of a workbook while keeping the original, you can create
a copy. For example, if you have a file named Sales Data, you could save it as Sales Data 2 so
you'll be able to edit the new file and still refer back to the original version.
To do this, you'll click the Save As command in Backstage view. Just like when saving a file for
the first time, you'll need to choose where to save the file and give it a new file name.

CS1: Computer Science Level 1 Digital Technology
To change the default save location:
If you don't want to use OneDrive, you may be frustrated that OneDrive is selected as the default
location when saving. If you find it inconvenient to select Computer each time, you can change
the default save location so Computer is selected by default.
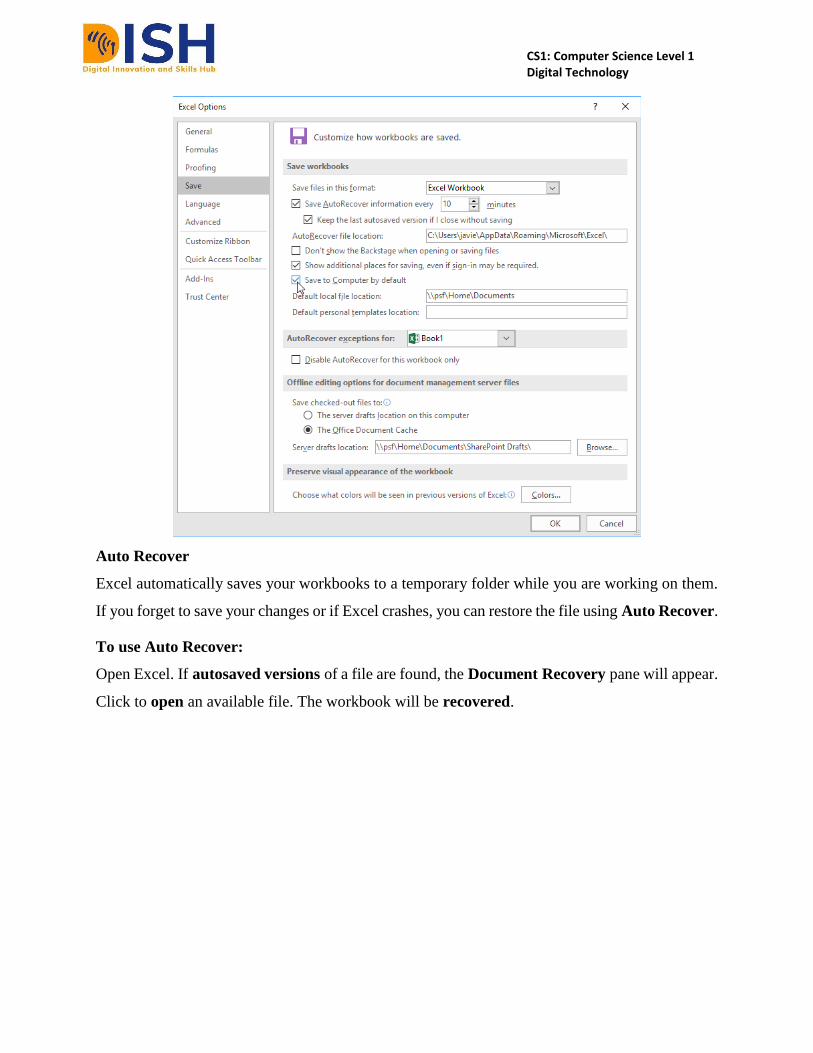
Click the File tab to access Backstage view.
Click Options.
The Excel Options dialog box will appear. Select Save, check the box next to Save to Computer
by default, then click OK. The default save location will be changed.
CS1: Computer Science Level 1 Digital Technology
Auto Recover
Excel automatically saves your workbooks to a temporary folder while you are working on them.
If you forget to save your changes or if Excel crashes, you can restore the file using Auto Recover.
To use Auto Recover:
Open Excel. If autosaved versions of a file are found, the Document Recovery pane will appear.
Click to open an available file. The workbook will be recovered.

CS1: Computer Science Level 1 Digital Technology
By default, Excel autosaves every 10 minutes. If you are editing a workbook for less than 10
minutes, Excel may not create an autosaved version.
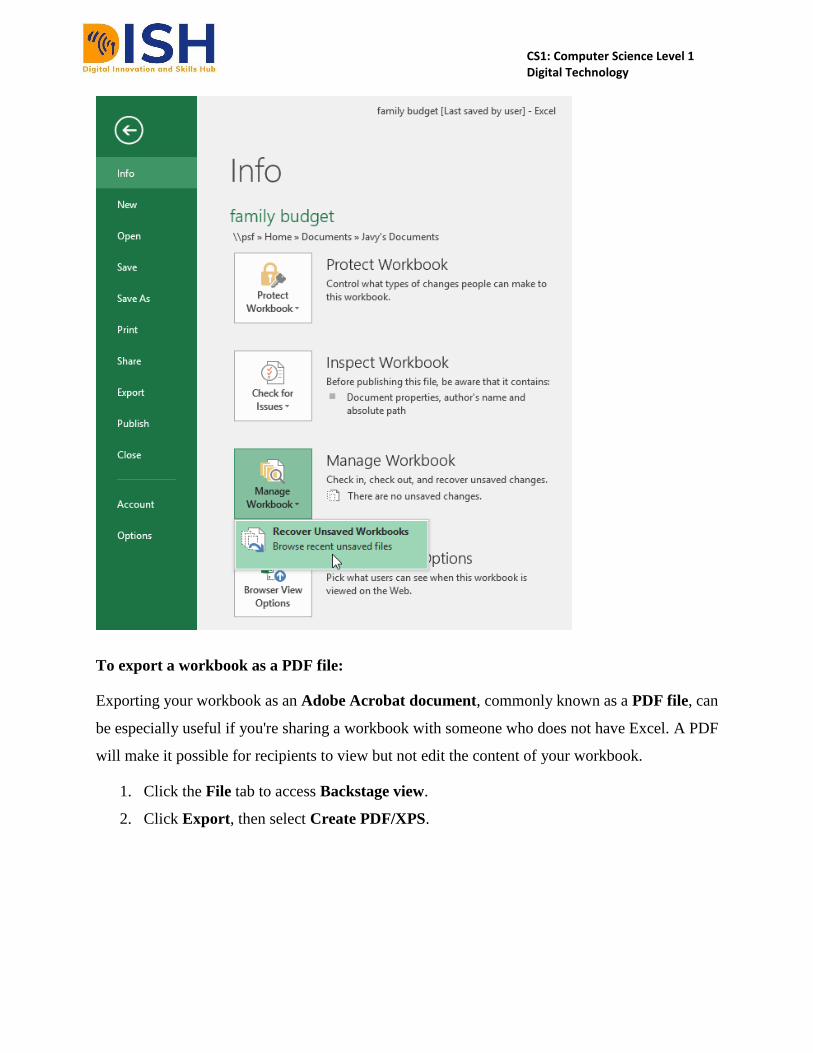
If you don't see the file you need, you can browse all autosaved files from Backstage view. Just
select the File tab, click Manage Versions, then choose Recover Unsaved Workbooks.
Exporting workbooks
By default, Excel workbooks are saved in the .xlsx file type. However, there may be times when
you need to use another file type, such as a PDF or Excel 97-2003 workbook. It's easy
to export your workbook from Excel to a variety of file types.
CS1: Computer Science Level 1 Digital Technology
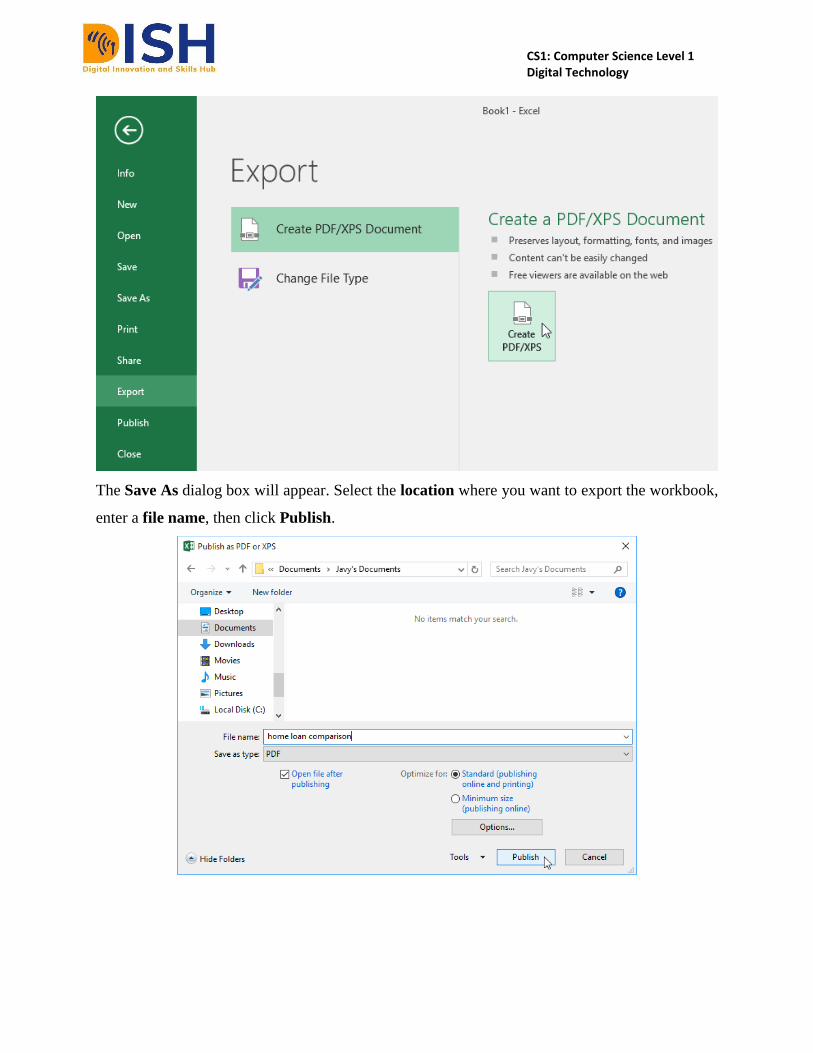
To export a workbook as a PDF file:
Exporting your workbook as an Adobe Acrobat document, commonly known as a PDF file, can
be especially useful if you're sharing a workbook with someone who does not have Excel. A PDF
will make it possible for recipients to view but not edit the content of your workbook.
1. Click the File tab to access Backstage view.
2. Click Export, then select Create PDF/XPS.
CS1: Computer Science Level 1 Digital Technology
The Save As dialog box will appear. Select the location where you want to export the workbook,
enter a file name, then click Publish.

CS1: Computer Science Level 1 Digital Technology
By default, Excel will only export the active worksheet. If you have multiple worksheets and want
to save all of them in the same PDF file, click Options in the Save As dialog box.
The Options dialog box will appear. Select Entire workbook, then click OK.
Whenever you export a workbook as a PDF, you'll also need to consider how your workbook data
will appear on each page of the PDF, just like printing a workbook. Visit our Page Layout and
Printing lesson to learn more about what to consider before exporting a workbook as a PDF.
To export a workbook to other file types:
You may also find it helpful to export your workbook to other file types, such as an Excel 97-2003
workbook if you need to share with people using an older version of Excel, or a .CSV file if you
need a plain-text version of your workbook.
● Click the File tab to access Backstage view.
● Click Export, then select Change File Type.

CS1: Computer Science Level 1 Digital Technology
Select a common file type, then click Save As.

CS1: Computer Science Level 1 Digital Technology
The Save As dialog box will appear. Select the location where you want to export the workbook,
enter a file name, then click Save.
You can also use the Save as type: drop-down menu in the Save As dialog box to save workbooks
in a variety of file types.

CS1: Computer Science Level 1 Digital Technology
Sharing workbooks
Excel makes it easy to share and collaborate on workbooks using OneDrive. In the past, if you
wanted to share a file with someone you could send it as an email attachment. While convenient,
this system also creates multiple versions of the same file, which can be difficult to organize.
When you share a workbook from Excel, you're actually giving others access to the exact same
file. This lets you and the people you share with edit the same workbook without having to keep
track of multiple versions.
As the contents of the tutorial is a bit lengthy, the tutorial has been saved and adapted into
another form of word document or Portable Document Format (pdf). Please, find the document
via this link
CS1: Computer Science Level 1 Digital Technology
2.2.4 Microsoft PowerPoint
PowerPoint is a presentation program that allows you to create dynamic slide presentations. These
presentations can include animation, narration, images, videos, and much more. Whenever you
have an event where you are to speak, teach or give a talk whether an academic or nonacademic
event, it is expected that you come along with a PowerPoint presentation slides
PowerPoint 2016 is similar to PowerPoint 2013 and PowerPoint 2010. If you've previously used
these versions, PowerPoint 2016 should feel familiar. But if you are new to PowerPoint or have
more experience with older versions, you should first take some time to become familiar with the
PowerPoint 2016 interface.
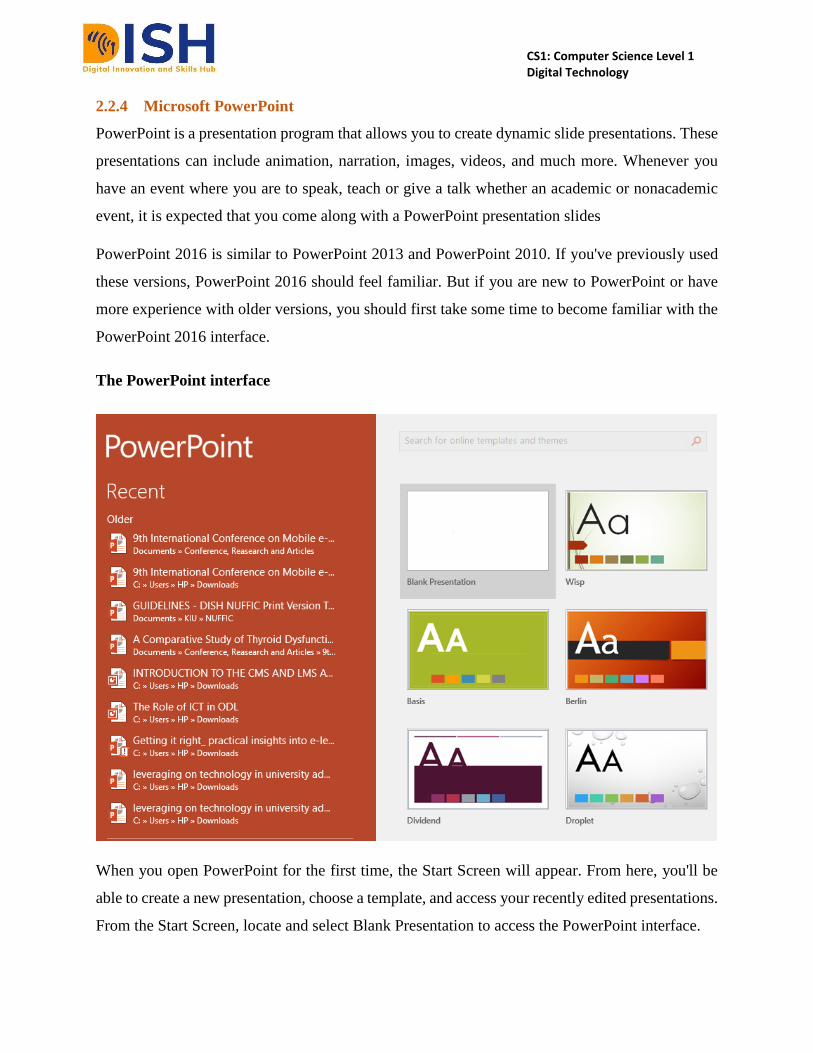
The PowerPoint interface
When you open PowerPoint for the first time, the Start Screen will appear. From here, you'll be
able to create a new presentation, choose a template, and access your recently edited presentations.
From the Start Screen, locate and select Blank Presentation to access the PowerPoint interface.
CS1: Computer Science Level 1 Digital Technology
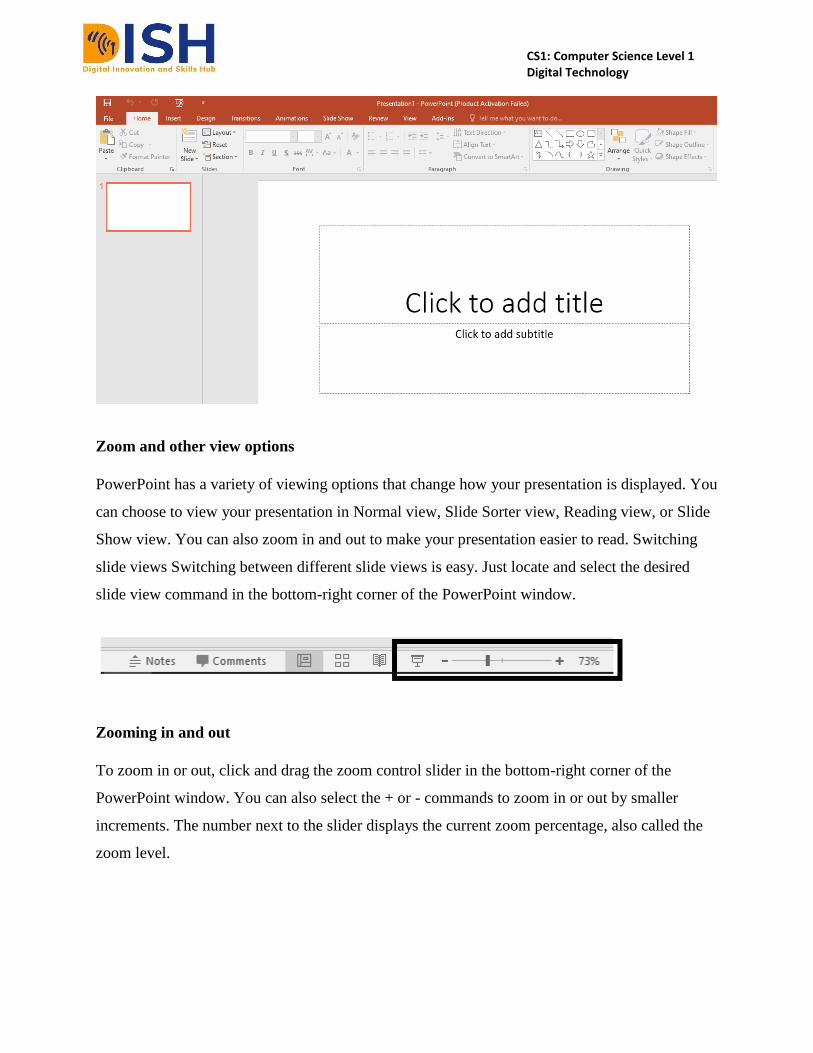
Zoom and other view options
PowerPoint has a variety of viewing options that change how your presentation is displayed. You
can choose to view your presentation in Normal view, Slide Sorter view, Reading view, or Slide
Show view. You can also zoom in and out to make your presentation easier to read. Switching
slide views Switching between different slide views is easy. Just locate and select the desired
slide view command in the bottom-right corner of the PowerPoint window.
Zooming in and out
To zoom in or out, click and drag the zoom control slider in the bottom-right corner of the
PowerPoint window. You can also select the + or - commands to zoom in or out by smaller
increments. The number next to the slider displays the current zoom percentage, also called the
zoom level.

CS1: Computer Science Level 1 Digital Technology
Using PowerPoint to Create Presentation Slides
PowerPoint files are called presentations. Whenever you start a new project in PowerPoint, you'll
need to create a new presentation, which can either be blank or from a template. You'll also need
to know how to open an existing presentation. Watch the video below to learn more about creating
and opening presentations in PowerPoint.
To create a new presentation:
When beginning a new project in PowerPoint, you'll often want to start with a new blank
presentation.
1. Select the File tab to go to Backstage view.
2. Select New on the left side of the window, then click Blank Presentation.
3. A new presentation will appear.
CS1: Computer Science Level 1 Digital Technology
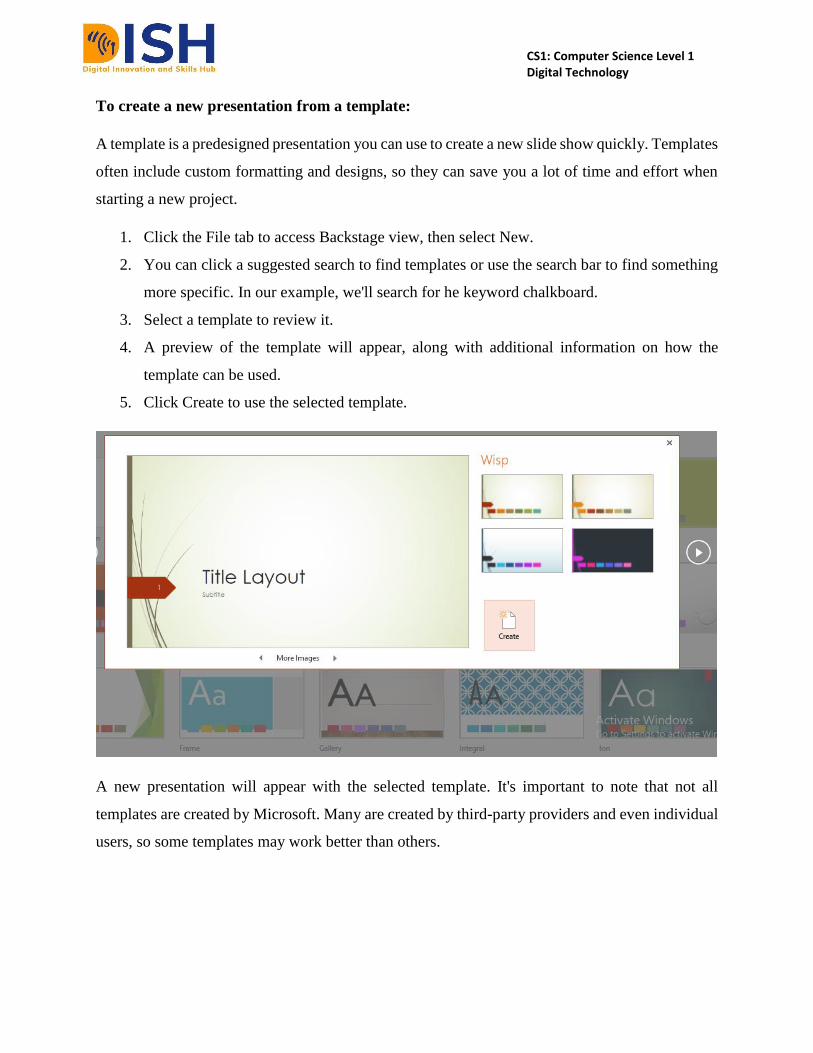
To create a new presentation from a template:
A template is a predesigned presentation you can use to create a new slide show quickly. Templates
often include custom formatting and designs, so they can save you a lot of time and effort when
starting a new project.
1. Click the File tab to access Backstage view, then select New.
2. You can click a suggested search to find templates or use the search bar to find something
more specific. In our example, we'll search for he keyword chalkboard.
3. Select a template to review it.
4. A preview of the template will appear, along with additional information on how the
template can be used.
5. Click Create to use the selected template.
A new presentation will appear with the selected template. It's important to note that not all
templates are created by Microsoft. Many are created by third-party providers and even individual
users, so some templates may work better than others.
CS1: Computer Science Level 1 Digital Technology
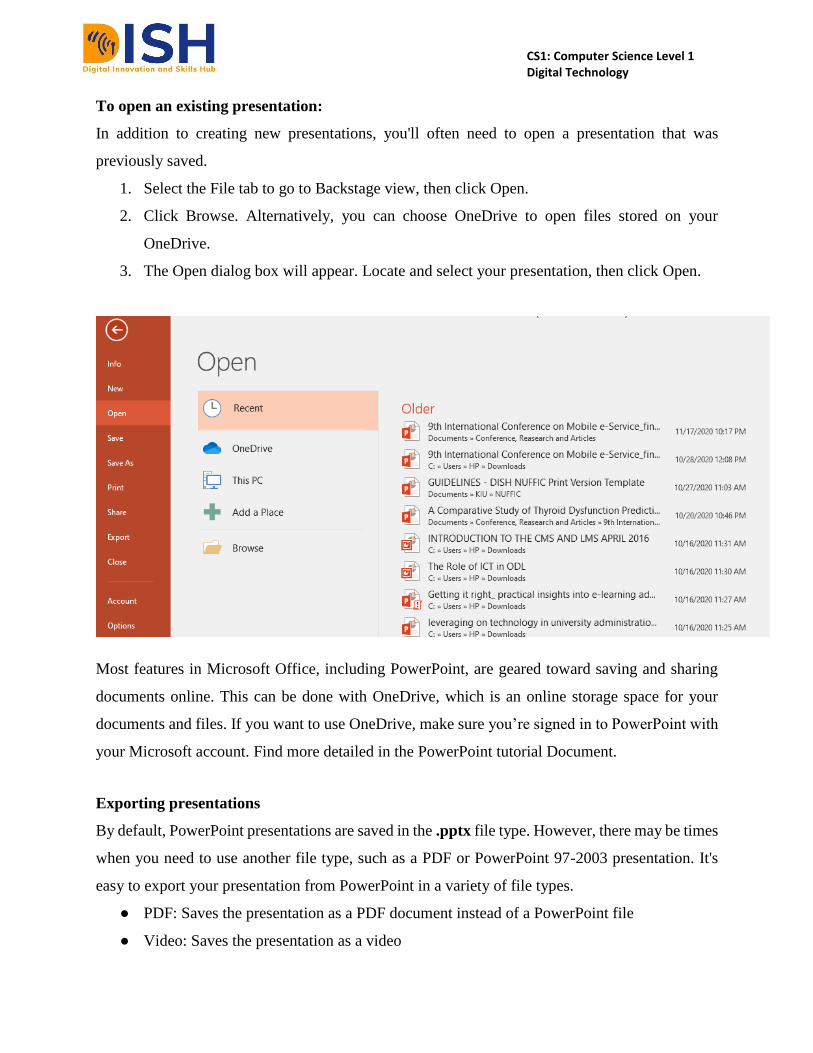
To open an existing presentation:
In addition to creating new presentations, you'll often need to open a presentation that was
previously saved.
1. Select the File tab to go to Backstage view, then click Open.
2. Click Browse. Alternatively, you can choose OneDrive to open files stored on your
OneDrive.
3. The Open dialog box will appear. Locate and select your presentation, then click Open.
Most features in Microsoft Office, including PowerPoint, are geared toward saving and sharing
documents online. This can be done with OneDrive, which is an online storage space for your
documents and files. If you want to use OneDrive, make sure you’re signed in to PowerPoint with
your Microsoft account. Find more detailed in the PowerPoint tutorial Document.
Exporting presentations
By default, PowerPoint presentations are saved in the .pptx file type. However, there may be times
when you need to use another file type, such as a PDF or PowerPoint 97-2003 presentation. It's
easy to export your presentation from PowerPoint in a variety of file types.
● PDF: Saves the presentation as a PDF document instead of a PowerPoint file
● Video: Saves the presentation as a video
CS1: Computer Science Level 1 Digital Technology
● Package for CD: Saves the presentation in a folder along with the Microsoft PowerPoint
Viewer, a special slide show player anyone can download
● Handouts: Prints a handout version of your slides
● Other file type: Saves in other file types, including PNG and PowerPoint 97-2003
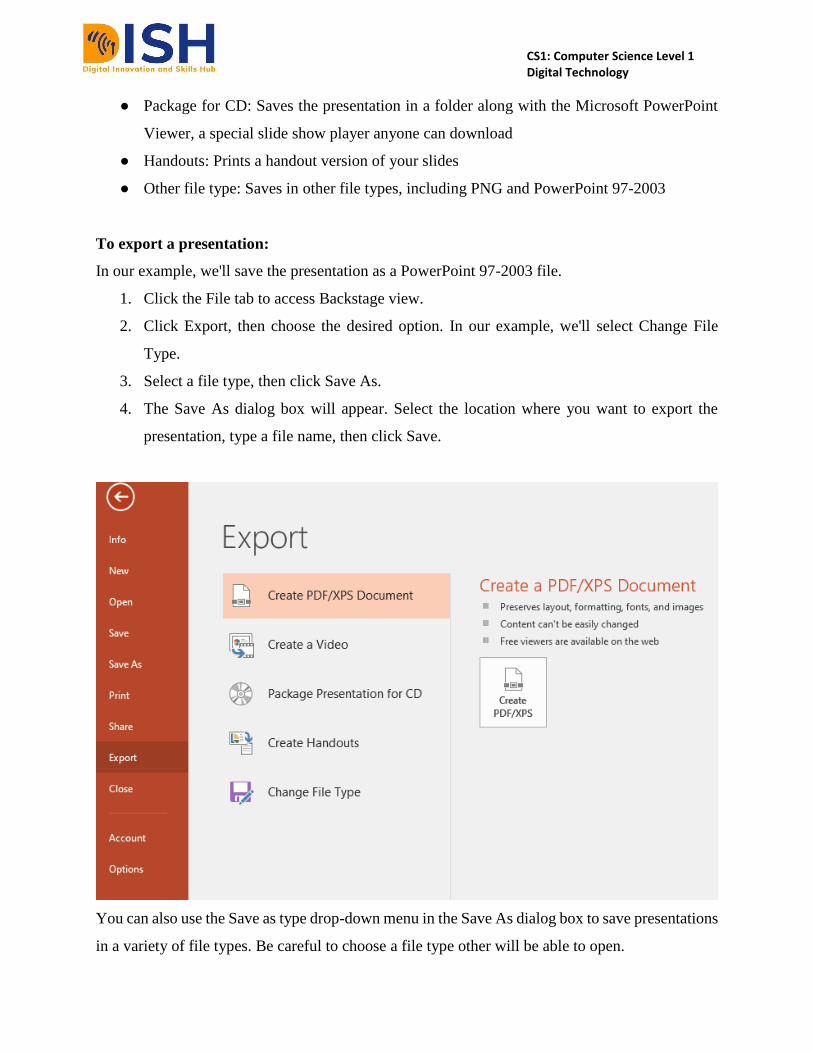
To export a presentation:
In our example, we'll save the presentation as a PowerPoint 97-2003 file.
1. Click the File tab to access Backstage view.
2. Click Export, then choose the desired option. In our example, we'll select Change File
Type.
3. Select a file type, then click Save As.
4. The Save As dialog box will appear. Select the location where you want to export the
presentation, type a file name, then click Save.
You can also use the Save as type drop-down menu in the Save As dialog box to save presentations
in a variety of file types. Be careful to choose a file type other will be able to open.

CS1: Computer Science Level 1 Digital Technology
As the contents of the tutorial is a bit lengthy, the tutorial has been saved and adapted into
another form of word document or Portable Document Format (pdf). Please, find the document
via this link
For better experience of this tutorial, follow the steps below as you engage with PowerPoint
a) Open our practice presentation.
b) Use Save As to create a copy of the presentation. Name the
new copy Saving Challenge Practice. You can save it to a
folder on your computer or to your Google Drive
c) Export the presentation as a PDF file.
2.2.5 Notepad and WordPad
NotePad and WordPad are two different applications that can be used to create a text file on a
Microsoft Windows Computer. Although both may seem like similar applications to a layman,
there are several differences between the two of them. The Microsoft Windows 10 OS offers both
the notepad and wordpad as in-built tools, however, Microsoft word is more popular than these
two even though all three (MS Word, MS Notepad and MS WordPad) are all products of Microsoft.
WORDPAD
WordPad has been around for many years, however the main difference between WordPad and
MS Word the two is that this is a word processing application which is more capable of performing
many functions that a text editor like Notepad cannot perform.
WordPad is a very toned down version of Microsoft Word. When you use this app, you can view
and create files using a format called rich text format or rtf. This helps you achieve some rich-text
editing tools that are not available in the other application. There are several font options and
paragraph settings that are available on WordPad to make the text appealing and readable. This

CS1: Computer Science Level 1 Digital Technology
tool also gives you the ability to insert pictures and objects in your file, making the overall file
more presentable and it can be used as a visual as well.
However, there aren’t any features that are more advanced than this. You miss out on all the
features that Microsoft Word would be able to provide, such as the ability to create table and to
perform complex formatting, design and spell check along with many other features you come to
expect from Microsoft Word and other applications.
WordPad is a good choice for basic content that only includes paragraphs, listings, and images.
You can create print documents with specific formats with this application, when you don’t have
the Microsoft word processor or any other text application installed on your computer. You can
also use it to open unformatted text documents or `.rtf’ files.
To launch WordPad on a windows PC, press window key and type WordPad, once it brings it,
launch the app by double-clicking on it
CS1: Computer Science Level 1 Digital Technology
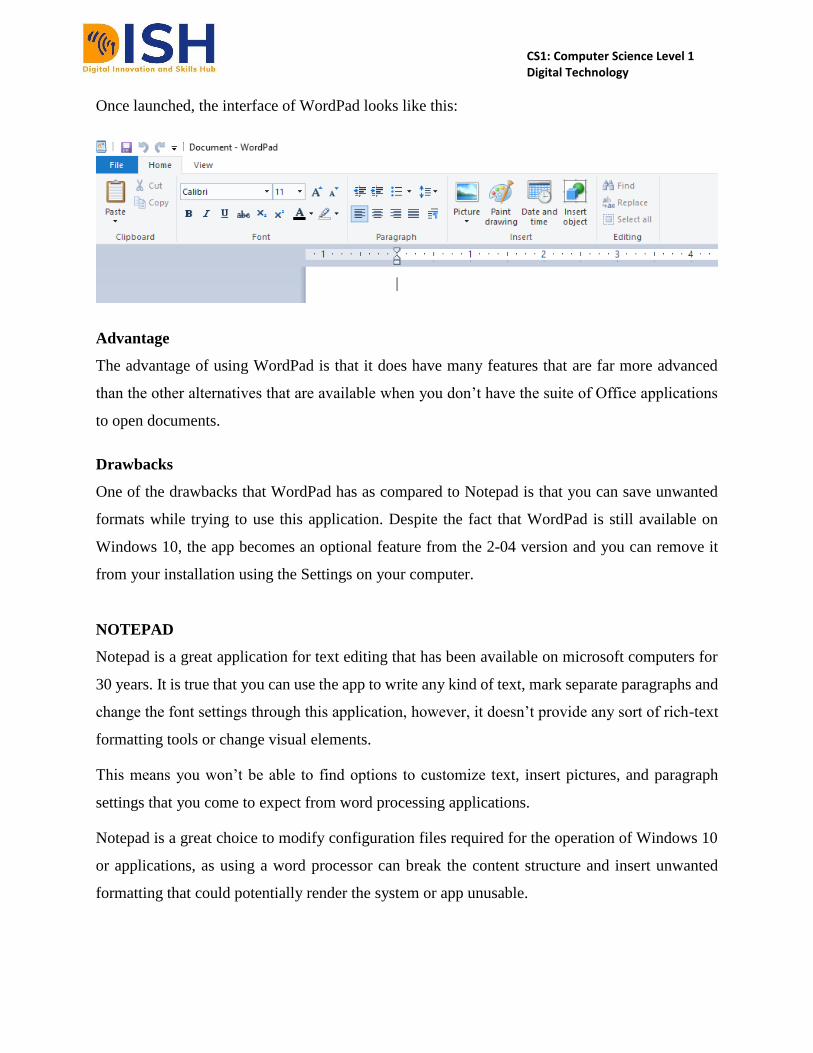
Once launched, the interface of WordPad looks like this:
Advantage
The advantage of using WordPad is that it does have many features that are far more advanced
than the other alternatives that are available when you don’t have the suite of Office applications
to open documents.
Drawbacks
One of the drawbacks that WordPad has as compared to Notepad is that you can save unwanted
formats while trying to use this application. Despite the fact that WordPad is still available on
Windows 10, the app becomes an optional feature from the 2-04 version and you can remove it
from your installation using the Settings on your computer.
NOTEPAD
Notepad is a great application for text editing that has been available on microsoft computers for
30 years. It is true that you can use the app to write any kind of text, mark separate paragraphs and
change the font settings through this application, however, it doesn’t provide any sort of rich-text
formatting tools or change visual elements.
This means you won’t be able to find options to customize text, insert pictures, and paragraph
settings that you come to expect from word processing applications.
Notepad is a great choice to modify configuration files required for the operation of Windows 10
or applications, as using a word processor can break the content structure and insert unwanted
formatting that could potentially render the system or app unusable.

CS1: Computer Science Level 1 Digital Technology
To launch Notepad on a windows PC, press window key and type Notepad, once it brings it,
launch the app by double clicking on it.
Once launched, the interface of Notepad looks like this:
Despite the lack of word processing functionalities, this tool has been so popular for generations
since it is still a powerful tool. If you create a plain text file, Notepad will usually save the content
using a “.txt” extension.
This container doesn’t include any style, tags, links, or special characters, making it one of the best
options to view and write code, such as HTML, batch files, making this an ideal text editor for
engineers and coders.

CS1: Computer Science Level 1 Digital Technology
The text-only nature of this application provides great simplicity to the interface and Notepad is a
well-suited application to write scripts. There are certain batch files that you can run in Command
Prompt or more complex scripts which you can save using this application.
It is a great tool to view and write programming codes such as create HTML files, edit
configuration files, and reviewing log files. This application is made to make programming more
straightforward and is meant for people who value simplicity more than visual functions.
Tutor Marked Assignment III
Submit this assignment via the LMS. Deadline dates will be provided on the course news
page
i. Use MS Word or any other Word processing
Software to write a report of your experiences
and challenges in the DISH courses you are
enrolled in.
ii. Create an Excel Spreadsheet for your monthly
budget. Export the excel sheet to pdf and submit
both the csv and pdf files.
iii. Create a PowerPoint presentation from this
teaching document to form points and make use
different elements of a PowerPoint templates
iv. Use WordPad to create a list of your favorite
food.
2.3 Multimedia Creating Tools
Multimedia files, such as digital imagery and video, have become increasingly popular in today's
world. In fact, when it comes to contents creation, a lot of contents consumers on blogs, websites
and social media platforms are excited, fascinated and interested more in multimedia (videos,
CS1: Computer Science Level 1 Digital Technology
audios and animations than they are in only text based contents. Thus, it is of paramount
importance for a digitally literate person to be able to create a simple multimedia.
Multimedia is the field concerned with the computer-controlled integration of text, graphics,
drawings, still and moving images (Video), animation, audio, and any other media where every
type of information can be represented, stored, transmitted and processed digitally.
A Multimedia Application is an application which uses a collection of multiple media sources e.g.
text, graphics, images, sound/audio, animation and/or video.
2.3.1 Video Recording Tools
We are now in the age of visual information where visual content plays a role in every part of life.
Most people now prefer watching videos to reading texts and this has been impacted a lot of sectors
especially in terms of contents creation. It has been confirmed by several researchers that audio
visual information is more retaining to learners and viewers than non-visuals.
Additional resources
Find more info on why visuals are more accepted than non-visuals, read more on the subject @
https://www.shiftelearning.com/blog/bid/350326/studies-confirm-the-power-of-visuals-in-
elearning.
It is important that a digital literate individual should know how to create simple multimedia, as
graphics or images, as videos or animations.
Video Production
Video Production is done in 3 phases, though it not all phases that are not mandatory for a
beginner. Most times, beginners stick to phase 1 and phase 2 only.
Phase 1: Pre-production
Phase 2: Filming
Phase 3: Editing or Post-production

CS1: Computer Science Level 1 Digital Technology
Pre-Production
This is the phase when ideas are brought together into a cohesive plan and the goals and objectives
of your video are established. In this phase, the recorder will have to consider the following factors
● your target audience,
● your budget and
● the message your video needs to convey.
Planning is of paramount importance – the more time you spend on planning, the more smoothly
your filming will go and the better your final video will be. Some the major areas and
considerations that needs to planned ahead include
● What type of video do you want to record? Is it just Screen recording or an actual
interactive video with lots of images and effects?
● What sort of set you need to use. What type of Camera of device will be adequate? What
resolution of video will be appropriate? If you are filming in a studio, do you need a green
or blue screen behind the presenter (blonde hair = blue screen)? Think about what, if any,
make-up will be required and whether any props are needed. How much filming time is
needed?
Next your video needs to be scripted or storyboarded. This involves putting together the list of
shots that will be required – the key elements that will make up your video. From this, you will be
able to develop your final script or storyboard. Your script will not only guide the filming team,
but also gives the editing team an excellent guide to work from and provide the basis for any
additional voiceover work.
Lighting is hugely important. You might be surprised at just how much light is needed for even
the most basic of videos. Time is needed to light the foreground, background and the subject.
Shadows can appear from nowhere and it can be difficult to work out where they are coming from
so don't be rushed. Time taken at this stage will reduce any work needed after the video has been
shot.
Think about audio – make sure you are using the correct microphones and the sound you need is
getting picked up. Use headphones plugged into the cameras to test the audio
CS1: Computer Science Level 1 Digital Technology
Filming
This phase involves the actual recording of the video using professional cameras, consumer
cameras or any other device that contains a camera (smartphones, laptops, iPad etc.). Sometimes,
recording video is asimple as possible especially if t is non formal or non professional video
needed. However, if the recording is for commercial purposes or formal functions in which the
session time ranges into hours, it can tedious and consuming. Some of the tips recommended for
filming includes
● Practice Safety. Tape or cover wires, and take care around equipment. If possible, keep
food and drink away from cameras, lights and audio equipment.
● Make sure everybody on the shoot is aware of their roles and responsibilities. One person
should be directing and one person taking responsibility for filming, lighting and sound.
Make sure everybody is aware of who to consult with in the case of issues or problems.
● Ensure that all batteries are charged and spares are available, everybody has the means to
contact everybody else (particularly if you are filming in a large space like a factory or
sports stadium) and all equipment is in good working order.
● Keep hydrated, composed and relaxed during filming and avoid being too conscious f the
camera.
Additional resources
For guide on how to record your videos, checkout this url
https://www.techsmith.com/tutorial-snagit-how-to-document-process-video.html
Some of the Popular Video and Screen Recording tools for PC users are:
Free Recording Software
● CamStudio
● Ezvid
● TinyTake
● OBS Studio
CS1: Computer Science Level 1 Digital Technology
Paid Screen Recording Software
● iSpring Suite
● Camtasia
● Filmora Scrn
● Movavi Screen Recorder
● My Screen Recorder Pro
Video Recording Software
● CloudApp
● SnagIt
● ShareX
● Debut Video Capture
● ScreenFlow
● GoPlay
● Camtasia
● Screencastify etc.
Mobile Video Recording and Editing Apps (For Smartphones Users)
The camera on your average smartphone rivals even dedicated digital cameras. And when
compared to stand-alone cameras even a couple of years old, the newest iPhone often comes out
on top.
● Filmic Pro
● MAVIS
● Movie Pro
● Cinema FV-5
● Open Camera
● Inshot
● LumaFusion
There are so many video recording software online. On the choice of which one is the best to use.
The answer is “the best is whichever works for you”. Research on them and pick one that you like
best.
Additional resources
For guide on how to use your mobile devices and smartphones to record videos, read full details
on the topic at https://www.techsmith.com/blog/from-smartphone-video-to-animated-gif/
For more details on the which mobile tools is appropriate for your recording, check out the pros
and the cons of each tools @

CS1: Computer Science Level 1 Digital Technology
https://www.ispringsolutions.com/blog/10-best-screen-recording-software-for-windows-free-
and-paid
https://www.getcloudapp.com/blog/best-video-recording-software
Post Processing or Editing
This is the phase where the editing of the recorded video is done. Most times the video recorded
is full of errors, which needs to be removed, this is done during post processing. Also, there might
be a need to add effects, texts and any other post processing effects as deemed fit.
Once filming is completed, download the raw footage onto a central storage location as soon as
possible. The footage is copied onto a local machine and the video editing can begin.
Some of the popular video editing tools are:
● VSDC Free Video Editor
● Pinnacle Studio
● Wondershare Filmora
● DaVinci Resolve
● iMovie
● Adobe Premiere Pro
● Final Cut Pro X
● Vegas Pro
2.3.2 Animation Making Tools
Animations is now
2.3.3 Skits and Vlogs
One of the newest trends in the world of social media and entertainment is the creations of Skits
which most creators upload to Vlogs.
A Skit is a short video created for a purpose. It can be comedy Skits, funny videos, Product reviews
or any other type of short video. A video blog or video log, sometimes shortened to vlog, is a form

CS1: Computer Science Level 1 Digital Technology
of blog for which the medium is video, and is a form of web television. Vlog entries often combine
embedded video with supporting text, images, and other metadata.
Nowadays, social media has become a non-negligible part of our daily lives. These platforms
which were initially created as a tool to keep people connected, now, they do more than connecting
people. A good percentage of the contents on social media are now videos and most of these videos
either comedy videos, pranks, funny memes, and so on. A typical Comedy skit is usually between
2 – 6 mins duration and these videos are created to amuse viewers on a particular interest.
Nowadays, comedy skit videos are becoming more popular and engaging. They have become the
choice medium to advertise brands and products as it is short and direct.
Some of the popular platforms where Skits can be found are:
Tiktok
YouTube
VSkit
Triller
Additional resources
For guide on how to create Skits, checkout this url
https://turbofuture.com/internet/How-to-Make-a-YouTube-Video-Skit
2.4 Computer Shortcuts for Everyday Use
The more familiar a digital literate individual uses a computer, the more familiar he or she becomes
until he or she becomes a professional in using the applications smoothly and without much
difficulty. However, there are several shortcuts that enables users to maneuver and perform several
actions without necessarily using the menu icon and the cursor or the mouse. The use of shortcuts
in most times involve the use of keyboard only.
CS1: Computer Science Level 1 Digital Technology
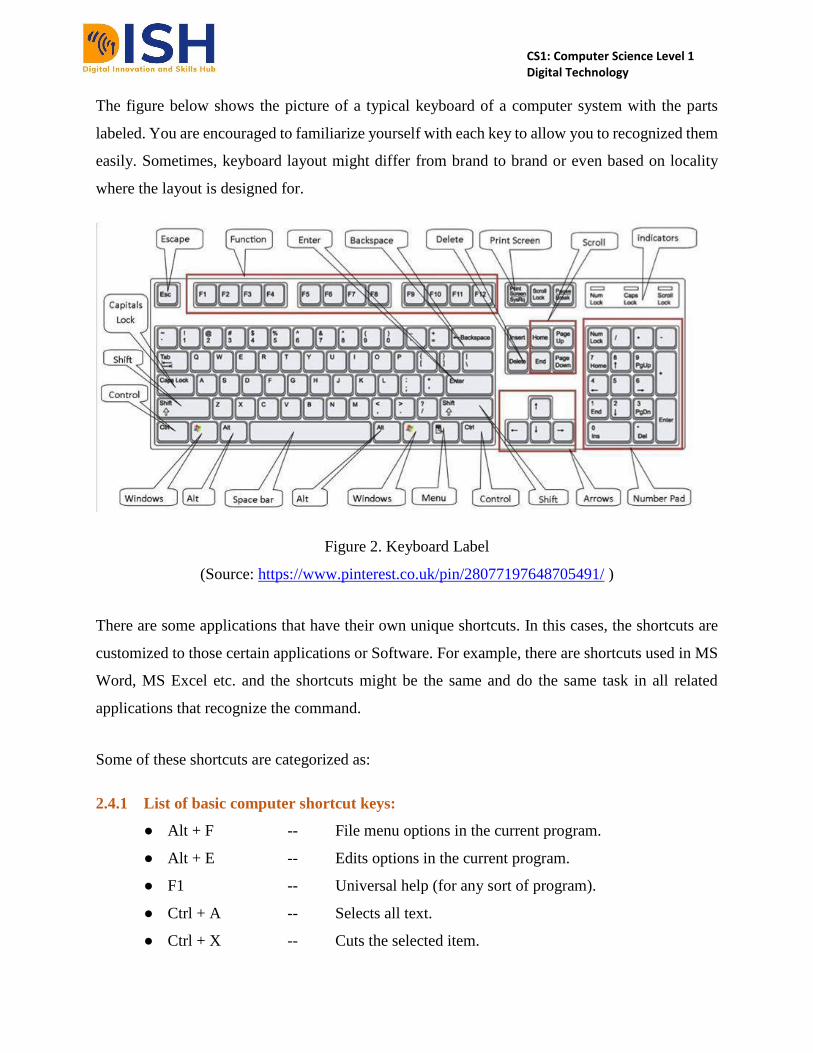
The figure below shows the picture of a typical keyboard of a computer system with the parts
labeled. You are encouraged to familiarize yourself with each key to allow you to recognized them
easily. Sometimes, keyboard layout might differ from brand to brand or even based on locality
where the layout is designed for.
Figure 2. Keyboard Label
(Source: https://www.pinterest.co.uk/pin/28077197648705491/ )
There are some applications that have their own unique shortcuts. In this cases, the shortcuts are
customized to those certain applications or Software. For example, there are shortcuts used in MS
Word, MS Excel etc. and the shortcuts might be the same and do the same task in all related
applications that recognize the command.
Some of these shortcuts are categorized as:
2.4.1 List of basic computer shortcut keys:
● Alt + F -- File menu options in the current program.
● Alt + E -- Edits options in the current program.
● F1 -- Universal help (for any sort of program).
● Ctrl + A -- Selects all text.
● Ctrl + X -- Cuts the selected item.
CS1: Computer Science Level 1 Digital Technology
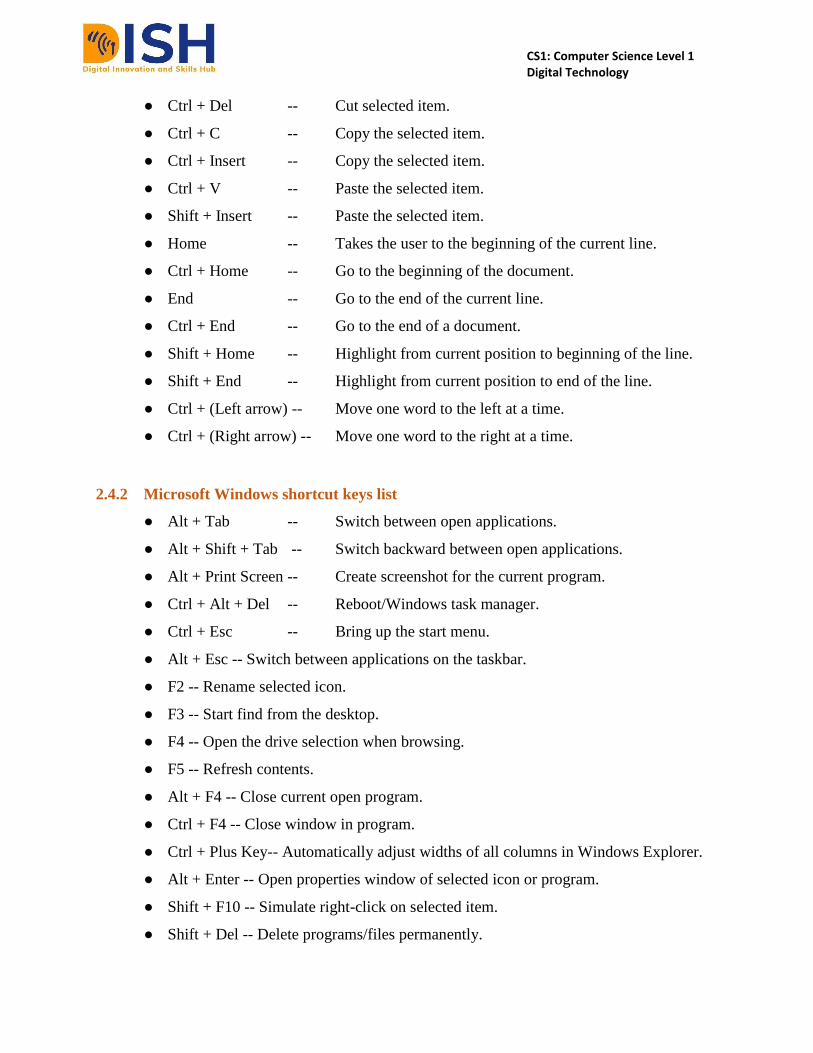
● Ctrl + Del -- Cut selected item.
● Ctrl + C -- Copy the selected item.
● Ctrl + Insert -- Copy the selected item.
● Ctrl + V -- Paste the selected item.
● Shift + Insert -- Paste the selected item.
● Home -- Takes the user to the beginning of the current line.
● Ctrl + Home -- Go to the beginning of the document.
● End -- Go to the end of the current line.
● Ctrl + End -- Go to the end of a document.
● Shift + Home -- Highlight from current position to beginning of the line.
● Shift + End -- Highlight from current position to end of the line.
● Ctrl + (Left arrow) -- Move one word to the left at a time.
● Ctrl + (Right arrow) -- Move one word to the right at a time.
2.4.2 Microsoft Windows shortcut keys list
● Alt + Tab -- Switch between open applications.
● Alt + Shift + Tab -- Switch backward between open applications.
● Alt + Print Screen -- Create screenshot for the current program.
● Ctrl + Alt + Del -- Reboot/Windows task manager.
● Ctrl + Esc -- Bring up the start menu.
● Alt + Esc -- Switch between applications on the taskbar.
● F2 -- Rename selected icon.
● F3 -- Start find from the desktop.
● F4 -- Open the drive selection when browsing.
● F5 -- Refresh contents.
● Alt + F4 -- Close current open program.
● Ctrl + F4 -- Close window in program.
● Ctrl + Plus Key-- Automatically adjust widths of all columns in Windows Explorer.
● Alt + Enter -- Open properties window of selected icon or program.
● Shift + F10 -- Simulate right-click on selected item.
● Shift + Del -- Delete programs/files permanently.

CS1: Computer Science Level 1 Digital Technology
● Holding Shift During Boot up -- Boot safe mode or bypass system files.
● Holding Shift During Boot up -- When putting in an audio CD, will prevent CD Player
from playing.
2.4.3 MS Word shortcut keys
● Ctrl + A -- Select all contents of the page.
● Ctrl + B -- Bold highlighted selection.
● Ctrl + C -- Copy selected text.
● Ctrl + X -- Cut selected text.
● Ctrl + N -- Open new/blank document.
● Ctrl + O -- Open options.
● Ctrl + P -- Open the print window.
● Ctrl + F -- Open find box.
● Ctrl + I -- Italicise highlighted selection.
● Ctrl + K -- Insert link.
● Ctrl + U -- Underline highlighted selection.
● Ctrl + V -- Paste.
● Ctrl + Y -- Redo the last action performed.
● Ctrl + Z -- Undo last action.
● Ctrl + G -- Find and replace options.
● Ctrl + H -- Find and replace options.
● Ctrl + J -- Justify paragraph alignment.
● Ctrl + L -- Align selected text or line to the left.
● Ctrl + Q -- Align selected paragraph to the left.
● Ctrl + E -- Align selected text or line to the center.
● Ctrl + R -- Align selected text or line to the right.
● Ctrl + M -- Indent the paragraph.
● Ctrl + T -- Hanging indent.
● Ctrl + D -- Font options.
● Ctrl + Shift + F -- Change the font.
● Ctrl + Shift + > -- Increase selected font +1.

CS1: Computer Science Level 1 Digital Technology
● Ctrl + ] -- Increase selected font +1.
● Ctrl + [ -- Decrease selected font -1.
● Ctrl + Shift + * -- View or hide non printing characters.
● Ctrl + (Left arrow) -- Move one word to the left.
● Ctrl + (Right arrow) -- Move one word to the right.
● Ctrl + (Up arrow) -- Move to the beginning of the line or paragraph.
● Ctrl + (Down arrow) -- Move to the end of the paragraph.
● Ctrl + Del -- Delete word to the right of the cursor.
● Ctrl + Backspace -- Delete word to the left of the cursor.
● Ctrl + End -- Move cursor to end of the document.
● Ctrl + Home -- Move cursor to the beginning of the document.
● Ctrl + Space -- Reset highlighted text to default font.
● Ctrl + 1 -- Single-space lines.
● Ctrl + 2 -- Double-space lines.
● Ctrl + 5 -- 1.5-line spacing.
● Ctrl + Alt + 1 Change text to heading 1.
● Ctrl + Alt + 2 Change text to heading 2.
● Ctrl + Alt + 3 Change text to heading 3.
● F1 -- Open help.
● Shift + F3 -- Change case of selected text.
● Shift + Insert -- Paste.
● F4 -- Repeat the last action performed (Word 2000+).
● F7 -- Spell check selected text and/or document.
● Shift + F7 -- Activate the thesaurus.
● F12 -- Save as.
● Ctrl + S -- Save.
● Shift + F12 -- Save.
● Alt + Shift + D -- Insert the current date.
● Alt + Shift + T -- Insert the current time.
● Ctrl + W -- Close document.

CS1: Computer Science Level 1 Digital Technology
2.4.4 Excel shortcut keys
● F2 -- Edit the selected cell.
● F5 -- Go to a specific cell.
● F7 -- Spell check selected text and/or document.
● F11 -- Create chart
● Ctrl + Shift + ; -- Enter the current time.
● Ctrl + ; -- Enter the current date
● Alt + Shift + F1 -- Insert new worksheet.
● Shift + F3 -- Open the Excel formula window.
● Shift + F5 -- Bring up the search box
● Ctrl + A -- Select all contents of a worksheet.
● Ctrl + B -- Bold highlighted selection.
● Ctrl + I -- Italicize highlighted selection.
● Ctrl + C -- Copy selected text.
● Ctrl + V -- Paste
● Ctrl + D -- Fill
● Ctrl + K -- Insert link
● Ctrl + F -- Open find and replace options.
● Ctrl + G -- Open go-to options.
● Ctrl + H -- Open find and replace options.
● Ctrl + U -- Underline highlighted selection.
● Ctrl + Y -- Underline selected text.
● Ctrl + 5 -- Strikethrough highlighted selection.
● Ctrl + O -- Open options.
● Ctrl + N -- Open new document.
● Ctrl + P -- Open print dialog box.
● Ctrl + S -- Save.
● Ctrl + Z -- Undo last action.
● Ctrl + F9 -- Minimize current window.
● Ctrl + F10 -- Maximize currently selected window.
● Ctrl + F6 -- Switch between open workbooks/windows.

CS1: Computer Science Level 1 Digital Technology
● Ctrl + Page up & Page Down -- Move between Excel worksheets in the same document.
● Ctrl + Tab -- Move between two or more open Excel files
● Alt + = -- Create the formula to sum all of the above cells.
● Ctrl + -- Insert the value of above cell into the current cell.
● Ctrl + Shift + ! -- Format number in comma format.
● Ctrl + Shift + $ -- Format number in currency format.
● Ctrl + Shift + # -- Format number in date format.
● Ctrl + Shift + % -- Format number in percentage format.
● Ctrl + Shift + ^ -- Format number in scientific format.
● Ctrl + Shift + @ -- Format number in time format.
● Ctrl + (Right arrow) -- Move to next section of text.
● Ctrl + Space -- Select entire column.
● Shift + Space -- Select entire row.
● Ctrl + W -- Close document.
2.4.5 WINKEY shortcuts:
● WINKEY + D -- Bring desktop to the top of other windows.
● WINKEY + M -- Minimize all windows.
● WINKEY + SHIFT + M -- Undo the minimize done by WINKEY + M and WINKEY
+ D.
● WINKEY + E -- Open Microsoft Explorer.
● WINKEY + Tab -- Cycle through open programs on the taskbar.
● WINKEY + F -- Display the Windows Search/Find feature.
● WINKEY + CTRL + F -- Display the search for computers window.
● WINKEY + F1 -- Display the Microsoft Windows help.
● WINKEY + R -- Open the run window.
● WINKEY + Pause /Break -- Open the system properties window.
● WINKEY + U -- Open utility manager.
● WINKEY + L -- Lock the computer (Windows XP & later).

CS1: Computer Science Level 1 Digital Technology
Summary of Study Unit 2: Digital Literacy: Offline Tools and Skills Needed
In this study unit, you have learnt that:
1. Digital Literacy is much more than reading an eBook on a tablet. It involves the ability to
use information and communication technologies to find, evaluate, create, edit and
communicate information. Simply put, digital literacy is all bout creating, editing and
sharing digital contents
2. Digital tools are programs, websites or online resources that can make tasks easier to
complete. A lot of these can be accessed in web browsers without needing to be
downloaded, and you can access them both at home and in work.
3. For creating digital contents, offline tools can be used for creating and editing text
documents and for creating and editing multimedia (videos and animations) etc. Likewise,
online tools, some of the offline tools are
Text Editors like Notepad, WordPad etc.
Word Pocessing Software like MS Word, MS Excel, etc
Multimedia creation tools – Camtasia, Maya 3D,
4. Computer Shortcuts make it easy and fast for users to maneuver and perform several
actions without necessarily using the menu icon and the cursor or the mouse. The major
shortcuts are listed for learners to know and use frequently.
CS1: Computer Science Level 1 Digital Technology
Self-Review Questions for Study Unit 2
Now that you have completed this study unit, you can assess how well you have achieved its
Learning Outcomes by answering these questions.
a). What is Digital Literacy? What are the skills every digital literate person should possess?
Do you possess any or all of these skills?
b). Use MS Word to write a simple greetings letter to your friend. Make sure you use all
of these features in the document.
o Indentation, Bold, Italics, Underline, List Numbering
o Font Size (12, 14, 16). Font color (Red, Green, Purple and so many more
Be creative in your design. Save your letter in both doc and pdf format.
c). Use SmartArt in MS to design a simple graphics
d). Create a simple thank you video to DISH project, and publish it in Mp4 format. Insert your
name in the video clip and let the logo of your partner university (where you subscribe to
the project) be shown in the video.
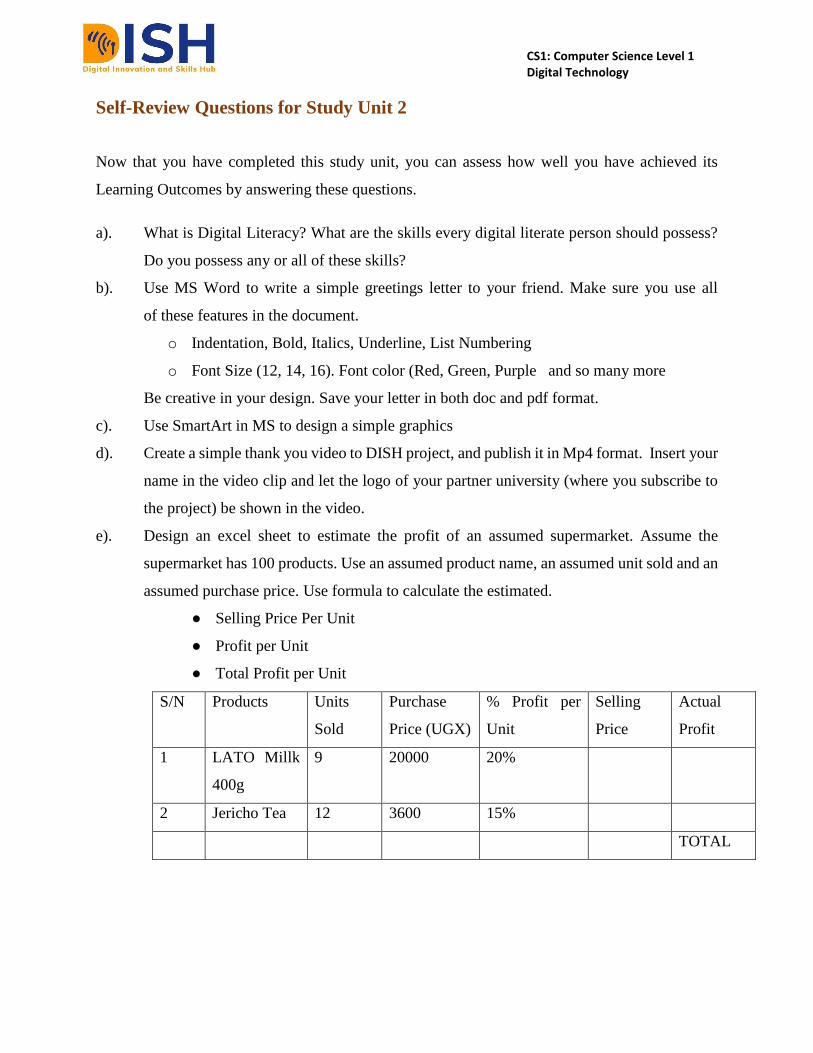
e). Design an excel sheet to estimate the profit of an assumed supermarket. Assume the
supermarket has 100 products. Use an assumed product name, an assumed unit sold and an
assumed purchase price. Use formula to calculate the estimated.
● Selling Price Per Unit
● Profit per Unit
● Total Profit per Unit
S/N Products Units
Sold
Purchase
Price (UGX)
% Profit per
Unit
Selling
Price
Actual
Profit
1 LATO Millk
400g
9 20000 20%
2 Jericho Tea 12 3600 15%
TOTAL

CS1: Computer Science Level 1 Digital Technology
References and Bibliography
https://www.dpsolutions.com/success-center/it-terminology-glossary

CS1: Computer Science Level 1 Digital Technology
Study
Session 3
Digital literacy: ONLINE
TOOLS AND SKILLS
NEEDED