Embed Size (px)
Citation preview
CRYSTAL4 UHD HDR
User Guide
CRYSTAL4User Guide
1

Contents3 Important Information3 About this User Guide & Safety5 Environnent6 Notice7 Introduction7 System Components8 Overview8 Remote Control
12 Product Overview13 Connections14 Keypad15 Installation15 Location16 Mounting19 Connections21 Switching On and Off22 LED indicators24 Operation24 Main Menu25 Source26 Image29 Color30 Lamp Control31 Setup33 Advanced34 Info35 Image Size and Projection Distances36 Compatibility Modes37 Replacing the lamp40 Adjusting the volume41 How to install a ceiling bracket with Crystal442 Specifications43 Dimensions
CRYSTAL4User Guide
2

• Important information
About this User GuideThis User Guide describes how to set up and operate the following projectors:
CRYSTAL4
Except where otherwise indicated, the information in this guide applies to all the projectors listed above, that will be referred to as “CRYSTAL4”.Information contained in this User Guide may be updated from time to time due toproduct improvements and customer feedback. Visit www.sim2.com to find the latestversion of this document.This document contains proprietary information protected by copyright. All rights arereserved.All trademarks and registered trademarks are the property of their respective owners.
SafetyTo reduce the risk of electrocution, disconnect the power cord on therear panel before removing the glass cover or side panels of the projec-tor. For technical service refer to trained personnel authorized by themanufacturer.
Read this manualRead all chapters of this manual carefully before switching on the projector. This man-ual provides basic instructions for operating the CRYSTAL4 projector. Installation, pre-liminary adjustments and procedures that necessitate the removal of the glass coverand the contact with electrical components, must be performed by authorized trainedtechnicians. To ensure safe operation and long term reliability use only the power cordsupplied by the manufacturer. Observe all warnings and precautions. Keep the manualfor future consultation.
Do not touch internal parts of the projectorInside the housing there are electrical parts carrying dangerously high voltages andparts operating at high temperature. Never open the housing. Entrust all servicing andrepair work to a SIM2 Authorized Service Center. Opening the housing voids the war-ranty.
Disconnect the projector from the power supplyThe device that disconnects the projector from the electrical outlet, is the power plug.Ensure that the power cord plugs and the electrical outlets are easily accessible duringinstallation operations. Pull the plug, not the cord, to disconnect the projector fromthe electrical outlet. Use only the specified power supply. Connect the projector to theelectrical supply with rated voltage of between 100-240 V AC, 50/60 Hz and equipped
CRYSTAL4User Guide
3
with a protective earth connection. If you are not sure of your domestic electrical out -let, contact an electrician. Take care to avoid overloading the power socket and anyextension leads.
Switching the projector offPay attention to the switch off procedure for the projector. The projector must alwaysbe brought back to the standby state to allow the projector to carry out the coolingprocedure. Should this not happen, for example due to a power cut, the projector mayenter a state of protection that leads to switch-on being blocked. This block will lastuntil the internal components of the projector have completely cooled down. Allow 90seconds for the projector to cool down.
Be careful with cablesMake sure cables are routed so that people are not impeded or become a trip hazard.Keep all cables away from children. Install the projector as close to the wall socket aspossible. Avoid stepping on power cords, make certain they do not become tangled,and never jerk or tug them; do not expose them to sources of heat, and make surethey do not become knotted or crimped. If the power cords become damaged, stopusing the projector and request the assistance of an authorized technician.
Disconnect the projector from the electrical outlet during storms and when not inuseTo prevent damage from lightning strikes in the vicinity, disconnect the projector dur-ing storms or when the projector is going to be left unused for a long time.
Avoid contact with liquids and exposure to dampDo not use the projector near water (sinks, tubs and so on); do not place objects con-taining liquids on or near the projector and do not expose it to rain, humidity, drops ofwater or sprays; do not use water or liquid detergent to clean it.
Place the projector on a stable surfacePlace the projector on a stable surface or use a suitable ceiling mounting bracket.Never place the projector on its side or rear, on the lens or top panel or rear.
Do not allow the projector to overheatTo prevent overheating, allow a free space of at least 0.20 m (5 in) on the rear, on thetop, and on the right and left sides of the projector. Do not obstruct the ventilationslots. Do not place the projector near heat sources such as heaters, radiators or otherdevices (including amplifiers) that generate heat. Do not place the projector in an areawhere there is insufficient space (shelving units, bookshelves and so on) and ingeneral avoid placing it in poorly ventilated areas as this may prevent sufficientcooling and significantly reduce lamp life.
Take special care regarding movement of the lensDo not place objects in the slots on the side of the lens and also ensure that verticallens movements are not impeded by external objects.Do not hold the projector by its lens.
CRYSTAL4User Guide
4

CRYSTAL4 handling and transportation
Do not insert objects through the openings in the projectorMake sure that no objects are inserted inside the projector.If this should occur, disconnect the projector from the power supply immediately andcall an authorized technician.
Power savingWe advise disconnecting the projector from the power supply when not in use. In thisway you will achieve considerable power savings while at the same time protecting in-ternal electrical parts from wear.
Do not use under the following conditions:• In extremely hot, cold or humid environments
◦ Ensure that the ambient room temperature is within 5°C ~ 35°C◦ Relative humidity is 10% ~ 85%
• In areas susceptible to excessive dust and dirt.• Near any equipment generating a strong magnetic field.• In direct sunlight.
EnvironmentThis product contains materials derived from natural resources during its manufac-ture. It may contain materials that constitute a health and environmental hazard. Toprevent harmful materials from being released into the environment and to promotethe use of natural materials, SIM2 provides the following information regarding thedisposal and recycling of the product.
Waste electrical and electronic materials (WEEE) should never be disposed of in nor-mal urban waste disposal facilities.
The label on the product, shown here, indicating a canceled garbage can,is intended to remind you that the product requires special handling atthe end of its service life. Materials such as glass, plastic and some chem-ical compounds are recoverable and can be recycled for reuse.
CRYSTAL4User Guide
5

Observe the following instructions: When you no longer wish to use your electrical and electronic equipment,
take it to your local waste disposal facility for recycling. You may return your old equipment to your SIM2 Authorized Dealer free of
charge when you buy a new product that is equivalent or has the same func-tions as the old one. Contact SIM2 to find your local dealer.
If you need more information regarding recycling, reuse and product ex-changes, contact SIM2 customer service.
Lastly we suggest further measures to safeguard the environment, such as recycling ofinternal and external packaging (including that used for shipping) in which the productwas delivered. With your help, we can reduce the amount of environmental resourcesrequired to make electric and electronic equipment, reduce the use of waste tips forused equipment and, in general, improve our quality of life by making sure that haz-ardous materials are correctly scrapped. Incorrect treatment of the product at the endof its service life and failure to follow the above disposal instructions are punishableunder local legislation.
NoticeThe projector has been subjected to exhaustive operating tests by SIM2 to guaranteethe highest quality. The projector light source life should thus initially be around 30-60hours. In addition to the customary checks, the Quality Control department also runsadditional statistical tests before shipment. In such cases, the packaging may showsigns of having been opened, and the hours of light source operation may prove to behigher than those normally shown when only standard tests are performed.
As the optical system of the CRYSTAL4 is extremely compact and has the purpose ofdeveloping very high brightness and contrast, it is possible that a small quantity oflight is visible outside of the projection area and will vary depending the zoom andshift setup. This characteristic of the optical system is to be deemed as normal. Inorder to reduce this effect SIM2 recommends that the area surrounding theprojection screen is as dark as possible.
As with any bright light source, do not stare into the beam, RG2 IEC 62471-5:2015.
CRYSTAL4User Guide
6

• IntroductionThe SIM2 CRYSTAL 4 UHD HDR projector achieves excellent picture quality through thepartnership of the latest 4K UHD 0.67” DLP® chipset from Texas Instruments andSIM2’s advanced video processing technology for a crisp, natural, and colorful viewingexperience in UHD HDR format.A high-power 300W lamp enables SIM2 CRYSTAL 4 UHD HDR to provide up to 2.200ANSI-lumens on-screen. The SIM2 CRYSTAL 4 UHD HDR is the best solution for mid-size Home and MediaRooms. The SIM2 CRYSTAL 4 UHD HDR features a stylish ‘made-in-Italy’ design:a distinctive, contemporary cabinet enriched by a luxurious crystal finish bydesigner Giorgio Revoldini. Available in Black Crystal glass.
System ComponentsYour CRYSTAL4 projector ships with the following items: 1 x backlit remote control unit (with two AAA/LR03 batteries) 1 x AC power cord - 2 m (6.6 ft.) long 1 x User Guide (this document) 1 x HDMI cable
CRYSTAL4User Guide
7

• Overview
Remote Control1 Power Off
2 Power On
3 HDMI 1,2,3
4 Picture Mode
5 Night
6 Day
7 Menu
8 EXIT
9
10 16 : 9
11 4 : 3
12 16 : 10
13 2.35 : 1
14 Source
15 Auto (Resync)
16 Volume
17 HDR
18 Mute
19 Freeze
20 Blank
CRYSTAL4User Guide
8

1 Power Off Turn Off the projector
2 Power On Turn On the projector
3 HDMI 1,2,3 Choose source from HDMI 1, 2 or 3 connector number
4 Picture Mode Select a picture mode for optimized settings for different applications
5 Night Switch the picture mode to Night mode
6 Day Switch the picture mode to Day mode.
7 Menu Display or exit the on-screen display menus for projector
8 EXIT Goes back to previous OSD menu, exits and saves menu settings.
9 Four directional select keys – use these menu arrows to select items or make adjustments to your selection
10 16 : 9 Displays 16 : 9 aspect ratio.
11 4 : 3 Displays 4 : 3 aspect ratio.
12 16 : 10 Displays 16 : 10 aspect ratio.
13 2.35 : 1 Displays 2.35 :1 aspect ratio.
14 Source Displays the source selection menu.
15 Auto (Resync) Automatically synchronizes the projector to the input source.
16 Volume Displays the volume setting menu.
17 HDR Activate the HDR function
18 Mute Toggles the audio from on and off in the built-in speaker
19 Freeze Toggles the freeze and unfreeze function in the displayed image
20 Blank Toggles the blank function in the displayed image
CRYSTAL4User Guide
9
Custom RemotesYou can use your own IR remote control to control your CRYSTAL4 projector. If you are using a remote control with learning capabilities, use the projector re-
mote control to teach the commands to your remote. If you are using a programmable remote control, the setup software probably al -
lows importing Hex codes. See “SIM2 CRYSTAL4 IR Control” document, for a list ofall the projector codes.
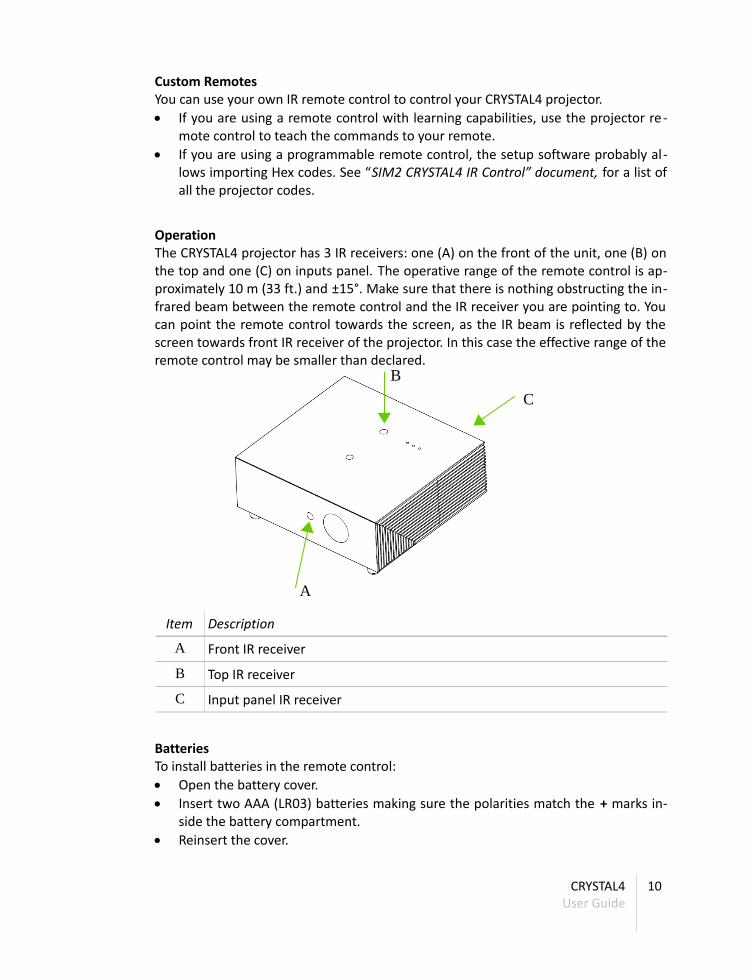
OperationThe CRYSTAL4 projector has 3 IR receivers: one (A) on the front of the unit, one (B) onthe top and one (C) on inputs panel. The operative range of the remote control is ap-proximately 10 m (33 ft.) and ±15°. Make sure that there is nothing obstructing the in-frared beam between the remote control and the IR receiver you are pointing to. Youcan point the remote control towards the screen, as the IR beam is reflected by thescreen towards front IR receiver of the projector. In this case the effective range of theremote control may be smaller than declared.
Item Description
A Front IR receiver
B Top IR receiver
C Input panel IR receiver
BatteriesTo install batteries in the remote control: Open the battery cover. Insert two AAA (LR03) batteries making sure the polarities match the + marks in-
side the battery compartment. Reinsert the cover.
CRYSTAL4User Guide
10
B
A
C
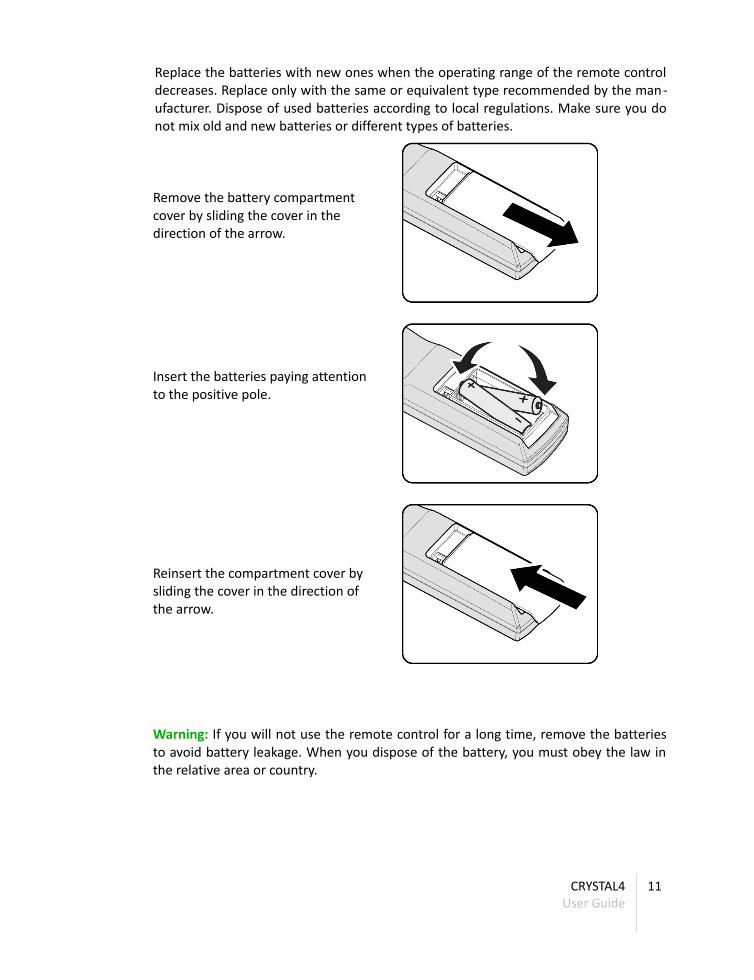
Replace the batteries with new ones when the operating range of the remote controldecreases. Replace only with the same or equivalent type recommended by the man-ufacturer. Dispose of used batteries according to local regulations. Make sure you donot mix old and new batteries or different types of batteries.
Remove the battery compartmentcover by sliding the cover in thedirection of the arrow.
Insert the batteries paying attentionto the positive pole.
Reinsert the compartment cover bysliding the cover in the direction ofthe arrow.
Warning: If you will not use the remote control for a long time, remove the batteriesto avoid battery leakage. When you dispose of the battery, you must obey the law inthe relative area or country.
CRYSTAL4User Guide
11
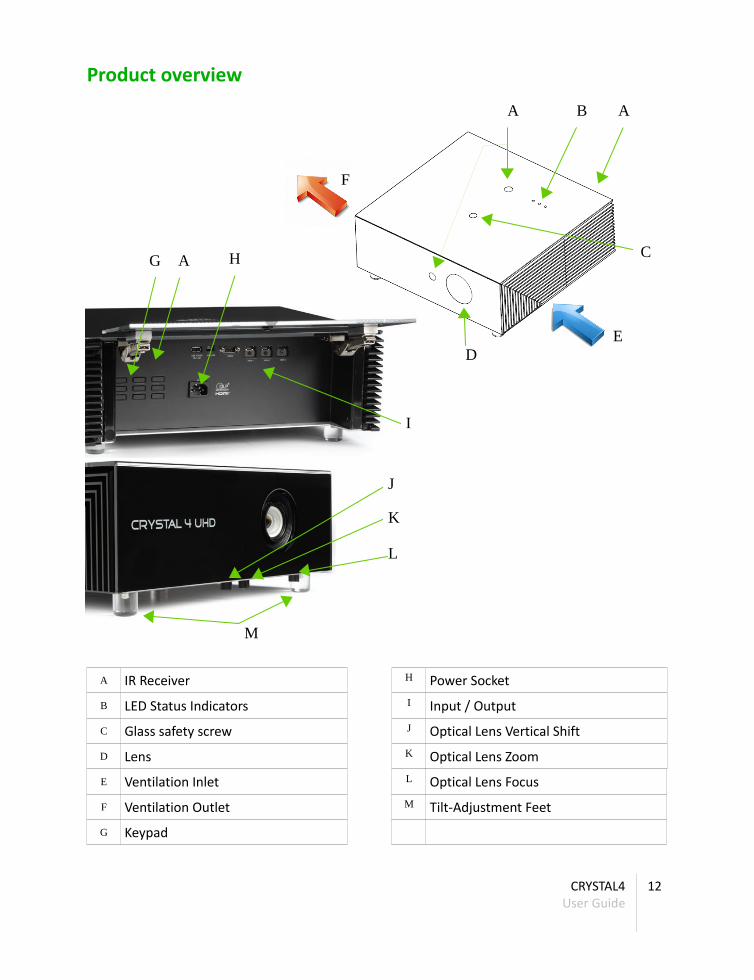
Product overview
A IR Receiver H Power Socket
B LED Status Indicators I Input / Output
C Glass safety screw J Optical Lens Vertical Shift
D Lens K Optical Lens Zoom
E Ventilation Inlet L Optical Lens Focus
F Ventilation Outlet M Tilt-Adjustment Feet
G Keypad
CRYSTAL4User Guide
12
E
F
G C
M
D
I
J
K
L
BA
HA
A

Connections
Inputs 6 HDMI 1 v2.0a, HDCP 2.2 UHD
7 HDMI 2 v2.0a, HDCP 2.2 UHD
8 HDMI 3 v2.0a, HDCP 2.2 MHL UHD
Control/Service
2 IR receiver Receive IR signal from remote control.
3 USB USB-A (Power out 5V-1,5A) for firmware upgrade.
4 USB Mini USB-B for firmware upgrade.
5 RS-232 RS232 port: projector control from serial commands
10 Keypad Function keys for projector's control and OSD operations
Outputs 1 AUDIO For a connection to an audio amplifier.
Power In 9 AC in Connect the Power cable
CRYSTAL4User Guide
13

Keypad
AMenu - opens and exits from the OSD menus
BLeft, Up, Right and Down, for Directional Select Keys in the OSD
CSelect or Enter in the OSD item
DSource selection
EAuto (Resync) - automatically synchronizes the projector to the input source.
FTurn On or turn Off the projector
CRYSTAL4User Guide
14
A B
B
B
BC
D E
F
• InstallationThis section provides instructions for the installation of the CRYSTAL4 projector.Important: Installation procedures should be performed by a qualified AV system spe-cialist.
LocationWhen installing the CRYSTAL4 projector, take the following considerations into ac-count.
Installation TypeSelect the installation type that best suits your needs: front or rear projection floor or ceiling mount
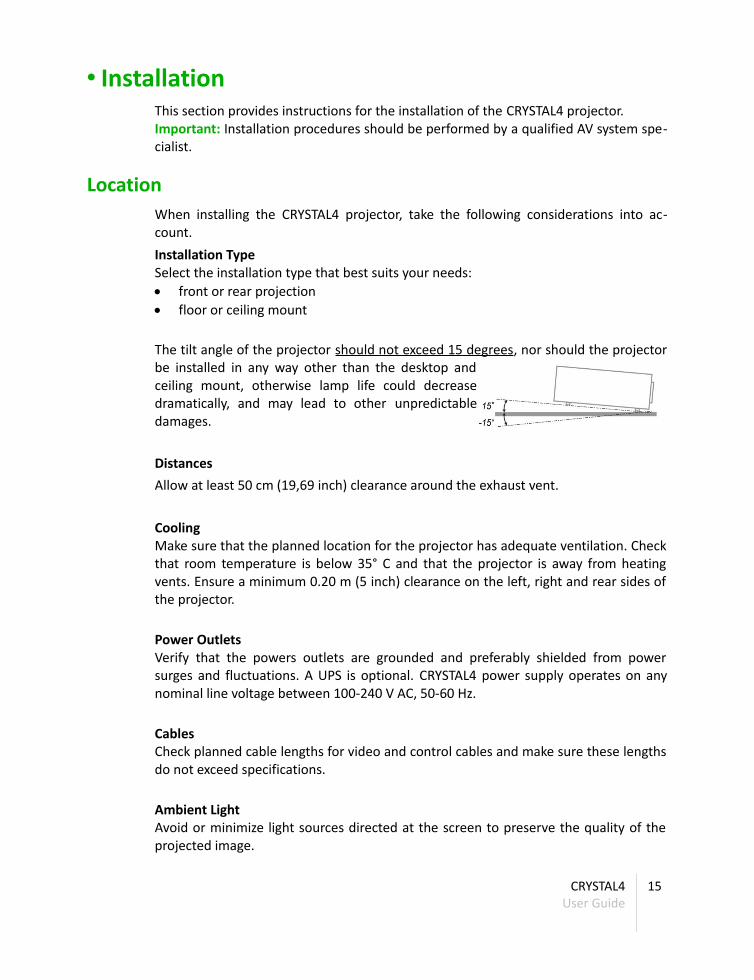
The tilt angle of the projector should not exceed 15 degrees, nor should the projectorbe installed in any way other than the desktop andceiling mount, otherwise lamp life could decreasedramatically, and may lead to other unpredictabledamages.
DistancesAllow at least 50 cm (19,69 inch) clearance around the exhaust vent.
CoolingMake sure that the planned location for the projector has adequate ventilation. Checkthat room temperature is below 35° C and that the projector is away from heatingvents. Ensure a minimum 0.20 m (5 inch) clearance on the left, right and rear sides ofthe projector.
Power OutletsVerify that the powers outlets are grounded and preferably shielded from powersurges and fluctuations. A UPS is optional. CRYSTAL4 power supply operates on anynominal line voltage between 100-240 V AC, 50-60 Hz.
CablesCheck planned cable lengths for video and control cables and make sure these lengthsdo not exceed specifications.
Ambient LightAvoid or minimize light sources directed at the screen to preserve the quality of theprojected image.
CRYSTAL4User Guide
15

MountingThe projector can be Floor mounted (upright) or Ceiling mounted (inverted). Choosethe method that best suits your installation. The CRYSTAL4 projector has been designed to comply with the EN60950/UL950 SafetyNorms (glass cabinet). To further guarantee a safe installation in ceiling-mouning applications, SIM2 hasequipped the projector with a glass safety screw that blends perfectly with the cabinetdesign (see C at page 12).To determine where to position the projector, consider the size and shape of yourscreen, the location of your power outlets, and the distance between the projectorand the rest of your equipment.
Important: The projection lens is not centered to the chassis, see the chapter 12, atpage 44. Make sure the center-line of the lens is centered horizontally to the center ofthe screen.
Floor MountingPlace the projector on a secure and flat surface (such as a table or a shelf). Adjust thetwo elevator feet at the bottom of the projector until the projector is level on all sides.Rotate the adjustable feet counter clockwise to raise the projector or clockwise tolower it. Repeat with the remaining feet as needed.
Ceiling MountingInvert the projector and suspend it from the ceiling using a specific Universal bracketwith or without its the extension Tube.
CRYSTAL4User Guide
16

OrientationBy default, the CRYSTAL4 is configured for a Front installation (projector installed up-right and in front of the screen). If the projector is installed behind the screen or in-verted, you can use the image orientation function of the projector.
Vertical Lens ShiftIdeally, the projector should be positioned at a right angle to the screen and in such a way that: the lens center and screen center are aligned with each other the projected image fills the screen perfectly
KeystoneIf the projector is ceiling-mounted and the screen is lower than the projector, you mayneed to tilt the projector by adjusting the ceiling mount. If you do so: the top and bottom borders of the image will be unequal in length the sides of the image will be inclined
LocationVerify if the voltage is stable, grounded properly and there is no electricity leakage. Turn on Altitude Mode when located in high altitude areas. The projector can only be installed upright or inverted. Avoid installing near air conditioner duct or subwoofer.
Cooling Make sure the air outlet is 50cm clear of any obstruction to ensure proper cooling.
Air outlet location should not be in front of the lens of other projector to avoidcausing illusions.
Keep the outlet at least 100cm away from the inlets of other projectors.
Make sure there is no object blocking air input within 30 cm.
Keep the inlet away from other heat sources
CRYSTAL4User Guide
17

Mechanical Lens ShiftThe CRYSTAL4 provides manual Vertical Shift control to change the display positionwith an offset up to +15% and -10% from the lens center point.
Mechanical Lens Zoom and FocusThe projector provides manual Zoom and Focus regulations.
CRYSTAL4User Guide
18
Vertical Lens Shift
Lens ZoomLens Focus
ConnectionsProceed as follows to connect the CRYSTAL4 to video sources, control devices and ACpower.When connecting your equipment: turn off all equipment before making any connections use the correct signal cables for each source make sure cables are routed so that people are not impeded or become a trip
hazard ensure that the cables are securely connected (tighten the thumbscrews on
connectors that have them)
HDMI The major benefits of this signal type are: best image quality, because the signal is carried in the digital domain throughout
the entire signal path highest available resolution, because video sources can deliver full resolution con-
tent via HDMI only optimization of several image parameters (color space, aspect, signal range, over
scan), thanks to auxiliary information (AVI info frame) sent by the source devicetogether with the signal.
If your source has dual HDMI outputs, we would recommend direct connection to theprojector from one of the HDMI connections and the second HDMI output to the in -put of an appropriate AV receiver/processor for audio.Sources with a DVI-D output can be connected to the HDMI input of the projector us-ing a suitable DVI-D to HDMI cable. In this case no auxiliary information is sent fromthe source to the projector.Note: HDMI uses a code known as HDCP (High-bandwidth Digital Copy Protection),which protects the recorded supports from being copied illegally. The connection be-tween the source and display requires that the two devices perform a handshake andexchange code keys before being able to display an image. The InstaPort technologyallows a simultaneous pre-authentication of every attached device at the same it isconnected, reducing drastically the time required for HDMI source switching. For thisreason you may note a slight delay before the image appears on the screen, but it isperfectly normal.
CRYSTAL4User Guide
19

ControlYou can connect the CRYSTAL4 projector to a Personal Computer or a control systemthrough one of the following methods: RS-232 port, using a standard 9-pin straight serial cable RS-232 port, using a USB to serial converter cable. In this case, installation of a
device driver provided by the cable manufacturer may be required.
Note: RS-232 communications are limited to max 15 m (50 ft.), VGA communicationare limited to max 20 m (65 ft.), HDMI communication are limited to max 20 m (65ft.).
USBUSB-A for 5V, 1.5A for service functions.
Mini USBUSB-B for service functions.
AC PowerPlug the female end of the power cord to the AC receptacle located on the left handside of the projector (100-240 V AC, 50-60 Hz) and the other end into a grounded ACoutlet. An high-quality surge protector is recommended while a UPS is optional.
CRYSTAL4User Guide
20

Switching On and OffSwitching On
I. Securely connect the power cord supplied and the signal cable. When con-nected, the Power LED will turn red.
II. Turn on the projector by pressing button either on the back panel of the pro-jector or the “ | ” button on remote control. The power LED will now turn blue.The startup screen will display in approximately 20 seconds.
III. Turn on and connect the source that you want to display on the screen (com-puter, notebook, video player, etc). The projector will detect the source auto-matically. If not, read the following note.
Note: if you connect multiple sources at the same time, press the “SOURCE” buttonon the back panel or the direct source keys on the remote control to switch betweeninputs.
Switching OffI. Press the button on the remote control or button on the back panel of
the projector one time. The following message will be displayed on the screen.
Press the button on the remote control, or the on the back panel again toconfirm, otherwise the message will disappear after 15 seconds. When you pressthe button for the second time, the projector will shut down (the interval be-tween pressing has to be around one second to turn off the projector).
II. The cooling fans continue to operate for about 10 seconds for cooling cycle andthe Power LED will flash blue. When the Power LED lights solid red, the projec-tor has entered in standby mode. If you wish to turn the projector back on, youmust wait until the projector has completed the cooling cycle and has enteredstandby mode. Once in standby mode, simply press the button on the backpanel or the “ | “ on the remote control to restart the projector.
III. Disconnect the power cord from the electrical outlet and the projector.
Warning: Do not turn on the projector immediately following a power off procedure.
CRYSTAL4User Guide
21

LED indicatorsUsual projector status
MESSAGE POWER LED(green)
Temp LED(Red)
LAMP LED(Red)
Standby State (Input power cord) On
Off OffPower On (Warming) FlashingPower On and Lamp Lighting Steady LightPower Off (Cooling) Flashing
Error projector status
MESSAGE DetailPOWER LED
(green)
TempLED
(Red)
LAMP LED(Red)
Temperature
Over temperatureOff On Off
Ballast T1 Over temp. Flashing – 1 blinksGeneric Ballast over t. Flashing – 5 blinks
OffFlashing – 1 blinks
Thermal Break Sensor Flashing – 4 blinks OffLamp Power On Lamp fail
Flashing – 5 blinks OffOff
Lamp fail while working Flashing – 5 blinksLamp voltage too low Flashing – 7 blinks
Fans Fan blower locked Flashing – 5 blinks
Off
Flashing – 6 blinksFan blower error
Flashing – 6 blinks
Flashing – 1 blinksLamp fan error Flashing – 2 blinksPower fan error Flashing – 3 blinksEngine fan error Flashing – 4 blinksFPGA fan error Flashing – 5 blinks
CRYSTAL4User Guide
22
Engine Fan
FPGA Fan
Lamp Fan
Blower Fan
Power Fan
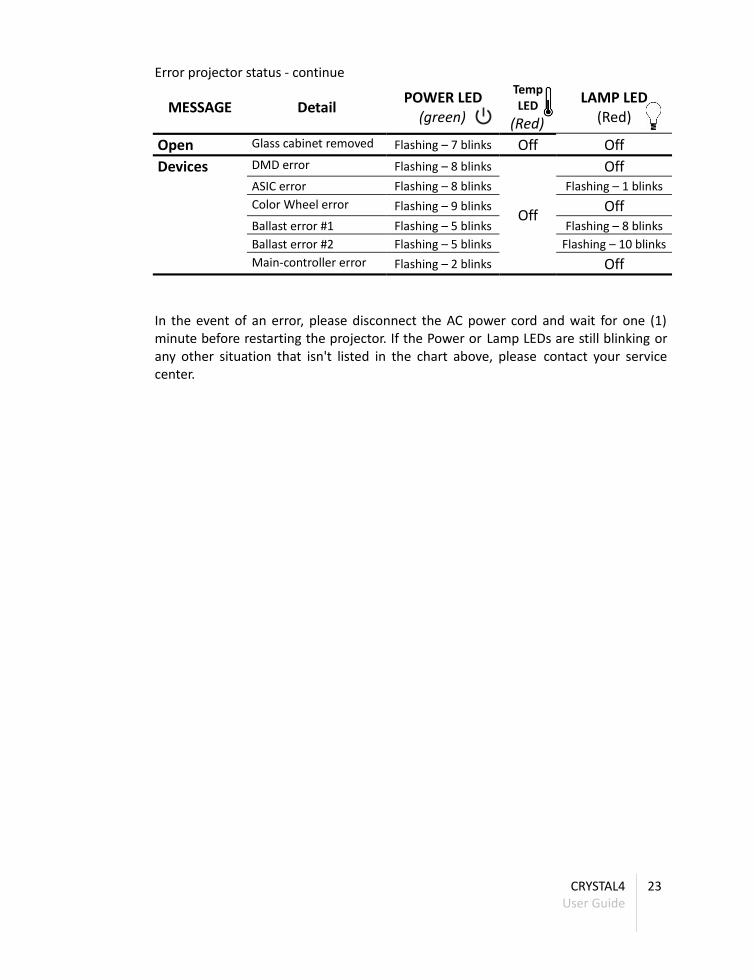
Error projector status - continue
MESSAGE DetailPOWER LED
(green)
TempLED
(Red)
LAMP LED(Red)
Open Glass cabinet removed Flashing – 7 blinks Off OffDevices DMD error Flashing – 8 blinks
Off
OffASIC error Flashing – 8 blinks Flashing – 1 blinksColor Wheel error Flashing – 9 blinks OffBallast error #1 Flashing – 5 blinks Flashing – 8 blinksBallast error #2 Flashing – 5 blinks Flashing – 10 blinksMain-controller error Flashing – 2 blinks Off
In the event of an error, please disconnect the AC power cord and wait for one (1)minute before restarting the projector. If the Power or Lamp LEDs are still blinking orany other situation that isn't listed in the chart above, please contact your servicecenter.
CRYSTAL4User Guide
23
• Operation
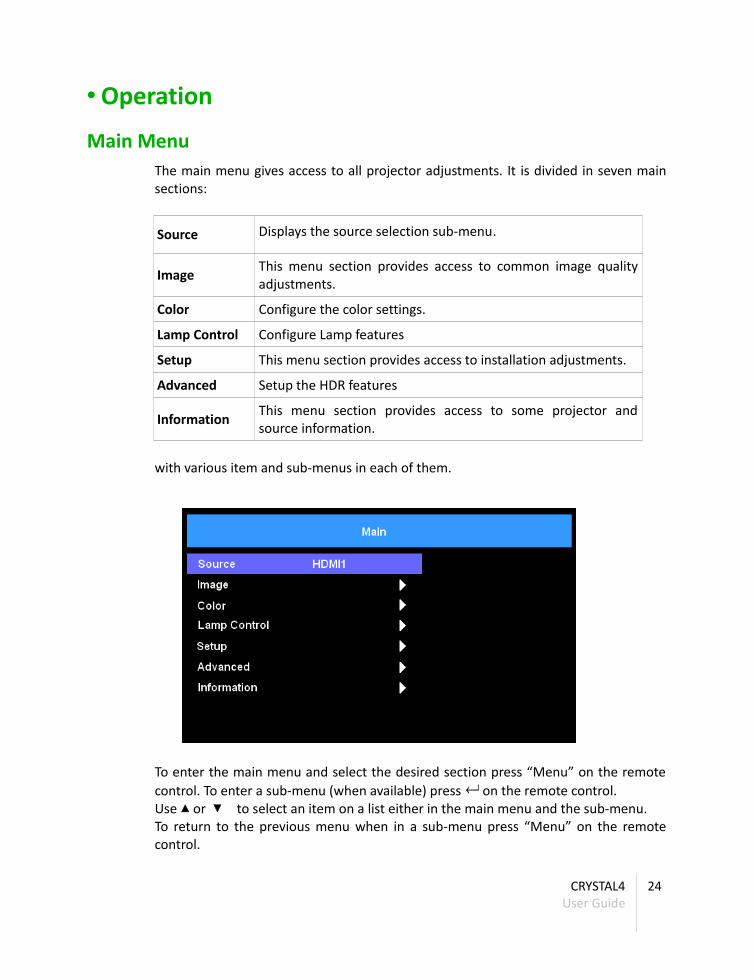
Main MenuThe main menu gives access to all projector adjustments. It is divided in seven mainsections:
Source Displays the source selection sub-menu.
Image This menu section provides access to common image qualityadjustments.
Color Configure the color settings.
Lamp Control Configure Lamp features
Setup This menu section provides access to installation adjustments.
Advanced Setup the HDR features
Information This menu section provides access to some projector andsource information.
with various item and sub-menus in each of them.
To enter the main menu and select the desired section press “Menu” on the remotecontrol. To enter a sub-menu (when available) press ↵ on the remote control. Use ▴ or ▾ to select an item on a list either in the main menu and the sub-menu.To return to the previous menu when in a sub-menu press “Menu” on the remotecontrol.
CRYSTAL4User Guide
24
To select menu items press ◂ ▸ on the remote control. To turn off the main menupress “Menu” on the remote control. Use ◂, ▸ to change settings on a selected item.
Note: Depending on the selected input source and signal characteristics, some adjust-ments may not be available.
Image and Setup menu sections provide access to most commonly-used projector ad-justments. Note that, in Image menu: you can enter these sections only when an image is displayed; the controls in these sections only operate on the active input; when you select another input all the settings in these sections are automatically
saved; each time you select an input the previously saved settings for that input or mode
CRYSTAL4 will be automatically recalled;Setup section provide access to installation and OSD adjustments. The settings inthese sections are global (for all inputs and modes, not just the active one).
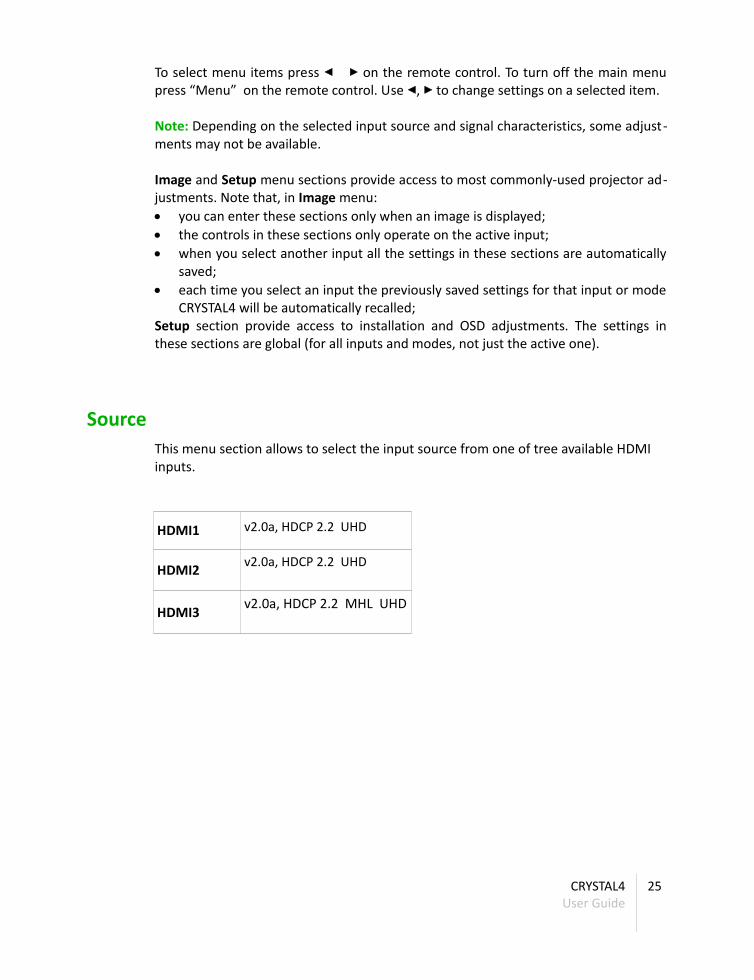
SourceThis menu section allows to select the input source from one of tree available HDMI inputs.
HDMI1 v2.0a, HDCP 2.2 UHD
HDMI2 v2.0a, HDCP 2.2 UHD
HDMI3 v2.0a, HDCP 2.2 MHL UHD
CRYSTAL4User Guide
25

Image
Picture ModeThere are many factory presets optimized for various types of images:Movie: default settings for home theater.Presentation: this mode is suitable for showing PowerPoint presentations when theprojector is connected to the PC. Day: Optimizes picture and color settings for a room with a normal daylight. Night: Optimizes picture and color settings for a room with dim lighting. User: user's settings.
Note: When the projector recognize an HDR content, in the signal, it will switched tothe HDR mode. If this will not happens, the user can force the HDR view, pressing the“HDR” button in the Remote Control.
GammaDetermines the projector response to the gray scale, emphasizing or attenuating the different grades of brightness (blacks, dark, medium and light grays, whites) in the projected image. Choose the setting that is appropriate to the type of video source, the ambient lighting and your subjective preferences. This allow you to set up gamma curve type. After the initial setup and fine tuning is completed, utilize the Gamma adjustment steps to optimize you image output.The available settings are:
CRYSTAL4User Guide
26
2.2: for standardized setting 2.4: for video or TV source 2.0/1.8: for specific PC/Photo source S-curve: increase the contrast and the saturation
BrightnessAdjust the brightness of the image.Use this control to adjust the darker areas of the picture (black level), without affect-ing bright areas. Increasing the value will give more detail in darker parts of the pic-ture. For correct adjustment it may prove useful to display a gray scale test patternwith at least twenty bands. Now try to reduce the brightness of the black band asmuch as possible while ensuring that it can still be distinguished from the adjacentband with brightness slightly higher than black. Alternatively use a scene composed ofblack objects alongside other dark colored objects and try to ensure that all the ob-jects can be separately identified.Press ◂ to darken the imagePress ▸ to lighten the image Range [0 .. 100]
ContrastThe contrast controls the degree of difference between the lightest and darkest partsof the picture. Use this control to adjust the image's white level without affecting itsdark areas. For correct adjustment it may prove useful to display a gray scale test pat-tern with at least twenty bands. Now try to increase the brightness of the white bandas much as possible while ensuring that it can still be distinguished from the adjacentband with brightness slightly less than white. Alternatively use a scene composed ofwell-lit white objects surrounded by light objects with lower level lighting, and try toensure that all the objects can be separately identified.Press ◂ to decrease the contrastPress ▸ to increase the contrastRange [0 .. 100]
SaturationAdjust a video image from black and white to fully saturated color.This control (also called Saturation) increases or decreases the picture color intensity.When set to zero, color images are shown in black and white. Increase the value untilthe colors appear natural: suitable references include skin tones and the green ingrass in landscape shots.Press ◂ to decrease the color saturation in the imagePress ▸ to increase the color saturation in the imageRange [0 .. 100]Note: Color is only supported for composite and component sources.
CRYSTAL4User Guide
27
HueAdjust the color balance of red and greenThis adjustment controls the purity of colors. Basically it determines the red-green ra-tio of the picture. Decreasing the value increases the red content of the image, in-creasing it increases the green content. For this adjustment use skin tones or a testcard image with color bars as a reference. This adjustment is primarily used for NTSCsourced material.Press ◂ to increase the amount of green in the image Press ▸ to increase the amount of red in the imageRange [0 .. 100]Note: Tint is only supported for composite and component sources.
SharpnessAdjust the sharpness of the image.This adjustment increases or decreases the level of picture detail. When the sharpnessvalue is reduced the image details appear less pronounced, while increasing the valueraises image definition, making the outline of objects sharper. Note that an excessivelylarge value may result in a noisy picture and the outline of images will have a highamount of edge enhancement.Press ◂ to decrease the sharpnessPress ▸ to increase the sharpnessRange [0 .. 10]
FreezeDisplay the quick menu to enable or disable the Freeze function.
ResetPress the button ↵ to overwrite, with default values, the current picture mode setup.
CRYSTAL4User Guide
28

ColorThis menu give the possibility to adjust the projector color settings, as the selection ofColor temperature and the single setup for any primaries and secondaries colors.Press the ↵ to enter the menu and then use ▴ or ▾ to select item.
Color TemperatureSelect a color temperature from “Warm”, “Normal”, “Cold”.
Warm is a white point D65 Normal is a white point D75 Cold is a white point D83
HSGThis function allows to customize the Color Gamut by the user, adjusting each color by its Hue, Saturation, and Gain. Hue is the primary characteristic of color that allows us to distinguish one colorfrom another. A color's hue is represented on the CIE chart by its angle to thewhite point. When a color's hue is off, its appearance will seem contaminated byother colors. For example, red that is too yellowish will begin to seem orange. Bluethat is too reddish will begin to appear purplish.Saturation is the colorfulness of the color independent of its luminance. A color'ssaturation displays on the CIE chart as the distance from the white point. Addsaturation to a color and it will appear deeper and richer-red becomes crimson.Under saturate a color and it will appear less colorful, but at the same level ofintensity: red becomes pink.Gain is the intensity of color.
CRYSTAL4User Guide
29

Press the ↵ to enter the menu and then use ▴ or ▾ to select item.Select one of the colors (Red/Green/Blue/Cyan/Magenta/Yellow/White) to adjust its Hue, Saturation and Gain.Press ◂ to decrease the valuePress ▸ to increase the valueRange [0 .. 199]
ResetPress the button ↵ to overwrite, with default values, all the hue, saturation and gainvalues, for any colors.
Lamp Control
This menu change the Lamp Power Mode setup and allows to reset the lamp hours.This last setup becomes useful when the user perform a lamp replacement.
Power ModePress the button ↵ to enter the menu and then use ▴ or ▾ to select item. This function allows you to choose Boost or Default values; it is intentionally disabledduring the lamp warm up (about 2 minutes). Boost
The displayed image is in higher brightness mode. Default
The displayed image is in lower brightness mode. This save the lamp life.
Lamp Hour ResetPress the button ↵ to execute the reset operation.This function is normally used after replacing the lamp.
CRYSTAL4User Guide
30

SetupThis menu section provides access to installation adjustments.
Aspect RatioThis adjustment changes the dimensions and aspect ratio (relationship between widthand height) of the displayed image. There are six default aspects available. You can se-lect a different aspect for each source: the selected aspect ratio will be automaticallyapplied the next time the relative source is displayed.
The following aspects are available: Fill: this format is the default value which stretches the image to fit the content
box, regardless of its aspect-ratio. 4:3: this format is for 4x3 input sources. 16:9: this format is for 16x9 input sources, like HDTV and DVD enhanced for
widescreen TV. 16:10: this format is for 16x9 input sources, like some widescreen PC resolution. Native: this format displays the original image without scaling. 2.35:1: this format is for some letterbox aspect format DVDs or anamorphic DVDs
and HDTV source. Use it with anamorphic lens and 2.35:1 screen format.
High Altitudewhen “On” is selected, the fans will spin faster. This feature is useful in high altitudeareas where the air is thin.
CRYSTAL4User Guide
31

OrientationSelects the orientation of the projected image. Press ↵ to select one the four preset orientation. Use arrow buttons to switch be-tween the four presets. Front-Table: this is the default selection. The image is projected straight on the
screen. Rear-Table: when selected, the image will appear reversed Front-Ceiling: when selected, the image will turn upside down Rear-Ceiling: when selected, the image will appear reversed in upside down posi-
tionNote: Rear-Table and Rear-Ceiling are to be used with a translucent screen.
Auto Power OffSelects to activate the Auto Power Off timer. The countdown timer will start whenthere is no signal being sent to the projector. The projector will automatically poweroff when the countdown has finished.
Auto Power OnChoose “On” to activate the Auto Power On mode. The projector will automaticallypower on when AC power is supplied, without pressing the “Power” key on the pro-jector keypad or on the remote control.
Startup LogoUse this function to set the desired startup screen. If changes are made, they will takeeffect the next time the projector is powered on. Select “On” for the SIM2 startupscreen or “Off” to do not have the logo displayed on startup screen. Selects to viewthe start-up logo, displayed on the screen, when the projector is in warm-up status.
Blank ScreenUse this function to display a Black, Purple, Blue or White color when no signal is avail-able.
Auto SourceSelect to enable or disable the automatic source detection.
Menu SettingsThis menu give the possibility to change some OSD menu proprieties. Language: selects the desired OSD language. It can display the menus in Multilan-
guage. Use ▴ or ▾ to select your preferred language. Press ↵ to finalize the selec-tion. Select a language between English, French, Spanish, German, Portuguese,Italian, Chinese simplified, Chinese Traditional, Japanese, and Korean.
Menu position: adjust the zoom in the projected image. Its possible values are Top Left, Top Right, Bottom Left, Bottom Right and Center.
Time out: set the duration where the OSD menu stay visible on the screen.
CRYSTAL4User Guide
32
Select “Always” to keep the OSD menu, until you change the OSD status, pressing a button in the remote control or keypad. Select 10, 30 seconds and 60 seconds toinsert a countdown timer.
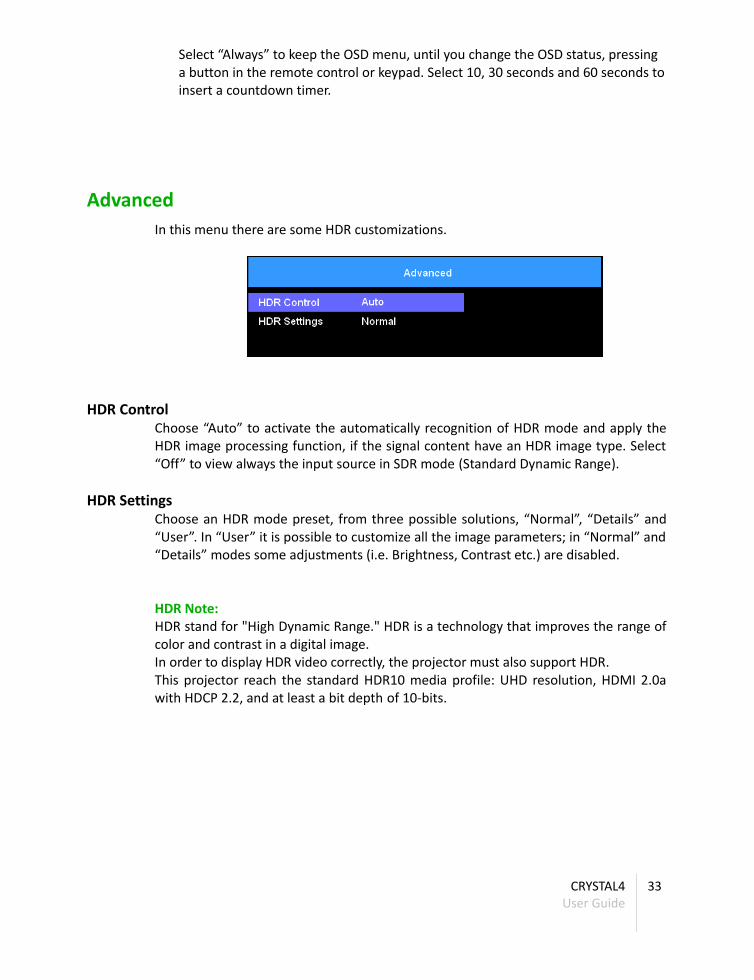
AdvancedIn this menu there are some HDR customizations.
HDR ControlChoose “Auto” to activate the automatically recognition of HDR mode and apply theHDR image processing function, if the signal content have an HDR image type. Select“Off” to view always the input source in SDR mode (Standard Dynamic Range).
HDR SettingsChoose an HDR mode preset, from three possible solutions, “Normal”, “Details” and“User”. In “User” it is possible to customize all the image parameters; in “Normal” and“Details” modes some adjustments (i.e. Brightness, Contrast etc.) are disabled.
HDR Note:HDR stand for "High Dynamic Range." HDR is a technology that improves the range ofcolor and contrast in a digital image. In order to display HDR video correctly, the projector must also support HDR. This projector reach the standard HDR10 media profile: UHD resolution, HDMI 2.0awith HDCP 2.2, and at least a bit depth of 10-bits.
CRYSTAL4User Guide
33

InfoThis menu section provides access to some projector information.
Model Name: projector model name. Software version 1: is the (scaler) Main processor's software version. Software version 2: is the DLP's software version. Software version 3: is the MCU processor's software version. This is the stand-by
microprocessor. Active source: is the input source selected. Signal Format: it displays signal resolution and frequency and reports in case of
HDR content HDR label. Lamp Hours: it shows the number of hours the lamp has been in use.
Reset AllPress the ↵ to return the factory default settings for any menus parameter.
CRYSTAL4User Guide
34
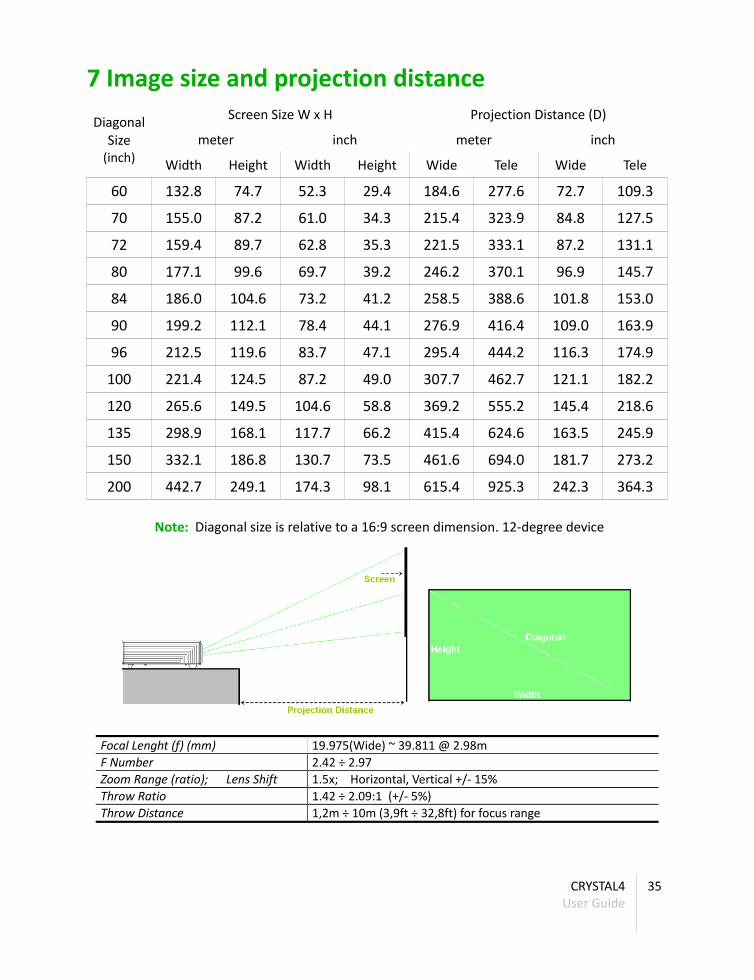
7 Image size and projection distanceDiagonal
Size(inch)
Screen Size W x H Projection Distance (D)
meter inch meter inch
Width Height Width Height Wide Tele Wide Tele
60 132.8 74.7 52.3 29.4 184.6 277.6 72.7 109.3
70 155.0 87.2 61.0 34.3 215.4 323.9 84.8 127.5
72 159.4 89.7 62.8 35.3 221.5 333.1 87.2 131.1
80 177.1 99.6 69.7 39.2 246.2 370.1 96.9 145.7
84 186.0 104.6 73.2 41.2 258.5 388.6 101.8 153.0
90 199.2 112.1 78.4 44.1 276.9 416.4 109.0 163.9
96 212.5 119.6 83.7 47.1 295.4 444.2 116.3 174.9
100 221.4 124.5 87.2 49.0 307.7 462.7 121.1 182.2
120 265.6 149.5 104.6 58.8 369.2 555.2 145.4 218.6
135 298.9 168.1 117.7 66.2 415.4 624.6 163.5 245.9
150 332.1 186.8 130.7 73.5 461.6 694.0 181.7 273.2
200 442.7 249.1 174.3 98.1 615.4 925.3 242.3 364.3
Note: Diagonal size is relative to a 16:9 screen dimension. 12-degree device
Focal Lenght (f) (mm) 19.975(Wide) ~ 39.811 @ 2.98mF Number 2.42 ÷ 2.97 Zoom Range (ratio); Lens Shift 1.5x; Horizontal, Vertical +/- 15%Throw Ratio 1.42 ÷ 2.09:1 (+/- 5%)Throw Distance 1,2m ÷ 10m (3,9ft ÷ 32,8ft) for focus range
CRYSTAL4User Guide
35

8 Compatibility ModesComputer/Video/HDMI/Mac Compatibility
Signal Resolution Refresh Rate (Hz) RGB YUVNTSC 720 x 480 60 -
PAL/SECAM 720 x 576 50 -SDTV 576p 720 x 576 50 -SDTV 480p 720 x 480 60 -
SDTV1440 x 480i 60
1440 x 576i 50
VGA 640 x 480 59.94/ 74.99/ 85 -MAC 640 x 480 66.59 -SVGA 800 x 600 60.3/ 75/ 85.06 -MAC 832 x 624 74.54 -XGA 1024 x 768 60/ 75/ 85 -
HDTV (720p)1280 x 720 47.95 -1280 x 768 60 -1280 x 720 50/ 59.94/ 60
WXGA1280 x 800 60 -1280 x 960 60 -1366 x 768 60 -
WXGA+ 1440 x 900 60 -SXGA 1280 x 1024 60/ 75/ 85 -
SXGA+ 1400 x 1050 60 -WSXGA+ 1680 x 1050 59.94 -
UXGA 1600 x 1200 60 -
HDTV (1080p)
1920 x 1080 47.95 -1920 x 1080 23.98/ 24/ 25
1920 x 1080 29.97/ 30
1920 x 1080 50/ 59.94/ 60
HDTV (1080i) 1920 x 1080 50/ 59.94/ 60
WUXGA 1920 x 1200 50/ 601 -2K 2048 x 1080 24/ 25/ 30/ 50/ 60
UHD3840 x 2160 24/ 25/ 30
3840 x 2160 50/ 608 bits
8 bit/ 10 bit (4:2:2)/12 bit (4:2:2)
4K4096 x 2160 24/ 25 /30
4096 x 2160 50/ 608 bits
8 bit/ 10 bit (4:2:2)/12 bit (4:2:2)
1: 1920 X 1200 @ 60 Hz only support RB (reduced blanking).
CRYSTAL4User Guide
36
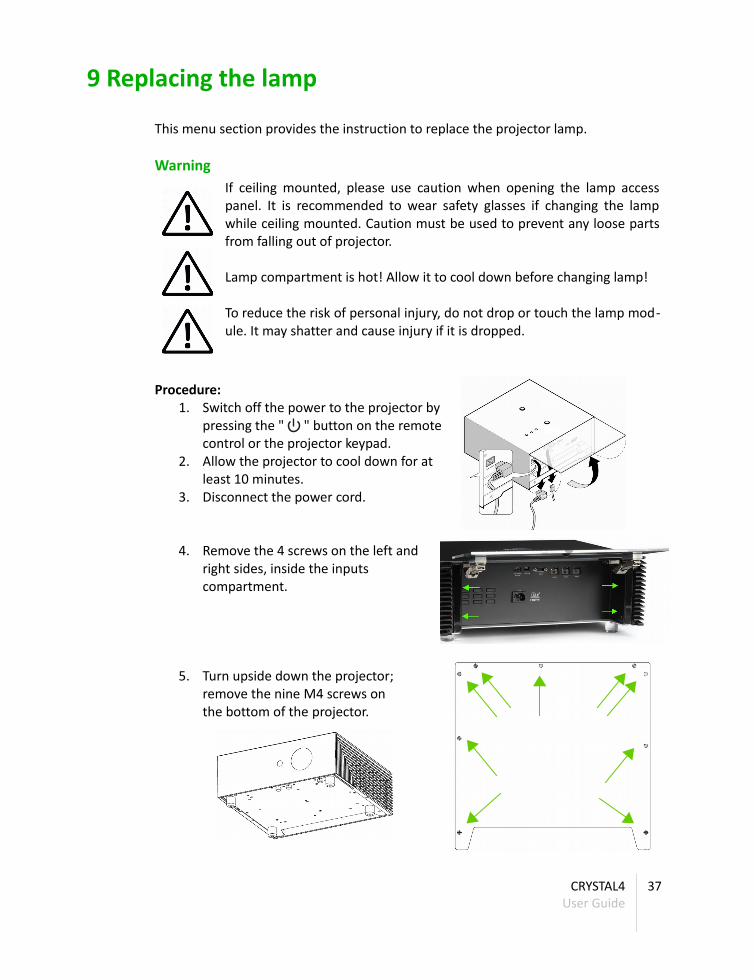
9 Replacing the lamp
This menu section provides the instruction to replace the projector lamp.
Warning If ceiling mounted, please use caution when opening the lamp accesspanel. It is recommended to wear safety glasses if changing the lampwhile ceiling mounted. Caution must be used to prevent any loose partsfrom falling out of projector.
Lamp compartment is hot! Allow it to cool down before changing lamp!
To reduce the risk of personal injury, do not drop or touch the lamp mod-ule. It may shatter and cause injury if it is dropped.
Procedure:1. Switch off the power to the projector by
pressing the " " button on the remotecontrol or the projector keypad.
2. Allow the projector to cool down for atleast 10 minutes.
3. Disconnect the power cord.
4. Remove the 4 screws on the left andright sides, inside the inputscompartment.
5. Turn upside down the projector;remove the nine M4 screws on the bottom of the projector.
CRYSTAL4User Guide
37

6. Turn the projector in the up right position and remove the glass cabinet
7. Unscrew the 3 screws on the lamp module (a).
8. Lift the module handle up (b).
9. Pull firmly on the module handle to remove the lamp module (c).
CRYSTAL4User Guide
38
a)
b)
c)
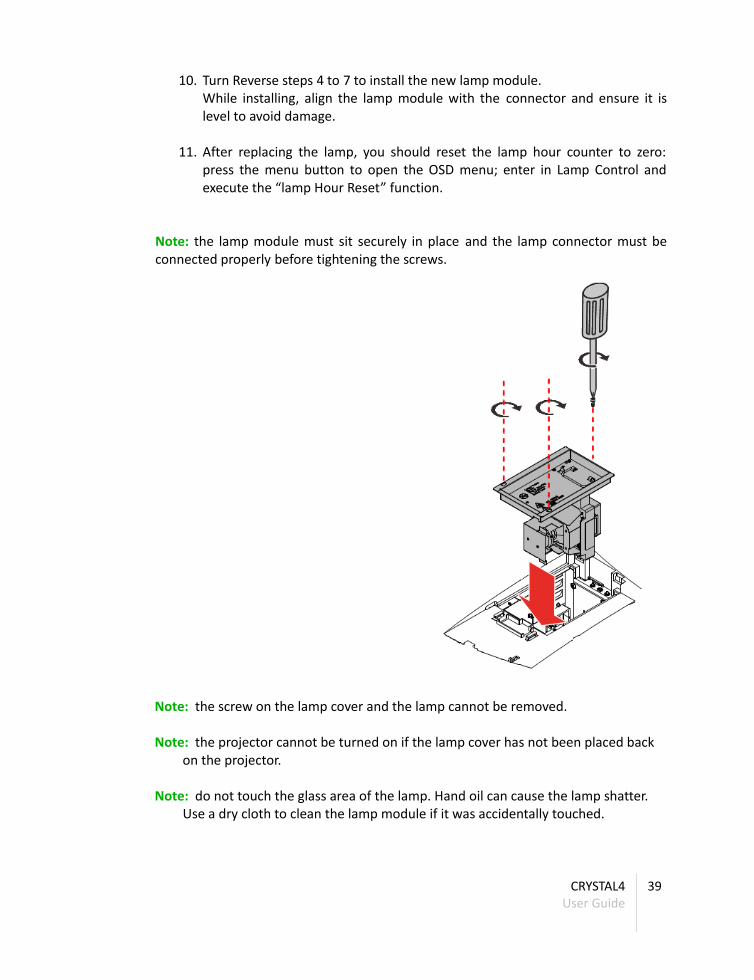
10. Turn Reverse steps 4 to 7 to install the new lamp module. While installing, align the lamp module with the connector and ensure it islevel to avoid damage.
11. After replacing the lamp, you should reset the lamp hour counter to zero:press the menu button to open the OSD menu; enter in Lamp Control andexecute the “lamp Hour Reset” function.
Note: the lamp module must sit securely in place and the lamp connector must beconnected properly before tightening the screws.
Note: the screw on the lamp cover and the lamp cannot be removed.
Note: the projector cannot be turned on if the lamp cover has not been placed back on the projector.
Note: do not touch the glass area of the lamp. Hand oil can cause the lamp shatter. Use a dry cloth to clean the lamp module if it was accidentally touched.
CRYSTAL4User Guide
39

10 Adjusting the volume
The volume control appears on the display when is pressed the button “Volume” (A).
Press the ◄► buttons on the keypad or remote control to adjust Volume +/-. Press the MUTE button to turn off the volume. (This feature is available only on the re-mote).
CRYSTAL4User Guide
40
A)
B)
B)C)

11 How to install a ceiling bracket with Crystal4
This quick guide explains how to install a ceiling bracket to the CRYSTAL4 projector.
• Even if it is not strictly necessary, you can remove the 4 feet (only for aesthetics matter).
• To install the bracket remove the 4 screws underneath the projector, indicated by the red circles.
• Attach bracket by using 4 x M4 screws and referring to the user guide of bracket;consider that the max depth of the holes for the fixing is 10 mm.
For ceiling mounting use only SIM2-approved ceiling brackets and adhere to theinstallation instructions and safety guidelines provided with the bracket. Do not over-tighten the screws.
CRYSTAL4User Guide
41
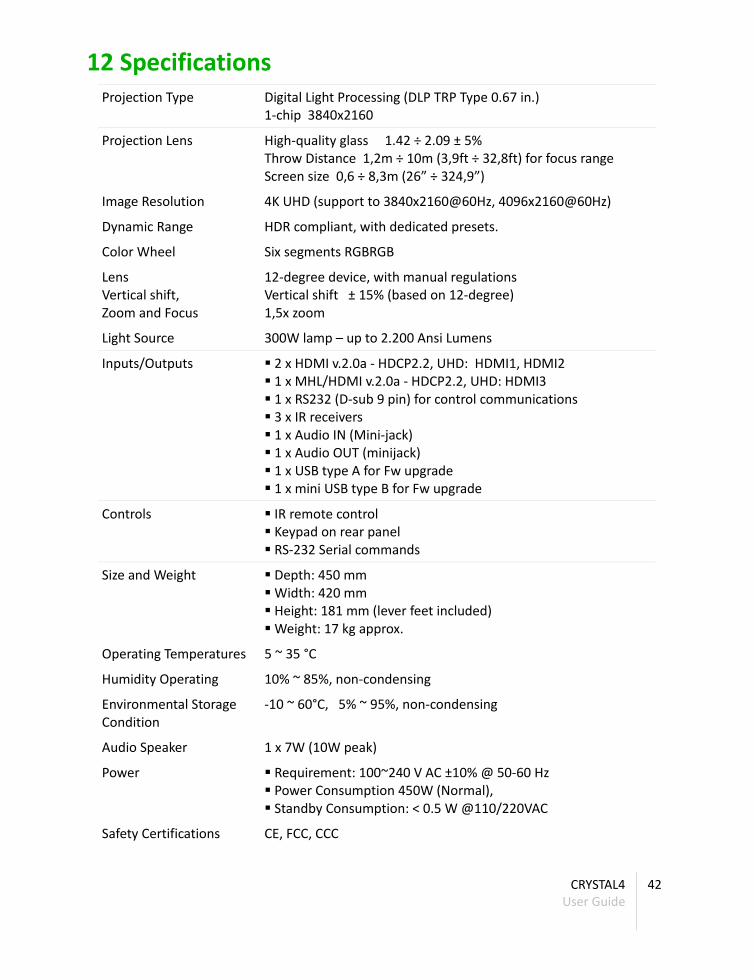
12 SpecificationsProjection Type Digital Light Processing (DLP TRP Type 0.67 in.)
1-chip 3840x2160
Projection Lens High-quality glass 1.42 ÷ 2.09 ± 5%Throw Distance 1,2m ÷ 10m (3,9ft ÷ 32,8ft) for focus rangeScreen size 0,6 ÷ 8,3m (26” ÷ 324,9”)
Image Resolution 4K UHD (support to 3840x2160@60Hz, 4096x2160@60Hz)
Dynamic Range HDR compliant, with dedicated presets.
Color Wheel Six segments RGBRGB
Lens Vertical shift, Zoom and Focus
12-degree device, with manual regulations Vertical shift ± 15% (based on 12-degree)1,5x zoom
Light Source 300W lamp – up to 2.200 Ansi Lumens
Inputs/Outputs 2 x HDMI v.2.0a - HDCP2.2, UHD: HDMI1, HDMI2 1 x MHL/HDMI v.2.0a - HDCP2.2, UHD: HDMI3 1 x RS232 (D-sub 9 pin) for control communications 3 x IR receivers 1 x Audio IN (Mini-jack) 1 x Audio OUT (minijack) 1 x USB type A for Fw upgrade 1 x mini USB type B for Fw upgrade
Controls IR remote control Keypad on rear panel RS-232 Serial commands
Size and Weight Depth: 450 mm Width: 420 mm Height: 181 mm (lever feet included) Weight: 17 kg approx.
Operating Temperatures 5 ~ 35 °C
Humidity Operating 10% ~ 85%, non-condensing
Environmental Storage Condition
-10 ~ 60°C, 5% ~ 95%, non-condensing
Audio Speaker 1 x 7W (10W peak)
Power Requirement: 100~240 V AC ±10% @ 50-60 Hz Power Consumption 450W (Normal), Standby Consumption: < 0.5 W @110/220VAC
Safety Certifications CE, FCC, CCC
CRYSTAL4User Guide
42
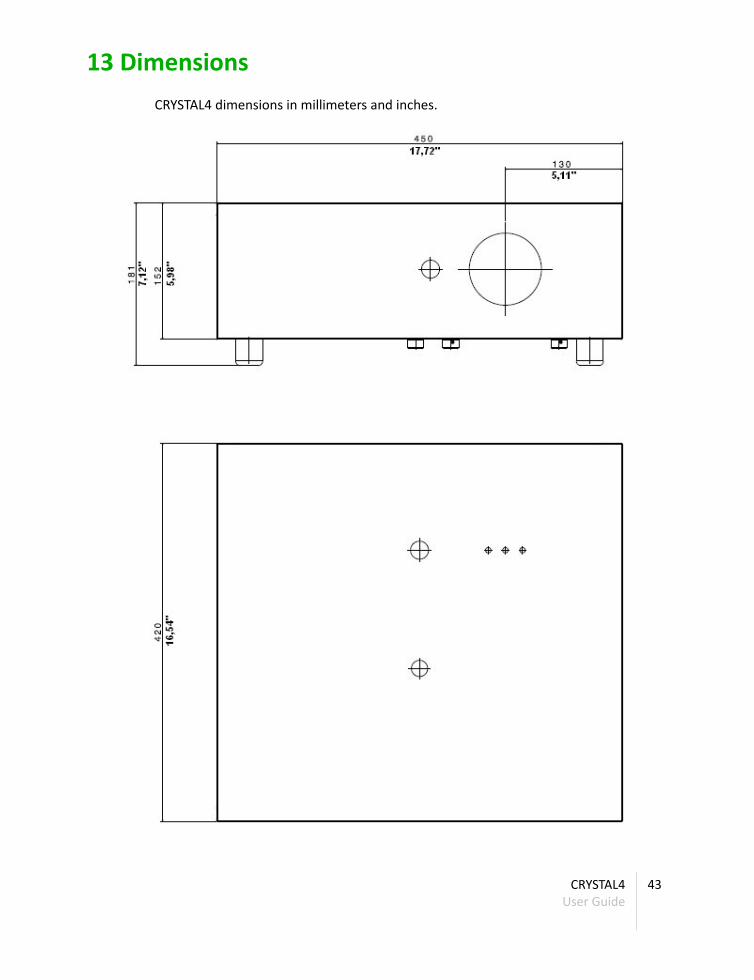
13 DimensionsCRYSTAL4 dimensions in millimeters and inches.
CRYSTAL4User Guide
43

SIM2 International S.r.l.Viale Lino Zanussi, 11 33170 Pordenone – ITALYPhone: + 39 0434 383292 Fax: +39 0434 383260Email: [email protected]
SIM2 USASIM2 USA Inc.10216 NW 47th StreetSunrise, FL 33351Phone: +1 (954) 442 2999Email: [email protected]
SIM2 BRIONVEGA Co., LtdRoom 303-304, No. 244 Liaoning RoadShanghai 200080 – CNPhone/Fax: 86 1 62881991Email: [email protected]
461240000(EN/1.4)
CRYSTA
User Guide
44


![User Guide...User. {{]}]} {}]}](https://img.dokumen.tips/doc/110x75/60918ca14327954d24291644/-user-guide-user-.jpg)