Embed Size (px)
Citation preview

CRiSis™ SystemDefibrillation Chest Skin
LF03652UInstruction Manual
Products by Nasco
SystemDefibrillation Chest Skin
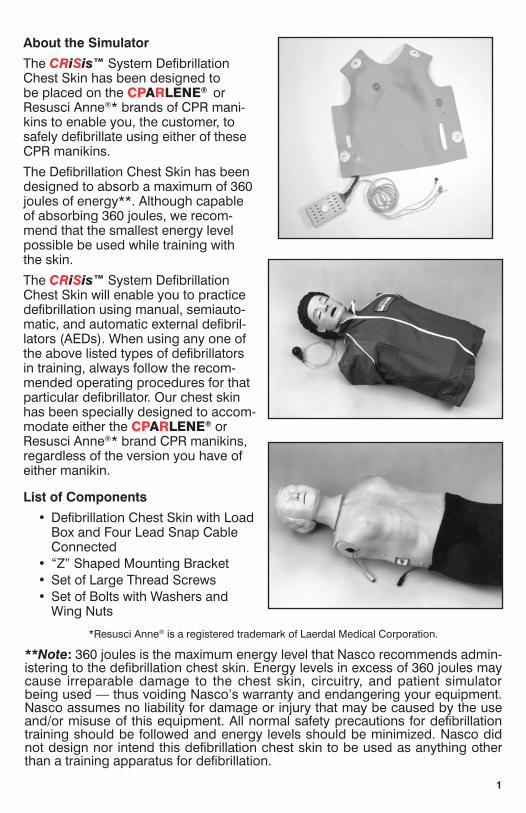
About the Simulator
The CRiSis™ System Defibrillation Chest Skin has been designed to be placed on the CPARLENE® or Resusci Anne®* brands of CPR mani-kins to enable you, the customer, to safely defibrillate using either of these CPR manikins.
The Defibrillation Chest Skin has been designed to absorb a maximum of 360 joules of energy**. Although capable of absorbing 360 joules, we recom-mend that the smallest energy level possible be used while training with the skin.
The CRiSis™ System Defibrillation Chest Skin will enable you to practice defibrillation using manual, semiauto-matic, and automatic external defibril-lators (AEDs). When using any one of the above listed types of defibrillators in training, always follow the recom-mended operating procedures for that particular defibrillator. Our chest skin has been specially designed to accom-modate either the CPARLENE® or Resusci Anne®* brand CPR manikins, regardless of the version you have of either manikin.
List of Components
•DefibrillationChestSkinwithLoad BoxandFourLeadSnapCable Connected • “Z”ShapedMountingBracket •SetofLargeThreadScrews •SetofBoltswithWashersand Wing Nuts
*Resusci Anne®isaregisteredtrademarkofLaerdalMedicalCorporation.
**Note: 360 joules is the maximum energy level that Nasco recommends admin-istering to the defibrillation chest skin. Energy levels in excess of 360 joules may cause irreparable damage to the chest skin, circuitry, and patient simulator being used — thus voiding Nasco’s warranty and endangering your equipment. Nasco assumes no liability for damage or injury that may be caused by the use and/or misuse of this equipment. All normal safety precautions for defibrillation training should be followed and energy levels should be minimized. Nasco did not design nor intend this defibrillation chest skin to be used as anything other than a training apparatus for defibrillation.
1

Set Up
The CRiSis™ System Defibrillation Chest Skin has been designed to replace the standard outer chest skin on the CPARLENE® and the Resusci Anne®* brand CPR manikins, thus enabling you to safely defibrillate these types of CPR manikins.
Please follow the setup procedures for the type of manikin on which you wish to place the CRiSis™ System Defibrillation Chest Skin.
Resusci Anne®* installation instruc-tions begin on this page.
CPARLENE® installation instructions begin on page 4.
For those of you who have purchased the complete CRiSis™ manikin, your load box has already been installed for you. You can skip over the setup procedures and go to the operating instructions on page 5.
Resusci Anne®* Installation Instructions
Regardless of the type or version of Resusci Anne®* you have, you will be able to use our CRiSis™ System Defibrillation Chest Skin. Simply follow along with the installation procedures.
Removing the Regular Chest Skin
In order to install our Defibrillation Chest Skin, you must first remove the outer chest skin that is currently in place on your CPR manikin.
Installing the Load Box
The next step is to install the load box for the defibrillation chest skin. The load box is the box attached to the skin via one large cable and a smaller cable with four lead snaps attached.
This is the device that will absorb the energy being administered to the chest skin during defibrillation.
Note: It is very important that this load box is installed properly!
The first step is to determine the type of Resusci Anne®* you have. Don’t worry, our skin works with all the vari-ous versions, although the installation techniques may vary. No extra tools are needed; we have provided everything you will need.
Liftoutthechestplatefromthemani-kin. This will enable you to see down inside the manikin.
*Resusci Anne®isaregisteredtrademarkofLaerdalMedicalCorporation.
2

Once the chest plate has been removed, you will need to determine if you have an electronic version or the basic (non-electronic version) of Resusci Anne®*.
As you can see from the photos, the electronic version has a battery pack in the lower right hand corner of the chest cavity. The basic does not.
To install the load box in the electronic version, simply remove the top of the battery pack and screw our load box down onto the threaded screw sticking up through the battery pack.
Now your load box is secure.
If you have a basic Resusci Anne®* (without the battery pack), the load box must be attached to the back plate of the manikin using the bracket and bolts provided with the chest skin. The back plate is the flat part of the manikin that the legs screw into when attached to the manikin.
We have included with the chest skin abagofhardwareanda“Z”shapedbracket. This bracket should be screwed down tight to the back plate on the right hand side using the screws provided.
*Resusci Anne®isaregisteredtrademarkofLaerdalMedicalCorporation.
3
Basic Resusci Anne®*
Electronic Version
If your manikin has legs on it, use the larger threaded screws to attach the bracket.
If you have a torso manikin, simply use the bolts, washers, and wing nuts to secure the bracket.
Once the bracket is in place with the single threaded screw and foam pads pointing towards the inner chest cavity, attach the load box to the screw sticking out and tighten until secure.
Your load box is now in place.
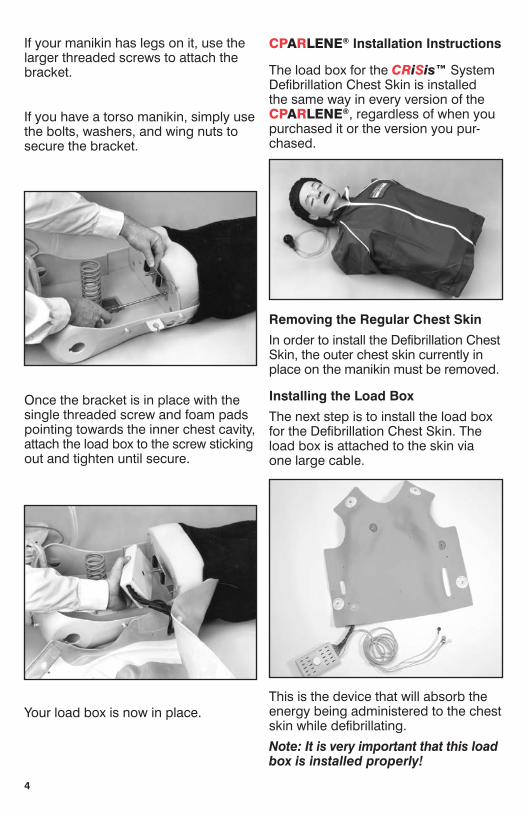
CPARLENE® Installation Instructions
The load box for the CRiSis™ System Defibrillation Chest Skin is installed the same way in every version of the CPARLENE®, regardless of when you purchased it or the version you pur-chased.
Removing the Regular Chest Skin
In order to install the Defibrillation Chest Skin, the outer chest skin currently in place on the manikin must be removed.
Installing the Load Box
The next step is to install the load box for the Defibrillation Chest Skin. The load box is attached to the skin via one large cable.
This is the device that will absorb the energy being administered to the chest skin while defibrillating.
Note: It is very important that this load box is installed properly!
4
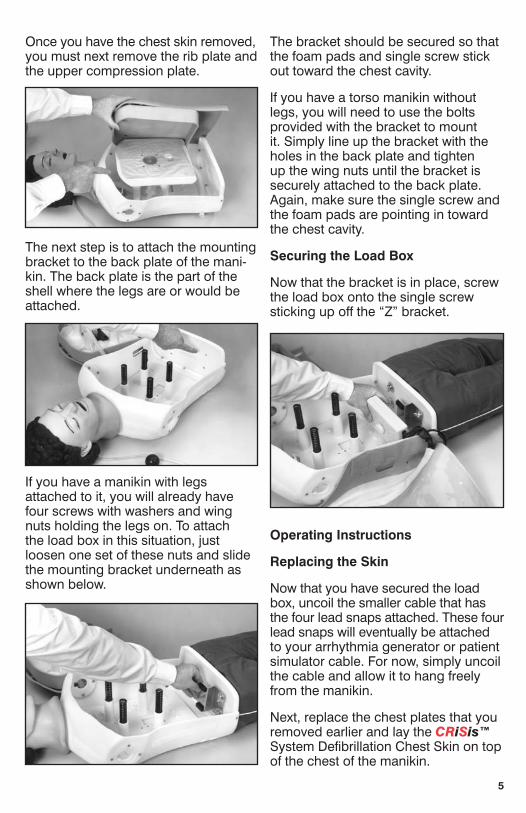
Once you have the chest skin removed, you must next remove the rib plate and the upper compression plate.
The next step is to attach the mounting bracket to the back plate of the mani-kin. The back plate is the part of the shell where the legs are or would be attached.
If you have a manikin with legs attached to it, you will already have four screws with washers and wing nuts holding the legs on. To attach the load box in this situation, just loosen one set of these nuts and slide the mounting bracket underneath as shown below.
The bracket should be secured so that the foam pads and single screw stick out toward the chest cavity.
If you have a torso manikin without legs, you will need to use the bolts provided with the bracket to mount it. Simply line up the bracket with the holes in the back plate and tighten up the wing nuts until the bracket is securely attached to the back plate. Again, make sure the single screw and the foam pads are pointing in toward the chest cavity.
Securing the Load Box
Now that the bracket is in place, screw the load box onto the single screw stickingupoffthe“Z”bracket.
Operating Instructions
Replacing the Skin
Now that you have secured the load box, uncoil the smaller cable that has the four lead snaps attached. These four lead snaps will eventually be attached to your arrhythmia generator or patient simulator cable. For now, simply uncoil the cable and allow it to hang freely from the manikin.
Next, replace the chest plates that you removed earlier and lay the CRiSis™ System Defibrillation Chest Skin on top of the chest of the manikin.
5

If you have a Resusci Anne®*, we have die-cut holes and slots in your chest skin so that it can be stretched over your Resusci Anne®* and attached to the posts.
If you have a CPARLENE®, the hook-and-loop fastener has already been sewn onto the skin. Simply line up the hook-and-loop fastener and you are all set.
Connecting Your Arrhythmia Generator or Patient Simulator
Now that the chest skin and the load box are in place, you will want to con-nect the four lead snap cable to your arrhythmia or patient simulator.
Nasco has designed the CRiSis™ System to be compatible with a variety of patient simulators. This is possible via the standard four lead snap cable. If your patient simulator has only two output posts, the red and black leads must be connected to the patient simu-lator.
*Resusci Anne®isaregisteredtrademarkofLaerdalMedicalCorporation.
If you want to connect the manikin to the simulator that came with your defi-brillator, it is necessary to purchase the corresponding adapters from Nasco separately, if the patient simulator doesn’t have the standard snap con-nectors. (Please see accessories at the end of this manual.)
Once your manikin is connected to your patient simulator, you will be able to pick up the ECG waves either through the monitor hook-ups on the skin or through the two disks attached to the skin on the defibrillation sites.
These disks will enable you to pick up theECGwaveusingeitherthe“QuickLook”paddleoptionordirectlythroughgel pads, just like on a real patient.
It is possible to use AED gel pads with the cable connectors built into the gel — the same ones you use on patients. In an effort to help you save money, Nasco does offer a set of training but-tons that will correspond to your partic-ular AED unit. These buttons are sold separately and can be used over and over again. They come as a set with the patient simulator adapters. (See accessories at the end of this manual.)
6

Troubleshooting:
Problem ECG wave is not being picked up from the manikin.
Solution
1. Check your connections on the patient simulators; one or more may be disconnected.
2. Check to make sure your patient simulator is plugged in and working properly.
Problem ECG wave is inverted.
Solution
Recheck the position of the red and black lead snaps on the patient simulator.
7
Note: If the Defibrillation Chest Skin is not functioning or wiring comes undone, please contact us to repair or replace the unit. Failure to do so, or unauthor-ized repair, may void the warranty or cause further harm or damage to you or your equipment.
Accessories
LF03656U Physio Control Training Pad Adapters and Patient Simulator AdaptersforLifePak10 andLifePak20
LF03657U MarquetteElectronics Training Pad Adapters and Patient Simulator Adapters
LF03658U SpaceLabs/Laerdal/ Heartstart/FirstMedic Training Pad Adapters and Patient Simulator Adapters
LF03961U ZollTrainingCables with Adapters
LF03962U Physio Control Training Cables with Adapters for LifePak12
Note: If you need help selecting the training pad adapters that correspond to your AED unit, please feel free to call us at 1-800-558-9595 for assistance.

COPYRIGHT © NASCO 1994 PRINTED IN U.S.A. NP 76-94/RV 7-12
Other Available SimulatorsLF00698U Adult Injectable Arm (White)LF00855U Male CatheterizationLF00856U Female CatheterizationLF00901U Prostate ExaminationLF00906U Ostomy CareLF00929U Surgical BandagingLF00957U Enema AdministrationLF00958U Pediatric Injectable ArmLF00961U Intramuscular InjectionLF00984U Breast ExaminationLF00995U Arterial Puncture ArmLF00999U Pediatric Injectable HeadLF01005U First Aid Arm LF01008U Intradermal Injection ArmLF01012U Heart Catheterization (TPN)LF01019U Ear ExaminationLF01027U Peritoneal DialysisLF01028U Suture Practice ArmLF01034U Suture Practice LegLF01036U Spinal InjectionLF01037U Hemodialysis Practice ArmLF01038U Episiotomy Suturing SetLF01042U Suture KitLF01062U Pelvic, Normal & AbnormalLF01063U Stump Bandaging, UpperLF01064U Stump Bandaging, LowerLF01069U Cervical EffacementLF01070U Birthing StationLF01082U CricothyrotomyLF01083U Tracheostomy CareLF01084U Sigmoidoscopic ExaminationLF01087U Central Venous CannulationLF01095U Blood Pressure ArmLF01108U Infant Intraosseous InfusionLF01121U Advanced IV ArmLF01131U Venipuncture and Injection ArmLF01139U Advanced IV HandLF01142U Auscultation TrainerLF01143U Testicular ExamLF01152U Male & Female CatheterLF01155U Advanced CPR DogLF01162U Venatech IV TrainerLF01174U NG Tube & Trach Skills
LF01184U Venatech IM & Sub Q LF01193U Special Needs BabyLF03000U CPARLENE® SeriesLF03601U Adult Airway Management Trainer with StandLF03602U Adult Airway Management ManikinLF03609U Child Airway Management Trainer with StandLF03616U Child CRiSis™ ManikinLF03617U Deluxe Child CRiSis™ Manikin with Arrhythmia TutorLF03620U PALS Update KitLF03623U Infant Airway Management Trainer with StandLF03632U Child Intraosseous Infusion/ Femoral Access Leg on a StandLF03633U Child Airway Management Trainer TorsoLF03693U Basic Buddy® CPR ManikinLF03699U “Airway Larry” Airway Management TrainerLF03709U Infant CRiSis™ ManikinLF03720U Baby Buddy™ Infant CPR ManikinLF03750U Fat Old FredLF03760U Airway Management/Cricoid Pressure TrainerLF03770U Chest TubeLF03953U CRiSis™ Manikin, CompleteLF03955U Deluxe CRiSis™ ManikinLF03956U Deluxe “Plus” CRiSis™ ManikinLF03965U Adult CRiSis™ Auscultation ManikinLF03966U Adult CRiSis™ Auscultation Manikin with ECG SimulatorLF04000U GERi™/KERi™ Manikin SeriesLF04200U Adult Sternal Intraosseous InfusionLF06001U CPR Prompt® Adult/Child ManikinLF06012U CPR Prompt® Infant ManikinLF06200U CPR Prompt® Keychain Rescue AidLF06204U CPR Prompt® Rescue and Practice Aid
901 Janesville Avenue, P.O. Box 901Fort Atkinson, Wisconsin 53538-0901
1-800-558-9595eNasco.com • E-mail: [email protected]
Fort Atkinson

![High-energy external defibrillation and transcutaneous ...quire external defibrillation or cardioversion [1]. The feasibility of in-bore defibrillation has been demon-strated in a](https://img.dokumen.tips/doc/110x75/60a040fa5ed69b1bff53b63d/high-energy-external-defibrillation-and-transcutaneous-quire-external-defibrillation.jpg)