Embed Size (px)
Citation preview

Last updated January 2019 © Copyright 2010-2019 JL Technical Group.
Exporter is a registered trademark of JL Technical. All other trademarks mentioned are the property of their respective owners. Reproduction, adaptation or translation without prior written permission is prohibited, except as allowed under the copyright.
Converting from ACT!®
to Salesforce.com®
Using Exporter® Software

Contents Getting Ready ................................................................................................................ 1
Data Clean-up ....................................................................................................................................................... 1
Analyze the Conversion Data ................................................................................................................................ 1
Export the ACT! Data .................................................................................................... 2
Setup Tab .............................................................................................................................................................. 2
Custom Controls Tab ............................................................................................................................................ 3
Remap the ACT! Users ......................................................................................................................................... 4
Apply Filters ........................................................................................................................................................... 5
CSV Tables ........................................................................................................................................................... 6
The ACT! IDs ......................................................................................................................................................... 6
Salesforce Setup ........................................................................................................... 7
User Set-up ........................................................................................................................................................... 7
Name option setup ................................................................................................................................................ 7
Salesforce Duplicate Checking .............................................................................................................................. 7
Audit Fields ............................................................................................................................................................ 7
Migration Summary ............................................................................................................................................... 7
Add User Defined Fields to Salesforce. ................................................................................................................. 8
PickList.CSV .......................................................................................................................................................... 8
Import your data ............................................................................................................ 9
Import Order .......................................................................................................................................................... 9
Preparing the Exported Files for import ................................................................................................................. 9
ACT! Cleanup Tools .................................................................................................... 12
Finding Duplicates ................................................................................................................................... 12
Remove the Old Data. ............................................................................................................................. 12
Appendix B – How the differences are handled ....................................................... 14
Account Assignment ............................................................................................................................... 14
Blank Contacts ........................................................................................................................................ 14
Account Addresses ................................................................................................................................. 14
Groups ..................................................................................................................................................... 15
Secondary Contacts (ACT! 2005+ only) ................................................................................................. 15

1 JLTechnical
Getting Ready
Data Clean-up
If you weren’t using the data in ACT!, you probably won’t be using the data in Salesforce.
1. Remove duplicate records
2. Remove records where the Contact and/or Company is blank.
3. Make certain any picklist that you plan to move contains only valid data.
4. Separate the data that will be imported. You can put it in groups and only export those groups.
5. Clean up your Group list.
Analyze the Conversion Data
Decide what data will be imported from ACT! and where it will go in Salesforce. Here are few
questions to address that can help set up your Salesforce org.
1. Do you want to import everything? Or, can some of the really old data be filtered out.
2. Do you want to use Leads and only import your contacts into the Salesforce
Accounts/Contacts?
3. How do you plan to deal with attachments? They can be imported into Professional and above
editions. But, Salesforce does charge for excess data. They can be loaded into Drop Box with a
field that links to them.

2 JLTechnical
Export the ACT! Data
There is a separate User Guide for the Exporter software. It is recommended that you read it before
proceeding. The steps below are a summary to get you started.
Depending on the size of your database, full extracts can take a while. We suggest that you first export a
sample of your database for testing.
Setup Tab
1. Select the version of your ACT! database.
2. Select the Salesforce.com option.
3. Select the SQL Server Instance you are using to read the database
4. Browse to your ACT! database and select it.
5. Browse to a folder to put the exported data and select it.

3 JLTechnical
Custom Controls Tab
Specify how you want Accounts built.
If you’re testing…..
select Run in Evaluation Mode and specify your sample size.
set the “Drop Fields” limit to zero to force all fields to be exported.

4 JLTechnical
Remap the ACT! Users
Specify how the ACT! contacts will be assigned in Salesforce. By remapping during export, you will
save a significant amount of time when preparing the records for import.
In this example only Chris Huffman and Allison Mikola are moving to Salesforce. Allison will become the
owner of all records that don’t belong to Chris.
5 JLTechnical
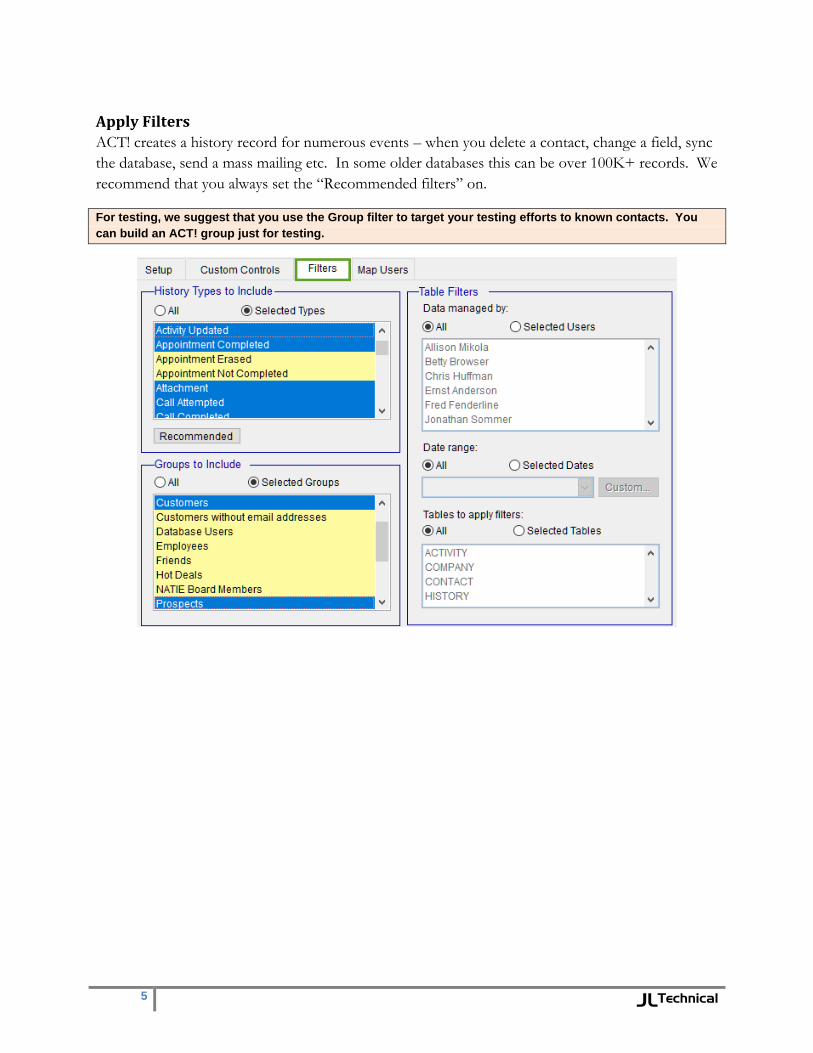
Apply Filters
ACT! creates a history record for numerous events – when you delete a contact, change a field, sync
the database, send a mass mailing etc. In some older databases this can be over 100K+ records. We
recommend that you always set the “Recommended filters” on.
For testing, we suggest that you use the Group filter to target your testing efforts to known contacts. You
can build an ACT! group just for testing.

6 JLTechnical
Exporter Output When the Exporter completes, there will be a folder named Salesforce_com located in the path
specified in Step 5. There will be several files, all with a .csv extension and a folder named Auxiliary
Tables. .
CSV Tables
The ACT! IDs
The Exporter software puts a letter in front of each of the IDs to help identify the type. Salesforce
does this too but with a 3 digit code.
A Exporter Created Account T Activity
X Account that was an ACT! Company Q Product/Service
C Contact P Product
H History S Secondary Contact
N Note G Group
O Opportunity

7 JLTechnical
Salesforce Setup
User Set-up – You’re probably not going to transfer all the users from your ACT! database into
Salesforce. You should set up the users that will be moving to Salesforce before running the export.
Once set up export the internal Salesforce IDs to load into the Exporter software’s map table.
The Exporter will allow you to reassign ACT! users to your SFDC users.
Salesforce users must be Active Users if you plan to assign data to them.
Name option setup – Salesforce allows you to add a middle name and suffix options to the data
entry screen. ACT! Automatically separates them when you enter the full contact name. So, if
you’ve been using a suffix and/or middle name in ACT!, you need to enable this function. You will
find more information in the Salesforce on-line instructions.
Salesforce Duplicate Checking – You should temporarily turn off the Salesforce duplicate
checking for both the Accounts and Contacts. If records are rejected, you will have issues when
trying to import records that have been linked to them i.e. Notes, History and Activities.
Audit Fields – Salesforce allows you to import the actual create date and edit date. You will need
to enable this option before importing your data.
Migration Summary. The Migration Summary is a list of the ACT! fields that did not map to
Salesforce fields. If you plan to transfer these, you will need to add them to Salesforce.

8 JLTechnical
The Migration Summary also contains information about how your data is distributed. This may
help you decide if you would like to apply any filters to the data instead of importing everything.
Any field that has been created by the Exporter and not part of the ACT! database will be prefaced
by X_. ACT! system fields the field will be prefaced by ACT_.
Add User Defined Fields to Salesforce. Using the Migration Summary, you need to determine
which fields will transfer from ACT! to Salesforce. There are some that must be included. These
are the ID fields for each object. They are not visible to the user in ACT! but are required for
import.
We recommend that when you create the new fields in Salesforce you match the names in ACT! This will
allow the import program to auto match your fields. If you want to change the names, you can do so after the
import is complete.
For the ACT_ContactID, ACT_AccountID and ACT_OpportunityID, select the “External ID” checkbox .
PickList.CSV– This files contains a list of fields that have pick list (drop downs) in ACT!. If you
want to use the pick list in Salesforce, you can copy the values and when you define the field in
Salesforce, paste the list into the Salesforce field or create a global picklist.
a.
ACT! is not fussy about what goes into PickList fields. Salesforce is. Entries that are not in the picklist will
be rejected. These will need to be corrected or you can change the field type to Text.

9 JLTechnical
Import your data
There are several data loaders for Salesforce – Jitterbit, dataloader.io, Excel Connector and the Apex
DataLoader. If you are using an SFDC edition with access to the API, we would recommend using
the Apex DataLoader from Salesforce. It can be downloaded from Salesforce.
The order that you import your data is important. You must load the parent (top) level objects first.
i.e. Accounts before Contacts.
Import Order
1. Accounts (ACCOUNT.CSV) >>insert into Account Object
2. Contacts (CONTACT.CSV) >>insert into Contact Object
3. Opportunities (OPPORTUNITY.CSV) >>insert into Opportunity Object
4. Notes (TASK_NOTE.CSV) >>insert into Task Object
5. History (TASK_HISTORY) >>insert Task Object
6. Activities (TASKS_EVENTS.CSV) >>insert into Task or Events Object
7. Secondary Contacts (SECONDARY_CONTACT.CSV) >>insert into Contact Object
Depending on the complexity of your ACT! database, there are several extended options that can be
imported – Account Relationships, Opportunity Line Items etc.. These files are found in the Auxiliary Tables
folder. If you plan to use these files, you will need to consult the Salesforce documentation to migrate them.
Preparing the Exported Files for Import
With the exception to the Account table, all tables must be related to another table. To do this, you
will need to use the Excel Vlookup command to convert the ACT! IDs into Salesforce IDs. Below
are the steps for importing Contacts.
Import the Accounts.
Export the ACT_AccountID and the ID (SalesforceID) from the Accounts table into a file named
Account_Extract.
The ACT_AccountID must be in Column 1 of the reference file. If not you can cut it and insert it there.
Open the Account_Extract file with Excel and sort the ACT_AccountID column in ascending
order.
Open the Contact.csv file.
Insert a column to the right of the ACT_AccountID column and label it AccountID.
Insert the formula =vlookup(a2, Account_Extract.csv!$a$2:$b$50000,2,false) into the B2 cell.
$a$2:$b$50000 is the range of the lookup table (Account_Extract). If yours is larger, it should be modified i.e.
$a$2:$b$150000. The top location should always be set to $a$2.

10 JLTechnical
Copy the B2 cell
Paste it into the remaining cells in Column B. They should all populate with the Salesforce
AccountID. If they don’t, there’s likely an error with the formula and/or the lookup file
(Account_Extract)
There should be no cells that do not match.

11 JLTechnical
The Contact.csv file can be inserted using the DataLoader. When you now view the Account
records in Salesforce, you should see the related Contacts.
You will need to do this for the remaining files. Below is the list of ACT! IDs that need to be
changed to Salesforce IDs.

12 JLTechnical
ACT! Cleanup Tools
Finding Duplicates
ACT 2005+: You can use ACT! to find these records. To do this, select Scan for Duplicates
from the Tools menu.
Remove the Old Data.
ACT! allows you to save a lot of “stuff” . Unfortunately, a lot the the “stuff” is really junk. So, you
might want to take some time and get rid of the data that you will never use.

13 JLTechnical

14 JLTechnical
Appendix B – How the differences are handled
There are many differences in structure between the ACT! and Salesforce databases. The following
explains how the Exporter deals with these:
Account Assignment
In Salesforce.com, if a contact is not assigned to a company, then the record owner is the only user
that has access to the contact and the contact cannot be odified. Therefore, when the import files
are prepared, each contact is assigned an account using the following rules.
If a contact belongs to an ACT! Company, the account information for that contact will be taken
from the ACT! Company data. The UniqueID for the company will be placed in the Salesforce.com
Site field.
If a contact does not belong to an ACT! Company and the Company name is present in the
contact’s record, then this company name will be used to create a Salesforce.com account.
If a contact does not belong to an ACT! Company and does not have a company name in the
record, the contact will be assigned to a Salesforce.com Account called “Not Given”
Blank Contacts
If the Contact name is blank and there is a Company name, then the contact will be named Contact
at companyname.
Account Addresses
ACT! Companies can have three address fields. Salesforce.com only has two. When ACT! company
data is used to populate the Salesforce.com Account addresses the following rules are used:
If the ACT! Company Billing Address field is blank, the Address is moved to the Salesforce.com
Billing Address.
If both the ACT! Company and billing addresses contain data, the ACT! Company address is put
into a field which will need to be created labeled, ACT_Company_Address.

15 JLTechnical
Groups
There are no groups in Salesforce.com. However, they can be simulated using Salesforce views.
Exporter provides a field labeled Group Membership which contains a list of all the groups the
contact belongs to. To use this in Salesforce, do the following:
1. On the Contacts home page, click the Create a New View option.
2. Give the view a name –e.g., the name of your ACT! Group
3. Specify the filter for the group
a. In the Field dropdown, select the Group Membership field.
b. In the Operator field, select contains
c. In the Value field, enter the name of the group.
Secondary Contacts (ACT! 2005+ only)
Salesforce does not have a similar function to ACT!’s secondary contacts. If you want to include
secondary contacts, you will need to load them separately. Secondary contacts will be linked to
their primary contact in Salesforce. You will see the primary ContactID in the Reports To: field of
Salesforce.