Embed Size (px)
Citation preview

MASARYK UNIVERSITY
Faculty of Informatics
BACHELOR’S THESIS
Context Help for
Kentico CMS
Brno 2011 Petr Pěnička

- ii -
Statement I declare that this thesis is my original copyrighted work, which I developed alone. All
resources, sources, and literature, which I used in preparing or I drew on them, I quote in the
thesis properly with stating the full reference to the source.
- iii -
Acknowledgements I would like to express sincere thanks to RNDr. Karel Kisza for his supervision and valuable
advice. I also want to thank Ing. Martin Hejtmanek, the CTO at Kentico Software, for his
consultations and in-depth information on Kentico CMS internals.

- iv -
Resume The aim of this thesis was to create a module which would enhance the current context-related
documentation (i.e. context help) possibilities of Kentico CMS, the ASP.NET web content
management system. The module’s implementation was carried out to comply with module
requirements received from Kentico Software, the company producing the system.
The module should provide website developers using the system with a way how they can
display help related to terms in website text or HTML elements in its code, both on the live
site and in the system’s user interface. On top of this functionality, it should also provide a
way how to customize default context help natively included in the system’s user interface.
Output of the thesis should be an export package containing the module’s definition and
related files. It should be possible to add it into any Kentico CMS 5.0 instance using the native
export/import functionality of the system.
Key words WWW, HTML, ASP.NET, C#, XML, Kentico CMS, documentation, help, term, HTML
element, module development
- 1 -
Contents
1 INTRODUCTION ....................................................................................................... 3
2 CONTENT MANAGEMENT SYSTEM .................................................................. 5
3 KENTICO CMS .......................................................................................................... 6
3.1. SYSTEM REQUIREMENTS ................................................................................... 6 3.2. KENTICO CMS FEATURES ................................................................................. 6
3.3. ADMINISTRATION INTERFACE ........................................................................... 7 3.3.1. CMS Desk ................................................................................................ 7
3.3.2. CMS Site Manager ................................................................................... 8 3.3.3. Default Context Help Functionality ....................................................... 10
4 ANALYSIS AND DESIGN ...................................................................................... 12
4.1. MODULE REQUIREMENTS................................................................................ 12
4.2. ANALYSIS OF REQUIRED FUNCTIONALITY ...................................................... 12
5 IMPLEMENTATION .............................................................................................. 15
5.1. DATABASE STRUCTURE .................................................................................. 15 5.2. PARSING ALGORITHMS ................................................................................... 15
5.2.1. What Data Should Be Parsed ................................................................. 16 5.2.2. Connection to the OutputFilter .............................................................. 16 5.2.3. Terms Highlighting ................................................................................ 18
5.2.4. HTML Elements Help ............................................................................ 22 5.2.5. ResolveHelpUrl Method ........................................................................ 24
5.3. CUSTOM CONTEXT HELP TOPICS .................................................................... 26 5.4. CUSTOMHELP.ASPX PAGE ............................................................................... 27 5.5. USER INTERFACE OF THE MODULE .................................................................. 29 5.5.1. User Interface Pages Nesting ................................................................. 31
5.5.2. The Terms, Elements and Custom Topics Tabs .................................... 32
6 FURTHER IMPROVEMENT POSSIBILITIES ................................................... 35
7 CONCLUSION ......................................................................................................... 36
LITERATURE ............................................................................................................. 37
ANNEXES .................................................................................................................... 39
A. MODULE REQUIREMENTS FROM KENTICO SOFTWARE ..................................... 39 A.1 Purpose ................................................................................................... 39
A.2 Description ............................................................................................. 39 A.3 Use Cases ............................................................................................... 39 A.4 User Interface ......................................................................................... 40 A.5 Interactions with Other Modules ........................................................... 40 A.6 Security Requirements ........................................................................... 40
A.7 Performance Requirements .................................................................... 41

- 2 -
B. DESCRIPTIONS OF DATA RECORDS STORED BY THE MODULE ........................... 41 B.1 dbo.customtable_ContextHelpTerms ..................................................... 41 B.2 dbo.customtable_ContextHelpElements ................................................ 42 B.3 dbo.customtable_ContextHelpTopics .................................................... 43 C. CODE EXTRACTS ............................................................................................. 44
C.1 Connection of the Module’s Methods to the OutputFilter ..................... 44 C.2 The AddTermsHelp Method .................................................................. 45 C.3 The AddTermTooltip Method ................................................................ 46 C.4 The AddElementsHelp Method ............................................................. 47 C.5 The ResolveHelpUrl Method ................................................................. 48
C.6 The ResolveCustomTopic Method ........................................................ 50 C.7 The CustomHelp.aspx Page ................................................................... 50
C.8 The PageLoad Method from the CustomHelp.aspx.cs File ................... 51 D. INSTALLATION INSTRUCTIONS ........................................................................ 52 E. ATTACHED CD MEDIUM ................................................................................. 52

- 3 -
Chapter 1
Introduction
With growing complexity of today’s software products, the need for high quality
documentation is being both expressed by software users and understood by software
development companies. Accessibility of documentation while using a software product is of
the highest importance, as users do not want to spend hours browsing through various
manuals and reference guides, looking for a piece of information which is needed for their
particular purpose and situation. This is where the idea of context help comes in handy.
Context help can be understood as documentation accessible directly from an
application’s user interface, relevant for the particular part of the user interface where a user is
currently intending to perform an action. The biggest advantage of this kind of documentation
is that the user gets just the information related to his current activity. This results in him not
being overwhelmed by tons of extensive texts to read through, which greatly decreases the
time needed for him to find the required information.
The same applies to today’s websites. Modern dynamic web applications are, in terms of
complexity of their user interface and provided functionality, fully comparable to traditional
installed desktop applications. They are capable of providing advanced functionality, whose
utilizing requires hands-on experience or previous study. Here again arises the need to provide
users with the right information and advice on how to use the current part of the web
application’s user interface.
Ultimately, website content itself can also get quite complex in many situations, typically
on websites focusing on a specialized topic. It can be virtually any field of interest – websites
about computer hardware, gardening, car modifications, fishing, politics, etc. can all have
content which may not be understandable to a novice or non-specialist site visitor. Such
websites often have a terminology section where terms often used in website content are
explained. However, visitors of these websites have to open the terminology section in a new
browser window or browse to it and back whenever they do not understand some term in
website text. This is obviously not very convenient and may even discourage users from
visiting the website in the future. Context help in form of the terms highlighting functionality
is an elegant solution for these situations.
For me as a documentation author at Kentico Software, writing context help articles is an
integral part of my everyday work. When the opportunity came to develop a module shifting
the current context help possibilities of Kentico CMS to a next level, I evaluated it as a great
opportunity to get valuable practical experience in software development, mainly in the field
of programming, which is not among my day-to-day professional duties. On the other hand,
the purpose of the module is directly related to my field of activity in the company –
- 4 -
documentation authoring. The combination of these two factors led me to the decision to
design and develop the module as my bachelor’s thesis.
- 5 -
Chapter 2
Content Management System A content management system (the CMS abbreviation is commonly used for this type of
software and will be used further in the text of this thesis) is a piece of software which enables
even users with limited technical skills and knowledge to create and manage web content, i.e.
content of a website. In the broader meaning of the word, a CMS can be conceived as a
development framework upon which a website can be built. These systems’ popularity is
rising steeply these days. It happens mainly thanks to the fact that the Internet has become an
inseparable part of how business is done. Even the smallest companies can benefit from
having a web presentation or an e-shop, while not having one means a substantial
disadvantage in the competition fight.
Without a content management system, unskilled business users would need a specialist
whenever they wanted to change the content of their website. Programming knowledge,
software tools and knowledge of website structure would be required from the specialist,
resulting in additional costs of any required content change. Contrary to this, when a CMS is
used, even complex content changes can be performed with little effort by the business users
themselves, whilst near-zero programming knowledge is required. On top of it, even no
special software tools are required to perform the content changes – the content can be
managed conveniently from a browser-based user interface. Another advantage of the
browser-based user interface is that it can be accessed from anywhere – it is a part of the
actual website, accessible under a special URL, hence the only necessary prerequisite is a
compatible web browser.
- 6 -
Chapter 3
Kentico CMS Kentico CMS is a web content management system produced by a software vendor named
Kentico Software. The company is based in Brno, Czech Republic. The full name of the
system is Kentico CMS for ASP.NET, which indicates that the system is based on Microsoft’s
ASP.NET platform. Its entire code is written in the C# programming language. Data storage is
provided by a Microsoft SQL Server database.
According to information published on Kentico Software’s website [1], the CMS is
currently used by approximately 4000 websites in more than 60 countries around the globe.
The latest released version of the system at the time when work on this thesis started was
Kentico CMS 5.0. The Context Help module developed as the output of this thesis is designed
for and tested on this particular version.
3.1. System Requirements
On the server side, Kentico CMS is compatible with all versions of Microsoft Windows as of
Windows XP, i.e. Windows XP, Windows 2003, Windows 2008, Windows 2008 R2, Windows
Vista and Windows 7. As for data storage, it requires Microsoft SQL Server 2005 or Microsoft
SQL Server 2008.
The CMS is designed for the front-end website to be compatible with most of today’s
web browsers, while the user interface is only tested and officially supported under Microsoft
Internet Explorer 7, Microsoft Internet Explorer 8, Mozilla Firefox 3.5 and Apple Safari 4.0.
Code of the web application can be edited in Microsoft Visual Studio or the free
Microsoft Visual Web Developer, both as of version 2005.
Detailed system requirements can be found in Kentico CMS for ASP.NET (on-line):
System requirements [2].
3.2. Kentico CMS Features
Kentico CMS is a feature-rich solution. It provides most of the functionality required by
today’s modern dynamic websites in a single package, giving web developers a powerful tool
for creation of such websites.
The following list is not meant to provide a complete overview of the system’s features. It
only points out the most important and useful ones.
Browser-based user interface for website development, management and content editing.
Unlimited number of separate websites running in a single instance on the web server.
WYSIWYG editor for editing of page content in Microsoft Word-like manner.
- 7 -
Support for multiple language versions of particular websites, as well as full localizability
of the user interface.
Workflow and Versioning features for team content editing, where an approval process for
documents to be published on the website can be defined. It also enables rollbacks to
previous versions of documents.
Full source code available.
Free edition with limited features, sufficient for personal or non-commercial websites.
E-commerce module for creation of on-line stores.
Media libraries module for storage of large numbers of media files and their presentation
on the website.
Extensive documentation, including context help natively integrated into the system’s user
interface.
A complete overview of Kentico CMS features can be found in Kentico CMS for ASP.NET
(on-line): Features [3].
3.3. Administration Interface
The administration interface of Kentico CMS is accessible directly from a web browser. It is a
part of the actual website, accessible under a special URL. The administration interface is
divided into two main sections – CMS Desk and CMS Site Manager. In brief, CMS Desk is
used for creation and administration of one particular website’s content, while CMS Site
Manager is the interface where settings of particular websites running in the instance of the
CMS can be managed and where development- and administration-related tasks can be
performed.
3.3.1. CMS Desk
As mentioned above, CMS Desk is the part of the administration interface where content of
one particular website running in the system can be created and managed. It is accessible from
a URL in the following format: <website URL>/cmsdesk. The interface is divided into four
main tabs.
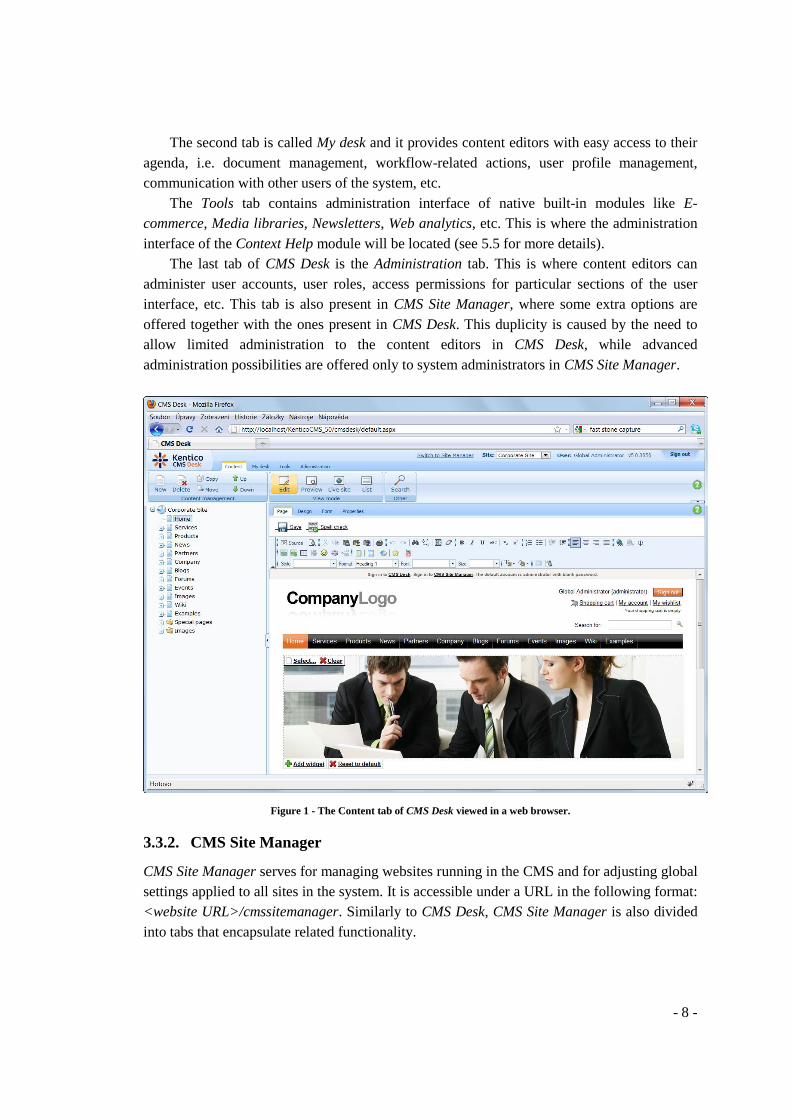
The first one – Content – is where content of the website can be created and managed. It
is depicted by Figure 1 below. The tree on the left of this tab is called the content tree and it
represents the site map, i.e. particular pages of the website. Site navigation controls are
rendered to reflect the documents in the content tree. By clicking a page in the tree, its content
gets displayed in the main area. Based on selection in the ribbon toolbar above the main area,
you can display the page for editing (the Edit option), display a preview of how the page will
look like after publishing (the Preview option), view the page’s current appearance on the
front-end website (the Live site option), or view a listing of all pages stored under the current
page in the content tree. In the Edit mode, users can make actual changes to content, design
and properties of the pages.
- 8 -
The second tab is called My desk and it provides content editors with easy access to their
agenda, i.e. document management, workflow-related actions, user profile management,
communication with other users of the system, etc.
The Tools tab contains administration interface of native built-in modules like E-
commerce, Media libraries, Newsletters, Web analytics, etc. This is where the administration
interface of the Context Help module will be located (see 5.5 for more details).
The last tab of CMS Desk is the Administration tab. This is where content editors can
administer user accounts, user roles, access permissions for particular sections of the user
interface, etc. This tab is also present in CMS Site Manager, where some extra options are
offered together with the ones present in CMS Desk. This duplicity is caused by the need to
allow limited administration to the content editors in CMS Desk, while advanced
administration possibilities are offered only to system administrators in CMS Site Manager.
Figure 1 - The Content tab of CMS Desk viewed in a web browser.
3.3.2. CMS Site Manager
CMS Site Manager serves for managing websites running in the CMS and for adjusting global
settings applied to all sites in the system. It is accessible under a URL in the following format:
<website URL>/cmssitemanager. Similarly to CMS Desk, CMS Site Manager is also divided
into tabs that encapsulate related functionality.
- 9 -
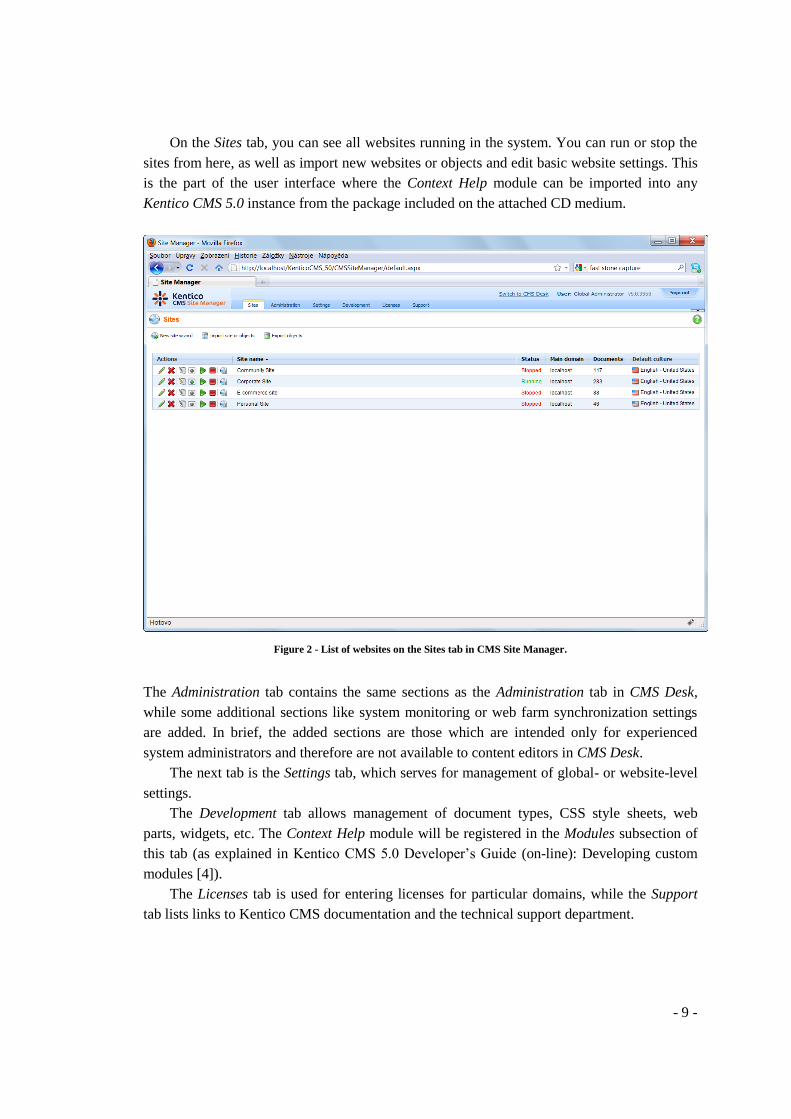
On the Sites tab, you can see all websites running in the system. You can run or stop the
sites from here, as well as import new websites or objects and edit basic website settings. This
is the part of the user interface where the Context Help module can be imported into any
Kentico CMS 5.0 instance from the package included on the attached CD medium.
Figure 2 - List of websites on the Sites tab in CMS Site Manager.
The Administration tab contains the same sections as the Administration tab in CMS Desk,
while some additional sections like system monitoring or web farm synchronization settings
are added. In brief, the added sections are those which are intended only for experienced
system administrators and therefore are not available to content editors in CMS Desk.
The next tab is the Settings tab, which serves for management of global- or website-level
settings.
The Development tab allows management of document types, CSS style sheets, web
parts, widgets, etc. The Context Help module will be registered in the Modules subsection of
this tab (as explained in Kentico CMS 5.0 Developer’s Guide (on-line): Developing custom
modules [4]).
The Licenses tab is used for entering licenses for particular domains, while the Support
tab lists links to Kentico CMS documentation and the technical support department.

- 10 -
3.3.3. Default Context Help Functionality
Kentico CMS is a fully documented solution. Complete documentation of the system can be
viewed or downloaded in various formats at Kentico DevNet (on-line): Documentation [5].
The full documentation consists of numerous separate guides, each of them aimed at a
different target audience or intended for different purposes. Among others, we can name
Kentico CMS Developer’s Guide, Kentico CMS E-commerce Guide, Kentico CMS API
Reference, etc.
On the top of these guides, the user interface of the system contains native context help
accessible via the green question mark icon in the top right corner of each user interface page.
Clicking the icon results in brief documentation of the current administration interface being
opened in a new browser window.
Figure 3 - Context help icon in Kentico CMS user interface.
Default Kentico CMS context help is a set of web pages with their own navigation, nested
inside the Kentico CMS web project. It is created with and rendered by a software tool called
EC Software Help & Manual. In the website root, it is stored in HTML format inside the
~/CMSHelp folder (the tilde (~) character prefix notation indicates location of the web
project’s root folder and will be used further in the text of this thesis).
The context help icons link to URLs in the following format: <website
URL>/CMSHelp/<topicname>.htm. The <topicname> part of the URL is unique for each
user interface page. When the icon is clicked and the URL accessed, the context help gets
opened in a new browser window, with the appropriate page selected in the navigation and
displayed in the main area. In Figure 4, you can see the context help page displayed after
clicking the icon on the List tab in CMS Desk -> Content.

- 11 -
Figure 4 - Default Kentico CMS context help.
- 12 -
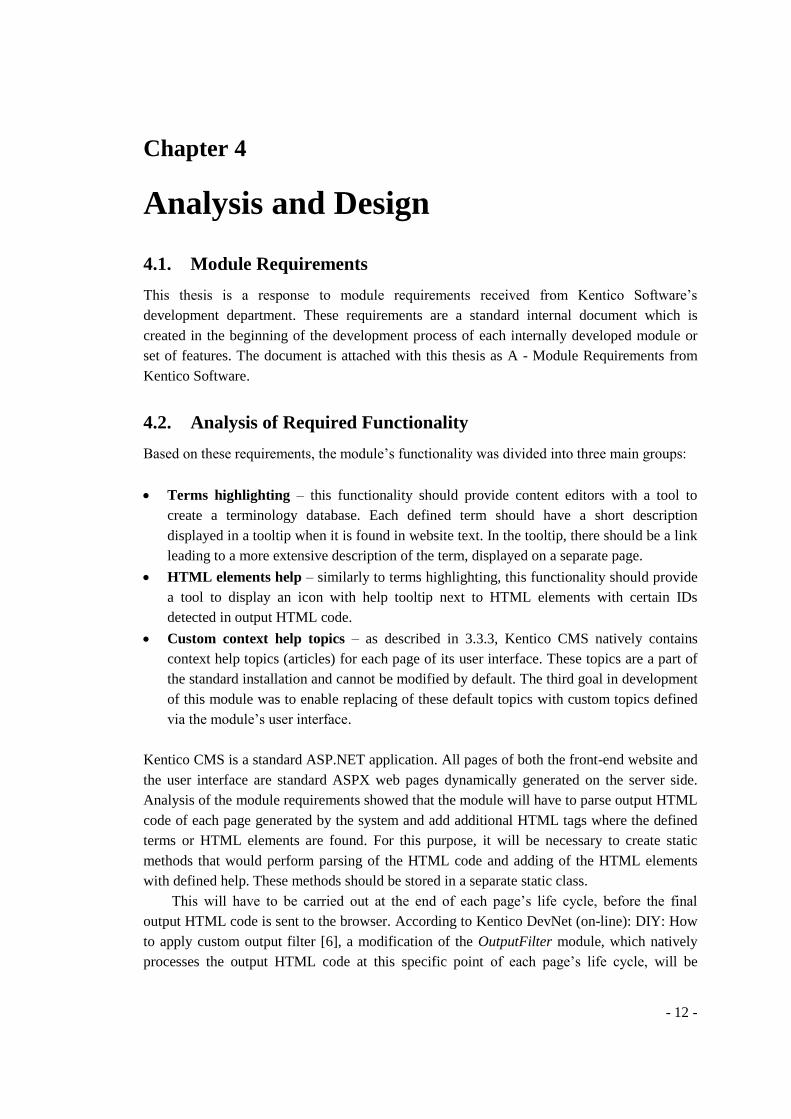
Chapter 4
Analysis and Design
4.1. Module Requirements
This thesis is a response to module requirements received from Kentico Software’s
development department. These requirements are a standard internal document which is
created in the beginning of the development process of each internally developed module or
set of features. The document is attached with this thesis as A - Module Requirements from
Kentico Software.
4.2. Analysis of Required Functionality
Based on these requirements, the module’s functionality was divided into three main groups:
Terms highlighting – this functionality should provide content editors with a tool to
create a terminology database. Each defined term should have a short description
displayed in a tooltip when it is found in website text. In the tooltip, there should be a link
leading to a more extensive description of the term, displayed on a separate page.
HTML elements help – similarly to terms highlighting, this functionality should provide
a tool to display an icon with help tooltip next to HTML elements with certain IDs
detected in output HTML code.
Custom context help topics – as described in 3.3.3, Kentico CMS natively contains
context help topics (articles) for each page of its user interface. These topics are a part of
the standard installation and cannot be modified by default. The third goal in development
of this module was to enable replacing of these default topics with custom topics defined
via the module’s user interface.
Kentico CMS is a standard ASP.NET application. All pages of both the front-end website and
the user interface are standard ASPX web pages dynamically generated on the server side.
Analysis of the module requirements showed that the module will have to parse output HTML
code of each page generated by the system and add additional HTML tags where the defined
terms or HTML elements are found. For this purpose, it will be necessary to create static
methods that would perform parsing of the HTML code and adding of the HTML elements
with defined help. These methods should be stored in a separate static class.
This will have to be carried out at the end of each page’s life cycle, before the final
output HTML code is sent to the browser. According to Kentico DevNet (on-line): DIY: How
to apply custom output filter [6], a modification of the OutputFilter module, which natively
processes the output HTML code at this specific point of each page’s life cycle, will be

- 13 -
carried out to ensure execution of the parsing methods after the OutputFilter finishes its native
modifications of the output code. We will have to modify the code further before it is sent to
the client browser.
The custom context help topics functionality will be provided by a modification to the
~/CMSAdminControls/UI/Help.ascx control, described in 3.3.3 and depicted in Figure 3. The
modification will have to ensure that the help icons’ target link will be set dynamically as a
URL returned by a custom static method. The method should return URL of the default
context help topic if no custom topic is defined for the current page, or a URL of a page where
a custom topic will be displayed in case that the current page has such topic defined. The
custom topics should be displayed on a dedicate page included with this module, as referred to
further below.
Based on analysis of the module requirements, the following UML 2.0 Activity diagrams
were created:
Figure 6 - UML 2.0 Activity diagram showing the connection of the module's methods
within each page request.
Figure 7 - UML 2.0 Activity diagram illustrating the flow of the AddTermsHelp method.
Figure 8 - UML 2.0 Activity diagram illustrating the flow of the AddTermTooltip method.
Figure 9 - UML 2.0 Activity diagram illustrating the flow of the AddElementsHelp
method.
Figure 10 - UML 2.0 Activity diagram illustrating the flow of the ResolveHelpUrl
method.
Figure 11 - UML 2.0 Activity diagram illustrating the flow of the ResolveCustomTopic
method.
For better clarity, these diagrams are located with each method’s description in Chapter 5 -
Implementation.
To provide data storage, it will be necessary to create three database tables, while defined
help for each of the three required sets of functionality will be stored in each of them. To
achieve inclusion of the tables in the final export package, the Custom tables module, natively
shipped with Kentico CMS, will be used. This module allows easy creation of custom
database tables in the system’s database and provides a useful API for querying of these
database tables dynamically from module code, without the need to write or generate custom
SQL queries. The tables will be independent, each serving only for the purpose of one of the
three functionalities. Each record will be identifiable using an integer primary key.
The ERD diagram below illustrates these three database tables, the columns in them and
the primary keys used to identify the data records. Descriptions of particular columns of these
tables and the data stored in them are attached in B - Descriptions of Data Records Stored by
the Module.

- 14 -
Figure 5 - ERD model of data stored by the module.
To enable users define help for terms, HTML elements and custom context help topics, a user
interface will also have to be created for the module. This user interface should be embedded
within the native user interface of Kentico CMS. As the most of the native modules included
in Kentico CMS have their user interface located in the Tools section of CMS Desk, user
interface of our module should also be added to this section. The module’s user interface
should be further divided into three tabs, while each tab will be dedicated to one of the three
required functionalities. On each of the tabs, it should be possible to view a list of defined
terms, HTML elements or custom context help topics, edit the listed ones or define new ones.
The last part of the module will be another user interface page. Even though it should
have a uniform look as all other user interface pages, this one will not be accessible through
any menu in the user interface. Contrary to that, it will only be linked from the modified code
in output pages and it will ensure displaying of detailed descriptions of terms and HTML
elements, as well as displaying of custom context help topics.

- 15 -
Chapter 5
Implementation
5.1. Database Structure
The first step in development of the module was to define database tables where module data
will be stored. I utilized the Custom tables module, which is a built-in module in Kentico
CMS. Its documentation can be found in Kentico CMS 5.0 Developer’s Guide (on-line):
Custom tables [7]. It provides website developers with the possibility to create and manage
database tables from within the system’s user interface, without the need to use Microsoft SQL
Server Management Stuido or write and execute any SQL queries. Furthermore, the Custom
tables module comes with a useful API for access and modification of data stored in the
tables.
Apart from these possibilities, custom tables are standard SQL database tables stored in
the system’s database. Among other tables in the database, they can be recognized by the
dbo.customtable_ prefix.
Based on expected functionality expressed in modules requirements (see A - Module
Requirements from Kentico Software), I created the following three custom tables:
dbo.customtable_ContextHelpTerms for storing terms data records.
dbo.customtable_ContextHelpElements for storing HTML elements data records.
dbo.customtable_ContextHelpTopics for storing custom context help topics data records.
These database tables reflect the ERD model presented in Figure 5 above. For detailed
descriptions of particular columns and the values stored in them, please refer to B -
Descriptions of Data Records Stored by the Module.
5.2. Parsing Algorithms
With the data structure defined, the next logical step was to proceed to development of the
actual methods that would parse output HTML code and search for terms and element IDs
whose help should be displayed.
As these methods were all meant to be static, I created the ContextHelpHelper.cs class,
which is a static class where all static methods of the module are stored. The namespace of the
class is CMS.ContextHelp.
The class is stored under the ~/AppCode/Global/ContextHelp folder. This location,
according to Kentico CMS 5.0 Developer’s Guide (on-line): Folder structure and
import/export [8], enables export of the folder’s content into a package using Kentico CMS

- 16 -
native export/import functionality. It will be facilitated later when creating the export package
containing the module.
5.2.1. What Data Should Be Parsed
Based on A - Module Requirements from Kentico Software, the parsing algorithms needed to
be applied to the final output code of each HTML page rendered by the system, both in the
system’s user interface and on the live site. For this purpose, I decided to utilize the
OutputFilter module. As described in Kentico DevNet (on-line): DIY: How to apply custom
output filter [6], the OutputFilter module is a standard ASP.NET HTTP module and it is a
native part of the system. Its original and main purpose is to perform additional modifications
to the final output code rendered by the system, such as adding missing closing tags, ensuring
validity based on various standards (e.g. XHTML), etc.
On top of the basic functionality, it contains a number of pre-defined events. These events
can be used as customization connection points in cases when customers need to apply some
specific custom filtering to the output code. This was exactly our situation, so from all the
available events, I chose the OnAfterFiltering event. This event is raised when the default
filtering performed by the OutputFilter finishes. This is when the output HTML code is
processed, stored in the finalHtml variable and ready to be sent to the browser for rendering.
In order to ensure the required functionality, we will further process this code by our custom
methods implemented in the ContextHelpHelper class.
5.2.2. Connection to the OutputFilter
As explained in Kentico DevNet (on-line): How to effectively customize Kentico CMS UI
[9], Kentico CMS contains a set of classes which serve as connection points for customization
of its user interface. These are the classes stored in the ~\AppCode\Global\CMS folder.
Location under ~\AppCode\Global ensures that these classes will be a part of the final export
package.
I made a modification to the CMSApplication.cs class, specifically to its
AfterApplicationStart method, analogically following the code example published and
explained in Kentico DevNet (on-line): How to effectively customize Kentico CMS UI [6]. I
based connection of my custom processing methods on the same principle that is described in
the referenced article.
The code ensures that after the application is started (in the AfterApplicationStart method,
which is executed at that specific moment), each newly created OutputFilter calls the
OutputFilter_OnFilterCreated method, which is declared next. The method adds a new
CustomFilterHandler with the filter_OnAfterFiltering method in its constructor parameter
into the OnAfterFiltering event. Since an instance of the OutputFilter is created with each
page request, we have ensured that the filter_OnAfterFiltering method will be called on each
page request, at the specific moment when filtering has just been performed and the output
HTML code to be processed is available in the referenced finalHtml variable.

- 17 -
The filter_OnAfterFiltering method is declared as the last method in the code sample
above. It ensures processing of the output HTML code in the referenced finalHtml variable by
our custom methods declared in the ContextHelpHelper class – the AddTermsHelp and
AddElementsHelp methods.
The activity diagram in Figure 6 below shows at which point within a page request these
methods are executed. The actual code ensuring this behavior is attached in C.1.
Figure 6 - UML 2.0 Activity diagram showing the connection of the module's methods within each page request.
To execute these module’s methods, the following variables are initialized first:
int originalLength – length of the HTML code to be processed; this value is used at the
end of processing to check if the HTML code was modified.

- 18 -
string currentUrl – URL of the currently processed page; this value is used below to
ensure processing of only pages with the “.htm”, “.html” or “.aspx” extensions; the value
is obtained from CMS.GolbalHelper.UrlHelper.CurrentURL.
CMS.URLRewritingEngine.URLRewritingResultEnum currentStatus – this enumeration is
used to identify the type of the processed page; it is used to ensure filtering of only live
site pages (the PathRewritten status) and user interface pages (the SystemPage status); its
value is passed in a parameter of both the AddTermsHelp and the AddElementsHelp
methods; this value for the current page is always available in
CMS.URLRewritingEngine.URLRewriter.CurrentStatus, so the variable is initialized with
its current value.
string currentCulture – culture of the processed page; it is used as a parameter of the
processing methods; after verifying that the processed page has one of the allowed
extensions and that it is either a live site page or a user interface page, we either get it
using the CMS.GlobalHelper.CultureHelper.GetPreferredCulture() method (if it is a live
site page), or using the CMS.GlobalHelper.CultureHelper.GetPreferredUICulture()
method (if it is a user interface page).
With these variables initialized, the AddTermsHelp and AddElementsHelp methods are
executed with the finalHtml, currentStatus and currentCulture variables as their parameters,
entered respectively. After processing, a check for the finalHtml variable’s modification is
performed based on comparison of its current length with the value stored in the
originalLenght variable. If a modification is detected, it indicates that some help has been
added by one or both of the methods. In this case, we need to add the tooltip script to the
beginning of the page (the beginning of the page is recognized by the regular expression
matching the opening <form> tag). The script is needed in order for tooltips with help added
by the methods to be displayed.
5.2.3. Terms Highlighting
The first functionality covered by the module is terms highlighting. It is ensured by two
methods – the main AddTermsHelp method and the AddTermTooltips method, which is called
from the code of the first one. The text below focuses on how the output HTML code is
processed by these methods.
The AddTermsHelp method is executed after the OutputFilter processes pages’ output
HTML code, as explained in 5.2.2.
The method ensures processing of the output HTML code by regular expression-based
search and replace of defined terms in page text, i.e. the text enclosed in between particular
HTML tags. The beginning of the method initializes local variables, among which ArrayList
terms is the most important. This ArrayList (see MSDN Library (on-line): ArrayList Class
[10] for more details on this ASP.NET class) contains data rows from the

- 19 -
dbo.customtable_ContextHelpTerms table that contain definitions of terms to be processed on
the current page.
To eliminate repetitive access to the system database and therefore optimize performance
of the module, these ArrayLists are stored in the htTerms hash table (see MSDN Library (on-
line): Hashtable Class [11]). As the key for each item in the hash table, URL of the current
page (value from the PageUrl column of the data record) together with the current culture
(value from the CurrentCulture column) is used, separated by the tube character.
If no record is found for the current URL and culture in the hash table, the ArrayList with
terms needs to be obtained from the database. The method first instantiates a
CMS.SiteProvider.CustomTableItemProvider and uses it to retrieve a DataTable with the
records, while an SQL WHERE condition is used in the second parameter of the GetItems
method to retrieve only those rows that match the current culture and that are defined either
for live site pages or for user interface pages, based on the current context. Then, records from
this DataTable are filtered further into the final ArrayList that will be added to the hash table.
The second filtering selects only those records (terms) that should be applied for the current
URL. Emptiness of the PageUrl column is checked first, another part of the condition
(evaluated as logical disjunction) is the ResolveHelpUrl method executed with parameters
reflecting the current context. The checks are intentionally in this order for the benefit of
better performance, as the more selective condition is always better to be checked first with
lazy evaluation (the type of evaluation used in this case in C#). Finally, the ArrayList filled
with matching items is added to the hash table.
To ensure processing of only the text between HTML tags, the method instantiates the
RegExTags instance of the System.Text.RegularExpressions.Regex class (see MSDN Library
(on-line): Regex Class [12] for more details). The actual text of the regular expression
matches all HTML tags in a provided text. It is originally used in the RegExFixXHTML
method declared in the CMS.GlobalHelper .HTMLHelper.RegExFixXHTML class included in
the standard installation of the CMS. I utilized it in my methods so that I didn’t need to design
my own regular expression. The regular expression is also utilized in the AddElementsHelp
method described in 5.2.4.
This regular expression is applied to the processed HTML code in a cycle for each row in
the ArrayList. Using positions of the regular expression matches (the HTML tags), we get
substrings of text in between them. Then another regular expression matching is performed on
the substrings, while now the actual term is searched. If the searched term is found in the
substring, the AddTermTooltip method is used to wrap the term with code ensuring that a
tooltip with defined help will be displayed. The AddTermTooltip method is described in more
details in the following sub-chapter.
Substrings of the original HTML code, either modified or in their original form, are
subsequently appended to one string using an instance of the StringBuilder class (see MSDN
Library (on-line): StringBuilder Class [13] for more details). When processing finishes, the
string from the StringBuilder is saved into the processedHTML variable and another cycle
- 20 -
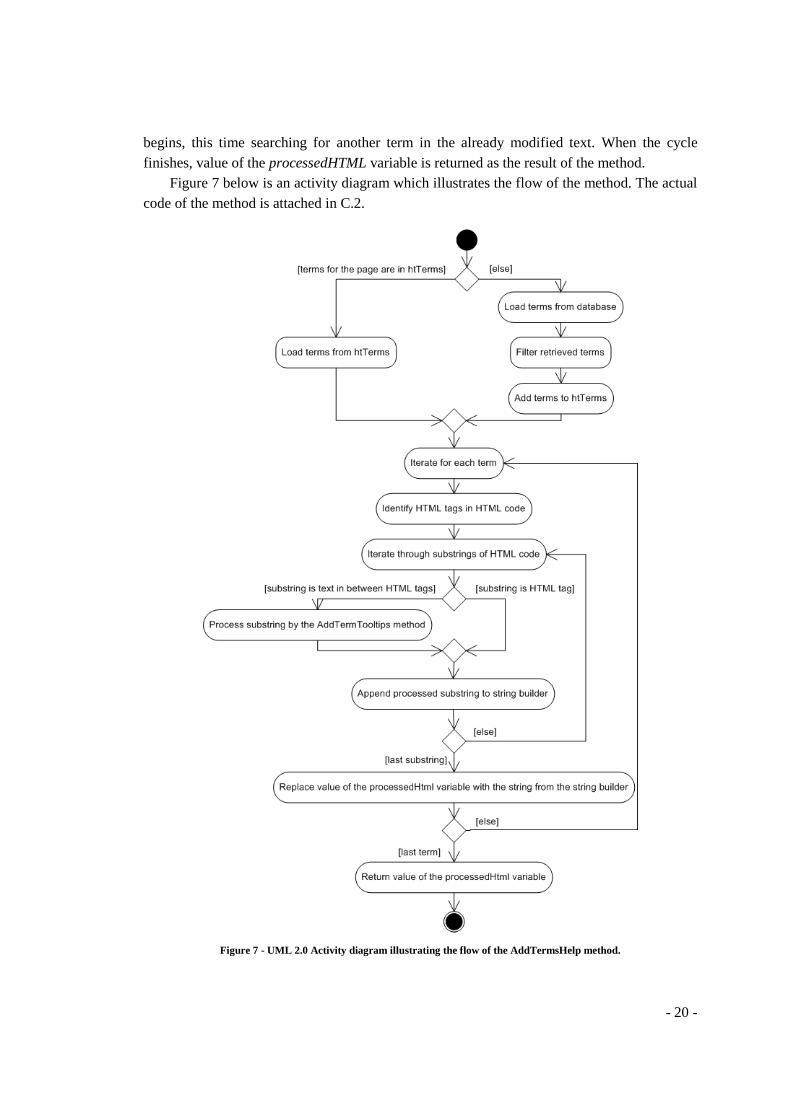
begins, this time searching for another term in the already modified text. When the cycle
finishes, value of the processedHTML variable is returned as the result of the method.
Figure 7 below is an activity diagram which illustrates the flow of the method. The actual
code of the method is attached in C.2.
Figure 7 - UML 2.0 Activity diagram illustrating the flow of the AddTermsHelp method.
- 21 -
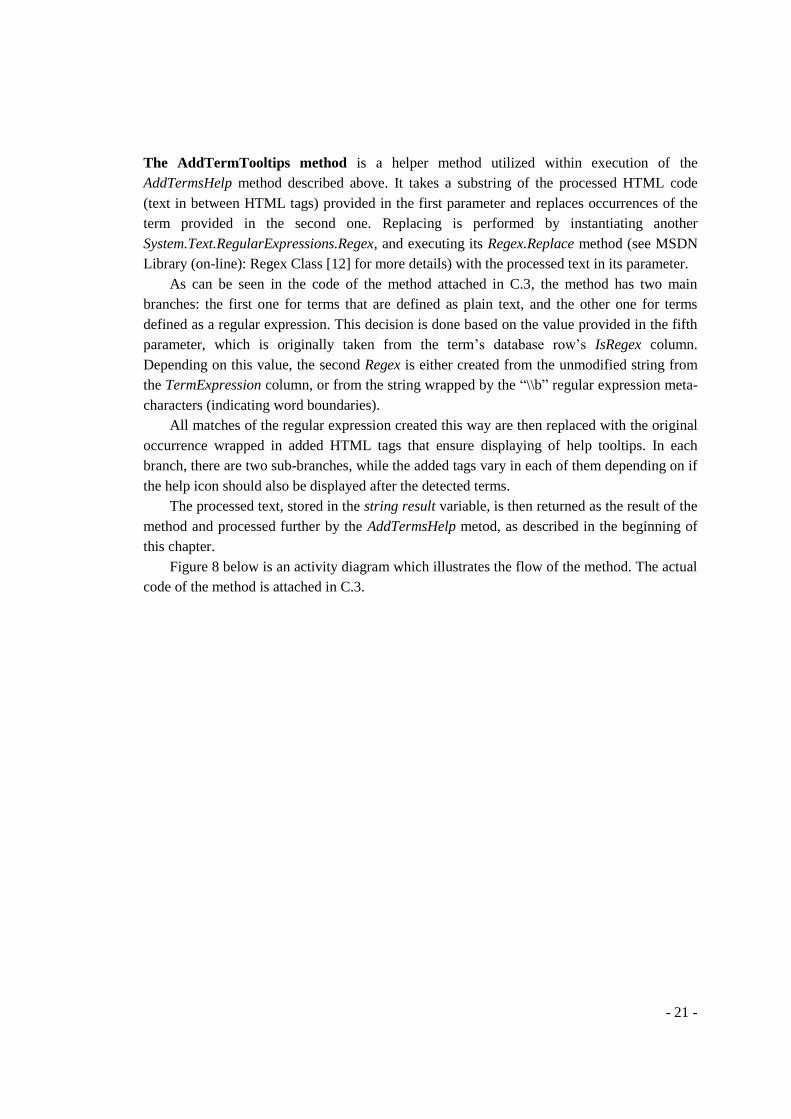
The AddTermTooltips method is a helper method utilized within execution of the
AddTermsHelp method described above. It takes a substring of the processed HTML code
(text in between HTML tags) provided in the first parameter and replaces occurrences of the
term provided in the second one. Replacing is performed by instantiating another
System.Text.RegularExpressions.Regex, and executing its Regex.Replace method (see MSDN
Library (on-line): Regex Class [12] for more details) with the processed text in its parameter.
As can be seen in the code of the method attached in C.3, the method has two main
branches: the first one for terms that are defined as plain text, and the other one for terms
defined as a regular expression. This decision is done based on the value provided in the fifth
parameter, which is originally taken from the term’s database row’s IsRegex column.
Depending on this value, the second Regex is either created from the unmodified string from
the TermExpression column, or from the string wrapped by the “\\b” regular expression meta-
characters (indicating word boundaries).
All matches of the regular expression created this way are then replaced with the original
occurrence wrapped in added HTML tags that ensure displaying of help tooltips. In each
branch, there are two sub-branches, while the added tags vary in each of them depending on if
the help icon should also be displayed after the detected terms.
The processed text, stored in the string result variable, is then returned as the result of the
method and processed further by the AddTermsHelp metod, as described in the beginning of
this chapter.
Figure 8 below is an activity diagram which illustrates the flow of the method. The actual
code of the method is attached in C.3.

- 22 -
Figure 8 - UML 2.0 Activity diagram illustrating the flow of the AddTermTooltip method.
5.2.4. HTML Elements Help
The second functionality of the module is displaying of help next to HTML elements with
certain IDs. These elements can be virtually any HTML tags that have the ID attribute and
some value in it. The functionality is provided by the AddElementsHelp method declared in
the ContextHelpHelper class. As explained in 5.2.2, the method is executed after the
AddTermsHelp method, with the output HTML code already processed by this method used in
its first parameter.
Similarly as in the AddTermsHelp method, the htElements hash table is used to store
ArrayLists containing defined help for elements that should be searched on particular pages.
These ArrayLists contain only those rows from the dbo.customtable_ContextHelpElements
custom table that match the current URL, type of page (either system page or live site page)
and the current culture. As a key for each hash table record, the current culture code and
current URL are used respectively, separated by the tube character.
If no record for the current page is found in the hash table, the
CMS.SiteProvider.CustomTableItemProvider is initialized and used to retrieve records from
the dbo.customtable_ContextHelpElements custom table. An SQL WHERE condition is used
in the second parameter of the GetItems method to retrieve only those rows that match the
current culture and that are defined either for live site pages or for user interface pages, based
on the current context. Then, records from this DataTable are filtered further into the final
ArrayList that will be added to the hash table. Filtering selects only those records (elements)
that should be applied for the current URL. Emptiness of the PageUrl column is checked first
(it is expected to be more selective and therefore it should be checked first with lazy
- 23 -
evaluation, which is used in this case), the second part of the logical disjunction is the
Boolean value returned by the ResolveHelpUrl method. The method is executed with the
parameters initialized above to reflect the current context. If the condition is met, the row is
added to the ArrayList. When iteration for all retrieved records finishes, the ArrayList filled
with data rows of elements to be searched on the current page is added to the hash table.
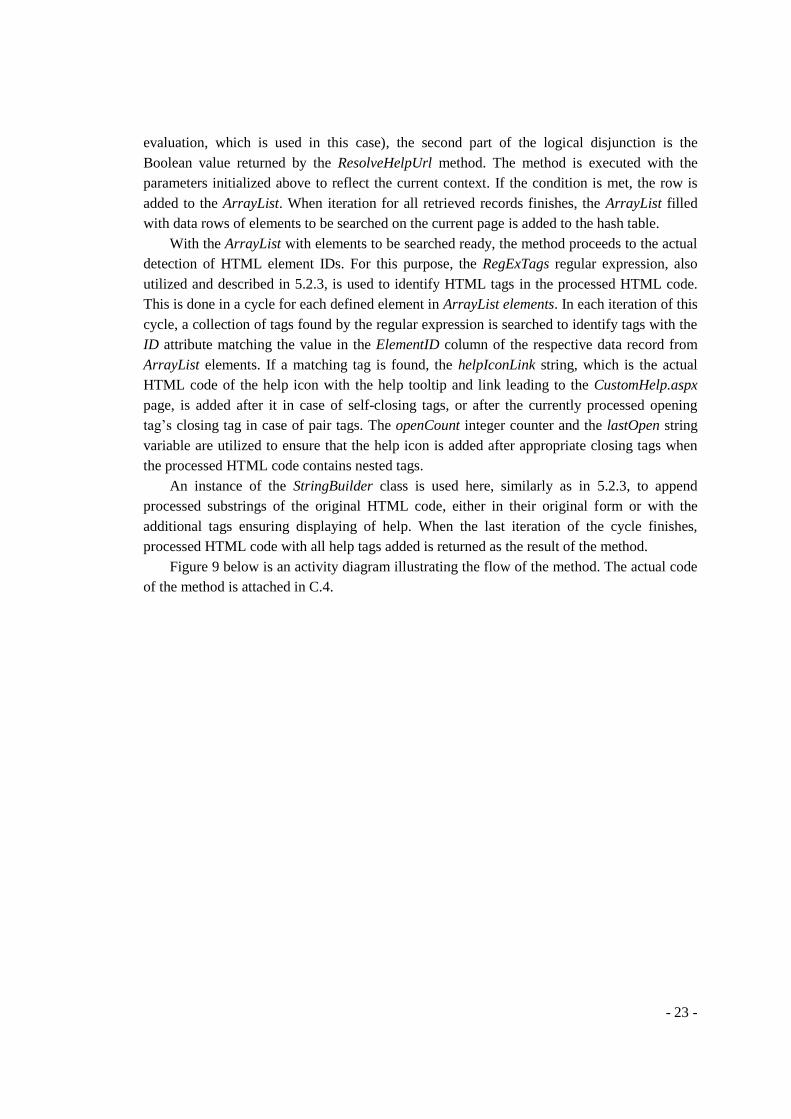
With the ArrayList with elements to be searched ready, the method proceeds to the actual
detection of HTML element IDs. For this purpose, the RegExTags regular expression, also
utilized and described in 5.2.3, is used to identify HTML tags in the processed HTML code.
This is done in a cycle for each defined element in ArrayList elements. In each iteration of this
cycle, a collection of tags found by the regular expression is searched to identify tags with the
ID attribute matching the value in the ElementID column of the respective data record from
ArrayList elements. If a matching tag is found, the helpIconLink string, which is the actual
HTML code of the help icon with the help tooltip and link leading to the CustomHelp.aspx
page, is added after it in case of self-closing tags, or after the currently processed opening
tag’s closing tag in case of pair tags. The openCount integer counter and the lastOpen string
variable are utilized to ensure that the help icon is added after appropriate closing tags when
the processed HTML code contains nested tags.
An instance of the StringBuilder class is used here, similarly as in 5.2.3, to append
processed substrings of the original HTML code, either in their original form or with the
additional tags ensuring displaying of help. When the last iteration of the cycle finishes,
processed HTML code with all help tags added is returned as the result of the method.
Figure 9 below is an activity diagram illustrating the flow of the method. The actual code
of the method is attached in C.4.
- 24 -
Figure 9 - UML 2.0 Activity diagram illustrating the flow of the AddElementsHelp method.
5.2.5. ResolveHelpUrl Method
This method is used in both the AddTermsHelp and the AddElementsHelp methods (described
in 5.2.3 and 5.2.4 respectively). In both cases, it is used as a part of a condition to decide if
- 25 -
each defined term or HTML element retrieved from the database should be searched on the
current page.
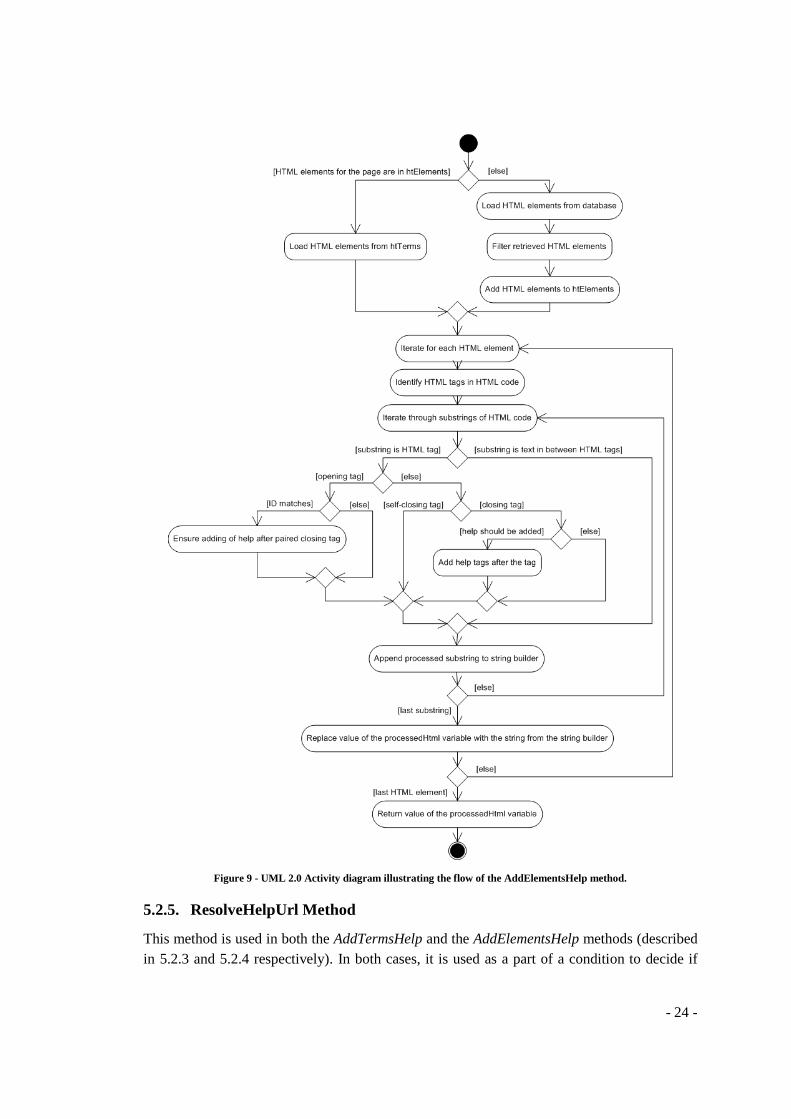
The method takes the resolved URL defined in the PageURL column of each term or
HTML element data record and compares it with the current page URL, which is provided to
the method in the second parameter. Based on the value of the third parameter, which is
originally the value of the UrlResolveType column of each particular term or HTML element
record, the code continues to one of the four branches of the switch branching. As explained in
the UrlResolveType column’s description in 5.1, particular branches ensure that the method
returns the true value (the URLs are matching), if:
case 0: the URL in the first parameter is equal to the current URL
case 1: the URL in the first parameter is a substring of the current URL
case 2: the URL in the first parameter is a regular expression that matches the current
URL
case 3: the URL in the first parameter is a regular expression that matches a substring of
the current URL
Except for the first case where comparison is done using the String.Equals method, regular
expression comparison using the Regex.IsMatch method (documented at MSDN Library (on-
line): Regex Class [12]) is used to compare the two URLs. Instantiation of a regular
expression in the Regex reUrl property using the RegexHelper.GetRegex method is performed
first, while the resolvedUrl string provided in the first parameter is used as its parameter,
differently in each of the remaining three branches.
When comparing as URL substring, it is escaped using the Regex.Escape method. When
comparing as a regular expression, it is wrapped in the ^ and $ meta-characters. When
comparing as a regular expression substring, the string is left unmodified. Then, the
reUrl.IsMatch method is called with the currentUrl value in its parameter. Boolean result of
this matching is then returned as a result of the whole method.
Figure 10 below is an activity diagram illustrating the flow of the method. The actual
code of the method is attached in C.5.
- 26 -
Figure 10 - UML 2.0 Activity diagram illustrating the flow of the ResolveHelpUrl method.
5.3. Custom Context Help Topics
The last functionality of the module is achieved by a modification of the
CMSAdminControls\UI\Help.ascx control. This control is a native part of Kentico CMS and it
is used in all user interface pages to provide users with access to the default context help
topics. The control appears as a green circle icon with a question mark in the middle, as
depicted in Figure 3 in chapter 3.3.3. The modification of the control is based on adding the
following extra line to the control’s Help.ascx.cs code behind file:
lnkHelp.NavigateUrl = ContextHelpHelper.ResolveCustomTopic(TopicName, DocumentationUrl);
The added code ensures that the value returned by the ResolveCustomTopic method, called
with the topic name in the first parameter and the default context help location in the second
one, is inserted as a value of the lnkHelp.NavigateUrl property. This is the property where the
actual target of the help icon, i.e. the URL of the default context help topic, is natively stored.
The method takes a context help topic name in the first parameter and checks if there is a
custom context help topic defined for it.
As explained in 5.1, defined custom topics are stored in the
dbo.customtable_ContextHelpTopics custom table. For optimized performance, the
htIsCustomTopic hash table is used here to eliminate repetitive database access, similarly as in
5.2.3 and 5.2.4. The hash table contains a Boolean value indicating if there is a custom topic
defined for a particular topic under a specific user interface culture. The culture code and topic
name are used as a key for each record, separated by the tube character.
If there is a record for the topic, the method returns a URL of the CustomHelp.aspx page
(see 5.4 for more details) with the topic name and current culture appended in query string
- 27 -
parameters. If no record is found for the topic, the method returns a URL of the default
context help topic, which is the default context help location provided in the second
parameter, with the topic name and the “.htm” suffix appended. The actual data of the custom
topic are not loaded at this point yet – they are obtained on page load of the CustomHelp.ascx
page, as explained in 5.4.
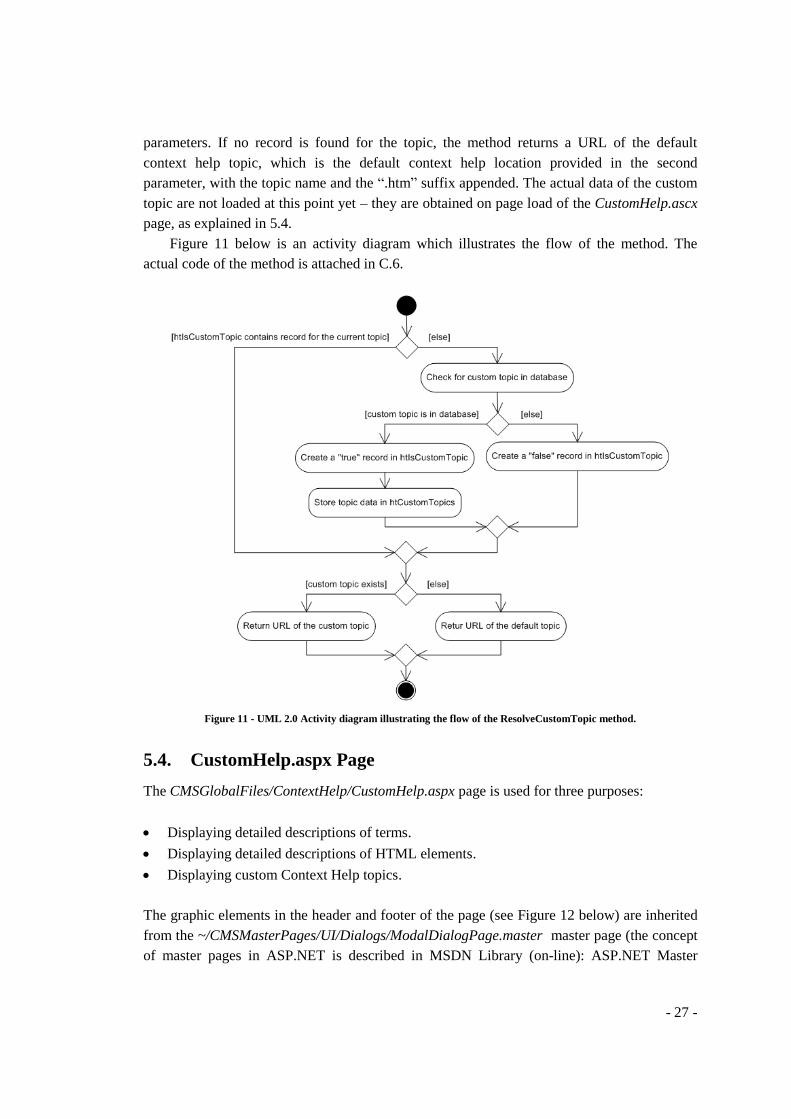
Figure 11 below is an activity diagram which illustrates the flow of the method. The
actual code of the method is attached in C.6.
Figure 11 - UML 2.0 Activity diagram illustrating the flow of the ResolveCustomTopic method.
5.4. CustomHelp.aspx Page
The CMSGlobalFiles/ContextHelp/CustomHelp.aspx page is used for three purposes:
Displaying detailed descriptions of terms.
Displaying detailed descriptions of HTML elements.
Displaying custom Context Help topics.
The graphic elements in the header and footer of the page (see Figure 12 below) are inherited
from the ~/CMSMasterPages/UI/Dialogs/ModalDialogPage.master master page (the concept
of master pages in ASP.NET is described in MSDN Library (on-line): ASP.NET Master

- 28 -
Pages [15]). This master page is commonly used for various parts of the system's user
interface. Besides ensuring the uniform look that all Kentico CMS user interface pages share,
using this master page also causes that the CustomHelp.aspx page will be treated as a system
page by the system. This, among other things, means that text of this page will be processed
by the two methods described in 5.2.3 and 5.2.4. In other words, help for terms and HTML
elements is displayed on this page too, as can be seen in Figure 12 below.
Figure 12 - Detailed description of a term displayed on the CustomHelp.aspx page. Please note that defined terms are
highlighted on this page too.
Below the graphic elements inherited from the master page, only a single Literal control
resides. This is a native ASP.NET control used to insert dynamically provided raw HTML
code into a page’s output HTML code (see MSDN Library (on-line): LiteralControl Class [14]
for more details). In our case, it is used to display the actual help text, obtained differently in
each of the three cases. The actual code of the method is attached in C.7.
The code attached in C.8 is the page’s Page_Load method. A Page_Load method is
present in the code behind file of each ASP.NET page (CustomHelp.aspx.cs in this case) and
it is executed when the page is loaded. As you can see, the code splits into three branches,
depending on the name of the query string key in the URL under which the page was
accessed. The CMS.GlobalHelper.QueryHelper.Contains method from Kentico CMS API is
used here to verify if the query string contains either the „termId“, „elementId“ or „topic“
- 29 -
parameters. The parameters are expected to be present in the URL, as all URLs leading to this
page are rendered with them, as explained in 5.2.3, 5.2.4 or 5.3. In case that neither of the
parameters is present (e.g. on access by entering a direct URL into the browser without any
query string), the following text message is displayed in the Literal control: “Invalid access -
no help subject specified in querystring.”
Based on presence of one of the parameters, a DataRow with the required help record is
loaded from either the htTerms, htElements or htTopics hash table (see 5.2.3, 5.2.4 or 5.3
respectively for more information on how data records are stored in the hash tables for
optimized performance). To get a key for a hash table record, value of the parameters
mentioned above is used, together with the value of the “culture“ parameter. Values are
obtained using the CMS.GlobalHelper.QueryHelper.GetValue mehtod, also available in the
native Kentico CMS API.
When the DataRow is obtained, values from the LongDescription column (for terms and
HTML elements) or the TopicText column (for custom topics) is inserted into the Literal.Text
property of the Literal control mentioned in the beginning of this chapter. This ensures that
defined custom help is displayed on the page.
5.5. User Interface of the Module
The module’s user interface is located in CMS Desk -> Tools -> Context help. This location
was chosen based on the module requirements attached as A - Module Requirements from
Kentico Software. Physically, pages of this user interface are stored inside the project folder,
specifically in ~\CMSGlobalFiles\ContextHelp\Tools. This location was chosen, according to
Kentico CMS 5.0 Developer’s Guide (on-line): Folder structure and import/export [8], to
ensure that the user interface pages will be included in the export package, together with the
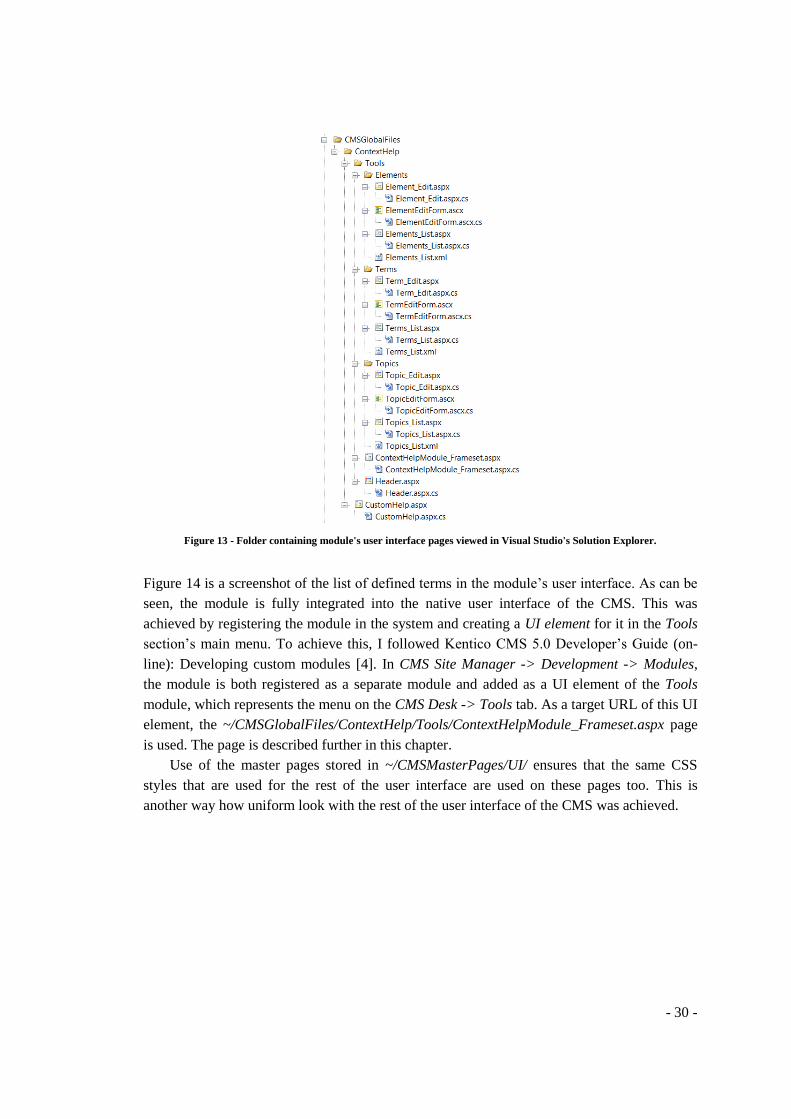
rest of the module. Figure 13 below depicts all files stored in this folder, viewed as a tree in
Visual Studio’s Solution Explorer.
- 30 -
Figure 13 - Folder containing module's user interface pages viewed in Visual Studio's Solution Explorer.
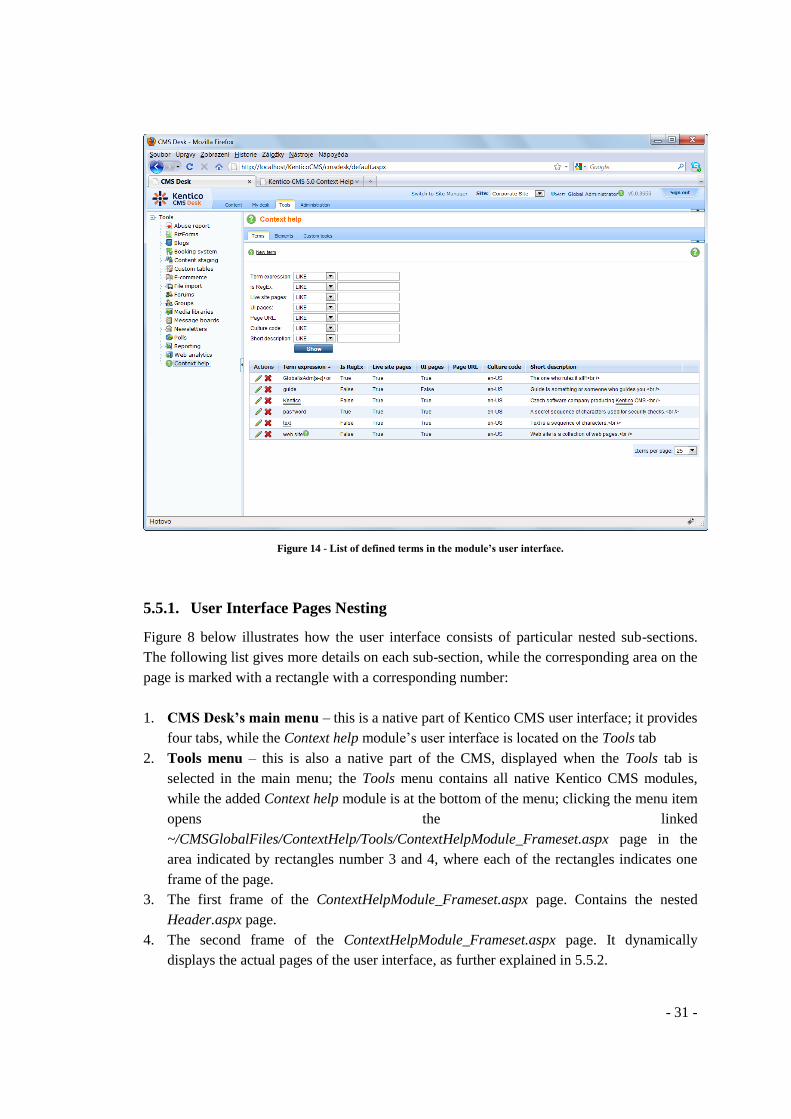
Figure 14 is a screenshot of the list of defined terms in the module’s user interface. As can be
seen, the module is fully integrated into the native user interface of the CMS. This was
achieved by registering the module in the system and creating a UI element for it in the Tools
section’s main menu. To achieve this, I followed Kentico CMS 5.0 Developer’s Guide (on-
line): Developing custom modules [4]. In CMS Site Manager -> Development -> Modules,
the module is both registered as a separate module and added as a UI element of the Tools
module, which represents the menu on the CMS Desk -> Tools tab. As a target URL of this UI
element, the ~/CMSGlobalFiles/ContextHelp/Tools/ContextHelpModule_Frameset.aspx page
is used. The page is described further in this chapter.
Use of the master pages stored in ~/CMSMasterPages/UI/ ensures that the same CSS
styles that are used for the rest of the user interface are used on these pages too. This is
another way how uniform look with the rest of the user interface of the CMS was achieved.
- 31 -
Figure 14 - List of defined terms in the module’s user interface.
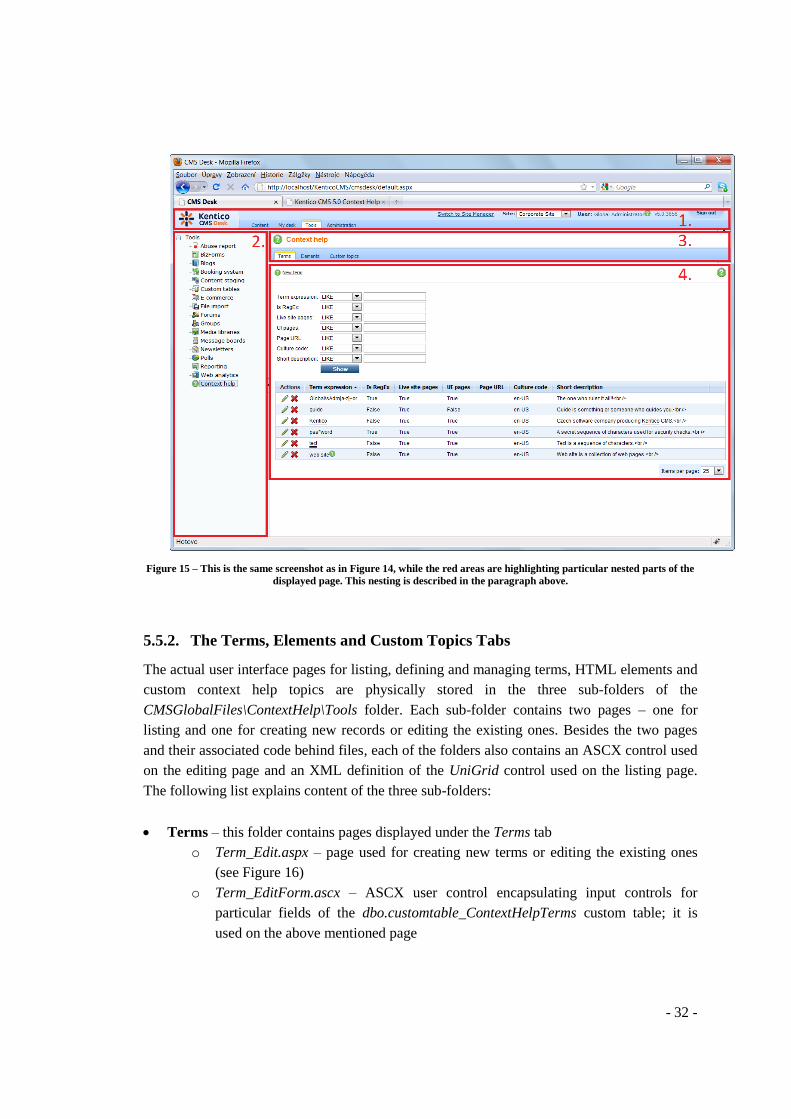
5.5.1. User Interface Pages Nesting
Figure 8 below illustrates how the user interface consists of particular nested sub-sections.
The following list gives more details on each sub-section, while the corresponding area on the
page is marked with a rectangle with a corresponding number:
1. CMS Desk’s main menu – this is a native part of Kentico CMS user interface; it provides
four tabs, while the Context help module’s user interface is located on the Tools tab
2. Tools menu – this is also a native part of the CMS, displayed when the Tools tab is
selected in the main menu; the Tools menu contains all native Kentico CMS modules,
while the added Context help module is at the bottom of the menu; clicking the menu item
opens the linked
~/CMSGlobalFiles/ContextHelp/Tools/ContextHelpModule_Frameset.aspx page in the
area indicated by rectangles number 3 and 4, where each of the rectangles indicates one
frame of the page.
3. The first frame of the ContextHelpModule_Frameset.aspx page. Contains the nested
Header.aspx page.
4. The second frame of the ContextHelpModule_Frameset.aspx page. It dynamically
displays the actual pages of the user interface, as further explained in 5.5.2.
- 32 -
Figure 15 – This is the same screenshot as in Figure 14, while the red areas are highlighting particular nested parts of the
displayed page. This nesting is described in the paragraph above.
5.5.2. The Terms, Elements and Custom Topics Tabs
The actual user interface pages for listing, defining and managing terms, HTML elements and
custom context help topics are physically stored in the three sub-folders of the
CMSGlobalFiles\ContextHelp\Tools folder. Each sub-folder contains two pages – one for
listing and one for creating new records or editing the existing ones. Besides the two pages
and their associated code behind files, each of the folders also contains an ASCX control used
on the editing page and an XML definition of the UniGrid control used on the listing page.
The following list explains content of the three sub-folders:
Terms – this folder contains pages displayed under the Terms tab
o Term_Edit.aspx – page used for creating new terms or editing the existing ones
(see Figure 16)
o Term_EditForm.ascx – ASCX user control encapsulating input controls for
particular fields of the dbo.customtable_ContextHelpTerms custom table; it is
used on the above mentioned page

- 33 -
o Terms_List.aspx – page used for listing of already defined terms; the UniGrid
control is used on the page, uniformly as in all listings in the system’s native user
interface
o Terms_List.xml – this XML file contains configuration of the UniGrid control
used on the above mentioned page; it defines which columns of the custom table
should be displayed in the grid and offered in the filter above the grid
Figure 16 - Editing of an existing terms on the Term_Edit.aspx page. The same page is also used for definition of new
terms.
The Elements and Topics folders have content similar to the Terms folder, and the purpose
and content of particular files is also fully analogical to what is described above:
Elements – contains pages displayed under the Elements tab
o Element_Edit.aspx
o Element_EditForm.aspx
o Elements_List.aspx
o Elements_List.xml
Topics – contains pages displayed under the Custom topics tab
o Topic_Edit.aspx
o Topic_EditForm.aspx
o Topics_List.aspx

- 34 -
o Topics_List.xml

- 35 -
Chapter 6
Further Improvement Possibilities As usual in software development, ideas for further improvements of the module over the
scope defined by received module requirements (as attached in A - Module Requirements
from Kentico Software) appeared during its implementation. Even though the module brings
an already interesting and powerful set of functionality, it may be further improved or
extended in many ways. The following list contains ideas for further improvements that may
be implemented in the future:
Enable global disabling of the module’s activity using a settings key in the user interface
of the CMS.
Ensure both case sensitive and case insensitive detection of defined terms.
Enable definition of scopes for more detailed specification of pages where particular
terms or HTML elements should be searched.
Enable advanced customization of added help styling, i.e. an alternative to the currently
used double-underlined font used for detected terms. This should be achievable by
selecting a custom or pre-defined CSS class within the system’s user interface, so that
users have no need to modify the code of the module to achieve this level of
customization.
Enable customization of the help icon displayed with detected terms of HTML elements.
This should be achievable by uploading a custom image file from the user’s local
computer via the system’s user interface.
Create a larger default set of defined HTML elements, terms or custom topics that would
be included in the package and that would extensively demonstrate possibilities of the
module on some of the sample websites shipped with the system.
Create dedicated data objects, providers and database tables for the module, so that it is
unified with the native part of the CMS.
Include the module in the standard installation of some future major release version of
Kentico CMS.
- 36 -
Chapter 7
Conclusion Development of the module described in this thesis contributed to further extension of the
possibilities that Kentico CMS gives to website developers. By adding this module to the
standard installation of Kentico CMS, website developers get a simple and straightforward
way how they can provide users of their websites with context-related help directly on the live
site or in the system’s user interface. If properly used, the module may contribute to their
websites being easier to use and their content easier to understand.
On top of it, the custom context help topics functionality allows web developers to
customize default context help that is natively shipped with the system. Because the default
context help is sometimes too general to be fully understood by non-technical end users, this
module enables its customization with regards to the specific needs of an individual website
and its content editors or generally all users of the system’s user interface.
- 37 -
Literature
[1] Kentico CMS for ASP.NET (on-line), 2010. Accessible at URL http://www.kentico.com
(May 2010).
[2] Kentico CMS for ASP.NET (on-line): System requirements, 2010. Accessible at URL
http://www.kentico.com/Download/System-Requirements.aspx (May 2010).
[3] Kentico CMS for ASP.NET (on-line): Features, 2010. Accessible at URL
http://www.kentico.com/free-cms-asp-net.aspx (May 2010).
[4] Kentico CMS 5.0 Developer’s Guide (on-line): Developing custom modules, 2010.
Accessible at URL: http://devnet.kentico.com/docs/5_0/devguide/custom_modules.htm
(June 2010).
[5] Kentico DevNet (on-line): Documentation, 2010. Accessible at URL:
http://devnet.kentico.com/Documentation.aspx (May 2010).
[6] Hejtmánek, Martin. Kentico DevNet (on-line): DIY: How to apply custom output filter,
2010. Accessible at URL: http://devnet.kentico.com/Blogs/Martin-Hejtmanek/April-
2010/DIY--How-to-apply-custom-output-filter.aspx (June 2010).
[7] Kentico CMS 5.0 Developer’s Guide (on-line): Custom tables, 2010. Accessible at URL:
http://devnet.kentico.com/docs/5_0/devguide/custom_tables_module_overview.htm (June
2010).
[8] Kentico CMS 5.0 Developer’s Guide (on-line): Folder structure and import/export, 2010.
Accessible at URL:
http://devnet.kentico.com/docs/5_0/devguide/folder_structure_and_importexport.htm
(June 2010).
[9] Hejtmánek, Martin. Kentico DevNet (on-line): How to effectively customize Kentico
CMS UI, 2009. Accessible at URL: http://devnet.kentico.com/Blogs/Martin-
Hejtmanek/June-2009/How-to-effectively-customize-Kentico-CMS-UI.aspx (June 2010).

- 38 -
[10] MSDN Library (on-line): ArrayList Class, 2010. Accessible at URL:
http://msdn.microsoft.com/en-us/library/system.collections.arraylist%28VS.71%29.aspx
(June 2010).
[11] MSDN Library (on-line): Hashtable Class, 2010. Accessible at URL:
http://msdn.microsoft.com/en-us/library/system.collections.hashtable%28VS.71%29.aspx
(June 2010).
[12] MSDN Library (on-line): Regex Class, 2010. Accessible at URL:
http://msdn.microsoft.com/en-us/library/system.text.regularexpressions.regex.aspx (June
2010).
[13] MSDN Library (on-line): StringBuilder Class, 2010. Accessible at URL:
http://msdn.microsoft.com/en-us/library/system.text.stringbuilder%28VS.71%29.aspx
(June 2010).
[14] MSDN Library (on-line): LiteralControl Class, 2010. Accessible at URL:
http://msdn.microsoft.com/en-us/library/system.web.ui.literalcontrol.aspx (June 2010).
[15] MSDN Library (on-line): ASP.NET Master Pages, 2010. Accessible at URL:
http://msdn.microsoft.com/en-us/library/wtxbf3hh.aspx (June 2010).
Please note: off-line versions of all referenced resources are available on the attached CD
medium.

- 39 -
Annexes
A. Module Requirements from Kentico Software
The following is a literal transcription of the module requirements received from Kentico
Software as the assignment of this thesis.
A.1 Purpose
The goal is to provide the way how to interactively provide the context help for the UI,
editable by the client (for their own specific purposes).
A.2 Description
The module should allow management of the context help topics (tooltips), their relations and
detailed descriptions to interconnect parts of the system and make the UI more friendly for
beginners. It should allow following options:
Term highlighting – Similar to Google AdWords, specific defined terms will be
highlighted and tooltips created over them
Tooltip for specific elements – User defines tooltip and location for specific UI page and
element on the page
Context help for specific page – It should replace current context help hint with the data
from the context help database
The tooltips will be displayed with the tooltip JS framework included into Kentico CMS.
There will be base version of tooltip and detailed version, which will display when the user
clicks “More information …” link at the bottom of the base tooltip. The tooltip will expand
automatically. The tooltips should be bound to specific UI culture as a new tab in the UI
culture properties. The tooltips should support all types of macros (should be resolved by the
macro resolver).
A.3 Use Cases
Term Highlighting
1. Administrator defines the specific term that should be highlighted across the system in
any text (not inside of the tags), e.g. “web part”.
2. He chooses the scope of the term from following options (different than the following
controls may be used):
(radiobutton) All pages in given scope
[checkbox] UI pages
[checkbox] Live site pages
- 40 -
(radiobutton) Specific URL
URL: [textbox]
3. He selects whether the help icon should be displayed at the term, if checked, the help icon
will be added directly after the given term.
[checkbox] Display the help icon
4. When user opens the UI, the given terms will be double underlined, and given tooltip will
be applied to the term
Element Tooltips
1. Administrator defines the specific tooltip
2. He defines for which pages the tooltip should apply (same as above)
3. He defines the HTML element ID to which the tooltip should be applied (different than
the following suggested controls may be used):
(radionbutton) Specific element
ID: [textbox]
4. When user opens the specific UI, the given elements will have
Page Context Help
1. Administrator defines the specific context help article
2. He defines for which page the context help should apply
3. The context help control on the page will automatically pick up the context help from the
context help module and displays in the new window the new help.
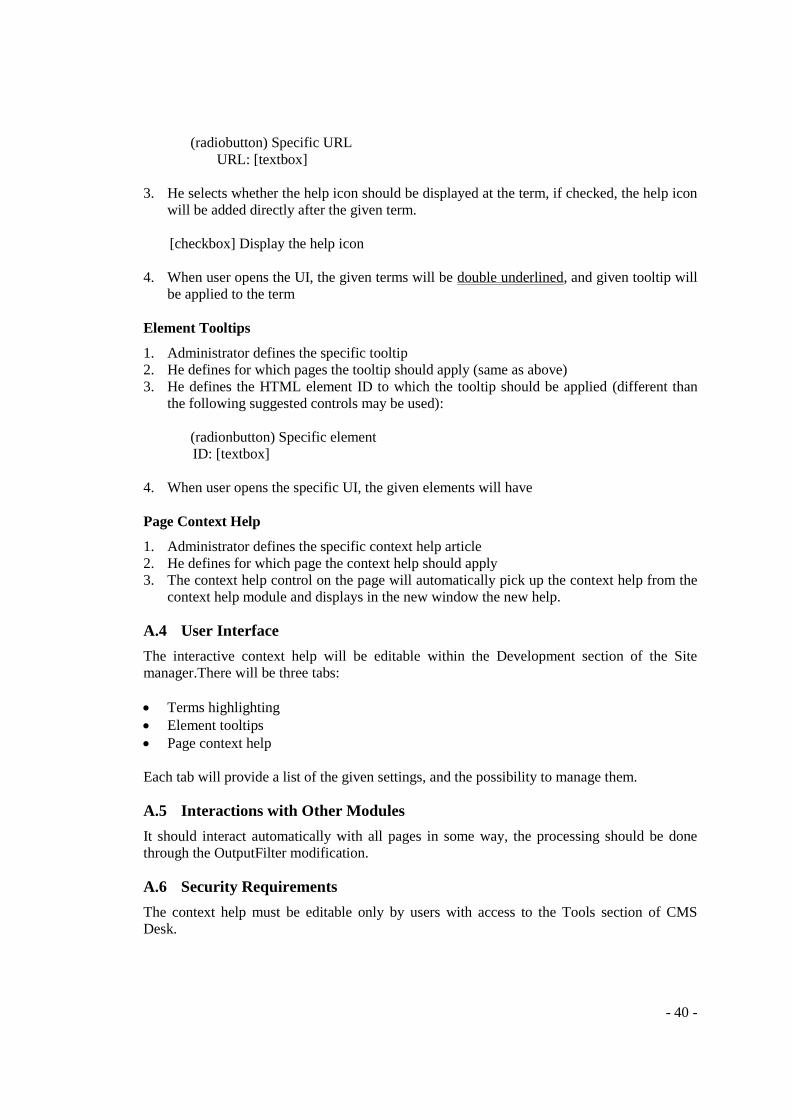
A.4 User Interface
The interactive context help will be editable within the Development section of the Site
manager.There will be three tabs:
Terms highlighting
Element tooltips
Page context help
Each tab will provide a list of the given settings, and the possibility to manage them.
A.5 Interactions with Other Modules
It should interact automatically with all pages in some way, the processing should be done
through the OutputFilter modification.
A.6 Security Requirements
The context help must be editable only by users with access to the Tools section of CMS
Desk.
- 41 -
A.7 Performance Requirements
The context help rules must be cached and the process of applying the data should not take too
long.
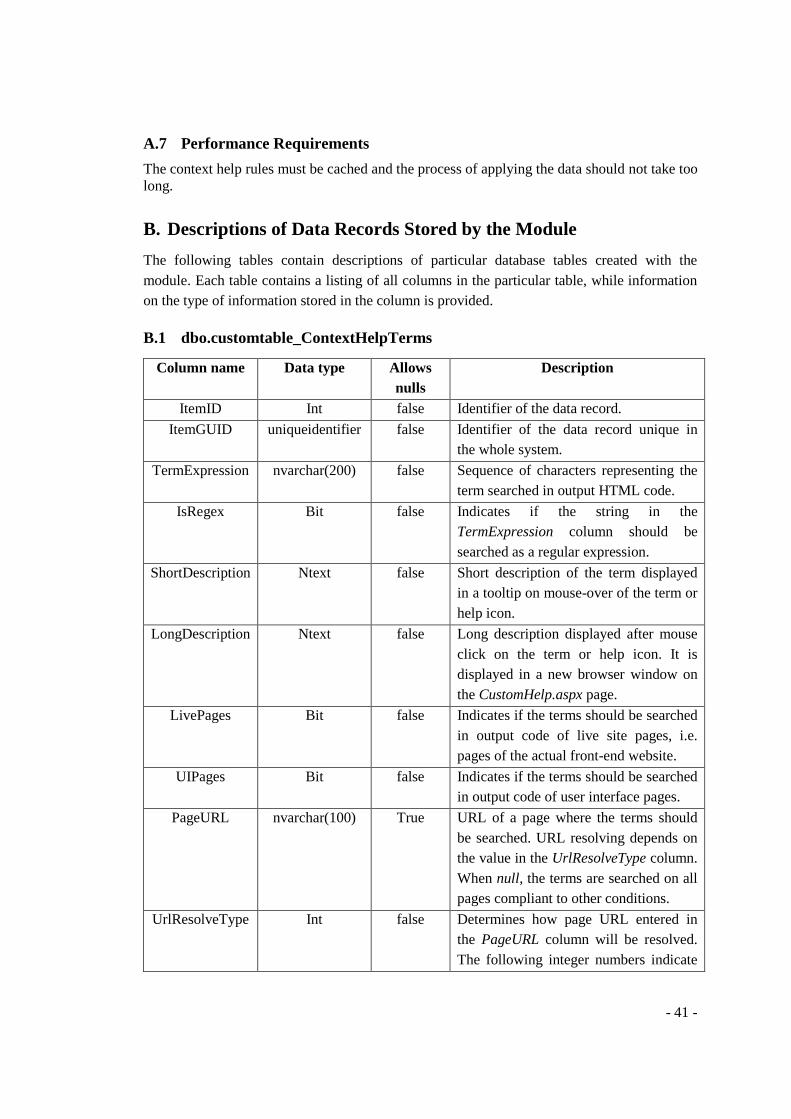
B. Descriptions of Data Records Stored by the Module
The following tables contain descriptions of particular database tables created with the
module. Each table contains a listing of all columns in the particular table, while information
on the type of information stored in the column is provided.
B.1 dbo.customtable_ContextHelpTerms
Column name Data type Allows
nulls
Description
ItemID Int false Identifier of the data record.
ItemGUID uniqueidentifier false Identifier of the data record unique in
the whole system.
TermExpression nvarchar(200) false Sequence of characters representing the
term searched in output HTML code.
IsRegex Bit false Indicates if the string in the
TermExpression column should be
searched as a regular expression.
ShortDescription Ntext false Short description of the term displayed
in a tooltip on mouse-over of the term or
help icon.
LongDescription Ntext false Long description displayed after mouse
click on the term or help icon. It is
displayed in a new browser window on
the CustomHelp.aspx page.
LivePages Bit false Indicates if the terms should be searched
in output code of live site pages, i.e.
pages of the actual front-end website.
UIPages Bit false Indicates if the terms should be searched
in output code of user interface pages.
PageURL nvarchar(100) True URL of a page where the terms should
be searched. URL resolving depends on
the value in the UrlResolveType column.
When null, the terms are searched on all
pages compliant to other conditions.
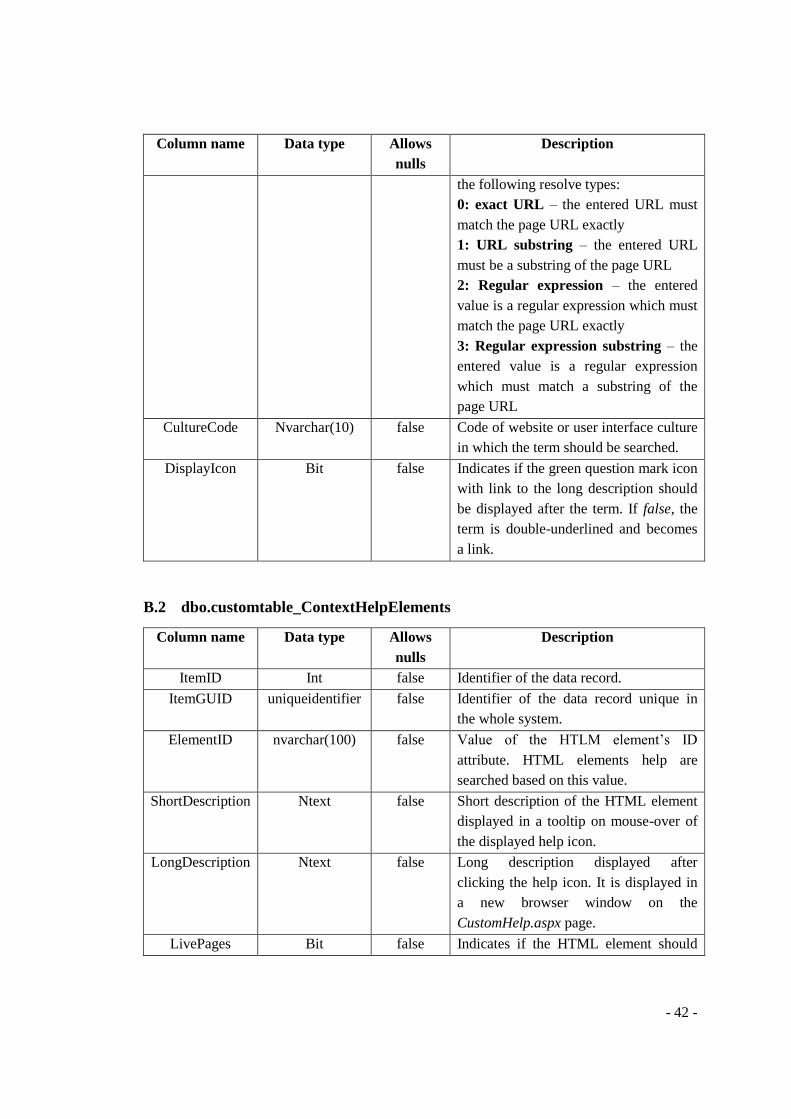
UrlResolveType Int false Determines how page URL entered in
the PageURL column will be resolved.
The following integer numbers indicate
- 42 -
Column name Data type Allows
nulls
Description
the following resolve types:
0: exact URL – the entered URL must
match the page URL exactly
1: URL substring – the entered URL
must be a substring of the page URL
2: Regular expression – the entered
value is a regular expression which must
match the page URL exactly
3: Regular expression substring – the
entered value is a regular expression
which must match a substring of the
page URL
CultureCode Nvarchar(10) false Code of website or user interface culture
in which the term should be searched.
DisplayIcon Bit false Indicates if the green question mark icon
with link to the long description should
be displayed after the term. If false, the
term is double-underlined and becomes
a link.
B.2 dbo.customtable_ContextHelpElements
Column name Data type Allows
nulls
Description
ItemID Int false Identifier of the data record.
ItemGUID uniqueidentifier false Identifier of the data record unique in
the whole system.
ElementID nvarchar(100) false Value of the HTLM element’s ID
attribute. HTML elements help are
searched based on this value.
ShortDescription Ntext false Short description of the HTML element
displayed in a tooltip on mouse-over of
the displayed help icon.
LongDescription Ntext false Long description displayed after
clicking the help icon. It is displayed in
a new browser window on the
CustomHelp.aspx page.
LivePages Bit false Indicates if the HTML element should
- 43 -
Column name Data type Allows
nulls
Description
be searched in output code of live site
pages, i.e. pages of the actual front-end
website.
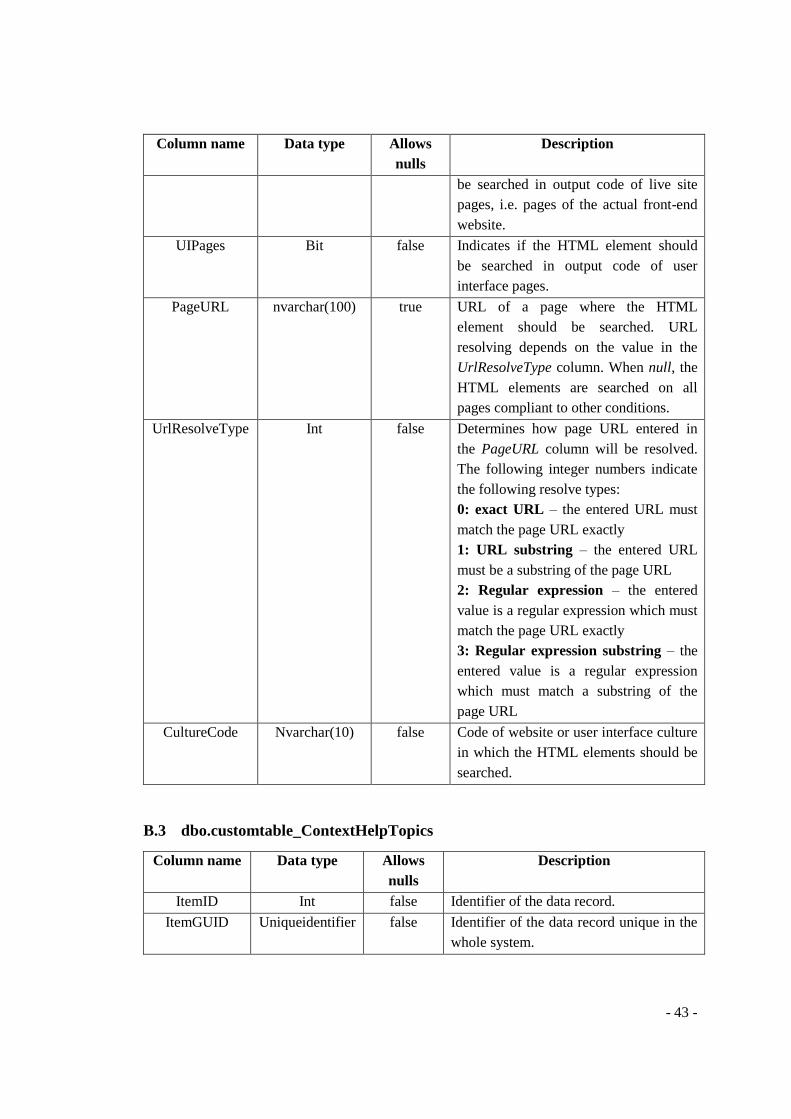
UIPages Bit false Indicates if the HTML element should
be searched in output code of user
interface pages.
PageURL nvarchar(100) true URL of a page where the HTML
element should be searched. URL
resolving depends on the value in the
UrlResolveType column. When null, the
HTML elements are searched on all
pages compliant to other conditions.
UrlResolveType Int false Determines how page URL entered in
the PageURL column will be resolved.
The following integer numbers indicate
the following resolve types:
0: exact URL – the entered URL must
match the page URL exactly
1: URL substring – the entered URL
must be a substring of the page URL
2: Regular expression – the entered
value is a regular expression which must
match the page URL exactly
3: Regular expression substring – the
entered value is a regular expression
which must match a substring of the
page URL
CultureCode Nvarchar(10) false Code of website or user interface culture
in which the HTML elements should be
searched.
B.3 dbo.customtable_ContextHelpTopics
Column name Data type Allows
nulls
Description
ItemID Int false Identifier of the data record.
ItemGUID Uniqueidentifier false Identifier of the data record unique in the
whole system.
- 44 -
Column name Data type Allows
nulls
Description
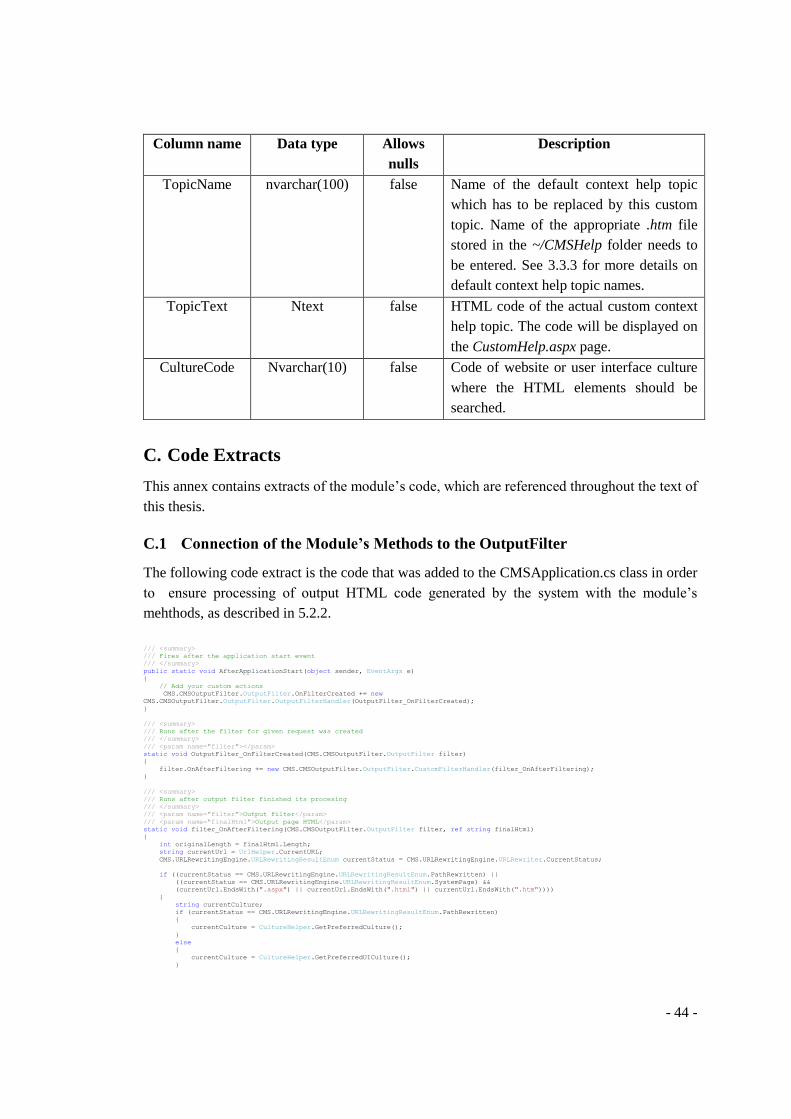
TopicName nvarchar(100) false Name of the default context help topic
which has to be replaced by this custom
topic. Name of the appropriate .htm file
stored in the ~/CMSHelp folder needs to
be entered. See 3.3.3 for more details on
default context help topic names.
TopicText Ntext false HTML code of the actual custom context
help topic. The code will be displayed on
the CustomHelp.aspx page.
CultureCode Nvarchar(10) false Code of website or user interface culture
where the HTML elements should be
searched.
C. Code Extracts
This annex contains extracts of the module’s code, which are referenced throughout the text of
this thesis.
C.1 Connection of the Module’s Methods to the OutputFilter
The following code extract is the code that was added to the CMSApplication.cs class in order
to ensure processing of output HTML code generated by the system with the module’s
mehthods, as described in 5.2.2.
/// <summary>
/// Fires after the application start event
/// </summary>
public static void AfterApplicationStart(object sender, EventArgs e)
{
// Add your custom actions
CMS.CMSOutputFilter.OutputFilter.OnFilterCreated += new
CMS.CMSOutputFilter.OutputFilter.OutputFilterHandler(OutputFilter_OnFilterCreated);
}
/// <summary>
/// Runs after the filter for given request was created
/// </summary>
/// <param name="filter"></param>
static void OutputFilter_OnFilterCreated(CMS.CMSOutputFilter.OutputFilter filter)
{
filter.OnAfterFiltering += new CMS.CMSOutputFilter.OutputFilter.CustomFilterHandler(filter_OnAfterFiltering);
}
/// <summary>
/// Runs after output filter finished its procesing
/// </summary>
/// <param name="filter">Output filter</param>
/// <param name="finalHtml">Output page HTML</param>
static void filter_OnAfterFiltering(CMS.CMSOutputFilter.OutputFilter filter, ref string finalHtml)
{
int originalLength = finalHtml.Length;
string currentUrl = UrlHelper.CurrentURL;
CMS.URLRewritingEngine.URLRewritingResultEnum currentStatus = CMS.URLRewritingEngine.URLRewriter.CurrentStatus;
if ((currentStatus == CMS.URLRewritingEngine.URLRewritingResultEnum.PathRewritten) ||
((currentStatus == CMS.URLRewritingEngine.URLRewritingResultEnum.SystemPage) &&
(currentUrl.EndsWith(".aspx") || currentUrl.EndsWith(".html") || currentUrl.EndsWith(".htm"))))
{
string currentCulture;
if (currentStatus == CMS.URLRewritingEngine.URLRewritingResultEnum.PathRewritten)
{
currentCulture = CultureHelper.GetPreferredCulture();
}
else
{
currentCulture = CultureHelper.GetPreferredUICulture();
}

- 45 -
finalHtml = CMS.ContextHelp.ContextHelpHelper.AddTermsHelp(finalHtml, currentStatus, currentCulture);
finalHtml = CMS.ContextHelp.ContextHelpHelper.AddElementsHelp(finalHtml, currentStatus, currentCulture);
// registers tooltip script for a page where context help was added
if ((finalHtml.Length != originalLength) && !finalHtml.Contains("wz_tooltip.js"))
{
string tooltipScript = "<script src=\"" + UrlHelper.ResolveUrl("~/CMSScripts/ToolTip/wz_tooltip.js") + "\"
type=\"text/javascript\"></script>";
System.Text.RegularExpressions.Regex re = RegexHelper.GetRegex("<form ", RegexHelper.DefaultOptions |
System.Text.RegularExpressions.RegexOptions.IgnoreCase);
finalHtml = re.Replace(finalHtml, tooltipScript + "$0");
}
}
}
C.2 The AddTermsHelp Method
The following code extract is the code of the AddTermsHelp method. The method is
implemented in the ContextHelpHelper.cs class and ensures adding of terms help, as
explained in 5.2.3.
public static string AddTermsHelp(string sourceHtml, CMS.URLRewritingEngine.URLRewritingResultEnum currentStatus, string currentCulture)
{
string processedText = String.Empty;
string processedHtml = String.Empty;
string currentUrl = UrlHelper.RemoveQuery(UrlHelper.CurrentURL);
string lowerUrl = currentUrl.ToLower();
// load array list with terms for the current culture and url from the hashtable
ArrayList terms = (ArrayList)htTerms[currentCulture + "|" + lowerUrl];
// if the array list is not in the hash table, load it from the custom table in DB
if (terms == null)
{
CustomTableItemProvider ctiProvider = new CustomTableItemProvider(CMSContext.CurrentUser);
DataSet ds = new DataSet();
if (currentStatus == CMS.URLRewritingEngine.URLRewritingResultEnum.SystemPage)
{
ds = ctiProvider.GetItems("customtable.ContextHelpTerms", "UIPages=1 AND CultureCode='" + currentCulture + "'", null);
}
else
{
ds = ctiProvider.GetItems("customtable.ContextHelpTerms", "LivePages=1 AND CultureCode='" + currentCulture + "'", null);
}
DataTable tableTerms = (DataTable)ds.Tables[0];
// create an arraylist with rows of the data table table
terms = new ArrayList();
for (int i = 0; i < tableTerms.Rows.Count; i++)
{
DataRow row = tableTerms.Rows[i];
string termUrl = (string)row["PageUrl"];
int resolveType = (int)row["UrlResolveType"];
if ((termUrl == String.Empty)||(ResolveHelpUrl(termUrl, currentUrl, resolveType)))
{
terms.Add(row);
}
}
// save the array list into the hashtable
htTerms[currentCulture + "|" + lowerUrl] = terms;
}
Regex RegExTags =
RegexHelper.GetRegex("<(?:/?(\\w+)(?:\\s+(\\w+)(?:\\s*=(?!\\s)((?:\"(?:[^\"]|\\\\\")*\")|(?:\'(?:[^\']|\\\\\')*\')|(?:[^\\s/>]|/(?!>))*)|(
?=[\\s/>])(?<3>)|(?<3>=)))*\\s*/?>|(?<1>!--))|(?<1>-->)");
processedHtml = sourceHtml;
// repeat for each term
foreach (DataRow dr in terms)
{
string term = (string)dr["TermExpression"];
bool displayHelpIcon = (bool)dr["DisplayIcon"];
// creates a string builder for the final output
StringBuilder sb = new StringBuilder();
// tags in the currently processed html
MatchCollection tags = RegExTags.Matches(processedHtml);
int counter = 0;
int index = 0;
bool isBody = false;
bool isScript = false;
foreach (Match m in tags)
{
string tag = m.ToString();
bool endTag = tag.StartsWith("</");
bool selfClosed = tag.EndsWith("/>");
string tagName = m.Groups[1].ToString();
string lowerTagName = tagName.ToLower();
int tagIndex = m.Index;
// append text before tag
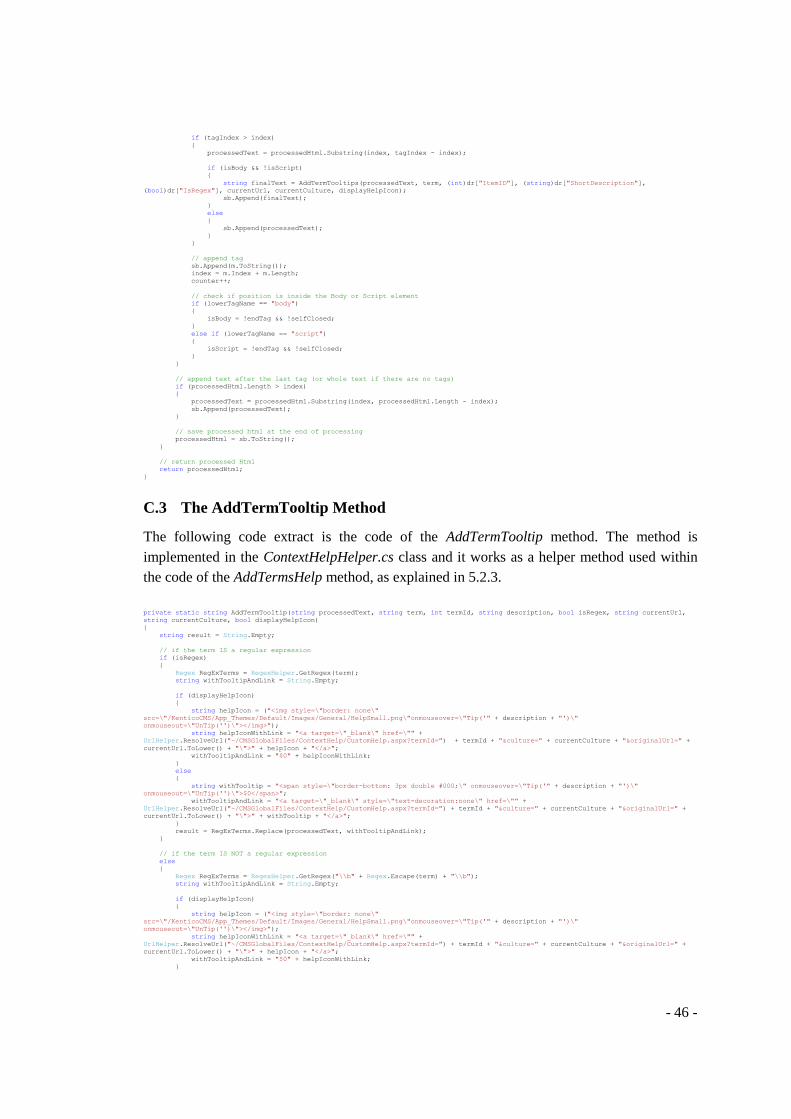
- 46 -
if (tagIndex > index)
{
processedText = processedHtml.Substring(index, tagIndex - index);
if (isBody && !isScript)
{
string finalText = AddTermTooltips(processedText, term, (int)dr["ItemID"], (string)dr["ShortDescription"],
(bool)dr["IsRegex"], currentUrl, currentCulture, displayHelpIcon);
sb.Append(finalText);
}
else
{
sb.Append(processedText);
}
}
// append tag
sb.Append(m.ToString());
index = m.Index + m.Length;
counter++;
// check if position is inside the Body or Script element
if (lowerTagName == "body")
{
isBody = !endTag && !selfClosed;
}
else if (lowerTagName == "script")
{
isScript = !endTag && !selfClosed;
}
}
// append text after the last tag (or whole text if there are no tags)
if (processedHtml.Length > index)
{
processedText = processedHtml.Substring(index, processedHtml.Length - index);
sb.Append(processedText);
}
// save processed html at the end of processing
processedHtml = sb.ToString();
}
// return processed Html
return processedHtml;
}
C.3 The AddTermTooltip Method
The following code extract is the code of the AddTermTooltip method. The method is
implemented in the ContextHelpHelper.cs class and it works as a helper method used within
the code of the AddTermsHelp method, as explained in 5.2.3.
private static string AddTermTooltip(string processedText, string term, int termId, string description, bool isRegex, string currentUrl,
string currentCulture, bool displayHelpIcon)
{
string result = String.Empty;
// if the term IS a regular expression
if (isRegex)
{
Regex RegExTerms = RegexHelper.GetRegex(term);
string withTooltipAndLink = String.Empty;
if (displayHelpIcon)
{
string helpIcon = ("<img style=\"border: none\"
src=\"/KenticoCMS/App_Themes/Default/Images/General/HelpSmall.png\"onmouseover=\"Tip('" + description + "')\"
onmouseout=\"UnTip('')\"></img>");
string helpIconWithLink = "<a target=\"_blank\" href=\"" +
UrlHelper.ResolveUrl("~/CMSGlobalFiles/ContextHelp/CustomHelp.aspx?termId=") + termId + "&culture=" + currentCulture + "&originalUrl=" +
currentUrl.ToLower() + "\">" + helpIcon + "</a>";
withTooltipAndLink = "$0" + helpIconWithLink;
}
else
{
string withTooltip = "<span style=\"border-bottom: 3px double #000;\" onmouseover=\"Tip('" + description + "')\"
onmouseout=\"UnTip('')\">$0</span>";
withTooltipAndLink = "<a target=\"_blank\" style=\"text-decoration:none\" href=\"" +
UrlHelper.ResolveUrl("~/CMSGlobalFiles/ContextHelp/CustomHelp.aspx?termId=") + termId + "&culture=" + currentCulture + "&originalUrl=" +
currentUrl.ToLower() + "\">" + withTooltip + "</a>";
}
result = RegExTerms.Replace(processedText, withTooltipAndLink);
}
// if the term IS NOT a regular expression
else
{
Regex RegExTerms = RegexHelper.GetRegex("\\b" + Regex.Escape(term) + "\\b");
string withTooltipAndLink = String.Empty;
if (displayHelpIcon)
{
string helpIcon = ("<img style=\"border: none\"
src=\"/KenticoCMS/App_Themes/Default/Images/General/HelpSmall.png\"onmouseover=\"Tip('" + description + "')\"
onmouseout=\"UnTip('')\"></img>");
string helpIconWithLink = "<a target=\"_blank\" href=\"" +
UrlHelper.ResolveUrl("~/CMSGlobalFiles/ContextHelp/CustomHelp.aspx?termId=") + termId + "&culture=" + currentCulture + "&originalUrl=" +
currentUrl.ToLower() + "\">" + helpIcon + "</a>";
withTooltipAndLink = "$0" + helpIconWithLink;
}

- 47 -
else
{
string withTooltip = "<span style=\"border-bottom:3px double #000;\" onmouseover=\"Tip('" + description + "')\"
onmouseout=\"UnTip('')\">" + term + "</span>";
withTooltipAndLink = "<a target=\"_blank\" style=\"text-decoration:none\" href=\"" +
UrlHelper.ResolveUrl("~/CMSGlobalFiles/ContextHelp/CustomHelp.aspx?termId=") + termId + "&culture=" + currentCulture + "&originalUrl=" +
currentUrl.ToLower() + "\">" + withTooltip + "</a>";
}
result = RegExTerms.Replace(processedText, withTooltipAndLink);
}
return result;
}
C.4 The AddElementsHelp Method
The following code extract is the code of the AddElementsHelp method. The method is
implemented in the ContextHelpHelper.cs class and it ensures adding of help for HTML
elements, as explained in 5.2.4.
public static string AddElementsHelp(string sourceHtml, CMS.URLRewritingEngine.URLRewritingResultEnum currentStatus, string
currentCulture)
{
string processedText = String.Empty;
string processedHtml = String.Empty;
string currentUrl = UrlHelper.RemoveQuery(UrlHelper.CurrentURL);
string lowerUrl = currentUrl.ToLower();
ArrayList elements = (ArrayList)htElements[currentCulture + "|" + lowerUrl];
if (elements == null)
{
// load the custom table with terms to be highlighted into a DataTable
CustomTableItemProvider ctiProvider = new CustomTableItemProvider(CMSContext.CurrentUser);
DataSet ds = new DataSet();
if (currentStatus == CMS.URLRewritingEngine.URLRewritingResultEnum.SystemPage)
{
ds = ctiProvider.GetItems("customtable.ContextHelpElements", "UIPages=1 AND CultureCode='" + currentCulture + "'", null);
}
else
{
ds = ctiProvider.GetItems("customtable.ContextHelpElements", "LivePages=1 AND CultureCode='" + currentCulture + "'", null);
}
DataTable tableElements = ds.Tables[0];
// create an arraylist with rows of the Terms custom table
elements = new ArrayList();
for (int i = 0; i < tableElements.Rows.Count; i++)
{
DataRow row = tableElements.Rows[i];
string elementUrl = (string)row["PageURL"];
int resolveType = (int)row["UrlResolveType"];
bool livePages = (bool)row["LivePages"];
bool uiPages = (bool)row["UIPages"];
if ((elementUrl == String.Empty)||(ResolveHelpUrl(elementUrl, currentUrl, resolveType)))
{
elements.Add(row);
}
}
htElements[currentCulture + "|" + lowerUrl] = elements;
}
Regex RegExTags =
RegexHelper.GetRegex("<(?:/?(\\w+)(?:\\s+(\\w+)(?:\\s*=(?!\\s)((?:\"(?:[^\"]|\\\\\")*\")|(?:\'(?:[^\']|\\\\\')*\')|(?:[^\\s/>]|/(?!>))*)|(
?=[\\s/>])(?<3>)|(?<3>=)))*\\s*/?>|(?<1>!--))|(?<1>-->)");
processedHtml = sourceHtml;
foreach (DataRow dr in elements)
{
string id = dr["ElementID"].ToString();
int itemId = (int)dr["ItemID"];
string description = dr["ShortDescription"].ToString();
string helpIcon = (" <img style=\"border: none\" src=\"App_Themes/Default/Images/General/HelpSmall.png\"onmouseover=\"Tip('" +
description + "')\" onmouseout=\"UnTip('')\"></img>");
string helpIconLink = "<a target=\"_blank\" href=\"" +
UrlHelper.ResolveUrl("~/CMSGlobalFiles/ContextHelp/CustomHelp.aspx?elementId=") + itemId + "&culture=" + currentCulture + "&originalUrl="
+ lowerUrl + "\">" + helpIcon + "</a>";
MatchCollection tags = RegExTags.Matches(processedHtml);
StringBuilder sb = new StringBuilder();
int openCount = 0;
int counter = 0;
int currentIndex = 0;
bool isBody = false;
string lastOpen = String.Empty;
foreach (Match m in tags)
{
// append normal text before the tag
if (currentIndex < m.Index)
{
string substring = processedHtml.Substring(currentIndex, m.Index - currentIndex);
sb.Append(substring);
}
// append the tag

- 48 -
string tag = m.ToString();
bool endTag = tag.StartsWith("</");
bool selfClosed = tag.EndsWith("/>");
string forAppend = String.Empty;
string tagName = m.Groups[1].ToString();
string lowerTagName = tagName.ToLower();
// opening tags
if (!(endTag || selfClosed))
{
// performs if the tag has the required ID
if (lowerTagName == lastOpen)
{
openCount++;
}
else if (lowerTagName == "body")
{
isBody = true;
}
else
{
if (((tag.Contains("ID=\"" + id + "\"")) || (tag.Contains("id=\"" + id + "\""))) && (lastOpen == String.Empty) &&
isBody)
{
lastOpen = lowerTagName;
openCount = 0;
}
}
forAppend = tag;
}
// closing tags
else if (endTag)
{
if (lowerTagName == lastOpen)
{
if (openCount == 0)
{
forAppend = tag + helpIconLink;
lastOpen = String.Empty;
}
else
{
forAppend = tag;
openCount--;
}
}
else if ((lowerTagName == "body") && (lastOpen != String.Empty))
{
forAppend = helpIconLink + tag;
lastOpen = String.Empty;
isBody = false;
}
else
{
forAppend = tag;
}
}
// self-closing tags
else
{
if (((tag.Contains("ID=\"" + id + "\"")) || (tag.Contains("id=\"" + id + "\""))) && isBody)
{
forAppend = tag + helpIconLink;
}
else
{
forAppend = tag;
}
}
sb.Append(forAppend);
currentIndex = (m.Index + m.Length);
counter++;
}
// append text after last tag
if (processedHtml.Length > currentIndex)
{
string substring = processedHtml.Substring(currentIndex, processedHtml.Length - currentIndex);
sb.Append(substring);
}
processedHtml = sb.ToString();
}
// return processed Html
return processedHtml;
}
C.5 The ResolveHelpUrl Method
The following code extract is the code of the ResolveHelpUrl method. The method is
implemented in the ContextHelpHelper.cs class and it is used by both the AddTermsHelp and
the AddElementsHelp methods to determine if a term or HTML element should be searched
on pages with a particular URL, as explained in 5.2.5.

- 49 -
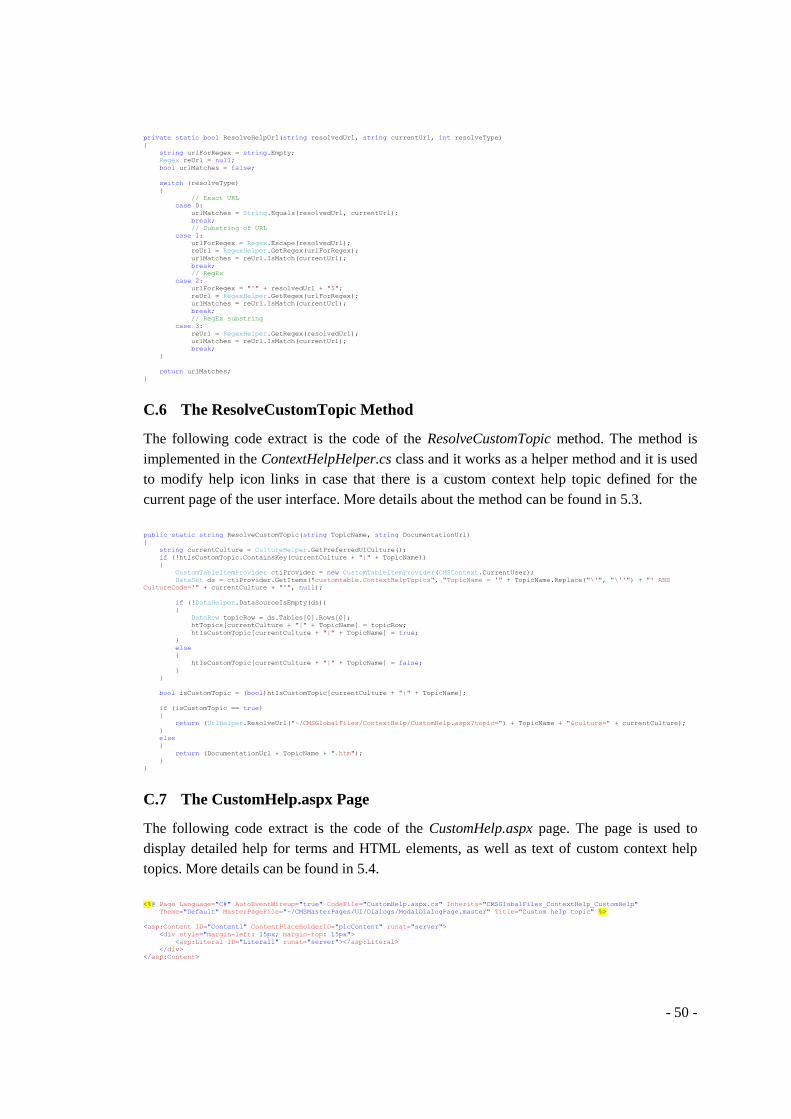
- 50 -
private static bool ResolveHelpUrl(string resolvedUrl, string currentUrl, int resolveType)
{
string urlForRegex = string.Empty;
Regex reUrl = null;
bool urlMatches = false;
switch (resolveType)
{
// Exact URL
case 0:
urlMatches = String.Equals(resolvedUrl, currentUrl);
break;
// Substring of URL
case 1:
urlForRegex = Regex.Escape(resolvedUrl);
reUrl = RegexHelper.GetRegex(urlForRegex);
urlMatches = reUrl.IsMatch(currentUrl);
break;
// RegEx
case 2:
urlForRegex = "^" + resolvedUrl + "$";
reUrl = RegexHelper.GetRegex(urlForRegex);
urlMatches = reUrl.IsMatch(currentUrl);
break;
// RegEx substring
case 3:
reUrl = RegexHelper.GetRegex(resolvedUrl);
urlMatches = reUrl.IsMatch(currentUrl);
break;
}
return urlMatches;
}
C.6 The ResolveCustomTopic Method
The following code extract is the code of the ResolveCustomTopic method. The method is
implemented in the ContextHelpHelper.cs class and it works as a helper method and it is used
to modify help icon links in case that there is a custom context help topic defined for the
current page of the user interface. More details about the method can be found in 5.3.
public static string ResolveCustomTopic(string TopicName, string DocumentationUrl)
{
string currentCulture = CultureHelper.GetPreferredUICulture();
if (!htIsCustomTopic.ContainsKey(currentCulture + "|" + TopicName))
{
CustomTableItemProvider ctiProvider = new CustomTableItemProvider(CMSContext.CurrentUser);
DataSet ds = ctiProvider.GetItems("customtable.ContextHelpTopics", "TopicName = '" + TopicName.Replace("\'", "\''") + "' AND
CultureCode='" + currentCulture + "'", null);
if (!DataHelper.DataSourceIsEmpty(ds))
{
DataRow topicRow = ds.Tables[0].Rows[0];
htTopics[currentCulture + "|" + TopicName] = topicRow;
htIsCustomTopic[currentCulture + "|" + TopicName] = true;
}
else
{
htIsCustomTopic[currentCulture + "|" + TopicName] = false;
}
}
bool isCustomTopic = (bool)htIsCustomTopic[currentCulture + "|" + TopicName];
if (isCustomTopic == true)
{
return (UrlHelper.ResolveUrl("~/CMSGlobalFiles/ContextHelp/CustomHelp.aspx?topic=") + TopicName + "&culture=" + currentCulture);
}
else
{
return (DocumentationUrl + TopicName + ".htm");
}
}
C.7 The CustomHelp.aspx Page
The following code extract is the code of the CustomHelp.aspx page. The page is used to
display detailed help for terms and HTML elements, as well as text of custom context help
topics. More details can be found in 5.4.
<%@ Page Language="C#" AutoEventWireup="true" CodeFile="CustomHelp.aspx.cs" Inherits="CMSGlobalFiles_ContextHelp_CustomHelp"
Theme="Default" MasterPageFile="~/CMSMasterPages/UI/Dialogs/ModalDialogPage.master" Title="Custom help topic" %>
<asp:Content ID="Content1" ContentPlaceHolderID="plcContent" runat="server">
<div style="margin-left: 15px; margin-top: 15px">
<asp:Literal ID="Literal1" runat="server"></asp:Literal>
</div>
</asp:Content>

- 51 -
C.8 The PageLoad Method from the CustomHelp.aspx.cs Code Behind File
The following code extract is the PageLoad method from the code behind of the
CustomHelp.aspx page. The page is used to display detailed help for terms and HTML
elements, as well as text of custom context help topics. More details can be found in 5.4.
protected void Page_Load(object sender, EventArgs e)
{
string text = string.Empty;
// display help for custom topics
if (QueryHelper.Contains("topic"))
{
string culture = QueryHelper.GetString("culture", "culture_not_found");
string topicName = QueryHelper.GetString("topic", "topic_not_found");
this.Page.Title = "Custom Context Help Topic - " + topicName;
CurrentMaster.Title.TitleText = "Custom Context Help Topic - " + topicName;
CurrentMaster.Title.TitleImage = GetImageUrl("General/HelpLarge.png");
DataRow dr = (DataRow)ContextHelpHelper.htTopics[culture + "|" + topicName];
if (!DataHelper.DataSourceIsEmpty(dr))
{
text = (string)dr["TopicText"].ToString();
}
}
// display help for element
else if (QueryHelper.Contains("elementId"))
{
string culture = QueryHelper.GetString("culture", "culture_not_found");
int itemId = QueryHelper.GetInteger("elementId", 0);
string url = QueryHelper.GetString("originalUrl", "element_not_found");
ArrayList elements = (ArrayList)CMS.ContextHelp.ContextHelpHelper.htElements[culture + "|" + url];
if (elements != null)
{
foreach (DataRow dr in elements)
{
if ((int)dr["ItemID"] == itemId)
{
string elementId = (string)dr["ElementID"];
this.Page.Title = "Detailed description of a UI element - " + elementId;
CurrentMaster.Title.TitleText = "Detailed description of a UI element - " + elementId;
CurrentMaster.Title.TitleImage = GetImageUrl("General/HelpLarge.png");
text = dr["LongDescription"].ToString();
}
}
}
}
// display help for term
else if (QueryHelper.Contains("termId"))
{
this.Page.Title = "Detailed description of term";
string culture = QueryHelper.GetString("culture", "culture_not_found");
int termId = QueryHelper.GetInteger("termId", 0);
string url = QueryHelper.GetString("originalUrl", "element_not_found");
ArrayList terms = (ArrayList)CMS.ContextHelp.ContextHelpHelper.htTerms[culture + "|" + url];
if (terms != null)
{
foreach (DataRow dr in terms)
{
if ((int)dr["ItemID"] == termId)
{
string termExpression = (string)dr["TermExpression"];
this.Page.Title = "Detailed description of a term - " + termExpression;
CurrentMaster.Title.TitleText = "Detailed description of a term - " + termExpression;
CurrentMaster.Title.TitleImage = GetImageUrl("General/HelpLarge.png");
text = dr["LongDescription"].ToString();
}
}
}
}
else
{
text = "Invalid access - no help subject specified in querystring.";
}
Literal1.Text = text;
}
- 52 -
D. Installation Instructions
The following steps need to be taken in order to add the module to an existing Kentico CMS
5.0 project:
1. Unzip the contents of the ContextHelpModule.zip package into the root of your web
project folder (e.g. c:\inetpub\wwwroot\KenticoCMS\). The folder structure within the ZIP
package reflects the structure of the web project folder, so that files will be copied to the
appropriate folders.
2. When extracting, confirm overwriting of the original Help.ascx and Help.ascx.cs files
with the ones from the package. The actual ContextHelp_Import.zip import package will
be copied to ~\CMSSiteUtils\Imports, which will ensure that it will be offered in the
packages list in step 4.
3. Log in to the Kentico CMS user interface using the administrator's account. Go to Site
Manger -> Sites and choose Import site or objects.
4. In Step 1 of the import wizard, choose the ContextHelp_Import.zip package that will be
offered in the Import packages list. Choose the Preselect all items option and click Next.
5. Go through the rest of the wizard until the import finishes. Once the package is imported,
restart your web application and you may start using the module.
E. Attached CD Medium
The CD medium attached with this thesis contains the module’s installation package
(ContextHelpModule.zip), an electronic printable version of this thesis (thesis.pdf) and off-line
versions of referenced literature and resources (the Literature folder).