Embed Size (px)
Citation preview

CONFIGURING ADOBE EXPERIENCE MANAGER FORMS ON JEE ON WEBSPHERE CLUSTER

Last updated 5/23/2016
Legal notices
Legal noticesFor legal notices, see http://help.adobe.com/en_US/legalnotices/index.html.

iii
Last updated 5/23/2016
Contents
Chapter 1: About This Document
1.1 Who should read this document? . . . . . . . . . . . . . . . . . . . . . . . . . . . . . . . . . . . . . . . . . . . . . . . . . . . . . . . . . . . . . . . . . . . . . . . . . . . . . . . . . . . 1
1.2 Conventions used in this document . . . . . . . . . . . . . . . . . . . . . . . . . . . . . . . . . . . . . . . . . . . . . . . . . . . . . . . . . . . . . . . . . . . . . . . . . . . . . . . . 1
1.3 Additional information . . . . . . . . . . . . . . . . . . . . . . . . . . . . . . . . . . . . . . . . . . . . . . . . . . . . . . . . . . . . . . . . . . . . . . . . . . . . . . . . . . . . . . . . . . . . . 2
Chapter 2: Introduction to Installation, Configuration, and Deployment Process
2.1 Installation, configuration, and deployment overview . . . . . . . . . . . . . . . . . . . . . . . . . . . . . . . . . . . . . . . . . . . . . . . . . . . . . . . . . . . . . . . 3
2.2 Selecting tasks for configuring and deploying . . . . . . . . . . . . . . . . . . . . . . . . . . . . . . . . . . . . . . . . . . . . . . . . . . . . . . . . . . . . . . . . . . . . . . 3
2.3 Automatic vs. manual configuration . . . . . . . . . . . . . . . . . . . . . . . . . . . . . . . . . . . . . . . . . . . . . . . . . . . . . . . . . . . . . . . . . . . . . . . . . . . . . . . . 4
2.4 AEM forms on JEE installation, configuration, and deployment lists . . . . . . . . . . . . . . . . . . . . . . . . . . . . . . . . . . . . . . . . . . . . . . . . . . 4
Chapter 3: Creating a WebSphere Application Server Cluster
3.1 Preparing to install . . . . . . . . . . . . . . . . . . . . . . . . . . . . . . . . . . . . . . . . . . . . . . . . . . . . . . . . . . . . . . . . . . . . . . . . . . . . . . . . . . . . . . . . . . . . . . . . . 6
3.2 Installing WebSphere Network Deployment software . . . . . . . . . . . . . . . . . . . . . . . . . . . . . . . . . . . . . . . . . . . . . . . . . . . . . . . . . . . . . . . 7
3.3 Creating and configuring the WebSphere cluster . . . . . . . . . . . . . . . . . . . . . . . . . . . . . . . . . . . . . . . . . . . . . . . . . . . . . . . . . . . . . . . . . . . 7
3.4 Testing the WebSphere Application Server cluster . . . . . . . . . . . . . . . . . . . . . . . . . . . . . . . . . . . . . . . . . . . . . . . . . . . . . . . . . . . . . . . . . 16
3.5 Next steps . . . . . . . . . . . . . . . . . . . . . . . . . . . . . . . . . . . . . . . . . . . . . . . . . . . . . . . . . . . . . . . . . . . . . . . . . . . . . . . . . . . . . . . . . . . . . . . . . . . . . . . . 16
Chapter 4: Installing LiveCycle modules
4.1 Before you begin . . . . . . . . . . . . . . . . . . . . . . . . . . . . . . . . . . . . . . . . . . . . . . . . . . . . . . . . . . . . . . . . . . . . . . . . . . . . . . . . . . . . . . . . . . . . . . . . . 17
4.2 Installation considerations . . . . . . . . . . . . . . . . . . . . . . . . . . . . . . . . . . . . . . . . . . . . . . . . . . . . . . . . . . . . . . . . . . . . . . . . . . . . . . . . . . . . . . . . 18
4.3 Installing AEM forms on JEE . . . . . . . . . . . . . . . . . . . . . . . . . . . . . . . . . . . . . . . . . . . . . . . . . . . . . . . . . . . . . . . . . . . . . . . . . . . . . . . . . . . . . . . 19
4.4 Configuring the caching locators in clusters (caching using TCP only) . . . . . . . . . . . . . . . . . . . . . . . . . . . . . . . . . . . . . . . . . . . . . . . 21
4.5 Global Document Storage Directory (GDS) . . . . . . . . . . . . . . . . . . . . . . . . . . . . . . . . . . . . . . . . . . . . . . . . . . . . . . . . . . . . . . . . . . . . . . . . . 23
4.6 Installing the font directories in cluster nodes . . . . . . . . . . . . . . . . . . . . . . . . . . . . . . . . . . . . . . . . . . . . . . . . . . . . . . . . . . . . . . . . . . . . . . 24
4.7 Next steps . . . . . . . . . . . . . . . . . . . . . . . . . . . . . . . . . . . . . . . . . . . . . . . . . . . . . . . . . . . . . . . . . . . . . . . . . . . . . . . . . . . . . . . . . . . . . . . . . . . . . . . . 24
Chapter 5: Configuring LiveCycle for deployment
5.1 Considerations when configuring and deploying AEM forms on JEE . . . . . . . . . . . . . . . . . . . . . . . . . . . . . . . . . . . . . . . . . . . . . . . . 25
5.2 AEM forms on JEE pre-configuration tasks . . . . . . . . . . . . . . . . . . . . . . . . . . . . . . . . . . . . . . . . . . . . . . . . . . . . . . . . . . . . . . . . . . . . . . . . . 27
5.3 Configuring and deploying AEM forms on JEE . . . . . . . . . . . . . . . . . . . . . . . . . . . . . . . . . . . . . . . . . . . . . . . . . . . . . . . . . . . . . . . . . . . . . 27
Chapter 6: Manually Configuring a WebSphere Cluster
6.1 Directory permissions . . . . . . . . . . . . . . . . . . . . . . . . . . . . . . . . . . . . . . . . . . . . . . . . . . . . . . . . . . . . . . . . . . . . . . . . . . . . . . . . . . . . . . . . . . . . . 35
6.2 Configuring the WebSphere Application Server instances . . . . . . . . . . . . . . . . . . . . . . . . . . . . . . . . . . . . . . . . . . . . . . . . . . . . . . . . . . 36
6.3 Configuring the LiveCycle database connectivity . . . . . . . . . . . . . . . . . . . . . . . . . . . . . . . . . . . . . . . . . . . . . . . . . . . . . . . . . . . . . . . . . . . 39
6.4 Next steps . . . . . . . . . . . . . . . . . . . . . . . . . . . . . . . . . . . . . . . . . . . . . . . . . . . . . . . . . . . . . . . . . . . . . . . . . . . . . . . . . . . . . . . . . . . . . . . . . . . . . . . . 49
Chapter 7: Manually Deploying to WebSphere
7.1 About deploying AEM forms on JEE modules . . . . . . . . . . . . . . . . . . . . . . . . . . . . . . . . . . . . . . . . . . . . . . . . . . . . . . . . . . . . . . . . . . . . . . 50
7.2 Deploying to WebSphere . . . . . . . . . . . . . . . . . . . . . . . . . . . . . . . . . . . . . . . . . . . . . . . . . . . . . . . . . . . . . . . . . . . . . . . . . . . . . . . . . . . . . . . . . 50
7.3 Starting the application . . . . . . . . . . . . . . . . . . . . . . . . . . . . . . . . . . . . . . . . . . . . . . . . . . . . . . . . . . . . . . . . . . . . . . . . . . . . . . . . . . . . . . . . . . . 51

ivCONFIGURING ADOBE EXPERIENCE MANAGER FORMS ON JEE APPLICATION SERVER CLUSTERS USING WEBSPHERE
Contents
Last updated 5/23/2016
Chapter 8: Post-deployment tasks
8.1 General tasks . . . . . . . . . . . . . . . . . . . . . . . . . . . . . . . . . . . . . . . . . . . . . . . . . . . . . . . . . . . . . . . . . . . . . . . . . . . . . . . . . . . . . . . . . . . . . . . . . . . . . 52
8.2 Verify the LiveCycle cluster . . . . . . . . . . . . . . . . . . . . . . . . . . . . . . . . . . . . . . . . . . . . . . . . . . . . . . . . . . . . . . . . . . . . . . . . . . . . . . . . . . . . . . . . 55
8.3 Verify the CRX Cluster . . . . . . . . . . . . . . . . . . . . . . . . . . . . . . . . . . . . . . . . . . . . . . . . . . . . . . . . . . . . . . . . . . . . . . . . . . . . . . . . . . . . . . . . . . . . . 55
8.4 Accessing module web applications . . . . . . . . . . . . . . . . . . . . . . . . . . . . . . . . . . . . . . . . . . . . . . . . . . . . . . . . . . . . . . . . . . . . . . . . . . . . . . . 56
8.5 Configure Correspondence Management Solution . . . . . . . . . . . . . . . . . . . . . . . . . . . . . . . . . . . . . . . . . . . . . . . . . . . . . . . . . . . . . . . . . 58
8.6 Configuring PDF Generator . . . . . . . . . . . . . . . . . . . . . . . . . . . . . . . . . . . . . . . . . . . . . . . . . . . . . . . . . . . . . . . . . . . . . . . . . . . . . . . . . . . . . . . 64
8.7 Final setup for Rights Management . . . . . . . . . . . . . . . . . . . . . . . . . . . . . . . . . . . . . . . . . . . . . . . . . . . . . . . . . . . . . . . . . . . . . . . . . . . . . . . . 72
8.8 Configuring LDAP access . . . . . . . . . . . . . . . . . . . . . . . . . . . . . . . . . . . . . . . . . . . . . . . . . . . . . . . . . . . . . . . . . . . . . . . . . . . . . . . . . . . . . . . . . . 73
8.9 Enabling FIPS mode . . . . . . . . . . . . . . . . . . . . . . . . . . . . . . . . . . . . . . . . . . . . . . . . . . . . . . . . . . . . . . . . . . . . . . . . . . . . . . . . . . . . . . . . . . . . . . . 74
8.10 Configuring HTML digital signature . . . . . . . . . . . . . . . . . . . . . . . . . . . . . . . . . . . . . . . . . . . . . . . . . . . . . . . . . . . . . . . . . . . . . . . . . . . . . . 74
8.11 Configure CSIv2 inbound transport . . . . . . . . . . . . . . . . . . . . . . . . . . . . . . . . . . . . . . . . . . . . . . . . . . . . . . . . . . . . . . . . . . . . . . . . . . . . . . 75
8.12 Configuring Connector for EMC Documentum . . . . . . . . . . . . . . . . . . . . . . . . . . . . . . . . . . . . . . . . . . . . . . . . . . . . . . . . . . . . . . . . . . . 75
8.13 Configuring the Connector for IBM Content Manager . . . . . . . . . . . . . . . . . . . . . . . . . . . . . . . . . . . . . . . . . . . . . . . . . . . . . . . . . . . . . 79
8.14 Configuring the Connector for IBM FileNet . . . . . . . . . . . . . . . . . . . . . . . . . . . . . . . . . . . . . . . . . . . . . . . . . . . . . . . . . . . . . . . . . . . . . . . 83
8.15 Enable messaging on standalone JBoss . . . . . . . . . . . . . . . . . . . . . . . . . . . . . . . . . . . . . . . . . . . . . . . . . . . . . . . . . . . . . . . . . . . . . . . . . . . 87
Chapter 9: Configuring Load Balancing
9.1 Preparing for installation . . . . . . . . . . . . . . . . . . . . . . . . . . . . . . . . . . . . . . . . . . . . . . . . . . . . . . . . . . . . . . . . . . . . . . . . . . . . . . . . . . . . . . . . . . 88
9.2 Installing the web server . . . . . . . . . . . . . . . . . . . . . . . . . . . . . . . . . . . . . . . . . . . . . . . . . . . . . . . . . . . . . . . . . . . . . . . . . . . . . . . . . . . . . . . . . . 88
9.3 Installing the web server plug-in . . . . . . . . . . . . . . . . . . . . . . . . . . . . . . . . . . . . . . . . . . . . . . . . . . . . . . . . . . . . . . . . . . . . . . . . . . . . . . . . . . 89
Chapter 10: Advanced Production Configuration
10.1 Configuring pool size for Output and Forms . . . . . . . . . . . . . . . . . . . . . . . . . . . . . . . . . . . . . . . . . . . . . . . . . . . . . . . . . . . . . . . . . . . . . . 91
10.2 PDF Generator . . . . . . . . . . . . . . . . . . . . . . . . . . . . . . . . . . . . . . . . . . . . . . . . . . . . . . . . . . . . . . . . . . . . . . . . . . . . . . . . . . . . . . . . . . . . . . . . . . 91
10.3 Enabling CIFS on Windows . . . . . . . . . . . . . . . . . . . . . . . . . . . . . . . . . . . . . . . . . . . . . . . . . . . . . . . . . . . . . . . . . . . . . . . . . . . . . . . . . . . . . . . 92
Chapter 11: Appendix - Install Command Line Interface
11.1 Overview . . . . . . . . . . . . . . . . . . . . . . . . . . . . . . . . . . . . . . . . . . . . . . . . . . . . . . . . . . . . . . . . . . . . . . . . . . . . . . . . . . . . . . . . . . . . . . . . . . . . . . . . 94
11.2 Install AEM forms on JEE . . . . . . . . . . . . . . . . . . . . . . . . . . . . . . . . . . . . . . . . . . . . . . . . . . . . . . . . . . . . . . . . . . . . . . . . . . . . . . . . . . . . . . . . . 94
11.3 Error logs . . . . . . . . . . . . . . . . . . . . . . . . . . . . . . . . . . . . . . . . . . . . . . . . . . . . . . . . . . . . . . . . . . . . . . . . . . . . . . . . . . . . . . . . . . . . . . . . . . . . . . . . 95
11.4 Uninstalling AEM forms on JEE in console mode . . . . . . . . . . . . . . . . . . . . . . . . . . . . . . . . . . . . . . . . . . . . . . . . . . . . . . . . . . . . . . . . . . 96
Chapter 12: Appendix - Configuration Manager Command Line Interface
12.1 Order of operations . . . . . . . . . . . . . . . . . . . . . . . . . . . . . . . . . . . . . . . . . . . . . . . . . . . . . . . . . . . . . . . . . . . . . . . . . . . . . . . . . . . . . . . . . . . . . . 97
12.2 Command Line Interface property file . . . . . . . . . . . . . . . . . . . . . . . . . . . . . . . . . . . . . . . . . . . . . . . . . . . . . . . . . . . . . . . . . . . . . . . . . . . . 97
12.3 General configuration properties . . . . . . . . . . . . . . . . . . . . . . . . . . . . . . . . . . . . . . . . . . . . . . . . . . . . . . . . . . . . . . . . . . . . . . . . . . . . . . . . . 98
12.4 Examples Usage . . . . . . . . . . . . . . . . . . . . . . . . . . . . . . . . . . . . . . . . . . . . . . . . . . . . . . . . . . . . . . . . . . . . . . . . . . . . . . . . . . . . . . . . . . . . . . . . 111
12.5 Configuration Manager CLI Logs . . . . . . . . . . . . . . . . . . . . . . . . . . . . . . . . . . . . . . . . . . . . . . . . . . . . . . . . . . . . . . . . . . . . . . . . . . . . . . . . 112
12.6 Next steps . . . . . . . . . . . . . . . . . . . . . . . . . . . . . . . . . . . . . . . . . . . . . . . . . . . . . . . . . . . . . . . . . . . . . . . . . . . . . . . . . . . . . . . . . . . . . . . . . . . . . . 112
Chapter 13: Appendix - Increasing the Deployer heap size for WebSphere

1
Last updated 5/23/2016
Chapter 1: About This Document
AEM forms on JEE is an enterprise server platform that helps you automate and streamline business processes. AEM
forms on JEE comprises the following components:
• J2EE-based Foundation provides server capabilities and runtime environment
• Tools to design, develop, and test AEM forms on JEE Applications
• Modules and Services are deployed on AEM forms on JEE Server and provide functional services
For more information about the AEM forms on JEE architecture and capabilities, see AEM forms on JEE Overview.
This document is part of a larger documentation set available at AEM forms on JEE Documentation page. It is advised
that you start with the preparing guide and then move on to installation and configuration guide depending on
whether you are performing a fresh installation (single server or cluster setup) or upgrading your existing LiveCycle
deployment. For Turnkey deployment, which is only for evaluation purposes, see Installing and Deploying AEM forms
on JEE using JBoss Turnkey.
1.1 Who should read this document?
This guide provides information for administrators or developers who are responsible for installing, upgrading,
configuring, administering, or deploying AEM forms on JEE components. The information provided is based on the
assumption that anyone reading this guide is familiar with J2EE application servers, operating systems, database
servers, and web environments.
1.2 Conventions used in this document
The installation and configuration documentation for AEM forms on JEE uses the following naming conventions for
common file paths.
Name Default value Description
[aem-forms root] Windows:
C:\Adobe\Adobe_Experience_Manager_forms
AIX, Linux, and Solaris:
/opt/adobe/adobe_Experience_Manager_forms
The installation directory that is used for all AEM forms
on JEE modules. The installation directory contains
subdirectories for Configuration Manager. This
directory also includes directories related to the SDK
and third-party products.
[appserver root] WebSphere on Windows:
C:\Program Files\IBM\WebSphere\AppServer\
WebSphere on Linux and Solaris:
/opt/IBM/WebSphere/AppServer/
WebSphere on AIX:
/usr/IBM/WebSphere/AppServer
The home directory of the application server that runs
the services that are part of AEM forms on JEE.
[server name] server1 The name of the server configured on your application
server.

2CONFIGURING ADOBE EXPERIENCE MANAGER FORMS ON JEE APPLICATION SERVER CLUSTERS USING WEBSPHERE
About This Document
Last updated 5/23/2016
Note: This document uses terms Adobe Experience Manager forms, AEM forms on JEE, and LiveCycle interchangeably.
Most of the information about directory locations in this guide is cross-platform (all file names and paths are case-
sensitive on non-Windows operating systems). Any platform-specific information is indicated as required.
1.3 Additional information
The resources in this table can help you learn more about AEM forms on JEE.
[dbserver root] Depends on the database type and your specification during
installation.
The location where the AEM forms on JEE database
server is installed.
[AEM_temp_dir] On Windows:
C:\Adobe\Adobe_Experience_Manager_forms\tmp
On Linux, UNIX and AIX:
/opt/adobe/adobe_experience_manager_forms/tmp
The temporary directory for AEM forms on JEE server.
[CRX_home] On Windows:
C:\Adobe\Adobe_Experience_Manager_forms\crx-repository
On Linux, UNIX and AIX
/opt/adobe/adobe_experience_manager_forms/crx-repository
The directory that is used for installing the CRX
repository.
For information about See
General information about AEM forms on JEE and the modules AEM forms on JEE Overview
AEM forms on JEE modules AEM forms on JEE Modules
Other services and products that integrate with AEM forms on JEE Adobe Developer Connection
Installing Workbench Installing Workbench
Preparing to Install AEM forms on JEE Preparing to Install AEM forms on JEE (Server Cluster)
AEM forms on JEE Upgrade Checklist and Planning AEM forms on JEE Upgrade Checklist and Planning
Troubleshooting Troubleshooting
Performing administrative tasks Administration Help
All the documentation available for AEM forms on JEE AEM forms on JEE documentation
Patch updates, technical notes, and additional information about this
product version
Adobe Enterprise Support
Name Default value Description

3
Last updated 5/23/2016
Chapter 2: Introduction to Installation, Configuration, and Deployment Process
2.1 Installation, configuration, and deployment overview
Installing, configuring, and deploying AEM forms on JEE involves the following processes:
• Installing: Install AEM forms on JEE by running the installation program. Installing AEM forms on JEE places all
of the required files onto your computer, within one installation directory structure. The default installation
directory is C:\Adobe\Adobe_Experience_Manager_forms (Windows) or
/opt/adobe/adobe_Experience_Manager_forms (non-windows); however, you can install the files to a different
directory.
• Configuring: Configuring AEM forms on JEE modifies various settings that determine how AEM forms on JEE
works. Assembling the product places all of the installed components into several deployable EAR and JAR files,
according to your configuration instructions. Configure and assemble the components for deployment by running
Configuration Manager. You can configure and assemble multiple AEM forms on JEE modules at the same time.
• Deploying: Deploying the product involves deploying the assembled EAR files and supporting files to your
application server on which you plan to run your AEM forms on JEE. If you have configured multiple modules, the
deployable components are packaged within the deployable EAR files. Components and AEM forms on JEE archive
files are packaged as JAR files.
Note: AEM forms on JEE archive file use .lca file extension.
• Initializing the database: Initializing the database to be used with AEM forms on JEE creates tables for use with
User Management and other components. Deploying any module that connects to the database requires you to
initialize the database after the deployment process.
Before you begin to install and configure AEM forms on JEE, ensure that you have prepared your environment as
described in the applicable Preparing guides.
2.2 Selecting tasks for configuring and deploying
After you have installed AEM forms on JEE, you can run Configuration Manager to:
• Configure modules in an EAR file for deploying to the application server or cluster of application servers
• Configure properties of the application server or cluster of application servers to support AEM forms on JEE
• Validate application server or cluster configuration
• Deploy AEM forms on JEE EAR files
• Initialize AEM forms on JEE database
• Deploy AEM forms on JEE components
• Validate AEM forms on JEE component deployment
• Configure AEM forms on JEE components

4CONFIGURING ADOBE EXPERIENCE MANAGER FORMS ON JEE APPLICATION SERVER CLUSTERS USING WEBSPHERE
Introduction to Installation, Configuration, and Deployment Process
Last updated 5/23/2016
2.3 Automatic vs. manual configuration
Although you can use Configuration Manager to configure the application server or cluster and set up data sources to
the database, you may prefer to complete these steps manually for the following reasons:
• You have other applications running on the application server or cluster, and are concerned about possible
conflicting configurations.
• Corporate security procedures for configuration management dictate finer control.
• You are performing deployments where automatic configuration is not available.
In the manual configuration case, do these tasks:
• Use Configuration Manager to configure AEM forms on JEE components with the required font, temp, and GDS
directories
• Manually configure the application server, configure data sources, and deploy AEM forms on JEE EAR files
• Run Configuration Manager to initialize the database
• Run Configuration Manager to deploy AEM forms on JEE components and validate the AEM forms on JEE
component deployment.
• Configure AEM forms on JEE components.
2.4 AEM forms on JEE installation, configuration, and deployment lists
This section includes lists that you can use to step through the installation and configuration process. A list is provided
for installing and configuring when using either the automatic method or the manual method.
• Automatic method: Refers to using Configuration Manager to configure the application server, configure and
deploy AEM forms on JEE EAR files, initialize the database, and deploy the modules to the server. Use the
automatic method if you want to have limited input into the installation, configuration, and deployment of AEM
forms on JEE.
• Manual method: Refers to using Configuration Manager only to configure AEM forms on JEE EAR files, initialize
the database, and deploy the modules to the server. Configuring the application server, connecting to the database,
and deploying AEM forms on JEE EAR files to the server is done manually by the administrator by following the
instructions later in this document. Use the manual method if you want to have precise input into the installation,
configuration, and deployment of AEM forms on JEE. For example, this method may be used in a locked-down
server environment.
Note: In a clustering environment, all application server configurations must be performed on each node of the cluster.
2.4.1 Automatic installation and deployment list
The following list includes the steps that are required for installing AEM forms on JEE modules by using the automatic
method. Note that your application server or cluster must be installed before you perform the installation:
• Ensure that you have the required software installed on each machine in the target environment. See the
appropriate preparing guide at http://www.adobe.com/go/learn_lc_documentation_11.
• Run the installation program only on one machine. (See “4.3 Installing AEM forms on JEE” on page 19.)
5CONFIGURING ADOBE EXPERIENCE MANAGER FORMS ON JEE APPLICATION SERVER CLUSTERS USING WEBSPHERE
Introduction to Installation, Configuration, and Deployment Process
Last updated 5/23/2016
• Run Configuration Manager and select all the tasks on the Task Selection screen. It configures the AEM forms on
JEE EAR files, configures application server settings, deploys the EAR files and other components to the application
server, initializes the AEM forms on JEE database, and verifies the deployment. (See Configuring AEM forms on
JEE for Deployment chapter in this guide.)
• Access the Administration Console and User Management. (See “8.1.4.1 Accessing Administration Console” on
page 53.)
• (Optional) Configure LDAP access. (See “8.8 Configuring LDAP access” on page 73.)
• Ensure that your clustering environment is prepared.
2.4.2 Manual installation and deployment list
The following list includes the steps that are required for installing AEM forms on JEE by using the manual method.
Your application server or cluster must be installed and configured before you perform the installation.
• Ensure that you have the required software installed and configured in the target environment.
• Ensure that you created and configured the cluster in the target environment.
• Run the installation program only on one machine.
• Run Configuration Manager and select the Configure AEM forms on JEE EARs task. This task configures AEM
forms on JEE.
Run the manual configuration steps on the machines where AEM forms on JEE is not installed. For example, copy
content repository.
• Configure the Application Server cluster for AEM forms on JEE.
• Deploy the EAR files to the application server. You can do this manually or use Configuration Manager.
Note: (Cluster only) Ensure that you deploy ear files to the application server on every node of the cluster. When
deploying ear files to the application server, ensure that the deployment scope is Cluster .
Note: (Cluster only) Ensure that you deploy ear files to the application server on every node of the cluster, When
deploying ear files to the application server, ensure that you map modules to the Cluster and the webserver.
• Run Configuration Manager to initialize the AEM forms on JEE database and deploy AEM forms on JEE
component files.
• Access Administration Console and User Management.
• (Optional) Configure LDAP access.

6
Last updated 5/23/2016
Chapter 3: Creating a WebSphere Application Server Cluster
You must install the WebSphere Application Server Network Deployment software to create your WebSphere cluster.
Perform the following tasks:
• Ensure that you properly prepared all computers in the cluster. (See “3.1 Preparing to install” on page 6.)
• Install the WebSphere Application Server Network Deployment software. (See “3.2 Installing WebSphere Network
Deployment software” on page 7.)
• Create your WebSphere Application Server cluster. (See “3.3 Creating and configuring the WebSphere cluster” on
page 7.)
• Test the WebSphere Application Server cluster configuration. (See “3.4 Testing the WebSphere Application Server
cluster” on page 16.)
3.1 Preparing to install
Before you install WebSphere Application Server on the computers of your cluster, ensure that your system meets the
following configuration requirements:
Disk space: Ensure that the partition that will hold the application server has a minimum of 10 GB of free disk space.
In addition to the space required to install the product, your environment variable TEMP or TMP must point to a valid
temporary directory with at least 500 MB of free disk space. The downloadable executable requires approximately 500
MB, plus an additional 1.0 GB to unpack the images.
IP address settings: All the computers must have a fixed IP address that is managed through a single DNS.
IP multicast: All the computers must fully support IP multicast packet propagation, which means that all routers and
other tunneling technologies must be configured to propagate multicast messages to clustered server instances. The
network latency must be low enough to ensure that most multicast messages reach their final destination within 200
to 300 milliseconds. Also, the multicast time-to-live (TTL) value for the cluster must be high enough to ensure that
routers do not discard multicast packets before they reach their final destination.
Versions: All the computers in the cluster must have the same version and same service pack of WebSphere
Application Server software.
Horizontal clustering: If your configuration is horizontally clustered (that is, instances of WebSphere Application
Server are installed on separate computers), ensure that all computers are on the same network subnet and that the
computer clocks are synchronized. (See Preparing to Install LiveCycle (Server Cluster).)
Account privileges: (Windows) You must install and run WebSphere Application Server under a user account that
has administrator privileges.
Shared network drive: You must have a secure shared network drive created that all computers in the cluster can
access with read and write permissions. (See Preparing to Install LiveCycle (Server Cluster).)
Clocks of all the systems on the cluster might be synchronized to a common time server. In Windows domain, clock
synchronization is done automatically. You must set-up Network Time Protocol on non-windows systems.
7CONFIGURING ADOBE EXPERIENCE MANAGER FORMS ON JEE APPLICATION SERVER CLUSTERS USING WEBSPHERE
Creating a WebSphere Application Server Cluster
Last updated 5/23/2016
3.2 Installing WebSphere Network Deployment software
You must install WebSphere Application Server Network Deployment software on each node of the cluster to create
your WebSphere Deployment Manager and application server instances.
WebSphere Deployment Manager allows you to manage your WebSphere Application Server cluster. You can install
WebSphere Application Server Network Deployment on a dedicated administrative computer or on any node in the
cluster that has sufficient capacity to install and run the Deployment Manager. (See WebSphere Application Server
site).
3.2.1 Modes of installing the WebSphere Network Deployment software
You can install the WebSphere Network Deployment software in one of the following ways:
• Choose None on the WebSphere Application Server Environments screen to install the WebSphere Network
Deployment Software without creating any profiles. Later, you can create a Deployment Manager or application
server profile using the manageprofiles script. See “3.3.1 Creating WebSphere profiles” on page 8.
• Choose Application server on the WebSphere Application Server Environments screen to install the WebSphere
Network Deployment software along with a single application server profile.
• Choose Management on the WebSphere Application Server Environments screen to install the WebSphere
Network Deployment software along with the Deployment Manager profile.
• Select the Cell (Deployment Manager and a Managed Node) option on the WebSphere Application Server
Environments screen to install the WebSphere Network Deployment software along with a cell that includes a
Deployment Manager and a managed node application server profile.
Selecting this option during installation saves the effort of manually creating the profiles later.
For more information about installing WebSphere Application Server software, see this WebSphere Application
Server site.
Note: While installing the WebSphere Network Deployment software on nodes where you want to host only the
application server, choose the Application server option on the WebSphere Application Server Environments screen.
Note: You can use the manageprofiles script to create Deployment Manager or application server profiles any time
after installing WebSphere Network Deployment software in one of the above ways.
3.3 Creating and configuring the WebSphere cluster
Configure your WebSphere Application Server cluster by performing the following tasks:
• Create WebSphere Deployment Manager and WebSphere Application Server profiles. (See “3.3.1 Creating
WebSphere profiles” on page 8.)
• Federate the nodes to the Deployment Manager. (See “3.3.3 Federating WebSphere Application Server profiles” on
page 10.)
• Create the cluster. (See “3.3.4 Creating the WebSphere cluster” on page 13.)
• Modify the SOAP connection time-out. (See “3.3.5 Modifying the SOAP connection time-out settings” on page 14.)
8CONFIGURING ADOBE EXPERIENCE MANAGER FORMS ON JEE APPLICATION SERVER CLUSTERS USING WEBSPHERE
Creating a WebSphere Application Server Cluster
Last updated 5/23/2016
Creating profiles creates empty nodes that do not contain an administrative console or server. After federating these
nodes, use the Deployment Manager to create a cluster of servers that use these nodes.
3.3.1 Creating WebSphere profiles
Once you have installed WebSphere Network Deployment software in one of the ways listed in “3.2.1 Modes of
installing the WebSphere Network Deployment software” on page 7, you can create different type of WebSphere
profiles. Create WebSphere profiles for your WebSphere Deployment Manager and for your WebSphere Application
Server instances.
If you selected the Cell (Deployment Manager and a Managed Node) option (on the WebSphere Application Server
environments screen) when you installed WebSphere Application Server Network Deployment software, the
Deployment Manager and managed application server profiles were created automatically for you.
3.3.1.1 Creating WebSphere profiles for 64-bit WebSphere Application Server
Use the WebSphere manageprofiles script (manageprofiles.bat on Windows and manageprofiles.sh on Linux
or UNIX) to create profiles on a 64-bit WebSphere Application Server.
Create a Deployment Manager profile on the node that you selected to host the WebSphere Deployment Manager.
This profile contains the WebSphere Administrative Console and also hosts the cell to which the nodes of your cluster
will be federated.
You must also create profiles for each of the WebSphere Application Server instances that will comprise your cluster.
Configure WebSphere and WebSphere profile to use JDK 1.7
Execute the following commands from <WAS_HOME>\AppServer\bin:
1 List available SDKs:
managesdk -listAvailable
2 Change the default SDK to SDK 7.0:
managesdk -setCommandDefault -sdkname 1.7_64
3 Set the New Profile to use SDK 7.0:
managesdk -setNewProfileDefault -sdkname 1.7_64
The following examples demonstrate the correct syntax for the managesdk command:
managesdk -listAvailable [-verbose] managesdk -listEnabledProfile -profileName AppSrv01 [-verbose] managesdk -listEnabledProfileAll [-verbose] managesdk -enableProfile -profileName AppSrv01 -sdkname 1.7_64 -enableServers managesdk -enableProfileAll -sdkname 1.7_64 -enableServers managesdk -getNewProfileDefault [-verbose] managesdk -setNewProfileDefault -sdkname 1.7_64 managesdk -getCommandDefault [-verbose] managesdk -setCommandDefault -sdkname 1.7_64
To create a WebSphere profile with the manageprofiles script:
1 On the computer that you will create the profile for, open a command prompt and navigate to the [appserver
root]/bin/ directory.
2 Start the WebSphere Profile Management Tool by entering the following command:
• (Windows) manageprofiles.bat

9CONFIGURING ADOBE EXPERIENCE MANAGER FORMS ON JEE APPLICATION SERVER CLUSTERS USING WEBSPHERE
Creating a WebSphere Application Server Cluster
Last updated 5/23/2016
• (Linux/UNIX) ./manageprofiles.sh
3 Type a command with the appropriate options to create a profile with the manageprofiles script. For example,
type the following text:
• (Windows):
[appserver root]\bin>manageprofiles.bat -create -templatePath "[appserver root]\profileTemplates\default" -profileName DS_AppSrv01 -profilePath "[appserver root]\profiles\DS_AppSrv01" -isDefault
• (Linux/UNIX):
[appserver root]/bin>./manageprofiles.sh -create -templatePath "[appserver root]/profileTemplates/default" -profileName DS_AppSrv01 -profilePath "[appserver root]/profiles/DS_AppSrv01" -isDefault
Creating Deployment Manager Profile
[appserver root]\bin>manageprofiles.bat -create -profileName LC_Dmgr01 -profilePath "[appserver root]\profiles\LC_Dmgr01" -templatePath "[appserver root]\profileTemplates\management"
Creating Managed Node Profile
[appserver root]\bin>manageprofiles.bat -create -profileName LC_AppSrv01 -profilePath "[appserver root]\profiles\LC_AppSrv01" -templatePath "[appserver root]\profileTemplates\managed"
Note: Above mentioned commands are using minimum parameters required to create a profile. Addiionaly, you
can specify the nodename, cellname, and hostname by setting the following arguments:
-nodeName -cellName -hostName
For more information about parameters that you can use with this command, refer to this article in the
WebSphere Application Server documentation.
Note: You can view a list of the allowable options for the manageprofiles script by typing manageprofiles.sh
help create–– from a command line. You should typically specify the following options:
• The template path, which is the path where profile templates reside. The profile path is usually [appserver
root]/profileTemplates. default, cell, dmgr, managed, management, and secureproxy are examples
of profile templates.
• The profile path. For more information about the profile path, see “1.2 Conventions used in this document”
on page 1.
• The profile name. Specify a profile name that readily identifies the WebSphere Application Server that the
profile applies to (for example, include the identifier DS for LiveCycle).
• If the profile is the default profile for the WebSphere Application Server. The -isDefault option specifies
that the profile is the default profile. On a cluster that uses Network Deployment, the dmgr01 profile typically
exists as the default profile.
Note: Depending on the option that you select on the WebSphere Application Server Environments screen,
you may need to execute managedprofiles.bat or managedprofiles.sh after installation for creating
profiles. For example, if you select None on the WebSphere Application Server Environments screen, you need
to execute the appropriate command twice—once for the Deployment Manager and then for the application
server node.

10CONFIGURING ADOBE EXPERIENCE MANAGER FORMS ON JEE APPLICATION SERVER CLUSTERS USING WEBSPHERE
Creating a WebSphere Application Server Cluster
Last updated 5/23/2016
3.3.2 Configuring WebSphere Application Server if global security is enabled
If your installation uses global security, you must run WebSphere Application Server as a user with the appropriate
roles. You can employ one of the following options to configure WebSphere Application Server to run if WebSphere
global security is enabled:
• Create a new user with the necessary roles, and run WebSphere Application Server as that user. If a user already
exists to run WebSphere Application Server, assign the necessary roles to that user.
Important: Ensure that you start WebSphere Application Server as this user. Some WebSphere processes may fail if
you start WebSphere Application Server as a different user while global security is enabled.
In a secure environment, it is recommended that you employ this option.
• Configure the EVERYONE group with the necessary roles.
To create a new WebSphere Application Server user:
1 In the WebSphere Administrative Console navigation tree, click Environment > Naming > CORBA Naming
Service Users, and then in the right pane, click Add.
2 In Roles, select all the roles.
3 Under Search and Select Users, select the User Realm.
4 In the search box, type the search string and click Search.
Note: To retrieve all users, type an asterisk (*).
5 From the Available text box, select the required users and click the right arrow to add them to the Mapped to role box.
6 Click Save directly to master configuration .
To configure an existing WebSphere Application Server user:
1 In the WebSphere Administrative Console navigation tree, click Environment > Naming > CORBA Naming
Service Users, and then in the right pane, select the user.
2 In Roles, select the required roles.
3 Click OK or Apply.
4 Click Save directly to master configuration.
To configure the EVERYONE group
1 In the WebSphere Administrative Console navigation tree, click Environment > Naming > CORBA Naming
Service Groups.
2 In Roles, select the required roles.
3 Enable Select from special subjects, and then from the Special subjects list, select the EVERYONE group.
Note: If the EVERYONE group is already configured, the group will not be shown in the Special subjects list. You only
need to assign the required roles to this group if not already done so.
1 Click OK or Apply.
2 Click Save directly to master configuration.
3.3.3 Federating WebSphere Application Server profiles
You must now federate individual servers by adding the profiles that you created for each WebSphere Application
Server instance into the Deployment Manager profile. (See “3.3.3.1 Adding profiles” on page 11.)

11CONFIGURING ADOBE EXPERIENCE MANAGER FORMS ON JEE APPLICATION SERVER CLUSTERS USING WEBSPHERE
Creating a WebSphere Application Server Cluster
Last updated 5/23/2016
You can also remove a WebSphere Application Server instance from an existing WebSphere cell by removing its
profile from the Deployment Manager profile. (See “3.3.3.2 Removing and deleting profiles” on page 12.)
3.3.3.1 Adding profiles
Before you add WebSphere Application Server profiles, ensure that the Deployment Manager is running. Also ensure
that you can connect to the Deployment Manager from the WebSphere Application Server instance by using the name
of the Deployment Manager as well as the IP address.
Important: Before you add WebSphere Application Server profiles, ensure that the system clocks of all WebSphere
Application Server instances are synchronized.
To add a custom profile to the Deployment Manager:
1 If the Deployment Manager is not running, navigate to the bin directory of the Deployment Manager Profile and
run the appropriate script:
• (Windows) startManager.bat
• (Linux, UNIX) ./startManager.sh
If you installed WebSphere Application Server using the Cell (deployment manager and a managed node) option,
navigate to the directory [appserver root]/profiles/<profile_name>/bin and start the node agent by running the
appropriate command:
• (Windows) startNode.bat
• (Linux, UNIX) ./startNode.sh
Note: You do not need to execute startNode.bat or startNode.sh for the application server node profile unless the
node is added to the cell . After this node is added to the cell, you can start the node by executing the appropriate
startNode command. For information on adding nodes to a cell, refer to step 3. Run startNode.bat or
startNode.sh only for the managed node installed with the Deployment Manager.
2 From a command prompt, navigate to the [profiles root]/<profile name>/bin directory of the WebSphere
Application Server instance you want to add.
3 Run the addNode script by using the computer name as a parameter; for example, type this text:
• (Windows) addNode.bat [dmgr_host] [dmgr_port]
• (UNIX/Linux) ./addNode.sh [dmgr_host] [dmgr_port]
Note: The dmgr_host argument is required. All of the other arguments are optional. The default port number is 8879
for the default SOAP port of the deployment manager. For more information, see this article in the WebSphere
Application Server documentation.
In addition to federating the node to the cell, addNode also starts the node agent process. After the node is federated
to a cell, the node agent is started with the startNode command, which is also located in the bin directory of the
WebSphere Application Server profile. During this process, the node being federated communicates to the
Deployment Manager by using port 8879 by default.
It is a good practice to add the node agent as an operating system daemon process in UNIX. You can add the node
agent as a service in Windows by using WASService, which is available in the bin directory of the base application
server installation.

12CONFIGURING ADOBE EXPERIENCE MANAGER FORMS ON JEE APPLICATION SERVER CLUSTERS USING WEBSPHERE
Creating a WebSphere Application Server Cluster
Last updated 5/23/2016
3.3.3.2 Removing and deleting profiles
You can remove a WebSphere Application Server profile from the cell by removing its profile from the WebSphere
Deployment Manager. You can execute this task by using either a pair of script files or the Deployment Manager
Administrative Console.
Note: Removing a profile from the cell only removes the server from the cluster; it does not delete the profile. The profile
remains (and can be added back to the cell later, if needed). To completely remove a profile, delete the profile as a separate task.
You can delete profiles that you no longer need on your Deployment Manager and servers.
To remove a WebSphere Application Server using script files:
1 If the Deployment Manager is not running, navigate to the bin directory of the Deployment Manager Profile and
run the appropriate script:
• (Windows) startManager.bat
• (Linux, UNIX) ./startManager.sh
2 On each WebSphere Application Server that you want to remove, navigate to the bin directory of the profile that is
running the node agent and run the appropriate removeNode script:
• (Windows) removeNode.bat
• (Linux, UNIX) ./removeNode.sh
3 Navigate to the bin directory of the Deployment Manager profile and run the appropriate cleanup script:
• (Windows) cleanupNode.bat <node name> [deploymgr host] [deploymgr port] [options]
• (Linux, UNIX) ./cleanupNode.sh <node name> [deploymgr host] [deploymgr port] [options]
For more information, refer to this articlein the WebSphere Application Server documentation.
To remove a WebSphere Application Server using the Deployment Manager:
1 Verify that the Deployment Manager is running.
2 In a web browser, type the URL to the Deployment Manager; for example, type
http://<servername>:<port>/ibm/console
Note: By default, the Deployment Manager Administrative Console web application listens on port 9060.
3 In the left pane, select System Administration and click Nodes.
4 Select the node to remove and click Remove Node.
5 To verify that the node is removed, navigate to System Administration > Nodes and confirm that the node is not
listed.
To delete a profile:
1 Open a command prompt and navigate to the [appserver root]/bin directory.
2 Run the following command from the console:
• (Windows) manageprofiles.bat -delete -profileName [profileName]
• (UNIX/Linux) ./manageprofiles.sh -delete -profileName [profileName]
Note: The profile directory and log files are not deleted. You must manually delete the profile directory. Any attempt
to create a profile by using the same name as the deleted profile without first deleting the directory causes an error.

13CONFIGURING ADOBE EXPERIENCE MANAGER FORMS ON JEE APPLICATION SERVER CLUSTERS USING WEBSPHERE
Creating a WebSphere Application Server Cluster
Last updated 5/23/2016
3.3.4 Creating the WebSphere cluster
You must now create the WebSphere cluster by perform the following tasks:
• Creating the cluster by using the Deployment Manager.
• Configuring the distributed environment settings for the cluster.
• Add ports and host aliases for WebSphere Application Server instances of the cluster.
By default, the WebSphere Administrative Console web application listens on port 9060.
To create a cluster using the Deployment Manager:
1 Log in to the WebSphere Administrative Console of the computer hosting Deployment Manager.
2 In a web browser, enter the URL to the Deployment Manager; for example, type
http://<servername>:<port>/ibm/console
Note: By default, the Deployment Manager Administrative Console web application listens on port 9060.
3 In the WebSphere Administrative Console navigation tree, click Servers > Clusters > WebSphere application
server clusters, and then click New.
4 In the Enter Basic Cluster Information box, enter the name of the cluster; for example, type ds_cluster.
5 In the Member name box in the right pane, enter a member name. This name is for the first in the cluster.
6 In the Select Node list, select the node that this cluster member will reside on.
7 Select Create the member using an application server template, select default from the list, and then click Next.
8 In the Member Name box, enter the name of another member to add to the cluster.
9 In the Select Node list, select the node that this cluster member will reside on.
10 Select Generate unique HTTP ports and click Add Member.
11 Repeat steps 8 to 11 to add WebSphere Application Servers to the cluster, entering the new member name.
12 After you add all members, click Next.
13 Click Finish and then click Save.
14 Click System Administration > Save Changes to Master Repository, select Synchronize changes with Nodes,
and then click Save.
To configure distributed environment settings for the cluster:
1 In the WebSphere Administrative Console navigation tree, click System administration > Nodes, and ensure that
the nodes are listed, that their status is Synchronized, and that all WebSphere Application Server instances of the
cluster are started.
2 Click Servers > Server Types > WebSphere application servers and, in the right pane, click the server name.
3 Click the Configuration tab and, under Container Settings, click Session management.
4 Under Additional Properties, click Distributed environment settings.
5 Under General Properties, click None and then OK.
6 Click Save directly to the master configuration.
7 On the next screen, under Additional Properties, click Distributed Environment Settings and Click custom
tuning parameters.
8 Select Low (optimize for failover) and then click OK.

14CONFIGURING ADOBE EXPERIENCE MANAGER FORMS ON JEE APPLICATION SERVER CLUSTERS USING WEBSPHERE
Creating a WebSphere Application Server Cluster
Last updated 5/23/2016
9 In the navigation tree, click Servers > Application servers and, in the right pane, click the server name.
10 Under Performance, select Performance Monitoring Infrastructure (PMI).
11 On the next screen, select Enable Performance Monitoring Infrastructure (PMI).
12 Under Currently Monitored Statistics Set, select Basic and then click OK.
13 Repeat steps 2 to 13 for each server in your cluster.
14 In the Messages box, click Save directly to the master configuration.
To configure WebSphere Application Server ports and aliases:
1 In a web browser, type the URL to the Deployment Manager; for example, type
http://<servername>:<port>/ibm/console
Note: By default, the WebSphere Administrative Console listens on port 9060.
2 In the navigation tree, click Servers > Application servers and, in the right pane, click the server name.
3 On the next screen, under Communications, click Ports.
4 In the table, click WC_defaulthost and assign a port address.
Note: For vertical clusters, set a unique address for each server in the cluster. For horizontal clusters, each server can
have unique or identical address.
5 Repeat steps 2 to 4 for each server in the cluster.
6 Click Save directly to the master configuration.
7 In the navigation tree, click Environment > Virtual Hosts and, in the right pane, click default_host.
8 Under Additional Properties, click Host Aliases.
9 On the next screen, click New and add the port you assigned for a server in the cluster.
10 In the Host Name box, enter an asterisk (*).
11 Repeat step 9 and 10 for each port that is assigned in step 4.
12 Click OK and then click Save directly to master configuration.
13 Restart the server. Click Servers > Server Types > WebSphere application servers, select the check box beside the
server name, and then click Restart.
3.3.5 Modifying the SOAP connection time-out settings
Modify the SOAP connection time-out settings for each WebSphere Application Server in the cluster and for
Deployment Manager.
To modify SOAP connection time-out settings
1 Log in to the WebSphere Administrative Console and, in the navigation tree, click Servers > Cluster > WebSphere
application server clusters.
2 In the right pane, stop all clusters.
3 Navigate to [appserver root]\profiles\<profile name>\properties and open the soap.client.props file in a text editor.
4 Configure the com.ibm.SOAP.requestTimeout property to 1800.
5 Save the edited file.
6 Repeat steps 3 to 5 for each application server and Deployment Manager in the cluster.

15CONFIGURING ADOBE EXPERIENCE MANAGER FORMS ON JEE APPLICATION SERVER CLUSTERS USING WEBSPHERE
Creating a WebSphere Application Server Cluster
Last updated 5/23/2016
7 Restart the deployment manager, node management and cluster.
3.3.6 Adding a new node to an existing cluster
Do the following to add a new node to a cluster:
1 Install WebSphere Network Deployment software. See “3.2 Installing WebSphere Network Deployment software”
on page 7 for details.
2 If you have not selected application server option while installing WebSphere Network Deployment software, then
create a WebSphere profile now. See “3.3.1 Creating WebSphere profiles” on page 8 for details.
3 Install Fix Packs and Feature Packs. See Supported Platform Combinations
4 Configure time-out settings. See “3.3.5 Modifying the SOAP connection time-out settings” on page 14
5 Federate the profile you created. See “3.3.3 Federating WebSphere Application Server profiles” on page 10 for
details.
6 Add New Node to the Cluster
• Click Servers > Clusters > WebSphere application server clusters.
• In the right pane, click the name of the cluster to which you want to add a node.
• Click Additional Properties > Cluster members in the right pane.
• Click New.
• On the Create additional cluster members screen, specify a name for the new member and then select the node
that you want to add to the cluster.
• Click Add Member and then click Next.
• Review the summary screen and click Finish.
• Click Save directly to the master configuration.
7 Before starting new node, ensure that:
• All required software are installed and environment variables are created.
• Temporary directory location is available for new node.
• GDS(shared) location is available for new node.
• Adobe Fonts, customer font and system font directories are available for new node.
• PDFG configurations are complete. See “8.6 Configuring PDF Generator” on page 64 for details.
• Custom properties, JVM arguments and heap arguments are configured for the new node. You may copy these
settings from existing nodes.
• Database jar file is available on new node at the same location as on exisiting nodes. You should not create Data
Source for the new node, it is already available for the cluster.
8 Start new node.
Note: Ensure that all the directories (local and shared) are available on the new node at the same location as on
existing nodes.

16CONFIGURING ADOBE EXPERIENCE MANAGER FORMS ON JEE APPLICATION SERVER CLUSTERS USING WEBSPHERE
Creating a WebSphere Application Server Cluster
Last updated 5/23/2016
3.4 Testing the WebSphere Application Server cluster
You can test the WebSphere Application Server cluster to ensure that all members are active and that the cluster
operates according to your design. You should ensure that the WebSphere Application Server cluster functions
correctly before you proceed to install and configure LiveCycle.
To test the WebSphere Application Server cluster:
1 Ensure that all WebSphere Application Server instances of the cluster are started.
2 View the server.log file located in [appserver root]/profiles/[profile name]/logs/[application server
name]/SystemOut.log. Messages such as the following one confirm the active members of the cluster:
[1/22/08 13:50:09:643 PDT] 00000018 PtpConnectedC I DCSV1031I: DCS Stack DefaultCoreGroup.lc9_cluster at Member LCcell\Node01\Node01Server1: Received a connection from an undefined member LCcell\Node02\ Node02Server1. Source address is /11.11.11.11. [1/22/08 13:50:09:696 PDT] 0000001f RoleMember I DCSV8051I: DCS Stack DefaultCoreGroup.lc9_cluster at Member LCcell\Node01\Node01Server1: Core group membership set changed. Added: [LCcell\Node02\Node02Server1]. [1/22/08 13:50:09:704 PDT] 0000001d RecoveryDirec I CWRLS0012I: All persistent services have been directed to perform recovery processing for this WebSphere server (LCcell\Node01\Node01Server1). [1/22/08 13:50:09:712 PDT] 00000018 MbuRmmAdapter I DCSV1032I: DCS Stack DefaultCoreGroup.lc9_cluster at Member LCcell\Node01\Node01Server1: Connected a defined member LCcell\Node02\Node02Server1. [1/22/08 13:50:09:839 PDT] 00000020 RecoveryManag A WTRN0028I: Transaction service recovering 0 transactions. [1/22/08 13:50:26:744 PDT] 0000001f RoleMergeLead I DCSV8054I: DCS Stack DefaultCoreGroup.lc9_cluster at Member LCcell\Node01\Node01Server1: View change in process. [1/22/08 13:50:26:764 PDT] 00000018 VSyncAlgo1 I DCSV2004I: DCS Stack DefaultCoreGroup.lc9_cluster at Member LCcell\Node01\Node01Server1: View synchronization completed successfully. The View Identifier is (1:0.LCcell\Node01\Node01Server1). The internal details are None.
3.5 Next steps
You must now install the LiveCycle solution component files. (See Installing the LiveCycle Modules.)

17
Last updated 5/23/2016
Chapter 4: Installing LiveCycle modules
4.1 Before you begin
4.1.1 Installation overview
Before you install the modules, ensure that your environment includes the software and hardware that is required to
run AEM forms on JEE. You should also understand the installation options and have the environment prepared as
required. For more information, see the Preparing to Install (Singler Server or Server Cluster) or Preparing to Upgrade
guide. The complete AEM forms on JEE documentation is available at
http://www.adobe.com/go/learn_aemforms_tutorials_6_en
AEM forms on JEE also provides a command line interface (CLI) for the installation program. See “Appendix - Install
Command Line Interface” on page 94 for instructions on using the CLI. There is also a CLI for Configuration
Manager. See “Appendix - Configuration Manager Command Line Interface” on page 97. These CLIs are intended to
be used by advanced users of AEM forms on JEE, in server environments that do not support the use of the graphical
user interface of the installation program or of Configuration Manager, or for users who wish to implement batch
(non-interactive) installation capabilities.
4.1.2 Checking the installer
Observe the following best practices with the installer files before you begin the installation process.
Check the DVD installation media
Ensure that the installation media that you received is not damaged. If you copy the installation media contents to the
hard disk of your computer where you are installing AEM forms on JEE, ensure that you copy the entire DVD contents
on to the hard disk. To avoid installation errors, do not copy the DVD install image to a directory path that exceeds
the Windows maximum path length limit.
Install AEM forms on JEE either by using a local copy of the installation files or directly from the DVD. The installation
could fail when AEM forms on JEE is installed over the network. Also, do not use special characters in the local path
(for example, the character ‘#’).
Check the downloaded files
If you downloaded the installer from the Adobe web site, verify the integrity of the installer file using the MD5
checksum. Do one of the following to calculate and compare the MD5 checksum of the downloaded file with the
checksum published on the Adobe download web page:
• Linux: Use the md5sum command
• Solaris: Use the digest command
• Windows: Use a tool such as WinMD5
• AIX: Use the md5sum command
Expand the downloaded archive files
If you downloaded the ESD from the Adobe web site, extract the entire lces_server_6_0_0_websphere_all_win.zip
(Windows) or lces_server_6_0_0_websphere_all_unix.tar.gz (AIX, Linux, or Solaris) archive file to your computer.
For non-windows, use the gunzip command to extract the .gz file.

18CONFIGURING ADOBE EXPERIENCE MANAGER FORMS ON JEE APPLICATION SERVER CLUSTERS USING WEBSPHERE
Installing LiveCycle modules
Last updated 5/23/2016
Note: Be sure to keep the directory hierarchy unchanged from the original ESD file.
4.2 Installation considerations
4.2.1 Installation paths
To successfully install, you need read, write, and execute permissions on the installation directory. The following
installation directories are the defaults; however, you can specify a different directory as required:
• (Windows) C:\Adobe\Adobe_Experience_Manager_forms
• (AIX, Linux, or Solaris) /opt/adobe/adobe_experience_manager_forms
Important: When installing AEM forms on JEE, do not use double byte or extended latin characters (such as
àâçéèêëîïôùûÄÖßÜ) in the installation path.
When you are installing the modules on UNIX-based systems, you must be logged in as the root user to successfully
install the modules to the default location, which is /opt/adobe/adobe_Experience_Manager_forms. If you are logged
in as a non-root user, change the installation directory to one that you have permissions (read-write-execute
privileges) for. For example, you can change the directory to
/home/[username]/adobe/adobe_experience_manager_forms.
Note: On a UNIX-like system, when you copy/download files from the source (installation media), install.bin might lose
the executable permissions. Ensure that you restore the write-execute permissions after copying/downloading the files.
On Windows, you must have administrator privileges to install AEM forms on JEE.
When you run the AEM forms on JEE installer, you should run it as the same user that installed WebSphere
Application Server.
4.2.2 Temporary directories
Temporary files are generated in the temp directory. In certain instances, the generated temporary files may remain
after the installer is closed. You can remove these files manually.
When installing on Linux, the installation program uses the logged-in user's home directory as a temporary directory
for storing files. As a result, messages such as the following text may appear in the console:
WARNING: could not delete temporary file /home/<username>/ismp001/1556006
When you complete the installation, you must manually delete the temporary files from the following directories:
• (Windows) TMP or TEMP path as set in the environment variables
• (AIX, Linux, or Solaris) Logged-in user’s home directory
On UNIX-based systems, a non-root user can use the following directory as the temporary directory:
• (Linux) /var/tmp or /usr/tmp
• (AIX) /tmp or /usr/tmp
• (Solaris) /var/tmp or /usr/tmp

19CONFIGURING ADOBE EXPERIENCE MANAGER FORMS ON JEE APPLICATION SERVER CLUSTERS USING WEBSPHERE
Installing LiveCycle modules
Last updated 5/23/2016
4.2.3 Installing on a Windows staging platform for Linux or UNIX
AEM forms on JEE can be installed and configured on Windows for deployment on a Linux or UNIX platform. You
can use this functionality for installing on a locked-down Linux or UNIX environment. A locked-down environment
does not have a graphical user interface installed. For the Linux or UNIX platform, the installation program installs
binaries that are used by Configuration Manager to configure the product.
The computer running Windows can then be used as a staging location for the deployable objects, which can be copied
to a Linux or UNIX computer for deployment to the application server. The application server on the Windows-based
computer, and the Linux or UNIX target computer on which you want to install AEM forms on JEE must be the same.
4.2.4 Configuring the JAVA_HOME environment variable
The JAVA_HOME environment variable must point to the Java SDK for your application server as outlined in the
preparing guide. See Preparing to Install AEM forms on JEE (Single Server)or Preparing to Install AEM forms on JEE
(Server Cluster)for more information
4.2.5 General installation notes
• On Windows, improve the speed of installation by disabling any on-access virus scanning software during
installation.
• If you are installing on UNIX-based systems and are not installing directly from a release DVD, set executable
permissions on the installation file.
• To avoid permission issues during deployment, ensure that you run the AEM forms on JEE installer and
Configuration Manager as the same user who will run the application server.
• If you are installing on UNIX-based computers, the installation directory you specify should not contain any
spaces.
• Ensure that the JAVA_HOME environment variable points to [appserver root]/java/.
• When configuring WebSphere on Windows, make sure that Configuration Manager is running using the
appropriate JDK. WebSphere installations typically use the IBM JDK. If WebSphere is not using the IBM JDK, re-
launch Configuration Manager using the [aem-forms root]/configurationManager/bin/ConfigurationManager.bat
script.
Note: If you are using a non-IBM JDK, do not use [aem-forms
root]/configurationManager/bin/ConfigurationManager.exe.
• If errors occur during installation, the installation program creates the install.log file, which contains the error
messages. This log file is created in the [aem-forms root]/log directory.
4.3 Installing AEM forms on JEE
1 Start the installation program:
• (Windows) Navigate to the \server\Disk1\InstData\Windows_64\VM directory on the installation media or
folder on your hard disk where you copied the installer. Right-click the install.exe file and select Run as
administrator.
• (Non-Windows) Navigate to the appropriate directory, and from a command prompt, type ./install.bin.
• (AIX) /server/Disk1/InstData/AIX/VM

20CONFIGURING ADOBE EXPERIENCE MANAGER FORMS ON JEE APPLICATION SERVER CLUSTERS USING WEBSPHERE
Installing LiveCycle modules
Last updated 5/23/2016
• (Linux) /server/Disk1/InstData/Linux/NoVM
• (Solaris) /server/Disk1/InstData/Solaris/NoVM
2 When prompted, select the language for the installation to use and click OK.
3 On the Introduction screen, click Next.
4 If you have LiveCycle ES4 SP1installed on the computer where you are running the installer, the Preparation for
Upgrade screen appears.
Note: If you are performing an out-of-place upgrade on a new machine, this screen is not shown.
• Prepare to upgrade existing installation to AEM forms on JEE:
Do not select this option if you are performing a fresh installation.
• Install AEM forms on JEE: Installs AEM forms on JEE afresh.
Select Next to continue.
5 On the Choose Install Folder screen, accept the default directory or click Choose and navigate to the directory
where you intend to install AEM forms on JEE, and then click Next. If you type the name of a directory that does
not exist, it is created for you.
Click Restore Default Folder to restore the default directory path.
6 (Windows only) On the Manual Installation Options screen, select the target deployment option and click Next:
• Windows (Local): Select this option if you are installing and deploying AEM forms on JEE on the local server.
• Staged (Installed on Windows, targeting remote systems): Select this option if you plan to use Windows as a
staging platform for your deployment and then select the target operating system on the remote server. You can
select a UNIX operating system as the target for deployment even if you are installing on Windows. (See “4.2.3
Installing on a Windows staging platform for Linux or UNIX” on page 19.)
7 Read the AEM forms on JEE License Agreement, select I accept to accept the terms of the license agreement and
then click Next. If you do not accept the license agreement, you cannot continue.
8 On the Pre-Installation Summary screen, review the details and click Install. The installation program displays the
progress of the installation.
9 Review the Release Notes information and click Next.
10 Review the details on the Install Complete screen.
11 The Start Configuration Manager checkbox is selected by default. Click Done to run the Configuration Manager.
Note: (PDF Generator for Windows only) If Acrobat is not installed on all nodes in the cluster, install it now. Then
complete the steps in “8.6 Configuring PDF Generator” on page 64.
Note: To run Configuration Manager later, deselect the Start Configuration Manager option before you click Done.
You can start Configuration Manager later using the appropriate script in the [aem-forms
root]/configurationManager/bin directory. See the Configuring AEM forms on JEE For Deployment chapter in this
guide.

21CONFIGURING ADOBE EXPERIENCE MANAGER FORMS ON JEE APPLICATION SERVER CLUSTERS USING WEBSPHERE
Installing LiveCycle modules
Last updated 5/23/2016
4.4 Configuring the caching locators in clusters (caching using TCP only)
If you implement caching for your LiveCycle cluster by using TCP, configure the TCP locators to find other members
of the LiveCycle cluster.
Note: This section does not apply if you implement caching for your LiveCycle cluster by using UDP. (See “6.2.2 Modifying
the JVM properties” on page 36to configure caching for your LiveCycle cluster using UDP.)
Do the following to enable LiveCycle cluster caching using TCP:
• Ensure that the TCP locators are installed and configured. TCP locators are installed in the [LiveCycle
root]/lib/caching directory, with a default configuration, when you install LiveCycle. You can change the default
configuration. (See Modifying the TCP locators.)
• Configure each node in the LiveCycle cluster to use the locators. (See “6.2.2 Modifying the JVM properties” on
page 36.)
• Ensure that TCP locators are running.
4.4.1 Modifying TCP locators
The LiveCycle installer creates a default configuration of the TCP locators that is ready to use without modification.
You can move the locators to any computer on your network and run them on that computer. The locators do not have
to reside on a computer that is a member of the LiveCycle cluster. You can also create additional failover locators to
support high availability in your cluster. (See To install the TCP locators:.)
You can also modify the TCP locators to use a port other than the default port (22345). (See To modify the default
locator port (Windows): or To modify the default locator port (UNIX):.)
4.4.2 Install TCP locators
1 Log on to the computer where you installed LiveCycle and navigate to the [LiveCycle root]/lib/ caching directory.
2 Copy the caching directory and its contents to the computer on which you want to run the locators.
You can start TCP locator from default location. You should copy the caching directory to another location, only if:
• You want to run TCP locator on a machine that does not have LiveCycle.
• You do not want to start TCP locator from default location.
Note: Do not run TCP locators on all the nodes of the LiveCycle Cluster. It is good practice to run minimum two
locators. One TCP locator serves as a primary locator and other TCP locator serves as a secondary locator to handle
failover issues. You can add more than two TCP locators as backup locators but it is not mandatory.
4.4.3 Modify the default locator port (Windows)
1 Open the startlocator.bat file in a text editor. The startlocator file for a default installation is on the computer where
you installed LiveCycle, in the [LiveCycle root]/lib/caching directory.
2 Change the default port number (22345) to your preferred port number in the following properties:
set port=22345
The port number can be any available port between 1025 and 65535.

22CONFIGURING ADOBE EXPERIENCE MANAGER FORMS ON JEE APPLICATION SERVER CLUSTERS USING WEBSPHERE
Installing LiveCycle modules
Last updated 5/23/2016
Note: Ensure that the port number that is configured here matches the port number that is configured in the JVM
argument of each node of the LiveCycle cluster.The port number can be any available port between 1025 and 65535.
See Modifying the JBoss run.conf file to complete the configuration.
3 If you are using more than one locator for failover, assign all of such locators to JVM argument -Dlocators listed
at the end of the startlocator.bat file.
-Dlocators=localhost[22345]
4 (Computers with multiple network cards only) If the computer hosting the locator has multiple network cards, set
the following properties in the script:
set bindaddr=<bind IP address>
Where <bind IP address> is the IP address that the locator will listen on. You must specify the <bind IP
address> for the JVM argument adobe.cache.cluster-locators on each node in your LiveCycle cluster.
Note: If you do not specify the bind address and the bind port in the startlocator script, you will be prompted to
input these values when you execute the script. However, for IPv6, you must specify the bind address and the bind port
in the startlocator script itself.
5 Save the edited file.
6 Repeat steps 1 to 4 on any additional locators for your LiveCycle cluster.
4.4.4 Modify the default locator port (UNIX)
1 Open the startlocator.sh file in a text editor. The startlocator file for a default installation is located on the computer
where you installed LiveCycle, in the [LiveCycle root]/lib/caching directory.
2 Change the default port number (22345) to your preferred port number in the following properties:
GF_PORT=22345
The port number can be any available port between 1025 and 65535.
Important: Ensure that the port number that is configured here matches the port number that is configured in the
JVM argument of each node of the LiveCycle cluster.
3 If you are using more than one locator for failover, assign all of such locators to JVM argument -Dlocators listed
at the end of the startlocator.sh file.
-Dlocators=localhost[22345]
4 (Computers with multiple network cards only) If the computer hosting the locators has multiple network cards,
modify the following argument:
GF_BIND_ADDRESS="<bind IP address>"
Where <bind IP address> is the IP address that the locator will listen on. You must specify the <bind IP
address> for the JVM argument adobe.cache.cluster-locators on each node in your LiveCycle cluster.
Note: For IPv6, it is recommended that you specify the bind address and the bind port in the startlocator script
itself.
5 Save the edited file.
6 Repeat steps on any additional locators for your LiveCycle cluster.

23CONFIGURING ADOBE EXPERIENCE MANAGER FORMS ON JEE APPLICATION SERVER CLUSTERS USING WEBSPHERE
Installing LiveCycle modules
Last updated 5/23/2016
4.4.5 Start the TCP locators
To use TCP-based caching for LiveCycle Cluster using TCP locator, you must start the TCP locators before you start
your cluster. If the TCP locators are not running when you start the members of the LiveCycle cluster, the LiveCycle
cluster will not function.
1 On the computer where the TCP locators are installed, navigate to the caching directory. For a default installation,
the TCP locators are installed on the computer where you installed LiveCycle, in the [LiveCycle root]/lib/caching
directory.
2 (IPv6 only) Modify startlocator.bat (Windows) or startlocator.sh (UNIX) and add the following JVM
arguments:
-Djava.net.preferIPv6Stack=true -Djava.net.preferIPv6Addresses=true
3 Run the appropriate file:
• (Windows) startlocator.bat
• (UNIX) startlocator.sh
4 Repeat above steps on any additional locators for your LiveCycle cluster.
Note: (Windows Only)On running startlocator script, you would be prompted to change the default value. You can
choose to keep the default values provided in the script or you can provide new values.
4.4.6 Stop TCP locators
1 On the computer where the TCP locators are installed, navigate to the caching directory. For a default installation,
the TCP locators are installed on the computer where you installed LiveCycle, in the [LiveCycle root]/lib/caching
directory.
2 Run the appropriate file:
• (Windows) stoplocator.bat
• (UNIX) stoplocator.sh
3 Repeat steps 1to 2 on any additional locators for your LiveCycle cluster.
Note: If you are not using the default values in the startlocator script and mentioned specific IP address and port
values, specify the same values in the stoplocator script. Otherwise, the stoplocator script may fail to stop the
locators.
4.5 Global Document Storage Directory (GDS)
On cluster configurations, create a shared file system for GDS directory accessible to each node on the LiveCycle
cluster. This shared file system can be a local storage on a computer or a share on the dedicated network storage system.
Ensure that all the nodes of the cluster have read and write permissions on the shared storage. The GDS directory
should have low access time, high up time, and should be accessible as UNC style path. For example,
\\storagename\shared\GDS.
24CONFIGURING ADOBE EXPERIENCE MANAGER FORMS ON JEE APPLICATION SERVER CLUSTERS USING WEBSPHERE
Installing LiveCycle modules
Last updated 5/23/2016
4.6 Installing the font directories in cluster nodes
You must install the font directories for each node in the cluster, including the LiveCycle fonts that are installed in the
[LiveCycle root]\fonts directory.
The fonts must exist in the same path on each node, and the directory must have identical contents on all nodes in the
cluster. To ensure this, use one of the following options:
• Use a shared directory that all nodes in the cluster can access. Copy fonts from [LiveCycle root]\fonts to the shared
directory. Using shared fonts directories can slow down the access to the fonts and induces performance issues.
• Copy the [LiveCycle root]\fonts directory to each node in the cluster in an identical path.
Record the location where you create these shared directories for later use when you configure LiveCycle using
Configuration Manager.
Note: The font directories must be distinct from the GDS directory. However, they may be distinct sibling subdirectories
of a single shared parent directory. The requirements and steps mentioned above are applicable to the custom font
directories.
4.7 Next steps
You must now configure AEM forms on JEE for deployment. You can also choose to run Configuration Manager later
by using the ConfigurationManager.bat or ConfigurationManager.sh file located in [aem-forms
root]\configurationManager\bin.

25
Last updated 5/23/2016
Chapter 5: Configuring LiveCycle for deployment
5.1 Considerations when configuring and deploying AEM forms on JEE
5.1.1 General Considerations
• For IPv6, run IPv6 Configuration Manager. For detailed information, see IPv6 support section in prepare to install
guide.
• You can override the default font for the Configuration Manager by adding the following JVM argument in [aem-
forms root]\configurationManager\bin\ConfigurationManager.bat (Windows) or [aem-forms
root]\configurationManager\bin\ConfigurationManager.sh (Linux, UNIX):
-Dlcm.font.override=<FONT_FAMILY _NAME>
For example:
-Dlcm.font.override=SansSerif
Restart the Configuration Manager after adding the JVM argument.
• During configuration, if you must reset the data in Configuration Manager by using the Reset to Default option,
ensure that you relaunch the Configuration Manager. Otherwise, you may encounter some missing configuration
screens.
• During configuration, you must provide the location of the JDBC drivers for your database. The Oracle, SQL
Server, and DB2 drivers are in the [aem-forms root]/lib/db/[database] directory.
• Temporary directory: Do not specify a shared network directory as your temporary directory on cluster
configurations. It is recommended to use local directory as a temporary directory. The temporary directory should
exist on every node of the cluster and the path of the temporary directory should be same for every node of the
cluster.
• Global Document Storage (GDS) directory: Specify the GDS directory that meets the requirements outlined in the
Preparing to Install (Single Server or Server Cluster). For latest documentation, see
http://www.adobe.com/go/learn_aemforms_tutorials_6_en.
• On cluster environments, several steps need to be performed manually in addition to the automatic configuration
that Configuration Manager performs.
5.1.2 CLI versus GUI versions of Configuration Manager
This section describes the GUI version of Configuration Manager. For instructions about using the command line
interface (CLI) version of Configuration Manager, see “Appendix - Configuration Manager Command Line Interface”
on page 97.
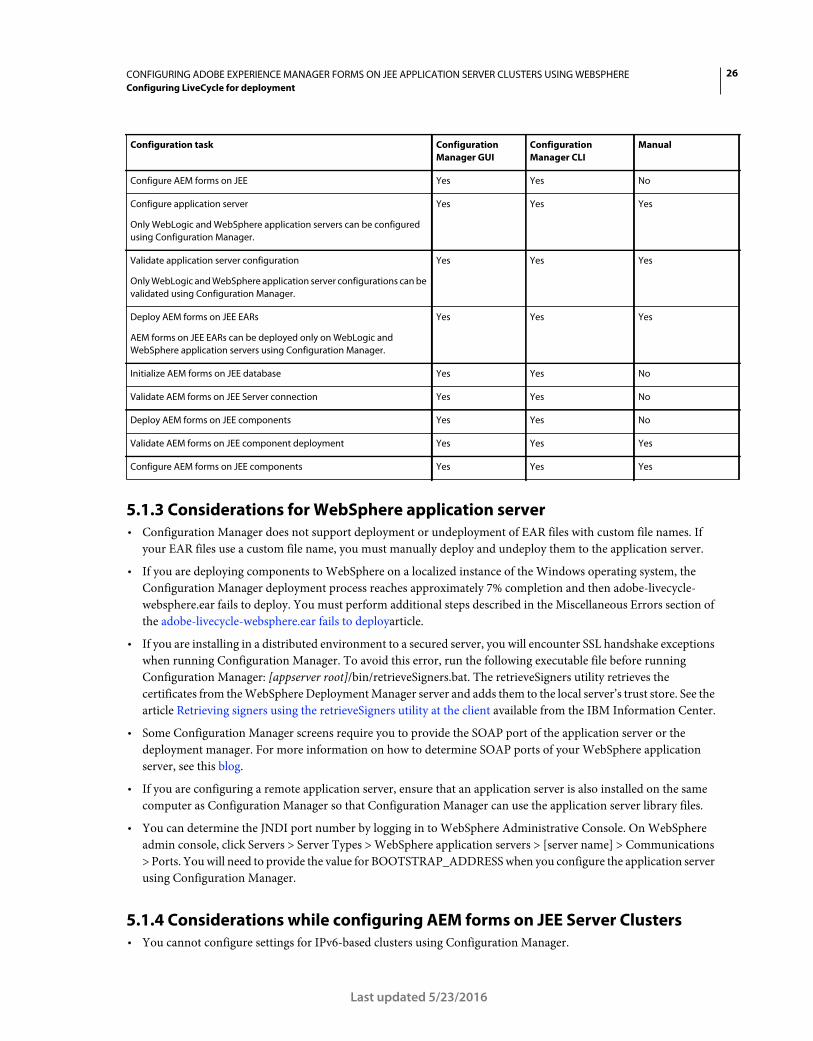
26CONFIGURING ADOBE EXPERIENCE MANAGER FORMS ON JEE APPLICATION SERVER CLUSTERS USING WEBSPHERE
Configuring LiveCycle for deployment
Last updated 5/23/2016
5.1.3 Considerations for WebSphere application server
• Configuration Manager does not support deployment or undeployment of EAR files with custom file names. If
your EAR files use a custom file name, you must manually deploy and undeploy them to the application server.
• If you are deploying components to WebSphere on a localized instance of the Windows operating system, the
Configuration Manager deployment process reaches approximately 7% completion and then adobe-livecycle-
websphere.ear fails to deploy. You must perform additional steps described in the Miscellaneous Errors section of
the adobe-livecycle-websphere.ear fails to deployarticle.
• If you are installing in a distributed environment to a secured server, you will encounter SSL handshake exceptions
when running Configuration Manager. To avoid this error, run the following executable file before running
Configuration Manager: [appserver root]/bin/retrieveSigners.bat. The retrieveSigners utility retrieves the
certificates from the WebSphere Deployment Manager server and adds them to the local server’s trust store. See the
article Retrieving signers using the retrieveSigners utility at the client available from the IBM Information Center.
• Some Configuration Manager screens require you to provide the SOAP port of the application server or the
deployment manager. For more information on how to determine SOAP ports of your WebSphere application
server, see this blog.
• If you are configuring a remote application server, ensure that an application server is also installed on the same
computer as Configuration Manager so that Configuration Manager can use the application server library files.
• You can determine the JNDI port number by logging in to WebSphere Administrative Console. On WebSphere
admin console, click Servers > Server Types > WebSphere application servers > [server name] > Communications
> Ports. You will need to provide the value for BOOTSTRAP_ADDRESS when you configure the application server
using Configuration Manager.
5.1.4 Considerations while configuring AEM forms on JEE Server Clusters
• You cannot configure settings for IPv6-based clusters using Configuration Manager.
Configuration task Configuration
Manager GUI
Configuration
Manager CLI
Manual
Configure AEM forms on JEE Yes Yes No
Configure application server
Only WebLogic and WebSphere application servers can be configured
using Configuration Manager.
Yes Yes Yes
Validate application server configuration
Only WebLogic and WebSphere application server configurations can be
validated using Configuration Manager.
Yes Yes Yes
Deploy AEM forms on JEE EARs
AEM forms on JEE EARs can be deployed only on WebLogic and
WebSphere application servers using Configuration Manager.
Yes Yes Yes
Initialize AEM forms on JEE database Yes Yes No
Validate AEM forms on JEE Server connection Yes Yes No
Deploy AEM forms on JEE components Yes Yes No
Validate AEM forms on JEE component deployment Yes Yes Yes
Configure AEM forms on JEE components Yes Yes Yes
27CONFIGURING ADOBE EXPERIENCE MANAGER FORMS ON JEE APPLICATION SERVER CLUSTERS USING WEBSPHERE
Configuring LiveCycle for deployment
Last updated 5/23/2016
• It is recommended that you have local server fonts and customer fonts directories at the same path on each node
in the cluster. Having shared fonts directories instead of local fonts directories may cause performance issues.
5.1.5 Set the date, time, and time zone
Setting the date, time, and time zone on all servers connected to your AEM forms on JEE environment will ensure that
time-dependent modules, such as Digital Signatures and Reader Extensions function correctly. For example, if a
signature appears to have been created in the future, it will not validate.
Servers that require time synchronization are database servers, LDAP servers, HTTP servers and J2EE servers
(Application servers).
Note: Ensure that all the machines used in a AEM forms on JEE cluster are time synchronized.
5.2 AEM forms on JEE pre-configuration tasks
Note: Press F1 in Configuration Manager to view Help information for the screen you are viewing. You can view the
configuration progress at any time by clicking View Progress Log.
1 If you did not start Configuration Manager automatically from the installation program, navigate to the [aem-forms
root]/configurationManager/bin directory and run the ConfigurationManager.bat/ConfigurationManager.sh
script.
2 If prompted, select a language for Configuration Manager to use and click OK.
3 On the Welcome screen, click Next.
4 Do not select any option on the Upgrade Task Selection screen and click Next.
5 On the Modules screen, select AEM forms on JEE modules you wish to configure and click Next.
Note: Some modules have technical dependencies on other modules for proper configuration and functioning.
Configuration Manager displays a dialog and does not allow to proceed further if mutually dependent modules are
not selected. For example, you must select Forms, Output, and Content Repository modules if you are configuring
Correspondence Management.
6 On the Task Selection screen, select all the tasks you want to perform and click Next.
5.3 Configuring and deploying AEM forms on JEE
Note: Press F1 in Configuration Manager to view Help information for the screen you are viewing.
Configuring LiveCycle
1 On the Configure Adobe Experience Manager forms(1 of 5) screen, click Configure and click Next when done.
2 On the Configure Adobe Experience Manager forms (2 of 5) screen, click Next to accept the default directory
locations, or click Browse to navigate to and change the directories that LiveCycle will use to access fonts, and then
click Next.

28CONFIGURING ADOBE EXPERIENCE MANAGER FORMS ON JEE APPLICATION SERVER CLUSTERS USING WEBSPHERE
Configuring LiveCycle for deployment
Last updated 5/23/2016
Click Edit configuration to change any values on this screen. This button is not available when the Configuration
Manager is run for the first time, but is available on the second and subsequent runs of the Configuration
Manager.
• (Optional) To change the default location of the Adobe server fonts directory, type the path or browse to the
directory.
• To change the default location of the Customer fonts directory, click Browse or specify a new location for your
customer fonts.
Note: Your right to use fonts provided by parties other than Adobe is governed by the license agreements provided
to you by such parties with those fonts, and is not covered under your license to use Adobe software. Adobe
recommends that you review and ensure that you are in compliance with all applicable non-Adobe license
agreements before using non-Adobe fonts with Adobe software, particularly with respect to use of fonts in a server
environment.
• (Optional) To change the default location of the System fonts directory, type the path or browse to the
directory. To add more directories to the list, click Add.
• (Optional) To enable FIPS, ensure that Enable FIPS is selected. Select this option only if you require the Federal
Information Processing Standards (FIPS) to be enforced.
3 Click Browse on the Configure Adobe Experience Manager forms (3 of 5) screen to specify the Location of the
temporary directory, and then click Next.
Note: Ensure that the temporary directory is on the local file system. LiveCycle does not support a temporary directory
at a remote location.
Note: If you do not specify the temporary directory, the default system-configured temp location is used.
4 On the Configure Adobe Experience Manager forms (4 of 5) screen, click Browse to specify the path for the Global
Document Storage (GDS) directory, and then click Next..
Note: If you leave the GDS directory field empty, LiveCycle will create the directory in a default location in the
application server directory tree. After you finish the configuration steps, you can access the location from
Administration Console > Settings > Core System Settings > Configurations.
Note: Ensure that GDS directory is accessible from all the nodes of the cluster. For Cluster, do not leave the directory
field empty..
5 On the Configure Persistent Document Storage (5 of 5) screen, select the option for persistent document storage in
addition to the GDS directory. Select one of the following:
• Use GDS: Use the file system-based GDS for all persistent document storage. This option provides the best
performance, and a single location for GDS.
• Use database: Use the LiveCycle database for storing the persistent documents and long-lived artifacts.
However, the file-system based GDS is also required. Using the database simplifies backup and restore
procedures.
Click Configure to configure the LiveCycle EARs with this directory information and, after the configuration is
complete, click Next.
Configure CRX
❖ The CRX Configuration screen allows you to configure the CRX repository and install it into the AEM forms on
JEE Core EAR file.
On this screen:
1 Specify the path to the repository. The default location is [aem-forms root]/crx-repository.

29CONFIGURING ADOBE EXPERIENCE MANAGER FORMS ON JEE APPLICATION SERVER CLUSTERS USING WEBSPHERE
Configuring LiveCycle for deployment
Last updated 5/23/2016
2 Select the repository type, as appropriate. If selecting CRX3 Mongo DB, specify the Mongo database name and
URL to the database.
3 Optionally, select AEM Samples need to be installed to install AEM samples.
4 Click Configure to create the required repository files at the specified location.
Note: If your AEM forms on JEE server is running remotely, select Server is running on remote host, and specify the
path to the repository on the remote host.
Click Next to continue.
Note: Ensure that the CRX repository path does not contain spaces and the content repository is available on all the
nodes of the cluster. After the configuration is complete, copy the content repository from local node to all the nodes
on the same location (as specified on the CRX configuration screen) .
Note: Once the packages are configured, you cannot remove them by re-running the Configuration Manager. For
clean uninstallation of deployed packages, you need to uninstall and delete the packages using Package Manager.
(Remote host only) CRX Configuration Summary
❖ For a remote deployment, copy the content from the [aem-forms root]/configurationManager/export/crx-
quickstart/ directory to the location on the remote host you specified on the CRX Configuration screen.
Note: In case of clustered deployment, you must copy the content from the [aem-forms
root]/configurationManager/export/crx-quickstart/ directory to the specified location on all cluster node hosts.
Configuring Acrobat for PDF Generator
❖ (Windows only) On the Configure Acrobat For PDF Generator screen, click Configure to run the script that will
configure Adobe Acrobat and required environment settings. Click Next when complete.
Note: This screen will perform the desired configuration only when Configuration Manager is running locally. You
must have Adobe Acrobat XI Pro already installed or this step will fail.
Note: You should manually configure Acrobat for PDF generator on all the other nodes of the cluster. See “8.6
Configuring PDF Generator” on page 64 in the Post Deployment chapter.
Configuration Summary
❖ On the Configure Adobe Experience Manager forms Summary screen, click Next. Configured archives are placed
in the [aem-forms root]/configurationManager/export directory.
Configuring your application server and database
1 On the Application Server Configuration Details screen, provide the information for the fields (all fields are
mandatory) and then click Verify Server Connection. When the verification has completed successfully, click
Next.
Note: If WebSphere Administrative Security is off, Admin User ID and Password fields can be left blank.
Note: When using WebSphere Cluster or WebSphere Network Deployment server to configure a standalone
WebSphere Application server, enter the port number of the deployment manager in the SOAP Port field.
Note: If you are using non-default WebSphere profile, ensure that you provide the complete path, including the profile
name, in the Local Application Server Root Directory field.
2 On the Application Server Configuration Selection screen, select the tasks for Configuration Manager to perform,
and click Next.
If you prefer to configure the application server cluster manually, ensure that all the tasks are deselected, then click Next.

30CONFIGURING ADOBE EXPERIENCE MANAGER FORMS ON JEE APPLICATION SERVER CLUSTERS USING WEBSPHERE
Configuring LiveCycle for deployment
Last updated 5/23/2016
3 On the Server Settings Configuration screen (appears only if Configure Server Settings was selected), provide the
information for the fields, and then click Next.
Note: : If you are using UDP then multicast port can be any available port between 1025 and 65535. The multicast
port must be unique to the AEM forms on JEE cluster (that is, the port must not be used by any other cluster on the
same network, any attempt to use the same port by any other cluster on the same network would result in bootstrap
failure).
Note: LCM does not configure configure -Dadobe.cache.multicast-address and -Dadobe.cache.bind-
address jvm arguments. You may need to configure these arguments manually. See “6.2.2 Modifying the JVM
properties” on page 36 section for more details.
4 On the Datasource Configuration screen (appears only if Configure Datasource option is selected), provide the
information for the fields and then click Test Database Connection. When the connection is tested successfully,
click Next.
You can choose to manually configure data sources rather than allowing Configuration Manager to configure them
for you. To override automatic data source configuration, select Manually configure data source in the
WebSphere Administrative Console before continuing, at the bottom of the screen.
Without exiting Configuration Manager, go to the application server administration console, and configure data
sources as described in Configuring the AEM forms on JEE database connectivity in Installing AEM forms on JEE
for WebSphere Server Guide.
5 On the Application Server Configuration screen, click Configure. When the process is completed, click Next.
6 On the Application Server Configuration Validation screen, select the tasks for validating and then click Validate
and select Yes on prompt to deploy adobe-lcm-lcvalidator.ear. When the process is completed, click Next.
Choose installation verification sample (IVS) EAR files
❖ (Forms, Output, Mobile Forms, and Assembler only)On the Adobe Experience Manager forms Installation
Verification Sample (IVS) EAR files screen, you can install three service-specific sample applications. Select
Include IVS EARs in deployment set and click Next to install these sample files.
The ear files appear only if you have selected respective modules on the Modules screen.
Note: Do not deploy the IVS EAR files to a production environment.
Copy CRX Content
Copy all the content of the [LiveCycle root]/configurationManager/export/crx-quickstart/ directory to the location
specified on the CRX Configuration screen on all the cluster nodes.
Deploying AEM forms on JEE EARs
1 (Applicable if using MongoDB as a repository) You must deploy the EAR only on the master node and keep other
nodes in the shutdown status.
In the WebSphere administration console, stop all servers running on slave nodes and keep only the server of the
master node running.
Note: After you have completed all configurations and have quit the Configuration Manager, ensure that you run one
of the stopped servers, wait for it to start completely, and then run other stopped servers, one by one.
2 On the Deploy Adobe Experience Manager forms EARs screen, select the EAR files to deploy, and then click
Deploy. This operation may take several minutes to complete. When the deployment has completed successfully,
click Next.

31CONFIGURING ADOBE EXPERIENCE MANAGER FORMS ON JEE APPLICATION SERVER CLUSTERS USING WEBSPHERE
Configuring LiveCycle for deployment
Last updated 5/23/2016
Note: If the deployment of EARs fails with the error – The system failed to make the SOAP RPC call: invoke – increase
the SOAP timeout value as described in Configuring WebSphere time-out settings and then deploy the EARs.
Note: When Configuration Manager has started the execution of the IBM WebSphere® JACL deployment scripts, you
cannot stop the deployment even if you exit or cancel Configuration Manager prior to deployment completion. No user
action is required because the product EARs will be successfully deployed.
By default, Configuration Manager deploys the EAR files to the WebSphere default virtual host, default_host. To
deploy the EAR files to a different virtual host, select the target host from the Virtual Host list.
To connect to the application server using a secure port while running Configuration Manager, do the following
tasks:
a Add the crypto.jar file provided by IBM to the LiveCycle Configuration Manager path.
b Set the following JVM argument to disable hostname verification:
ssl.disable.url.hostname.verification.CWPKI0027I=CWPKI0027I
You can connect to the application server using this workaround only if you are using the default HTTPS port.
Note: Whenever an application is deployed for the first time, the application name is retained. Subsequent
deployments of the application on a different cluster within the same cell append the name of the cluster to the
application name.
Initializing AEM forms on JEE database
1 On the Adobe Experience Manager forms Database Initialization screen, verify that the hostname and port number
provided for your application server is correct and then click Initialize. The database initialization task creates
tables in the database, adds default data to the tables, and creates basic roles in the database. When the initialization
has completed successfully, click Next. Restart the application server manually when you are prompted to do so.
Note: Initialize the database only on one node of the cluster. Subsequent steps are performed only on initialized server.
2 On the Adobe Experience Manager forms Information screen, enter Adobe Experience Manager forms User ID
and Password whose default values are administrator and password respectively.
Click Verify Server Connection, and when complete, click Next.
Note: The server information that appears on this screen represents default values for the deployment.
Verifying the server connection helps narrow troubleshooting in case failures occur in the deployment or
validation. If the connection test passes but deployment or validation fails in the next few steps, connectivity issues
can be eliminated from the troubleshooting process.
Deploying Central Migration Bridge Service
❖ On the Central Migration Bridge Service Deployment Configuration screen, if applicable, select the Include
Central Migration Bridge Service in deployment option and then click Next.
Deploying AEM forms on JEE components
1 On the Adobe Experience Manager forms Component Deployment screen, click Deploy. The components that are
deployed at this time are Java archive files that plug into the service container that is part of AEM forms on JEE for
purposes of deploying, orchestrating, and executing services. When the deployment has completed successfully,
click Next.
2 On the Adobe Experience Manager forms Component Deployment Validation screen, click Validate. Click View
Progress Log to view the validation progress and, when the validation has completed successfully, click Next.
32CONFIGURING ADOBE EXPERIENCE MANAGER FORMS ON JEE APPLICATION SERVER CLUSTERS USING WEBSPHERE
Configuring LiveCycle for deployment
Last updated 5/23/2016
Configuring LiveCycle components
❖ On the Configure Adobe Experience Manager forms Components screen, select the tasks to run with Configuration
Manager, and click Next.
LiveCycle Server JNDI information
❖ On the Adobe Experience Manager forms Server JNDI Information screen, enter the host name and port number
for the JNDI server. Provide location for Local Application Server Root Directory, and Click Test Connection.
When complete, click Next.
Configure Connector for EMC® Documentum®
Note: In case of a remote AEM forms on JEE deployment, you cannot configure the Connector for EMC Documentum
using Configuration Manager.
1 On the Specify Client for EMC Documentum screen, select Configure Connector for EMC Documentum
Content Server, and specify the following settings. Enter the details, click Verify, and when complete, click Next
to continue.
• Choose EMC Documentum Client Version: Select the client version to use with the EMC Documentum
Content Server.
• EMC Documentum Client Installation Directory Path: Click Browse to select the directory path.
2 On the Specify EMC Documentum Content Server Settings screen, enter the EMC Documentum Server details,
and then click Next. Press F1 for information about the details you need to enter.
3 On the Configure Connector for EMC Documentum screen, click Configure Documentum Connector. When
completed, click Next.
4 On the Required Manual Configurations for Connector for EMC Documentum screen, review and perform the
manual steps listed and then click Next.
Configure Connector for IBM® Content Manager
Note: In case of a remote AEM forms on JEE deployment, you cannot configure the Connector for IBM Content Manager
using Configuration Manager.
1 On the Specify Client for IBM Content Manager screen, select Configure Connector for IBM Content Manager,
and enter a value for the IBM Content Manager Client Installation Directory Path. Click Verify and when
complete, click Next to continue.
2 On the Specify IBM Content Manager Server Settings screen, enter the details of the IBM Content Manager Server,
and click Next.
3 On the Configure Connector for IBM Content Manager screen, click Configure IBM Content Manager
Connector. When complete, click Next.
4 On the Required Manual Configurations for Connector for IBM Content Manager screen, review and perform the
manual steps listed and then click Next.

33CONFIGURING ADOBE EXPERIENCE MANAGER FORMS ON JEE APPLICATION SERVER CLUSTERS USING WEBSPHERE
Configuring LiveCycle for deployment
Last updated 5/23/2016
Configure Connector for IBM® FileNet
Note: In case of a remote AEM forms on JEE deployment, you cannot configure the Connector for IBM FileNet using
Configuration Manager.
1 On the Specify Client for IBM FileNet screen, select Configure Client for IBM FileNet Content Manager, and
specify the following settings.
• Choose IBM FileNet Client Version: Select the client version that you want to use with the IBM FileNet
Content Server.
• IBM FileNet Client Installation Directory Path: Click Browse to select the directory path.
Note: The validation of IBM FIleNet may fail if there are special characters, such as hyphen (-), underscore (_),
comma (,), or dot (.) in the directory name containing the IBM FileNet client.
Click Verify, and when complete, click Next to continue.
2 On the Specify IBM FileNet Content Server Settings screen, enter the required details, and click Next. Press F1 for
more information.
3 On the Specify Client for IBM FileNet Process Engine screen, enter the required details, and click Verify. When
complete, click Next.
4 On the Specify IBM FileNet Process Engine Server Settings screen, enter the required details and click Next. Press
F1 for more information.
5 On the Configure Connector for IBM FileNet screen, click Configure FileNet Connector. When complete, click Next.
6 On the Required Manual Configurations for Connector for IBM FileNet screen, review and perform the manual
steps listed and then click Next.
Configure Connector for Microsoft® SharePoint®
Note: In case of a remote AEM forms on JEE deployment, you cannot configure the Connector for Microsoft SharePoint
using Configuration Manager.
On the Configure Adobe Adobe Experience Manager forms Connector for Microsoft SharePoint screen, do one of the
following tasks:
• Deselect the Configure Adobe Experience Manager forms Connector for Microsoft SharePoint option to
manually configure Microsoft Sharepoint later, and then click Next.
• Leave the Configure Adobe Experience Manager forms Connector for Microsoft SharePoint option selected.
Enter the required values, and then click Configure SharePoint Connector. When complete, click Next.
Note: You can skip this step if you want to configure the Connector for Microsoft SharePoint later using
Administration Console.
Configuring LiveCycle Server for native file conversions
❖ (PDF Generator only) On the Admin user credentials for native PDF conversions screen, enter the user name
and password of a user with administrative privileges on the server computer, and then click Add user.
Note: You must add at least one administrative user for Windows 2008 Server. On Windows 2008 Server, User
Account Control (UAC) must be disabled for the users you add. To disable UAC, click Control Panel > User Accounts
> Turn User Account Control on or off and deselect Use User Account Control (UAC) to help protect your computer,
then click OK. Restart the computer to apply these changes.
34CONFIGURING ADOBE EXPERIENCE MANAGER FORMS ON JEE APPLICATION SERVER CLUSTERS USING WEBSPHERE
Configuring LiveCycle for deployment
Last updated 5/23/2016
System readiness test for PDF Generator
❖ On the Document Services PDF Generator System Readiness Test screen, click Start to validate if the system has
been appropriately configured for PDF Generator. Review the System Readiness Tool Report and click Next. Note
that the system readiness test fails if AEM forms on JEE is deployed on a remote machine.
Configuring LiveCycle Reader Extensions
❖ On the Reader Extensions Credential Configuration screen, specify the details that are associated with the Reader
Extensions credential that activates the module services.
Note: You can skip this step at this time by selecting Configure later using LiveCycle ES4 Administration Console.
You can configure the Reader Extensions credential by using Administration Console after you complete the
deployment. (After logging in to Administration Console, click Home > Settings > Trust Store Management > Local
Credentials.)
Click Configure and then click Next.
Summary, and Next Steps
❖ Review the Configuration Manager task summary list and choose the appropriate options:
• Select Launch Next Steps to view information about AEM forms on JEE users and administrative interfaces to
launch an html page containing step-by-step instructions to start and use LiveCycle.
Click Finish to exit the Configuration Manager

35
Last updated 5/23/2016
Chapter 6: Manually Configuring a WebSphere Cluster
This chapter describes how to manually configure a WebSphere Application Server cluster to prepare for the manual
deployment of LiveCycle in the clustered environment. This chapter applies only if you chose not to configure your
WebSphere Application Server cluster automatically. For information about how to automatically configure your
application server, see “Configuring LiveCycle for Deployment” .
At this point in the installation process, you have already installed LiveCycle files and run Configuration Manager to
configure the LiveCycle deployable archives. Now, you must perform the following tasks manually:
• Configure the WebSphere Application Servers. (See “6.2 Configuring the WebSphere Application Server instances”
on page 36.)
• Configure JDBC connectivity. (See “6.3 Configuring the LiveCycle database connectivity” on page 39.
6.1 Directory permissions
The LiveCycle application will extract files to the [appserver root]/installedApps directory. Therefore, it is important
that writable permissions be given to that directory. If writable permissions cannot be given, the section below
describes how to modify the location for the extracted files.
Note: It is recommended that you modify the location of the extracted files.
6.1.1 Modify the location for the extracted files
1 Log in to the WebSphere Administrative Console.
2 Do one of the following:
• Click Servers > Server Types > WebSphere Application servers and click your server name, such as server1.
3 Under Server Infrastructure, click Java and Process Management > Process Definition.
4 Under Additional Properties, click Java Virtual Machine and then click Custom Properties.
5 Click New and create a custom property named adobeidp.RootDirectory.
6 Set the value of adobeidp.RootDirectory to the path where Adobe native files should be extracted, such as [appserver
root]/profiles/<profile_name>/installedApps.
7 Click OK or Apply.
8 In the Messages box, click Save directly to master configuration, and then restart the application server.

36CONFIGURING ADOBE EXPERIENCE MANAGER FORMS ON JEE APPLICATION SERVER CLUSTERS USING WEBSPHERE
Manually Configuring a WebSphere Cluster
Last updated 5/23/2016
6.2 Configuring the WebSphere Application Server instances
You must configure the WebSphere Application Server instances that you installed in the cluster by performing the
following tasks:
• Modify the WebSphere time-out settings. (See “6.2.1 Modifying the WebSphere time-out settings” on page 36.)
• Modify the JVM properties. (See “6.2.2 Modifying the JVM properties” on page 36.)
• Create a J2C authentication alias for the database. (See “6.2.3 Creating a J2C authentication alias for the database”
on page 39.)
6.2.1 Modifying the WebSphere time-out settings
You must modify the WebSphere time-out settings on each WebSphere Application Server in the cluster.
To modify WebSphere time-out settings:
1 In the WebSphere Administrative Console navigation tree, click Servers > Application servers and, in the right
pane, click the server name.
2 Under Container Settings, click Container services > Transaction Service.
3 In the Total transaction lifetime timeout box, type 300 and then click OK.
4 Under Container Settings, click Container Services > ORB Service.
5 In the Request timeout box, type 360 and, in the Locate Request Timeout box, type 300, and then click OK.
6 Under Server Infrastructure, click Administration > Administration Services.
7 On the next screen, click JMX Connectors and, in the table, click SOAPConnector.
8 On the next screen, click Custom properties and, in the table, click requestTimeout.
9 In the Value box, type 1800.
10 Click OK and then click Save directly to the master configuration.
6.2.2 Modifying the JVM properties
You must modify the Java Virtual Machine (JVM) properties of each WebSphere Application Server instance in the
LiveCycle cluster to add LiveCycle options.
Note: You must restart each node of the application server after you modify the JVM parameters.
Before starting this procedure, you must know if your cluster uses a 32-bit or 64-bit JVM. See Preparing to Install
LiveCycle (Server Cluster) to determine the JVM required for your cluster configuration.
Before starting this procedure, you must determine how your LiveCycle cluster implements cluster caching so that you
can correctly configure a JVM argument for cluster caching. You may implement cluster caching by using UDP or
TCP but not both. The following factors may affect your choice:
• UDP can be used only if your cluster is based on IPv4.
• Use TCP if your cluster is either IPv4-based or IPv6-based. On an IPv6-based cluster, you must use TCP to be IPv6-
compliant.
If you implement cluster caching by using TCP, you must also ensure that you configure the TCP locators correctly
(see “Configuring the caching locators (caching using TCP only)” ).

37CONFIGURING ADOBE EXPERIENCE MANAGER FORMS ON JEE APPLICATION SERVER CLUSTERS USING WEBSPHERE
Manually Configuring a WebSphere Cluster
Last updated 5/23/2016
It is recommended to use TCP instead of UDP multicasting for production systems because of the inherent reliability
of the TCP protocol.
To modify JVM properties:
1 Log in to the WebSphere Administrative Console and, in the navigation tree, click Servers > Application servers
and then, in the right pane, click the server name.
2 Under Server Infrastructure, click Java and Process Management > Process Definition.
3 Under Additional Properties, click Java Virtual Machine and add or configure the following properties:
• In the Initial Heap Size box, type 512
• In the Maximum Heap Size box, set one of the following values:
• (32-bit JVM only) Type 1024
• (64-bit JVM only) Type 2048
• In the Generic JVM arguments box, add the following arguments:
-Xgcpolicy:gencon
-Dfile.encoding=utf8
-Dcom.adobe.livecycle.crx.integration.url=http://<IP>:<port>
Note: Add the -Xgcpolicy:gencon JVM argument only if WebSphere is using the IBM JDK. However, do not
add this argument in case of WebSphere on Solaris operating system.
• In the Generic JVM arguments box, set one of the following values:
• (32-bit JVM only) Type -XX:MaxPermSize=256m
• (64-bit JVM only) Type -XX:MaxPermSize=512m
4 On the same screen, in the Generic JVM arguments box, add the following caching arguments depending on the
configured cluster cache mechanism (UDP or TCP):
• Caching using UDP discovery
• Configure the multicast port argument in the following format:
-Dadobe.cache.multicast-port=<port number>
Note: The value for <port number> can be any available port between 1025 and 65535. The multicast port
must be unique to the LiveCycle cluster (that is, the port must not be used by any other cluster on the same
network, any attempt to use the same port by any other cluster on the same network would result in bootstrap
failure). It is recommended that you configure the same <port number> on all nodes in the LiveCycle cluster,
as in this example:
-Dadobe.cache.multicast-port=33456
• Setting multicast address argument is optional. Default muticast addresses for IPv4 and IPv6 are as following:
IPv6 - FF38::1234 IPv4 - 239.192.81.1
If you have restriction on multicast addresses in your network, use following argument to set multicast
addresses:
-Dadobe.cache.multicast-address=<ip address>
Note: The value for <ip address> is the IP address used for multicast networking. The IP address is ignored
if adobe.cache.multicast-port is zero.

38CONFIGURING ADOBE EXPERIENCE MANAGER FORMS ON JEE APPLICATION SERVER CLUSTERS USING WEBSPHERE
Manually Configuring a WebSphere Cluster
Last updated 5/23/2016
Note: The multicast address must be unique to the LiveCycle cluster and must not be used by any other cluster
on the same network. It is recommended that you configure the same <ip address> on all nodes in the
LiveCycle cluster. For example:
-Dadobe.cache.multicast-address=239.192.81.1
• Caching using TCP only
• For IPv4, configure the cluster locators argument in the following format:
-Dadobe.cache.cluster-locators=<IPaddress>[<port number>],<IPaddress>[<port number>]
For IPv6, configure the cluster locators argument in the following format:
-Dadobe.cache.cluster-locators=<hostname>@<IPv6 address>[<port number>], <hostname>@<IPv6 address>[<port number>]
Note: Configure, as a comma-separated list, the locators for all nodes of the cluster. The value for <IPaddress>
is the IP address of the computer running the locator, and the value for <port number> is any unused port
between 1025 and 65535. It is recommended that you configure the same <port number> for all locators, as
in this example:
-Dadobe.cache.cluster-locators=10.20.30.5[22345],10.20.30.6[22345]
Note: Do not run TCP locator for all the nodes. Configure only two TCP locators. Enable one TCP locator to
serve as a primary locator and another TCP locator to serve as a secondary/backup locator. For information on
configuring TCP locators, see “4.4 Configuring the caching locators in clusters (caching using TCP only)” on
page 21.
• For machines with multiple Network Interfaces
Some machines may be connected to multiple networks via multiple Network Interface Cards (NICs). For such
machines, set the JVM property -Dadobe.cache.bind-address to the IP address of the network interface card
that you are using for LiveCycle Server.
-Dadobe.cache.bind-address=<IP Address>
Note: It is recommended to set JVM property -Dadobe.cache.bind-address for machines with one Network
Interface Card, also.
5 To prevent application server from Denial of Service attacks configure the following JVM argument:
-DentityExpansionLimit=10000
6 Click Apply and click Custom Properties.
7 (IPv4 only) On the next screen, click New, add or configure the following properties, and then click OK:
• In the Name box, type java.net.preferIPv4Stack.
• In the Value box, type true.
8 (IPv6 only) On the next screen, click New, add or configure the following properties, and then click OK:
• In the Name box, type java.net.preferIPv6Stack.
• In the Value box, type true.
• In the Name box, type java.net.preferIPv6Addresses.
• In the Value box, type true.
9 Click OK and then click Save directly to the master configuration.
10 Restart the server.

39CONFIGURING ADOBE EXPERIENCE MANAGER FORMS ON JEE APPLICATION SERVER CLUSTERS USING WEBSPHERE
Manually Configuring a WebSphere Cluster
Last updated 5/23/2016
11 Repeat steps 11 to 19 for each server in the cluster.
6.2.3 Creating a J2C authentication alias for the database
You must create a J2C authentication alias for the database.
To create a J2C authentication configuration for the data source:
1 In the WebSphere Administrative Console navigation tree, click Security > Global security.
2 In the right pane, under Authentication, click Java Authentication and Authorization Service > J2C
authentication data, and then click New.
3 Set the following properties:
• In the Alias box, type an alias name appropriate to the database user, such as IDP_DS/db2-db2user.
• In the User ID box, type a name, such as db2user. This ID is the login credential used to access the database
that will be used with the IDP_DS data source.
• In the Password box, type a password for this user.
Note: In this guide, IDP_DS identifies the LiveCycle data source.
4 Click OK and then click Save directly to master configuration.
5 Repeat steps 3 and 4 for RM_DS. Use EDC_DS/db2-db2user as the alias name.
Note: EDC_DS is JNDI name of the RM_DS datasource.
6.3 Configuring the LiveCycle database connectivity
To enable WebSphere and your LiveCycle deployment to connect to the LiveCycle database, you must create a
database connection for LiveCycle by installing the database drivers and then setting up a data source.
You must install drivers for the type of database that you use for the LiveCycle database. The drivers should be placed
in the installation directories of the application server.
You must configure the data source to connect to the database. For WebSphere, you can configure a DB2, an Oracle,
SQL Server data source.
You will need the following information from tasks you did in Preparing to Install LiveCycle (Server Cluster):
• Database name
• Server name
• Port number
• User name
• Password
Refer to the following section that applies to your database:
• “6.3.1 Configuring the DB2 data source” on page 40
• “6.3.2 Configuring the Oracle data source” on page 43
• “6.3.3 Configuring the SQL Server data source” on page 45

40CONFIGURING ADOBE EXPERIENCE MANAGER FORMS ON JEE APPLICATION SERVER CLUSTERS USING WEBSPHERE
Manually Configuring a WebSphere Cluster
Last updated 5/23/2016
6.3.1 Configuring the DB2 data source
Configuring the DB2 data source requires you to install the DB2 database drivers, create a DB2 JDBC provider on
WebSphere, create the data source on WebSphere, and then configure the corresponding connection pool.
To install the DB2 database driver:
1 On a WebSphere Application Server instance, in the [appserver root] directory, create a directory named db2libs.
2 Copy the db2jcc.jar file from one of these locations to the [appserver root]\db2libs directory:
• The java directory under your [dbserver root] directory, such as [dbserver root]/ibm/Sqllib/java (Windows) or
[dbserver root]/java (Linux or UNIX)
• [LiveCycle root]\lib\db\db2\
3 Repeat steps 1 to 2 for each WebSphere Application Server in the cluster.
To create a DB2 JDBC provider:
1 On a WebSphere Application Server instance, in the WebSphere Administrative Console navigation tree, click
Environment > WebSphere Variables and, in right pane, click DB2UNIVERSAL_JDBC_DRIVER_PATH.
2 In the Value box on the next screen, type the path to the db2libs directory.
3 Repeat steps 1 to 2 for each node scope as well as for the Cell Manager scope, inserting the path to the db2libs
directory on the relevant node.
4 Click OK or Apply and in the Messages box, click Save directly to master configuration.
5 In the navigation tree, click Resources > JDBC > JDBC Providers.
6 In the drop-down list above the table, select Cluster=<cluster name> as the scope, and then click New.
7 In the Step 1 pane, set the following configuration and then click Next:
• In the Database type list, select DB2.
• In the Provider type list, select DB2 Universal JDBC Driver Provider.
• In the Implementation type list, select Connection pool data source. Take note that for each Configuration
Manager configuration script, the field implementation class name is
com.ibm.db2.jcc.DB2ConnectionPoolDataSource.
• In the Name box, keep the name DB2 Universal JDBC Driver Provider.
8 In the Step 2 pane, enter the path to the db2libs directory (for example, [appserver root]/db2libs), and then click Next.
9 In the Step 3 pane, click Finish and then click Save directly to master configuration.
To create the DB2 JDBC data source:
1 In the navigation tree, click Resources > JDBC > JDBC Providers and, in the right pane, click the provider.
2 Under Additional Properties, click Data sources and then click New.
3 In the Step 1 pane, set the following configuration and then click Next.
• In the Data source name box, type Livecycle - DB2 - IDP_DS.
• In the the JNDI name box, type IDP_DS.
4 In the Step 2 pane, type a database name and server name.
Note: If the port used by the database is not the default port (50000), also specify your alternative port in the Port
number box.

41CONFIGURING ADOBE EXPERIENCE MANAGER FORMS ON JEE APPLICATION SERVER CLUSTERS USING WEBSPHERE
Manually Configuring a WebSphere Cluster
Last updated 5/23/2016
5 Ensure that Use this data source in container managed persistence (CMP) is selected.
6 Click Next and set the following configurations in the Step 3 pane:
• In the list under Component-managed authentication alias, select the authentication alias created for this data
source in “6.2.3 Creating a J2C authentication alias for the database” on page 39.
• In the Mapping-configuration alias list, select DefaultPrincipalMapping.
• In the Container-managed authentication alias list, select the authentication alias created for this data source
in “6.2.3 Creating a J2C authentication alias for the database” on page 39.
7 Click Next and, in the Step 4 pane, click Finish.
8 Click Save directly to the master configuration.
Configure LiveCycle - DB2 - IDP_DS connection pools
1 In the navigation tree, click Resources > JDBC > JDBC Providers and, in the right pane, click the DB2 Universal
JDBC Driver Provider. See To create a DB2 JDBC provider.
2 Under Additional Properties, click Data sources and, in the right pane, click Livecycle - DB2 - IDP_DS.
3 On the next screen, under Additional Properties, click Connection Pool Properties and set the properties as
follows:
• In the Maximum connections box, type 30.
• In the Minimum connections box, type 1.
4 Click OK or Apply, and then click Save directlyto master configuration.
Configure the custom property for DB2
1 In the navigation tree, click Resources > JDBC > Data sources and, in the right pane, click the data source. See To
create the DB2 JDBC data source.
2 Under Additional Properties, click Custom properties and then click New.
3 In the Name box, type useRRASetEquals and in the Value box, type true.
4 Click OK or Apply and then click Save directly to master configuration.
Create the DB2 JDBC data source for Adobe® LiveCycle® Rights Management 11
Note: This procedure applies only if you have Rights Management installed.
1 In the navigation tree, click Resources > JDBC > JDBC Providers and click the provider you created in To create
a DB2 JDBC provider section.
2 Under Additional Properties, click Data sources and then click New.
3 In the Step 1 pane, set the following configurations and then click Next:
• In the Data source name box, type Livecycle - DB2 - RM_DS.
• In the JNDI name box, type EDC_DS.
• In the list under Component-Managed Authentication and XA Recovery Authentication Alias, select the
authentication alias created for this data source in “6.2.3 Creating a J2C authentication alias for the database” on
page 39.
4 In the Step 2 pane, type the database name and server name of the database you created.
Note: If the port used by the database is not the default port (50000), also specify your alternative port in the Port
number box.
42CONFIGURING ADOBE EXPERIENCE MANAGER FORMS ON JEE APPLICATION SERVER CLUSTERS USING WEBSPHERE
Manually Configuring a WebSphere Cluster
Last updated 5/23/2016
5 Click Next and, in the Step 3 pane, click Finish.
6 Select the data source you just created to modify additional parameters and set the following configuration:
• In the Container-managed authentication alias list, select the authentication alias created for this data source
in “6.2.3 Creating a J2C authentication alias for the database” on page 39.
• In the Mapping-configuration alias list, select DefaultPrincipalMapping.
7 Click OK or Apply, and then click Save directly to master configuration.
Configure LiveCycle - DB2 - RM_DS connection pools for Rights Management
Note: This section applies only if you have Rights Management installed.
1 In the navigation tree, click Resources > JDBC > JDBC Providers and, in the right pane, click the DB2 Universal
JDBC Driver Provider you created in To create a DB2 JDBC provider section.
2 Under Additional Properties, click Data sources and, in the right pane, click LiveCycle - DB2 - RM_DS.
3 On the next screen, under Additional Properties, click Connection Pool Properties and set the properties as
follows:
• In the Maximum connections box, enter 20.
• In the Minimum connections box, enter 5.
4 Click OK or Apply, and then click Save directly to master configuration.
Configure the custom property for DB2:
1 In the navigation tree, click Resources > JDBC > Data sources and, in the right pane, click the data source you
created in To create the DB2 JDBC data source for Rights Management section.
2 Under Additional Properties, click Custom properties and then click New.
3 In the Name box, type useRRASetEquals and in the Value box, type true.
4 Click OK or Apply and then click Save directly to master configuration.
6.3.1.1 Set default isolation level
1 Log in to WebSphere Integrated Solutions Console.
2 In the WebSphere Administrative Console navigation tree, click Resources > JDBC > Data Sources.
3 From the drop-down list in the right pane, for Cluster,select Cluster=[appropriate cluster name]. All data sources
under the cluster is displayed.
4 Click LiveCycle - DB2 - IDP_DS with JNDI name IDP_DS.
5 Click Custom Properties.
6 Search for webSphereDefaultIsolationLevel property, and click to open it for edit.
7 Set value as 2. The value 2 denotes Read Committed.
8 Click Apply and then click OK.
9 Repeat steps 5-8 for LiveCycle - DB2 - RM_DS with JNDI name EDC_DS.
10 In the Messages box at the top of the page, click Save directly to master configuration.
11 Restart WebSphere.

43CONFIGURING ADOBE EXPERIENCE MANAGER FORMS ON JEE APPLICATION SERVER CLUSTERS USING WEBSPHERE
Manually Configuring a WebSphere Cluster
Last updated 5/23/2016
6.3.2 Configuring the Oracle data source
Configuring the Oracle data source requires you to install the Oracle database drivers, create an Oracle JDBC provider
on WebSphere, create the data source on WebSphere, and then configure the corresponding connection pool.
Install the Oracle database driver
1 For each WebSphere Application Server instance, in the [appserver root] directory, create a directory named
db_driver.
2 Copy the ojdbc6.jar for JDK 1.6 driver file from the [DVD_root]/third_party/db/oracle directory to the directory
created in step 1.
Create the Oracle JDBC provider
1 On a WebSphere Application Server instance, in the WebSphere Administrative Console navigation tree, click
Environment >WebSphere Variables and, in the right pane, click ORACLE_JDBC_DRIVER_PATH.
2 Under General Properties, in the Value box, type the path to the ojdbc6.jar file you created in Configuring the
Oracle data source and then click OK.
3 Repeat steps 1 to 2 for each WebSphere Application Server instance, inserting the appropriate path to the db_driver
directory for the node on which the WebSphere Application Server instance resides.
4 Click Save directly to master configuration.
5 In the navigation tree, click Resources > JDBC > JDBC Providers.
6 In the drop-down list above the table, select Cluster=<cluster_name> as the scope and then click New.
7 In the Step 1 pane, set the following configuration and then click Next:
• In the Database type list, select Oracle.
• In the Provider type list, select Oracle JDBC Driver.
• In the Implementation type list, select Connection pool data source.
8 In the Step 2 pane, accept the default database class path and then click Next.
9 In the Step 3 pane, click Finish and then click Save directly to master configuration.
Create the Oracle JDBC data source
1 In the navigation tree, click Resources > JDBC > JDBC Providers and, in the right pane, click the provider you
created in Configuring the Oracle data source section.
2 Under Additional Properties, click Data sources and then click New.
3 In the Step 1 pane, set the following configurations and then click Next:
• In the Data source name box, type Livecycle - oracle - IDP_DS.
• In the JNDI name box, type IDP_DS.
• In the list, under Component-Managed Authentication and XA Recovery Authentication, select the
authentication alias created for this data source in “6.2.3 Creating a J2C authentication alias for the database” on
page 39
4 In the Step 2 pane, type the following line in the URL box and then click Next:
jdbc:oracle:thin:@<server_host>:<port>:<SID>
where <server_host> is the IP address of the database server, <port> is the port on which the database is listening
(default 1521), and <SID> is the service ID of the database.

44CONFIGURING ADOBE EXPERIENCE MANAGER FORMS ON JEE APPLICATION SERVER CLUSTERS USING WEBSPHERE
Manually Configuring a WebSphere Cluster
Last updated 5/23/2016
5 In the Step 3 pane, click Finish and then click Save directly to master configuration.
6 Select the data source you just created to modify additional parameters and set the following configuration options:
• In the Container-managed authentication alias list, select the authentication alias created for this data source
in “6.2.3 Creating a J2C authentication alias for the database” on page 39.
• In the Mapping-configuration alias list, select DefaultPrincipalMapping.
7 Click OK or Apply, and then click Save directly to master configuration.
Configure LiveCycle - oracle - IDP_DS connection pools
1 In the navigation tree, click Resources > JDBC > JDBC Providers and, in the right pane, click the Oracle JDBC
driverdata source. See, create the Oracle JDBC provider.
2 Under Additional Properties, click Data sources and, in the right pane, click Livecycle - oracle - IDP_DS.
3 On the next screen, under Additional Properties, click Connection Pool Properties and, in the Maximum
connections box, type 30.
4 Click OK or Apply, and then click Save directlyto master configuration.
Configure the custom property for Oracle
1 In the navigation tree, click Resources > JDBC > Data sources and, in the right pane, click the data source that you
created in To create the Oracle JDBC data source section.
2 Under Additional Properties, click Custom properties and then click New.
3 In the Name box, type useRRASetEquals and in the Value box, type true.
4 Click OK or Apply and then click Save directly to master configuration.
Create the Oracle JDBC data source for Rights Management
Note: This section applies only if you have Rights Management installed.
1 In the navigation tree, click Resources > JDBC > JDBC Providers and, in the right pane, click the provider you
created in create the Oracle JDBC provider section.
2 Under Additional Properties, click Data sources and then click New.
3 In the Step 1 pane, set the following configurations and then click Next:
• In the Data source name box, type Livecycle - oracle - RM_DS.
• In the JNDI name box, type EDC_DS.
• In the list under Component-Managed Authentication and XA Recovery Authentication Alias, select the
authentication alias created for this data source in “6.2.3 Creating a J2C authentication alias for the database” on
page 39.
4 In Step 2 pane, type the following line in the URL box and then click Next:
jdbc:oracle:thin:@<server_host>:<port>:<SID>
where <server_host> is the IP address of the database server, <port> is the port on which the database is listening
(default 1521), and <SID> is the service ID of the database.
5 In the Step 3 pane, click Finish and then click Save directly to master configuration.
6 Select the data source you just created to modify additional parameters and set the following configuration options:
• In the Container-managed authentication alias list, select the authentication alias created for this data source
in “6.2.3 Creating a J2C authentication alias for the database” on page 39.
45CONFIGURING ADOBE EXPERIENCE MANAGER FORMS ON JEE APPLICATION SERVER CLUSTERS USING WEBSPHERE
Manually Configuring a WebSphere Cluster
Last updated 5/23/2016
• In the Mapping-configuration alias list, select DefaultPrincipalMapping.
7 Click OK and then click Save directly to master configuration.
Configure LiveCycle - oracle - RM_DS connection pools for Rights Management
Note: This section applies only if you have Rights Management installed.
1 In the navigation tree, click Resources > JDBC > JDBC Providers and, in the right pane, click the Oracle JDBC
driver provider created in To create the Oracle JDBC provider section.
2 Under Additional Properties, click Data sources and, in the right pane, click Livecycle - oracle - RM_DS.
3 On the next screen, under Additional Properties, click Connection Pool Properties and set the properties as
follows:
• In the Maximum connections box, enter 20.
• In the Minimum connections box, enter 1.
4 Click OK or Apply, and then click Save directlyto master configuration.
Configure the custom property for Oracle:
1 In the navigation tree, click Resources > JDBC > Data sources and, in the right pane, click the data source that you
created in To create the Oracle JDBC data source for Rights Management section.
2 Under Additional Properties, click Custom properties and then click New.
3 In the Name box, type useRRASetEquals and in the Value box, type true.
4 Click OK or Apply and then click Save directly to master configuration.
6.3.3 Configuring the SQL Server data source
Configuring the SQL Server data source requires you to install the SQL Server database drivers, create a SQL Server
JDBC provider on WebSphere, create the data source on WebSphere, and then configure the corresponding
connection pool.
Install the SQL Server database driver
• If you have not done so, download and install the SQL Server JDBC Driver 3.0 from the Microsoft Download site
by following the site instructions.
Note: Use SQL Server JDBC Driver 3.0 for both Microsoft SQL Server 2005 SP2 and Microsoft SQL Server 2008.
Note: Make note of the directory location where you install the driver on your system.
Create the SQL Server JDBC provider
1 In the WebSphere Administrative Console navigation tree, click Environment > WebSphere Variables and, in the
right pane, click MICROSOFT_JDBC_DRIVER_PATH..
2 Under General Properties, in the Value box, type the path to the sqljdbc.jar file that you created and then click OK.
3 In the Messages box, click Save directly to master configuration.
4 In the navigation tree, click Resources > JDBC > JDBC Providers.
5 In the Scope drop-down list in the right pane, select Cluster=<cluster name> as the level, and then click New.
6 In the Create new JDBC provider pane, set the following configurations and then click Next:
• In the Database type list, select SQL Server.

46CONFIGURING ADOBE EXPERIENCE MANAGER FORMS ON JEE APPLICATION SERVER CLUSTERS USING WEBSPHERE
Manually Configuring a WebSphere Cluster
Last updated 5/23/2016
• In the Provider Type list, select Microsoft SQL Server JDBC Driver.
• In the Implementation type list, select Connection Pool Data Source.
• In the Name box, type Microsoft SQL Server JDBC Driver, or accept the default value.
7 In the Enter database class path information pane, replace the existing entry with one of the following, and then
click Next:
• ${MICROSOFT_JDBC_DRIVER_PATH}/sqljdbc.jar
Note: If you have set the WebSphere variable MICROSOFT_JDBC_DRIVER_PATH, the database class path
information is populated automatically.
8 In the Summary pane, click Finish and then click Save directly to master configuration.
Create the SQL Server data source for LiveCycle
Follow the steps below to create the SQL Server data source for your application server version.
1 In the navigation tree, click Resources > JDBC > JDBC Providers and, in the right pane, click the provider that
you created in Create the SQL Server JDBC provider section.
2 Under Additional Properties, click Data sources and then click New.
3 In the Enter basic data source information pane, set the following configurations and then click Next:
• In the Data source name box, type Livecycle - SQLServer - IDP_DS.
• In the JNDI name box, type IDP_DS.
4 In the Enter database specific properties for the data source pane, enter the database name, server name, and port.
5 In the Setup security aliases pane, set the following, and click Next.
• In the Component managed authentication alias list, select the authentication alias that you created for this
data source in To create a J2C authentication configuration for the data source section.
• In the Mapping-configuration alias list, select DefaultPrincipalMapping.
• In the Container managed authentication alias list, select the authentication alias that you created for this data
source in To create a J2C authentication configuration for the data source section.
6 In the Summary pane, click Finish, and then click Save directly to master configuration.
7 Set the data store helper class for the data source. Do the following tasks:
• In the navigation tree, click Resources > JDBC > Data sources and, in the right pane, click the data source that
you created.
• In the next screen, under Data store helper class name, select Specify a user-defined data store helper, and
replace the existing entry with the following text:
com.ibm.websphere.rsadapter.GenericDataStoreHelper
8 Change the statement cache size. Do the following tasks:
• In WebSphere Administrative Console, click JDBC > Data sources.
• Click the data source you just created and under Additional Properties, click WebSphere Application Server
data source properties.
• Change the value of the Statement cache size field to 80.
• Click OK or Apply and the click Save directly to master configuration.

47CONFIGURING ADOBE EXPERIENCE MANAGER FORMS ON JEE APPLICATION SERVER CLUSTERS USING WEBSPHERE
Manually Configuring a WebSphere Cluster
Last updated 5/23/2016
Configure LiveCycle - SQLServer - IDP_DS connection pools
1 In the navigation tree, click Resources > JDBC > JDBC Providers and, in the right pane, click the provider that
you created earlier
• Microsoft SQL Server JDBC Driver.
2 Under Additional Properties, click Data sources and then select Livecycle - SQLServer - IDP_DS.
3 On the next screen, under Additional Properties, click Connection Pool Properties and, in the Maximum
connections box, type 30.
4 9. Click OK or Apply and then click Save directly to master configuration.
Configure the custom property for SQL Server
1 In the navigation tree, click Resources > JDBC > Data sources and, in the right pane, click the data source that you
created in Create the SQL Server data source for LiveCycle section.
2 Under Additional Properties, click Custom properties and then click New.
3 In the Name box, type useRRASetEquals and in the Value box, type true.
4 Click OK or Apply and then click Save directly to master configuration.
Create SQL Server data source for Rights Management
Follow the steps below to create the SQL Server data source for your application server version.
1 In the navigation tree, click Resources > JDBC > JDBC Providers and, in the right pane, click the provider that
you created in Create the SQL Server JDBC provider section.
2 Under Additional Properties, click Data sources and then click New.
3 In the Enter basic data source information pane, set the following configurations and then click Next:
• In the Data source name box, type Livecycle - SQLServer - RM_DS.
• In the JNDI name box, type EDC_DS.
4 In the Enter database specific properties for the data source pane, in the Data store helper class name box,
replace the existing entry with the following:
com.ibm.websphere.rsadapter.GenericDataStoreHelper
5 In the Setup security aliases pane, set the following, and click Next.
• In the Component managed authentication alias list, select the authentication alias that you created for this
data source in To create a J2C authentication configuration for the data source section.
• In the Mapping-configuration alias list, select DefaultPrincipalMapping.
• In the Container managed authentication alias list, select the authentication alias that you created for this data
source in To create a J2C authentication configuration for the data source section.
6 In the Summary pane, click Finish, and then click Save directly to master configuration.
7 Change the statement cache size. Do the following tasks:
• In WebSphere Administrative Console, click JDBC > Data sources.
• Click the data source you just created and under Additional Properties, click WebSphere Application Server
data source properties.
• Change the value of the Statement cache size field to 80.
• Click OK or Apply and the click Save directly to master configuration.

48CONFIGURING ADOBE EXPERIENCE MANAGER FORMS ON JEE APPLICATION SERVER CLUSTERS USING WEBSPHERE
Manually Configuring a WebSphere Cluster
Last updated 5/23/2016
Configure LiveCycle - SQLServer - RM_DS connection pools
1 In the navigation tree, click Resources > JDBC > JDBC Providers and, in the right pane, click the provider that
you created earlier
• SQL Server Provider.
2 Under Additional Properties, click Data sources and then select Livecycle - SQLServer - RM_DS.
3 On the next screen, under Additional Properties, click Connection Pool Properties and, in the Maximum
connections box, type 20.
4 Click OK or Apply and then click Save directly to master configuration.
Configure the custom property for SQL Server
1 In the navigation tree, click Resources > JDBC > Data sources and, in the right pane, click the data source that you
created.
2 Under Additional Properties, click Custom properties and then click New.
3 In the Name box, type useRRASetEquals and in the Value box, type true.
4 Click OK or Apply and then click Save directly to master configuration.
Configure integrated security on Windows
1 In the navigation tree, click Resources > JDBC > Data Sources and, in the right pane, click IDP_DS.
2 In the right pane, under Additional Properties, click Custom Properties, and on the next screen, click
integratedSecurity.
3 On the next screen, under General Properties, type true in the Value box.
4 In the navigation tree, click Resources > JDBC > Data Sources and, in the right pane, click Livecycle - SQLServer
- RM_DS.
5 In the right pane, under Additional Properties, click Custom Properties, and on the next screen, click
integratedSecurity.
6 On the next screen, under General Properties, type true in the Value box.
7 Click Apply and then click Save directly to master configuration.
8 On the computer where WebSphere is installed, add the sqljdbc_auth.dll file to the Windows systems path
(C:\Windows). The sqljdbc_auth.dll file is in the same location as the Microsoft SQL JDBC 3.0 driver installation
(default is [InstallDir]/sqljdbc_3.0/enu/auth/x86).
9 Modify the Log On As property of the Windows service that starts the WebSphere Application Server [node name]
by doing the following tasks:
• Click Start > Settings > Control Panel > Administrative Tools > Services.
• Right click [node name] and select Properties.
• On the Log On tab, select This account and select a valid user account other than Local System, then click OK.
10 Change SQL Server’s Security from Mixed mode to Windows Authentication only.

49CONFIGURING ADOBE EXPERIENCE MANAGER FORMS ON JEE APPLICATION SERVER CLUSTERS USING WEBSPHERE
Manually Configuring a WebSphere Cluster
Last updated 5/23/2016
6.4 Next steps
After you configure your WebSphere Application Server cluster, do the following tasks:
• Configure the LiveCycle EAR files by using Configuration Manager. (See “Configuring LiveCycle for
Deployment”.)
• Choose one of these ways to deploy the LiveCycle EAR files to your WebSphere Application Server cluster:
• Automatically: Use Configuration Manager. (See “Configuring LiveCycle for Deployment”.)
• Manually: See “Appendix - Manually Deploying to WebSphere”.

50
Last updated 5/23/2016
Chapter 7: Manually Deploying to WebSphere
7.1 About deploying AEM forms on JEE modules
Before you deploy AEM forms on JEE, ensure that you completed these tasks:
• Run Configuration Manager to configure AEM forms on JEE modules according to your system and application
server requirements. To add a module to your deployment, you can run Configuration Manager to make the
changes and then redeploy the updated EAR file.
If you are deploying AEM forms on JEE for the first time, initialize the database by using Configuration Manager
after you deploy the EAR files.
If you are using an external web server, see your web server documentation for information about the configuration
that is required to allow access to the application server.
7.1.1 Summary of deployable components
During the deployment process, you need to deploy the following components for AEM forms on JEE:
• adobe-livecycle-native-websphere-[OS].ear
• adobe-livecycle-websphere.ear
• adobe-workspace-client.ear
After AEM forms on JEE is configured using Configuration Manager, these files are located in the [aem-forms
root]/configurationManager/export/ directory.
7.2 Deploying to WebSphere
Deploy AEM forms on JEE modules to WebSphere by deploying the component EAR files to the application server
using the WebSphere Administrative Console.
Before deploying to WebSphere, start the application server or the cluster. After you deploy the required components,
stop and restart the application server or cluster before you start any services.
To deploy the EAR files:
1 In the WebSphere Administrative Console navigation tree, click Applications > New Application.
2 In the right pane, click New Enterprise Application and then select Remote file system or Local File System.
3 Click Browse, navigate to one of the EAR files in Summary of deployable components, and select the EAR file.
4 Select Show all installation options and parameters and expand Choose to generate default bindings and
mappings.
5 Select Generate Default Bindings and click Next.
6 In the left column of the Summary pane on the right, select the last step and click Finish.
51CONFIGURING ADOBE EXPERIENCE MANAGER FORMS ON JEE APPLICATION SERVER CLUSTERS USING WEBSPHERE
Manually Deploying to WebSphere
Last updated 5/23/2016
7 When the EAR file is installed successfully, in the Messages box, click Save directly to Master Configuration.
8 Repeat these steps for each of the EAR files in Summary of deployable components.
7.3 Starting the application
After deploying the module, you need to start the applications. When the red “X” beside the name of the application
changes to a green arrow, the application has been deployed and started successfully. WebSphere displays an error
message if it cannot start the application.
For information about WebSphere error messages, see your WebSphere Application Server documentation.
To start an application in WebSphere:
1 In the WebSphere Administrative Console navigation tree, click Applications > Application Types > WebSphere
Enterprise applications.
2 Select any or all of the AEM forms on JEE applications that you want to start and click Start. The red “X” beside
the status of each application changes to a green arrow, indicating that the application is running.
52
Last updated 5/23/2016
Chapter 8: Post-deployment tasks
8.1 General tasks
8.1.1 Configure Allowed Referers
When you run Configuration Manager, the default host, IPv4 address, IPv6 address, loopback address, and localhost
address are added to the Allowed Referer list. These addresses are added only for the machine where LCM is executed.
For a AEM forms on JEE cluster, manually add all the other cluster nodes to the list:
1 In Administration Console, click Settings > User Management > Configuration > Configure Allowed Referer
URL’s. The Allowed Referer list appears at the bottom of the page.
2 To add an allowed referer:
a Type a host name or IP address in the Allowed Referers box. To add more than one allowed referer at a time,
type each host name or IP address on a new line. Provide hostName and IP address of all the cluster nodes/load
balancer.
b In the HTTP Port and HTTPS Ports boxes, specify which ports to allow for HTTP, HTTPS, or both. If you leave
those boxes empty, the default ports (port 80 for HTTP and port 443 for HTTPS) are used. If you enter 0 (zero)
in the boxes, all ports on that server are enabled. You can also enter a specific port number to enable only that
port.
c Click Add.
3 Click Save.
If the Allowed Referer List is empty, the CSRF feature stops working and the system becomes insecure.
4 After changing the Allowed Referer list, restart the AEM forms on JEE cluster.
8.1.2 Perform a system image backup
After AEM forms on JEE is installed and deployed into production areas and before the system is live, it is
recommended that you perform a system image backup of the servers on which AEM forms on JEE is implemented.
Also take backup of CRX repository.
The AEM forms on JEE database, GDS directory, and application servers must be part of this backup. This is a
complete system backup that you can use to restore the contents of your computer if your hard drive or entire
computer stops working. See the Backup and Recovery topic in Administration Help.
8.1.3 Restart the application server
When you first deploy AEM forms on JEE, the server is in a deployment mode in which most modules are in memory.
As a result, the memory consumption is high and the server is not in a typical production state. You must restart the
application server to get the server back into a clean state.
Note: You may skip to restart the AEM forms on JEE server, if you have restarted the server after configuring CRX
clustering or after updating Allowed Referer list

53CONFIGURING ADOBE EXPERIENCE MANAGER FORMS ON JEE APPLICATION SERVER CLUSTERS USING WEBSPHERE
Post-deployment tasks
Last updated 5/23/2016
8.1.4 Verify the deployment
You can verify the deployment by logging in to Administration Console. If you log in successfully, then AEM forms
on JEE is running on the application server and the default user is created in the database. To verify the CRX repository
deployment, access the CRX welcome page.
You can review the application server log files to ensure that components were deployed correctly or to determine the
cause of any deployment issues you may encounter.
8.1.4.1 Accessing Administration Console
Administration Console is the web-based portal for accessing a variety of configuration pages where you can set run-
time properties that control the way AEM forms on JEE operates. When you log in to Administration Console, you
can access User Management, Watched Folder, and Email client configuration, and administrative configuration
options for other services. Administration Console also provides access to Applications and Services, which
administrators use for managing archives and deploying services to a production environment.
The default user name and password for logging in is administrator and password. After you log in the first time, access
User Management and change the password.
Before you access Administration Console, AEM forms on JEE must be deployed and running on your application
server.
For information about using Administration Console, see Administration Help.
1 Type the following URL in a web browser:
http://[hostname]:[port]/adminui
For example: http://localhost:9080/adminui
2 If you have upgraded to AEM forms on JEE, enter the same administrator user name and password as that of your
previous LiveCycle installation. In case of a fresh installation, enter the default user name and password.
3 After you log in, click Services to access the service administration pages or click Settings to access the pages on
which you can administer settings for different modules.
8.1.4.2 Change the default password of AEM forms on JEE Administrator
AEM forms on JEE creates one or more default users during the installation. The password for these users is in the
product documentation and is publicly available. You must change this default password, depending on your security
requirements.
The AEM forms on JEE administrator user password is set to “password” by default. You must change it in
Administration Console > Settings > User Management.
Also, it is recommended to change the default password for CRX Administrator.
For detailed information, see Change the default administrator password.
8.1.4.3 Accessing CQ Welcome Page
CQ welcome page is the web-based portal for accessing various CQ components, administration, deployment and
development tools. The default user name and password for logging in is administrator and password (same as AEM
forms on JEE Administrator).
Access the welcome page using the following steps:
1 Type the following URL in a web browser:
http://[hostname]:[port]/lc/welcome
54CONFIGURING ADOBE EXPERIENCE MANAGER FORMS ON JEE APPLICATION SERVER CLUSTERS USING WEBSPHERE
Post-deployment tasks
Last updated 5/23/2016
2 Enter the same administrator user name and password as mentioned above.
3 After you log in, you can access various components, administration, deployment and development UIs.
8.1.4.4 Accessing OSGi Management Console
In CQ, components are in form of OSGi bundles which are deployed to Apache Felix OSGi container. OSGi console
provides a way to manage OSGi bundles and services configurations. The default user name and password for logging
in is admin and admin (same as CRX Administrator).
Access the OSGi Management console using the following steps:
1 Type the following URL in a web browser:
http://[hostname]:[port]/lc/system/console
2 Enter the same administrator username and password as mentioned above.
3 After you log in, you can access various components, services, bundles and other configurations.
8.1.4.5 Change CQ Administrator default password
CQ embedded within AEM forms on JEE has two administrator users as mentioned below.
• Super Administrator (administrator): The Super Administrator user can access various CQ/CRX UIs and
perform admin operations. The default username and password are same as AEM forms on JEE Administrator,
administrator/password. This user doesn't have access to OSGi Management Console. The default password of
this user can be changed using Administrator console only as mentioned in section Change default AEM forms
password. The changed password will be applicable for both AEM forms on JEE and CQ.
• Administrator (admin): This user can access to OSGi console in addition to CQ/CRX UIs and has administrator
privileges. The default username and password for the user are admin/admin. To change the default password
follow the below mentioned steps:
1 Type the following URL in a web browser.
http://[hostname]:[port]/lc/libs/granite/security/content/admin.html
2 Login using following credential:
Username: admin
Password: admin.
3 Search for user Administrator.
4 Click on the user in left pane, the user details is displayed in the right pane.
5 Click on Edit icon in the right pane.
6 On the edit page in the right pane, provide new password in the New Password field and current password in
Your Password field.
7 Click Save icon in the right pane.
8 Re-login using the changed password to verify.
8.1.4.6 View the log files
Events, such as run-time or startup errors, are recorded to the application server log files. If you have problems
deploying to the application server, you can use the log files to help you find the problem. You can open the log files
by using any text editor.

55CONFIGURING ADOBE EXPERIENCE MANAGER FORMS ON JEE APPLICATION SERVER CLUSTERS USING WEBSPHERE
Post-deployment tasks
Last updated 5/23/2016
The following log files are located in the [appserver root]/profiles/[profilename]/logs/[server name] directory:
• SystemErr.log
• SystemOut.log
• startServer.log
Following CRX log files are located at [CRX_home]/
• error.log
• audit.log
• access.log
• request.log
• update.log
Note: Each time AEM forms on JEE starts, the following error appears in the log:
FacesConfigur E org.apache.myfaces.config.FacesConfigurator configureRenderKits failed to configure class com.adobe.framework.jsf.renderkit.SecureInputRenderer java.lang.ClassCastException
This error occurs due to a different version of the IBM JSF engine expected by WebSphere. This is a known issue and
this error can be safely ignored.
8.2 Verify the LiveCycle cluster
1 Ensure that all application server instances of the cluster are started.
2 View the Gemfire.log file, located in the directory appropriate to your application server:
• WebSphere: [lc_temp_dir]/adobews_*/Caching.
where adobe_temp_dir is the temporary directory during EAR configuration using Configuration Manager.
3 Messages such as the following confirm that the cache is connected to all servers of the cluster:
[info 2008/01/22 14:24:31.109 EST GemfireCacheAdapter <UDP mcast receiver> nid=0x5b611c24] Membership: received new view [server-0:2916|1] [server-0:2916/2913, server-1:3168/3165] [info 2008/01/22 14:24:31.125 EST GemfireCacheAdapter <View Message Processor> nid=0x7574d1dc] DMMembership: admitting member <server-1:3168/3165>; now there are 2 non-admin member(s)
Note: Ensure that the number of non-admin members (two in the example log entry above) matches the number of
members in your cluster. A discrepancy indicates that some members of the cluster are not connected to the cache.
8.3 Verify the CRX Cluster
1 Go to http://<authorHost>:<authorPort>/lc/system/console. Login with OSGi Management Console user
credentials. The default credential is admin/admin
2 Navigate to Main>JMX, locate the row with domain: com.adobe.granite and type: Repository.
3 Click Repository and locate Attribute Name: ClusterNodes.

56CONFIGURING ADOBE EXPERIENCE MANAGER FORMS ON JEE APPLICATION SERVER CLUSTERS USING WEBSPHERE
Post-deployment tasks
Last updated 5/23/2016
The ClusterNodes attribute contains a table. Each row in the table represents a node in the cluster. Each row
contains Operating System, hostname, id, and repositoryHome of a cluster node.
On all the slave node, value of crx.cluster.master is false and on the master node vale of crx.cluster.master is true.
8.4 Accessing module web applications
After AEM forms on JEE is deployed, you can access the web applications that are associated with the following
modules:
• Reader Extensions
• Workspace
• HTML Workspace
• User management
• Correspondance management
• PDF Generator web application
• PDF Generator
• Rights Management
After accessing the web applications by using the default administrator permissions to ensure that they are accessible,
you can create additional users and roles so that others can log in and use the applications. (See Administration Help.)
8.4.1 Access the Reader Extensions web application
Note: You must apply a Reader Extensions credential and apply the user roles for a new user. (See “Configuring
credentials for use with Reader Extensions” in Administration Help.)
1 Open a web browser and enter this URL:
http://[hostname]:[port]/ReaderExtensions
2 Log in using the user name and password for AEM forms on JEE.
Note: You must have administrator or superuser privileges to log in. To allow other users to access the Reader
Extensions web application, you must create the users in User Management and grant them the Reader Extensions
Web Application role.
8.4.2 Access Workspace
1 Open a web browser and enter this URL:
http://[hostname]:[port]/workspace
2 Log in using the user name and password for AEM forms on JEE.
8.4.3 Access HTML Workspace
1 Open a web browser and enter this URL:
http://[hostname]:[port]/lc/ws
2 Log in using the user name and password for AEM forms on JEE.

57CONFIGURING ADOBE EXPERIENCE MANAGER FORMS ON JEE APPLICATION SERVER CLUSTERS USING WEBSPHERE
Post-deployment tasks
Last updated 5/23/2016
8.4.4 Access Forms Manager
1 Open a web browser and enter this URL:
http://[hostname]:[port]/lc/fm
2 Log in using the user name and password for AEM forms on JEE.
8.4.5 Access PDF Generator Web Application
1 Open a web browser and enter this URL:
http://[hostname]:[port]/pdfgui
2 Log in using the user name and password for AEM forms on JEE.
8.4.6 Access Rights Management
You must create a user with the Rights Management End User role in User Management and log in to the Rights
Management administrator or end-user applications by using the login information that is associated with that user.
Note: The default administrator user cannot access the Rights Management end-user web application but you can add
the appropriate role to its profile. You can create a new user or modify an existing user through Administration Console.
Access the Rights Management end-user web application
❖ Open a web browser and enter this URL:
http://[hostname]:[port]/edc
Access the Rights Management administration web application
1 Open a web browser and enter this URL:
http://[hostname]:[port]/adminui
2 Click Services > LiveCycle Rights Management 11.
For information about setting up users and roles, see Administration Help.
Assign the Rights Management End User role
1 Log in to Administration Console. (See “8.1.4.1 Accessing Administration Console” on page 53.)
2 Click Settings > User Management > Users and Groups.
3 In the Find box, type all and, in the In list, select Groups.
4 Click Find and, for the required domains, click All Principals in the list that appears.
5 Click the Role Assignments tab and click Find Roles.
6 In the list of roles, select the check box next to Rights Management End User.
7 Click OK and then click Save.

58CONFIGURING ADOBE EXPERIENCE MANAGER FORMS ON JEE APPLICATION SERVER CLUSTERS USING WEBSPHERE
Post-deployment tasks
Last updated 5/23/2016
8.4.7 Accessing User Management
By using User Management, administrators can maintain a database of all users and groups, synchronized with one or
more third-party user directories. User Management provides authentication, authorization, and user management
for AEM forms on JEE modules, including Reader Extensions, Workspace, Rights Management, Process Management,
Forms Standard and PDF Generator.
1 Log in to Administration Console.
2 On the home page, click Settings > User Management.
Note: For information about configuring users with User Management, click User Management Help in the upper-
right corner of the User Management page.
8.4.8 Access Correspondence Management Solution template
You can verify the Correspondence Management Solution deployment by visiting http://[hostname]:[port]/lc/cm and
logging in using AEM forms on JEE administrator credentials. Solution template is a reference implementation of
Correspondence Management Solution.
Note: In a non-turnkey deployment, if you encounter an error while accessing the solution template, you must integrate
AEM forms on JEE with Correspondence Management Solution. For more information, see the Configure Publish nodes
to Integrate with AEM forms on JEE section of this document.
8.5 Configure Correspondence Management Solution
Perform the following tasks to configure Correspondence Management Solution.
For a recommended setup for the Correspondence Management Solution, see Correspondence Management Solution
Topology.
8.5.1 Configure the Author instance
The Author instance is embedded within the AEM forms on JEE server. This implies that you do not need to make any
configuration updates to the Author instance. The instance inherits all the configuration settings from the AEM forms
on JEE server.
8.5.2 Configure the Publish instance
You must run separate Author and Publish instances for Correspondence Management Solution. However, you can
configure the two instances on the same or on different machines. An author instance is embedded in the AEM forms
on JEE Core application and runs on the AEM forms on JEE server. For publish instance, LCM configures a publish
ear (adobe-livecycle-cq-publish.ear). Deploy the publish ear on a separate server instance.
Note: Before configuring the Publish instance, ensure that your author instance is configured and deployed. You can
verify by successfully logging in to the solution template for Correspondence management Solution. For more
information, see the Access Correspondence Management Solution template section of this document.
1 Create a server instance in a different application server profile.
2 Copy the [aem-forms root]/crx-repository directory from the author instance to the publish instance machine.

59CONFIGURING ADOBE EXPERIENCE MANAGER FORMS ON JEE APPLICATION SERVER CLUSTERS USING WEBSPHERE
Post-deployment tasks
Last updated 5/23/2016
3 From the crx-repository directory on the publish instance machine, open the crx-repository/install folder.
Keep the following packages and delete all other packages from the install folder:
• dataservices-pkg.zip
• platform-common-pkg.zip
• platform-content-pkg.zip
• platform-security-pkg.zip
• solution-correspondencemanagement-pkg.zip
4 Start the Publish server with -Dcom.adobe.livecycle.crx.home=<location for crx-repository>
parameter, where <location for crx-repository> is the location where you copied the crx-repository
directory for the Publish instance.
For details on how to configure generic JVM arguments for WebSphere and WebLogic, see the Configuring the
JVM arguments section for WebSphere and WebLogic.
5 Deploy adobe-livecycle-cq-publish.ear to the server.
Note: If author and Publish instances are on the same machine, ensure that you start the Publish instance using a
different port.
Now that the Publish instance is up and running, you need to configure the two instances to communicate with each
other.
8.5.3 Configure Publish nodes to Integrate with AEM forms on JEE
Perform these steps on all publish instances. To enable communication between publish instance and AEM forms on
JEE Server:
1 Go to http://[publishhost]:[publishport]/lc/system/console/configMgr and Login with OSGi Management Console
user credentials. The default credential are admin/admin.
2 Search and click Edit next to the Adobe LiveCycle Client SDK Configuration setting.
3 In the Server Url field, ensure that http://[lchost]:[lcport] is specified.
Important: Ensure that the AEM forms on JEE server is listening on the specified host and port combination. The
following three scenarios are possible in the case of a AEM forms on JEE server cluster:
• All AEM forms on JEE server instances are running on localhost and the same port. In this case use
localhost:[port].
• All AEM forms on JEE server instances are running on localhost but on different ports. In this case, use a load
balancer host name and port combination—[loadbalancer_host]:[loadbalancer_port].
• All AEM forms on JEE server instances are running on a particular host name (not localhost) and different/same
ports. In this case, use a load balancer host name and port—[loadbalancer_host]:[loadbalancer_port].
If you need to use a load balancer URL to access the AEM forms on JEE server cluster (as mentioned above), ensure
that the required communication ports between Author instances and the load balancer are open.
4 Specify AEM forms on JEE administrator credentials in the Username as Password fields.
5 Click Save.

60CONFIGURING ADOBE EXPERIENCE MANAGER FORMS ON JEE APPLICATION SERVER CLUSTERS USING WEBSPHERE
Post-deployment tasks
Last updated 5/23/2016
8.5.4 Communicating between the Author and Publish instances
You need to perform certain configuration changes to enable two-way communication between the Author and
Publish instances.
8.5.4.1 Configure Replication Agents (Define publish instance URL)
On the Author instance, you need to configure replication agents for each Publish instance. These agents replicate
content from the Author instances to all the Publish instances.
1 Log in to Tools UI at http://<authorHost>:<authorPort>/lc/miscadmin
2 Select Replication, then Agents on author in the left panel.
On the right panel, you see various agents configured for the Author instance.
3 On the right panel, Select New.... and click New Page.
The Create Page dialog displays.
4 Set the Title and Name, then select Replication Agent.
5 Click Create to create new agent.
6 Double-click the new agent item to open the configuration panel.
7 Click Edit - the Agent Settings dialog displays.
a In the Settings tab:
• Enter a Description.
• Check Enabled.
• Select Serialization Type as Default.
• Set the Retry Delay to 60000.
• Set the Log Level as Info.
b In the Transport tab:
• Enter the required URI for the Publish instance
http://<publishHost>:<publishPort>/lc/bin/receive?sling:authRequestLogin=1
• Set User and Password. The default credential are admin/admin.
8 Click OK to save the settings.
9 On the agent configuration panel, click Test Connection.
Successful connection ensures that the configuration is done correctly.
Note: : In case, you have only one Publish instance you can use the default Replication Agent named as publish. You need
to edit it for specifying Publish URI in the Transport tab as mentioned in the step b(i). In this case, you do not need to
create a new replication agent.
Note: : In case, you have a publish farm(multiple non-clustered publish instances), you need to create a replication agent
for each Publish instance as mentioned in Steps 1-9. For each such replication agent, Title and Name should be significant
and unique, so the identification of the corresponding Publish instance can be simpler. Each such replication agent has a
different URI in the Transport tab pointing to a particular Publish instance. For multiple publish instances, you can also
create replication agents by copying the default agent publish and then editing Name and URI in transport tab of the
created agent. If you are not using the default Replication Agent, disable it, so an unnecessary replication attempt can be
avoided.
Note: For Author clusters, these steps need to be performed on one Author instance (preferably a master instance).

61CONFIGURING ADOBE EXPERIENCE MANAGER FORMS ON JEE APPLICATION SERVER CLUSTERS USING WEBSPHERE
Post-deployment tasks
Last updated 5/23/2016
8.5.4.2 Define Publish instance URL for ActivationManagerImpl
1 Go to http://<authorHost>:<authorPort>/lc/system/console/configMgr. Login with OSGi Management Console
user credentials. The default credential is admin/admin.
2 Find and click the Edit icon next to the
com.adobe.livecycle.content.activate.impl.ActivationManagerImpl.name setting.
3 In the ActivationManager Publish URL field, specify the URL for accessing the Publish instance
ActivationManager. You can provide the following URLs.
a Load Balancer URL (Recommended): Provide load balancer URL, If you have a webserver acting as load
balancer in front of publish farm (multiple non-clustered publish instances).
b Publish instance URL: Provide any publish instance URL, If you have a single publish instance or the webserver
fronting the publish farm is not accessible from the author environment due to any restrictions. In case, the
specified publish instance is down, there is a fallback mechanism to deal with on the author side.
URL string: http://<hostname>:<port>/lc/bin/remoting/lc.content.remote.activate.activationManager
4 Click Save.
8.5.4.3 Configure reverse replication queue
On the Author instance, you need to configure reverse replication agents for each Publish instance. These agents
replicate content from the Publish instance to the Author instance.
1 Log in to Tools UI at http://<authorHost>:<authorPort>/lc/miscadmin
2 Select Replication, then Agents on author in the left panel.
On the right panel, you see various agents configured for the Author instance.
3 On the right panel, Select New, and click New Page.
The Create Page dialog appears.
4 Set the Title and Name, then select Reverse Replication Agent.
5 Click Create to create new agent.
6 Double-click the new agent item to open the configuration panel.
7 Click Edit - the Agent Settings dialog displays.
a In the Settings tab:
• Enter a Description
• Check Enabled.
• Set the Retry Delay to 60000.
• Set the Log Level as Info.
b In the Transport tab:
• Enter the required URI for the Publish instance -
http://<publishHost>:<publishPort>/lc/bin/receive?sling:authRequestLogin=1
• Set User and Password - admin/admin
c In the Extended tab: Set HTTP Method as GET
8 Click OK to save the settings.
9 On the agent configuration panel, click Test Connection.
62CONFIGURING ADOBE EXPERIENCE MANAGER FORMS ON JEE APPLICATION SERVER CLUSTERS USING WEBSPHERE
Post-deployment tasks
Last updated 5/23/2016
Successful connection ensures that the configuration is done correctly.
Note: : In case, you have only one Publish instance you can use the default Reverse Replication Agent named as
publish_reverse. You need to edit it for specifying Publish URI in the Transport tab as mentioned in the step b(i). In this
case, you do not need to create a new reverse replication agent.
Note: In case, you have a publish farm(multiple non-clustered publish instances), you need to create a reverse replication
agent for each Publish instance as mentioned in Steps 1-9. For each such replication agent, Title and Name should be
significant and unique, so the identification of the corresponding Publish instance can be simpler. Each such replication
agent has a different URI in the Transport tab pointing to a particular Publish instance. For multiple publish agents, you
can also create reverse replication agents by copying the default agent publish_reverse and then editing Name and URI
in transport tab of the created agent. If you are not using the default Reverse Replication Agent, disable it, so an
unnecessary replication attempt can be avoided.
Note: For Author clusters, these steps need to be performed on one Author instance (preferably a master instance).
8.5.4.4 Define author instance URL for VersionRestoreManagerImpl
1 Go to http://<publishHost>:<publishPort>/lc/system/console/configMgr. Login with OSGi
Management Console user credentials. The defaults credential are admin/admin.
2 Find and click the Edit icon next to the
com.adobe.livecycle.content.activate.impl.VersionRestoreManagerImpl.name setting.
3 In the VersionRestoreManager Author URL field, specify the URL of the author instance VersionRestoreManager.
URL string: http://<hostname>:<port>/lc/bin/remoting/lc.content.remote.activate.versionRestoreManager
Note: If there are multiple author instances( Clustered) fronted by a Load Balancer, specify the URL to the load
balancer in the VersionRestoreManager Author URL field.
4 Click Save.
8.5.4.5 Disable launcher workflows
Note: Perform this step only if you are running the Publish instance in a cluster with MongoDB as a shared repository.
Launcher workflows are used to replicate to all publish instances what it receives from the reverse replication queue.
That means they are used to keep two publish instances in sync. However, a cluster created with MongoDB as the CRX
repository, the publish instances are already in sync as all of them are connected to the same Mongo instance.
Therefore, workflows are not required and you need to disable them.
1 Go to the miscellaneous admin of your AEM server at http://<host>:<port>/miscadmin.
2 On the left rail, double-click Workflows. A new browser tab will open .
3 Click the Launcher tab in top rail .
4 Double-click the following launchers and check the Disable radio button.
• Launcher with the description CM Letter Instance Create Auto Activation
• Launcher with the description CM Audit Log Create Auto Activation
• Launcher with the description CM Letter Instance Edit Auto Activation
5 Verify that for all the three launchers, the entry in the Enabled column is blank.
63CONFIGURING ADOBE EXPERIENCE MANAGER FORMS ON JEE APPLICATION SERVER CLUSTERS USING WEBSPHERE
Post-deployment tasks
Last updated 5/23/2016
8.5.5 Install sample users and assets
You can install sample users with predefined user permissions to further explore the solution template, which you can
customize to build your own solution.
1 Go to http://<authorHost>:<authorPort>/lc/crx/explorer/index.jsp.
2 Log in using administrator credentials and click Package Manager.
3 In Package Manager, upload the samples-correspondencemanagement-pkg-<version>.zip package from
<LC_HOME>/deploy/crx.
4 Click Install once the package uploads successfully.
5 Click Install on the confirmation dialog to install the sample users and assets.
Correspondence Management Sample Users
Correspondence Management Solution Accelerator contains the following sample users. These user are expected to
participate in the activities leading to generation of interactive customer communication.
The following roles mentioned are automatically assigned to the users during package Installation:
For more information about the sample users and guidelines to implement a solution using the solution template, see
Correspondence Management Solution Guide.
Note: For author clusters, these steps need to be performed on one author instance (preferably a master instance).
User name Assigned role Responsibilities
Todd Goldman Correspondence Management Administrator This user is the general system administrator.
This role enables the user to modify all assets.
This role also lets define the categories.
Heather Douglas Correspondence Management Subject Matter
Expert
This persona has the role enabling him to
CRUD texts and images.
Caleb Lopez Correspondence Management Application
Specialist
This user defines the letter template by
judicious usage of the text, picture, condition,
list objects. With this role, the user can CRUD
the letter templates, layouts, lists, conditions,
texts and images.
Gloria Rios Correspondence Management Claim Adjustor An agent user would use the letter template
defined by the business user to produce the
letter communication to deliver to the
customer.
Jocelyn Robinson Correspondence Management Form Designer This user has the skills to design form layouts
using LiveCycle Designer. Having equipped
with the necessary know-how to design form
layouts for use in correspondence
management, this user will use LiveCycle
Designer and design the XDP templates, which
would serve as the boilerplate for the letter.
Frank Kricfalusi Correspondence Management Developer This user has the knowledge about XSD
schema and data modelling concepts and is
responsible for creation and maintenance of
Data Dictionaries.

64CONFIGURING ADOBE EXPERIENCE MANAGER FORMS ON JEE APPLICATION SERVER CLUSTERS USING WEBSPHERE
Post-deployment tasks
Last updated 5/23/2016
8.5.6 Configure IPv6 implementation
Note: Perform these steps only if Correspondence Management Solution is running on a machine that uses an IPv6
address.
To map the IPv6 address to a hostname on the server and client machines:
1 Navigate to the C:\Windows\System32\drivers\etc directory.
2 Open the hosts file in a text editor.
3 Add a mapping for the IPv6 address to a host name. For example:
2001:1890:110b:712b:d1d:9c99:37ef:7281 <ipv6_hostname>
4 Save and close the file.
Ensure that you use the mapped host name instead of the IPv6 address to access Correspondence Management
Solution.
8.5.7 Install Japanese fonts for Adobe Reader
If your Correspondence Management assets use Japanese fonts, you must install the Japanese Language Support
Package for Adobe Reader. Otherwise, your letters and forms will not render and function properly. For installing
language packs, visit the downloads page for Adobe Reader.
8.6 Configuring PDF Generator
If you installed PDF Generator as part of your AEM forms on JEE, complete the following tasks:
8.6.1 Environment variables
If you installed the PDF Generator module and configured it to convert files to PDF, for some file formats, you must
manually set an environment variable that contains the absolute path of the executable that is used to start the
corresponding application. The table below lists the environment variables for the native applications that you have
installed.
Note: Ensure that the required applications are installed on all nodes in the cluster.
Note: All environment variables and respective paths are case-sensitive.
Application Environment variable Example
Adobe Acrobat Acrobat_PATH C:\Program Files (x86)\Adobe\Acrobat 11.0\Acrobat\Acrobat.exe
Adobe FrameMaker® FrameMaker_PATH C:\Program Files (x86)\Adobe\FrameMaker8.0\FrameMaker.exe
Notepad Notepad_PATH C:\WINDOWS\notepad.exe
You can leave the Notepad_PATH variable blank.
OpenOffice OpenOffice_PATH C:\Program Files (x86)\OpenOffice.org 3.3
Adobe PageMaker® PageMaker_PATH C:\Program Files (x86)\Adobe\PageMaker 7.0.2\PageMaker.exe
WordPerfect WordPerfect_PATH C:\Program Files (x86)\WordPerfect Office 12\Programs\wpwin12.exe
Adobe Photoshop® Photoshop_PATH C:\Program Files (x86)\Adobe\Adobe Photoshop CS4\Photoshop.exe

65CONFIGURING ADOBE EXPERIENCE MANAGER FORMS ON JEE APPLICATION SERVER CLUSTERS USING WEBSPHERE
Post-deployment tasks
Last updated 5/23/2016
Note: These environment variables must be set for all nodes in the cluster.
Note: The environment variable OpenOffice_PATH is set to the installation folder instead of the path to the executable.
You do not need to set up the paths for Microsoft Office applications such as Word, PowerPoint, Excel, Visio, and
Project, or for AutoCAD. The Generate PDF service starts these applications automatically if they are installed on the
server.
Create a new Windows environment variable
1 Select Start > Control Panel > System.
2 Click the Advanced tab and click Environment Variables.
3 In the System variables section, click New.
4 Enter the environment variable name you need to set (for example, enter Photoshop_PATH). This folder is the one
that contains the executable file. For example, type the following path:
D:\Program Files\Adobe\Adobe Photoshop CS4\Photoshop.exe
Set the PATH variables on Linux or UNIX (OpenOffice only)
Execute the following command:
export OpenOffice_PATH=/opt/openoffice.org3.3
8.6.2 Configuring the application server to use HTTP proxy server
If the computer that AEM forms on JEE is running on uses proxy settings to access external web sites, the application
server should be started with the following values set as Java virtual machine (JVM) arguments:
-Dhttp.proxyHost=[server host] -Dhttp.proxyPort=[server port]
Complete the following procedure to start your application server with HTTP proxy host setting.
1 In the WebSphere Administrative Console navigation tree, Log in to WebSphere Administrative Console, click
Servers > Server Types > WebSphere application servers, and then click the name of the server instance to configure
(for example, server1)
2 Under Server Infrastructure, click Java and Process Management > Process Definition.
3 Under Additional Properties, click Java Virtual Machine > Custom Properties.
4 Click New and, in the Name box, type http.proxyHost.
5 In the Value box, type the host name or IP address of your HTTP proxy server and then click OK.
6 Click New and, in the Name box, type http.proxyPort.
7 In the Value box, type the port number of your HTTP proxy server and then click OK.
8 In the Messages box, click Save directly to master configuration.
9 Restart all WebSphere server instances.
8.6.3 Setting the Adobe PDF Printer as the default printer
You must set the Adobe PDF Printer to be the default printer on the server. If the Adobe PDF Printer is not set as the
default, PDF Generator cannot convert files successfully.
For clusters, you must set Adobe PDF Printer as the default printer on all nodes.
66CONFIGURING ADOBE EXPERIENCE MANAGER FORMS ON JEE APPLICATION SERVER CLUSTERS USING WEBSPHERE
Post-deployment tasks
Last updated 5/23/2016
Set the default printer
1 Select Start > Printers and Faxes.
2 In the Printers and Faxes window, right-click Adobe PDF and select Set as Default Printer.
8.6.4 Configuring Acrobat Professional (Windows-based Computers Only)
Note: This procedure is required only if you upgraded to or installed Acrobat after you completed the AEM forms on JEE
installation. Upgrading Acrobat can be completed after you run Configuration Manager and deploy AEM forms on JEE
to the application server. Acrobat Professional root directory is designated as [Acrobat root]. Typically, the root directory
is C:\Program Files\Adobe\Acrobat 11.0\Acrobat.
Configure Acrobat for use with PDF Generator
1 If an earlier version of Acrobat is installed, uninstall it by using Add or Remove Programs in the Windows Control
Panel.
2 Install Acrobat XI Pro by running the installer.
3 Navigate to the additional\scripts folder on the AEM forms on JEE installation media.
4 Run the following batch file.
Acrobat_for_PDFG_Configuration.bat [LiveCycle root]/pdfg_config
Note: On clusters, you must run the command on the cluster node where AEM forms on JEE is installed.
5 On other cluster nodes on which you do not run AEM forms on JEE Configuration Manager,do the following:
• Add a new registry DWORD entry named SplWOW64TimeOut at
HKEY_LOCAL_MACHINE\SYSTEM\CurrentControlSet\Control\Print. Set its value to 60000.
• Copy PDFGen.api from the [aem-forms root]/plugins/x86_win32 directory on the node where AEM forms on
JEE is installed to the [Acrobat root]/plug_ins directory on the node being currently configured.
6 Open Acrobat and select Help > Check for updates > Preferences.
7 Deselect Automatically check for Adobe updates.
Validate the Acrobat installation
1 Navigate to a PDF file on your system and double-click it to open it in Acrobat. If the PDF file opens successfully,
Acrobat is installed correctly.
2 If the PDF file does not open correctly, uninstall Acrobat and reinstall it.
Note: Ensure that you dismiss all the Acrobat dialog boxes that are displayed after the Acrobat installation is completed
and disable the automatic updates for Acrobat. Set the Acrobat_PATH environment variable to point to Acrobat.exe (For
example, C:\Program Files\Adobe\Acrobat 11.0\Acrobat\Acrobat.exe).
Configure native application support
1 Install and validate Acrobat as described in the previous procedure.
2 Set Adobe PDF printer as the default printer.
Add temporary directories to trusted directories list in Acrobat
The OptimizePDF service uses Adobe Acrobat and mandates that AEM forms on JEE temporary directory and PDF
Generator temporary directory are listed in the trusted directories list of Acrobat.

67CONFIGURING ADOBE EXPERIENCE MANAGER FORMS ON JEE APPLICATION SERVER CLUSTERS USING WEBSPHERE
Post-deployment tasks
Last updated 5/23/2016
If AEM forms on JEE temporary directory and PDF Generator temporary directory are not listed in the trusted
directories list, the OptimizePDF service fails to run. Perform the following steps to add directories to the temporary
directory list:
1 Open Acrobat, Choose Edit > Preferences.
2 From the Categories on the left, select Security (Enhanced), and then select the Enable Enhanced Security option.
3 To add AEM forms on JEE temporary directory and PDF Generator temporary directory to the trusted directories
list, click Add Folder Path, select directories and click OK.
8.6.5 Installing East Asian characters in Windows Server 2003
When HTML files are converted to PDF by using PDF Generator, some East Asian languages, such as Japanese,
Korean, and Chinese, and also right-to-left languages, such as Arabic, Armenian, Georgian, Hebrew, Indic, Thai, and
Vietnamese, may not be displayed in the PDF file.
To ensure that these languages are displayed in Windows Server 2003, appropriate fonts must be present on the client
and server.
Install East Asian characters in Windows Server 2003
1 Select Start > Control Panel and open Regional and Language Options.
2 Click the Languages tab and select Install Files for East Asian Languages.
3 Click the Advanced tab and select all the options under Code Page Conversion Tables.
If converted PDF files are still missing fonts, verify that the Arial Unicode MS (TrueType) font (ARIALUNI.TTF) is
present in the C:\WINDOWS\Fonts directory.
8.6.6 Adding fonts to PDF Generator
AEM forms on JEE provides a central repository of fonts, which is accessible to all AEM forms on JEE modules. Make
the extra fonts available to non-AEM forms on JEE applications on the server so that PDF Generator can use these
fonts to create PDF documents that are created with these applications.
Note: Restart the application server after adding new fonts to the specified fonts folder.
8.6.6.1 Non-AEM forms on JEE applications
The following list contains non-AEM forms on JEE applications that PDF Generator can use for PDF generation on
the server side:
Windows-only Applications
• Microsoft Office Word
• Microsoft Office Excel
• Microsoft Office PowerPoint
• Microsoft Office Project
• Microsoft Office Visio
• Microsoft Office Publisher
• AutoDesk AutoCAD
• Corel WordPerfect

68CONFIGURING ADOBE EXPERIENCE MANAGER FORMS ON JEE APPLICATION SERVER CLUSTERS USING WEBSPHERE
Post-deployment tasks
Last updated 5/23/2016
• Adobe Photoshop CS
• Adobe FrameMaker
• Adobe PageMaker
• Adobe Acrobat Professional
Multiplatform applications
• OpenOffice Writer
• OpenOffice Calc
• OpenOffice Draw
• OpenOffice Impress
Note: In addition to these applications, your list may include additional applications that you added.
Of the above applications, the OpenOffice Suite (which includes Writer, Calc, Draw, and Impress) is available on
Windows, Solaris, and Linux platforms, whereas other applications are available on Windows only.
8.6.6.2 Adding new fonts to Windows applications only
All the Windows-only applications that are mentioned above can access all the fonts that are available in the
C:\Windows\Fonts (or equivalent) folder. In addition to C:\Windows\Fonts, each of these applications may have its
own private fonts folders.
Therefore, if you plan to add any custom fonts to the AEM forms on JEE fonts repository, ensure that the same fonts
are available to the Windows-only applications also by copying these fonts to either C:\Windows\Fonts or to an
equivalent folder.
Your custom fonts must be licensed under an agreement that allows you to use them with the applications that have
access to these fonts.
8.6.6.3 Adding new fonts to other applications
If you added support for PDF creation in other applications, see the Help for these applications to add new fonts. In
Windows, copying your custom fonts to the C:\Windows\Fonts (or equivalent) folder should be sufficient.
8.6.7 Configuring HTML to PDF conversions
The HTML-to-PDF conversion process is designed to use the settings from Acrobat XI Pro that override the settings
from PDF Generator.
Note: This configuration is required to enable the HTML-to-PDF conversion process, otherwise this conversion type will fail.
8.6.7.1 Configure the HTML-to-PDF conversion
1 Install and validate Acrobat as described in “8.6.4 Configuring Acrobat Professional (Windows-based Computers
Only)” on page 66.
2 Locate the pdfgen.api file in the [aem-forms root]\plugins\x86_win32 directory and copy it to [Acrobat
root]\Acrobat\plug_ins directory.

69CONFIGURING ADOBE EXPERIENCE MANAGER FORMS ON JEE APPLICATION SERVER CLUSTERS USING WEBSPHERE
Post-deployment tasks
Last updated 5/23/2016
8.6.7.2 Enable support for Unicode fonts in HTML to PDF conversions
Important: The HTML-to-PDF conversion fails if a zipped input file contains HTML files with double-byte characters in
filenames. To avoid this problem, do not use double-byte characters when naming HTML files.
1 Copy the Unicode font to any of the following directories as appropriate for your system:
• Windows
[Windows root]\Windows\fonts
[Windows root]\WINNT\fonts
• UNIX
/usr/lib/X11/fonts/TrueType
/usr/openwin/lib/X11/fonts/TrueType
/usr/share/fonts/default/TrueType
/usr/X11R6/lib/X11/fonts/ttf
/usr/X11R6/lib/X11/fonts/truetype
/usr/X11R6/lib/X11/fonts/TrueType
/usr/X11R6/lib/X11/fonts/TTF
/Users/cfqauser/Library/Fonts
/System/Library/Fonts
/Library/Fonts
/Users/ + System.getProperty(<user name>, root) + /Library/Fonts
System.getProperty(JAVA_HOME) + /lib/fonts
/usr/share/fonts (Solaris)
Note: Ensure that the directory /usr/lib/X11/fonts exists. If it does not, create a symbolic link from
/usr/share/X11/fonts to /usr/lib/X11/fonts using the ln command.
2 Modify the font-name mapping in the cffont.properties file located in the [aem-forms root]/deploy/adobe-
generatepdf-dsc.jar file:
• Extract this archive, and locate the cffont.properties file and open it in an editor.
• In the comma-separated list of Java font names, add a map to your Unicode system font for each font type. In
the example below, kochi mincho is the name of your Unicode system font.
dialog=Arial, Helvetica, kochi mincho
dialog.bold=Arial Bold, Helvetica-Bold, kochi mincho ...
• Save and close the properties file, and then repackage and redeploy the adobe-generatepdf-dsc.jar file.
Note: On a Japanese operating system, specify the font mapping in the cffont.properties.ja file as well, which takes
precedence over the standard cffont.properties file.
Fonts in the list are searched from left to right, using the first font found. HTML-to-PDF conversion logs return a
list of all the font names that are found in the system. To determine the font name you need to map, add the font
to one of the directories above, restart the server, and run a conversion. You can determine from the log files the font
name to use for mapping.

70CONFIGURING ADOBE EXPERIENCE MANAGER FORMS ON JEE APPLICATION SERVER CLUSTERS USING WEBSPHERE
Post-deployment tasks
Last updated 5/23/2016
To embed the font in the generated PDF files, set the embedFonts property in the cffont.properties file to true (the
default is false).
8.6.8 Modify Microsoft Visio default macro settings
When a Microsoft Visio file containing macros is submitted for conversion, the resultant Microsoft Office Visio
Security Notice dialog causes the conversion to time out. To successfully convert files that contain macros, the default
macro settings in Visio must be changed.
❖ In Visio, click Tools > Trust Center > Macro Settings and select either of the following options and then click OK:
• Disable all macros without notification
• Enable all macros
8.6.9 Installing the Network Printer Client
PDF Generator includes an executable file to install the PDF Generator network printer on a client computer. After
the installation is complete, a PDF Generator printer is added to the list of existing printers on the client computer.
This printer can then be used to send documents for conversion to PDF.
Note: The Network Printer Client installation wizard available in the Administration Console is supported only on
Windows operating system. Ensure that you use a 32-bit JVM to launch the Network Printer Client installation wizard.
You will encounter an error if you use a 64-bit JVM.
If the PDFG Network Printer fails to install on Windows or if you want to install the printer on UNIX or Linux
platforms, use the operating system’s native Add Printer utility and configure it as described in “8.6.9.2 Configure
PDFG Network Printer on Windows using the native Add Printer wizard” on page 71
8.6.9.1 Install the PDF Generator Network Printer Client
Note: Before installing the PDF Generator network printer client on Windows Server 2008, Ensure that you have the
Internet Printing Client feature installed on your Windows Server 2008. For installing the feature, see Windows Server
2008 Help.
1 Ensure that you successfully installed PDF Generator on your server.
2 Do one of the following:
• From a Windows client computer, enter the following URL in your web browser, where [host] is the name of the
server where you installed PDF Generator and [port] is the application server port used:
http://[host]:[port]/pdfg-ipp/install
• In Administration Console, click Home > Services > PDF Generator > PDFG Network Printer. In the PDFG
Network Printer Installation section, click Click here to launch the PDFG Network Printer Installation.
3 On the Configure Internet Port screen, select Use the specified user account option, and provide the credentials
of a AEM forms on JEE user who has the PDFG Administrator/User role. This user must also have an email address
that can be used to receive the converted files. To have this security setting apply to all users on the client computer,
select Use the same security options for all users, and then click OK.
Note: If the user’s password changes, then users will need to reinstall the PDFG Network Printer on their computers.
You cannot update the password from Administration Console.
Upon successful installation, a dialog box appears, indicating that the printer is successfully installed.
4 Click OK. You will now have a PDF Generator printer available in your list of printers.

71CONFIGURING ADOBE EXPERIENCE MANAGER FORMS ON JEE APPLICATION SERVER CLUSTERS USING WEBSPHERE
Post-deployment tasks
Last updated 5/23/2016
8.6.9.2 Configure PDFG Network Printer on Windows using the native Add Printer wizard
1 Click Start > Printers and Faxes and double-click Add Printer.
2 Click Next, select A network printer, or a printer attached to another computer, and then click Next.
3 Select Connect to a printer on the internet or on a home or office network and type the following URL for the
PDFG printer, where [host] is the server name and [port] is the port number where the server is running:
http://[host]:[port]/pdfg-ipp/printer
4 On the Configure Internet Port screen, select Use the specified user account and provide valid User credentials.
5 In the Printer Driver Select box, choose any standard PostScript-based printer driver (for example, HP Color
LaserJet PS).
6 Complete the installation by choosing appropriate options (for example, setting this printer as default).
Note: The user credentials used while adding the printer must have a valid email ID configured in User Management
to receive the response.
7 Configure the email service’s sendmail service. Provide a valid SMTP server and authentication information in the
service’s configuration options.
8.6.9.3 Install and configure the PDF Generator Network Printer Client using Proxy server port forwarding
1 Configure port forwarding on the CC Proxy server on a particular port to the AEM forms on JEE Server, and disable
the authentication at proxy server level (because AEM forms on JEE uses its own authentication). If a client
connects to this Proxy server on the forwarded port, then all the requests will be forwarded to the AEM forms on
JEE Server.
2 Install PDFG Network Printer using the following URL:
http://[proxy server]:[forwarded port]/pdfg-ipp/install.
3 Provide the necessary credentials for authentication of the PDFG Network Printer.
4 The PDFG Network Printer will be installed on the client machine which you can use for PDF conversion using the
firewall protected AEM forms on JEE Server.
8.6.10 Changing File Block Settings
Change Microsoft Office trust center settings to enable PDFG to convert older versions of Microsoft office documents.
1 Click the File tab in any Office 2010 application. Under Help, click Options; the Options dialog box appears
2 Click Trust Center, and then click Trust Center Settings.
3 In the Trust Center settings, click File Block Settings.
4 In the File Type list, uncheck open for the file type that you want to be converted by PDFG.
8.6.11 Watched folder performance parameters
To avoid java.io.IOException error messages indicating that not enough disk space is available to perform PDF
conversions by using a watched folder, you can modify the settings for PDF Generator in Administration Console.
You must ensure that for WebSphere application server, the maximum transaction time-out and ORB service have the
proper values.

72CONFIGURING ADOBE EXPERIENCE MANAGER FORMS ON JEE APPLICATION SERVER CLUSTERS USING WEBSPHERE
Post-deployment tasks
Last updated 5/23/2016
Configure transaction time-out
1 Do the following:
• Log in to WebSphere Administrative Console, click Servers > Server Types > WebSphere application servers,
and then click the name of the server instance to configure (for example, server1).
2 Under Container Settings, click Container Services > Transaction Service.
3 Under General Properties, in the Total transaction lifetime timeout box, type 300 (or higher).
4 Ensure that the value in the Maximum transaction timeout box is greater than or equal to the Total transaction
lifetime timeout.
5 Click OK or Apply and then click Save directly to master configuration.
Increase the CORBA time-out value
1 Do the following:
• Log in to WebSphere Administrative Console, click Servers > Server Types > WebSphere application servers,
and then click the name of the server instance to configure (for example, server1).
2 Under Container Settings, click Container Services > ORB Service.
3 Under General Properties, in the Request timeout box, type 360 and, in the Locate Request Timeout box, type 300.
4 Click OK or Apply and then click Save directly to master configuration.
Set performance parameters for PDF Generator
1 Log in to Administration Console and click Services > Applications and Services > Service Management.
2 In the list of services, navigate to and click PDFGConfigService, and then set the following values:
• PDFG Cleanup Scan Seconds: 1800
• Job Expiration Seconds: 6000
• Server Conversion Timeout: Change the default of 270 to a higher value, such as 450.
3 Click Save and restart the server.
8.6.12 Enable PDF Conversion for Microsoft Word document containing
protected fields
The PDF Generator supports Microsoft Word documents containing protected fields. To enable PDF Conversion for
Microsoft Word document containing protected fields, change the file type settings:
1 In the Administration Console, navigate to Services > PDF Generator > File Type Settings, and open your file
type settings profile.
2 Expand the Microsoft Word option and select the Preserve document markup in Adobe PDF (for Microsoft
Office 2003 or later) option.
3 Click Save As, specify name of the file type setting, and click OK.
8.7 Final setup for Rights Management
Rights Management requires the application server to be configured to use SSL. (See Administration Help.)

73CONFIGURING ADOBE EXPERIENCE MANAGER FORMS ON JEE APPLICATION SERVER CLUSTERS USING WEBSPHERE
Post-deployment tasks
Last updated 5/23/2016
8.8 Configuring LDAP access
8.8.1 Configure User Management (Local Domain)
1 Open a web browser, navigate to http://[host]:[port]/adminui, and log in. (See “8.1.4.1 Accessing Administration
Console” on page 53 .)
2 Click Settings > User Management > Domain Management, and then click New Local Domain.
3 In the appropriate boxes, enter the domain ID and name. (See “Adding local domains” in Administration help.)
4 (Optional) Disable account locking by deselecting the Enable Account Locking option.
5 Click OK.
8.8.2 Configure User Management with LDAP (Enterprise Domain)
1 Open a web browser, navigate to http://[host]:[port]/adminui and log in. (See “8.1.4.1 Accessing Administration
Console” on page 53.)
2 Click Settings > User Management > Domain Management, and then click New Enterprise Domain.
3 In the ID box, type a unique identifier for the domain and, in the Name box, type a descriptive name for the
domain.
Note: When using DB2 for your AEM forms on JEE database, the maximum permitted length of the ID is 100 single-
byte (ASCII) characters or 50 double-byte characters or 25 four-byte characters. (See “Adding enterprise domains” in
Administration Help.)
4 Click Add Authentication and, in the Authentication Provider list, select LDAP.
5 Click OK.
6 Click Add Directory and, in the Profile Name box, type a name for your LDAP profile.
7 Click Next.
8 Specify values in the Server, Port, SSL, and Binding boxes, and in the Populate Page with box, select a directory
settings option such as Default Sun ONE values. Also, specify values in the Name and Password box that would
be used to connect to the LDAP database when anonymous access is not enabled. (See “Directory settings” in
Administration Help.)
9 (Optional) Test your configuration:
• Click Test. The screen displays a message indicating either a successful server test or any configuration errors
that exist.
10 Click Next and configure the User Settings as required. (See “Directory settings” in Administration Help.)
11 (Optional) Test your configuration:
• Click Test.
• In the Search Filter box, verify the search filter or specify a new search filter, and then click Submit. The screen
displays a list of entries that match the search criteria.
• Click Close to return to the User Settings screen.
12 Click Next configure the Group Settings as required. (See “Directory settings” in Administration Help.)
13 (Optional) Test your configuration:
• Click Test.
74CONFIGURING ADOBE EXPERIENCE MANAGER FORMS ON JEE APPLICATION SERVER CLUSTERS USING WEBSPHERE
Post-deployment tasks
Last updated 5/23/2016
• In the Search Filter box, verify the search filter or specify a new search filter, and then click Submit. The screen
displays a list of entries that match the search criteria.
• Click Close to return to the Group Settings screen.
14 Click Finish to exit the New Directory page and then click OK to exit.
8.9 Enabling FIPS mode
AEM forms on JEE provides a FIPS mode to restrict data protection to Federal Information Processing Standard
(FIPS) 140-2 approved algorithms using the RSA BSAFE Crypto-C 2.1 encryption module.
If you did not enable this option by using Configuration Manager during AEM forms on JEE configuration or if you
enable it but want to turn it off, you can change this setting through Administration Console.
Modifying FIPS mode requires you to restart the server.
FIPS mode does not support Acrobat versions earlier than 7.0. If FIPS mode is enabled and the Encrypt With Password
and Remove Password processes include the Acrobat 5 setting, the process fails.
In general, when FIPS is enabled, the Assembler service does not apply password encryption to any document. If this
is attempted, a FIPSModeException is thrown, indicating that “Password encryption is not permitted in FIPS mode.”
Additionally, the PDFsFromBookmarks element is not supported in FIPS mode when the base document is password-
encrypted.
Turn FIPS mode on or off
1 Log in to Administration Console.
2 Click Settings > Core System Settings > Configurations.
3 Select Enable FIPS to enable FIPS mode or deselect it to disable FIPS mode.
4 Click OK and restart the application server.
Note: AEM forms on JEE software does not validate code to ensure FIPS compatibility. It provides a FIPS operation mode
so that FIPS-approved algorithms are used for cryptographic services from the FIPS-approved libraries (RSA).
8.10 Configuring HTML digital signature
To use the HTML digital signature feature of Forms, complete the following procedure.
1 Manually deploy the [aem-forms root]/deploy/adobe-forms-ds.ear file to your application server.
2 Log in to Administration Console and click Services > LiveCycle Forms ES4.
3 Select HTML Digital Signature Enabled and then click Save.
75CONFIGURING ADOBE EXPERIENCE MANAGER FORMS ON JEE APPLICATION SERVER CLUSTERS USING WEBSPHERE
Post-deployment tasks
Last updated 5/23/2016
8.11 Configure CSIv2 inbound transport
On the default Global Security enabled installation of IBM WebSphere, CSIv2 inbound transport option is set to SSL-
required. This configuration causes Output and Forms components to fail. Ensure that you change CSIv2 inbound
transport option to SSL-Supported: To change the option:
1 Log in to IBM WebSphere Administration Console.
2 Expand Security, and then click Global security.
3 In the Authentication section, expand RMI/IIOP security, and then click CSIv2 inbound communications
4 In CSIv2 Transport Layer section, set value of Transport to SSL-Supported.
5 Click Apply.
8.12 Configuring Connector for EMC Documentum
Note: AEM forms on JEE supports EMC Documentum, versions 6.7 SP1 and 7.0 with minor updates only. Make sure
your ECM is upgraded accordingly.
Note: Ensure that installing client for the connectors, copying of JAR's file and configuration changes tasks are performed
on all the nodes of the cluster.
If you installed Connector for EMC Documentum as part of your AEM forms on JEE, complete the following
procedure to configure the service to connect to the Documentum repository.
Configure Connector for EMC Documentum
1 Locate the adobe-component-ext.properties file in the [appserver root]/profiles/[profile name] folder (if the file
does not exist, create it).
2 Add a new system property that provides the following Documentum Foundation Classes JAR files:
• dfc.jar
• aspectjrt.jar
• log4j.jar
• jaxb-api.jar
• configservice-impl.jar
• configservice-api.jar
• commons-codec-1.3.jar
• commons-lang-2.4.jar
The new system property should take on this form:
[component id].ext=[JAR files and/or folders]
For example, using default Content Server and Documentum Foundation Classes installations, add to the file one
of the following system properties on a new line, with no line breaks, and end the line with a carriage return:
• Connector for EMC Documentum 6.7 SP1 and 7.0 only:

76CONFIGURING ADOBE EXPERIENCE MANAGER FORMS ON JEE APPLICATION SERVER CLUSTERS USING WEBSPHERE
Post-deployment tasks
Last updated 5/23/2016
com.adobe.livecycle.ConnectorforEMCDocumentum.ext= C:/Program Files/Documentum/Shared/dfc.jar, C:/ProgramFiles/Documentum/Shared/aspectjrt.jar, C:/Program Files/Documentum/Shared/log4j.jar, C:/Program Files/Documentum/Shared/jaxb-api.jar, C:/Program Files/Documentum/Shared/configservice-impl.jar, C:/Program Files/Documentum/Shared/configservice-api.jar C:/Program Files/Documentum/Shared/commons-codec-1.3.jar C:/Program Files/Documentum/Shared/commons-lang-2.4.jar
Note: The above text contains formatting characters for line breaks. If you copy and paste this text, you must
remove the formatting characters.
3 Repeat previous steps on each application server instance of the cluster.
4 Open a web browser and enter this URL:
http://[host]:[port]/adminui
5 Log in using the default user name and password:
User name: administrator
Password: password
6 Navigate to Services > LiveCycle 11 Connector for EMC Documentum > Configuration Settings and perform
these tasks:
• Type all the required Documentum repository information.
• To use Documentum as your repository provider, under Repository Service Provider Information, select EMC
Documentum Repository Provider, and then click Save. For more information, click the Help link in the
upper-right corner of the page in the Administration Help.
7 (Optional) Navigate to Services > LiveCycle 11 Connector for EMC Documentum > Repository Credentials
Settings, click Add, specify the Docbase information, and then click Save. (For more information, click Help in the
upper-right corner.)
8 If the application server is not currently running, start the server. Otherwise, stop and then restart the server.
9 Open a web browser and enter this URL.
http://[host]:[port]/adminui
10 Log in using the default user name and password:
User name: administrator
Password: password
11 Navigate to Services > Applications and Services > Service Management and select these services:
• EMCDocumentumAuthProviderService
• EMCDocumentumContentRepositoryConnector
• EMCDocumentumRepositoryProvider
12 Click Start. If any of the services do not start correctly, check the settings you completed earlier.

77CONFIGURING ADOBE EXPERIENCE MANAGER FORMS ON JEE APPLICATION SERVER CLUSTERS USING WEBSPHERE
Post-deployment tasks
Last updated 5/23/2016
13 Do one of the following tasks:
• To use the Documentum Authorization service (EMCDocumentumAuthProviderService) to display content
from a Documentum repository in the Resources view of Workbench, continue with this procedure. Using the
Documentum Authorization service overrides the default AEM forms on JEE authorization and must be
configured to log in to Workbench using Documentum credentials.
• To use the AEM forms on JEE repository, log in to Workbench by using the AEM forms on JEE super
administrator credentials (by default, administrator and password).
You have now completed the required steps for this procedure. Use the credentials provided in step 19 for accessing
the default repository in this case and use the default AEM forms on JEE authorization service.
14 Restart the application server.
15 Log in to Administration Console and click Settings > User Management > Domain Management.
16 Click New Enterprise Domain, and type a domain ID and name. The domain ID is the unique identifier for the
domain. The name is a descriptive name for the domain.
Note: (WebLogic and WebSphere only) When using DB2 for your AEM forms on JEE database, the maximum
permitted length of the ID is 100 single-byte (ASCII) characters or 50 double-byte characters or 25 four-byte
characters. (See “Adding enterprise domains” in Administration Help.)
17 Add a custom authentication provider:
• Click Add Authentication.
• In the Authentication Provider list, select Custom.
• Select EMCDocumentumAuthProvider and then click OK.
18 Add an LDAP authentication provider:
• Click Add Authentication.
• In the Authentication Provider list, select LDAP, and then click OK.
19 Add an LDAP directory:
• Click Add Directory.
• In the Profile Name box, type a unique name, and then click Next.
• Specify values for the Server, Port, SSL, Binding, and Populate page with options. If you select User for the
Binding option, you must also specify values for the Name and Password fields.
• (Optional) Select Retrieve Base DN to retrieve base domain names, as required.
• Click Next, configure the user settings, click Next, configure group settings, as required, and then click Next.
For details about the settings, click User Management Help in the upper-right corner of the page.
20 Click OK to exit the Add Directory page and then click OK again.
21 Select the new enterprise domain and click Sync Now. Depending on the number of users and groups in your LDAP
network and the speed on your connection, the synchronization process may take several minutes.
(Optional) To verify the status of the synchronization, click Refresh and view the status in the Current Sync State
column.
22 Navigate to Settings > User Management > Users and Groups.
23 Search for users that were synchronized from LDAP and perform these tasks:
• Select one or more users and click Assign Role.

78CONFIGURING ADOBE EXPERIENCE MANAGER FORMS ON JEE APPLICATION SERVER CLUSTERS USING WEBSPHERE
Post-deployment tasks
Last updated 5/23/2016
• Select one or more AEM forms on JEE roles and click OK.
• Click OK a second time to confirm the role assignment.
Repeat this step for all users that you assign roles to. For more information, click User Management Help in the
upper-right corner of the page.
24 Start Workbench and log in by using the credentials for the Documentum repository:
Username: [username]@[repository_name]
Password: [password]
After you log in, the Documentum repository appears in the Resources view within Workbench. If you do not log
in using the username@repository_name, Workbench attempts to log in to the default repository.
25 (Optional) To install the AEM forms on JEE Samples for Connector for EMC Documentum, create a Documentum
repository named Samples, and then install the samples in that repository.
After you configure the Connector for EMC Documentum service, see AEM forms on JEE Administration Help for
information about configuring Workbench with your Documentum repository.
8.12.1 Creating the XDP MIME format in a Documentum repository
Before users can store and retrieve XDP files from a Documentum repository, you must do one of these tasks:
• Create a corresponding XDP format in each repository where users will access XDP files.
• Configure the Connector for EMC Documentum service to use a Documentum Administrator account when
accessing the Documentum repository. In this case, the Connector for EMC Documentum service uses the XDP
format whenever it is required.
Create the XDP format on Documentum Content Server using Documentum Administrator
1 Log in to Documentum Administrator.
2 Click Formats and then select File > New > Format.
3 Type the following information in the corresponding fields:
Name:xdp
Default File Extension:xdp
Mime Type: application/xdp
4 Repeat steps 1 to 3 for all other Documentum repositories where users will store XDP files.
Configure the Connector for EMC Documentum service to use a Documentum Administrator
1 Open a web browser and enter this URL:
http://[host]:[port]/adminui
2 Log in using the default user name and password:
User name: administrator
Password: password
3 Click Services > LiveCycle 11 Connector for EMC Documentum > Configuration Settings.
4 Under Documentum Principal Credentials Information, update the following information and then click Save:
User Name: [Documentum Administrator user name]

79CONFIGURING ADOBE EXPERIENCE MANAGER FORMS ON JEE APPLICATION SERVER CLUSTERS USING WEBSPHERE
Post-deployment tasks
Last updated 5/23/2016
Password: [Documentum Administrator password]
5 Click Repository Credentials Settings, select a repository from the list or, if none exist, click Add.
6 Provide the appropriate information in the corresponding fields and then click Save:
Repository Name: [Repository Name]
Repository Credentials User Name:[Documentum Administrator user name]
Repository Credentials Password:[Documentum Administrator password]
7 Repeat steps 5 and 6 for all repositories where users will store XDP files.
8.12.2 Add support for multiple connection brokers
AEM forms on JEE Configuration Manager supports configuring only one connection broker. Use AEM forms on JEE
Administrator Console to add support for multiple connection brokers:
1 Open AEM forms on JEE Administrator Console.
2 Navigate to Home > Services > LiveCycle 11 Connector for EMC Documentum > Configuration Settings.
3 In the Connection broker Host Name or IP Address, enter comma seperated list of hostnames of different
connection brokers. For example, host1, host2, host3.
4 In the Port Number of Connection broker, enter comma seperated list of the ports of corresponding connection
brokers. For example, 1489, 1491, 1489.
5 Click Save.
8.13 Configuring the Connector for IBM Content Manager
Note: AEM forms supports IBM Content Manager. See the Supported Platform Combinations document and make sure
your ECM is upgraded to the supported version.
Note: Ensure that installing client for the connectors, copying of JAR's file and configuration changes tasks are performed
on all the nodes of the cluster.
If you installed the Connector for IBM Content Manager as part of your LiveCycle, complete the following procedure
to configure the service to connect to the IBM Content Manager datastore.
Configure Connector for IBM Content Manager
1 Locate the adobe-component-ext.properties file in the [appserver root]/profiles/[profile name] folder. If the file
does not exist, create it.
2 Add a new system property that provides the location of the following IBM II4C JAR files:
• cmb81.jar
• cmbcm81.jar
• cmbicm81.jar
• cmblog4j81.jar
• cmbsdk81.jar

80CONFIGURING ADOBE EXPERIENCE MANAGER FORMS ON JEE APPLICATION SERVER CLUSTERS USING WEBSPHERE
Post-deployment tasks
Last updated 5/23/2016
• cmbutil81.jar
• cmbutilicm81.jar
• cmbview81.jar
• cmbwas81.jar
• cmbwcm81.jar
• cmgmt
Note: cmgmt is not a JAR file. On Windows, by default, this folder is at C:/Program Files/IBM/db2cmv8/.
• common.jar
• db2jcc.jar
• db2jcc_license_cisuz.jar
• db2jcc_license_cu.jar
• ecore.jar
• ibmjgssprovider.jar
• ibmjsseprovider2.jar
• ibmpkcs.jar
• icmrm81.jar
• jcache.jar
• log4j-1.2.8.jar
• xerces.jar
• xml.jar
• xsd.jar
The new system property looks similar to the following:
[component id].ext=[JAR files and/or folders]
For example, using a default DB2 Universal Database Client and II4C installation, in the file, add the following
system property on a new line, with no line breaks, and end the line with a carriage return:

81CONFIGURING ADOBE EXPERIENCE MANAGER FORMS ON JEE APPLICATION SERVER CLUSTERS USING WEBSPHERE
Post-deployment tasks
Last updated 5/23/2016
C:/Program Files/IBM/db2cmv8/cmgmt, C:/Program Files/IBM/db2cmv8/java/jre/lib/ibmjsseprovider2.jar, C:/Program Files/IBM/db2cmv8/java/jre/lib/ibmjgssprovider.jar, C:/Program Files/IBM/db2cmv8/java/jre/lib/ibmpkcs.jar, C:/Program Files/IBM/db2cmv8/java/jre/lib/xml.jar, C:/Program Files/IBM/db2cmv8/lib/cmbview81.jar, C:/Program Files/IBM/db2cmv8/lib/cmb81.jar, C:/Program Files/IBM/db2cmv8/lib/cmbcm81.jar, C:/Program Files/IBM/db2cmv8/lib/xsd.jar, C:/Program Files/IBM/db2cmv8/lib/common.jar, C:/Program Files/IBM/db2cmv8/lib/ecore.jar, C:/Program Files/IBM/db2cmv8/lib/cmbicm81.jar, C:/Program Files/IBM/db2cmv8/lib/cmbwcm81.jar, C:/Program Files/IBM/db2cmv8/lib/jcache.jar, C:/Program Files/IBM/db2cmv8/lib/cmbutil81.jar, C:/Program Files/IBM/db2cmv8/lib/cmbutilicm81.jar, C:/Program Files/IBM/db2cmv8/lib/icmrm81.jar, C:/Program Files/IBM/db2cmv8/lib/db2jcc.jar, C:/Program Files/IBM/db2cmv8/lib/db2jcc_license_cu.jar, C:/Program Files/IBM/db2cmv8/lib/db2jcc_license_cisuz.jar, C:/Program Files/IBM/db2cmv8/lib/xerces.jar, C:/Program Files/IBM/db2cmv8/lib/cmblog4j81.jar, C:/Program Files/IBM/db2cmv8/lib/log4j-1.2.8.jar, C:/Program Files/IBM/db2cmv8/lib/cmbsdk81.jar, C:/Program Files/IBM/db2cmv8/lib/cmbwas81.jar
3 If the application server is not currently running, start the server; otherwise, stop and then restart the server.
You can now connect to the IBM Content Manager datastore from the IBMCMConnectorService Property Sheets by
using the Use User Credentials as the login mode.
You have now completed the required steps for this procedure.
(Optional) If you want to connect to IBM Content Manager datastore from IBMCMConnectorService Property Sheets
by using the Use Credentials From Process Context as the login mode, complete the following procedure.
Connect using Use Credentials from process context login mode
1 Open a web browser and enter this URL:
http://[host]:[port]/adminui
2 Log in using the super administrator credentials. Default values set during installation are:
User name:administrator
Password:password
3 Click Services > LiveCycle 11 Connector for IBM Content Manager
4 Type all of the required repository information and click Save. For more information about the IBM Content
Manager repository information, click the Help link in the upper-right corner of the page.
5 Do one of these tasks:
• To use the IBM Content Manager Authorization service IBMCMAuthProvider to use content from an IBM
Content Manager datastore, in the Processes view of Workbench, continue with this procedure. Using the IBM
Content Manager Authorization service overrides the default LiveCycle authorization and must be configured
to log in to Workbench by using IBM Content Manager credentials.

82CONFIGURING ADOBE EXPERIENCE MANAGER FORMS ON JEE APPLICATION SERVER CLUSTERS USING WEBSPHERE
Post-deployment tasks
Last updated 5/23/2016
• To use the System Credentials provided in step 4 to use content from an IBM Content Manager datastore, in the
Processes view of Workbench, log in to Workbench by using the LiveCycle super administrator credentials (by
default, administrator and password). You have now completed the required steps for this procedure. The
System Credentials that are provided in step 4 use the default LiveCycle authorization service for accessing the
default repository in this case.
6 Log in to the Administration Console, and click Settings > User Management > Domain Management.
7 Click New Enterprise Domain and type a domain ID and name. The domain ID is the unique identifier for the
domain. The name is a descriptive name for the domain.
Note: When using DB2 for your LiveCycle database, the maximum permitted length of the ID is 100 single-byte
(ASCII) characters or 50 double-byte characters or 25 four-byte characters. (See “Adding enterprise domains” in
LiveCycle Administration Help.)
8 Add a custom authentication provider:
• Click Add Authentication.
• In the Authentication Provider list, select Custom, and then select IBMCMAuthProviderService and click OK.
9 Add an LDAP authentication provider:
• Click Add Authentication.
• In the Authentication Provider list, select LDAP and then click OK.
10 Add an LDAP directory:
• Click Add Directory.
• In the Profile Name box, type a unique name, and then click Next.
• Specify values for the Server, Port, SSL, Binding, and Populate page with options. If you select User for the
Binding option, you must also specify values for the Name and Password fields. (Optional) Select Retrieve Base
DN to retrieve base domain names, as required. When finished, click Next.
• Configure the user settings, click Next, configure group settings as required, and then click Next.
For details about the above settings, click the Help link in the upper-right corner of the page.
11 Click OK to exit the Add Directory page and click OK again.
12 Select the new enterprise domain and click Sync Now. Depending on the number of users and groups in your LDAP
network and the speed on your connection, the synchronization process may take several minutes.
13 To verify the status of the synchronization, click Refresh and view the status in the Current Sync State column.
14 Navigate to Settings > User Management > Users and Groups.
15 Search for users that were synchronized from LDAP and do these tasks:
• Select one or more users and click Assign Role.
• Select one or more LiveCycle roles and click OK.
• Click OK a second time to confirm the role assignment.
Repeat this step for all users that you want to assign roles to. For more information, click the Help link in the upper-
right corner of the page.
16 Start Workbench and log in using the following credentials for IBM Content Manager datastore:
Username:[username]@[repository_name]
Password: [password]
83CONFIGURING ADOBE EXPERIENCE MANAGER FORMS ON JEE APPLICATION SERVER CLUSTERS USING WEBSPHERE
Post-deployment tasks
Last updated 5/23/2016
The IBM Content Manager datastore can now be used in the Processes view within Workbench when the login
mode for IBMCMConnectorService orchestrable components is selected as Use Credentials from process context.
8.14 Configuring the Connector for IBM FileNet
LiveCycle supports IBM FileNet, versions 5.0 and 5.2 only. Make sure your ECM is upgraded accordingly.
Note: LiveCycle supports FileNet 5.2 Content Engine; FileNet 5.2 Process Engine is not supported. Moreover, the
LiveCycle Configuration Manager (LCM) does not support/configure FileNet 5.2, perform manual configuration for
FileNet 5.2.
If you installed Connector for IBM FileNet as part of your LiveCycle, you must configure the service to connect to the
FileNet object store.
Note: Ensure that installing client for the connectors, copying of JAR's file and configuration changes tasks are performed
on all the nodes of the cluster.
Complete the following procedure to configure Connector for IBM FileNet.
Configure Connector for IBM FileNet using FileNet 5.0, FileNet 5.2, and CEWS transport
1 Log in to WebSphere Administrative Console, click Servers > Server Types > WebSphere application servers, and
then click the name of the server instance to configure (for example, server1).
2 Under Server Infrastructure, click Java and Process Management > Process Definition.
3 Under Additional Properties, click Java Virtual Machine.
4 Click Apply and then click Save to Master Configuration.
5 Locate the adobe-component-ext.properties file in the [appserver root]/profiles/[profile name] folder (if the file
does not exist, create it).
6 Add a new system property that provides the location of these FileNet Application Engine JAR files:
For FileNet 5.x add following JAR files
• Jace.jar
• javaapi.jar
• log4j.jar
• pe.jar
• stax-api.jar
• xlxpScanner.jar
• xlxpScannerUtils.jar
Note: Add the pe.jar file only if your deployment uses the IBMFileNetProcessEngineConnector service. The new system
property should reflect this structure:
[component id].ext=[JAR files and/or folders]
For example, using a default FileNet Application Engine installation on a Windows operating system, add the
following system property on a new line with no line breaks and end the line with a carriage return:
Note: The following text contains formatting characters for line breaks. If you copy this text to a location outside this
document, remove the formatting characters when you paste it to the new location.

84CONFIGURING ADOBE EXPERIENCE MANAGER FORMS ON JEE APPLICATION SERVER CLUSTERS USING WEBSPHERE
Post-deployment tasks
Last updated 5/23/2016
com.adobe.livecycle.ConnectorforIBMFileNet.ext= C:/Program Files/FileNet/AE/CE_API/lib2/javaapi.jar, C:/Program Files/FileNet/AE/CE_API/lib2/log4j-1.2.13.jar
7 (FileNet Process Engine Connector only) Configure the connection properties for the process engine as follows:
• Using a text editor, create a file with the following content as a single line and end the line with a carriage return:
(FileNet 5.0 only)
RemoteServerUrl = cemp:http://[contentserver_IP]:[contentengine_port]/wsi/FNCEWS40DIME/
(FileNet 5.2 only)
RemoteServerUrl = cemp:http://[contentserver_IP]:[contentengine_port]/wsi/FNCEWS40MTOM/
• Save the file as WcmApiConfig.properties in a separate folder, and add the location of the folder that contains
the WcmApiConfig.properties file to the adobe-component-ext.properties file.
For example, if you save the file as c:/pe_config/WcmApiConfig.properties, add the path c:/pe_config to the
adobe-component-ext.properties file.
Note: The filename is case-sensitive.
8 Locate the file wsjaas.conf and add the following lines:
FileNetP8 {com.filenet.api.util.WSILoginModule required;}; FileNetP8WSI {com.filenet.api.util.WSILoginModule required;}; FileNetP8Engine
{com.ibm.ws.security.common.auth.module.proxy.WSLoginModuleProxy required delegate=com.ibm.ws.security.common.auth.module. WSLoginModuleImpl;};
FileNetP8Server {com.ibm.ws.security.common.auth.module.proxy.WSLoginModuleProxy required delegate=com.ibm.ws.security.common.auth.module. WSLoginModuleImpl;};
FileNetP8KerberosService {com.ibm.ws.security.common.auth.module.proxy.WSLoginModuleProxy required delegate=com.filenet.engine.authentication.kerberos.login. KrbServiceLoginModule; com.ibm.ws.security.common.auth.module.proxy.WSLoginModuleProxy required delegate=com.ibm.ws.security.server.lm.ltpaLoginModule; com.ibm.ws.security.common.auth.module.proxy.WSLoginModuleProxy required delegate=com.ibm.ws.security.server.lm. wsMapDefaultInboundLoginModule;};
Note: By default, the wsjaas.conf file is located in the folder [appserver root]/profiles/[profile name]/properties/.
9 If the application server is not currently running, start the server. Otherwise, stop and then restart the server.
10 (Applicable only if IBM FileNet and LiveCycle are installed on the same WebSphere application server) Verify that
these settings have been implemented correctly in the WebSphere Administrative Console by doing the following:
• In the WebSphere Administrative Console navigation tree, click Security > Global security.
• Under Authentication, click Java Authentication and Authorization Service > Application logins.
• Click the FileNetP8 application login, and then click JAAS login modules.
If the values on this page do not match the following, modify them:
Module class name: "com.filenet.api.util.WSILoginModule"
Authentication Strategy: REQUIRED

85CONFIGURING ADOBE EXPERIENCE MANAGER FORMS ON JEE APPLICATION SERVER CLUSTERS USING WEBSPHERE
Post-deployment tasks
Last updated 5/23/2016
Module Order: 1
Click OK or Apply, and then click Save directly to master configuration.
11 Open a web browser and enter this URL:
http://[host]:[port]/adminui
12 Log in using the default user name and password:
User name: administrator
Password: password
13 Click Services > LiveCycle 11 Connector for IBM FileNet.
14 Provide the Content Engine URL. For example,
cemp:http://ContentEngineHostNameorIP:port/wsi/FNCEWS40MTOM?jaasConfigurationName=FileNetP8WSI
15 Provide all of the required FileNet repository information and, under Repository Service Provider Information,
select IBM FileNet Repository Provider.
If your deployment uses the optional process engine service, under Process Engine Settings, select Use Process
Engine Connector Service and specify the process engine settings. For more information, click the Help link in the
upper-right corner of the page.
Note: The credentials that you provide in this step are validated later when you start the IBM FileNet repository
services. If the credentials are not valid, an error is thrown and the services will not start.
16 Click Save and navigate to Services > Applications and Services > Service Management.
17 Select the check box next to each of these services and then click Start:
• IBMFileNetAuthProviderService
• IBMFileNetContentRepositoryConnector
• IBMFileNetRepositoryProvider
• IBMFileNetProcessEngineConnector (if configured)
If any of the services do not start correctly, verify the Process Engine settings.
18 Do one of the following tasks:
• To use the FileNet Authorization service (IBMFileNetAuthProviderService) to display content from a FileNet
object store in the Resources view of Workbench, continue with this procedure. Using the FileNet Authorization
service overrides the default LiveCycle authorization and must be configured to log in to Workbench by using
FileNet credentials.
• To use the LiveCycle repository, log in to Workbench by using the LiveCycle super administrator credentials
(by default, administrator and password). The credentials provided in step 16 use the default LiveCycle
authorization service for accessing the default repository in this case.
19 Restart your application server.
20 Log in to Administration Console and click Settings > User Management > Domain Management.
21 Click New Enterprise Domain and then type a domain ID and name. The domain ID is the unique identifier for
the domain. The name is a descriptive name for the domain.
When using DB2 for your LiveCycle database, the maximum permitted length of the ID is 100 single-byte (ASCII)
characters or 50 double-byte characters or 25 four-byte characters. (See “Adding enterprise domains” in
Administration Help.)

86CONFIGURING ADOBE EXPERIENCE MANAGER FORMS ON JEE APPLICATION SERVER CLUSTERS USING WEBSPHERE
Post-deployment tasks
Last updated 5/23/2016
22 Add a custom authentication provider:
• Click Add Authentication.
• In the Authentication Provider list, select Custom.
• Select IBMFileNetAuthProviderService and then click OK.
23 Add an LDAP authentication provider:
• Click Add Authentication.
• In the Authentication Provider list, select LDAP and then click OK.
24 Add an LDAP directory:
• Click Add Directory and, in the Profile Name box, type a unique name, and then click Next.
• Specify values for the Server, Port, SSL, Binding, and Populate page with options. If you select User for the
Binding option, you must also specify values for the Name and Password fields.
• (Optional) Select Retrieve Base DN to retrieve base domain names, as required. When finished, click Next.
• Configure the user settings, click Next, configure group settings as required, and then click Next.
For details about the settings, click Help link in the upper-right corner of the page.
25 Click OK to exit the Add Directory page, and then click OK again.
26 Select the new enterprise domain and click Sync Now. Depending on the number of users and groups in your LDAP
network and the speed on your connection, the synchronization process may take several minutes.
(Optional) To verify the status of the synchronization, click Refresh and view the status in the Current Sync State
column.
27 Navigate to Settings > User Management > Users and Groups.
28 Search for users that were synchronized from LDAP and perform these tasks:
• Select one or more users and click Assign Role.
• Select one or more LiveCycle roles and click OK.
• Click OK a second time to confirm the role assignment.
Repeat this step for all users you want to assign roles to. For more information, click the Help link in the upper-
right corner of the page.
29 Start Workbench and log in using the following credentials for the IBM FileNet repository:
User name:[username]@[repository_name]
Password: [password]
The FileNet object store should now be visible in the Resources view within Workbench. If you do not log in using
the username@repository name, Workbench attempts to log in to the default repository specified in step 16.
30 (Optional) If you intend to install the LiveCycle Samples for Connector for IBM FileNet, create a FileNet object
store named Samples and install the samples in that object store.
After you configure Connector for IBM FileNet, it is recommended that you see LiveCycle Administration Help for
information about configuring Workbench functions properly with your FileNet repository.

87CONFIGURING ADOBE EXPERIENCE MANAGER FORMS ON JEE APPLICATION SERVER CLUSTERS USING WEBSPHERE
Post-deployment tasks
Last updated 5/23/2016
8.15 Enable messaging on standalone JBoss
To enable messaging on a standalone JBoss 6.2 server for AEM forms on JEE:
1 Enable the messaging module on the JBOSS 6.2 if it is not enabled yet.
Copy the following tags from the standalone_full.xml file to the specified location in the lc_turnkey.xml file.
Both the files are located in the <aem-forms root>/jboss/standalone/configuration directory.
• Copy the entire tag with its content <extension module="org.jboss.as.messaging">....</extension>
from the standalone_full.xml file and put it after the <extensions> tag in the lc_turnkey.xml file
• Copy the entire tag with its content <subsystem
xmlns="urn:jboss:domain:messaging:1.4">....</subsystem> from the standalone_full.xml file
and put it after the <profile> tag in the lc_turnkey.xml file
2 Run the add-user.bat script located at <aem-forms root>/jboss/bin to create an application user and add the user
to the guest group. The JMS DSC component on AEM forms on JEE expects a Connection User Name and
Password to be specified. This user must have permission to use JMS Queue/Topic for performing the Send/Receive
operation.
Note: In the lc_turnkey.xml file, a user with a guest role is already defined under the <security-setting match="#">.....
</security-settings> tag. The default user has the privilege to send-receive messages via JMS. However, you must
create an application user on the JBoss 6.2 server with the above role to send-receive JMS messages. While creating a
user using the add-user.bat script, you can assign it the guest group.
3 Change the JMS DSC Configuration with the user created in step 2.
a Log in to the administration console for AEM forms on JEE.
b Navigate to Services > Application and Services > Service Management.
c Search JMS service.
d In the configuration tab, change the JMS configuration.

88
Last updated 5/23/2016
Chapter 9: Configuring Load Balancing
You can configure your WebSphere cluster to provide load-balancing functionality. Use the IBM HTTP server that
ships with the WebSphere Application Server to perform the following tasks:
• Preparatory tasks. (“9.1 Preparing for installation” on page 88)
• Install IBM HTTP Server. (“9.2 Installing the web server” on page 88)
• Install the web server plug-in. (“9.3 Installing the web server plug-in” on page 89)
Note: LiveCycle in a cluster environment supports only sticky sessions for load balancing. IBM HTTP server supports
sticky sessions by default.
9.1 Preparing for installation
Before you install the web server, perform the following configuration tasks:
Server domain: If you are using a domain architecture, ensure that the server is not a member of any domain other
than the same domain as the LDAP server.
Create local user: In Microsoft Windows, if you plan to run IBM HTTP Server as a service, you can create a local
account and make this account a part of the local administrators group.
9.2 Installing the web server
The following steps describe how to install IBM HTTP Server on a separate node from the WebSphere Network
Deployment or WebSphere basic application servers. For information about installing and configuring other IBM
supported web servers, such as Apache, Microsoft IIS, and Sun Java System Web Server, see the IBM web page Editing
Web Server Configuration File.
Note: Ensure that you have WebSphere Application Server Network Deployment and supplement installation files are
available locally.
You must first insert the installation media or copy the files to a local directory.
Note: This procedure can be used to upgrade the current version of IBM HTTP Server by replacing the existing
installation.
1 To start the installation, go to the directory that contains the WebSphere Application Server Network Deployment
installer and type the appropriate command:
• (Linux/UNIX) ./launchpad.sh
• (Windows) launchpad.bat
2 From the Launch Pad, select Launch the installation wizard for IBM HTTP Server and provide location of first
part of the extracted installation files of the supplement.
3 On the Welcome screen, click Next.
4 Select I accept both the IBM and the non-IBM terms and click Next.
5 Specify the location of the installation directory and click Next.
89CONFIGURING ADOBE EXPERIENCE MANAGER FORMS ON JEE APPLICATION SERVER CLUSTERS USING WEBSPHERE
Configuring Load Balancing
Last updated 5/23/2016
6 Specify the HTTP port and HTTP Administration port and click Next.
7 (Windows) Select Run IBM HTTP Server as a Windows Service, Run IBM HTTP Administration as a Windows
Service, and Log on as local system account.
Note: A user name and password is not required for this selection. To run this service using a specific user account and
password combination, select Log on as a specified user account and specify your user ID and password information.
8 Under Startup Type, select Automatic and then click Next.
9 Provide User ID and Password to create HTTP Administration server and click Next.
10 Uncheck Install the IBM HTTP Server Plug-in for IBM WebSphere Application Server Web server definition
option and click Next.
11 Review the Installation Summary panel to verify your selections, click Back to change any of your specifications,
and click Next to begin installing IBM HTTP Server.
After displaying the installation status, the wizard displays the Completion status panel that indicates a successful
installation.
12 Click Finish.
9.3 Installing the web server plug-in
After the application server is installed and the applications are deployed, install the web server plug-in on the HTTP
server. This procedure assumes that the HTTP server is on a node that is not in the cluster.
1 On the web server computer (the remote system that has HTTP server installed),go to the WebSphere Network
Deployment installer directory and run Launch Pad by typing the appropriate command:
• (Linux/UNIX) ./launchpad.sh
• (Windows) launchpad.bat
2 From Launch Pad, select Launch the installation wizard for Web server plug-ins.
3 Deselect Installation roadmap and Plug-ins section of the Getting Started guide, and then click Next.
4 Select I accept both the IBM and the non-IBM terms and click Next. The installer will now check your system.
5 On the System Prerequisites Check screen, click Next.
6 If your system passes the prerequisites check, click Next.
Note: If your system does not pass the prerequisites check, stop the installation, correct any problems, and restart the
installation.
7 Select IBM HTTP Server V7 and click Next.
8 Select Web server machine (remote) and click Next.
9 Specify the [plugins_root] directory and the location where the web server plug-ins should be installed, and click Next.
10 In Select the existing IBM HTTP Server httpd.conf file, click Browse and select the httpd.conf file from the
[webserver root]/conf directory, where [webserver root] specifies the directory where IBM HTTP Server is installed.
11 In the Specify the Web server port box, keep the default port value of 80 and click Next.
12 In the Specify a unique Web server definition name box, enter a unique identifier for this definition and then click Next.
13 In the Web server plugin-cfg.xml file box, accept the default settings and then click Next.

90CONFIGURING ADOBE EXPERIENCE MANAGER FORMS ON JEE APPLICATION SERVER CLUSTERS USING WEBSPHERE
Configuring Load Balancing
Last updated 5/23/2016
14 In the Host name or IP address for the Application Server box, type the host name or IP address of the ND node
and then click Next.
15 In the confirmation pane, click Next and, in the summary information pane, click Next.
16 After the the web server plug-in is installed and copied, click Next and then click Finish.
17 Copy the appropriate file from IBM HTTP Server <plugin_dir>/bin to the WebSphere Network Deployment
[appserver root]\bin folder:
• (Windows) configure[webserver definition name].bat. For example, configureserver1.bat
• (Linux/UNIX) configure[webserver definition name].sh
18 Ensure that Deployment Manager is running and then run configure<webserver definition name>.bat for Windows
or configure<webserver definition name>.sh for Linux or UNIX on the WebSphere Network Deployment
computer to create an unmanaged node on the WebSphere Network Deployment computer and add the web server
to it.
19 Log in to the WebSphere Administrative Console and, in the navigation tree, click Servers > Web servers and then,
click web server name. Under Additional Properties click Remote Web server management. Ensure that Port,
Username and Password details are the same as provided for IBM HTTP Administration server.
20 Click Servers > Web servers and then, in the right pane, Select check box beside the web server name. Click
Start.Before performing above step,
Note: ensure that IBM HTTP Administration Server is running on the remote machine (IBM HTTP Server machine)
21 Open a web browser and access the administrative console for the web server computer (http://[web server
name]:80/adminui) to verify whether the plug-in generated and propagated successfully. The following response
indicates that you must generate and propagate the plug-in as described in steps 21 to 24:
/[application name] not defined
Note: The plug-in generates and propagates automatically only if your system previously enabled automatic
synchronization, which is disabled by default.
22 Log in to the WebSphere Administrative Console and, in the navigation tree, click Servers > Web servers and then,
in the right pane, select the Select check box beside the HTTP server name.
23 Click Generate Plug-in. A message confirms successful generation of the Plugin-cfg.xml file.
24 Click Propagate Plug-in. A message confirms successful propagation of the Plugin-cfg.xml file.
25 Restart the web server.

91
Last updated 5/23/2016
Chapter 10: Advanced Production Configuration
This section describes advanced tuning for Output, Forms Standard, and PDF Generator modules. This section should
be completed only on a production system by an advanced application server administrator.
10.1 Configuring pool size for Output and Forms
The current default value for PoolMax is 4. The actual value to set depends on the hardware configuration and the
expected usage in your environment.
For optimal use, we recommend that the lower limit of PoolMax not be less than the number of CPUs that are
available. The upper limit must be determined by the load pattern on your server. Generally, the upper limit should be
set to twice the number of CPUs cores on your server.
Modify the existing PoolMax value
1 Log in to the WebSphere Administrative Console.
2 In the navigation tree, click Servers > Application Servers > [server name] > Java and Process Management >
Process Definition >Java Virtual Machine > Custom Properties.
3 Add the following properties for ConvertPdf:
• com.adobe.convertpdf.bmc.POOL_MAX=[new value]
• com.adobe.convertpdf.bmc.MAXIMUM_REUSE_COUNT=5000
• com.adobe.convertpdf.bmc.REPORT_TIMING_INFORMATION=true
• com.adobe.convertpdf.bmc.CT_ALLOW_SYSTEM_FONTS=true
4 Add the following properties for XMLFM:
• com.adobe.xmlform.bmc.POOL_MAX=[new value]
• com.adobe.xmlform.bmc.MAXIMUM_REUSE_COUNT=5000
• com.adobe.xmlform.bmc.REPORT_TIMING_INFORMATION=true
• com.adobe.xmlform.bmc.CT_ALLOW_SYSTEM_FONTS=true
5 (Cluster only) Repeat steps 2 to 4 for each server in the cluster.
10.2 PDF Generator
PDF Generator is capable of doing multiple PDF conversions simultaneously for some types of input files. This is
enforced through the use of stateless session beans.

92CONFIGURING ADOBE EXPERIENCE MANAGER FORMS ON JEE APPLICATION SERVER CLUSTERS USING WEBSPHERE
Advanced Production Configuration
Last updated 5/23/2016
10.2.1 Configuring EJB Pool Size
Four different stateless session beans exist for enforcing independent pool sizes for the following types of input files:
• Adobe PostScript® and Encapsulated PostScript (EPS) files
• Image files, such as BMP, TIFF, PNG, and JPEG files
• OpenOffice files
• All other file types (except HTML files), such as Microsoft Office, Photoshop®, PageMaker®, and FrameMaker® files
The pool size for HTML-to-PDF conversions is not managed through the use of stateless session beans.
The default pool size for PostScript and EPS files and for image files is set to 3, and the default pool size for OpenOffice
and other file types (except HTML) is set to 1.
You can configure the PS/EPS and image pool size to a different value based on your server hardware configuration,
such as the number of CPUs, the number of cores within each CPU, and so on. However, it is mandatory that the pool
size for the OpenOffice and other file types be left unchanged at 1 for proper functioning of PDF Generator.
This section describes how the pool size for PS2PDF and Image2PDF can be configured for each of the supported
application servers.
The text that follows assumes that the following two AEM forms on JEE application EARs are deployed on the
application server:
• adobe-livecycle-websphere.ear
• adobe-livecycle-native-websphere-[platform].ear
where [platform] should be replaced with one of the following strings, depending on your operating system:
• (Windows) x86_win32
• (Linux) x86_linux
• (SunOS™) sparc_sunos
• (AIX) powerpc_aix
Configure the pool size for PS2PDF and Image2PDF
Refer to Distiller service settings and Generate PDF service settings under “Managing services” in the Administration Help.
10.3 Enabling CIFS on Windows
You will need to manually configure the Windows Server machine that host AEM forms on JEE.
Note: Ensure that the server has a static IP address.
On Windows machines, you need to do the following:
More Help topics
“10.3.3 Disable SMB over NetBIOS registry (Windows Server 2003 only)” on page 93
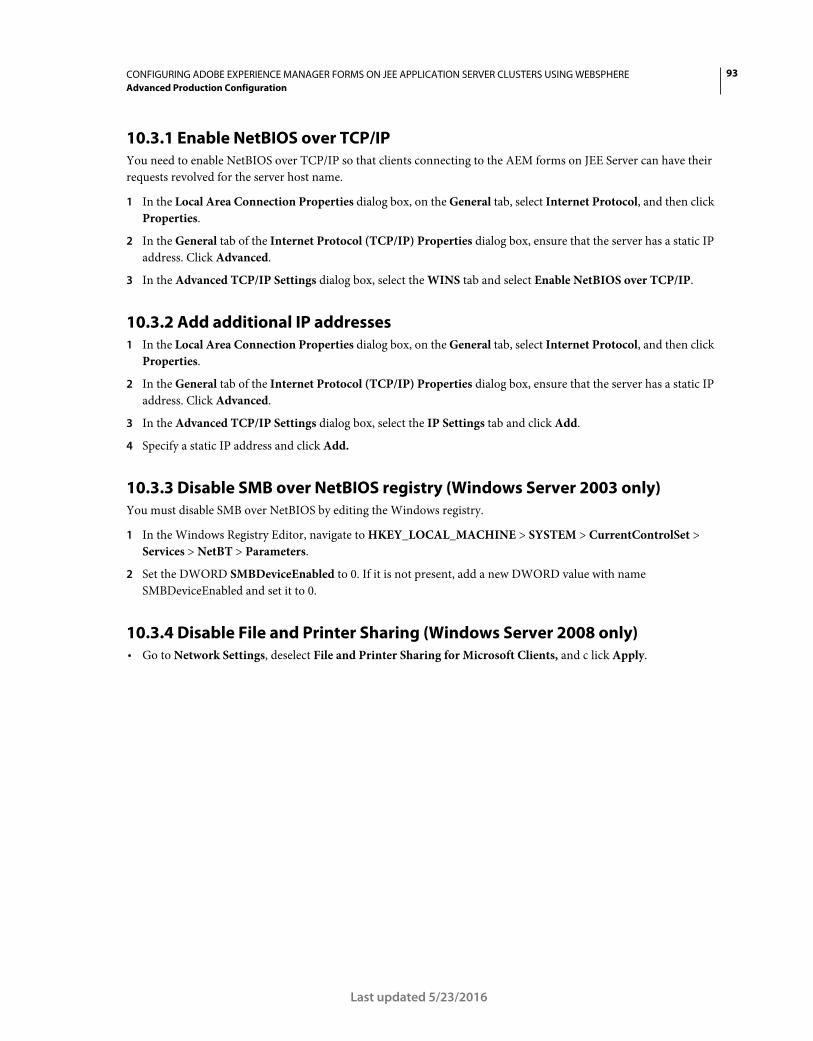
93CONFIGURING ADOBE EXPERIENCE MANAGER FORMS ON JEE APPLICATION SERVER CLUSTERS USING WEBSPHERE
Advanced Production Configuration
Last updated 5/23/2016
10.3.1 Enable NetBIOS over TCP/IP
You need to enable NetBIOS over TCP/IP so that clients connecting to the AEM forms on JEE Server can have their
requests revolved for the server host name.
1 In the Local Area Connection Properties dialog box, on the General tab, select Internet Protocol, and then click
Properties.
2 In the General tab of the Internet Protocol (TCP/IP) Properties dialog box, ensure that the server has a static IP
address. Click Advanced.
3 In the Advanced TCP/IP Settings dialog box, select the WINS tab and select Enable NetBIOS over TCP/IP.
10.3.2 Add additional IP addresses
1 In the Local Area Connection Properties dialog box, on the General tab, select Internet Protocol, and then click
Properties.
2 In the General tab of the Internet Protocol (TCP/IP) Properties dialog box, ensure that the server has a static IP
address. Click Advanced.
3 In the Advanced TCP/IP Settings dialog box, select the IP Settings tab and click Add.
4 Specify a static IP address and click Add.
10.3.3 Disable SMB over NetBIOS registry (Windows Server 2003 only)
You must disable SMB over NetBIOS by editing the Windows registry.
1 In the Windows Registry Editor, navigate to HKEY_LOCAL_MACHINE > SYSTEM > CurrentControlSet >
Services > NetBT > Parameters.
2 Set the DWORD SMBDeviceEnabled to 0. If it is not present, add a new DWORD value with name
SMBDeviceEnabled and set it to 0.
10.3.4 Disable File and Printer Sharing (Windows Server 2008 only)
• Go to Network Settings, deselect File and Printer Sharing for Microsoft Clients, and c lick Apply.

94
Last updated 5/23/2016
Chapter 11: Appendix - Install Command Line Interface
11.1 Overview
AEM forms on JEE provides a command line interface (CLI) for the installation program. The CLI is intended to be
used by advanced users of AEM forms on JEE or in server environments which do not support the use of the Graphical
User Interface (GUI) of the installation program. The CLI runs in console mode with one interactive session for all
install operations.
Before you install the modules using the CLI install option, ensure that you have prepared your environment required
to run AEM forms on JEE according to the Preparing guide for fresh single server installation, cluster setup, or
upgrade, as appropriate. The completed AEM forms on JEE documentation is available at
http://www.adobe.com/go/learn_lc_documentation_11.
For an overview of the installation process, see “4.1 Before you begin” on page 17.
After you start the installation process, follow the on-screen instructions to choose your installation options. Respond
to each prompt to proceed to the next step in the installation.
Note: If you want to change a choice that you made on a previous step, type back. You can cancel the installation at any
time by typing quit.
11.2 Install AEM forms on JEE
1 Open a command prompt and navigate to the folder in the installation media or your hard disk that contains the
installer executable:
• (Windows) server\Disk1\InstData\Windows_64\VM
• (Linux) server/Disk1/InstData/Linux/NoVM
• (Solaris) server/Disk1/InstData/Solaris/NoVM
• (AIX) server/Disk1/InstData/AIX/VM
2 Open a command prompt and run the following command:
• (Windows) install.exe -i console
• (Non-Windows) ./install.bin -i console
Note: Entering the command without the -i console option launches the GUI-based installer.
3 Respond to the prompts as described in the following table:

95CONFIGURING ADOBE EXPERIENCE MANAGER FORMS ON JEE APPLICATION SERVER CLUSTERS USING WEBSPHERE
Appendix - Install Command Line Interface
Last updated 5/23/2016
11.3 Error logs
If an error occurs, you can review the install.log in the log directory of your installation:
• (Windows) [aem-forms root]\log
• (AIX, Linux, Solaris) [aem-forms root]/log
Prompt Description
Choose Locale Select the locale for the installation to use by entering a value between 1 and 3. You can select
the default value by pressing Enter.
The options are Deutsch, English, and Français. English is the default language.
Choose Install Folder On the Destination screen, press Enter to accept the default directory or type the new
installation directory location.
Default install folders are:
(Windows): C:\Adobe\Adobe_Experience_Manager_forms
(Non-Windows): /opt/adobe/adobe_Experience_Manager_forms
Do not use accented characters in the directory name. Otherwise, the CLI will ignore the accents
and create a directory after modifying the accented characters.
AEM forms on JEE Server License Agreement Press Enter to read through the pages of the license agreement.
If you agree to the agreement, type Y and press Enter.
Pre-Installation Summary Review the installation choices you have made and press Enter to continue installation with the
choices you have made.
Type back to go back to previous steps and change any of the settings.
Ready To Install Installer displays the installation directory.
Press Enter to start the installation process.
Installing During the installation process, the progress bar advances to indicate the progress of
installation.
Configuration Manager Press Enter to complete the installation of AEM forms on JEE.
You can run the Configuration Manager in GUI mode by invoking the following script:
(Windows):
C:\Adobe\Adobe_Experience_Manager_forms\configurationManager\bin\ConfigurationMana
ger.bat
(Non-Windows):
/opt/adobe/adobe_experience_manager_forms/configurationManager/bin/ConfigurationManager.sh
Installation Complete The installation completion screen displays the status and the location of install.
Press Enter to exit the installer.
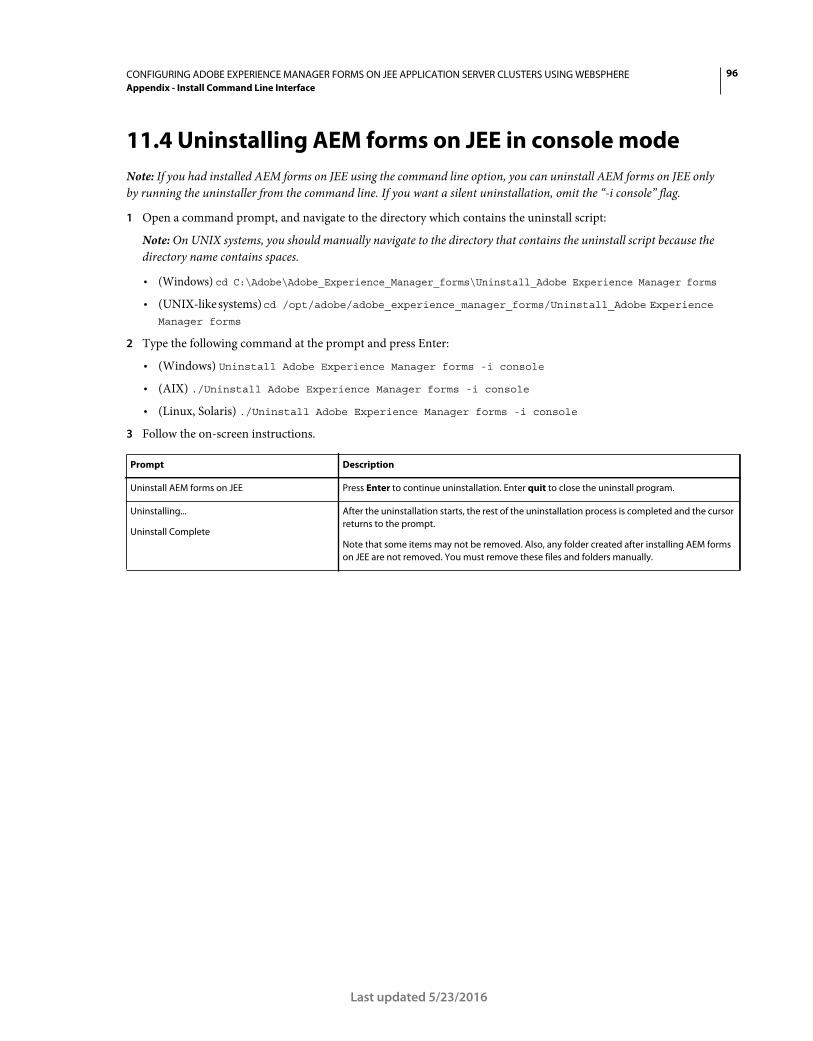
96CONFIGURING ADOBE EXPERIENCE MANAGER FORMS ON JEE APPLICATION SERVER CLUSTERS USING WEBSPHERE
Appendix - Install Command Line Interface
Last updated 5/23/2016
11.4 Uninstalling AEM forms on JEE in console mode
Note: If you had installed AEM forms on JEE using the command line option, you can uninstall AEM forms on JEE only
by running the uninstaller from the command line. If you want a silent uninstallation, omit the “-i console” flag.
1 Open a command prompt, and navigate to the directory which contains the uninstall script:
Note: On UNIX systems, you should manually navigate to the directory that contains the uninstall script because the
directory name contains spaces.
• (Windows) cd C:\Adobe\Adobe_Experience_Manager_forms\Uninstall_Adobe Experience Manager forms
• (UNIX-like systems) cd /opt/adobe/adobe_experience_manager_forms/Uninstall_Adobe Experience
Manager forms
2 Type the following command at the prompt and press Enter:
• (Windows) Uninstall Adobe Experience Manager forms -i console
• (AIX) ./Uninstall Adobe Experience Manager forms -i console
• (Linux, Solaris) ./Uninstall Adobe Experience Manager forms -i console
3 Follow the on-screen instructions.
Prompt Description
Uninstall AEM forms on JEE Press Enter to continue uninstallation. Enter quit to close the uninstall program.
Uninstalling...
Uninstall Complete
After the uninstallation starts, the rest of the uninstallation process is completed and the cursor
returns to the prompt.
Note that some items may not be removed. Also, any folder created after installing AEM forms
on JEE are not removed. You must remove these files and folders manually.
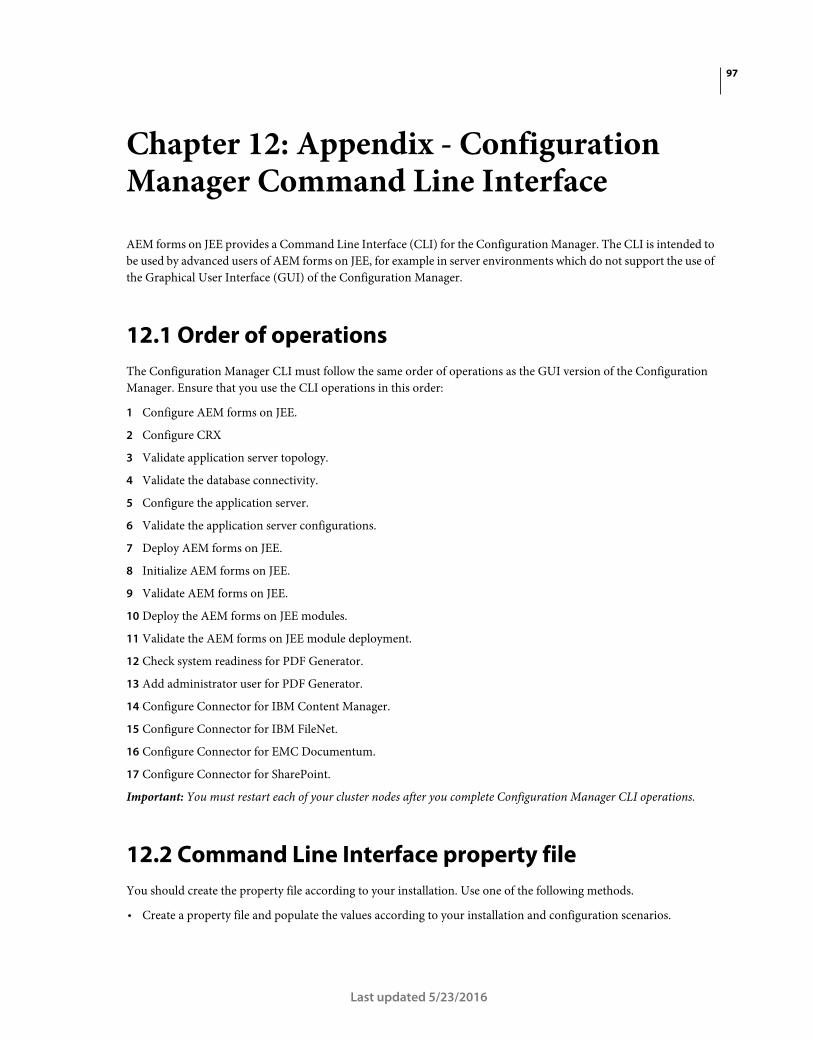
97
Last updated 5/23/2016
Chapter 12: Appendix - Configuration Manager Command Line Interface
AEM forms on JEE provides a Command Line Interface (CLI) for the Configuration Manager. The CLI is intended to
be used by advanced users of AEM forms on JEE, for example in server environments which do not support the use of
the Graphical User Interface (GUI) of the Configuration Manager.
12.1 Order of operations
The Configuration Manager CLI must follow the same order of operations as the GUI version of the Configuration
Manager. Ensure that you use the CLI operations in this order:
1 Configure AEM forms on JEE.
2 Configure CRX
3 Validate application server topology.
4 Validate the database connectivity.
5 Configure the application server.
6 Validate the application server configurations.
7 Deploy AEM forms on JEE.
8 Initialize AEM forms on JEE.
9 Validate AEM forms on JEE.
10 Deploy the AEM forms on JEE modules.
11 Validate the AEM forms on JEE module deployment.
12 Check system readiness for PDF Generator.
13 Add administrator user for PDF Generator.
14 Configure Connector for IBM Content Manager.
15 Configure Connector for IBM FileNet.
16 Configure Connector for EMC Documentum.
17 Configure Connector for SharePoint.
Important: You must restart each of your cluster nodes after you complete Configuration Manager CLI operations.
12.2 Command Line Interface property file
You should create the property file according to your installation. Use one of the following methods.
• Create a property file and populate the values according to your installation and configuration scenarios.

98CONFIGURING ADOBE EXPERIENCE MANAGER FORMS ON JEE APPLICATION SERVER CLUSTERS USING WEBSPHERE
Appendix - Configuration Manager Command Line Interface
Last updated 5/23/2016
• Use the property file cli_propertyFile_template.txt file as a template and edit the values based on the Configuration
Manager operations you intend to use.
• Use the GUI of the Configuration Manager and then use the property file created by the GUI version as the CLI
version property file. When you run the [aem-forms
root]/configurationManager/bin/ConfigurationManager.bat/sh file, the userValuesForCLI.properties file is
created in the [aem-forms root]/configurationManager/config directory. You can use this file as input for the
Configuration Manager CLI.
Note: In the CLI properties file, you must use the escape character (\) for Windows paths directory separator (\). For
example, if the Fonts folder to be mentioned is C:\Windows\Fonts, in the Configuration Manager CLI script, you
should enter it as C:\\Windows\\Fonts.
Note: The following modules depend on ALC-LFS-ContentRepository. If you are using the
cli_propertyFile_template.txt as template then either remove the ALC-LFS-ContentRepository from
excludedSolutionComponents list or add the following LFS in excludedSolutionComponents list:
• ALC-LFS-ProcessManagement
• ALC-LFS-CorrespondenceManagement
• ALC-LFS-ContentRepository
• ALC-LFS-MobileForms
• ALC-LFS_FormsManager
12.3 General configuration properties
12.3.1 Common properties
Common properties are:
WebLogic and WebSphere specific properties: Required for the Configure Application Server, Deploy AEM forms
on JEE, Validate Application Server Topology and Validate Application Server Configurations operations.
AEM forms on JEE Server specific properties: Required for the Initialize AEM forms on JEE and Deploy AEM forms
on JEE Components operations.
These properties are required for the following operations:
• Initialize AEM forms on JEE
• Deploy AEM forms on JEE components.
Property Values Description
targetServer.topologyType server or cluster The type of application server topology for
which you are deploying AEM forms on JEE.
targetServer.name String The name assigned to the application
server/admin server node or cluster.
targetServer.adminHost String
Default is localhost
The hostname of the server where the
application server is installed.
targetServer.adminPort Integer The port number the admin server uses to listen
for SOAP requests.

99CONFIGURING ADOBE EXPERIENCE MANAGER FORMS ON JEE APPLICATION SERVER CLUSTERS USING WEBSPHERE
Appendix - Configuration Manager Command Line Interface
Last updated 5/23/2016
targetServer.adminUserID String The administrative user ID to use when accessing
the application server.
localServer.appServerRootDir Default:
(Windows) C:\Program Files\IBM\
WebSphere\AppServer
(Linux, Solaris) /opt/IBM/WebSphere/AppServer
(AIX) /usr/IBM/WebSphere/AppServer
The root directory of the application server
instance that you are configuring locally (on
which you plan to deploy AEM forms on JEE or
that you will use to communicate with a remote
server on which you plan to deploy AEM forms
on JEE).
AEM forms on JEE Server specific properties
LCHost String The hostname of the server where AEM forms on
JEE will be deployed.
For cluster deployments, hostname of any one of
the cluster nodes where the application server is
running.
LCPort Integer The web port number where AEM forms on JEE
will be deployed.
excludedSolutionComponents String. Values include:
ALC-LFS-Forms,
ALC-LFS-ConnectorEMCDocumentum,
ALC-LFS-ConnectorIBMFileNet,
ALC-LFS-ConnectorIBMContentManager,
ALC-LFS-DigitalSignatures,
ALC-LFS-DataCapture,
ALC-LFS-Output,
ALC-LFS-PDFGenerator,
ALC-LFS-ProcessManagement,
ALC-LFS-ReaderExtensions,
ALC-LFS-RightsManagement
ALC-LFS-CorrespondenceManagement,
ALC-LFS-ContentRepository,
ALC-LFS-MobileForms,
ALC-LFS_FormsManager
(Optional) List the AEM forms on JEE modules
you do not want to configure. Specify the
excluded modules in a comma separated list.
includeCentralMigrationService true: to include service
false: to exclude servcie
The property to include or exclude Central
Migration Bridge Service.
CRX Content repository
The following properties are specified in the
cli_propertyFile_crx_template.txt file.
true:
false:
contentRepository.rootDir Path of the CRX repository.
Property Values Description

100CONFIGURING ADOBE EXPERIENCE MANAGER FORMS ON JEE APPLICATION SERVER CLUSTERS USING WEBSPHERE
Appendix - Configuration Manager Command Line Interface
Last updated 5/23/2016
12.3.2 Configure AEM forms on JEE properties
These properties only apply to the configure AEM forms on JEE operation.
12.3.3 Configure or validate application server properties
12.3.3.1 Configure or Validate WebSphere properties
The Configuration Manager can configure or validate your WebSphere application server as required by AEM forms
on JEE.
These properties apply to the following operations:
• Configure Application Server
• Validate Application Server Topology
use.crx3.mongo true: false: If you have performed a fresh installation, to use
Mongo DB with CRX3 set value to true. If the
value is false CRX3 TAR is configured.
mongo.db.uri <URI of Mongo DB> If you are using Mongo DB, set URI of Mongo DB
mongo.db.name <name of Mongo DB> If you are using Mongo DB, provide name of
Mongo DB instance
Property Values Description
AdobeFontsDir String Location of the Adobe server fonts directory.
This path must be accessible from all cluster
nodes being deployed to.
customerFontsDir String Location of the customer fonts directory.
This path must be accessible from all cluster
nodes being deployed to.
systemFontsDir String Location of the system fonts directory.
This path must be accessible from all cluster
nodes being deployed to.
LCTempDir String Location of the temporary directory.
This path must be accessible from all cluster
nodes being deployed to.
LCGlobalDocStorageDir String The global document storage root directory.
Specify a path to an NFS shared directory used to
store long-lived documents and to share them
among all cluster nodes.
This path must be accessible from all cluster
nodes being deployed to.
EnableDocumentDBStorage true or false
Default: false
Enables or disables document storage in
database for persistent documents.
Even if you enable document storage in
database, you will need the file system directory
for GDS.
Property Values Description

101CONFIGURING ADOBE EXPERIENCE MANAGER FORMS ON JEE APPLICATION SERVER CLUSTERS USING WEBSPHERE
Appendix - Configuration Manager Command Line Interface
Last updated 5/23/2016
• Validate Application Server Configurations
• Validate Database Connectivity
12.3.3.2 Application server properties
Property Values Description
You must configure the application server-specific properties section. For more information see Common properties
jvm.initialHeapSize Default:
256
The initial heap size, in MB, for the JVM.
jvm.maxHeapSize Default:
2048
The maximum heap size, in MB, for the JVM.
WebLogic and WebSphere Cluster only
cache.useUDP true Set the value to true if AEM forms on JEE uses
UDP to implement caching.
Set to false if AEM forms on JEE uses TCP to
implement caching.
cache.udp.port Default:
33456
The port number that the primary computer uses
for UDP-based caching communication.
Configure only if cache.useUDP=true.
cache.tcpip.primaryhost String The host name of the computer where the
primary application server is installed.
Configure only if cache.useUDP!=true.
cache.tcpip.primaryport Default:
22345
The port number that the primary application
server computer uses for TCP-based caching
communication.
Configure only if cache.useUDP!=true.
cache.tcpip.secondaryhost String The host name of the computer where the
secondary application server is installed.
Configure only if cache.useUDP!=true.
cache.tcpip.secondaryport Default:
22345
The port number that the secondary application
server computer uses for TCP-based caching
communication.
Configure only if cache.useUDP!=true.
Datasource configuration
datasource.dbType Choose:
• oracle
• db2
• sqlserver
The type of database configured to use with AEM
forms on JEE.
datasource.dbName String The name of the database.
datasource.dbHost String The host name or IP address of the server where
the database is located.

102CONFIGURING ADOBE EXPERIENCE MANAGER FORMS ON JEE APPLICATION SERVER CLUSTERS USING WEBSPHERE
Appendix - Configuration Manager Command Line Interface
Last updated 5/23/2016
12.3.4 Deploy AEM forms on JEE properties
These Deploy AEM forms on JEE properties only apply to the deploy AEM forms on JEE operation.
12.3.5 Initialize AEM forms on JEE properties
These initialize AEM forms on JEE properties only apply to the initialize AEM forms on JEE operation.
12.3.6 Deploy AEM forms on JEE Components properties
These properties apply to the following operations:
• Deploy AEM forms on JEE Components
• Validate AEM forms on JEE Component Deployment
• Validate AEM forms on JEE Server.
datasource.dbPort Integer The database port AEM forms on JEE will use
when communicating with the database.
datasource.dbUser String The user ID AEM forms on JEE will use when
accessing the database.
datasource.dbPassword String The password associated with the database user
ID.
datasource.target.driverPath String JDBC driver in the application server lib
directory.
This path must be valid and accessible from all
cluster nodes being configured.
datasource.local.driverPath String Local JDBC driver. This value is used for testing
direct database connection.
Property Values Description
For more information, see “12.3.1 Common properties” on page 98
deployment.includeIVS false Specifies whether IVS EAR files are included in
the deployment.
It is recommended not to include IVS EAR files in
a production environment.
targetServer.virtualHost String Virtual host of your WebSphere application
server.
The default values are admin_host, default_host,
proxy_host.
Property Values Description
For more information, see “12.3.1 Common properties” on page 98
Property Values Description

103CONFIGURING ADOBE EXPERIENCE MANAGER FORMS ON JEE APPLICATION SERVER CLUSTERS USING WEBSPHERE
Appendix - Configuration Manager Command Line Interface
Last updated 5/23/2016
12.3.7 Add administrator user for PDF Generator
These properties apply only to the adding administrator user for PDF Generator operation. These properties are
present in cli_propertyFile_pdfg_template.txt
12.3.8 Configure Connector for IBM Content Manager
Property Values Description
You must configure the AEM forms on JEE Server Information section. For more information, see Common properties
LCAdminUserID String The user ID to assign to the AEM forms on JEE
Administrator user. This User ID is used to
login to the Administrator Console.
LCAdminPassword String The password to assign to the AEM forms on
JEE Administrator user. This password is used
to login to the Administrator Console.
Property Values Description
LCHost String Hostname where AEM forms on JEE Server is
installed.
LCPort Integer Port number where AEM forms on JEE
application server is configured
LCAdminUserID String The user ID to assign to the AEM forms on JEE
Administrator user. This User ID is used to login
to the Administrator Console.
LCAdminPassword String The password to assign to the AEM forms on JEE
Administrator user. This password is used to
login to the Administrator Console.
LCServerMachineAdminUser String The user ID of the Administrator user of the
Operation System hosting AEM forms on JEE
LCServerMachineAdminUserPasswd String The password of the Administrator user of the
Operation System hosting AEM forms on JEE
Property Values Description
LCHost String Hostname where AEM forms on JEE Server is
installed.
LCPort Integer Port number where AEM forms on JEE
application server is configured
LCAdminUserID String The user ID to assign to the AEM forms on JEE
Administrator user. This User ID is used to login
to the Administrator Console.
LCAdminPassword String The password to assign to the AEM forms on JEE
Administrator user. This password is used to
login to the Administrator Console.
jndiPortNumber String JNDI port corresponding to AEM forms on JEE
application server.
jboss.clientjar.location String The location of the jbossall-client.jar file (JBoss
only)
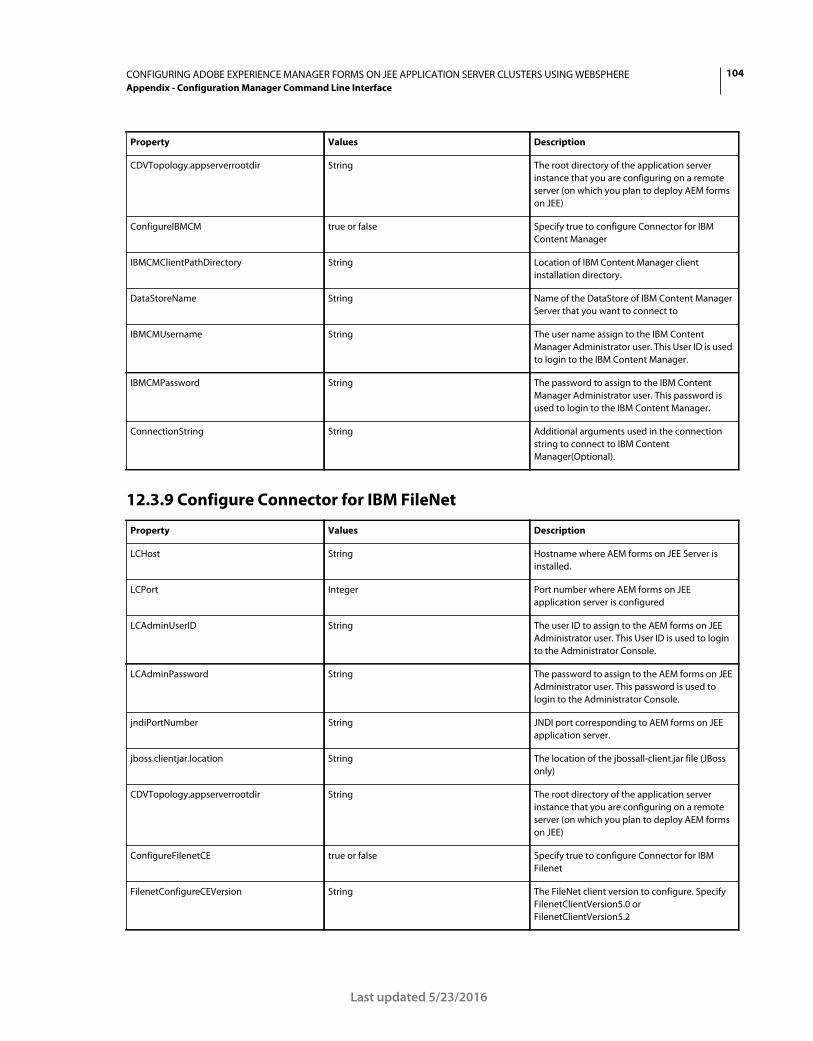
104CONFIGURING ADOBE EXPERIENCE MANAGER FORMS ON JEE APPLICATION SERVER CLUSTERS USING WEBSPHERE
Appendix - Configuration Manager Command Line Interface
Last updated 5/23/2016
12.3.9 Configure Connector for IBM FileNet
CDVTopology.appserverrootdir String The root directory of the application server
instance that you are configuring on a remote
server (on which you plan to deploy AEM forms
on JEE)
ConfigureIBMCM true or false Specify true to configure Connector for IBM
Content Manager
IBMCMClientPathDirectory String Location of IBM Content Manager client
installation directory.
DataStoreName String Name of the DataStore of IBM Content Manager
Server that you want to connect to
IBMCMUsername String The user name assign to the IBM Content
Manager Administrator user. This User ID is used
to login to the IBM Content Manager.
IBMCMPassword String The password to assign to the IBM Content
Manager Administrator user. This password is
used to login to the IBM Content Manager.
ConnectionString String Additional arguments used in the connection
string to connect to IBM Content
Manager(Optional).
Property Values Description
LCHost String Hostname where AEM forms on JEE Server is
installed.
LCPort Integer Port number where AEM forms on JEE
application server is configured
LCAdminUserID String The user ID to assign to the AEM forms on JEE
Administrator user. This User ID is used to login
to the Administrator Console.
LCAdminPassword String The password to assign to the AEM forms on JEE
Administrator user. This password is used to
login to the Administrator Console.
jndiPortNumber String JNDI port corresponding to AEM forms on JEE
application server.
jboss.clientjar.location String The location of the jbossall-client.jar file (JBoss
only)
CDVTopology.appserverrootdir String The root directory of the application server
instance that you are configuring on a remote
server (on which you plan to deploy AEM forms
on JEE)
ConfigureFilenetCE true or false Specify true to configure Connector for IBM
Filenet
FilenetConfigureCEVersion String The FileNet client version to configure. Specify
FilenetClientVersion5.0 or
FilenetClientVersion5.2
Property Values Description

105CONFIGURING ADOBE EXPERIENCE MANAGER FORMS ON JEE APPLICATION SERVER CLUSTERS USING WEBSPHERE
Appendix - Configuration Manager Command Line Interface
Last updated 5/23/2016
12.3.10 Configure Connector for EMC Documentum
FilenetCEClientPathDirectory String Location of IBM Filenet Content Manager client
installation directory.
ContentEngineName String Hostname or IP address of the machine where
IBM Filenet Content Engine is installed
ContentEnginePort String The port number used by IBM Filenet Content
Engine
CredentialProtectionSchema CLEAR or SYMMETRIC Specify the level of protection.
EncryptionFileLocation String Location of the encryption file. This is required
only when you select SYMMETRIC option for
CredentialProtectionSchema attribute.
Use a forward slash (/) or double backward
slashes (\\) as a path seperator.
DefaultObjectStore String Name of the ObjectStore for the Connector for
IBM Filenet Content Server.
FilenetContentEngineUsername String The user ID to connect to the IBM FileNet
Content server.
The user ID with read-access privileges would be
allowed to connect to the Default object Store.
FilenetContentEnginePassword String The password to assigned to the IBM FileNet
user. This password is used to connect to Default
object Store.
ConfigureFilenetPE true or false Specify true to configure Connector for IBM
FileNet
FilenetPEClientPathDirectory String Location of IBM FIleNet client installation
directory
FilenetProcessEngineHostname String Hostname or IP address of the process router.
FilenetProcessEnginePortNumber Integer Port number for IBM FileNet Content Server
FilenetPERouterURLConnectionPoint String Name of the process router.
FilenetProcessEngineUsername String The user ID to connect to the IBM FileNet
Content Server
FilenetProcessEnginePassword String The password to connect to the IBM FileNet
Content Server
Property Values Description
LCHost String Hostname where AEM forms on JEE Server is
installed.
LCPort Integer Port number where AEM forms on JEE
application server is configured
LCAdminUserID String The user ID to assign to the AEM forms on JEE
Administrator user. This User ID is used to login
to the Administrator Console.
Property Values Description

106CONFIGURING ADOBE EXPERIENCE MANAGER FORMS ON JEE APPLICATION SERVER CLUSTERS USING WEBSPHERE
Appendix - Configuration Manager Command Line Interface
Last updated 5/23/2016
12.3.11 Configure Connector for Microsoft SharePoint
LCAdminPassword String The password to assign to the AEM forms on JEE
Administrator user. This password is used to
login to the Administrator Console.
jndiPortNumber String JNDI port corresponding to AEM forms on JEE
application server.
jboss.clientjar.location String The location of the jbossall-client.jar file (JBoss
only)
CDVTopology.appserverrootdir String The root directory of the application server
instance that you are configuring on a remote
server (on which you plan to deploy AEM forms
on JEE)
ConfigureDocumentum true or false Specify true to configure Connector for EMC
Documentum
DocumentumClientVersion String The EMC Documentum client version to
configure. Specify
DocumentumClientVersion6.7 or
DocumentumClientVersion7.0
DocumentumClientPathDirectory String Location of EMC Documentum client installation
directory
ConnectionBrokerHostName String Hostname or IP address of the EMC
Documentum Content Server.
ConnectionBrokerPortNumber String Port number for EMC Documentum Content
Server
DocumentumUsername String The user ID to connect to the EMC Documentum
Content Server.
DocumentumPassword String The password ID to connect to the EMC
Documentum Content Server.
DocumentumDefaultRepositoryName String Name of the default repository of MC
Documentum Content Server
Property Values Description
LCHost String Hostname where AEM forms on JEE Server is
installed.
LCPort Integer Port number where AEM forms on JEE
application server is configured
LCAdminUserID String The user ID to assign to the AEM forms on JEE
Administrator user. This User ID is used to login
to the Administrator Console.
LCAdminPassword String The password to assign to the AEM forms on JEE
Administrator user. This password is used to
login to the Administrator Console.
jndiPortNumber String JNDI port corresponding to AEM forms on JEE
application server.
Property Values Description
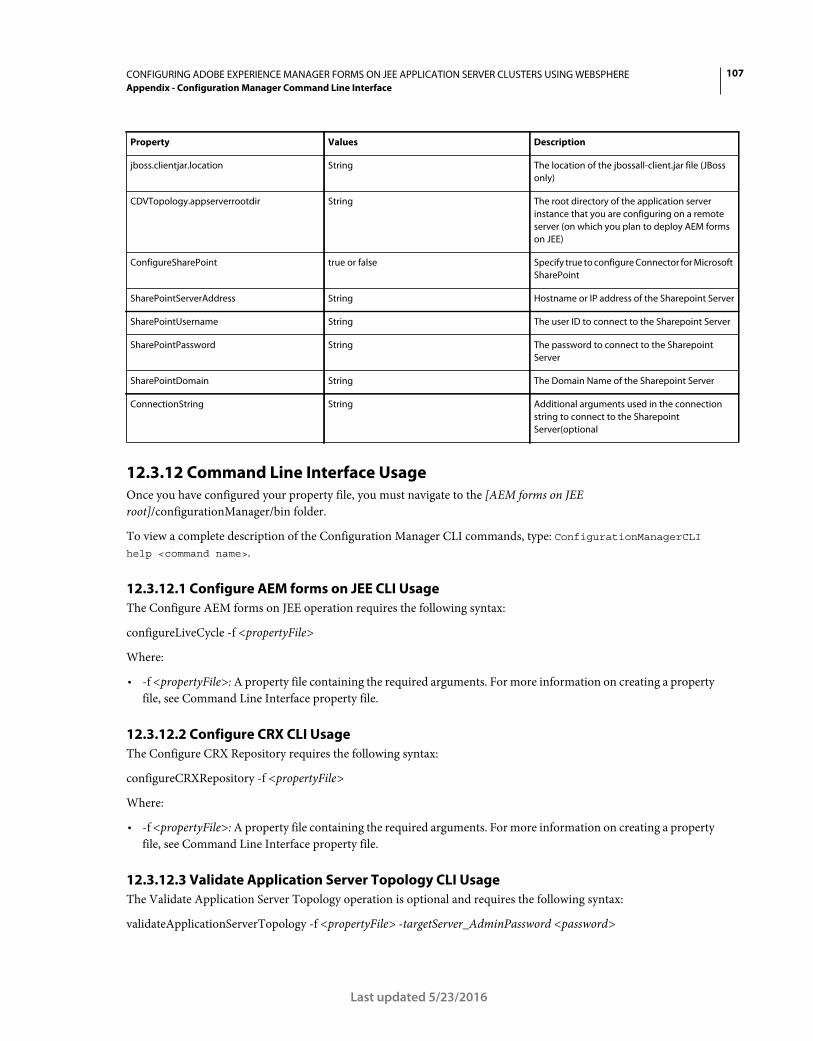
107CONFIGURING ADOBE EXPERIENCE MANAGER FORMS ON JEE APPLICATION SERVER CLUSTERS USING WEBSPHERE
Appendix - Configuration Manager Command Line Interface
Last updated 5/23/2016
12.3.12 Command Line Interface Usage
Once you have configured your property file, you must navigate to the [AEM forms on JEE
root]/configurationManager/bin folder.
To view a complete description of the Configuration Manager CLI commands, type: ConfigurationManagerCLI
help <command name>.
12.3.12.1 Configure AEM forms on JEE CLI Usage
The Configure AEM forms on JEE operation requires the following syntax:
configureLiveCycle -f <propertyFile>
Where:
• -f <propertyFile>: A property file containing the required arguments. For more information on creating a property
file, see Command Line Interface property file.
12.3.12.2 Configure CRX CLI Usage
The Configure CRX Repository requires the following syntax:
configureCRXRepository -f <propertyFile>
Where:
• -f <propertyFile>: A property file containing the required arguments. For more information on creating a property
file, see Command Line Interface property file.
12.3.12.3 Validate Application Server Topology CLI Usage
The Validate Application Server Topology operation is optional and requires the following syntax:
validateApplicationServerTopology -f <propertyFile> -targetServer_AdminPassword <password>
jboss.clientjar.location String The location of the jbossall-client.jar file (JBoss
only)
CDVTopology.appserverrootdir String The root directory of the application server
instance that you are configuring on a remote
server (on which you plan to deploy AEM forms
on JEE)
ConfigureSharePoint true or false Specify true to configure Connector for Microsoft
SharePoint
SharePointServerAddress String Hostname or IP address of the Sharepoint Server
SharePointUsername String The user ID to connect to the Sharepoint Server
SharePointPassword String The password to connect to the Sharepoint
Server
SharePointDomain String The Domain Name of the Sharepoint Server
ConnectionString String Additional arguments used in the connection
string to connect to the Sharepoint
Server(optional
Property Values Description
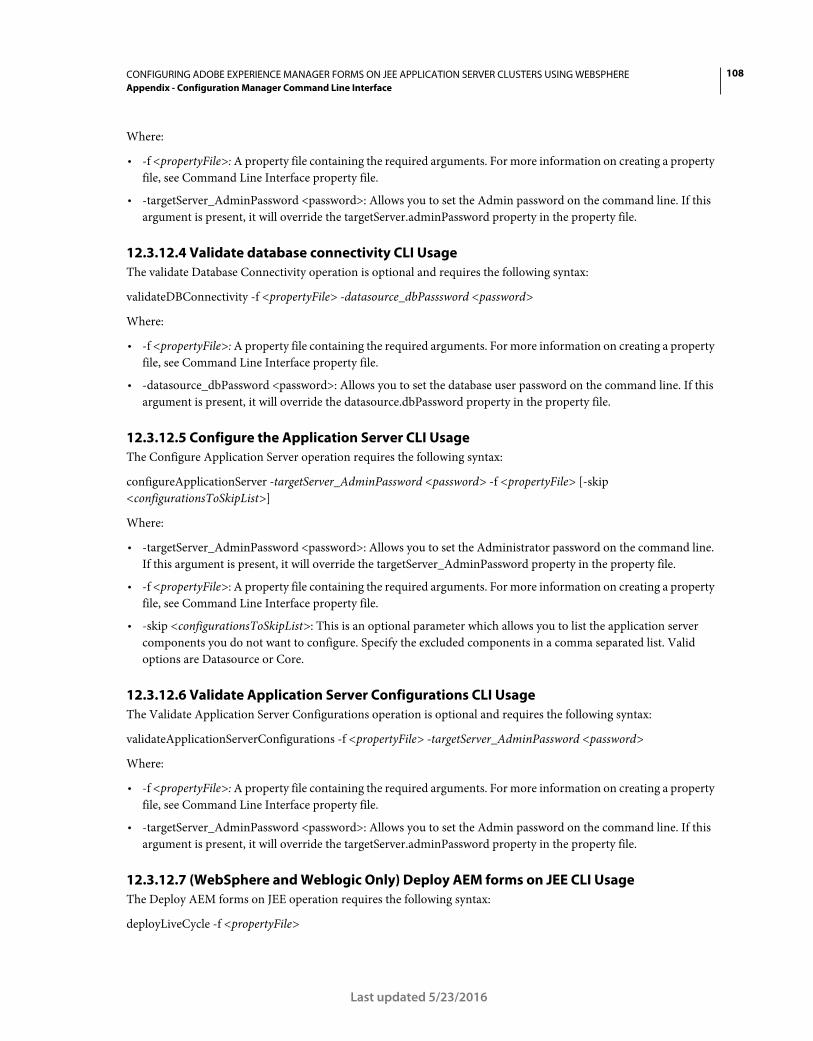
108CONFIGURING ADOBE EXPERIENCE MANAGER FORMS ON JEE APPLICATION SERVER CLUSTERS USING WEBSPHERE
Appendix - Configuration Manager Command Line Interface
Last updated 5/23/2016
Where:
• -f <propertyFile>: A property file containing the required arguments. For more information on creating a property
file, see Command Line Interface property file.
• -targetServer_AdminPassword <password>: Allows you to set the Admin password on the command line. If this
argument is present, it will override the targetServer.adminPassword property in the property file.
12.3.12.4 Validate database connectivity CLI Usage
The validate Database Connectivity operation is optional and requires the following syntax:
validateDBConnectivity -f <propertyFile> -datasource_dbPasssword <password>
Where:
• -f <propertyFile>: A property file containing the required arguments. For more information on creating a property
file, see Command Line Interface property file.
• -datasource_dbPassword <password>: Allows you to set the database user password on the command line. If this
argument is present, it will override the datasource.dbPassword property in the property file.
12.3.12.5 Configure the Application Server CLI Usage
The Configure Application Server operation requires the following syntax:
configureApplicationServer -targetServer_AdminPassword <password> -f <propertyFile> [-skip
<configurationsToSkipList>]
Where:
• -targetServer_AdminPassword <password>: Allows you to set the Administrator password on the command line.
If this argument is present, it will override the targetServer_AdminPassword property in the property file.
• -f <propertyFile>: A property file containing the required arguments. For more information on creating a property
file, see Command Line Interface property file.
• -skip <configurationsToSkipList>: This is an optional parameter which allows you to list the application server
components you do not want to configure. Specify the excluded components in a comma separated list. Valid
options are Datasource or Core.
12.3.12.6 Validate Application Server Configurations CLI Usage
The Validate Application Server Configurations operation is optional and requires the following syntax:
validateApplicationServerConfigurations -f <propertyFile> -targetServer_AdminPassword <password>
Where:
• -f <propertyFile>: A property file containing the required arguments. For more information on creating a property
file, see Command Line Interface property file.
• -targetServer_AdminPassword <password>: Allows you to set the Admin password on the command line. If this
argument is present, it will override the targetServer.adminPassword property in the property file.
12.3.12.7 (WebSphere and Weblogic Only) Deploy AEM forms on JEE CLI Usage
The Deploy AEM forms on JEE operation requires the following syntax:
deployLiveCycle -f <propertyFile>
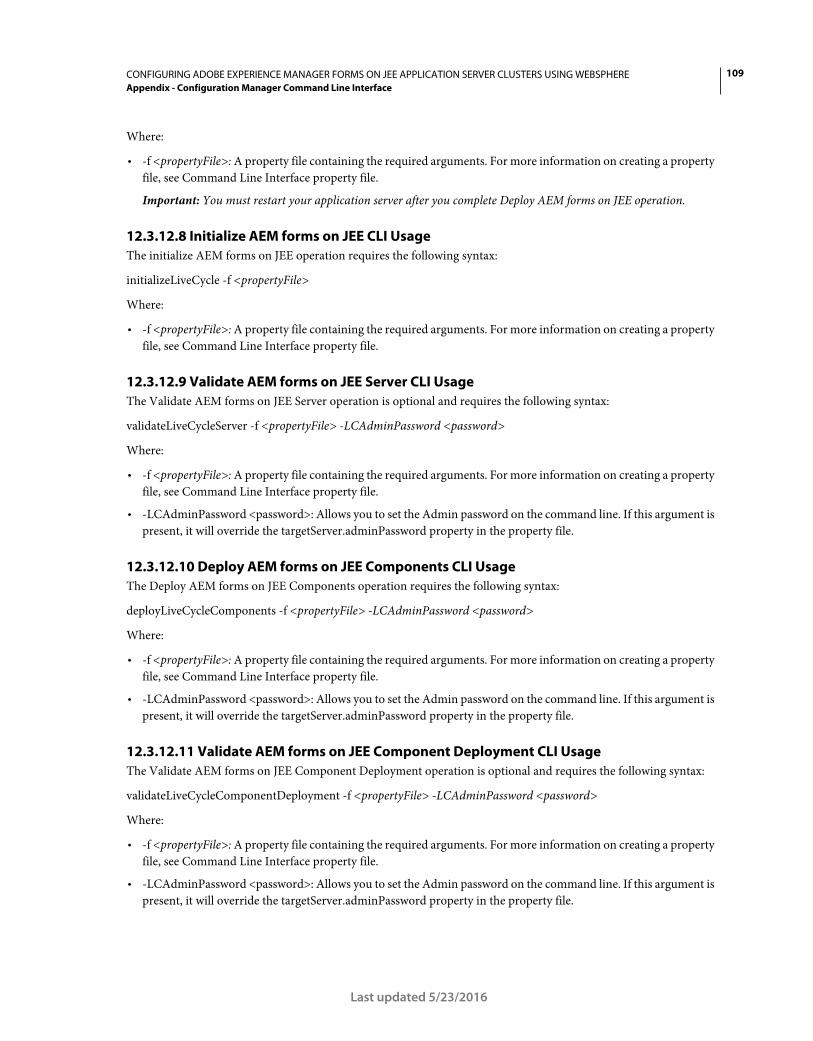
109CONFIGURING ADOBE EXPERIENCE MANAGER FORMS ON JEE APPLICATION SERVER CLUSTERS USING WEBSPHERE
Appendix - Configuration Manager Command Line Interface
Last updated 5/23/2016
Where:
• -f <propertyFile>: A property file containing the required arguments. For more information on creating a property
file, see Command Line Interface property file.
Important: You must restart your application server after you complete Deploy AEM forms on JEE operation.
12.3.12.8 Initialize AEM forms on JEE CLI Usage
The initialize AEM forms on JEE operation requires the following syntax:
initializeLiveCycle -f <propertyFile>
Where:
• -f <propertyFile>: A property file containing the required arguments. For more information on creating a property
file, see Command Line Interface property file.
12.3.12.9 Validate AEM forms on JEE Server CLI Usage
The Validate AEM forms on JEE Server operation is optional and requires the following syntax:
validateLiveCycleServer -f <propertyFile> -LCAdminPassword <password>
Where:
• -f <propertyFile>: A property file containing the required arguments. For more information on creating a property
file, see Command Line Interface property file.
• -LCAdminPassword <password>: Allows you to set the Admin password on the command line. If this argument is
present, it will override the targetServer.adminPassword property in the property file.
12.3.12.10 Deploy AEM forms on JEE Components CLI Usage
The Deploy AEM forms on JEE Components operation requires the following syntax:
deployLiveCycleComponents -f <propertyFile> -LCAdminPassword <password>
Where:
• -f <propertyFile>: A property file containing the required arguments. For more information on creating a property
file, see Command Line Interface property file.
• -LCAdminPassword <password>: Allows you to set the Admin password on the command line. If this argument is
present, it will override the targetServer.adminPassword property in the property file.
12.3.12.11 Validate AEM forms on JEE Component Deployment CLI Usage
The Validate AEM forms on JEE Component Deployment operation is optional and requires the following syntax:
validateLiveCycleComponentDeployment -f <propertyFile> -LCAdminPassword <password>
Where:
• -f <propertyFile>: A property file containing the required arguments. For more information on creating a property
file, see Command Line Interface property file.
• -LCAdminPassword <password>: Allows you to set the Admin password on the command line. If this argument is
present, it will override the targetServer.adminPassword property in the property file.

110CONFIGURING ADOBE EXPERIENCE MANAGER FORMS ON JEE APPLICATION SERVER CLUSTERS USING WEBSPHERE
Appendix - Configuration Manager Command Line Interface
Last updated 5/23/2016
12.3.12.12 Check system readiness for PDF Generator
The Checking system readiness for PDF Generator operation requires the following syntax:
pdfg-checkSystemReadiness
12.3.12.13 Adding administrator user for PDF Generator
The adding administrator user for PDF Generator operation requires the following syntax:
pdfg-addAdminUser -f <propertyFile>
Where:
• -f <propertyFile>: A property file containing the required arguments. For more information on creating a property
file, see Command Line Interface property file.
12.3.12.14 Configure Connector for IBM Content Manager
The Configure Connector for IBM Content Manager operation is optional and requires the following syntax:
IBMCM-configurationCLI -f <propertyFile>
Where:
• -f <propertyFile>: A property file containing the required arguments. For more information on creating a property
file, see Command Line Interface property file.
Important: Modify the <propertyFile> called cli_propertyFile_ecm_ibmcm_template.txt located in the [aem-forms
root]\configurationManager\bin\ directory.
Perform the following steps manually to complete the configuration for Connector for IBM Content Manager.
1 Copy the adobe-component-ext.properties file from [aem-forms root]/configurationManager/configure-
ecm/websphere to the following [appserver root]/profiles/[profile_name] directory.
2 Restart the Application Server.
3 Start the following services from Administration Console
• IBMCMAuthProviderService
• IBMCMConnectorService
12.3.12.15 Configure Connector for IBM FileNet
The Configure Connector for IBM FileNet operation is optional and requires the following syntax:
filenet-configurationCLI -f <propertyFile>
Where:
• -f <propertyFile>: A property file containing the required arguments. For more information on creating a property
file, see Command Line Interface property file.
Important: Modify the <propertyFile> called cli_propertyFile_ecm_filenet_template.txt located in the [aem-forms
root]\configurationManager\bin\ directory.
Perform the following steps manually to complete the configuration for Connector for IBM Content Manager.
1 Copy the adobe-component-ext.properties file from [aem-forms root]/configurationManager/configure-
ecm/websphere to the following [appserver root]/profiles/[profile_name] directory.

111CONFIGURING ADOBE EXPERIENCE MANAGER FORMS ON JEE APPLICATION SERVER CLUSTERS USING WEBSPHERE
Appendix - Configuration Manager Command Line Interface
Last updated 5/23/2016
2 Locate the wsjass.conf file in the [appserver root]/profiles/[profile name]/properties directory and add to it
contents of wsjass.conf file available in [aem-forms root]/configurationManager/configure-ecm/websphere
directory.
3 Restart the Application Server.
4 Start the following services from Administration Console
• IBMFileNetAuthProviderService
• IBMFileNetContentRepositoryConnector
• IBMFileNetRepositoryProvider
• IBMFileNetProcessEngineConnector(If configured)
12.3.12.16 Configure Connector for EMC Documentum
The Configure Connector for EMC Documentum operation is optional and requires the following syntax:
documentum-configurationCLI -f <propertyFile>
Where:
• -f <propertyFile>: A property file containing the required arguments. For more information on creating a property
file, see Command Line Interface property file.
Important: Modify the <propertyFile> called cli_propertyFile_ecm_documentum_template.txt located in the [aem-
forms root]\configurationManager\bin\ directory.
Perform the following steps manually to complete the configuration for Connector for EMC Documentum.
1 Copy the adobe-component-ext.properties file from [aem-forms root]/configurationManager/configure-
ecm/websphere to the following [appserver root]/profiles/[profile_name] directory.
2 Restart the Application Server.
3 Start the following services from Administration Console
• EMCDocumentumAuthProviderService
• EMCDocumentumRepositoryProvider
• EMCDocumentumContentRepositoryConnector
12.3.12.17 Configure Connector for Microsoft SharePoint
The Configure Connector for Microsoft SharePoint operation is optional and requires the following syntax:
sharepoint-configurationCLI -f <propertyFile>
Where:
• -f <propertyFile>: A property file containing the required arguments. For more information on creating a property
file, see Command Line Interface property file.
Important: Modify the <propertyFile> called cli_propertyFile_ecm_sharepoint_template.txt located in the [aem-
forms root]\configurationManager\bin\ directory.
12.4 Examples Usage
From the C:\Adobe\Adobe_Experience_Manager_forms\configurationManager\bin, type:

112CONFIGURING ADOBE EXPERIENCE MANAGER FORMS ON JEE APPLICATION SERVER CLUSTERS USING WEBSPHERE
Appendix - Configuration Manager Command Line Interface
Last updated 5/23/2016
ConfigurationManagerCLI configureLiveCycle -f cli_propertyFile.txt
Where cli_propertyFile.txt is the name of the property file you created.
12.5 Configuration Manager CLI Logs
If an error occurs, you can review the CLI logs located here in the [aem-forms root]\configurationManager\log folder.
The log file generated will have a naming convention such as lcmCLI.0.log where the number in the filename (0) will
increment when the log files are rolled over.
12.6 Next steps
If you used Configuration Manager CLI to configure and deploy AEM forms on JEE, you can now do the following
tasks:
• Verify the deployment. (See “8.1.4 Verify the deployment” on page 53.)
• Access Administration Console. (See “8.1.4.1 Accessing Administration Console” on page 53.)
• Configure AEM forms on JEE modules to access LDAP. (See “8.8 Configuring LDAP access” on page 73.)

113
Last updated 5/23/2016
Chapter 13: Appendix - Increasing the Deployer heap size for WebSphere
You must increase the heap size in the ejbdeploy.bat/sh script to avoid time-out errors.
AIX, Linux, Soloaris
1 Go to the [appserver root]/deploytool/itp/ directory and open ejbdeploy.sh for editing.
2 (Solaris only) In the SunOS section, find the EJBDEPLOY_JVM_OPTIONS attribute and change the value of the -
XX:PermSize option to 256m, and ensure that the value of the -Xverify option is none.
3 Change the heap size in the $JAVA_CMD\ section to the following value:
-Xms256m Xmx512m
4 Save and close the file.
Windows
Windows
1 Go to [appserver root]\deploytool\itp and open the ejbdeploy.bat file in a text editor.
2 Find the line beginning with %JAVA_HOME% and then find the argument -Xmx.
3 Change the argument to -Xmx512M.
4 Save and close the file.
Increase MaxPermSize (WebSphere on Solaris)
1 Log in to the WebSphere Administrative Console.
2 In the navigation tree of the WebSphere Administrative Console, do one of the following:
• Click Servers > Server Types > WebSphere Application servers and, in the right pane, click the server name.
3 Under Server Infrastructure, click Java and Process Management > Process Definition.
4 Under Additional Properties, click Java Virtual Machine.
5 In the Generic JVM Arguments, enter the MaxPermSize parameter as follows:
-XX:MaxPermSize=512m
6 Click OK or Apply.
7 In the Messages box, click Save directly to master configuration, and then restart the application server.


![Adobe Experience Manager JBoss 自動インストー …...[Adobe_JAVA_HOME] C:\Adobe\Adobe_Experience_Manager_Forms\Java\ jdk1.8.0_74 JEE 上の AEM Forms 自動インストールによ](https://img.dokumen.tips/doc/110x75/5ec91ac14f083434fa4c959e/adobe-experience-manager-jboss-efff-adobejavahome-cadobeadobeexperiencemanagerformsjava.jpg)