Embed Size (px)
Citation preview

7/31/2019 Configuration Básica MikroTik hotspot
http://slidepdf.com/reader/full/configuration-basica-mikrotik-hotspot 1/5
Mikrotik RouterOS includes an excellent hotspot solution. Read on for details on getting a basichotspot going using RouterOS on any standard x86 PC hardware or a RouterBOARD. TheRouterOS hotspot solution is very powerful and only the very basics of the solution are covered
here; just enough to get you started.
Getting the Hotspot to Work
First of all you will need to have a copy of RouterOS. You can purchase a license or download a 24-hour trial from Mikrotik. RouterBOARDs also usually come with RouterOS pre-licensed andinstalled. You will also need a computer with at least a 100MHz CPU, 32MB RAM and an IDEharddisk, or a RouterBOARD. Either method you choose will need a compatible wireless cardandEthernet adapter, or two Ethernet adapters with one connected to a standard wirelessaccess point.You should check your hardware against the RouterOS compatibility list. If you are installingRouterOS for the first time, download the ISO image from Mikrotik and burn it to CD. Note thatinstallation of RouterOS will completely wipe the contents of the hard disk! Boot the PC off this CDand install the following packages:
System DHCP Wireless Hotspot Proxy User Manager (optional) Security (optional - recommended) Advanced tools (optional)
Now to get started. Log onto the PC as admin with no password. If this box intended fordeployment, change set a password by typing in password at the prompt. Change the hostname bytyping in name. Assign an IP address to each interface. As this is going to be set up as a router,they will need to be on a different subnet. Substitute wlan1 with ether2 if you havea separate access point.
[admin@Mikrotik] > ip address add address=192.168.24.3/24interface=ether1[admin@Mikrotik] > ip address add address=192.168.30.1/24 interface=wlan1
Now we need to add a default route to the IP of the internet router.
[admin@MikroTik] > ip route add gateway 192.168.24.1
Enable the wireless interface and set it to run as an access point as below. If you have an accesspoint instead, ignore the command below, make sure it is running with no security enabled, use asuitable SSID and channel and change its admin password.

7/31/2019 Configuration Básica MikroTik hotspot
http://slidepdf.com/reader/full/configuration-basica-mikrotik-hotspot 2/5
[admin@Mikrotik]> interface wireless set wlan1 ssid="My HotSpot"band=2.4ghz-b mode=ap-bridge
Run the hotspot setup as below. Substitute the values in italics to suit your network. The useraccount bears no relation to the admin account and is used for the hotspot service only. You mayalso need to add a host record to your DNS server for the hostname of the hotspot box. Make surethe address pool does not conflict with any devices using static IPs, such as access points.
[admin@MikroTik] > ip hotspot setuphotspot interface: wlan1local address of network: 192.168.30.1/24masquerade network: yes
address pool of network: 192.168.30.2-192.168.30.99select certificate: noneip address of smtp server: 0.0.0.0dns servers: 192.168.24.2dns name: hotspot.mydomain.netname of local hotspot user: user
password for the user: password
That’s the guts of it there. Fire up your laptop, associate to the network and try to access a webpage. You should be redirected to the hotspot login page instead where you can enter the user
credentials you set up earlier. Click the thumbnails for a full view of the default page.
You should now be able to access the web normally and a pop-up window will display yourconnection time and data usage as you go.

7/31/2019 Configuration Básica MikroTik hotspot
http://slidepdf.com/reader/full/configuration-basica-mikrotik-hotspot 3/5
Bear in mind I have left out the certificate so usernames and passwords will be sent as plain text. Ifyou intend on deploying the hotspot, you should install a certificate on it and set up SSL to protectaccount data from being sniffed. Setting up User Manager The User Manager is a nice and simpleweb administration for setting up user account for the MikroTik hotspot and other services. It can behosted on either the same box as the hotspot or located in a separate box on the same local
network. One User Manager package can control multiple hotspots. Before getting the UserManager set up, check for any existing hotspot account and remove them. To do this, run thefollowing command:
[admin@MikroTik] > ip hotspot user printFlags: X - disabled, D - dynamic# SERVER NAME ADDRESS PROFILE UPTIME 0 fred default 0s
If any items are listed (in this case bob), run the following command to remove them:
[admin@MikroTik] > ip hotspot user remove 0
You can delete multiple items at the same time, simply separate each item number with a comma.To get the User Manager working we first need to add a customer login. This is used to access theUM web administration. Make sure you substitute the values in italics to suit.
[admin@MikroTik] > tool user-manager customer add login=hs_admin
password=password
Now we need to add the hotspot as a RADIUS client to the user manager. This is done under theuser manager router section. The shared secret can be any string of text and should be reasonablylong and complex. If you are setting the user manager up on the same box as the hotspot, use127.0.0.1 for the IP address.

7/31/2019 Configuration Básica MikroTik hotspot
http://slidepdf.com/reader/full/configuration-basica-mikrotik-hotspot 4/5
[admin@MikroTik] > tool user-manager router add ip-address=hotspot-ipshared-secret=12345 subscriber=hs_admin
In return, we need to set up the hotspot to use RADIUS for user authentication. First this involvescreating a RADIUS client to communicate with the UM. Remember that if you have both services onthe same box, the IP address should be set to 127.0.0.1. The secret should be the same as you setup above.
[admin@MikroTik] > radius add service=hotspot address=ip-address
secret=12345
Now we tell the hotspot itself to use a RADIUS client. First bring up a list of hotspot profiles:
[admin@MikroTik] > ip hotspot profile print
Locate the profile in use and type the following command where 1 is the number of the profile toconfigure:
[admin@MikroTik] > ip hotspot profile set 1 use-radius=yes
Now we are done with configuration. Browse to http://router-ip/userman where router-ip is the IPaddress of the box you are configuring User Manager on. Login using the customer username andpassword created earlier. Click on the User menu and select Add. Enter in a username, passwordand any other details you wish. You can limit the speed the client can access the internet byselecting the Rate limits checkbox and typing in a suitable speed (e.g. for a flat128kBps download/64kBps upload speed limit simply type in 128k in the RX field and 64k in the TXfield). Click Add and you should be able to now access the hotspot using the username andpassword you specified. If you want to generate a printable ticket for the users you set up, click onthe Users link, select the users to make a ticket for, click Generate and select the number of ticketsper page.
Other Tips
You can also go a step further and play with some other available options, as this only skims thesurface of the hotspot capabilities. I’ll post more notes as I play with additional options. 1. To disable communication between wireless clients (recommended), disable the default forward
option on the wirelessinterface.
interface wireless set wlan1 default-forward=disabled
7/31/2019 Configuration Básica MikroTik hotspot
http://slidepdf.com/reader/full/configuration-basica-mikrotik-hotspot 5/5
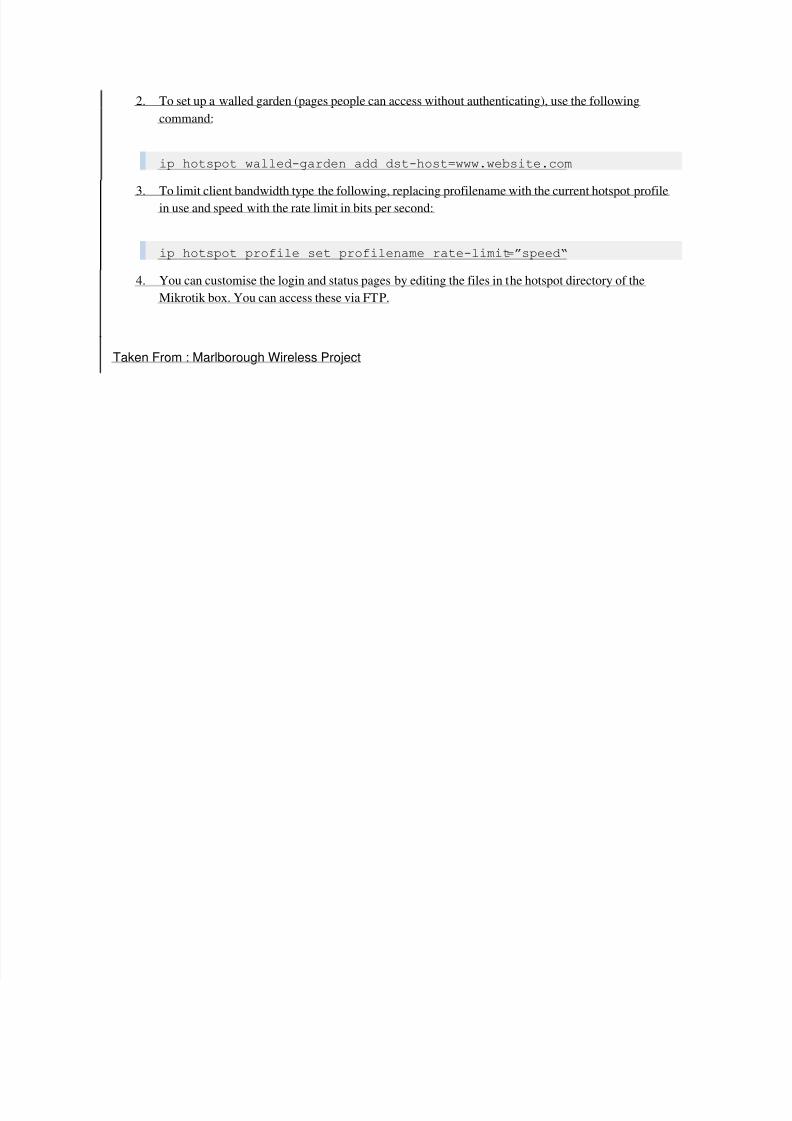
2. To set up a walled garden (pages people can access without authenticating), use the followingcommand:
ip hotspot walled-garden add dst-host=www.website.com
3.
To limit client bandwidth type the following, replacing profilename with the current hotspot profilein use and speed with the rate limit in bits per second:
ip hotspot profile set profilename rate-limit =”speed“
4. You can customise the login and status pages by editing the files in the hotspot directory of theMikrotik box. You can access these via FTP.
Taken From : Marlborough Wireless Project