Embed Size (px)
Citation preview

. . . . . . . . . .
..........Accordions International
Concerto D/A-250Digital Accordion
User Manual
The ultimate accordioncapable of producing an
entire World of soundswith variety and contrast!
Accordions International1760 South 450 WestSalt Lake City, UT 84115www.AccordionInfo.comPhone 801-485-5840

Page - 2
Conc
erto G
rill L
ayou
t

Page - 3
SONG
1
9
Factory Song
1 2 3 4 5 6 7 8
Song Registers
EP 2
EP 1
H Piano
Organ 1Piano
Organ 2
Organ 3
Organ 4
8
16User Songs
Guitar 1
J Guitar
E Guitar
Mandol.
String 1
String 2
Choir
Violin
Clarinet
Sax
Flute
Oboe
Trumpet
Tromb.
Brass
F Horn
Vibe
Banjo
Marimb
Steel D
A Bass
F Bass
E Bass
Tuba
SONG
NEXT
EXIT
TOUCH
REVERB
BELLOW
CHOR.
Range
Range
ARPEG.
Split TRANS.
BASS
Chord 1
Chord 2
SOLO
Orch. 1
Orch. 2
Start/StopTRACKSelect
+0 Song F55 BassAc32 Piano121 StrSlo
ROF T120Violin OFPiano1 55StrSlo 35
ARR. C.HOLD T.START
SONG
NEXT
EXIT
TOUCH
REVERB
BELLOW
CHOR.
Concerto Grill – Split, Range, Volume Control & Display
Concerto Grill – Sounds & Registers
Concerto GrillEffects, Exit & Next
1 13 17
2 14 18
3 15 19
4 16 20
5 6 7 8 9 10 11
21
22 23
24 25
26
12 59
27 31 35 39 43 47 51 55
28 32 36 40 44 48 52 56
29 33 37 41 45 49 53 57
30 34 38 42 46 50 54 58
59 60 61 62 63 64 65 66 67
F.Bass CH 1
CH2
Solo OR1OR2
68 69
70 71 72
73 74 75
Concerto Small Display

Page - 4
..........
Getting the most out ofyour Concerto DA-250Thanks for selecting Concerto.We are here to serve you!
Best Wishes
We at Accordions International wish to thank you for choosing theincomparable Concerto D/A Digital Acoustic Accordion. Concertocombines high levels of technology, rich CD quality sound, and aneasy to use format. We are confident you will find it to be the mostadvanced and easiest to use accordion of its kind.
We urge you to read and study this manual carefully so you mayobtain the maximum benefits and receive many years of satisfactionfrom your new Concerto accordion. After reading this manual shouldyou need further help then please feel free to contact us for technicalsupport. Below are several ways to choose from.
You may contact us via the World Wide Web athttp://www.AccordionInfo.com. Where you may find updatedinformation. Or email us directly [email protected] may phone Toll Free for an Appointment with our TechSupport; 1-800-935-0013Please identify yourself, include your phone number and besttime to call.
Please take the time to review this manual and then if you feel you stillare unclear or need help then please contact us for support.

Page - 5
Overview
Concerto is a simple to use, yet powerful system providing completecontrol at the touch of a button. Simply touching a register buttonrecalls an entire, global setup, which includes sounds, volumes,octaves, effects, effect levels, velocities, and many other parameters.Concerto features eight factory registers for instant playing pleasure,and the ability to set 128 of your own favorite registers.
Registers are stored in groups of eight, called a song, and may bestored on optional RAM memory cards, Registers may be sequencedfrom the expression pedal allowing for hands-free sequencing.
Concerto's eight factory registers let yon play any style of musicwithout studying the manual. Simply turn the power on and select oneof the eight register buttons. As you learn to make you own registersyou may store them in one of 128 user registers.
By touching one of the 32 sound select buttons, you may quicklychange sound settings in real time, allowing you to perform withoutprogramming the registers. The six LED's located on the top side of thegrill will indicate which section is assigned to the 32 tone selectbuttons. If you wish to change a bass sound simply press the bassbutton to light up the bass led and make your selection from the 32tone buttons.
Concerto has eight families of voices (piano, organ, guitar, etc.). Eachfamily has four sounds that can be recalled at the touch of a button.Over 300 additional sounds are available in the sound library.
Concerto features six sections, three for the left hand (bass, chord 1,and chord 2) and three for the right hand (solo, orchestra 1, andorchestra 2). A separate sound may be selected for each sectionproviding for a rich layering of sounds which may be fine tuned with
SONG
1
9
Factory Song
1 2 3 4 5 6 7 8
Song Registers
EP 2
EP 1
H Piano
Organ 1Piano
Organ 2
Organ 3
Organ 4
8
16User Songs
Guitar 1
J Guitar
E Guitar
Mandol.
String 1
String 2
Choir
Violin
Clarinet
Sax
Flute
Oboe
Trumpet
Tromb.
Brass
F Horn
Vibe
Banjo
Marimb
Steel D
A Bass
F Bass
E Bass
Tuba

Page - 6
volume, velocity, octave range, reverb type and level, chorus type andlevel, repeat and other effects, tempo settings for external drum, andsequencer devices.
We urge you to study this manual carefully and to keep it as a handyreference to your Concerto.
This manual has been written for the Concerto DA-250 but is alsovaluable for the DA-100 and DA-200 models. Please note that both theDA-200 and DA-250 have the same hardware except for the SoundEngine. The DA-250 has more sounds and more memory to provideeven more accurate sound than the previous models.
For those who are reading this manual that own a DA-100 the majorfunctional difference is in how you back-up or archive the registerssaved in your accordion. With the DA-100 they are saved on batterybacked memory cards. Please see Appendix C at the end of thismanual for specific instructions on how to use the Concerto RAM 64Memory Cards.
Those with the DA-200 and DA-250 have the latest technology inFLASH memory that requires no batteries and is non-volatile.Instructions for how you back-up or archive the registers saved in youraccordion are included in Chapter 5 of this manual.

Page - 7
Chapter OneConcerto Setup
Inventorying Your Equipment
After unpacking your new Concerto carefully place all of the items infront of you. Check that you have all of the following:
1 Concerto accordion1 Concerto generator1 Concerto power supplyI Volume pedal (expression pedal)1 Four-way foot switch1 Foot-switch cable (with a five pin connector on one end and a
nine pin connector on the other)1 Firing cable (eight pin DIN plug on both ends)2 Audio cables for Generator Left and Right1 Stereo Y Cable for amplified accordion.
You will also need an amplifier or a stereo PA system capable ofhandling Concerto's full spectrum of sound. Your local dealer shouldbe able to assist you in choosing the correct amplification for yourspecific needs.

Page - 8
Connecting Your Concerto
The following steps will assist you in correctly connecting yourConcerto.
A. Connect the firing cable to the bottom of the Concerto and to thegenerator connector labeled "accordion"
B. Connect the volume pedal to the generator jack labeled "pedal 1"C. Connect the four way foot pedal to the generator jack labeled
"pedal 2"D. Connect the power supply to an electrical outlet and then to the
generator jack labeled “power"E. Connect the audio cables to the stereo left and right outputs of
the generator, then to two channels on the amplifier. It isimportant that both channels used on the amplifier have thesame settings.
F. Power up the ConcertoG. Turn on the amplifier (to prevent popping in the speakers turn
the amplifier off before turning off the rest of the equipment)H. Adjusting the volume: With the expression pedal in the
maximum position (all the way down) and the Concerto'svolume at the 3 O'clock position gradually raise the volume onthe amplifier until you are at the loudest forte you desire. Theexpression pedal will now provide a full range of volumefrom zero to full volume.

Page - 9
Chapter TwoFactory Set Registers
Exploring the Eight Factory-set Registers
Each time Concerto is turned on an automatic systems check will beperformed. At the same time the large display identifies the softwareversion currently being used. After about four seconds the display willgo immediately to factory-set song register 1.
Factory-set Registers(Please note - The numbers in parenthesis - example (60) - refer to the drawing on page 3.)
Register 1 (60): Features acoustic piano and slow strings on the righthand, and acoustic bass, acoustic piano, and slow strings on the lefthand. Phantom*: Violin
Register 2 (61): Features great theater organ combination on bothright and left hands. Phantom*: Trumpet
Register 3 (62): Features acoustic nylon guitar with slow strings onthe right hand, and acoustic bass, nylon guitar and slow strings on theleft hand. Phantom*: Flute
Register 4 (63): Features orchestra strings on both hands.

Page - 10
Phantom*: Violin
Register 5 (64): Features solo clarinet with soft brass on the right hand,and acoustic bass and soft brass on the left hand. Phantom*: Clarinet
Register 6 (65): Features solo trumpet with brass on the right hand,and acoustic bass and brass on the left hand. Phantom*: Trumpet
Register 7 (66): Features vibes with slow strings on the right hand, andacoustic bass and organ on the left hand. Phantom*: Clarinet
Register 8 (67): Features mandolin with strings on the right hand, andacoustic bass with clarinet (arpeggio) on the left hand. Phantom*: Tremolo strings
Touch the Register 1 button. You should hear piano with slow strings.Notice the touch-sensitivity. The piano really comes alive with thetouch feature! Turn off this feature by touching the button labeledtouch. The red LED above the button will go off. Play the Concertowith the touch feature on and off and compare the difference. Touchsensitivity adds extra realism to many sounds.
Now touch the Register 2 button and try the great organ sound.Notice the touch button is off. For more realistic ORGAN sounds werecommend turning off this feature and the using the expression pedal.
Try all of the factory settings and you will find they match most stylesof music. Pay particular attention to Registers 5 and 6 as they featuresolo sounds. Solo means there is an automatic split which plays thesolo sound only on the highest note and other orchestra sounds areplayed on all other notes.
We suggest that after becoming familiar with the factory-set registersyou learn how to select and create your own registers. Refer to Chapter3, "Making and Recording Your Very Own Registers"

Page - 11
* Phantom is a feature that brings a new (phantom) sound to thetreble keyboard. This feature is presented in the next chapter.

Page - 12
Chapter ThreeFixed Footswitches& Panel Buttons
In this chapter you will learn the functions of the two side switches on theexpression pedal, the phantom pedal on the four-way pedal, and the buttons onthe front of the Concerto.
Fixed Foot Switches
Expression Pedal
The expression pedal is equipped with two side switches. The rightswitch on the expression pedal is a very powerful tool, which allowsyou the hands-free ability to sequence up to the next register. Set yourConcerto at Resister 1 and touch the right switch on the expressionpedal. Notice the LED above the registers advances to the next register.The left switch on the volume pedal decrements the registers allowingyou to go down to the previous register on your Concerto.
It is important to mention that Concerto has been painstakinglystudied to provide you with the most natural musical effects. One ofour achievements in producing natural effects is that the sound of anynote held during a register change is not affected until the note isreleased and a new note played. This provides for a smooth andnatural transition between register changes. Notice, there is a specialscreen saver function that allows register changes to occur as fast aspossible. When notes are played during a register change, the screen isnot fully displayed which saves time and allows the register change to

Page - 13
be immediate. If you wish to view the entire screen, simply touch theexit button and the full screen will be displayed.
Phantom
Phantom is a feature you will find invaluable no matter what yourmusic ability. Phantom is an imaginary keyboard, or second sound,that allows you to carry on a dialogue between two separateinstruments. Phantom also provides the ability to play a solo passageon notes other than those with high note priority, with phantom, notesup and down the scale may be played by the solo instrument.
To see how this feature works select factory-set Register 2. You nowhave a theater organ sound. Touch the "phantom" foot pedal (the first,or far left pedal on the four-way pedal) and the sound will change to atrumpet. Touch the "phantom" pedal again and you will return to theorgan sound. The LED above the solo button will flash when phantomis on.
Now, with the phantom off touch any note on the keyboard. Whileholding that note (organ sound) touch the "phantom" foot switch andplay a passage of notes above and below the original note. Note thatthese have a trumpet sound while the original note remains the organ.Now release all the notes and play a new passage. All of these noteswill have a trumpet sound. Touch the "phantom" pedal (turning thephantom feature off) and any new notes return to the organ sound.
Four-way Foot Pedal
Foot pedal A (second pedal from the left) is set as a sustain pedal whilein the factory songs. Foot pedal B (third pedal from the left) issostenuto. To use the sostenuto effect you must first play a note(s),then before releasing it hold down the sostenuto pedal. The sostenutopedal will sustain the notes for you allowing you to play non-sustained passages with only the pre-selected notes being sustained.Foot pedal C (far right pedal) is the soft damper pedal. This allows youto soften a passage on the right hand. The use of these pedals will bedescribed later in this manual.

Page - 14
Panel Buttons
The buttons on the Concerto panel, or grill, are described below. Seeattachment A for a picture of Concerto with accompanying referencenumbers. (Panel buttons will be italicized throughout these manuals).
Important: We have placed settings in your Concerto that shouldsuffice for your immediate needs. We do not recommend youexperiment with these settings until you read about them specificallyin this manual.
#1. SplitThere are four split settings, which are indicated by the following LEDpatterns:
a. No split (no LED): All active sections play (solo playsonly high notes).
b. Split one (left LED on): High note is played only by solosection.
c. Split two (right LED on): Same as split one, but threenotes must be played before orchestra section sounds.This split allows solo legato passages to be playedwithout the interference of the orchestra sectionspopping in between legato notes.
d. Split three (both LED's on): This is first note priority forthe solo section. Similar to phantom in that this is nothigh note priority. Different from phantom in which thesolo sound is really struck after the first note; this is firstnote priority.
#2.Bass RangeThere are two bass ranges to select from:
a. Bass range one (left LED on): Lowest bass note is Cranging up to B.
b. Bass range two (right LED on): Lowest bass note is F#below C with the highest note being F above C.
#3. Chord RangeThere are three selections:

Page - 15
a. Chord range one (left LED on): Chords are formed in theoctave F# to F
b. Chord range two (right LED on): Chords are formed inthe octave C to B
c. Chord range three (both LED's on): Chords are formed inthe 1.5 octave range of F# to B3 forming open harmony.
#4. ArpeggioThere are four positions:
a. Arpeggio off (no LED's): Chords are fixed.b. Arpeggio one (left LED on): Chords are automatically
inverted upward in harmony with each strike. Striking abass note starts the chord position at the beginning.
c. Arpeggio two (right LED on): Chords are automaticallyinverted up once and repeated down once with eachstrike. Again striking a bass note starts the pattern fromthe beginning.
d. Arpeggio three (both LED's on): Chords are automaticallyplayed in a pattern of invert up, up, up then down, down,down which when combined with a bass note forms aclassical six step pattern. Try with 3/4 or 6/8 timesignatures.
#5. Arr.Reserved for future use.
#6. C. HoldLEFT HAND REGISITER FREEZEThe C.HOLD button turns on and off this feature. When the C.HOLDbutton is on the left hand remains frozen to the current Song Registerand as new Song Registers are recalled they are applied only to theright hand. While the Concerto is in this mode you can still makechanges manually to the left hand and record new registers while theC.HOLD feature is on.
Example you may recall Factory Setting #2 (ORGAN) and then selectC.HOLD and then Recall Factory Setting #1. You will then have theORGAN on the left hand and the Piano & Strings on the Right hand(this could then be saved as a new register). Now release the C.HOLDfunction and press Factory Setting #1 again and you will have

Page - 16
Acoustic Bass & Piano again in the left hand and the Song Registerswill now apply to both Left and Right sides of the Concerto.
#7. T.StartReserved for future use.
#8. SelectUsed to select screens, sub-menu screens, second functions such asmanual drums, and record a register. Each function is discussed indetail under the appropriate sections later in this manual.
#9. TrackUsed to access Manual Drum Sounds while pressed together withSELECT. Other functions reserved for future updates.
#10. Intro/EndReserved for future use.
#11. Start/StopStart/stop internal Midi clock
#12. ExitExit performs several functions. First it exits any sub-menu and bringsback the main screen. It also writes the screen, which may not bevisible when recalled while playing. Exit is also used in conjunctionwith Select to bring up the record menu to record a register.
#13. TransYou may transpose the electronics of Concerto (and all attached midigear) up or down half steps with the up or down arrow buttons. This iseasily done in real time during performance. Note you must return thetranspose to +O to play the acoustic accordion together with theelectronics so that they are both in the same key.
#14. BassVolume for bass section
#15. Chord lVolume for chord I. section

Page - 17
#16. Chord 2Volume for chord 2 section
#17. RhythmSends Program Change numbers 1 to 64 on Channel 10
#18. SoloVolume for solo section
#19. Orch. IVolume for orchestra 1
#20. Orch. 2Volume for orchestra 2
Additional Information about volume keys:
Volume RangeThere are 64 increments of volume ranging from 0 (volume off) to 64,(the maximum volume). The volumes settings for all sections beingplayed are indicated in the large display while the top display showsthe volume setting momentarily while you are adjusting an individualinstrument.
The Volume or “value” buttons are an important part of yourConcerto. You will later learn that with different menu’s you canchange the “value” or many different things such as changing theoctave range of the section or selecting a new sound from thealphabetized “Library” of sounds.
You may want to spend some time practicing using the volumebuttons. They have two speeds. If you touch the button momentarilythe numbers will roll by slowly one at a time. If you hold the keydown after about 2 seconds the numbers go into high gear and roll byvery rapidly. The high-speed feature is to get you to the general rangeand the slow speed (touching the button and releasing) is for accuracy.
Section on/off:When both up/down volumes of a section are depressed then thesection is turned off. To turn on a section, simply touch either up ordown for the desired section. Example; pressing both bass volume up

Page - 18
and down together turns off the bass section, pressing either bassvolume up or down turns the bass section back on again.
Other FunctionsImportant: Buttons 14 - 20 are also used as value keys for other menus.The only time they perform the descriptions above is during the mainscreen. Each button controls the information present in the screen.There are four rows of information in the screen and four rows ofvolume/value keys on each side of the screen. Each button controlsthe corresponding line of information in the display screen.
#21. TempoAdjusts the tempo of the internal Midi clock
#22. ReverbTurns on and off the reverb effect on the entire instrument
#23. ChorusTurns on and off the chorus effect for the entire instrument
#24. TouchTurns on and off the keyboard touch sensitivity
Additional Information about Effects Buttons
Note: Other functionsThe effects sections (buttons 22 - 24) also have sub-menus that areimportant to their function. To select these sub-menus simply holdselect and then touch the effect you wish to select. For example,selecting reverb will bring up a reverb menu that will allow you toselect the type and level of reverb for each section. Again exit bringsyou out of this menu. We will explore these features in further detaillater.
#25. BellowsTurns on and off the bellow expression. When bellows expression isengaged the expression is controlled by the bellows rather than by theexpression pedal.
Page - 19
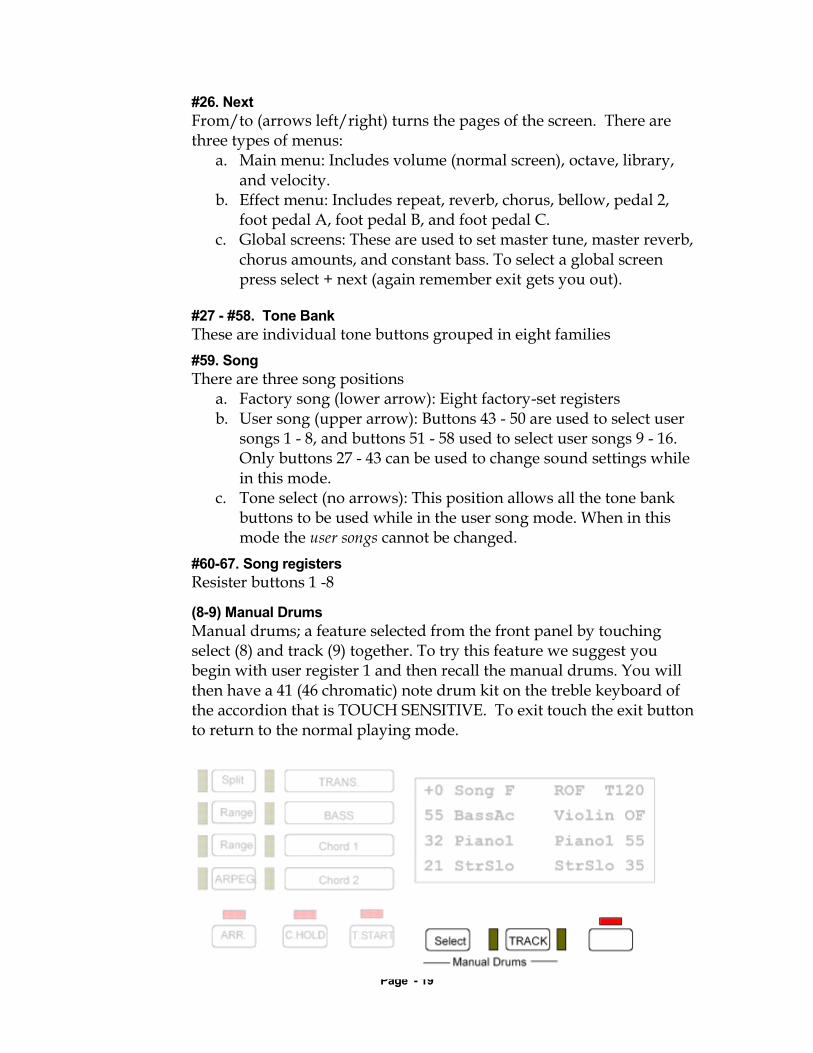
#26. NextFrom/to (arrows left/right) turns the pages of the screen. There arethree types of menus:
a. Main menu: Includes volume (normal screen), octave, library,and velocity.
b. Effect menu: Includes repeat, reverb, chorus, bellow, pedal 2,foot pedal A, foot pedal B, and foot pedal C.
c. Global screens: These are used to set master tune, master reverb,chorus amounts, and constant bass. To select a global screenpress select + next (again remember exit gets you out).
#27 - #58. Tone BankThese are individual tone buttons grouped in eight families#59. SongThere are three song positions
a. Factory song (lower arrow): Eight factory-set registersb. User song (upper arrow): Buttons 43 - 50 are used to select user
songs 1 - 8, and buttons 51 - 58 used to select user songs 9 - 16.Only buttons 27 - 43 can be used to change sound settings whilein this mode.
c. Tone select (no arrows): This position allows all the tone bankbuttons to be used while in the user song mode. When in thismode the user songs cannot be changed.
#60-67. Song registersResister buttons 1 -8
(8-9) Manual DrumsManual drums; a feature selected from the front panel by touchingselect (8) and track (9) together. To try this feature we suggest youbegin with user register 1 and then recall the manual drums. You willthen have a 41 (46 chromatic) note drum kit on the treble keyboard ofthe accordion that is TOUCH SENSITIVE. To exit touch the exit buttonto return to the normal playing mode.
Range
Range
ARPEG.
Split TRANS.
BASS
Chord 1
Chord 2
TRACKSelect
+0 Song F55 BassAc32 Piano121 StrSlo
ROF T120Violin OFPiano1 55StrSlo 35
ARR. C.HOLD T.START
Manual Drums

Page - 20

Page - 21
Additional Information about Small Display
(68 and 69) Small Display
The small display is your navigation guide – it tells you (68) what songbank you are on – and therefore you will know what bank of 8registers you are playing (buttons 60 – 67) whether they are FACTORYor USER registers.
The display will show F for Factory (which is the normal positionwhen you power up your Concerto).
When you select the USER song banks – (done with the SONG [59]button – turning on the top triangular LED indicating USER SONGS).The SONG BANKS are then selected with the row of buttons startingwith 29, 33, 37, 41, 45, 49, 53, & 58. This row will select the USERSONGS 1 thru 8 and the small display will display the number of theBANK.
The second set of 8 USER Songs selected with the buttons just belowthe previous row 30, 34, 38, 42, 46, 50, 54, & 58. This row selects banks9 thru 16 but is displayed as 1. thru 8. (please pay attention to the dot(.) after the number this is indicating the second set of Bank Numbers.
F.Bass CH 1
CH2
Solo OR1OR2
68 69
70 71 72
73 74 75
Concerto Small Display
SONG
1
9
Factory Song
1 2 3 4 5 6 7 8
Song Registers
EP 2
EP 1
H Piano
Organ 1Piano
Organ 2
Organ 3
Organ 4
8
16User Songs
Guitar 1
J Guitar
E Guitar
Mandol.
String 1
String 2
Choir
Violin
Clarinet
Sax
Flute
Oboe
Trumpet
Tromb.
Brass
F Horn
Vibe
Banjo
Marimb
Steel D
A Bass
F Bass
E Bass
Tuba
27 31 35 39 43 47 51 55
28 32 36 40 44 48 52 56
29 33 37 41 45 49 53 57
30 34 38 42 46 50 54 58
59 60 61 62 63 64 65 66 67
Page - 22
Chapter 4Making and RecordingYour Own Registers
In this chapter you will learn to record your own user registers. Theability to select sounds and record registers assists you in making yourConcerto a very unique and personal instrument.
The following examples will lead you through the steps necessary torecord user registers. Each example results in a different type or styleof sound.
Example l: Jazz Guitar with Strings
Step 1 Begin by selecting a factory song register, which is close toyour desired style. A register that has many of the traits you alreadydesire. This means you have far less work in creating the new registerif much of the register is similar to what you desire.
After you have recorded your own user song registers, you maychoose either one of these or a factory song register as the basis of anew register.
a. In this example choose factory song register l.
b. Touch the orchestra 1 volume button
c. Select jazz guitar - now assigned to orchestra I
d. Activate chord l and select jazz guitar again

Page - 23
You now have a jazz guitar on both the left hand chords and the righthand along with an acoustic bass. Using steps a through d practicemaking other changes.
Important when you select or touch a volume button you must changethe volume setting to activate the section. We suggest you practice thisso that when you touch a section button you only move the volume upor down by one number (example 55 to 56).
Step 2. Now you are ready to record your new register
a. Press both the Select and Exit together until you see a
new screen appear. Since you were at factory song(which cannot be recorded over) Concerto has taken youto user song bank 1 (if you wish to select another bankthen select it now [example - organ 3 button will recallsong 2.
b. Now select register I to write. That is it you haverecorded a new register.
Step 3. Recalling your new register.
a. Press the song button until the user song arrow is litb. Press user song bank l button (EP2)c. Press the desired register button 1- 8 (for this example 1
is where we recorded our new register and pressing 1will now recall it)
J Gtr J Gtra. Select & Exit TOGETHER
b. Press 1to record
J Gtr J Gtr
a.
b.
c.

Page - 24
Example 2: Jimmy Smith B3 organ with key click
Step 1. Selecting an appropriate register and then make selectionsand alterations (Since we are dealing with an organ registerwe will begin with factory song register 2).
a. Select factory song 2b. Select organ 2 on orchestra 1c. Turn off the chorus effect button
Step 2. Now record this new setting on user song bank 1 register 2
a. Press select and exit togetherb. Select song bank 1 (if not selected press EP 1 button)c. Press register 2 button to write
You have now completed and recorded two new registers on your Concerto!
Example 3: Banjo solo and guitar accompaniment on chord
Step 1. Selecting the sounds – For this register we will begin withfactory song register 3 (Guitar), which is similar to a banjo.
a. Select factory register 3b. Select banjo on orchestralc. Cancel orchestra2 (up and down volume together = off
Step 2. Record to song bank 1 register 3 (remember you have 128places to store your favorite settings located in 16 usersong banks times 8 registers each).
a. Press select/exitb. Make sure song 1 is selectedc. Press register 3 to write
Example 4: Strauss waltz style
Step 1. Selecting the sounds

Page - 25
a. Select factory register 4b. Select arpeggio #1 (left LED on next to arpeggio
button)c. Raise volume of both chord 1 and chord 2 to about 50
Step 2 Record to song bank 1 register 4
a. Press select/exitb. Select song 1c. Press register 4 to write
Recalling your registers
Once you have entered user song bank 1 you simply need press theregister button to recall one of the 4 registers we have just recorded. Ifyou have already recalled a register in that bank (example 2 the B3organ) and wish to recall the banjo setting simply press register 3 (youdo not need to press the song bank button as long as you do not wishto go to another song bank).
We are confident that with a little experimentation you will soon becreating many of your own personal combinations. Have funexperimenting.
If you wish to alter one of your user registers you may record over theoriginal and save the new version. You may also copy registers byrecalling them and then recording them to a new location. (This is anecessary step to avoid erasing a previously recorded register). This isespecially useful in programming sequences of registers to perform aconcert type arrangement. Using the sequence up switch on the side ofthe volume pedal will move you smoothly to the next register.

Page - 26
Chapter 5Overall Settings& Archival Memory
About Archival Memory*
*NOTE – DA-100 Series Users See Appendix for Memory CardInstructions
It is really simple! You can either bring (RECALL) 64 registers UP tothe ACCORDION or you can send (SAVE) 64 registers down to anarchival position in the generator box.
Let's examine a little further - you have the ability to SAVE or RECALL64 registers at one time. The 64 registers in the Accordion are labeledeither <SONGS 1to 8> or they are <SONGS 9 to 16>.
The Archive positions are labeled as numbers <1, 2, 3 and so on> anddepending on what was purchased in your accordion you have aminimum of 3 positions up to total possible 14 Archival positions.Should you be interested in purchasing more memory please contactAccordions International.
Below is a listing of how many archival positions are available with 1,2 , 3 or 4 memory units.
1 UNIT (Standard) provides 3 positions
2 UNITS (with 1 optional unit) provides a total of 7 positions
3 UNITS (with 2 optional units) provides a total of 10 positions
4 UNITS (with 3 optional units) provides a total of 14 positions

Page - 27
Now - back to the Archival positions - say you have 3 positions only inyour Generator box. Then when you enter the ARCHIVAL SCREENarea, in the bottom half of the screen with the <ORCH 1> button youselect the Archive positions and they will scroll only from 1 to 3 butshould you have a second FLASH memory unit installed you will thenhave a total of 7 positions should you have 3 units installed you willthen have 10 total archival positions and with all 4 units installed youwill have the maximum of 14 positions - that is 14 X 64 registers or 896total archival registrations (and combined with the 128 in the Concertothat is 1024 Registers) - more than even I would ever need.
It is best to think about ARCHIVAL MEMORY as you would thinkabout storing your Christmas Decorations – Archive is a place to putaway registers that may be specialty items such as 64 registers forChristmas songs.
Helpful hint! - It is very important that you keep a written log of yourregisters - and even making a title for all 64 registers as a group is agood idea - such as "Christmas Registers" then when you keep awritten record and you archive them say you store them to Archive 3and you develop 64 for Country Western and October-Fest and maybeanother for weddings and parties. Then you can logically save 64registers away with labels and for example have the following saved.
Archive 1 = Weddings and PartiesArchive 2 = Country Western and October-FestArchive 3 = Christmas
SAVING and RECALLING Archival Registers
Archiving is simple all you need to do is follow the instructions in theConcerto’s screen – below are the steps to SAVE or RECALL registersinto archival memory.
SONG
NEXT
EXIT
TOUCH
REVERB
BELLOW
CHOR.
Range
Range
ARPEG.
Split TRANS.
BASS
Chord 1
Chord 2
SOLO
Orch. 1
Orch. 2
Start/StopTRACKSelect
+0 Song F55 BassAc32 Piano121 StrSlo
ROF T120Violin OFPiano1 55StrSlo 35
ARR. C.HOLD T.START
GLOBAL EDITReverb depth 64Chorus depth 64Master Tune 0

Page - 28
1. Enter the GLOBALS Screens, by pressing the SELECT and NEXTtogether until you see the global screen appear.
2. Step with the NEXT key until you see the ARCHIVE MEMORYscreen
SONG
NEXT
EXIT
TOUCH
REVERB
BELLOW
CHOR.
Range
Range
ARPEG.
Split TRANS.
BASS
Chord 1
Chord 2
SOLO
Orch. 1
Orch. 2
Start/StopTRACKSelect
+0 Song F55 BassAc32 Piano121 StrSlo
ROF T120Violin OFPiano1 55StrSlo 35
ARR. C.HOLD T.START
3. Follow the instructions in the screen.
4. Decide if you want to do by pressing the SOLO button < or >RECALL SONGS 1 TO 8RECALL SONGS 9 TO 16SAVE SONGS 1 TO 8SAVE SONGS 9 TO 16
Note: You may want to SAVE the song registers in your accordion firstbefore you RECALL song registers from the archive memory.Recalling means that you will erase and replace 64 registers in youraccordion with 64 registers from the archive memory.
5. Then use the ORCH1 and press < or >to choose the desiredarchive 1, 2 or 3. Change to the archive you want to either RECALL orSAVE.
6. Double check and read the screen THREE TIMES –and make surethe statement is really what you want to do – remembering SAVE willsave your registers to the selected archive location in your generatorbox – and RECALL means that you will replace the selected 64registers in your accordion with the selected archive position. Onceyou are sure you have read it three times and are sure that you want toproceed then go on to the final step. Otherwise you may always pressEXIT and abort the procedure.
7. Now that you are ready to either SAVE or RECALL the desired 64registers – you simply press the SPLIT and T.START buttons togetheron your grill.
ARCHIVE MEMORYRECALL SONGS [1 TO 8]FROM ARCHIVE [ 1 ]PUSH SPLIT & T. START
SONG
NEXT
EXIT
TOUCH
REVERB
BELLOW
CHOR.
Range
Range
ARPEG.
Split TRANS.
BASS
Chord 1
Chord 2
SOLO
Orch. 1
Orch. 2
Start/StopTRACKSelect
+0 Song F55 BassAc32 Piano121 StrSlo
ROF T120Violin OFPiano1 55StrSlo 35
ARR. C.HOLD T.START
Page - 29
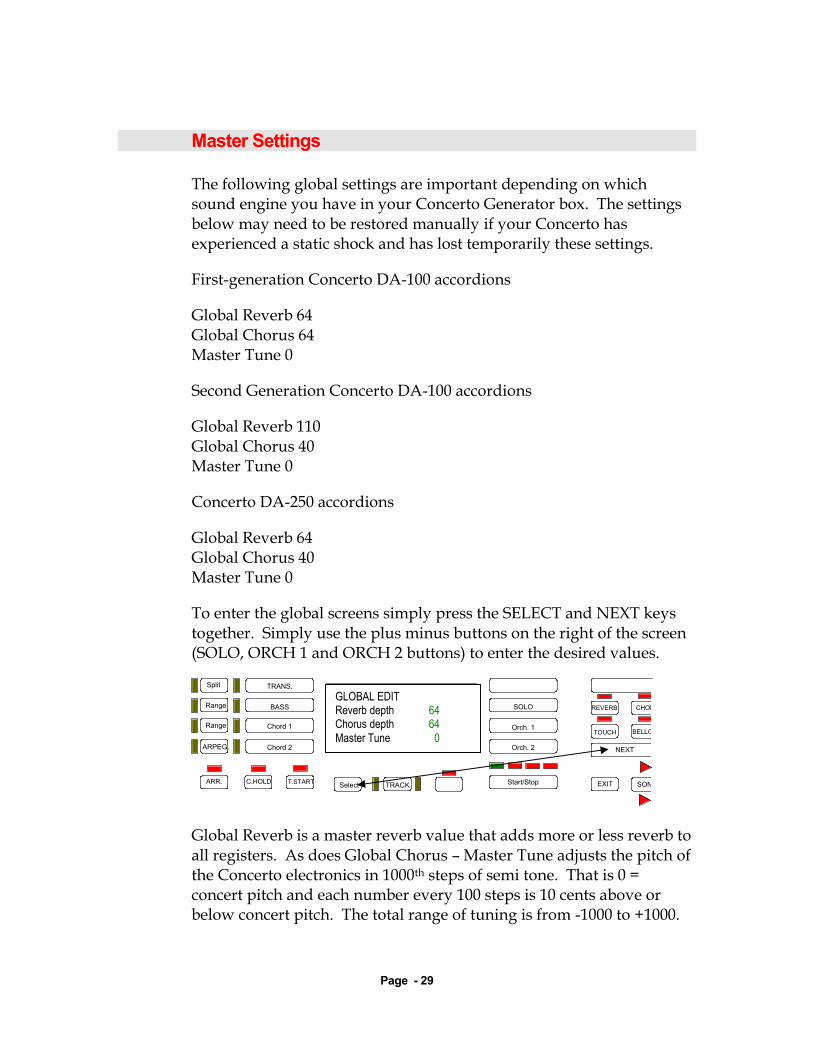
Master Settings
The following global settings are important depending on whichsound engine you have in your Concerto Generator box. The settingsbelow may need to be restored manually if your Concerto hasexperienced a static shock and has lost temporarily these settings.
First-generation Concerto DA-100 accordions
Global Reverb 64Global Chorus 64Master Tune 0
Second Generation Concerto DA-100 accordions
Global Reverb 110Global Chorus 40Master Tune 0
Concerto DA-250 accordions
Global Reverb 64Global Chorus 40Master Tune 0
To enter the global screens simply press the SELECT and NEXT keystogether. Simply use the plus minus buttons on the right of the screen(SOLO, ORCH 1 and ORCH 2 buttons) to enter the desired values.
SONG
NEXT
EXIT
TOUCH
REVERB
BELLOW
CHOR.
Range
Range
ARPEG.
Split TRANS.
BASS
Chord 1
Chord 2
SOLO
Orch. 1
Orch. 2
Start/StopTRACKSelect
+0 Song F55 BassAc32 Piano121 StrSlo
ROF T120Violin OFPiano1 55StrSlo 35
ARR. C.HOLD T.START
Global Reverb is a master reverb value that adds more or less reverb toall registers. As does Global Chorus – Master Tune adjusts the pitch ofthe Concerto electronics in 1000th steps of semi tone. That is 0 =concert pitch and each number every 100 steps is 10 cents above orbelow concert pitch. The total range of tuning is from -1000 to +1000.
GLOBAL EDITReverb depth 64Chorus depth 64Master Tune 0

Page - 30
We recommend you leave tuning at 0 which is in tune with theConcerto reeds.
Some Final Notes
Now that you have learned the basics of your Concerto it is time toexplore and experiment with all the possibilities available to you. Keepthis manual as a handy reference.
Most importantly, have fun exploring, experimenting, and wowingyour family, friends, and community with your new incomparableConcerto. We wish you lots of fun and happy years of enjoyment.
To clean your accordion we recommend Uncle Paul’s AccordionFormula #1 and a clean micro fiber cloth. Spray the cloth and thenwipe and restore the lustrous shine of your Concerto. Avoid sprayingany cleaner or polish directly on the area’s that are engraved on yourConcerto as liquids may dissolve and wash away the decorative filling.
Thank you for owning a Concerto – you own a very special musicalinstrument that has been not only engineered with love and care – buthas had much thought and design in creating the hand built Concertoyou own. This has been a personal dream for me to offer to the worldthe Concerto accordion and I am proud that you have chosen to ownthe World’s BEST Accordion!
All the best to you and if you have any questions please feel free to callme – it will be my pleasure to personally assist you. And again thankyou for caring enough to own a Concerto!
Sincerely,
Paul PasqualiAccordions International(Home of the Concerto)
Page - 31
APENDIX AHistory of ConcertoSoftware Upgrades.
Note: from time to time we have added and will continue to add features to the Concerto – belowis a list of past releases and the features that have been added – note all these features are in yournew Concerto DA-250. Please feel free to contact us about new updates from time to time.
Version 1.07 New Release
Version 1.07 provides several fixes as well as allows the Concerto to be compatiblebetween sound engines including the new DREAM sound engine.
Also version 1.07 allows the pedal feature of both sequences UP and DOWN ofSong Registers. You will find that now the Right butterfly switch on theExpression Pedal advances the Song Registers while the left butterfly switchdecrements the Song Register to the previous Register.
If you require STOP/START to be on the floor with version 1.07 then an optionalfootswitch is available. Please contact your dealer or Accordions International.

Page - 32
Version 1.10c Release
Version 1.10c incorporates all previous upgrades including version 1.07 andprovides two new features to the Concerto. The first is UP and DOWN volumeof the Section Buttons (Bass, Solo, ORCH 1, etc.) has been changed. Now whenthe volume reaches the lowest or highest level it stops at either 0 or 63 and doesnot wrap around and cycle again. Also, the GS Bank Select is now implementedon the Footswitch programs.
The most significant feature of is the Left Hand HOLD function. The C.HOLDbutton turns on and off this feature. When the C.HOLD button is on the lefthand remains frozen to the current Song Register and as new Song Registers arerecalled they are applied only to the right hand. While the Concerto is in thismode you can still make changes manually to the left hand and record newregisters while the C.HOLD feature is on.Example you may recall Factory Setting #2 (ORGAN) and then select C.HOLDand then Recall Factory Setting #1. You will then have the ORGAN on the lefthand and the Piano & Strings on the Right hand (this could then be saved as anew register). Now release the C.HOLD function and press Factory Setting #1again and you will have Acoustic Bass & Piano again in the left hand and theSong Registers will now apply to both Left and Right sides of the Concerto.
Accordions International1760 South 450 WestSalt Lake City, UT 84115www.AccordionInfo.comPhone 801-485-5840
Version 1.10D Release
Version 1.10D incorporates the GS PAN effect. This allows the sound for each ofthe musical sections of the Concerto to be PANNED in the STEREO field fromLEFT (0) to RIGHT (63) with Center being (32). To access and adjust the PANfeature in the default mode simply press the NEXT key until you see PAN in theupper left corner of the display. The PAN setting is then displayed for eachsection. Simply change the number from 0 to 64 to adjust the PAN for eachsection desired.The PAN values are specific for each REGISTER – this means you can save thesettings in a USER REGISTER and each USER REGISTER can have its very ownPAN settings.NOTE – YOU MUST HAVE A STEREO SOUND SYSTEM TO HEAR THESTEREO PAN EFFECT!

Page - 33
Version 1.11b Gateway to DA-250 ReleaseVersion 1.11B incorporates all the previous versions and is the first release for the ConcertoDA-250. The major change here is the new generator box and this software is the gatewayinterface to the new DA-250 Generator box including the FLASH ARCHIVAL MEMORYreplacing the memory cards of the DA-250 generator. The advantages are added power,quieter design, better sound, greater memory capacity and the fact that the memory is notdependent on battery power. Archival memory is more secure and stable with this newtechnology.You may save SONG Banks 1 to 8 OR 9 to 16 from the accordion to the ARCHIVE as well asrecall archive memory back to SONG Banks 1 to 8 or 9 to 16 in the accordionEnter the GLOBAL Screens – Press SELECT and NEXT together until you see the globalscreen appearStep with the NEXT key until you see the archive memory screen and follow the instructionsin the screen. The generator box is shipped with 3 archive positions and is expandable to 14positions.To SAVE 64 Registers created in your Concerto
Step 1 – Enter Archive Menu – See instructions above with SELECT & NEXTStep 2 – Select with SOLO button – UP or DOWN Select the 64 Registers you want to
save either [SAVE SONGS 1-8] or [SAVE SONGS 9-16]Step 3 - Select the archive location to save your 64 registers use the ORCH 1 button,
either 1, 2 or 3 (optional memory locations to 14).Step 4 – When you have completed making your selection of 64 registers to SAVE and
also selected the archive location PRESS [SPIT] and [T START] and wait for yourConcerto to could up to 64 as is transfers the data.
Step 5 – When the data transfer reaches 64 the Archive Screen returns – you mayeither save or recall more groups of 64 registers or press [EXIT] to exit the archive menu.TO RECALL 64 Registers saved in your Concerto Sound Module
Step 1 – Enter Archive Menu – See instructions above with SELECT & NEXTStep 2 – Select with SOLO button – UP or DOWN Select the 64 Registers you want to
RECALL (bring up to your Concerto)by selecting either[RECALL SONGS 1-8] or [RECALL SONGS 9-16]Step 3 – Now select the archive location where you want to recall your 64 registers
from by using the ORCH 1 button, either 1, 2 or 3 (optional memory locations to 14).Step 4 – When you have completed making your selection of the archival location to
recall 64 registers to RECALL and also selected the archive location PRESS [SPIT]and [T START] and wait for your Concerto to could up to 64 as is transfers the data.
Step 5 – When the data transfer reaches 64 the Archive Screen returns – you mayeither save or recall more groups of 64 registers or press [EXIT] to exit the archive menu.
Accordions International1760 South 450 WestSalt Lake City, UT 84115www.AccordionInfo.comPhone 801-485-5840

Page - 34
APPENDIX BConcerto DA-250Sound List & Drum Charts
PC Bnk Sound1 0 Grand Piano
8 Grand Piano 216 Grand Piano+Strings24 Octa Piano 125 Octa Piano 231 Tibia 16 & 4 Trem32 Bassoon
2 0 Bright Piano31 Tibia 16 & 8 Trem32 Cassotto
3 0 El.Grand Piano31 Tibia 16 & 4 & 2 Trem32 Double Basson
4 0 Honky Tonk31 Tibia 16 & 8 & 4 Trem32 16+16+8
5 0 E. Piano 17 Detune E.Piano18 E.Piano 316 Soft E.Piano24 Mix E.Piano31 Tibia 16 & 8 & 4 & 2 Trem32 Bandon1
6 0 E.Piano 28 Detune E.Piano216 E.Piano 2 + Strings24 E.Piano 2 + Voice31 Tibia 16 & 2 2/3 Trem32 Bandon2
7 0 Harpsichord 18 Harpsichord 216 Harpsi + Strings31 Tibia 16 & 8 & 2 2/3 Trem32 Tuba Fisa
8 0 Clavinet8 Funky Clavinet31 Tibia 16 & 4 & 2 2/3 Trem32 Accordeon
9 0 Celesta31 Tibia 16 & 8 & 4 & 2 2/3 Trem32 Horn
10 0 Glockenspiel32 Organ31 Tibia 16 & 8 & 3 1/5 Trem
11 0 Music Box31 Tibia 8 & 1 3/5 Trem32 Harmonium
12 0 Vibes31 Tibia 8 & 2 2/3 & 1 3/5 Trem32 Master 1
13 0 Marimba8 Marimba 231 Tibia 16 & 6 2/5 & 8 & 4 & 2 Trem32 Master 2
14 0 Xylophone31 Tibia 16 & 6 2/5 & 8 & 4 & 2 2/3 Trem32 Master 3
15 0 Chimes8 Church Bell9 Church Bell 216 Tubular Bells31 Theatre Organ 132 Master 4
16 0 Dulcimer31 Theatre Organ 232 Master 5
17 0 Drawbar Organ8 Detune Organ 113 Click Organ14 Theatre Organ 115 Theatre Organ 216 60' Organ17 Rock Organ 118 Cool Organ20 Tone Weel22 Rotor Organ23 Gospel Organ26 Jazz Organ 227 Rock Organ 231 Tibia 16 & 8 & 4 Trem + PH8 Trem32 Master 6
18 0 Jazz Organ 38 Jazz Organ 415 Tibia 16 & 4 Tremolo16 Detune Organ 231 Tibia 8 Trem + Glock32 Musette
19 0 Rock Organ 314 Chapel Organ

Page - 35
15 Tibia 8 & 4 Tremolo17 Tibia 8' Tremolo18 Tibia 16 & 2 Tremolo19 Tibia 8 Trem+Post Horn 820 Kinura 8' + Tremolo21 Tibia 8 Trem+Vox 8 Trem22 Trumpet 8'23 Vox 8 Tremolo24 Tibia 8 Trem + Chrysoglott25 Post Horn Tremolo31 Tibia 8 & 4 & 2 w/ Tremolo32 French
20 0 Church Organ 18 Church Organ 214 Lower Organ15 Vox 8 Tremolo16 Church Organ 324 Church Org.// Dynamic Choir31 Tibia 8 Trem + Kinura 8 + Glock32 Italian Accordion
21 0 Reed Organ31 Tibia 8 Trem + Trumpet 8 Trem32 Brilliant
22 0 Musette8 Master31 Tibia 8 Trem + Post Horn 832 Violino
23 0 Harmonica8 Blues Harmonica31 Tibia 8 & 4 Trem + PosHor 832 Celeste
24 0 Tango Accordion31 Tibia 8 Trem + Vox 8 Trem32 Tremolo
25 0 Nylon Guitar8 Nylon Guitar 216 Nylon Guitar+Strings31 Tibia 8 & 4 Trem + Vox Trem32 American Tremolo
26 0 Steel Guitar8 12 Strings16 Mandolin31 Tibia 8 Trem32 Tango Accordion
27 0 Jazz Guitar1 Jazz Guitar 24 Double Jazz Guitar 15 Double Jazz Guitar 26 Jazz Guitar + Vibes8 Hawaiian Guitar 116 Hawaiian Guitar 224 Country Guitar31 Tibia 8 Trem + Kinura 832 Musette+Piccolo
28 0 Clean Guitar 18 Clean Guitar 216 Electric Guitar24 60 's Guitar31 Tibia 8 & 2 2/3 Trem + Kinura 832 Oboe1
29 0 Muted Guitar8 Funk Guitar 116 Funk Guitar 231 Tibia 8 & 4 Trem32 Oboe 2
30 0 Overdrive Guitar31 Tibia 8 & 2 Trem32 Clarinet
31 0 Distortion Guitar8 Feed Back Guitar16 Distorted Guitar Vibr.31 Tibia 8 & 4 & 2 Trem32 Flute
32 0 Guitar Harmonics8 Guitar Feed Back31 Tibia 8 & 4 & 2 2/3 Trem32 Piccolo
33 0 Acoustic Bass 11 Acoustic Bass 28 Acoustic Bass 316 Bass + Ride Cymbal31 Tibia 8 Trem with Chrysoglott32 Diatonic
34 0 Finger Bass 11 Finger Bass 22 Finger // Slap Bass3 Finger Bass 38 Big Bass16 Big Bass Sustain24 Organ Bass 131 Post Horn + Trumpet32 Diatonic Bass
35 0 Pick Bass8 Bass 16+816 Bass 824 Organ Bass 231 Post Horn + Trumpet + Kinura32 Diatonic Chord
36 0 Fretlees Bass 18 Fretless Bass 231 Post Horn + Trumpet + Kinura Trem32 Accordion Bass 1
37 0 Slap Bass 18 Slap Bass 231 Trumpet 832 AccordionBass2
38 0 Slap Bass 38 Slap Bass 4

Page - 36
31 Trumpet 8 Trem32 Accordion Chord 1
39 0 Synth Bass 18 Synth Bass 316 Synth Bass 531 Post Horn32 Accordion Chord 2
40 0 Synth Bass 28 Synth Bass 431 Post Horn + Trem32 Accordion Bass 3
41 0 Violin 18 Violin 231 Kinura 8
42 0 Viola31 Kinura 8 + Trem
43 0 Cello31 Vox Humana 8
44 0 Contrabass31 Vox 8 Trem
45 0 Tremolo Strings46 0 Pizzicato47 0 Harp48 0 Timpani49 0 Strings Ensemble 1
16 Dynamic Orchestra25 Orchestra + Flute26 Orchestra + Oboe27 Orchestra + Horn 128 Orchestra + Horn 2
50 0 Strings Ensemble 28 Octa Strings 116 Strings Ensemble 317 Octa Strings 218 Accomp. Strings 119 Accomp. Strings 2
51 0 Synth Strings 152 0 Synth Strings 253 0 Choir Aah
4 Choir Aah + Voice8 Big Choir16 Choir+Strings 117 Choir+Strings 218 Strings + Voice24 Choir + Organ25 Choir + Principal 8'
54 0 Scat Voice55 0 Synth Voice
8 Pop Voice16 Soft Pad
56 0 Orchestra Hit57 0 Trumpet
8 Trumpet216 Trumpet3
58 0 Trombone 14 Trombone 28 Mellow Trombone24 Soft Trombone
59 0 Tuba8 Tuba 2
60 0 Muted Trumpet61 0 French Horn 1
8 French Horn 216 Horn Section17 Flugel Horn
62 0 Brass3 Soft Brass 14 Soft Brass 28 Soft Brass 39 Soft Brass 416 Big Brass 124 Big Brass 225 Big Brass 326 Big Brass 4
63 0 Synth Brass 18 Synth Brass 3
64 0 Synth Brass 28 Synth Brass 4
65 0 Soprano Sax66 0 Alto Sax 1
8 Alto Sax 216 Circus Sax
67 0 Tenor Sax16 Tenor Sax Vibrato24 Sax Section 125 Sax Section 226 Sax Section 3
68 0 Baritone Sax69 0 Oboe70 0 English Horn71 0 Bassoon72 0 Clarinet
4 Clarinet Vibrato8 Mellow Clarinet16 Circus Clarinet24 Clarinet Section
73 0 Piccolo74 0 Flute
8 Jazz Flute75 0 Recorder76 0 Pan Flute77 0 Blow Bottle78 0 Shakuhachi79 0 Whistle80 0 Ocarina81 0 Square 1
1 Square 28 Syn Wave

Page - 37
82 0 Saw Tooth1 Saw Tooth 28 Syn Flute
83 0 Calliope84 0 Chiff85 0 Charang86 0 Voice
8 Voice Sust.87 0 Fifths88 0 Bass Lead 1
8 Bass Lead 289 0 Fantasy 1
8 Orchestra Bell16 Fantasy 2
90 0 Warm Pad91 0 Polisynth92 0 Choir93 0 Bowed94 0 Metallic95 0 Halo96 0 Sweep97 0 Rain98 0 Soundtrack99 0 Crystal100 0 Atmosphere 1
8 Atmosphere 2101 0 Brightness102 0 Goblins
8 Ghost103 0 Echoes
2 Echo Pan104 0 Sci-fi105 0 Sitar106 0 Banjo107 0 Shamisen108 0 Koto 1
8 Koto 2109 0 Kalimba110 0 Bagpipe111 0 Fiddle112 0 Shanai113 0 Tinkbell114 0 Agogo115 0 Steel Drum116 0 Wood Block
8 Castanet117 0 Taiko Drum
8 Concert Bass Drum118 0 Melodic Tom 1
8 Melodic Tom 2119 0 Syn Drum 1
8 Syn Drum 2
9 Syn drum 3120 0 Reverse Cymbal121 0 Guitar Fret Noise
1 Guitar Cut Noise2 String Slap
122 0 Breath Noise1 Key Click
123 0 Sea Shore1 Rain2 Thunder3 Wind4 Stream5 Bubble
124 0 Birds1 Dog2 Horse3 Birds 2
125 0 Telephone 11 Telephone 22 Door Open3 Door Close4 Scratch5 Wind Chime
126 0 Helicopter1 Car Start2 Car Break3 Car Pass4 Car Crash5 Police6 Train7 Jet8 Star Ship9 Burst Noise
127 0 Applause1 Laughing2 Screaming3 Punch4 Heart Beat5 Foot Step6 Yeah7 One8 Two9 Three10 Four
128 0 Gun Shot1 Machine2 Laser Gun3 Explosion

Page - 38
Concerto Drum Sounds Chart ANote STANDARD PC=1 ROOM PC=9 POWER PC=17 ELECTRIC PC=25 TR-808 PC=2624 - C1 Fingers Snap Left Fingers Snap Left Fingers Snap Left Fingers Snap Left Fingers Snap Left25 - C#1 Finger Snap Right Finger Snap Right Finger Snap Right Finger Snap Right Finger Snap Right26 - D1 Snare Roll Snare Roll Snare Roll Snare Roll Snare Roll27 - D#1 High Q High Q High Q High Q High Q28 - E1 Slap Slap Slap Slap Slap29 - F1 Scratch Push Scratch Push Scratch Push Scratch Push Scratch Push30 - F#1 Scratch Pull Scratch Pull Scratch Pull Scratch Pull Scratch Pull31 - G1 Sticks Sticks Sticks Sticks Sticks32 - G#1 Square Click Square Click Square Click Square Click Square Click33 - A1 Metron. Click Metron. Click Metron. Click Metron. Click Metron. Click34 - A#1 Metron. Bell Metron. Bell Metron. Bell Metron. Bell Metron. Bell35 - B1 Bass Drum 2 Bass Drum 2 Bass Drum 2 El. Bass Drum 2 808 Bass Drum 236 - C2 Bass Drum 1 Bass Drum 1 Bass Drum 1 El. Bass Drum 1 808 Bass Drum 137 - C#2 Side Stick Side Stick Side Stick Side Stick Side Stick38 - D2 Snare Drum 1 Snare Drum 1 Gated Snare El. Snare Drum 1 808 Snare Drum39 - D#2 Hand Clap Hand Clap Hand Clap Hand Clap Hand Clap40 - E2 Snare Drum 2 Snare Drum 2 Snare Drum 2 Gated Snare Snare Drum 241 - F2 Low Floor Tom Room Low Tom 2 Room Low Tom 2 El. Low Tom 2 808 Low Tom 242 - F#2 Close Hi-Hat Close Hi-Hat Close Hi-Hat Close Hi-Hat 808 Close Hi-Hat43 - G2 H. Floor Tom Room Low Tom 1 Room Low Tom 1 El. Low Tom 1 808 Low Tom 144 - G#2 Pedal Hi-Hat Pedal Hi-Hat Pedal Hi-Hat Pedal Hi-Hat 808 Pedal Hi-Hat45 - A2 Low Tom Room Mid Tom 2 Room Mid Tom 2 El. Mid Tom 2 808 Mid Tom 246 - A#2 Open Hi-Hat Open Hi-Hat Open Hi-Hat Open Hi-Hat 808 open Hi-Hat47 - B2 Low Mid Tom Room Mid Tom 1 Room Mid Tom 1 El. Mid Tom 1 808 Mid Tom 148 - C3 Hi Mid Tom Room Hi Tom 2 Room Hi Tom 2 El. Hi Tom 2 808 Hi Tom 249 - C#3 Crash Cymbal1 Crash Cymbal1 Crash Cymbal1 Crash Cymbal1 808 Crash Cymb 150 - D3 High Tom Room Hi Tom 1 Room Hi Tom 1 El. Hi Tom 1 808 Hi Tom 151 - D#3 Ride Cymbal 1 Ride Cymbal 1 Ride Cymbal 1 Ride Cymbal 1 Ride Cymbal 152 - E3 Chinese Cymbal Chinese Cymbal Chinese Cymbal Reverse Cymbal Chinese Cymbal53 - F3 Ride Bell Ride Bell Ride Bell Ride Bell Ride Bell54 - F#3 Tambourine Tambourine Tambourine Tambourine Tambourine55 - G3 Splash Cymbal Splash Cymbal Splash Cymbal Splash Cymbal Splash Cymbal56 - G#3 Cowbell Cowbell Cowbell Cowbell 808 Cow Bell57 - A3 Crash Cymbal2 Crash Cymbal2 Crash Cymbal2 Crash Cymbal2 Crash Cymbal258 - A#3 Vibraslap Vibraslap Vibraslap Vibraslap Vibraslap59 - B3 Ride Cymbal 2 Ride Cymbal 2 Ride Cymbalal 2 Ride Cymbal 2 Ride Cymbal 260 - C4 Hi Bongo Hi Bongo Hi Bongo Hi Bongo Hi Bongo61 - C#4 Low Bongo Low Bongo Low Bongo Low Bongo Low Bongo62 - D4 Mute Hi Conga Mute Hi Conga Mute Hi Conga Mute Hi Conga 808 Mute Hi Cong63 - D#4 Open Hi Conga Open Hi Conga Open Hi Conga Open Hi Conga 808 Open Hi Cong64 - E4 Conga Low Conga Low Conga Low Conga Low 808Low Conga65 - F4 High Timbale High Timbale High Timbale High Timbale High Timbale66 - F#4 Low Timbale Low Timbale Low Timbale Low Timbale Low Timbale67 - G4 High Agogo High Agogo High Agogo High Agogo High Agogo68 - G#4 Low Agogo Low Agogo Low Agogo Low Agogo Low Agogo69 - A4 Cabasa Cabasa Cabasa Cabasa Cabasa70 - A#4 Maracas Maracas Maracas Maracas 808 Maracas71 - B4 Short Whistle Short Whistle Short Whistle Short Whistle Short Whistle72 - C5 Long Whistle Long Whistle Long Whistle Long Whistle Long Whistle73 - C#5 Short Guiro Short Guiro Short Guiro Short Guiro Short Guiro74 - D5 Long Guiro Long Guiro Long Guiro Long Guiro Long Guiro75 - D#5 Claves Claves Claves Claves 808 Claves76 - E5 Hi Woodblok Hi Woodblok Hi Woodblok Hi Woodblok Hi Woodblok77 - F5 Low Woodblok Low Woodblok Low Woodblok Low Woodblok Low Woodblok78 - F#5 Mute Cuica Mute Cuica Mute Cuica Mute Cuica Mute Cuica79 - G5 Open Quica Open Quica Open Quica Open Quica Open Quica80 - G#5 Mute Triangle Mute Triangle Mute Triangle Mute Triangle Mute Triangle81 - A5 Open Triangle Open Triangle Open Triangle Open Triangle Open Triangle82 - A#5 Shaker Shaker Shaker Shaker Shaker83 - B5 Jingle Bell Jingle Bell Jingle Bell Jingle Bell Jingle Bell84 - C6 Bell Tree Bell Tree Bell Tree Bell Tree Bell Tree85 - C#6 Castanets Castanets Castanets Castanets Castanets86 - D6 Mute Surdo Mute Surdo Mute Surdo Mute Surdo Mute Surdo87 - D#6 Open Surdo Open Surdo Open Surdo Open Surdo Open Surdo

Page - 39
Concerto Drum Sounds Chart BJAZZ PC=33 BRUSH PC=41 ORCHES. PC=49 SOUND FX PC=57
24 - C1 Fingers Snap Left Fingers Snap Left Fingers Snap Left25 - C#1 Finger Snap Right Finger Snap Right Finger Snap Right26 - D1 Snare Roll Snare Roll Snare Roll27 - D#1 High Q High Q Closed Hi-hat28 - E1 Slap Slap Pedal Hi-Hat29 - F1 Scratch Push Scratch Push Open Hi-Hat30 - F#1 Scratch Pull Scratch Pull Ride Cymbal31 - G1 Sticks Sticks Sticks32 - G#1 Square Click Square Click Square Click33 - A1 Metron. Click Metron. Click Metron. Click34 - A#1 Metron. Bell Metron. Bell Metron. Bell35 - B1 Bass Drum 2 Bass Drum 2 Bass Drum 236 - C2 Bass Drum 1 Bass Drum 1 Bass Drum 137 - C#2 Side Stick Side Stick Side Stick38 - D2 Jazz Snare 2 Brush Tap Concert SD39 - D#2 Hand Clap Brush Slap Castanets High Q40 - E2 Jazz Snare 1 Brush Swirl Concert SD Slap41 - F2 Low Floor Tom Low Floor Tom Timpani F Scratch Push42 - F#2 Close Hi-Hat Close Hi-Hat Timpani F# Scratch Pull43 - G2 H. Floor Tom H. Floor Tom Timpani G Sticks44 - G#2 Pedal Hi-Hat Pedal Hi-Hat Timpani G# Square Click45 - A2 Low Tom Low Tom Timpani A Metronome Click46 - A#2 Open Hi-Hat Open Hi-Hat Timpani A# Metronome Bell47 - B2 Low Mid Tom Low Mid Tom Timpani B Guitar Slide48 - C3 Hi Mid Tom Hi Mid Tom Timpani C Guitar Cut Noise 149 - C#3 Crash Cymbal1 Crash Cymbal1 Timpani C# Guitar Cut Noise 250 - D3 High Tom High Tom Timpani D Double Bass Slap51 - D#3 Ride Cymbal 1 Ride Cymbal 1 Timpani D# Key Click52 - E3 Chinese Cymbal Chinese Cymbal Timpani E Laughing53 - F3 Ride Bell Ride Bell Timpani F Screaming54 - F#3 Tambourine Tambourine Tambourine Punch55 - G3 Splash Cymbal Splash Cymbal Splash Cymbal Heart Beat56 - G#3 Cowbell Cowbell Cowbell Foot Step 157 - A3 Crash Cymbal2 Crash Cymbal2 Concert Cymb. 2 Foot Step 258 - A#3 Vibraslap Vibraslap Vibraslap Applause59 - B3 Ride Cymbal 2 Ride Cymbal 2 Concert Cymb. 1 Door Creaking60 - C4 Hi Bongo Hi Bongo Hi Bongo Door Closing61 - C#4 Low Bongo Low Bongo Low Bongo Scratch62 - D4 Mute Hi Conga Mute Hi Conga Mute Hi Conga Wind Chime63 - D#4 Open Hi Conga Open Hi Conga Open Hi Conga Car Start64 - E4 Conga Low Conga Low Conga Low Car Breaking65 - F4 High Timbale High Timbale High Timbale Carr Pass66 - F#4 Low Timbale Low Timbale Low Timbale Car Crash67 - G4 High Agogo High Agogo High Agogo Police68 - G#4 Low Agogo Low Agogo Low Agogo Train69 - A4 Cabasa Cabasa Cabasa Jet70 - A#4 Maracas Maracas Maracas Helicopter71 - B4 Short Whistle Short Whistle Short Whistle Starship72 - C5 Long Whistle Long Whistle Long Whistle Gun Shot73 - C#5 Short Guiro Short Guiro Short Guiro Machine Gun74 - D5 Long Guiro Long Guiro Long Guiro Laser75 - D#5 Claves Claves Claves Explosion76 - E5 Hi Woodblok Hi Woodblok Hi Woodblok Dog77 - F5 Low Woodblok Low Woodblok Low Woodblok Horse78 - F#5 Mute Cuica Mute Cuica Mute Cuica Birds79 - G5 Open Quica Open Quica Open Quica Rain80 - G#5 Mute Triangle Mute Triangle Mute Triangle Thunder81 - A5 Open Triangle Open Triangle Open Triangle Wind82 - A#5 Shaker Shaker Shaker Seashore83 - B5 Jingle Bell Jingle Bell Jingle Bell Bubble84 - C6 Bell Tree Bell Tree Bell Tree Yeah85 - C#6 Castanets Castanets Castanets86 - D6 Mute Surdo Mute Surdo Mute Surdo87 - D#6 Open Surdo Open Surdo Open Surdo88 - E6 Applause

Page - 40
AppendixCThis Section For DA-100 Owners ONLY
Concerto DA-100 Memory CardMemory Card Device Prior to Archival
Overview
The RAM-64 Memory card will hold 64 Performance Registers at onetime from your Concerto. These can be either from Songs 1 to 8 orfrom Songs 9 to 16. The memory card must be inserted with thechrome cover face down and going in first. Opposite of the chromecover you will find a small switch that is used for memory protection.Next to the switch is a small plastic carrier that pulls out (see theindent where the nail of your thumb can be used to pull the carrierout). The card may be shipped to you with the carrier partially open.
Installing Battery
Pull the battery carrier out and install the 2016 battery in the carrierpositive side up and insert the carrier back into the slot fully inserted.The battery will last about two years but we suggest you change thebattery once a year.
Using the Memory Card
With the Concerto OFF insert the card with the chrome end face downfirst into the Concerto Generator until you feel the card latch intoplace. You will first feel a little resistance and then the card will firmlylatch into place. Make sure you always insert and remove the memorycard with the power OFF.
With the power ON from the grill of the accordion enter the GLOBALscreen by pressing SELECT and NEXT together. Then with the NEXT

Page - 41
key turn the page in the display until you come to the page dealingwith the memory card. Note that if the memory card is not installedcorrectly the screen will read MEMORY CARD NOT INSTALLED.Then use the SOLO key to change the wording in the display. Thereare four options.
*RECALL SONGS 1 to 8=COPY from CARD to *Concerto song banks 1 to 8
*RECALL SONGS 9 to 16=COPY from CARD to *Concerto song banks 9 to 16
SAVE SONGS 1 to 8=Save from Concerto to CARD song banks 1 to 8
SAVE SONGS 9to 16=Save from Concerto to CARD song banks 9 to 16
*RECALL will ERASE registers in the accordion and replace them withregisters stored on the card!
Memory Protect Switch
The memory protect switch will allow you to save data on the card ¬ accidentally write over or erase the settings you have saved. Whenthe switch is in the WRITE PROTECT position positions 1 and 2 abovewill read MEMORY PROTECTED and the Concerto will not allow youto write onto the protected card. If you want to SAVE information to aprotected card simply move the switch.