Embed Size (px)
Citation preview
Comparison of real and simulated
galaxies using Deep Learning
Pavan Vynatheya
BS-MS student
IISER Kolkata, India
Supervisor :
Prof. Pauline Barmby
University of Western Ontario
London, Canada

Contents
1 Prerequisites . . . . . . . . . . . . . . . . . . . . . . . . . . . . . . . . . . . . . . 2
1.1 Machine learning and artificial neural networks . . . . . . . . . . . . . . 2
1.2 Convolutional neural networks . . . . . . . . . . . . . . . . . . . . . . . . 3
1.3 Anomaly detection . . . . . . . . . . . . . . . . . . . . . . . . . . . . . . 4
1.4 Python packages . . . . . . . . . . . . . . . . . . . . . . . . . . . . . . . 4
2 The project . . . . . . . . . . . . . . . . . . . . . . . . . . . . . . . . . . . . . . 5
2.1 Motivation . . . . . . . . . . . . . . . . . . . . . . . . . . . . . . . . . . . 5
2.2 Objective . . . . . . . . . . . . . . . . . . . . . . . . . . . . . . . . . . . 5
2.3 Algorithm and code . . . . . . . . . . . . . . . . . . . . . . . . . . . . . . 5
2.4 Directory structure . . . . . . . . . . . . . . . . . . . . . . . . . . . . . . 7
2.5 Datasets . . . . . . . . . . . . . . . . . . . . . . . . . . . . . . . . . . . . 7
2.6 Networks . . . . . . . . . . . . . . . . . . . . . . . . . . . . . . . . . . . 9
2.7 Optimizers . . . . . . . . . . . . . . . . . . . . . . . . . . . . . . . . . . . 11
2.8 Program parameters . . . . . . . . . . . . . . . . . . . . . . . . . . . . . 12
3 Results . . . . . . . . . . . . . . . . . . . . . . . . . . . . . . . . . . . . . . . . . 13
3.1 Running the program . . . . . . . . . . . . . . . . . . . . . . . . . . . . . 13
3.2 Code output . . . . . . . . . . . . . . . . . . . . . . . . . . . . . . . . . . 14
3.3 Errors and possible solutions . . . . . . . . . . . . . . . . . . . . . . . . . 18
4 Acknowledgements . . . . . . . . . . . . . . . . . . . . . . . . . . . . . . . . . . 19
5 References . . . . . . . . . . . . . . . . . . . . . . . . . . . . . . . . . . . . . . . 19
1

1 Prerequisites
1.1 Machine learning and artificial neural networks
Machine learning is the scientific study of algorithms and statistical models that computer sys-
tems use to perform a specific task without using explicit instructions, relying on patterns and
inference instead. It is seen as a subset of artificial intelligence.
Artificial neural networks (ANN) or connectionist systems are computing systems that are
inspired by the biological neural networks that constitute animal brains. Such systems ’learn’
to perform tasks by considering examples, generally without being programmed with any task-
specific rules. Deep learning is part of a broader family of machine learning methods based on
artificial neural networks.
An ANN consists of an input layer, an output layer and multiple intermediate ’hidden’ layers.
The nodes of each layer are connected to the consecutive layers, and thus can affect their values
through weights1 and biases2.
output = Σ(input× weight) + bias
The weights and biases are the learnable parameters of the ANN. An illustration of the various
layers of an ANN is shown in Fig. 1.
Figure 1: ANN illustration
1Weight represents the strength of the connection between nodes.2Bias is an extra (offset) input to neurons to make sure that neurons are activated even if inputs are 0.
2

1.2 Convolutional neural networks
A convolutional neural network (CNN) is a class of deep neural networks, most commonly
applied to analyzing visual imagery. The pre-processing required in a CNN is much lower as
compared to other classification algorithms.
There are 3 types of hidden layers in a CNN -
1. Convolutional layers - These convolve3 the input data matrices (images) and pass its
result to the next layer. The filter kernel (matrix) dimensions are hyperparameters, and
the matrix values are the weights, which are learnable. This operation reduces the number
of free parameters, allowing the network to be deeper with fewer parameters.[
2. Pooling layers - These reduce the dimensionality of the data matrices but retain the
important information. Max pooling takes the largest element from a node (pixel) cluster.
3. Fully connected layers - These flatten the data matrices into vectors and feed it into
a fully connected structure like an ANN.
Some important hyperparamters are -
• Kernel size - dimensions of the filter - height× width× depth
• Padding - padding matrices with zeros to maintain image size after convolution
• Stride - number of pixel shifts over the input matrix
An illustration of the various layers of an CNN is shown in Fig. 2.
Figure 2: CNN illustration
3The general expression of an image convolution is g(x, y) = ω ∗ f(x, y) =
a∑s=−a
b∑t=−b
ω(s, t)f(x− s, y − t),
where g(x, y) is the filtered image, f(x, y) is the original image, ω is the filter kernel (matrix).
3

1.3 Anomaly detection
Anomaly detection (AD) is the identification of rare items, events or observations which raise
suspicions by differing significantly from the majority of the data.
In this project, AD is used to categorize input data (simulated galaxy images) into normal
and anomalous classes. Three classes are chosen - Barred, Elliptical and Spiral. The AD al-
gorithm used is the Deep Suppoert Vector Data Description (Deep SVDD) used in Lukas Ruff
et. al. (2018). The algorithm is described in a later section.
1.4 Python packages
A good background in the Python programming language is essential, including knowledge of
object oriented programming languages. The following packages are extensively used -
• torch (PyTorch) provides two high-level features for machine learning - Tensor compu-
tation and Deep Neural Networks.
• torchvision consists of popular datasets, model architectures, and common image trans-
formations for computer vision.
• sklearn (scikit-learn) provides a range of supervised and unsupervised learning algo-
rithms for machine learning.
• numpy adds support for large, multi-dimensional arrays and matrices, along with a large
collection of high-level mathematical functions.
• matplotlib is a plotting library which produces publication quality figures in a variety
of formats and environments.
• pandas provides high-performance, easy-to-use data structures and data analysis tools
• PIL (Pillow) adds support for opening, manipulating, and saving many different image
file formats.
Along with the ones listed above, the packages click, logging, time, os are also used.
4

2 The project
2.1 Motivation
Star-galaxy classification has always been important to Astronomy. With the advent of ma-
chine learning, various algorithms have made this process simpler. Among galaxies themselves,
there are various morphologies observed - spiral, barred spiral, elliptical and irregular. Thus,
it is important to make a qualitative distinction among these.
The rapid development in computation has made it possible to generate magnetohydrodynamic
simulations of galactic systems. Some of these include the Illustris4 and the FIRE5 projects.
The results of these simulations need to be compared with actual galaxies. This can be done
using machine learning.
2.2 Objective
To apply an anomaly detection algorithm developed by Lukas Ruff et. al. (2018) to compare
and categorize simulated and actual galaxy images.
2.3 Algorithm and code
The method used is the same as the one used in the paper by Lukas Ruff et. al. (2018).
The github code for the same can be found here. This code works on the standard MNIST
and CIFAR-10 labelled datasets. Thus, it has been edited and extended to use unlabelled and
custom datasets - the simulated galaxies image data. The edited code can be found here. The
two main parts of the algorithm are described below.
Deep autoencoder
An autoencoder is an ANN that learns to copy its input to its output. It has an internal layer
that describes a code used to represent the input, and it is constituted by two main parts: an
encoder that maps the input into the code, and a decoder that maps the code to a reconstruction
of the original input. Autoencoders are mainly used for dimensionality reduction (bottleneck).
An illustration of a Deep autoencoder is shown in Fig. 3.
In this project, the autoencoder network is the pretrainer, which tries to learn the identity
function. After the designated number of epochs are run, the learnt weights of the encoder
network are used as starting weights for the subsequent training AD network.
4http://www.illustris-project.org/5https://fire.northwestern.edu/
5

Figure 3: Deep autoencoder illustration
Deep SVDD
The Deep support vector data description (Deep SVDD) is an AD algorithm used for one-class
classification. Deep SVDD uses minimum volume estimation by finding a data-enclosing hy-
persphere of smallest size. To do this a neural network is employed to train to map the data
into a hypersphere of minimum volume.
For some input space X ⊆ Rd and output space F ⊆ Rp, let φ(;W) : X → F be a neu-
ral network with L ∈ N hidden layers and set of weights W = {W1, ...,WL} where Wl are the
weights of layers l ∈ {1, ..., L}. Below are two ways of optimization (loss functions) -
1. Soft-boundary Deep SVDD -
minR,W
(R2 +
1
νn
n∑i=1
max{0, ||φ(xi;W)− c||2 −R2}+λ
2
L∑l=1
||Wl||2)
Minimizing R2 minimizes the volume of the hypersphere. The second term is a penalty
term for points lying outside the sphere after being passed through the network. Hyperpa-
rameter ν ∈ (0, 1] controls the trade-off between the volume of the sphere and violations
of the boundary. The last term is a weight decay regularizer on the network parameters
W with hyperparameter λ > 0.
2. One-Class Deep SVDD -
minW
(1
n
n∑i=1
||φ(xi;W)− c||2 +λ
2
L∑l=1
||Wl||2)
A quadratic loss is employed for penalizing the distance of every network representation
φ(xi;W) to c ∈ F .The second term again is a network weight decay regularizer with
hyperparameter λ > 0.
6

2.4 Directory structure
The main directory galaxy_classify contains three subdirectories - log (containing log files),
data (containing image data) and src (containing source code).
The src directory contains modules main.py and deepSVDD.py, and the following subdirecto-
ries -
• base contains modules forming the basic skeleton for datasets, networks and trainers.
These modules are left mostly unchanged, except for adding a provision for the application
(unlabelled) dataset.
• datasets contains the module to load training, testing and application datasets (plus a
preprocessing module). This module is explained in a later section.
• networks contains the module which defines network architectures. This module is ex-
plained in a later section.
• optim contains modules implementing the optimization (and training) of the Deep au-
toencoder and the Deep SVDD codes. These modules are left mostly unchanged, except
for adding a provision to apply the model to unlabeled datasets. They are explained in a
later section.
• utils contains modules to collect, load and save results. These modules are left un-
changed.
These directories and submodules are extensively described in later sections.
2.5 Datasets
The datasets directory contains the module galData.py, which loads custom labelled (testing
and training) and unlabelled (application) datasets. The class, galDataset does this job. The
function load_dataset is callable from the main module to run the complete code.
The other module in this directory, preprocessing.py has functions for global contrast nor-
malaization6 and getting target image labels (0 or 1).
Here are some important points to consider -
1. All images (labelled and unlabelled) need to be in grayscale and of dimensions 256 px
× 256 px. If not, the dataset needs to be converted to this format. This has been
implemented in the equal_size.py module of the data directory using Python’s PIL
package.
6output of GCN isimage−mean
std. dev.
7

2. Training and testing data have to be augmented7 if there are not many images. This has
been implemented in the data_augment.py module of the data directory using Python’s
PIL package..
3. The inputs to the Python code are in the form of readable csv files, which have two
columns - image location and image label. For labelled data, both columns are filled,
while for unlabelled data, the second column consists of empty strings. An example is
shown in Tab. 1 and Tab. 2. These files are read using Python’s pandas package.
Location Label
/path/to/directory/labelled1.jpg 0
/path/to/directory/labelled2.jpg 2
/path/to/directory/labelled3.jpg 1
... ...
... ...
Table 1: Labelled data file example (random labels)
Location Label
/path/to/directory/unlabelled1.jpg
/path/to/directory/unlabelled2.jpg
/path/to/directory/unlabelled3.jpg
...
...
Table 2: Unlabelled data file example (empty strings for labels)
The dataset used in this project is described below -
• Training and testing (labelled) data are the same. Generally, 70/30 or 80/20 division of
the dataset is recommended. In this case, however, the whole labelled dataset is used for
training since the model has to be applied to another set of unlabelled data.
The galaxy data images are classified into 3 labels - Barred (0), Elliptical (1) and Spiral
(2). All images are from Google Images, and were manually filtered to remove anomalous
images and/or artist impressions. 61, 65 and 73 images respectively were downloaded
respectively, and data augmentation increased the numbers by 500 each.
• Application (unlabelled) data consists of images from the Illustris and FIRE simulations.
890 and 25 images respectively were downloaded and resized. The labels of these images
are to be predicted by the machine learning program.
7Data augmentation involves random changes in image orientation (rotations and flips) and/or addition of
noise and similar effects. This helps in training since rotated/flipped images are new information to the program.
8

Examples of images in the training/testing dataset are given in Figs. 4, 5, 6.
Figure 4: Barred galaxies
Figure 5: Elliptical galaxies
Figure 6: Spiral galaxies
2.6 Networks
The networks directory contains the module galNet.py, which defines the custom network ar-
chitectures of the Deep autoencoder and the Deep SVDD networks. The two classes, galNetwork_autoencoder
and galNetwork build the networks shown in Tab. 1 and Tab. 2 respectively. The functions
build_autoencoder and build_network are callable from the main module to run the com-
plete code.
9
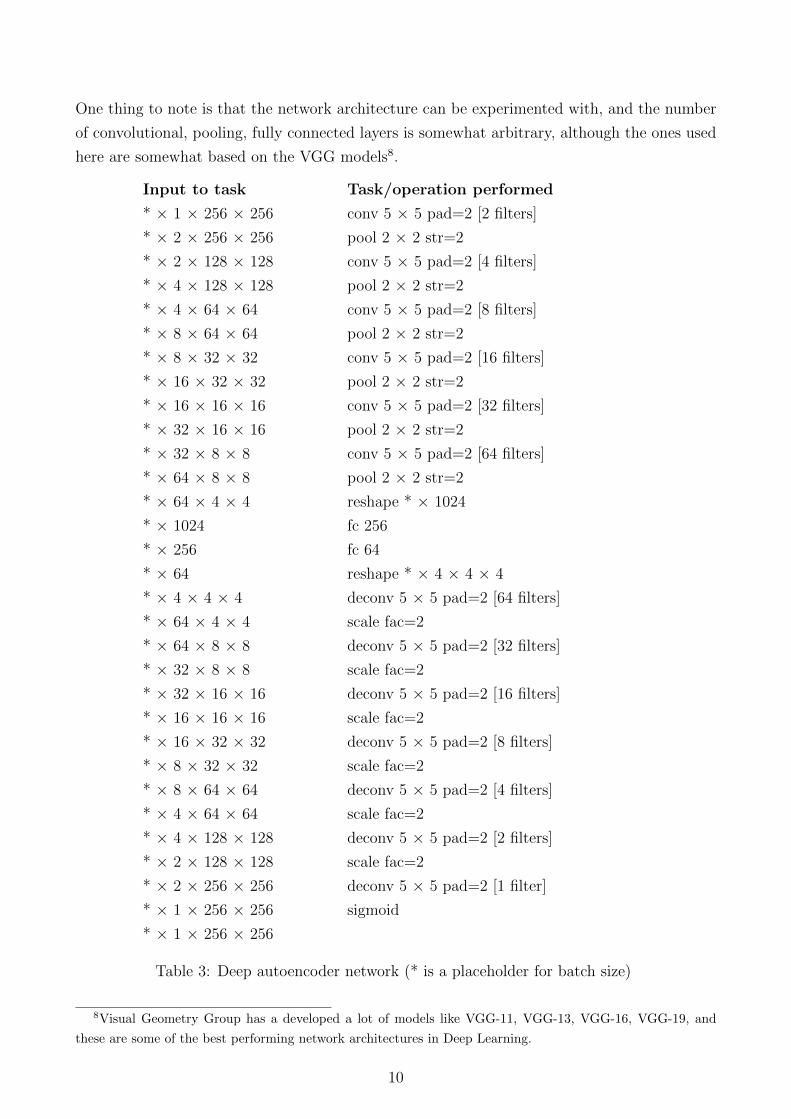
One thing to note is that the network architecture can be experimented with, and the number
of convolutional, pooling, fully connected layers is somewhat arbitrary, although the ones used
here are somewhat based on the VGG models8.
Input to task Task/operation performed
* × 1 × 256 × 256 conv 5 × 5 pad=2 [2 filters]
* × 2 × 256 × 256 pool 2 × 2 str=2
* × 2 × 128 × 128 conv 5 × 5 pad=2 [4 filters]
* × 4 × 128 × 128 pool 2 × 2 str=2
* × 4 × 64 × 64 conv 5 × 5 pad=2 [8 filters]
* × 8 × 64 × 64 pool 2 × 2 str=2
* × 8 × 32 × 32 conv 5 × 5 pad=2 [16 filters]
* × 16 × 32 × 32 pool 2 × 2 str=2
* × 16 × 16 × 16 conv 5 × 5 pad=2 [32 filters]
* × 32 × 16 × 16 pool 2 × 2 str=2
* × 32 × 8 × 8 conv 5 × 5 pad=2 [64 filters]
* × 64 × 8 × 8 pool 2 × 2 str=2
* × 64 × 4 × 4 reshape * × 1024
* × 1024 fc 256
* × 256 fc 64
* × 64 reshape * × 4 × 4 × 4
* × 4 × 4 × 4 deconv 5 × 5 pad=2 [64 filters]
* × 64 × 4 × 4 scale fac=2
* × 64 × 8 × 8 deconv 5 × 5 pad=2 [32 filters]
* × 32 × 8 × 8 scale fac=2
* × 32 × 16 × 16 deconv 5 × 5 pad=2 [16 filters]
* × 16 × 16 × 16 scale fac=2
* × 16 × 32 × 32 deconv 5 × 5 pad=2 [8 filters]
* × 8 × 32 × 32 scale fac=2
* × 8 × 64 × 64 deconv 5 × 5 pad=2 [4 filters]
* × 4 × 64 × 64 scale fac=2
* × 4 × 128 × 128 deconv 5 × 5 pad=2 [2 filters]
* × 2 × 128 × 128 scale fac=2
* × 2 × 256 × 256 deconv 5 × 5 pad=2 [1 filter]
* × 1 × 256 × 256 sigmoid
* × 1 × 256 × 256
Table 3: Deep autoencoder network (* is a placeholder for batch size)
8Visual Geometry Group has a developed a lot of models like VGG-11, VGG-13, VGG-16, VGG-19, and
these are some of the best performing network architectures in Deep Learning.
10

The first half is the encoder, which consists of convolution and pooling layers. The second
half is the decoder, which consists of deconvolutions and scaling layers. The decoder tries to
reverse what the encoder does to imitate the identity function. This network is pretrained by
minimizing the loss function.
Input to task Task/operation performed
* × 1 × 256 × 256 conv 5 × 5 pad=2 [2 filters]
* × 2 × 256 × 256 pool 2 × 2 str=2
* × 2 × 128 × 128 conv 5 × 5 pad=2 [4 filters]
* × 4 × 128 × 128 pool 2 × 2 str=2
* × 4 × 64 × 64 conv 5 × 5 pad=2 [8 filters]
* × 8 × 64 × 64 pool 2 × 2 str=2
* × 8 × 32 × 32 conv 5 × 5 pad=2 [16 filters]
* × 16 × 32 × 32 pool 2 × 2 str=2
* × 16 × 16 × 16 conv 5 × 5 pad=2 [32 filters]
* × 32 × 16 × 16 pool 2 × 2 str=2
* × 32 × 8 × 8 conv 5 × 5 pad=2 [64 filters]
* × 64 × 8 × 8 pool 2 × 2 str=2
* × 64 × 4 × 4 reshape * × 1024
* × 1024 fc 256
* × 256 fc 64
Table 4: Deep SVDD network (* is a placeholder for batch size)
The above network is exactly same as the encoder network in the Deep autoencoder. This is
no coincidence. After this point, the optimizer is run to minimize the radius of the hypersphere
containing the normal vectors.
In a chronological order, the Deep autoencoder is pretrained first. The resultant weights of
the encoder network are used as initial weights in the Deep SVDD network, which is then
trained. This is done to prevent unnecessary training of the Deep SVDD network from scratch.
2.7 Optimizers
The optim directory contains the modules ae_trainer.py and deepSVDD_trainer.py, which
train and test the Deep autoencoder and the Deep SVDD networks respectively. The two
classes, AETrainer and DeepSVDDTrainer have various functions for this purpose.
These modules are almost exactly the same as the original. The difference is that a new func-
tion, apply_model, was added to apply the models to unlabelled data (the original program
works only for labelled data).
11

2.8 Program parameters
The main.py module is the one which has to be run by the user. The main function has a lot
of parameters, most of which are self-explanatory (explained in the Python module).
There are three location parameters which are mandatory (while the rest of them have de-
fault values) -
• xp_path is the directory where the log files and model should be stored.
• train_test_path is the csv file of training/testing (labelled) images.
• apply_model_path is thr csv file of images on which model has to be applied (unlabelled).
Other important parameters are -
• normal_class is the label of the normal class (Barred is 0, Elliptical is 1, Spiral is 2).
• nu is the hyperparameter 0 < ν < 1 which controls the trade-off between the hypersphere
volume and boundary violations.
• objective is the loss function used (either ’one-class’ or ’soft-boundary’).
• optimizer_name is the optimization algorithm to be used for training. Examples include
stochasic gradient descent and Adam optimizer.
• load_config and load_model, if not None, are the files from which previous configuration
and model must be loaded.
• lr and ae_lr are the learning rates9 of the two networks respectively.
• n_epochs and ae_n_epochs are the number of epochs (iterations) for training of the two
networks respectively.
• lr_milestone and ae_lr_rmilestone are the epochs at which learning rates of the two
networks respectively are updated.
• batch_size and ae_batch_size are the number of images input (batch size) to the two
networks respectively in one epoch.
• weight_decay and ae_weight_decay are the weight decay10 rates of the optimizer of the
two networks.
9Learning rate is a hyperparameter that controls how much the weights of the network are influenced by the
loss gradient. This value should neither be too high nor too low.10Weight decay is an additional term that causes the weights to exponentially decay to zero, if no other
update is scheduled. This prevents weights from growing too large.
12

3 Results
3.1 Running the program
The main.py is run by providing the above-mentioned parameters. The values used in this
program are -
• normal_class = 0,1,2 (three runs)
• nu = 0.1
• objective = ’one-class’
• optimizer_name = ’adam’
• lr = 0.0001 and ae_lr = 0.0001
• n_epochs = 100 and ae_n_epochs = 100
• lr_milestone = 50 and ae_lr_rmilestone = 50
• batch_size = 200 and ae_batch_size = 200
• weight_decay = 0.5e-6 and ae_weight_decay = 0.5e-6
The exact flow of the program is show in Fig. 7.
Figure 7: Program flowchart
13

3.2 Code output
The output files of the main code are as follows -
• results.json contains the testing results
• config.json contains the program configuration
• model.tar contains the model parameters (weights)
Along with the above files, two more text files are outputted for easy accessibility -
• test_output.txt contains test image results in two columns - image labels and scores
• apply_output.txt contains application image results in two columns - image indices
(irrelevant) and scores
The image scores are the most important outputs of all. They represent the final ’catego-
rization’ after the Deep SVDD program is run. This means that there is a strong correlation
between image scores and their labels (which are required).
The test image results for the three normal classes are shown in Figs. 8, 9, 10.
Figure 8: Test image results for normal class 0 (Barred)
14

Figure 9: Test image results for normal class 1 (Elliptical)
Figure 10: Test image results for normal class 2 (Spiral)
On thing to note is that the x ranges of the images is truncated at 0.2, but the scores can reach
upto 1. This is done because the region before 0.2 is most interesting, where images labelled
0s and 1s have overlapping scores.
15

Overlaying the above images are four lines - two red and two blue. These lines are manu-
ally realized thresholds for the score-label correlation. The five resulting regions are -
1. Before first red line - Most definitely label 0 or normal class
2. Between first red and blue lines - Probably label 0 or normal class
3. Between blue lines - Overlapping region, undecided label
4. Between second blue and red lines - Probably label 1 or anomalous class
5. After second red line - Most definitely label 1 or anomalous class
When the final model is applied to the simulated galaxy (application) images, the five regions
are labelled 0.0, 0.2, 0.5, 0.8, 1.0 respectively. Test image results are shown in Tab. 5.
Class Accuracy Th 1 Th 2 Th 3 Th 4
Barred 94.97% 0.032 0.041 0.083 0.105
Elliptical 99.66% 0.040 0.061 0.078 0.090
Spiral 96.05% 0.030 0.035 0.075 0.083
Table 5: Test Class accuracies and thresholds
The application image results for the three normal classes are shown in Figs. 11, 12, 13.
Figure 11: Application image results for normal class 0 (Barred)
16

Figure 12: Application image results for normal class 1 (Elliptical)
Figure 13: Application image results for normal class 2 (Spiral)
The threshold lines are the same as before. Using these lines, the simulated galaxy images can
be assigned labels.
17

3.3 Errors and possible solutions
• One of the biggest problems is availing the training and testing data. Initially, Galaxy
Zoo images of the Sloan Digital Sky Survey were used since there were a lot of labelled
images. But a lot of these turned out to be erroneous. Finally, google images were used.
• The number of google images was extremely less - around 60-70 per normal class. For a
good CNN code, at least 1000-2000 images are required. Even though data augmentation
was done, there is a huge chance of overfitting.
• The ideal testing:training ratio is 70:30. This is feasible only if a large dataset is available.
Yet again, this was not possible.
• The final results were not as expected. The testing accuracies were high, but even many
obvious images were not classified properly. This may be due to overfitting of training
data.
• The three training classes - Barred, Elliptical, Spiral - might have been poorly cho-
sen. While elliptical galaxies are significantly different morphologically, spiral and barred
galaxies have a lot in common. Differentiating between these two classes is the most
difficult.
Most of the above problems can be solved by larger and better labelled datasets. This is the
biggest challenge. Secondly, class division must be properly done to ensure effectiveness. For
a final evaluation of the algorithm, different network architectures and AD algorithms need to
be compared side by side for their efficiencies.
18

4 Acknowledgements
First and foremost, I would like to thank my professor, Dr. Pauline Barmby, who was extremely
friendly and encouraging. This project was a great introduction to machine learning and neural
networks. I also loved the knit cap (thank you for that).
A hearty thanks to Mitacs Globalink for this wonderful opportunity. I got to meet and befriend
people from everywhere around the world. Canada was a nice country to do an internship in.
I would also like to thank my flatmates and the people at PAB for not being boring to hang
out with. Finally, I am grateful to my family and friends back home for keeping in touch.
5 References
1. Lukas Ruff et. al. (2018): Deep One-Class Classification
2. GitHub code: Deep One-Class Classification
3. GitHub code: PyTorch Custom Dataset Examples
19