Embed Size (px)
Citation preview

CMP-30 CPCL Command Manual
Rev 1.0
2009.4.1
2
CMP-30 Command Manual
TABLE OF CONTENTS 1. Programming Introduction 5
2. Printer Commands 6
A. Printer Commands
B. PRINT Command
C. FORM Command
D. JOURNAL Command
E. UNITS Command
F. Using Commend
6
7
7
7
8
9
3. TEXT 10
A. TEXT Command
B. FONT-GROUP(FG) Command
C. TEXT CONCATENATION Command
D. MULTILINE(ML) Command
E. COUNT Command
F. SETMAG Command
10
11
12
13
14
14
4. Linear Bar Codes 15
A. BARCODE Command
B. BARCODE-TEXT Command
15
16
5. Two-Dimensional Bar Codes 17
A. PDF417 (PORTABLE DATA FILE)
B. MAXICODE
17
18
6. Graphics 20
A. BOX Command
B. LINE Commands
C. INVERSE-LINE Commands
D. PATTERN Command
E. GRAPHICS Commands
F. PCX Commands
20
20
21
21
22
23
3
CMP-30 Command Manual
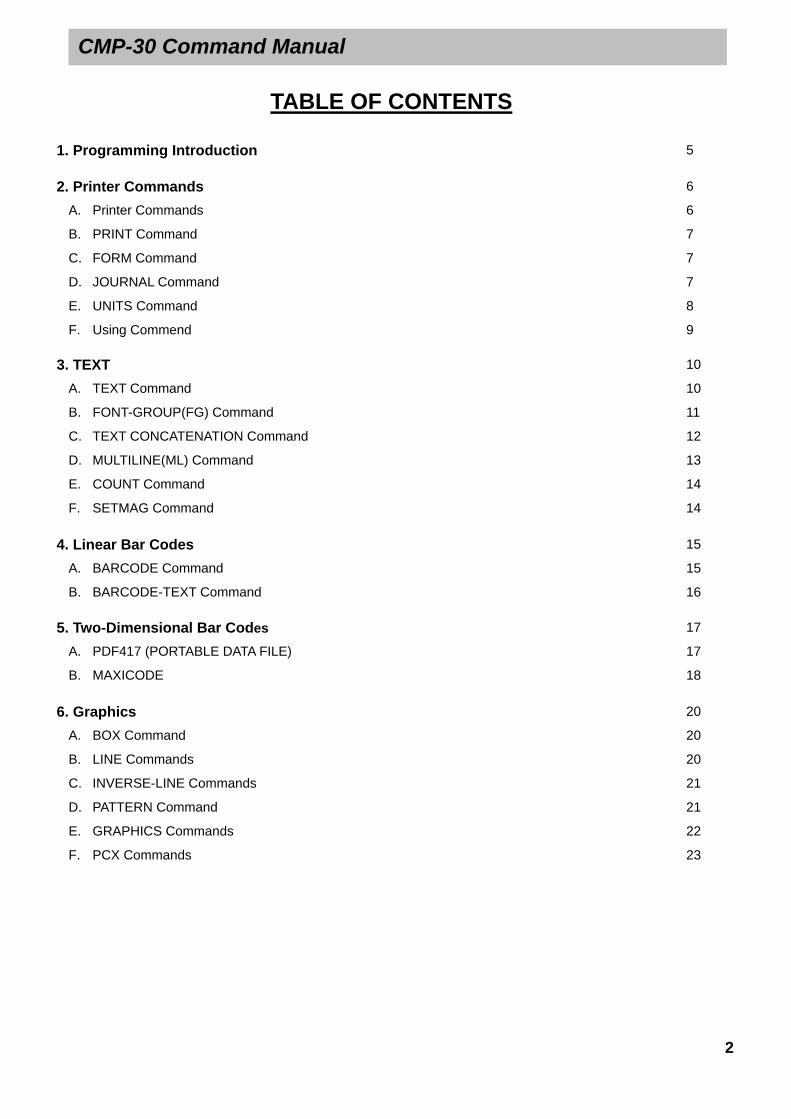
7. Advanced Commands 24
A. CONTRAST Command
B. TONE Command
C. JUSTIFICATION Commands
D. PAGE-WIDTH Command
E. PACE Command
F. NO-PACE Command
G. WAIT Command
H. SPEED Command
I. SETSP Command
J. ON-OUT-OF-PAPER Command
K. ON-FEED Command
L. PREFEED Command
M. POSTFEED Command
N. COUNTRY/CODE PAGE Command
O. USING FORMAT FILES
P. BEEP Command
24
24
24
25
26
26
26
27
27
27
28
28
29
29
30
30
8. Line Print Mode 31
A. SETLP Command
B. SETLF Command
C. Moving With X and Y Coordinates
D. LMARGIN Command
E. SETBOLD Command
F. SETSP Command
G. PAGE-WIDTH Command
H. PAGE-HEIGHT Command
I. Special ASCII Characters
J. SETFF Command
K. SET-TOF Command
L. SETLP-TIMEOUT
31
31
31
32
32
32
33
33
33
33
34
34

4
CMP-30 Command Manual
9. Advanced Utilities 35 A. VERSION Utility
B. CHECKSUM Utility
C. DEL Utility
D. DIR Utility
E. DEFINE-FILE(DF) Utility
F. TYPE Utility
G. BAUD Utility
H. TIMEOUT Utility
I. ON-LOW-BATTERY Command
J. LT Command
K. SET-TIME Utility
L. GET-TIME Utility
M. SET-DATE Utility
N. GET-DATE Utility
O. Printing a Time Stamp
P. Printing a Date Stamp
Q. PAPER-JAM Utility
35
35
35
35
36
36
36
37
37
37
38
38
38
39
39
39
40
10. Printer Escape Commands 41
A. SET AND READ CODE Command
B. STATUS/INFORMATION
C. POWER OFF Command
41
41
42
11. Configuration/Control Commands 43
A. Command Format
B. Commands/Parameters
43
43
12. Others
A. GAP-SENSE & BAR-SENSE Commands

5
CMP-30 Command Manual 1. Programming introduction
This manual details the various commands in the CPCL language which allow the programmer to utilize
the built in text, graphics, bar code printing and communications capabilities. The following notation
conventions are used throughout this manual.
{} Required item
[] Optional item
() Abbreviated command
<> Literal item
A space character is used to delimit each field in a command line.
Getting Printer Information
The printer can print a report containing information about the application resident in the printer memory.
This information can be printed by following these procedures.
1. Turn off the printer
2. While holding the FEED key down, turn the printer on.
3. When printing begins, release the FEED key.
The printing will contain information about printer model, ROM version, serial number, baud rate, USB, Bluetooth,
font extra information which has been saved in the printer. In addition, certain amount of ASII hex codes will be
printed to check the printing quality.
If you require to set for communication Diagnostic Mode, press FEED button again after printing information by
following the steps above. The printer then indicates received information with hexadecimal.
LabelMaker
As LaberMaker has similar interface as general graphic edit tool, you can design readily without specific expertise
for programming and print the data through LUKHAN Portable Printer. Moreover, you are able to save the label
image into your PC with LBL file format. Saved label file can be reopening and edited.
Apart from the function of designing, you can save the file by communicating with printer, reopen saved file or see
the state information of the printer.

6
CMP-30 Command Manual 2. Printer commands
A label file always begins with the “!” character followed by an “x” offset parameter, “x” and “y” axis
resolutions, a label length and finally a quantity of labels to print. The line containing these parameters is
referred to as the Command Start Line.
A label file always begins with the Command Start Line and ends with the “PRINT” command. The
commands that build specific labels are placed between these two commands.
☞ NOTE: Every line in the command session must be terminated with both carriage-return and line –feed
characters. All printer Commands must be in uppercase character ONLY.
A. PRINTER Commands
Form <!> {offset} <200> <200> {height} {qty}
<!> Session start
{offset} The value of label horizontal offset
<200> Horizontal resolution
<200> Vertical resolution
{height} Maximum value of Label Height
The Maximum height of the label is the numerical value deducted 1/16” (1.5mm) from the value which
is measured from first bar (or gap) to the next bar (or gab). (In dots: 12donts on 203 dpi).
The quantity of label. The maximum value is 1024

7
CMP-30 Command Manual B. Print command
The print command terminates and prints the file. This must always be the last command (except
when in Line Pint Mode). Upon execution of the Print command, the printer will exit from a control
session. Be sure to terminate this and all commands with both carriage-return and line-feed characters.
Format
Format {command}
Command & option
{command} PRINT
C. FORM Command
The Form command will execute a form feed after the label is printed and instructs the printer to feed
to top of form after printing.
Format {command}
Command & option
{command} FORM
D. JOURNAL Command
Be default, the printer will check for correct media alignment if it encounters the eye-sense mark
during a print cycle. If necessary, the Journal command can be used to disable this automatic
correction feature.
Format {command}
Command & option
{command} JOURNAL

8
CMP-30 Command Manual E. UNITS Command
The Units commands are used to specify a measurement system for all subsequent command fields
in a control session. Coordinates, widths, and heights for all control commands can be entered with
precision for four decimal places. The printer measurement system will default to dots until a units
command is issued.
Format {command}
Command & option
IN-INCHES Measurement in inches.
IN-CENTIMETERS Measurement in centimeters
IN-MILLIMETER Measurement in millimeters.
{command}
IN-DOTS Measurement in dots

9
CMP-30 Command Manual F. Using Comments
Comments can be added between the first line of a command start line and the print command.
A comment is placed in the file by starting a line with the ‘;’ character in the first column. Any
remaining text to the end of the line will be ignored. Comments are illegal between the CONCAT and
ENDCONCAT commands.

10
CMP-30 Command Manual 3. TEXT
A. TEXT Commands
The TEXT command is used to place text on a label. This command and its variants control the
specific font number and size used, the location of the text on the label.
Format {command} {font} {size} {x} {y} {data}
Command & option
TEXT (or T) Prints text horizontally
VTEXT (or VT) Prints text (vertically) rotated 90degrees counterclockwise
TEXT90 (or T90) Same as VTEXT above.
TEXT180 (or T180) Prints text (upside down) rotated 180 degrees
counterclockwise
{command}
TEXT270 (or T270) Prints text (vertically) rotated 270 degrees
counterclockwise
{font} font의 Name/number
{size} font의 size
{x} Horizontal starting position
{y} Vertical starting position
{data} The text to be printed

11
CMP-30 Command Manual B. FONT-GROUP(FG) Command
The FG command gives a user the ability to group up to 10 pre-scaled font files into a single group. A
user can later specify the font group in a TEXT command. If a font group is used in a text command,
the printer will use the largest font specified in the font group that will produce the required text data
and still remain within the available width of the label the text. When specified in the TEXT command,
the {font} parameter is specified as FG, and the {size} parameter is specified as the {fg}. Note that a
user can also specify an FG command within a CONCAT/ENCONCAT command.
Format {command} {fg fn fs} {fn, fs} …
Command & option
{command} FG
{fg} Font group number. Up to 10font groups can be specified, Valid font groups
rage from 0 to 9.
{fn} Number of the font
{fs} Size identifier for the font
☞ NOTE: Up to 10 font number/font size pairs can be assigned to a font group.

12
CMP-30 Command Manual C. TEXT CONCATENATION Command
Text concatenation allows you to assign different character styles to strings, printing them with
uniform spacing on the same text line. This command should be used in combination with CONCAT
Command and ENDCONCAT Command.
Format {command} {x} {y}
{font} {size} {offset} {data}
…………
{font} {size} {offset} {data}
<ENDCONCAT>
Command & option
CONCAT Horizontal concatenation {command}
VCONCAT Vertical concatenation
{x} Horizontal starting position.
{y} Vertical starting position
{font} font의 Name/number.
{size} Name/number of the font
{offset} Unit-value to offset text from the starting position. Used to align individual text
strings or create superscript/subscript characters
{data} Text to be printed
<ENDCONCAT> Terminates concatenation

13
CMP-30 Command Manual D. MULTILINE(ML) Command
MULTILINE (ML) allow you to print multiple lines of text using the same number of font and
line-height.
Format {command} {height}
{text} {font} {size} {x} {y}
{data}
………
{data}
<ENDMULTILINE>
Command & option
{command} MULTILINE (or ML) MULTILINE Prints multiple lines of text.
{height} Unit-height for each line of text
{text} Text command (TEXT, VTEXT, etc.)
{font} Name/number of the font
{size} Size identifier for the font
{x} Horizontal starting position.
{y} Vertical starting position
{data} Text to be printed
<ENDMULTILINE>
(or ENDML)
Terminates NULTILINE

14
CMP-30 Command Manual E. COUNT Command
The COUNT command is used for printing multiple labels where a numeric text field or numeric data
encoded in a bar code is to be incremented or decremented for each label. The TEXT/BACODE
command string must contain this numeric data as the last characters of the string. The numeric data
portion can be up to 20characters, and can be preceded by the ‘-’ sign. Incrementing or decrementing
the numeric data thru ‘0’ is not allowed, Leading Zeros will be retained. Up to 3 COUNT commands can
be used in a label file.
Format {command} {numeric value}
Command & option
{command} COUNT
{numeric value} Any integer value up to 20 characters. The value can be preceded by a ‘ – ’
sign if decrementing of the TEXT/BARCODE value is desired, Leading zeros will
be retained in the output.
F. SETMAG Command
The SETMAG command magnifies a resident font to the magnification factor specified.
Format {command} {w} {h}
Command & option
{command} SETMAG
{w} Width magnification of the font (1~16)
{h} Height magnification of the font (1~16)
☞ NOTE: The SETMAG command stays in effect after printing a label. To cancel any SETMAG values and allow
the printer to use its default font sizes, use “SETMAG 0 0”.

15
CMP-30 Command Manual 4. Linear Bar Codes
A. BARCODE Command
The BARCODE command prints bar codes in both vertical and horizontal orientations at specified
widths and heights.
Standard Bar Codes
ormat {command} {type} {width} {ratio} {height} {x} {y} {data}
Command & option
BARCODE (or B) Prints bar code horizontally {command}
VBARCODE (or VB) Prints bar code vertically
UPC-A UPCA, UPCA2, UPCA5
UPC-E UPCE, UPCE2, UPCE5
EAN/JAN-13 EAN13, EAN132, EAN135
EAN/JAN-8 EAN8, EAN82, EAN 85
Code 39 39, 39C, F39, F39C
Code 93/Ext. 93 93
Interleaved 2 of 5 I2OF5
Interleaved 2 of 5
with checksum
I2OF5C
German Post Code I2OF5G
Code 128 (Auto) 128
UCC EAN 128 UCCEAN128
Codabar CODABAR, CODABAR16
MSI/Plessy MSI, MSI10, MSI1010, MSI1110
Postnet POSTNET
{type}
Symbology
FIM FIM
{width} Unit-width of the narrow bar.
{ratio} Ratio of the wide bar to the narrow bar
20 = 2.0:1 26 = 2.6:1
21 = 2.1:1 27 = 2.7:1
22 = 2.2:1 28 = 2.8:1
23 = 2.3:1 29 = 2.9:1
24 = 2.4:1 30 = 3.0:1
{height} Unit-height of the bar code
{x} Horizontal starting position
{y} Vertical starting position
{data} Bar code data

16
CMP-30 Command Manual
B. BARCODE-TEXT Command
The BARCODE-TEXT command is used to label bar codes with the same data used to create the bar
code. The command eliminates the need to annotate the bar code using separate text commands.
Use BARCODE-TEXT OFF (or BT OFF) to terminate.
Format {command} {font number} {font size} {offset}
Command & option
{command} BARCODE-TEXT (or BT)
{font number} The font number to use when annotating the bar code
{font size} The font size to use when annotating the bar code
{offset} Unit distance to offset text away from the barcode

17
CMP-30 Command Manual 5. Two-Dimensional Bar Codes
A. PDF417 (PORTABLE DATA FILE)
The following commands are used for the creation and formatting of two-dimensional bar codes.
Format {command} {type} {x} {y} [XD n] [YD n] [C n] [S n]
{data}
<ENDPDF>
Command & option
BARCODE (or B) Prints bar code horizontally {command}
VBARCODE (or VB) Prints bar code vertically
{type} PDF-417
{x} Horizontal starting position
{y} Vertical starting position
[XD n] Unit-width of the narrowest element. The range is 1 to 32 and the default is 2.
[YD n] Unit-height of the narrowest element. The range is 1 to 32 and the default is 6.
[C n] Number of columns to use. Data columns do not include start/stop characters
and left/fight indicators. The range is 1 to 30 and the default is 3.
[S n] Security level indicates maximum amount of errors to be detected and/or
corrected.
The range is 0 to 8 and the default is 1.
{data} Bar code data.
<ENDPDF> Terminates PDF-417
18
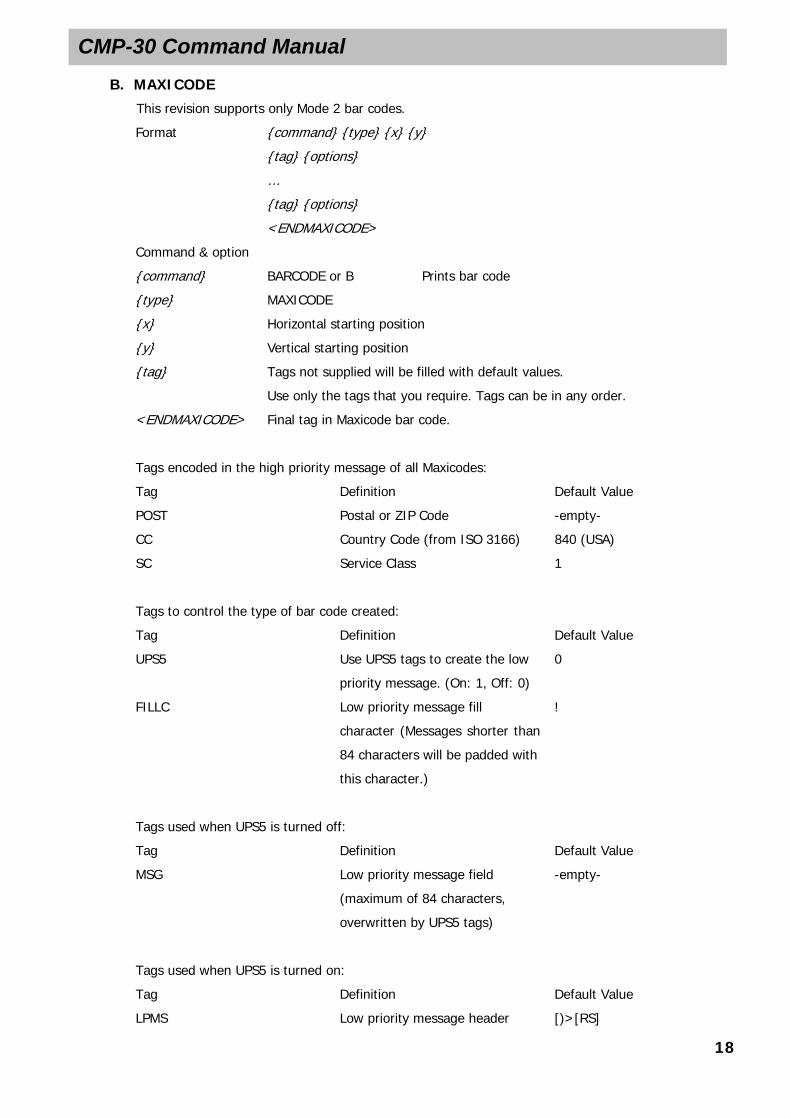
CMP-30 Command Manual B. MAXICODE
This revision supports only Mode 2 bar codes.
Format {command} {type} {x} {y}
{tag} {options}
…
{tag} {options}
<ENDMAXICODE>
Command & option
{command} BARCODE or B Prints bar code
{type} MAXICODE
{x} Horizontal starting position
{y} Vertical starting position
{tag} Tags not supplied will be filled with default values.
Use only the tags that you require. Tags can be in any order.
<ENDMAXICODE> Final tag in Maxicode bar code.
Tags encoded in the high priority message of all Maxicodes:
Tag Definition Default Value
POST Postal or ZIP Code -empty-
CC Country Code (from ISO 3166) 840 (USA)
SC Service Class 1
Tags to control the type of bar code created:
Tag Definition Default Value
UPS5 Use UPS5 tags to create the low
priority message. (On: 1, Off: 0)
0
FILLC Low priority message fill
character (Messages shorter than
84 characters will be padded with
this character.)
!
Tags used when UPS5 is turned off:
Tag Definition Default Value
MSG Low priority message field
(maximum of 84 characters,
overwritten by UPS5 tags)
-empty-
Tags used when UPS5 is turned on:
Tag Definition Default Value
LPMS Low priority message header [)>[RS]

19
CMP-30 Command Manual HEAD Transportation data format
header
01[GS]98
TN Tracking Number [GS]
SCAC Standard Carrier Alpha Code UPSN
SHIPPER UPS Shipper Number [GS]
PICKDAY Julian day of pickup [GS]
SHIPID Shipment ID Number [GS]
NX Package N of X (n/x) [GS]
WEIGH Package weight [GS]
VAL Address validation (Y or N) [GS]
STADDR Ship to street address [GS]
CITY Ship to city [GS]
ST Ship to state [GS]
EXTRA Extra user defined fields - empty -
EOT End of transmission character 0x004h
GS Field separator character [GS] 0x01Dh
RS Format type separator [RS] 0x01Eh

20
CMP-30 Command Manual 6. Graphics
A. BOX Command
The BOX command provides the user with the ability to produce rectangular shapes of specified line
thickness.
Format {command} {x0} {y0} {x1} {y1} {width}
Command & option
{command} BOX
{x0} X-coordinate of the top left corner
{y0} Y-coordinate of the top left corner
{x1} X-coordinate of the bottom right corner
{y1} Y-coordinate of the bottom right corner
{width} Unit-width (or thickness) of the lines forming the box.
B. LINE Commands
Lines of any length, thickness and angular orientation can be drawn using the LINE command.
Format {command} {x0} {y0} {x1} {y1} {width}
Command & option
{command} LINE (or L)
{x0} X- coordinate of the top-left corner
{y0} Y- coordinate of the top-left corner
{x1} X-coordinate of :-top right corner for horizontal.
- bottom left corner for vertical
{y1} Y-coordinate of :-top right corner for horizontal
- bottom left corner for vertica
{width} Unit-width( or thickness) of the line

21
CMP-30 Command Manual C. INVERSE-LINE Commands
The INVERSE-LINE Command has the same syntax as the LINE command. Previously created objects
that lie within the area defined by the INVERSE-LINE command will have their black areas re-drawn
white, and white areas re-drawn black.
D. PATTERN Command
The PATTERN command is used with the LINE and SCALE-TEXT commands to change the patterns
used to fill these shapes. In the diagonal line by using Line command, Pattern Command can not be
used, and the default is 100 in solid black.
Format {command} {pattern number}
Command & option
{command} PATTERN
100 Filled (solid black/default pattern).
101 Horizontal lines.
102 Vertical lines.
103 Right rising diagonal lines.
104 Left rising diagonal lines.
105 Square pattern.
{pattern number}
106 Cross hatch pattern.

22
CMP-30 Command Manual E. GRAPHICS Commands
Bit- mapped graphics can be printed by using graphics commands. ASCii HEX is used for expanded
graphics data. Data size can be reduced to one-half by utilizing the COMPRESSED GRAPHICS
commands with the equivalent binary character(s) of the hex data.
Format {command} {width} {height} {x} {y} {data}
Command & option
EXPANDED-GRAPHICS Prints expanded (or EG) graphics horizontally.
VEXPANDED-GRAPHICS Prints expanded (or VEG) graphics vertically.
COMPRESSED-GRAPHICS Prints compressed (or CG) graphics horizontally.
{command}
VCOMPRESSED-GRAPHICS Prints compressed (or VCG) graphics vertically.
{width} Byte-width of image
{height} Dot-height of image
{x} Horizontal starting position
{y} Vertical starting position
{data} Graphics data

23
CMP-30 Command Manual F. PCX Commands
The PCX command gives a user the ability to send “.PCX” graphics formatted images to the printer.
The .PCX image MUST be encoded as a black and white image.
Format {command} {x} {y} {data}
Command & option
{command} PCX
{x} X-coordinate of the top-left corner
{y} Y-coordinate of the top-left corner
{data} PCX image data.
24
CMP-30 Command Manual 7. Advanced Commands
A. CONTRAST Command
The contrast command is used to specify the print darkness for the entire label. The lightest printout is
at contrast level 0. The darkest contrast level is 3. The printer defaults to contrast level 0 on power up.
Contrast level must be specified for each label file.
Format {command} {level}
Command & option
{command} CONTRAST
{level} Contrast level.
0 = Default
1 = Medium
2 = Dark
3 = Very Dark
B. TONE Command
The TONE Command can be used instead of the CONTRAST Command to specify the print darkness
for all labels. The lightest printout is at tone level-99. The darkest tone level is 200. The printer
defaults to tone level 0 on power up. Tone level settings remain in effect for all printing tasks until
changed. The TONE and CONTRAST commands cannot be used in combination with one another.
Format {command} {level}
Command & option
{command} TONE
{level} select a value from -99 200.→
Contrast to Tone level equivalents.
Contrast 0 = Tone 0
Contrast 1 = Tone 100
Contrast 2 = Tone 200
Contrast 3 = No equivalent
C. JUSTIFICATION Commands
Alignment of fields can be controlled by using the justification commands. By default, the printer will
left justify all subsequent fields until another justification command is specified.
Format {command} [end]
Command & option
CENTER Center justifies all subsequent fields.
LEFT Left justifies all subsequent fields.
{command}
RIGHT Right justifies all subsequent fields.
[end] End point of justification. If no parameter is entered, justification commands
use the print head’s width for horizontal printing or zero (top of form) for
vertical printing.

25
CMP-30 Command Manual
D. PAGE-WIDTH Command
The command specifies the page width
Format {command} {width}
Command & option
{command} PAGE-WIDTH (or PW)
{width} Unit –width of the page

26
CMP-30 Command Manual E. PACE Command
When PACE is activated, the user must depress the printer’s ‘FEED’ key to print additional labels until
the bath quantity is exhausted.
Format {command}
Command & option
{command} PACE
F. NO-PACE Command
This command cancels the PACE and AUTO-PACE mode
G. WAIT Command
This command is used to introduce a delay after a label is printed.
Format {command} {delay-time}
Command & option
{command} WAIT
{delay-time} Delay time- Delay time in 1/8 seconds
In the example below, the printer will pause 10 seconds after printing each label.
27
CMP-30 Command Manual H. SPEED Command
This SPEED command selects a speed level within a range of 0 to 5, with 0the slowest speed.
Format {command} {speed level}
Command & option
{command} SPEED
{speed level} A number between 0 and 5, 0 being the slowest speed.
I. SETSP Command
The SETSP command is used to change spacing between text characters.
Format {command} {spacing}
Command & option
{command} SETSP
{spacing} Unit measurement between characters. The default for spacing is zero.
☞ NOTE: That this command is affected by the UNIT command setting.
J. ON-OUT-OF-PAPER Command
ON-OUT-OF-PAPER can be issued to instruct the printer as to the course of action to action to take
when it encounters an error while printing the label. There are two instructions; PURGE and WAIT
Format {command} {action} {number of retries}
Command & option
{command} ON-OUT-OF-PAPER
{action} PURGE: Discard the label if printer error is encountered after the specified
number of attempts. WAIT: Do not discard the label if printer error is
encountered. In this mode the printer will wait for the error to be corrected
before making eh nest print attempt.
The default printer configuration is ON-OUT-OF-PAPER PURGE 2

28
CMP-30 Command Manual K. ON-FEED Command
Your printer can be configured to ignore, form-feed, or reprint the last label when the feed key is
pressed or when it receives a form-feed character.
Format {command} {action}
Command & option
{command} ON-FEED
{action} IGNORE: Do not take any action when the feed key is pressed or when the
form-feed character is received .
FEED: Feed to top-of –form when the feed key is pressed or when the form-
feed character is received.
REPRINT: Reprint the last label when the feed key is pressed or when the
form-feed character is received.
L. PREFEED Command
The PREFEED command instructs the printer to advance the media a specified amount prior to printing.
Format {command} {length}
Command & option
{command} PREFEED
{length} Unit length the printer advances media prior to printing.

29
CMP-30 Command Manual M. POSTFEED Command
The POSTFEED command instructs the printer to advance the media a specified amount after printing.
Format {command} {length}
Command & option
{command} POSTFEED
{length} Unit length the printer advances media after printing.
N. COUNTRY/CODE PAGE Command
The COUNTRY control command substitutes the appropriate character set for the specified country,
Format {command} {name}
Command & option
{command} COUNTRY
{name} USA
GERMANY
FRANCE
SWEDEN
SPAIN
NORWAY
CHINA (double byte encoding)
ITALY
CP850
UK
BIG5 (Traditional Chinese; double byte encoding)
JAPAN-S (Simplified Japanese fonts; double byte encoding)
30
CMP-30 Command Manual O. USING FORMAT FILES
When you used the same form repeatedly, you can print the label only sending variable date to the
printer by using a pre-loaded format.
In order to save a specified form, use “! DE” and to recall the saved format, use “! UF”.
P. BEEP Command
This command instructs the printer to sound the beeper for a given time length.
Format {command} {beep length}
Command & option
{command} BEEP
{beep length} Duration of beep, specified in 0.125ms.

31
CMP-30 Command Manual 8. Line Print Mode
The “! UTILITIES” command, or “! U” for short, must be ended by the terminator “PRINT” followed by a
CR/LF to end the utility session. Also, the “! U1” command can be placed anywhere in a text line o
execute the command.
A. SETLP Command
This command will be used to select the font, size and lint height
Format ! U1 SETLP {font name or number} {size} {unit height}
{font name or number} Font number
{size} Font size
{unit height} Real font size to use
B. SETLF Command
This command is to specify the distance between lines.

32
CMP-30 Command Manual C. Moving With X and Y Coordinates
Even though the printer is in a line print mode, it can still move down and across the paper using X
and Y values.
Format ! U1 X {unit value}
! U1 Y {unit value}
! U1 XY {x unit value} {y unit value}
! U1 RX {unit x value to move relative to present position}
! U1 RY {unit y value to move relative to present position}
! U1 RXY{unit x value to move relative to present position} {unit x value to move
relative to present position}
{unit value} Unit value
{x unit value} X Unit value
{y unit value} Y Unit value
{unit x value to move relative to present position} Unit X value to move relative to present
position
{unit y value to move relative to present position} Unit Y value to move relative to present
position
D. LMARGIN Command
The LMARGIN command sets the left margin in line print mode.
Format ! U1 LMARGIN {dots to offset from left}
{dots to offset from left} The value of Left margin
E. SETBOLD Command
The SETBOLE command will make text bolder and slightly wider. The value is an offset number from
0 to 5. Be sure to issue a “! U1 SETBOLE 0” command to turn the bolding off when done.
Format ! U1 SETBOLD {value}
{value} Value Range from 0 to 5
F. SETSP Command
The SETSP command is used to change spacing between text characters.
Format ! U1 SETSP {unit to separate characters}
{unit to separate characters} The space between each characters

33
CMP-30 Command Manual
G. PAGE-WIDTH Command
This command let you control the width.
Format ! U1 PW {unit width}
{unit width} Printing width for unit
H. PAGE-HEIGHT Command
This command let you control the height.
Format ! U1 PH {unit height}
{unit height} Print height
I. Special ASCII Characters
1. Form Feed
ASCII Character will advance the paper to either the next index mark, or the length specified by the
PAGE-HIGHT, SETFF OR SET-TOF commands.
J. SETFF Command
The SETFF command is used to align top of media to printhead. Once this command is executed, the
alignment will occur when:
Feed key is pressed
Form-feed character is issued
FORM command is issued
Format <!> <UTILITIES>
{command} {max-feed} {skip-length}
<PRINT>
Command & option
{command} SETFF
{max-feed} Maximum unit-length the printer advances searching for the next eye-sense
mark to align top of from. Valid values are 0-20,000
{skip-length} Unit-length printer advances past top of from. Valid values are 5-50.

34
CMP-30 Command Manual K. SET-TOF Command
This command is used to program the distance between the top-of-form and the end of the next or
previous eye-sense mark or gap.
Format ! U1 {command} {d}
Command & option
{command} SET-TOF
{d} The distance between the top of form and the end of the next or previous eye-
sense mark or gap.
L. SETLP-TIMEOUT
If the printer does not receive any characters after a set time, it will begin to print. This delay can be
set with the SETLP-TIMEOUT command. The range of the time out is 0 to 255.
Format ! U1 {command} {time in 1/8 second units}
Command & option
{command} SETLP-TIMEOUT
{time in 1/8 second units} Multiply the seconds to wait by 8 to get the correct time for the
command (125ms)

35
CMP-30 Command Manual 9. Advanced Utilities
A. VERSION Utility
This command reports the firmware version as a four character null-terminated ASCII string.
Format <!> <UTILITIES>
{command}
<PRINT>
Command & option
{command} VERSION
B. CHECKSUM Utility
This command reports the application checksum as a four character null-terminated ASCII string.
C. DEL Utility
The DEL command deletes the specified file.
Format <!> <UTILITIES>
{command} {name.ext}
<PRINT>
Command & option
{command} DEL
{name.ext} Name of file to be deleted
D. DIR Utility
The DIR command sends the file directory to a host.
Format <!> <UTILITIES>
{command}
<PRINT>
Command & option
{command} DIR

36
CMP-30 Command Manual E. DEFINE-FILE(DF) Utility
The DF command defiles a file name for a file to be loaded into the printer. If a file with the same
name already exists in the printer. it will be overwritten with the new file.
Format <!> {command} {filename.ext}
{data}
{terminator}
Command & option
{command} DF
{filename.ext}
{data}
{terminator} PRINT: If the PRINT terminator is used, it is also written to the file.
END: If the END terminator is used, it is not written to the file.
F. TYPE Utility
The TYPE command allows you to read a text file by sending it from the printer to host
Format <!> <UTILITIES>
{command} {name.ext}
<PRINT>
Command & option
{command} TYPE
{name.ext}
G. BAUD Utility
The BAUD command enables you to set the printer serial port baud rate.
Format <!> <UTILITIES>
{command} {baud}
<PRINT>
Command & option
{command} BAUD
{baud} 1200
4800
9600
19200
38400
57600
115200
37
CMP-30 Command Manual H. TIMEOUT Utility
If no data is received after the specified timeout, the printer will turn itself off to save energy and
preserve battery life. You can disable the timeout feature by setting the timeout value to 0.
Format <!> <UTILITIES>
{command} {time}
<PRINT>
Command & option
{command} TIMEOUT
{time} Time in 1/8 seconds of inactivity before printer will turn itself off.
I. ON-LOW-BATTERY Command
This command can be issued to instruct the printer as to what action to take when the battery voltage
fallos below the level set by the ‘low battery shut-down’ setting.
Format {command} {options}
Command & option
{command} OLB
{options} ALERT: The printer will transmit any message included between quote marks
out the serial port.
ALARM: Sounds the printer’s beeper in a set time.
J. LT Command
This command specifies the command line terminator character(s). The default terminator characters
are CR/LF or LF
Format {command} {mode}
Command & option
{command} LT
{mode} CR: Carriage-return (0x0D) character is the line terminator.
LF : Line-feed (0x0A) character is the line terminator.
CR-LF: Carriage-return/line-feed (0x0D 0x0A) characters are the line
terminator.
CR-X-LF: Line terminator is a carriage-return (0x0D) followed by any number
of characters followed by the line-feed (0x0A) character.
Characters found between the carriage-return and line-feed characters are
discarded.

38
CMP-30 Command Manual K. SET-TIME Utility
This command sets the time in the real time clock module.
Format <!> <UTILITIES>
{command} {time-stamp}
<PRINT>
Command & option
{command} SET-TIME
{time-stamp} hh:mm:ss
hh = hours (00 – 23)
mm = minutes (00 – 59)
ss = seconds (00 – 59)
L. GET-TIME Utility
This command reports the current time recalled from the real time clock module.
Format <!> <UTILITIES>
{command}
<PRINT>
Command & option
{command} GET-TIME
Printer output hh:mm:ss₩0
hh = hours (00 – 23)
mm = minutes (00 – 59)
ss = seconds (00 – 59)
null terminator (00H)
M. SET-DATE Utility
The command sets the date in the real time clock module.
Format <!> <UTILITIES>
{command} {date-stamp}
<PRINT>
Command & option
{command} SET-DATE
{date-stamp} mm-dd-yyyy
mm = month (01 – 12)
dd = day (01 – 31)
yyyy = year (1990 – 2089)

39
CMP-30 Command Manual N. GET-DATE Utility
This command reports the current date.
Format <!> <UTILITIES>
{command}
<PRINT>
Command & option
{command} GET-DATE
Printer output mm:dd:yyyy₩0
mm = month (01 – 12)
dd = day (01 – 31)
yy = year (1990 – 2089)
null terminator (00H)
O. Printing a Time Stamp
To print a time stamp on a label, use any text command and insert “ !< TIME” in the place of the text
to be printed.
P. Printing a Date Stamp
To print a date stamp on a label, use any text command and insert “!<DATE” in place of the text to be
printed.
40
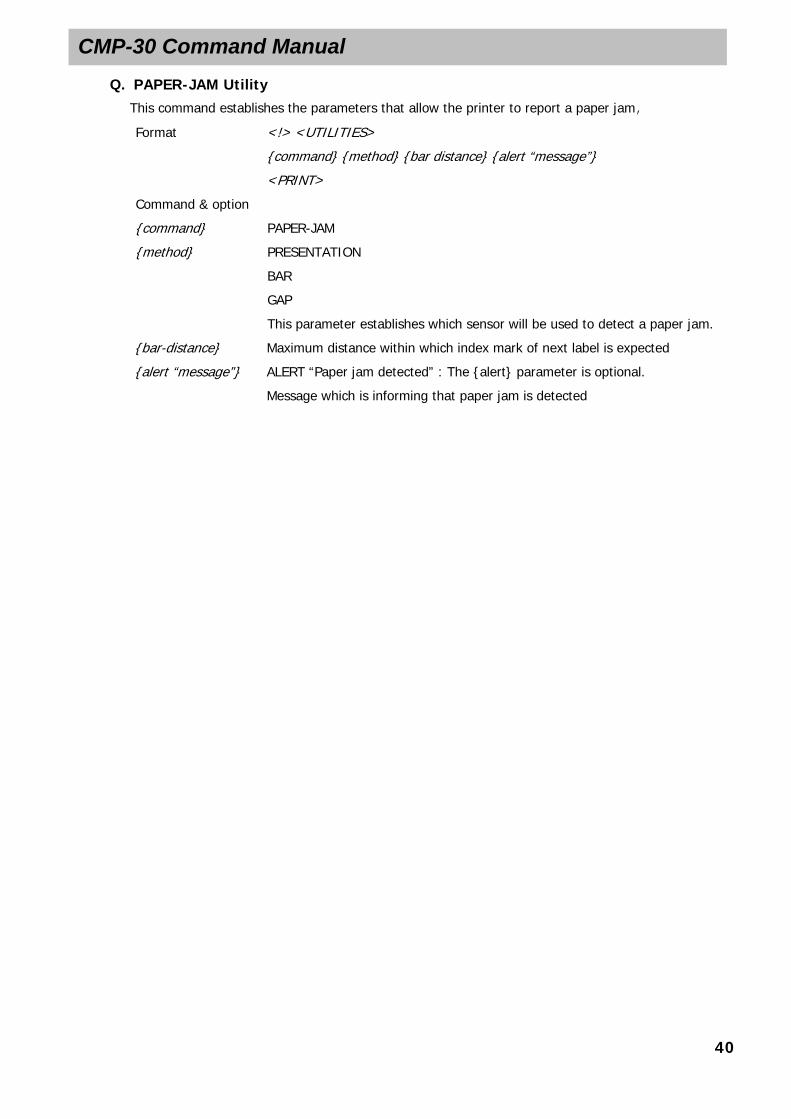
CMP-30 Command Manual Q. PAPER-JAM Utility
This command establishes the parameters that allow the printer to report a paper jam.
Format <!> <UTILITIES>
{command} {method} {bar distance} {alert “message”}
<PRINT>
Command & option
{command} PAPER-JAM
{method} PRESENTATION
BAR
GAP
This parameter establishes which sensor will be used to detect a paper jam.
{bar-distance} Maximum distance within which index mark of next label is expected
{alert “message”} ALERT “Paper jam detected” : The {alert} parameter is optional.
Message which is informing that paper jam is detected

41
CMP-30 Command Manual 10. Printer Escape Commands
A. SET AND READ CODE Command
Printer command sessions normally start with the ‘!’ character. When the printer is used in Generic
Text Mode (or Line-Print Mode) and if the user expects to print the ‘!” character in that mode, then
the CCL code must be changed.
Set CCL Code
ESC(0x1b) ‘}’(0x7d) ‘W’(0x57) ‘1’(0x31) <new CCL code>
Where {new CCL code} is a one-bye character representing the new CCL code.
Once the CCL Code is changed, all CCL session should be stared with the new CCL code.
The printer will retain the new CCL code for as long as it remains powered.
Follow sequence to read the CCL code:
Read CCL Code
ESC(0x1b) ‘}’(0x7d) ‘R’(0x52) ‘1’(0x31)
After the above command is issued, the printer will return the one-character CCL code.
PRINTER ESCAPE COMMANDS FORMAT
Format {escape} {command} [parameters]
Command & option
{escape} The ESC characte (0x1b)
{command} Choose from the escape commands in this section
[parameters] Parameters for the escape commands
☞ NOTE: The escape commands should not be used while in a control/utility session
(“! UTILITIES … PRINT” or ! 0 … PRINT”)
B. STATUS/INFORMATION
1. Get Printer Status
ESC (0x1b) ‘f’(0x68)
This command requests a status byte form the printer. It should be called before loading or
printing a label in order to make sure that the host software is synchronized with the printer. A
status byte from the printer is as follows
Bit0 Status(0: ready, 1: busy)
Bit1 Paper(0: present, 1: out of paper)
Bit2 Latch(0: closed, 1: open)
Bit3 Battery Level(0: OK, 1: Low)
Bit4 ~ 7 Reserved
Bit8 ~ 11 Contrast(0 ~ 3)
Bit12 ~ 15 Reserved

42
CMP-30 Command Manual 2. Get Printer Information
ESC (0x1b) ‘s’(0x73)
This command instruct the printer to return a null-terminated string containing its model number,
firmware revision and serial number.
3. Get User Label Count
ESC (0x1b) ‘L’(0x73) ‘R’(0x52) ‘U’(0x55) ‘C’(0x43)
This command requests the current user label count from the printer. This count represents the
total number of labels printed since the last time the count was reset to zero.
4. Reset User Label Count
ESC (0x1b) ‘S’(0x53) ‘W’(0x57) ‘M’(0x4D) ‘L’(0x4C) ‘C’(0x43)
This command instructs the printer to clear its user label count to zero.
C. POWER OFF Command 1. Off Command
ESC (0x1b) ‘p’(0x70)
This function instructs the printer power off.
2. Timeout Command
GS (0x1D) ‘S’(0x53) ‘P’(0x50) mode(0x00 ~ 0x02) time(minute, 1 ~ 60)
This function instructs the printer stand by or power off.
mode
0 The Timeout function is not used.
1 It turns off the power after the designated time.
2 It is converted to the hold mode after the designated
time..
The time to designate is (minute) unit. And it can designate to 1 ~ 60 minute.

43
CMP-30 Command Manual 11. Configuration/Control Commands
The following section covers a set of commands to configure and query printer parameters and perform
various printer control functions. For example, this set of commands include querying printer’s baud rate
or setting the specified value of baud rate. This set of commands is referred to as the set/get/do
command.
A. Command Format
3. setvar command
This command are used to configure printer operating parameters to specified values.
Format setvar “{parameter name}”
{parameter name}” Please refer to the parameter list below.
4. getvar command
The getvar command is used to get the current value of printer parameter.
Format getvar “{parameter name}” “{value}”
{parameter name}” Please refer to the parameter list below.
{value} The customized value
5. do command
The do command can be used to instruct the printer to the specified parameter
Format Do “{parameter name}”
{parameter name}” Please refer to the parameter list below.
6. Usage
This set/get/do command is used in combination with “U1” Command
Format ! U1 setvar “{parameter name}”
! U1 getvar “{parameter name}” “{value}”
! U1 do “{parameter name}”
B. Commands/Parameters parameter command value description
Application Parameters
appl.date getvar Printer’s application date
appl.name getvar Printer’s application name
appl.version getvar Printer’s application version
Bluetooth Parameters
bluetooth.address getvar Bluetooth device address
getvar bluetooth.authentication
setvar “off”
“default”
“setpin”
This parameter sets Bluetooth authentication mode and
works in combination with the
“bluetooth.bluetooth_pin”
parameter.
default “off”
bluetooth.bluetooth_pin setvar text string
up to 10
This parameter is used to connect to the printer only
when the “bluetooth.authentication” parameter is set to
44
CMP-30 Command Manual characters “setpin”. This parameter is not used when the
“bluetooth.authentication” parameter is set to “default”
or “off”. See “bluetooth.authentication”.
bluetooth.date getvar This parameter is the release date of the Bluetooth
module.
getvar bluetooth.discoverable
setvar “on”
“off”
This parameter sets the Bluetooth discoverable mode
default “on”
getvar bluetooth.friendly_name
setvar any srring
of 20
characters
or less
This parameter sets the friendly_name, which is part of
the local_name used during service discovery and also
affects authentication. The friendly_name is a string of
up to 20 characters long; it will default to the printer
serial number if not set by the user.
bluetooth.local_name getvar This parameter is the local name that will be provided
during service discovery. It is a combination of the
printer model name and the friendly_name
bluetooth.version getcar This parameter is the Bluetooth library version number
Comm Port Parameters
getvar comm.parity
setvar “n” (none)
“e” (even)
“o” (odd)
Printer’s comm. parity
default “n”
getvar comm.baud
setvar “9600”
“19200”
“38400”
“57600”
“115200”
Printer’s comm (cable) baud rate.
default “19200”
getvar comm.stop_bits
setvar “1”
“2”
Printer’s comm. port stop bits
default “1”
Device Parameters
getvar device.friendly_name
setvar A string of
Up to 16
characters
This parameter refers to the device’s friendly name. The
printer will report its serial number as friendly name if a
name has not been assigned to it yet.
device.reset do Instructs the printer to perform a soft reset.
device.languages getvar This parameter sets the programming language
recognized by the printer.
device.restore_defaults do Instructs the printer to restore factory default values for
the specified category of parameters.
File Parameters
file.delete do This command can be used to delete printer files.
file.dir getvar This parameter refers to the printer file directory
file.print do This command can be used to print the contents of

45
CMP-30 Command Manual printer files.
file.rename do This command can be used to rename printer files.
file.run do This command can be used to execute a batch file or
label file stored in the printer’s file system.
file.type do This command can be used to retrieve contents of a
file.
Printer Machanism Parameters
head.latch getvar This parameter refers to the status of the printer head
latch. The head latch must be closed for printing.
media.width_sense.enable setvar “on”
“off”
This parameter turns the Media Width Sensing option
“on” or “off”. This parameter only applies to printers
equipped with the Media Width Sensing option, other’s
will ignore this command.
default “off”
media.width_sense.in_mm getvar This parameter returns the current media width
installed in the printer measured in millimeters. The
“media.width_sense.enable” parameter must be set to
“on”.
media.width_sense.in_cm getvar This parameter returns the current media width
installed in the printer measured in centimeters. The
“media.width_sense.enable” parameter must be set to
“on”.
media.width_sense.in_dots getvar This parameter returns the current media width
installed in the printer measured in dots. The
“media.width_sense.enable” parameter must be set to
“on”.
media.width_sense.in_inches getvar This parameter returns the current media width
installed in the printer measured in inches. The
“media.width_sense.enable” parameter must be set to
“on”.
Media Parameters
getvar media.sense_mode
setvar “bar”
“gap”
This parameter refers to media sense mode.
default “gap”
media.status getvar This parameter refers to the paper status.
getvar media.tof
setvar “0”
~
“255”
This parameter refers to the print’s top-of-form setting.
The TOF setting is used to program the distance
between the top-of-form and the end of the next
(positive value) or previous (negative value) eye-sense
mark or gap. The eye-sense-mark or gap that is closer
to the top-of form should be used for top-of-form
setting. Refer to the SETTOF command in Section 9 for
more detailed information on the TOF setting.
default “16”
getvar media.type
setvar “label”
This parameter refers to the media type that is being
used.
46
CMP-30 Command Manual “journal”
default “label”
Memory Parameters
memory.flash_size getvar This parameter refers to the total amount of Flash
memory.
memory.flash_free getvar This parameter refers to the amount of available Flash
memory.
memory.ram_size getvar This parameter refers to the total amount of Random
Access Memory.
memory.ram_free getvar This parameter refers to the amount of available RAM.
Odometer Parameters
odometer.label_dot_length getvar Reports the length of the last label printed (or fed), in
dots. The label dot-length is set to zero when the
printer is turned on. This parameter is updated every
time the printer feeds or prints a label and detects a
marker, either gap or bar, while printing or feeding.
getvar odometer.latch_open_count
setvar “0”
~
“65535”
This parameter refers to the number of times the
printer’s latch has been opened. The latch open count
can be set to an initial value and incremented every
time the latch is opened. Typically the latch is opened
each time a roll of media is loaded.
default “0”
odometer.media_marker_count getvar This parameter refers to the media marker count. The
media marker counter keeps track of how many labels
have passed through the printer, (if they have been
printed or not) by counting the bar sense marks on the
back of the media.
getvar odometer.user_label_count
setvar “0”
~
“65535”
This parameter refers to the user label count. The user
label counter keeps track of how many labels have been
printed.since the last re-set of the counter. The user’s
label count can be set to an initial value and
ncremented every time a label is printed.
default “0”
Power Parameters
getvar power.Inactivity_timeout
setvar “0”
~
“65535”
This parameter refers to the inactivity timeout.
A value of “0” disables inactivity timeout
default “120”
power.low_battery_timeout getvar This parameter refers to the low battery timeout. When
47
CMP-30 Command Manual setvar “0”
~
“65535”
the printer reaches the low battery state this timeout
will become active. The printer will shut down after the
specified low battery time out
A value of “0” disables inactivity timeout
default “60”
power.low_battery_shutdown getvar This parameter refers to the low battery shutdown
level.
power.low_battery_warning getvar This parameter refers to the low battery warning level.
power.PercentFull getvar This parameter refers to the battery status.
power.status getvar This parameter refers to the battery status.
power.voltage getvar This parameter refers to the battery voltage.
Test Function Parameters
test.feed do This command can be used to advance media to top-of
-form.
test.print_diags do This command can be used to print a diagnostics
report.
test.report_diags do This command can be used to retrieve a diagnostics
report from the printer.
USB Parameters
usb.device.device_id_string getvar This parameter refers to the manufacturer assigned
IEEE1284 Device Identification string used to describe a
particular USB product.
usb.device.device_version getvar This parameter refers to the version of the USB device
being queried.
usb.device.manufacturer_string getvar This parameter refers to the string containing the name
of the manufacturer of the USB device.
usb.device.product_id getvar This parameter refers to the Product Identification
number that a manufacturer has assigned to a
particular product. This number, along with the Vendor
ID, allows a USB host to distinguish one device from
another.
usb.device.product_string getvar This parameter refers to the manufacturer assigned
string describing a particular USB product.
usb.device.serial_string getvar This parameter refers to the manufacturer assigned
serial number string describing a particular USB
product. This string should be unique to a particular
device.
usb.device.vendor_id getvar This parameter refers to the Vendor Identification
number that the USB organization has assigned to a
particular group. This number, along with the Product
ID, allows a USB host to distinguish one device from
another.

48
CMP-30 Command Manual GAP-SENSE & BAR-SENSE Commands
These commands are used to instruct the printer as to which means of top-of-form detection should be employed.
Printers default to GAP-SENSE if no command is specified.
Format {command}
Command & option
{command} GAP-SENSE # (0-255)
BAR-SENSE
Gap Sense commands can be followed by a number to adjust sensitivity
GAP-SENSE Command Example:
The following example configures the printer for barsensing. In addition, it specifies that the distance from top-of-
form to the gap is zero.
! UTILITIES
BAR-SENSE