Embed Size (px)
Citation preview

ADMINISTRATION GUIDE
Cisco Small Business Pro
Cisco WebEx PhoneConnectVersion 1.0

© 2009 Cisco Systems, Inc. All rights reserved. OL-157218-01
CCDE, CCSI, CCENT, Cisco Eos, Cisco HealthPresence, the Cisco logo, Cisco Lumin, Cisco Nexus, Cisco Nurse Connect, Cisco Stackpower,Cisco StadiumVision, Cisco TelePresence, Cisco WebEx, DCE, and Welcome to the Human Network are trademarks; Changing the Way We Work, Live, Play, andLearn and Cisco Store are service marks; and Access Registrar, Aironet, AsyncOS, Bringing the Meeting To You, Catalyst, CCDA, CCDP, CCIE, CCIP, CCNA,CCNP, CCSP, CCVP, Cisco, the Cisco Certified Internetwork Expert logo, Cisco IOS, Cisco Press, Cisco Systems, Cisco Systems Capital, the Cisco Systemslogo, Cisco Unity, Collaboration Without Limitation, EtherFast, EtherSwitch, Event Center, Fast Step, Follow Me Browsing, FormShare, GigaDrive, HomeLink,Internet Quotient, IOS, iPhone, iQuick Study, IronPort, the IronPort logo, LightStream, Linksys, MediaTone, MeetingPlace, MeetingPlace Chime Sound, MGX,Networkers, Networking Academy, Network Registrar, PCNow, PIX, PowerPanels, ProConnect, ScriptShare, SenderBase, SMARTnet, Spectrum Expert,StackWise, The Fastest Way to Increase Your Internet Quotient, TransPath, WebEx, and the WebEx logo are registered trademarks of Cisco Systems, Inc. and/or its affiliates in the United States and certain other countries.
All other trademarks mentioned in this document or website are the property of their respective owners. The use of the word partner does not imply apartnership relationship between Cisco and any other company. (0903R)

Contents
About This Document iii
Organization iii
Locating Information in PDF Files iv
Chapter 1: Getting Started 1
Introduction to WebEx PhoneConnect 1
Hardware and Software Requirements 2
SBCS Platform 3
Supported Cisco IP Phones 3
Supported Locales 5
Chapter 2: Configuring WebEx PhoneConnect 6
Before You Begin 7
Disable User Password Changes on the WebEx Service Site 7
Launch Configuration Assistant and Connect to the UC 500 8
Enter DNS Server Address in Configuration Assistant 10
Configure an NTP Server (Recommended) 11
Apply General Application Settings 12
Re-apply Authentication Configuration Settings and Generate a New HTTPS Certificate 14
Enable PhoneConnect and Log In as the WebEx Administrator 15
Configure Site Settings 18
Add WebEx Users and Enable PhoneConnect on IP Phones 22
Manually Add New Users 23
Using Copy From Device to Add WebEx Users 26
Enable PhoneConnect for Existing WebEx Users 27
Verify CME Service URL Settings 28
Verify WebEx PhoneConnect Works Correctly 29
Advanced Site Configuration Settings 30
Cisco WebEx PhoneConnect Administration Guide i

Contents
Chapter 3: Administering WebEx PhoneConnect 32
Updating WebEx User Information 33
Replacing a User Phone 35
Deleting WebEx PhoneConnect Users 36
Adding New Supported Languages Between Releases 37
Disabling WebEx PhoneConnect 39
Clearing All WebEx PhoneConnect Site Data 40
Chapter 4: Troubleshooting 42
Loss of Connection to WebEx Service 42
PhoneConnect Administration Login Problems 42
WebEx PhoneConnect and WebEx Connect 44
Connectivity Problems 44
Application Access 44
Meeting Time/Alert Synchronization 45
IP Phone Error Messages and Call-In Problems 45
Audio-Only Meeting Hosted from a Conference Room Phone 47
Appendix A: Where to Go from Here 48
Support Contact Information 48
Cisco Smart Business Communications System Support 48
WebEx Support 48
Resources for VARs 49
How to Obtain a WebEx Account 49
Resources WebEx PhoneConnect Users 50
Cisco IP Phone Documentation 50
Getting Started with WebEx 50
WebEx Connect Click-to-Call 51
End User License Agreement (EULA) 52
Cisco WebEx PhoneConnect Administration Guide ii

Preface
About This Document
This guide describes the concepts and tasks necessary to:
• Use Cisco Configuration Assistant to enable and configure the WebEx PhoneConnect application
• Manage PhoneConnect users and accounts using Configuration Assistant
The audience for this document includes Cisco SMB-select VARS (value added resellers) responsible for administering WebEx PhoneConnect on Cisco Smart Business Communication Systems (SBCS) platforms for customers.
The information and procedures in this guide assume that VARs are familiar with administration of Cisco Smart Business Communications Systems using Cisco Configuration Assistant. Knowledge of Cisco IOS command-line interface is not required.
OrganizationThis table describes the contents of each chapter in this administration.
Table 1 Document Organization
Chapter Title Description
Chapter 1 Getting Started Describes how customers use the WebEx PhoneConnect application and how the application is administered through Cisco Configuration Assistant. It also lists supported locales, hardware and software requirements, and describes customer site information required to enable the application.
Cisco WebEx PhoneConnect Administration Guide iii

Preface
Locating Information in PDF FilesWebEx PhoneConnect documentation is published in Adobe PDF format. The PDF Find/Search tool within Adobe® Reader® lets you find information quickly and easily online. You can perform the following tasks:
• Search an individual PDF file.
• Search multiple PDF files at once (for example, all PDF files in a specific folder or disk drive).
• Perform advanced searches.
Chapter 2 Configuring WebEx PhoneConnect
Describes procedures for enabling and authenticating the application, logging in, configuring system and site settings, and adding user accounts using Cisco Configuration Assistant.
Chapter 3 Administering WebEx PhoneConnect
Provides procedures for administering the application after the initial installation, installing language files, configuring advanced options, troubleshooting, and clearing site data.
Appendix A Where to Go from Here Provides pointers to Cisco product resources, including URLs for related product documentation and resources available on Cisco.com and support contact information.
Table 1 Document Organization (Continued)
Chapter Title Description
Cisco WebEx PhoneConnect Administration Guide iv

Preface
Finding Text in a PDF File
Follow this procedure to find text in a PDF file.
STEP 1 Enter your search terms in the Find text box on the toolbar.
NOTE By default, the Find tool is available at the right end of the Acrobat toolbar. If the Find tool does not appear, choose Edit > Find.
STEP 2 Optionally, click the arrow next to the Find text box to refine your search by choosing special options such as Whole Words Only.
STEP 3 Press Enter.
STEP 4 Acrobat displays the first instance of the search term.
STEP 5 Press Enter again to continue to more instances of the term.
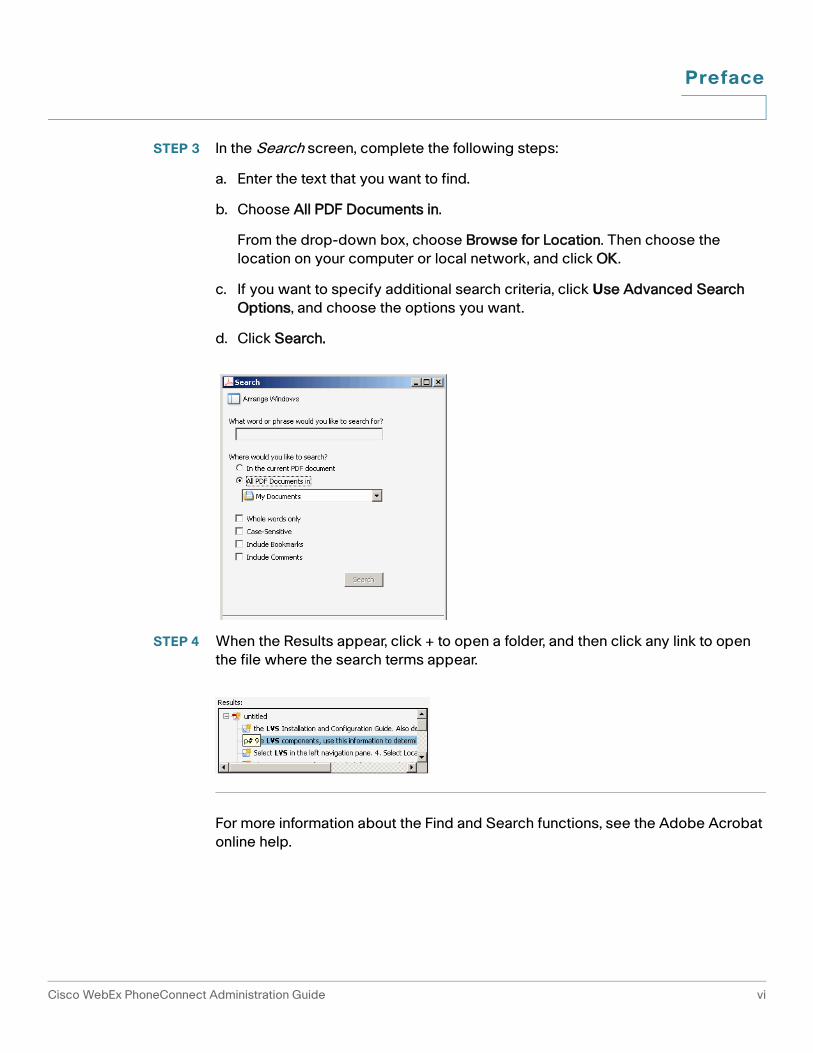
Finding Text in Multiple PDF Files
The Search screen lets you search for terms in multiple PDF files that are stored on your PC or local network. The PDF files do not have to be open.
STEP 1 Start Acrobat Professional or Adobe Reader.
STEP 2 Choose Edit > Search, or click the arrow next to the Find box and then choose Open Full Acrobat Search.
Cisco WebEx PhoneConnect Administration Guide v
Preface
STEP 3 In the Search screen, complete the following steps:
a. Enter the text that you want to find.
b. Choose All PDF Documents in.
From the drop-down box, choose Browse for Location. Then choose the location on your computer or local network, and click OK.
c. If you want to specify additional search criteria, click Use Advanced Search Options, and choose the options you want.
d. Click Search.
STEP 4 When the Results appear, click + to open a folder, and then click any link to open the file where the search terms appear.
For more information about the Find and Search functions, see the Adobe Acrobat online help.
Cisco WebEx PhoneConnect Administration Guide vi

1
Getting Started
Read this chapter to learn how customers use the WebEx PhoneConnect application. This chapter also covers hardware and software requirements, WebEx site information required to enable the application, and supported locales.
• Introduction to WebEx PhoneConnect, page1
• Hardware and Software Requirements, page 2
Introduction to WebEx PhoneConnect
WebEx PhoneConnect is designed for customers who want fast, simple access to WebEx meetings from their IP phone without the need for a desktop PC.
Many people find the process of starting or joining an online conference frustrating, with the various URLs, dial-in numbers, and meeting IDs needed. WebEx PhoneConnect automates this entire process so that IP phone users can join the audio portion of a WebEx conference by pressing a single softkey on their IP phone.
Once a WebEx user is associated with an IP phone through WebEx PhoneConnect, a simple meeting browser application is installed on their Cisco IP phone display that allows the IP phone user to:
• List WebEx meetings they are hosting
• List WebEx meetings to which they are invited by other IP phone users in their company (users must share same UC500 router)
• Receive audio and visual alerts on their IP phone when it is time to join a meeting
• Control how far in advance of the meeting they want to receive alerts
• Press a single softkey to join a meeting
Cisco WebEx PhoneConnect Administration Guide 1

Getting StartedHardware and Software Requirements 1
In addition, WebEx users with access to a WebEx Connect client from a desktop PC can use Click-to-Call with their IP phone to automatically dial someone on their WebEx Connect Buddy List.
The following illustration shows the end-to-end WebEx PhoneConnect customer experience.
The WebEx PhoneConnect application is associated with a single UC500 and a single WebEx service and site administrator account.
• Multi-site UC500 configurations are not supported.
• Only IP phone users connected to the same UC500 can use PhoneConnect application to automatically call into meetings hosted on their WebEx service.
Hardware and Software Requirements
Read this section carefully to make sure you have the needed hardware and software to use WebEx PhoneConnect. You must also have certain information about your customer’s WebEx service site, as described below.
• Hardware and Software Requirements, page 2
• Obtaining the Customer WebEx Site Account Information, page 4
Cisco WebEx PhoneConnect Administration Guide 2

Getting StartedHardware and Software Requirements 1
SBCS Platform
The WebEx PhoneConnect application is supported on Cisco SBCS platforms only. It is delivered as part of the Cisco UC500 software package and requires Cisco Configuration Assistant Version 2.0 or greater.
You must have the following software components installed.
Supported Cisco IP Phones
WebEx PhoneConnect will work with the following Cisco IP phone models (SCCP protocol only):
• Cisco Unified IP Phone Models 794x
• Cisco Unified IP Phone Models 796x
• Cisco Unified IP Phone Model 7975
• Cisco Unified Wireless Phone Models 7921 and 7925
• Cisco Unified IP Phone Model 7937
• Cisco Unified IP Phone Model 524G
• Cisco Unified IP Phone Model 521G
• Cisco IP Phone Model SPA525G
• Cisco IP Communicator (CIPC) softphone client, version 2.1 or later
Component Version
Cisco Configuration Assistant (CCA) 2.0 or later
UC500 Software Pack Version 7.0(3), which includes:
• Cisco IOS 12.4(20)T2
• Cisco Unity Express (CUE) 7.0.3
• Current phone firmware loads (older loads are not supported)
Cisco WebEx PhoneConnect Administration Guide 3

Getting StartedHardware and Software Requirements 1
Downloading and Installing Cisco Configuration Assistant
You must use Cisco Configuration Assistant to configure WebEx PhoneConnect. There is no command line Interface (CLI) support for this application.
To install Configuration Assistant on your PC, follow these steps.
STEP 1 Go to this web address: http://www.cisco.com/go/configassist.
NOTE You must be a registered Cisco.com user.
STEP 2 Find the latest version of the Configuration Assistant installer file, for example. configuration-assistant-windows-k9-installer-2-0-en.exe.
STEP 3 Download and run the Configuration Assistant installer.
Follow the onscreen instructions to compete the installation.
For more information about configuring CCA, refer to Getting Started with Cisco Configuration Assistant Version 2.0 at http://www.cisco.com/en/US/products/ps7287/tsd_products_support_install_and_upgrade.htm.
Obtaining the Customer WebEx Site Account Information
Before you can enable and configure the WebEx PhoneConnect application, your customer must have or obtain a WebEx service site account from WebEx with an administrative user. Direct your customer to http://www.webex.com where they can purchase a service option that best fits their needs.
TIP Make sure that your customer understands that simply obtaining a free user account from WebEx is not enough. The customer must purchase a WebEx service option from WebEx.com and then provide you with the site account information you need to configure WebEx PhoneConnect.
Cisco WebEx PhoneConnect Administration Guide 4

Getting StartedHardware and Software Requirements 1
In order to configure WebEx PhoneConnect, the customer must provide the following WebEx service site account information.
Configuration Assistant uses this information to connect to the customer’s WebEx service site and associate the customer's WebEx user accounts with the WebEx PhoneConnect application.
Supported Locales
For the current release, WebEx PhoneConnect is localized for English and Spanish only.
Data Description
UserID Customer’s WebEx site administrator user ID. Also referred to as a WebExID.
Password Customer’s WebEx site administrator password.
SiteID Customer’s WebEx site ID number.
SiteName Customer’s WebEx site name (the first string in the WebEx site URL).
For example, if the WebEx site URL is http://acme.webex.com, the WebEx site name is “acme”.
Cisco WebEx PhoneConnect Administration Guide 5

2
Configuring WebEx PhoneConnect
After you have the correct versions of hardware and software installed and have obtained the required WebEx site and administrator account information from the customer, you are ready to use Cisco Configuration Assistant to enable and configure WebEx PhoneConnect.
The topics in this chapter cover the steps required for initial configuration of WebEx PhoneConnect:
• Before You Begin, page 7
• Launch Configuration Assistant and Connect to the UC 500, page 8
• Enter DNS Server Address in Configuration Assistant, page10
• Configure an NTP Server (Recommended), page11
• Apply General Application Settings, page12
• Enable PhoneConnect and Log In as the WebEx Administrator, page15
• Configure Site Settings, page18
• Add WebEx Users and Enable PhoneConnect on IP Phones
• Verify WebEx PhoneConnect Works Correctly
Once you have configured basic settings and users, refer to the following sections for advanced options and troubleshooting:
• Advanced Site Configuration Settings, page 30
• Chapter 4, “Troubleshooting”
Cisco WebEx PhoneConnect Administration Guide 6
Configuring WebEx WebEx PhoneConnectAdvanced WebEx PhoneConnect Settings 2
Before You Begin
WebEx PhoneConnect must be enabled and configured after basic network, data, and telephony features for the site have been set up and calls are functioning correctly.
Before enabling and configuring WebEx PhoneConnect using Cisco Configuration Assistant, make sure that you have configured phone users and extensions.
NOTE To configure WebEx PhoneConnect, Cisco Configuration Assistant must be running on a PC connected to the UC 500 platform via LAN or VPN.
Disable User Password Changes on the WebEx Service Site
It is strongly recommended that you disable the option for WebEx users to change their passwords on the WebEx service site. Password changes made on the WebEx service site will cause WebEx PhoneConnect application authentication to fail.
To disable user password changes on the WebEx site, follow these steps.
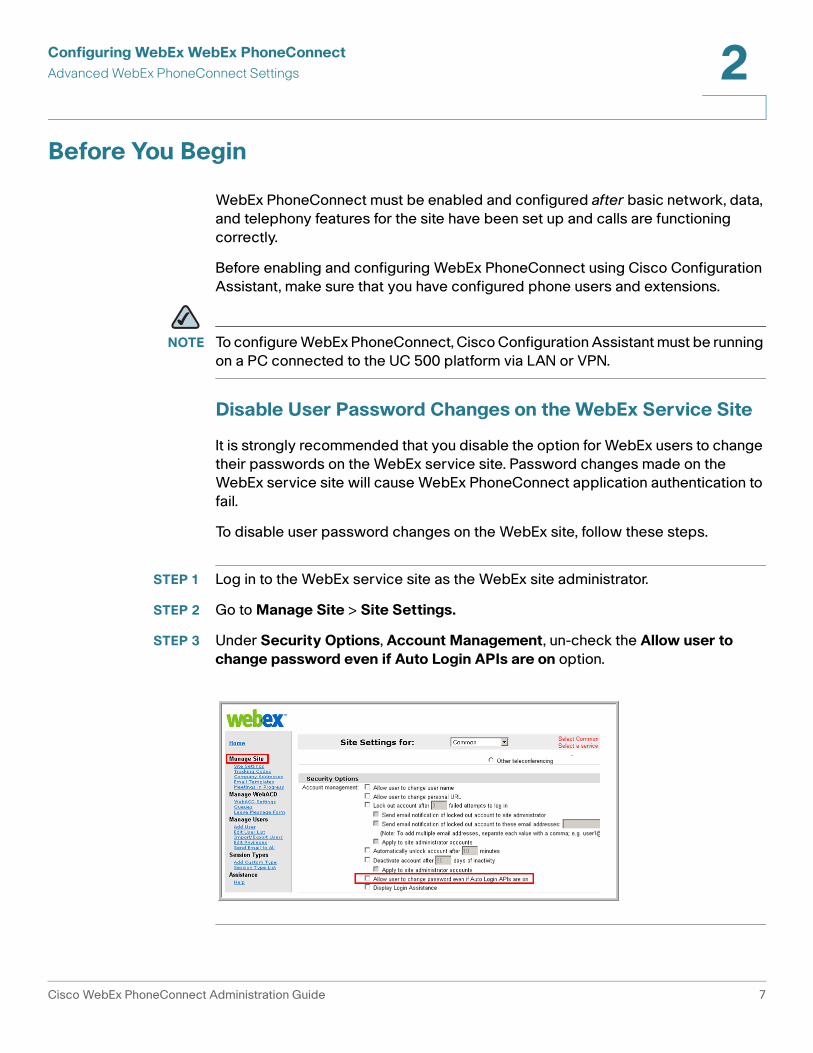
STEP 1 Log in to the WebEx service site as the WebEx site administrator.
STEP 2 Go to Manage Site > Site Settings.
STEP 3 Under Security Options, Account Management, un-check the Allow user to change password even if Auto Login APIs are on option.
Cisco WebEx PhoneConnect Administration Guide 7

Configuring WebEx WebEx PhoneConnectAdvanced WebEx PhoneConnect Settings 2
Launch Configuration Assistant and Connect to the UC 500
STEP 1 Verify that Cisco Configuration Assistant, Version 2.0 or later is installed on the PC you are using to configure WebEx PhoneConnect.
STEP 2 Connect the PC to one of the LAN ports on the Cisco UC 500 and verify that the PC is set to use DHCP to obtain its IP address.
STEP 3 Launch Cisco Configuration Assistant on your PC. The Connect window opens.
STEP 4 Connect to the Cisco UC 500 using one of the following methods:
• To connect to an existing customer site, select the Customer Sites tab and highlight a site in the list.
• To create a new customer site, click Add a New Site.
For instructions on creating a customer site, refer to Getting Started with Cisco Configuration Assistant 2.0 at http://www.cisco.com/en/US/products/ps7287/tsd_products_support_install_and_upgrade.htm.
• To connect to the Cisco UC 500 only, select the Host Name/IP Address tab and enter the hostname or IP address of the Cisco UC 500. The default LAN IP address is 192.168.10.1.
STEP 5 Click OK.
Cisco WebEx PhoneConnect Administration Guide 8

Configuring WebEx WebEx PhoneConnectAdvanced WebEx PhoneConnect Settings 2
STEP 6 If prompted, click Yes to accept the security certificate on the Cisco UC 500.
STEP 7 Enter the administrator username and password for the UC 500 and click OK.
Once you have connected to the Cisco UC 500, Configuration Assistant reads in the current configuration, then loads voice-related data.
Wait until all voice-related data is loaded before continuing. The progress bar on the bottom left corner of the main window displays the percent completed.
When working in Cisco Configuration Assistant:
• Click Apply if you want to save your changes, but keep the window open.
• Click Refresh if you do not want to save your changes, but keep the window open.
• Click OK if you want to save your changes and close the window.
When you have completed configuration for the application, choose Configure > Save Configuration to save all your settings to the start-up configuration on the UC 500 to ensure that the configuration will be preserved after a system outage or restart.
You can also click the Save Configuration icon on the Configuration Assistant toolbar to open the Save Configuration dialog.
Cisco WebEx PhoneConnect Administration Guide 9
Configuring WebEx WebEx PhoneConnectAdvanced WebEx PhoneConnect Settings 2
Enter DNS Server Address in Configuration Assistant
The Internet Service Provider DNS server IP address is used by WebEx PhoneConnect to locate the webex.com server.
This DNS IP address configuration is static. It does not synchronize with DNS IP changes that can occur if the Internet Service Provider (ISP) is using a dynamic IP address. If the DNS server IP address changes, you must update the DNS IP address using the procedure described in this section.
To manually set the DNS server IP address using Cisco Configuration Assistant, follow these steps.
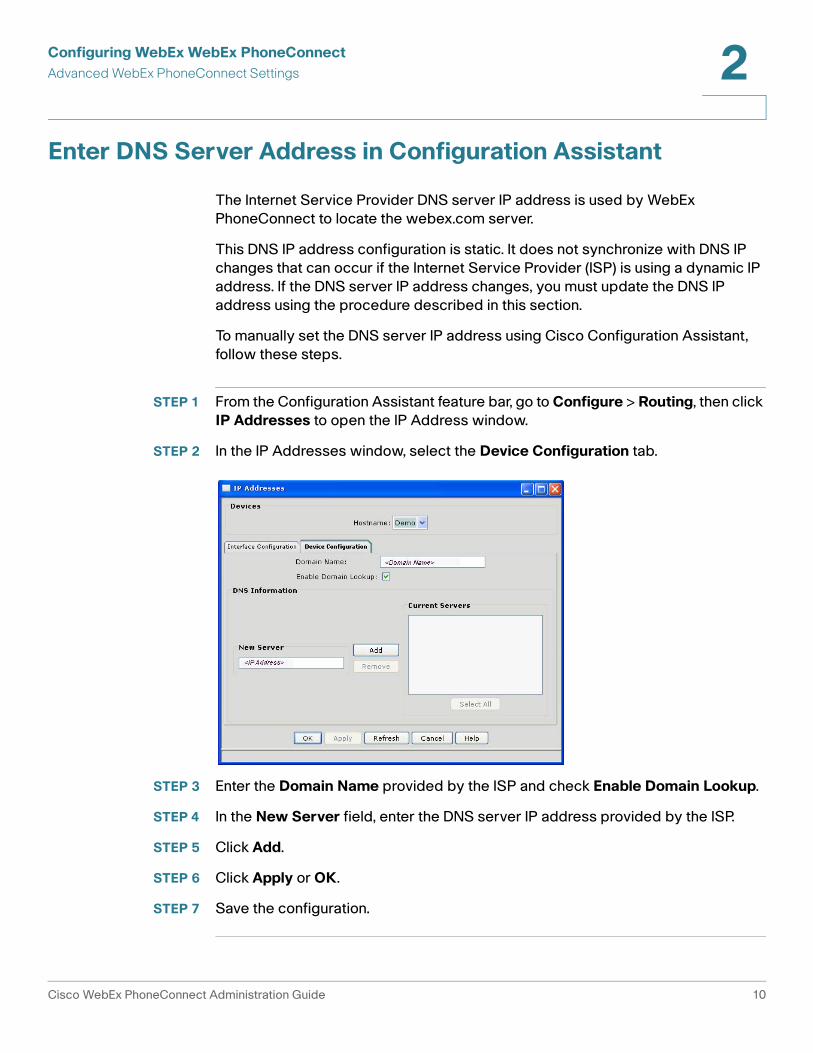
STEP 1 From the Configuration Assistant feature bar, go to Configure > Routing, then click IP Addresses to open the IP Address window.
STEP 2 In the IP Addresses window, select the Device Configuration tab.
STEP 3 Enter the Domain Name provided by the ISP and check Enable Domain Lookup.
STEP 4 In the New Server field, enter the DNS server IP address provided by the ISP.
STEP 5 Click Add.
STEP 6 Click Apply or OK.
STEP 7 Save the configuration.
Cisco WebEx PhoneConnect Administration Guide 10

Configuring WebEx WebEx PhoneConnectAdvanced WebEx PhoneConnect Settings 2
Configure an NTP Server (Recommended)
It is strongly recommended that you configure an external NTP (Network Time Protocol) server to ensure that WebEx meeting times and alerts are not displayed too early or too late.
To configure an NTP server using Configuration Assistant, follow these steps.
STEP 1 From the feature bar in Configuration Assistant, go to Configure > Device Properties > System Time.
STEP 2 In the System Time window, click NTP.
Complete the fields in the Network Time Server window to configure devices to receive time updates from an NTP server and to configure NTP authentication. For authentication to work properly, you must first obtain the key information from the server administrator and enter it in the NTP Authentication fields.
STEP 3 In the IP Address field, enter the IP address of the NTP server.
STEP 4 Optional: In the Key ID field, specify the authentication key to use when sending packets to the server. Enter a number from 1 to 4294967295.
STEP 5 Optional: In the Key Value field, enter the secret key. Enter up to 32 printable characters, excluding spaces, !, ", #, $, }, |, and ~.
STEP 6 Optional: In the Encryption Type field, enter the number used to encrypt the key value.
STEP 7 Click OK.
STEP 8 Click Apply.
STEP 9 Click Refresh to update the System Time window.
STEP 10 Save the configuration.
Cisco WebEx PhoneConnect Administration Guide 11
Configuring WebEx WebEx PhoneConnectAdvanced WebEx PhoneConnect Settings 2
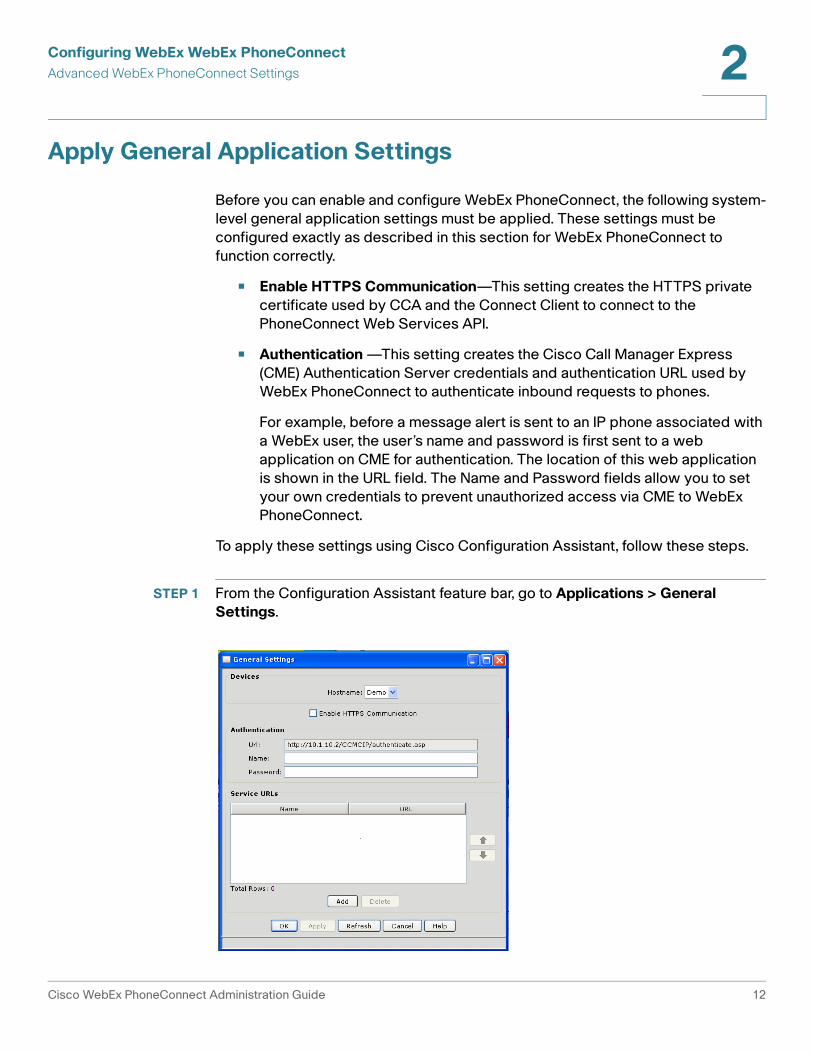
Apply General Application Settings
Before you can enable and configure WebEx PhoneConnect, the following system-level general application settings must be applied. These settings must be configured exactly as described in this section for WebEx PhoneConnect to function correctly.
• Enable HTTPS Communication—This setting creates the HTTPS private certificate used by CCA and the Connect Client to connect to the PhoneConnect Web Services API.
• Authentication —This setting creates the Cisco Call Manager Express (CME) Authentication Server credentials and authentication URL used by WebEx PhoneConnect to authenticate inbound requests to phones.
For example, before a message alert is sent to an IP phone associated with a WebEx user, the user’s name and password is first sent to a web application on CME for authentication. The location of this web application is shown in the URL field. The Name and Password fields allow you to set your own credentials to prevent unauthorized access via CME to WebEx PhoneConnect.
To apply these settings using Cisco Configuration Assistant, follow these steps.
STEP 1 From the Configuration Assistant feature bar, go to Applications > General Settings.
Cisco WebEx PhoneConnect Administration Guide 12

Configuring WebEx WebEx PhoneConnectAdvanced WebEx PhoneConnect Settings 2
STEP 2 Select the UC 500 device from the Hostname menu.
STEP 3 Make sure that the Enable HTTPS Communication option is checked.
Every time HTTPS is enabled, the certificate is changed, and all related applications external to the SBCS platform must re-authenticate with the UC 500 device. For example, if a WebEx user is using WebEx Connect when the certificate is changed, their WebEx Connect session terminates, and they must log back into WebEx Connect to re-establish their connection.
Once an HTTPS private certificate is created, it has a life of 2 years before it expires. Once it expires, the customer administrator must create a new certificate. See the ”Re-apply Authentication Configuration Settings and Generate a New HTTPS Certificate” section on page14.
!IMPORTANT The HTTPS certificate is not backed up by Configuration Assistant. This means that
if you restore a configuration from a back-up, the HTTPS certificate is not restored. In this case, you must generate a new certificate. See the ”Re-apply Authentication Configuration Settings and Generate a New HTTPS Certificate” section on page14.
STEP 4 Enter a name and password for HTTPS authentication. HTTPS authentication fields are described in the following table.
Field Value Description Recommended Action
URL http://10.1.10.2/CCMCIP/authenticate.asp
Location of a web application on CME that provides internal authentication of IP phone user names and passwords.
None.
This is a factory pre-set static address for WebEx PhoneConnect. It cannot be changed.
Cisco WebEx PhoneConnect Administration Guide 13

Configuring WebEx WebEx PhoneConnectAdvanced WebEx PhoneConnect Settings 2
STEP 5 The Service URLs section defines the menu item name, CME Service URL, and order of menu items for configurable service URLs such as WebEx PhoneConnect.
The first time you access General Settings, the Service URLs section is blank. This information is filled in by the application after it is enabled. For detailed information on these settings, see Verify CME Service URL Settings, page 28.
STEP 6 Click Apply or OK to save your changes.
STEP 7 Save the configuration.
Re-apply Authentication Configuration Settings and Generate a New HTTPS Certificate
Whenever Cisco Unity Express is upgraded or reinstalled, or a previously backed up configuration is restored to the Cisco UC 500, you must re-apply the Authentication Configuration from the Applications > General Settings window. This procedure also generate a new HTTPS certificate, so it can be performed if the HTTPS certificate has expired.
Name Default: None (blank)
15-character maximum; spaces and special characters are not permitted.
HTTPS Name and Password fields prevent unauthorized access to WebEx PhoneConnect via CME.
Required field.
Enter a username for HTTP authentication.
Password Default: None (blank)
15-character maximum; spaces and special characters are not permitted.
HTTPS Name and Password fields prevent unauthorized access to WebEx PhoneConnect via CME.
Required field.
Enter a password for HTTP authentication.
Field Value Description Recommended Action
Cisco WebEx PhoneConnect Administration Guide 14

Configuring WebEx WebEx PhoneConnectAdvanced WebEx PhoneConnect Settings 2
To re-apply Authentication Configuration settings and generate a new HTTPS certificate, follow these steps.
STEP 1 From the feature bar in Configuration Assistant, go to Applications > General Settings.
STEP 2 Perform one of the following actions:
• If Enable HTTPS Communication is checked, un-check it and then click Apply.
With the General Settings window still open, re-check the Enable HTTPS Communication option. Click Apply, then click OK.
• If Enable HTTPS Communication is unchecked, check it. Click Apply, then click OK.
STEP 3 Save the configuration.
Enable PhoneConnect and Log In as the WebEx Administrator
The next step in configuring WebEx PhoneConnect is to enable it using Configuration Assistant.
WebEx PhoneConnect is one of several applications that can run on the UC 500 platform if enabled. Configuration Assistant prevents you from exceeding the available resources on the UC 500 platform by showing you how much each application will consume. The Smart Applications Manager window in Configuration Assistant uses a system of numerical credits per application. The window shows you how many credits each application requires and how many credits are currently available. The number of credits is calculated dynamically, based on which applications are running and the current load on the UC 500.
When WebEx PhoneConnect is enabled and you log in as the WebEx site administrator, the application automatically connects to the WebEx service site via the WAN connection and downloads the customer’s WebEx administrator and user account information.
You can then use Cisco Configuration Assistant to manage your customer’s WebEx user accounts and associate IP phones with those accounts.
Cisco WebEx PhoneConnect Administration Guide 15

Configuring WebEx WebEx PhoneConnectAdvanced WebEx PhoneConnect Settings 2
!CAUTION Once you have enabled WebEx PhoneConnect, it is strongly recommended that
you administer all WebEx user account changes from the PhoneConnect Application Main window in Cisco Configuration Assistant instead of through the WebEx service site.
To enable WebEx PhoneConnect, follow these steps.
STEP 1 From the feature bar in Configuration Assistant, go to Applications > Smart Applications Manager.
STEP 2 In the Smart Applications Manager window, select the UC 500 device from the Hostname menu.
STEP 3 Under Applications, click PhoneConnect to highlight it.
STEP 4 Under the Description tab, make sure that the sum of the credits required and the credits used does not exceed 100.
STEP 5 Check the Enable option.
Cisco WebEx PhoneConnect Administration Guide 16

Configuring WebEx WebEx PhoneConnectAdvanced WebEx PhoneConnect Settings 2
If the total number of resources exceeds 100, Configuration Assistant prevents you from enabling PhoneConnect. Disable (un-check) one or more of the applications already running and apply the changes until you have enough resources.
STEP 6 Click Apply to apply the changes, but leave the Smart Applications Manager window open.
STEP 7 Click Setup Options to open the PhoneConnect Configuration Login window.
WebEx PhoneConnect only accepts credentials from the WebEx Administrator. No one else can use WebEx PhoneConnect to create or modify WebEx user accounts.
STEP 8 Complete the fields as shown in the following table.
STEP 9 Click Login.
Name Description
UserID Customer’s WebEx site administrator user ID. Also referred to as a WebExID.
Password Customer’s WebEx site administrator password.
SiteID Customer’s WebEx site ID number.
SiteName Customer’s WebEx site name (the first string in the WebEx site URL).
For example, if the WebEx site URL is http://acme.webex.com, enter acme for the site name.
Cisco WebEx PhoneConnect Administration Guide 17

Configuring WebEx WebEx PhoneConnectAdvanced WebEx PhoneConnect Settings 2
On a successful login, site administration and user account information is downloaded from the WebEx service site to the Cisco UC 500, and the PhoneConnect Application Main window opens.
If you do not immediately see the customer’s WebEx service site administrator listed, click Refresh.
You are now ready to configure settings for the application.
Continue with the ”Configure Site Settings” section on page18.
Configure Site Settings
This section provides instructions for:
• Verifying customer administration information
• Configuring site-level settings for meeting call-in numbers
• Configuring dialing digits so that the PhoneConnect application correctly auto-dials the meeting call-in number
Cisco WebEx PhoneConnect Administration Guide 18

Configuring WebEx WebEx PhoneConnectAdvanced WebEx PhoneConnect Settings 2
To configure PhoneConnect site settings, follow these steps.
STEP 1 In the PhoneConnect Application Main window, verify that the information displayed in the Customer Administrator Information section of the window is correct and matches the information for the customer site.
STEP 2 For now, skip the WebEx Users Information section. Procedures for adding WebEx user accounts and associating IP phones are covered in a later section of this chapter (see the ”Add WebEx Users and Enable PhoneConnect on IP Phones” section on page 22).
STEP 3 Configure meeting call-in settings.
a. Choose a Call-In Preference, either Toll-Free or Toll call. The default value is Toll-Free.
b. Enter the Dial-Out Prefix (access code) for external calling. This field is required.
STEP 4 Optional. Configure dialing digit conversion for meeting call-in.
Depending on where your customer is dialing from, how their outgoing dial plan is set up, and how the WebEx call-in number is formatted, you may need to remove or replace initial dialing prefixes such as country codes, area or city codes, or code for international dialing.
Cisco WebEx PhoneConnect Administration Guide 19

Configuring WebEx WebEx PhoneConnectAdvanced WebEx PhoneConnect Settings 2
Complete the fields in the Call-In Number Conversion section as described in the following table.
Field Description Default Value Action
WebEx-provided Number
Meeting call-in number provided by WebEx.
Number provided by WebEx.
None
This field is read-only.
Remove Num. of Digits from the Front
Number of digits to remove from the beginning of WebEx-provided number.
This field is required and cannot be left blank.
0 Enter the number of digits that must be removed or replaced as required to match the dial-out number.
Add Digits to the Front
Digits to add to the beginning of the WebEx-provided call-in number.
This field can contain up to 20 digits.
None (blank). Enter digits to be added to the front of the number, for example, an area code that differs from the one in the WebEx-provided number.
You do not need to add the Dial-Out Prefix (access code) here. The Dial Out Prefix is automatically added to the front of the number.
Cisco WebEx PhoneConnect Administration Guide 20

Configuring WebEx WebEx PhoneConnectAdvanced WebEx PhoneConnect Settings 2
The following example shows how the call-in number conversion settings are configured in the case where the WebEx call-in number must be converted from 10 digits to 7 digits.
Resulting Number to Dial
Dial-out number after adding and removing digits and pre-pending the dial-out prefix.
Read-only value generated from the values entered in the Dial-Out Prefix and Remove/Add Digits fields.
Verify that the number matches what users manually dial to reach the WebEx service.
Call-in Number Conversion Setting
Example Value
Dial-Out Prefix 9
WebEx Provided Number 1-214-883-4000
WebEx Provided Number Stripped of Prefixes, Dashes and Spaces
12148834000
Remove Num. of Digits from the Front
4
This field specifies the number of digits to remove from the front of the call-in number. For the example, 4 is entered to remove the long distance code (1) and the 3-digit area code (214) from the number.
Add Digits to the Front None (blank)
The 9 does not to need be added to the front of the number because the Dial-Out Prefix is always added to the resulting number to dial.
Resulting Number to Dial 98834000
Field Description Default Value Action
Cisco WebEx PhoneConnect Administration Guide 21

Configuring WebEx WebEx PhoneConnectAdvanced WebEx PhoneConnect Settings 2
NOTE Occasionally, a WebEx service site may automatically switch over to a different set of call-in numbers until an issue with an old number is fixed. This may cause your call-in number conversion to fail.
As a result, whenever the WebEx-provided numbers are automatically changed, the WebEx PhoneConnect one-button call-in feature is disabled until the old numbers are restored. If an IP phone user attempts to use the one-button call-in feature during this time, WebEx PhoneConnect displays a message with all of the information the IP phone user needs to dial in manually, including meeting ID and call-in numbers.
STEP 5 Click Apply to apply your site settings, but do not close the PhoneConnect Application Main window.
When you are finished configuring site settings, continue with the ”Add WebEx Users and Enable PhoneConnect on IP Phones” section on page 22.
Add WebEx Users and Enable PhoneConnect on IP Phones
NOTE Before adding WebEx users and enabling PhoneConnect, make sure that you have configured phones and user extensions in Configuration Assistant (Configure > Telephony > Voice, User Extensions tab).
From the PhoneConnect Application Main window, you can add WebEx users and enable PhoneConnect on their IP phones using the following methods:
• Add and configure new users one at a time.
Click New to add users one at a time, manually enter all WebEx account information, then select an IP phone to associate with the WebEx user. See the ”Manually Add New Users” section on page 23.
Cisco WebEx PhoneConnect Administration Guide 22

Configuring WebEx WebEx PhoneConnectAdvanced WebEx PhoneConnect Settings 2
• Use Copy from Device.
When you click Copy from Device, a list of phone users that have not been associated with a WebEx user is displayed. When you select one or more phone users, WebEx user entries are created for each of these users and automatically populated with existing values. This provides a convenient way to quickly add and configure multiple users. See the ”Using Copy From Device to Add WebEx Users” section on page 26.
• Enable PhoneConnect for an existing WebEx user’s IP phone.
If existing WebEx user account information was imported when PhoneConnect was first enabled, you can retain the existing account information. In this case, you only need to associate an IP phone with the WebEx account and set a new password. See the ”Enable PhoneConnect for Existing WebEx Users” section on page 27.
Manually Add New Users
To add a WebEx user and enable WebEx PhoneConnect on their IP phone, follow these steps.
STEP 1 In the PhoneConnect Application Main window, locate the WebEx Users Information section.
If this is the first time you have enabled the application and there are no existing WebEx users, only the WebEx site administrator user is listed in the WebEx Users Information section.
STEP 2 Click New to open a new entry in the WebEx users table.
Cisco WebEx PhoneConnect Administration Guide 23

Configuring WebEx WebEx PhoneConnectAdvanced WebEx PhoneConnect Settings 2
STEP 3 Click in the row you just added and complete the fields as shown in the following table.
Field Description
UserID Required. This is the user ID that is used for logging in to the WebEx service site to schedule, attend, and browse meetings.
The recommended format is
<phone user ID>@<admindomain>.com
NOTE: All new WebEx users created through the PhoneConnect configuration screens must use the e-mail address format for their user ID. WebEx user accounts created before PhoneConnect was enabled can continue to use the existing user ID format.
If all of your customer’s users share the same e-mail domain, it is recommended that you add your customer’s e-mail domain after the phone user ID, and use this as the User ID, for example, [email protected].
Password Required. This is the password used when logging in to the WebEx service site to host, attend, or browse meetings.
Use the same password policy as that used for your customer’s WebEx service site.
NOTE: Be sure to notify users if you change their password.
Email Required. This is the e-mail address to which WebEx meeting invitations and WebEx notices are sent.
If the user does not have an e-mail address (for example, the user is a conference room, the following format is recommended:
<phone user ID>@<admindomain>.com
where the <phone user ID> is the phone user ID found in the Associated Phone User field.
First Name Required. The WebEx user’s first name.
Last Name Required. The WebEx user’s last name.
Cisco WebEx PhoneConnect Administration Guide 24

Configuring WebEx WebEx PhoneConnectAdvanced WebEx PhoneConnect Settings 2
STEP 4 Click the Select Phone Users button for the new WebEx user.
The Select Phone From List window opens.
STEP 5 Locate the user’s phone and click Add to select it. This enables the WebEx PhoneConnect application on the user’s phone.
STEP 6 Click OK.
STEP 7 Click OK to apply the changes and close the PhoneConnect Application Main window.
STEP 8 Save the configuration.
As soon as an IP phone is associated with a WebEx user, it has full WebEx PhoneConnect functionality. The IP phone does not need to be restarted. Open menus on phones may need to be closed in order to see the changes.
Associated Phone User
Read Only. Displays the current phone user ID associated with the account.
If there is no phone user ID associated with the WebEx PhoneConnect user, --None-- is shown.
Field Description
Cisco WebEx PhoneConnect Administration Guide 25

Configuring WebEx WebEx PhoneConnectAdvanced WebEx PhoneConnect Settings 2
Using Copy From Device to Add WebEx Users
The Copy From Device option provides a convenient way to add WebEx accounts and enable PhoneConnect for multiple phone users.
When you use Copy From Device, existing values are automatically copied into the appropriate WebEx user account fields.
To use Copy From Device, follow these steps.
STEP 1 In the PhoneConnect Application Main window, click Copy from Device to display a list of phone users configured on the system.
STEP 2 In the Copy From Device dialog, select one or more phone users for which you want to add WebEx accounts.
Click Select All or use the CTRL-click and SHIFT-click keyboard shortcuts to select multiple users.
STEP 3 Click Add to move phone users to the list of selected users.
STEP 4 Click OK.
The first name, last name, password, and phone associated with each existing phone user are copied into the WebEx users list. The WebEx UserID and e-mail address fields are left blank.
STEP 5 In the PhoneConnect Application Main window, locate the users you just added, and complete the WebEx userID and e-mail address fields as described in ”Configure Site Settings” section on page18.
STEP 6 Click OK to apply the changes and close the PhoneConnect Application Main window.
Cisco WebEx PhoneConnect Administration Guide 26

Configuring WebEx WebEx PhoneConnectAdvanced WebEx PhoneConnect Settings 2
STEP 7 Save the configuration.
As soon as an IP phone is associated with a WebEx user, it has full WebEx PhoneConnect functionality. The IP phone does not need to be restarted. Open menus on phones may need to be closed in order to see the changes.
Enable PhoneConnect for Existing WebEx Users
If the user has an existing WebEx account and has a phone configured on the system, but does not have PhoneConnect enabled on their phone, follow these steps to associate their IP phone with PhoneConnect.
STEP 1 In the PhoneConnect Application Main window, locate the user in the WebEx users list.
When Configuration Assistant reads in the WebEx site data, users with existing WebEx accounts will have data in all of the fields except the Associated IP Phone field. The Associated Phone field displays --None-- for these users.
STEP 2 Click the Select Phone Users button for the WebEx user.
The Select Phone From List window opens.
STEP 3 Locate the user’s phone and click Add to select it.
STEP 4 Click OK.
Cisco WebEx PhoneConnect Administration Guide 27

Configuring WebEx WebEx PhoneConnectAdvanced WebEx PhoneConnect Settings 2
STEP 5 Assign the WebEx user a new password (required so that PhoneConnect can authenticate the phone user).
Be sure to notify existing WebEx users that their password has changed.
STEP 6 Repeat these steps for other existing WebEx account users with phones.
STEP 7 Click OK to apply the changes and close the PhoneConnect Application Main window.
STEP 8 Save the configuration.
As soon as an IP phone is associated with a WebEx user, it has full WebEx PhoneConnect functionality. The IP phone does not need to be restarted. Open menus on phones may need to be closed in order to see the changes.
Continue with the ”Verify CME Service URL Settings” section on page 28.
Verify CME Service URL Settings
Once the application is enabled and you have added users, go to Application > General Settings and verify that CME Service URLs are correctly displayed in the General Settings window.
For WebEx PhoneConnect, this information is filled in automatically when you enable the application, with the values shown in the following table.
Field Value Description
Name WebEx-Meetings Name for WebEx PhoneConnect menu item on the CME Services URLs. This is the menu option that is displayed on IP phones when the user presses the Services button.
Set by Configuration Assistant when PhoneConnect is enabled.
Do not modify.
Cisco WebEx PhoneConnect Administration Guide 28

Configuring WebEx WebEx PhoneConnectAdvanced WebEx PhoneConnect Settings 2
If multiple CME service URLs are listed, use the Up and Down Arrow buttons to reorder the menu items. Only the order of configurable CME service URLs can be modified. On the IP phone Services menu, the CME Service URL item always appears first, followed by configurable CME service URLS, Extension Mobility, and My Phone Apps.
Continue with the ”Verify WebEx PhoneConnect Works Correctly” section on page 29.
Verify WebEx PhoneConnect Works Correctly
To verify the PhoneConnect application is functioning correctly:
• Check to make sure that the WebEx-Meetings option is listed on the CME Service URLS page if the application is enabled on the IP phone.
• Schedule a WebEx meeting and invite WebEx PhoneConnect users.
• Verify that meeting alerts are being received and displayed correctly on phones prior to the meeting.
• Verify that the call-in number is being dialed correctly by PhoneConnect and users can connect to the meeting.
See Chapter 4, “Troubleshooting,” for possible solutions to common WebEx PhoneConnect problems.
URL http://10.1.10.1/WebExPhone/MainMenu
CME Service URL
Set by Configuration Assistant when PhoneConnect is enabled.
Read-only.
Field Value Description
Cisco WebEx PhoneConnect Administration Guide 29

Configuring WebEx WebEx PhoneConnectAdvanced WebEx PhoneConnect Settings 2
Advanced Site Configuration Settings
The Advanced Site Configuration window provides controls for:
• Defining how often WebEx PhoneConnect checks the customer’s WebEx service site for new meetings, so that WebEx users with IP phones can be alerted.
• Adjusting the auto-dial settings so that there is a sufficient pause after auto-dialing into a meeting before auto-dialing the meeting ID.
• Adjusting the speed with which digits are dialed when auto-dialing a meeting ID.
• Clearing all WebEx PhoneConnect and site information from the Cisco UC 500. See the ”Clearing All WebEx PhoneConnect Site Data” section on page 40.
To access the Advanced Site Configuration window, perform the following steps:
STEP 1 From the feature bar in Configuration Assistant, go to Configure > Smart Applications Manager.
STEP 2 Highlight PhoneConnect in the application list, click Setup Options, and log in as the WebEx site administrator. See ”Enable PhoneConnect and Log In as the WebEx Administrator” section on page15.
STEP 3 Under the Customer Site Configuration Information area, click the Advanced Configuration button.
Cisco WebEx PhoneConnect Administration Guide 30

Configuring WebEx WebEx PhoneConnectAdvanced WebEx PhoneConnect Settings 2
STEP 4 Adjust the default field values as described in the following table.
!CAUTION It is strongly recommended that you do not attempt to adjust the Application Timing
Configuration settings on your own. For additional product support information, refer to Appendix B, “Support Contacts.”
STEP 5 Click Apply or OK.
STEP 6 Save the configuration.
Field Description Default Value
Why/When/Performance Impacts
Check for new meetings (minutes)
How often to poll WebEx for new meetings.
4 min Reducing frequency below 4 minutes may adversely affect Call Unity Express (CUE) performance.
Delay before providing the meeting ID (seconds)
Number of seconds the system waits after the Call button is pressed before auto-entering the meeting ID.
10 sec The default setting of 10 seconds is based on FXO/BRI/PRI trunk connectivity.
This value can be set to 7 seconds if SIP trunks are used.
May need to increase interval if calling internationally.
No known performance impacts.
Delay between digits (milliseconds)
The speed with which digits are dialed when auto-entering a meeting ID.
200 ms May need to increase interval depending on where calling (for example, when calling internationally).
No known performance impacts.
Cisco WebEx PhoneConnect Administration Guide 31
3
Administering WebEx PhoneConnect
This chapter covers administration tasks that are performed after the initial installation. The following topics are covered:
• Updating WebEx User Information, page 33
• Deleting WebEx PhoneConnect Users, page 36
• Replacing a User Phone, page 35
• Adding New Supported Languages Between Releases, page 37
• Disabling WebEx PhoneConnect, page 39
• Clearing All WebEx PhoneConnect Site Data, page 40
!CAUTION Once you have enabled WebEx PhoneConnect, it is strongly recommended that
you administer all WebEx user account changes from the PhoneConnect Application Main window in Cisco Configuration Assistant.
Cisco WebEx PhoneConnect Administration Guide 32

Administering WebEx PhoneConnectUpdating WebEx User Information 3
Updating WebEx User Information
Use this procedure to modify WebEx account information for users. You can change all WebEx user information except the User ID. If you need to change a WebEx user ID, you must delete the WebEx user and add them again as a new WebEx user. See the ”Add WebEx Users and Enable PhoneConnect on IP Phones” section on page 22.
TIP If a WebEx user is having problems accessing the WebEx service site, a best practice is to first reset the user’s password in WebEx PhoneConnect, as occasionally a user’s password will be accidentally reset from the WebEx service site.
NOTE Notify WebEx users immediately if you change their user information. WebEx users must know their correct WebEx user ID and password to host WebEx meetings.
To modify a WebEx user account, perform the following tasks:
STEP 1 Launch Cisco Configuration Assistant and connect to the UC 500.
STEP 2 From the feature bar in Configuration Assistant, choose Configure > Smart Applications Manager.
STEP 3 Highlight WebEx PhoneConnect in the list of applications, click Setup Options, and log into WebEx PhoneConnect.
See ”Enable PhoneConnect and Log In as the WebEx Administrator” section on page15.
STEP 4 Scroll through the WebEx Users Information list to find the WebEx user you wish to modify.
STEP 5 Change the user information in the row as necessary. All fields are editable except UserID.
Cisco WebEx PhoneConnect Administration Guide 33

Administering WebEx PhoneConnectUpdating WebEx User Information 3
STEP 6 To remove or change the phone assigned to a WebEx user:
a. Click the Select Phone Users button for the desired user. The Select Phone From List window opens.
b. Select a phone from the Existing User list on the left.
c. Use the controls to move a phone to the Selected User list on the right.
d. Click OK to save your selection and close the window. The phone you selected appears in the Associated Phone Users column.
STEP 7 Assign the user a new password.
The user will need this password to schedule meetings via WebEx.
STEP 8 Click Apply or OK.
Cisco WebEx PhoneConnect Administration Guide 34

Administering WebEx PhoneConnectReplacing a User Phone 3
Replacing a User Phone
Follow these steps to replace a user’s phone. Although this procedure is not specific to WebEx PhoneConnect, it allows you to replace a WebEx PhoneConnect user’s phone without having to reconfigure the user’s WebEx PhoneConnect account.
STEP 1 Disconnect the phone to be replaced from the Cisco UC 500.
STEP 2 Wait for the phone to un-register (this can take up to 5 minutes).
STEP 3 Using Configuration Assistant, go to Configure > Telephony >Voice and select the User Extensions tab.
STEP 4 Locate the user whose phone you are replacing and select a different phone type from the drop-down menu.
If the only phone type available in the drop-down menu is the phone type for the phone you are replacing, then the old phone is still registered. If that is the case, wait a little while and then refresh the page. Repeat this step until all options are displayed for the phone type.
STEP 5 Enter the MAC address of the replacement phone in the MAC address field for the user whose phone you are replacing.
STEP 6 Click Apply.
At this point, you can connect the replacement phone to the UC 500 or attached switch and it should register with all the same options and applications that were previously configured for the user, including WebEx PhoneConnect.
Cisco WebEx PhoneConnect Administration Guide 35

Administering WebEx PhoneConnectDeleting WebEx PhoneConnect Users 3
Deleting WebEx PhoneConnect Users
Use this procedure to permanently delete a WebEx user account from the Cisco UC 500, and the user is moved to the de-activated state on the WebEx service site. Once the user's account is deleted, they no longer have access to WebEx or WebEx PhoneConnect. They will no longer receive meeting invitations or alerts, and they will not be able to attend or host WebEx meetings from their company’s WebEx service site.
To reinstate a user after they have been deleted (for example, if a user leaves your company but then returns), you can use their old UserID and other account information. However, a new password must be created, as WebEx will reject their password if it is the same as any of the last three passwords previously registered in WebEx.
NOTE WebEx PhoneConnect does not allow you to delete the customer site administrator.
STEP 1 Launch Cisco Configuration Assistant and connect to the Cisco UC 500.
STEP 2 From the feature bar in Configuration Assistant, choose Configure > Smart Applications Manager and log into WebEx PhoneConnect.
STEP 3 Highlight PhoneConnect in the application list, click Setup Options and log in as the WebEx site administrator. The PhoneConnect Application Main window displays.
STEP 4 In the PhoneConnect Application Main window, scroll through the WebEx Users Information list to find the WebEx user you wish to delete.
STEP 5 Select the row to highlight it.
STEP 6 Click Delete.
STEP 7 Click Apply or OK.
Cisco WebEx PhoneConnect Administration Guide 36

Administering WebEx PhoneConnectAdding New Supported Languages Between Releases 3
Adding New Supported Languages Between Releases
WebEx PhoneConnect supports localization of IP phone GUI displays for the WebEx PhoneConnect meeting browser and for alerts.
The current release of WebEx PhoneConnect is localized for English and Spanish only. If an IP phone is localized to use a language other than one of the provided localizations, English is used.
Between releases, Cisco supports additional languages as they become available. You can update the WebEx PhoneConnect application with a new language using the following instructions. Once the new language file is installed and the new language is selected in CCA, all of the WebEx PhoneConnect IP phone screen menus will be in the new language.
NOTE Only the WebEx PhoneConnect IP phone screens are affected by this procedure.
Only North American English phone loads and CUE (voicemail) prompts are included with the factory unit and UC 500 software pack. All other countries require download of separate language packs. For information about localizing all of your UC 500 system using Configuration Assistant refer to the Getting Started Guide for Cisco Configuration Assistant, available on Cisco.com at the following URL:
http://www.cisco.com/en/US/products/ps7287/prod_installation_guides_list.html
Downloading and Installing the New Language File
Before you begin this procedure, you must first download the localization file for the language you wish to localize from Cisco.com. Go to www.cisco.com/go/uc500swpk to download IP phone localization files, CUE localization files, and WebEx PhoneConnect language files.
Follow the steps below to add a new localized language for your IP phone users’ WebEx PhoneConnect meeting browser and alerts.
STEP 1 Launch Configuration Assistant and connect to the UC 500.
STEP 2 From the feature bar, go to Configure > Smart Applications Manager and log into WebEx PhoneConnect. See the ”Enable PhoneConnect and Log In as the WebEx Administrator” section on page15.
The PhoneConnect Application Main window opens.
Cisco WebEx PhoneConnect Administration Guide 37

Administering WebEx PhoneConnectAdding New Supported Languages Between Releases 3
STEP 3 Under the Customer Site Configuration Information area, click Install Language File.
STEP 4 Browse to the language file you want to install and click Open.
The File to install field displays the name of the file you just opened.
STEP 5 Click Install.
The new language file is moved to the Installed Language File(s) list.
You can overwrite an existing language file, but you cannot delete an existing language file.
STEP 6 Click OK.
The language file is sent to the UC 500.
STEP 7 Close the PhoneConnnect Application main window.
The new language is not applied until you restart Cisco Unity Express (CUE).
STEP 8 To restart CUE, go to Maintenance > Restart/Reset.
Cisco WebEx PhoneConnect Administration Guide 38

Administering WebEx PhoneConnectDisabling WebEx PhoneConnect 3
STEP 9 In the Restart/Reset window, select the UC 500 from the Hostname menu and check the Restart CUE option.
STEP 10 Click OK.
Connections to the voice mail system are lost when CUE is restarted. As a result, telephony features and applications such as voice mail, Auto Attendant, Basic ACD, and WebEx PhoneConnect will not be available. Depending on the version of CUE installed, the restart can take from 10 to 15 minutes.
Disabling WebEx PhoneConnect
When you disable WebEx PhoneConnect in CCA, all WebEx user account information is retained, but WebEx PhoneConnect functionality is immediately terminated. After WebEx PhoneConnect is disabled, any time an IP phone user presses a softkey for a WebEx PhoneConnect menu, a “Service not enabled” error message displays on their IP phone screen.
To disable WebEx PhoneConnect within CCA, follow these steps:
STEP 1 Launch Cisco Configuration Assistant and connect to the UC 500.
STEP 2 From the feature bar, go to Applications > Smart Applications Manager.
STEP 3 In the Smart Applications Manager window, select your UC 500 device from the Hostname menu.
STEP 4 Under Applications, select WebEx PhoneConnect to highlight it.
STEP 5 Under the Description tab, un-check the Enable check box.
STEP 6 Click OK or Apply.
Cisco WebEx PhoneConnect Administration Guide 39

Administering WebEx PhoneConnectClearing All WebEx PhoneConnect Site Data 3
STEP 7 Save the configuration.
Clearing All WebEx PhoneConnect Site Data
The Advanced Configuration Settings window includes an option for clearing all WebEx Phone Connect data. This may be needed, for example, if the customer’s WebEx service site URL changes, the customer is no longer using WebEx, or the wrong site data is imported onto the UC 500. It can also be used to remove demonstration site data from the system.
NOTE Clearing this data does not affect the WebEx service site or account information; it only removes the WebEx PhoneConnect application settings and site data stored on the UC 500.
To remove all WebEx PhoneConnect site data from the UC 500, follow these steps:
STEP 1 Launch Configuration Assistant and connect to the UC 500.
STEP 2 From the feature bar in Configuration Assistant, choose Configure > Smart Applications Manager.
STEP 3 Highlight WebEx PhoneConnect in the application list, click Setup Options, and log into WebEx PhoneConnect. See ”Enable PhoneConnect and Log In as the WebEx Administrator” section on page15.
STEP 4 In the PhoneConnect Application Main window, click Advanced Configuration.
Cisco WebEx PhoneConnect Administration Guide 40

Administering WebEx PhoneConnectClearing All WebEx PhoneConnect Site Data 3
STEP 5 Click Clear WebEx Site Data. You will be prompted to confirm the action.
STEP 6 Click Delete.
STEP 7 Click OK or Apply.
Cisco WebEx PhoneConnect Administration Guide 41

4
Troubleshooting
This chapter describes solutions to common WebEx PhoneConnect configuration problems. The following topics are covered:
• Loss of Connection to WebEx Service, page 42
• PhoneConnect Administration Login Problems, page 42
• WebEx PhoneConnect and WebEx Connect, page 44
• Meeting Time/Alert Synchronization, page 45
• IP Phone Error Messages and Call-In Problems, page 45
• Audio-Only Meeting Hosted from a Conference Room Phone, page 47
Loss of Connection to WebEx Service
Problem: No connectivity to WebEx service. The DNS IP address used by WebEx PhoneConnect to connect with the WebEx service (webex.com) can change unexpectedly if the UC 500 is using DHCP to get its WAN-side IP address. If the WAN-side IP changes, the DNS server IP received via DHCP can change also. This can cause a loss of connectivity with the WebEx service (webex.com), and require the customer administrator to reconfigure the DNS IP in CCA.
Solution: Make sure the DNS IP is configured in UC 500 as described in the ”Enter DNS Server Address in Configuration Assistant” section on page10.
PhoneConnect Administration Login Problems
Problem: Administrator is having difficulty logging into WebEx PhoneConnect.
Solution: Check the general application settings. For more, refer to Apply General Application Settings, page12.
Cisco WebEx PhoneConnect Administration Guide 42

TroubleshootingPhoneConnect Administration Login Problems 4
Problem: The message “Failed to communicate with PhoneConnect Database” is displayed when the administrator attempts to log in to PhoneConnect or when using the PhoneConnect Application Main window in Configuration Assistant.
Solution: This message is displayed if Configuration Assistant cannot connect PhoneConnect. This can occur if the private HTTPS certificate has not been generated or has expired. Generate a new certification from the General Settings configuration window in Configuration Assistant, as described in the ”Re-apply Authentication Configuration Settings and Generate a New HTTPS Certificate” section on page14.
This problem can also occur if the PC running Configuration Assistant has two network interfaces or a VPN with split tunneling is enabled. If this is the case, open a command window on the PC and enter the following to add a static route:
route add 10.1.0.0 mask 255.255.0.0 <default gateway IP of the IP connection to the UC500>
NOTE The factory default gateway IP for the UC 500 is 192.168.10.1
Problem: The message “Failed to communicate with WebEx server at <URL>” is displayed during login or while using the PhoneConnect Application Main configuration window in Configuration Assistant.
Solution: This message indicates a network connectivity issue. Possible causes include
• DNS server IP not configured
• WAN physically not connected
• Firewall problems
• Dual NIC cards on PC (need to add routing to the appropriate NIC)
Cisco WebEx PhoneConnect Administration Guide 43

TroubleshootingWebEx PhoneConnect and WebEx Connect 4
WebEx PhoneConnect and WebEx Connect
Connectivity Problems
Problem: WebEx user is having difficulty using the WebEx Connect client on a PC with WebEx PhoneConnect.
Solution: Check that the computer is connected to the UC 500 via LAN. For most users, this means their computer must either be:
• Connected to a switch connected to the UC 500, or
• Connected to the data port on their IP phone.
Application Access
Problem: WebEx user has difficulties with application access while using WebEx Connect with WebEx PhoneConnect.
Solution: Determine if the computer has two or more network connections. If so, have the user add a static route as follows:
From the PC command prompt, enter:
route add 10.1.0.0 mask 255.255.0.0 <default gateway IP of the IP connection to the UC>
NOTE The factory default gateway IP for the UC 500 is 192.168.10.1
Problem: The WebEx Connect client Click-to-Dial feature does not work if you do not run as Administrator in Microsoft Windows Vista.
On a PC running the Microsoft Vista operating system, if you login with a username that has administrator privileges but does not have the username of Administrator or if you login with a username that does not have any administrator privileges, when you configure Click to Dial, you will encounter the following error:
Unable to get profile due to network or certificate issue
Cisco WebEx PhoneConnect Administration Guide 44

TroubleshootingMeeting Time/Alert Synchronization 4
Solution: No workaround is available for an account without administrator privileges. The user must have administrator privileges in Vista in order for Click-to-Dial to work.
To work around the problem for an account with administrator privileges, in Windows Explorer, go to the WebEx Connect client application (for example, C:\Program Files\WebEx\Connect). Right-click on it, and choose Run as administrator. This will launch the Connect client with the correct privileges to modify the registry in order for click-to-dial to work in Windows Vista.
Meeting Time/Alert Synchronization
Problem: Meeting alerts are being displayed too early or too late.
Solution: It is strongly recommended that you configure the system to synchronize with an external NTP (Network Time Protocol) server to avoid this problem. For more information, see the ”Configure an NTP Server (Recommended)” section on page11.
IP Phone Error Messages and Call-In Problems
This section lists common IP phone problems and error messages displayed on IP phones that are related to WebEx PhoneConnect, along with recommended actions and explanations.
Problem: IP phone displays the message “Service not enabled. Please contact your site phone administrator” when phone user selects WebEx-Meetings from the Services menu.
Solution: Verify that the HTTPS Communication Enabled is checked in the General Settings window and that the PhoneConnect application is enabled in the Smart Applications Manager window in Configuration Assistant.
Cisco WebEx PhoneConnect Administration Guide 45

TroubleshootingIP Phone Error Messages and Call-In Problems 4
Problem: IP phone displays the message “WebEx User account not created. Please contact your site phone administrator.”
Solution: This can occur if the phone user has not been configured to be a PhoneConnect user either because the WebEx user has not been created or has not been associated with their IP phone. To resolve the problem, go to the PhoneConnect Application Main window in Configuration assistant and create a new PhoneConnect user for the user of the phone (if not only created), and associate the PhoneConnect user with the appropriate phone user ID.
Solution: Verify that the WebEx account is associated to the phone.
Problem: IP phone displays the message “Meeting host is not a local PhoneConnect user or is configured with incorrect user ID password.”
Solution: This can occur when a user presses the Details softkey to view meeting details. This error occurs when the meeting invitation is from someone other than a local phone PhoneConnect user on the same Cisco UC 500. This includes meeting invitations from users on another WebEx site and invitations from users on the same WebEx site who are not configured as PhoneConnect users.
Problem: WebEx Meetings menu item is not present on the phone's Services menu.
Solution: Verify that the PhoneConnect application is enabled in the Smart Applications Manager window and that WebEx-Meetings is displayed in the CME Service URLs list in the General Settings window in Configuration Assistant. Then, re-associate the WebEx user to the phone.
Problem: IP phone displays an Error 404 on IP phone when the user selects WebEx-Meetings from the Services menu on their IP phone.
Solution: From the Applications > General Settings window in Configuration Assistant, verify that the PhoneConnect Services menu item (“WebEx-Meetings”) has the correct URL: http://<CUE_IP_Address> /WebExPhone/MainMenu. The default IP address for CUE is 10.1.10.1.
Solution: Check to make sure the application is enabled in the Smart Applications Manager window in Configuration Assistant.
Problem: IP phone displays the error message “Service Busy. Try Again” when the phone user chooses WebEx-Meetings from the IP phone Services menu.
Solution: This message is displayed if the max sessions limit is reached. Exit the error screen and try the menu item again. This issue is unlikely to occur under normal conditions. If the issue persists, check to make sure that WAN connectivity has not been lost. If that is not the case, contact Support.
Cisco WebEx PhoneConnect Administration Guide 46

TroubleshootingAudio-Only Meeting Hosted from a Conference Room Phone 4
Problem: User did not receive any alerts on the phone and was not able to dial in to the meeting automatically. For example, PhoneConnect stops responding at the dial screen when CIPC softphone client.
Solution: The PhoneConnect administrator should check the logs for a 405 error message produced by an authentication issue. If the error is present, the administrator must have user restart their IP phone or softphone client to reestablish authentication.
Problem: Phone user presses the Call softkey to auto-dial into a WebEx Pro meeting and receives the error: “You have entered an invalid meeting ID or the meeting has not started.”
Solution: Check to make sure that the online (data) portion of the WebEx session has been started. The online portion of the WebEx Pro meeting must be started before PhoneConnect users can auto-dial into the meeting.
Problem: IP phone displays the message “Can not connect to Webex Meeting Center”.
Solution: Check the DNS server setting in Configuration Assistant. If this field is set, make a note of the current setting, delete the DNS server, then click Apply. Re-add the DNS server and click Apply. For more information, see Enter DNS Server Address in Configuration Assistant, page10.
Audio-Only Meeting Hosted from a Conference Room Phone
Problem: How do I host an audio-only WebEx meeting from a conference room phone?
Solution: Create a WebEx user account for the conference room and associate it with the conference room phone. Add the conference room WebEx user to the meeting as an attendee. From the conference room phone, manually dial in to the conference with the host account information from the WebEx invitation e-mail.
Cisco WebEx PhoneConnect Administration Guide 47
A
Where to Go from Here
Cisco provides a wide range of resources to help you and your customer obtain the full benefits of WebEx PhoneConnect.
• Support Contact Information, page 48
• Resources for VARs, page 49
• Resources WebEx PhoneConnect Users, page 50
• End User License Agreement (EULA), page 52
Support Contact Information
Cisco Smart Business Communications System Support
For Cisco SBCS product support, contact the Planning, Design and Implementation Help Desk at the following location:
www.cisco.com/go/pdihelpdesk (Cisco.com Login required)
or call:
1-800-GO-CISCO (Ask the agent for the “PDI Help Desk.”)
You can also post your questions on the Cisco Small Business Support Community at the following location:
www.cisco.com/go/smallbizsupport (Cisco.com login required for posting)
WebEx Support
For WebEx support, go to:
http://support.webex.com/support/support-overview.html
Cisco WebEx PhoneConnect Administration Guide 48

Where to Go from HereResources for VARs A
Resources for VARs
How to Obtain a WebEx Account
Your customer will need a WebEx service site account before they can use WebEx PhoneConnect. To learn more, go to http://www.webex.com.
User and Installation/Upgrade Guides for Cisco Configuration Assistant can be found at cisco.com at:
http://www.cisco.com/en/US/products/ps7287/prod_installation_guides_list.html
User and Installation/Upgrade Guides for the components of the Cisco Unified Communications 500 Series for Small Business can be found on cisco.com at:
http://www.cisco.com/en/US/products/ps7293/tsd_products_support_series_home.html
The Cisco Smart Business Communications System (SBCS) website provides information and references at:
http://www.cisco.com/go/sbcs
The Cisco Small Business Support Community is available at:
http://www.cisco.com/go/smallbizsupport
Cisco WebEx PhoneConnect Administration Guide 49

Where to Go from HereResources WebEx PhoneConnect Users A
Resources WebEx PhoneConnect Users
Cisco IP Phone Documentation
Getting Started with WebEx
The following basic procedures are included to help your customers get started using their WebEx service site.
Hosting a Meeting
All WebEx users can host meetings.
STEP 1 Launch your Internet browser and enter the URL for your WebEx service site.
STEP 2 Log in.
STEP 3 On the navigation bar, click Host a Meeting.
STEP 4 Click Schedule a Meeting.
STEP 5 Enter the meeting information.
STEP 6 Click SCHEDULE MEETING.
If the meeting is within 15 minutes, click START NOW.
Table 2 IP Phone User Documentation
Resource Location
WebEx PhoneConnectQuick Reference
http://www.cisco.com/go/sbcs-docs
Cisco IP Phone User Guides and Quick References
http://www.cisco.com/go/sbcs-docs
Cisco WebEx PhoneConnect Administration Guide 50

Where to Go from HereResources WebEx PhoneConnect Users A
Productivity Tools
Productivity Tools makes starting and scheduling WebEx meetings quicker and easier, by installing WebEx meeting controls on your desktop and in Microsoft Outlook.
To Install Productivity Tools, perform the following steps:
STEP 1 Launch your Internet browser and enter the URL for your WebEx service site.
STEP 2 Log in.
STEP 3 On the navigation bar, expand Support and click Downloads.
STEP 4 Scroll down and click the link for Productivity Tools
STEP 5 Save the file to your desktop
STEP 6 When the file is downloaded, double-click on the file ptools.msi
STEP 7 Follow the on-screen instructions.
WebEx Connect Click-to-Call
WebEx PhoneConnect supports Click-to-Call, a time-saving feature in WebEx Connect that enables to you to use your personal computer with your Cisco IP phone to call anyone in your WebEx Connect buddy list.
To obtain a WebEx Connect user account, contact WebEx.
The WebEx Connect application resides on your personal computer. It is distinct from the WebEx PhoneConnect IP phone meeting reminder. You can use WebEx Connect to send instant messages, make video and voice calls, collaborate with team members, and manage meetings.
Once you have installed WebEx Connect, you must configure its Click-to-Call feature to work with WebEx PhoneConnect. You must provide the user name, password, and system URL for your IP phone account. Your system administrator can provide this information.
Cisco WebEx PhoneConnect Administration Guide 51

Where to Go from HereEnd User License Agreement (EULA) A
STEP 1 From the WebEx Connect Edit menu, click Settings.
STEP 2 Click the Click-to-Call tab.
STEP 3 Click Edit Account.
STEP 4 Click the Use the following server radio button.
STEP 5 Enter the requested information about your Cisco Unified Communications Manager configuration:
• The IP address for your Cisco Unified Communications Manager Express Server For Cisco SBCS systems, this IP address and port is 10.1.10.1:443.
• Your WebEx PhoneConnect user name.
• Your WebEx PhoneConnect password.
STEP 6 Click OK.
End User License Agreement (EULA)
End-user licensing information that applies to this product is available on Cisco.com at the following location:
www.cisco.com/go/warranty
Cisco WebEx PhoneConnect Administration Guide 52