Embed Size (px)
Citation preview


CHAPTER
5
INTRODUCTION: THE CONCEPT OFTHE ACCELERATED FREEFALLCOURSE (AFF)
1.1 THE AFF COURSE
1.1.1 Congratulations on choosing the AFFcourse to introduce you to skydiving. Thiscourse, due to its excellent results, has becomethe most widespread course amongst theschools all over the world. It is called“ACCELERATED” because the learning processis three to five times faster than the traditionalmethod (static line, i.e. automatically openedparachute jumps), which is becomingobsolete.
1.1.2 The AFF course was developed in the USAin the early eighties and since then it has beenin constant evolution. The method is designedto provide personalized one on one instructionand, after a brief but intensive training period,allows the student to continue jumping byhimself with complete safety. Althoughambitious in nature, this program has beencarefully and systematically developed, and hasincorporated the most advanced skills,techniques and equipment.
1.2 THE TRADITIONAL METHOD
1.2.1 The traditional method of learning toskydive starts with a static line parachutejump. This jump provides only theopportunity to exit the aircraft and assumethe freefall body position.
1.2.2 After the third static line jump, andduring the three following jumps the studentwill perform one practice pull per jump. Toadvance to the next level of progression thesepractice pulls must be satisfactorilyperformed.
1.2.3 If these jumps are performed withsuccess, the student will continue with“delayed” jumps. During these jumps thestudent attempts to perform a good exit,assume the freefall body position andcorrectly execute the actual opening of theparachute, all of it in three seconds, then infive and finally in ten seconds. During thesefleeting exposures to freefall the student willalso experience a phenomenon known as“sensory overload”, which consists of adistortion of the perceptions a person has asa consequence of a rush of stimuli to thesenses in a short period of time.
Paracaidas, ANGLÈS 14/10/05 15:14 Página 5

6
student performs the exercises with directassistance and will learn freefall stabilityduring the much longer freefall exposure.
The student still experiences sensory overload,but the freefall assistance makes it easier toovercome. Sensory overload is surpassed afterapproximately five seconds.
During the first jumps various practice pullsare performed, preparing the student for theactual parachute opening on the same jump.The instructors are highly qualified and areprepared to assist the student if it werenecessary. With this system more learning
1.2.4 From this point on the student learns toperform turns, back loops and horizontalmovement (tracking) during jumps with 15,20 and 30 second freefalls. During this phasethe student normally feels scared and alone.
1.3 ACCELERATED FREEFALL METHOD
1.3.1 With the AFF method the student,accompanied by his instructors in freefall,will start jumping from 12.500’ and will have50 ‘’ of freefall learning time per jump. The
FIG. 1
MAININSTRUCTOR
SECONDARYINSTRUCTOR
STUDENT
Paracaidas, ANGLÈS 14/10/05 15:15 Página 6

7
takes place in less time, less jumps and, inconsequence, with less exposure to the risks ofopening and landing problems.
1.3.2 The student progresses through theseven levels at his or her own pace.
1.3.3 The skills required to exit the aircraftand fall in a controlled and stable manner arepractised and developed through intensiveground training and direct in-air supervision.
1.3.4 In the progression through the sevenlevels the student learns to fall stable, torecover stability from any position, toperform forward movements, 360° turns,back loops and front loops, and tracking. Thestudent becomes accustomed to the use ofinstruments, formation skydiving safetyprocedures as well as orientation in the airjumping alone or with other skydivers, andthe development of time awareness andawareness of his position regarding otherskydivers.
1.4 OBJECTIVESDuring this course the student receives all theinformation necessary to enjoy a successful andrewarding skydive. All the instruction andtraining in this course are aimed at achievingthese three basic objectives:
1.5 THE VIDEOThe AFF student has readily available aunique learning tool: his freefall video. All thejumps during the course will be recorded,and the video thoroughly analysed with theassistance of his instructor, allowing for abetter understanding of what wasexperienced during the last jump and theelements of improvement applicable to thefollowing jump.
Order of priorities on every skydive:• Deploy your parachute.• Deploy at the correct altitude.• Deploy in a stable position.• Land in an area without obstacles.• Land in a safe manner.
!
• A controlled freefall.
• Opening and controlled descent with ahigh performance parachute.
• A safe landing in a designated landing area.
Paracaidas, ANGLÈS 14/10/05 15:15 Página 7

8
QUESTIONS
• How much freefall time do we have on every AFF course jump?
• Which are the basic objectives of the AFF course?
• Which are the priorities on every skydive?
Paracaidas, ANGLÈS 14/10/05 15:15 Página 8

CHAPTER
9
PARACHUTE AND EQUIPMENT
2.1 COMPONENTS OF A STUDENT FREEFALLPARACHUTE SYSTEM (Fig 2)
2.1.1 Containers: Both main and reserveparachutes are mounted on the back of thestudent.
2.1.2 Harness: Set of adjustable webbingstraps, which secure the containers and theparachutes to the student.
FIG. 2AFF Student rig
Paracaidas, ANGLÈS 14/10/05 15:15 Página 9

10
FIG. 3Main canopy
Paracaidas, ANGLÈS 14/10/05 15:15 Página 10

11
2.1.3 Main canopy (Fig.3): The main parachuteis stowed in the lower container and isattached to the harness by the 3-ring releasesystem located on the shoulders. (Fig. 4).
2.1.4 Reserve canopy: The reserve parachuteis stowed in the upper container and it ispermanently attached to the harness.
2.1.5 Main deployment handle: A plasticcylinder or a ball located on the upper skin ofthe pilot chute.
2.1.6 Pilot chute: Located in a pocket at thebottom of the container. When thrown intothe air stream it causes the opening of thecontainer and the deployment of the mainparachute.
2.1.7 Secondary Instructor deploymenthandle: A handle located at the bottom ofthe container, on the opposite side of theMain deployment handle, to be activated bythe AFF instructor if necessary in order toavoid having to go around the student todeploy the main parachute. This handleallows the extraction of the pilot chute,therefore provoking the main parachutedeployment from the left side of the student.
2.1.8 3-ring release handle (cutaway pad): Asoft handle secured with Velcro tape on theupper-right, front of the harness which,when pulled, allows for the separation of theskydiver from the main parachute.
2.1.9 Reserve ripcord handle: A metal handlelocated on the upper-left, front of theharness which, when pulled, opens thereserve container..
2.1.10 Automatic Activation Device (CYPRES):This device activates at a pre-set altitude andspeed cutting the reserve closure loop andinitiating the reserve deployment sequence.The control unit is mounted under the reserveflap or on the inside of the reserve container.
FIG. 43-Ring release system
Paracaidas, ANGLÈS 14/10/05 15:16 Página 11

12
2.1.11 Reserve Static Line (RSL or Stevens) (Fig.5): A bridle that connects the main canopywith the reserve ripcord pin. When the maincanopy is separated from the skydiver, in theevent of a cutaway, the Stevens would initiatethe reserve deployment.
2.1.12 Steering Toggles: Located on the backof the rear risers of both the main and reservecanopies.
2.2 ACCESSORY EQUIPMENT
2.2.1 Altimeter: Usually mounted on the lefthand wrist. The altimeter displays altitudeabove ground in feet or meters.
2.2.2 Radio: Used to assist the student whileunder canopy. Only used as an aid and mustnot be relied upon.
2.2.3 Helmet: Worn for protection fromknocks during exit, freefall or landings.
2.2.4 Goggles: Used as eye protection againstthe wind created by the freefall.
2.2.5 Jumpsuit: Designed with arm and leggrips for the instructors.
2.3 OPERATION AND PARACHUTEOPENING SEQUENCE
The skydiver extracts the pilot chute from itspocket and throws it into the air stream.Exposed to the wind the pilot chute inflatesand acts as an anchor, lifting the deploymentbag, which contains the main parachute, outof the container, while the skydiver falls away.The suspension lines unstow from the rubber
FIG. 5RSL or Stevens
Paracaidas, ANGLÈS 14/10/05 15:16 Página 12

13
bands and extend, then the bag opens andthe canopy unfolds and begins to inflate,causing the slider to descend. Finally the
canopy deploys completely and then theskydiver releases the brakes allowing it to flynormally. (Fig. 6)
FIG. 6Deployment sequence
Paracaidas, ANGLÈS 14/10/05 15:16 Página 13

14
QUESTIONS
• How does the 3-ring release system work?
• What is the Cypres, and how does it work?
• What is the RSL or Stevens, and how does it work?
• Where are the steering toggles located?
Paracaidas, ANGLÈS 14/10/05 15:16 Página 14

CHAPTER
15
AIRCRAFT PROCEDURES ANDPOSSIBLE AIRCRAFTEMERGENCIES
3.1 STANDARD AIRCRAFT PROCEDURES
3.1.1 The AFF student and the instructorswill wait the arrival of the aircraft at theboarding area and will be the first to enterthe aircraft.
3.1.2 Always approach the aircraft from therear to avoid the propellers.
3.1.3 Put on the helmet and fasten the seatbelt for take-off. Remain like that untilreaching, at least, 1000’.
3.1.4 Use the 15’ it takes to reach the correctaltitude to prepare yourself both mentallyand physically for the jump. The entireskydive will be reviewed orally with yourinstructor.
3.1.5 The instructor will again perform acomplete equipment check.
NEVER BOARD THE AIRCRAFTWITHOUT RECEIVING AN EQUIPMENTCHECK FROM THE INSTRUCTORS!
Paracaidas, ANGLÈS 14/10/05 15:16 Página 15

16
3.1.6 The student remains seated until toldotherwise by the instructor.
3.1.7 The instructor will command the climb-out prior to the exit.
3.1.8 Once in the door, the student will lookat the inside instructor and ask “READY?”,after receiving the OK he will repeat theoperation with the outside instructor ( ExitChecks). Once he has received the OK fromboth instructors he will initiate the exit count,shouting “ out, in, arch” with a simultaneousbody movement. This way the studentsynchronizes the exit with the instructors.
3.2 PARACHUTE PROTECTION IN THEAIRCRAFT
3.2.1 Always be aware of your main andreserve handles; protect them!
3.2.2 If a container opens and the canopyfalls out inside the plane, jump on it! andprevent it from going near the door. If thiswere to happen when the door is open,immediately have it closed.
3.2.3 If one of your parachutes does go outthe door, follow it out immediately, jump outand be prepared for a possible malfunction.
3.2.4 If it were to get hooked on the plane andyou find yourself in tow from your main, behindthe aircraft, cut away and deploy the reserve.
3.3 AIRCRAFT EMERGENCY PROCEDURES
3.3.1 Below 1000’ we will land with theaircraft, the helmet remains on and the seatbelts are still fastened and we will adopt the“brace up” position.
3.3.2 If we have to abandon the aircraftbetween 1000’ and 3000’ follow yourinstructor’s orders, position yourself in thedoor and grasp the reserve handle with yourleft hand. Jump as soon as your instructor tellsyou to. Count “one thousand and one, onethousand and two, one thousand and three”(to clear the aircraft and to gain the essentialfreefall speed needed for the deployment) andpull the reserve handle.
3.3.3 Above 3000’ follow your instructorsorders, position yourself in the door and graspyour main deployment handle with your righthand and jump when you are told, arch,count “one thousand and one, one thousandand two, one thousand and three” and pull.
3.3.4 In the event of having to abandon theaircraft above 5000’ we will perform apoised exit as in a normal jump, even thoughthere might not be enough time to completethe whole planned sequence.
Paracaidas, ANGLÈS 14/10/05 15:16 Página 16

17
AIRCRAFT EMERGENCY PROCEDURES
Paracaidas, ANGLÈS 14/10/05 15:16 Página 17

18
QUESTIONS
• We will never proceed to board the aircraft unless our instructor has….
• Describe the exit checks and exit count.
• What must you do in the event of an aircraft emergency?
3.3.5 If you descend with the aircraft forlanding and your rig is equipped with aStudent Cypres (yellow button) your instructorwill switch it off before initiating the descent.
3.3.6 While in the aircraft it is yourresponsibility to:• Protect the main and reserve handles at all
times.• Maintain eye contact with your instructors
at all time.
REMEMBER: It is very important to keep eyecontact with your instructors. In the aircraftthe noise level is high and in an emergencysituation the instructor will be quite occupiedcommunicating with the pilot, because thepilot is ultimately in command of the aircraftand will let the instructor know whether toexit the aircraft or not. At this moment, whenthe instructor needs to communicatesomething to you it is very important toalready have your attention.
Paracaidas, ANGLÈS 14/10/05 15:16 Página 18

CHAPTER
19
EXIT PROCEDURES AND BASICFREEFALL BODY POSITION
4.1 POSITIONING IN THE DOOR (CLIMB-OUT)
4.1.1 Climb-out procedures will varydepending on the type of aircraft used for thejump. However, in all the cases one of the
Instructors will have complete control over thestudent during the climb-out.
4.1.2 Pilatus Porter (Fig. 7): the right-hand sideInstructor will observe the spot and climb outthe door. The student will position himself onthe floor once he has received the commandorder “on the floor” and following thecommand order “in the door” he will move tothe door ( right foot on the step, left knee on
Paracaidas, ANGLÈS 14/10/05 15:16 Página 19

20
the edge on the door-frame,arms in the freefall positionand the body slightlyorientated into the relativewind). The student thenperforms the pre-exit checks(left OK, right OK). Initiatingimmediately afterwards theexit count “ Out!, In!, Arch!”synchronized with adetermined and rhythmicbody movement.
4.1.3 Twin Otter (Fig 8): theleft-hand Instructor willobserve the spot and climbout the door. The right-handside Instructor, holding thestudent by the leg strap ofthe harness, will command“to the door”, the studentwill then position himself atthe door frame slightly bentdown, with the spine columnstraight, both feet at the doorframe, right foot forward,gripping the front-door frameand keeping the bodyorientated into the relativewind. The student thenperforms the pre-exit checks(left OK, right OK). Initiatingimmediately afterwards theexit count “ Out!, In!, Arch!”synchronized with a de-termined and rhythmic body
FIG. 7Pilatus Porter
FIG. 8Twin Otter
Paracaidas, ANGLÈS 14/10/05 15:16 Página 20

21
movement and jumps out assumingimmediately the basic freefall position.
4.2 THE FIRST FEW SECONDSThe first 5 seconds following the exit areespecially important to obtain stability. Afterthe initial exit boost, the student mustassume the basic freefall position ARCHINGand thus, progressively, after a few secondshe will fall stable, horizontal to the ground.
4.3 BASIC FREEFALL BODY POSITIONThe basic freefall stable body position(horizontal and facing towards the ground)(Fig. 9).
• Body slightly bent back at the waist, hipspushed forward.
• Head back
• Arms extended and bent 90° at the elbows.
• Legs apart (shoulder width), knees relaxedand toes pointed.
• Relaxed, without any muscular tension
FIG. 9Basic freefall bodyposition
Paracaidas, ANGLÈS 14/10/05 15:16 Página 21

22
4.4 ARCH AND STABILITY
4.4.1 Learning to know this position isessential for a good skydive. You will learnwhere your arms, legs and feet are withoutlooking.
QUESTIONS
• How should you orientate your body during the exit?
• Why is the basic freefall body position important?
• Where do you look while in the basic freefall body position?
4.4.2 A good arch will always give us a stableposition and will make us recover fromunusual attitudes or instability
Paracaidas, ANGLÈS 14/10/05 15:16 Página 22

CHAPTER
23
LEVEL OUT AND SKYDIVE
5.1 CIRCLE OF AWARENESS
5.1.1 The circle of awareness is an exercisethat allows us to make us aware of all theimportant things in freefall: stability, altitudeand our body position.
5.1.2 We will perform this exercise duringthe first three levels of the course, afterexiting the aircraft and as soon aspossible.
• Look at the horizon in front of you and pickup a heading (orientation, stabilityawareness).
• Look at the altimeter, turning the head butwithout moving the arm and read thealtitude (altitude awareness).
• Look at the left hand Instructor and shout outthe altitude you have read and wait for his“OK” signal (Fig.10), this means that yourbody position is correct. Once we receive the“OK” signal from the left hand Instructor,look at the right hand Instructor and wait forhis “OK”. When we have received the second“OK” the exercise is finished. (You must makeeye contact with your Instructors).
5.1.3 During the communication with theInstructors you will probably receive somehand signals to correct your body position, if somake the corrections as appropriate andmaintain eye contact until you receive thecorresponding “OK” signal.
FIG. 10“OK”
Paracaidas, ANGLÈS 14/10/05 15:17 Página 23

24
5.2 PRACTICE PULLS
5.2.1 This exercise will be performed after theCircle of Awareness during the first threelevels (three practice pulls on Level I, two onLevel II, and one on Level III, although theInstructor may change the number ofrepetitions for a given student).
5.2.2 From the basic freefall body position andmaintaining the arch, the student will touch thedeployment handle with his right hand whilesimultaneously placing his left hand to a position
above his head, between his eyes and the horizon.Maintain this position for a second and return tothe basic freefall body position after simulating thedeployment of the parachute (Fig. 11).
5.3 OTHER EXERCISES
From Levels II to VII our Instructor willprogressively introduce us in the knowledgeof other freefall maneuvers of control bymeans of exercises like, forward movementsin group (L-II), turns (L-IV / V), front and backloopings and tracking (L-VI / VII).
FIG. 11Practice Pull
Paracaidas, ANGLÈS 14/10/05 15:17 Página 24

25
5.5 AT 6,000’When reaching 6000’ we will make a headshake signal to indicate, “ No moreexercises”. From this moment on you will fixyour eyes on the altimeter, preparing yourselffor the deployment.
5.6 AT 5,000’When reaching exactly 5,000’ you will make asignal crossing your hands over your head(wave-off) to announce the deployment,immediately followed by the actualdeployment according to this sequence: Arch,grasp, launch and check the deploymentmaintaining the basic freefall body positionand looking at the deployment over your rightshoulder (Fig. 12).
FIG. 12Deployment sequence
5.4 ALTITUDE CONTROL
This will be your most important duty duringfreefall. You must always check the altitudebefore and after every exercise, especially whenyou begin to practice looping and tracking,because when these exercises are performedwe lose more altitude more rapidly. During“free time” (after finishing the plannedexercises) and down to 6,000’, you mustconstantly check the altitude (every 3-5’’) soyou can begin to understand the relationshipbetween time and the loss of altitude infreefall.
Paracaidas, ANGLÈS 14/10/05 15:17 Página 25

26
QUESTIONS
• What is the Circle of Awareness and why is it important?
• Until what altitude can we continue doing exercises?
• Which is the deployment altitude?
• What will you do if you lose your stability during freefall?
5.7.4 If at any moment during the freefall youreceive a pull signal do not question it anddeploy. It could be that your altimeter is notreading correctly, or that there is a plane underus or many other circumstances….
5.7.5 If you were to lose your altimeter infreefall or it were to malfunction, one of yourInstructors will place his in front of your faceand will keep it there until pull time.Therefore the skydive will continue as planedand you will be able to control the altitude atany moment.
If these altimeter problems were to occur whileyou are doing a solo skydive, you are to deployimmediately. The ground visual reference maybe quite different and misleading, dependingon the light, atmospheric conditions andlandscape of the area.
5.7 FREEFALL PROBLEMS
5.7.1 If you find yourself out of control duringthe exit, or at any moment, the solution willbe to ARCH ! and relax your body position.
5.7.2 One instructor releases and disappears,the student must arch and continue with thenormal freefall sequence, communicatingonly with the remaining Instructor.
5.7.3 If you lose both Instructors and you findyourself alone in freefall you must arch torecover stability, and if you have altitudecontrol wait until 5000’ to deploy. If youcannot read the altimeter and after 5’’ ofbeing unstable you cannot recover stability,arch and deploy.
Paracaidas, ANGLÈS 14/10/05 15:17 Página 26

CHAPTER
27
FREEFALL COMMUNICATION
6.1 COMMUNICATION WITH THEINSTRUCTORSDuring freefall your Instructors willaccompany you. They have the informationyou require at this time, that’s why thecommunication with them is essential. Thisinformation will be transmitted to you bysignals. You may receive these signals at anymoment during the 50’ of freefall.
6.2 FREEFALL SIGNALS
6.2.1 There are three types of signals:
• Exercise reminder signals.
• Body correction signals.
• Safety signals.
6.2.2 Reminder signals, given to you if you
forget any exercise of the sequence.
Fig. 13Circle of awareness
Fig.14Arch
6.2.2.2 Practice pulls; this is done by a tap onthe student’s hip where the deploymenthandle is.
6.2.3 Body correction signals to correct the
body position.
6.2.3.1 ARCH! In other words, move yourhips lower. (Fig. 14).
6.2.2.1 Circle of awareness or Circle ofobservation (Fig.13)
Paracaidas, ANGLÈS 14/10/05 15:17 Página 27

28
6.2.3.2 Straighten legs (Fig.15).
6.2.3.3 Bend legs (Fig.16).
6.2.3.4 Relax the position, when yourposition is correct but tense, given by a handwaving in front of your face (Fig. 17).
6.2.3.5 If your arms are not in the correctposition your Instructors will physically movethem to the correct position. Do not offerresistance if they do.
Fig. 15Straighten legs
Fig. 16Bend legs
Fig. 17Relax
Paracaidas, ANGLÈS 14/10/05 15:18 Página 28

29
6.2.3.6 Bring legs a bit closer together (Fig. 18).
6.2.3.7 Other signals, to be determined, maybe used to correct specific problems for eachstudent.
6.2.4 Safety signals
6.2.4.1 Look at the altimeter! Tap (gently) onthe student’s helmet or an Instructor in frontof you will show you his altimeter tapping itwith his right hand.
6.2.4.2 Pull! It may come from eitherInstructor and at any time. (Fig.19).
Fig.18Bring legs a bit closer together
Fig. 19Pull!
Paracaidas, ANGLÈS 14/10/05 15:19 Página 29
30
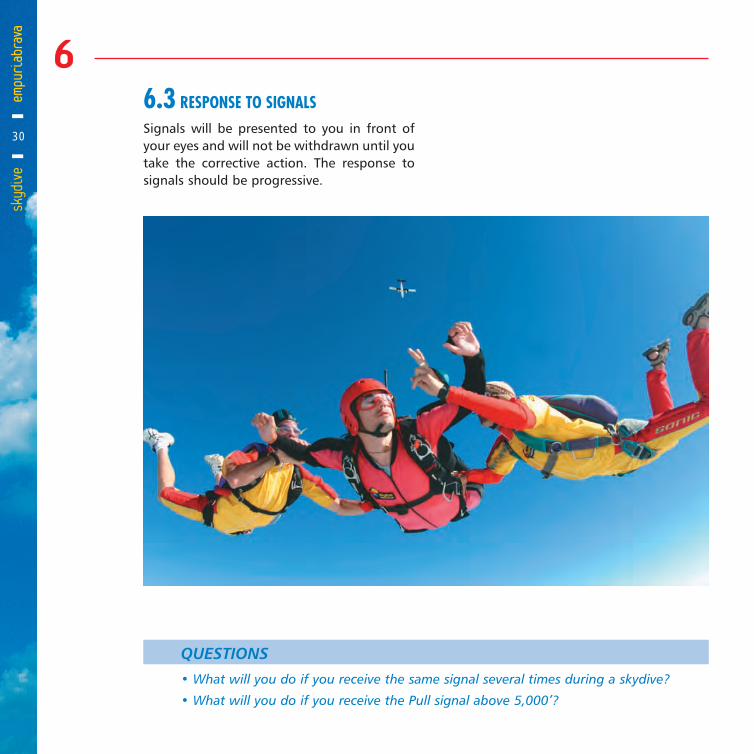
6.3 RESPONSE TO SIGNALSSignals will be presented to you in front ofyour eyes and will not be withdrawn until youtake the corrective action. The response tosignals should be progressive.
QUESTIONS
• What will you do if you receive the same signal several times during a skydive?
• What will you do if you receive the Pull signal above 5,000’?
Paracaidas, ANGLÈS 14/10/05 15:19 Página 30

CHAPTER
31
CANOPY CONTROL
7.1 BASIC AERODYNAMICS
7.1.1 Some basic concepts on aerodynamicsare necessary to understand how aparachute opens, flies and how it iscontrolled.
7.1.2 The basic ram-air canopy (“airfoil”) orthe wing of an aircraft work under a verysimple principle. As the wing moves throughthe air, some air passes over the top of thewing and some passes under it. Due to theshape the wing has, the top skin is curved
while the bottom skin is flat (Fig. 20), thedistance from the nose (leading edge) to thetail (trailing edge) is longer over the top thanacross the bottom.
7.1.3 The Laws of Physics state that all the airthat strikes the nose of the canopy mustmeet again at the tail at precisely the sameinstant. Therefore, because of the airfoilshape of the canopy, the air traveling overthe top of the canopy must travel faster thanthe air traveling across the bottom. Thisaction will cause a negative pressure area todevelop on the upper wing surface. Becauseof this difference in pressure the wing movesup into the lower pressure area. The wing isin flight.
FIG. 20
Paracaidas, ANGLÈS 14/10/05 15:19 Página 31

FIG.21
32
7.1.4 The forces acting on the canopy whilein flight are: • Lift, do to the difference in pressure
between the top skin and the bottom skin.• Thrust, a forward movement caused by the
angle of attack of the canopy.• Gravity, do to the suspended weight of the
skydiver.• Drag or resistance to the forward movement
do to the shape of the canopy. (Fig. 21).
7.2 AIR NAVIGATION AND MANEUVERING
7.2.1 Full glideWith toggles up, your canopy will glidestraight and stable at about 30 to 50 Km/hwith a rate of descent of approximately 4 to
5 m/s. This is the most usual flight positionand, in normal conditions, the starting pointfor turning and flaring the canopy.
7.2.2 Half brakes
Braking is achieved by altering the airflowalong the lower surface of the canopy. This isaccomplished by distorting the trailing edgein much the same manner as flaps on anairplane.
Half brakes is achieved, from the full glideposition, by slowly depressing both toggleshalf way down (approximately at chest level),the forward speed will be now between15 and 20 Km/h and the rate of descentbetween 3 and 4 m/s.
Paracaidas, ANGLÈS 14/10/05 15:19 Página 32

33
7.2.3 Full brakesUnder normal flight conditions, the full-braked attitude will be reached by depressingboth toggles slowly until all the forwardspeed is reduced (Fig. 22). In this mode thedirection of flight will be almost vertical. Theforward speed will be approximately 8 km/hor less, and the rate of descent about 5 m/s.Directional stability can be maintained in the75-100 % braked condition. When brakingfurther the canopy doesn’t fly; we arereaching the stall point.
7.2.4 The stallA stall is induced by slowly pulling down bothtoggles slightly more than the full brakeposition, the canopy is completely braked.
In this attitude the canopy loses its efficiency asa lifting device. Forward speed is reduced to 0and the canopy sinks as it gently rocksbackwards.
Your canopy may start to fly backwards or turntowards any side and collapse. To recovernormal flight from this position simply raiseboth toggles gently. Your canopy will smoothlyrecover from the stall.
FIG. 22Ram-air parachute inlanding configuration.
Never induce a stall,release the togglescompletely, nor let themup abruptly. If the togglesare released in such amanner, the canopy maysurge forward possiblycausing a line twist.
!
Paracaidas, ANGLÈS 14/10/05 15:19 Página 33

34
FIG. 23
GROUND SPEED VS. AIR SPEED
Paracaidas, ANGLÈS 14/10/05 15:19 Página 34
35
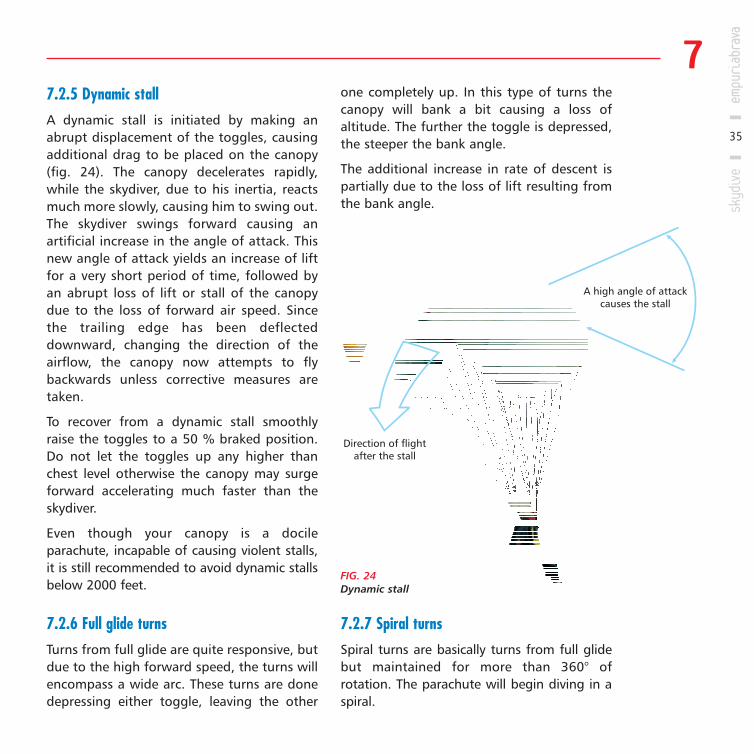
7.2.5 Dynamic stallA dynamic stall is initiated by making anabrupt displacement of the toggles, causingadditional drag to be placed on the canopy(fig. 24). The canopy decelerates rapidly,while the skydiver, due to his inertia, reactsmuch more slowly, causing him to swing out.The skydiver swings forward causing anartificial increase in the angle of attack. Thisnew angle of attack yields an increase of liftfor a very short period of time, followed byan abrupt loss of lift or stall of the canopydue to the loss of forward air speed. Sincethe trailing edge has been deflecteddownward, changing the direction of theairflow, the canopy now attempts to flybackwards unless corrective measures aretaken.
To recover from a dynamic stall smoothlyraise the toggles to a 50 % braked position.Do not let the toggles up any higher thanchest level otherwise the canopy may surgeforward accelerating much faster than theskydiver.
Even though your canopy is a docileparachute, incapable of causing violent stalls,it is still recommended to avoid dynamic stallsbelow 2000 feet.
7.2.6 Full glide turnsTurns from full glide are quite responsive, butdue to the high forward speed, the turns willencompass a wide arc. These turns are donedepressing either toggle, leaving the other
one completely up. In this type of turns thecanopy will bank a bit causing a loss ofaltitude. The further the toggle is depressed,the steeper the bank angle.
The additional increase in rate of descent ispartially due to the loss of lift resulting fromthe bank angle.
7.2.7 Spiral turnsSpiral turns are basically turns from full glidebut maintained for more than 360° ofrotation. The parachute will begin diving in aspiral.
FIG. 24Dynamic stall
Paracaidas, ANGLÈS 14/10/05 15:19 Página 35

36
The first turn will be fairly slow, with shallowbank angles, but both the turn speed and thebank angle will increase rapidly if the spiral ismaintained. Increasing the turn rate will causeexcessively fast diving speed with a quick lossof altitude. Therefore spiral turns should beavoided below 2000 feet and when there areother canopies in the air.
7.2.8 50 % brake turnsTurns from the 50% braked configuration aredone by further depressing either toggle.Canopy response in this mode is much faster,with minimal banking, resulting in almost flatturns.This type of turn is especially useful when achange of direction is desired with aminimum loss of altitude.
7.2.9 75% - 100% brake turnsCanopy response is extremely quick in thismode. When flying in this mode, one shouldbe keenly aware that we are operating verynear the stall range. Turns are best made withdirectional cross control, by slightly raisingthe opposite toggle. This way you prevent thecanopy from stalling. There is little or nobanking and the resulting turns are quick andflat.
7.2.10 Stall turnsIf your canopy is flying in the 90-100% brakerange and either toggle is further depressed,a stall turn will result. Stall turns produce avery quick, pivoting action, with the stalled
side of the canopy flying backwards. Sincethe stalled side of the canopy generates verylittle lift, the rate of descent will increase.Never attempt stall turns because it couldcause a line twist.
7.3 CANOPY DEPLOYMENT CHECKS
When reaching 5000’ we will initiate thecanopy deployment as seen in 5.6 (page25). Once the deployment pilot chute hasbeen launched while checking it over theright shoulder, we will start counting from1001 to 1005, these 5 seconds aresufficient time for the canopy to inflatecompletely.
7.4 CANOPY PROCEDURES
7.4.1 Once the canopy is open you mustproceed as follows:1) Move your hands to the rear risers, locate
the steering toggles and grab them.2) Check the canopy (Is it open correctly?),
pump the toggles three times all the waydown. This way we will unlock the toggles,which were set on brakes during thecanopy packing.
3) Check the airspace and locate the rest ofthe skydivers in order to prevent canopycollisions.
4) Perform a controllability check todetermine if your parachute is controllableand if it can be landed without problems.
Paracaidas, ANGLÈS 14/10/05 15:19 Página 36

37
5) Locate the landing area and proceed tothe holding area. Your instructor willhelp you do it on your first jump (atandem), and you will always do it bystarting to look straight down, on yourvertical, and from there outwards. Thebest is, before boarding the aircraft, tochoose an easy to locate reference pointthat will act as a guide. For example,look for the sea, on the shoreline isEmpuriabrava and at the end of thetown the drop zone.
CHECK CANOPY
• Canopy flies straight when bothtoggles are all the way up
• Turns to the right when depressingthe right toggle
• Flares when pulling down on bothtoggles
• Doesn’t stall if the flare is held for3 seconds
Paracaidas, ANGLES.Qxd 4/7/08 11:20 Página 37

38
7.4.2 When in doubt look for the canopiesunder you because they will be flying towardsthe landing area.
7.5 CANOPY CONTROL(AIR NAVIGATION AND MANEUVERING)
7.5.1 The “wind line” is an imaginary line,which runs from the opening point throughthe planned landing point (fig. 25).
7.5.2 A basic understanding of the wind lineand how to stay on it will help you tosystematically land on the desired area.
Remember you are the pilot. TAKECHARGE !!
Fig. 25The wind line
Paracaidas, ANGLÈS 14/10/05 15:20 Página 38

39
7.5.3 The wind line and the exit point mustbe determined in advance to do a goodapproach to the target area.
7.5.4 Important points to better canopycontrol:• Never let go of the toggles.• Always move the toggles straight up and
down, not out to the sides.• Keep your movements in the harness to a
minimum.
7.6 LANDING
7.6.1 The ram-air parachute landingapproach is identical that the aircraft do. It isa simple procedure consisting of adownwind leg, a base leg and a finalapproach upwind, towards the target. It isdifficult to determine visually the variationsin altitude accurately, so the use of analtimeter during approaches is highlyrecommended.
7.6.2 Distributed through out the landingarea we can find various aids that indicatethe wind direction (windsocks), there isalso the “T” indicator, highly visual whileunder canopy and that will tell us thelanding direction even when there is nowind.
7.6.3 The most common winds in SkydiveEmpuriabrava are north or south winds. In
accordance with these wind directions weestablish a north or a south landing pattern.
7.6.4 North landing patternWith north winds we will establish ourholding area to the north of the field,approximately over the roundabout on theFigures-Rosas road and we will remain thereuntil reaching 1000’. At this altitude weinitiate the downwind leg towards thedesignated landing area flying downwindparallel to the landing area and about 20-50m on the outside of it. When we reach 500’we will turn 90° to the right to initiate ourbase leg and position ourselves in the centerof the landing area. When we reach 300’ weagain turn 90° to the right to set up for thefinal approach into the wind. We will not doany more turns (although we could stillmake small corrections to maintain thedirection or to avoid any obstacle) and wewill keep the toggles all the way up untilabout 3 meters from the ground where wewill initiate the “flare”.
7.6.5 South landing patternWith south winds we will establish our holdingarea to the south of the field, approximatelyover the last houses/road of Empuriabrava andwe will remain there until reaching 1000’. Atthis altitude we initiate the downwind legtowards the designated landing area flyingdownwind parallel to the landing area andabout 20-50 m on the outside of it. When wereach 500’ we will turn 90° to the left to
Paracaidas, ANGLÈS 14/10/05 15:20 Página 39

make small corrections to maintain thedirection or to avoid any obstacle) and we willkeep the toggles all the way up until about 3meters from the ground where we will initiatethe “flare”.
40
initiate our base leg and position ourselves inthe center of the landing area. When we reach300’ we again turn 90° to the left to set up forthe final approach into the wind. We will notdo any more turns (although we could still
FIG. 26Drop zone and landing patterns.
Paracaidas, ANGLÈS 14/10/05 15:20 Página 40

41
7.6.6 The “base” leg could be slightlymodified to correct a traffic that does nottake us to the desired target point (Fig. 27).
7.6.7 Depending on the wind speed ourcanopy will penetrate more or less into thewind, that’s why the “final“ approach will beshorter in stronger winds (Fig. 28).
FIG. 28Glide angle in “final” approach
FIG. 27Corrections in the “base” leg
Paracaidas, ANGLÈS 14/10/05 15:20 Página 41

42
7.7 FLARED LANDINGS
7.7.1 The flared landing is in essence acarefully controlled dynamic stall, timed sothat touchdown occurs during the exactmoment of high lift yield during the artificialchange in the angle of attack that takes placein the dynamic stall.
This is just an instant prior to the stall, andthe jumper should be extremely careful not tostall too high (Fig. 29).
The flare should be done facing the wind andshould start at a height of about 3 meters.
Both toggles are depressed at the same timefrom all the way up, thus reducing theforward speed.
At about 3 meters from the ground, slowlydepress both toggles downwards, timing the
movement to coincide with the 100% brakeposition at touchdown. The flared landing,when properly executed, practicallyeliminates both horizontal and verticalvelocities for a short period of time. If thecanopy has been slowed down prior to theflare attempt, depressing the toggles furtherwill result in a “sink”. If, on a misjudged flareattempt, the canopy enters a dynamic stall,immediate dynamic stall recovery must beinitiated by raising a bit both toggles.
7.7.2 For the landing you must take visualreferences looking at the ground with a 45°angle. Looking straight under our feet can bemisleading.
ALWAYS AVOID LOW TURNS!!
FIG. 29“Flare”
Paracaidas, ANGLÈS 14/10/05 15:20 Página 42

43
7.7.3 A canopy can be safetly landed withoutflaring by flying the canopy on final approachat 50-75% brakes with final braking increasedimmediately prior to landing.
7.8 CONSIDERATION UNDER CANOPY
7.8.1 The lower canopy has the right of way;we must keep sufficient vertical and horizontaldistance between canopies.
7.8.2 If you see another canopy comingtowards you, both skydivers should avoid thecollision by turning right, unless there isanother canopy there. In the event of a collision, we must try not togo through the lines of the other canopy(spreading our legs and arms). If you end uphanging from another skydiver or hisequipment you must immediately establishverbal contact with each other tocommunicate your intentions, keeping inmind that if you need to cutaway the lowestskydiver will cutaway first and must obtainsome separation before deploying the reserve(therefore the RSL must be disconnectedbefore cutting away). NEVER CUTAWAYBELOW 1000’, in this situation, if it werenecessary, deploy the reserve without cuttingaway the main.
7.8.3 When flying in clouds do so at 30%brakes pulling a bit more on the rightsteering toggle. This will prevent you from
getting drifted away from the drop zone.Stay alert to avoid a possible collision!
7.9 HAZARDOUS LANDINGS
7.9.1 The severity of hazardous landings canbe reduced to a minimum if you follow thebasic steps outlined for each kind of hazard.
7.9.2 Tree landings1) Face into the wind, brake just before
touching the obstacle.2) Feet and knees together, keeping your legs
towards the tree.3) Protect your face and neck with your arms.4) Prepare yourself for a hard landing.5) If you’ve hurt yourself, don’t move! Wait
for assistance.6) If you are suspended from the tree and
your feet are not on the ground, don’tcutaway to free yourself, try to hold onto athick branch or the trunk of the tree andwait for assistance.
7.9.3 Water landings1) With sufficient altitude prepare for the water
landing by disconnecting the chest strap andthe “Stevens”.
2) Land into the wind, “flare” over thesurface of the water.
3) Feet and knees together.4) Prepare yourself for a hard landing.5) Once in the water, cutaway the main
Paracaidas, ANGLÈS 14/10/05 15:20 Página 43

44
1) Big.
2) Clear of obstacles.
3) Flat.4) If possible with an easy access.
Don’t let it bother you if you have to walk a bitmore. In this case it is preferable to land far fromthe drop zone instead of trying to make it backand realize that you are too low for the last turn.If you think you are not going to reach thelanding area comfortably, look for analternative landing area before 1000’.
7.9.7 Landing in strong windsIf you are flying into the wind and your canopyis going backwards, you will have to look overyour shoulder to make sure you’re not goingtowards an obstacle. You may correct or evenimprove this situation by pulling down onboth front risers, without letting the togglesout of your hands. In this mode your canopywill have more penetrating capabilities but willalso have a higher rate of descent. Be careful!Remember to release the front risers beforeflaring for the landing.
If when reaching the ground the winds are abit strong, your canopy will remain inflatedand may drag you. To avoid this situation, assoon as you land let go of one toggle and pullthe other one as far as you can while, at thesame time, run around it so it remainsbetween you and the wind. If you cannotavoid been dragged, the best solution, afterdisconnecting the “Stevens”, would be tocutaway the main.
canopy, get your shoulders out of theharness and slide off the leg straps byswimming away from the canopy.
6) Do not attempt to save the equipment. Itcould cost you your life!
7) If you are far away from the coast, stayclose to the equipment.
7.9.4 Power linesTry to avoid them even by turning lowattempting to land parallel to the lines.1) Feet and knees together.2) Try to go through the lines without
touching them.3) Prepare yourself for a hard landing.4) If you are touching the ground, cutaway
and walk clear.5) If you are suspended from the power line
wait for assistance from your Instructors.
Don’t allow anybody to touch you norattempt to climb down on your own!
7.9.5 Other obstacles1) Buildings.2) Vehicles.3) People.4) Roofs.To avoid them you can land crosswind ordownwind as long as your canopy is level.
7.9.6 Off field landingsIn the event of an off field landing look for analternative landing area.
Paracaidas, ANGLÈS 14/10/05 15:20 Página 44

45
7.9.8 Downwind or crosswind landingsAlthough we should always try to land into thewind, we could find ourselves facing thesituation of having to land downwind orcrosswind because we misinterpreted the winddirection, to avoid a hazardous area or for anyother reason. In this situation we would landthe canopy in the same way we would whenflying into the wind, but expecting moreforward speed than usual and also that thecanopy will not come to a full stop so we willbe forced to run at landing or, if the wind isquite strong, prepare for the landing byperforming a parachute landing fall.Never attempt a low turn to face into thewind for the landing.
7.9.9 Landing in the Empuriabrava MarinaThis is very unlikely situation since studentsare the last to exit the plane and the jump-run is always done from south to north.However, in the event of having to land in themarina you should land in the water.
In the marina one can find all kinds ofobstacles and there is no alternative landingarea so, as usual, before reaching 1000’ youmust select a channel, if possible orientatedthe wind and attempt to land in the middleof it.In this case you will have to execute youremergency procedures for water landings andremember that you might encounterturbulence close to the ground.
7.9.10 Parachte landing fall (PLF)
All skydivers may suffer a hard landingfrom time to time. You can minimize therisk of injury if you anticipate it andexecute a PLF. On touchdown keep legstogether, slightly bent and with muscletension, trying to make contact with bothfeet at the same time. Turn sideways a bitto contact first the leg, followed by thebuttock, your back and finally roll over theopposite shoulder. It is very important notto put your arms in the way.
AVOID OBSTACLES!
PREPARE YOUR LANDING WITHENOUGH ALTITUDE!
!
Paracaidas, ANGLÈS 14/10/05 15:20 Página 45

46
QUESTIONS
• What is a dynamic stall?• When your canopy turns, is the vertical speed, reduced, increased or maintained? • Describe a canopy check.• How should you land regarding the wind direction?• Describe the procedure for a water landing.• What will you do if at 200’ you realize that you are going downwind?• If you think your landing is going to be harder than usual, What will you do to avoid
hurting yourself?
Paracaidas, ANGLÈS 14/10/05 15:20 Página 46

CHAPTER
47
TURBULENCE AND RAM AIRPARACHUTES
8.1 WHAT IS TURBULENCE?
8.1.1 Turbulence is also known as “eddies” or“rotors”. They come in all sizes from a fewcentimeters in diameter to some kilometers indiameter.
8.1.2 Rotors than effect a canopy arecaused by;
1) Solid objects, like trees, hills, buildingsetc., obstructing the air flow on thesurface.
2) The static instability of air (due to thermalactivity).
3) Wind shear, (due to differences of velocitybetween two wind streams of air).
Number 3 type turbulence is least likelyto be encountered by skydivers andexcept in extreme cases, like clouds orwarm fronts, would pose little danger tothe jumper.
Number 2 type turbulence is alwaysassociated with thermal activity. They areproduced when a mass of air acquires asudden inertia.
The most common turbulence, and the onesthat have more effects on the skydiver arethe ones caused by solid objectsobstructing the path of the wind (type 1).
This type of turbulence is oftencompounded by turbulence generated bythermal activity.
8.1.3 The factors that affect the intensity ofturbulence are wind velocity, density of theair and the size and shape of the obstructionsin the path of the wind.
Wind velocity is the most influential factor inthese types of turbulence. In winds up to 10knots, the turbulence generated will not bevery intense nor will it pose serious danger tothe jumper. In winds between 10 and 15knots a great turbulence can be generatedwhich could cause a canopy to collapse. Ifthe winds are in excess of 15 knots,turbulence can be produced by even verysmall objects.
The higher the density of air, the greater theintensity or energy of the turbulent eddy.Cold air is more dense than warm air soturbulent eddies are more common inwinter than in summer. Humid air is lessdense than dry air so turbulence will bemore powerful at 30% relative humiditythan at 80%.
Higher elevation fields, with lower air densitythan at sea level, will produce turbulence oflesser intensity.
The shape and size of the objects obstructingthe wind flow are also determining factors ofthe size and intensity of the turbulence. Alarge object will generate larger eddies,although not more intense, than smallerones.
Paracaidas, ANGLÈS 14/10/05 15:20 Página 47

48
A rectangular building with corners at 90°,will generate eddies at slower wind speedsand generate more forceful eddies thanthose created by, for example, an igloo-shaped building (Fig. 30). We may encounter more turbulence atmidday since at this time the thermalactivity and the wind velocity tend to behigher.
8.2 FLYING WITH TURBULENCE PRESENT
Canopies with a high wing loading withstandturbulence better; so lighter jumpers withlarge wing surfaces are more susceptible toturbulent air.
When flying in turbulent air we should:• Keep toggles all the way up to allow for
maximum canopy speed.• Maintain flight direction by using smooth
but effective toggle input.• Prepare for a hard landing.
QUESTIONS
• With south winds, in which part of the landing area can you foresee encountering
more turbulence?
• In turbulent wind conditions, how will you fly your canopy?
FIG. 30
Paracaidas, ANGLÈS 14/10/05 15:20 Página 48

CHAPTER
49
MALFUNCTIONS
9.1 EQUIPMENT MALFUNCTIONS AND
SOLUTIONS
9.1.1 By the term malfunction we understandany failure of the canopy or related equipmentthat does not provide a normal rate of descentfor a safe landing. When facing a possiblemalfunction we should ask ourselves if the
canopy is controllable and if it can be landedsafetly.
9.1.2 Upon opening look up to check thatyour canopy is correctly open (Fig. 31) andperform a canopy check.
9.1.3 There are two types of malfunctions;
• Total malfunctions. (High speed)
• Partial malfunctions. (Low speed)
Fig. 31Canopy after the opening
Paracaidas, ANGLÈS 14/10/05 15:20 Página 49

50
EMERGENCY PROCEDURE
Paracaidas, ANGLÈS 14/10/05 15:22 Página 50
51
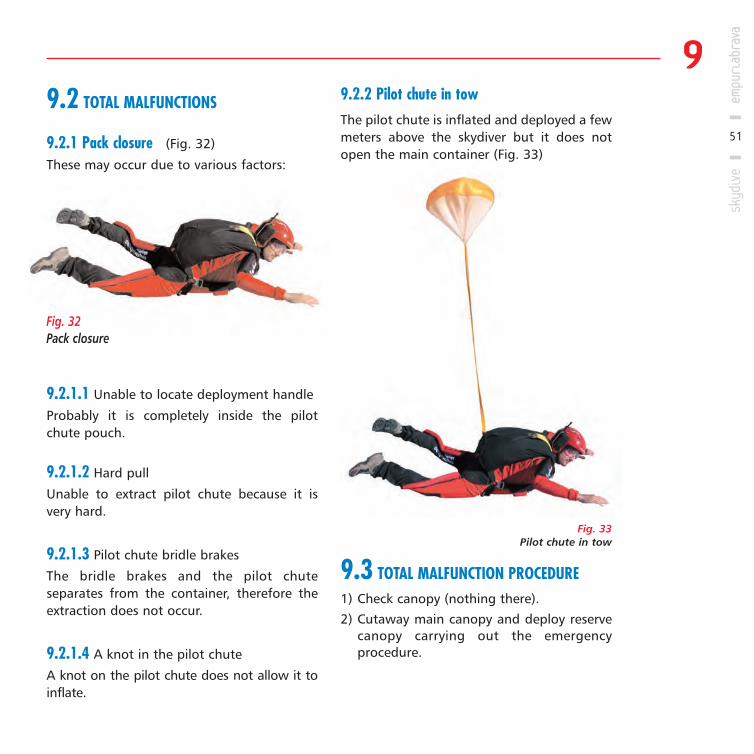
9.2.2 Pilot chute in towThe pilot chute is inflated and deployed a fewmeters above the skydiver but it does notopen the main container (Fig. 33)
9.3 TOTAL MALFUNCTION PROCEDURE1) Check canopy (nothing there).
2) Cutaway main canopy and deploy reservecanopy carrying out the emergencyprocedure.
Fig. 32Pack closure
Fig. 33Pilot chute in tow
9.2 TOTAL MALFUNCTIONS
9.2.1 Pack closure (Fig. 32)
These may occur due to various factors:
9.2.1.1 Unable to locate deployment handle
Probably it is completely inside the pilotchute pouch.
9.2.1.2 Hard pull
Unable to extract pilot chute because it isvery hard.
9.2.1.3 Pilot chute bridle brakes
The bridle brakes and the pilot chuteseparates from the container, therefore theextraction does not occur.
9.2.1.4 A knot in the pilot chute
A knot on the pilot chute does not allow it toinflate.
Paracaidas, ANGLÈS 14/10/05 15:22 Página 51

52
3) Reach up and grab the reserve canopysteering toggles.
If you were not able to extract the pilot chute,for whatever reason, it is not necessary tocutaway and you must open the reservedirectly.
9.4 PARTIAL MALFUNCTIONS
9.4.1 In this type of malfunction theparachute or part of it has deployed so wehave a bit more time to try to remedy theproblem. Always maintaining altitudeawareness!
9.4.2 Bag lockThe pilot chute extracts the bag containingthe main and it is lifted until line stretch butremains closed not letting the canopy out(Fig. 34).
9.4.3 StreamerIn this situation there is complete line stretchand the canopy is out of the bag, but it is notcompletely deployed. We could attempt toremedy the problem, always maintainingaltitude awareness, by pulling on bothtoggles repeatedly. If the situation doesn’timprove we would execute emergencyprocedures. (Fig. 35).
Fig. 34Bag lock.
Fig. 35Streamer
Paracaidas, ANGLÈS 14/10/05 15:23 Página 52

53
9.4.4 HorseshoeThere are two types of horseshoe malfunctions:
9.4.4.1 During freefall the main containeropens (normally because the closing loopwas loose or worn out). In this case the bagwill come out of the container and initiateline stretch, but since the pilot chute is still inits pouch, the deployment sequence will notbe completed and the pilot chute bridle, thelines and the bag will get entangled witheach other, thwarting the normaldeployment. (Fig. 36).
Fig. 37Horseshoe malfunction
9.4.4.2 The pilot chute, the bridle, or anyother part of the parachute is caught aroundthe jumper’s body or some part of theequipment, and even thou the lines arestretched and some part of the canopyexposed, it cannot deploy correctly. (Fig. 37).
In this case and having altitude awareness,we could make one attempt to unhookourselves before initiating emergencyprocedures.
Fig. 36Horseshoe malfunction
Paracaidas, ANGLÈS 14/10/05 15:23 Página 53

54
9.4.5 Line-over (Fig. 38)
In some cases it could be possible to makethe line come down from over the canopy byturning the canopy. If after this attempt itremains over the canopy, and even thoughthe canopy may seem to be flying correctly,we must initiate emergency procedures.
9.4.6 Slider hang-up (Fig. 39)
The slider gets hung up and it becomesimpossible to make it descend.
Fig. 38Line-over
Fig. 39Slider hang-up
Fig. 40Broken lines
9.4.7 Broken linesBroken suspension lines. (Fig. 40)If when checking the canopy we find outthat some line has broken duringdeployment, we must perform a canopycheck (see box in page 37) to determine ifour canopy is controllable and if you candescend and land it. If not, initiateemergency procedures.
9.4.8 Knots in the lines
9.4.9 Holes or fabric failures on the canopy
Paracaidas, ANGLÈS 14/10/05 15:23 Página 54

55
9.5 PARTIAL MALFUNCTION EMERGENCYPROCEDURE1) Check canopy.
2) Attempt to solve the problem maintainingaltitude awareness.
3) Cutaway main canopy and deploy reservecanopy carrying out the emergencyprocedure. (See box in page 50)
4) Reach up and grab the reserve canopysteering toggles.
9.6 TRAINING HARNESSMalfunction procedures can be practiced inthe training harness where you can executethem calmly. It is convenient to review theemergency procedures prior to very jump.
9.7 UNUSUAL PARACHUTE OPENINGSThere are unusual parachute openings, whichdo not require cutaway and reserveactivation:
9.7.1 Pilot chute hesitationSome times the pilot chute does not go updirectly but rather stays “flying” for aninstant in the turbulent “burble” formedby the relative wind on the jumpers back.(Fig. 41).
9.7.2 Slider up (Fig. 42)
Common problem that happens frequently,especially with big canopies with littlesuspended weight, like the ones used forstudents. We must pull repeatedly on bothtoggles to make it come down.
Fig. 42Slider up
Fig. 41Pilot chute hesitation
Paracaidas, ANGLÈS 14/10/05 15:23 Página 55

56
9.7.3 Closed end cells
9.7.3.1 End cells closed, with slider down(Fig. 43).
9.7.3.2 End cells closed, with slider up
9.7.4 Line twists (Fig. 44).
Generally caused by a less than stableopening or a packing error.
If you find yourself in this line twist situation,you must reach for the risers and try toseparate them, while at the same time kicktrying to make your body turn in the oppositedirection of the twist.
If you cannot undo the line twist or you beginspinning you must execute the emergencyprocedure.
9.7.5 Broken steering lineProbably the canopy will be turningcontinuously after the opening. We must pullon both steering toggles to release the brakes(one toggle will remain in our hand) andfrom here on steer using the rear risers. Inthis case it is important to practice thelanding with rear risers at altitude to find theflare point of the canopy.
9.7.6 Premature brake releaseIf on opening your canopy starts turningcontinuously, it is probably because one of thesteering lines was not set on brakes during thepacking or it has released during the opening.In this situation you must grab both steeringtoggles and pull them down completely threetimes. If the turn persists them it was causedby a different problem and you must cutawayand deploy the reserve.
Fig. 44Line twists
Fig. 43Closed end cells
Paracaidas, ANGLÈS 14/10/05 15:23 Página 56

57
9.7.7 Pilot chute over noseYou must perform a canopy check, and if yousee that the canopy flight is not affected,then continue as normal.
If it is affected then execute the emergencyprocedure.
9.7.8 Remember that you must alwaysperform a canopy check, especially after oneof these unusual openings, to evaluate if youare capable of steering and landing yourcanopy.
REMEMBER! THE MINIMUMDECISION ALTITUDE FOR CUTTINGAWAY IS 2500’
AND THE MINIMUM ALTITUDE TOINITIATE THE CUTAWAY IS 2000’
!
POSSIBLE SITUATIONS AFTER THE OPENING
Paracaidas, ANGLÈS 14/10/05 15:23 Página 57

58
9.8 BOTH CANOPIES OPEN
9.8.1 BiplaneOne canopy in front of the other. You mustrelease the brakes of the front canopy andsteer the front canopy until landing. It is veryimportant not to do sharp turns nor longones. In this situation we will not flare thecanopy for landing and we will do a PLF ontouchdown.
9.8.2 Side-by-side (Fig. 45)
Check to see which canopy is more overhead,this is the dominant canopy and the one youshould release the brakes on and steer, verygently, until touchdown.
In this case it won’t be necessary to flare thecanopy for landing. We will do a PLF ontouchdown.
Fig. 45Side-by-side
9.8.3 DownplaneIt can be caused by a sharp turn on a side-by-side or by other circumstances. You mustcutaway the main canopy immediately!
9.8.4 Main and reserve entanglementIn this case you must do everything possible toseparate the two canopies, pulling on the risersand/or toggles. Cutting away the main canopycould increase the problem.
Paracaidas, ANGLÈS 14/10/05 15:23 Página 58

59SAFETY ALTITUDES. STUDENT SKYDIVERS
Paracaidas, ANGLÈS 14/10/05 15:23 Página 59

60
QUESTIONS
• What is the difference between a total and a partial malfunction?
• Describe the emergency procedure.
• Is a line twist a malfunction?
• What is the minimum decision altitude to cut away your main canopy?
Paracaidas, ANGLÈS 14/10/05 15:23 Página 60

CHAPTER
61
THE SEVEN LEVELS OF AFF
10.1 AFF PROGRESSION
10.1.1 Once you have concluded your groundschool, your ground training, your suspendedharness practices and you have done yourtandem jump with your Instructor, you will beprepared to begin jumping with your ownparachute.
10.1.2 The course is divided into sevenlearning levels through which you mustprogress in order to graduate and begin tojump on your own.
10.1.3 In each level your Instructor will tellyou the learning objectives required to passthe level. The learning objectives will besomewhat simple but very important, andyou must achieve these learning objectives inorder to progress to the next level. Thelearning objectives for each jump can bepassed in one jump but it could be necessaryto repeat a level if you do not achieve them.
Paracaidas, ANGLÈS 14/10/05 15:24 Página 61

62
10.1.4 The best way to achieve the objectivesof each jump is to follow the sequenceprepared by your Instructor.
10.2 GENERAL AFF COURSE OBJECTIVES
• General concept of the AFF Course.
• Familiarization with parachuting equipment.
• Familiarization with aircraft and with thedrop zone.
• Learning of the procedures, beforeboarding the plane, in flight, in freefall,under canopy and landing.
• Study of the possible problems andmalfunctions along with their solutions.
• Practical objectives- Aircraft exits- Freefall stability control- Altitude awareness- Canopy opening and control- Landings
Paracaidas, ANGLÈS 14/10/05 15:24 Página 62

63
LEVEL I
10.3 INTRODUCTION TO FREEFALL
10.3.1 Objectives:1) Exposure to continuous freefall.2) Heading awareness.3) Focused awareness and attention.4) Coordinated movements during the
practice pulls.5) Altitude awareness.6) Deployment at 5,000 feet.7) Safe landing
10.3.2 On the ground (for all seven levels):
1) Prepare with your Instructor the landingpattern for this jump.
2) Your Instructor must perform an equipmentcheck before boarding.
10.3.3 In flight:
1) Locate the landing area.
2) Review signals and the jumpsequence with your Instructors (forall seven levels).
3) Equipment check by one of yourInstructors (for all seven levels).
10.3.4 Jump sequence:• Pre-exit checks with your Instructors in the
door.• Exit count.• Exit, presenting the body to the relative
wind and arching.• Level out• Circle of awareness.• Three practice pulls.• Free time, maintaining the stable body
position, controlling the orientation using thehorizon and checking the altitude every 3’’- 5’’.
• The left side Instructor will release if youhave a good body position.
• At 6,000’ make a head shake signal toindicate, “no more exercises” and fix youreyes on the altimeter until reaching 5,000’.
• At 5,000’ make the wave-off signal anddeploy (arch, grasp, launch the pilot chuteand check, 1,001, 1,002, 1,003, 1,004,1,005).
• Check canopy.
Paracaidas, ANGLÈS 14/10/05 15:24 Página 63

FIG. 46Backward movement position
64
LEVEL II
10.4 FORWARD MOVEMENT
10.4.1 Once surpassed the first contact withfreefall we can start working a bit further onthe freefall position.
10.4.2 A common error among beginners isto use the arms more than the legs, leavingthe arms more forward than desirable andthe legs a bit too bent. That is exactly theposition to fly backwards (Fig. 46).
10.4.3 In Level II we will perform some forwardmovements that will help us to think moreabout the use of the legs and will let us see howthis affects stability.
10.4.4 Forward movement exercise: From theneutral stable position, and with altitudeawareness, we will select a point in thehorizon, right in front of us. Then we willprogressively point our toes until our legs arecompletely straight. At the same time we willmove our arms backwards keeping thembent by the elbows (Fig. 47). We will maintainthis position for 5 seconds and then return tothe neutral freefall body position. During thetime in which we maintain the forwardmovement position we will feel that we arefalling a bit more head down and that wemove forward.
FIG. 47Forward movement
Paracaidas, ANGLÈS 14/10/05 15:24 Página 64

65
10.4.5 Objectives:1) Same as level I.2) More perception of our legs and basic
knowledge of the forward movement.3) Relax the body position without losing the
arch during the whole jump.
10.4.6 Jump sequence:• Pre-exit checks with your Instructors in the door.• Exit count.• Exit, presenting the body to the relative
wind and arching.• Level out• Circle of awareness.• Two practice pulls.
• Check altitude• Perform one forward movement• Check altitude• If we still have enough altitude (+ 7,000’),
perform a second forward movement.• Free time, maintaining the stable body
position, controlling the orientation usingthe horizon and checking the altitude every3’’- 5’’.
• The left side Instructor will release if youhave a good body position.
• At 6,000’ make a head shake signal toindicate, “no more exercises” and fix youreyes on the altimeter until reaching 5,000’.
• At 5,000’ make the wave-off signal anddeploy.
Paracaidas, ANGLÈS 14/10/05 15:24 Página 65

66
LEVEL III
10.5 UNASSISTED FREEFALL
10.5.1 Our next step in the progression will beto maintain the stability, therefore to controlthe body position continuously during freefall.To achieve it both Instructors will release youon this jump.
10.5.2 Objectives:1) More perception in freefall.2) Hover control3) Altitude awareness.4) Deployment at 5000’
10.5.3 Jump sequence:• Pre-exit checks with your Instructors in the door.• Exit, presenting the body to the relative
wind and arching.• Level out.• Circle of awareness.• One practice pull.• Check altitude.• Both Instructors release the student.• Free time, maintaining the stable body
position, controlling the orientation using thehorizon and checking the altitude every 3’’- 5’’.
• At 6,000’ make a head shake signal toindicate, “no more exercises” and fix youreyes on the altimeter until reaching 5,000’.
• At 5,000’ make the wave-off signal anddeploy.
Paracaidas, ANGLÈS 14/10/05 15:24 Página 66

67
LEVEL IV
10.6 STABLE FREEFALL AND TURNS
10.6.1 From this moment on we will continuejumping with only one Instructor. Since you arenow capable of maintaining stability at alltimes, it is the moment to start working onnew exercises: turns.
10.6.2 During this jump we will perform 90°turns following our Instructor. He will placehimself in front of you to begin the exerciseand then move to your side. From thatposition he will indicate, with a hand signal,to follow him, then we must turn until we areagain in front of him.
10.6.3 Turns: from the basic neutral position,and looking in the direction in which wewant to turn, we will lower the elbow to
Paracaidas, ANGLÈS 14/10/05 15:24 Página 67

68
where we want to turn while simultaneouslyraising the opposite elbow (Fig. 48). Thespine column must remain straight at alltimes, like in the arching position. To stop theturn we will return to the neutral position.
10.6.4 Objectives:
1) To fly close to the Instructor withoutturning using the knowledge acquired inthe previous jumps.
2) Altitude awareness.
3) Deployment at 5,000 feet.
Even though the turns are an exercise of thisjump they are not one of the main objectivesof this level.
10.6.5 Jump sequence:
• Pre-exit checks with your Instructor in thedoor.
• Exit count and exit.
• Circle of awareness.
• The Instructor releases and moves in frontof the student.
• The student maintains orientation andproximity with the Instructor, checking thealtitude every 5 seconds.
• The Instructor moves to one side and thestudent follows performing a 90° turn.
• Altitude check.
• Repeat the exercise as long as there isenough altitude.
• At 6,000’ “no more exercises” signal.
• At 5,000’ wave-off signal and deploy.
FIG. 48Right turn
Paracaidas, ANGLÈS 14/10/05 15:24 Página 68

69
LEVEL V
10.7 360° TURNS
10.7.1 In this level we will continue with theturning skills performing controlled 360°turns. We must bear in mind that the biggerthe angle of the arms, the faster the turn willbe, and also that when we want to stop the
turn we will have more momentum,therefore we must stop the turn sooner inorder to stop at the desired reference point.
Also in this jump we will exit the plane byourselves for the first time, in other words,our Instructor will not be holding onto us inthe door, so we will feel the relative windduring the exit a bit different. A good archingposition and a good presentation to therelative wind will guarantee stability duringthe exit.
Paracaidas, ANGLÈS 14/10/05 15:25 Página 69

70
• 360° turn to the right using the Instructoras reference.
• Altitude check.
• The student maintains orientation andproximity with the Instructor, who willsignal the student to turn left.
• 360° turn to the left using the Instructor asreference.
• Altitude check.
• Repeat the exercise as long as there isenough altitude.
• At 6,000’ “no more exercises” signal.
• At 5,000’ wave-off signal and deploy.
10.7.2 Objectives:
1) Alternative 360° turns.
2) Axes control
3) Altitude awareness.
4) Deployment at 5,000’.
10.7.3 Jump sequence:
• Pre-exit checks with your Instructor in the door.
• Exit count and solo exit.
• The Instructor positions himself in front ofthe student.
• The student maintains orientation andproximity with the Instructor, who willsignal the student to turn right.
Paracaidas, ANGLÈS 14/10/05 15:25 Página 70

71
LEVEL VI
10.8 STABILITY RECOVERY
10.8.1 In Level VI we will go one step furtherin the progression, being ourselves the onesto provoke situations of loss of stability (byperforming back loops), to recover stabilityusing the arch technique, in other words, bygoing back to the neutral body position.These exercises will also help us to improveour three dimensional orientation.
In this level we will also improve our forwardmovement technique (which we covered inLevel II) by practicing the “delta” position, aprevious step to “tracking”, which is one ofthe most important maneuvers in skydiving.
10.8.2 Delta: from the neutral position, andwith altitude control, we will select a point inthe horizon right in front of us. Then we willprogressively point our toes until our legs arecompletely straight while simultaneouslymoving your arms back to the sides andmaintaining them away from our body atabout 20-30 cm. (Fig. 49). In the deltaposition we still maintain the arch and ourlegs are apart at shoulder width. Maintainthis position for 5 seconds and return to theneutral body position. Our position will be abit head-down and, even though we move abit forward our loss of altitude will beconsiderable.
10.8.3 Objectives:
1) Recovery of stability from unstable positions.2) Delta position.3) Altitude awareness.4) Deployment at 5,000’.
Paracaidas, ANGLÈS 14/10/05 15:25 Página 71

72
• Altitude check.• After receiving the corresponding signal,
the student takes a reference point andperforms a delta for 5 ‘’.
• Altitude check and free time.• At 6,000’ “no more exercises” signal. • At 5,000’ wave-off signal and deploy.
The exercises performed in this level will cause important changes in the neutral bodyposition, lessening the air resistance and therefore increasing the fall rate.When in the neutral body position you fall 1,000’ every 5.5’’, performing this type ofexercises you will lose much more altitude in the same time.
!
FIG. 49Delta position
10.8.4 Jump sequence:
• Pre-exit checks with your Instructor andsolo exit.
• The Instructor positions himself in front ofthe student.
• After receiving the corresponding signal,the student performs a back loop.
• Altitude check.• After receiving the corresponding signal,
the student performs a front loop.
Paracaidas, ANGLÈS 14/10/05 15:25 Página 72

73
LEVEL VII
10.9 GRADUATION JUMP
10.9.1 By now you have acquired all thenecessary knowledge and the minimumexperience needed to jump alone but yourInstructor will still make one more jump with
you. During this jump, after the pre-exit checksyou probably will not see your instructor againuntil you have finished your exercises or untiljust before deployment.
We will not introduce any more new exercises,but now you will have to make the decision ofperforming them, decide if you have thealtitude necessary to execute the exercises ornot, and whether you position is stable enoughto begin them.
Paracaidas, ANGLÈS 14/10/05 15:25 Página 73

74
FIG. 50Trackingposition
10.9.2 Objectives:
1) Execution of all the exercises without assistance.
2) Demonstrate good judgment in makingdecisions when performing the exercises(enough altitude, stability beforebeginning them).
3) Overall control during the skydive.
10.9.3 Jump sequence:
• Pre-exit checks with your Instructor andsolo exit.
• Stability and altitude check.
• Back loop.
• Altitude check.
• 360° right turn.
• Altitude check.
• 360° left turn.
• Altitude check.
• Delta for 5 ‘’, you must try to improve thedelta position progressing towards thetracking position (Fig. 50).
• Altitude check and free time.
• At 6,000’ “no more exercises” signal.
• At 5,000’ wave-off signal and deploy.
Paracaidas, ANGLÈS 14/10/05 15:25 Página 74

Quick referenceguide
Paracaidas, ANGLÈS 14/10/05 15:25 Página 75

77
Quickreference
guide
Paracaidas, ANGLÈS 14/10/05 15:26 Página 77

78
Quickreference
guide
Paracaidas, ANGLÈS 14/10/05 15:26 Página 78

79
Quickreference
guide
Paracaidas, ANGLÈS 14/10/05 15:26 Página 79

80
Quickreference
guide
Paracaidas, ANGLÈS 14/10/05 15:26 Página 80

81
Quickreference
guide
Paracaidas, ANGLÈS 14/10/05 15:27 Página 81

82
Quickreference
guide
Paracaidas, ANGLÈS 14/10/05 15:27 Página 82

83
Quickreference
guide
Paracaidas, ANGLÈS 14/10/05 15:27 Página 83