Embed Size (px)
Citation preview

31
CHAPTER 3
INSULATION MATERIALS SELECTION ANDINSTALLATION
Insulation slows down the conduction of heatthrough walls, ceilings and floors in both winter andsummer. It was first used extensively during the 1940'sand 50's, not to save fuel (which was relatively inexpen-sive) but to increase comfort. A couple of inches offiberglass or rockwool were sufficient.
With today's energy prices, however, we need to beconsiderably more conscientious. Proper insulation isamong the most important tools in controlling fuel costs.Increasing existing levels of insulation or insulating areasthat are uninsulated, represent one of the most cost-effective things a homeowner can do. The payback andbenefits are almost immediate. This chapter describes thevarious types of insulation and how they are installed.
R-value – The Power Of InsulationInsulation is rated by "R-value" which stands for
"thermal resistance". R-value is a measure of a material'sability to slow down heat flow. The higher the R-value, thebetter. With a temperature difference of 1 degree Fahren-heit, insulation with R=1 allows 1 Btu per hour heat flowfor each square foot of surface area. In general,
Heat Flow (Btu per hour per square foot) =Temperature Difference (degree F) x R-value
The R-value of an insulation material is usually listedin terms of R per inch. For any thickness, the total R-valueequals the rated R per inch multiplied by the thickness ininches. For example, cellulose attic insulation has an R-value of R-3.7 per inch. A 6-inch-thick installation willtherefore have a total R-value of R-22.2 (6 inches x 3.7per inch).
For insulation manufactured in a particular thickness,the R-value of the manufactured piece is given. For
instance, one manufacturer's fiberglass blanket insulationmight have an R-value of R-13. Another manufacturer'srigid foam panels might have an R-value of R-10. If morethan one layer of insulation is used, the total R-value canbe calculated by adding the R-values of the layers.
Throughout this chapter we will refer to representa-tive R-values for various types of insulation. Keep in mindhowever, that the actual R-value for a specific type ofinsulation varies somewhat between manufacturers andeven between different products from the same manufac-turer. Manufacturers are required to label their insulationproducts according to strict regulations set forth by theFederal Trade Commission. The R-value is always listedprominently either on the insulation material (batts and rigidfoam) or on the bag (loose-fill). When the R-value givenin this book differs from the R-value used on themanufacturer's label, use the label R-value.
Five Categories Of InsulationResidential insulation falls into five basic categories:
loose-fill, batts and blankets, rigid plastic foam, spray-applied products, and reflective materials. These catego-ries and the specific types which fall into each are de-scribed below.
Loose-fill InsulationAs the name implies, loose-fill insulation consists of
granular or fluffy material that can be blown into hollowcavities or open attics. Its main advantage is that whenproperly installed, it completely fills the installation spacewithout having to be cut and fitted. If an attic floor haslots of obstructions, loose-fill is probably the appropriatechoice. Stores where you purchase your insulation oftenprovide the use of a blowing machine at no cost. Other-

32
CHAPTER 3
wise a blowing machine can be rented at a minimalexpense. Be sure to use all safety procedures in operatinga blowing machine and always wear protective clothing,goggles, and the appropriate type of dust mask. Pouringinsulation by hand is not recommended.
Cellulose fiber - R-3.7 per inchLoose-fill cellulose fiber insulation is made from
recycled paper products, such as newspapers and tele-phone books, which are pulverized into a fibrous materialand then chemically treated for fire and pest resistance. Itis suitable for both attics and exterior walls and for bothnew construction and retrofit work, although it is particu-larly effective for retrofit.
When tightly packed into walls, cellulose fiber notonly adds R-value, but drastically reduces air leakage aswell. Research has shown that densely packed celluloseinsulation in the walls can reduce a house's overall airleakage rate by as much as 50%! Cellulose is best installedwith a blowing machine. Installing cellulose without amachine gives uneven coverage and is not recommended.
Some loose-fill cellulose is intended for damp applica-
tion into attics. Called "stabilized" cellulose due to its semi-rigid texture and resistance to settling, these productsrequire special installation equipment that mixes water intothe insulation as it is blown into the attic.
Fiberglass - R-2.3 to 2.8 per inchFiberglass is the most common type of loose-fill
insulation used in homes. It is made by spinning moltenglass into long thin fibers that are bound together and thencut into small tufts or cubes.
Mineral wool (Slag and Rock wool) - R-3.2per inch
Mineral wool is made by spinning molten slag intolong fibers, a process similar to that used to make fiber-glass. One advantage of mineral wool is that it is totallyfireproof and won't melt or burn in a house fire. (Fiberglassinsulation doesn't burn, but it does melt.)
Mineral wool is fairly dense and should beinstalled with a blowing machine.
Vermiculite - R-2.4 per inchVermiculite is made by expanding mica under high
temperature and pressure. Because it can withstandwetting better than any other loose-fill, it is commonly usedto fill the cores of blocks in foundations. It is not com-monly used in attics, partly because of its heaviness andpartly because it is not as widely available as other materi-als.
According to the U.S. Environmental ProtectionAgency (EPA), all vermiculite is likely to contain smalltrace amounts of asbestos. A number of manufacturersproduced insulation from vermiculite, but one mine in theUnited States produced over 70% of the world's vermicu-lite before the mine was closed in 1990. Vermiculiteproducts generated from this mine were likely to havebeen contaminated with asbestos. If you suspect that youmay have vermiculite in your attic, do not disturb it in anymanner. Seek professional guidance and have the producttested for asbestos and then follow professional proce-dures if it must be removed or disturbed in any way.
Blower
Figure 3-1 - Loose fill insulation can be blown intoattics. Machine blowing produces thorough coverage.
33
CHAPTER 3
Batts and blankets
Figure 3-2 - Fiberglass batts are installed in openwalls and floors. Wearing a dust mask, gloves, andgoggles can help avoid irritation from fiberglass dust.
Batts and blankets are made of either fiberglass,mineral wool, or recycled cotton material that is spun into acohesive mat. Fiberglass batts are the most common,accounting for roughly 90% of the material used to insulatewalls in new homes. Mineral wool batts and blankets arerelatively rare. Cotton or natural fiber insulation is fairlynew to the market. An advantage to using cotton batts isthat it is non-toxic and there is no itch or irritation associ-ated with its use.
Batts and blankets can be used to insulate attics,
cathedral ceilings, and basement ceilings. One advantageof batts and blankets is their ease of installation in opencavities.
The difference between batts and blankets is simplypackaging. Batts are precut to roughly 4-foot or 8-footlengths so that they will fit into a standard-height wall.
Blankets are long rolls of material that are cut tolength on site, usually to be used in attic floors.
Fiberglass batts are available in the following thick-ness and R-values:
Thickness R-value
3-1/2" R-11
3-1/2" R-13
3-1/2" R-15
6-1/4" R-19
5-1/2" R-21
8-1/2" R-30
12" R-38
Notice that 3-1/2" batts come in three different R-values. The reason for this is that with fiberglass, as withsome other insulation materials, the R-value per inch varieswith density of the material. Manufacturers are able topack more R's into a batt by increasing the density withoutchanging the thickness.
Faced versus unfaced battsFiberglass batts are available with or without paper or
foil facing on one side. The choice between faced versusunfaced is usually a matter of personal preference. Thefacers help control moisture movement into walls andfloors and also have flanges for attachment to studs orjoists. Unfaced batts are also suitable for any applicationas long as proper attention is paid to moisture control.Unfaced batts are typically made slightly wider than facedbatts in order to "friction fit" into stud wall cavities withoutsagging. Be sure to wear protective clothing, goggles, andan appropriate dust mask whenever you work with fiber-glass.

34
CHAPTER 3
Rigid foam insulation R-4.0 to R-8.7 perinch
Figure 3-3 - Rigid foam insulation is made fromseveral different types of plastic foam, each with adifferent R-value. The most common application forrigid foam is as exterior insulative wall sheathing.Some rigid foam insulation has the significantadvantage of being resistant to water, and so is thebest insulation for below grade foundation insulation.
Extruded polystyrene: R-5.0 per inchExtruded polystyrene is made by four manufacturers
in the United States, each of which uses a distinctive color:blue, pink, green and yellow. From the user's standpoint,all four are basically the same. Extruded polystyrene is
very resistant to water penetration and is a good materialfor insulating foundations below grade.
Expanded molded bead polystyrene: R-3.5 toR-4.5 per inch
Sometimes referred to as "beadboard", expandedpolystyrene insulation is very similar to the materialused to make common coffee cups -- both are made oftiny beads fused together. The R-value varies withdensity. Expanded polystyrene is resistant to water pen-etration and is suitable for below grade use except in verywet sites.
Polyisocyanurate: R-7.2 to R-8.7 per inchMost commonly sold with a shiny foil facing on one
or both sides, polyisocyanurate or "iso board" has thehighest R-value of any common insulation material.Though somewhat water resistant, iso board is not recom-mended for below-grade application.
Foam and fire - Caution!Almost all the rigid foam insulation boards are
flammable and must be protected by a fire-ratedcovering if installed in the living space or basement.Some building codes also require that rigid foam becovered when installed in crawl spaces.
Foam and the environment - the CFCs andHCFCs
Producing foam insulation requires use of a "blowingagent": a gas that forms the many tiny cavities in the foamand fills them after they are formed. Until recently, manyof the foam products described above were made withchlorofluorocarbon blowing agents (CFCs). In fact, theCFCs helped give them their impressively high R-values.
Because scientists have discovered that CFCs arecausing damage to the Earth's ozone layer, they arebeing phased out of production and are now banned in theUS. Foam manufacturers are working to find alternativeblowing agents for rigid foam insulation. Some manufac-turers have already switched to hydrochlorofluorocarbons(HCFCs). HCFCs also damage the ozone layer, but theybreak down more quickly than CFCs in the atmosphere.

35
CHAPTER 3
As a result, they have only 1/20 the deleterious effect onthe ozone layer that CFCs have.
Because HCFCs still do some damage to the ozonelayer, they are gradually being phased out of productionand will be fully replaced by other blowing agents by 2030.
No foams now on the market (unless they've been ina warehouse for years) contain CFCs. Many containHCFCs, while many others use neither CFCs nor HCFCs.Insulation labels are not required to disclose the blowingagent used in foams. Many manufacturers advertise thattheir foams are "CFC-free", but this is in fact a legalrequirement for all foams. A few manufacturers advertisethat their foams contain neither CFCs nor HCFCs, andthese materials are the best for the environment. Insulat-ing with an HCFC-containing foam, however, is muchbetter for the environment than not insulating at all.
Spray-applied insulation
Figure 3-4 - Several types of insulation can be appliedas a liquid or wet slurry. These "spray-applied"insulation materials are used mostly in newconstruction of walls, but some contractors use them inattics for both new construction and retrofits.
Urethane: R- 6.0 per inchUrethane is a spray-applied foam that is chemically
similar to the material used to make rigid isocyanurate.Like the iso-board, it is made using HCFCs or some othera blowing agents.
In addition to its high R-value, urethane has advan-
tages in its air sealing properties and strength. Whensprayed into a wall or attic, it forms an extremely effectiveair seal and adds rigidity to the structure.
One very effective use of urethane as a retrofitmaterial is to spray a skim coat onto the attic floor,followed by loose-fill fiberglass or cellulose. The urethanewill automatically seal air leakage sites and attic bypasses.
Wet-spray celluloseCellulose insulation can be applied wet using special
equipment that mixes water into the insulation as it isblown out of a hose. Sometimes a small amount ofadhesive is added. When installed in wall cavities, the wetcellulose sticks and forms a monolithic "batt". The sametechnique is sometimes used in attics to reduce dust duringinstallation.
Except for attic application, wet cellulose would notbe useful for retrofit situations unless the home is beingrehabilitated and the interior has been gutted so theexisting wall cavities are exposed.
"Blow-in-Blanket" system - R-3.9 per inch
Figure 3-5 - One unique method for installing eitherloose-fill fiberglass or cellulose in walls is called the"blow-in-blanket" or "BIB" system.
With the BIB system, the insulation is mixed with asmall amount of water and adhesive and is then pumpedinto wall cavities behind a nylon scrim that is stapled to thestud faces. The glue dries to form a lightweight monolithic"batt".

36
CHAPTER 3
Reflective insulation and radiant barriersAnother type of reflective insulation, rarely used in
homes, consists of multiple layers of foil, separated byspacers to create several reflective airspaces. Theseproducts are used mostly in industrial applications.
Figure 3-6 - Reflective insulation works differentlyfrom all the other types of insulation described above.When installed over attic insulation, reflective foil ormetalized plastic products reflect heat away from theattic floor in summer. Referred to as "radiantbarriers", these products will save up to an additional8% on your cooling bill if installed over R-19 atticinsulation. One source of moisture is water vapor inindoor air. Indoor moisture is carried into insulationprimarily by air leakage into walls, ceilings, andfloors. It can also diffuse through some solid surfacessuch as unpainted drywall (see Figure 3-7).
Protecting Your Insulation From MoistureWhenever you install insulation, you should protect it
from all moisture sources. Wet insulation is less effectivethan dry insulation and can also lead to other moistureproblems such as wood rot.
One source of moisture is water vapor in indoor air.Indoor moisture is carried into insulation primarily by airleakage into walls, ceilings, and floors. It can also diffusethrough some solid surfaces such as unpainted drywall(see Figure 3-7).
To protect the insulation against water vapor fromindoors, you should seal all air leakage pathways into wallsor attic before installing the insulation. Proper air sealingshould eliminate most chances of moisture problems.
The second line of defense against indoor moisture is
Both air andwater vapormoleculespass throughgypsumboard
Electricalbox
Gypsum board
Outside
Perforatedradiantbarrier
RafterInsulation
Figure 3-7a
Figure 3-7 - Moisture in indoor air can get into wallcavities either by diffusion through solid wall surfaces(Figure 7a) or by air leakage through electrical outletsand other penetrations (Figure 7b).
Figure 3-7b
Water vapormoleculespass throughgypsum board
Air moleculesstopped bygypsum board
Gypsum board
Outside
to install a "vapor retarder" (sometimes called a "vaporbarrier") on the warm side of the insulation to preventvapor diffusion into the wall cavity or attic. A vapor

37
CHAPTER 3
retarder is any material that is impermeable to watervapor. Suitable vapor retarder materials include polyethyl-ene film, kraft or foil-faced batts, and oil-based paint.
It is usually difficult to install a polyethylene vaporretarder during retrofit work. In attics, it involves remov-ing all existing insulation to get the vapor retarder againstthe attic floor. It is not possible to install polyethylene inclosed-in walls without removing all dry wall or plaster.
Experience has shown that installing insulationwithout a vapor retarder does not usually cause problems.Proper air leakage control should prevent moisture prob-lems in your new insulation. Nonetheless, it is probablygood insurance to add a vapor retarder whenever possible,especially when insulating rooms with high indoor humidity.The most practical vapor retarder for walls is one coat ofoil-based paint or special "vapor retarder" paints which areavailable at most paint stores.
Insulation Techniques and ApplicationsIf your attic has less than R-19 insulation, you will
need to add more. The recommended minimum R-value inVirginia is R-30. If the attic is open, (no floorboards), youhave a choice of either batts, blankets or loose-fill. Ifthere are floorboards, your only alternative is blown-inloose-fill.
General considerations and precautionsAir sealing before insulation
Make sure the attic floor has been properly air sealedbefore installing the insulation. Keep in mind that yourattic will be colder during winter after you insulate it. Anyair leakage up into the cold attic will carry indoor humiditythat could condense and cause moisture problems.
Knob and tubewiring
4" clearance aboverecessedlight fixture
3" clearance around recessedlight fixture
Joist
Figure 3-8 - Knob and tube wiring
See Chapter 2 for how to seal attic bypasses andother air leakage pathways into the attic.
Check for wiring hazardsLook for worn or frayed wiring that should be
replaced before insulating. If you have knob and tubewiring, it must be replaced before insulating since it hasexposed copper conductors.
Check for recessed light fixturesUnless they are specifically rated for insulation
contact (IC rated), you should not install insulation on topof recessed light fixtures. Non-IC-rated fixtures must beprotected from contact with the insulation by a barrier onall sides and must not be covered.
Figure 3-9 - Protected recessed light fixture
Make sure the attic is adequately ventilatedAttic ventilation serves two purposes. It removes
excess heat in summer to prevent overheating, and itremoves moisture in winter. Ventilation is particularlyimportant after you add insulation because the insulationwill make the attic colder in winter and thus more prone tomoisture condensation. If you ventilate your attic withoutair sealing the attic floor, you will increase the potential fora moisture problem.
There are several types of ventilators to suit almostany attic configuration. They can be installed in the soffits,on the gable walls, or on the roof.
As a rule of thumb, you should install roughly onesquare foot of "net free" ventilation area per 300 square

38
CHAPTER 3
3-11a 3-11bFigure 3-11 - Soffit vents must be protected against blockage by attic insulation.
Soffitvent
Loose-fillinsulationAir
flowEavedam
Soffitvent
WithdrawnbattAir
flow
24" 24"
Kraft paperon bottomof batt
InsulationAtticfloor joist
Batts meetover joist
23" 23"
Figure 3-12 - Measure the spacing between your atticfloor joists. It should be either 15" or 23". Whenpurchasing the batts, be sure to get the proper width,made for attic application, not for walls. The properwidth batts should come together above the attic floorjoists. If you are installing the batts over existinginsulation, buy unfaced batts. If there is no insulationin your attic, get kraft-faced batts and install them withthe kraft paper facing down.
feet of attic floor area. (Net free vent area refers to theactual area of open holes in a manufactured vent. It isusually about one-half the total vent hole area.)
Repair any roof leaksLook for signs of roof leaks and repair them before
installing any new insulation. Make sure you don't blockoff soffit vents with insulation
Different types of ventilation: 1) soffit vents; 2) gableend vent; 3) ridge vent; 4) roof vent.
4
3
1
2
Figure 3-10 - Attic ventilators
If your attic has soffit vents, or if you install soffitvents, you should make sure not to cover the vents withinsulation. If you are using loose-fill, install a baffle at theedge of the floor joists (Figure 3-11a). With batts, keepthem back far enough to allow at least a two-inch airspacebetween the batt surface and the underside of the roofsheathing (Figure 3-11b).

39
CHAPTER 3
Figure 3-13 - Batts won't work well unless properlyinstalled. It is very important that the batts arecarefully fitted, as shown, to completely fill joistcavities with no gaps or voids. If even 5% of the spaceis left open, the R-value of the installation will bedegraded by as much as 20%.
Installing batts in atticsAvoid gaps and voids
If using batts, rather than blankets, butt the endstogether. If you are installing two layers, run the top layerperpendicular to the bottom layer. Wherever there areobstructions such as cross bracing or plumbing stacks, cutthe batts to fit around the obstructions.
Installing loose-fill cellulose in atticsLoose fill cellulose is installed by using an insulation
blowing machine. Do-it-yourself machines are usuallyavailable from tool rental agencies or your insulationretailer. Installing loose fill cellulose by hand is not recom-mended. Using the "coverage chart" on the insulation bag,determine the thickness and number of bags required toobtain the desired R-value. For determining the required
thickness, make sure to use the "installed thickness" listedin the coverage chart, not "settled thickness." Celluloseinsulation always settles about 20% after it is installed.
When installing the cellulose, begin at the eaves andwork your way back toward the center, making sure thatthe insulation completely fills all cavities. As you workback, spread the insulation evenly using a rake or othersuitable tool.
It might take a little practice, but check your cover-age as you go to make sure you are installing the propernumber of bags for the area you are insulating. To obtainthe desired R-value, you must install the proper thicknessand the specified number of bags of insulation.
Make sure that you avoid gaps and voids due to
R value@ 75˚ meantemperatures
Minimuminch
Thickness
Bags per1000 Sq. Ft.
MaximumSw. Ft.Per Bag
ExposedFraming
16 in. O.C.
MinimumWt./Sq. Ft.
50 13.2 70.18 1.7514.2514.90
none2 x 6
40 10.5 56.15 1.4117.8118.75
none2 x 6
32 8.4 44.90 1.1222.2723.89
none2 x 6
30 7.9 42.10 1.0623.7525.60
none2 x 6
24 6.3 33.68 .8429.6932.64
none2 x 6
Windowsand Doors
none2 x 6
19 5.0 26.66 .6737.5041.74
none2 x 6
13 3.4 18.24 .4654.8161.00
13 3.6 50 .7240.9734.72
18%none
21 5.6 50 1.1226.3322.32
18%none
28 7.6 50 1.5219.4116.45
18%none
CAVITY FILL
Net Weight 25 lbs.
COVERAGE CHART FOR
XL-100
Figure 3-14 - Typical cellulose bag coverage chart.
40
CHAPTER 3
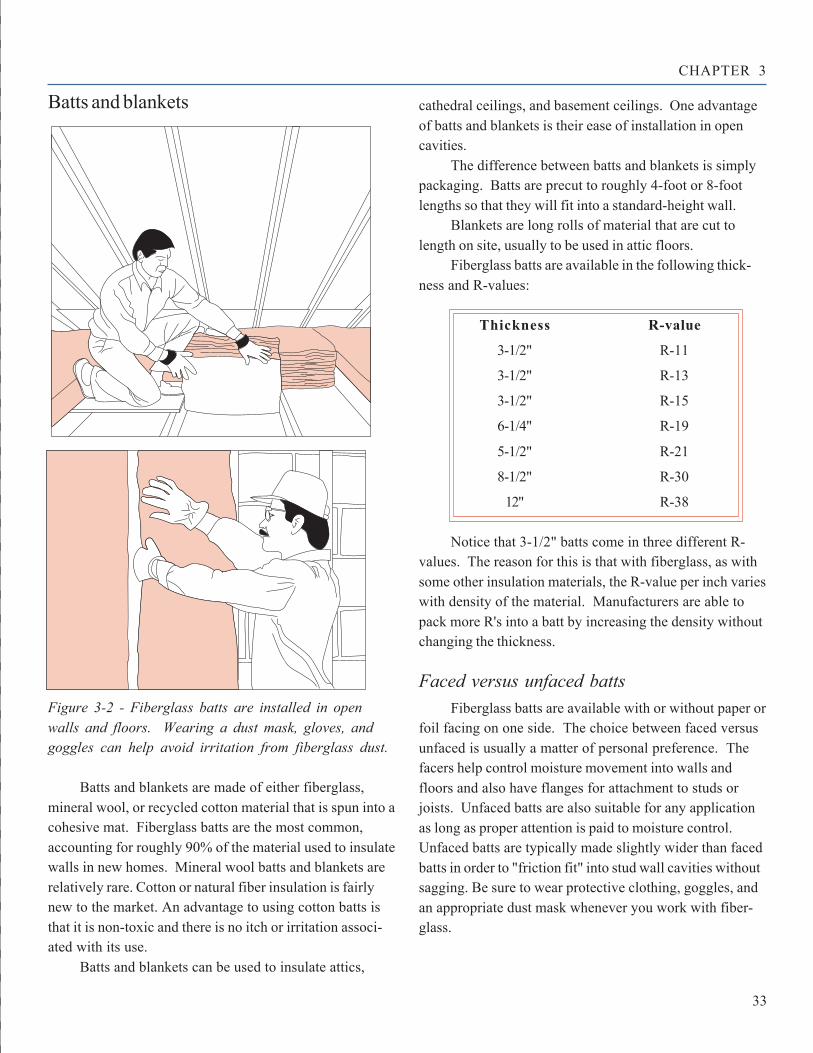
Figure 3-15 - In Cape Cod style homes, where a kneewall separates the second story from an unheated atticspace, install batts in the stud cavities.
uneven or incomplete coverage of the attic area.
Installing loose-fill fiberglass in atticsLoose-fill fiberglass should be installed by a profes-
sional with an insulation blowing machine. As withcellulose, it is necessary to install both the required numberof bags, as indicated on the coverage chart, and theindicated thickness to get the desired R-value.
Insulating cathedral ceilingsThe only practical way to insulate cathedral ceilings
is to blow in cellulose or fiberglass. This is a professionaljob.
The insulation is installed by drilling holes, usuallyfrom the inside, and pumping the insulation into the raftercavities. The job should not be done unless you are sure
that there will be no air leakage up into the ceiling cavity.A good time to do this job is when re-roofing. The
insulation can then be pumped in from the top, avoiding themess indoors.
Insulating knee walls on 1-1/2 story housesUse faced batts to create a vapor retarder and install
the batts with the kraft facing inward, toward the livingspace. Ideally, you should also install insulation in the floorunder the unheated space, but this is a tricky job. It is veryimportant to air seal the area where the floor of the heatedspace interconnects with the opening to the un-heated atticspace. This open area represents a very significantthermal bypass.
Installing basement insulationIf your basement is to be used as conditioned space,
you should insulate the walls. For the Virginia climate,heated basements should have roughly R-10 to R-12basement insulation. Before installing any type of base-ment insulation, be sure to seal any air leakage sites in thewall such as cracks or gaps around pipe penetrations. SeeChapter 2.
Insulate on the outside or inside?Your first decision is whether to insulate the walls on
the inside or the outside.Unless the inside wall surface is already finished or
otherwise difficult to insulate, you are better off insulatingthe inside because exterior insulation requires excavationand is usually more expensive.
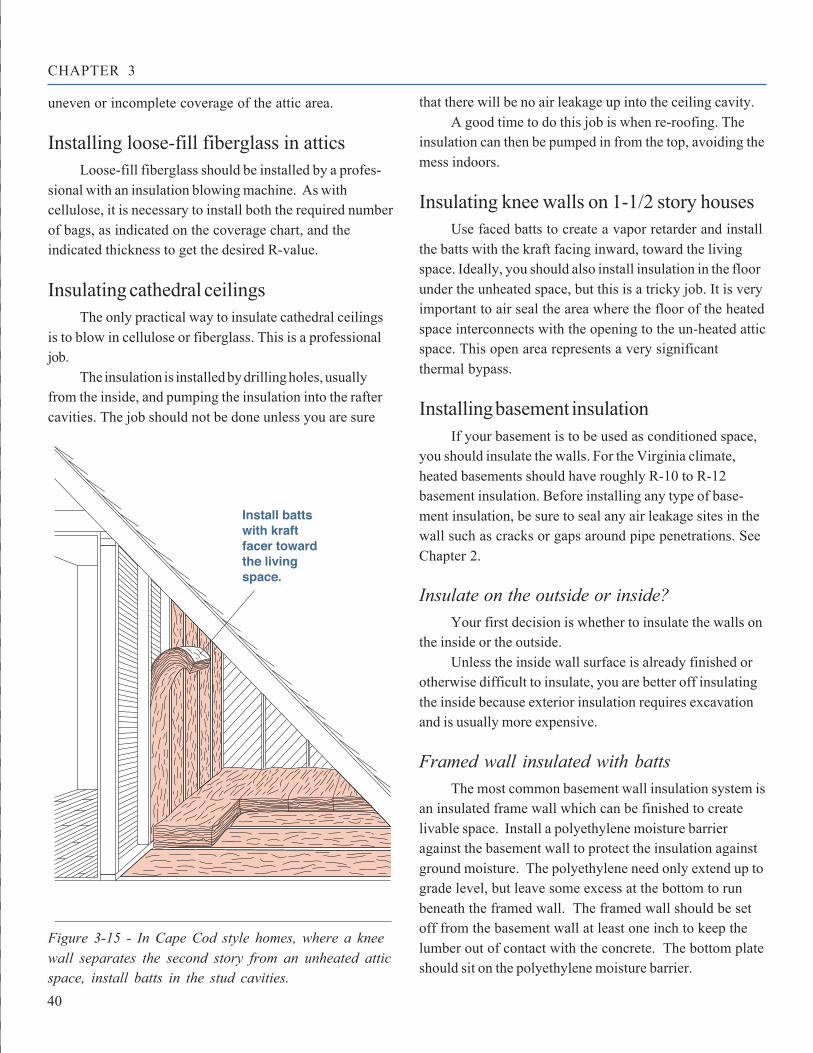
Framed wall insulated with battsThe most common basement wall insulation system is
an insulated frame wall which can be finished to createlivable space. Install a polyethylene moisture barrieragainst the basement wall to protect the insulation againstground moisture. The polyethylene need only extend up tograde level, but leave some excess at the bottom to runbeneath the framed wall. The framed wall should be setoff from the basement wall at least one inch to keep thelumber out of contact with the concrete. The bottom plateshould sit on the polyethylene moisture barrier.
Install battswith kraftfacer towardthe livingspace.
41
CHAPTER 3
Moisturebarrier
New framewall
Insulation
Air andvaporbarrier
Finishing
Furring strips(or 2 x 4's)
Gypsum board or3/8" plywood
Insulation
Excavating
Damp-proofing Insulation
Protectivecoating andflashing
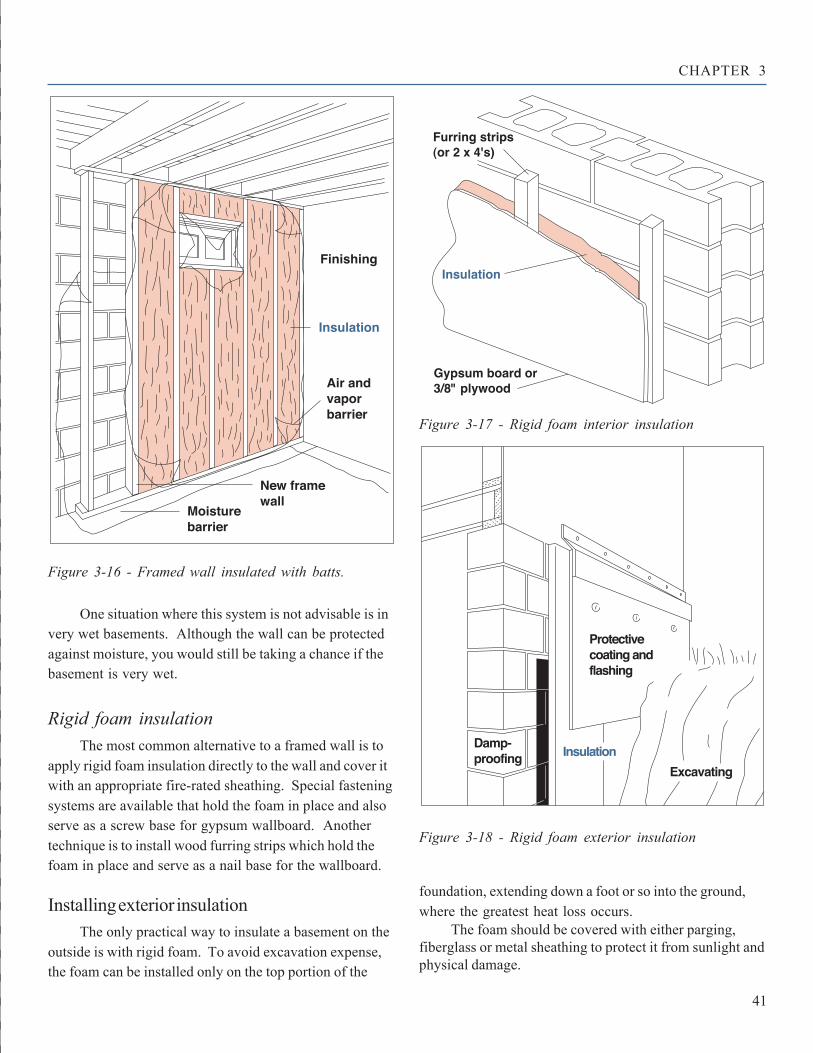
Figure 3-18 - Rigid foam exterior insulation
Figure 3-16 - Framed wall insulated with batts.
Figure 3-17 - Rigid foam interior insulation
One situation where this system is not advisable is invery wet basements. Although the wall can be protectedagainst moisture, you would still be taking a chance if thebasement is very wet.
Rigid foam insulationThe most common alternative to a framed wall is to
apply rigid foam insulation directly to the wall and cover itwith an appropriate fire-rated sheathing. Special fasteningsystems are available that hold the foam in place and alsoserve as a screw base for gypsum wallboard. Anothertechnique is to install wood furring strips which hold thefoam in place and serve as a nail base for the wallboard.
Installing exterior insulationThe only practical way to insulate a basement on the
outside is with rigid foam. To avoid excavation expense,the foam can be installed only on the top portion of the
foundation, extending down a foot or so into the ground,where the greatest heat loss occurs.
The foam should be covered with either parging,fiberglass or metal sheathing to protect it from sunlight andphysical damage.

42
CHAPTER 3
Figure 3-19 - Insulating rim joist area
Figure 19a
Floor joist
1" rigid foambetween floor joist
Foundation wall
Rim joist(shouldbe 2 x 10)
Floor joist
6" thick fiberglass battsbetween floor joist,kraft paper on warm side.
Foundation wall
Rim joist
Basement CeilingInsulation
• Joists are already in
place for receiving batt
insulation
• Batt insulation
on ceiling needs no
protection from
mechanical damage
• Basement ceiling may
be difficult to seal
because of many
penetrations
• Basement ceiling may
be difficult to insuluate
because of many
obstructions
• Basement ceiling area
may be larger than
basement wall area
Basement WallInsulation
• Basement walls easier
to seal than ceiling
• Protects ducts
and pipes in basement
• Insulated walls
prepare the basement
for conversion to living
space
• Batt wall insulation
requires protection
from moisture &
mechanical damage
• Foam wall insulation
requires protection
from fire, requires
excavation
• Required framing or
furring and sheathing
adds to inside insulation
cost
Advantages
Disadvantages
Don’t forget the rim joist areaThe final step when insulating a basement is to install
insulation at the rim joist area. The most effective materialfor this application is rigid foam, caulked at the edgesagainst each floor joist. This is a fairly tedious task andsometimes impractical in older homes. Alternatively, usefaced batts, stapled to the floor joists.
Insulation of unconditioned basementsThere is some disagreement among experts on the
value of insulation in unconditioned (no heat or air condi-tioning) basements. In general, an unconditioned basementwhich is almost entirely below grade does not requireinsulation. If the basement has many walls above grade,however, insulation is probably worthwhile. Insulating anunconditioned basement has two benefits: it reducesenergy transfer to the conditioned rooms above, and itincreases winter comfort (especially in rooms with bare
Table 3-1 - Unconditioned BasementInsulation Options
Vaporbarrier
FlexibleBatt
Stiff wire stays
Floor joist
Figure 3-20 - Installing batts in basement ceiling.

43
CHAPTER 3
Band
Foundationwall
Joist
Insulation
Facing with25 flame spreador less
End wall
Seamscontinuouslytaped or stapledwith 6"maximumspacing
Black 6 milpolyethyleneground cover
6"
3'Insulation mustcover 3' of theadjacent earth, ontop of ground cover.
floors) by making the floors above the basement warmer.If you choose to insulate an unconditioned basement,
you can either insulate the basement walls (to reduce heattransfer between the basement and the outdoors) orinsulate the basement ceiling (to reduce heat transferbetween the basement and the upstairs). Each approachhas advantages and disadvantages, as shown in Table 3-1on page 42.
If you insulate the ceiling, use unfaced batts rated atR-10 or R-12. Push them up snugly between the joists,against the basement ceiling, and secure them in placewith wire stays. Before installing insulation, seal all airleakage points in the basement ceiling (see Chapter 2).
If you insulate the walls, use one of the techniquesshown for conditioned basement spaces.
Crawl space insulationCrawl space insulation can be installed either on the
exterior walls or in the floor above. If your crawl space isnot vented and appears dry, the best alternative is toinsulate the walls, especially if there are ducts or othermechanical equipment located in the space. If the crawlspace is vented, then the only alternative is to insulate thecrawl space ceiling.
In either case, if there is obvious visible wetness inthe space (e.g. wet ground or wet joists), you must curethe moisture problem before installing insulation. Install athick (6 mil) polyethylene moisture barrier on the ground ifthere is not one there already. Lap the seams 12 to 18inches, but don’t bother to seal them. If this doesn’t
Figure 3-21 - The simplest way to insulate the inside surface of a crawl space is to staple faced batts to the rimjoist and run the batts down the wall. Before installing the insulation, attach a polyethylene sheet over the walland down onto the floor to protect the insulation from outdoor moisture.
44
CHAPTER 3
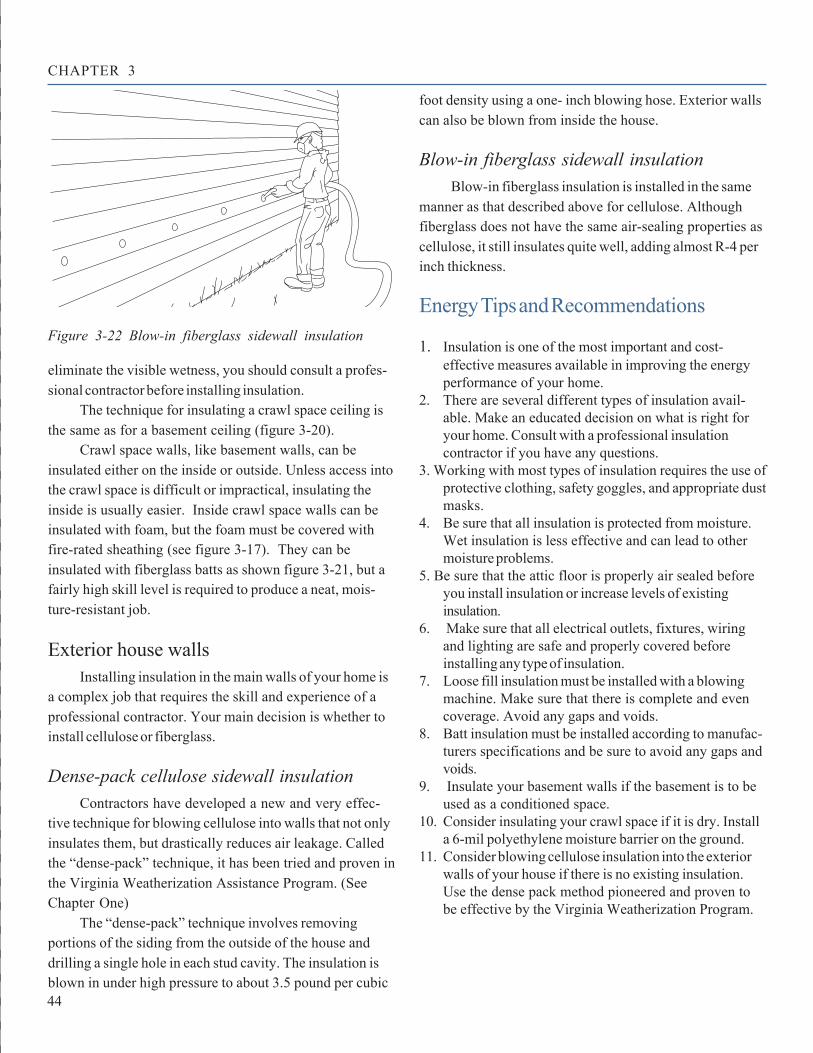
Figure 3-22 Blow-in fiberglass sidewall insulation
eliminate the visible wetness, you should consult a profes-sional contractor before installing insulation.
The technique for insulating a crawl space ceiling isthe same as for a basement ceiling (figure 3-20).
Crawl space walls, like basement walls, can beinsulated either on the inside or outside. Unless access intothe crawl space is difficult or impractical, insulating theinside is usually easier. Inside crawl space walls can beinsulated with foam, but the foam must be covered withfire-rated sheathing (see figure 3-17). They can beinsulated with fiberglass batts as shown figure 3-21, but afairly high skill level is required to produce a neat, mois-ture-resistant job.
Exterior house wallsInstalling insulation in the main walls of your home is
a complex job that requires the skill and experience of aprofessional contractor. Your main decision is whether toinstall cellulose or fiberglass.
Dense-pack cellulose sidewall insulationContractors have developed a new and very effec-
tive technique for blowing cellulose into walls that not onlyinsulates them, but drastically reduces air leakage. Calledthe “dense-pack” technique, it has been tried and proven inthe Virginia Weatherization Assistance Program. (SeeChapter One)
The “dense-pack” technique involves removingportions of the siding from the outside of the house anddrilling a single hole in each stud cavity. The insulation isblown in under high pressure to about 3.5 pound per cubic
foot density using a one- inch blowing hose. Exterior wallscan also be blown from inside the house.
Blow-in fiberglass sidewall insulationBlow-in fiberglass insulation is installed in the same
manner as that described above for cellulose. Althoughfiberglass does not have the same air-sealing properties ascellulose, it still insulates quite well, adding almost R-4 perinch thickness.
Energy Tips and Recommendations
1. Insulation is one of the most important and cost-effective measures available in improving the energyperformance of your home.
2. There are several different types of insulation avail-able. Make an educated decision on what is right foryour home. Consult with a professional insulationcontractor if you have any questions.
3. Working with most types of insulation requires the use ofprotective clothing, safety goggles, and appropriate dustmasks.
4. Be sure that all insulation is protected from moisture.Wet insulation is less effective and can lead to othermoisture problems.
5. Be sure that the attic floor is properly air sealed beforeyou install insulation or increase levels of existinginsulation.
6. Make sure that all electrical outlets, fixtures, wiringand lighting are safe and properly covered beforeinstalling any type of insulation.
7. Loose fill insulation must be installed with a blowingmachine. Make sure that there is complete and evencoverage. Avoid any gaps and voids.
8. Batt insulation must be installed according to manufac-turers specifications and be sure to avoid any gaps andvoids.
9. Insulate your basement walls if the basement is to beused as a conditioned space.
10. Consider insulating your crawl space if it is dry. Installa 6-mil polyethylene moisture barrier on the ground.
11. Consider blowing cellulose insulation into the exteriorwalls of your house if there is no existing insulation.Use the dense pack method pioneered and proven tobe effective by the Virginia Weatherization Program.