Embed Size (px)
Citation preview
audionet
CARMA 4The CARMA 4 user's manual
will be available soon
Computer Aided RooM Analyser
For PC and MAC
Version 3.0
User's Manual

3
Contents
1 Preface .............................................................................................4 1.1 What is CARMA, and who is Audionet? ......................................4 1.2 Characteristics................................................................................5
2 Installation / System requirements ...............................................6 2.1 System requirements......................................................................6 2.2 Installation on a Microsoft Windows PC ......................................6 2.3 Installation on a Mac .....................................................................7
3 Hardware setup ..............................................................................8 3.1 Setting up the sound card (Windows)............................................8 3.2 Setting up the sound card (OS X) ................................................10 3.3 Setting up the components...........................................................11 3.4 Setting up the microphone ...........................................................13
4 Quick start guide ..........................................................................15
5 Basic settings .................................................................................20 5.1 Operational mode.........................................................................20
6 Graphical representation.............................................................21 6.1 Working instructions ...................................................................21 6.2 Frequency domain .......................................................................22 6.3 OpWin (Operational Window) ....................................................24
7 Tools...............................................................................................26 7.1 Equalizer ......................................................................................26 7.2 Equalizer info...............................................................................27 7.3 Microphone correction.................................................................28 7.4 Overplot .......................................................................................29

4
1 Preface
1.1 What is CARMA, and who is Audionet? Audionet is one of the leading manufacturers of high end products – aimed at the connoisseurs of world class audio and video reproduction. Long-time experience of developing "state of the art"-components have led to the development of CARMA, an instrument to analyse the acous-tics of your room. With the Computer Aided RooM Analyser you can measure and analyse the acoustics of a room and find out how to improve the sound reproduction. With the help of parametric equalizers you are able reduce the harmful room influences by setting up to 5 equalizers in a graphic environment. Adequate equalizers are embedded in all Audionet multi-channel pream-plifiers like MAP V2 or MAP 1. The concept to separate the software that calculates the room-correction from the preamplifier has a simple cause: conventional home entertainment systems manipulate with their automatic room correction the frequency response curve without consid-ering individual sound preferences or a particular and most often wel-come "sound" of the loudspeakers. CARMA on the other hand offers more accurate and personal sound im-provements to the user – the result is a further improved sound experi-ence in home cinemas and classical stereo set-ups. Even if you don’t own an Audionet system until now you can benefit from Audionet CARMA. You can check the frequency response of your room and audio components and visualize them. You can get more information on Audionet at Hwww.audionet.de or via: IDEKTRON GmbH & Co KG Herner Str. 299 44809 Bochum Germany Tel.: +49 (0) 234 / 50 72 70 We will be pleased to send you further information about our products and our company. Enjoy Audionet CARMA! Your Audionet Team
Important Audionet CARMA is freeware and as such it is literally a gift. Therefore we can’t give any individual support or any legal liability.
5
1.2 Characteristics The AUDIONET CARMA is an analyser software for room acoustics and loudspeakers. It calculates the impulse response and the correspond-ing amplitude response based from a logarithmic sinusoid stimulus sig-nal. Goal: Identifying and correcting room and speaker characteristics in the frequency and time domain. Audionet CARMA Characteristics: • Intuitive and easy operation • Mono-, stereo-, multi-channel (up to 7.1) and separate subwoofer
measurements • Averaging of up to 30 measurements (internal signal generation only) • Amplitude response plot of measured objects • Amplitude response plot of several basic minimum phase equalizers
(notch/peak, high / low shelf, high / low pass filters of 1st and 2nd or-der)
• Amplitude response plot of complete setup (incl. measured object, room acoustics and all used filters)
• Cumulative spectral decay plot of room and speaker setup (aka water-fall diagram)
• Visualisation of the summed up bass-signal of all loudspeakers • Virtual adjustment of the subwoofer distance • Impulse response plot h(t) in the time domain • Plot of logarithmic absolute value of the impulse response h(t) • Calculation of the step response sigma(t) • Visualisation of the energy time curve (ETC) and the Schroeder inte-
gral • Listed view of acoustic parameters (EDT, T10, T20, T30, TS, C50,
C80, D50) • Zoomable and scalable in time and frequency for precise view of
measurements • 4 overplots for overlays of curves (to compare different measurements) • Save and load function for measurements, overplots and equalizer set-
tings • Export and print functions for measurement plots • Export of equalizer settings to text file • Option to correct microphone characteristics
6
2 Installation / System requirements
2.1 System requirements • Java Runtime Environment Version SE 5.0 or higher • PC: Windows 98/2000/2003/XP/Vista with WDM compatible full-
duplex soundcard • Mac OS X Version 10.3.4 or higher • Microphone • External microphone preamplifier (recommended) Audionet CARMA is written in JAVA. Therefore it requires the "JAVA Runtime Environment" (JRE). If JRE is not already installed on your PC or MAC please install it from the Audionet CARMA CD or download the latest version free of charges from Hhttp://www.java.com/
Important Audionet CARMA V3.0 requires JRE-Version SE 5.0 or higher.
2.2 Installation on a Microsoft Windows PC To install Audionet CARMA please unpack "Audio-net_CARMA_V3.zip" at the desired location of your Computer. Once you have unpacked the file you don’t need further installation routines – just start the program by opening the file "CARMA.exe" that is located in the directory "Audionet CARMA V3.0". If no current Java Version is installed, an automatic download page will open in the standard internet browser. In that case, please follow the instructions of the installation routine. After the installation you can run Audionet CARMA.
Important Although it is possible to start CARMA by double-clicking the file "CARMA.jar", we strongly recommend that you only use the ".exe" file as described above in order to ensure a correct execution of CARMA.
7
2.3 Installation on a Mac Before installing Audionet CARMA, please verify that JRE-Version SE 5.0 or higher is installed. If you use an older version you can use the AutoUpdate function or download the latest version from Hhttp://www.apple.com/support/. Unpack and store "Audionet_CARMA_V3.zip" on your local hard disc. Open the directory "Audionet CARMA V3.0" and choose the file "CARMA.jar". Now press the "Apple" key and "L" at the same time. You have created now a link (alias) that you can place on the desktop. By double-clicking on the alias you can start CARMA directly.
8
3 Hardware setup Before starting Audionet CARMA, please configure your sound card and check all connections from your microphone to your computer and to the Audionet MAP V2 (or other preamplifier).
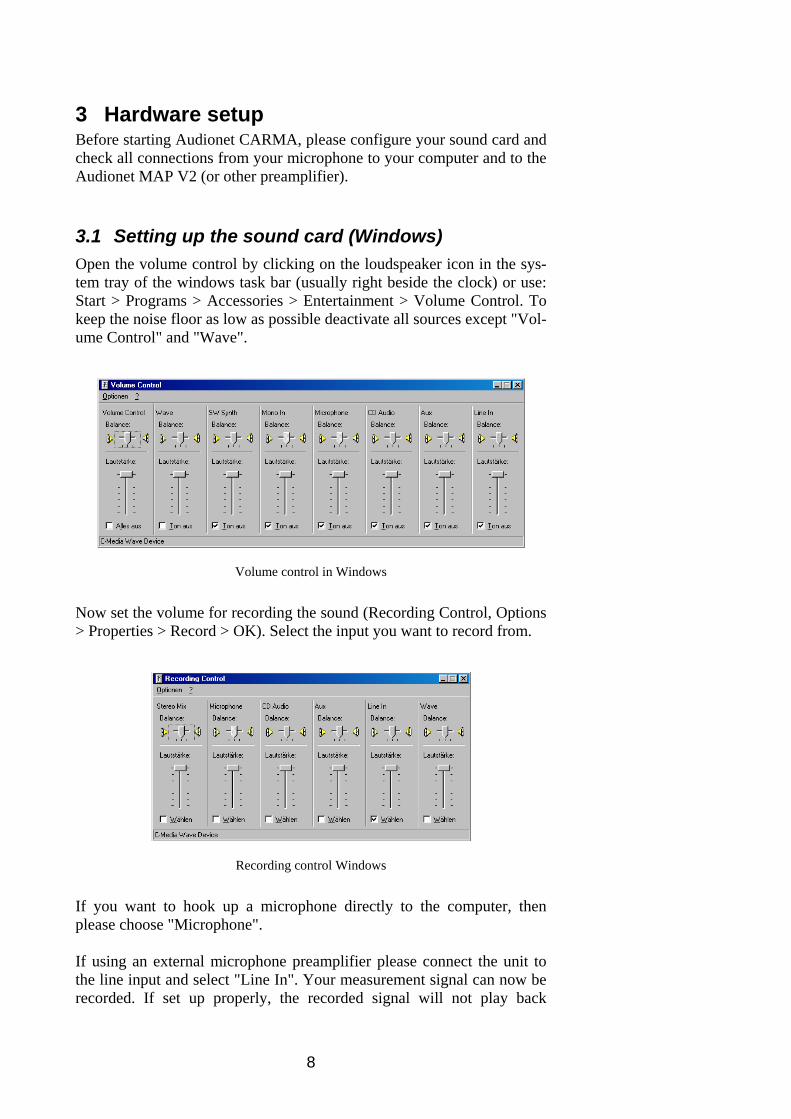
3.1 Setting up the sound card (Windows) Open the volume control by clicking on the loudspeaker icon in the sys-tem tray of the windows task bar (usually right beside the clock) or use: Start > Programs > Accessories > Entertainment > Volume Control. To keep the noise floor as low as possible deactivate all sources except "Vol-ume Control" and "Wave".
Volume control in Windows
Now set the volume for recording the sound (Recording Control, Options > Properties > Record > OK). Select the input you want to record from.
Recording control Windows
If you want to hook up a microphone directly to the computer, then please choose "Microphone". If using an external microphone preamplifier please connect the unit to the line input and select "Line In". Your measurement signal can now be recorded. If set up properly, the recorded signal will not play back

9
through the PC speakers and therefore not causing any feedback effects while recording.
Important You can only use the internal signal generation of Audionet CARMA, if the sound card is full-duplex capable (record and playback at the same time). With some sound cards the Play Control window is slightly different ar-ranged than in the picture below. If you use the line input for recording then, the line-in needs to stay enabled.
Play control Windows
Afterwards the Recording Control has to be setup. Please choose "Ana-log Mix" as source of the recording.
Recording control Windows
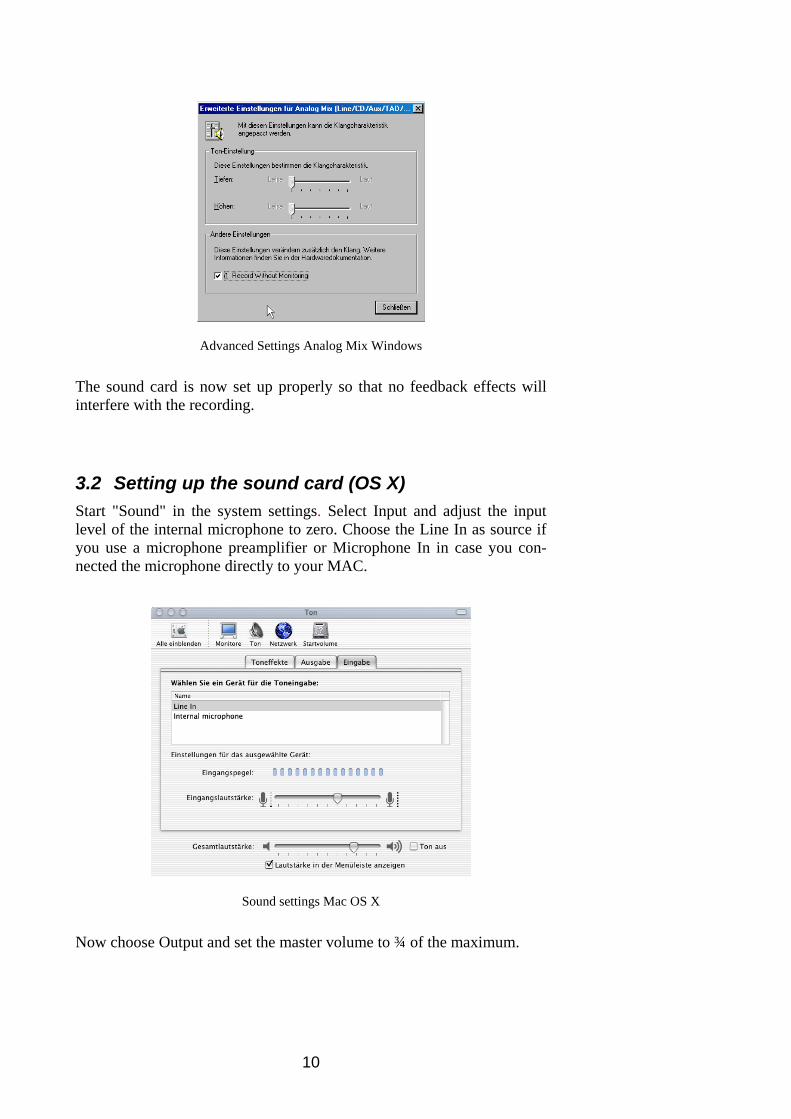
Subsequently press the "Advanced" button and choose "Record With-out Monitoring".
10
Advanced Settings Analog Mix Windows
The sound card is now set up properly so that no feedback effects will interfere with the recording.
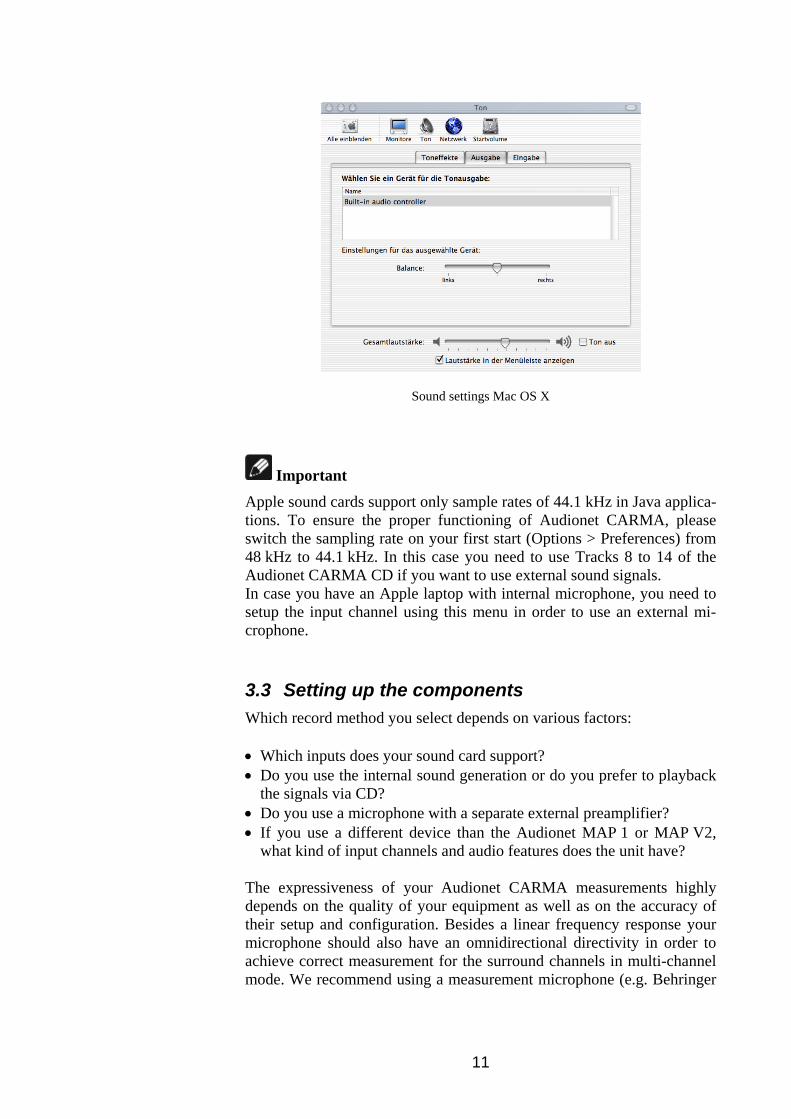
3.2 Setting up the sound card (OS X) Start "Sound" in the system settings. Select Input and adjust the input level of the internal microphone to zero. Choose the Line In as source if you use a microphone preamplifier or Microphone In in case you con-nected the microphone directly to your MAC.
Sound settings Mac OS X
Now choose Output and set the master volume to ¾ of the maximum.
11
Sound settings Mac OS X
Important Apple sound cards support only sample rates of 44.1 kHz in Java applica-tions. To ensure the proper functioning of Audionet CARMA, please switch the sampling rate on your first start (Options > Preferences) from 48 kHz to 44.1 kHz. In this case you need to use Tracks 8 to 14 of the Audionet CARMA CD if you want to use external sound signals. In case you have an Apple laptop with internal microphone, you need to setup the input channel using this menu in order to use an external mi-crophone.
3.3 Setting up the components Which record method you select depends on various factors: • Which inputs does your sound card support? • Do you use the internal sound generation or do you prefer to playback
the signals via CD? • Do you use a microphone with a separate external preamplifier? • If you use a different device than the Audionet MAP 1 or MAP V2,
what kind of input channels and audio features does the unit have? The expressiveness of your Audionet CARMA measurements highly depends on the quality of your equipment as well as on the accuracy of their setup and configuration. Besides a linear frequency response your microphone should also have an omnidirectional directivity in order to achieve correct measurement for the surround channels in multi-channel mode. We recommend using a measurement microphone (e.g. Behringer
12
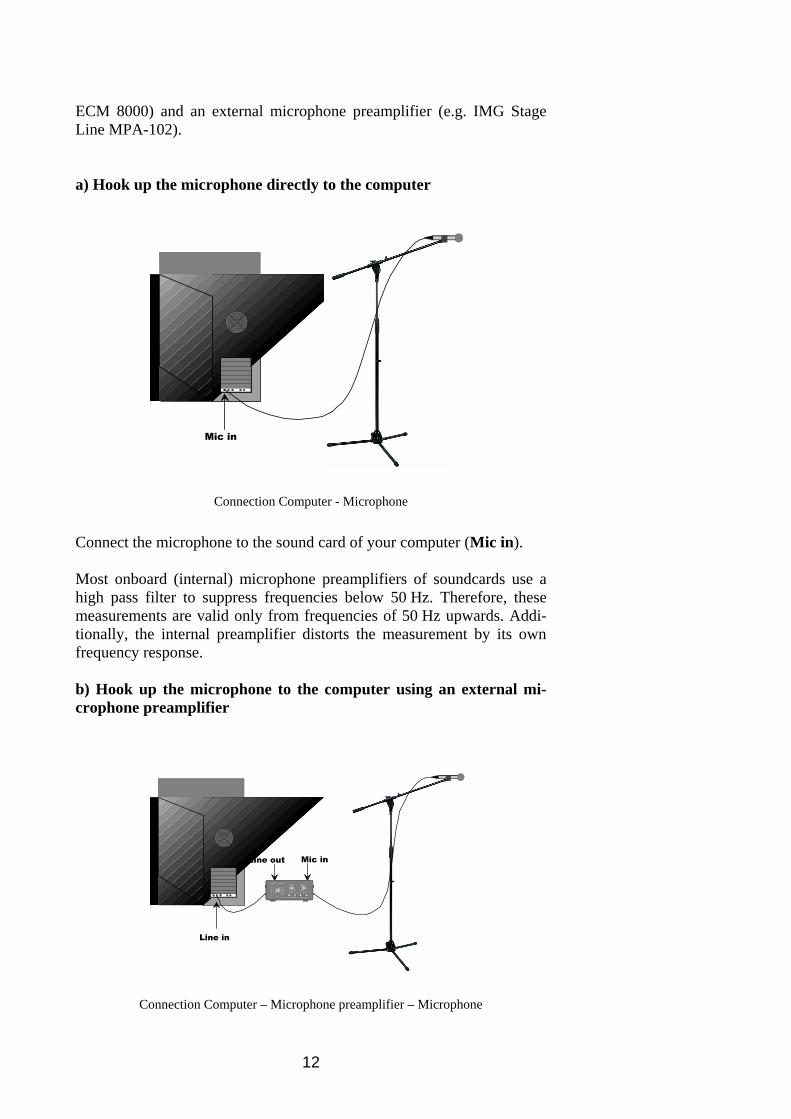
ECM 8000) and an external microphone preamplifier (e.g. IMG Stage Line MPA-102). a) Hook up the microphone directly to the computer
Mic in
Connection Computer - Microphone
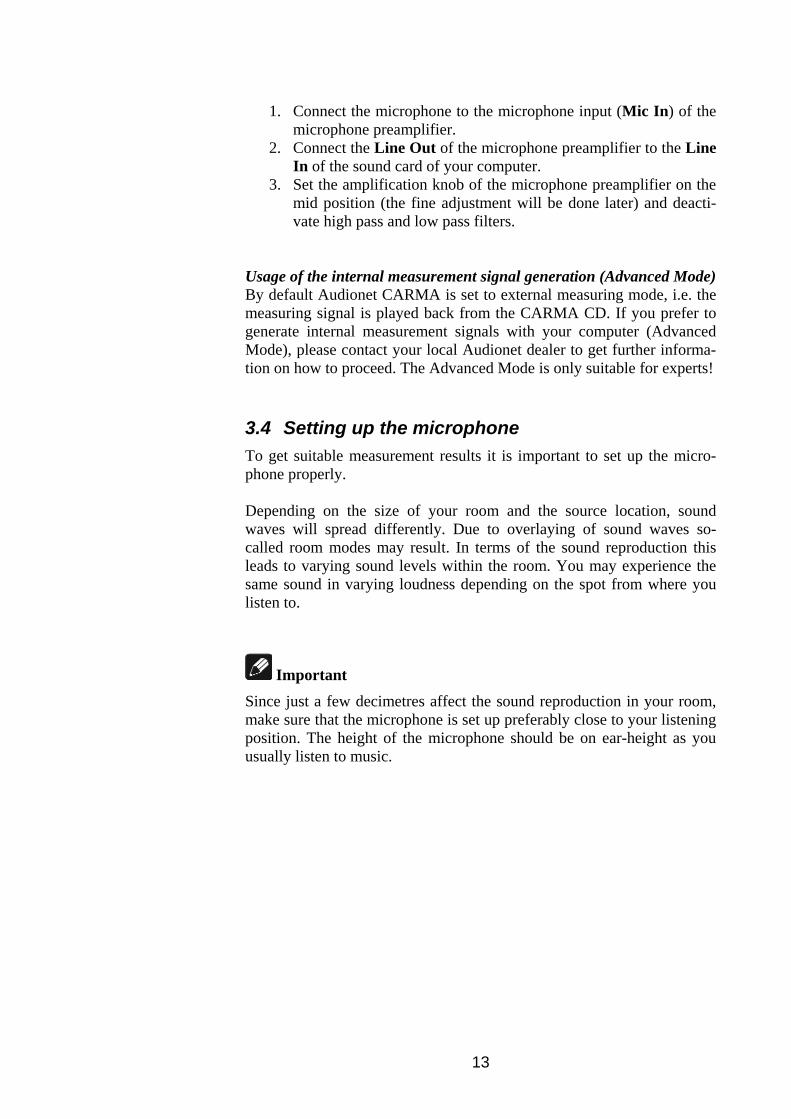
Connect the microphone to the sound card of your computer (Mic in). Most onboard (internal) microphone preamplifiers of soundcards use a high pass filter to suppress frequencies below 50 Hz. Therefore, these measurements are valid only from frequencies of 50 Hz upwards. Addi-tionally, the internal preamplifier distorts the measurement by its own frequency response. b) Hook up the microphone to the computer using an external mi-crophone preamplifier
Line in
Mic inLine out
Connection Computer – Microphone preamplifier – Microphone
13
1. Connect the microphone to the microphone input (Mic In) of the microphone preamplifier.
2. Connect the Line Out of the microphone preamplifier to the Line In of the sound card of your computer.
3. Set the amplification knob of the microphone preamplifier on the mid position (the fine adjustment will be done later) and deacti-vate high pass and low pass filters.
Usage of the internal measurement signal generation (Advanced Mode) By default Audionet CARMA is set to external measuring mode, i.e. the measuring signal is played back from the CARMA CD. If you prefer to generate internal measurement signals with your computer (Advanced Mode), please contact your local Audionet dealer to get further informa-tion on how to proceed. The Advanced Mode is only suitable for experts!
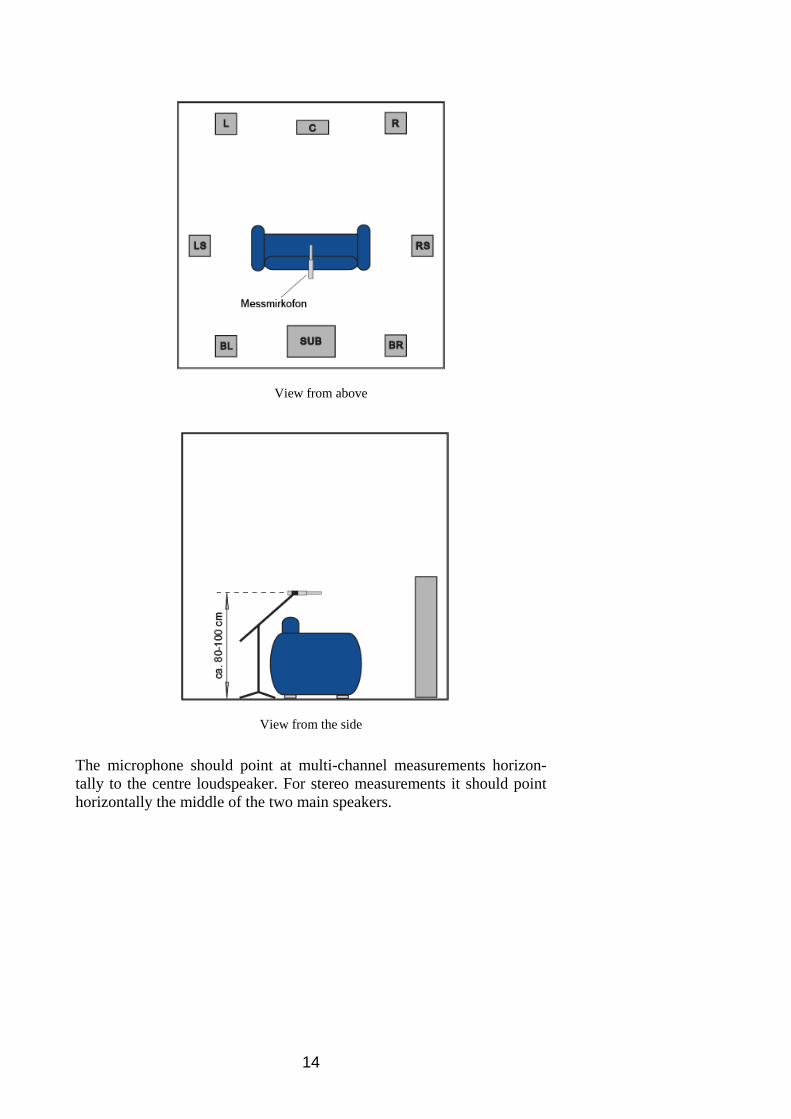
3.4 Setting up the microphone To get suitable measurement results it is important to set up the micro-phone properly. Depending on the size of your room and the source location, sound waves will spread differently. Due to overlaying of sound waves so-called room modes may result. In terms of the sound reproduction this leads to varying sound levels within the room. You may experience the same sound in varying loudness depending on the spot from where you listen to.
Important Since just a few decimetres affect the sound reproduction in your room, make sure that the microphone is set up preferably close to your listening position. The height of the microphone should be on ear-height as you usually listen to music.
14
View from above
View from the side
The microphone should point at multi-channel measurements horizon-tally to the centre loudspeaker. For stereo measurements it should point horizontally the middle of the two main speakers.
15
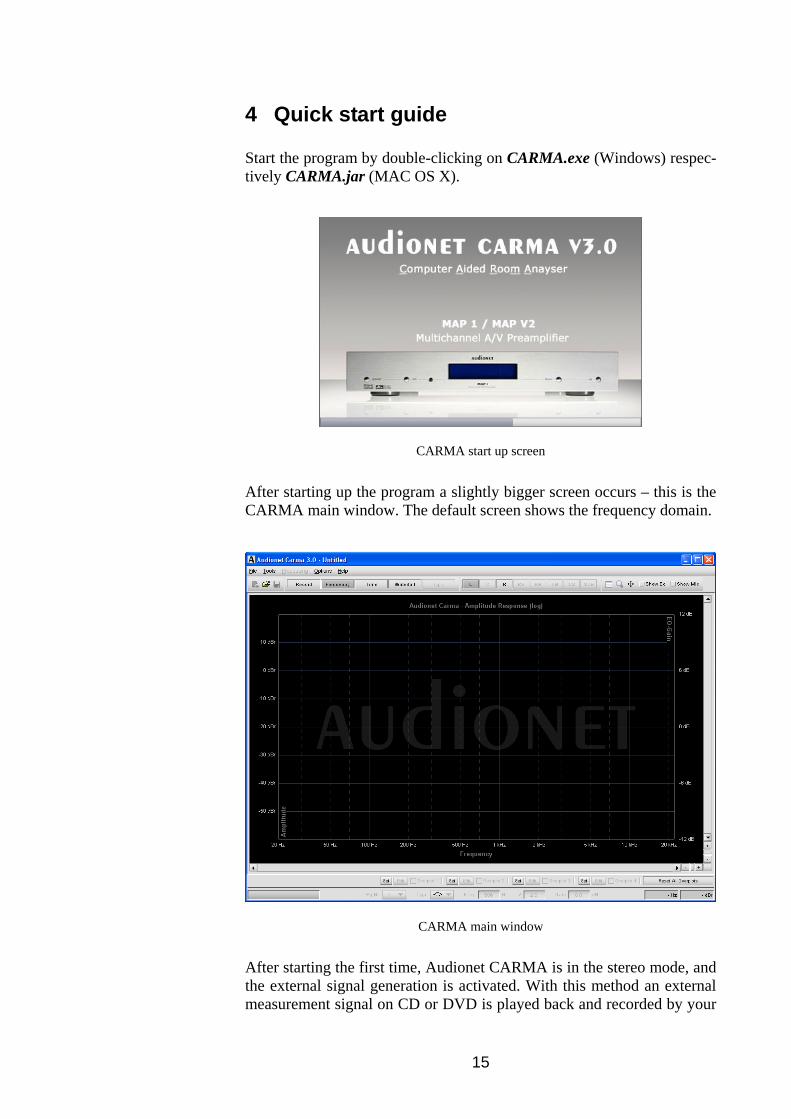
4 Quick start guide Start the program by double-clicking on CARMA.exe (Windows) respec-tively CARMA.jar (MAC OS X).
CARMA start up screen
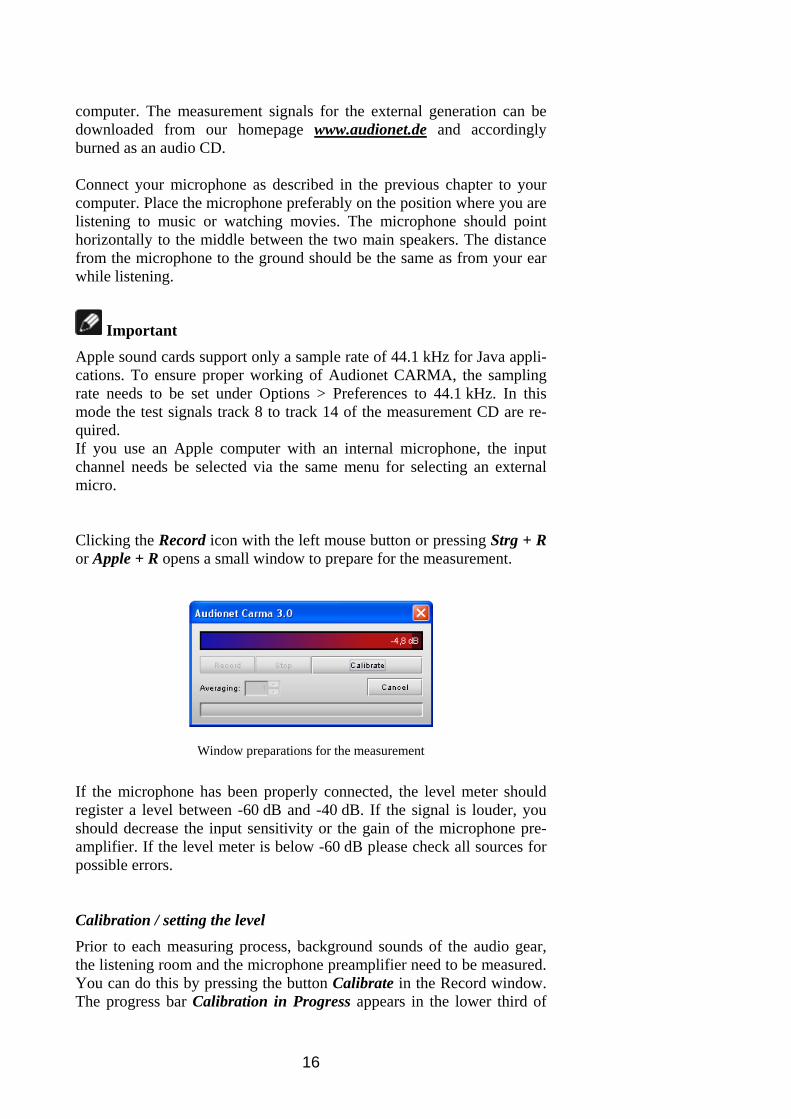
After starting up the program a slightly bigger screen occurs – this is the CARMA main window. The default screen shows the frequency domain.
CARMA main window
After starting the first time, Audionet CARMA is in the stereo mode, and the external signal generation is activated. With this method an external measurement signal on CD or DVD is played back and recorded by your
16
computer. The measurement signals for the external generation can be downloaded from our homepage www.audionet.de and accordingly burned as an audio CD. Connect your microphone as described in the previous chapter to your computer. Place the microphone preferably on the position where you are listening to music or watching movies. The microphone should point horizontally to the middle between the two main speakers. The distance from the microphone to the ground should be the same as from your ear while listening.
Important Apple sound cards support only a sample rate of 44.1 kHz for Java appli-cations. To ensure proper working of Audionet CARMA, the sampling rate needs to be set under Options > Preferences to 44.1 kHz. In this mode the test signals track 8 to track 14 of the measurement CD are re-quired. If you use an Apple computer with an internal microphone, the input channel needs be selected via the same menu for selecting an external micro. Clicking the Record icon with the left mouse button or pressing Strg + R or Apple + R opens a small window to prepare for the measurement.
Window preparations for the measurement
If the microphone has been properly connected, the level meter should register a level between -60 dB and -40 dB. If the signal is louder, you should decrease the input sensitivity or the gain of the microphone pre-amplifier. If the level meter is below -60 dB please check all sources for possible errors. Calibration / setting the level Prior to each measuring process, background sounds of the audio gear, the listening room and the microphone preamplifier need to be measured. You can do this by pressing the button Calibrate in the Record window. The progress bar Calibration in Progress appears in the lower third of
17
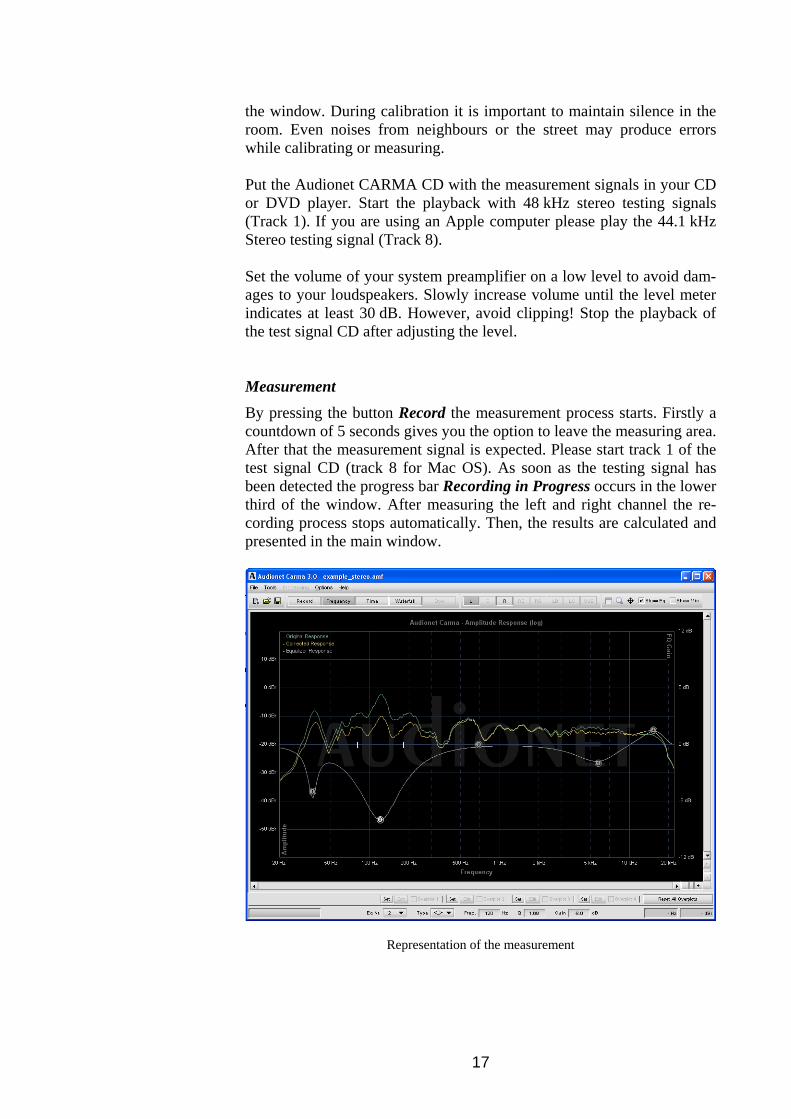
the window. During calibration it is important to maintain silence in the room. Even noises from neighbours or the street may produce errors while calibrating or measuring. Put the Audionet CARMA CD with the measurement signals in your CD or DVD player. Start the playback with 48 kHz stereo testing signals (Track 1). If you are using an Apple computer please play the 44.1 kHz Stereo testing signal (Track 8). Set the volume of your system preamplifier on a low level to avoid dam-ages to your loudspeakers. Slowly increase volume until the level meter indicates at least 30 dB. However, avoid clipping! Stop the playback of the test signal CD after adjusting the level. Measurement By pressing the button Record the measurement process starts. Firstly a countdown of 5 seconds gives you the option to leave the measuring area. After that the measurement signal is expected. Please start track 1 of the test signal CD (track 8 for Mac OS). As soon as the testing signal has been detected the progress bar Recording in Progress occurs in the lower third of the window. After measuring the left and right channel the re-cording process stops automatically. Then, the results are calculated and presented in the main window.
Representation of the measurement
18
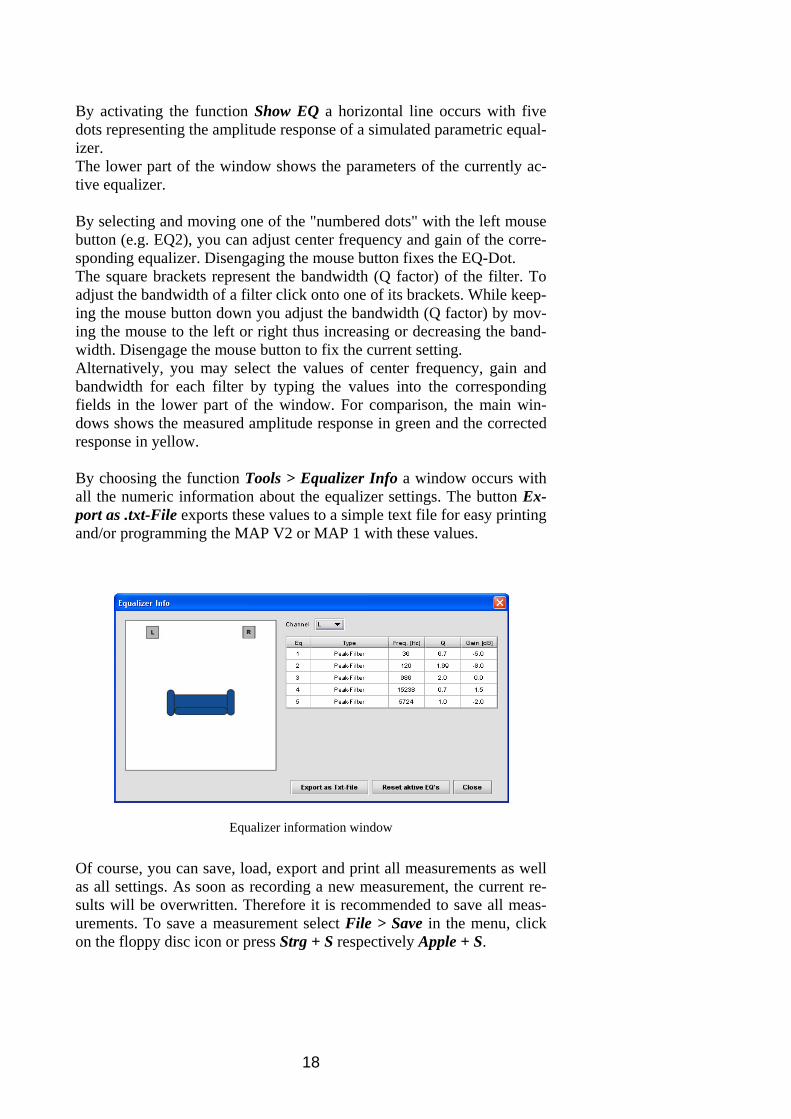
By activating the function Show EQ a horizontal line occurs with five dots representing the amplitude response of a simulated parametric equal-izer. The lower part of the window shows the parameters of the currently ac-tive equalizer. By selecting and moving one of the "numbered dots" with the left mouse button (e.g. EQ2), you can adjust center frequency and gain of the corre-sponding equalizer. Disengaging the mouse button fixes the EQ-Dot. The square brackets represent the bandwidth (Q factor) of the filter. To adjust the bandwidth of a filter click onto one of its brackets. While keep-ing the mouse button down you adjust the bandwidth (Q factor) by mov-ing the mouse to the left or right thus increasing or decreasing the band-width. Disengage the mouse button to fix the current setting. Alternatively, you may select the values of center frequency, gain and bandwidth for each filter by typing the values into the corresponding fields in the lower part of the window. For comparison, the main win-dows shows the measured amplitude response in green and the corrected response in yellow. By choosing the function Tools > Equalizer Info a window occurs with all the numeric information about the equalizer settings. The button Ex-port as .txt-File exports these values to a simple text file for easy printing and/or programming the MAP V2 or MAP 1 with these values.
Equalizer information window
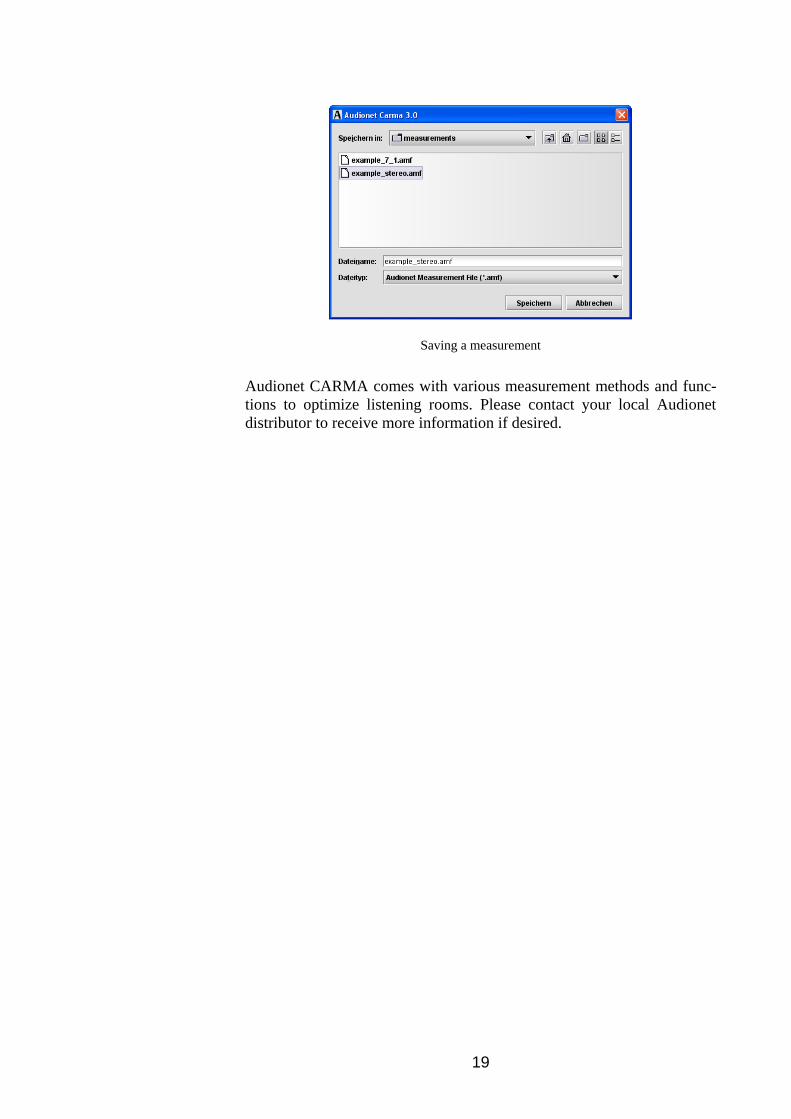
Of course, you can save, load, export and print all measurements as well as all settings. As soon as recording a new measurement, the current re-sults will be overwritten. Therefore it is recommended to save all meas-urements. To save a measurement select File > Save in the menu, click on the floppy disc icon or press Strg + S respectively Apple + S.
19
Saving a measurement
Audionet CARMA comes with various measurement methods and func-tions to optimize listening rooms. Please contact your local Audionet distributor to receive more information if desired.
20
5 Basic settings
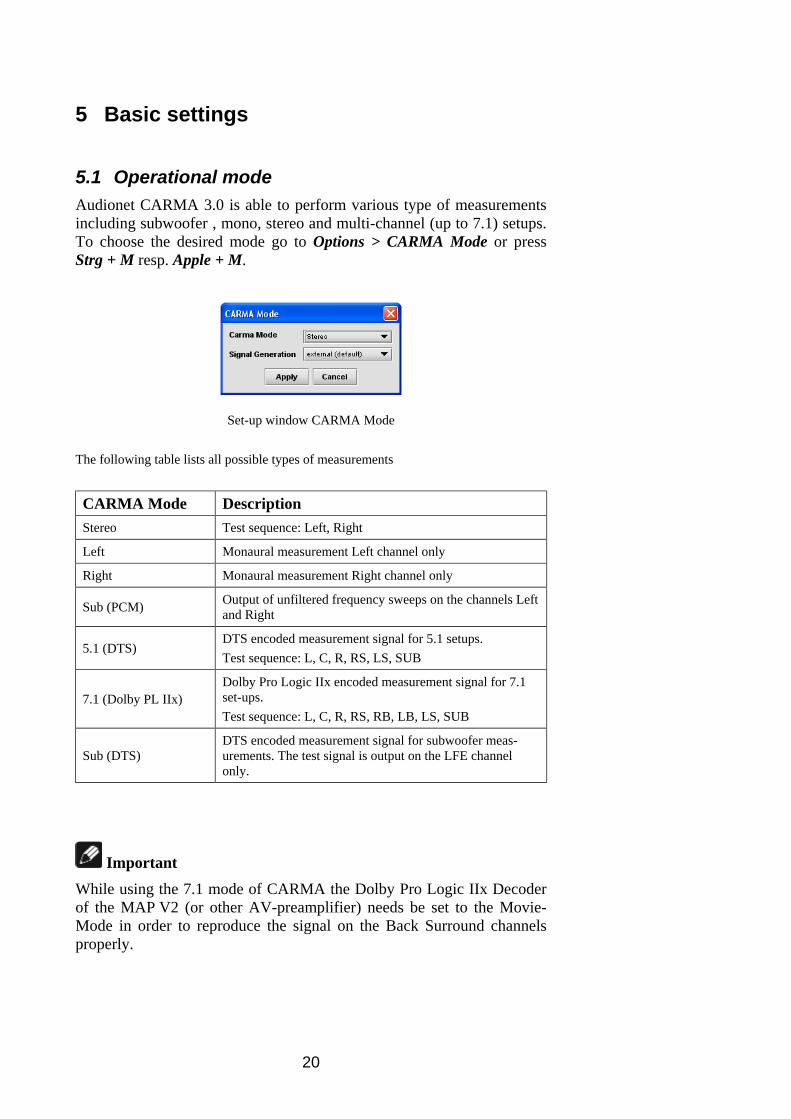
5.1 Operational mode Audionet CARMA 3.0 is able to perform various type of measurements including subwoofer , mono, stereo and multi-channel (up to 7.1) setups. To choose the desired mode go to Options > CARMA Mode or press Strg + M resp. Apple + M.
Set-up window CARMA Mode
The following table lists all possible types of measurements
CARMA Mode Description Stereo Test sequence: Left, Right
Left Monaural measurement Left channel only
Right Monaural measurement Right channel only
Sub (PCM) Output of unfiltered frequency sweeps on the channels Left and Right
5.1 (DTS) DTS encoded measurement signal for 5.1 setups. Test sequence: L, C, R, RS, LS, SUB
7.1 (Dolby PL IIx) Dolby Pro Logic IIx encoded measurement signal for 7.1 set-ups. Test sequence: L, C, R, RS, RB, LB, LS, SUB
Sub (DTS) DTS encoded measurement signal for subwoofer meas-urements. The test signal is output on the LFE channel only.
Important While using the 7.1 mode of CARMA the Dolby Pro Logic IIx Decoder of the MAP V2 (or other AV-preamplifier) needs be set to the Movie-Mode in order to reproduce the signal on the Back Surround channels properly.
21
6 Graphical representation
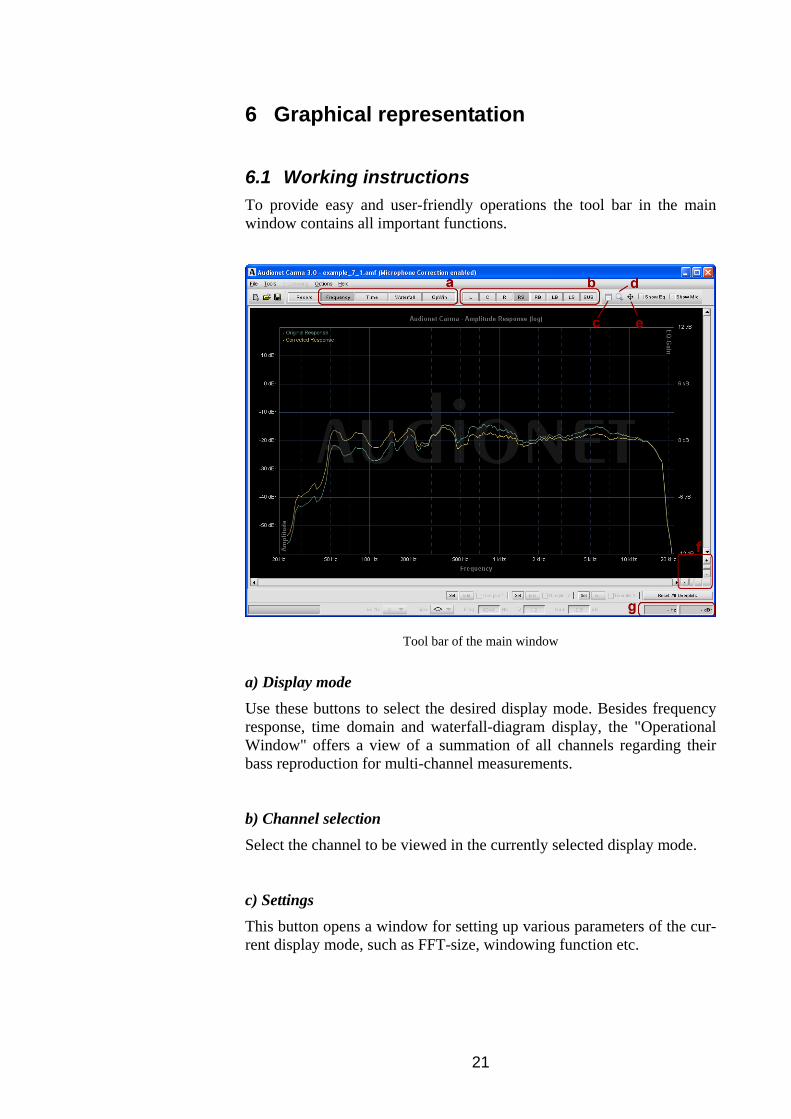
6.1 Working instructions To provide easy and user-friendly operations the tool bar in the main window contains all important functions.
Tool bar of the main window
a) Display mode Use these buttons to select the desired display mode. Besides frequency response, time domain and waterfall-diagram display, the "Operational Window" offers a view of a summation of all channels regarding their bass reproduction for multi-channel measurements. b) Channel selection Select the channel to be viewed in the currently selected display mode. c) Settings This button opens a window for setting up various parameters of the cur-rent display mode, such as FFT-size, windowing function etc.

22
d) Zoom mode Click the magnifier icon or select Zoom from the right mouse button context menu. The mouse pointer changes to a magnifier. Now select the area you would like to zoom into. Press the left mouse button to select the first edge of the selection area. Then hold mouse button down and drag mouse to define the area you want to zoom into. Disengage mouse button, and CARMA change the view to the previously selected area. Press the ESC key to leave zoom selection mode without performing a zoom. e) Zoom out Click this button to reset any zoom settings and zoom out to full view of the current display mode. f) Horizontal / vertical zoom Use the + and – icons to enlarge or reduce the view in horizontal or verti-cal direction. Click on the button between the + and – icons to quickly enlarge or reduce the view while moving the mouse with the left button held down. If the view is enlarged, use the grey scroll bars to scroll the view in horizontal or vertical direction. g) Display of coordinates Depending on the selected display mode, the values of the current mouse position on the x- and y-axes are presented with the according unit.
Important If the zoom is engaged, click and hold down the left mouse button to move the current view with your mouse.
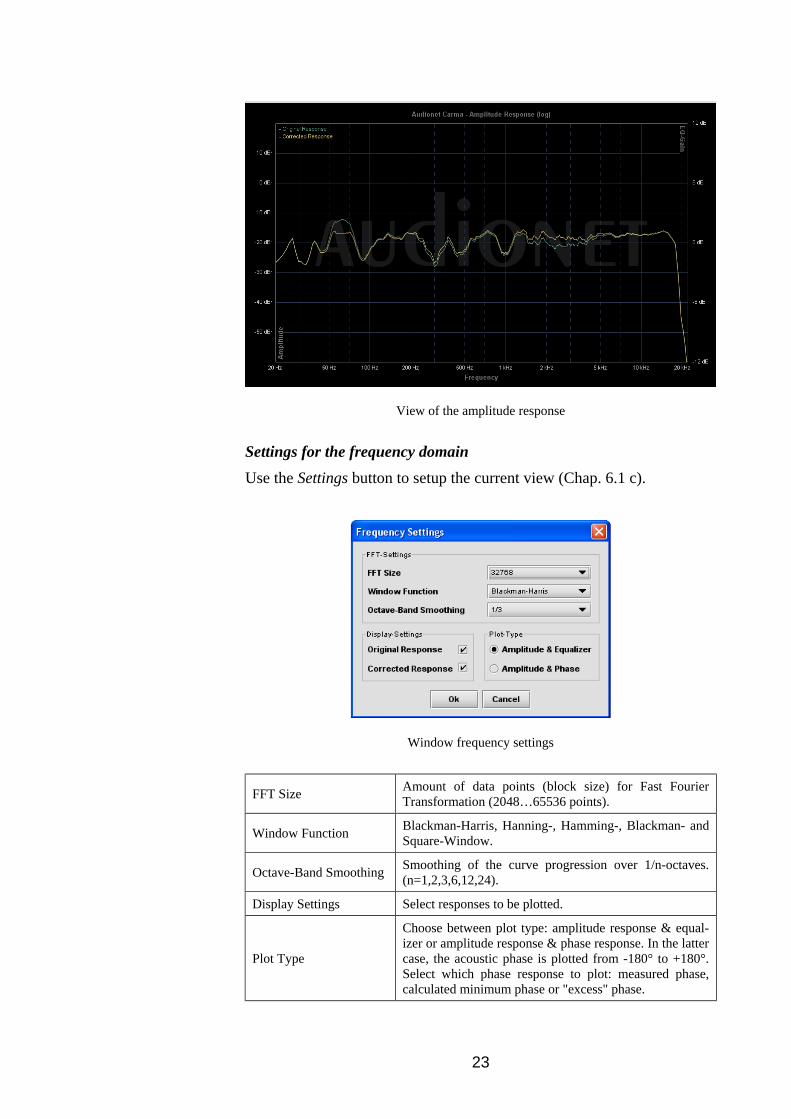
6.2 Frequency domain For example, load the CARMA measurement file example_7_1.amf. The amplitude response of the measurement appears on the screen. The main window shows the logarithmic absolute value of the amplitude response in decibels (dBr). This is a standardized and most common view. The green line represents the current measurement, and the yellow line shows the amplitude response corrected by the equalizer.
23
View of the amplitude response
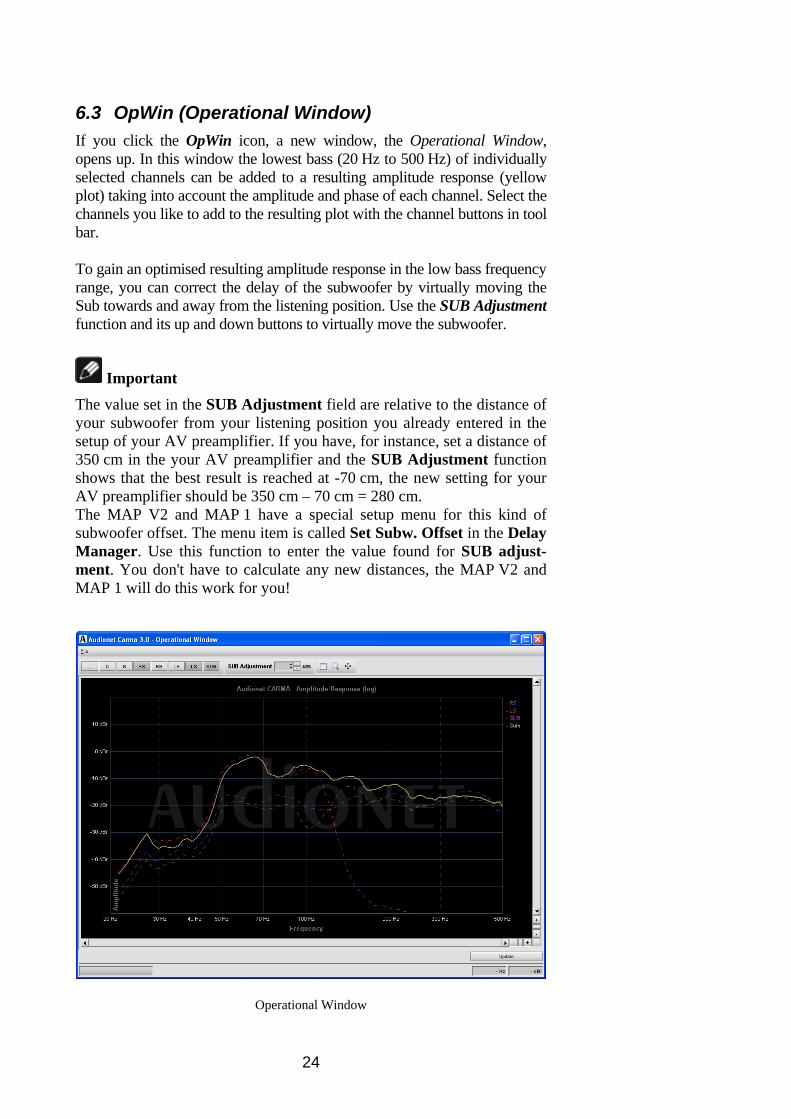
Settings for the frequency domain Use the Settings button to setup the current view (Chap. 6.1 c).
Window frequency settings
FFT Size Amount of data points (block size) for Fast Fourier Transformation (2048…65536 points).
Window Function Blackman-Harris, Hanning-, Hamming-, Blackman- and Square-Window.
Octave-Band Smoothing Smoothing of the curve progression over 1/n-octaves. (n=1,2,3,6,12,24).
Display Settings Select responses to be plotted.
Plot Type
Choose between plot type: amplitude response & equal-izer or amplitude response & phase response. In the latter case, the acoustic phase is plotted from -180° to +180°. Select which phase response to plot: measured phase, calculated minimum phase or "excess" phase.
24
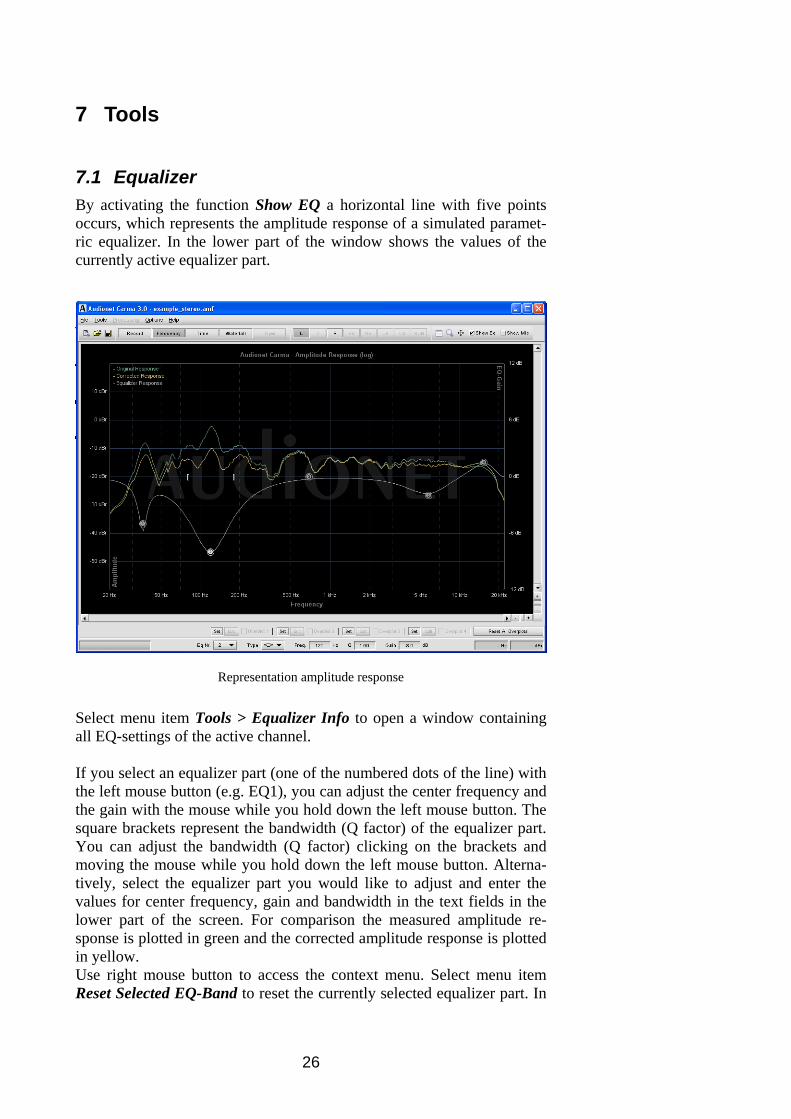
6.3 OpWin (Operational Window) If you click the OpWin icon, a new window, the Operational Window, opens up. In this window the lowest bass (20 Hz to 500 Hz) of individually selected channels can be added to a resulting amplitude response (yellow plot) taking into account the amplitude and phase of each channel. Select the channels you like to add to the resulting plot with the channel buttons in tool bar. To gain an optimised resulting amplitude response in the low bass frequency range, you can correct the delay of the subwoofer by virtually moving the Sub towards and away from the listening position. Use the SUB Adjustment function and its up and down buttons to virtually move the subwoofer.
Important The value set in the SUB Adjustment field are relative to the distance of your subwoofer from your listening position you already entered in the setup of your AV preamplifier. If you have, for instance, set a distance of 350 cm in the your AV preamplifier and the SUB Adjustment function shows that the best result is reached at -70 cm, the new setting for your AV preamplifier should be 350 cm – 70 cm = 280 cm. The MAP V2 and MAP 1 have a special setup menu for this kind of subwoofer offset. The menu item is called Set Subw. Offset in the Delay Manager. Use this function to enter the value found for SUB adjust-ment. You don't have to calculate any new distances, the MAP V2 and MAP 1 will do this work for you!
Operational Window

25
Settings OpWin Use the Settings button (Chap. 6.1 c) to change the setup options for the Operational Window:
OpWin Settings
FFT Size Amount of data points (block size) for Fast Fourier Transformation (2048…65536 points).
Window Function Blackman-Harris, Hanning-, Hamming-, Blackman- and Square-Window.
Octave-Band Smoothing Smoothing of the curve progression over 1/n-octaves. (n=1,2,3,6,12,24).
Apply Eq-Settings Choose if the equalizer settings made in the main win-dow also apply to the Operational Window.
Important The OpWin function is only available for multi-channels measurements.
26
7 Tools
7.1 Equalizer By activating the function Show EQ a horizontal line with five points occurs, which represents the amplitude response of a simulated paramet-ric equalizer. In the lower part of the window shows the values of the currently active equalizer part.
Representation amplitude response
Select menu item Tools > Equalizer Info to open a window containing all EQ-settings of the active channel. If you select an equalizer part (one of the numbered dots of the line) with the left mouse button (e.g. EQ1), you can adjust the center frequency and the gain with the mouse while you hold down the left mouse button. The square brackets represent the bandwidth (Q factor) of the equalizer part. You can adjust the bandwidth (Q factor) clicking on the brackets and moving the mouse while you hold down the left mouse button. Alterna-tively, select the equalizer part you would like to adjust and enter the values for center frequency, gain and bandwidth in the text fields in the lower part of the screen. For comparison the measured amplitude re-sponse is plotted in green and the corrected amplitude response is plotted in yellow. Use right mouse button to access the context menu. Select menu item Reset Selected EQ-Band to reset the currently selected equalizer part. In
27
case you would like to reset all Equalizer settings, select Reset All EQ-Bands from the menu. If you like to copy all Equalizer setting from one channel to a different one, use menu item Copy EQ-Channel and then Paste EQ-Channel on the channel you want to copy the settings to. With the function Type you can choose from various EQ-filter types.
Important Both Audionet preamplifiers MAP V2 and MAP 1 currently support only the type Peak-Filter. Minimum and maximum values as well as step size for all parameters of this filter type (frequency, gain, bandwidth Q) in CARMA match exactly the ones in those preamplifiers. Therefore, the use is able to simply transfer the parameters found with CARMA to both MAP V2 and MAP 1. Changes of the equalizer settings are automatically linked with the cur-rent measurement. If you would like to transfer these settings to a differ-ent measurement, export the settings to an Audionet EQ-file (File > Ex-port > Eq-Settings) and import them later to a different measurement (File > Import >Eq-Settings).
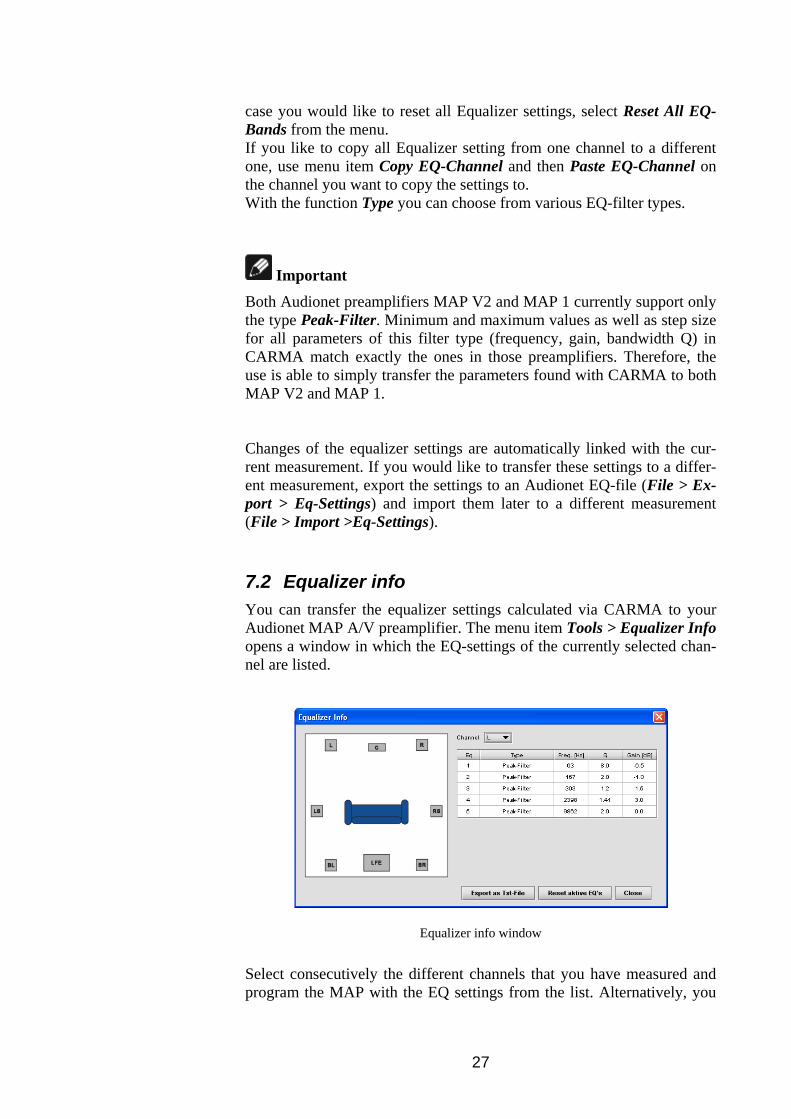
7.2 Equalizer info You can transfer the equalizer settings calculated via CARMA to your Audionet MAP A/V preamplifier. The menu item Tools > Equalizer Info opens a window in which the EQ-settings of the currently selected chan-nel are listed.
Equalizer info window
Select consecutively the different channels that you have measured and program the MAP with the EQ settings from the list. Alternatively, you
28
can export all EQ data to a text file using the Export as Txt-File button and program your MAP (or other AV preamplifier) from this text file.
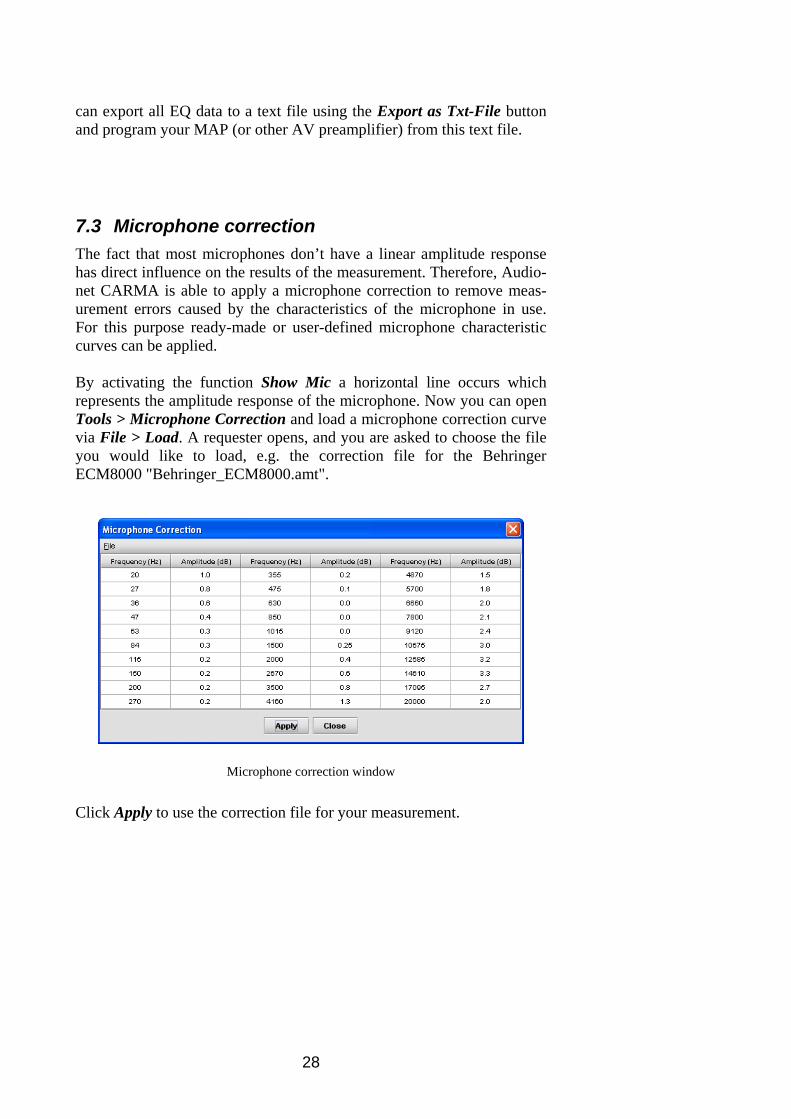
7.3 Microphone correction The fact that most microphones don’t have a linear amplitude response has direct influence on the results of the measurement. Therefore, Audio-net CARMA is able to apply a microphone correction to remove meas-urement errors caused by the characteristics of the microphone in use. For this purpose ready-made or user-defined microphone characteristic curves can be applied. By activating the function Show Mic a horizontal line occurs which represents the amplitude response of the microphone. Now you can open Tools > Microphone Correction and load a microphone correction curve via File > Load. A requester opens, and you are asked to choose the file you would like to load, e.g. the correction file for the Behringer ECM8000 "Behringer_ECM8000.amt".
Microphone correction window
Click Apply to use the correction file for your measurement.
29
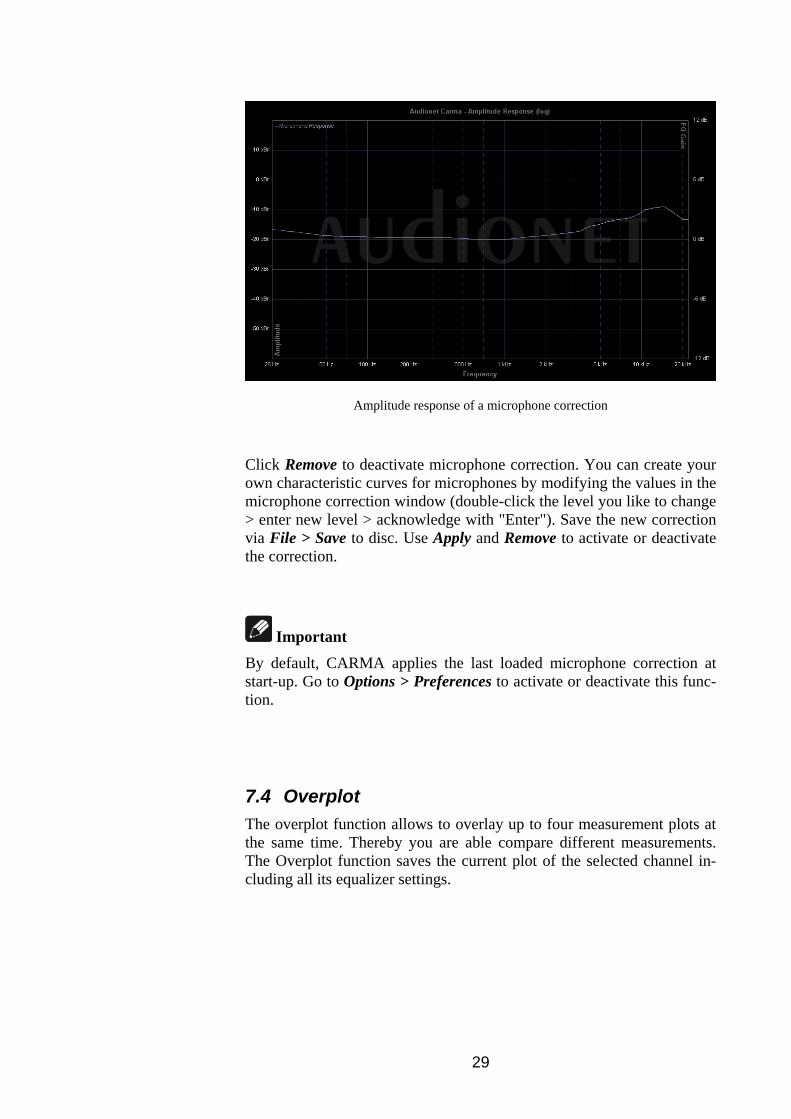
Amplitude response of a microphone correction
Click Remove to deactivate microphone correction. You can create your own characteristic curves for microphones by modifying the values in the microphone correction window (double-click the level you like to change > enter new level > acknowledge with "Enter"). Save the new correction via File > Save to disc. Use Apply and Remove to activate or deactivate the correction.
Important By default, CARMA applies the last loaded microphone correction at start-up. Go to Options > Preferences to activate or deactivate this func-tion.
7.4 Overplot The overplot function allows to overlay up to four measurement plots at the same time. Thereby you are able compare different measurements. The Overplot function saves the current plot of the selected channel in-cluding all its equalizer settings.
30
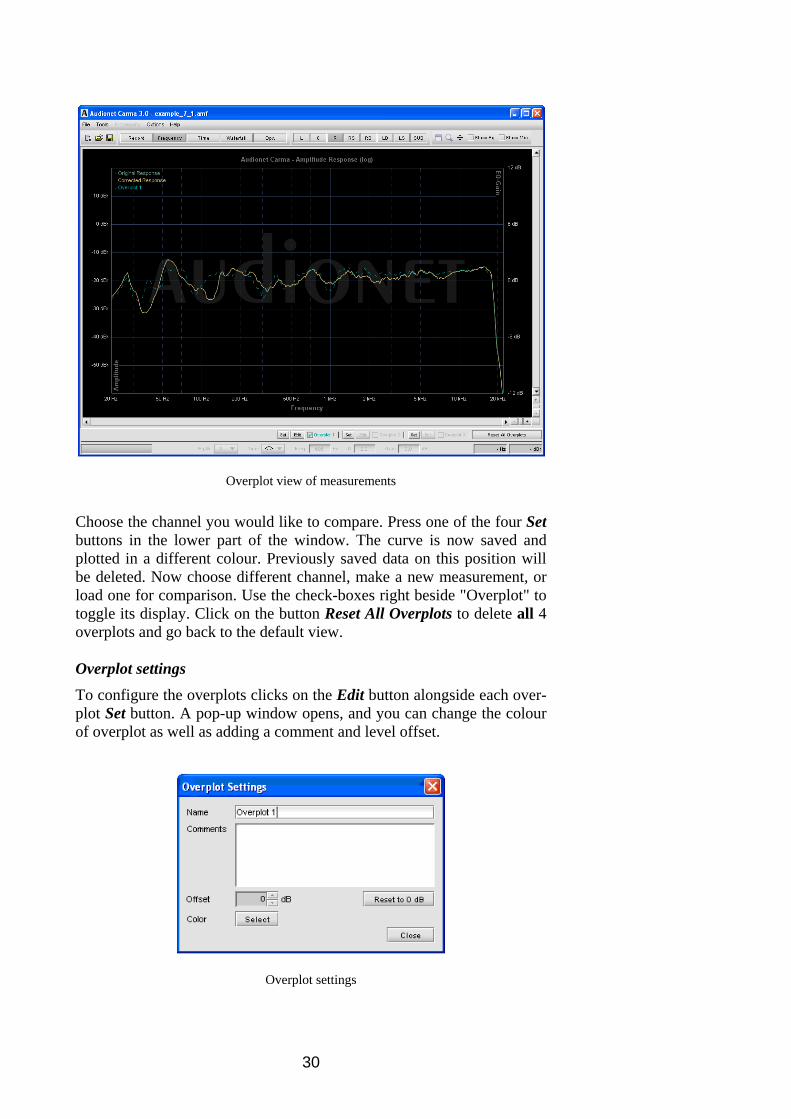
Overplot view of measurements
Choose the channel you would like to compare. Press one of the four Set buttons in the lower part of the window. The curve is now saved and plotted in a different colour. Previously saved data on this position will be deleted. Now choose different channel, make a new measurement, or load one for comparison. Use the check-boxes right beside "Overplot" to toggle its display. Click on the button Reset All Overplots to delete all 4 overplots and go back to the default view. Overplot settings To configure the overplots clicks on the Edit button alongside each over-plot Set button. A pop-up window opens, and you can change the colour of overplot as well as adding a comment and level offset.
Overplot settings

31
Errors and omissions excepted. Specifications and design are subject to changes without prior notice.
audionet GmbH
Brundbütteler Damm 140 B
13581 Berlin, Germany
www.audionet.de