Embed Size (px)
Citation preview

CALL RECORDING
USER GUIDE
May 2015 Applicable for SIP Print Call Recorder software version 2.0.185 and newer Visit www.SIPPrint.com/support for the most current Administrative Guide
Please contact SIP Print @ 866-655-3555 for information on system updates

TABLE OF CONTENTS
Table of Contents PART I: LISTENING TO/MANAGING CALL RECORDS ..............................................................................3
Chapter 1: Logging in, Using the Main Call Records Page ........................................................................... 3
Section 1: Logging In and Pulling Today’s Records ................................................................................ 3
Section 2: Searching and Sorting the Calls............................................................................................. 5
Section 3: Copying and Deleting Calls .................................................................................................... 9
PART I: LISTENING TO/MANAGING CALL RECORDS
This section of the guide will cover the basic use of the recorder, as well as more advanced settings of
the Call Recorder, to include managing the initial Call Records page and utilizing searches.
Chapter 1: Logging in, Using the Main Call Records Page This chapter will focus on how to log into the unit, listen to the calls, perform searches, manipulate how
the records are shown to you, and how to do a quick bulk copy of what is displayed on the screen.
Log into the unit by typing into a browser the IP address that was assigned to it during installation; this
information may be provided by your local administrator. The Call Recorder interface is designed for optimal use in Internet Explorer versions 11 and newer, Firefox version 29 and newer, and Chrome
version 34 and newer. There may be formatting problems if using mobile browsers or other 3rd party
browsers, so the newest versions of IE, FF, or Chrome are recommended for use.
Section 1: Logging In and Pulling Today’s Records
Figure 1.1.1.1

Once logged in, you will be presented with the following screen, which we will utilize to view the call
records. Note that depending on your specific permissions granted by the local administrator, you may
not have the Delete or Copy functions:
At first, no information will be displayed since the unit is awaiting a prompt to show specific date data. By
default, if you click on the ‘Search’ button, it will show the current calls from that day. Here is an example
of the information that will be shown:
Figure 1.1.1.2
Figure 1.1.1.3

As you can see, there is a lot of information that can be taken from this. We can tell that on that specific
day, there were 921 calls recorded (as seen in the ‘Returned’ and ‘Total’ section near the top right of the picture), we are displaying both incoming and outgoing calls (as seen by ‘Both’ being selected in the top
right as well), and that so far, there have been 87,237 calls recorded on the recorder since it was
installed (as viewed in the first column of the call records titled ‘Call ID’). You may also note that the Call
ID in these examples are in bold; this is due to our example unit having a ‘Call Scoring’ key entered,
which will be discussed in the Administrator Guide in Part II Chapter 3. If your unit does not have this
feature or you lack the permissions to access this feature, your Call ID numbers will not be in bold.
Looking at the top call, we can see that it was an incoming call to Cathy Kurtz (who has a Handset ID of
5106) by Walton Michelle, and we can see the phone number of that outside line as well. We can see
that the phone call was initiated on April 27th 2015 at 9:01:40 AM (9:01 AM and 40 seconds), and that the call lasted 1 minute and 21 seconds. You can also see that the phone system in place uses a ‘9’ prefix
in front of all their calls; this may differ from site to site, and is dictated by the phone system, not the
Call Recorder.
Observing the bottom call in that list, we can see that Hollie Charles, who has a Handset ID of 5109, made an outgoing call at 9:14:10, and that call lasted 33 seconds. Note that for most circumstances,
outgoing calls will not have a RemoteName, since this acts similar to a “Caller ID” that you have on your
cell phone.
You can listen to any of the calls simply by clicking on the speaker as if it was an internet link; depending
on your browser and system, it may automatically open in the media player currently set as the default
on your computer, or it may prompt you to open or save the file. The files are in a .WAV format, and are
easily played on most Windows and Apple computers. You may choose to open it which will cause it to
play, or save it for an email attachment or to listen later on. Please contact your local IT support for
questions on default media player settings and computer configuration.
Section 2: Searching and Sorting the Calls
Now that you understand how to display call records, you will likely need to know how to perform searches of calls that you have recorded at one point. Generally, you will be searching by one of three
things: the date the call took place, the agent involved in the call, or the phone number the agent was in
contact with. Depending on specific permissions for your login, you may be able to view the calls from
numerous agents, or only your own calls.
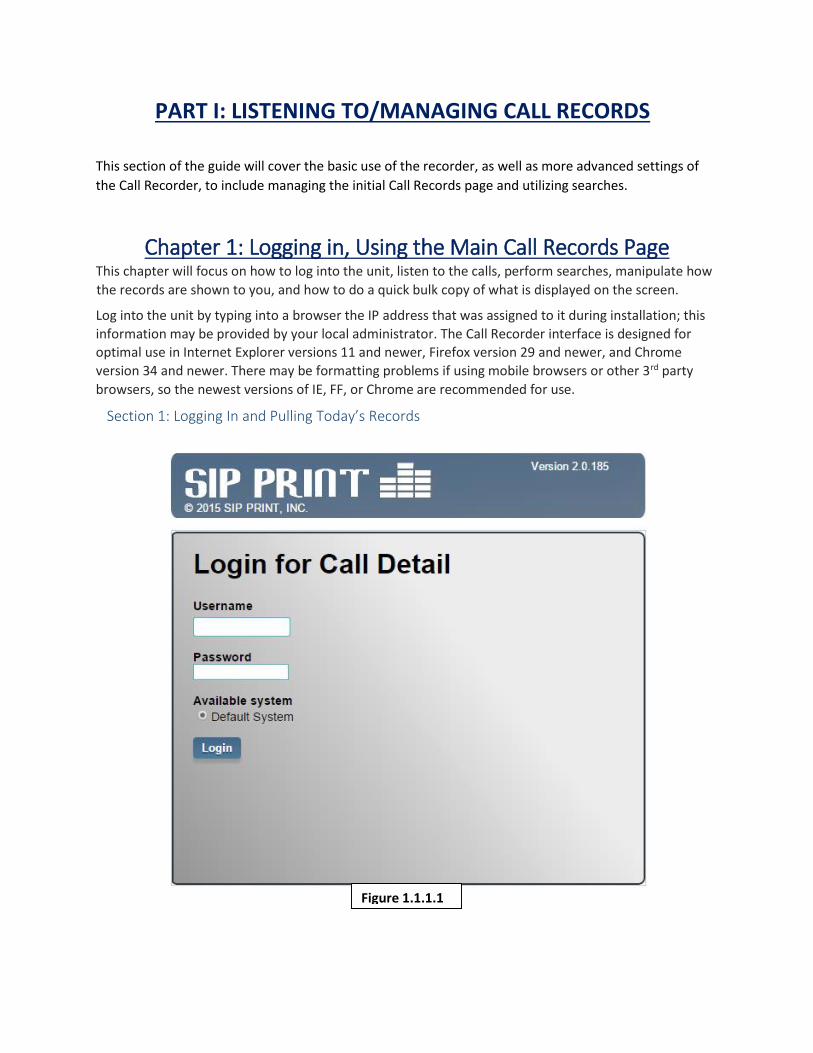
Let’s begin by selecting the date that we want to search for calls on. By clicking the date field, we will
see a new window that we can select the date from.
After selecting the date, the window will close. You may choose your “From” date and “To” date as
necessary; do bear in mind that the longer your time span chosen is, the longer it may take to pull
records. Our recommendation is to keep your searches no longer than a month’s time if necessary.
Next, you will enter in your search parameters using the ‘Filters’ at the top of main page:
By using the drop-down choices in the Filter section, you may notice that the choices coincide with the
names of the columns as shown in the next picture. Choosing the Filter “Agent Name” will allow you to
search by the name of local agent, and RemoteNum will allow us to search by the number the agent
spoke with.
Figure 1.1.2.1
Figure 1.1.2.2
Figure 1.1.2.3

To search by an agent name, select the Agent Name drop-down choice, and in the ‘Value’ text field,
enter the first and/or last name of the agent you want to search for. You may want to include both first and last if you have many agents in your system, since the system will show all users that happen to
have in their name the parameter you search for (i.e., if you have multiple named “Steve” at your
company, searching simply by “Steve” will show all of them, as opposed to entering the first and last
name will show the results you want.)
Searches are not case sensitive, though you do have to spell the agent name correctly. Asterisks are also
not able to be entered either as wildcards. After entering the name, click on ‘Search’. The next picture is
an example of what it would look like if we wanted to do a search for calls by Cathy Kurtz for the second
full week of April in 2015. Note the details that are given when you do searches: You can see that out of
the total number of calls that week (1,185), Cathy was involved with 494 of them (shown by ‘Returned’). The calls are also listed in order of newest to oldest, with the newest on top. This order can be reversed
by changing the arrow next to ‘Direction’ to be pointing up, then hitting refresh, or by changing the sort
order, which we will go into shortly.
Figure 1.1.2.4

For something a bit more advanced, you can also change how you want the information to be sorted. As
you may have noticed, there is a red bar above the call records; this bar can be moved across each column by clicking and holding it as you move your mouse, and it will change which column the
information is sorted by after clicking ‘Refresh’. By default, records are sorted by Call ID, which again
shows the sequential number of the call in the Call Recorder as it was started. Shown below is how to
sort the information by longest call first:
As you can see, the search of all of Cathy’s calls from the second week of April have now been sorted by
longest call to shortest. Like how you changed seeing the calls from newest on top to oldest on top, this
search can be changed to show shortest calls on top with the longest on the bottom by changing the
direction of the arrow next to ‘Direction’ near the top of the page.
Doing a search by a phone number is just as easy: Changing the Filter drop-down to ‘RemoteNum’, you
can enter in the text field the number that you want to search for. And, just like searching for an Agent
Name, you do not need to enter the entire phone number, which may be convenient for phone systems
that add in prefixes. The best recommendation is to type in the local 7-digit number (example, instead of
typing in the full area code as well as the number, like 8666553555, you can simply search for 6553555).
Note that when searching for phone numbers, do not include dashes or parenthesis.
You can type in as few numbers as you want, or as many as you want, but the less information you
enter, the broader your results will be (the same when searching for Agent Names). So, since every
phone number that includes the numbers you indicate will be shown in the results, entering just the
number 4 in the text field will show every phone number with the number 4 in it, as opposed to
searching for the entire number will show only the conversations that took place with that specified
number.
You can also combine searches, searching for a call from a specific agent along with a specific phone
number; this can be done by using a second Filter. Shown below is an example of what it would look like
if we wanted to display Cathy’s calls with the phone number 410-3341:
Figure 1.1.2.4

You can now see that out of the 1,185 calls from that time period, Cathy made outgoing calls to the
phone number 410-3341 twice.
Section 3: Copying and Deleting Calls Part of managing the Call Records includes having the ability to quickly copy and/or delete calls. Depending on your specific permissions granted by the local administrator, you may be able to perform
some of these actions. If you have the proper permissions set for your login, you will see the ‘Delete’ and ‘Copy’ function above the call records. You can select individual calls by clicking the box next to each
one, or, you can select all the calls displayed in the call records by clicking the box in between the
columns ‘ID’ and ‘Play’. The first option you have, Delete, will allow you to delete any call that you have
selected.
SIP Print technicians cannot restore calls that have been deleted, so take care when using this function.
It is irreversible unless you have configured the Automatic Backup solution (detailed in Part IV).
The second option will allow you to quickly copy all the calls you have selected, giving you the option to
open the .zip file they are placed in, or downloading the .zip file to the location your browser is preset for (contact your local IT department for browser-related or download questions). Once you open the
.zip file, you will see all of the calls listed. There is a limitation of how many files can be grabbed using
this quick-copy however, so it is best to grab calls one day at a time, depending on your call volume (no
more than 50 or so calls at a time).
As you can see below, the calls are saved in .WAV files, and the file names are configured so they display
[year][month[day][hour][minute][second], followed by an internal lettering scheme utilized by the Call
Recorder.
Figure 1.1.2.5

So, using the first call as an example, we know that the call took place in 2015 on February 10th, at
8:32AM and 14 seconds. Using this information, you can cross-reference with the Call Recorder to see
the agent name and the phone number by searching for that date as previously discussed.
Figure 1.1.2.6