Embed Size (px)
Citation preview

Using Caliber Datamart™
11.1.0
User Guide

Copyright © 2013 Micro Focus. All Rights Reserved. Portions Copyright © 1998-2009 Borland Software Corporation (a Micro Focus company). All other marks are the property of their respective owners.
CRM06-DMUG February 2012
i
Table of Contents
Chapter 1Introduction 1Overview . . . . . . . . . . . . . . . . . . . . . . . 1Micro Focus Support . . . . . . . . . . . . . . . . . 1
Chapter 2Configuring Databases and Data Source Names 3
Configuring Microsoft Access . . . . . . . . . . . . . 3Configuring Microsoft SQL Server . . . . . . . . . . 4
Configuring a Userid and Password in Caliber . . 4Configuring MS SQL Server . . . . . . . . . . . . 4Configuring a System Data Source Name (DSN) . 5
Configuring Oracle Server . . . . . . . . . . . . . . 6Multi-Extraction Naming Conventions. . . . . . . . . 6
Chapter 3Datamart 7Overview . . . . . . . . . . . . . . . . . . . . . . . 7Datamart Configurator . . . . . . . . . . . . . . . . 8Datamart Extractor . . . . . . . . . . . . . . . . . . 9
Datamart Extractor Recommendations . . . . . . 11Scheduling Datamart Extractions . . . . . . . . . 11
Datamart Synchronizer . . . . . . . . . . . . . . . . 12
Chapter 4Using BusinessObjects 15Overview . . . . . . . . . . . . . . . . . . . . . . . 15Configuring the BusinessObjects DSN . . . . . . . . 15
For Microsoft Access . . . . . . . . . . . . . . . 15For Microsoft SQL Server . . . . . . . . . . . . . 16
Configuring the Datamart Universe Location . . . . . 17Running a Simple Report . . . . . . . . . . . . . . . 17
Chapter 5Reports 19Overview . . . . . . . . . . . . . . . . . . . . . . . 19Attribute Distribution . . . . . . . . . . . . . . . . . 19Impact Analysis . . . . . . . . . . . . . . . . . . . . 20Project Scorecard . . . . . . . . . . . . . . . . . . . 20Requirement Volatility . . . . . . . . . . . . . . . . . 20Status Summary . . . . . . . . . . . . . . . . . . . 20Traceability Complexity . . . . . . . . . . . . . . . . 21User Deployment . . . . . . . . . . . . . . . . . . . 21
Appendix AUniverse Parameters 23Requirement Reports Class. . . . . . . . . . . . . . 23Administration Reports Class . . . . . . . . . . . . . 26Glossary Class . . . . . . . . . . . . . . . . . . . . 28
Appendix BReport Samples 29
Appendix CDatamart Restrictions 33Document References . . . . . . . . . . . . . . . . 33Reporting Domains . . . . . . . . . . . . . . . . . 33List of Values . . . . . . . . . . . . . . . . . . . . 34Requirement Types and Projects . . . . . . . . . . 35Security on Groups . . . . . . . . . . . . . . . . . 35Users in Groups . . . . . . . . . . . . . . . . . . . 35Relational Database Restrictions . . . . . . . . . . 35
User-Defined Attributes. . . . . . . . . . . . . . 36
Appendix DGlossary 37
Index 39

ii

Chapter 1: Introduct ion 1
C h a p t e r
Chapter 1Introduction
Overview
Datamart is a requirements-based decision support system that extracts data from the Caliber operational repository into a relational database, transforms that data, and loads it into a relational database.
The robust query and analysis capabilities of Datamart are compatible with various reporting tools from leading business intelligence software vendors (for example, BusinessObjects, Crystal Reports).
The Datamart includes the Datamart Extractor, the Datamart Configurator, and the Datamart Synchronizer. It also provides three BusinessObjects universes and two templates. You can use this reporting tool or another reporting tool.
Datamart extracts data from the Caliber operational database, transforms the data, and then loads it into a relational database where you can access it using a reporting tool.
Micro Focus Support
Micro Focus offers a variety of support options. These include free services on the Internet, where you can search our extensive information base and connect with other users of Micro Focus products. In addition, you can choose from several categories of support, ranging from installation support to fee-based consultant-level support and extensive assistance.
For more information about Micro Focussupport services, go to http://supportline.microfocus.com.
When contacting support, be prepared to provide complete information about your environment, the version of the product you are using, and a detailed description of the problem. For support on third-party tools or documentation, please contact the vendor of the tool. In addition to this document, you can find more detailed information on how to create reports in your reporting tool documentation.

2 Cal iberRM Datamart User Guide

Chapter 2: Conf igur ing Databases and Data Source Names 3
C h a p t e r
Chapter 2Configuring Databases and Data Source Names
Before you can begin using the Datamart, you must first create and configure a data source name (DSN) and a database on the server the Datamart resides, if:
n during the installation process, you chose not to create a MS Access DSN and database,
n you need to create another MS Access database and DSN,
n you want to use a Microsoft SQL Server database, or
n you want to use an Oracle database.
Configuring Microsoft Access
There are two steps to configuring Microsoft Access:
n creating a DSN, which also selects or
n creates the database
To configure MS Access:
1 On the machine that will run the extraction program, select Start > Settings > Control Panel>Administrative Tools from the Windows Start menu.
2 Double-click on Data Sources (ODBC).
Note: Skip Control Panel for Windows 2003; skip Settings for Windows XP.
3 Select the System DSN tab.
4 Click Add. The Create New Data Source dialog box is displayed.
5 Select Microsoft Access Driver (*.mdb) from the list and click Finish. The ODBC Microsoft Access Setup dialog box is displayed.
6 Enter a name and description for the DSN.
Note: Borland recommends RMMSA. See the section “Multi-Extraction Naming Conventions” on Datamart on Page 7 for information on structure and naming conventions for multiple extractions.
4 Cal iberRM Datamart User Guide
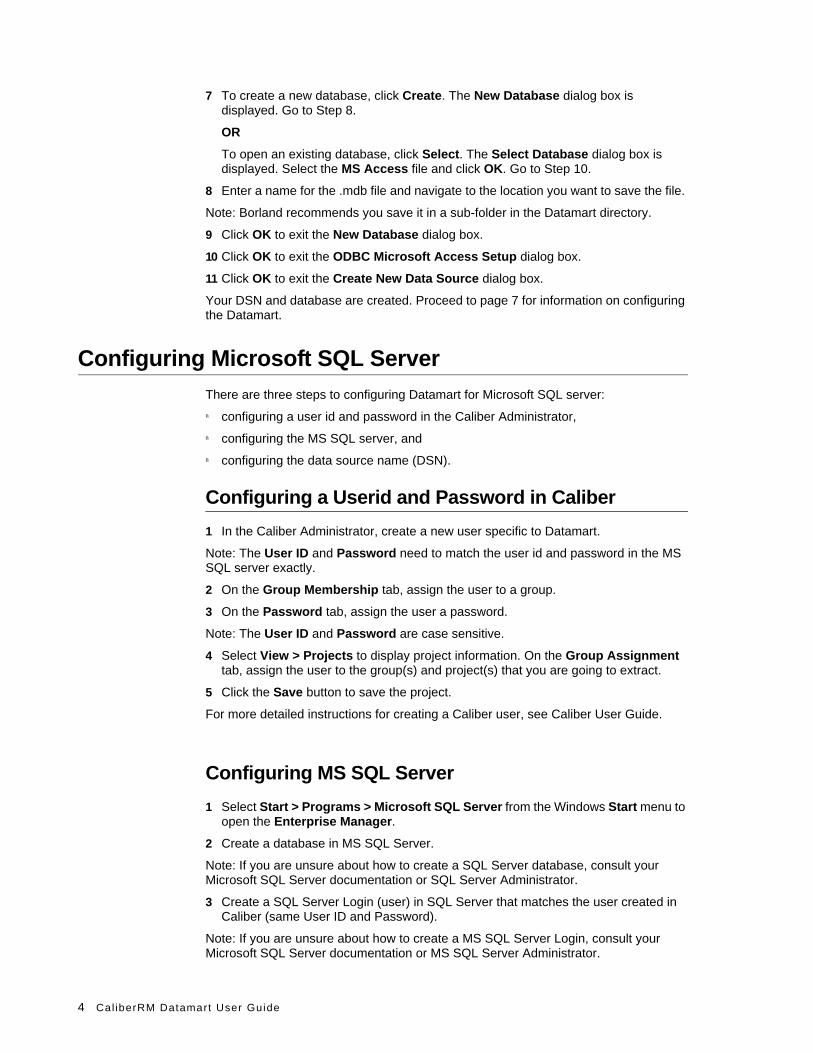
7 To create a new database, click Create. The New Database dialog box is displayed. Go to Step 8.
OR
To open an existing database, click Select. The Select Database dialog box is displayed. Select the MS Access file and click OK. Go to Step 10.
8 Enter a name for the .mdb file and navigate to the location you want to save the file.
Note: Borland recommends you save it in a sub-folder in the Datamart directory.
9 Click OK to exit the New Database dialog box.
10 Click OK to exit the ODBC Microsoft Access Setup dialog box.
11 Click OK to exit the Create New Data Source dialog box.
Your DSN and database are created. Proceed to page 7 for information on configuring the Datamart.
Configuring Microsoft SQL Server
There are three steps to configuring Datamart for Microsoft SQL server:
n configuring a user id and password in the Caliber Administrator,
n configuring the MS SQL server, and
n configuring the data source name (DSN).
Configuring a Userid and Password in Caliber
1 In the Caliber Administrator, create a new user specific to Datamart.
Note: The User ID and Password need to match the user id and password in the MS SQL server exactly.
2 On the Group Membership tab, assign the user to a group.
3 On the Password tab, assign the user a password.
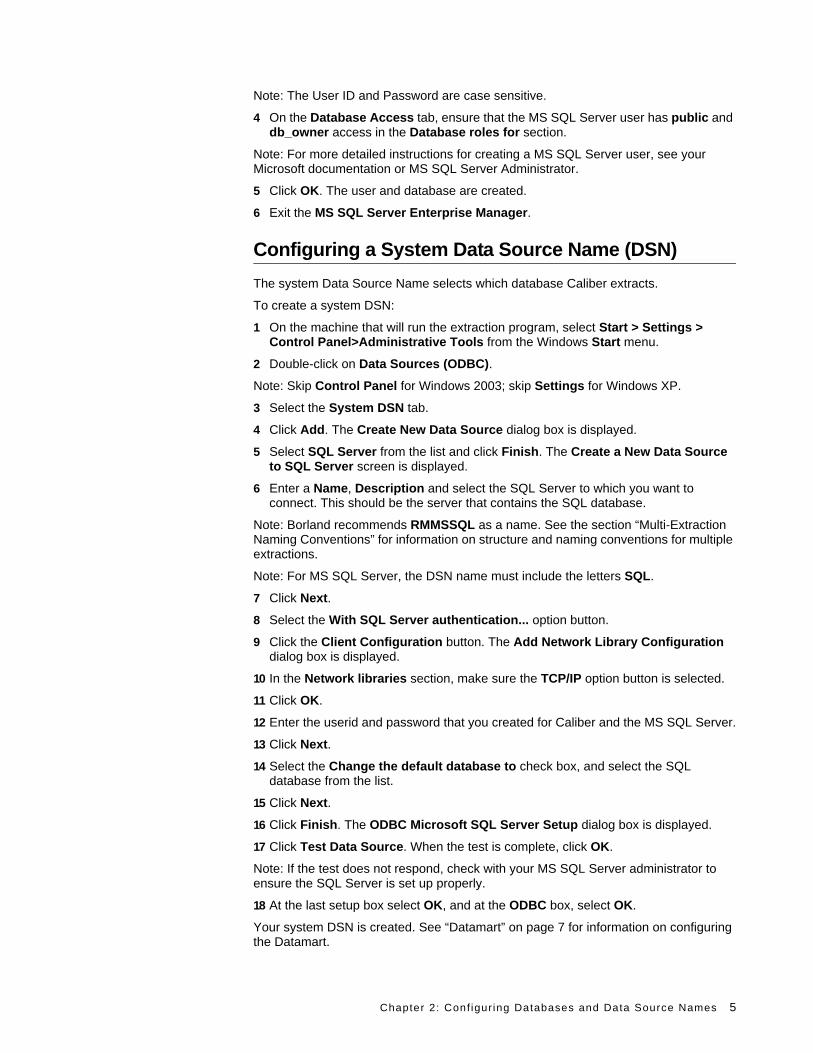
Note: The User ID and Password are case sensitive.
4 Select View > Projects to display project information. On the Group Assignment tab, assign the user to the group(s) and project(s) that you are going to extract.
5 Click the Save button to save the project.
For more detailed instructions for creating a Caliber user, see Caliber User Guide.
Configuring MS SQL Server
1 Select Start > Programs > Microsoft SQL Server from the Windows Start menu to open the Enterprise Manager.
2 Create a database in MS SQL Server.
Note: If you are unsure about how to create a SQL Server database, consult your Microsoft SQL Server documentation or SQL Server Administrator.
3 Create a SQL Server Login (user) in SQL Server that matches the user created in Caliber (same User ID and Password).
Note: If you are unsure about how to create a MS SQL Server Login, consult your Microsoft SQL Server documentation or MS SQL Server Administrator.
Chapter 2: Conf igur ing Databases and Data Source Names 5
Note: The User ID and Password are case sensitive.
4 On the Database Access tab, ensure that the MS SQL Server user has public and db_owner access in the Database roles for section.
Note: For more detailed instructions for creating a MS SQL Server user, see your Microsoft documentation or MS SQL Server Administrator.
5 Click OK. The user and database are created.
6 Exit the MS SQL Server Enterprise Manager.
Configuring a System Data Source Name (DSN)
The system Data Source Name selects which database Caliber extracts.
To create a system DSN:
1 On the machine that will run the extraction program, select Start > Settings > Control Panel>Administrative Tools from the Windows Start menu.
2 Double-click on Data Sources (ODBC).
Note: Skip Control Panel for Windows 2003; skip Settings for Windows XP.
3 Select the System DSN tab.
4 Click Add. The Create New Data Source dialog box is displayed.
5 Select SQL Server from the list and click Finish. The Create a New Data Source to SQL Server screen is displayed.
6 Enter a Name, Description and select the SQL Server to which you want to connect. This should be the server that contains the SQL database.
Note: Borland recommends RMMSSQL as a name. See the section “Multi-Extraction Naming Conventions” for information on structure and naming conventions for multiple extractions.
Note: For MS SQL Server, the DSN name must include the letters SQL.
7 Click Next.
8 Select the With SQL Server authentication... option button.
9 Click the Client Configuration button. The Add Network Library Configuration dialog box is displayed.
10 In the Network libraries section, make sure the TCP/IP option button is selected.
11 Click OK.
12 Enter the userid and password that you created for Caliber and the MS SQL Server.
13 Click Next.
14 Select the Change the default database to check box, and select the SQL database from the list.
15 Click Next.
16 Click Finish. The ODBC Microsoft SQL Server Setup dialog box is displayed.
17 Click Test Data Source. When the test is complete, click OK.
Note: If the test does not respond, check with your MS SQL Server administrator to ensure the SQL Server is set up properly.
18 At the last setup box select OK, and at the ODBC box, select OK.
Your system DSN is created. See “Datamart” on page 7 for information on configuring the Datamart.

6 Cal iberRM Datamart User Guide
Configuring Oracle Server
Since Datamart accesses Oracle server using a TNS service name that specifies the location of the Oracle database, no special configuration from Datamart is required.
You need to install and configure an Oracle client on the machine where Datamart is already installed.
Note: It is important that you specify the correct TNS name during the Oracle client installation.
Refer to your Oracle documentation or contact your system administrator for support.
After the installation is complete, you need to obtain a valid user name and password from your system administrator to access the Oracle server.
Multi-Extraction Naming Conventions
It is recommended that you follow the following structure and naming conventions for multiple Datamart extractions.
First Extraction Second Extraction Third Extraction n Extraction
Name Access SQL Access SQL Access SQL Access SQL
*.ini file RMMSA RMMSSQL RMMSA2 RMMSSQL2 RMMSA3 RMMSSQL3 RMMSAn RMMSSQLn
System DSN RMMSA RMMSSQL RMMSA2 RMMSSQL2 RMMSA3 RMMSSQL3 RMMSAn RMMSSQLn
Universe file RMMSA.unv RMMSSQL.unv RMMSA2.unv RMMSSQL2.unv RMMSA3.unv RMMSSQL3.unv RMMSAn.unv RMMSSQLn.unv
First Extraction Second Extraction Third Extraction n Extraction
Name Access SQL Access SQL Access SQL Access SQL
*.mdb file RMMSA.mdb N/A RMMSA2.mdb N/A RMMSA3.mdb N/A RMMSAn.mdb N/A
SQL database
N/A RMMSSQL N/A RMMSSQL2 N/A RMMSSQL3 N/A RMMSSQLn
.bat file (command file)*
RMMSA RMMSSQL RMMSA2 RMMSSQL2 RMMSA3 RMMSSQL3 RMMSAn RMMSSQLn
Connection Name (in Universe)
RMMSA RMMSSQL RMMSA2 RMMSSQL2 RMMSA3 RMMSSQL3 RMMSAn RMMSSQLn

Chapter 3: Datamart 7
C h a p t e r
Chapter 3Datamart
Overview
The Datamart extracts data from a Caliber repository, transforms that data and loads it into a relational database. You can run the Datamart program from a command prompt or using a batch file. The Datamart is comprised of three components:
n Datamart Configurator: a wizard that enables you to create or edit a configuration file for the Datamart Extractor to use
n Datamart Extractor: the component of the Datamart that extracts the data
n Datamart Synchronizer: a behind-the-scenes module of the Datamart that keeps the objects in the Datamart universe synchronized with the user-defined attributes (UDAs) in Caliber.
ProgramType of
Program Input Output
Datamart Configurator
Wizard-based Selection: Caliber projects, baseline information, choice to extract history, traceability or discussions
A *.ini file (* = the file name)
Datamart Extractor Command-line 1. The file name .ini, the Data Source Name (DSN) that points to the database and the server that holds the database (MS Access and SQL Server specific)
2. The file name .ini, the TNS service name that points to the location of the Oracle database and the server that holds the database (Oracle specific)
A loaded MS Access, SQL Server, or Oracle database

8 Cal iberRM Datamart User Guide
Datamart Configurator
To to create or edit a configuration file:
1 Select Start > Programs > Borland Caliber > Administration > Datamart. The first step of the Caliber Datamart Configuration Wizard displays.
To create a new configuration file, select the Create a new configuration file option button.
OR
To open an existing configuration file, select the Open an existing configuration file option button. Click the Browse button to navigate to the location of the file you want to use. Click Next.
2 Enter the Caliber server Host that contains the information you want to export, your User name and Password. Click Next.
Note: Click Back to change any options on the previous screen if necessary. Click Cancel to end the process without saving any changes.
3 Select the check box beside the baselines you want to export. If you chose to create a new file, the current baseline versions are selected. If you chose to use an existing configuration file, the baselines included in that file are automatically selected. Click Next.
Note: Select All Projects if you want to export the current baselines of all projects.
4 Select the check box next to the objects you want to export. If you chose to use an existing configuration file, the objects included in that file are automatically selected. Click Next.
5 Step 5 of the Datamart Configuration Wizard provides a preview of the configuration file you are about to create.
6 Click Finish. In the Save As dialog box, navigate to the location in which you want to save the configuration file. Enter a name for your file.
Note: Please read the section “Multi-Extraction Naming Conventions” on page 6 for information on structure and naming conventions for more than one extraction.
7 Click Save. The configuration file is saved as a *.ini. file.
Note: It is recommended that you save it in a subfolder in the Datamart directory.
ProgramType of
Program Input Output
Datamart Synchronizer
Command-line 1. The universe name and the DSN (MS Access and SQL Server specific)
2. The universe name and the TNS service name (Oracle specific)
An updated universe with UDAs from Caliber (RMMSA.unv, RMMSSQL.unv, or RMORA.unv)

Chapter 3: Datamart 9
Datamart Extractor
The Datamart Extractor is the program that exports the data. It is a command line executable that accepts arguments for specifying a configuration file, logging options, a data source name, server name or syntax help. The Extractor program loads plain text into the database’s description field.
The Extractor program can export incremental changes since the last extraction. This requires that a full extraction has to have been performed on the database first. Once a full extraction has been performed, an indicator is added to the configfile.ini to show the last date and time that the extraction was run on that database. This allows you to use different configfile.ini files to retrieve data from different projects and baselines and still keep track of the last updated date and times for the different extractions. You can also copy the .ini file to a different computer to perform the extraction and keep track of the last update date and times on different machines.
The syntax is:
Extractor.exe [parameters]
-c configfile.ini – specifies the configuration file; required
-l turns on logging; optional
-d 1. dsnname – specifies data source name for MS Access and SQL Server
2. TNS name – specifies Oracle server location for Oracle; required
-s 1. server name containing the MS SQL Server database; required
2. oracle – specifies Oracle as a database server; required
-? displays the syntax
-long extracts text fields non-truncated; optional, for Oracle only
-dbu specifies the Oracle user name; optional, applies only if Oracle user name differs from Caliber user name specified in the *.ini file
-dbp specifies the Oracle user password; optional; applies only if Oracle user password differs from Caliber user password specified in the *.ini file
-noextraces turns off extracting external traces
-updateincrementally extracts data modified since the last date of the last extraction; Note: configfile.ini is required to perform incremental updates.
10 Cal iberRM Datamart User Guide
Important! When using MS SQL database, the Caliber user that extracts the data must have an identical userid with permit in database: public, db_owner, and bulkadmin roles in the MS SQL Server.
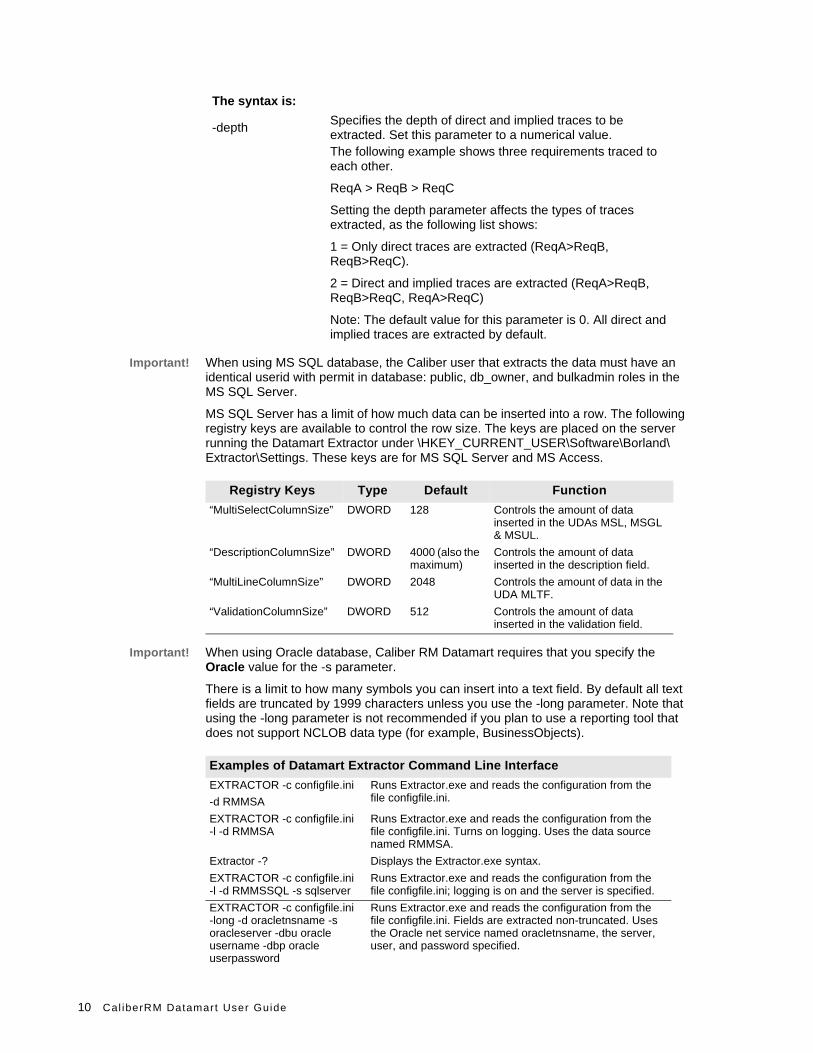
MS SQL Server has a limit of how much data can be inserted into a row. The following registry keys are available to control the row size. The keys are placed on the server running the Datamart Extractor under \HKEY_CURRENT_USER\Software\Borland\Extractor\Settings. These keys are for MS SQL Server and MS Access.
Important! When using Oracle database, Caliber RM Datamart requires that you specify the Oracle value for the -s parameter.
There is a limit to how many symbols you can insert into a text field. By default all text fields are truncated by 1999 characters unless you use the -long parameter. Note that using the -long parameter is not recommended if you plan to use a reporting tool that does not support NCLOB data type (for example, BusinessObjects).
-depthSpecifies the depth of direct and implied traces to be extracted. Set this parameter to a numerical value. The following example shows three requirements traced to each other.
ReqA > ReqB > ReqC
Setting the depth parameter affects the types of traces extracted, as the following list shows:
1 = Only direct traces are extracted (ReqA>ReqB, ReqB>ReqC).
2 = Direct and implied traces are extracted (ReqA>ReqB, ReqB>ReqC, ReqA>ReqC)
Note: The default value for this parameter is 0. All direct and implied traces are extracted by default.
The syntax is:
Registry Keys Type Default Function
“MultiSelectColumnSize” DWORD 128 Controls the amount of data inserted in the UDAs MSL, MSGL & MSUL.
“DescriptionColumnSize” DWORD 4000 (also the maximum)
Controls the amount of data inserted in the description field.
“MultiLineColumnSize” DWORD 2048 Controls the amount of data in the UDA MLTF.
“ValidationColumnSize” DWORD 512 Controls the amount of data inserted in the validation field.
Examples of Datamart Extractor Command Line Interface
EXTRACTOR -c configfile.ini
-d RMMSA
Runs Extractor.exe and reads the configuration from the file configfile.ini.
EXTRACTOR -c configfile.ini -l -d RMMSA
Runs Extractor.exe and reads the configuration from the file configfile.ini. Turns on logging. Uses the data source named RMMSA.
Extractor -? Displays the Extractor.exe syntax.
EXTRACTOR -c configfile.ini -l -d RMMSSQL -s sqlserver
Runs Extractor.exe and reads the configuration from the file configfile.ini; logging is on and the server is specified.
EXTRACTOR -c configfile.ini -long -d oracletnsname -s oracleserver -dbu oracle username -dbp oracle userpassword
Runs Extractor.exe and reads the configuration from the file configfile.ini. Fields are extracted non-truncated. Uses the Oracle net service named oracletnsname, the server, user, and password specified.

Chapter 3: Datamart 11
Datamart Extractor Recommendations
Borland recommends the following to optimize your extractor performance and usage:
n Extract “requirements” or “requirements with traces” data only and turn logging off to increase the speed of the extraction. If History and Discussion are needed, consider a less frequent separate extraction (into another database) containing data from those options.
n Place the output database (MS Access, MS SQL Server, or Oracle) on the Caliber server machine and run the extraction during off peak hours to avoid network traffic. Review the section “System Requirements” in the Caliber Release Notes for server recommendations for this configuration.
n Use MS Access to optimize the display (up to 8,000 characters can be stored in the description and multi-line text attribute fields.)
n Do not extract projects that are empty. The extraction time is impacted by the number of projects extracted include those with no requirements.
n Extract incremental changes only provided the list of UDA types is preserved.
n Datamart performance can be enhanced by using temporary text files to load information into the relational databases. The size of the files is approximately equal to the size of the extracted database. You must ensure you have enough hard drive space for the temporary files. The files are created in the directory from which you run the extractor. Upon successful extraction, the files are automatically removed. To leverage this Microsoft and Oracle recommended option:
n For Oracle: Include the -sqlldr command option. If you do not include this option, Datamart will not use the temporary files.
n For Microsoft SQL Server: Ensure that you grant the Datamart user the bulkadmin role in addition to the public and db_owner roles.
If the Microsoft SQL Server database and Datamart reside on different machines, you must complete the following steps:
1 The person responsible for the network security must create a shared folder on the computer where Datamart is installed and ensure that the Microsoft SQL Server user is granted read-only access rights to this folder.
2 Add the -path option to the command specifying the path to the folder created in Step 1. For example, -path "C:\Program Files\bulkdata". The temporary files will be placed in this folder.
3 Add the -share option to the command specifying the same folder in UNC format. For example, -share "\\MyComputer\bulkdata" where MyComputer is the computer name where the shared folder is located and bulkdata is the name of the share.
Scheduling Datamart Extractions
To schedule the extractions using standard Windows Scheduled Task Wizard, perform the following:
EXTRACTOR -c configfile.ini
-d RMMSA -noextraces
Runs Extractor.exe, reads the configuration from the file configfile.ini and does not extract any external traces.
EXTRACTOR -c configfile.ini
-d RMMSA -update
Runs Extractor.exe, reads the configuration from the file configfile.ini and performs incremental update.
Examples of Datamart Extractor Command Line Interface
12 Cal iberRM Datamart User Guide
1 Start Scheduled Task Wizard from the Start menu. Click Next on the first screen.
2 On the next screen, click Browse and locate the Datamart Extractor Executable (Extractor.exe).
3 Specify the name of the scheduled task and run interval. Click Next.
4 Select the start time and date. Click Next.
5 Specify the authentication information for the task. Click Next.
6 Select Open advanced properties for this task when I click Finish and click Finish.
7 In the Run field of the tasks advanced properties dialog box, specify necessary parameters for the Extractor.exe file. For example:
"C:\Program Files\Borland\Caliber\extractor.exe" -c "C:\Program Files\Borland\Caliber\Datamart\ConfigurationFile.ini" -s oracle -d dmart4rm.intra.serverexact.com -sqlldr -dbu DatabaseUser -dbp DatabasePassword -l -noextraces
Alternatively, you can create a batch file with necessary parameters for Extractor.exe and schedule batch file execution.
Notes:
n If the data you want to extract contains traces to or from StarTeam, Caliber tries to log on to the necessary StarTeam server using credentials stored on the current computer. Make sure the StarTeam Toolbar is running or log on at least once to your StarTeam server to acquire a trace in the Caliber to store logon information on the computer.
n To perform silent extraction of traces to or from Quality Center, select the Make default credentials option while logging on to Quality Center. To change the default credential, delete the “HKEY_CURRENT_USER\Software\Borland\Caliber\qc_auth" registry key and log again in Quality Center.
Datamart Synchronizer
The Datamart Synchronizer keeps the user-defined attribute (UDA) objects in the Datamart universe synchronized with the UDAs in Caliber. The Datamart Synchronizer is a behind-the-scenes program that you should run after the Datamart is run. You should run it once, and then only after a user-defined attribute is created, modified or deleted in Caliber. The Datamart Synchronizer runs independently using the command prompt.
The syntax is:
Synchronizer.exe [parameters]
-u Universe Name – specifies which BusinessObjects universe to synchronize if you selected BusinessObjects as a reporting tool
-d 1. DSN – specifies the data source name to the database with which it is synchronized for MS Access and SQL Server
2. TNS – specifies the TNS service name to the database with which it is synchronized for Oracle
-n User Name – your reporting tool (for example, BusinessObjects) user name; the default user name is (CaliberPRO User); optional; only used when a BusinessObjects security model is used
Chapter 3: Datamart 13
Important! When using BusinessObjects as a reporting tool, you must complete the following steps once for each universe file before running the Datamart Synchronizer.
1 Select Start > Programs > Business Objects > Designer to Launch BusinnessObjects Designer.
Note: If the Designer Wizard launches, click Cancel.
2 Select File > Open. The Open dialog box is displayed.
Navigate to where you installed BusinessObjects and select the universe you want to work with (RMSSA for MS Access, RMMSSQL for MS SQL Server, or RMORA for Oracle).
3 Click Open. The universe is displayed.
4 Select File > Parameters. On the Definition tab, locate and note the Connection name. Then click the Edit button and locate and note the Data Source Name for MS Access and MS SQL Server, or the User name, Password, and Service for Oracle.
5 Click OK.
6 If you want to do a multi-extraction that Datamart supports for MS Access and MS SQL Server, change the connection name and select the corresponding DSN. Otherwise, click OK again.
Note: See the section “Multi-Extraction Naming Conventions” on page 6 for more information on structure and naming conventions for multi-extractions.
Note: If the connection user name and password are filled in, take note of them. You will need them in Step 10.
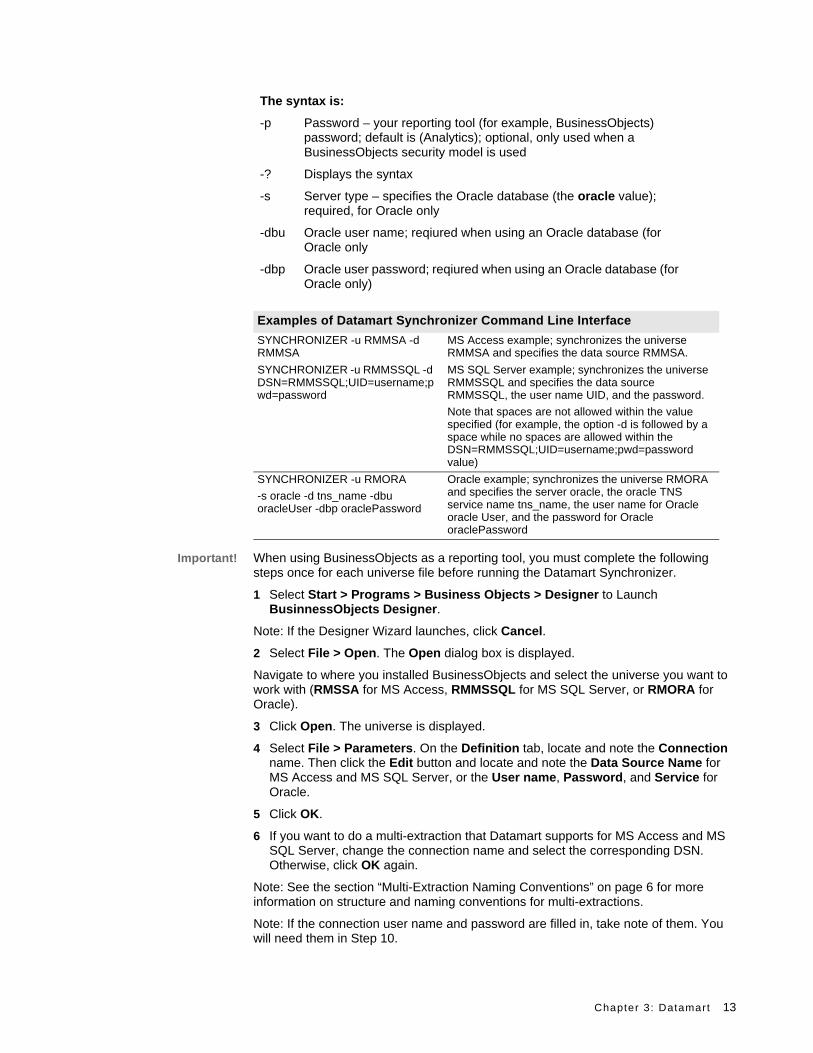
-p Password – your reporting tool (for example, BusinessObjects) password; default is (Analytics); optional, only used when a BusinessObjects security model is used
-? Displays the syntax
-s Server type – specifies the Oracle database (the oracle value); required, for Oracle only
-dbu Oracle user name; reqiured when using an Oracle database (for Oracle only
-dbp Oracle user password; reqiured when using an Oracle database (for Oracle only)
Examples of Datamart Synchronizer Command Line Interface
SYNCHRONIZER -u RMMSA -d RMMSA
MS Access example; synchronizes the universe RMMSA and specifies the data source RMMSA.
SYNCHRONIZER -u RMMSSQL -d DSN=RMMSSQL;UID=username;pwd=password
MS SQL Server example; synchronizes the universe RMMSSQL and specifies the data source RMMSSQL, the user name UID, and the password.
Note that spaces are not allowed within the value specified (for example, the option -d is followed by a space while no spaces are allowed within the DSN=RMMSSQL;UID=username;pwd=password value)
SYNCHRONIZER -u RMORA
-s oracle -d tns_name -dbu oracleUser -dbp oraclePassword
Oracle example; synchronizes the universe RMORA and specifies the server oracle, the oracle TNS service name tns_name, the user name for Oracle oracle User, and the password for Oracle oraclePassword
The syntax is:

14 Cal iberRM Datamart User Guide
7 Select Tools > Connections. The Connections dialog box is displayed.
Note: If the connection name noted in Step 4 appears in the Connections dialog box, go to Step 14.
8 Click Add. The New Connection Wizard launches.
9 Click Next. Select the Data Access Driver.
10 Click Next. Specify the login parameters to access your middleware.
11 Click Next. The Perform a test step of the Wizard is displayed. Review all the connection details.
12 Click Next. Specify the advanced parameters to access your middleware.
13 Click Next. Define the custom parameters to access your middleware.
14 Click Finish. The Connections List step of the Wizard is displayed.
15 Click Finish.
You may now run the Datamart Synchronizer.
Chapter 4: Using BusinessObjects 15
C h a p t e r
Chapter 4Using BusinessObjects
Overview
BusinessObjects is a reporting tool that enables you to create queries based on Caliber universes that are contained on the product CD and loaded with the product.
Important! Before running BusinessObjects, you must:
n configure the BusinessObjects DSN for MS Access and MS SQL Server
Note: For Oracle only. You do not need a DSN configured for an Oracle database. Only a new connection is required so that BusinessObjects can access the Oracle database. Go to page 11 for more detailed instructions for creating a connection in BusinessObjects Designer.
n configure the BusinessObjects Universe location
n run a Simple Test Report
n read the following instructions.
Note: The user must be a member of the Power User or Administrator’s group to run Datamart.
Note: For details on how to use BusinessObjects, please refer to your BusinessObjects documentation.
Configuring the BusinessObjects DSN
For Microsoft Access
The system DSN allows BusinessObjects to access the data in the MS Access database.
1 On the machine that will run the extraction program, select Start > Settings > Control Panel>Administrative Tools from the Windows Start menu.
2 Double-click on Data Sources (ODBC).

16 Cal iberRM Datamart User Guide
Note: Skip Control Panel for Windows 2003; skip Settings for Windows XP.
1 Select the System DSN tab.
2 Click Add.
3 Select Microsoft Access Driver (*.mdb) from the list.
4 Click Finish. The ODBC Microsoft Access Setup dialog box is displayed.
5 Contact your Datamart Administrator for the DSN name used on the Datamart machine. Enter that as the Data Source Name.
Note: Borland recommends RMMSA. See the section “Multi-Extraction Naming Conventions” on page 6 for information on structure and naming conventions for multiple extractions.
6 Click Select. The Select Database window is displayed.
7 In the Directories section, navigate to the MS Access database. Select it from the list and click OK.
Note: This may require that you map a network drive to the Datamart machine.
8 Click OK to exit the ODBC Microsoft Access Setup dialog box.
9 Click OK to exit the ODBC Data Source Administrator dialog box.
The DSN is created. Proceed to the section “Configuring the Datamart Universe Location on” page 17.
For Microsoft SQL Server
The system DSN allows BusinessObjects to access the data in the MS SQL Server database.
1 On the machine that will run the extraction program, select Start > Settings > Control Panel>Administrative Tools from the Windows Start menu.
2 Double-click on Data Sources (ODBC).
Note: Skip Control Panel for Windows 2003; skip Settings for Windows XP.
3 Select the System DSN tab.
4 Click Add.
5 Select SQL Server from the list. Click Finish. The Create a New Data Source to SQL Server wizard is displayed.
6 Contact your Datamart Administrator for the DSN name used on the Datamart machine. Enter that as the Data Source Name.
Note: Borland recommends RMMSASQL. See the section “Multi-Extraction Naming Conventions” on page 6 for information on structure and naming conventions for multiple extractions. For MS SQL Server, the DSN name must include the letters SQL.
Example: RMMSSQL
7 If you want, enter a Description for the data source.
8 Select the server that contains the SQL database.
9 Click Next. The next wizard screen is displayed.
10 Select the With SQL Server authentication... option button.
11 Click the Client Configuration button. The Add Network Library Configuration dialog box is displayed.
12 Verify that the TCP/IP option button is selected and click OK.

Chapter 4: Using BusinessObjects 17
13 Enter the user id and password created for Caliber and SQL Server.
Note: If you do not know the user id and password, ask your Datamart Administrator.
14 Click Next. The next wizard screen is displayed.
15 Select the Change the default database to: check box and select the SQL database from the list.
16 Click Next. The next wizard screen is displayed.
17 Click Finish. A screen is displayed indicating your configuration settings.
18 Click Test Data Source. When the test is complete, click OK.
Note: If the test does not respond, check with your SQL Server administrator to ensure the SQL Server is set up properly.
19 Click OK to exit the configuration settings window.
20 Click OK to exit the ODBC Data Source Administrator dialog box.
The DSN is created. Go to “Configuring the Datamart Universe Location” that follows.
Configuring the Datamart Universe LocationYou must configure BusinessObjects to “point” to the universe folder that contains the BusinessObjects universes. The universes are installed with the Datamart.
To configure the universe location:
1 Select Start > Programs > Business Objects > BusinessObjects from the Windows Start menu, to launch BusinessObjects.
Note: If the New Report Wizard is displayed, click Cancel.
2 Select Tools > Options.
3 Select the File Location tab.
4 Select Universes from the File Types list.
5 Click Change.
6 Navigate to the folder that contains the BusinessObjects universes. The universes are installed with Datamart. The default is (C:\Program Files\Borland\Caliber Datamart\Universes\Business Objects).
7 Click OK.
8 Click OK to exit the Options dialog box.
BusinessObjects is ready to run reports. However, you may want to run a simple report to verify everything is configured properly.
Running a Simple ReportTo run a simple report:
1 In BusinessObjects, select File > New. The New Report Wizard is displayed.
2 Click Begin.
3 In the Specify Data Access screen, verify that the Universe option button is selected, and click Next.
4 In the Available Universes list, select either MS Access, MS SQL Server, or Oracle Server.
5 Click Finish. The Query Panel opens.

18 Cal iberRM Datamart User Guide
6 Open the Requirements Reports folder.
7 Open the Projects folder.
8 Refer to your BusinessObjects online Help for further instructions.
Chapter 5: Reports 19
C h a p t e r
Chapter 5Reports
Overview
There is a series of pre-defined report templates that are included when you install the product. These report templates are intended for use as the starting point for developing more complete and detailed reports. The standard queries are defined below and detailed further in the following sections. See “Appendix B: Report Samples” on page 29 for examples of these reports.
n Attribute Distribution: shows the way attributes are distributed throughout the repository
n Impact Analysis: shows the number of traces, both direct and implied, related to a set of requirements
n Project Scorecard: a number-focused report that gives indicators to the overall soundness of a project(s)
n Requirement Volatility: shows the number of changes that are made to a requirement within a project(s) over time
n Status Summary: shows the number of requirements broken down by project, baseline, requirement type, status and priority
n Traceability Complexity: shows the number of traces that link a user-defined number of “Top 10” requirements within projects and Automated Software Quality (ASQ) applications
n User Deployment: shows users assigned to a specific project(s)
Attribute Distribution
The Attribute Distribution report is primarily designed for Caliber administrators. This report details the way attributes are distributed throughout the repository. It shows both the distribution of an attribute across projects as well as the attributes contained in each project. The data is broken down by attribute, requirement type and project. The report shows a tabular and a graphical representation of the data and presents different levels of detail on several different tabs. It also shows which UDAs are not used in any of your projects.

20 Cal iberRM Datamart User Guide
Impact Analysis
The Impact Analysis report is primarily designed for Project Managers, Quality Managers and Change Management Assessors. This report shows the number of traces, both direct and implied, related to a set of requirements both upstream and downstream. It also shows the types of elements that the traces relate. The number of traces are broken down by project, baseline, requirement type, status and priority. Suspect traces are flagged and the “average depth” of traces are shown. The report presents the different levels of detail of several tabs.
Project Scorecard
The Project Scorecard report is a numbers-focused report that gives several indicators to the overall well-being of your project(s). This report is designed for Project Managers and Project Team Members. Data is available by project and requirement type and is run for the current version’s baseline or other baselines, depending on the data. This report contains the following indicators:
n Length of trace chains (maximum, average)
n Number of requirements broken down by status and total
n Number of requirements broken down by owner
n Number of requirements broken down by responsible person
n Average length of time from creation to current status broken down by status.
n Total number of suspect links
n Total number of requirement’s growth time, broken down by year, month and week
Requirement Volatility
The Requirement Volatility report is designed primarily for Project Managers and Project Team Members. This report shows the number of minor and major changes that are made to a requirement within a project or projects over time. It shows the rate of change as well as the cumulative total number of changes. The data is broken down by project, current baseline, requirement type, status, priority, owner and requirement ID. The data is further broken down by year, month, week and day. The report shows a tabular and a graphical representation of the data and presents different levels of detail on several different tabs.
Status Summary
The Status Summary report is designed primarily for Development Managers. This report shows the number of requirements broken down by project, baseline, requirement type, status and priority. It shows the percentage of total requirements represented by each status in each project and requirement type. Its information is presented on several different tabs.

Chapter 5: Reports 21
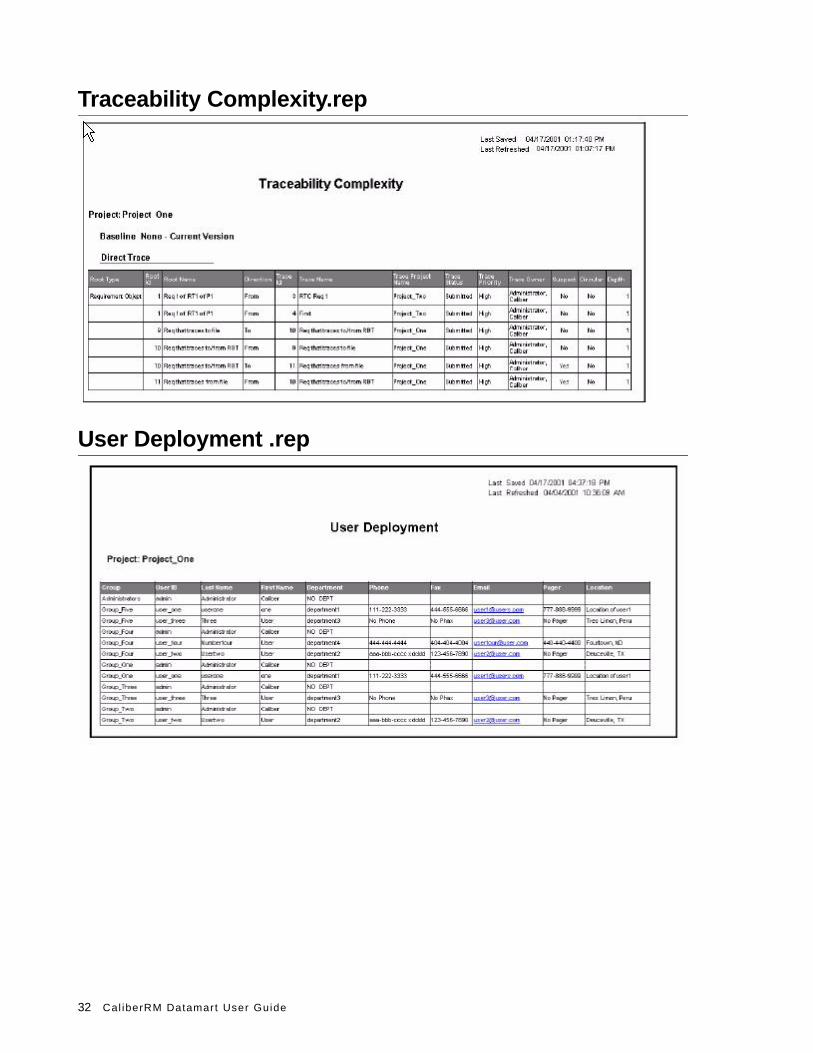
Traceability Complexity
The Traceability Complexity report is designed primarily for Project Managers and Project Team Members. It shows the number of traces that link to a user-defined number of most frequently observed requirements within and between projects and ASQ applications. It includes upstream and downstream traces, as well as direct and implied traces. It shows the type of object to or from which a requirement traces. All data is grouped by project.
User Deployment
The User Deployment report is designed for Project Managers and Caliber Administrators. It shows the users that are assigned to a specified project. The report also shows which users are assigned to a group and the security profiles for each user, group and project.

22 Cal iberRM Datamart User Guide

Appendix A: Universe Parameters 23
A p p e n d i x
Appendix AUniverse ParametersThis appendix details the universe objects, including the object description and type, as they appear in the BusinessObjects query panel.
Requirement Reports Class
These objects give information about requirement-centric data. You must break down the information by project and baseline if the Datamart has multiple projects and baselines.
The information in these folders cannot be combined in a queries with information from the Administration Reports or Glossary folders.
Projects Class
Object Description Type / Qualification
Project Name The name of the Caliber project Character; Dimension
Description The project's description Long text; Detail
TestDirector Integration Enabled
A flag signifying whether the TestDirector integration is turned on or off (On=Enabled)
Character; Dimension
Select Integration Enabled A flag signifying whether the Select Enterprise integration is turned on or off (On=Enabled)
Character; Dimension
SCM Integration Enabled A flag signifying whether the Source Code Management integration is turned on or off (On=Enabled)
Character; Dimension
Security Enforced A flag signifying whether security is turned on or off for the project (On=Enabled)
Character; Dimension
Requirements Mapped Enabled A flag signifying whether a requirement can be mapped for the project (Yes=Mapped)
Character; Dimension
Requirements Shared Enabled A flag signifying whether a requirement can be shared for the project (Yes=Mapped)
Character; Dimension
Number of Projects A count of the number of projects Number; Measure
24 Cal iberRM Datamart User Guide
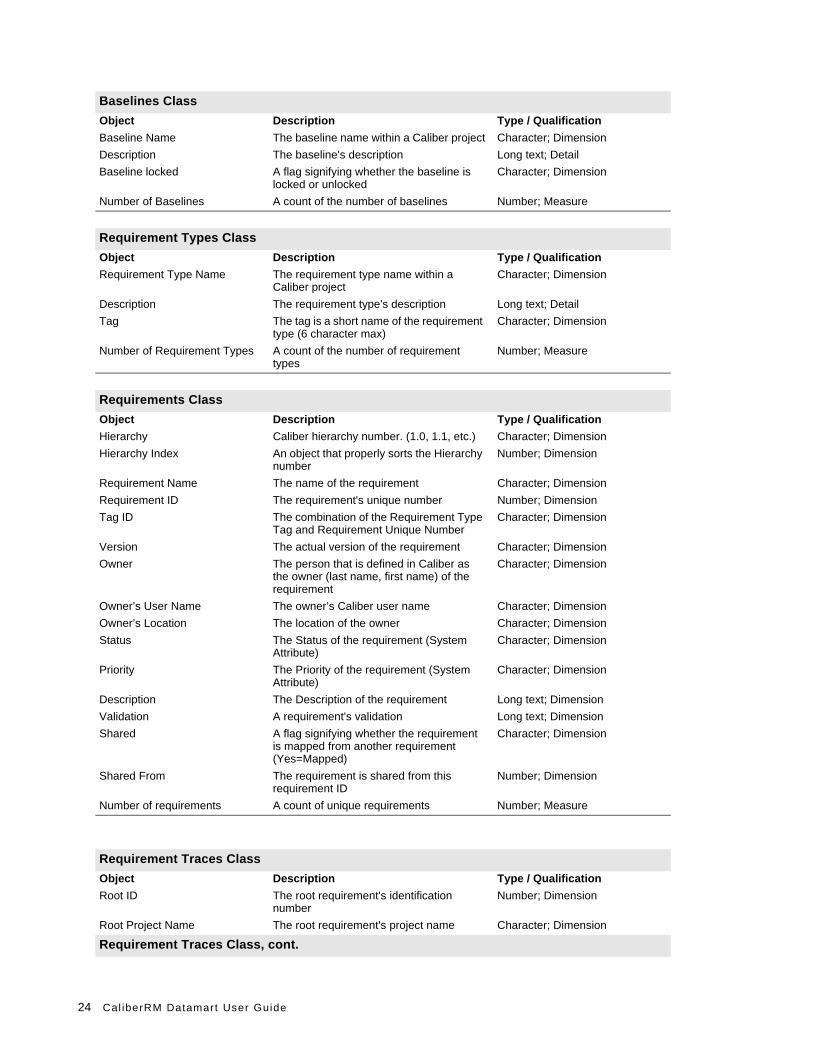
Baselines Class
Object Description Type / Qualification
Baseline Name The baseline name within a Caliber project Character; Dimension
Description The baseline's description Long text; Detail
Baseline locked A flag signifying whether the baseline is locked or unlocked
Character; Dimension
Number of Baselines A count of the number of baselines Number; Measure
Requirement Types Class
Object Description Type / Qualification
Requirement Type Name The requirement type name within a Caliber project
Character; Dimension
Description The requirement type's description Long text; Detail
Tag The tag is a short name of the requirement type (6 character max)
Character; Dimension
Number of Requirement Types A count of the number of requirement types
Number; Measure
Requirements Class
Object Description Type / Qualification
Hierarchy Caliber hierarchy number. (1.0, 1.1, etc.) Character; Dimension
Hierarchy Index An object that properly sorts the Hierarchy number
Number; Dimension
Requirement Name The name of the requirement Character; Dimension
Requirement ID The requirement's unique number Number; Dimension
Tag ID The combination of the Requirement Type Tag and Requirement Unique Number
Character; Dimension
Version The actual version of the requirement Character; Dimension
Owner The person that is defined in Caliber as the owner (last name, first name) of the requirement
Character; Dimension
Owner’s User Name The owner’s Caliber user name Character; Dimension
Owner’s Location The location of the owner Character; Dimension
Status The Status of the requirement (System Attribute)
Character; Dimension
Priority The Priority of the requirement (System Attribute)
Character; Dimension
Description The Description of the requirement Long text; Dimension
Validation A requirement's validation Long text; Dimension
Shared A flag signifying whether the requirement is mapped from another requirement (Yes=Mapped)
Character; Dimension
Shared From The requirement is shared from this requirement ID
Number; Dimension
Number of requirements A count of unique requirements Number; Measure
Requirement Traces Class
Object Description Type / Qualification
Root ID The root requirement's identification number
Number; Dimension
Root Project Name The root requirement's project name Character; Dimension
Requirement Traces Class, cont.

Appendix A: Universe Parameters 25
Object Description Type / Qualification
Root Name The root requirement's name Character; Dimension
Root Description The root requirement's description Long text; Dimension
Root Type The root requirement's type (Requirement, TestDirector, StarTeam, other, etc.)
Character; Dimension
Root Owner The root requirement's owner Character; Dimension
Root Test Status The root requirement's status for Mercury's TestDirector Tests
Character; Dimension
Trace ID The trace requirement's identification number
Number; Dimension
Trace Project Name The trace requirement's project name Character; Dimension
Trace Name The trace requirement's name Character; Dimension
Trace Description The trace requirement's description Long text; Dimension
Trace Type The type of trace Character; Dimension
Trace Owner The trace requirement's owner Character; Dimension
Trace Priority The trace requirement's priority Character; Dimension
Trace Status The trace requirement's status Character; Dimension
Trace Test Status The requirement's status for Mercury's TestDirector Tests
Character; Dimension
Direction The direction of the root/trace (to or from) Character; Dimension
Direct or Implied Signifies whether the trace is direct or implied
Character; Dimension
Circular A flag set that indicates a root/trace is in a circular path
Character; Dimension
Suspect A flag set that indicates a root/trace is suspect
Character; Dimension
Depth The total number of direct and indirect traces
Number; Measure
Number of Traces A count of the number of traces Number; Measure
Number of Direct Traces A count of the number of direct traces Number; Measure
Number of Circular Traces A count of the number of circular traces Number; Measure
Number of Non-suspect Traces A count of the number of non-suspect traces
Number; Measure
Number of Suspect Traces A count of the number of suspect traces Number; Measure
Requirement Discussions Class
Object Description Type / Qualification
Subject The subject of the discussion Long text; Dimension
Discussion Date The date and time the discussion was posted
Date; Dimension
Day of Week The day of the week the discussion was posted
Character; Dimension
Discussion Week The week the discussion was posted Number; Dimension
Object Description Type / Qualification
Discussion Month The month the discussion was posted Character; Dimension
Discussion Year The year the discussion was posted Number; Dimension
Discussion Posted By The person who posted the discussion Character; Dimension
User Name The user name of the person who posted the discussion
Character; Dimension
Location The location of the person who posted the discussion
Character; Dimension
Body The content of the discussion Long Text; Dimension
Discussion Depth The depth of the discussion Number; Measure
Requirement Discussions Class, cont.

26 Cal iberRM Datamart User Guide
Administration Reports Class
These objects give information about non requirement-centric data that is beneficial to an Administrator.
Object Description Type / Qualification
Number of Total Discussions A count of the number of discussions Number; Measure
Requirement Responsibility Class
Object Description Type / Qualification
Responsible Member The name of the responsible user Character; Dimension
Responsible User Name The user name of the responsible person Character; Detail
Location The location of the responsible person Character; Detail
Number of Responsible Members
A count of the number of responsible members
Number; Measure
Requirement Version Class
Object Description Type / Qualification
Requirement ID The requirement’s ID Number; Dimension
Version Actual The actual version of the requirement Character; Dimension
Major or Minor change Indicates whether the change is a major or minor change
Character; Dimension
Version Change Date The date the version changed Date; Dimension
Change Owner The owner of the requirement change Character; Dimension
Day of Week The day of the week the version changed Character; Dimension
Version Change Week The week the version changed Number; Dimension
Version Change Month The month the version changed Character; Dimension
Version Change Year The year the version changed Number; Dimension
Comment A comment about the change Long text; Dimension
Field Changed The field to which a change was made Character; Dimension
Old Value The old value of the field changed Long text; Dimension
New Value The new value of the field changed Long text; Dimension
Requirement Day Age Shows the age of the requirement from v1.0 to the max version (USE ONLY WITH OBJECTS IN THE REQUIREMENT VERSION CLASS FOLDER)
Number; Dimension
Number of Changes A count of the total number of changes (not by version)
Number; Measure
Project Discussion Class
Object Description Type / Qualification
Project Name Use this project name object when running reports on project discussion
Character; Dimension
Posted By The user who posted the discussion Character; Dimension
Subject of Project Discussion The subject of the discussion Long text; Dimension
Body of Project Discussion The content of the discussion Long text; Dimension
Discussion Depth The depth of the discussion Number; Dimension
Project Discussion Date The date the discussion was posted Date; Dimension
Number of Project Discussions A count of the total number of discussions Number; Measure
Caliber User Class
Object Description Type / Qualification

Appendix A: Universe Parameters 27
User Name The Caliber userid Character, Dimension
First Name Caliber user's first name Character; Dimension
Object Description Type / Qualification
Last Name Caliber user's last name Character; Dimension
Email Address Caliber user's Email address Character; Dimension
Location Caliber user's location Character; Dimension
Phone Number Caliber user's phone number Character; Dimension
Fax Number Caliber user's fax number Character; Dimension
Pager Number Caliber user's pager number Character; Dimension
Department Name Caliber user's department Character; Dimension
Must Change Password A flag set on the user’s account so he/she must change the password
Character; Dimension
Cannot Change Password A flag set on the user’s account so he/she cannot change the password
Character; Dimension
Password Never Expires A flag set on the user’s account allowing a password that never expires
Character; Dimension
Account Disabled A flag set on the user’s account that disables the account
Character; Dimension
Number of Caliber Users A count of the total number of Caliber users
Number; Measure
Caliber Groups Class
Object Description Type / Qualification
Group Name The Caliber group name Character; Dimension
Description The Caliber group's description Long text; Dimension
Group Email Address The Caliber group's Email address Character; Dimension
Number of Groups A count of the total number of groups Number; Measure
Project Security Admin Class
Object Description Type / Qualification
Project Name The Caliber project Character; Dimension
Project Description The Caliber project description Long text; Detail
Security Profile Name The Caliber security profile name Character; Dimension
Security Profile Description The Caliber security profile description Long text; Detail
Group Name The Caliber group name Character; Dimension
Full Name The Caliber user Character; Dimension
User Name The Caliber user name Character; Detail
Department Name The Caliber department name Character; Dimension
Number of Security Profiles A count of the total number of security profiles
Number; Measure
Requirement Type Security Admin Class
Object Description Type / Qualification
Security Profile Name The Caliber security profile name Character; Dimension
Security Profile Description The Caliber security profile description Long text; Detail
Requirement Type Security Admin Class, cont.
Object Description Type / Qualification
Requirement Type Name The requirement type name within a Caliber project
Character; Dimension
Requirement Type Access The security access for the requirement type (None, Read, Create)
Character; Dimension

28 Cal iberRM Datamart User Guide
Glossary Class
This class remembers Glossary Terms that are global to all projects.
Requirement Type Delete Permission
The security delete access for the requirement type (None, Owned, Any)
Character; Dimension
UDA Name The name of the UDAs in the requirement type
Character; Dimension
UDA Access The security access for the UDA (None, Owned, Any)
Character; Dimension
Requirement Types Admin Class
Object Description Type / Qualification
Project Name The name of the Caliber project Character; Dimension
Project Description The project's description Long text; Detail
Requirement Type Name The requirement type name within a Caliber project
Character; Dimension
Tab Name The name of the tab within a Caliber project
Character; Dimension
UDA Name The name of the UDAs in the requirement type
Character; Dimension
UDA Description The description of the UDA Long text; Detail
UDA Type The type of the UDA Character; Dimension
System Attribute A flag set that indicates the attribute as a system attribute
Character; Dimension
Causes Version Change A flag set to change the version to a major increment
Character; Dimension
Change Makes Trace Links Suspect
A flag set to make the trace suspect Character; Dimension
Inherit From Parent A flag set for the UDAs to inherit the default value from the parent
Character; Dimension
Mandatory Set on Create A flag set for the UDAs to make the default value mandatory
Character; Dimension
Accept Default Setting A flag set for the UDAs to accept a default value
Character; Dimension
Object Description Type / Qualification
Glossary Word The glossary word Character; Dimension
Glossary Definition The definition of the glossary word Character; Dimension
Number of Glossary Words A count of the number of glossary words Number; Measure

Appendix B: Report Samples 29
A p p e n d i x
Chapter 5Report SamplesThis appendix consists of examples of data generated using BusinessObjects reports.
There are seven reports:
n Attribute Distribution: shows the way attributes are distributed throughout the repository
n Impact Analysis: shows the number of traces, both direct and implied, related to a set of requirements
n Project Scorecard: a number-focused report that gives indicators to the overall soundness of a project(s)
n Requirement Volatility: shows the number of changes that are made to a requirement within a project(s) over time
n Status Summary: shows the number of requirements broken down by project, baseline, requirement type, status and priority
n Traceability Complexity: shows the number of traces that link a user-defined number of “Top 10” requirements within projects and Automated Software Quality (ASQ) applications
n User Deployment: shows users assigned to a specific project(s)

30 Cal iberRM Datamart User Guide
Attribute Distribution.rep
Impact Analysis.rep

Appendix B: Report Samples 31
Project Scorecard.rep
Status Summary.rep
32 Cal iberRM Datamart User Guide
Traceability Complexity.rep
User Deployment .rep

Appendix C: Datamart Restr ic t ions 33
A p p e n d i x
Appendix CDatamart RestrictionsThis appendix details certain restrictions when using Datamart.
Document References
In Datamart, the extraction of document references is not available.
Reporting Domains
There are ten “domains” in the Datamart that dictate how you can access data. Each of these domains contains information that correlates to information in the Classes on the Datamart Query Panel.
1 Requirement information, contained in the classes:
a Project
b Baseline
c Requirement Type
d Requirements
2 Traceability information, contained in the classes:
a Project
b Baseline
c Requirement Type
d Requirement Traces
3 Responsibility information, contained in the classes:
a Project
b Baseline
c Requirement Type
d Requirements
e Requirement Responsibility
34 Cal iberRM Datamart User Guide
4 Requirement Discussion information, contained in the classes:
a Project
b Baseline
c Requirement Type
d Requirements
e Requirement Discussions
5 Requirement Change information, contained in the classes:
a Project
b Baseline
c Requirement Type
d Requirements
e Requirement Change
6 Project Discussions information, contained in the class:
a Project Discussion
7 Projects (Users, Groups & Security Profiles) information, contained in the classes:
a Caliber User
b Caliber Group
c Project Security Admin
8 Requirement Type & Security Profiles information, contained in the class:
a Requirement Type Security Admin
9 Requirement Type Structure information, contained in the class:
a Requirement Types Admin
10 Glossary information
You can only create a query in the context of a single domain. Reporting across these domains with a single query is not supported because there is no correlation in the data. That is, a single query across domains does not make sense. For example, you cannot create a single query that shows which requirement type(s) have a certain security profile and how many requirements are in each requirement type. If you needed to display this information, you would use two queries.
If you attempt to create a query that spans domains, the Error during SQL generation error message appears.
For advance reporting, you can print the database schema using BusinessObjects Designer. Select Start > Programs > Business Objects > Designer from the Windows Start menu, to launch BusinessObjects Designer. When Designer opens, select File > Open, navigate to the universe RMMSA.unv and open it. Select Tools > Options > Print tab to select the information you want to display in the graphical structure. Click OK. Select File > Print to print the universe.
Warning! Please do not modify the content of the original universes.
List of Values
When running a query with a prompt and selecting the Values button, always remember to select the Refresh button. If a query is run with older values it may not return any data.
Appendix C: Datamart Restr ic t ions 35
Requirement Types and Projects
There is no relationship between requirement types and projects unless there are requirements in the requirement type. That is, you cannot show the requirement types assigned to a project if the requirement type is “empty.”
Security on Groups
There is no relationship between security profiles and groups in projects. You can show security profile information on requirement types and UDAs, but you cannot relate that to a specific group in a project.
Users in Groups
There is no relationship between users in groups. The relationship is users in groups in projects. You can show which users are assigned to which groups in which projects. A report showing which groups a user is a member of (outside of the context of a project) is provided in Caliber.
Relational Database Restrictions
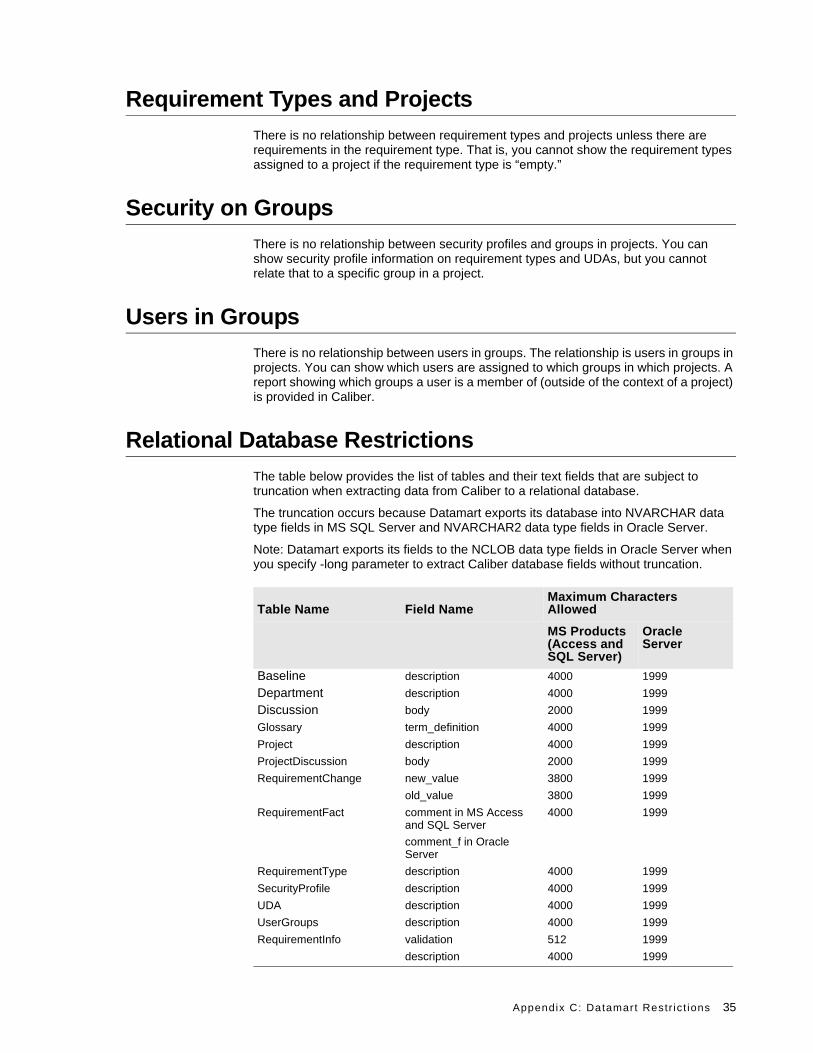
The table below provides the list of tables and their text fields that are subject to truncation when extracting data from Caliber to a relational database.
The truncation occurs because Datamart exports its database into NVARCHAR data type fields in MS SQL Server and NVARCHAR2 data type fields in Oracle Server.
Note: Datamart exports its fields to the NCLOB data type fields in Oracle Server when you specify -long parameter to extract Caliber database fields without truncation.
Table Name Field NameMaximum Characters Allowed
MS Products (Access and SQL Server)
Oracle Server
Baseline description 4000 1999
Department description 4000 1999
Discussion body 2000 1999
Glossary term_definition 4000 1999
Project description 4000 1999
ProjectDiscussion body 2000 1999
RequirementChange new_value 3800 1999
old_value 3800 1999
RequirementFact comment in MS Access and SQL Server
comment_f in Oracle Server
4000 1999
RequirementType description 4000 1999
SecurityProfile description 4000 1999
UDA description 4000 1999
UserGroups description 4000 1999
RequirementInfo validation 512 1999
description 4000 1999

36 Cal iberRM Datamart User Guide
User-Defined Attributes
Only the first 230 UDAs associated with the projects selected will be extracted to a relational database. To optimize space in the table, only the UDAs associated with projects selected are extracted into the database. Only UDAs with values are extracted into the database.
Note: There is a row size limitation in the Microsoft SQL Server database. The maximum row size has a limitation of 8060 bytes, which means that if the total number of bytes in the UDAs and system attributes combined equals more than 8060 for a given row, you either must reduce some of the field sizes or decrease the number of projects included in the extraction.
in Microsoft SQL Server 2005, this restriction is relaxed for tables that contain varchar, nvarchar or user-defined type columns. The length of each one of these columns must still fall within the limit of 8060 bytes per row; however when a row exceed 8060 bytes, the data for varying columns (typed as varchar, nvarchar) is automatically moved into the large object area, rather than terminating the data modification. Datamart dynamically detects the MS SQL Server version and if it is MS SQL Server 2005 the length of varying columns is always regarded as 24 bytes.
If you look in the registry:
Hkey Current User\Software\Borland\extractor\settings, you will see the field sizes that can be reduced manually.
MultiSelectColumnSize =
DescriptionColumnSize =
MultiLineColumnSize =
ValidationColumnSize =
Making these changes will truncate the attribute value during the extraction; therefore you will want to determine the settings for each field. For example, you may want ValidationColumnSize to be lower and Description to be higher. You will have to experiment with these until you find a combination that works.

Appendix D: Glossary 37
A p p e n d i x
Chapter 5GlossaryAttributes: Characteristics that help define requirements
Baseline: A static snapshot of a group of requirements or a project at specific versions or a specific point in time
Class: A logical grouping of data elements called objects
Dimension: Key data elements that are the parameters of a query
Detail: Data elements that provide a description of a dimension object; these are always associated with dimension objects and do not form the basis of a query
Group: A set of users with similar responsibilities (i.e., managers, developers, engineers, etc.)
Measure: Numeric data that convey information that is a result of calculations on the database
Object: An element in a universe that corresponds to a selection of data in the database; objects are used to build queries that retrieve data for reports; there are three types of objects: Dimension, Detail and Measure
Project: Any application or system under development; projects consist of several layers of information, including users and groups, requirement types and requirements
Query: A request for information from a database
Requirements: Specifications that the application or system being built must meet; requirements can originate from many sources such as business rules, business process models, product marketing, prototypes, development meetings and more
Requirement ID Numbers: These numbers, also called Serial numbers, are displayed to the right of the requirement name; these are static and automatically generated by Caliber; each ID number is unique in the system; if a requirement is deleted, that ID number is not reused
Requirement Types: High-level groups of requirements; requirement types are typically classified by their function (i.e., Marketing, Functional, GUI, Software, Testing, etc.)
Traceability: Caliber supports requirement traceability to allow you to see requirement relationships easily; requirements may trace to or trace from other requirements, as well as object modeling and test entities; suspect links, which indicate a change in a requirement that may affect other objects, are shown when a requirement is changed

38 Cal iberRM Datamart User Guide
Universe: The file that creates the relationship between the database tables; it also provides the mapping between business level terms and database level elements
User-Defined Attributes: An attribute that a user defines and assigns to a custom tab in a requirement type
User: Any person who has access to and uses Caliber.
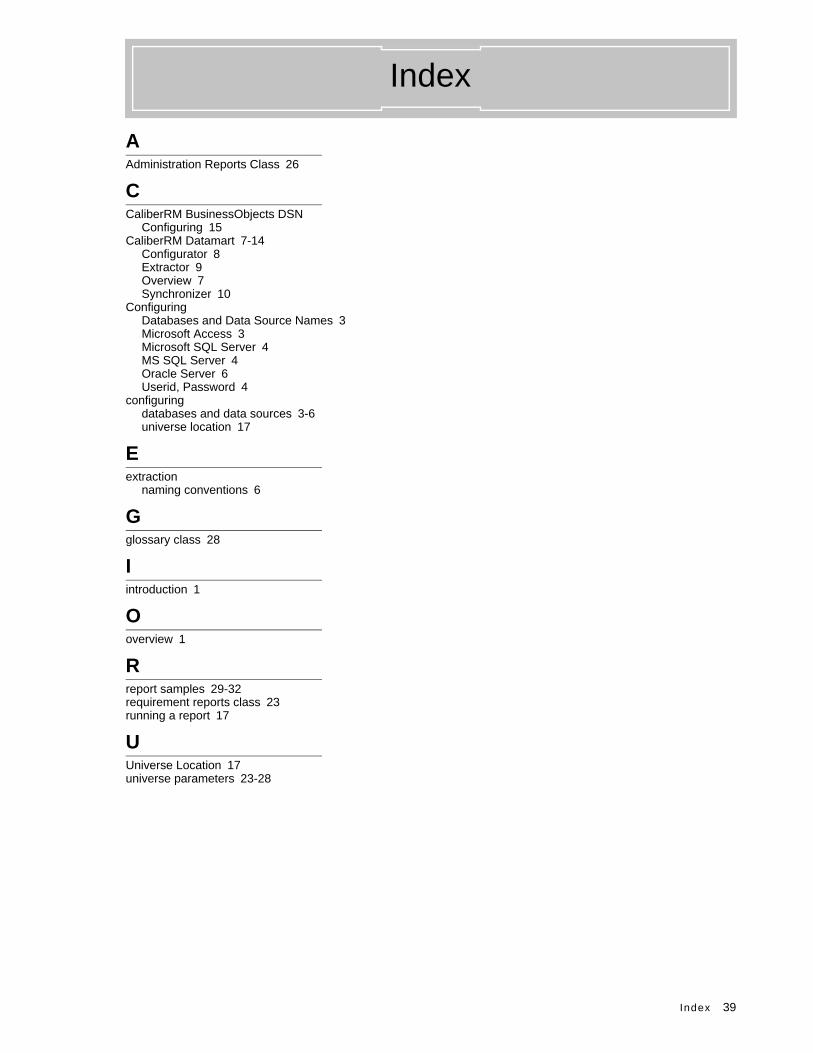
Index 39
AAdministration Reports Class 26
CCaliberRM BusinessObjects DSN
Configuring 15CaliberRM Datamart 7-14
Configurator 8Extractor 9Overview 7Synchronizer 10
ConfiguringDatabases and Data Source Names 3Microsoft Access 3Microsoft SQL Server 4MS SQL Server 4Oracle Server 6Userid, Password 4
configuringdatabases and data sources 3-6universe location 17
Eextraction
naming conventions 6
Gglossary class 28
Iintroduction 1
Ooverview 1
Rreport samples 29-32requirement reports class 23running a report 17
UUniverse Location 17universe parameters 23-28
Index

40 Cal iberRM Datamart User Guide