Embed Size (px)
Citation preview

C++ Builder 2009 Professional Getting started. Kjell Gunnar Bleivik: http://www.kjellbleivik.com/ March 22. 2009. Follow me on Twitter and join my C++ Builder group on Facebook: Twitter: http://twitter.com/kbleivik FaceBook: http://www.facebook.com/people/Kjell-Gunnar-Bleivik/1244860831 Mini network: http://www.digitalpunkt.no/ 1. Getting started with C++ Builder. 1.1 Installation and a quick IDE Tour. This document is written for C++ Builder 2009 Professional Edition: http://www.codegear.com/products/cppbuilder
• Buy the platform and download the code from the link sent to you. • Unzip the code. • Click the install program • Install the C++ Builder. • Install the documentation.

You may need to read the release notes: http://edn.embarcadero.com/article/38475#CPPcompiler I assume that C++ Builder is now installed on your computer and that you have a shortcut on you desktop. Click this shortcut and the program starts.
When finished loading program parts, you see an application with a lot of menu items at the top. Some of these items like file, edit, view and help should be familiar to you from other windows programs. This is the main menu. Below you see a toolbar other small windows and a Welcome Page that is the working area of the C++ Builder. Note the address of the Welcome Page: bds:/default.htm.
Note the scroll field to the right of the help item on the main menu (help menu for short when there is not risk of misunderstanding). In this field you can choose among four layouts:
• <None> • Classic Undoced • Debug Layout • Default Layout (the choice on upstart).
Choose Debug Layout and note how the small windows at the left side changes context. Then go back to the Default Layout and close the Welcome Page. It is easy to reopen it from the view item on the main menu. Note the functionality of the Welcome Page. Note also how it changes content as you build your projects.
2

The working area is where you build your projects by writing code in the code editor or dropping components on the form designer (that will be explained below).
Now click the Help menu + Codegear. After a while the help page is loaded. In the upper left corner note the Filtered by: scroll field where the first field is Blackfish SQL, the second Language: C++ etc. Don’t filter now. In the Look for: field write
Welcome Page + Enter
A short description of the Welcome Page is shown in the top right window. At the bottom of that page you should see an IDE Tour link. Click that link. Take a look at the different subjects. It is a good place to get a bird’s eye view of the IDE.
In addition to the menu line, the toolbar and the Welcome Page, you should see a lot of smaller windows with the following headings:
• Structure • Object Inspector • Messages • Project Manager • Tool Palette
In the lower right window, click the three different folders and note the change in the upper right window. Go back to the Project Manager folder. If closed, the windows can be reloaded from the view menu. In the lower right window, close the Tool Palette, then the Project Manager Window etc. Close the application, from the File + Exit menu and not by clicking the x in the upper right corner. That is the correct way to close applications and there may be differences. Restart the application and observe that the default is restored. Now it is time to configure the IDE.
Below the menu line (where one of the items is a scroll field where you can choose layout – default layout is the default the first time you start the program), there is a toolbar with a lot of icons. Actually it is more than one toolbar merged together in groups. The following are checked the first time you start the C++ Builder:
• Standard • Debug • Desktop • Custom • Personality • Browser • View.
Uncheck all and observe where they are placed. Then go back to the default toolbar installation. Other toolbars, like HTML Design, HTML format, HTML Table etc. can be checked at the bottom of the View menu. Check the HTML toolbars and see where they are placed. From the view menu, you can, as is standard in most Windows programs, customize your toolbars with commands and options. That is the last item on the View + Toolbars menu. Alternatively, you can also as is a Windows standard, right click on the top grey empty space outside the menus and choose the last item, customize. Let us try that now. Right click in the grey field and choose customize. The customize dialog with the Toolbars folder pops
3

up. First you will note that this is a faster way to check and uncheck toolbars. You can choose more than one at a time. I assume that you noted where the standard and debug toolbars were located. If not it is very easy to see the location by checking and unchecking them. First click the Options folder that should be easy to understand. Then click the Commands folder. Click and drag the following icons to the standard toolbar:
• Undo • Redo • Cut • Copy • Paste. • Delete. • Select all.
If you want other commands on the standard toolbar, drag them to the toolbar. If you don’t want a command (icon), drag it from the toolbar and drop it somewhere on the main window. On the debug toolbar, I personally choose all commands. When finished, close the customize dialog. I assume that you do not have an open project, so most of the icons are greyed out when you close the dialog. In a similar way you can drag the toolbars to another position. Since the standard and the debug toolbars are now very wide, drag the Custom toolbar at the right of the Desktop toolbar. Then customize a second time, and on the Commands folder choose Component and drag the New VCL Component and Install Packages icon to that toolbar. As you have noted, there are a lot of toolbars and commands that can be chosen to configure a seamless C++ Builder platform. The choice is yours. A lot of these commands are, as is also standard in windows programs, available from the top menus. In addition, there are contextual menus available by right clicking the mouse. Function keys and acceleration keys are also available. Mouse over the Edit menu, and you should recognize the standard Windows acceleration keys, CTRL + X = Cut, CTRL + V=Paste etc. Mouse over the Run menu and you note that F9=Run, Shift + CTRL + F9 =Run without debugging, F8=Step Over, F7=Trace Into etc. If you want speed, it can be very important to remember and use these acceleration and function keys.
1.2. The first console programs. So let us start with our first C++ program. It will be a DOS like console program. First of all close the program by selecting Exit from the File menu (I always prefer that method), restart the program and observe that your toolbars are saved as you left them before closing the application. If you get a problem that is difficult to solve, close the application and restart the program. Before you start, close the welcome page. In the help index (read chapter 2), Look for: Console Applications (and read), then look for: hello world and finally look for: dialog and dialog. Note that we have not used the example under the heading “Building a Windows “Hello World” Console Application that used the std name space. You may try that as an exercise.
1. Click file | New | Other | Console Application. Alternatively you can choose that from the Project Manager window by clicking new and double click Console Application.
2. In the New Console Application dialog choose | C++ as source Type | Only check Console Application. Uncheck the other options.
3. Click OK
4

4. A file named File1.cpp, and its code is loaded in the code editor. We will explain that code in further detail later.
5. Click the run menu | then run or alternatively F9. 6. Oops!! What happened? Some blinking, a black DOS like windows popped up and
then back to the File1.cpp code. 7. Congratulation, you have compiled your first console C++ program in C++ Builder
2009 professional. 8. And if you did not change anything in the files code, everything should compile
without error, even if you do not see any output. 9. You check if everything was ok in the bottom messages window. 10. If I scroll down (at the right) in the messages window, I see that the program
(File1.cpp) built and compiled with no warnings and errors. 11. In addition to the Messages window, you should note that something happened in the
Project Manager window, where a project named Project1.exe is shown. 12. Click Project1.exe and note what happens in the Object Inspector window at the left.
Among other things the Full Path is shown. Locate that folder with Windows explorer. You should also see a Debug subfolder. Browse the files in the main folder and the subfolder.
13. Then choose File and Save the project in the default folder(s). 14. Refresh Windows Explorer (F5 in my OS). You should see some additional new files. 15. In the builder, click File + Close all. 16. In Windows Explorer, choose all and then Delete. 17. Make your own folder and repeat the above steps. 18. Even if you run (compile) a program without saving it, you will note that some files
are stored in the Debug sub folder.
You should now have and idea of what you are able to do with this excellent platform. But let us make a console program where you see some output. Change the code in File1.cpp to the following:
Example 1.1
#pragma hdrstop #include <tchar.h> #include <iostream.h> #include <conio.h> //--------------------------------------------------------------------------- #pragma argsused int _tmain(int argc, _TCHAR* argv[]) { cout << "Hello World" << endl; cout << endl << "Press any key to continue..."; getch(); return 0; } Then run the program. If everything is Ok, you should see a DOS window with the following messages. Hello World!
5

Press any key to continue... 1.3. A short very important note on adding an existing cpp file to a project. If you have YourUnit.cpp and YourUnit.h files then the .h file must have then following lines: #ifndef YourUnitH #define YourUnitH …………………………………….. #endif and the .cpp file must include the .h file: #include "YourUnit.h" Take a look at the code of the cpp and h file in a new / existing project if you are uncertain.
Note that if you open different new projects, all of them may include a default file named File1.cpp. So if you modify that file, you should save the file under another name if you want to keep it. Projects and files with the same name as the current project and source files are overwritten unless you save the new projects and files with another name! For that reason it is a good practice to save your different projects in different folders. Note that C++ source files have the extension .cpp. If you are used to other compilers something may surprise you. If you open a cpp source file and try to compile it, it will not compile. The same happens if you start a New + Form – C++ Builder application, similar to older versions of the C++ Builder. Now it is a true builder where source files have to be part of a project to (compile and) run. So you have to start a new project or add files to an existing project with unique names.
If you are used to other C++ compilers or older version of the C++ Builder, the code in Example 1.1 may be unfamiliar to you. The following
Example 1.2
#pragma hdrstop #include <iostream.h> #include <conio.h> //--------------------------------------------------------------------------- #pragma argsused int main(int argc, char **argv) { cout << "Hello World" << endl; cout << endl << "Press any key to continue..."; getch(); return 0; } code or this
6

Example 1.3
#pragma hdrstop #include <iostream.h> #include <conio.h> //--------------------------------------------------------------------------- #pragma argsused main(int argc, char **argv) { cout << "Hello World" << endl; cout << endl << "Press any key to continue..."; getch(); } or even this minimal version.
Example 1.4
#pragma hdrstop #include <iostream.h> #include <conio.h> //--------------------------------------------------------------------------- #pragma argsused main() { cout << "Hello World" << endl; cout << endl << "Press any key to continue..."; getch(); } should be more familiar to you. If you (compile and) run them, all versions will give the same output. Aside from the two first statements in the main function: cout << "Hello World" << endl; cout << endl << "Press any key to continue..."; of example 1.4, that example should be most familiar to you if you have used C, but are new to C++ programming. Remove the following line from the code in example 1.4: #include <iostream.h> and you will get an error. C++ started as “C with headers” (include files) and evolved to C with classes. So the header file iostream.h simplifies input and output streaming compared to pure C programs. The same happens if you keep that line and remove the line #include <conio.h> that define the getch function that should now be clear since the statement is red and the error in the message windows says: [BCC32 Error] File1.cpp(13): E2268 Call to undefined function ‘getch’. So if you get a similar error in your projects, most probably you have forgotten to define the function in your code or you have forgotten the correct include statement. Let us continue with one more console application:
7

Example 1.5
#pragma hdrstop #include <iostream.h> #include <conio.h> //--------------------------------------------------------------------------- #pragma argsused int main(int argc, char **argv) { cout << "argc = " << argc << endl; for (int i = 0; i < argc; i++) { cout << endl << "Parameter " << i << ": " << argv[i] << endl; } cout << endl << "Press any key to continue ..."; getch(); return 0; } Did you note that when you have written for and space in the above code, C++ Builder automatically fills out the following code block for you: for (i = 0; i < 10; i ++) { } That is part of the RAD’s (Rapid Application Development) IntelliSense auto completion. On older compilers you would get an error on the first line of the above code: Undefined symbol i, so you have to change that part of the code to for (int i = 0; i < 10; i ++) { 1.4. The first Windows programs. Form-based visual programming. Now load the help index and Look for:
• VCL and get an overview of what it is. (More is learned in chapter 5 below). • Object Inspector. • Properties, methods. • Event handler. https://forums.codegear.com/message.jspa?messageID=84846#84846
Components are objects that can be dropped on a form and manipulated via properties, methods and events, visual form-based programming, if you prefer that term. Note that properties (arranged in alphabetical order on the Object Inspector) are more than simple data members of a class (see chapter 5 below).
When you select a standard component on a form, or a property or event in the Object Inspector, you can press F1 to get Help on that item. It takes time to bring up the help topic the first time. You can provide developers with the same kind of documentation for your components if you create the appropriate Help files.
8

In the help index (use no filter unless otherwise stated) and look for: VCL Forms | creating Windows applications. Scroll down to – See Also and click the “Building a Windows “Hello World” Application”. You may read the other two topics as well. The more you read (it takes time though), the better you will understand the IDE.
Example 1.6
Close all (and save the project if you want to keep it). Then continue
1. Click File + New + VCL Forms Application - C++ Builder or click new in the Project Manager and choose VCL Forms application. VCL is the key words for “Visual Component Library”.
2. Then a form grid pattern pups up in the working area. This is the form designer, the essential tool to build Windows and web applications. You click and drop components, a binary piece of software that performs some specific function, on the form.
3. Hold the mouse over the form, and click Alt | F12. A file Unit1.dfm is shown. This is a special binary file. Note this line: object Form1: TForm1 Go back by hitting Alt | F12 again. More on this later.
4. In the Structure view, upper left, you should see a Form1 structure. Click on Form1 and then F1 to get an explanation of the Structure View.
5. In the Object inspector, located at the left of the form you should see a Properties and an Events tab. It is through the Object Inspector that you modify a component’s properties and events (if the component has events).
6. At the bottom of the form you see some folders with the source file, Unit1.cpp and a header file Unit1.h. Click on the Unit1.cpp file and you will see the C++ source code loaded in the Code Editor. Click somewhere outside the code in the code editor and then hit F1. The following menu should pop up the first time you do that.
9

7. I accept the default and hit OK. An explanation about the Code Editor pops up. If not choose Code Editor from help index and read about the following subjects now: Change Bars Code Browsing Help Insight Code Navigation All topics are important. The code editor and Object Inspector are some of the most important and often used tools. Learn them and study and restudy the help index subject about them. Knowing the small details can dramatically improve you productivity.
8. Click the Unit1.h folder and take a look at the code.
//--------------------------------------------------------------------------- #ifndef Unit1H #define Unit1H //--------------------------------------------------------------------------- #include <Classes.hpp> #include <Controls.hpp> #include <StdCtrls.hpp> #include <Forms.hpp> //--------------------------------------------------------------------------- class TForm1 : public TForm { __published: // IDE-managed Components private: // User declarations public: // User declarations __fastcall TForm1(TComponent* Owner); }; //--------------------------------------------------------------------------- extern PACKAGE TForm1 *Form1; //--------------------------------------------------------------------------- #endif That is standard C++ code. Click on the parenthesis at the right of Owner, (bolded above). The left and right parenthesis are blued if you did it correct. Hit F1 and you should see something like.
10
C++ header (include) files set up declarations and include other relate header (hpp) files. You will also observe that the main function has disappeared from the header and the cpp source. In Windows API programming those low level details are hidden for you, so don’t worry unless the details are needed. Observe that Unit1.h has 21 code lines where #endif is the last line. Observe line 13 and 14. In a few moments there will be a new line 14.
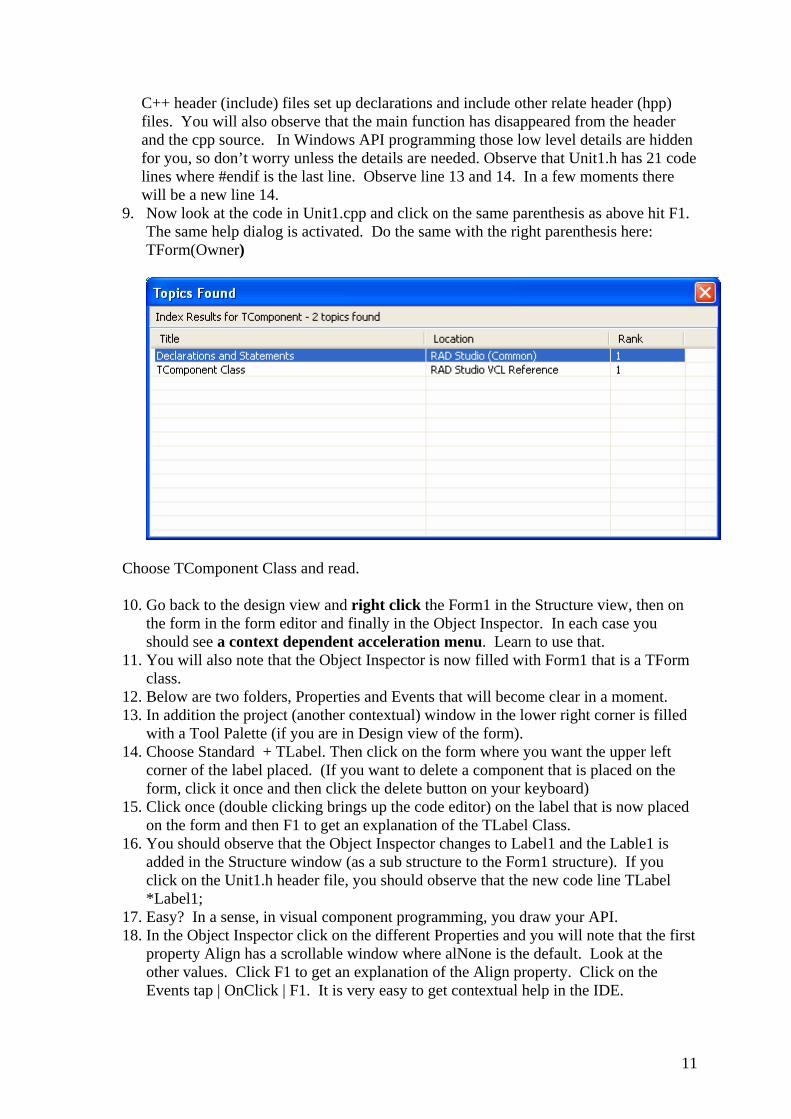
9. Now look at the code in Unit1.cpp and click on the same parenthesis as above hit F1. The same help dialog is activated. Do the same with the right parenthesis here: TForm(Owner)
Choose TComponent Class and read. 10. Go back to the design view and right click the Form1 in the Structure view, then on
the form in the form editor and finally in the Object Inspector. In each case you should see a context dependent acceleration menu. Learn to use that.
11. You will also note that the Object Inspector is now filled with Form1 that is a TForm class.
12. Below are two folders, Properties and Events that will become clear in a moment. 13. In addition the project (another contextual) window in the lower right corner is filled
with a Tool Palette (if you are in Design view of the form). 14. Choose Standard + TLabel. Then click on the form where you want the upper left
corner of the label placed. (If you want to delete a component that is placed on the form, click it once and then click the delete button on your keyboard)
15. Click once (double clicking brings up the code editor) on the label that is now placed on the form and then F1 to get an explanation of the TLabel Class.
16. You should observe that the Object Inspector changes to Label1 and the Lable1 is added in the Structure window (as a sub structure to the Form1 structure). If you click on the Unit1.h header file, you should observe that the new code line TLabel *Label1;
17. Easy? In a sense, in visual component programming, you draw your API. 18. In the Object Inspector click on the different Properties and you will note that the first
property Align has a scrollable window where alNone is the default. Look at the other values. Click F1 to get an explanation of the Align property. Click on the Events tap | OnClick | F1. It is very easy to get contextual help in the IDE.
11

19. Go back to the properties folder and continue to click the different properties and stop with the Font Property. First of all you note that that property can be expanded and collapsed. Also, at the right edge of the scrollable field, there is a little button with three dots (…). Click that button and observe that a small font editor pops up. The ellipsis button tells you that this property can be edited using a property editor. You can bring up the property editor by double clicking the property value (here (TFont)) or clicking the button.
20. Now run the program. If everything is correct so far, you should see: • A window named Form1 with the text Lable1. • It is a true windows program. Note the Form1 icon on your Windows toolbar
if you use it. • The window can be minimized, maximized and closed as standard windows
programs.
Let us add more functionality to the program, by dropping components on the form and modifying the components properties and events through the Object Inspector. A components properties control how a component operates. For example, changing the colour property changes the component’s background. The list of available properties varies from component to component, although the components usually share properties like colour, left, top, height and width. Events that are seen on the events tab of the object inspector occur when the user or Windows interact with the component. For example, when a component is clicked, an event is generated that tells you that the component was clicked. You can write code, event handlers, that responds to these events, performing specific actions when an event occur. An event handler is a method that is invoked in your application in response to an event. This will become clear in a moment. As with properties, the events that you can respond to vary form component to component. You will note that Form1 has no Events. If you click the Unit1.cpp folder at the bottom of the form designer, you will note the following code
TForm1 *Form1; __fastcall TForm1::TForm1(TComponent* Owner) : TForm(Owner)
{
}
First of all note that C++Builder functions use the __fastcall keyword (two underscores are used). Every C++Builder function uses this calling convention, so the sooner you get used to the syntax, the better. If you are used to object oriented programming (OOP), you will recognize that Form1 is a TForm1 pointer (indicated by the indirection operator *). That implies that Form1 points to (the memory location of a) TForm1 object (class). You will also note the TForm object / class in the code. Now, Look for: form and then look for: TForm in the help index. You will see the TForm Class with a visual picture of its Class Hierarchy. Just under the class name, you should note some very important links, TForm Mehtods, TForm Proeperties, TForm Events, TForm Members, Description and See Also. It is here you look for a component’s / class’s documentation. Learn to use that documentation when you are in doubt of the implementation of a component’s / class’s interface. It is especially important when you write event handlers that are related with the different component’s events. As with properties, the events that you can respond to, varies form component to
12

component. Sometimes the same effect can be achieved by giving a (new) value to a property or firing an event by an event handler.
Example 1.7 The fundamental name property of a form or component and its pointer.
1. Before we continue, look once gain at the code in the dfm file (alt | F12), in the header file and in the two cpp source files. If you can not remember the code, copy it to an editor (WordPad or similar) so you can compare with the code that is generated below.
2. Click on the name property in the Object Inspector and change its value to MyForm. Once you have done that and click outside the Object Inspector, you should immediately note that the name of the form changes in both the Structure view and in the form designer.
3. Control by selecting View | Forms or alternatively shift + F12. There is only one form, MyForm. But there are more important changes.
4. Look at the different source files, start with the dfm file where you should note the following change: object MyForm: MyForm.
5. You should also note that at least Form1 is changed to MyForm in the two cpp source files and in the header file.
6. The name MyForm is a TForm pointer. That implies that MyForm points to the memory location of the form. Try to change MyForm back to Form1 in one or more of the source files, (compile and) run (F9). Do you see any errors?
7. Use the Object Inspectors when you change component names. It is a good rule to always use the Object Inspector if you want to change a property. You should also implement the code editor via the value field (double click in the field at the right of the event) of an event when you write a related event handler. More about this below.
The name property is so fundamental that you have to understand it fully. You also have to understand that C++Builder gererates code behind the scene. If you are not convinced, go to the Project menu and click View Source. A new file Project1 and if you look at the Project Manager window, you will see that Project1.cpp is active, so it is another cpp source file that is related to the project. There are even more files in the Project Manager window and at the top you should see the name Project1.cbproj. So a lot of code and files are generated behind the scene. So when you change property values in the Object Inspector, add new event handlers and add new components etc. the change may take effect in more than one file. So you can not expect your application to function if you change the name property outside the Object Inspector.
Example 1.7 continued.
8. Close all from the file menu (I personally don’t save anything). Let us repeat. 9. In the Project Manager window click new + VCL Forms Application + OK. 10. Place the TLabel component on the form as you did above. 11. In the Structures window click on Form1. 12. In the Object Inspector change the Caption property to Hello World. (you should note
the new name on the status line of the form. OOPS! Wasn’t that the name property? No it is not. It is the caption property. The Caption property changed automatically from Form1 to MyForm when you changed the Name property. The behind the scene changes are not always easy to observe. )
13. Then click Label1 in the Structure window.
13

14. In the Object Inspector change the Caption property to Hello World! Windows programming in C++ Builder is funny.
15. Expand the Font property and change Size to 24. 16. (Compile and) run the program. 17. Still not very useful, but a little more informative.
Exercise 1.1.
Exit the builder, restart it and:
• Try to repeat example 1.1 to 1.7 for yourself. • Note the properties and the events of the TLabel component. • Explain how components are modified. • What is an event handler? • Where and how do you look for a component’s / class’s documentation? • Which properties and events do the Form and the Label in example 1.7 have in
common? • Change some of the properties of the Form in the Object Inspector and observe the
change on the form. • Double click the label component on the form. Which code do you think is shown in
the code editor? • Look up the documentation for the TLabel class. • Compare the documentation for the label’s properties and events with those that you
find in the Object Inspector. • Is the documentation meaningful? • Drop a button on the form. Look up the documentation for the TButton class. • How would you use the documentation to write an event handler for a button
component? Hint! Continue and read example 4.1 if you are in doubt. • Where should the name property of a component be changed? • Why is the name property of a component so important? • What is meant by a TForm pointer named the name of your form, e.g. MyForm? • What is meant by deign time and run time? • What do you think is the effect of these
MyComponent->Visible=False; MyComponent->Hide();
Exercise 1.2. Care, minimalism and simplicity when you write event handlers. Comment on the following statements:
1. Care has to be taken when you write (use) event handlers in your applications. 2. Never change the name property of a component outside of the Object
Inspector. That can have side effects on event handlers. 3. Minimalism. Sometimes a property can do the same as an event handler.
Example: To hide a component you can set the visible property to false or you can call the Hide () method.
4. Simplicity: Dealing with Mouse events can be tricky. For example, a single (double) click can result in the following three (four) events and related event handlers being fired:
14

OnMouseDown, OnClick, (OnDblClick) and OnMouseUp in that order. Is that what you really want? Is OnClick enough?
Exercise 1.3. Source: https://forums.codegear.com/thread.jspa?threadID=14006&tstart=0
“I am using Borland C++ Builder 6.0. In my program, I use the TOpenDialog class to open the File Open dialog window. When the dialog box opens, it defaults to a certain directory which is not the directory I want. I can browse to the directory that I need however after I close the program and reopen it, it defaults to the first directory again. How can I get the program to remember the most recently used directory path and default to that when the File Open dialog box is displayed? Also, how can I get a default extension set in the "Files of type:" field in the open dialog box (i.e. by default I want it to show me all of the *.DAT files in the directory). At the moment, the "Files of type" box is empty”.
First answer:
“How can I get the program to remember the most recently used directory path” “Your program would need to remember that (save it in a file)”.
“and default to that when the File Open dialog box is displayed”? “See the help for TOpenDialog::InitialDir”
“Also, how can I get a default extension set in the "Files of type:" field in the open dialog box (i.e. by default I want it to show me all of the *.DAT files in the directory). At the moment, the "Files of type" box is empty..”
See the help for TOpenDialog::Filter
Second answer:
“In my program, I use the TOpenDialog class to open the File Open dialog window. When the dialog box opens, it defaults to a certain directory which is not the directory I want”.
Before calling Execute(), set the InitialDir property, and clear the FileName property (or at least remove the path from it).
“Also, how can I get a default extension set in the "Files of type:" field in the open dialog box (i.e. by default I want it to show me all of the *.DAT files in the directory”).
“Make sure *DAT is listed in the Filters property, and then set the FilterIndex property”.
Try to look up the documentation yourself, comment and explain. Where are the changes set? Are the changes done at design time or run time or both?
15

2. More about the help system. 2.1. Installing online help. If you did not install the online help, during the compiler installation, you have to install it now. 2.2. Using Help. Click the Help menu and then Table of Contents (it may take some time to load the first time you use help). You should note the following:
• It is possible to filter by different subjects - RAD studio. That is the natural starting point. Expand and read some minutes every day. - Dinkumware http://www.dinkumware.com/ The makers of the STL library included in Microsoft's VC. - Internet Direct (Indy) 10 http://www.indyproject.org An open source internet component suite comprised of popular internet protocols that is included in both Delphi 6 and Kylix. - Rave Reports: http://www.nevrona.com/ Rave Reports, built on the foundation of Nevrona's ReportPrinter Pro, offers a wide range of reporting solutions - TeeChart 8 Standard: http://www.steema.com/ TeeChart Pro provides complete, quick and easy to use charting .NET, Java, ActiveX / COM and CodeGear VCL controls for Business, Real-Time, Financial and Scientific applications. TeeChart 8 Standard is referenced. - Microsoft Windows Platform SDK http://www.microsoft.com/
• At the bottom of the the Contents Window, you see three folders, Contents, Index and Help Favorites.
Now expand the RAD studio subject and choose RAD Studio VCL Reference. If you are used to older versions of the C++ Builder Professional and you miss the Class Explorer in the 2009 version, you have the most here. Let us assume that you want an overview of SOAP components / classes. Scroll down to the first SOAP category, SOAPAttachInf, and click expand. There you should note three sub subjects, Classes, Interfaces and Types. Now collapse it and note the other SOAP related categories. No let us get an overview of the Web categories. Scroll down to the first WebAdapt category, expand it and note that there are 7 sub categories. Expand the Classes category. Impressed? You will use days, weeks and months to be a content expert. If you learn to use the Content Index, you will get a good overview of the IDE. If you click the Index folder at the bottom of the subject window, you get a Look for: field in addition to the Filter By option at the top of the window. Now use No Filter and Look for: DOM and then AJAX. Now close the help page. If you are interested in the Web solutions in the IDE, let us continue
16

2.3. The search item on the main menu. Very much in the C++Builder IDE is contextual. Observe how the topics on the Search Menu changes depending on context. The topics are very different in
• Design view. • Code view.
If you look for Code Editor in the help index, among other things, under the heading Code Navigation, you will find this section: Method Hopping
You can navigate between methods using a series of editor hotkeys. You can also lock the hopping to occur only within the methods of the current class. For example, if class lock is enabled and you are in a method of TComponent, then hopping is only available within the methods of TComponent.
The keyboard shortcuts for Method Hopping are as follows:
• CTRL+Q^L - toggles class lock • CTRL+ALT+UP - moves to the top of the current method, or the previous method • CTRL+ALT+DOWN - moves to the next method • CTRL+ALT+HOME - first method in source • CTRL+ALT+END - last method in source • CTRL+ALT+MOUSE_WHEEL - scrolls through methods
Finding Classes
Allows you to find classes. Use the Search > Find Class command to see a list of available classes that you can select. After you choose one, the IDE navigates to its declaration.
Try it out. 3. The Embarcadero developer network and other online resources. There are some important resources online. Note the following:
• The Embarcadero DN: http://dn.embarcadero.com/ • The Embarcadero Blogs: http://blogs.embarcadero.com/ • The Embarcadero Forums: https://forums.codegear.com/ • The CB Forums: https://forums.codegear.com/category.jspa?categoryID=8 • Note especially the
- C++ Language subforum: https://forums.codegear.com/forum.jspa?forumID=30 - The IDE subforum: https://forums.codegear.com/forum.jspa?forumID=35 - The MS compatability subforum: https://forums.codegear.com/forum.jspa?forumID=37
• http://www.atozed.com IntraWeb, is an extension to the CPPBuilder that essentially takes form based development to the web.
• Codepedia CB pages: http://www.codepedia.com/1/CppBuilder Note The error pages.
17

• ProgrammersHeaven CB Forum: http://www.programmersheaven.com/mb/bcbuilder/Board.aspx
• CH 9 VisualStudio: http://channel9.msdn.com/posts/VisualStudio/ • Dr. Bob’s CPB Gate: http://www.drbob42.com/cbuilder/index.htm • DevX C++ Forum: http://forums.devx.com/forumdisplay.php?f=110 • C++Builder Journal: http://bcbjournal.org/ Note: Forum and Archive CD
Exercise 3.1. Make your own web browser. I will help you to start the project. You have to finish (streamline) the Browser yourself. You should read about the different controls in the Help index. Note how the component (class) hierarchy expands in the Structure window as you drop components on the form. You can click a component in the Structure window and inspect the properties and events in the Object Inspector. This is visual object or component programming. You add properties and events in the Object Inspector and C++ code are generated for you. Sometimes you have to write a small piece of code to sew the controls and components / classes together. Before you start the Builder, make a folder where you want the project saved, eg with the name WebBrowser.
1. Start the Builder and in the Project Manager click New + VCL Forms Application. 2. From the File menu, Save all, and give the source the name WebBrowsU.cpp and the
project the name WebBrows. 3. From the Project menu choose Project | Build WebBrows or Shift + F9. Everything is
Ok if the Compiling dialog shows Done: Build All and there are no Warnings and Errors. Click OK. Try again if you got problems. The best may be to close the Builder and restart it.
4. You can see the projects source file, WebBrows from Project | View Source. Note that the header file has the name WebBrowsU.h and is related to the WebBrowsU.cpp file.
5. Now choose close all from the File menu and locate the projects folder in Windows explorer. You should see 7 files in both the main folder and in the Debug subfolder.
6. Open the project again (CTRL + F11) and click the WebBrows project file. Note that you do not see the other 6 files in the main folder.
7. Change its Name property to WebMain and the Caption property to the name you want for your browser.
8. Drop a TPanel component (found on the standard Tool Palette) on the form, change its Align property to alTop, its height property to 60 and clear the Caption property.
9. Place a ComboBox on the Panel. Move it to the top of the Panel and make it as wide as the panel itself. Change the name property to URLComboBox. Change the Text property to the URL of your choice, I choose http://www.digitalpunkt.no.
10. Place a TStatusBar (on the Win32 TooPalette) on the form. Change its Name property to StatusBar and its SimplePanel property to true.
11. Choose the Internet Tool Palette, and browse the different categories. You will notice two web browser components, TCppWebBrowser and TWebBrowser. Read the documentation for TWebBrowser. Drop a TCppWebBrowser on the form and look at it’s properties and events in the Object Inspector. When finished, click the TCppWebBrowser component, then F1 and eventually delete that component from the form. Continue with these steps.
18

12. Drop a TWebBrowser or TCppWebBrowser (if you want to experiment. I have not tried that version, so I can not guarantee you success) component in the middle of the form, change its Align property to alClient and its Name property to HTML.
13. If you want to test what you have made so long, you can (compile and) run the project. It should compile without error. Take a look at the code in the cpp and h file in the editor before you continue. So far you are not able to see the content of the URL. Additional functionality has to be added by you.
14. You continue by adding some events in the ObjectInspector. In the Structure window, click URLComboBox (child of the Panel). In the Object Inspector, click the Events folder and add URLComboBoxClick and URLComboBoxKeyPress to the OnClick and OnKeyPress events respectively. Look at the code changes in WebBrowsU.h.
15. From here you have to continue yourself. You have to write the code for the two handlers in the WebBrowsU.cpp file. Look at how the handlers are declared in the WebBrowsU.h file.
16. Use the Help system, search the web for solutions with the relevant key words or ask on the forums given in the above links.
4. Writing Event Handlers / code to sew components together. This is often the hardest part of your project, especially if it grows big. Mathematics is a collection of trivialities. Each step is a triviality. The same with a program. Each step is trivial and simple. What makes the programming difficult is the complexity. It may be easy to understand a program of some hundred and after some months extensive training, even thousand of code lines. But when a program grows more than 10 000 lines long and different project groups work on different parts that are combined into the final project code the code is no longer trivial. Because of that it is extremely important that:
• You document (comment) your code. • Use meaningful names for functions, classes, properties and events. • Use a contextual structure / hierarchy in your project (files).
The following is a little taste of what is meant by the above section. So let us make a project where you have to do some coding.
Example 4.1. Hand coding. Sewing components together with an event handler.
Start by reading in the help index. Look for VCL Forms and click creating Windows application. The C++ Builders IDE is similar to that used in Delphi, so don’t worry that Delphi is mentioned in the explanation. Focus on “Associate logic with controls”. This explanation is so important that we repeat the steps here:
To associate code with a control.
• In the Designer, double-click the component to which you want to apply logic. The Code Editor appears, cursor in place between the reserved words begin and end in the event handler.
• Code your application logic. • Save and compile the application.
Then look for forms | adding in the help system. Note what is written about “Linking forms”
19

“Adding a form to a project adds a reference to it in the project file, but not to any other units in the project. Before you can write code that references the new form, you need to add a referencing forms unit files. This is called form linking.
A common reason to link forms is to provide access to the components in that form. For example, you’ll often use form linking to enable a form that contains data-aware components to connect to the data-access components in a data module
To link a form to another form:
1. Select the form that needs to refer to another. 2. Choose File | Use Unit 3. Select the name of the form unit for the form to be referenced. 4. Choose OK.
Linking a form to another just means that the uses clauses of one form unit contains a reference to the other’s form unit, meaning that the linked form and its components are now in scope for the linking form”
Also note what is written about “Avoiding circular unit references”. Don’t close the help document if you don’t remember everything (a good reason why you should use multiple screens when using an advanced development platform). Then continue with the following steps.
1. Create a new project in the project manager by choosing New | VCL Form Applications.
2. Change the Name property to MainForm and the Caption property to Multiple Forms Test Program.
3. Save the cpp unit as Main and the project as Multiple. 4. Drop a button on the form by double clicking (another acceleration option) a TButton
component in the Standard Tool Palette. 5. Make the buttons name property ShowForm2 and the caption property Show Form 2. 6. Choose File | Form – C++Builder. We want the new form to be about 50 % smaller
than the main form so size the new form by dragging the lower-right corner. 7. Change the new forms Name property to SecondForm and it’s Caption property to A
Second Form. Save the new form with the name Second. 8. Drop a new TLabel component on the second form and change the Caption property to
This is the second form. Change the label’s Font | size and colour as desired. Centre the label on the form.
9. Link the two forms together by Clicking on (the folder for) the Main from (Main.cpp). 10. Click File | Use Unit or Alt + F11. In the Use Unit dialog choose Second. 11. Double click on the ShowForm2 button. The Code Editor is displayed, and the cursor
is placed just where you need to begin typing code. 12. Code your application logic, that is place the following code line between the two { }
SecondForm->ShowModal();
13. Take a look at the code of the two .cpp units and the two .h header files. 14. Run the application. Everything should now compile, link and run without problems
if you have done everything correctly. Test your new application.
20

Exercise 4.1.
Look for: modal | VCL Forms and then look for: modal form | VCL Forms.
1. Dynamically create a VCL Modal Form application. 2. Dynamically create a VCL Modeless Form application.
Example 4.2. Dialog boxes in C++ Builder.
Look up Dialog Boxes (there is also a lowercase category dialog boxes) in the help index. Read or scan the subjects of interest to get an idea of the possibilities. The more you read, the more you learn and the lesser is the probability of making an error. A C++Builder dialog box (any C++Builder form, actually) is modal or modeless depending on how it is displayed.
5. More about the Visual Component Library (VCL). Ideally, use a week on reading and scanning the following subjects. Go to the help index and Look for:
• Background: https://forums.codegear.com/thread.jspa?threadID=13594&tstart=0 • Pascal • DelphiInterface. • Delphi. Also Filter by Language: Delphi and scan. Then return to (No Filter) • VCL • VCL, Architecture • VCL Designer • VCL, applications • VCL, Forms • DOM • Javascript libraries. • VCL Forms, XML components. • VCL, Class Declarations • VCL, class library • TObject • TApplication. • TForm. • VCL for the Web • Filter by: RAD Studio, Dinkumware C++, Indy, Rave Reports. Then return to (No
Filter) • Microsoft (Screen and get an overview). • Filter by: Microsoft Windows Platform SDK and scan. Then return to (No Filter) • Windows API + sub subjects (Read the most important subjects and screen). • .NET VCL Components • Database and database. Screen the subjects and read. • ADO.NET • VCL Forms, ADO.NET database applications. • In the Data Explorer of the C++Builder IDE, click dbExpress | F1 • Properties, classes and objects.
21

• Properties, component writing. • Properties, events. • Methods. • Functions. • Events, handling. • Events, classes and objects.
Properties are more than simple data members of a class. Each property has an underlying data member associated with it, but the property itself is not a class data member. Properties have two access specifiers, a read specifier and a write specifier. The read specifier is used to reference (read) a property like: int x = MainForm->Left; To change (write) the Left property of a from at runtime, use code like: MainForm->Left = 200. A property can be read-only and in rare cases a property can be mad write-only. Finally, some properties can be specified runtime-only. A runtime-only property can be associated only at runtime, not at design time. Because a runtime-only property doesn’t apply at design time, it is not displayed in the Object Inspector. A runtime-only property can be declared as read-only, too, which means that it can be accessed only at runtime and can only be read (not written to). Exercise 5.1.
• Explain a C++Builder function’s calling convention. • Comment on this statement: “VCL is a library written in Object Pascal. VCL is
written in Object Pascal because it is written for Delphi”. • Comment on this statement: “Delphi is related to C++Builder like Visual Basic is
related to the Microsoft SDK”. • A deeper explanation of how VCL is related to Pascal and Delphi? • How is the Microsoft SDK compatibility in C++Builder? • How do you build database driven (Desktop / Web) Applications in C++Builder? • How do you build XML driven applications in C++Builder? • How do you build Web Applications with C++Builder? • How do you build AJAX applications in C++Builder? • How do you integrate third party (component) libraries and frameworks in
C++Builder? • What are the following RAD Studio:
- Dinkumware C++ - Indy - Rave Reports?
• Look at this http://www.webtoolkit.eu C++ Web toolkit. Can it be integrated into the C++Builder IDE?
Exercise 5.2. Locate the CodeGear | RAD Studio | 6.0 (or other version) | in Windows Explorer.
• Browse the sub folders to get an overview.
22

• In the include subfolder search for or scroll down to sysdefs.h. • Double click the file name and it is loaded in the CPPBuilder code editor. • The search for system.hpp in the include subfolder. Look at the code in the code
editor and search for (Search + Find or CTRL + F): typedef AnsiString • Search again: F3 until you reach the end of the system.hpp file. • In the RAD Studio | 6.0 | subfolder search for: example. Click on the first hit to see
where it is located.
OK, there you are. It is great to constantly dig deeper into the folders and scan them for content. The sky is the limit if you
• Use the F1 key and the help index efficiently. • Browse and get a deep knowledge of what is in the RAD Studio folder on your
computer. • Can integrate third party libraries and frameworks into your projectcs. • Learn to use online forums, blogs and sites. • Use a clustering meta search engine like http://clusty.com/ my own meta search engine
http://www.surftoolbar.com/ and Google’s search operators http://www.googleguide.com/advanced_operators.html and http://www.googleguide.com/advanced_operators_reference.html
An example: I noted that OWL (Object Windows Library) designer Carl Quinn and Bruneau Babet have worked with the C++Classes for Borland. Search on experts in the field will very often bring up exellent hits and fresh subjects. So I searched for: "Bruneau Babet" C++ and found that he had written some books of interest etc. Then I searched for "Carl Quinn" C++ and wrote this Exercise 5.3. Comment on this
“I agree that closures should be added to language by the way. However, one should be wary of the evolution of language changes. A brief glance into the history of the C++ language, for example, the "C with Classes", probably will hint at what one should not do with computer languages. Additions to C++ have been well cautious after the inclusion of templates. In fact Bjarne Stroustrup wrote a book of the evolution of C++ language, because it was such a large change and lead to the long process of standardisation. Adding Closures would take the Java well away from its C/C++ parentage. I think that is a must-have feature for Java to stay alive in the next decade. As Bloch himself said at the JavaPolis conference event, not at the future of computing talk, it would be like taking Java and adding parts of Scheme to it. We have to got the closures part of it correct,
quote cut from the following source: http://www.jroller.com/peter_pilgrim/entry/javapolis_2007_conference_days_part
under the heading “The Future of Computing Panel: Gosling, Gafter, Bloch and Odersky”.
23

Exercise 5.4.
1. Use Google Book Search http://www.google.com/help/features.html#book to search for “Bruneau Babet” “Advanced C++”
2. Search for: "Bruneau Babet" web services 3. Try to find out which company Carl Quinn works for in 2009. 4. Use Google’s advanced operators to find more specific information on C++ and
CppBuilder. Example -- Try the following search terms • intitle:"C++ tutorials" • inurl:"CppBuilder" • inurl:"Carl Quinn" OR cquinn (A way to find social network profiles etc).
6. Advanced features. 6.1. The component menu. If you browse the component menu, you will discover that you can Install packages and Import components. If you click the New VCL Component sub menu, you can choose among a lot of Ancestor Components. Experiment with the TXMLDocument and other ancestor components. Close all when you have got an idea of what it is 6.2. The Tools menu. On the Tools menu, among several options, you should note:
• Repository – where you can save your own objects. • QualityControl where you can report bugs etc. Here
http://qc.embarcadero.com/wc/qcmain.aspx?d=61360 is an example of a report.
• Here http://qc.embarcadero.com/wc/qcmain.aspx is the online Quality Central. Read about packages and the other subjects introduced above in the Help index. You should by now be able to look up and read about (scan) the different subjects. Exercise 6.1. In the Project Manager choose VCL for the Web | VCL for the Web Application Wizard | OK Choose the default and hit OK. Get help for, hit F1 on
• The two forms, the IWUserSession form and IWForm1 (click the Unit1.cpp) folder. • On the different properties and events in the Object Inspector.
Then look for: VCL for the Web, IntraWeb in the help index and read the documentation. You should now know that you load the form’s code, by double clicking on the relevant form in the form designer. In the same way, you load the event handler for an event by double clicking in the value field of the Event in the Object Inspector.
24

Example 6.1: On the IWUserSession form’s Events tab in the ObjectInspector, double click in the field to the right of the OnCreate event. The code for an event handler (C++ function), IWUserSessionBaseCreate that takes a TObject pointer named Sender as an argument pops up. Do the same with the OnDestroy event and you should note that an IWUserSessionBaseDestroy function that takes the same argument is loaded in the code editor. You have to write the event handlers yourself by looking for the documentation in the help system, scan (or search through) the content in cpp and header files for the relevant key word or figure out the implementation yourself. As you write more and more applications, you can write your own handlers and save them in the Object Repository. On the Project menu, note the Add to Repository choice. Try to make a simple web application. 7. Graphics programming in C++Builder and more. To draw graphics in an application, you draw on an objects canvas, rather than directly on the object. The canvas is a property of the object, and itself an object. Note that canvases are available only at runtime, so you do all your work with canvases by writing code. Example 7.1 In a new empty form, locate the OnPaint event and double click in the right field. In the event handler, write the following code: Canvas->Rectangle(0, 0, ClientWidth /2, ClientHeight / 2); Hit F9. If the result was not what you expected, close the above application and replace the above code with the following: Canvas->MoveTo(0, 0); Canvas->LineTo(ClientWidth, ClientHeight); Hit F9. You don’t see the graphic shapes at design time, only at runtime. Components that can be put on a form are easily documented by dropping the component (double clicking the component on the relevant Component Palette is fastest) on an empty form, clicking the component once and hit F1. Otherwise, you must go to the help index and (read about) look for:
• GDI+ • GDI+ | Documentation | especially the Overview link • GDI+ | Documentation | Overview | Introduction to GDI+ • GDI+ | Documentation | Overview | Lines, Curves and Shapes
25

• GDI+ | Documentation | Overview | Lines, Curves and Shapes | Overview of Vector Graphics.
• Graphics • Frame3D • Graphics, overview. • Graphics, canvases • Graphics, VCL Forms applications (The sub subjects give you some code examples). • TCanvas (Not a component). • Graphics, classes • TNotebook (Win3.1 Component Palette) • TStringGrid (Additional Component Palette) • TDrawGrid (Additional Component Palette) • TAnimate (Win32 Component Palette) • TMonthCalender (Win32 Component Palette) • TMediaPlayer (System Component Palette).
Exercise 7.1.
Experiment with the above components and when you have got a good understanding of their functionality:
• Write a simple application with a notebook, a small spreadsheet and a calendar using multiple windows (forms).
• Write a graphic application that rotates a circle. • Write your own media player. • Now explore the last categories on the Tool Palette like:
- TeeChart std. - The different IW and Indy categories. - TCppInternetExplorer.
TCppInternetExplorer as a server component that can be dropped on a form. What does that mean? In short, it means that you can use Internet Explorer as an ActiceX control in your own applications. Ok, drop the component on the form, click it once and hit F1. You understand how you use online help now. Note, that you don’t find a meaningful explanation for TCppInternetExplorer in the help index. But when you click the component a more meaningful class, TOleServerClass pops up. Now you have the tools to write your own windows and web applications. Essentially, it is not much hand writing (at least of the GUI), but more about locating the correct components and sew them together to meaningful and useful applications. The sky is the limit. 8. Using extensions, external libraries and packages. 8.1 Namespaces. C++ comes with some third party libraries. In addition, you can use other libraries and packages. This can be a little tricky. Example, you have you own mathematical function
26

complexMult that multiplies two complex numbers and the same function with the same name in a library that you use in your projects. That can open for problems without further action.
• Which function are called when you multiply the numbers? • How precise is it?
You may already know what an XML namespace is. If not look for: XML namespace. A C++ namespace is not the same, but there are similarities. C++ Namespaces were first introduced by Bjarne Strostrup, the inventor of C++ in his book, “The design and evolution of C++” chapter 17. Look for namespace in the help system without any filter and you get this explanation:
“Most real-world applications consist of more than one source file. The files can be authored and maintained by more than one developer. Eventually, the separate files are organized and linked to produce the final application. Traditionally, the file organization requires that all names that aren't encapsulated within a defined namespace (such as function or class body, or translation unit) must share the same global namespace. Therefore, multiple definitions of names discovered while linking separate modules require some way to distinguish each name. The solution to the problem of name clashes in the global scope is provided by the C++ namespace mechanism.
The namespace mechanism allows an application to be partitioned into a number of subsystems. Each subsystem can define and operate within its own scope. Each developer is free to introduce whatever identifiers are convenient within a subsystem without worrying about whether such identifiers are being used by someone else. The subsystem scope is known throughout the application by a unique identifier.
It only takes two steps to use C++ namespaces. The first is to uniquely identify a namespace with the keyword namespace. The second is to access the elements of an identified namespace by applying the using keyword”.
Now filter by RAD Studio, make the same search and you get another Delphi related explanation. The reason is that the C++Builder and the Delphi RAD environments are related and the documentation overlap. You have to filter out the C++ documentation yourself, so click the sub category C++ language specifics and you should get the same explanation as above. In the help contents, you will see a chapter on Dinkumware, http://www.dinkumware.com/ that is a respected supplier of Standard C and C++ libraries. If you have looked at C++ source code, you may already have noticed, statements like these: #include <fstream> using namespace std; If not, you find an example on the Dinkumware’s site in the complete reference section. Click <fstrem.h>. The explanation there is as follows: Include the traditional header <fstream.h> to effectively include the standard header <fstream> and hoist its names outside the std namespace. In this implementation, all names are hoisted, to provide a more traditional library environment.
27

And clicking the <fstream> link brings up a new explanation that start with the declaration of the std namespace like this: namespace std { template<class Elem, class Tr = char_traits<Elem> > class basic_filebuf; typedef basic_filebuf<char> filebuf; typedef basic_filebuf<wchar_t> wfilebuf; template<class Elem, class Tr = char_traits<Elem> > class basic_ifstream; typedef basic_ifstream<char> ifstream; typedef basic_ifstream<wchar_t> wifstream; template<class Elem, class Tr = char_traits<Elem> > class basic_ofstream; typedef basic_ofstream<char> ofstream; typedef basic_ofstream<wchar_t> wofstream; template<class Elem, class Tr = char_traits<Elem> > class basic_fstream; typedef basic_fstream<char> fstream; typedef basic_fstream<wchar_t> wfstream; } // namespace std It may seem overwhelming at this point. What you have to know now, is that when you use external libraries and packages, there are potential name clashes. The solution is to use name spaces. How precise is the third party function you are using? Computers may impress you and math may impress you even more. By simple fractal mathematics, you can produce fractal music and the most beautiful fractals: http://www.fractal-recursions.com/files/anim/anim.htmlBut from the very start you have to know that there is a big difference between numerical and pure mathematics. If you had all the computing power in the universe, you would not be able to compute Pi, http://www.joyofpi.com/. A computer has final state and its precision (a side from simulation) is equal to (1/2) raised to the power of the number of bits the computer is operating at. So a 64 bits computer has a precision of (1/2) raised to the power of 64. That means that the precision of a floating point computation may depend on:
• Hardware. • Compiler. • The specific function implementation.
Dinkumware is one of the better suppliers, so you should know who you compete with when you make your own mathematical functions. Here
• http://www.roguewave.com/ • http://www.edg.com/ • http://www.peren.com/
are some additional sites for a deeper study of the subject. Don’t think it is trivial. There are some other great extensions like IntraWeb VCL for the Web deliverd by http://www.atozed.com that ships with CPPBuilder 2009..
28

• Choose New | Other | VCL for the Web | VCL for the Web Application | The IntraWeb The VCL for the Web dialog pops up.
• Choose the default the first time. A form, UserSessionUnit.cpp is shown in the from designer.
• Close the Project Manger window, so you can see more in the tool palette window. Note the Two contextual IW Standard and IW Control tool palette.
• In the form designer there is another file, our friend Unit1.cpp that is the source code for a larger from. Note that three additional contextual Tool Palettes are shown in the Tool Palette Window, IW Standard 3.2, IW Data and IW Client Side. You can drop components on the IW forms like you have done with VCL form applications and make Web From Applications. You can read more here: http://www.atozed.com/IntraWeb/Weblication/index.EN.aspx “There is very little difference between writing an IntraWeb application and a normal application. Most developers, even with no prior web development experience, successfully develop weblications using IntraWeb in under 30 minutes. Developers need not spend months learning how individual HTML pages interact using HTTP, or learning Javascript to customize the client interface. Developers can leverage their existing knowledge immediately”.
Exercise 8.1. Go to the Help index and look for: Creating Web Server Applications Using IntraWeb. Are you
• Able to consume a known Web Service on your own site • Produce your own Web Service
Using the IntraWeb extension? Exercise 8.2. Wolfram research http://www.wolfram.com/ the supplier of Mathematica is a famous math source. (3,5), (5,7), (11,13), (17,19) … are examples of prime number twins.
• Why is it enough to go to SQRT(P) to see if P is a prime number? • Write your own prime number routine to find the firs 1000 prime number twin pairs. • If you did not use this technique, save prime numbers below P in an array and
combine that with your above routine. • Which routine is fastest? • Read about Twin primes at Wolfram research:
http://mathworld.wolfram.com/TwinPrimes.html and improve your algorithm. Exercise 8.3. Look at the following code (ignore the comments in Norwegian): /* Borland C++ - (C) Copyright 1994 by Kjell G. Bleivik TELLING.CPP: Tester prosessorens effektivitet.
29

*/ #include <iostream.h> #include <time.h> //#include <stdlib.h> int main() { clock_t start, slutt; start = clock()/CLOCKS_PER_SEC; unsigned long i=0; while (i <= 100000000){++i;} //Teller till 100 Mill. slutt = clock()/CLOCKS_PER_SEC; cout << "\nTalt til 100 millioner pa " << slutt-start << " sekunder\n" << endl; return 0; }
• Explain what the code does. • Try to find external libraries with function to compute prime numbers. • Modify the above code to find the fastest solution.
Fractals were mentioned above. Fractals are used for may purposes like compression. I once read an article “Fast Fractals” Microcornucopia #43, Sept-Oct 1988 page 22 that claimed: “This is one of our trick articles. The fractals are really a sneaky way to get your attention. After all, how many of you would read an article about spending up 386 software by a factor of 100? (One second thought …).” That article got my attention. It was about assembler coding. I already knew that there are slow (bubble sort) and fast (radix sort) algorithms. Sometimes, you can halt a computation if you use the wrong algorithm. Recursive function call is one example. If you use a recursive function call to compute the first n Fibonacci numbers http://mathworld.wolfram.com/FibonacciNumber.html the stack will soon be filled and your computer stands there minutes and hours waiting for the next computation. Dynamic programming is the solution. In some cases you can combine, a good algorithm, dynamic programming and inline assembler code. In high school, we had a teacher that said the subtraction was best solved by addition. To solve the simple problem: 10 – 3, you should ask, which number do you need to add to 3 to get 10. That seems ridiculous here, but not always in accounting. Division is also the opposite of multiplication so you can use a multiplication algorithm to find the result of a division. I have seen that in practice. Only symmetric matrices have a standard inverse. Matrix multiplication of symmetric matrices are also commutative, that is an Abelian group (if you know group theory). That fact can be used to find the inverse of a matrix. So in matrix notation you have: A(Ainverse) = I (The Unit Matrix http://mathworld.wolfram.com/UnitMatrix.html ).
30

I used that to my advantage since the library I used was faster on solving linear equations systems like the above equation than on finding matrix inverses. So, in scalar division, you can use inversion or multiplication. If you are interested in further speeding up positive integer division, you can look for assembler routines online. In C++Builder (console) applications you can use inline assembler statements (only for fast illustration) like this: /* ASM.CPP: Illustrates how to use Inline Assembler statements in C++ source code. */ #include<iostream.h> void main() { int i = 9, x = 2; cout << "\n x = "<< x << endl << endl; if (i > 0) { asm mov x, 4 // Single assembler statement cout << "\n x = "<< x << endl << endl; asm { // Assembler code begin mov x, 7; mov x, 5; } // Assembler code ends } else i = 7; cout << "\n x = "<< x << endl << endl; } Exercise 8.4.
• Look up assembler code on the internet. • Compare the speed and precision with similar C (C++ library) routines.
References for those interested in a deeper understanding of the subject:
• Don Morgan (1992): Numerical Methods, Real Time and Embedded Systems Programming M&T Books ISBN 1-55851-232-2. The accompanying disk has a lot of numerical assembler code routines.
• http://www.nr.com/ • http://www.itl.nist.gov/div897/sqg/dads/terms.html • http://www.ddj.com/cpp/cuj.jhtml
9. Can you make HTML and XML documents in the IDE? The answer is a strong yes. In reality, you have an advanced editor at your disposal that can
31

be combined with the object inspector, templates, 9. 1. Internet and Web solutions in the IDE. What is available on start up? Exit the Builder and draw your attention to the lower right window. You should note a lot of categories. Scroll down to the Web Documents category. If you are used to XML family of technologies, you see a lot of XML related categories. Scroll down to HTML Page and choose that option. The Tool Palette changes to HTML Elements. Perform the following steps:
• View the code. It is the start of an HTML page. • Go back to design view, click and drop some HTML elements to the page and note the
changes in the code. • Also take a short look at the object inspector.
So you can build ordinary HTML pages in the Builder. Close all and this time, experiment with some of the other possibilities like C++ Builder Projects | VCL for the Web to get an overview of what is available on start up. Note the Tool (Component) Palette that is related to the design view of each choice. 9.2. The Tool Palette. Very much is dependent on context in the IDE, and the Tool Palette used to drag (click) components to the form is no exception. To get an Idea, we will only show one example. Then you should be able to experiment with the other possibilities yourself. First of all, close all. In the project manager Window (upper right), click New + VCL Forms Application. You should now be familiar with the changes in the Structure, Object Inspector, the Unit1.cpp, Project Manager and Tool Palette window. We are interested in the possibilities in the last Window (lower right corner). As is natural, you will note that the Tool Palette disappears when you click the cpp source file or the header file folder. The Tool Palette is designed to drop VCL components on forms. Activate the Design view, and scroll down the categories in the Tool Palette window. Among other things you should note the following web related categories:
• Internet • InternetExpress • WebSnap • WebServices
Expand the Internet category and explore the sub categories. You may drop some of the components on the Form and observe the change in the cpp and h files. Now close the Tool Palette in addition to the Project Manager. It is easy to reopen them from the View menu or from icons configured on the View Toolbar like I explained above. I have all toolbars active on my Vista driven laptop. So the figures in this document may be misleading, since they are cut from my old Xp driven computer. I don’t have Word and Adobe Professional on my laptop, so the screen dumps are from the stationary Pc. So to start: Choose File | Web Documents | HTML page
32

The figure shows the Structure Window, the Object Inspector and the HTML Editor. Look at the code, and you will see that it is the start of an html document. Observe the Structure Window in code view and the Object Inspector in design vies. But that is not all. From the View menu, scroll down to the bottom and choose the Tag Editor. The Form designer (HTML editor) window is split horizontally in two parts with the tag editor in the lower part. Start writing <bloc in the tag editor and choose blocquote and close the tag. Look at the code. <blockquote></blockquote> Start writing in the tag editor: <blockquote>This is quoted text!</blockquote> Observe what is happening in the HTML editor. Got it? But that is not all. From the main menu, choose View | Templates.
33

In the figure above, I have dragged the Templates dialog to the middle of the HTML / Tag editor. Click the code folder and in the code, place the cursor where you want a table inserted. That is place the cursor in the body where you want a table inserted. Here is the code (after the quoted text is deleted) before the table is clicked from the Templates tag: <!DOCTYPE HTML PUBLIC "-//W3C//DTD HTML 4.01 Transitional//EN"> <html> <head> <title></title> </head> <body> </body> </html> One mouse click on the Templats newTable option and here <!DOCTYPE HTML PUBLIC "-//W3C//DTD HTML 4.01 Transitional//EN"> <html> <head> <title></title> </head> <body> <table cellspacing="1" cellpadding="1" width="300" border="1">
34

<tr> <td></td> <td></td> <td></td> </tr> <tr> <td></td> <td></td> <td></td> </tr> <tr> <td></td> <td></td> <td></td> </tr> </table> </body> </html> is the result. Exercise 9.1. Go to the Help Content and read about IntraWeb and HTML pages.
• Make an html document. Experiment with dropping components on the page using the relevant component palettes.
• Experiment with other Web Documents. (File | Other | Web Documents). Read more in the help content and index.
• Search for C++Builder Event Handlers in your favourite search engine. You can do more targeted searches like they are exemplified above.
• Try to make an IntraWeb VCL for the Web application by looking up documentation on the web and / or in the CPPBuilders help index.
• Are you able to write a Web Application that is similar to a simple desktop application you like?
35