Embed Size (px)
Citation preview

First Revision November 2017
Insulat ion
INSTALLATION GUIDE FOR RESIDENTIAL & LIGHT COMMERCIAL APPLICATIONS
Building Wrap and Flashing

2 3
1. General Information
Kingspan GreenGuard® MAX™, HPW™, VW™, Classic, RainDrop® 3D and C2000 Building Wrap are designed specifically for use in the residential and light commercial construction applications, and perform as a water–resistive barrier when installed in accordance with the information in this Guide.
Such use involves the installation of these products in wall systems in combination with various types of exterior wall sheathings and exterior coverings e.g. brick, stucco, clay tile, vinyl, fiber cement and wood.
Kingspan GreenGuard® MAX™, HPW™, RainDrop® 3D and C2000 Building Wrap are also recognized as air–barrier materials, having a higher level of performance. However, the air-barrier must be maintained by sealing seams with tape, e.g. Kingspan GreenGuard® Custom Seam Tape (or other tape approved by Kingspan Insulation LLC), and by sealing around all windows, doors, wall penetrations, roof / wall intersections, deck / porch attachments to walls and other areas that require an air–tight seal, using flashing, e.g. Kingspan GreenGuard® Flashing.
Kingspan Insulation LLC recommends the use of Kingspan GreenGuard® Butyl Flashing and Kingspan GreenGuard®
SuperStretch™ Butyl Flashing with Kingspan GreenGuard® Building Wrap. Kingspan GreenGuard® Butyl Flashing and Kingspan GreenGuard® SuperStretch™ Butyl Flashing have a butyl adhesive that has a wider recommended service temperature range and better adhesion than ordinary flashings and enhances their ability to provide a seal against water intrusion when installed around window and door openings, roof / wall intersections, deck / porch attachments to walls, pipe penetrations and other areas that require a waterproof seal. Kingspan GreenGuard® Butyl Flashing is designed for sealing at straight openings, while Kingspan GreenGuard® SuperStretch™ Butyl Flashing is flexible and designed for sealing around curved openings. Kingspan GreenGuard®
SuperStretch™ Butyl Flashing is ideal for flashing window sills, since it is flexible and will conform to the window rough opening without cutting.
Alternatively, Kingspan GreenGuard® Standard Flashing may be used. Kingspan GreenGuard® Standard Flashing is a self-adhering membrane comprising a polyolefin film and a rubber–modified asphalt adhesive and is designed for sealing at straight openings.
NOTE: Sealing of building wrap seams and around all windows, doors and wall penetrations is highly recommended in all cases, however, it is optional unless the building wrap is intended to perform as the primary air–barrier.
These guidelines are not intended to address all possible combinations of construction materials that may be used in a wall system. For this reason, the installation information provided is intended only as a guide and is for the convenience of contractors, specifiers and other interested parties.
2. Usage & Limitations
Installed with the print side facing outward, Kingspan GreenGuard® MAX™, HPW™, RainDrop® 3D and C2000 Building Wrap may be exposed for up to 9 months; Kingspan GreenGuard® Classic Building Wrap 12 months; Kingspan GreenGuard® VW™ Building Wrap 6 months.
Kingspan GreenGuard® Building Wrap products should not be used as a vapor retarder or as roofing paper.
For recommended installation temperature limits for Kingspan GreenGuard® Flashing products, please refer to the Product Sheets for these products. For installation at temperatures below 40°F, store Kingspan GreenGuard® Flashing in a heated area until use.
When installed, Kingspan GreenGuard® Butyl Flashing and Kingspan GreenGuard® SuperStretch™ Butyl Flashing may remain exposed for up to 120 days, Kingspan GreenGuard® Flashing for 30 days.
3. Building Code RequirementsBuilding codes require the use of two layers of Grade D building paper over wood sheathing when a cementitious covering (conventional stucco) is used. As an alternative, one layer of Grade D building paper can be used in conjunction with one layer of foam plastic insulation. Check with a local building code official to verify requirements.
4. ComplianceBuilding Wrap ProductsSee Intertek CCRR -1018 for IBC, IECC and IRC Compliance;DrJ Engineering TER No. 1407 -05 (NFPA 285);ASTM D 226, Type I (Specification for Building / Roofing Paper);ASTM E 1677, Type I (Kingspan GreenGuard® VW™ and Classic Building Wrap);ASTM E 1677, Type II (Kingspan GreenGuard® MAX™, RainDrop® 3D and C2000 Building Wrap);ASTM E 2178 – Air Barrier Material (Kingspan GreenGuard® MAX™,HPW™, RainDrop® 3D and C2000 Building Wrap);AC 38, Acceptance Criteria for Water-Resistive Barriers (Kingspan GreenGuard® MAX™);ASTM E 2357 – Air Barrier Assembly (go to www.airbarrier.org);ASTM E 2556, Type I (Kingspan GreenGuard® VW™ and Classic Building Wrap);ASTM E 2556, Type II (Kingspan GreenGuard® MAX™, RainDrop® 3D and C2000 Building Wrap);CCMC -13280 -R – Sheathing Membrane (Kingspan GreenGuard® MAX™ Building Wrap);CCMC -13290 -R – Air Barrier Material (Kingspan GreenGuard® MAX™ Building Wrap);HUD/FHA UU -B -790a – Equivalent to Grade D / Type 15 Building Paper;Ontario Ministers Ruling No. 07-27-185 / 14-04-300 (CCMC 13280-R).
Flashing ProductsAAMA 711;ICC-ES Acceptance Criteria AC148.
5. Handling & Storage
When stored outdoors, Kingspan GreenGuard® Building Wrap products should be protected from exposure to direct sunlight using the original packaging or an opaque, light–colored tarp. Material that has been unwrapped should be covered or rewrapped.
Store boxes containing Kingspan GreenGuard® Flashing products in a clean, dry area without prolonged, direct exposure to sunlight.
WARNING: Kingspan GreenGuard® Building Wrap products and Kingspan GreenGuard® Flashing products are combustible. A protective barrier or a thermal barrier is required as specified in the appropriate building code. Protect them from exposure to open flame or other ignition sources during shipping, storage and installation.
WARNING: The release paper of Kingspan GreenGuard® Flashing products is slippery and should not be walked on at any time. Discard release paper in a designated container.
6. Health & SafetyKingspan GreenGuard® Building Wrap products are made of synthetic materials that are generally recognized as not providing a food source for insects, fungus, mold, or mildew. They should always be properly installed and stored.
Review this Installation Guide prior to installation.
Refer to the Safety Data Sheets for the products referred to in this Installation Guide for additional information.
7. Adhesives, Sealants & PrimersMany common adhesives, sealants and primers are compatible with Kingspan GreenGuard® Building Wrap and Kingspan GreenGuard® Flashing. Prior to beginning a project, the installer should obtain chemical compatibility information from the manufacturer of the adhesive, sealant or primer. For more information regarding adhesives, sealants and primers for use with Kingspan GreenGuard® Building Wrap and Kingspan GreenGuard® Flashing, go to www.kingspaninsulation.us and look for Technical Bulletin #11 under ‘Product Literature’.
8. General Installation of Building Wrap
The following guidelines should be used when installing Kingspan GreenGuard® Building Wrap products on exterior walls.
NOTE: Alternative installation details may be used if approved in writing by Kingspan Insulation LLC prior to installation.
8a. Install building wrap over structural sheathing board, over insulation board (see Figures 1 and 2), or directly to framing members.
Figure 1: Exterior Wall Cross–Section
Kingspan GreenGuard®
Building Wrap
Typical overlap 6"and tape
Ceiling air / vapor barrier
Figure 2: Exterior Wall with Kingspan GreenGuard® Building Wrap
Kingspan GreenGuard®
Building Wrap
Tape seams
Sheathing
Wood frame
8b. Begin by aligning the bottom edge of the roll with the base of the wall, approximately 2 feet around a corner, fastening securely to a structural sheathing, through insulation boards to studs or directly to the studs.
8c. Unroll the building wrap with the printed side facing out, wrapping the entire building, including door and window rough openings. Acceptable fasteners include: common galvanized roofing nails, plastic cap nails, 1” crown staples and 3/8” non–corrosive staples. The following applicable fastener spacing shall be used.
● For Kingspan GreenGuard® MAX™, VW™, RainDrop® 3D and C2000 Building Wraps the fastener spacing shall be 36” to 48” along every other stud location.
● For Kingspan GreenGuard® HPW™ Building Wrap the fastener spacing shall be 32” along every stud location.
4 5
Figure 3: Example of modified ‘I’ cut at a window opening
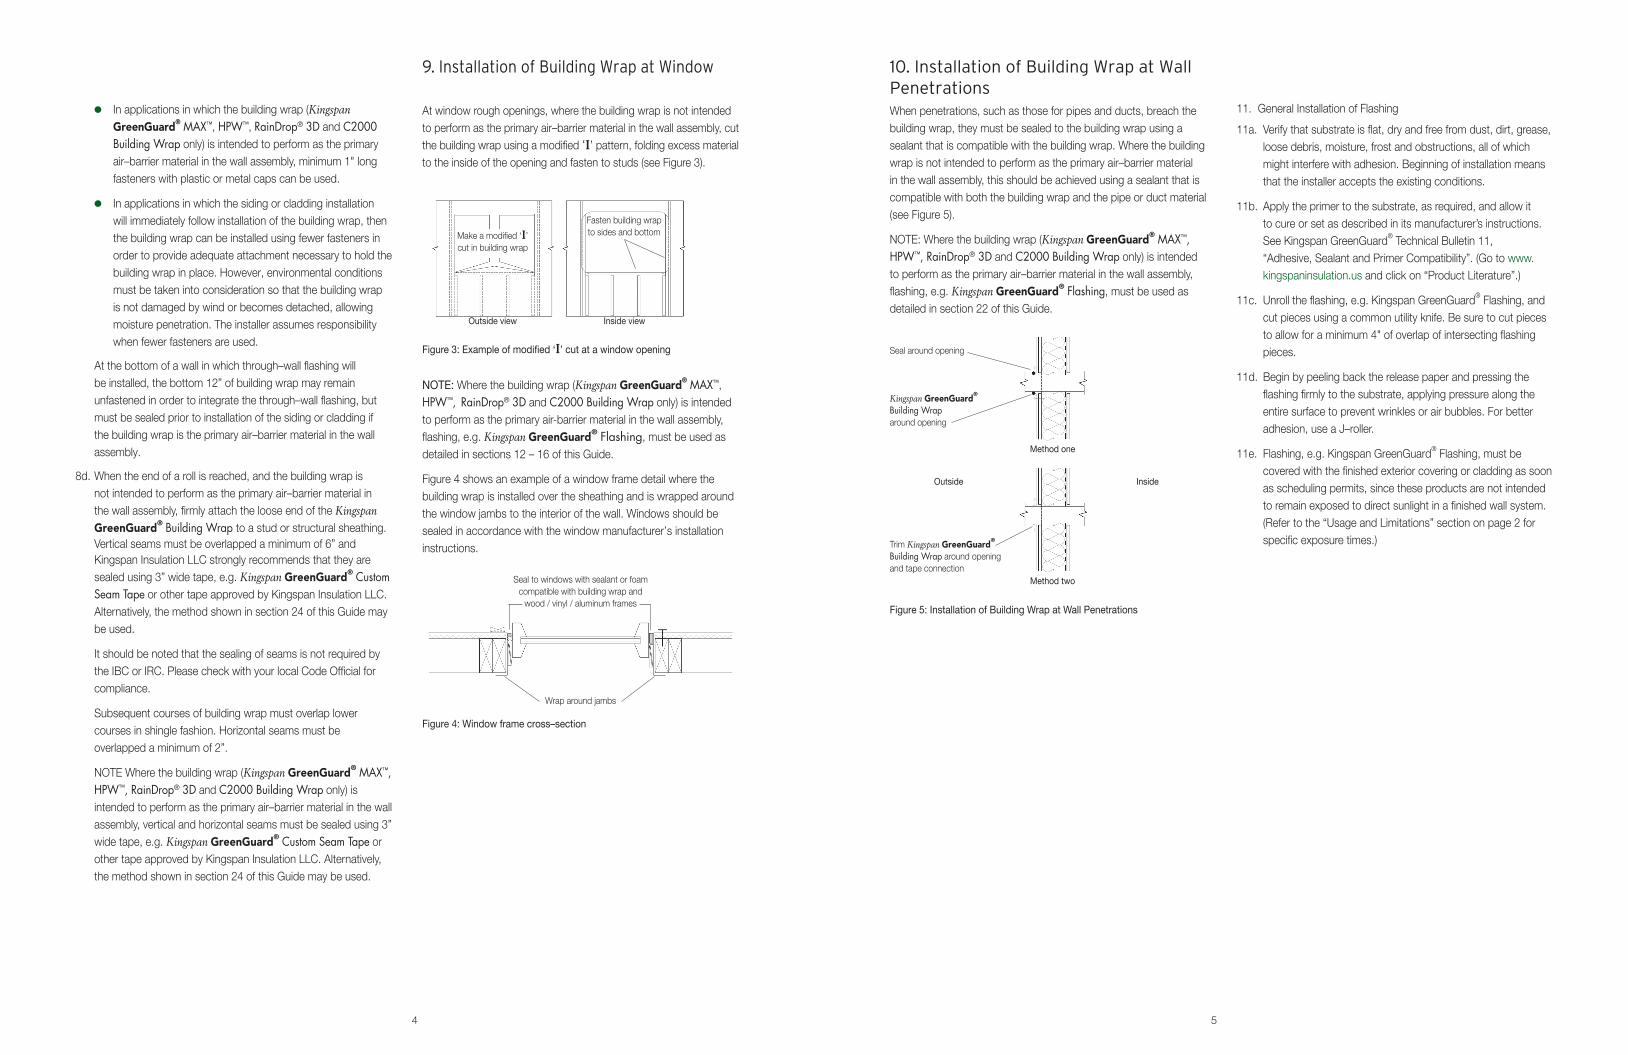
9. Installation of Building Wrap at Window
At window rough openings, where the building wrap is not intended to perform as the primary air–barrier material in the wall assembly, cut the building wrap using a modified ‘I’ pattern, folding excess material to the inside of the opening and fasten to studs (see Figure 3).
NOTE: Where the building wrap (Kingspan GreenGuard® MAX™, HPW™, RainDrop® 3D and C2000 Building Wrap only) is intended to perform as the primary air-barrier material in the wall assembly, flashing, e.g. Kingspan GreenGuard® Flashing, must be used as detailed in sections 12 – 16 of this Guide.
Figure 4 shows an example of a window frame detail where the building wrap is installed over the sheathing and is wrapped around the window jambs to the interior of the wall. Windows should be sealed in accordance with the window manufacturer’s installation instructions.
Figure 4: Window frame cross–section
Seal to windows with sealant or foamcompatible with building wrap and
wood / vinyl / aluminum frames
Wrap around jambs
Outside view
Make a modified ‘I’ cut in building wrap
Fasten building wrapto sides and bottom
Inside view
● In applications in which the building wrap (Kingspan GreenGuard® MAX™, HPW™, RainDrop® 3D and C2000 Building Wrap only) is intended to perform as the primary air–barrier material in the wall assembly, minimum 1" long fasteners with plastic or metal caps can be used.
● In applications in which the siding or cladding installation will immediately follow installation of the building wrap, then the building wrap can be installed using fewer fasteners in order to provide adequate attachment necessary to hold the building wrap in place. However, environmental conditions must be taken into consideration so that the building wrap is not damaged by wind or becomes detached, allowing moisture penetration. The installer assumes responsibility when fewer fasteners are used.
At the bottom of a wall in which through–wall flashing will be installed, the bottom 12” of building wrap may remain unfastened in order to integrate the through–wall flashing, but must be sealed prior to installation of the siding or cladding if the building wrap is the primary air–barrier material in the wall assembly.
8d. When the end of a roll is reached, and the building wrap is not intended to perform as the primary air–barrier material in the wall assembly, firmly attach the loose end of the Kingspan GreenGuard® Building Wrap to a stud or structural sheathing. Vertical seams must be overlapped a minimum of 6” and Kingspan Insulation LLC strongly recommends that they are sealed using 3” wide tape, e.g. Kingspan GreenGuard® Custom Seam Tape or other tape approved by Kingspan Insulation LLC. Alternatively, the method shown in section 24 of this Guide may be used.
It should be noted that the sealing of seams is not required by the IBC or IRC. Please check with your local Code Official for compliance.
Subsequent courses of building wrap must overlap lower courses in shingle fashion. Horizontal seams must be overlapped a minimum of 2”.
NOTE Where the building wrap (Kingspan GreenGuard® MAX™, HPW™, RainDrop® 3D and C2000 Building Wrap only) is intended to perform as the primary air–barrier material in the wall assembly, vertical and horizontal seams must be sealed using 3” wide tape, e.g. Kingspan GreenGuard® Custom Seam Tape or other tape approved by Kingspan Insulation LLC. Alternatively, the method shown in section 24 of this Guide may be used.
10. Installation of Building Wrap at Wall PenetrationsWhen penetrations, such as those for pipes and ducts, breach the building wrap, they must be sealed to the building wrap using a sealant that is compatible with the building wrap. Where the building wrap is not intended to perform as the primary air–barrier material in the wall assembly, this should be achieved using a sealant that is compatible with both the building wrap and the pipe or duct material (see Figure 5).
NOTE: Where the building wrap (Kingspan GreenGuard® MAX™, HPW™, RainDrop® 3D and C2000 Building Wrap only) is intended to perform as the primary air–barrier material in the wall assembly, flashing, e.g. Kingspan GreenGuard® Flashing, must be used as detailed in section 22 of this Guide.
Figure 5: Installation of Building Wrap at Wall Penetrations
Method one
Method two
Outside Inside
Kingspan GreenGuard®
Building Wraparound opening
Trim Kingspan GreenGuard®
Building Wrap around opening and tape connection
Seal around opening
11. General Installation of Flashing
11a. Verify that substrate is flat, dry and free from dust, dirt, grease, loose debris, moisture, frost and obstructions, all of which might interfere with adhesion. Beginning of installation means that the installer accepts the existing conditions.
11b. Apply the primer to the substrate, as required, and allow it to cure or set as described in its manufacturer’s instructions. See Kingspan GreenGuard® Technical Bulletin 11, “Adhesive, Sealant and Primer Compatibility”. (Go to www.kingspaninsulation.us and click on “Product Literature”.)
11c. Unroll the flashing, e.g. Kingspan GreenGuard® Flashing, and cut pieces using a common utility knife. Be sure to cut pieces to allow for a minimum 4" of overlap of intersecting flashing pieces.
11d. Begin by peeling back the release paper and pressing the flashing firmly to the substrate, applying pressure along the entire surface to prevent wrinkles or air bubbles. For better adhesion, use a J–roller.
11e. Flashing, e.g. Kingspan GreenGuard® Flashing, must be covered with the finished exterior covering or cladding as soon as scheduling permits, since these products are not intended to remain exposed to direct sunlight in a finished wall system. (Refer to the “Usage and Limitations” section on page 2 for specific exposure times.)

6 7
Figure 6: Preparation of Rough Opening
Figure 7: Cutting of Wrap on Sill
12. Installation of Flashing at Window – Wrap Pulled into OpeningNOTE: The following installation information is intended to represent a “best practice” approach and is not intended to address all possible construction scenarios. Some of the information described below for installation of building wrap and flashing materials is similar to that described in ASTM E 2112, Method A1.
12a. Preparation of OpeningMake a modified ‘I’ cut through the Kingspan GreenGuard® Building Wrap at the window opening (see Figure 8). Cut a header flap in the building wrap above the top of the window, fold up the header flap and temporarily tape in position. Fold the building wrap into the sides of the opening and over the sill. Cut building wrap on sill to promote flashing–to–wood adhesion (see Figure 6).
Cut a header flap
Cut modified ‘I’ over rough opening and attach remaining loose ends to the interior
Kingspan GreenGuard® Building Wrap
Cut wrap≤ 2" into sill
Overview of Install Methodology for Openings.The following sections detail installation of wrap and flashing using three methods of applying wrap at openings and six methods of flashing the sill plate. The methods of flashing sills are not dependent on the method of wrapping the opening.Methods for wrapping openings include:
1. Wrap pulled into opening - Section 122. Wrap Cut-Back Method - Section 133. Wrap Pull-Back Method - Section 14
Methods for flashing sill plates (Section 15) include:1. Stretch Flashing2. Sloped Sill3. Sill Dam4. Sill Pan 5. Corner Guards6. Corner Flashing
12c. Window InstallationInstall the window in accordance with the window manufacturer’s installation instructions. Typically, this requires that a bead of sealant be applied to the back side of the window flange prior to installing the window (see Figure 8). IMPORTANT: DO NOT SEAL THE BOTTOM FLANGE OF THE WINDOW, SINCE THIS MAY RESTRICT DRAINAGE. Attach the window using fasteners specified by the window manufacturer.
12d. Jamb FlashingInstall flashing, e.g. Kingspan GreenGuard® Flashing, at the jamb so that it overlaps the sill flashing or flashing corner guards. (see Figure 9).
Figure 8 Installation of Window
Figure 9: Installation of Jamb Flashing
Bottom
Jamb flashing (overlaps window flange)
Jamb flashing
Window frame
Sill flashing
Jamb flashing (overlaps sill flashing)
Kingspan GreenGuard® Building
Wrap
Figure 10: Preparation of Rough Opening
13. Installation of Flashing at Window – Wrap Cut–Back NOTE: The following installation information is intended to represent a “best practice” approach and is not intended to address all possible construction scenarios. Some of the information described below for installation of building wrap and flashing materials is similar to that described in ASTM E 2112, Method A1.
13a. Preparation of OpeningMake a modified ‘I’ cut through the building wrap at the window opening (see Figure 10). Cut a header flap in the building wrap and fold material above top of window and tape. Cut building wrap on sill to promote flashing–to–wood adhesion. On the sides of the rough opening, mark off a vertical line approximately 3" from the opening.
Cut the building wrap along the marked vertical lines on the sides of the opening. The cut will end at the parallel point along the bottom of the rough opening (see Figure 11). Remove wrap from the inside of the rough opening.
Figure 11: Cut Back of Wrap on the Sides
12b. Sill FlashingFollow sill flashing recommendations in Section 15.
12e. Head FlashingFollow recommendations for head flashing in Section 13c.

8 9
13c. Head FlashingInstall flashing, e.g. Kingspan GreenGuard® Flashing, at the head so that it overlaps and extends beyond the jamb flashing. Fold the building wrap down at the header so that it overlaps the head flashing (see Figure 12). Tape the diagonal cuts in the building wrap at the head with tape, e.g. Kingspan GreenGuard® Custom Seam Tape, or flashing, e.g. Kingspan GreenGuard® Flashing (see Figure 13).
If the building wrap is the primary air–barrier, then apply flasing, e.g. Kingspan GreenGuard® Flashing, across the entire window head to prevent air–leakage.
Figure 12: Installation Head Flashing
Figure 13: Tape Header Flap Down
Head flashing(extend beyond jamb flashing)
Remove existing tape and fold down header flap
Apply Kingspan GreenGuard® Custom Seam
Tape or Kingspan GreenGuard® Flashing
Kingspan GreenGuard® Building Wrap
14. Installation of Flashing at Window – Wrap Pull–Back NOTE: The following installation information is intended to represent a “best practices” approach and is not intended to address all possible construction scenarios. Some of the information for installation of building wrap and flashing materials is similar to details described in ASTM E 2112, Method A1.
14a. Preparation of OpeningTrim the wrap to the edge of the window rough opening on all four sides. Cut back the building wrap at the window header and jambs and proceed to pull back the building wrap as shown in Figure 14. Temporarily tape wrap edges in place.
Figure 14: Preparation of Rough Opening
14c. Sealing Building Wrap around WindowFold the building wrap over the flashings (see Figure 16) and use flashing, e.g. Kingspan GreenGuard® Flashing or Kingspan GreenGuard® Seam Tape, to adhere the wrap to the flashing at the jambs. Tape the diagonal cuts in the building wrap at the head with tape, e.g. Kingspan GreenGuard® Custom Seam Tape, or flashing, e.g. Kingspan GreenGuard® Flashing. Optionally install a 3” section of flashing, e.g. Kingspan GreenGuard® Flashing, at the center of the header flap to hold the building wrap in place (see Figure 16). If the building wrap is the primary air–barrier, then apply flashing, e.g. Kingspan GreenGuard® Flashing, across the entire window head to prevent air–leakage.
Figure 15: Installation of Head Flashing
Figure 16: Sealing Building Wrap around Window
14b. Head FlashingInstall Kingspan GreenGuard® Flashing at the head so that it overlaps the jamb flashing (see Figure 15).
13b. Sill FlashingFollow sill flashing recommendations in Section 15.
15. Sill Flashing
15a. Sill Flashing Method No. 1 - Stretchable Flashing Cut a piece of stretchable flashing, e.g. Kingspan GreenGuard® SuperStretch™ Butyl Flashing that is at least 12" longer than the width of the rough opening, allowing for about 6” of flashing up each side of the window opening. Use the appropriate width of flashing to cover the sill and at least 2” overlap to the face of the rough opening (see Figures 17 and 18).
Figure 17: Installation of Sill Flashing
Figure 18: Installation of Sill Flashing
Temporary tapeheader flap
Apply two staplesin corner
Kingspan GreenGuard®
SuperStretch™
Butyl Flashing
Kingspan GreenGuard®
SuperStretch™
Butyl Flashing
Jamb flashing (overlaps window flange)
Jamb flashing (overlaps sill flashing)
Jamb flashing
Window frame
Sill flashing

10 11
15e. Sill Flashing Method No. 5 - Corner GuardsInstall the corner guards with staples or roofing nails in both bottom corners of the opening (see Figure 23).
After fastening the corner guards, install a piece of flashing, e.g. Kingspan GreenGuard® Flashing, over the top edge of the corner guard (see Figure 24).
15d. Sill Flashing Method No. 4 - Sill Pan Install a sill pan directly over the building wrap after applying a bead of sealant to the back side of the front edge of the sill pan (see Figure 21). Attach the sill pan using roofing nails or panhead screws. Then install small pieces of stretchable flashing, e.g. Kingspan GreenGuard® SuperStretch™ Butyl Flashing, at the sill corners so that they overlap the sill pan edges and the side jamb (see Figure 22).
Figure 21: Sill Pan Option
Figure 22: Sill Pan Option Corners Sealed
Kingspan GreenGuard®
SuperStretch™ Butyl Flashing
● Install the sill flashing as shown in Figure 25, below. Use the appropriate width of flashing, e.g. Kingspan GreenGuard® Flashing, to cover the sill and at least 2" overlap to the face of the rough opening.
Kingspan GreenGuard® Flashing
Corner guard
Bead of sealanton backside
Kingspan GreenGuard®
SuperStretch™ Butyl Flashing
Figure 23
Figure 24
Figure 25
15c. Sill Flashing Method No. 3 - Sill Dam Install a sill dam directly over the building wrap at the back of the sill and then install the stretchable flashing, e.g. Kingspan GreenGuard® SuperStretch™ Butyl Flashing, as described in Method 15a. (See Figure 20).
Figure 20: Installation of Sill Dam
Caulk here
Sill dam
Kingspan GreenGuard®
SuperStretch™ Butyl Flashing
Figure 19: Installation of Sloped Sill
15b. Optional Sill Flashing Method No. 2 - Sloped Sill Install a sloped sill directly over the building wrap at the sill and then install the stretchable flashing, e.g. Kingspan GreenGuard® SuperStretch™ Butyl Flashing as described in Method 1 (see Figure 19).
Sloped sill
Kingspan GreenGuard®
SuperStretch™ Butyl Flashing
15f. Sill Flashing Method No. 6 - Corner FlashingInstall a 6” x 6” piece of flashing, e.g. Kingspan GreenGuard® Flashing, in each sill corner. Cut the flashing near the corner and pull the flashing into the rough opening on the sill and the jamb (see Figure 26).
Figure 26: Installation of Corner Flashing
Cut a piece of flashing, e.g. Kingspan GreenGuard® Flashing that is at least 12” longer than the width of the rough opening. Use the appropriate width of flashing to cover the sill and at least 2” overlap to the face of the rough opening.
Cut the flashing at each corner to allow the flashing to adhere to the face of the wall around the sill and jambs. The flashing should overlap the corner flashing pieces that were previously installed (see Figure 27).
Figure 27: Installation of Sill Flashing
(darker grey for differentiation of top layer only)
1312
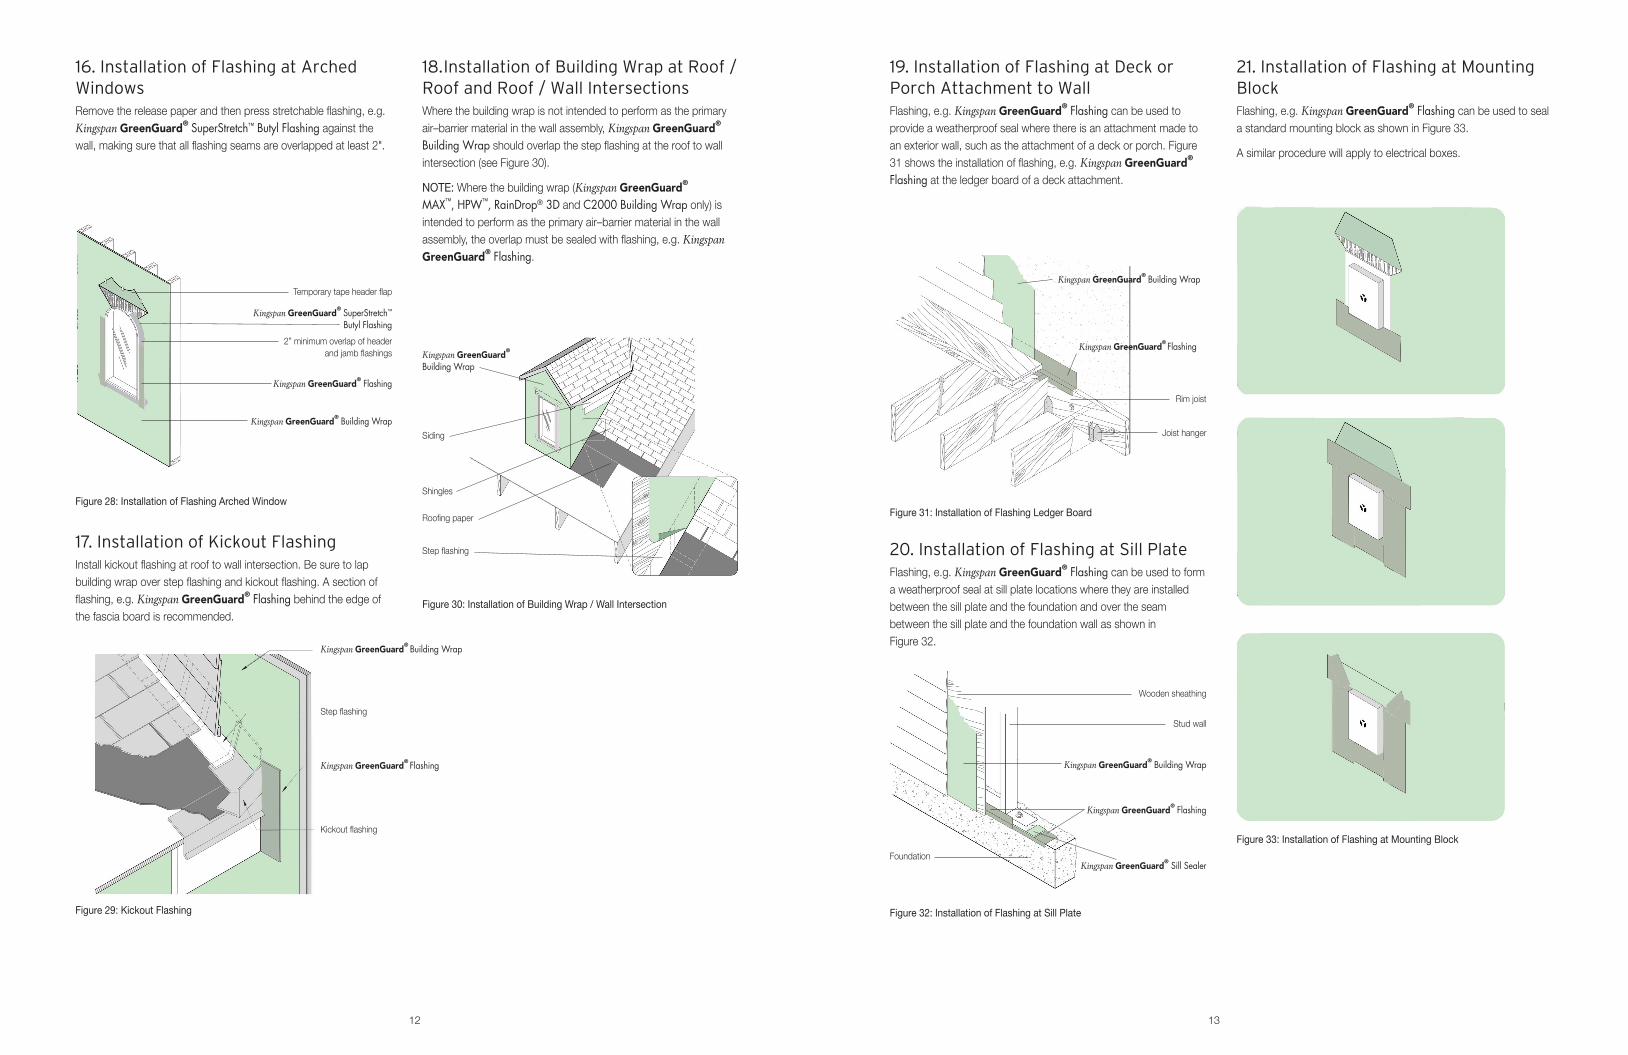
16. Installation of Flashing at Arched WindowsRemove the release paper and then press stretchable flashing, e.g. Kingspan GreenGuard® SuperStretch™ Butyl Flashing against the wall, making sure that all flashing seams are overlapped at least 2".
19. Installation of Flashing at Deck or Porch Attachment to WallFlashing, e.g. Kingspan GreenGuard® Flashing can be used to provide a weatherproof seal where there is an attachment made to an exterior wall, such as the attachment of a deck or porch. Figure 31 shows the installation of flashing, e.g. Kingspan GreenGuard® Flashing at the ledger board of a deck attachment.
17. Installation of Kickout FlashingInstall kickout flashing at roof to wall intersection. Be sure to lap building wrap over step flashing and kickout flashing. A section of flashing, e.g. Kingspan GreenGuard® Flashing behind the edge of the fascia board is recommended.
20. Installation of Flashing at Sill PlateFlashing, e.g. Kingspan GreenGuard® Flashing can be used to form a weatherproof seal at sill plate locations where they are installed between the sill plate and the foundation and over the seam between the sill plate and the foundation wall as shown in Figure 32.
Figure 28: Installation of Flashing Arched WindowFigure 31: Installation of Flashing Ledger Board
Figure 29: Kickout Flashing Figure 32: Installation of Flashing at Sill Plate
Temporary tape header flap
2” minimum overlap of headerand jamb flashings
Step flashing
Kickout flashing
Kingspan GreenGuard® SuperStretch™ Butyl Flashing
Kingspan GreenGuard® Flashing
Kingspan GreenGuard® Flashing
Kingspan GreenGuard® Building Wrap
Kingspan GreenGuard® Building Wrap
Kingspan GreenGuard® Flashing
Kingspan GreenGuard® Building Wrap
Rim joist
Wooden sheathing
Stud wall
Joist hanger
Kingspan GreenGuard® Building Wrap
Kingspan GreenGuard® Flashing
Kingspan GreenGuard® Sill Sealer
Foundation
18. Installation of Building Wrap at Roof / Roof and Roof / Wall IntersectionsWhere the building wrap is not intended to perform as the primary air–barrier material in the wall assembly, Kingspan GreenGuard®
Building Wrap should overlap the step flashing at the roof to wall intersection (see Figure 30).
NOTE: Where the building wrap (Kingspan GreenGuard® MAX™, HPW™, RainDrop® 3D and C2000 Building Wrap only) is intended to perform as the primary air–barrier material in the wall assembly, the overlap must be sealed with flashing, e.g. Kingspan GreenGuard® Flashing.
Figure 30: Installation of Building Wrap / Wall Intersection
Siding
Shingles
Roofing paper
Step flashing
Kingspan GreenGuard®
Building Wrap
21. Installation of Flashing at Mounting BlockFlashing, e.g. Kingspan GreenGuard® Flashing can be used to seal a standard mounting block as shown in Figure 33.
A similar procedure will apply to electrical boxes.
Figure 33: Installation of Flashing at Mounting Block

1514
22. Installation of Flashing at Pipe Penetrations
Stretchable flashing, e.g. Kingspan GreenGuard® SuperStretch™ Butyl Flashing, can be used to seal around pipe penetrations in an exterior wall as shown in Figure 34.
Figure 34: Installation of Flashing at Pipe Penetration
Fold Kingspan GreenGuard®
SuperStretch™ Butyl Flashing before wrapping around pipe
Unfold Kingspan GreenGuard®
SuperStretch™ Butyl Flashing against Kingspan GreenGuard
® Building Wrap
Kingspan GreenGuard®
SuperStretch™ Butyl Flashing
Kingspan GreenGuard®
SuperStretch™ Butyl Flashing
Kingspan GreenGuard®
SuperStretch™ Butyl Flashing
Release paper
24. Alternative Method for Sealing Overlapped Building Wrap SeamsCommon sealants can be used to seal overlapped seams in Kingspan GreenGuard® Building Wrap, where the building wrap is intended to perform as the primary air–barrier material.
When using common sealants to seal building wrap seams as an alternative to using seam tape, install the sealant as follows.
Apply 1/8” to 1/2" bead of sealant on the lower course of building wrap. Make sure that the horizontal overlap of the upper building wrap course is at least 2". Apply hand pressure to the overlap to create a full seal.
Go to www.kingspaninsulation.us for a list of sealants (see Technical Bulletin #11 under “Product Literature”).
23. Inside and Outside Corners
Flashing, e.g. Kingspan GreenGuard® Flashing is ideal for flashing the inside and outside corners of buildings.
Flashing can be applied directly to sheathing before the building wrap or over the building wrap.
Figure 35: Flashing of Inside and Outside Corners
Figure 36: Using adhesive to seal building wrap.

Kingspan Insulation LLC2100 RiverEdge Parkway, Suite 175, Atlanta, Georgia 30328
1-800-241-4402www.kingspaninsulation.us www.kingspaninsulation.ca
Kingspan Insulation LLC believes the information and recommendations herein to be accurate and reliable. However, since use conditions are not within its control, Kingspan Insulation LLC does not guarantee results from use of such products or other information herein and disclaims all liability from any resulting damage or loss. No warranty, express or implied, is given as to the merchantability, fitness for particular purpose, or otherwise with respect to the products referred to.
® Kingspan, the G Device and the Lion Device are Registered Trademarks of the Kingspan Group plc in the US, Canada and other countries. All rights reserved.® GreenGuard and RainDrop are Registered Trademarks of the Kingspan Group plc in the US. All rights reserved.
TM MAX, HPW SuperStretch and VW are Trademarks of the Kingspan Group plc.INSTL-RES 1711
For more information on specific building product recommendations and product data, contact your Kingspan Insulation LLC representative.
For the most current installation guidelines and compliance information go to www.kingspaninsulation.us.