Embed Size (px)
Citation preview

7/29/2019 Bose Free Style Speaker System Users Manual
http://slidepdf.com/reader/full/bose-free-style-speaker-system-users-manual 1/20
Bose® FreeStyle®
Speaker System
Owner’s Guide
J uly 24, 2002
AM267190_00_V.pdf
7/29/2019 Bose Free Style Speaker System Users Manual
http://slidepdf.com/reader/full/bose-free-style-speaker-system-users-manual 2/20
2
Safety Information
The Interface module is to be used only with the Acoustimass
®
module in the Bose
®
FreeStyle
®
powered speaker system.
WARNING: To reduce the risk of fire or electric shock, do not expose the system to rain ormoisture. The apparatus shall not be exposed to dripping or splashing, and objects filled withliquids, such as vases, shall not be placed on the apparatus.
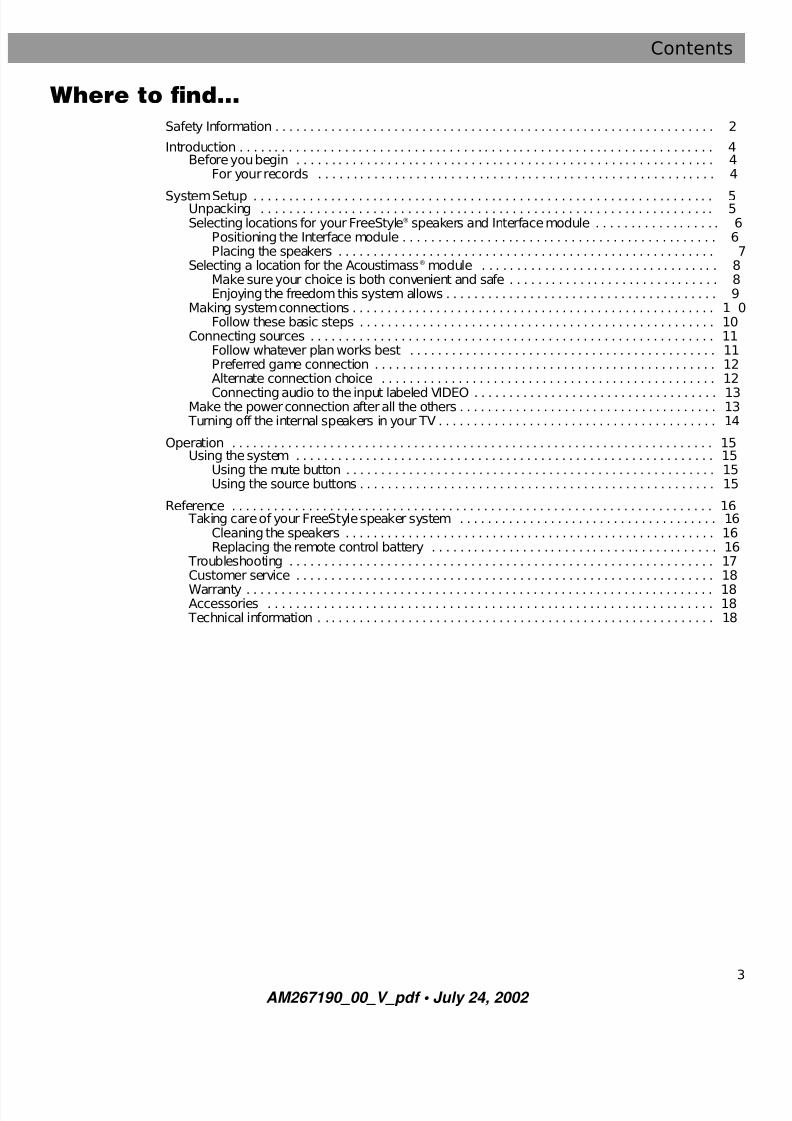
These CAUTION marks are located on the rear panel of the Acoustimass module:
The lightning flash with arrowhead symbol, within an equilateral triangle,is intended to alert the user to the presence of uninsulated dangerous voltagewithin the system enclosure that may be of sufficient magnitude to constitute a
risk of electric shock. The exclamation point within an equilateral triangle, as marked on the system,is intended to alert the user to the presence of important operating and main-tenance instructions in this owner’s guide.
CAUTION: To prevent electric shock, match wide blade of plug to wide slot, insert fully.
Class B emissions limits
This Class B digital apparatus meets all requirements of the Canadian Interference-CausingEquipment Regulations.
Batteries
Please dispose of used batteries properly, following any local regulations.Do not incinerate.
Additional safety information
See the additional instructions on the Important Safety Information sheet enclosed with thisowner’s guide.
Please read this owner’s guide
Please take the time to read and follow this owner’s guide carefully. It will help you set up and
operate your system properly, and enjoy all of its advanced features. Save your owner’s guidefor future reference.
©2002 Bose Corporation. No part of this work may be reproduced, modified, distributed or otherwise used without
prior written permission
. Bose FreeStyle speaker system is a registered trademark of Bose Corporation.
CAUTIONAUTIONRISK OF ELECTRICAL SHOCK
DO NOT OPEN
CAUTION: TO REDUCE THE RISK OF ELECTRIC SHOCK,
DO NOT REMOVE COVER (OR BACK).
NO USER-SERVICABLE PARTS INSIDE.
REFER SERVICING TO QUALIFIED PERSONNEL.
AVISRISQUE DE CHOC ÉLECTRIQUE
NE PAS OUVRIR
ATTENTION : POUR RÉDUIRE LE RISQUE DE DÉCHARGEÉLECTRIQUE, NE RETIREZ PAS LE COUVERCLE (OU
L’ARRIÈRE). IL NE SE TROUVE ÀL’INTÉRIEUR AUCUNEPIÈCE POUVANT ÊTRE RÉPARÉE PAR L’USAGER.S’ADRESSER À UN RÉPARATEUR COMPÉTENT.
Batteries
AM267190_00_V_pdf • July 24, 2002
7/29/2019 Bose Free Style Speaker System Users Manual
http://slidepdf.com/reader/full/bose-free-style-speaker-system-users-manual 3/20
3
Contents
Where to find...
Safety Information . . . . . . . . . . . . . . . . . . . . . . . . . . . . . . . . . . . . . . . . . . . . . . . . . . . . . . . . . . . . . . . 2
Introduction . . . . . . . . . . . . . . . . . . . . . . . . . . . . . . . . . . . . . . . . . . . . . . . . . . . . . . . . . . . . . . . . . . . . 4Before you begin . . . . . . . . . . . . . . . . . . . . . . . . . . . . . . . . . . . . . . . . . . . . . . . . . . . . . . . . . . . . 4
For your records . . . . . . . . . . . . . . . . . . . . . . . . . . . . . . . . . . . . . . . . . . . . . . . . . . . . . . . . . 4
System Setup . . . . . . . . . . . . . . . . . . . . . . . . . . . . . . . . . . . . . . . . . . . . . . . . . . . . . . . . . . . . . . . . . . 5Unpacking . . . . . . . . . . . . . . . . . . . . . . . . . . . . . . . . . . . . . . . . . . . . . . . . . . . . . . . . . . . . . . . . . 5Selecting locations for your FreeStyle
®
speakers and Interface module . . . . . . . . . . . . . . . . . . 6Positioning the Interface module . . . . . . . . . . . . . . . . . . . . . . . . . . . . . . . . . . . . . . . . . . . . . 6Placing the speakers . . . . . . . . . . . . . . . . . . . . . . . . . . . . . . . . . . . . . . . . . . . . . . . . . . . . . . 7
Selecting a location for the Acoustimass
®
module . . . . . . . . . . . . . . . . . . . . . . . . . . . . . . . . . . 8Make sure your choice is both convenient and safe . . . . . . . . . . . . . . . . . . . . . . . . . . . . . . 8Enjoying the freedom this system allows . . . . . . . . . . . . . . . . . . . . . . . . . . . . . . . . . . . . . . . 9
Making system connections . . . . . . . . . . . . . . . . . . . . . . . . . . . . . . . . . . . . . . . . . . . . . . . . . . . . 10Follow these basic steps . . . . . . . . . . . . . . . . . . . . . . . . . . . . . . . . . . . . . . . . . . . . . . . . . . . 10
Connecting sources . . . . . . . . . . . . . . . . . . . . . . . . . . . . . . . . . . . . . . . . . . . . . . . . . . . . . . . . . . 1Follow whatever plan works best . . . . . . . . . . . . . . . . . . . . . . . . . . . . . . . . . . . . . . . . . . . . 1Preferred game connection . . . . . . . . . . . . . . . . . . . . . . . . . . . . . . . . . . . . . . . . . . . . . . . . . 12Alternate connection choice . . . . . . . . . . . . . . . . . . . . . . . . . . . . . . . . . . . . . . . . . . . . . . . . 12
Connecting audio to the input labeled VIDEO . . . . . . . . . . . . . . . . . . . . . . . . . . . . . . . . . . . 13Make the power connection after all the others . . . . . . . . . . . . . . . . . . . . . . . . . . . . . . . . . . . . . 13
Turning off the internal speakers in your TV . . . . . . . . . . . . . . . . . . . . . . . . . . . . . . . . . . . . . . . . 14
Operation . . . . . . . . . . . . . . . . . . . . . . . . . . . . . . . . . . . . . . . . . . . . . . . . . . . . . . . . . . . . . . . . . . . . . 15Using the system . . . . . . . . . . . . . . . . . . . . . . . . . . . . . . . . . . . . . . . . . . . . . . . . . . . . . . . . . . . . 15
Using the mute button . . . . . . . . . . . . . . . . . . . . . . . . . . . . . . . . . . . . . . . . . . . . . . . . . . . . . 15Using the source buttons . . . . . . . . . . . . . . . . . . . . . . . . . . . . . . . . . . . . . . . . . . . . . . . . . . . 15
Reference . . . . . . . . . . . . . . . . . . . . . . . . . . . . . . . . . . . . . . . . . . . . . . . . . . . . . . . . . . . . . . . . . . . . . 16 Taking care of your FreeStyle speaker system . . . . . . . . . . . . . . . . . . . . . . . . . . . . . . . . . . . . . 16
Cleaning the speakers . . . . . . . . . . . . . . . . . . . . . . . . . . . . . . . . . . . . . . . . . . . . . . . . . . . . . 16Replacing the remote control battery . . . . . . . . . . . . . . . . . . . . . . . . . . . . . . . . . . . . . . . . . 16
Troubleshooting . . . . . . . . . . . . . . . . . . . . . . . . . . . . . . . . . . . . . . . . . . . . . . . . . . . . . . . . . . . . . 17Customer service . . . . . . . . . . . . . . . . . . . . . . . . . . . . . . . . . . . . . . . . . . . . . . . . . . . . . . . . . . . . 18
Warranty . . . . . . . . . . . . . . . . . . . . . . . . . . . . . . . . . . . . . . . . . . . . . . . . . . . . . . . . . . . . . . . . . . . 18Accessories . . . . . . . . . . . . . . . . . . . . . . . . . . . . . . . . . . . . . . . . . . . . . . . . . . . . . . . . . . . . . . . . 18
Technical information . . . . . . . . . . . . . . . . . . . . . . . . . . . . . . . . . . . . . . . . . . . . . . . . . . . . . . . . . 18
AM267190_00_V_pdf • July 24, 2002
7/29/2019 Bose Free Style Speaker System Users Manual
http://slidepdf.com/reader/full/bose-free-style-speaker-system-users-manual 4/20
4
Introduction
Before you begin
Thank you for purchasing a Bose
®
FreeStyle
®
speaker system, which delivers the superioracoustic performance needed to enjoy the full audio impact of video games and otherexciting home entertainment.
Using Dolby* Digital
®
and Bose VideoStage
®
signal processing technology, FreeStyle speak-ers provide improved spaciousness for bold 3-D effects from game audio, movie-like realism
from surround encoded DVDs, and a natural soundstage for music. In fact, it provides muchof the performance of premium five-speaker systems, yet from a modest array of equipment
Your system includes:
• Small, easy-to-place shelf speakers
• An attractive floor-standing Acoustimass
®
module
• Easy-to-use, aim-and-press infrared (IR) remote control
• Interface module with input jacks for connecting source components (like a game console,VCR, DSS, CD changer, or tape deck) and IR signal receiver that processes your remotecontrol commands
For your records
The serial number is located on the rear of the Acoustimass module.
Serial number: _____________________________________________________________________
Dealer name: ______________________________________________________________________
Dealer phone: __________________________ Purchase date: _____________________________
We suggest you keep your sales receipt and warranty card together with this owner’s guide.
*“Dolby” and the double-D symbol are trademarks of Dolby Laboratories. Manufactured under license from Dolby Laboratories.
Confidential unpublished works. 1992-1997 Dolby Laboratories. All rights reserved.
AM267190_00_V_pdf • July 24, 2002

7/29/2019 Bose Free Style Speaker System Users Manual
http://slidepdf.com/reader/full/bose-free-style-speaker-system-users-manual 5/20
5
System Setup
Unpacking
Carefully unpack your system. Save all packing materials, which provide the safest way totransport your system as needed.
WARNING: To avoid danger of suffocation, keep the plastic bags out of the reach of children
If any part of the system appears damaged, do not attempt to use it. Notify Bose or your
authorized Bose
®
dealer immediately. For contact information, refer to the address sheetincluded in the carton.
Check to be sure your system includes the parts shown in Figure 1.
Note: Now is a good time to find the serial number on the rear of the Acoustimass
®
module.Copy that number onto your warranty card and in the space provided on page 4.
Figure 1
Contents of the shippingcarton:
• 2 Speakers
• 4 Rubber feet, large
• 1 Acoustimass module
• 8 Rubber feet, small
• 1 Interface module
• 1 extra attachment strip
• 1 Remote control(battery installed)
• 1 120V power cord(8-foot)
• 1 Stereo cable (6-foot))
• 1 Speaker cable (15-foot)
©
Acoustimassmodule
Remotecontrol120V power cord
Speaker cable
Speakers
Stereo cable
Rubber feet, large
Rubber feet, small
Interface module
Extraattachment strip
AM267190_00_V_pdf • July 24, 2002
7/29/2019 Bose Free Style Speaker System Users Manual
http://slidepdf.com/reader/full/bose-free-style-speaker-system-users-manual 6/20
6
System Setup
Selecting locations for your FreeStyle
®
speakers and Interface module
Use the following guidelines to choose locations and positions for the speakers and the Inter-face module. While these guidelines are offered to ensure the best system performance, youmay find other placement variations that are more convenient and provide the sound youenjoy.
Note: Keep in mind that the Acoustimass
®
module is the part of this system that connects to
a power outlet.
Positioning the Interface module
The Interface module is the sound-source connection and communication center for theFreeStyle speaker system. The Interface module receives infrared signals from the remotecontrol to turn the speakers on, change volume, select the input source, and mute or turn offthe speaker system. It also sends information to the speakers from any sound sources con-nected to it.
Remember that the cables of other components, like your video game console, VCR, or DSS,will connect directly to this module, so make sure it is within reach of those cables.
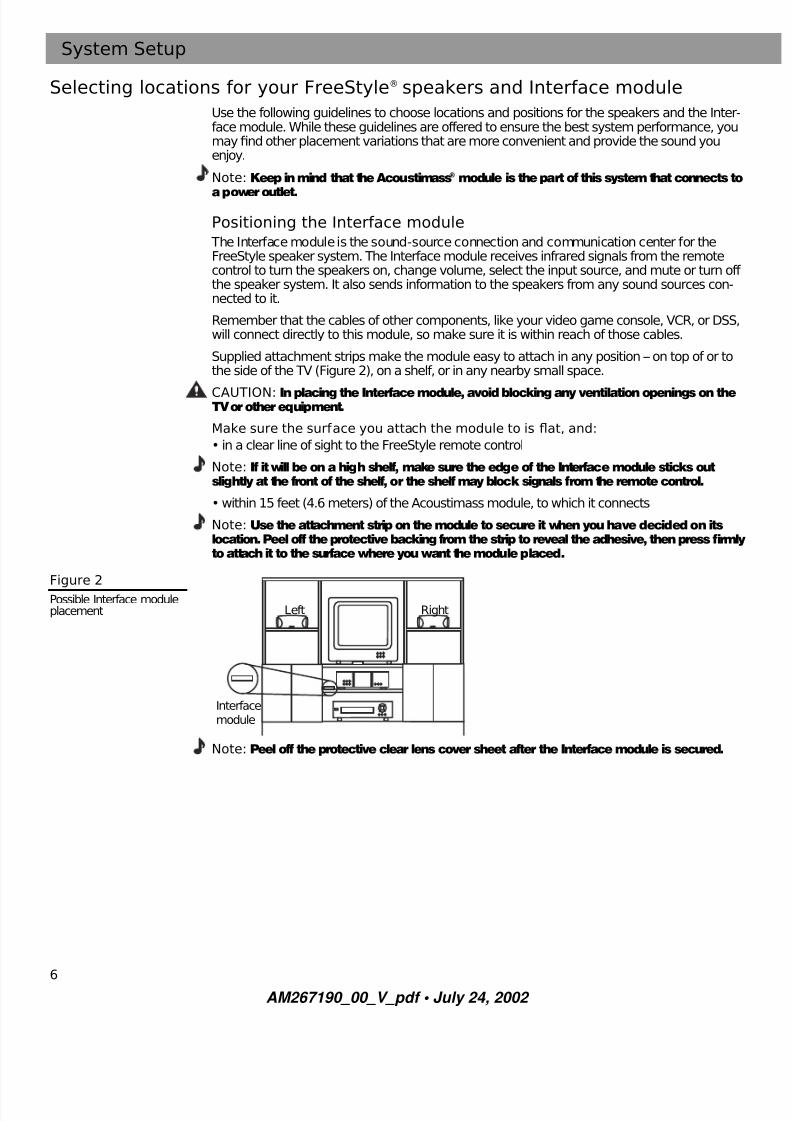
Supplied attachment strips make the module easy to attach in any position – on top of or tothe side of the TV (Figure 2), on a shelf, or in any nearby small space.
CAUTION: In placing the Interface module, avoid blocking any ventilation openings on theTV or other equipment.
Make sure the surface you attach the module to is flat, and:
• in a clear line of sight to the FreeStyle remote control
Note: If it will be on a high shelf, make sure the edge of the Interface module sticks outslightly at the front of the shelf, or the shelf may block signals from the remote control.
• within 15 feet (4.6 meters) of the Acoustimass module, to which it connects
Note: Use the attachment strip on the module to secure it when you have decided on itslocation. Peel off the protective backing from the strip to reveal the adhesive, then press firmlyto attach it to the surface where you want the module placed.
Figure 2
Possible Interface moduleplacement
Note: Peel off the protective clear lens cover sheet after the Interface module is secured.
Interfacemodule
Left Right
AM267190_00_V_pdf • July 24, 2002

7/29/2019 Bose Free Style Speaker System Users Manual
http://slidepdf.com/reader/full/bose-free-style-speaker-system-users-manual 7/20
7
System Setup
Placing the speakers
These speakers are designed to sit only on their bottom surface (Figure 3). In that position(with the Bose
®
logo right side up), they can also be mounted on optional Bose brackets,table stands, or floor stands. For details and ordering information, refer toAccessories
onpage 18.
Figure 3
Recommended orientationof the speakers
Choosing a good location for the speakers will allow you to experience the audio spacious-ness and surround effects that your FreeStyle system is designed to deliver.
• Be sure to face each speaker straight ahead (toward the listening area), so that it covers thebroadest listening area.
Angling one or both speakers into or away from the listening area significantly alters systemperformance.
Figure 4
Placement
• If you are using a bookshelf or a home entertainment unit, place each speaker at the frontedge of its shelf
.
Positioning these speakers farther back in an enclosed space can change the overall qual-
ity of sound and alter the system performance.• If you are placing the speakers on a flat surface, be sure to attach the small rubber feet to
the bottom surface.
CAUTION: Choose a stable and level surface for both speakers. Vibration can cause thespeakers to move, particularly on smooth surfaces like marble, glass, or highly polishedwood. If needed, you may obtain additional rubber feet (Part Number 178321) from BoseCustomer Service. To contact Bose, refer to the address sheet included in the product carton
AM267190_00_V_pdf • July 24, 2002

7/29/2019 Bose Free Style Speaker System Users Manual
http://slidepdf.com/reader/full/bose-free-style-speaker-system-users-manual 8/20
8
System Setup
• Place the speakers on top or to the left and right of your TV (Figure 5) and at roughly equadistance from it.
Figure 5
Placement of the smallspeakers near a flat wall orin a corner position
Note: The speakers are magnetically shielded to prevent interference when they are on ornear the TV.
• Try to maintain at least 3 feet (1 meter) of space between the two speakers.
• Place the speakers no more than 3 feet (1 meter) from the edges of the TV screen.
Bose recommends a maximum distance of 3 feet from each speaker to the edge of the TVscreen to prevent the sound from becoming too separated from the picture. You may varythis distance, however, based on room conditions and your personal preference.
• Keep both speakers at approximately the same height.
Selecting a location for
the Acoustimass
®
module
The Acoustimass module is designed to be the unseen part of this system. It can be placedunder or behind furniture, for example, and contribute to the lifelike sound you hear from thespeakers without being detected.
Make sure your choice is both convenient and safe
Place the module in a location that is convenient (under a table, behind a sofa or chair,screened by drapes) but roomy enough for ventilation from the rear panel. Consider theguidelines below when choosing a location.
Place the module on a flat surface where it is:
• within reach of an AC (mains) power outlet
• no more than 15 feet (4.6 meters) from the Interface module
• at the same end of the room as the TV and speakers
• a minimum of 3 feet (1 meter) from the TV to prevent interference from the module, which inot magnetically shielded (Figure 6 on page 9)
L e f t
R i g h t
AM267190_00_V_pdf • July 24, 2002

7/29/2019 Bose Free Style Speaker System Users Manual
http://slidepdf.com/reader/full/bose-free-style-speaker-system-users-manual 9/20
9
System Setup
Figure 6
3-foot distance betweenthe Acoustimass
®
moduleand the TV
CAUTION: The Acoustimass module generates a magnetic field. Although this is not animmediate risk to your video tapes, audio tapes, and other magnetic media, you should notstore any of these items directly on or near the module.
Be sure to:
• aim the port of the module away from the wall to decrease bass or toward the wall toincrease bass (maintain at least 3 inches from the wall).
• stand the Acoustimass module on its legs. Do not lay it on its side or stand it on either end(Figure 7).
• attach the large rubber feet to the bottom of each leg on the module. The rubber feet pro-vide increased stability and protection from scratches.
Figure 7
Recommended orientationfor the module
CAUTION: Do not block the openings on the back of the module, which provide ventilation
for the built-in circuitry.
Enjoying the freedom this system allows
When the speakers, Acoustimass module, and Interface module are placed as directed, youcan enjoy the freedom to sit, recline, or move about the room while enjoying the full perfor-mance of this system (Figure 8).
Figure 8
System placement for idealcoverage
CAUTION: Be sure to read the section on making connections before you plug in the system
Ri g ht
Lef t
L e f t
Ri g ht
A C I N P U T
M U S I C C E N T E R
AM267190_00_V_pdf • July 24, 2002
7/29/2019 Bose Free Style Speaker System Users Manual
http://slidepdf.com/reader/full/bose-free-style-speaker-system-users-manual 10/20
10
System Setup
Making system connections
Labeled jacks on the rear of the Acoustimass
®
module and the custom cables supplied withthe system ensure a fast and easy hookup.
CAUTION: Do not plug the Acoustimass module into an AC power (mains) outlet until all thesource components are connected to the Interface module.
Follow these basic steps
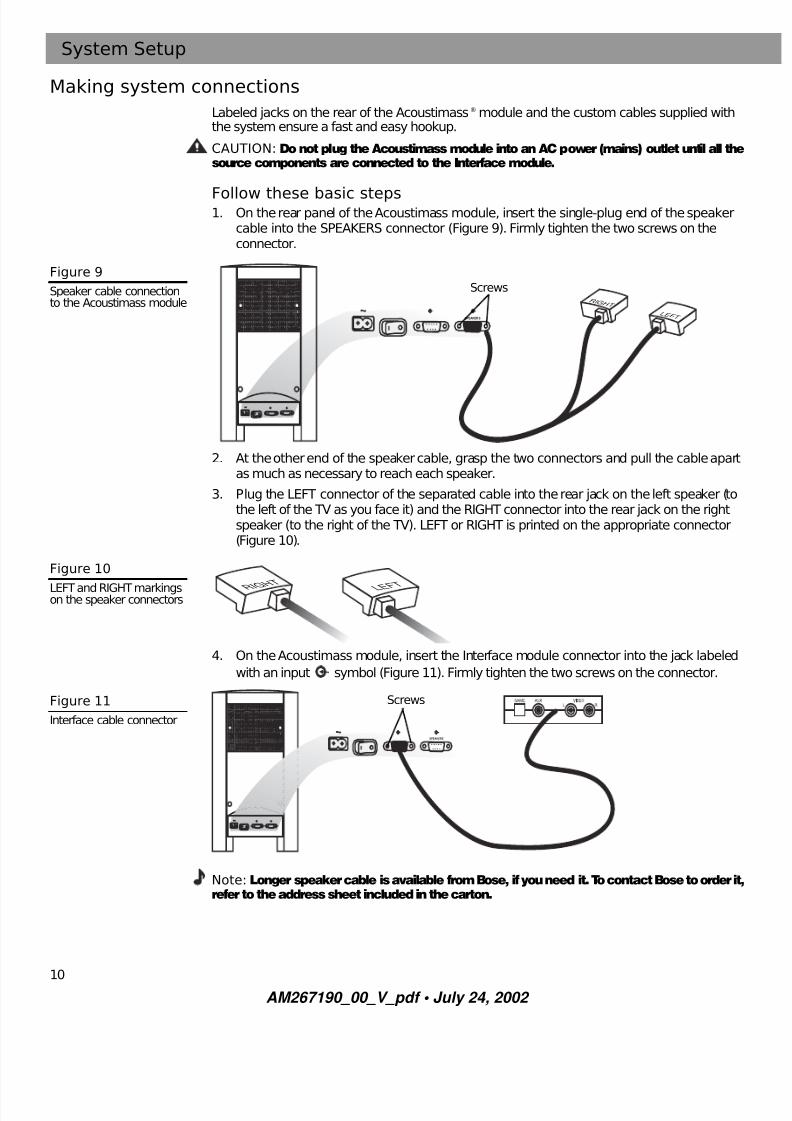
1. On the rear panel of the Acoustimass module, insert the single-plug end of the speakercable into the SPEAKERS connector (Figure 9). Firmly tighten the two screws on theconnector.
Figure 9
Speaker cable connectionto the Acoustimass module
2. At the other end of the speaker cable, grasp the two connectors and pull the cable apartas much as necessary to reach each speaker.
3. Plug the LEFT connector of the separated cable into the rear jack on the left speaker (tothe left of the TV as you face it) and the RIGHT connector into the rear jack on the rightspeaker (to the right of the TV). LEFT or RIGHT is printed on the appropriate connector(Figure 10).
Figure 10
LEFT and RIGHT markingson the speaker connectors
4. On the Acoustimass module, insert the Interface module connector into the jack labeled
with an input symbol (Figure 11). Firmly tighten the two screws on the connector.
Figure 11
Interface cable connector
Note: Longer speaker cable is available from Bose, if you need it. To contact Bose to order it,refer to the address sheet included in the carton.
SPEAKERS
SPEAKERS
R I G H T
L E F T
Screws
R I G H
T
L E F T
SPEAKERS
SPEAKERS
Screws
AM267190_00_V_pdf • July 24, 2002

7/29/2019 Bose Free Style Speaker System Users Manual
http://slidepdf.com/reader/full/bose-free-style-speaker-system-users-manual 11/20
11
System Setup
Connecting sources
After all of the FreeStyle® system parts are connected (Figure 12), use the jacks on theInterface module to connect the audio outputs of a game console, TV/VCR, or other audiocomponents.
Figure 12
Interface module jacksavailable after completedconnection of the suppliedsystem parts
There are three jacks on the Interface module, marked GAME, AUX, and VIDEO (Figure 13),and multiple possibilities for connecting both analog and digital components to them.
Figure 13
Connection jacks on theInterface module
Refer to the preferred and alternate system connection options that are described andillustrated on page 12.
Note: If you have more than one component with optical outputs, you can connect one ofthem using its analog audio inputs instead. You can connect the left and right analog inputsto the VIDEO source L & R inputs on the Interface module. Or you can use a coaxial con-verter. To order that converter from Bose®, ask for Part Number 253561. To contact Bose, referto the address sheet included in the carton.
Follow whatever plan works bestWhen you decide on the best choice for your setup, connect your sources as shown in thediagram that applies.
SPEAKERS
L E F T R I G H T
Speakercable
Acoustimass® module
AC input jack
Interfacemodule
Right Left
Designed to deliver thebest performance fromyour game console(which may or may notinclude the requiredoptical cable).Or, usethis jackfor other
digitalsources,if you
prefer.
For digital inputfrom a digitalsource, likeDSS or DVD.
Use this analog inputfor a VCR, TV, or your
game console(if you do not havean optical cable
or the gameconsole does not
support that option).
AM267190_00_V_pdf • July 24, 2002
7/29/2019 Bose Free Style Speaker System Users Manual
http://slidepdf.com/reader/full/bose-free-style-speaker-system-users-manual 12/20
12
System Setup
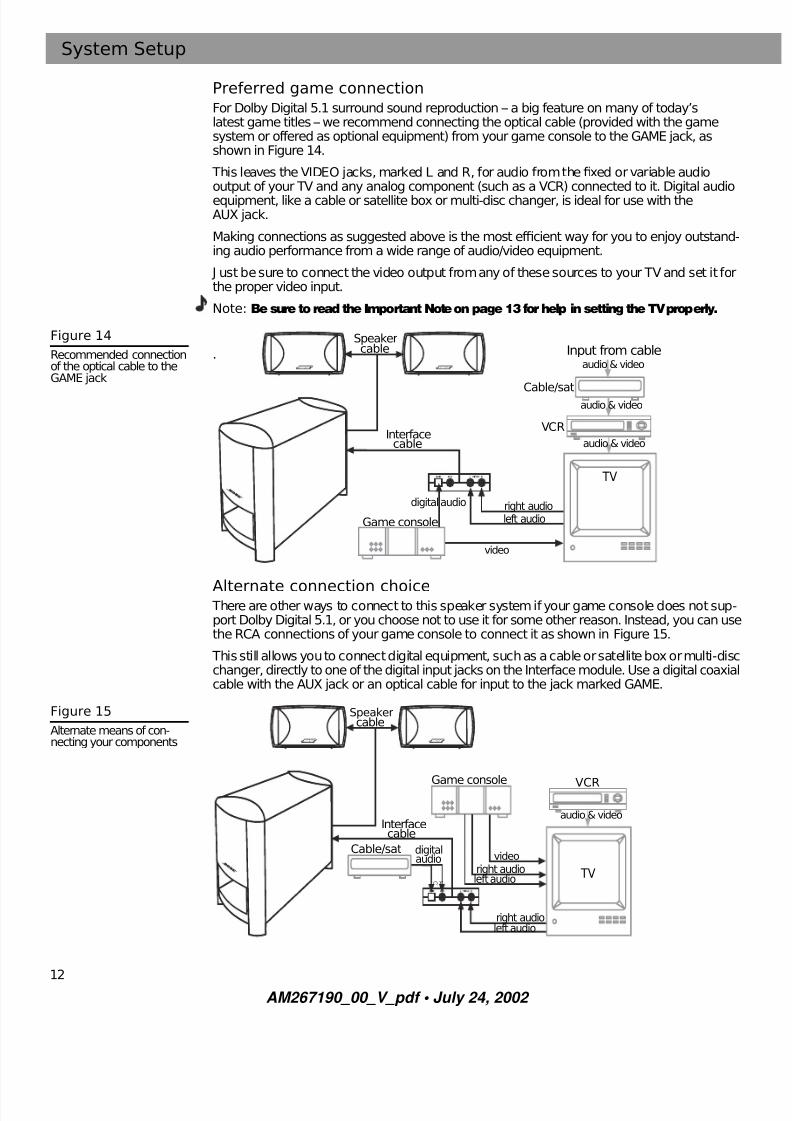
Preferred game connection
For Dolby Digital 5.1 surround sound reproduction – a big feature on many of today’slatest game titles – we recommend connecting the optical cable (provided with the gamesystem or offered as optional equipment) from your game console to the GAME jack, asshown in Figure 14.
This leaves the VIDEO jacks, marked L and R, for audio from the fixed or variable audiooutput of your TV and any analog component (such as a VCR) connected to it. Digital audioequipment, like a cable or satellite box or multi-disc changer, is ideal for use with theAUX jack.
Making connections as suggested above is the most efficient way for you to enjoy outstand-ing audio performance from a wide range of audio/video equipment.
J ust be sure to connect the video output from any of these sources to your TV and set it forthe proper video input.
Note: Be sure to read the Important Noteon page 13 for help in setting the TV properly.
Figure 14
Recommended connectionof the optical cable to theGAME jack
.
Alternate connection choice There are other ways to connect to this speaker system if your game console does not sup-port Dolby Digital 5.1, or you choose not to use it for some other reason. Instead, you can usethe RCA connections of your game console to connect it as shown in Figure 15.
This still allows you to connect digital equipment, such as a cable or satellite box or multi-discchanger, directly to one of the digital input jacks on the Interface module. Use a digital coaxiacable with the AUX jack or an optical cable for input to the jack marked GAME.
Figure 15
Alternate means of con-necting your components
digital audio
Speaker
audio & video
Input from cable
TV
Cable/sataudio & video
VCR
Game console
video
audio & video
right audio left audio
cable
Interfacecable
videodigital
TV
VCR
Cable/sat
Game console
audio & video
or
right audio left audio
Interfacecable
Speakercable
right audio left audio
audio
AM267190_00_V_pdf • July 24, 2002
7/29/2019 Bose Free Style Speaker System Users Manual
http://slidepdf.com/reader/full/bose-free-style-speaker-system-users-manual 13/20
13
System Setup
Connecting audio to the input labeled VIDEO
When connecting audio from a video component to the VIDEO L and R jacks on the Interfacemodule, remember to:
• use standard RCA audio cables (one is supplied with the FreeStyle® speakers)
• match the red connector to the right channel (R) and the white (or black) connector to theleft channel (L)
• use a Y-adapter (available at electronics stores) to connect to a mono source
For further details on making the video connections between your game console and TV, referto the manuals for those video components.
Important Note:Your televisionmust be set for VIDEO INPUT when playing a game console.If it is not set properly, you may hear the sound, but will not see the picture on the TV screen.
For most TV models*, there is a button labeled either TV/VIDEO, INPUT, or AUX IN (or a similarterm) for you to use. When the video input is correctly selected, the word VIDEO, AUX, orLINE IN usually appears in a corner of the TV screen.
If you are unable to locate the video input of your television, please consult the manufacturerof your TV.
*Other TV models (in particular, some GE/RCA/Proscan models) assign the video input to
channel 00 or 91, so you need to select that channel to receive the video input.
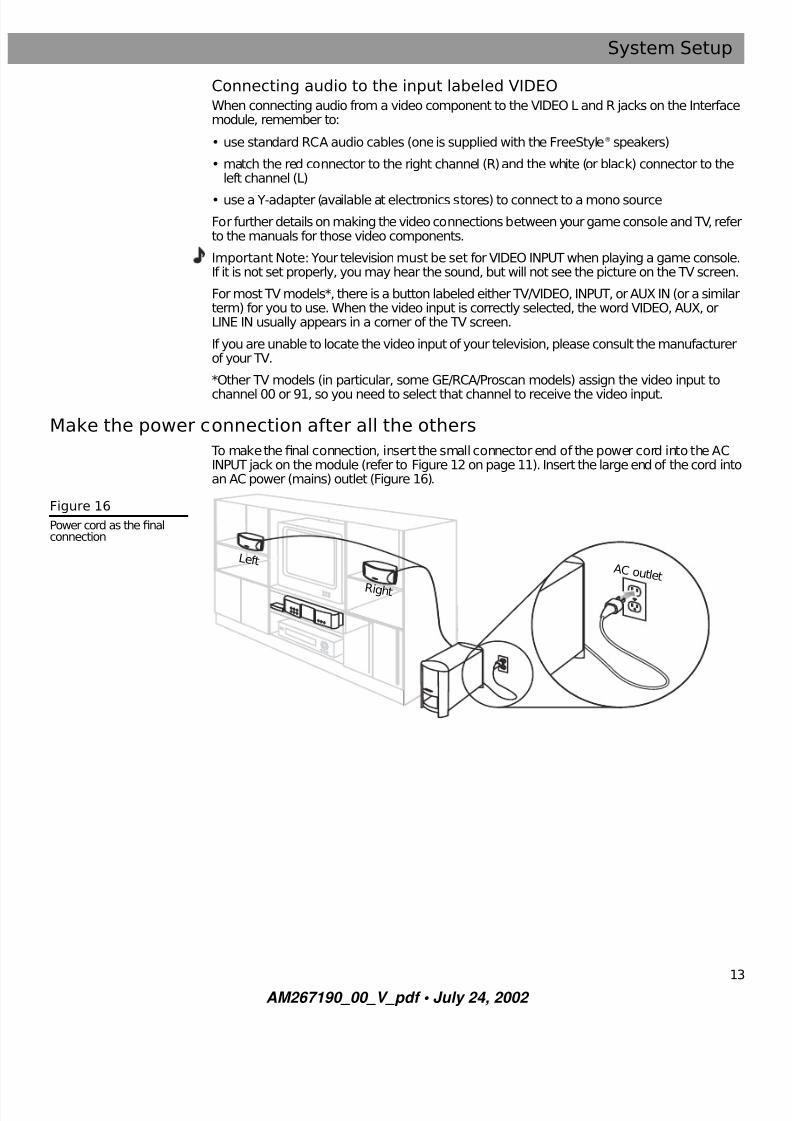
Make the power connection after all the others
To make the final connection, insert the small connector end of the power cord into the ACINPUT jack on the module (refer to Figure 12 on page 11). Insert the large end of the cord intoan AC power (mains) outlet (Figure 16).
Figure 16
Power cord as the finalconnection
AC o u t l e t
Ri g ht
L e f t
AM267190_00_V_pdf • July 24, 2002

7/29/2019 Bose Free Style Speaker System Users Manual
http://slidepdf.com/reader/full/bose-free-style-speaker-system-users-manual 14/20
14
System Setup
Turn on the power switch on the back panel of the module (Figure 17).
Figure 17
Power switch on the backof the module
Turning off the internal speakers in your TV
When you listen to TV sound through your FreeStyle® speaker system, the speakers in your TV should not be on. Use the on-screen menus in your TV to select INTERNAL SPEAKERS:OFF (the exact on-screen message may be different). Refer to your TV owner’s guide fordetailed instructions.
If your TV does not have an option to turn off the internal speakers, reduce the volume of your TV by using its lowest setting.
SPEAKERS
SPEAKERS
AM267190_00_V_pdf • July 24, 2002
7/29/2019 Bose Free Style Speaker System Users Manual
http://slidepdf.com/reader/full/bose-free-style-speaker-system-users-manual 15/20
15
Operation
Using the system
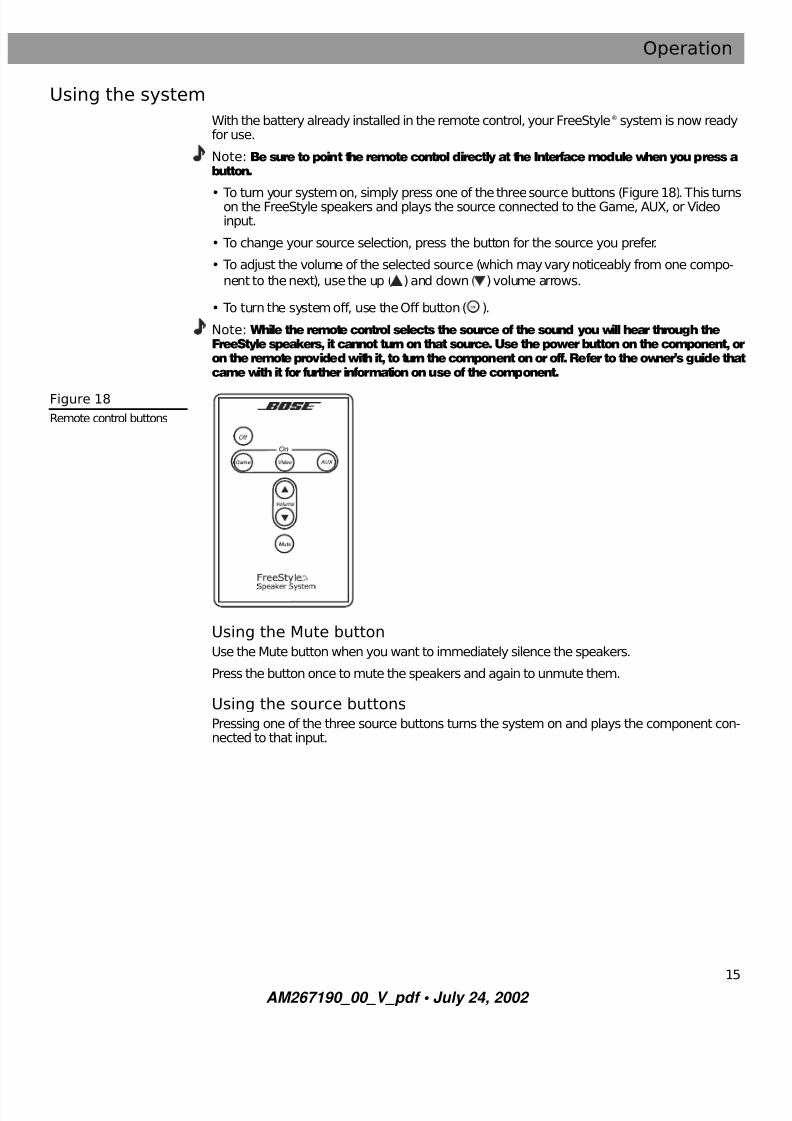
With the battery already installed in the remote control, your FreeStyle® system is now readyfor use.
Note: Be sure to point the remote control directly at the Interface module when you press abutton.
• To turn your system on, simply press one of the three source buttons (Figure 18). This turnson the FreeStyle speakers and plays the source connected to the Game, AUX, or Videoinput.
• To change your source selection, press the button for the source you prefer.
• To adjust the volume of the selected source (which may vary noticeably from one compo-nent to the next), use the up ( ) and down ( ) volume arrows.
• To turn the system off, use the Off button ( ).
Note: While the remote control selects the source of the sound you will hear through theFreeStyle speakers, it cannot turn on that source. Use the power button on the component, oron the remote provided with it, to turn the component on or off. Refer to the owner’s guide thatcame with it for further information on use of the component.
Figure 18
Remote control buttons
Using the Mute button
Use the Mute button when you want to immediately silence the speakers.
Press the button once to mute the speakers and again to unmute them.
Using the source buttons
Pressing one of the three source buttons turns the system on and plays the component con-nected to that input.
®
AM267190_00_V_pdf • July 24, 2002

7/29/2019 Bose Free Style Speaker System Users Manual
http://slidepdf.com/reader/full/bose-free-style-speaker-system-users-manual 16/20
16
Reference
Taking care of your FreeStyle® speaker system
Caring for your system may include cleaning the speaker enclosures and replacing theremote control battery.
Cleaning the speakers
• Clean the surface of your speakers with a soft, damp cloth. You can use an ammonia-free
window cleaner on a soft cloth to maintain the finish.
• Do not use any sprays near the speakers. Do not use any solvents, chemicals, or cleaningsolutions containing alcohol, ammonia, or abrasives.
• Do not allow liquids to spill into any openings.
• The speaker grilles require no special care, although you may vacuum them carefully,if necessary.
Replacing the remote control battery
WARNING: Keep the remote control battery away from children. It may cause a fire or chemical burn if mishandled. Do not recharge, disassemble, heat above 100̊C (212̊F), or inciner-ate. Dispose of used battery properly. Replace only with a battery of the correct type andmodel number.
CAUTION: Danger of explosion if battery is incorrectly replaced. Replace only with the sameor equivalent type.
1. Place the remote control face down on a flat surface.
2. Using your finger, push the tab lock to the side and hold, as shown. Slide the batterycompartment open and remove the spent battery.
Figure 19
Locating the tab-type safetylock
Note: Use only a Duracell, Eveready, Maxell, or Toshiba CR2032 or DL2032 lithium battery(available at electronics stores). If you have difficulty finding a replacement battery, contactBose® Customer Service. For contact information, refer to the address list included with thesystem.
3. Keeping the remote control face down, insert the new battery into the compartment withthe + symbol facing up.
4. Gently slide the battery compartment closed. It locks automatically.
S e e o p e r a t i n
g
i n s t r u
c t i o
n s f o
r t y
p e s
o f
b a t t e
r y t o b
e u s e d
S e e o p e r a t i n
g
i n s t r u
c t i o
n s f o
r t y
p e s
o f
b a t t e
r y t o b
e u s e d
+ symbol
Tab
AM267190_00_V_pdf • July 24, 2002
7/29/2019 Bose Free Style Speaker System Users Manual
http://slidepdf.com/reader/full/bose-free-style-speaker-system-users-manual 17/20
17
Reference
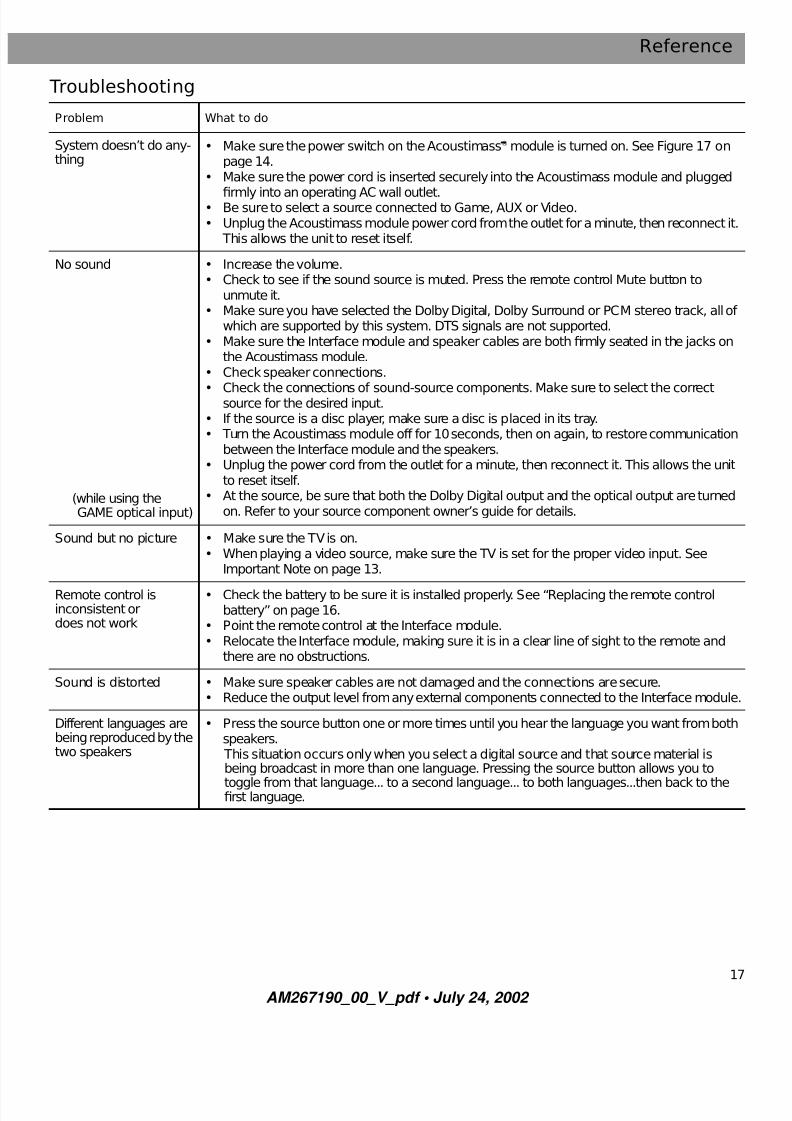
Troubleshooting
Problem What to do
System doesn’t do any-thing
• Make sure the power switch on the Acoustimass® module is turned on. See Figure 17 onpage 14.
• Make sure the power cord is inserted securely into the Acoustimass module and plugged
firmly into an operating AC wall outlet.• Be sure to select a source connected to Game, AUX or Video.• Unplug the Acoustimass module power cord from the outlet for a minute, then reconnect it.
This allows the unit to reset itself.
No sound
(while using theGAME optical input)
• Increase the volume.• Check to see if the sound source is muted. Press the remote control Mute button to
unmute it.• Make sure you have selected the Dolby Digital, Dolby Surround or PCM stereo track, all of
which are supported by this system. DTS signals are not supported.• Make sure the Interface module and speaker cables are both firmly seated in the jacks on
the Acoustimass module.• Check speaker connections.
• Check the connections of sound-source components. Make sure to select the correctsource for the desired input.• If the source is a disc player, make sure a disc is placed in its tray.• Turn the Acoustimass module off for 10 seconds, then on again, to restore communication
between the Interface module and the speakers.• Unplug the power cord from the outlet for a minute, then reconnect it. This allows the unit
to reset itself.• At the source, be sure that both the Dolby Digital output and the optical output are turned
on. Refer to your source component owner’s guide for details.
Sound but no picture • Make sure the TV is on.• When playing a video source, make sure the TV is set for the proper video input. See
Important Note on page 13.
Remote control isinconsistent ordoes not work
• Check the battery to be sure it is installed properly. See “Replacing the remote controlbattery” on page 16.
• Point the remote control at the Interface module.• Relocate the Interface module, making sure it is in a clear line of sight to the remote and
there are no obstructions.
Sound is distorted • Make sure speaker cables are not damaged and the connections are secure.• Reduce the output level from any external components connected to the Interface module
Different languages arebeing reproduced by thetwo speakers
• Press the source button one or more times until you hear the language you want from bothspeakers. This situation occurs only when you select a digital source and that source material isbeing broadcast in more than one language. Pressing the source button allows you to
toggle from that language... to a second language... to both languages...then back to thefirst language.
AM267190_00_V_pdf • July 24, 2002

7/29/2019 Bose Free Style Speaker System Users Manual
http://slidepdf.com/reader/full/bose-free-style-speaker-system-users-manual 18/20
18
Reference
Customer service
For additional help in solving problems, contact Bose® Customer Service. Refer to theaddress sheet included with the system.
Warranty
The FreeStyle® speaker system is covered by a limited transferable warranty. Details of the
warranty are provided on the product registration card that came with your system. Please filout the information section on the card and mail it to Bose.
Accessories
The FreeStyle shelf speakers are compatible with Bose mounting accessories, including theUB-20 wall brackets, UFS-20 floor stands and UTS-20 table stands. Bose also offers cableadapters, for use in running speaker cable through walls, and longer speaker wire, as needed
For further information or to order mounting brackets, stands, or cable adapters, contact yourBose dealer. Or, to call Bose directly, refer to the address sheet included in the carton.
Technical information
Power rating
USA/Canada: 120VAC, 60 Hz, 300W
Source Inputs
VIDEO, AUX, GAME
Dimensions
Speakers:
31/2"H x 77/8"W x 51/4"D(8.7 cm x 19.9 cm x 13.6 cm)
Acoustimass® module:
141
/2"H x 83
/4"W x 191
/8"D(36.7 cm x 22.2 cm x 48.5 cm)
Weight
Speakers: 2.7 lb (1.2 kg) each
Acoustimass module: 23.3 lb (10.6 kg)
Finish
Speakers: polymer
Acoustimass module: polymer
AM267190_00_V_pdf • July 24, 2002

7/29/2019 Bose Free Style Speaker System Users Manual
http://slidepdf.com/reader/full/bose-free-style-speaker-system-users-manual 19/20
19
Reference
AM267190_00_V_pdf • July 24, 2002

7/29/2019 Bose Free Style Speaker System Users Manual
http://slidepdf.com/reader/full/bose-free-style-speaker-system-users-manual 20/20
©2002 Bose CorporationThe Mountain, Framingham, MA 01701-9168 USA