Embed Size (px)
Citation preview

BOSaNOVA Secure
User Guide

The following is an abridged version of the BOSaNOVA License Agreement:
Information in this manual is subject to change without advance notice. This manual is provided under the same license agreement which covers the corresponding software and hardware.
BOSaNOVA is protected by copyright law and international trade agreements. No part of this product, including software and manual may be reproduced or copied in any form or by any means without express written permission from Xorcom Ltd. Unauthorized reproduction or distribution of this program or document, or any part thereof, is subject to criminal and civil penalties.
BOSaNOVA are trademarks of Xorcom Ltd. And 10Zig Inc.
It shall be inferred that all registered or trademarked products referred to in this manual retain their copyrights and trademarks.
© 2014 Xorcom. All rights reserved.
Your feedback is valuable.
If you have questions or suggestions regarding this document—number
MM0040–07, please forward them to the Bosanova Technical
Communication department at: [email protected]
Contact Information
BOSaNOVA, a division of Xorcom Ltd.
Tel: +972 4 9951995 Email: [email protected]
Web site: http://www.bosanova.co.il

TABLE OF CONTENTS
BOSaNOVA Secure Description....................................................................................... 2
BOSaNOVA Secure Features..................................................................................... 2
The Administrator ............................................................................................................. 3
Opening the Administrator .......................................................................................... 3
Installation Parameters................................................................................................. 3
Administrative Parameters........................................................................................... 4
Connectivity................................................................................................................. 4
Installed Modules......................................................................................................... 5
Diagnostics................................................................................................................... 5 The SECURE Configurator................................................................................................ 6
Basic ................................................................................................................... 6
Advanced Tab ................................................................................................... 7 The Emulation Configurator....................................................................................................... 9
Using the Emulation Configurator .............................................................................. 9
Sessions Tab ....................................................................................................... 9
Advanced Properties Tab ............................................................................... 10
Diagnostics................................................................................................................. 12
Secure Sockets Layer (SSL)............................................................................................13
Overview.................................................................................................................... 13
SSL prerequisites ....................................................................................................... 14
Creating the System Certificate ................................................................................. 14
Configuring SSL in BOSaNOVA Secure .................................................................. 15 The BOSaNOVA Emulation .......................................................................................................17
Starting BOSaNOVA Secure .................................................................................... 17
Opening a Display or Printer Emulation Session ...................................................... 17
Display Emulation Sessions....................................................................................... 18
Display Emulation Toolbar Buttons................................................................. 18
Background Bitmaps in a Display Emulation .................................................. 20
Image Mapping in a Display Emulation........................................................... 21
Additional Image Mapping Procedures............................................................ 22
Printer Emulation Sessions ........................................................................................ 23
Printer Emulation Toolbar Buttons .................................................................. 23
Accessing Printer Session Properties......................................................................... 25
General Tab ...................................................................................................... 25
Previous Job Attributes Tab ............................................................................. 25
Page Setup Tab ................................................................................................. 25

Diagnostics ....................................................................................................... 26
Page Setup Tab ................................................................................................. 26
Custom Driver Considerations................................................................................... 26
Copying Between Sessions or Applications .............................................................. 27
Switching Between Emulation Sessions.................................................................... 28
From the Toolbar.............................................................................................. 28
From the Menu Bar .......................................................................................... 28
From the Keyboard........................................................................................... 28
Using Macros ............................................................................................................. 29
Recording a Macro ........................................................................................... 25
Viewing a Macro .............................................................................................. 29
Playing a Macro................................................................................................ 30
Deleting a Macro .............................................................................................. 30
The Macro Organizer and Macro Editor .......................................................... 30
Closing a Session ....................................................................................................... 27
Stopping an Emulation Session ................................................................................. 31
Customizing the Emulation Mouse................................................................................ 32
Customizing the Emulation Keyboard .......................................................................... 34
Accessing Keyboard Customization .......................................................................... 34
Customizing Your Keyboard ..................................................................................... 34
Mapping Editor .......................................................................................................... 37
[Host Actions List] ........................................................................................... 37
PC Key ............................................................................................................. 37
Mapping for PC Key ........................................................................................ 38
Deleting a Keyboard Mapping................................................................................... 39
Exporting a Keyboard Mapping ................................................................................ 39
Importing a Keyboard Mapping ................................................................................ 40
Customizing the Emulation Toolbars............................................................................ 41
Customizing Toolbars................................................................................................ 43
Arranging Toolbar Buttons ........................................................................................ 44
Moving Toolbars........................................................................................................ 44
Hotkeys ............................................................................................................................ 45
MorphExpress ................................................................................................................. 46
Displaying the MorphExpress Screen........................................................................ 46
Configuring MorphExpress ....................................................................................... 46
Customizing GUI Controls ........................................................................................ 46
Customizing GUI Colors ........................................................................................... 47

iii
Miscellaneous.................................................................................................................. 48
PDE (Printer Driver Editor) ....................................................................................... 48
Euro Symbol Support................................................................................................. 48
Host Requirements ........................................................................................... 48
Changes Required for Euro Symbol Support ................................................... 49
DTF (Data Transfer Function)..........................................................................................51
Introduction to DTF ................................................................................................... 51
The DTF Wizard ........................................................................................................ 52
The DTF Interface ..................................................................................................... 52
The Scheduler ............................................................................................................ 53
The Scheduler Interface.................................................................................... 53
The Menus ........................................................................................................ 53
The Toolbar ...................................................................................................... 54
Scheduler Wizard ............................................................................................. 54
The Send Utility......................................................................................................... 54
Remote Command........................................................................................................... 55
Introduction................................................................................................................ 55
Syntax ........................................................................................................................ 55
Parameters ........................................................................................................ 55
Examples.................................................................................................................... 56
Troubleshooting ...............................................................................................................57
Printer Session ........................................................................................................... 57
Euro Support .............................................................................................................. 57
Traces and Screen Captures ....................................................................................... 57
Recording a Telnet Trace ................................................................................. 57
Screen Capture ................................................................................................. 57
From a Printer Session ..................................................................................... 59
Preparing the Information File ......................................................................... 59
Collecting User Information ...................................................................................... 60
Contacting Technical Support ................................................................................... 61

iv BOSaNOVA Secure
Error Messages ............................................................................................................... 62
Error Codes ...................................................................................................... 62
Error Categories ............................................................................................... 62
Administrator Errors (ADM) ................................................................................... 63
TCP/IP Configurator Errors (TPC) .......................................................................... 64
Emulation Configurator Errors (BPC) ..................................................................... 66
Display Emulation Errors (EML) ............................................................................ 67
Message or Text Errors (BSV) ................................................................................ 68
Driver Errors (BCD) ................................................................................................ 69
Kernel Engine Error Messages (KRN) .................................................................... 73
WinSock Return Codes.............................................................................................. 74

1
BOSaNOVA Secure CONFIGURATION
AND ADMINISTRATION
BOSaNOVA Secure includes several modules or components to help you
configure, administer, and customize the software. These are:
• The Administrator
Use to set and maintain overall parameters, see p. 3
• The TCP/IP Configurator
Use to define the TCP/IP connection, proxy servers, and ports, see p. 6
• The Emulation Configurator
Use to define emulation sessions, see p. 9
• The BOSaNOVA Emulation
The environment in which you run your host applications, see p. 13
• MorphExpress
A tool that converts your host screen into a GUI screen, see p. 42
• Printer Driver Editor
Use to customize the printer driver, see p. 44
• Data Transfer Function
A 32-bit Windows utility for transferring data in either direction between a
PC and a host, see p. 47
• Remote Command
Send an AS/400 CL command to a host system from a PC, see p. 53

2 BOSaNOVA Secure
BOSaNOVA Secure DESCRIPTION
BOSaNOVA Secure combines TN5250E display emulation with DTF
software in a package that is specifically designed for direct BOSaNOVA
-to-AS/400 or iSeries connectivity.
BOSaNOVA Secure includes the following program modules:
• Display/Printer Emulation provides TN5250E display and printer
emulation
• Printer Driver Editor enables you to customize the printer driver
• DTF (Data Transfer Functions) is a 32-bit Windows utility for transferring
data between a BOSaNOVA Secure and its host
BOSaNOVA Secure Features
• supports up to 32 simultaneous display and/or printer emulation sessions
• includes MorphExpress for converting host screens to true GUI screens
without changing the host application
• supports Text Assist
• supports 3477FC devices (132-column display with color)
• supports PC and Terminal styles for keyboards, allowing you to work with
either a 101/102-key keyboard or 122-key keyboard
• supports the Euro symbol
• includes comprehensive keyboard mapping and customization, using Shift,
Caps Lock, Alt, Ctrl, function keys, etc.
• includes Print Preview, which displays print output before sending the print
job to the physical printer
• includes Printer Session Properties, for modifying printer session settings
• includes customizable “floating” toolbars and Internet Explorer-type
toolbar buttons
• supports user-definable macros
• includes BOSaNOVA EHLLAPI/DDE Interface 32, which sets a standard
IBM EHLLAPI-style interface for enhancing interaction between host
sessions and Windows applications

The Administrator 3
THE ADMINISTRATOR
The Administrator provides an overall view of various parameters relating to
your installation of BOSaNOVA Secure. The Administrator also enables you
to run certain administrative procedures.
Opening the Administrator
To open the Administrator:
1. Click the Windows Start button.
2. Select All Programs BOSaNOVA Secure.
3. Select .
The top pane of the Administrator uses a Windows-style tree structure to
display the parameters and installed modules. To use this structure:
• An item preceded by a plus sign (+) contains nested items. Click the plus
sign to expand the item (display the nested folders).
• An item preceded by a minus sign (-) is already fully expanded. Click the
minus sign to collapse that part of the tree.
• Names of parameter sets appear in black, while the current status values
appear in blue. Values always appear in arrow brackets (< >).
• When you select a parameter set or installed module in the top pane, the
buttons and controls that configure or run that parameter set or module
appear in the bottom pane.
Installation Parameters
When Installation Parameters, in the top pane of the Administrator, is
expanded, the following parameters are displayed:
Product Version
The installed version of BOSaNOVA Secure. Technical Support ask for
this number if you contact them for help.
Installation Type
Standalone for BOSaNOVA Secure.
Installation Path
The path to which BOSaNOVA Secure is installed.
Installation Set
The set number.
Product ID
The BOSaNOVA Secure product ID. Technical Support will ask for this
number if you contact them for help.

4 BOSaNOVA Secure
Administrative Parameters
When Administrative Parameters in the top pane of the Administrator is
expanded, the following parameters are displayed:
Host Language/Country
The host keyboard ID (language), the host EBCDIC code page used, and
the EBCDIC/ASCII translation table that is used. These values were
defined when you installed BOSaNOVA Secure.
Euro Support is enabled from the Host Language/Country parameter. If
you select this option and your Windows system and the host are set to
support the euro symbol, BOSaNOVA Secure uses euro symbol-
compliant keyboard type and code page IDs when allocating a session and
EBCDIC/ANSI and ANSI/EBCDIC tables with euro symbol support. If
your host or Windows system do not support the euro symbol, do not
select this checkbox. See “Euro Symbol Support” on page 44 for details
on system requirements, changes, and patches.
License
Displays the license type.
Connectivity
When Connectivity, in the top pane of the Administrator, is expanded, the
following parameter is displayed:
Connection Type
TCP/IP
Run
(This button is disabled for the TCP/IP connection type.)
Configure
Click to open the TCP/IP Configurator to configure the connection.

The Administrator 5
Installed Modules
Expand Installed Modules to view all currently installed BOSaNOVA Secure
components. Choices made during installation determine which modules exist.
Display/Printer Emulation
Click Configure to run the Emulation Configurator. Use the Emulation
Configurator to change the parameters that control the look and operation
of BOSaNOVA Secure’s emulation.
DTF
DTF is a 32-bit Windows utility for transferring data between a client and
its host. (See “DTF (Data Transfer Function)” on page 47.)
Diagnostics
If you contact Technical Support with a problem, they may ask you to provide
them with special files to help them solve it. This process is explained in
“Traces and Screen Captures” on page 55.
Expand Diagnostics in the Administrator display tree to display the following
parameter:
• Troubleshooting Information
Click Collect Technical Information to open the User Information
dialog box; fill in the information requested to create the information
file (default Bsinfo.bts).
You must close all sessions before accessing Diagnostics.

6 BOSaNOVA Secure
THE TCP/IP CONFIGURATOR
Use the TCP/IP Configurator to configure parameters for your BOSaNOVA
Secure to host communication. The TCP/IP Configurator opens automatically
when you start BOSaNOVA Secure. You can access it any time to change
parameters.
Starting the TCP/IP Configurator
1. Close all sessions.
2. From the Start menu, select All Programs BOSaNOVA Secure.
3. Click .
4. Expand Connectivity in the top pane.
5. Click Connection Type.
6. In the bottom pane, click Configure. The TCP/IP Configurator is
displayed.
Using the TCP/IP Configurator
Configurator parameters are divided between two tabs, Basic and Advanced.
Basic
Use the Basic tab to add, modify, or delete host systems and to define security
parameters.
For a detailed explanation of the TCP/IP Configurator Basic tab:
1. Open the online Help.
2. Click Contents.
3. Expand the Components book.
4. Select The TCP/IP Configurator.
5. In the Basic section of that topic click Details. The topic entitled Basic
Tab (TCP/IP Configurator) is displayed.

The TCP/IP Configurator 7
Advanced Tab
Use this tab to set advanced parameters for the TCP/IP connection.
The top pane of the Advanced Tab uses a Windows-style tree structure to
display the parameters. To use this structure:
• An item preceded by a plus sign (+) contains nested items. Click the plus
sign to expand the item (display the nested folders).
• An item preceded by a minus sign (-) is already fully expanded. Click the
minus sign to collapse that part of the tree.
• The names of the parameter sets appear in black, while the current status
values appear in blue. Values always appear in arrow brackets (< >).
When you change a parameter, it appears in red until you click OK.
• When you select a parameter set in the top pane, the buttons and controls
that configure or run that parameter set appear in the bottom pane.
Select a parameter in the top pane and use the dialog box that appears in the
bottom pane to define or modify the connection.
For a detailed explanation of the TCP/IP Configurator Advanced tab:
1. Open the online Help.
2. Click Contents.
3. Expand the Components book.
4. Select The TCP/IP Configurator.
5. In the Advanced section of that topic click Details. The topic entitled
Advanced Tab (TCP/IP Configurator) is displayed.

8 BOSaNOVA Secure
The Advanced tab includes the following parameter sets:
• Telnet Proxy Server
Use this parameter set to define or modify the connection to the Telnet
proxy server.
• SOCKS Proxy Server
Use this parameter set to define or modify the connection to the
SOCKS proxy server.
• FTP Proxy Server
Use this parameter set to define or modify the connection to the FTP
proxy server.
• LPD Port
Use this parameter set to define or modify the LPD port.
• Keep Alive Mode
When enabled, Keep Alive Mode maintains a connection between an
idle emulation session and the AS/400. In the event of a connection
failure, or after an AS/400 IPL procedure, Keep Alive Mode often helps
reconnect the emulation. The following options are available:
• None
Keep Alive Mode is disabled.
• No-op
One of two minor buffers which track communication between the
client and the AS/400. This buffer can identify both idle sessions
and disconnected sessions. Enter the interval, measured in
seconds, between signals.
• Time-mark
We recommend this setting, the second of two minor buffers which
track communication between the client and the AS/400. This
buffer can identify both idle sessions and disconnected sessions.
Enter the interval, measured in seconds, between signals.
• SSL Certificate
Use this parameter set to identify the SSL Certificate. This parameter is
available only when running BOSaNOVA Secure.
Allow non-trusted certificates to encrypt the content of the traffic but
disregard verification of the recipient.

The Emulation Configurator 9
THE EMULATION CONFIGURATOR
Use the Emulation Configurator to change the parameters that control the look
and operation of the BOSaNOVA Secure emulation and to define sessions.
You can access the Emulation Configurator while the emulation is running, but
you can not add or change sessions while sessions are open.
Starting the Emulation Configurator
When the Emulation is closed:
1. From the Start menu, select All Programs BOSaNOVA Secure
2. Click .
3. Select Display/Printer Emulation in the top pane.
4. Click Configure in the bottom pane.
From the Emulation
• Click from the emulation toolbar, or
• Select File Run Configurator from the emulation menu bar.
Using the Emulation Configurator
Configurator parameters are divided between two tabs, Sessions and Advanced
Properties.
Sessions Tab
For adding, modifying, or deleting display and printer emulation sessions. For
BOSaNOVA Connect, SSL is enabled via this tab.
For a detailed explanation of the Sessions tab:
1. Open the online Help.
2. Click Contents.
3. Expand the Components book.
4. Select The Emulation Configurator.
5. In the Sessions section of that topic click Details. The topic entitled
Session Tab is displayed.

10 BOSaNOVA Secure
Advanced Properties Tab
Use this dialog box to add, modify, or delete display and printer emulation
sessions, as well as for defining sets of global parameters.
For a detailed explanation of the parameter sets on the Advanced Properties
tab:
1. Open the online Help.
2. Click Contents.
3. Expand the Components book.
4. Select The Emulation Configurator.
5. In the Advanced Properties section of that topic click Details. The topic
entitled Advanced Properties Tab is displayed.
The Advanced Properties tab includes the following parameter sets:
• Sessions
This parameter lists the number of display and printer emulation
sessions currently defined. In the bottom section, you can add a new
session or remove all the sessions.
• Keyboard
This set displays the type and style of the keyboard. You can change
the keyboard style and type and other customization options.
• Mouse
Use this branch to select from the available mouse functions.

The Emulation Configurator 11
• Sign-on Screen
This set contains parameters for defining what actions BOSaNOVA
Secure takes at the host sign-on screen.
• MorphExpress
This set contains parameters for defining the way the GUI elements
appear on the screen.
• Image Mapping
Image Mapping defines the graphics that will be displayed on a
session’s screen.
• External Applications Toolbar
This toolbar is used to run programs from a display session.
• Macro Organizer
The Macro Organizer interface displays a list of existing macros and
buttons for managing the macros. Use the Macro Organizer to add,
edit, order, import, export, etc. host session macros.
• Display Properties
Use this dialog box to set color schemes, map host attributes to different
colors, and define GUI controls.
• Session Preferences
Use this dialog box to define parameters that affect the display session
environment such as the display font and ruler type.
• Options
This set contains parameters for setting various emulation options.
• Diagnostics
This set contains parameters for running diagnostic traces or recording
screens for troubleshooting.

12 BOSaNOVA Secure
Diagnostics
If you contact Technical Support with a problem, they may ask you to provide
them with special files to help them solve it. This process is explained in
“Traces and Screen Captures” on page 55.
Expand Diagnostics in the Administrator display tree to display the following
parameter:
• Troubleshooting Information
Click Collect Technical Information to open the User Information
dialog box; fill in the information requested to create the information
file (default Bsinfo.bts).
You must close all sessions before running Diagnostics.

Secure Socket layer (SSL) 13
SECURE SOCKETS LAYER (SSL)
BOSaNOVA Secure provides SSL asymmetric encryption and server
authentication with self-signed certificates thereby ensuring secure display and
printer sessions across TCP/IP networks. This chapter describes how to set up
the iSeries and the Windows based PC to enable SSL.
Overview
When information is sent over the Internet or Intranet, several security risks
exist.
• Eavesdropping
The information remains intact but its privacy is compromised.
• Modification
The original information is changed or replaced and then sent to the
recipient.
• Impersonation
The information passes to a person who poses as the intended recipient.
The Secure Sockets Layer (SSL) protocol safeguards against these threats.
Confidentiality and integrity are guaranteed through asymmetric encryption.
Authentication is provided through digital certificates.
Asymmetric encryption, also known as public key cryptography, is an
encryption method that uses a two-part key: a public key and a private key. To
send an encrypted message, the recipient’s public key is used. To decrypt the
message, the recipient uses the private key.
A certificate is an item of information that binds the details of an individual or
organization to their public key. There are two types of certificates:
• Certificate issued by a Certificate Authority
A Certificate Authority (CA) is a third party, trusted by both
communicating parties, that is responsible for both the contents and
ownership of a certificate. The certificate is signed with the CA’s private
key. This guarantees its authenticity and integrity. There are several well-
known CA companies including VeriSign, Inc. and Thawte, Ltd.
• Self-signed Certificate
A certificate where the Issuer and Subject are the same.
When a server sends its certificate to a client, the process is called server

Secure Socket layer (SSL) 13
authentication. When a client sends a certificate to a server, the process is
called client authentication.

14 BOSâNOVA Secure
SSL prerequisites
The following are the SSL software prerequisites on the iSeries:
• IBM Digital Certificate Manager (DCM), option 34 of OS/400 (5722-SS1)
• TCP/IP Connectivity Utilities for iSeries (5722-TC1)
• IBM HTTP Server for iSeries (5722-DG1). To use the HTTP server to use
the DCM, be sure you have the IBM Developer Kit for Java (5722-JV1)
installed. By default on the iSeries, this product provides the iSeries HTTP
Administration Server, which has a link to the Digital Certificate Manager
from the administration server’s initial page. If you need to start this
administration server, enter the following Start TCP Server command from
a 5250 session:
STRTCPSVR SERVER(*HTTP) HTTPSVR(*ADMIN)
• The IBM Cryptographic Access Provider product, 5722-AC3 (128-bit).
The bit size for this product indicates the maximum size of the secret
material within the keys that can be used in cryptographic operations. The
size allowed for a key is controlled by the export and import laws of each
country. A higher bit size results in a more secure connection.
• Client Encryption product, 5722-CE3 (128-bit). BOSaNOVA Secure needs
this product in order to establish the secure connection.
Creating the System Certificate
The Digital Certificate Manager (DCM) is used to create the system certificate
that will be used for SSL authentication.
For IBM documentation concerning the creation of a self-signed certificate,
and other SSL issues, see chapter 4 of the IBM Redbook entitled “iSeries
Access for Windows V5R2 Hot Topics: Tailored Images, Application
Administration, SSL, and Kerberos” available from the following web site:
http://www.redbooks.ibm.com/abstracts/sg246939.html?Open

15 Secure Socket Layer (SSL)
Configuring SSL in BOSaNOVA Secure
1. Ensure that the Telnet server and host servers on the iSeries server are
configured to use SSL.
2. Ensure that the certificate is available on the computer. The certificate can
either be downloaded, copied, or made available via the local network.
3. Click the Windows Start button.
4. Select Programs BOSaNOVA Secure.
5. Select .
6. Expand Connectivity in the top pane and click Connection Type.
7. In the bottom pane, click Configure to open the TCP/IP Configurator.
8. Select the Basic tab.
9. Either:
• Select an existing system and click Change, or
• Click Add to add a new system. The parameters available on the Host
Parameters dialog box are explained in the online Help topic named
Add New System/Host Parameters.
10. Select the Use SSL checkbox.

16 BOSâNOVA Secure
11. Select the Advanced tab.
12. Select SSL Certificate.
13. Enter the full path to the certificate or click Browse to locate the file.
14. Select either:
• Certificate File (extension *.cer)
A Certificate File is a certificate that has not been reformatted. If you
select a Certificate File, BOSaNOVA Secure will reformat the file and
will automatically change the .cer extension to the .pem extension.
• Certificate Store (extension *.pem)
A certificate store is a certificate formatted for use in BOSaNOVA
Secure.
15. Click Open. The path of the *.pem file is displayed in the field.
16. Click OK.

17
THE BOSaNOVA EMULATION
The BOSaNOVA emulation is the environment in which you run your host
applications. The host application appears in a window with optional toolbars,
customizable macros and display enhancements.
Starting BOSaNOVA Secure
To start BOSaNOVA Secure:
1. Click Start.
2. Select All Programs BOSaNOVA Secure.
3. Select
In addition, you can start BOSaNOVA Secure automatically by adding it to the
Windows Startup folder. To do this, place a shortcut to the BOSaNOVA TCP/
IP Display Emulation (Bsmdemul.exe in your BOSaNOVA TCP/IP folder) in
your Startup folder (Start Menu Programs StartUp).
Opening a Display or Printer Emulation Session
After starting BOSaNOVA Secure, to begin working, open a display session or
printer session:
• Click the desired icon.
• The icon: indicates a display session.
• The icon: indicates a printer session.
• Select Sessions Activate Session and select the desired session.
• Select Sessions Activate All to activate all sessions.
• If you selected File Save Workspace the last time you closed
BOSaNOVA Secure, then you can select File Restore Workspace
to automatically reopen all sessions.
All defined sessions that are not currently open are listed according to session
name in Session Activate Sessions. A session with no session name defined
is listed by its number and device model type; for example, Session_2 3477.

18 BOSaNOVA Secure
Display Emulation Sessions
A truncated image of a display emulation screen is shown below:
Figure 1: BOSaNOVA Display Emulation Session
Display Emulation Toolbar Buttons
Some of these buttons must be selected before they are displayed. See
“Customizing Toolbars” on page 39.
Icons on the Sessions Toolbar
Shows the active emulation session (when selected).
Shows the active printer session (when selected).
Shows the All Sessions window. This window displays all
configured sessions and is especially helpful when more than
8 sessions are configured.
Runs the Administrator.
Runs the Emulation Configurator.
Displays Print Screen setup.
Opens the DTF Open Profile window. Use this window to
create or open a profile or a profile list.
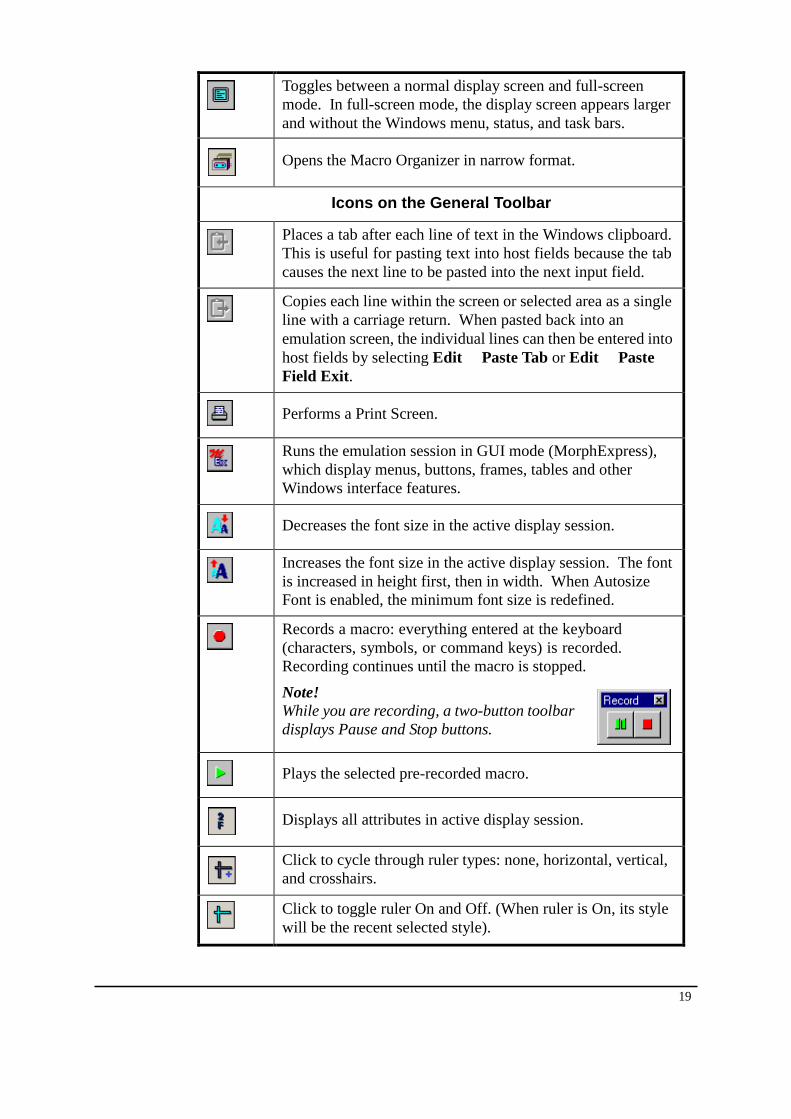
Toggles between a normal display screen and full-screen
mode. In full-screen mode, the display screen appears larger
and without the Windows menu, status, and task bars.
Opens the Macro Organizer in narrow format.
Icons on the General Toolbar
Places a tab after each line of text in the Windows clipboard.
This is useful for pasting text into host fields because the tab
causes the next line to be pasted into the next input field.
Copies each line within the screen or selected area as a single
line with a carriage return. When pasted back into an
emulation screen, the individual lines can then be entered into
host fields by selecting Edit Paste Tab or Edit Paste
Field Exit.
Performs a Print Screen.
Runs the emulation session in GUI mode (MorphExpress),
which display menus, buttons, frames, tables and other
Windows interface features.
Decreases the font size in the active display session.
Increases the font size in the active display session. The font
is increased in height first, then in width. When Autosize
Font is enabled, the minimum font size is redefined.
Records a macro: everything entered at the keyboard
(characters, symbols, or command keys) is recorded.
Recording continues until the macro is stopped.
Note!
While you are recording, a two-button toolbar
displays Pause and Stop buttons.
Plays the selected pre-recorded macro.
Displays all attributes in active display session.
Click to cycle through ruler types: none, horizontal, vertical,
and crosshairs.
Click to toggle ruler On and Off. (When ruler is On, its style
will be the recent selected style).
19

20 06
BOSaNOVA Secure
Icons on the Host Operations Toolbar
A sample of the functions on the Host
Operations toolbar.
Icons on the Macros Toolbar
Green arrows with the recorded macro’s name. Only 20
macros fit on the toolbar.
Icons on the External Applications Toolbar
Opens the program associated with the icon. You choose the
programs that are available from this toolbar.
Background Bitmaps in a Display Emulation
A picture in BMP format can be assigned as a background to a display
emulation session.
1. From the display emulation session menu bar, select Options
Background bitmap.
2. Enter the following parameters:
• Path to bitmap file
Enter the path of the BMP file or browse to select it.
• Displaying picture
The choices, Tile, Center, or Stretch, indicate the placement of the
graphic on the screen. View the appearance of each in the Sample
window.
• Input field's background style
The choices, Opaque background or Inverse, define whether or not
there is contrast between input fields and the background picture. If
neither of these are chosen, the input field is transparent.
• Set the picture as background
Select the checkbox to display the picture. Clear the checkbox to save
the settings but hide the picture.
• Session
The settings in this dialog box can be applied to a single session or all
sessions. Select a defined session from the dropdown list.
3. Click OK to apply the changes and close the dialog box, Cancel to close
the dialog box without applying the changes, or Apply to make the
changes and leave the dialog box open for additional changes.

21
Image Mapping in a Display Emulation
Image Mapping defines the graphics that will be displayed on a session's
screen.
To hide the mapped images, right-click anywhere in the display session screen.
From the popup-menu, select Hide Mapped Image(s).
1. Access the Emulation Configurator.
2. Select the Advanced Properties tab.
3. Select Image Mapping in the top pane.
4. Click Run Image Mapping Configurator in the bottom pane.
5. In the Configuration File field, define the path to the file containing the
Image Mapping data. The file ends with the suffix .IMM.
6. Define one or more Trigger. A trigger is a word, appearing on the screen,
which prompts BOSaNOVA to search for image links.
a. Click New. The New Trigger dialog box is displayed.
b. Enter a word which appears on the session screen.
c. Only clear the “Trigger can be located …” checkbox if you must define
exactly where on the screen the trigger appears. Otherwise, leave the
checkbox selected.
d. Click OK.
7. Define the image link.
a. Click New. The New Image Link dialog box is displayed.

22 BOSaNOVA Secure
b. Enter the tag of the link. (A tag is a word, appearing on the screen,
which indicates which image to display.) The tag reappears in the
popup menu, and if possible, should be unique.
c. Select the trigger associated with the tag.
When both the trigger and the tag appear, the image will be displayed.
d. Enter the path to the image.
e. Define the placement and size of the image.
f. Click OK. The New Image Link dialog box closes and the new
image link appears in the table of image links.
8. To preview the image link:
a. Select Enable Preview.
b. Select the image link from the table.
9. Click OK.
10. To view the new image mapping, close all sessions and restart
BOSaNOVA Secure.
Additional Image Mapping Procedures
The following Image Mapping Procedures are documented only in the online
Help:
• Creating Multiple New Image Mapping Links
• Importing Previously Configured Image Mapping
To view these procedures, see the online Help. From the Index, select the
image mapping entry. The Topics Found window includes links to these
procedures.

23
Printer Emulation Sessions
BOSaNOVA Secure uses a Windows-style tree structure to display printer
sessions and their status information. The following diagram shows a sample
printer session status screen.
If a parameter is not applicable to your connection type, it appears blank.
Figure 2: BOSaNOVA Printer Emulation Session
Printer Emulation Toolbar Buttons
In a Printer Emulation session, only the Sessions and the Printer Session
toolbars can be displayed.
Icons on the Sessions Toolbar
Shows the active emulation session (when selected).
Shows the active printer session (when selected).
Shows the All Sessions window. This window displays all
configured sessions and is especially helpful when more than
8 sessions are configured.
Runs the Administrator.
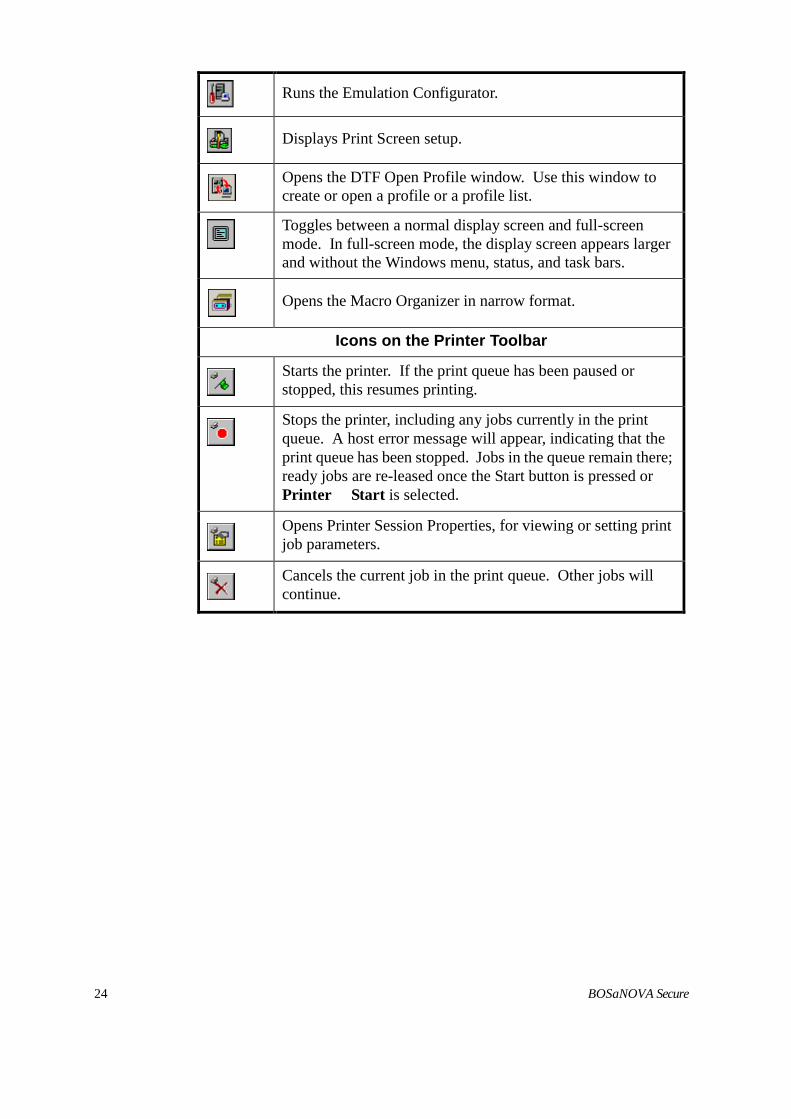
Runs the Emulation Configurator.
Displays Print Screen setup.
Opens the DTF Open Profile window. Use this window to
create or open a profile or a profile list.
Toggles between a normal display screen and full-screen
mode. In full-screen mode, the display screen appears larger
and without the Windows menu, status, and task bars.
Opens the Macro Organizer in narrow format.
Icons on the Printer Toolbar
Starts the printer. If the print queue has been paused or
stopped, this resumes printing.
Stops the printer, including any jobs currently in the print
queue. A host error message will appear, indicating that the
print queue has been stopped. Jobs in the queue remain there;
ready jobs are re-leased once the Start button is pressed or
Printer Start is selected.
Opens Printer Session Properties, for viewing or setting print
job parameters.
Cancels the current job in the print queue. Other jobs will
continue.
24 BOSaNOVA Secure

25
Accessing Printer Session Properties
You cannot change values directly on the screen. Make changes in the Printer
Session Properties dialog box. Access the dialog box in one of three ways:
• In a print emulation screen, right-click to display the popup menu and
select Properties.
• From the print emulation menu bar, select Printer Properties
• From the printer emulation toolbar, click
General Tab
This tab contains parameters defining the printer driver and job timeout
settings.
• Print Test Page
Sends a test page to the local printer. The print session emulates a host
print device, but the output is directed to a PC printer.
• Printer Driver
BOSaNOVA Secure enables you to print using your default Windows
printer driver or to bypass Windows printing by defining your own
custom printer driver.
• Timeout Settings
The default job timeout is 10 seconds. This is the maximum amount of
time that can elapse between buffers received from the host. If no
buffer is received within this time period, BOSaNOVA Secure assumes
that the end of the print job has occurred. During troubleshooting, you
may need to increase this number. To restore the default value, click
Set Default Timeout.
Previous Job Attributes Tab
Displays the attribute values of the most recent host print job in the left pane
and corresponding local printer settings (converted from the host attributes by
the BOSaNOVA printer emulation) in the right pane. For details, see Printer
Session Properties in online Help.
Page Setup Tab
For setting parameters such as CPI, LPI, page orientation, paper size, and paper
source. For details, see Printer Session Properties in online Help.
If your screen display is not clear, click the + or – box in front of an entry
several times to refresh the screen.

26 BOSaNOVA Secure
Diagnostic Tab
Contains parameters for running diagnostic mode. This is for troubleshooting
print problems. For details, see “Traces and Screen Captures” on page 55.
Advanced Tab
See Printer Session Properties in online Help for more information.
Custom Driver Considerations
In order to decide whether to use the default Windows driver or a custom
driver, you must understand how BOSaNOVA Secure handles print jobs.
When using the Windows driver, a data buffer (ASCII or EBCDIC) arrives at
the Windows driver. It is then output as a graphics buffer to the printer queue.
Each output buffer is approximately 40K.
When using a custom driver, a data buffer arrives at the custom driver. It is
then output as the same strings (ASCII or EBCDIC) plus commands for that
printer driver. This output is then routed to the Windows driver, where it again
is output to the printer queue as data strings plus printer commands. Because
no graphic processing is involved, each buffer is approximately 3K.
If you are printing straight ASCII text, for example, and require speed and high
throughput, you might consider using a custom driver. Custom drivers can be
modified using the Printer Driver Editor.

27
Copying Between Sessions or Applications
Most Windows applications use the Windows Clipboard to transport text,
graphics, and other data. You can also use the Clipboard to copy data from a
session into another session or another application.
For a detailed explanation of all Copy > Paste options, open the online Help,
click Contents, expand the How to … book, and select Copy-and-Paste.
1. In an active display emulation session, use the mouse to mark the on-
screen text you want to copy.
2. To copy:
• select one of the copy methods from the Edit menu (Copy Continuous,
Copy by Line, or Copy Bitmap), or
• press <Ctrl+C>, or
• click on the toolbar.
3. If you are copying to a different session or application, switch to the other
session or application.
4. Before pasting the copied text, use the mouse to position the cursor at the
insertion point.
5. To paste:
• select one of the paste methods from the Edit menu (Paste Continuous,
Paste Tab, or Paste Field Exit), or
• press <Ctrl+V>, or
• click on the toolbar.
The data copied into the Windows Clipboard will remain there until replaced
by the next copy action.

28
BOSaNOVA Secure
Switching Between Emulation Sessions
You can switch (or toggle) between open display and printer emulation
sessions using the toolbar, the menu bar, or the keyboard.
From the Toolbar
Click the display session button (for example, ) or the printer session
button (for example, ) to switch to that session.
From the Menu Bar
Select the Window menu. The bottom of the menu lists all the open display
and printer emulation sessions. A check appears next to the currently-active
session (on top session). You can switch to another session by selecting it from
this list.
From the Keyboard
In Windows, press <Ctrl>+<F6> or <Ctrl>+<Tab> to switch to the next open
emulation session.
• Press the mapped PC key for “Jump to Next Session” (default
<Alt>+<PageUp>).
• You can remap this key in the Mapping Editor. (See “Customizing the
Emulation Keyboard” on page 30.)
• Set the Session Toggle Key Combination:
i. From the menu bar, select Options Keyboard Customization.
ii. Under Session Toggle Key Combination, select No key (for no
toggle key combination) or <Alt+Num> or <Ctrl+Num>.
iii. Check that Num Lock is on.
iv. To switch to another session, press Alt or Ctrl (depending which
combination you selected in step 2) and press the session number on
the numeric keypad. The session changes when you release both
keys.

29
Using Macros
Macros are strings of keystrokes (characters, symbols, or command keys)
entered at the keyboard and saved for repeated use. They provide a simple way
to enter repetitive command data into a host session screen.
You will not be able to use macros from another emulation product; you must
re-record the desired macros in BOSaNOVA Secure.
Recording a Macro
To record a macro, you must be in a display emulation session (see “Opening a
Display or Printer Emulation Session” on page 13).
1. Click from the toolbar or select Macro Record Macro.
2. Enter any keystrokes for the macro. As soon as you begin
recording, this popup Record toolbar appears . It contains
only the Pause and Stop buttons.
3. Stop recording by clicking or selecting Macro
Stop Macro. The Record popup toolbar closes and the Save Macro As
dialog box appears.
If you exit the emulation before stopping record mode, the recorded key
sequences are lost.
4. Enter a logical name for the macro and click Save. When you reopen the
Macro Organizer, the newly recorded macro appears in the list.
If you record a macro with a key sequence that is already in use, the new key
sequence automatically replaces the existing one.
Viewing a Macro
1. From the emulation menu bar, select Macro Macro Organizer. The
Macro Organizer opens.
2. Select a macro from the list.
3. Click View. The macro commands and text strings are displayed in the
Macro Viewer.
4. Click OK to return to the Macro Organizer.

30
BOSaNOVA Secure
1. Click . The Macro Organizer
opens in Narrow format.
1. Click . A list of
macros is displayed.
2. Double-click a macro. The macro plays
and the Macro Organizer remains open.
2. Click a macro. The macro
plays and the list closes.
Playing a Macro
To play a macro, you must be in a display emulation session.
There are two ways to play macros from the Sessions toolbar:
To play macros from the Macro menu:
a. Select Macro Play Macro. A list of all defined macros is displayed.
b. Select a macro from the list.
To play a macro from Macros toolbar:
click the desired macro button.
Deleting a Macro
1. Select Macro Macro Organizer. The Macros Organizer opens.
2. Select a macro from the list and click Remove.
3. Confirm the delete action by clicking Yes.
4. Click Close to close the dialog box.
The Macro Organizer and Macro Editor
There are two versions of the macro organizer. The full version, lists all the
macros and has buttons for adding and modifying the macros. Some
modifications can be done with the abridged version, but its main advantage is
that it stays on top even when the focus is changed to another window.
With the Macro Organizer, you can manage and modify recorded macros in an
easy-to-use interface. The Macro Organizer interface displays a list of existing
macros on the left side and buttons for managing the macros on the right side.
The Macro Editor provides a convenient way for adding, removing, or
substituting macro commands or text strings in a selected macro. The Macro
Editor displays the text strings and commands of the selected macro in the
order they were recorded or entered in the Macro Organizer. For details, refer
to online Help.

31
Closing a Session
To close a session:
• close the session window by clicking the Close button ( ) at the far
right of the title bar, or
• select Sessions Close Session and select the desired session
To close all sessions, select File Exit.
All open sessions appear in the Close Session cascade menu and are listed
according to session name. A session with no session name defined is listed by
its number and device model type; for example, Session_2 3477.
Stopping an Emulation Session
When you close the BOSaNOVA emulation, all sessions will be closed. To do
this:
• Select File Exit, or
• Click on the window title bar.
If you log out of the host session without closing your host application, the
session may remain active at the host side even if BOSaNOVA Secure is
closed. To prevent this, select Check for sign-on screen on exit in Sign-on
Screen in the Advanced Properties tab in the Emulation Configurator. This
displays a warning if you try to close a session when the host Sign-on screen is
not the current screen.

32
BOSaNOVA Secure
CUSTOMIZING THE EMULATION MOUSE
BOSaNOVA Secure includes several options for mouse customization.
1. Open the Emulation Configurator.
2. Select the Advanced tab.
3. Select Mouse. The following options are displayed in the bottom pane:
4. Select or clear the following checkboxes:
• Enable default left click actions
• Left click positions cursor
When selected, clicking the left mouse button once moves the
cursor to the current mouse location on the screen.
• Left click on option sends Enter
When selected, if a display option is selected, clicking the left
mouse button once enters the option number onto the command
line and adds an <Enter>.
Before left-clicking, the cursor must be located on the command line.
• Left double-click sends Enter
When selected, double-clicking the left mouse button anywhere on
the screen adds an <Enter> onto the command line.
• Enable right click popup menu
When selected, right clicking in a session causes a popup menu to be
displayed.

Customizing the Emulation Mouse 33
5. Click Advanced to open the following dialog box:
• Mouse wheel support
When Enable page scrolling is selected, use the mouse wheel to scroll
up and down a screen.
• Enable External Link
If selected, the External Link option enables the user to treat any text
field on the display session screen as either the name of a document file,
the name of a folder, or an Internet address.
For detailed instructions concerning enabling and using the External
Link feature, see the online Help. From the Index, select the external
link entry
Enable External Link is disabled if Enable right click popup menu is cleared.
6. Click OK to apply the changes and close the dialog box, Cancel to close
the dialog box without applying the changes.

34 BOSaNOVA Secure
CUSTOMIZING the EMULATION KEYBOARD
Accessing Keyboard Customization
• From an emulation session, select Options Keyboard Customization
from the emulation menu bar.
• From the Administrator:
a. In the top pane, select Installed Modules Display Emulation; in the
bottom pane, click Configure.
b. Select the Advanced Properties tab. In the top pane, select
Keyboard; in the bottom pane, click Keyboard Customization.
Customizing Your Keyboard
1. From the Advanced Properties tab in the Emulation Configurator, select
Keyboard.
2. In Keyboard style, select Terminal or PC (that is, the style of the
keyboard you use).
3. In Keyboard type, select the keyboard you are using from the list: BOS
122-Key, BOScom 122 PC, or the Standard 101/102-key keyboard. (The
BOScom 122 PC keyboard does not require installation of a driver.)
4. To view the default keyboard settings, click Keyboard Customization.
If the default keyboard settings are appropriate, which is the case for most
users, go to step 6 (to check host settings). If, however, you want to change
these settings, continue with step 5.
5. To change the default keyboard settings, set the following parameters (for
details, see Keyboard Customization in online Help):
Keyboard Mapping Name
The only three PC keyboard options on the list are BOS 122-key, BOScom
122 PC and the Standard 101/102-key keyboard. Select the type of
keyboard you have.
The following parameters apply to all the keyboard mappings in the list;
therefore, if you change a parameter, it changes in all the listed keyboard
mappings, not just the selected one.

Customizing the Emulation Keyboard 35
Keyboard Locks
You an override these default Terminal or PC-style keyboard mappings:
• Select Shift Lock or Caps Lock. On a terminal-style keyboard,
<Caps Lock> works like a terminal <Shift Lock> and remains in
place until the <Shift> key is pressed
• Set Num Lock at session startup: when selected, this sets <Num
Lock> when you open a session. On a terminal-style keyboard, the
numeric keypad is always numeric whether or not <Num Lock> is
selected.
Enter and Field Exit
Select the keystrokes for Enter and Field Exit. There are two choices:
• <Field exit>=Enter; <Enter>=Right Ctrl (terminal-style keyboard
defaults)
• <Field exit>=Right Ctrl; <Enter>=Enter
Word Processor Key Combination
If you are using Office Vision Text Assist, select the key combinations
used for text editing functions (<Alt>+<Key> or <Ctrl>+<Key>). These
key combinations are not usually supported by Windows (they perform
different functions in Windows). Selecting a key combination enables
BOSaNOVA Secure to support your text editing functions. If you are not
using Text Assist, select None to improve system performance.
Session Toggle Key Combination
No key, or Alt+Num, or Ctrl+Num.
Key Sound
Select Enable to hear a click when pressing a key.
Modern right to left
For Hebrew data entry: select Enable to enter characters from right to left
(Not by pushing the characters).
6. To view the current Host-to-PC keyboard mapping, click Edit to open the
Mapping Editor (see Mapping Editor in online Help).
If the default Host-to-PC keyboard mappings are appropriate, which is the
case for most users, go to step 12. If, however, you want to change these
mappings, continue with step 7.
7. In Categories, select a host action category (Characters on PC and Host
keyboard, Emulation controls, Host function keys, Host operations,
Macros, or Numeric pad keys).
8. Select an action from the [Host actions list] edit box. (The title on this edit
box is the category you selected in Categories.) The PC key to which that
host action is currently mapped appears in PC Key and is highlighted (blue
border) on the keyboard display.

36
BOSaNOVA Secure
9. On the keyboard display, delete the current mapping of the highlighted key
by left-clicking it.
10. Remap the selected host action by left-clicking the new key to which you
want to map it. This opens Mapping for PC key. Click the button with the
desired key combination (Norm, Shift+, Ctrl+, or Alt+). If this key
combination is already mapped, you are prompted to change the existing
mapping. Click Yes to accept the change and return to Mapping Editor.
The new mapping appears in PC Key.
You can remap from a PC key to a host action by right-clicking the key you
want to map. The popup menu displays the current mapping of the selected PC
key combinations: Norm, Shift+, Ctrl+, and Alt+. Follow the cascading
menus to delete the current mapping or to remap the key combination to a
different host action.
11. When done, click Save As. This opens “Keyboard mapping will be saved
as”. In Name, type a name for your customized keyboard mapping. In
Description, you can type a more detailed description of this mapping.
Click OK to save the keyboard mapping.
12. When you have finished, click OK to save the keyboard mapping.
Continue to click OK in each dialog box to save the changes and close the
dialog box until you exit the Emulation Configurator. The keyboard
changes take effect as soon as you return to the emulation.

Customizing the Emulation Keyboard 37
Mapping Editor
Use the Mapping Editor dialog box to define which host actions map to which
PC key combinations.
• To map from host actions to PC keys, use the edit boxes at the top of the
dialog box and left-click.
• To map from PC keys to host actions, use the keyboard display and
right-click.
All the following parameters apply to the selected keyboard mapping name that
appears in square brackets [ ] in the title bar of the Mapping Editor dialog box.
Categories
Select one of the following categories:
Characters on PC and Host keyboard
This category includes all the keys for letters, numbers, and symbols.
Emulation controls
This category includes emulation actions such as <Jump to next host
session> and <Play macro>.
Host function keys
This category includes the host command keys such as <Cmd1>.
Host operations
This category includes host actions such as <Attn>, <Clear>, and
<Field +>.
Macros
This category includes recorded host macros such as <Sign off> and
<Sign on as QUSER>.
Numeric pad keys
This category includes the numbers on the numeric keypad.
[Host Actions List]
The title of this middle edit box changes according to the category you selected
in Categories. This edit box lists all the host action options in the selected
category. Select the host action you want to map to a PC key.
PC Key
Displays the PC key (or keys) to which the selected host action is currently
mapped.

38
BOSaNOVA Secure
Keyboard display: The keyboard in the bottom half of the dialog box, displays
the current mapping of the keyboard mapping name shown on the title bar of
the popup dialog box. Right-click a key: it will be highlighted by a blue
border. The popup dialog box shows the key to which the selected host action
is currently mapped. From the keyboard display, you can perform the
following functions:
• Display the current mapping of any key by holding the cursor over it for
a few seconds.
• Delete the current mapping of the highlighted key by left-clicking it.
• Remap the selected host action by left-clicking the new key to which
you want to map it. This opens Mapping for PC key.
• Remap from a PC key to a host action by right-clicking the key you
wish to map. The popup menu displays the current mapping of the
highlighted PC key combinations: <Norm>, <Shift>, <Ctrl>, and
<Alt>. Follow the cascading menus to delete the current mapping or to
remap the key combination to a different host action.
OK
Not available when you select Standard 101/102-key or 122-key
keyboards; when you customize and save the new mapping, you can then
view this customized keyboard mapping without making any changes and
click OK.
Save As
To save a customized keyboard mapping, click Save As and give the
keyboard mapping a name; you can also add a more detailed description of
the keyboard mapping (optional).
Cancel
If you do not want to change the keyboard mapping or if you made
changes to the mapping that you do not want to save, click Cancel.
Mapping for PC Key
In the Mapping Editor, select a host operation from the list at the top of the
Editor. When you left-click a key in the Mapping Editor, you open a Mapping
for PC key dialog box. The key you clicked appears in square brackets [ ] in
the title bar and the host operation you selected appears in angle brackets (< >)
in the first line.
Map the host operation you chose to one of the key-combination buttons
displayed in the Mapping for PC key dialog box:
• <Norm> maps the selected host action to the normal key character.
• <Shift>+… maps the selected host action to <Shift> + the key
character.

Customizing the Emulation Keyboard 39
• Ctrl>+… maps the selected host action to <Ctrl> + the key
character.
• <Alt>+… maps the selected host action to <Alt> + the key character.
Deleting a Keyboard Mapping
You can remove a customized keyboard mapping from the Keyboard Mapping
Name list by deleting it. If you want to remove it from the list, but not erase it,
first Export it to a file (see “Exporting a Keyboard Mapping” directly below).
Then you can Import it later if necessary.
You cannot delete 122-Key or Standard 101/102-Key keyboards as they are
the standards from which you map your customized keyboards.
1. Open the Keyboard Customization dialog box (see “Accessing Keyboard
Customization” on page 30).
2. In Keyboard mapping name, select a customized keyboard mapping.
3. Click Delete to remove the keyboard mapping and return to Keyboard
Customization.
4. Click OK to save the changes and exit the Emulation Configurator.
Exporting a Keyboard Mapping
You can save a keyboard mapping to a file and send it to others on the network.
1. Open the Keyboard Customization dialog box (see “Accessing Keyboard
Customization” on page 30).
2. In Keyboard mapping name, select a customized keyboard mapping.
3. Click Export to open the Save As dialog box.
4. In File name, enter the Keyboard mapping name. In Save as type, select
Keyboard mapping files (*.kbm). Click Save to save the file and return
to the Keyboard Customization dialog box.
5. Click OK to exit the dialog box.

40
BOSaNOVA Secure
Importing a Keyboard Mapping
You can open a keyboard mapping that has been saved to a file (for example,
by the system administrator). You can also make changes to it.
1. Open the Keyboard Customization dialog box (see “Accessing Keyboard
Customization” on page 30).
2. In Keyboard mapping name, select a customized keyboard mapping.
3. Click Import; locate the file and click Open. The customized keyboard
mapping opens directly in Mapping Editor.
The imported keyboard mapping overrides the keyboard type and style settings
for all the keyboard mappings listed in Keyboard Mapping Name. If you need
to change these settings, see “Customizing Your Keyboard” on page 30.
4. Make any changes and click Save As to save the new mapping.
5. Enter the new customized keyboard mapping name and click OK. Click
OK to accept the changes and to exit the Emulation Configurator.

Customizing the Emulation Toolbars 41
CUSTOMIZING the EMULATION TOOLBARS
There are seven toolbars in BOSaNOVA Secure. Select View Toolbars to
open the Toolbar dialog box to define which toolbars are displayed and which
buttons they contain.
The toolbars below are shown as they would appear when “floating” (that is,
when they have been dragged into the emulation screen area). When toolbars
appear under the menu bar, they do not have titles.
All toolbar functions are duplicated in menu items or by keyboard hotkeys.
You can display toolbars with visible borders or in the style used by Microsoft
Internet Explorer (where a button has a visible border only when the mouse
cursor is on the button). Select the kind of borders you want in the Toolbar
dialog box.
Sessions
Contains a button for each defined session
plus buttons for accessing the Emulation
Configurator and Print Screen setup,
running ATF, and toggling between full-
screen and normal display mode.
General
Printer
Contains buttons for performing a print
screen, changing fonts, playing macros,
displaying print attributes, and changing
the ruler cursor style.
(Appears only if the in-focus session is a
printer emulation session.) Contains
buttons for starting and stopping print jobs.

42
BOSaNOVA Secure
Host Operations
Function Keys
Macros
External Applications
Contains buttons of these common host
commands.
Contains buttons for function keys.
Contains buttons of all defined macros. If
no macros have been recorded, this toolbar
will not appear.
Contains buttons of all programs that can
be opened from the display session. For
detailed instructions, see the online Help.
From the Index, select the external
application toolbar entry.

Customizing the Emulation Toolbars 43
Customizing Toolbars
1. From the emulation, select View Toolbars.
2. Select the toolbar you want to modify and click Customize. This opens
the Customize Toolbar dialog box (for details, see Customizing Toolbars in
online Help).
3. Customize the toolbar:
• To add a button, select it in the Available Buttons table on the left side
of the dialog box, and click Add.
• To remove a button, select it in the Toolbar Buttons table on the right
side of the dialog box, and click Remove.
• To display a small popup help message over interface elements when
the cursor rests on them for a few seconds, select Show Tooltips.
• To display toolbars in the same style used by the Microsoft Internet
Explorer; that is, a button has no visible border until the mouse cursor
rests on it, select Set MSIE Style.
4. When you have made all changes, click Close to return to the Toolbar
dialog box.
Changes are not saved until you click OK in the Toolbars dialog box. This
saves the changes and returns you to the emulation. Click Reset to return the
values to the previously saved settings.
5. Click OK to save the changes and close the Toolbars dialog box. The
modifications appear as soon as that toolbar is displayed.

44
BOSaNOVA Secure
Arranging Toolbar Buttons
You can arrange the order of buttons in toolbars in two ways.
• From the Customize Toolbar dialog box:
a. Select View Toolbars.
b. Select a toolbar and click Customize to open the Customize Toolbar
dialog box (for details, see Arranging Toolbar Buttons in online Help).
c. Select a button in Toolbar Buttons (on the right side of the dialog box),
and click Move Up or Move Down to reposition it. Toolbar buttons are
arranged according to the order in which they appear in the Toolbar
Buttons table.
d. When you have finished, click Close.
e. Click OK in the Toolbars dialog box to save the changes and return to
the emulation screen.
• On the toolbar:
a. <Alt>-click a toolbar button (that is, click a toolbar button with the left
mouse button while holding down the <Alt> key).
b. Drag the button to a new location on the toolbar and release the mouse.
c. If you drag the button off the toolbar, it will be removed; to restore it,
go back to the Customize Toolbar dialog box.
Moving Toolbars
Windows supports “floating toolbars”: that is, you can click-and-drag toolbars
to different places on your screen.
• Click a toolbar and drag it onto the session area. When you release the
mouse button, the toolbar changes into a toolbox. The buttons remain
arranged in the same order.
• Click a toolbar and drag it to the bottom of the session area. When you
release the mouse button, the toolbar is displayed at the bottom of the
screen.
• Click a toolbar and drag it to either side of the session area. When you
release the mouse button, the toolbar is displayed vertically at the side
of the screen.

Hotkeys 45
EMULATION VIEWING OPTIONS
You can control various viewing options in BOSaNOVA Secure:
• To determine which toolbars are displayed, select View Toolbars in
the emulation menu bar. This opens the Toolbars dialog box.
• To display the status bar, select View Status Bar in the emulation. If
a check appears next to this menu item, the status bar appears at the
bottom of the display session screen. To turn it off, click again.
• To convert the host display to a Windows style display, select View
MorphExpress in the emulation. MorphExpress changes the look of
the display session, converting it into a true GUI application.
MorphExpress only appears in the View menu if a display session is active
.
HOTKEYS
BOSaNOVA Secure supports the following hotkeys:
The hotkey examples given here are for 101/102 keyboards only.
• <Alt> + <Page Up> jumps from one session to another
• <Alt> + <Insert> toggles between a full screen and a split screen for the
present session
• <Alt> + <Page Down> cycles between the different ruler cursor styles
• <Alt> + <F3>starts recording a macro
• <Alt> + <F5>starts playing a macro
• <Alt> + <F8>toggles between Test mode (in which host attributes are
displayed) and normal mode
• <Alt> + <Print Scrn>performs a print screen to the local PC printer

46
BOSaNOVA Secure
MORPHEXPRESS
MorphExpress is an automated tool that converts your original host screen into
a GUI screen by:
• analyzing host screens
• automatically detecting commands and menus and converting them
from plain text to GUI buttons
• adding panels and graphic elements
• converting subfiles into tables, and options into buttons
Displaying the MorphExpress Screen
Click on the toolbar to toggle between the GUI display and your previous
color scheme choice (Color or Mono).
The original (non-MorphExpress) color tables are always saved.
Configuring MorphExpress
1. From the Advanced Properties tab in the Emulation Configurator, select
MorphExpress in the top pane and click GUI Customize in the bottom
pane to open GUI Logic Configuration (for details, see Configuring
MorphExpress in online Help).
2. Set the parameters to define the way MorphExpress recognizes and
converts screen elements.
3. Click OK in each dialog box to save the changes and close the dialog box
until you exit the Emulation Configurator. The changes take effect as soon
as you return to the emulation screen.
Customizing GUI Controls
1. From the Advanced Properties tab in the Emulation Configurator, select
Display Properties in the top pane and click Display Properties in the
bottom pane to open the Display Properties dialog box.
2. In Display Mode, select MorphExpress and click Customize to open the
MorphExpress Options dialog box, where you define how the controls
look.
3. Make changes and click OK. Click OK in each dialog box to save the
changes and close the dialog box until you exit the Emulation
Configurator. The changes take place automatically in all display
sessions.

MorphExpress 47
Customizing GUI Colors
1. From the Advanced Properties tab in the Emulation Configurator, select
Display Properties in the top pane and click Display Properties in the
bottom pane to open the Display Properties dialog box.
2. Under Display Mode, select MorphExpress; under Color scheme name,
select the palette from the dropdown list.
3. Select a background color for controls from the BackColor dropdown
palette.
4. Select a background color for input fields from the BackColor dropdown
palette. (Using a contrasting color helps make input fields more
noticeable.)
5. Click Apply to make the changes. You can see how the selections look in
the sample (the top half of the dialog box). When you are satisfied with
the color schemes, click OK to close the Emulation Configurator.

48
BOSaNOVA Secure
MISCELLANEOUS
PDE (Printer Driver Editor)
The application named Printer Driver Editor is a part of BOSaNOVA Secure.
PDE enables you to modify custom printer drivers. For details, refer to online
Help.
Euro Symbol Support
The euro is the single currency of the European Monetary Union that was
adopted by 11 member states on 1 January 1999. These are Belgium, Germany,
Spain, France, Ireland, Italy, Luxembourg, the Netherlands, Austria, Portugal
and Finland. For more information see the Euro Web site (http://europa.eu.int/
euro) run by the European Commission.
There are now fonts, keyboard types, and code pages that add the euro symbol
character. For euro symbol support to function correctly in your applications,
both the host and Windows must be configured for euro symbol support.
Check your host and Windows configuration for euro symbol support and
select Euro support in the Administrator (in Administrative parameters
Host language/country). If your host and/or Windows are not configured
for euro support, deselect Euro support to use the old code page.
Host Requirements
AS/400 Release (Version) Group PTF Number Info APAR Number
V3R2M0 SF99205 II11523
V4R1M0 SF99206 II11523
V4R2M0 SF99207 II11523
V4R3M0 SF99208 II11523

Miscellaneous 49
Changes Required for Euro Symbol Support
The character ID for all countries was changed from 697 to 695. The following
table contains the required code changes by country:
Country Old KBDTYPE and
CCSID (code page)
New (Euro) KBDTYPE
and CCSID (code page)
Euro
EBCDIC
Euro
ANSI
Austria/Germany AGB 237 AGE 1141 0x9F 0x80
Belgium BLI 500 BLM 1148 0x9F 0x80
Canadian French CAI 500 CAM 1148 0x9F 0x80
Denmark DMB 277 DME 1142 0x5A 0x80
France (azerty) FAB 297 FAE 1147 0x9F 0x80
Finland/Sweden FNB 278 FNE 1143 0x5A 0x80
Italian ITB 280 ITE 1144 0x9F 0x80
Netherlands NEB 037 NEE 1140 0x9F 0x80
Norway NWB 277 NWE 1142 0x5A 0x80
Portugal PRB 037 PRE 1140 0x9F 0x80
Spain SPB 284 SPE 1145 0x9F 0x80
Switzerland/French SFI 500 SFM 1148 0x9F 0x80
Switzerland/German SGI 500 SGM 1148 0x9F 0x80
United Kingdom UKB 285 UKE 1146 0x9F 0x80
United States/Canada USB 037 USE 1140 0x9F 0x80

This page is intentionally blank.
50
BOSaNOVA Secure

51
DTF (DATA TRANSFER FUNCTION)
Introduction to DTF
DTF (Data Transfer Functions) is a 32-bit Windows utility for transferring data
in either direction between a BOSaNOVA Secure and a host .
Data transfers are managed by file transfer profiles. These are files with an
.h2p (host-to-PC) or .p2h (PC-to-host) extension that contain information
about the data and how it is to be transferred, e.g., the source and destination
paths, the transfer type, and conversion information.
After you create a DTF profile, you have a number of options to use for
transferring the data: DTF interface (interactive mode), DTF background
mode, Profile lists (batch mode), and the Scheduler. In addition, the Send
utility provides a tool for transferring strings and running script files in display
sessions via HLLAPI.
DTF contains four components:
• The DTF Wizard helps you create new DTF profiles.
• The DTF interface displays DTF profiles in a Windows-like tree
structure. In the DTF interface, you can:
• View profiles and profile lists
• Create profiles
• Change profile parameters
• Change profile lists
• Run data transfers in interactive mode. (See also Running DTF in
Background Mode, in online Help.)
• The Scheduler lets you define automated transfers to run on a specified
schedule or as triggered by a dynamic event.
• The Send utility lets you send strings or commands to the host.
With DTF, you can create a list of profiles and then run these multiple transfers
in background mode.
If you have used ATF for data transfer, you will be familiar with many of the
terms and procedures in DTF. For information about new terminology and
procedures in DTF, see Tips for ATF Users, in online Help.
For details about running data transfers, refer to the online Help.

52
BOSaNOVA Secure
The DTF Wizard
Use the DTF Wizard to create a new DTF profile. A DTF profile contains
information about the data and how it is to be transferred. The parameters that
appear in the wizard depend on the host type and transfer direction (host-to-PC
or PC-to-host) you selected in DTF Open Profile. For details about each step
in the DTF Wizard, click Help in the wizard screen.
The DTF Interface
The DTF interface displays the selected data transfer profile or profile list. It
provides all the controls for creating DTF profiles and profile lists, viewing the
host file, and running data transfers.
Menu Bar
Use the menus in the menu bar to perform all the functions available in
DTF.
Toolbar
Use the buttons on the toolbar to perform many of the common functions
found in the menus. ToolTips define the buttons.
Panes
The top pane of the DTF interface uses a Windows-style tree structure to
display the parameters of the displayed profile or profile list.
To use this structure:
• If an item has a plus sign (+) next to it, it contains nested items. Click the
plus sign to expand the item (display the nested folders).
• If an item has a minus sign (-) next to it, it is already fully expanded and all
the nested items are displayed. Click the minus sign to collapse that part of
the tree.
• The names of the parameter sets appear in black; current status values
appear in blue. Values always appear in <brackets>.
• When you select a parameter set in the top pane, buttons and controls for
defining or changing that parameter set appear in the bottom pane.
To access online Help for the displayed dialog box, press F1, click , or select Help Context-sensitive Help.
The parameters are divided into the following categories:

53
General
Host type, transfer direction, transfer type, code page conversion
information.
Host
Information for finding and identifying the source or destination on the
host and for defining how the transferred data will be written on the host.
PC
Information for finding and identifying the source or destination on the PC
and for defining how the transferred data will be written on the PC.
Advanced
Advanced parameters affecting the data transfer.
The Scheduler
With the Scheduler, you can run tasks automatically, according to the time and
other conditions. You can choose to run file transfers at set periods of time, or
based on certain string triggers which occur on the host emulation screen.
You can schedule to send strings or run script files via the Send utility. You can
schedule other Windows applications to run in conjunction with file transfers.
Create a task using the Scheduler Wizard, which prompts you for all required
information.
The Scheduler Interface
The Scheduler interface resembles the DTF interface, with a top pane
containing a tree structure of all created tasks and their parameters.
The Menus
The Scheduler menu bar contains the following menus:
File
create new, open, close, save, and hide Scheduler.
Task
suspend and resume tasks. Also contains Options for setting the frequency
and intervals of the scheduled tasks.
Log
display details and write log to a file.
Help
displays this online Help topic.

54
BOSaNOVA Secure
The Toolbar
The following toolbar contains the basic tools for working with tasks.
Scheduler Wizard
With the Scheduler, you define data transfer tasks to be run automatically. You
can choose to run file transfers at set periods of time, or based on certain string
triggers which occur on the host emulation screen. You can schedule to send
strings or run script files via the Send utility. You can schedule other Windows
applications to run in conjunction with file transfers. Use the Scheduler
Wizard to define the tasks.
For details about each step in the Scheduler Wizard, click Help in the specific
wizard screen.
In the first screen, enter a description.
This is the name of the DTF task that will appear in the Scheduler list, so we
recommend using a descriptive name that will help you remember the purpose
of the task.
The Send Utility
The Send utility is a BOSaNOVA application for sending a simple string
from the BOSaNOVA Secure to a specified position on a specified display
session or for processing a script file via the specified display session.
A simple string is a string which will be sent to the specified display session
either at the current cursor position or another specified position.
A script file is a series of statements (commands) to be processed. The
statements must follow a specific syntax and must be terminated with a
carriage return/line feed combination (also referred to as EOL, or End-of-
Line).
For details about Send syntax and usage, refer to online Help.
Remote Command 55
REMOTE COMMAND
Introduction
With BOSaNOVA’s Remote Command Utility, you can send an AS/400 CL
command (or commands) to a host system from a BOSaNOVA client.
Syntax
BSRMTCMD command [//system] /z
or
BSRMTCMD /I [drive][path]filename [/q] [//system] [/z]
Parameters
Parameters appearing in the above syntax in [brackets] are optional.
• command
The AS/400 CL command, with parameters. This is the command to be
sent and executed on the specified AS/400 host system.
• /I
Read commands from the specified file; the filename (and optional
path) must be separated from the /I by a space.
• filename
The name of the file containing the AS/400 commands. The file must
be a text file with only one command per line. If the filename is a long
name containing a space, you must quote the entire filename—
including the full path—in apostrophes (').
• /Q
When using the /I parameter (sending commands from a batch file), any
error occurring appears on the BOSaNOVA client screen, prompting
you to select Y or N (to continue or not). The /Q parameter suppresses
all error messages and assumes Y whenever an error occurs.
• //system
Name of the system on which the commands are to be run. If not
defined, the default system name is used.
• /Z
If selected, all messages other than error messages are suppressed.

56
BOSaNOVA Secure
• /? or /H
Displays help. (Using the command BSRMTCMD without any
parameters also displays help.)
Examples
Example 1
In this example, the AS/400 CL command CRTLIB BOSTEST (create a library
called “Bostest”) was sent to the default host.
rmtcmd crtlib bostest
Example 2
In this example, the file Tuesday.txt, located on drive D: in the folder \Remote,
was sent to the host Mainsys.
BSRMTCMD /I D:\Remote\tuesday.TXT //mainsys
Example 3
Here is a sample command file as used in Example 2, above:
crtlib boscstlib
chkobj bsrrr

57
TROUBLESHOOTING
Printer Session
In a printer session, if you selected Current Windows Driver (General tab)
and you saved print output in ASCII format (Diagnostics tab Save to ASCII
file), do not click Collect Technical Support Information because the
resulting file may be too large.
Euro Support
For euro symbol support to function correctly in your applications, both the
host and Windows must be configured for euro symbol support. If you receive
a euro symbol support error, check your host and Windows configuration for
euro symbol support and select Euro support in the Administrator (in
Administrative parameters Host language/country). If your host and/or
Windows are not configured for euro symbol support, deselect Euro support
to use the old code page. For details, see “Euro Symbol Support” on page 44.
Traces and Screen Captures
When you experience problems with an emulation session, Technical Support
may request that you provide them with files to help them solve the problem.
Prepare files, as follows:
1. To help debug a problem, you may be asked to record a trace (*.trc or *.bts
files) or create a screen captures (*.scn files). This is done from the
Emulation Configurator (Advanced Properties Diagnostics). In
addition, you may be asked to record a print output (*.asc or *.ebc files)
from printer emulation sessions.
2. Then, send the technical information file (default name is: Bsinfo.bts)
from the Administrator (Diagnostics Troubleshooting Information).
The technical information file automatically includes all *.trc, *.scn, *.bts,
*.asc, and *.ebc files created.

58
BOSaNOVA Secure
Recording a Telnet Trace
Record a Telnet Trace when you have problems with an display emulation
session.
To record a trace:
1. Close all applications.
2. In the Emulation Configurator, select the Advanced Properties tab.
3. Expand Diagnostics and select Record Telnet Trace in the top pane.
4. In the bottom pane, select Record Telnet Trace and specify a filename
and location.
5. Create screen captures, if required (see the next section).
6. Run an emulation. Make sure you run the TCP/IP trace on the first session
only!
7. When the error occurs again, close the emulation. Trace data is written to
the file specified in step 4, above.
8. Prepare the information file for Technical Support; see “Preparing the
Information File” on page 57.
Screen Capture
Playback Recorded Screens
If selected, you must specify the playback file (see Record Screens for
Playback, below) or use the dropdown list of the last four previously
stored files.
Record Screen for Playback
Creates a file with “snapshots” of the display session screens. Enter the
filename (default Demo.scn), using the extension .scn. The file is
automatically created in the BOSaNOVA Secure installation folder (or
another folder, if defined).
Record only works for the first (display) session; Playback can be run during
any display session. The screens are played back in the same sequence in
which they were recorded.
To record a screen capture:
1. Close all open sessions.
2. In the Emulation Configurator, select the Advanced Properties tab.

59
3. Expand Diagnostics and select Screen capture in the top pane.
4. In the bottom pane:
a. Select Record screen for playback.
b. If you don’t want the screen grabs to be written to Demo.scn, browse
for another file; note that all screen captures will be recorded in the file
selected.
c. Click OK.
5. Continue at step 6 (“Run an emulation”) in the previous section. Note that
each screen that is opened when you run the emulation will be captured
and placed in the file selected in 4b, above.
From a Printer Session
1. In an open Printer session, right-click.
2. Select Properties.
3. Select the Diagnostics tab.
4. Select Activate Diagnostic Mode and select the output option.
5. Prepare the information file to send to Technical Support for analysis; see
Preparing the Information File, directly below.
Preparing the Information File
Make sure that you have created all the trace files and screen captures required
by Technical Support before preparing the information file.
1. Close all sessions.
2. Run the Administrator.
3. In the top pane, expand Diagnostics and select Troubleshooting
information.
4. In the bottom pane, click Collect Technical Information to open the User
Information dialog box (for details, see Collecting User Information,
below
5. Complete the information and save the user information file (default name
Bsinfo.bts).
6. The user information file automatically includes all trace and screen
captures. Send the file (as an e-mail attachment) to Technical Support for
analysis.

60
BOSaNOVA Secure
Collecting User Information
Use this dialog box to collect diagnostic information in the Administrator and
to collect printer troubleshooting information in Printer Session Properties
Diagnostic.
The information you enter in these fields will be written to a text file when you
click OK. The default file is Bsinfo.bts in the BOSaNOVA Secure installation
folder. Include this file along with the trace (dump) files or recorded screens
for Technical Support.
The file also automatically includes other information, depending on the origin
(Administrator or Printer Session Properties). When run from the
Administrator, data about your system, all defined sessions, and EBCDIC to
ANSI translation tables, are automatically captured and added to the file.
When run from Printer Session Properties, a subset of this information is
captured (system information plus the specific printer session only).
Name
By default, the name you used when installing BOSaNOVA Secure will
be used. You can change this.
Company
By default, the company name you used when installing BOSaNOVA
Secure will be used. You can change this.
Address
Enter your full mailing address, including the postal code and country.
Phone Number
Enter a daytime phone number where we can reach you.
E-mail Address
(If available)
Tech Support Call #
This number will be provided by Technical Support. Make sure to include
it so that your diagnostic files can be properly tracked.
Host Type
Enter your host type (AS/400, System/36, AS/36, etc.).
Host OS Version
Enter the complete version number of your host operating system.
Description
Describe the problem carefully. Under what circumstances does the
problem occur? Are you able to duplicate it? Have you made any changes
to your connectivity hardware or software that could contribute to this?

61
Contacting Technical Support
Before Contacting Technical Support:
1. Refer to the appropriate topic in the Troubleshooting sections. The
problem may be something you can solve on your own.
2. If you can’t solve the problem by yourself, run the Administrator. In the
top pane, expand Diagnostics and select Troubleshooting information.
In the bottom pane, click Collect Technical Information to open the User
Information dialog box. Fill in the form before contacting Technical
Support. If contacting us via fax, include a printout of this form;
otherwise, have it handy when you call us.

62
BOSaNOVA Secure
ERROR MESSAGES
Many of the error messages in BOSaNOVA Secure are self-explanatory; they
include possible causes of the problem and suggest solutions. When multiple
solutions are suggested, always try them in the order presented. If the solutions
do not work or if you do not understand the message, contact Technical
Support.
Error Codes
All BOSaNOVA Secure error messages have the following syntax: xxxnnn
where xxx is three-letter code for the error category (that is, which the
software is responsible for the error), and nnn is a three-digit code for the particular error.
Error Categories
The following codes are used:
• ADM Administrator errors; p. 63
• TPC TCP/IP Configurator errors; p. 64
• BPC Emulation Configurator errors; p. 66
• EML Display emulation errors and errors that occur in the
printer session list window; p. 67
• BSV Message or text errors; p. 68
• KRN Kernel engine errors; p. 73
In addition, there are WinSock Return Codes; p. 74
If you encounter an error that is not self-explanatory and is not listed below,
contact BOSaNOVA Technical Support.

Administrator Errors (ADM)
ADM01 Error:
Wrong password verification.
Cause:
In MS SNA Server configuration, the password verification you entered is
incorrect.
Action:
Enter the correct password verification.
ADM02 Error:
Unable to load library <library name>.
Cause:
The load library is missing or was deleted.
Action:
Check that the library path is correct. Rerun the Administrator.
ADM03 Error:
Cannot execute <filename>. File not found.
Cause:
The executable file is not correctly installed.
Action:
Check that you have selected the appropriate operation to perform.
The following Administrator errors have no error code numbers:
Error:
You must enter the host alias name.
Cause:
The host alias name parameter is undefined.
Action:
Define the host alias name.
Error:
Wrong TCP/IP number: value can’t be zero.
Cause:
A TCP/IP address segment is zero.
Action:
Define the correct AS/400 IP address, making sure that no address
segment is zero.
Error:
Wrong TCP/IP number: value must not exceed 255.
Cause:
The host TCP/IP address is incorrectly set in the Administrator.
Action:
In the Administrator, select Connectivity Connection Type TCP/
IP and define the correct TCP/IP address.
Error Messages 63

TCP/IP Configurator Errors (TPC)
TPC001 Error:
Unable to save Registry parameters.
TPC002 Error:
Password verification is incorrect.
TPC003 Error:
Unable to read Registry parameters.
TPC004 Error:
Incorrect system name.
TPC005 Error:
Registry for the system <system name> is corrupted. Restart Windows. If
this doesn’t help, contact BOSaNOVA Technical Support.
TPC006 Error:
Unable to read parameter <parameter name> from the Registry. Restart
Windows. If this doesn’t help, contact Technical Support.
TPC007 Error:
Parameter <parameter name> in the Registry is invalid. Restart Windows.
If this doesn’t help, contact Technical Support.
TPC008 Error:
Parameter <parameter name> must be defined.
TPC009 Error:
Unable to read parameter <parameter name> of the system <system name>
from the Registry. The default value will be used.
TPC010 Error:
Parameter <parameter name> of the system <system name> in the Registry
is invalid. The default value will be used.
TPC011 Error:
Unable to load <filename>.
Action:
Check if this file exists. Contact Technical Support.
TPC012 Error:
Parameter <parameter name> is invalid.
TPC013 Error:
Unable to read <parameter name> parameters from the Registry. The
default values will be used.
TPC014 Error:
Unable to read Default Templates from the Registry. Restart Windows. If
this doesn’t help, contact Technical Support.
TPC020 Error:
The maximum number of systems (n) is already defined.
64
BOSaNOVA Secure

TPC021 Error:
The system name <system name> has been assigned to another system.
This system name must be unique.
TPC023 Error:
No system defined. Define at least one system.
Action:
In the TCP/IP Configurator, Basic tab, define at least one system.
TPC024 Error:
Unable to read key <registry key> from the Registry. Restart Windows. If
this doesn’t help, contact Technical Support.
TPC026 Error:
The system name <system name> has been assigned to more than one
system. This system name must be unique.
Error Messages 65

Emulation Configurator Errors (BPC)
BPC001 Error:
Registry x corrupted.
Cause:
This key is missing from the Registry or is incorrectly defined.
Action:
Run Setup; in Setup, select Update and Revert Registry.
BPC002 Error:
Unable to load <module name>.
Cause:
The module is missing or has been deleted.
Action:
Rerun Setup; in Setup, select Update and Update Executable Files.
BPC003 Error:
Error using DLL <DLL name>.
Cause:
Internal error.
Action:
Contact Technical Support.
BPC004 Error:
x memory allocation failure!
Cause:
Not enough Windows resources.
Action:
Close other applications; if this doesn’t help, restart Windows.
BPC005
Error:
Unknown product ID has been detected.
Cause:
The Registry was corrupted.
Action:
Run Setup; in Setup, select Replace or install to a new directory.
BPC006
Error:
Key x not valid.
Cause:
The Registry was corrupted.
Action:
Run Setup; in Setup, select Update and Revert Registry.
66 BOSaNOVA Secure

Display Emulation Errors (EML)
EML1 Error:
Failed to create toolbar.
EML2 Error:
Initialization failed.
EML3 Error:
The application is already running.
EML4 Error:
Unable to open session.
EML5 Error:
Registry access denied.
EML7 Error:
Unable to close session.
EML8 Error:
Configuration parameter error.
EML9 Error:
Unable to disconnect from the kernel.
EML10 Error:
Unable to load emulation font.
EML11 Error:
Registry corrupted. x key or value doesn’t exist.
EML12 Error:
Unable to start printer emulator process.
EML13 Error:
Unable to execute printer command.
EML14 Error:
Memory allocation error.
EML15 Error:
Invalid macro name length. The name must be between 1 and <n>
characters long.
EML16 Error:
Keyboard Processing: Passed parameters (HostCom: x) are wrong.
ReturnStatus: x.
EML17 Error:
Unable to run Configurator x.
Error Messages 67

Message or Text Errors (BSV)
BSV001 Error:
Unable to open Registry Key.
Cause:
This key is missing from the Registry or is incorrectly defined.
Action:
Check that Regedit.exe exists in the Windows folder. Then run Setup; in
Setup, select Update and Revert Registry.
BSV002 Error:
Incorrect function call in Administrator mode.
Cause:
Internal error.
Action:
Contact Technical Support.
BSV003 Error:
Unable to retrieve x value from y Registry Key.
Cause:
This key is missing from the Registry or is incorrectly defined.
Action:
Check that Regedit.exe exists in the Windows folder. Then run Setup; in
Setup, select Update and Revert Registry.
BSV004 Error:
There is no installation Registry Key.
Cause:
This key is missing from the Registry or is incorrectly defined.
Action:
Check that Regedit.exe exists in the Windows folder. Then run Setup; in
Setup, select Update and Revert Registry.
BSV005 Error:
Unable to save x value into y Registry Key.
Cause:
This key is missing from the Registry or is incorrectly defined.
Action 1:
Check that Regedit.exe exists in the Windows folder. Then run Setup; in
Setup, select Update and Revert Registry.
Action 2:
Contact Technical Support.
68 BOSaNOVA Secure

Driver Errors (BCD)
BCD001 Error:
Internal error BCD001, code x.
Cause:
Internal error.
Action:
Contact Technical Support.
BCD002 Error:
GetProcAddress failed: x.
Cause:
You may have an old version of the library file.
Action:
Run Setup; in Setup, select Update and Update Executable Files.
BCD003 Error:
Unable to load library filename (code x)
Cause:
The library file is missing or incorrect.
Action:
Run Setup; in Setup, select Update and Update Executable Files.
BCD004 Error:
Unable to open installation registry key (code x).
Cause:
Internal error.
Action:
Contact Technical Support.
BCD005 Error:
Unable to retrieve x value from y registry key (code x).
Cause:
Internal error.
Action:
Contact Technical Support.
BCD006 Error:
Can’t allocate memory. Close unused applications or restart Windows.
Cause:
Insufficient memory.
Action 1:
Close all unnecessary applications.
Action 2:
Restart Windows.
BCD007 Error:
Unable to open registry key (code x).
Cause:
Internal error.
Action:
Contact Technical Support.
Error Messages 69

BCD008 Error:
Unable to create Data or Keyboard events.
Cause:
This is an internal Windows error.
Action:
Restart Windows.
BCD009 Error:
Unable to create Decode or Keyboard threads.
This is an internal Windows error.
Action:
Restart Windows.
BCD010 Error:
Unable to establish a connection to the host. Check that the connection type
is defined correctly in the Administrator.
Cause:
The connection type is wrong or incorrectly configured.
Action:
Correct the connection type in the Administrator (Connectivity Connec-
tion type)
BCD012 Error:
Cannot start session. Check session parameters (system name, session
name, etc.).
Cause 1:
Session parameters are incorrect.
Action:
Check the session parameters in the Emulation Configurator (Sessions tab).
Cause 2:
This session name is already active on the AS/400.
Action:
Change the session name in the Emulation Configurator (Sessions tab).
BCD044 Error:
Version of <filename> file does not correspond to version of
BSCLDRV.DLL file.
Cause:
The version of this file is too old and cannot be connected to Bscldrv.dll.
Action:
Run Setup; in Setup, select Update and Update Executable Files.
BCD052 Error:
Unable to open trace file <filename>.
Cause:
The emulation is trying to create a file in a write-protected folder.
Action:
Define another trace folder in the Emulation Configurator (Advanced
Properties tab Diagnostics Record APPC Trace).
70 BOSaNOVA Secure

BCD060 Error:
Unable to start connection to host.
Cause:
The connection supplier is not connected to the AS/400.
Action:
Check the status of the connection supplier.
BCD070 Error:
Failed to load <filename>.
Cause:
The file is damaged or does not exist.
Action 1:
Check the file’s status.
Action 2:
Run Setup; in Setup, select Update and Update Executable Files.
BCD071 Error:
Some WinSock functions not found.
Cause:
The Wsock32.dll file is corrupted or is an older version that no longer
works.
Action:
Install a new version of the TCP/IP protocol.
BCD072 Error:
Error received from WinSock.
Cause:
This is a WinSock error; if the WinSock error is 11001 or 11004, this may
be caused by the session configuration. The Local Control Point name of
the AS/400 was defined as System Name, which is correct for an APPC
connection but not for TCP/IP; refer to WinSock Return Codes, p. .
Action 1:
Remove System Name from the session configuration or change it to an IP
address or name defined in your TCP/IP network for the AS/400. See
Basic, p. .
Action 2:
Use a name defined in the Hosts file in the Windows folder.
BCD073 Error:
Too many open files
Cause:
Too many applications are currently open.
Action:
Close all unnecessary applications.
BCD074 Error:
Access denied.
Cause:
The Telnet trace folder is write-protected.
Action:
Define another trace folder in the Emulation Configurator (Advanced tab
Diagnostics).
Error Messages 71

BCD075 Error:
Sector not found.
Cause:
Internal error.
Action:
Contact Technical Support.
BCD076 Error:
General failure.
Cause:
This is an internal emulation error.
Action:
Contact Technical Support.
BCD077 Error:
Network access denied.
Cause:
This is an internal emulation error.
Action:
Contact Technical Support.
BCD078 Error:
Failed to open file.
Cause:
The Telnet trace folder is write-protected.
Action:
Define another trace folder in the Emulation Configurator (Advanced tab
Diagnostics).
72 BOSaNOVA Secure

Kernel Engine Error Messages (KRN)
KRN001 Error:
Internal error KRN001, code x.
KRN002 Error:
Unable to load dynamic link library (DLL).
KRN003 Error:
GetProcAddress failed: x
KRN004 Error:
Application provided invalid callback function address(es).
KRN005 Error:
Maximum number of session exceeded.
KRN006 Error:
Can’t initialize synchronization object.
KRN007 Error:
Can’t open file.
KRN008 Error:
File contains incorrect data format.
KRN009 Error:
Can’t retrieve driver data.
KRN010 Error:
Can’t allocate memory.
KRN011 Error:
Unable to continue: the application wasn’t initiated.
Error Messages 73

WinSock Return Codes
Each WinSock return code (listed by its Hex value) is presented with a brief
description. For some codes, a cause and suggested action are provided.
10004 Error:
Interrupted system call.
10009 Error:
Bad file number.
10013 Error:
Permission denied.
10014 Error:
Bad address.
10022 Error:
Invalid argument.
10024 Error:
Too many open files.
Cause 1:
Too many WinSock applications are running simultaneously.
Action:
Close unnecessary applications.
Cause 2:
An application opens and closes sockets frequently but does not close
them properly.
Action:
Restart the application.
10035 Error:
Operation would block.
10036 Error:
Operation now in progress.
10037 Error:
Operation already in progress.
10038 Error:
Socket operation on nonsocket.
10039 Error:
Destination address required.
Cause:
The destination address is missing.
Action:
Define the host destination address in the Administrator (Connectivity
Connection Type Configure).
10040 Error:
Message too long.
74 BOSaNOVA Secure

10041 Error:
Protocol wrong type for socket.
10042 Error:
Bad protocol option.
10043 Error:
Protocol not supported.
10044 Error:
Socket type not supported.
10045 Error:
Operation not supported on socket.
10046 Error:
Protocol family not supported.
10047 Error:
Address family not supported by protocol family.
10048 Error:
Address already in use.
Action:
Do not run two TCP/IP applications of the same type on the same
machine. Remove all TCP/IP applications and restart BOSaNOVA TCP/
IP.
10049 Error:
Cannot assign requested address.
Cause:
The destination address is missing.
Action:
Define the host destination address in the Administrator (Connectivity
Connection Type Configure).
10050 Error:
Network is down.
Action:
Check that your WinSock protocol stack, network driver, and network
interface card configuration exist. Reinstall BOSaNOVA Secure.
10051 Error:
Network is unreachable.
Action:
Try to ping the destination AS/400 to see if you get the same results.
Check that the destination address is correct. Check that you have a
router configured in your network system. Perform a trace to determine
where the failure occurs along the route between your host and the desti-
nation AS/400. If this doesn’t work, contact your network administrator.
Error Messages 75

10052 Error:
Net dropped connection or reset.
Cause:
The network dropped the connection.
Action:
Ping the remote host. If it does not respond, it might be off-line or there
may be a network problem along the way. If it does respond, this
problem might be temporary (in which case, try to reconnect) or the
server application might have terminated (in which case, ask your system
administrator to restart the server).
10053 Error:
Software caused connection abort.
Cause:
The software aborted the connection.
Action:
Ping the remote host. If it does not respond, it might be off-line or there
may be a network problem along the way. If it does respond, this
problem might be temporary (in which case, try to reconnect) or the
server application might have terminated (in which case, ask your system
administrator to restart the server).
10054 Error:
Connection reset by peer.
Cause:
Connection reset by AS/400.
Action:
If your network system supports commands that report statistics, check
the number of TCP RST packets or port unreachable CMP packets
received. See Error 10053, above.
10055 Error:
No buffer space available.
Cause:
There is a shortage of resources on your system, which can occur if you
are trying to run too many applications simultaneously.
Action:
Close all unnecessary applications and restart BOSaNOVA Secure.
10056 Error:
Socket is already connected.
10057 Error:
Socket is not connected.
10058 Error:
Cannot send after socket shutdown.
10059 Error:
Too many references, cannot splice.
76 BOSaNOVA Secure

10060 Error:
Connection timed out.
Action:
Check the following: that the destination’s alias name is defined as a
valid IP address; use the Hosts file or Host.sam to define alias names. If
you used a host name, did it resolve to the correct address? Can you ping
that host? Do you have a router configured? Is the router up and
running? Check your subnet mask. If you do not have the proper subnet
mask, your network system could treat local addresses as remote
addresses. If this doesn’t work, contact your network administrator.
10061 Error:
Connection refused.
Cause:
Connection refused by the AS/400 (either you tried to connect to the
wrong host or the server application you are trying to contact is not exe-
cuting).
Action:
In the Administrator (Connectivity Connection Type Configure),
right-click Run Ping. Check the AS/400 address you are using. If you
used a host name, check that it resolves to the correct address.
10062 Error:
Too many levels of symbolic links.
10063 Error:
File name too long.
10064 Error:
Host is down.
10065 Error:
No route to host.
Cause:
No route to the AS/400.
Action:
Try to ping the destination host to see if you get the same results. Check
that the destination address is the one you wanted to go to. Check
whether you have a router configured in your network system. Perform a
trace route to try to determine where the failure occurs along the route
between your host and the destination host. Contact your network
administrator.
10066 Error:
Directory not empty.
10067 Error:
Too many processes.
10068 Error:
Too many users.
10069 Error:
Disk quota exceeded.
Error Messages 77

10070 Error:
Stale NFS file handle.
10071 Error:
Too many servers of remote in path.
10091 Error:
Network subsystem is unavailable.
Action:
Check that Wsock32.dll file comes from the same vendor as your under-
lying protocol stack. To do so, select Wsock32.dll from the Explorer (in
Windows System), right-click, and select Properties Version.
10092 Error:
WINSOCK.DLL version out of range.
Cause:
Wrong WinSock DLL version.
Action:
You must have WinSock DLL version 1.1.
10093 Error:
Successful WSAStartup( ) not yet performed.
Cause:
The network subsystem is wrongly configured or inactive.
Action:
Contact your network administrator.
10101 Error:
Session was disconnected; socket error.
11001 Error:
Host not found.
Action:
Check that your name server(s) and/or host table are configured. If you
are using name server(s), check whether the server AS/400 is running.
11002 Error:
Non-authoritative AS/400 found.
Action:
Check that your name server(s) and/or host table are configured. If you
are using name server(s), check whether the server AS/400 is running.
11003 Error:
Non-recoverable query error.
Action:
Check that your name server(s) and/or host table are configured. If you
are using name server(s), check whether the server AS/400 is running.
11004 Error:
Valid name, but no data of that type.
Action:
Check that your name server(s) and/or host table are configured. If you
are using name server(s), check whether the server AS/400 is running.
78 BOSaNOVA Secure