Embed Size (px)
DESCRIPTION
Bobath, treatment, lecture, powerpoint, presentation, lecture guide, physical therapy, stroke
Citation preview
Positioning and Moving of Hemiplegic Pt.
Bed Mobility Exercises

Positioning of UE, head and torso
Arm and head
Position in bed: pt. lying on his back
To prevent shoulder retraction:
place outstretched arm alongside the body on a pillow somewhat higher than the trunk. Place outstretched hand on pillow or, better if possible, supinated against the outside of the pillow
Important:
place the head laterally to the unaffected side, and the affected shoulder on the pillow as far forward as possible

Pelvis and leg
Position in bed:
Lying on back. A pillow or sandbag is placed under the pelvis on the affected side in order to lift the pelvis. The pillow must be long enough to give support to the lateral side of the thigh. This prevents ER of the leg, but it must not, go beyond the middle position. If too much extension or supination of the ankle results, a board may be placed against the foot to give dorsiflexion and pronation.

Patients who develop extensor spasticity early on
Position in bed:
the pt. should not always be on his back, but should learn to lie on the sound and, also, the affected side. Support the pelvis and lift it forward with a sandbag and pillow. In order to avoid excessive extensor spasticity, the pt. needs support under the knee by means of a small foam rubber cushion, with the knee slightly bent. No board should be placed against the foot, as he will push against it with his toes.

Bed mobility exercises
Turning of Pt. over his unaffected and affected side
Remember:
Turning should begin with the upper part of the body and, in order to do this, the pt. must first learn to lift the affected arm with the good arm, and to clasp his hands (i.e. with fingers interlocked). He should then lift his clasped hands, with elbows extended, to the horizontal and if possible, above his head. From there, the pt. should move his arms first to one side and then to the other.

Bed mobility exercises
Turning of Pt. over his unaffected or sound side
• Turning over to the sound side should be started with his arms and trunk, his hands clasped.
• The therapist can give minimal help by turning the pt. pelvis and move the affected leg to the sound side
• When he is lying on the sound side, the shoulder of the affected side should be brought well forward, the are supported on a pillow and extended at the elbow.
• The pillow can thus be ‘embraced’ by both arms.
NOTE:
Movement started with shoulder forward; knee kept in slight flexion with small pillow.

Bed mobility exercises
Turning of Pt. over his affected side
• Turning over to the affected side should be started with his arms and trunk, his hands clasped.
• The pt. can use his sound arm and leg for turning it over.• When lying on the affected side, his involved shoulder should
be brought well forward and the arm is then in external rotation and extended at the elbows.

Bed mobility exercises
Using the bedpan
• Bend the affected leg and place his foot flat on the bed.• The pt. will then bend the sound leg and place that foot
parallel with and close to the affected foot.• The therapist must fix both feet with one hand and ask the
patient to lift his pelvis.• The therapist will then place the bedpan under the pelvis. The
patient should keep his legs bent.

Bed mobility exercises
The patient pushes himself up in the bed if he has slipped down
POSITION: (the same when using bedpan)
• Fix the pt. affected foot with one hand and help him up from the shoulder with your other hand.
• Place your arm under the pt. arm-pit, at the same time lifting the shoulder upwards and forwards or the pt. may lift his pelvis and help him in this way to push himself forwards.

TURNING OVER TO SIT UP ON THE SIDE OF THE BED AND
SITTING AND STANDING ACTIVITIES FROM THE BED

TURNING OVER TO SIT UP ON THE SIDE OF THE BED
• TURNING TO THE SOUND SIDE TO SIT UP
– Pt. starts with clasped hands and supports himself on the sound forearm while pt. brings the sound leg over the edge into half-kneeling.
If the pt. needs some assistance…
– The nurse/caregiver may help the pt. to sit up by moving his head towards the affected side and at the same time, she moves the affected leg over the edge of the bed with the other hand .
Note: pt. should keep his/her hands clasped together. If the pt. does not need help to lower the affected leg on the edge of the bed
for sitting up or if they have been trained to move both legs flexed on one side or the other…
– Pt.’s hands are clasped, she/he will start to turn the trunk and then the pelvis. Feet are on the bed and both knees are kept together when turning over.

TURNING OVER TO SIT UP ON THE SIDE OF THE BED
• TURNING TO THE AFFECTED SIDE TO SIT UP
– Pt. starts with clasped hands– When the pt. is lying on the affected side, the PT supports
the pt’s head on the affected side and helps the pt to move it towards the unaffected side and up while the pt. supports himself on the affected forearm.
– The PT will help the pt. to move the affected leg over the edge of the bed.
– While the pt. moves his sound leg over the edge of the bed, the PT pushes his head further up to the sound side and so to sitting up.

TURNING OVER TO SIT UP ON THE SIDE OF THE BED
• LYING DOWN FROM SITTING
– The PT holds the affected hand of the pt. The pt’s arm is externally rotated and extended diagonally forward at shoulder height.
– While the pt. slowly lies down, using his sound arm for support.
– Then the pt. lifts the sound leg on to the bed.– If at all possible, the pt. should then bend the affected
leg at the knee and move it onto the bed, the PT gives a little help by lifting from under the knee

SITTING AND STANDING ACTIVITIES FROM THE BED
• SITTING UP TO STAND
– While the pt is sitting on the bed, the PT stands in front of the pt.
– The pt. places his sound arm around the PT’s waist.– PT takes the affected arm and with one hand under
the pt. armpit, lift his shoulder, rotate the arm outwards and extend the elbow.
– Before the pt. stands up, the PT will help the pt. to move forward from the hips.
– The PT will place one of her hands under the pt’s shoulder and holding on it while drawing the pt. lightly towards the affected side.

SITTING AND STANDING ACTIVITIES FROM THE BED
• GETTING UP FROM THE CHAIR
– PT stands in front of the pt., taking both arms of the pt. forward
– The knees of the pt. should be together in mid-line and the feet parallel at right angles to the knees
– The affected foot should not be in front of the sound one.
– PT will press her knees against the pt’s knees and help him rise in the same way as she helped him rise from the bed

First (Mainly Flaccid) Stage
1.To counteract retraction of scapula2.Preparing the patient for sitting up and standing
3. Leg extension exercise for preparation for weight bearing exercise

Turning over from Supine to Side-Lying
Rolling over to sound side
• Shoulder and arm should be placed forward
• Elbow extended and legs in semi-flexion
Rolling over to affected side
• Shoulder and arm should be placed forward
• Elbow extended and in Supination

Turning over from Supine to Side-Lying
Preparation for Rolling
• Patient in Supine, clasps his hands, the thumb of the affected hand being above that of the sound one
• Patient practices lifting clasped hands above his head and down with extended elbows. With both hands having equal degree of supination.
• Patient then practices bending his elbows and placing his hands on his chest.
• Elbow of arm the affected must be well forward to allow for extension of wrist.
• Patient then moves his arm up again and forward.

Turning over from Supine to Side-Lying
Rolling with clasped hands
• Patient brings both arms, with clasped hands, over first to one side and then to another.
• PT can assist if necessary to move his leg and pelvis over to side-lying.
Flexion and extension of arm without Retraction of shoulder
• When lying on the affected side, should be placed forward. arm in external rotation, forearm pronated and elbow extended
• Patient practices isolated flexion and extension and supination of forearm by bringing his hand to his mouth and back

Controlled Extension Without Extensor Spasticity
The therapist bends the patient's leg, but avoids it falling into abduction.
The foot is held in dorsiflexion and pronation. The therapist waits until resistance has subsided
and then slowly, extends the leg, asking the patient not to let the leg fall or push against her hand.
If during the movement the PT feels the full weight of the leg or even a slight push against her hand, she must stop the movement and ask the patient to bend the leg a little until he holds and controls it again.

Active Dorsiflexion of the ankle
Therapist supports the sole of the foot Therapist dorsiflexes the foot by giving some
pressure backwards and downwards against the ankle, while, with her other hand, she lifts the front of the foot, with the toes dorsiflexed.
Maintain pronation by raising the lateral border more than the medial one.
Dorsiflexion with eversion of the ankle can be reinforced by dorsiflexion of the toes. Sensory stimulation with quick stroking movements along the plantar aspect of the toes, excluding the big toe.

Extension in preparation for weight bearing
Therapist places the patient’s dorsiflexed and pronated foot against himself
Therapist holds it in position and asks the patient to perform small isolated movements of alternate flexion and extensions of the knee.
If the patient can control his leg during extensor phase, the PT can bend the leg and move the foot down over the side of the bed so that he extends the hip with the knees in flexion.
Patient then lifts his leg up again and place his foot on the support

Treatment for standing up and standing position

Standing training using a high chair
• Starting position: sitting c pt. hands clasped in front
• Instruct pt. to stand up
• As the pt. is standing up, PT applies pressure on knee
• Train sit ↔ stand
• Progression

Getting down from plinth using affected side
• Staring position: pt. in short sitting
• Instruct pt. to touch the ground using affected side
• PT puts pt.’s affected foot in ankle dorsiflexion, forearm supination and elbow extension
• Ask pt. to extend knee
• Progression

Standing training leaning on the plinth
• Starting position: pt. in short sitting
• Instruct pt. to stand up with both feet parallel on the floor
• Practice weight transfer
• Progression

Standing away from plinth
• Starting position: pt. standing c both feet parallel on the floor
• Instruct pt. to lift the heel of the sound side
• Progress by asking pt. to make small steps forward and backward c sound foot

Extensor spasticity on affected leg during stepping forward
• To prevent, use toe spreader• PT place hand under ball of pt.’s foot and lifts his toes and
dorsiflexes the ankle while standing on heel until there is no pressure felt

Treatment for walking

Moving pelvis forward over affected leg
• Starting position: pt. standing• Instruct pt. to take small step forward and backward with
sound foot

Trunk balance in sitting
Intial treatment of flaccid Stage

-Pt tends to fall on the affected side.-In sitting and standing, balancing s arm support when
weightbearing on one side makes the normal person move his head laterally towards the opposite side. However,normal side of hemiplegic pt is unable to counteract the pull of fall to the affected side.It may be due to the pull of spastic mm towards the affected side and also to sensory loss, depriving the sound side of info about what happens on the affected side.

-Pt gets trunk control c righting of his head towards the normal side.
-Pt needs elongation of the side flexors of the trunk and neck and raising of his shoulder on the affected side.

TREAMENT-pt sits on the bed c therapist on his affected side.-Pt raises his shouldergirdle supporting it from the under the axilla,
holding his arm abducted in lateral rotation,extended at the elbow, hand extended at the wrist c fingers extended if possible c the normal hand on knee.
-Then pt leans torwards therapist, and straighten himself up again to mid posn. He should start this by side flexing his head lateral to the normal side and not just turn his head

.-When moving to the affected side, pt should not lean backwards. -The shoulder should be kept in raised by the therapist. Next, pt’s
hand is placed on the support some distance away from the body, therapist holding hand firmly down while lifting his shoudler up c the other hand.
-Pt is then ask to move his trunk towards the therapist so that he takes full weight on the affected hip.

-Pt is then helped to take weight on FA, his hands clasped, or his hand being held flat down on the support either c his sound hand or by the therapist.
-If he feels very insecure and tends to collapse on his arm, his shoulder can be kept raised by the therapist or alternatively, if possible, she should just keep his head lateral flexed towards the normal side to stop his pulling down or falling to the affected side .


-It is always difficult for pt to lean forward at hips when sitting s being afraid of falling forward.
-It is important to practice this balance as well as standing up. -Therapist stands in front of the pt, fixing his affected extended arm against her waist c her elbow, and letting him hold on to her c his normal side.
- Then ask and help to lean lean well forward at the hips .

-Care should be taken see that he extends his back and does not bend his head and look down.
-From this position he is then helped to stand up.

Preparing for walking without circumduction
Rameer Zerwin S. De VeraColeen C. Dequito

Control of adduction and abduction of the hip
• Pt. Position: o Supine, both legs flexed and feet flat for supporto Both feet should be parallel or near to each other
• Procedure: o The pt. hold and keep the unaffected knee in midpositiono The pt. should not move the unaffected when the affected limb
perform small movement of adduction and abduction alternatelyo At first, he may have difficulty in reversing the movement
especially if the leg fall outwards into abductiono When he can control the movement, the affected leg will be keep
to midline while moving the unaffected into adduction and abduction
Control of adduction and abduction of the hip
o The independent holding of the affected leg when moving the sound one is very important for later walking
o As otherwise there will be no control and fixation of the affected leg at the hip when making a step with the sound leg
o Same maneuver can be practiced later on with the pelvis raised off the support
o If this is possible and done well, the patient can next lift one foot off the bed or plinth and support himself only on the other, but when he lifts the sound leg
o His pelvis should be level and not allowed to drop on the affected side

Preparing for walking without circumduction
• Pt. Position:o Supine, affected limb hip extended, knee flexed,
foot DF and pronation–Procedure:
o The pt. can use the foot to push the pelvis forward towards the unaffected side
o Then, move the affected leg across the unaffected with the medial border of the foot touching a wall
o Then perform selective flexion and extension of the knee while moving the foot up and down

Trunk Balance in Sitting

Side Leaning on the affected side
• Pt. Positiono Sitting, arm abducted in lateral rotation, extended
elbow, hand extended, wrist and fingers are extended if possible
• Physical Therapisto Standing on the affected side of the pt.o PT will raise the pt. shoulder girdle supporting it
under the axilla

Side Leaning on the affected side
• Procedureo Flex the head laterally to the unaffected side lean
towards the therapist and straighten up to mid-position
o Lean towards the therapist and straighten up to mid-position
o Don’t let the pt. lean backwards when moving to the affected side
o Shoulder girdle should be kept raised by the PT

Side Leaning on the affected side
• Pt. Positiono Sitting, pt.’s hand placed on the support some
distance away from the body• Physical therapist
o Holding the hand firmly while the other hand lifting the shoulder girdle up

Side Leaning on the affected side
• Procedureo Ask the patient to move his trunk towards the
therapisto Help the patient to take weight on his affected
side with his forearm, hands clasped, or being flat down by his unaffected hand or the therapist’s hand
o If he feels insecure, keep raising the shoulder girdle or keeping the head laterally flexed to the unaffected side

WORKING FOR EXTENDED ARM SUPPORT IN SITTING

WORKING FOR EXTENDED ARM SUPPORT IN SITTING
• The practice of support and weightbearing on extended arm is important for two reasons:
> Extension, with outward rotation, abduction and supination counteracts flexor spasticity which is associated with inward rotation, pronation and retraction of the shoulder. Weightbearing on the extended arm activates the extensor muscles in a much needed functional pattern.
>Weightbearing on the extended arm is part of the process of gaining balance and makes the patient feel sufficiently safe to bear weight on the affected side without fear of falling over.
Weightbearing can be pratice in the ff. ways:
position of pt.: SITTING with AFFECTED limb on the side. (important reminder: to avoid IR of the arm, pt's hand should be sideward or even diagonal backwards with fingers extended)
• TRAINING A: pt hand is placed on the support, some distance away from his body
> pt SH girdle is lifted & supported under the PT's axilla > pt moves his trunk over his supporting arm (*transferring most of his weight on affected hip) when pt can maintain elbow extension without help, PT can put a downward pressure on the shoulder to extension activity & stability. >Then ask pt to perform selective movements of elbow (eg. slight flexion alternating c full extension.)

TRAINING B: If flexor spasticity is very strong and pt cant keep his arm extended by his side
PT stands behind the patient > move the pt’s arm backward in extension & full ER > move the arm backward, lift them off the support while the pt slowly moves his hips forward > PT will gently push & pull the arm to stimulate pt's active extension.

Initial Flaccid stage:Controlling the arm at the shoulder
Presented by : Arnaiz, Pauline
Villas, Karl

Initial flaccid stage:“Controlling the arm at the shoulder”
MOBILIZING THE SHOULDER GIRDLE It is easier for the patient to get control of his shoulder girdle and
arm in supine than in sitting, because when the hips are flexed, the tendency to flexor spasticity is increased.
Mobility of the scapula is important not only to obtain movements of the arm at the shoulder, but also to prevent shoulder pain. Spasticity of the Rhomboids, Trapezius and Latissimus prevents the
inferior angle of the scapula from turning outwards and upwards when the arm is raised.
Mobilizing the shoulder girdle can be done best in supine, but can also be done in side-lying on the sound side. The aim is to make the painless elevation of the arm possible.

A. INHIBITION OF THE HYPERACTIVE SHOULDERInhibition of the hyperactive shoulder flexor and depressors prepared the patient to attempt independent movement of the shoulder girdle such as shrugging.
B. Mobilizing the shoulder girdle in sidelying and supine position:-The patient's arm is supported by the therapist with his elbow extended and in external rotation. -She uses both hands to move his shoulder girdle upwards, forward and downward, but avoids moving it backwards as this reinforces retraction of the scapula. -The patient's head should be laterally flexed towards the sound side. If shoulder retraction is very strong, the procedure can be done in side-lying on the sound side. The shoulder girdle is then more easily brought forward (Figs. 6.17a, b, c, d).
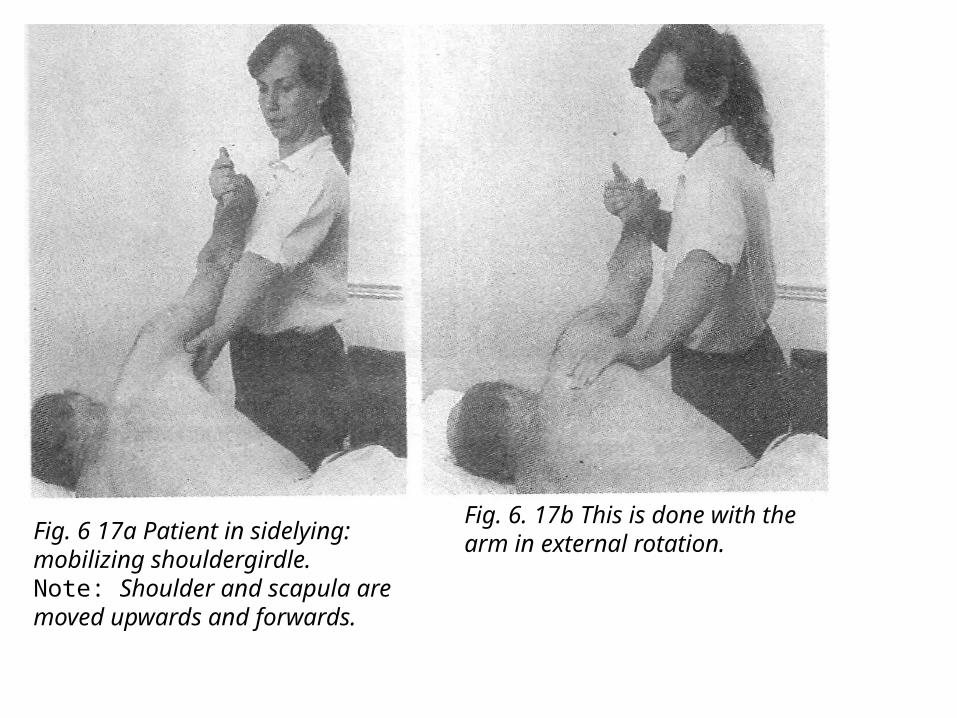
Fig. 6 17a Patient in sidelying:mobilizing shouldergirdle.Note: Shoulder and scapula aremoved upwards and forwards.
Fig. 6. 17b This is done with the arm in external rotation.

Fig. 6. 17c Patient in supine: mobilizing shoulder girdle forward and upwards with arm in extension and supination.
Fig. 6.17d This is followed by elevating arm and placing palm of hand against wall.Note: Abduction of thumb.

C. Elongation of the affected side:-Another way of mobilizing the shoulder girdle is to extend the patient's arm above his head, with his hand held firmly in this position, the arm in external rotation. He is then asked to turn over into side- and prone-lying.
-Moving the trunk against the limb is reducing spasticity more effectively than pulling the arm against the trunk. The whole of the affected side becomes maximally elongated. In this way, using rotation, the patient counteracts his flexor spasticity actively (Figs. 6.l8a, b, c, d).
-When resistance to moving the shoulder girdle is no longer present, the therapist gradually raises the extended arm in supine, using some traction and keeping the shoulder well forward.

Fig. 6. 18a Shoulder retraction makespatient start movement from the pelvis.
Fig. 6.18b Therapist now helps patientby mobilizing shoulder girdle and trunkand bringing it forward

Fig. 6.18c Note: Elongation of the.whole of the affected side as theturning movement goes on.
Fig. 6. 18d Movement almost completed.Note: Elongation of affected sidemaintained throughout.

D. If pain occurs during upward movement of the affected limb:
-At the first indication of shoulder pain, the upward movement must be stopped and the arm slightly lowered again. Shoulder pain occurs when the patient pulls the scapula back and downwards.
-The arm is then slowly moved up again until full elevation has been obtained without pain. The whole pattern of the flexor synergy has to be counteracted by elongating the side of the trunk, by movement of the shoulder forward and upward, by external rotation of the arm, and by keeping the elbow and wrist extended, with the fingers also extended, if possible (Fig. 6.l9a).

-As soon as there is no resistance to the arm in full elevation, the patient is encouraged to extend his elbow actively, while his hand is still supported in extension. He is asked to push upwards against the therapist's hand. Alternate small movements of flexion and extension at the elbow are practised to obtain selective movements of the elbow (Fig. 6.19b).
-When the patient is able to do this, the therapist releases his hand and the patient tries to keep the arm up unaided and then to move it a little at the shoulder without letting it fall sideways or forward and down.

Fig. 6.19a Elevation of arm. This isdone with extension and externalrotation.
Fig. 6 19b The patient pushes intermittentlyupwards against thetherapist's hand with alternating slightand isolated flexion and extension ofelbow.

Stage of Spasticity
“Flaccid Stage”

• Most treatment during this stage is done in supine, but will have to be continued and progress towards sitting and standing.
• It is the stage wherein most patients with hemiplegia come for out-patient treatment.
• Spasticity usually develops in the flexor muscles of the UE, and the extensor muscles of the LE
• As spasticity develops, there is increasing resistance to certain passive movements.

Most affected muscles groups inUE
• Depressors of shoulder girdle and arm• Fixators and retractors of the scapula• Side-flexors of the trunk• Adductors and internal rotators of the arm• Flexors and pronators of the elbow and wrist • Flexors and adductors of the fingers

Affected muscle groups in LE
• Extensors of the hip, knee and ankle• Supinators of the feet

(+) SUBLUXATION
• Wearing of sling is supposed to push the humerus upwards mechanically and so prevent subluxation.
• As the arm is in flexion, adducted, pronated and internally rotated in the sling, flexor spasticity is reinforced.

a. Teaching a pt. to use the Bobath sling
• In the early stages, before the patient can use active extension--lifting and holding the arm up against gravity-- a temporary support may be given to the shoulder girdle to prevent long lasting stretch of the superior part of the capsule and supraspinatus
• the pt. will need this support when he is upright until such time as he can use the supraspinatus and deltoid to hold the humeral head in the glenoid fossa.
• Support should consist of a “cuff” applied to the upper arm and held by a figure-of-eight bandage.
• Small and soft foam rubber cushion is placed under the axilla to abduct the arm slightly. However, this may tend to displace the head of the humerus laterally.

• Pt. in upright position, support of the upper arm keeps it mobile and leaves the elbow free to extend.
• For flaccid pt. it is necessary to prevent the arm from hanging down, pt. could be made to put his hand into the pocket by his side.


To obtain extension of wrist and fingers:• a foam rubber “finger-spreader” can be used- abducts
fingers and thumb• Clasping the hands has the same effect as finger-spreader- it
reduces flexor spasticity and gives extension through abduction of fingers and thumb, and has the added advantage of keeping the forearm in supination.

• When pt. does not need to use the sound limb for any task, he should sit with his fingers clasped.
• The pt. then sees both his arms and hands in front of him and get the feeling of bilaterality.
• The affected arm then looks, and perhaps feels, more like the sound one and, therefore, becomes more acceptable as part of his body percept again.
• If possible, pt. should sit at a table or in wheelchair, with tray in front of him. So that his upper arm is supported and raised forward.

WEIGHT SHIFTING EXERCISE USING 3 CHAIRS

When standing up:• The affected foot is in front of the sound one
and all the weight is taken on the sound leg.• Pt. pushes himself up with the sound arm• He may hold the affected leg in extension and
external rotation• Swing the leg forward by lifting and pulling the
pelvis up on the affected side.

• Have pt sit on the middle chair • Affected foot should not be in front of the
sound one• Equal weight should be distributed on both
hips or more weight on the affected one• Have pt learn how to shift himself from one
chair to another• Find the center of a chair with his hips


CONTROL OF ADDUCTION AND ABDUCTION IN SITTING

a. Leg crossing exercise, (+) Difficulty in adduction and abduction
• When sitting, the patient carries more weight on the unaffected hip than on the affected one.
• The affected arm is flexed• If knee is flexed, the leg is more widely abducted than
the unaffected one.• If there is strong extensor spasticity, the knee is in
some degree of extension and the leg is adducted.• There is side flexion of the trunk• The shoulder on the affected side is held lower than
that on the unaffected side

• Have pt’s feet flat on the floor• Ask pt to perform adduction and abduction of the affected
leg• Pt should hold and keep sound knee stable and in mid
position (no movement during movements of the affected leg)

b. Leg Lifting exercise in sitting position (+ pressure downwards) while performing hip abd and add
• the effort used in lifting the stiffly extended leg in walking increases the flexor spasticity of the arm.• pt. uses his affected leg as a rigid “prop” (co-contraction) to
take his weight in standing and walking, for without extensor spasticity and co-contraction his leg will collapse• difficulty in lifting leg is due to extensor spasticity which
results to feeling of heaviness of the leg and downward pressure on the ball of the foot upon lifting passively

• passively flex the leg into full flexion and slowly lower it asking the pt to hold and control it until foot touches the ground without pressure

c. Knee bending while moving the foot backward
• in order to bend his knee, he has first to lift his leg with the knee extended until there is enough hip flexion to make flexion of the knee possible• the pt. cannot keep his foot on the support when bending his
leg and he should learn to do this from the beginning.• the lack of control over extension has a detrimental effect on
walking, as the pt. will drop his leg, or push it down when making a step.• the leg, and especially the ankle, is then stiff, the ball of the
foot touches the ground first and presses against it. • dorsiflexion of the ankle is lacking, making weight transfer
over the standing leg difficult or impossible, resulting in hyperextension of the knee

• pt. in short sitting position• ask the pt. to dorsiflex the affected foot• PT then passively move the foot backward under the chair
with the heel remaining on the ground

Stance Phase

Standing in Front of a Plinth• Patient is made to stand in front of a plinth with feet close
together• PT is standing at affected side of patient, with hands supporting
patient on the axilla to keep shoulder girdle raised, and with other hand supporting patient with wrist and elbow extended
• Patient is then asked to move hips towards affected side, transferring his whole weight towards affected side
• When patient feels safe, he is asked to make very small steps forward and backward well behind the affected one
• Patient should not bend his trunk forward and flex his hip, but keep it well extended, as this counteracts hyperextension of knee
• In this way, patient learns to transfer weight over the standing leg and to control every phase of it

Stance Phase Training with Knees in Flexed and Extended Position
• When patient is in step position, patient is asked to maintain his full weight and to balance on the affected leg with the sound foot in front
• Patient should then transfer his weight forward to the sound one, leaving the affected leg behind with the heel on the ground
• Patient’s greatest balance problems occur when he has to have his full weight on the affected leg while the sound one remains in front: patient tends to fall backwards if he flexes his hip on his weight bearing leg
• Small isolated movements of the knee alternating flexion with extension should be practiced to ensure mobility of weight bearing leg

Swing Phase

Knees in flexed and extended in prone position
• Patient lying on prone with leg lowered over the edge of the plinth, the hip fully extended an knee made to bed
• PT bends patient’s knee until there is no resistance in flexion
• He is then asked to hold it flexed and to maintain it in various degrees of flexion when the leg is gradually extended by the PT

Hip abduction and Adduction in Standing Position for Stepping Forward Without Circumduction
• The patient is asked to stand with his full weight on the sound leg, the affected one is slightly behind it then he is asked to relax and bend his affected knee, adduct his thigh and his foot should remain on the ground in pronation.
• Ask patient to make a step forward, however, there may still be some pressure of the toes against the ground which may produce a supination of the ankle and stiffening of the knee, the patient is forced to make a step with a stiff knee and plantiflexed foot, in order to not scrape the ground with his toes, he has to pull his pelvis upwards and circumduct his leg.
• Therefore, the PT will lift the patient’s foot of the ground and check for resistance to this movement then the patient is asked to lift his foot without pulling his pelvis upwards while the PT is controlling the foot to prevent supination

Hip abduction and Adduction in Standing Position for Stepping Forward Without Circumduction
• The patient should practice doing small alternating moment of flexion and extension of the knee, while keeping the toes on the ground.
• If the patient can do this without stiffening of the knee, he is now asked to step forward while the PT guides the foot by controlling the dorsiflexed foot

Trunk Twisting Exercises to Improve the Patient’s Gait
• Trunk twisting exercises is a good way to improve the gait of patients
• The patient is asked to stand on a small base of support and the feet parallel and rotate his pelvis or twist his trunk against his limbs for a few seconds then he is asked to take a step forward.
• When the walking pattern deteriorate the pelvis rotation is repeated before taking the next step

Walking Sideways
• It is usually easier for a patient to walk sideways on a line if PT wants him to move his knee, than to walk forwards or backwards, especially if he walks sideways towards the sound side
• The advantage when walking sideways towards the affected side is that he has to take full weight on to that leg
• However, PT should make sure that the patient does not place the affected foot in front of the line

STAGE OF RELATIVE RECOVERY
I. STEPPING POSITION

A. HEEL STEPPING TRAINING
- To train dorsiflexion of affected limb
- Position: Step-positon c sound foot forward

B. USING A TROLLEY (FORWARD, SIDEWAYS AND BACKWARDS)
- To practice swing phase of affected limb
- Position: Standing c affected foot on small trolley fitted c castors

C. MODIFICATION USING WEIGHING SCALES USING AFFECTED LEG
- To check and control pressure given on affected leg
- Position: Standing c affected foot on flat scale

D. 2 SCALES – TIPPING MOVEMENTS
- To see and control how much weight puts on each leg
- Position: Standing c both feet on 2 scales

TREATMENT IN PRONE-LYING AND KNEELING
• It is important that all patients be taught how to get up from the floor in case they fall at anytime.
• Tx in Four-foot kneeling ,Balancing on the affected knee, Kneel standing training and Half kneeling will help in practicing the to stand up from the floor and will make patients less afraid of falling.

Four-foot kneeling
1. From prone-lying, pt. will first bend the affected the leg then the sound leg.
2. Pt. will extend the affected elbow and hand placed flat on the ground with the fingers extended and thumb abducted then the sound arm.
Balancing on the affected knee
1. pt. get down on his hands and knees by first bending the affected leg and immediately putting weight on it.
2. Support the affected arms, elbow in extension, hand placed flat on the ground with the fingers extended and thumb abducted.
3. weight on the body should be well over the affected arm and leg.
4. Pt then made to rock forward and backward and from side to side, in order to obtain mobility and balance reactions.
5. The normal leg or arm is lift to support his weight on the affected side.


Kneel standing training
• Starting position: four-foot kneeling1. Raise the head and trunk so that pt. stands on their knees
only.If pt. is having difficulty in extending the hips especially the affected side:2. Pt’s arms are elevated in external rotation3. Hands are placed on the PT shoulders as she stands in front
of the PT.4. Pt’s stands by using affected side and move affected down to
the side held in extension at the elbow. PT support the hand and wrist in full extension.


Half-kneeling
1. Pt. stands by the side of a chair or stool with the affected knee resting on the seat.
2. pt. is asked to make small steps forward and backward with the sound leg.
Note: prevent flexor spasticity of the arm by controlling elbow and wrist extension at the side or above the head


Working for Independent Controlled Movement of the Elbow
Johnson N. SeeArt Joseph Valencia

A. In sideways, diagonal and forward position, lastly placing
Procedure:1. To begin with, the therapist holds the patient's hand with wrist and fingers extended, the thumb abducted.
2. The patient extends his elbow, pushing against the therapist's hand.
3. The therapist should be able to use some intermittent pressure to stimulate active extension.
4. Patient can now hold his elbow in full extension, therapist moves patient’s hand slowly sideways and down, but only as long as the patient is able to keep his elbow extended.

5. Patient is then asked to move his arm up again.
6. Gradually, the whole range of movement sideways for full horizontal abduction is performed.
7. The movement is then done diagonally forward, as long as external rotation can be maintained.
8. As a progression, the therapist holds the patient's fingers, but only lightly, to prevent the occurrence of flexion until eventually the therapist is able to take his hand away at various points of the downward movement, and the patient is able to control his arm at each stage.

B. Stimulating the flaccid arm
If the patient's arm is more flaccid than spastic, contraction of the deltoid for holding the arm up in horizontal abduction can be facilitated by :
Procedure:1. Suddenly and without warning dropping the arm, but letting
it fall only a little way down
2. Move it up again. (Letting it fall may produce a protective holding reaction through sudden stretch in the inner range of the Deltoid and supraspinatus)
The patient can then use this contraction immediately, i.e. before its effect has subsided, for lifting his arm up again.

C. Pull-push training• Another way of stimulating active extension of the flaccid arm is a
technique called 'pull push'. • This inhibits flexor spasticity
Procedure: 1. Place patient's hand in wrist and fingers extension2. Patient’s arm is also raised sideways to the horizontal, or above3. A quick pull followed by a push against his extended arm is given through his hand.4. This should be done with the patient's arms in any direction, sideways, forward and diagonally, and also gradually downwards. 5.When sufficient activation has been obtained at shoulder and elbow, the therapist lets go of the patient's hand and should hold his arm up unaided.

D. Functional movements of the elbow joint by
touching various body parts in different directionPosition:• In supine, or sitting
Procedure: 1. Patient is asked to bend his elbow to touch the top of his head with his
palm.
2. Followed by moving his hand to the opposite shoulder, then back again to his head.
3. He can also be instructed to touch the opposite ear and then move his hand to the shoulder and down the arm, as if washing himself. 4. Whenever the patient moves his hand downwards, he should be able to raise it again.

Position• Lying on the affected side.
Procedure:1. Pt’s. arm is extended and in full external rotation. 2. Shoulder should be placed well forward. 3. Ask patient to bend his elbow to bring his hand to his mouth, and then back to extend it again. 4. This movement of the elbow should be slow and controlled at every stage 5. The same movements can be practiced in supine 6. Pt’s. arm lying in horizontal abduction, or lower down by his side.7. Ask pt. to touch his shoulder with his supinated hand.

Position: • Sitting (Forearm resting on a table)
Procedure:1. Flexion of the elbow with supination brings
his hand to his mouth and to the opposite shoulder or ear.

Balance Reaction Training

On Affected Side• To improve balance reactions on the affected leg, the therapist
transfers the patient's weight well over to that leg. • Therapist stands by this side and holds his hand with his arm
abducted and extended. • Pt.'s shoulder girdle should be prevented from pulling
downward.

On Affected Side• Pt. should be encouraged to flex his head laterally towards the
sound side and his arm and leg on that side should lift and abduct. • When pt can do this well, he should be asked to perform small
alternate movements of flexion and extension of the knee of the affected leg.

Crossed Standing• When pt is standing with his legs crossed, they should be
externally rotated so that the toes of his feet point towards each other. • When the affected leg is in front, his hip is extended and
brought well forward. • Small movements of his hips from side to side, or with rotation,
can be done when he is safe enough to stand still and balance.

Crossed Standing• Pt. is then asked to bring the sound foot forward and across the
affected one. • Pt. should do this slowly so that he carries his full weight for as
long as possible on the affected leg. • The therapist must guard against hyperxtension of the knee at
the back, which can be done by bending it a little to touch the back of the sound knee.

Crossed Standing• The pt. should then bring the affected leg forward again and
across the sound one, but he should not abduct it more than absolutely necessary. • This movement is very useful, as the pt. has to bend his knee to
get the affected leg in front of the sound one without circumducting the hip.

Walking Backwards and Forwards• Walking backwards and forwards should be practised
alternately by making, for instance, a few steps backwards and then one or two steps forward. • When making a step backwards, the patient has to bend his
knee and then he need not pull his pelvis upward. • As soon as the toes touch the ground at the back, he should
gradually put his heel down before he puts weight on the leg.

Walking Backwards and Forwards• He should keep his hip well forward in extension; this prevents
hyperextension of the knee and gives full dorsiflexion of the ankle. • Weight transfer forward and backward is practised in between
making steps.

Walking Backwards and Forwards• When walking, the therapist is at the patient's affected side. • His arm is held in external rotation and extended by his side,
slightly diagonally backwards. • His wrist and fingers should be extended and his thumb
abducted. • Walking can also be practised with the therapist behind the
patient, holding both arms backward as described when sitting on a stool.

Walking Backwards and Forwards• The patient then walks and moves his hip well forward over his
foot before he makes a step with the sound leg. • When his weight is on the sound leg, he should stop for a
moment before making a step with the affected one, so that he has time to release his knee, drop his pelvis on the affected side, and stop himself from pushing his foot down to the ground. • He can then take a step forward.

TRUNK ROTATION TRAINING
Reyes, Jessie Marie D.

• Rotation of the pelvis and shoulder girdle is
necessary practice to improve coordination in
walking.
• Rotation of the shoulder girdle can first be
practiced by the patient in standing.
• He swings his arms from side to side rotating his
trunk and touching the opposite thigh with one
hand.
• To practice the same movement when walking, the
therapist stands in front of the patient and holds
him by both hands while she walks backwards.

• As the patient steps forward with, say, the right
leg, she swings both his arms diagonally towards
the right, the left arm well forward and across his
body so that he touches his right thigh.
• As the patient transfers his weight over the right
leg and makes a step with the left foot, the
therapist reverses the movement of his arms.
• The rhythmical swinging of the arms and the
rotation of his trunk helps to develop a more
normal walking pattern.

• The movement of his arms have to be well timed
to coincide with the patient's steps.
• The patient then continues this procedure
unaided.

• Another, and even better, way of introducing
rotation into the patient's walking pattern can be
done by the therapist standing behind him and
rotating his hips or shoulder girdle.
• If she wants to influence the movement of his
legs, it is better to rotate his pelvis; if she wants.
to work for more arm swinging, she rotates the
shoulder girdle.
• The therapist should avoid bringing one side
forward as a whole against the other.

• The patient should then perform rotation of the
pelvis when standing without the help of the
therapist and continue the movement when
walking.
• However, if he reverts to his former pattern of
walking, i.e. moving one whole side against the
other, he should stand still again, twisting his
pelvis a few times before walking again.


![[PPT]PRINCIPLES OF BOBATH APPROACH - · Web viewPRINCIPLES OF BOBATH APPROACH BY – GAJANAN BHALERAO What is Bobath therapy? Bobath therapy is an interdisciplinary approach to the](https://img.dokumen.tips/doc/110x75/5aadbe627f8b9a9c2e8eb866/pptprinciples-of-bobath-approach-viewprinciples-of-bobath-approach-by-.jpg)


