Embed Size (px)
Citation preview
1
Bladelogic
Patching AIX By ---
Sept. 2011
Bladelogic Application Server version 8.1, SLES 11, Oracle 10g
Overview of AIX Patching process ............................................................................................................. 2
AIX Patching Walkthrough: ........................................................................................................................ 3
Part A - Role-based Permissions ............................................................................................................ 3
Part B – Patch Downloader Utility ......................................................................................................... 3
Part C – Create offline Patch Repository ................................................................................................ 4
Part D – Setup XML configuration file .................................................................................................... 4
Part E – Download Patches to Patch Repository (offline mode) ......................................................... 7
Part G - Global Configuration Parameters ............................................................................................. 8
Part H - Create a patch catalog in Bladelogic ...................................................................................... 10
2
Overview of AIX Patching process The Patching process consists of the following steps
Define Role-Based Permissions (see part A)
Patch Download Utility (see part B)
Build an offline patch repository for AIX patches. (on AIX server) (see part C)
Configure XML config file to manage offline patch download (on AIX server) (see part D)
Download patches for AIX using 'offline mode' (on AIX server) (see Part E)
Download the Updates List (on AIX server) (see Part F)
Configure Global Configuration parameters (Bladelogic) (see part G)
Create a patch catalog to manage patches stored on the server (Bladelogic) (see part H)
Analyze the target servers to determine the payload that needs to be deployed to these
servers (Bladelogic) (see part I)
Roll out patches to servers that need to be patched. BMC BladeLogic Server Automation
creates BLPackages that contain the missing payload and Deploy Jobs that remediate
the target servers
Re-analyze your servers to ensure that each one is at the required patch level.
3
AIX Patching Walkthrough:
Part A - Role-based Permissions
Before you can create or update a catalog, you must be assigned a role that includes the necessary permissions. To facilitate division of responsibilities, you can assign permissions to one role or split them between several roles. If you are working as a Patch Administrator, make sure to give your Role the following authorizations PatchCatalog.* PatchSmartGroup.* WindowsSoftware.* SolarisSoftware.* AIXPatchSoftware.* LinuxSoftware.* Server.* ServerGroup.* Depot.* DepotFile.* DepotGroup.*
Part B – Patch Downloader Utility
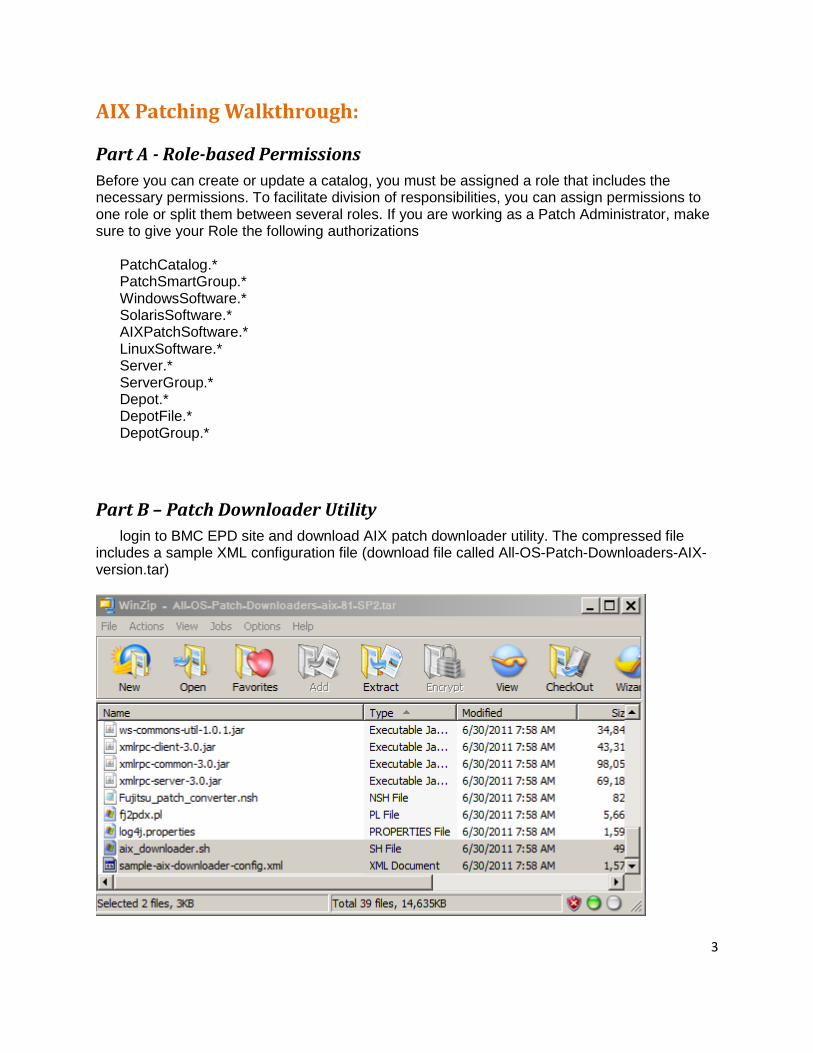
login to BMC EPD site and download AIX patch downloader utility. The compressed file includes a sample XML configuration file (download file called All-OS-Patch-Downloaders-AIX-version.tar)
4
Extract all files to a location on the AIX server that will act as the patch repository (for example, on the NIM server, the location can be /export/bmc/patches
Part C – Create offline Patch Repository
On the NIM server, create a new directory called /export/bmc/patches/repo
This will be the Patch Repository folder, make sure it has at least 50GB of space to hold the proper
patches
On your Bladelogic file server, create a new path that will serve as the Bladelogic patch repository
for example, //fileserver/opt/bmc/bladelogic/storage/patch/aix61/repo
Part D – Setup XML configuration file
Rename the sample-aix-downloader-config.xml (included in patch downloader .tar file) to aix-downloader-config.xml
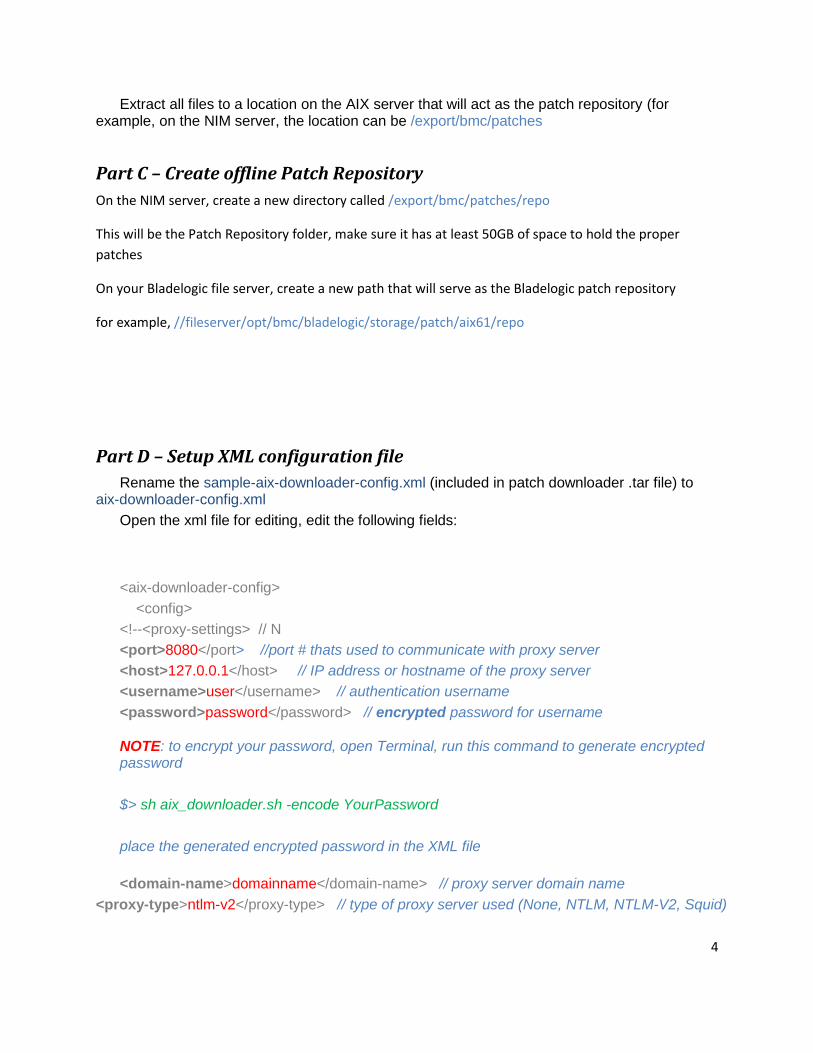
Open the xml file for editing, edit the following fields: <aix-downloader-config>
<config>
<!--<proxy-settings> // N
<port>8080</port> //port # thats used to communicate with proxy server
<host>127.0.0.1</host> // IP address or hostname of the proxy server
<username>user</username> // authentication username
<password>password</password> // encrypted password for username NOTE: to encrypt your password, open Terminal, run this command to generate encrypted password
$> sh aix_downloader.sh -encode YourPassword
place the generated encrypted password in the XML file
<domain-name>domainname</domain-name> // proxy server domain name
<proxy-type>ntlm-v2</proxy-type> // type of proxy server used (None, NTLM, NTLM-V2, Squid)
5
</proxy-settings>-->
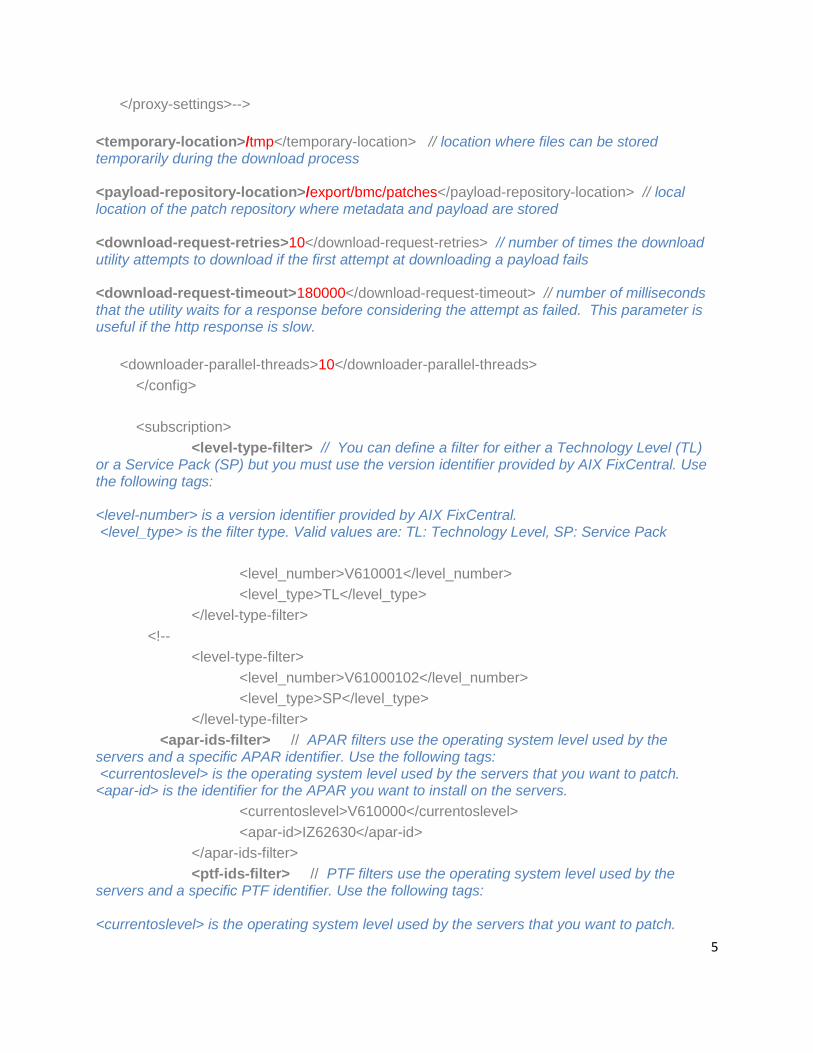
<temporary-location>/tmp</temporary-location> // location where files can be stored temporarily during the download process <payload-repository-location>/export/bmc/patches</payload-repository-location> // local location of the patch repository where metadata and payload are stored <download-request-retries>10</download-request-retries> // number of times the download utility attempts to download if the first attempt at downloading a payload fails <download-request-timeout>180000</download-request-timeout> // number of milliseconds that the utility waits for a response before considering the attempt as failed. This parameter is useful if the http response is slow.
<downloader-parallel-threads>10</downloader-parallel-threads>
</config>
<subscription>
<level-type-filter> // You can define a filter for either a Technology Level (TL) or a Service Pack (SP) but you must use the version identifier provided by AIX FixCentral. Use the following tags: <level-number> is a version identifier provided by AIX FixCentral. <level_type> is the filter type. Valid values are: TL: Technology Level, SP: Service Pack
<level_number>V610001</level_number>
<level_type>TL</level_type>
</level-type-filter>
<!--
<level-type-filter>
<level_number>V61000102</level_number>
<level_type>SP</level_type>
</level-type-filter>
<apar-ids-filter> // APAR filters use the operating system level used by the servers and a specific APAR identifier. Use the following tags: <currentoslevel> is the operating system level used by the servers that you want to patch. <apar-id> is the identifier for the APAR you want to install on the servers.
<currentoslevel>V610000</currentoslevel>
<apar-id>IZ62630</apar-id>
</apar-ids-filter>
<ptf-ids-filter> // PTF filters use the operating system level used by the servers and a specific PTF identifier. Use the following tags: <currentoslevel> is the operating system level used by the servers that you want to patch.
6
<ptf-id> is the identifier for the PTF you want to install on the servers.
<currentoslevel>V520000</currentoslevel>
<ptf-id>U497901</ptf-id>
</ptf-ids-filter>
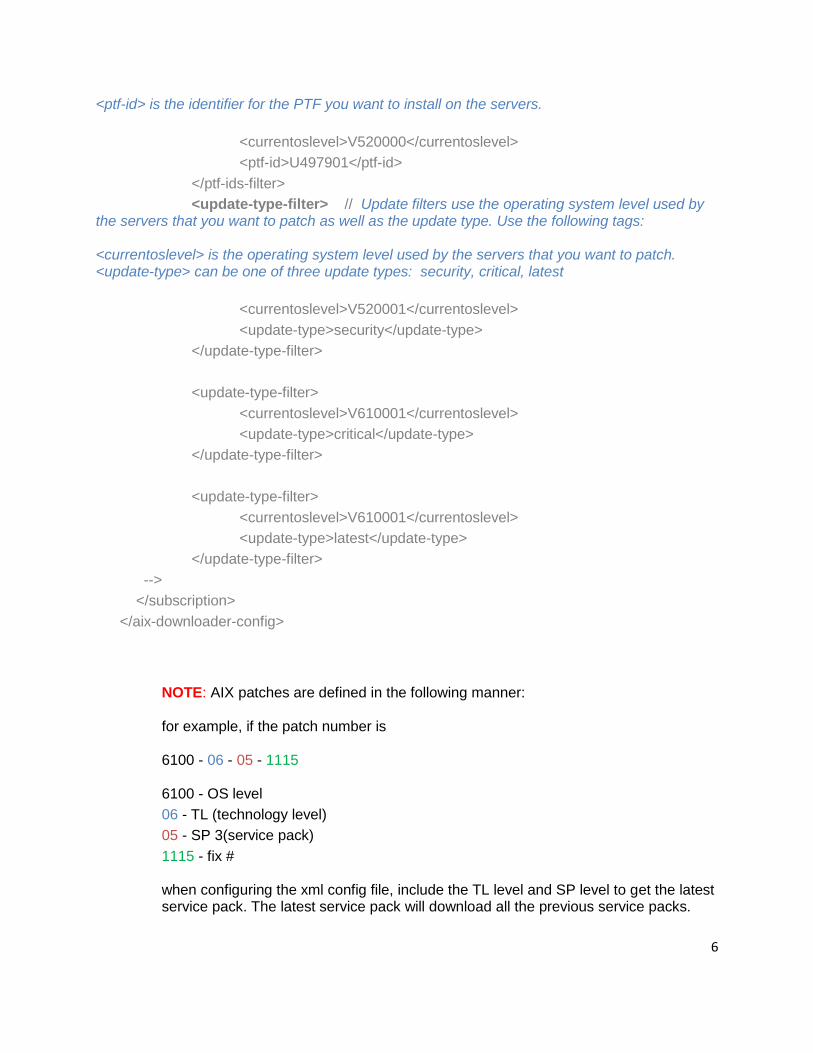
<update-type-filter> // Update filters use the operating system level used by the servers that you want to patch as well as the update type. Use the following tags: <currentoslevel> is the operating system level used by the servers that you want to patch. <update-type> can be one of three update types: security, critical, latest
<currentoslevel>V520001</currentoslevel>
<update-type>security</update-type>
</update-type-filter>
<update-type-filter>
<currentoslevel>V610001</currentoslevel>
<update-type>critical</update-type>
</update-type-filter>
<update-type-filter>
<currentoslevel>V610001</currentoslevel>
<update-type>latest</update-type>
</update-type-filter>
-->
</subscription>
</aix-downloader-config>
NOTE: AIX patches are defined in the following manner: for example, if the patch number is 6100 - 06 - 05 - 1115 6100 - OS level
06 - TL (technology level)
05 - SP 3(service pack)
1115 - fix # when configuring the xml config file, include the TL level and SP level to get the latest service pack. The latest service pack will download all the previous service packs.

7
Save the XML file. Place the XML file into /export/bmc/patches directory
Part E – Download Patches to Patch Repository (offline mode)
Open the Terminal, cd to /export/bmc/patches and run the following
sh aix_downloader.sh -configFile "downloaderConfigurationFilePath+ConfigFileName" quotations
around path are required)
$> ./aix_downloader.sh -configFile "/export/bmc/patches/aix-downloader-config.xml"
Patches will be downloaded to the patch repository
Part F – Download the Updates List Open the Terminal, cd to /export/bmc/patches and run the following
sh aix_downloader.s h -configFile "downloaderConfigurationFilePath+ConfigFileName"
-generateUpdateList "updatesFilePath"
$> ./aix_downloader.sh -configFile "/export/bmc/patches/aix-downloader-config.xml" -
generateUpdateList "/export/bmc/patches/updatesList"
After the Updates File is created, login to Bladelogic console and add this file into the Depot as a 'File'.
8
Part G - Global Configuration Parameters
Global configuration parameters provide basic information that is automatically supplied as the default
during catalog creation and update as well as during Patching and Remediation Job creation.
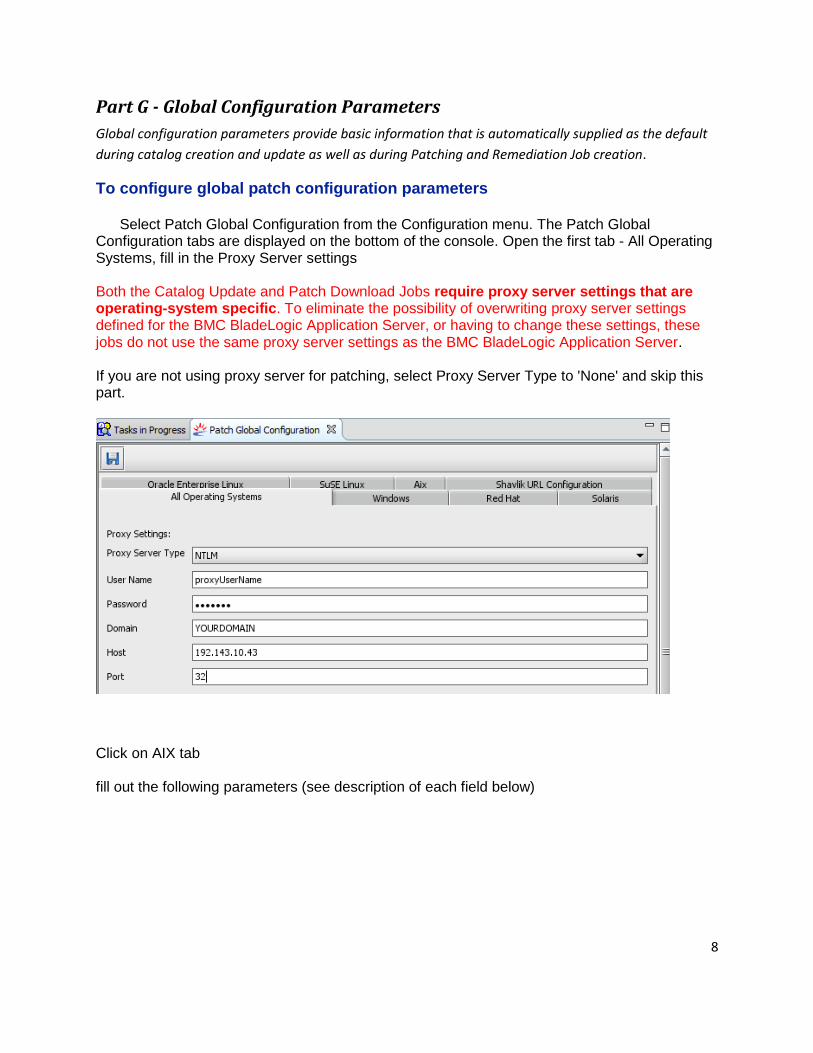
To configure global patch configuration parameters Select Patch Global Configuration from the Configuration menu. The Patch Global Configuration tabs are displayed on the bottom of the console. Open the first tab - All Operating Systems, fill in the Proxy Server settings Both the Catalog Update and Patch Download Jobs require proxy server settings that are operating-system specific. To eliminate the possibility of overwriting proxy server settings defined for the BMC BladeLogic Application Server, or having to change these settings, these jobs do not use the same proxy server settings as the BMC BladeLogic Application Server. If you are not using proxy server for patching, select Proxy Server Type to 'None' and skip this part.
Click on AIX tab fill out the following parameters (see description of each field below)
9
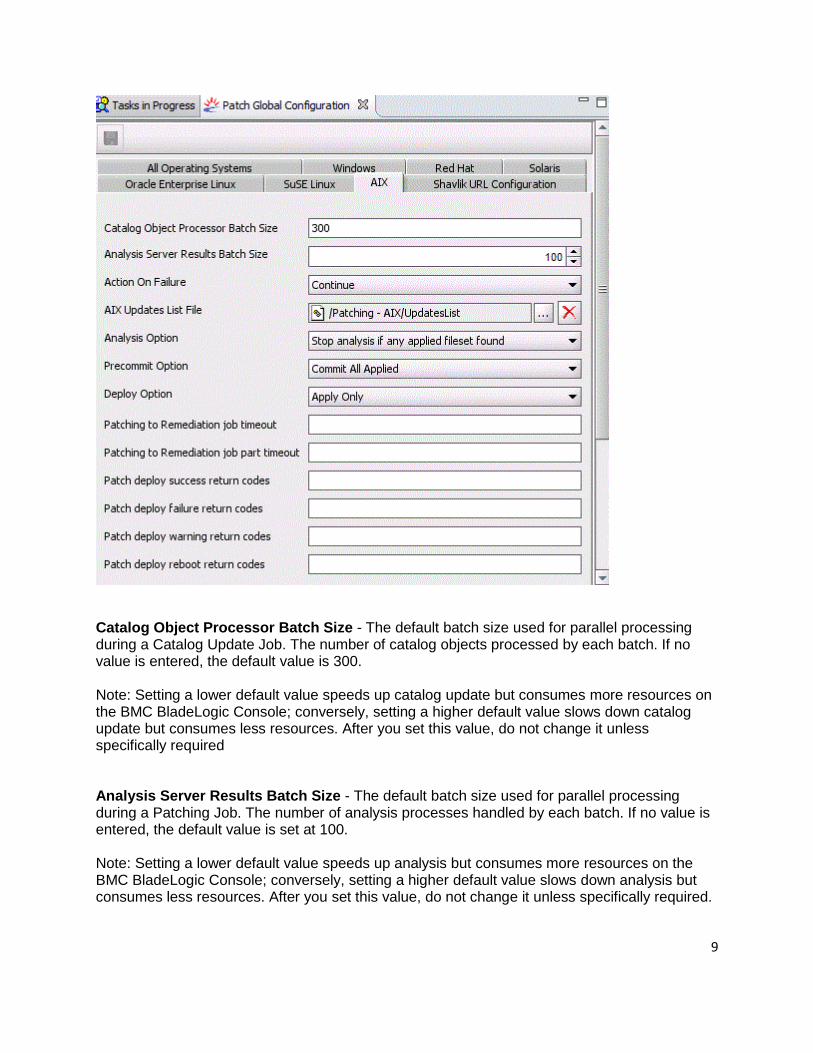
Catalog Object Processor Batch Size - The default batch size used for parallel processing during a Catalog Update Job. The number of catalog objects processed by each batch. If no value is entered, the default value is 300. Note: Setting a lower default value speeds up catalog update but consumes more resources on the BMC BladeLogic Console; conversely, setting a higher default value slows down catalog update but consumes less resources. After you set this value, do not change it unless specifically required
Analysis Server Results Batch Size - The default batch size used for parallel processing during a Patching Job. The number of analysis processes handled by each batch. If no value is entered, the default value is set at 100. Note: Setting a lower default value speeds up analysis but consumes more resources on the BMC BladeLogic Console; conversely, setting a higher default value slows down analysis but consumes less resources. After you set this value, do not change it unless specifically required.
10
AIX Updates List File - File generated in Part F (select it from the Depot) Analysis Option - Select one of following: Stop Analysis if any applied fileset found: Select to stop analysis if any fileset is found in the applied state on a target server. Analysis ends on that server but continues on all other target servers included in the Patching Job if the servers do not have filesets in the applied state. This option can also be set for an individual Patching Job. Continue Analysis if any applied fileset found : Analysis continues even if a fileset in the applied state is found on the target server. Precommit Option - Select one of the following actions: Commit All Applied: Changes the state of all currently installed filesets from Applied to Commit. None: The state of all currently installed filesets in the Applied state does not change. Deploy Option - Select one of the following actions: Apply and Commit: During deployment, all filesets for the target server are installed in the Commit state. Apply Only: During deployment, all filesets for the target server are installed in the Apply state. Patching to Remediation job timeout Defines a job timeout ratio, patching to remediation, applied to Remediation Jobs created by the Patching Job (if create remediation artifacts is selected as a job option). The ratio is defined using the format x:y; BMC recommends that x > y. In most cases, we recommend that you not change the default value which is set at zero for both sides of the ratio. Patching to Remediation job part timeout - Defines the work item timeout ratio, patching to remediation, applied to Remediation Jobs created by the Patching Job (if create remediation artifacts is selected as a job option). The ratio is defined using the format x:y; BMC recommends that x > y. In most cases, we recommend that you not change the default value, which is set at zero for both sides of the ratio.
Part H - Create a patch catalog in Bladelogic
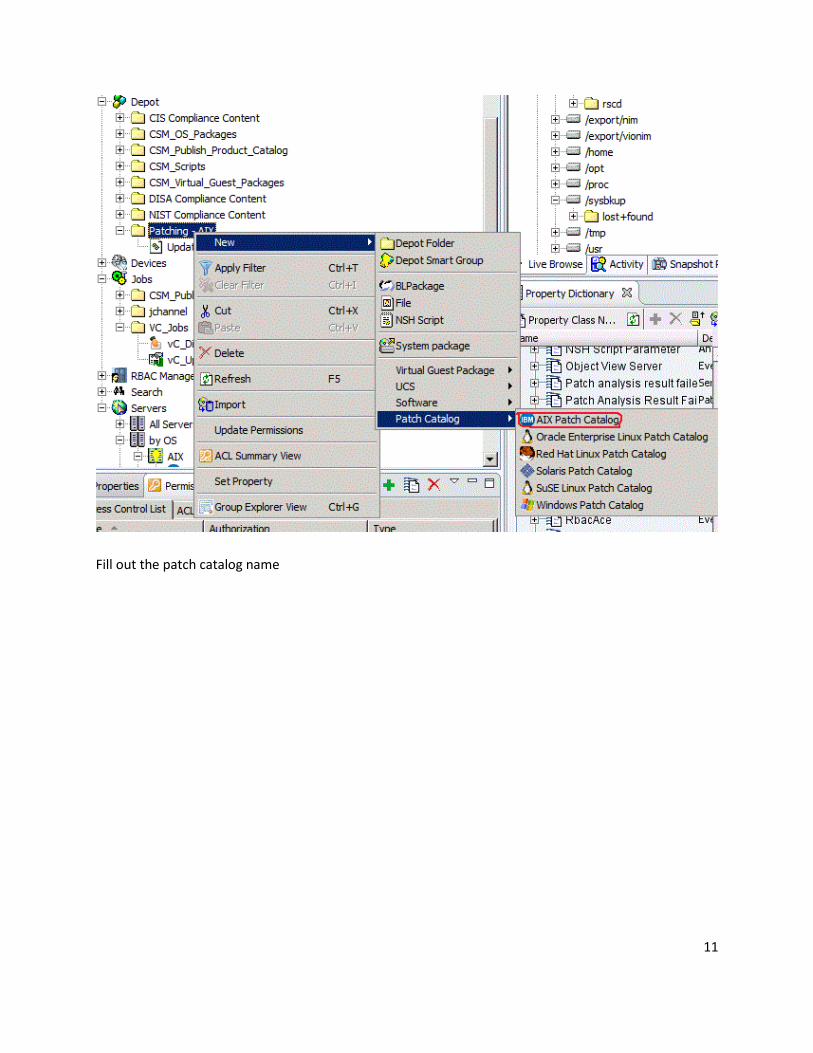
In Bladelogic console, right click on a folder in Depot > New Patch Catalog > AIX Patch Catalog
11
Fill out the patch catalog name
12
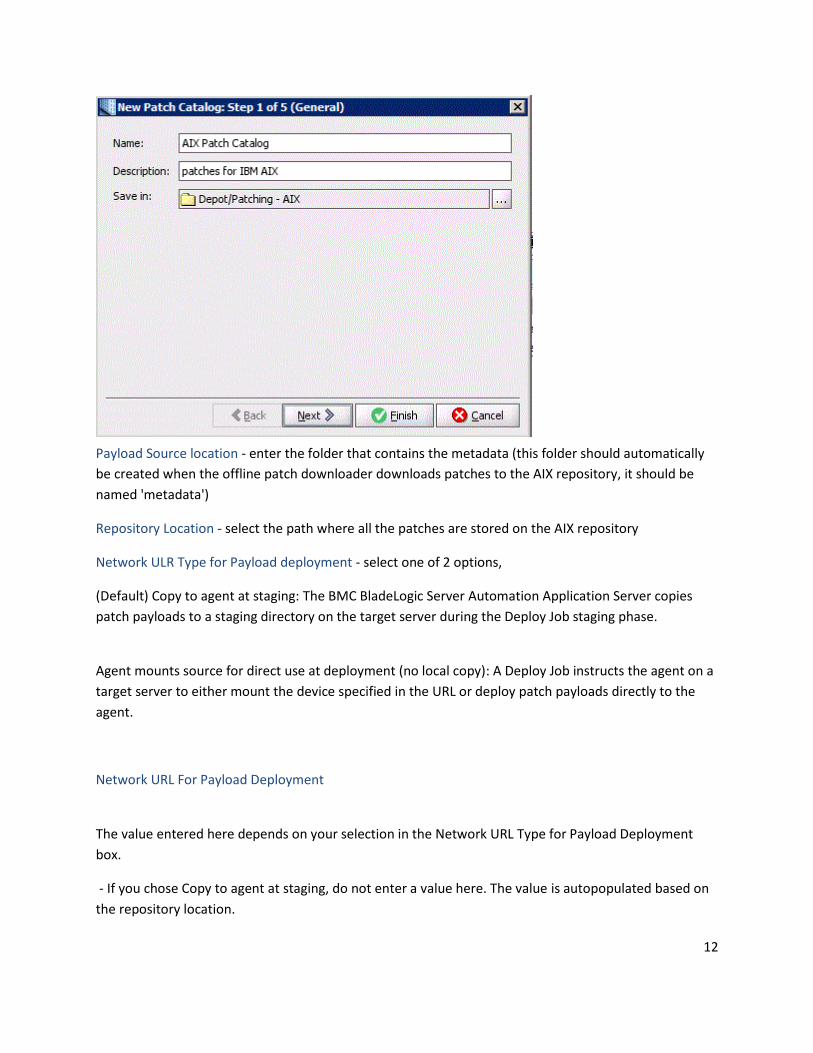
Payload Source location - enter the folder that contains the metadata (this folder should automatically
be created when the offline patch downloader downloads patches to the AIX repository, it should be
named 'metadata')
Repository Location - select the path where all the patches are stored on the AIX repository
Network ULR Type for Payload deployment - select one of 2 options,
(Default) Copy to agent at staging: The BMC BladeLogic Server Automation Application Server copies
patch payloads to a staging directory on the target server during the Deploy Job staging phase.
Agent mounts source for direct use at deployment (no local copy): A Deploy Job instructs the agent on a
target server to either mount the device specified in the URL or deploy patch payloads directly to the
agent.
Network URL For Payload Deployment
The value entered here depends on your selection in the Network URL Type for Payload Deployment
box.
- If you chose Copy to agent at staging, do not enter a value here. The value is autopopulated based on
the repository location.
13
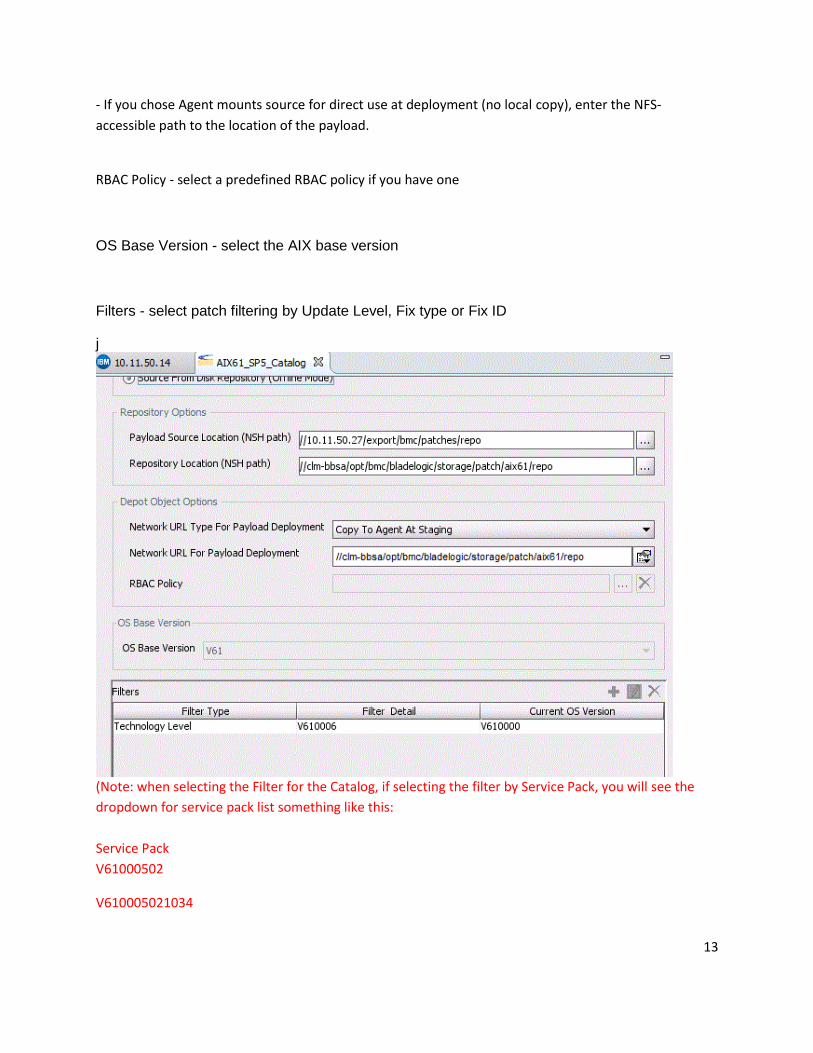
- If you chose Agent mounts source for direct use at deployment (no local copy), enter the NFS-
accessible path to the location of the payload.
RBAC Policy - select a predefined RBAC policy if you have one
OS Base Version - select the AIX base version
Filters - select patch filtering by Update Level, Fix type or Fix ID
j
(Note: when selecting the Filter for the Catalog, if selecting the filter by Service Pack, you will see the
dropdown for service pack list something like this:
Service Pack
V61000502
V610005021034
14
V61000503
V610005031036
V61000504
V610005041048
only use SP #s that do not have extra digits, so only use V61000502, not V610005021034
the SPs with long digits will fail when you run the offline downloader. So only use the shorter
digit names if filtering the catalog by SP #
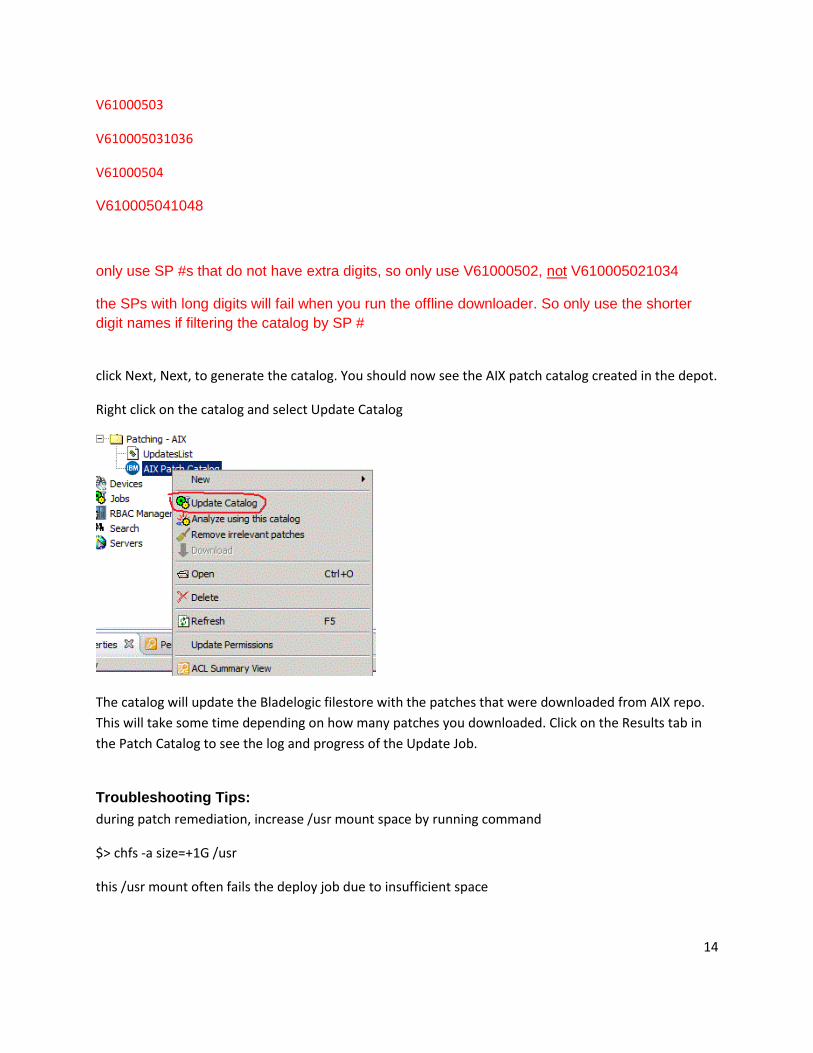
click Next, Next, to generate the catalog. You should now see the AIX patch catalog created in the depot.
Right click on the catalog and select Update Catalog
The catalog will update the Bladelogic filestore with the patches that were downloaded from AIX repo.
This will take some time depending on how many patches you downloaded. Click on the Results tab in
the Patch Catalog to see the log and progress of the Update Job.
Troubleshooting Tips:
during patch remediation, increase /usr mount space by running command
$> chfs -a size=+1G /usr
this /usr mount often fails the deploy job due to insufficient space