Embed Size (px)
DESCRIPTION
Bizhub C6500 AdminRefUserGuide
Citation preview

Contents
1 Introduction
1.1 Composition of User’s Guide .......................................................... 1-4
1.2 Machine Status Screen Setting Outlines ........................................ 1-5
1.3 Utility Screen Setting Outlines ........................................................ 1-8
2 Paper Setting
2.1 Paper Setting Outlines ..................................................................... 2-3
2.1.1 Setting Items in Paper Setting ....................................................... 2-3
2.1.2 Paper Type Specifications ............................................................. 2-5
2.2 Register Paper Type/Weight ............................................................ 2-8
2.3 Delete Paper Setting ...................................................................... 2-16
3 Adjustment
3.1 01 Machine Adjustment ................................................................... 3-3
3.1.1 01 Printer Adjustment \ 01 Restart Timing Adjustment ................. 3-3
3.1.2 01 Printer Adjustment \ 02 Centering Adjustment ......................... 3-6
3.1.3 01 Printer Adjustment \ 03 FD-Mag. Adjustment ........................... 3-8
3.1.4 01 Printer Adjustment \ 04 CD-Mag. Adjustment ........................ 3-11
3.1.5 02 Scanner Adjustment \ 01 Restart Timing Adjustment ............. 3-13
3.1.6 02 Scanner Adjustment \ 02 Centering Adjustment .................... 3-15
3.1.7 02 Scanner Adjustment \ 03 FD-Mag. Adjustment ...................... 3-17
3.2 02 Image Quality Stability .............................................................. 3-19
3.3 03 Execute Adjust Operation ......................................................... 3-20
3.4 04 Finisher Adjustment (FS-503) ................................................... 3-21
3.4.1 01 Stapler Position Adj. \ 01 Staple Center Position ................... 3-21
3.4.2 01 Stapler Position Adj. \ 02 Paper Width (Staple) ...................... 3-24
3.4.3 01 Stapler Position Adj. \ 03 Paper Width (Straight) .................... 3-27
3.5 04 Finisher Adjustment (FD-501) ................................................... 3-30
3.5.1 02 Multi Folder (Punch) Adj. \ 01 Paper Width Adjustment ......... 3-30
3.5.2 02 Multi Folder (Punch) Adj. \ 02 Hole-Punch Vertical Pos. ........ 3-32
3.5.3 03 Multi Folder (Fold) Adj. \ 01 Half Fold Position Adj. ................ 3-35
bizhub PRO C6500 Contents-1
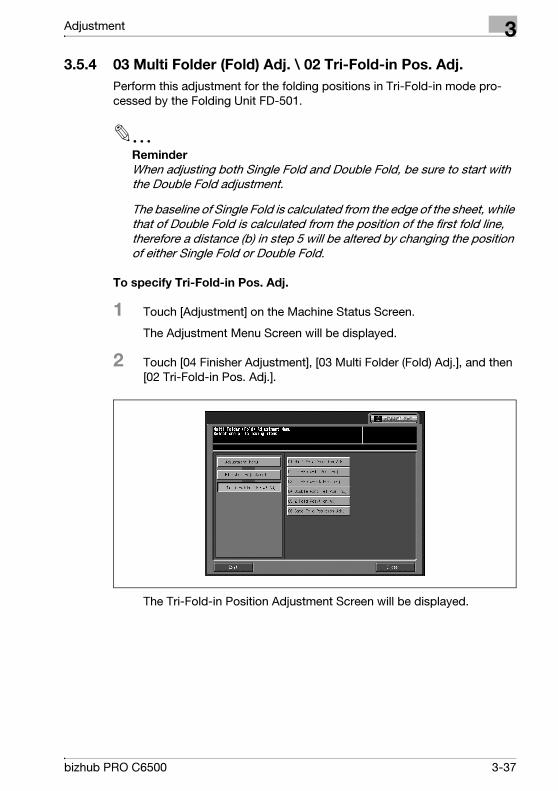
3.5.4 03 Multi Folder (Fold) Adj. \ 02 Tri-Fold-in Pos. Adj. ....................3-37
3.5.5 03 Multi Folder (Fold) Adj. \ 03 Tri-Fold-out Pos. Adj. ..................3-40
3.5.6 03 Multi Folder (Fold) Adj. \ 04 Double Parallel Pos. Adj. .............3-43
3.5.7 03 Multi Folder (Fold) Adj. \ 05 Z-Fold Position Adj. .....................3-46
3.5.8 03 Multi Folder (Fold) Adj. \ 06 Gate Fold Position Adj. ................3-49
3.6 04 Finisher Adjustment (LS-501) ....................................................3-52
3.6.1 05 Stacker Adjustment \ 01 Paper Width Adjustment ..................3-52
3.6.2 05 Stacker Adjustment \ 02 Paper Length Adjustment ................3-54
3.7 04 Finisher Adjustment (SD-501) ....................................................3-56
3.7.1 06 Saddle Stitcher Adj. \ 01 Staple Center Adj. ............................3-56
3.7.2 06 Saddle Stitcher Adj. \ 02 Staple Paper Width Adj. ..................3-59
3.7.3 06 Saddle Stitcher Adj. \ 03 Staple Pitch Adjustment ..................3-62
3.7.4 06 Saddle Stitcher Adj. \ 04 Half Fold Position Adj. .....................3-64
3.7.5 06 Saddle Stitcher Adj. \ 05 Tri-Fold Position Adj. .......................3-66
3.7.6 06 Saddle Stitcher Adj. \ 06 Fold Paper Width Adj. ......................3-69
3.7.7 06 Saddle Stitcher Adj. \ 07 Trimming Adjustment ......................3-71
3.7.8 06 Saddle Stitcher Adj. \ 08 Trimming Receiver Adj. ....................3-73
3.8 04 Finisher Adjustment (RU-503/RU-504) .....................................3-75
3.8.1 07 RU Adjustment \ 01 Curl Reform Direction ..............................3-75
3.9 Finisher Adjustment (PB-501) .........................................................3-77
3.9.1 01 Cover Trimming Adjustment ....................................................3-77
3.9.2 02 Cover Lead Edge Adjustment ..................................................3-80
3.9.3 03 Spine Corner Forming Position Adjustment ............................3-82
3.9.4 04 Pasting Start Position Adjustment ...........................................3-84
3.9.5 05 Pasting Finish Position Adjustment .........................................3-86
3.9.6 06 Paste Formation Finish Position Adjustment ...........................3-88
3.9.7 07 Temperature Adjustment .........................................................3-90
3.9.8 08 Sub Compile CD Width Adjustment ........................................3-92
3.9.9 09 Clamp CD Width Adjustment ...................................................3-95
3.9.10 10 Cover Up/Down CD Width Adjustment ...................................3-98
3.9.11 11 Clamp FD Position Adjustment ..............................................3-100
3.10 Finisher Adjustment (FS-520/FS-607) ..........................................3-102
Contents-2 bizhub PRO C6500
3.10.1 01 Saddle Stitcher Stopper Adj. (FS-607 Only) ......................... 3-102
3.10.2 02 Half Fold Stopper Adjustment (FS-607 Only) ........................ 3-105
3.10.3 03 Punch Adjustment \ 01 Vertical Position Adj.
(FS-520/FS-607) ......................................................................... 3-107
3.10.4 03 Punch Adjustment \ 02 Horizontal Position Adj.
(FS-520/FS-607) ......................................................................... 3-109
3.10.5 03 Punch Adjustment \ 03 Registration Adjustment
(FS-520/FS-607) ......................................................................... 3-111
3.10.6 03 Punch Adjustment \ 04 Paper Edge Detect Sensor Adj.
(FS-520/FS-607) ......................................................................... 3-113
3.10.7 04 Tri-Fold Adjustment (FS-607 Only) ....................................... 3-114
3.10.8 05 2 Position Staple Pitch Adjustment (FS-607 Only) ............... 3-116
3.10.9 06 Paper Inserter Tray Size Adj. (FS-520/FS-607) ..................... 3-118
3.10.10 07 Output Quantity Limit (FS-520/FS-607) ................................ 3-120
3.10.11 08 Curl Adjustment (FS-520/FS-607) ......................................... 3-121
4 Utility Screen Outlines
4.1 Chart of Setting Items on Utility Screen ......................................... 4-4
4.2 Function List of User Setting ......................................................... 4-11
4.3 Function List of Machine Administrator Setting .......................... 4-18
5 User Setting
5.1 User Setting Outlines ....................................................................... 5-3
5.2 01 System Setting ............................................................................. 5-6
5.2.1 01 Language Setting ...................................................................... 5-6
5.2.2 02 Unit Setting ............................................................................... 5-8
5.2.3 03 Feed Tray Setting \ 01 Paper Setting ........................................ 5-9
5.2.4 03 Feed Tray Setting \ 02 Paper Feed Auto Selection ................. 5-10
5.2.5 03 Feed Tray Setting \ 03 ATS Permit Setting ............................. 5-12
5.2.6 03 Feed Tray Setting \ 04 Auto Paper Type ................................. 5-13
5.2.7 03 Feed Tray Setting \ 05 Dehumidification Fan .......................... 5-15
5.2.8 04 Reset Setting \ 01 Auto Reset Setting .................................... 5-17
5.2.9 04 Reset Setting \ 02 Mode Reset Setting .................................. 5-19
5.2.10 05 Default Screen Setting ............................................................ 5-22
5.2.11 06 Preset Zoom Setting ............................................................... 5-24
bizhub PRO C6500 Contents-3
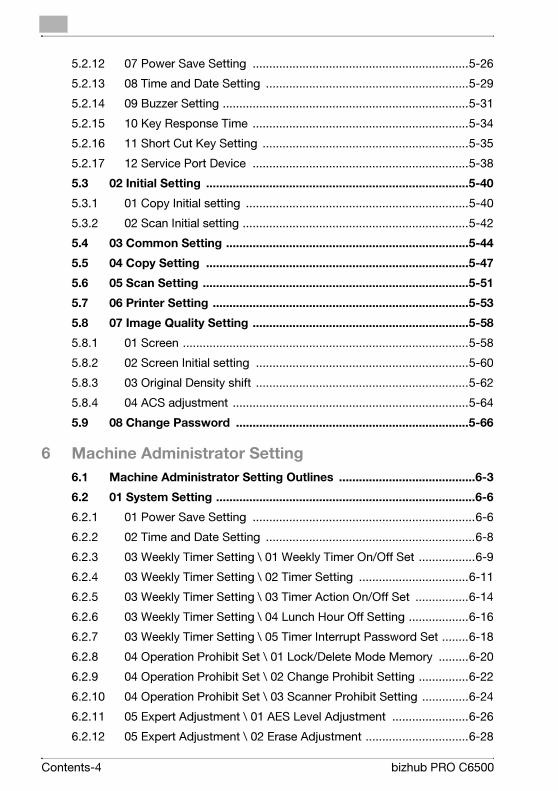
5.2.12 07 Power Save Setting .................................................................5-26
5.2.13 08 Time and Date Setting .............................................................5-29
5.2.14 09 Buzzer Setting ..........................................................................5-31
5.2.15 10 Key Response Time .................................................................5-34
5.2.16 11 Short Cut Key Setting ..............................................................5-35
5.2.17 12 Service Port Device .................................................................5-38
5.3 02 Initial Setting ...............................................................................5-40
5.3.1 01 Copy Initial setting ...................................................................5-40
5.3.2 02 Scan Initial setting ....................................................................5-42
5.4 03 Common Setting .........................................................................5-44
5.5 04 Copy Setting ...............................................................................5-47
5.6 05 Scan Setting ................................................................................5-51
5.7 06 Printer Setting .............................................................................5-53
5.8 07 Image Quality Setting .................................................................5-58
5.8.1 01 Screen ......................................................................................5-58
5.8.2 02 Screen Initial setting ................................................................5-60
5.8.3 03 Original Density shift ................................................................5-62
5.8.4 04 ACS adjustment .......................................................................5-64
5.9 08 Change Password ......................................................................5-66
6 Machine Administrator Setting
6.1 Machine Administrator Setting Outlines .........................................6-3
6.2 01 System Setting ..............................................................................6-6
6.2.1 01 Power Save Setting ...................................................................6-6
6.2.2 02 Time and Date Setting ...............................................................6-8
6.2.3 03 Weekly Timer Setting \ 01 Weekly Timer On/Off Set .................6-9
6.2.4 03 Weekly Timer Setting \ 02 Timer Setting .................................6-11
6.2.5 03 Weekly Timer Setting \ 03 Timer Action On/Off Set ................6-14
6.2.6 03 Weekly Timer Setting \ 04 Lunch Hour Off Setting ..................6-16
6.2.7 03 Weekly Timer Setting \ 05 Timer Interrupt Password Set ........6-18
6.2.8 04 Operation Prohibit Set \ 01 Lock/Delete Mode Memory .........6-20
6.2.9 04 Operation Prohibit Set \ 02 Change Prohibit Setting ...............6-22
6.2.10 04 Operation Prohibit Set \ 03 Scanner Prohibit Setting ..............6-24
6.2.11 05 Expert Adjustment \ 01 AES Level Adjustment .......................6-26
6.2.12 05 Expert Adjustment \ 02 Erase Adjustment ...............................6-28
Contents-4 bizhub PRO C6500
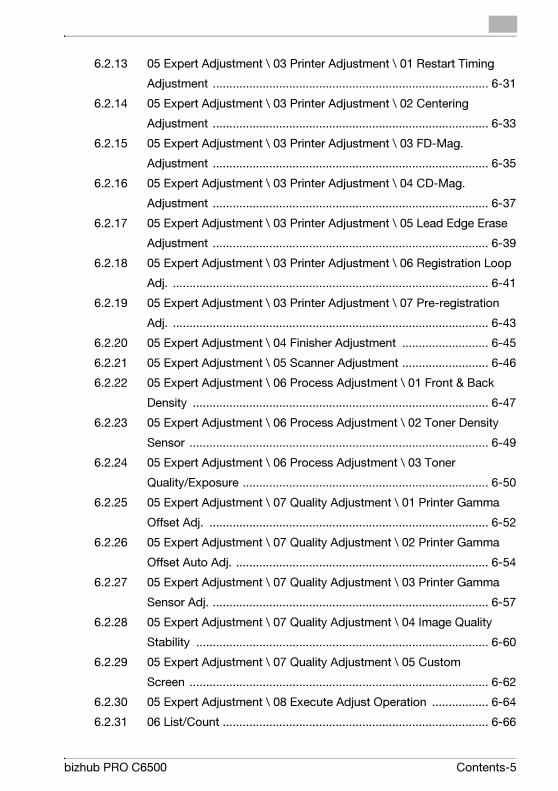
6.2.13 05 Expert Adjustment \ 03 Printer Adjustment \ 01 Restart Timing
Adjustment ................................................................................... 6-31
6.2.14 05 Expert Adjustment \ 03 Printer Adjustment \ 02 Centering
Adjustment ................................................................................... 6-33
6.2.15 05 Expert Adjustment \ 03 Printer Adjustment \ 03 FD-Mag.
Adjustment ................................................................................... 6-35
6.2.16 05 Expert Adjustment \ 03 Printer Adjustment \ 04 CD-Mag.
Adjustment ................................................................................... 6-37
6.2.17 05 Expert Adjustment \ 03 Printer Adjustment \ 05 Lead Edge Erase
Adjustment ................................................................................... 6-39
6.2.18 05 Expert Adjustment \ 03 Printer Adjustment \ 06 Registration Loop
Adj. ............................................................................................... 6-41
6.2.19 05 Expert Adjustment \ 03 Printer Adjustment \ 07 Pre-registration
Adj. ............................................................................................... 6-43
6.2.20 05 Expert Adjustment \ 04 Finisher Adjustment .......................... 6-45
6.2.21 05 Expert Adjustment \ 05 Scanner Adjustment .......................... 6-46
6.2.22 05 Expert Adjustment \ 06 Process Adjustment \ 01 Front & Back
Density ......................................................................................... 6-47
6.2.23 05 Expert Adjustment \ 06 Process Adjustment \ 02 Toner Density
Sensor .......................................................................................... 6-49
6.2.24 05 Expert Adjustment \ 06 Process Adjustment \ 03 Toner
Quality/Exposure .......................................................................... 6-50
6.2.25 05 Expert Adjustment \ 07 Quality Adjustment \ 01 Printer Gamma
Offset Adj. .................................................................................... 6-52
6.2.26 05 Expert Adjustment \ 07 Quality Adjustment \ 02 Printer Gamma
Offset Auto Adj. ............................................................................ 6-54
6.2.27 05 Expert Adjustment \ 07 Quality Adjustment \ 03 Printer Gamma
Sensor Adj. ................................................................................... 6-57
6.2.28 05 Expert Adjustment \ 07 Quality Adjustment \ 04 Image Quality
Stability ........................................................................................ 6-60
6.2.29 05 Expert Adjustment \ 07 Quality Adjustment \ 05 Custom
Screen .......................................................................................... 6-62
6.2.30 05 Expert Adjustment \ 08 Execute Adjust Operation ................. 6-64
6.2.31 06 List/Count ................................................................................ 6-66
bizhub PRO C6500 Contents-5
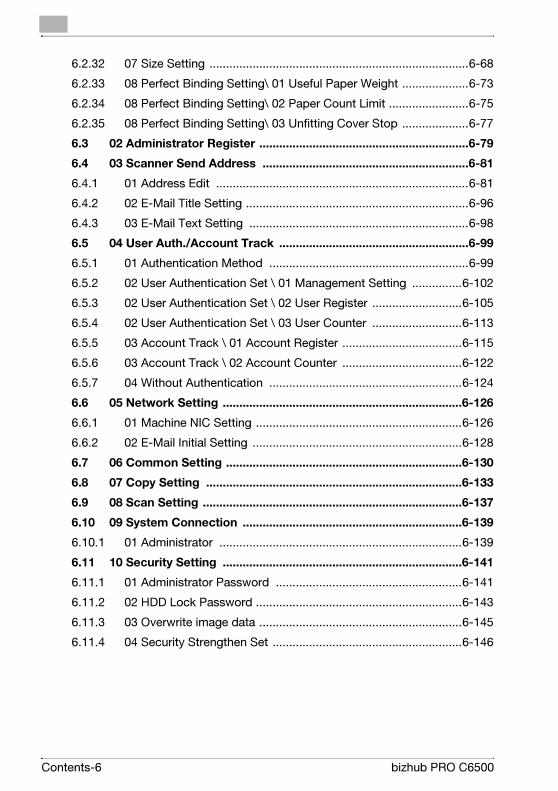
6.2.32 07 Size Setting ..............................................................................6-68
6.2.33 08 Perfect Binding Setting\ 01 Useful Paper Weight ....................6-73
6.2.34 08 Perfect Binding Setting\ 02 Paper Count Limit ........................6-75
6.2.35 08 Perfect Binding Setting\ 03 Unfitting Cover Stop ....................6-77
6.3 02 Administrator Register ...............................................................6-79
6.4 03 Scanner Send Address ..............................................................6-81
6.4.1 01 Address Edit ............................................................................6-81
6.4.2 02 E-Mail Title Setting ...................................................................6-96
6.4.3 03 E-Mail Text Setting ..................................................................6-98
6.5 04 User Auth./Account Track .........................................................6-99
6.5.1 01 Authentication Method ............................................................6-99
6.5.2 02 User Authentication Set \ 01 Management Setting ...............6-102
6.5.3 02 User Authentication Set \ 02 User Register ...........................6-105
6.5.4 02 User Authentication Set \ 03 User Counter ...........................6-113
6.5.5 03 Account Track \ 01 Account Register ....................................6-115
6.5.6 03 Account Track \ 02 Account Counter ....................................6-122
6.5.7 04 Without Authentication ..........................................................6-124
6.6 05 Network Setting ........................................................................6-126
6.6.1 01 Machine NIC Setting ..............................................................6-126
6.6.2 02 E-Mail Initial Setting ...............................................................6-128
6.7 06 Common Setting .......................................................................6-130
6.8 07 Copy Setting .............................................................................6-133
6.9 08 Scan Setting ..............................................................................6-137
6.10 09 System Connection ..................................................................6-139
6.10.1 01 Administrator .........................................................................6-139
6.11 10 Security Setting ........................................................................6-141
6.11.1 01 Administrator Password ........................................................6-141
6.11.2 02 HDD Lock Password ..............................................................6-143
6.11.3 03 Overwrite image data .............................................................6-145
6.11.4 04 Security Strengthen Set .........................................................6-146
Contents-6 bizhub PRO C6500
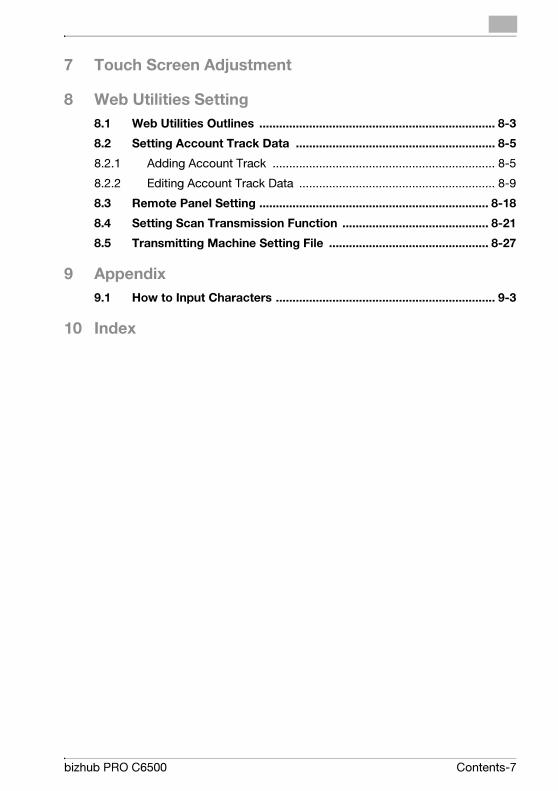
7 Touch Screen Adjustment
8 Web Utilities Setting
8.1 Web Utilities Outlines ....................................................................... 8-3
8.2 Setting Account Track Data ............................................................ 8-5
8.2.1 Adding Account Track ................................................................... 8-5
8.2.2 Editing Account Track Data ........................................................... 8-9
8.3 Remote Panel Setting ..................................................................... 8-18
8.4 Setting Scan Transmission Function ............................................ 8-21
8.5 Transmitting Machine Setting File ................................................ 8-27
9 Appendix
9.1 How to Input Characters .................................................................. 9-3
10 Index
bizhub PRO C6500 Contents-7


1 Introduction

Introduction 1
1 Introduction
This section describes the overview of this document.
FEDERAL OR STATE STATUTES MAY PROHIBIT THE COPYING OF CER-
TAIN DOCUMENTS OR INFORMATION, RESULTING IN FINES OR IMPRIS-
ONMENT FOR VIOLATORS.
ACKNOWLEDGEMENTS
- KONICA MINOLTA, KONICA MINOLTA Logo, and The essentials of im-
aging are registered trademarks or trademarks of KONICA MINOLTA
HOLDINGS, INC.
- bizhub PRO is registered trademarks of KONICA MINOLTA BUSINESS
TECHNOLOGIES, Inc.
- Microsoft, MS, Windows and MS-DOS are registered trademarks or
trademarks of Microsoft Corporation in the United States and / or other
countries.
- IBM is a registered trademarks of the IBM Corporation.
- Macintosh and PowerMac are registered trademarks or trademarks of
Apple Computer, Inc. in the United States and / or other countries.
- Adobe, Adobe Logo, Acrobat, Acrobat Logo, PostScript and PostScript
Logo are registered trademarks or trademarks of Adobe Systems, Inc.
- RC4® is a registered trademark or trademark of RSA Security Inc. in the
United States and/or other countries.
- Other company names and product names used in this manual are the
registered trademarks or trademarks of their respective companies.
Copyright © 2007 KONICA MINOLTA BUSINESS TECHNOLOGIES, Inc.
Copyright © 2007 GoAhead Software, Inc. All rights reserved.
EXEMPTION
- No part of this manual may be used or duplicated without permission.
- Manufacturer and Sales Company will have no liability for any influences
caused by using the printing system and this User’s Guide.
- The information written in this User’s Guide is subject to change without
prior notice.
bizhub PRO C6500 1-3
1 Introduction
1.1 Composition of User’s Guide
This machine is provided with the following user’s guides as printed matters.
*bizhub PRO C6500 User’s Guide - Copier
This guide describes an outline of the machine and copy operations.
Please refer to this guide for safety information, turning on/off the machine,
paper supply, dealing with machine trouble such as paper jam, and copy op-
eration available on the machine.
* bizhub PRO C6500 User’s Guide - POD Administrator’s Reference
(This book)
This guide provides you with detailed information about the machine man-
agement and how to customize the machine according to your daily use.
Please refer to this guide for a setup and management of the machine includ-
ing registration of copy paper and tray setting.
* bizhub PRO C6500 User’s Guide - Security
This guide describes the security functions.
Please refer to this guide for how to use the Security Strengthen mode, and
for detailed machine operation in Security Strengthen mode.
To operate safely, be sure to read "Section 1 Safety Information" in "bizhub
PRO C6500 User’s Guide - Copier" before using the machine.
1-4 bizhub PRO C6500
Introduction 1
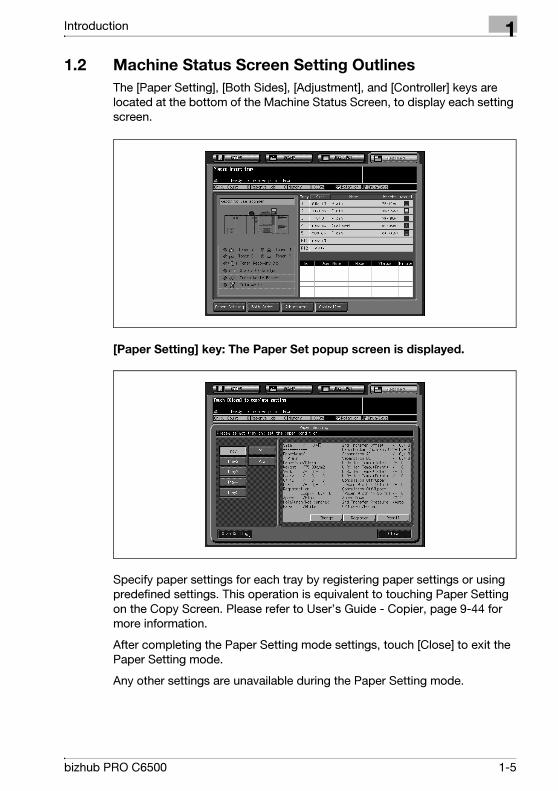
1.2 Machine Status Screen Setting Outlines
The [Paper Setting], [Both Sides], [Adjustment], and [Controller] keys are
located at the bottom of the Machine Status Screen, to display each setting
screen.
[Paper Setting] key: The Paper Set popup screen is displayed.
Specify paper settings for each tray by registering paper settings or using
predefined settings. This operation is equivalent to touching Paper Setting
on the Copy Screen. Please refer to User’s Guide - Copier, page 9-44 for
more information.
After completing the Paper Setting mode settings, touch [Close] to exit the
Paper Setting mode.
Any other settings are unavailable during the Paper Setting mode.
bizhub PRO C6500 1-5
1 Introduction
2
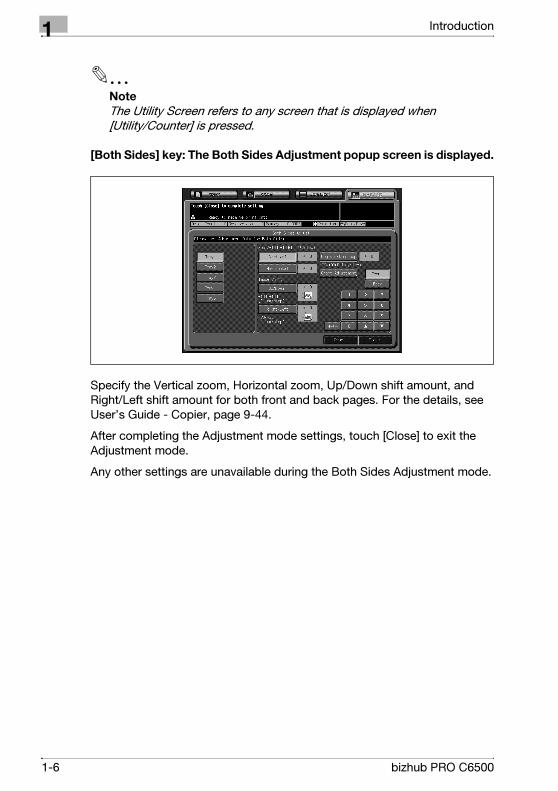
Note
The Utility Screen refers to any screen that is displayed when
[Utility/Counter] is pressed.
[Both Sides] key: The Both Sides Adjustment popup screen is displayed.
Specify the Vertical zoom, Horizontal zoom, Up/Down shift amount, and
Right/Left shift amount for both front and back pages. For the details, see
User’s Guide - Copier, page 9-44.
After completing the Adjustment mode settings, touch [Close] to exit the
Adjustment mode.
Any other settings are unavailable during the Both Sides Adjustment mode.
1-6 bizhub PRO C6500
Introduction 1
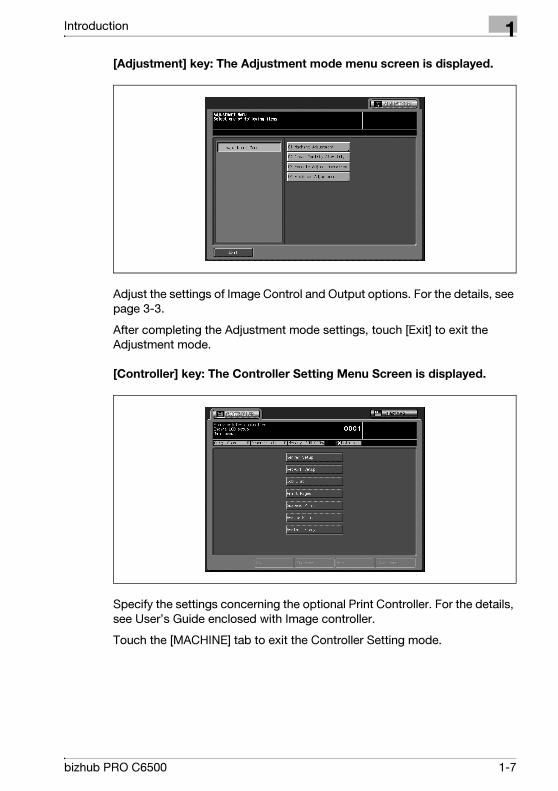
[Adjustment] key: The Adjustment mode menu screen is displayed.
Adjust the settings of Image Control and Output options. For the details, see
page 3-3.
After completing the Adjustment mode settings, touch [Exit] to exit the
Adjustment mode.
[Controller] key: The Controller Setting Menu Screen is displayed.
Specify the settings concerning the optional Print Controller. For the details,
see User’s Guide enclosed with Image controller.
Touch the [MACHINE] tab to exit the Controller Setting mode.
bizhub PRO C6500 1-7
1 Introduction
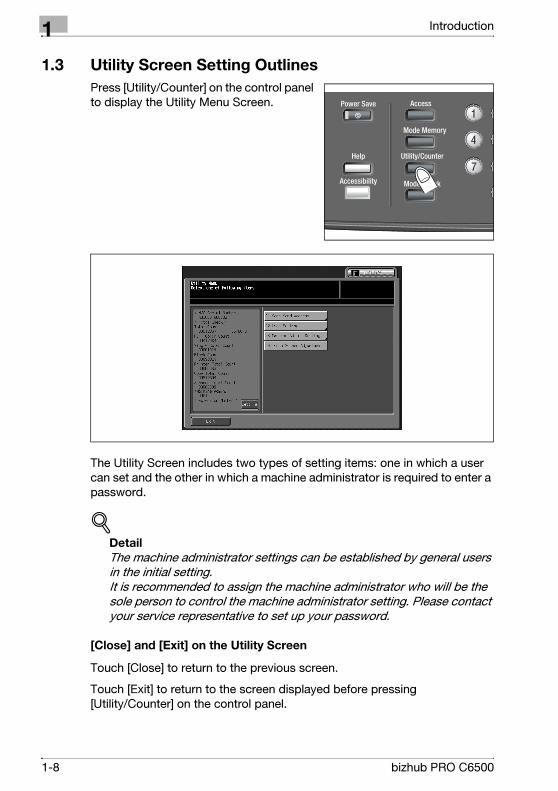
1.3 Utility Screen Setting Outlines
Press [Utility/Counter] on the control panel
to display the Utility Menu Screen.
The Utility Screen includes two types of setting items: one in which a user
can set and the other in which a machine administrator is required to enter a
password.
!Detail
The machine administrator settings can be established by general users
in the initial setting. It is recommended to assign the machine administrator who will be the
sole person to control the machine administrator setting. Please contact
your service representative to set up your password.
[Close] and [Exit] on the Utility Screen
Touch [Close] to return to the previous screen.
Touch [Exit] to return to the screen displayed before pressing
[Utility/Counter] on the control panel.
1-8 bizhub PRO C6500
2 Paper Setting

Paper Setting 2
2 Paper Setting
2.1 Paper Setting Outlines
This section provides information on, and instructions for, settings the items
in the User Setting.
This machine provides Paper Setting mode in order to perform printing job
according to the characteristics of paper to be used, by specifying
conditions such as Paper Name, Size, Paper Type, Weight, Both Sides
Adjustment, Process Adjustment, Speed Setting, Hole-Punch, Color Paper,
and Air Assist.
Paper conditions as mentioned above are supposed to be predefined, and
can be edited and even deleted at any time. (Paper Setting in User Setting
on Utility Screen)
Recall the predefined conditions for each tray, and modify them, if
necessary, in order to satisfy the environmental conditions (temperature,
humidity, condition of paper, etc.) at that time. (Paper Setting on Copy
Screen or Machine Status Screen)
This section provides information on, and instructions for, settings the items
in the User Setting.
2.1.1 Setting Items in Paper Setting
Paper Type
Select one of the following seven types.
High Quality, Plain, Color Specific, Coated-GL, Coated-ML, Coated-GO,
Coated-MO
See page 2-5 for details of paper type specifications.
Paper Name
You can use maximum 22 characters.
Weight
Select one of the following eight types.
64-74g/m2, 75-80g/m2, 81-105g/m2, 106-135g/m2, 136-162g/m2, 163-
209g/m2, 210-256g/m2, 257-300g/m2
The unit display for paper weight can be changed. Touch [Unit Change] to
switch between the options.
See page 2-5 for details of relation between paper type and weight.
bizhub PRO C6500 2-3
2 Paper Setting
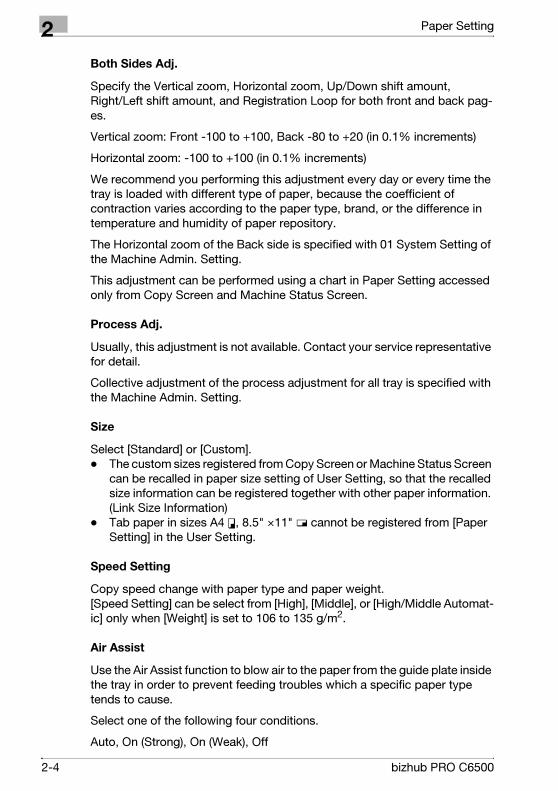
Both Sides Adj.
Specify the Vertical zoom, Horizontal zoom, Up/Down shift amount,
Right/Left shift amount, and Registration Loop for both front and back pag-
es.
Vertical zoom: Front -100 to +100, Back -80 to +20 (in 0.1% increments)
Horizontal zoom: -100 to +100 (in 0.1% increments)
We recommend you performing this adjustment every day or every time the
tray is loaded with different type of paper, because the coefficient of
contraction varies according to the paper type, brand, or the difference in
temperature and humidity of paper repository.
The Horizontal zoom of the Back side is specified with 01 System Setting of
the Machine Admin. Setting.
This adjustment can be performed using a chart in Paper Setting accessed
only from Copy Screen and Machine Status Screen.
Process Adj.
Usually, this adjustment is not available. Contact your service representative
for detail.
Collective adjustment of the process adjustment for all tray is specified with
the Machine Admin. Setting.
Size
Select [Standard] or [Custom].
- The custom sizes registered from Copy Screen or Machine Status Screen
can be recalled in paper size setting of User Setting, so that the recalled
size information can be registered together with other paper information.
(Link Size Information)
- Tab paper in sizes A4 v, 8.5" ×11" w cannot be registered from [Paper
Setting] in the User Setting.
Speed Setting
Copy speed change with paper type and paper weight. [Speed Setting] can be select from [High], [Middle], or [High/Middle Automat-
ic] only when [Weight] is set to 106 to 135 g/m2.
Air Assist
Use the Air Assist function to blow air to the paper from the guide plate inside
the tray in order to prevent feeding troubles which a specific paper type
tends to cause.
Select one of the following four conditions.
Auto, On (Strong), On (Weak), Off
2-4 bizhub PRO C6500
Paper Setting 2
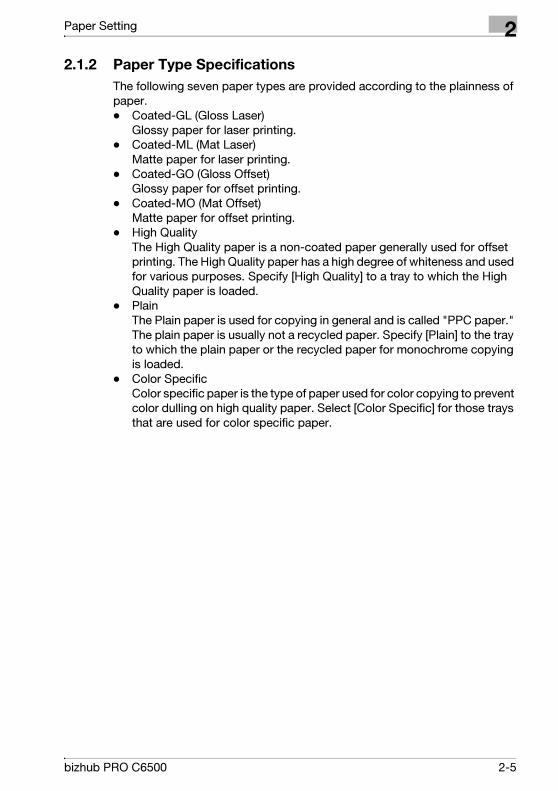
2.1.2 Paper Type Specifications
The following seven paper types are provided according to the plainness of
paper.
- Coated-GL (Gloss Laser) Glossy paper for laser printing.
- Coated-ML (Mat Laser) Matte paper for laser printing.
- Coated-GO (Gloss Offset) Glossy paper for offset printing.
- Coated-MO (Mat Offset) Matte paper for offset printing.
- High Quality The High Quality paper is a non-coated paper generally used for offset
printing. The High Quality paper has a high degree of whiteness and used
for various purposes. Specify [High Quality] to a tray to which the High
Quality paper is loaded.
- Plain The Plain paper is used for copying in general and is called "PPC paper."
The plain paper is usually not a recycled paper. Specify [Plain] to the tray
to which the plain paper or the recycled paper for monochrome copying
is loaded.
- Color Specific Color specific paper is the type of paper used for color copying to prevent
color dulling on high quality paper. Select [Color Specific] for those trays
that are used for color specific paper.
bizhub PRO C6500 2-5
2 Paper Setting
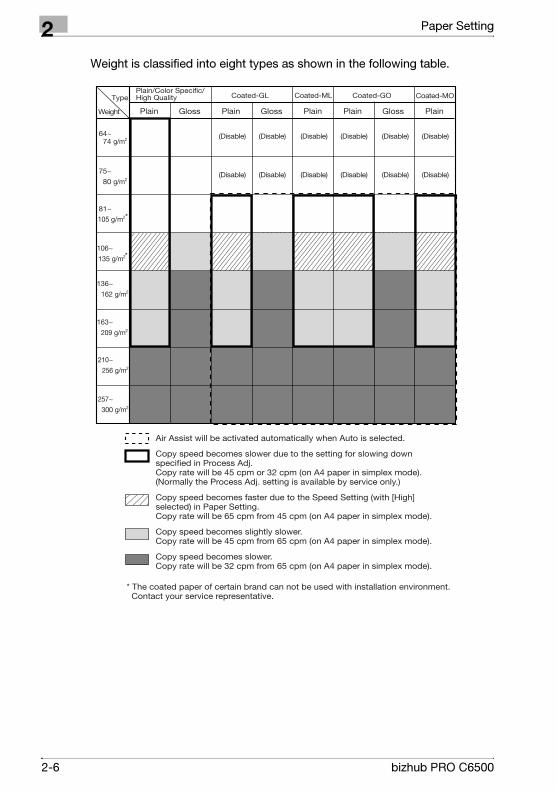
Weight is classified into eight types as shown in the following table.
2-6 bizhub PRO C6500
Paper Setting 2
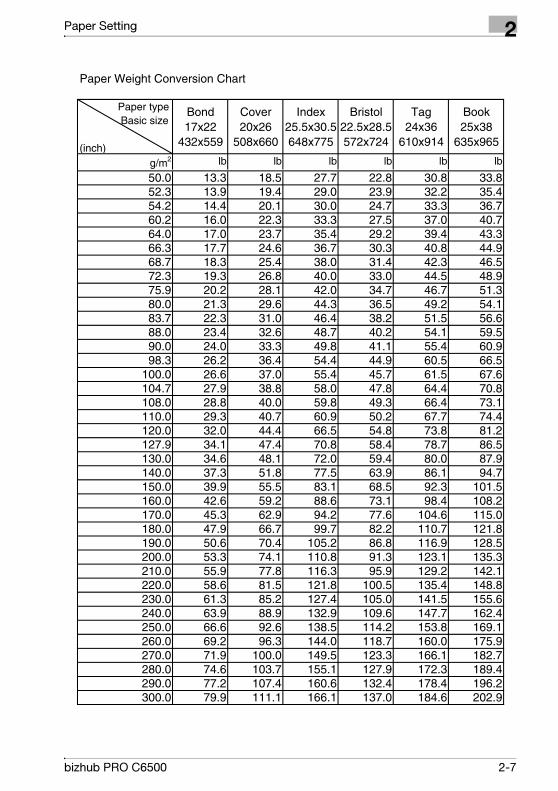
Paper Weight Conversion Chart
Paper type Basic size
(inch)
Bond17x22
432x559
Cover20x26
508x660
Index25.5x30.5648x775
Bristol22.5x28.5572x724
Tag24x36
610x914
Book25x38
635x965
g/m2 lb lb lb lb lb lb
50.0 13.3 18.5 27.7 22.8 30.8 33.852.3 13.9 19.4 29.0 23.9 32.2 35.454.2 14.4 20.1 30.0 24.7 33.3 36.760.2 16.0 22.3 33.3 27.5 37.0 40.764.0 17.0 23.7 35.4 29.2 39.4 43.366.3 17.7 24.6 36.7 30.3 40.8 44.968.7 18.3 25.4 38.0 31.4 42.3 46.572.3 19.3 26.8 40.0 33.0 44.5 48.975.9 20.2 28.1 42.0 34.7 46.7 51.380.0 21.3 29.6 44.3 36.5 49.2 54.183.7 22.3 31.0 46.4 38.2 51.5 56.688.0 23.4 32.6 48.7 40.2 54.1 59.590.0 24.0 33.3 49.8 41.1 55.4 60.998.3 26.2 36.4 54.4 44.9 60.5 66.5
100.0 26.6 37.0 55.4 45.7 61.5 67.6104.7 27.9 38.8 58.0 47.8 64.4 70.8108.0 28.8 40.0 59.8 49.3 66.4 73.1110.0 29.3 40.7 60.9 50.2 67.7 74.4120.0 32.0 44.4 66.5 54.8 73.8 81.2127.9 34.1 47.4 70.8 58.4 78.7 86.5130.0 34.6 48.1 72.0 59.4 80.0 87.9140.0 37.3 51.8 77.5 63.9 86.1 94.7150.0 39.9 55.5 83.1 68.5 92.3 101.5160.0 42.6 59.2 88.6 73.1 98.4 108.2170.0 45.3 62.9 94.2 77.6 104.6 115.0180.0 47.9 66.7 99.7 82.2 110.7 121.8190.0 50.6 70.4 105.2 86.8 116.9 128.5200.0 53.3 74.1 110.8 91.3 123.1 135.3210.0 55.9 77.8 116.3 95.9 129.2 142.1220.0 58.6 81.5 121.8 100.5 135.4 148.8230.0 61.3 85.2 127.4 105.0 141.5 155.6240.0 63.9 88.9 132.9 109.6 147.7 162.4250.0 66.6 92.6 138.5 114.2 153.8 169.1260.0 69.2 96.3 144.0 118.7 160.0 175.9270.0 71.9 100.0 149.5 123.3 166.1 182.7280.0 74.6 103.7 155.1 127.9 172.3 189.4290.0 77.2 107.4 160.6 132.4 178.4 196.2300.0 79.9 111.1 166.1 137.0 184.6 202.9
bizhub PRO C6500 2-7
2 Paper Setting
2.2 Register Paper Type/Weight
Follow the procedure below to register paper type/weight in the User Setting.
Procedure
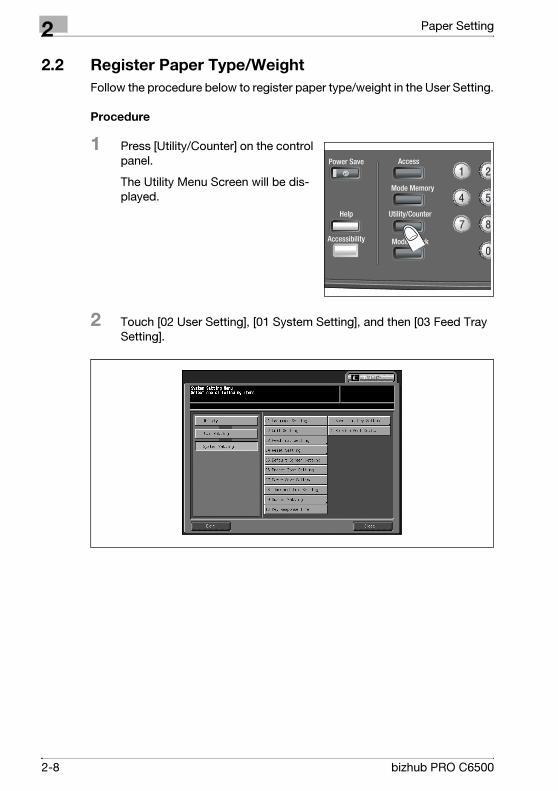
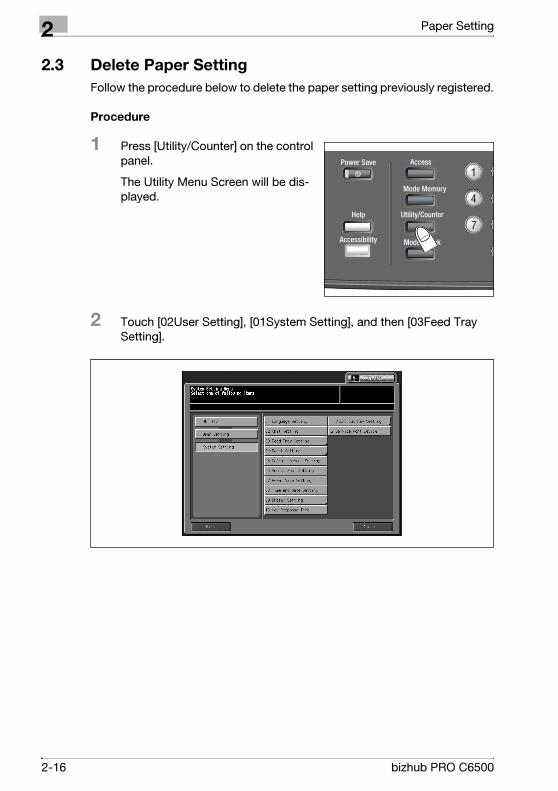
1 Press [Utility/Counter] on the control
panel.
The Utility Menu Screen will be dis-
played.
2 Touch [02 User Setting], [01 System Setting], and then [03 Feed Tray
Setting].
2-8 bizhub PRO C6500
Paper Setting 2
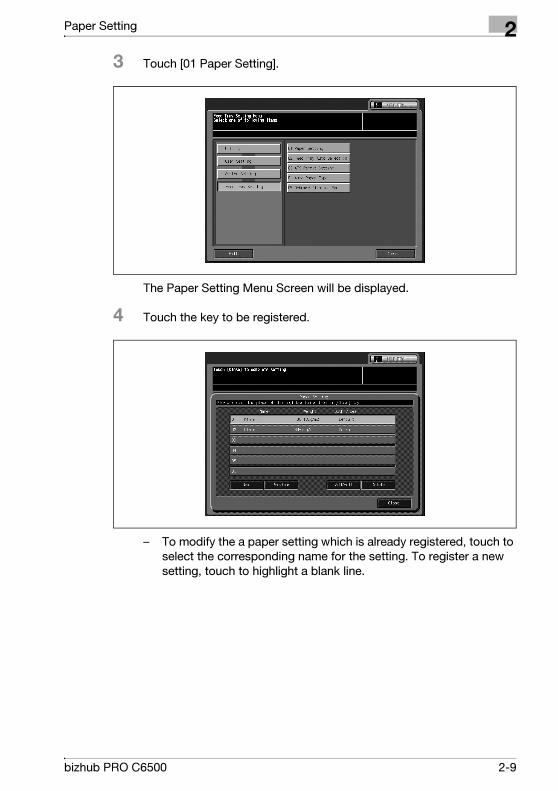
3 Touch [01 Paper Setting].
The Paper Setting Menu Screen will be displayed.
4 Touch the key to be registered.
– To modify the a paper setting which is already registered, touch to
select the corresponding name for the setting. To register a new
setting, touch to highlight a blank line.
bizhub PRO C6500 2-9
2 Paper Setting
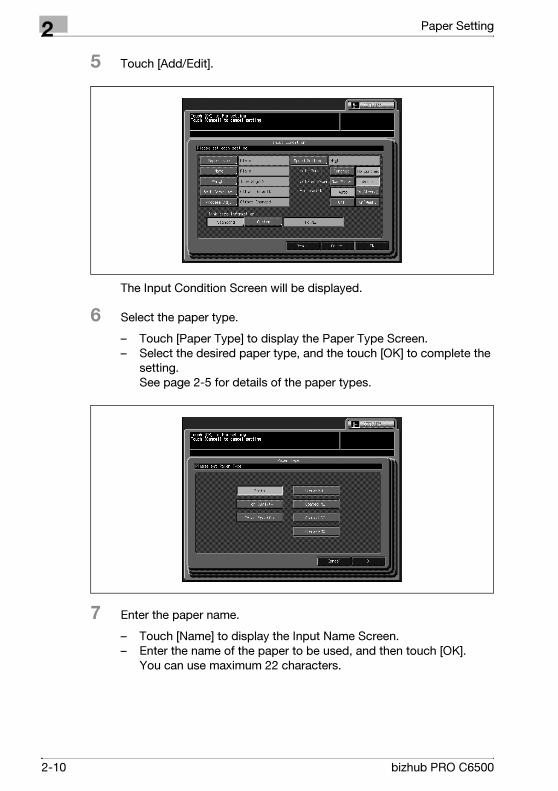
5 Touch [Add/Edit].
The Input Condition Screen will be displayed.
6 Select the paper type.
– Touch [Paper Type] to display the Paper Type Screen.
– Select the desired paper type, and the touch [OK] to complete the
setting. See page 2-5 for details of the paper types.
7 Enter the paper name.
– Touch [Name] to display the Input Name Screen.
– Enter the name of the paper to be used, and then touch [OK]. You can use maximum 22 characters.
2-10 bizhub PRO C6500
Paper Setting 2
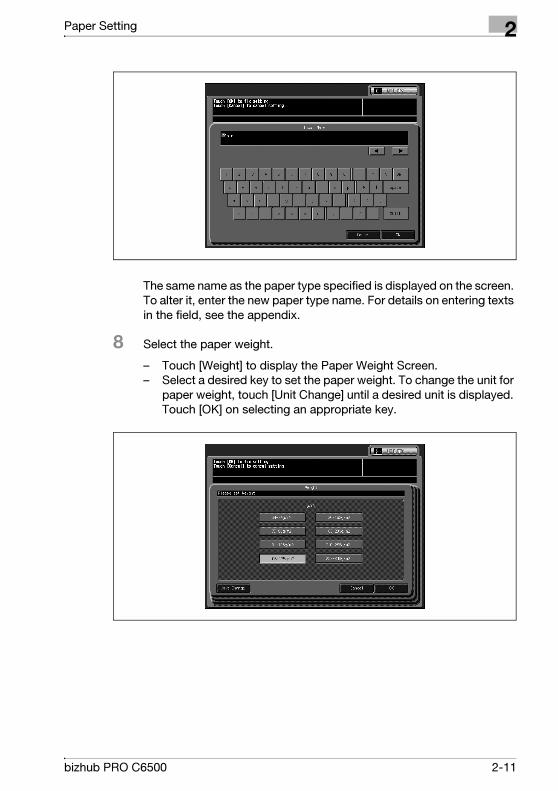
The same name as the paper type specified is displayed on the screen.
To alter it, enter the new paper type name. For details on entering texts
in the field, see the appendix.
8 Select the paper weight.
– Touch [Weight] to display the Paper Weight Screen.
– Select a desired key to set the paper weight. To change the unit for
paper weight, touch [Unit Change] until a desired unit is displayed.
Touch [OK] on selecting an appropriate key.
bizhub PRO C6500 2-11
2 Paper Setting
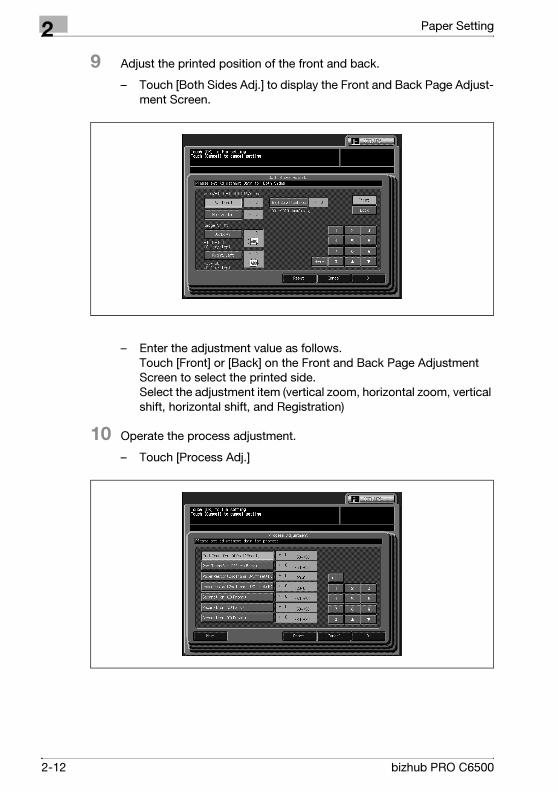
9 Adjust the printed position of the front and back.
– Touch [Both Sides Adj.] to display the Front and Back Page Adjust-
ment Screen.
– Enter the adjustment value as follows. Touch [Front] or [Back] on the Front and Back Page Adjustment
Screen to select the printed side. Select the adjustment item (vertical zoom, horizontal zoom, vertical
shift, horizontal shift, and Registration)
10 Operate the process adjustment.
– Touch [Process Adj.]
2-12 bizhub PRO C6500
Paper Setting 2
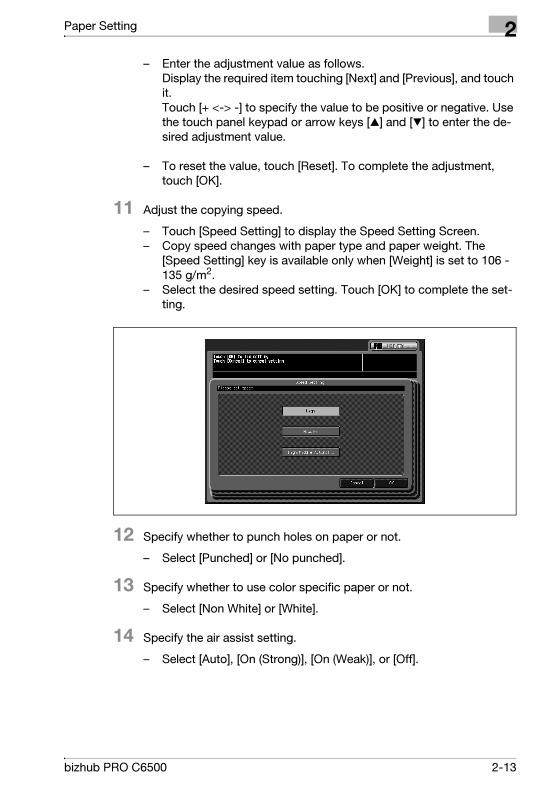
– Enter the adjustment value as follows. Display the required item touching [Next] and [Previous], and touch
it. Touch [+ <-> -] to specify the value to be positive or negative. Use
the touch panel keypad or arrow keys [c] and [d] to enter the de-
sired adjustment value.
– To reset the value, touch [Reset]. To complete the adjustment,
touch [OK].
11 Adjust the copying speed.
– Touch [Speed Setting] to display the Speed Setting Screen.
– Copy speed changes with paper type and paper weight. The
[Speed Setting] key is available only when [Weight] is set to 106 -
135 g/m2.
– Select the desired speed setting. Touch [OK] to complete the set-
ting.
12 Specify whether to punch holes on paper or not.
– Select [Punched] or [No punched].
13 Specify whether to use color specific paper or not.
– Select [Non White] or [White].
14 Specify the air assist setting.
– Select [Auto], [On (Strong)], [On (Weak)], or [Off].
bizhub PRO C6500 2-13
2 Paper Setting
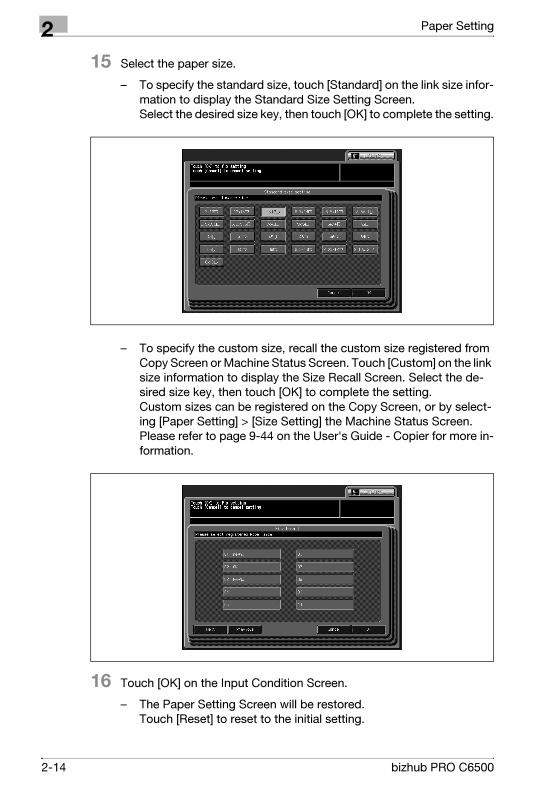
15 Select the paper size.
– To specify the standard size, touch [Standard] on the link size infor-
mation to display the Standard Size Setting Screen. Select the desired size key, then touch [OK] to complete the setting.
– To specify the custom size, recall the custom size registered from
Copy Screen or Machine Status Screen. Touch [Custom] on the link
size information to display the Size Recall Screen. Select the de-
sired size key, then touch [OK] to complete the setting. Custom sizes can be registered on the Copy Screen, or by select-
ing [Paper Setting] > [Size Setting] the Machine Status Screen.
Please refer to page 9-44 on the User's Guide - Copier for more in-
formation.
16 Touch [OK] on the Input Condition Screen.
– The Paper Setting Screen will be restored. Touch [Reset] to reset to the initial setting.
2-14 bizhub PRO C6500
Paper Setting 2
17 Touch [Close] on the Paper Setting Screen.
– Touch [Exit] to return to the Copy Screen.
!Detail
Chart adjustment is available from the Paper Setting on the Copy Screen
or Machine Status Screen only. Paper Setting of User Setting does not provide this function.
Contact your service representative for details.
Air assist setting is available when tray 4 and tray 5.
bizhub PRO C6500 2-15
2 Paper Setting
2.3 Delete Paper Setting
Follow the procedure below to delete the paper setting previously registered.
Procedure
1 Press [Utility/Counter] on the control
panel.
The Utility Menu Screen will be dis-
played.
2 Touch [02User Setting], [01System Setting], and then [03Feed Tray
Setting].
2-16 bizhub PRO C6500
Paper Setting 2
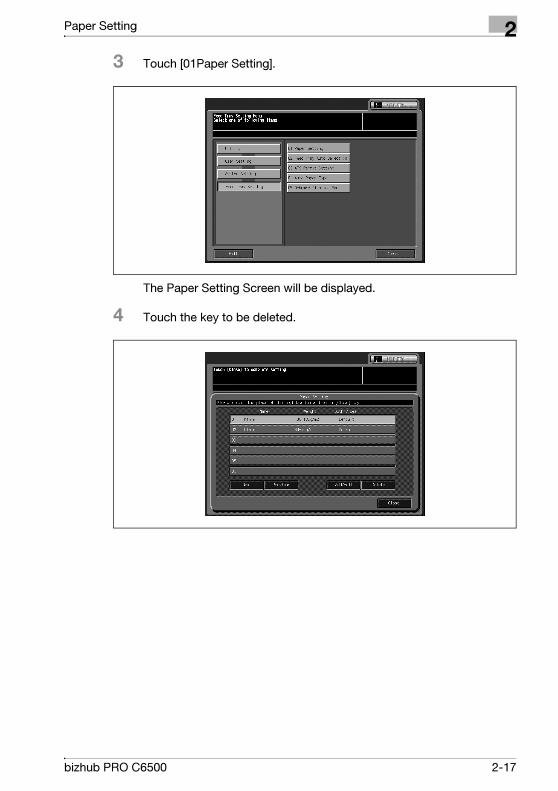
3 Touch [01Paper Setting].
The Paper Setting Screen will be displayed.
4 Touch the key to be deleted.
bizhub PRO C6500 2-17
2 Paper Setting
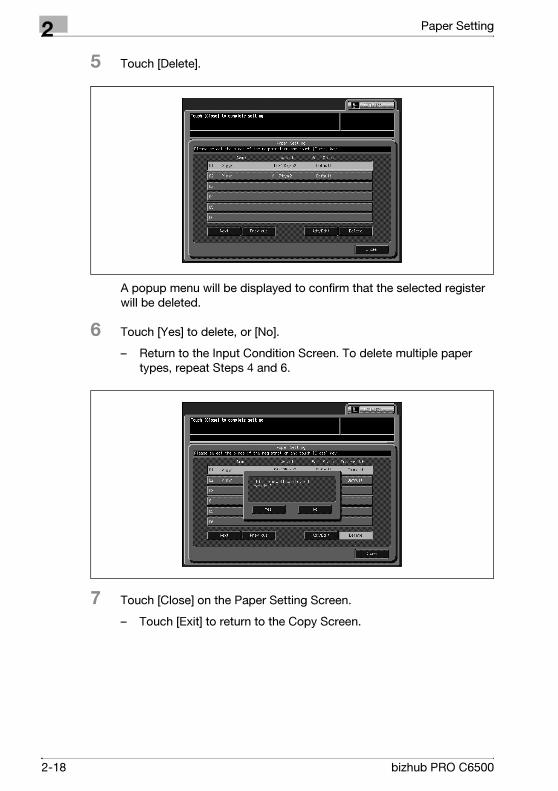
5 Touch [Delete].
A popup menu will be displayed to confirm that the selected register
will be deleted.
6 Touch [Yes] to delete, or [No].
– Return to the Input Condition Screen. To delete multiple paper
types, repeat Steps 4 and 6.
7 Touch [Close] on the Paper Setting Screen.
– Touch [Exit] to return to the Copy Screen.
2-18 bizhub PRO C6500

3 Adjustment


Adjustment 3
3 Adjustment
This section describes information on adjusting the settings in the Image
Control and Output options.
3.1 01 Machine Adjustment
3.1.1 01 Printer Adjustment \ 01 Restart Timing Adjustment
Perform this adjustment to control the restart timing.
2
Reminder
Perform this adjustment after completing FD-Mag. Adjustment.
To specify Restart Timing Adjustment
1 Touch [Adjustment] on the Machine Status Screen.
The Adjustment Menu Screen will be displayed.
2 Touch [01 Machine Adjustment], [01 Printer Adjustment], and then [01
Restart Timing Adjustment].
The Restart Timing Adjustment Screen will be displayed.
bizhub PRO C6500 3-3
3 Adjustment
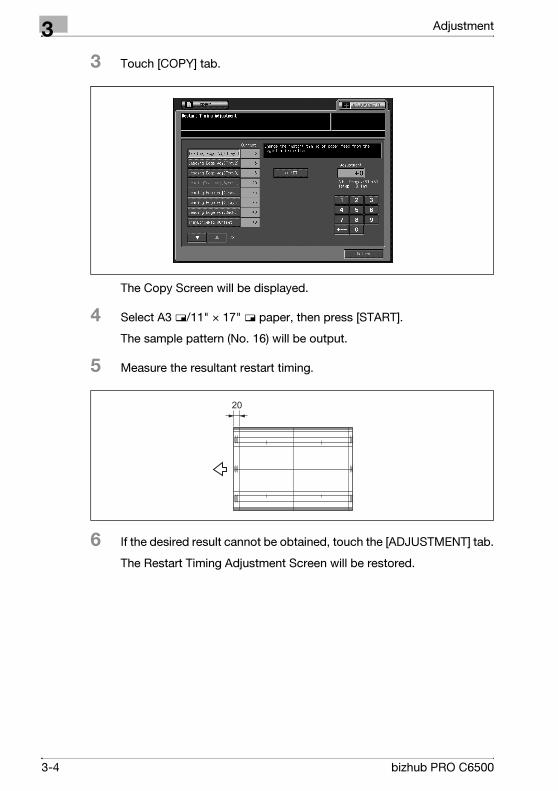
3 Touch [COPY] tab.
The Copy Screen will be displayed.
4 Select A3 w/11" × 17" w paper, then press [START].
The sample pattern (No. 16) will be output.
5 Measure the resultant restart timing.
6 If the desired result cannot be obtained, touch the [ADJUSTMENT] tab.
The Restart Timing Adjustment Screen will be restored.
20
3-4 bizhub PRO C6500
Adjustment 3
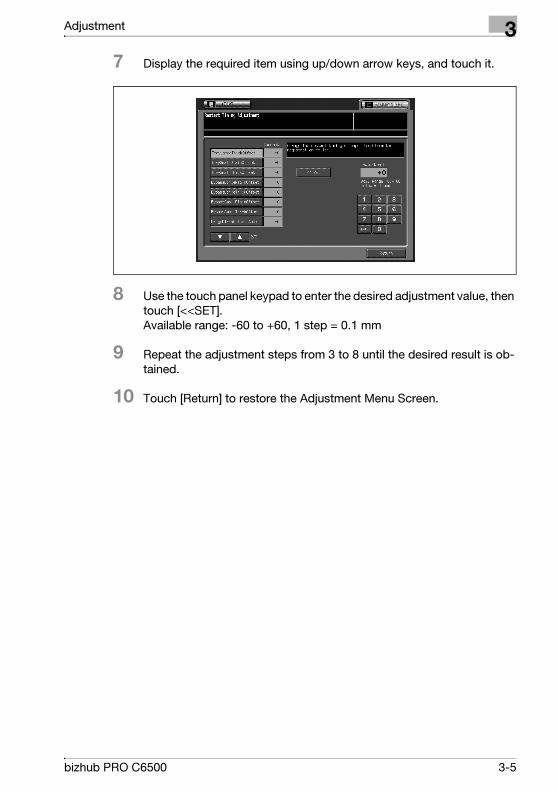
7 Display the required item using up/down arrow keys, and touch it.
8 Use the touch panel keypad to enter the desired adjustment value, then
touch [<<SET]. Available range: -60 to +60, 1 step = 0.1 mm
9 Repeat the adjustment steps from 3 to 8 until the desired result is ob-
tained.
10 Touch [Return] to restore the Adjustment Menu Screen.
bizhub PRO C6500 3-5
3 Adjustment
3.1.2 01 Printer Adjustment \ 02 Centering Adjustment
Perform this adjustment to control image centering to the direction of paper
feed.
To specify Centering Adjustment
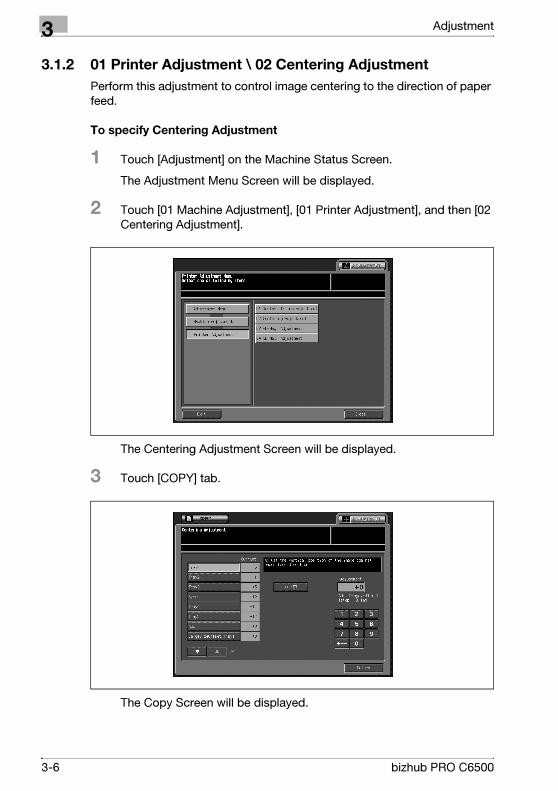
1 Touch [Adjustment] on the Machine Status Screen.
The Adjustment Menu Screen will be displayed.
2 Touch [01 Machine Adjustment], [01 Printer Adjustment], and then [02
Centering Adjustment].
The Centering Adjustment Screen will be displayed.
3 Touch [COPY] tab.
The Copy Screen will be displayed.
3-6 bizhub PRO C6500
Adjustment 3
4 Select A3 w/11" × 17" w paper, then press [START].
The sample pattern (No. 16) will be output.
5 Fold the output sheet at the center to the direction of paper feed and
measure the distance between the lines on both sides.
6 If the desired result cannot be obtained, touch the [ADJUSTMENT] tab.
The Centering Adjustment Screen will be restored.
7 Display the required item using up/down arrow keys, and touch it.
8 Use the touch panel keypad to enter the desired adjustment value, then
touch [<<SET]. Available range: -40 to +40, 1 step = 0.1 mm
9 Repeat the adjustment steps from 3 to 8 until the desired result is ob-
tained.
10 Touch [Return] to restore the Adjustment Menu Screen.
bizhub PRO C6500 3-7
3 Adjustment
3.1.3 01 Printer Adjustment \ 03 FD-Mag. Adjustment
Perform this adjustment to control the magnification to the direction of paper
feed.
2
Note
This value is used as the baseline for the Both Sides Adjustment function
in the Paper Setting. Specified value in that adjustment will be an offset
estimated from this baseline.
To specify FD-Mag. Adjustment
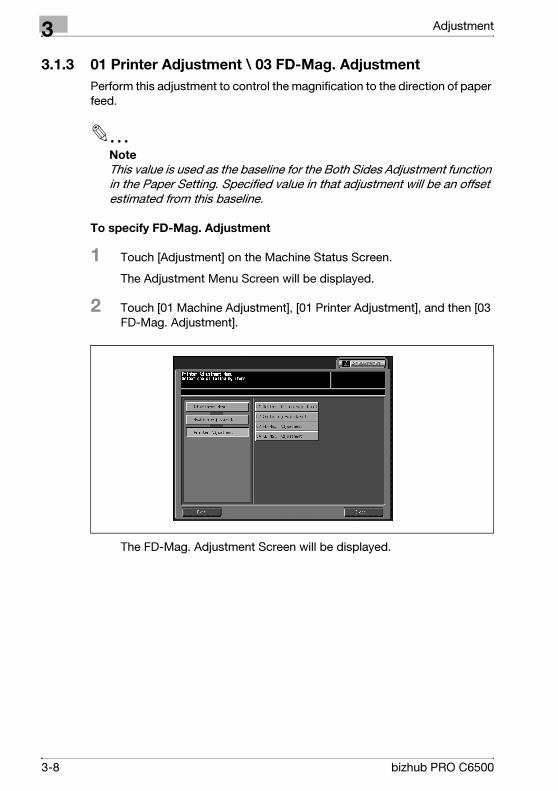
1 Touch [Adjustment] on the Machine Status Screen.
The Adjustment Menu Screen will be displayed.
2 Touch [01 Machine Adjustment], [01 Printer Adjustment], and then [03
FD-Mag. Adjustment].
The FD-Mag. Adjustment Screen will be displayed.
3-8 bizhub PRO C6500
Adjustment 3
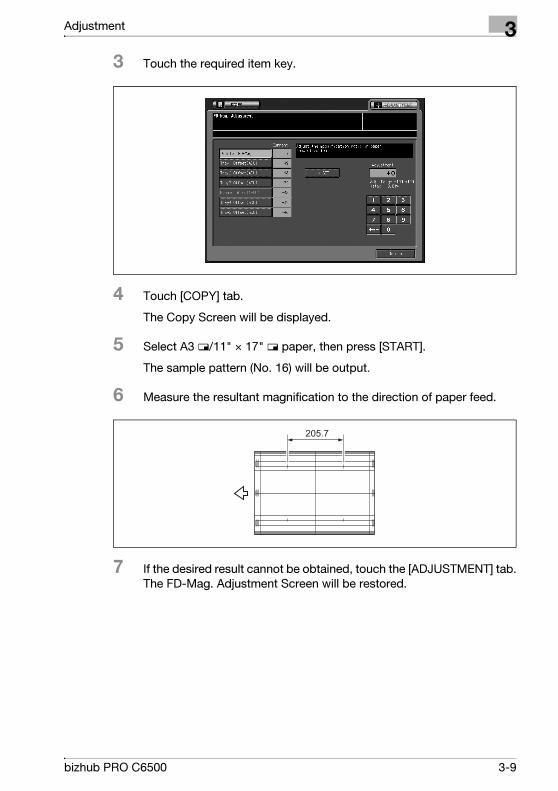
3 Touch the required item key.
4 Touch [COPY] tab.
The Copy Screen will be displayed.
5 Select A3 w/11" × 17" w paper, then press [START].
The sample pattern (No. 16) will be output.
6 Measure the resultant magnification to the direction of paper feed.
7 If the desired result cannot be obtained, touch the [ADJUSTMENT] tab. The FD-Mag. Adjustment Screen will be restored.
205.7
bizhub PRO C6500 3-9
3 Adjustment
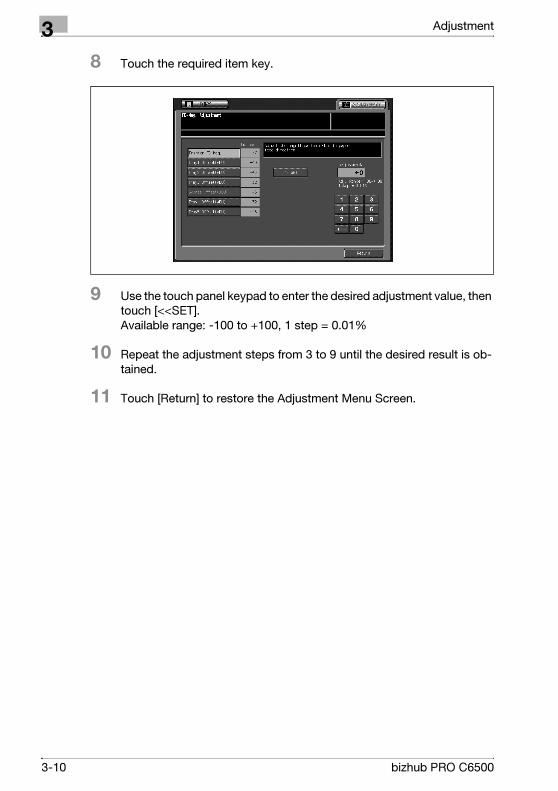
8 Touch the required item key.
9 Use the touch panel keypad to enter the desired adjustment value, then
touch [<<SET]. Available range: -100 to +100, 1 step = 0.01%
10 Repeat the adjustment steps from 3 to 9 until the desired result is ob-
tained.
11 Touch [Return] to restore the Adjustment Menu Screen.
3-10 bizhub PRO C6500
Adjustment 3
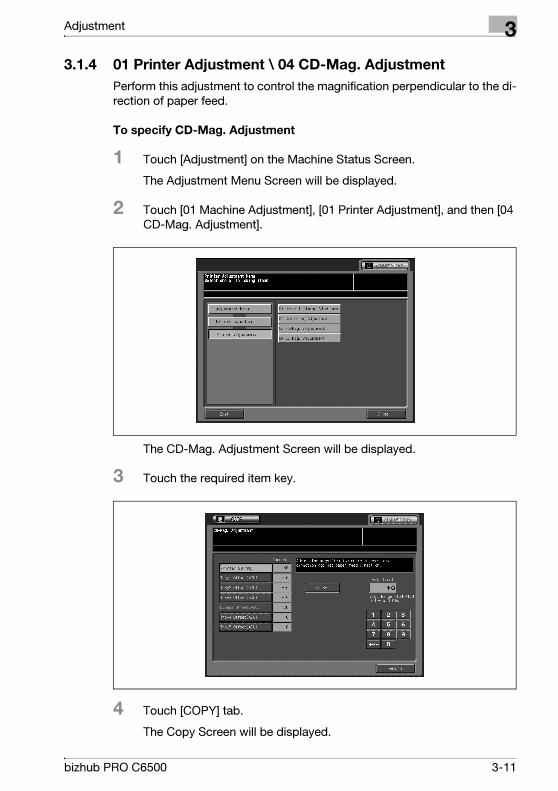
3.1.4 01 Printer Adjustment \ 04 CD-Mag. Adjustment
Perform this adjustment to control the magnification perpendicular to the di-
rection of paper feed.
To specify CD-Mag. Adjustment
1 Touch [Adjustment] on the Machine Status Screen.
The Adjustment Menu Screen will be displayed.
2 Touch [01 Machine Adjustment], [01 Printer Adjustment], and then [04
CD-Mag. Adjustment].
The CD-Mag. Adjustment Screen will be displayed.
3 Touch the required item key.
4 Touch [COPY] tab.
The Copy Screen will be displayed.
bizhub PRO C6500 3-11
3 Adjustment
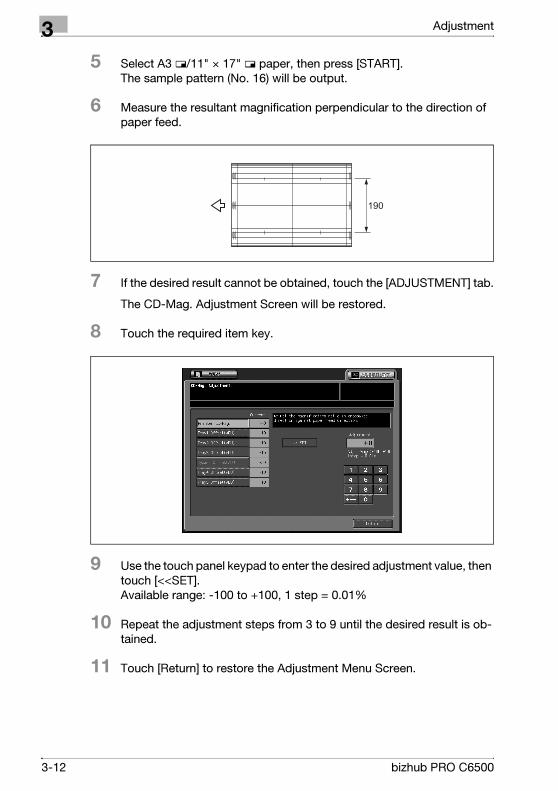
5 Select A3 w/11" × 17" w paper, then press [START]. The sample pattern (No. 16) will be output.
6 Measure the resultant magnification perpendicular to the direction of
paper feed.
7 If the desired result cannot be obtained, touch the [ADJUSTMENT] tab.
The CD-Mag. Adjustment Screen will be restored.
8 Touch the required item key.
9 Use the touch panel keypad to enter the desired adjustment value, then
touch [<<SET]. Available range: -100 to +100, 1 step = 0.01%
10 Repeat the adjustment steps from 3 to 9 until the desired result is ob-
tained.
11 Touch [Return] to restore the Adjustment Menu Screen.
190
3-12 bizhub PRO C6500
Adjustment 3
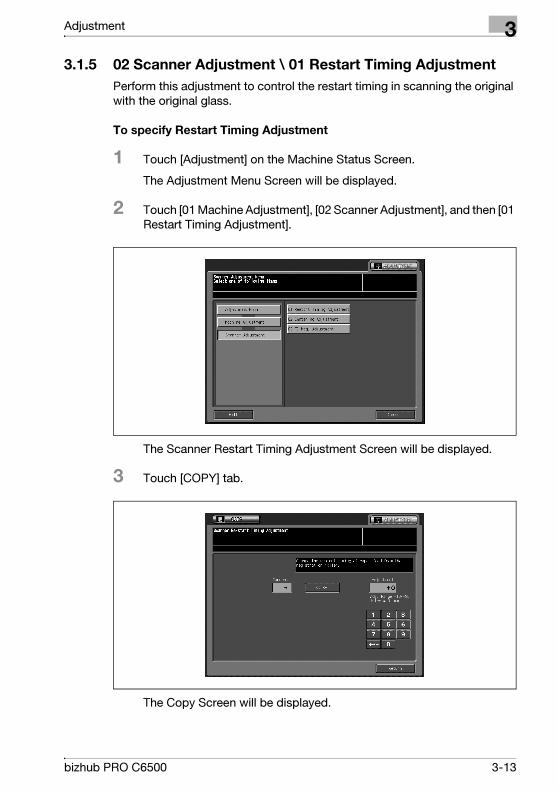
3.1.5 02 Scanner Adjustment \ 01 Restart Timing Adjustment
Perform this adjustment to control the restart timing in scanning the original
with the original glass.
To specify Restart Timing Adjustment
1 Touch [Adjustment] on the Machine Status Screen.
The Adjustment Menu Screen will be displayed.
2 Touch [01 Machine Adjustment], [02 Scanner Adjustment], and then [01
Restart Timing Adjustment].
The Scanner Restart Timing Adjustment Screen will be displayed.
3 Touch [COPY] tab.
The Copy Screen will be displayed.
bizhub PRO C6500 3-13
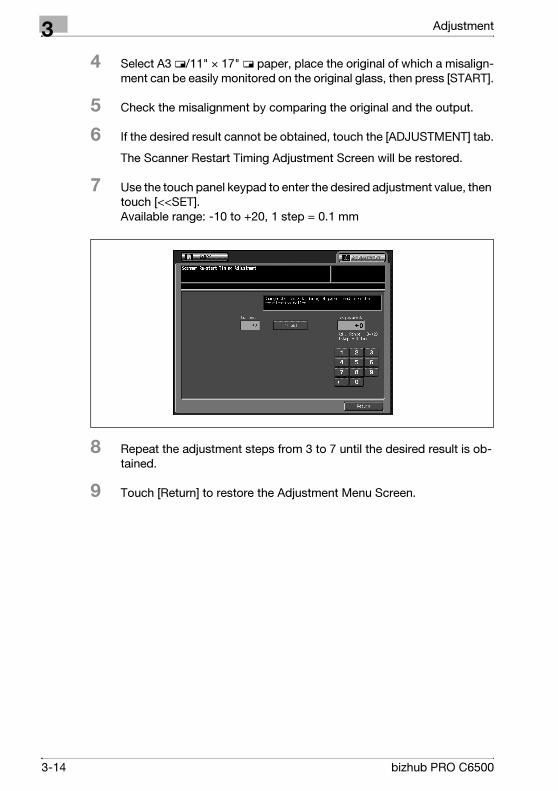
3 Adjustment
4 Select A3 w/11" × 17" w paper, place the original of which a misalign-
ment can be easily monitored on the original glass, then press [START].
5 Check the misalignment by comparing the original and the output.
6 If the desired result cannot be obtained, touch the [ADJUSTMENT] tab.
The Scanner Restart Timing Adjustment Screen will be restored.
7 Use the touch panel keypad to enter the desired adjustment value, then
touch [<<SET]. Available range: -10 to +20, 1 step = 0.1 mm
8 Repeat the adjustment steps from 3 to 7 until the desired result is ob-
tained.
9 Touch [Return] to restore the Adjustment Menu Screen.
3-14 bizhub PRO C6500

Adjustment 3
3.1.6 02 Scanner Adjustment \ 02 Centering Adjustment
Perform this adjustment to control image centering to the direction of paper
feed in scanning the original with original glass.
To specify Centering Adjustment
1 Touch [Adjustment] on the Machine Status Screen.
The Adjustment Menu Screen will be displayed.
2 Touch [01 Machine Adjustment], [02 Scanner Adjustment], and then [02
Centering Adjustment].
The Centering Adjustment Screen will be displayed.
3 Touch [COPY] tab.
The Copy Screen will be displayed.
bizhub PRO C6500 3-15
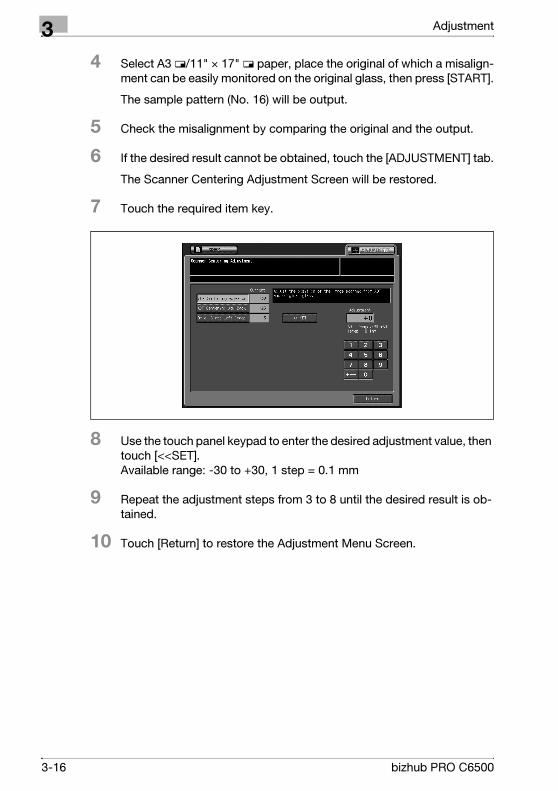
3 Adjustment
4 Select A3 w/11" × 17" w paper, place the original of which a misalign-
ment can be easily monitored on the original glass, then press [START].
The sample pattern (No. 16) will be output.
5 Check the misalignment by comparing the original and the output.
6 If the desired result cannot be obtained, touch the [ADJUSTMENT] tab.
The Scanner Centering Adjustment Screen will be restored.
7 Touch the required item key.
8 Use the touch panel keypad to enter the desired adjustment value, then
touch [<<SET]. Available range: -30 to +30, 1 step = 0.1 mm
9 Repeat the adjustment steps from 3 to 8 until the desired result is ob-
tained.
10 Touch [Return] to restore the Adjustment Menu Screen.
3-16 bizhub PRO C6500
Adjustment 3
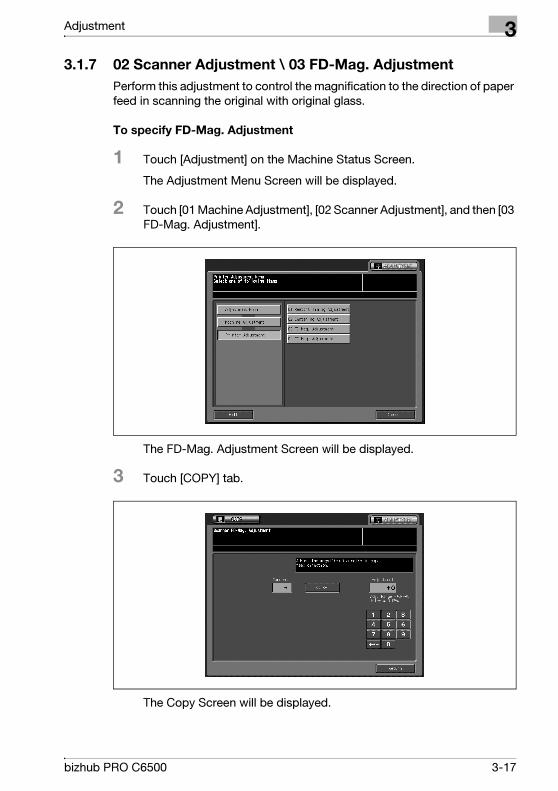
3.1.7 02 Scanner Adjustment \ 03 FD-Mag. Adjustment
Perform this adjustment to control the magnification to the direction of paper
feed in scanning the original with original glass.
To specify FD-Mag. Adjustment
1 Touch [Adjustment] on the Machine Status Screen.
The Adjustment Menu Screen will be displayed.
2 Touch [01 Machine Adjustment], [02 Scanner Adjustment], and then [03
FD-Mag. Adjustment].
The FD-Mag. Adjustment Screen will be displayed.
3 Touch [COPY] tab.
The Copy Screen will be displayed.
bizhub PRO C6500 3-17
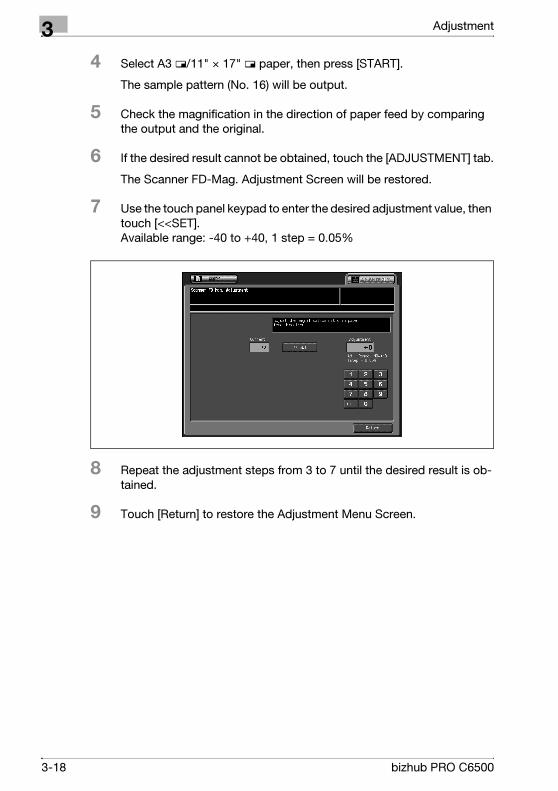
3 Adjustment
4 Select A3 w/11" × 17" w paper, then press [START].
The sample pattern (No. 16) will be output.
5 Check the magnification in the direction of paper feed by comparing
the output and the original.
6 If the desired result cannot be obtained, touch the [ADJUSTMENT] tab.
The Scanner FD-Mag. Adjustment Screen will be restored.
7 Use the touch panel keypad to enter the desired adjustment value, then
touch [<<SET]. Available range: -40 to +40, 1 step = 0.05%
8 Repeat the adjustment steps from 3 to 7 until the desired result is ob-
tained.
9 Touch [Return] to restore the Adjustment Menu Screen.
3-18 bizhub PRO C6500

Adjustment 3
3.2 02 Image Quality Stability
Set priority to either the output speed or the image quality stability in a copy-
ing or printing job.
To specify Image Quality Stability
1 Touch [Adjustment] on the Machine Status Screen.
The Adjustment Menu Screen will be displayed.
2 Touch [02 Image Quality Stability].
The Image Quality Stability Screen will be displayed.
3 Select [Speed] or [Stability] for a copying or printing job.
4 Touch [OK] to restore the Adjustment Menu Screen.
bizhub PRO C6500 3-19
3 Adjustment
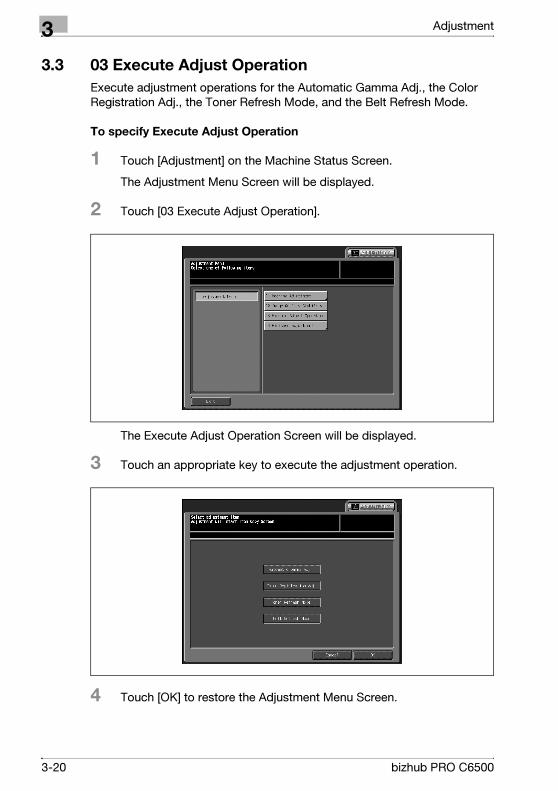
3.3 03 Execute Adjust Operation
Execute adjustment operations for the Automatic Gamma Adj., the Color
Registration Adj., the Toner Refresh Mode, and the Belt Refresh Mode.
To specify Execute Adjust Operation
1 Touch [Adjustment] on the Machine Status Screen.
The Adjustment Menu Screen will be displayed.
2 Touch [03 Execute Adjust Operation].
The Execute Adjust Operation Screen will be displayed.
3 Touch an appropriate key to execute the adjustment operation.
4 Touch [OK] to restore the Adjustment Menu Screen.
3-20 bizhub PRO C6500
Adjustment 3
3.4 04 Finisher Adjustment (FS-503)
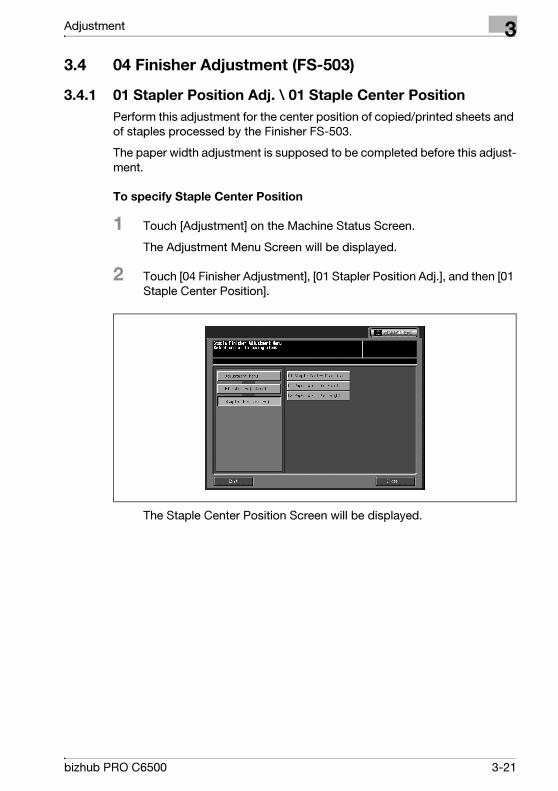
3.4.1 01 Stapler Position Adj. \ 01 Staple Center Position
Perform this adjustment for the center position of copied/printed sheets and
of staples processed by the Finisher FS-503.
The paper width adjustment is supposed to be completed before this adjust-
ment.
To specify Staple Center Position
1 Touch [Adjustment] on the Machine Status Screen.
The Adjustment Menu Screen will be displayed.
2 Touch [04 Finisher Adjustment], [01 Stapler Position Adj.], and then [01
Staple Center Position].
The Staple Center Position Screen will be displayed.
bizhub PRO C6500 3-21
3 Adjustment
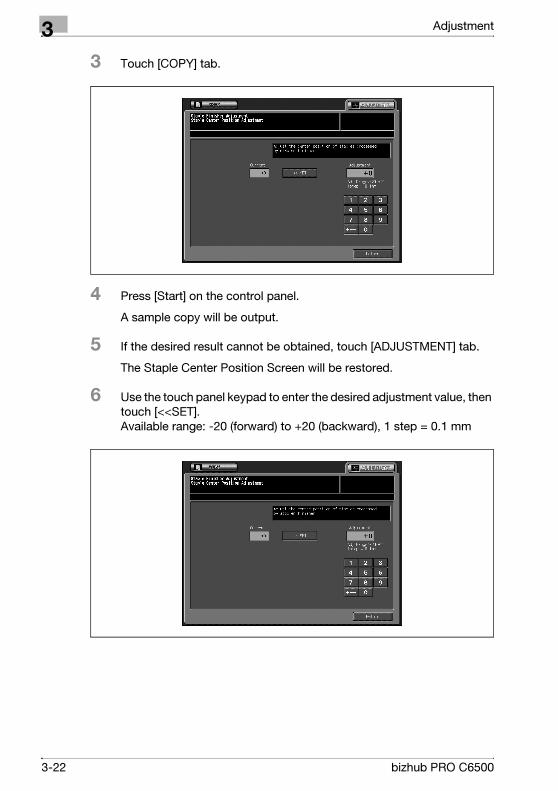
3 Touch [COPY] tab.
4 Press [Start] on the control panel.
A sample copy will be output.
5 If the desired result cannot be obtained, touch [ADJUSTMENT] tab.
The Staple Center Position Screen will be restored.
6 Use the touch panel keypad to enter the desired adjustment value, then
touch [<<SET]. Available range: -20 (forward) to +20 (backward), 1 step = 0.1 mm
3-22 bizhub PRO C6500
Adjustment 3
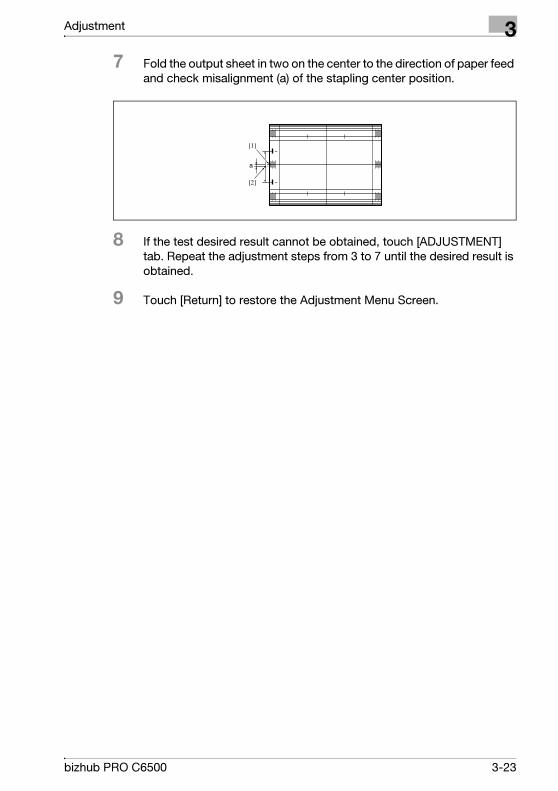
7 Fold the output sheet in two on the center to the direction of paper feed
and check misalignment (a) of the stapling center position.
8 If the test desired result cannot be obtained, touch [ADJUSTMENT]
tab. Repeat the adjustment steps from 3 to 7 until the desired result is
obtained.
9 Touch [Return] to restore the Adjustment Menu Screen.
a
[2]
[1]
bizhub PRO C6500 3-23
3 Adjustment
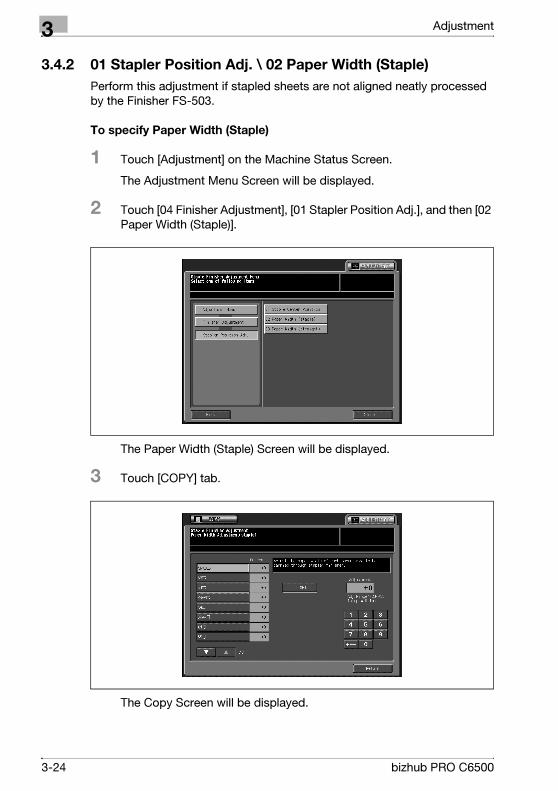
3.4.2 01 Stapler Position Adj. \ 02 Paper Width (Staple)
Perform this adjustment if stapled sheets are not aligned neatly processed
by the Finisher FS-503.
To specify Paper Width (Staple)
1 Touch [Adjustment] on the Machine Status Screen.
The Adjustment Menu Screen will be displayed.
2 Touch [04 Finisher Adjustment], [01 Stapler Position Adj.], and then [02
Paper Width (Staple)].
The Paper Width (Staple) Screen will be displayed.
3 Touch [COPY] tab.
The Copy Screen will be displayed.
3-24 bizhub PRO C6500
Adjustment 3
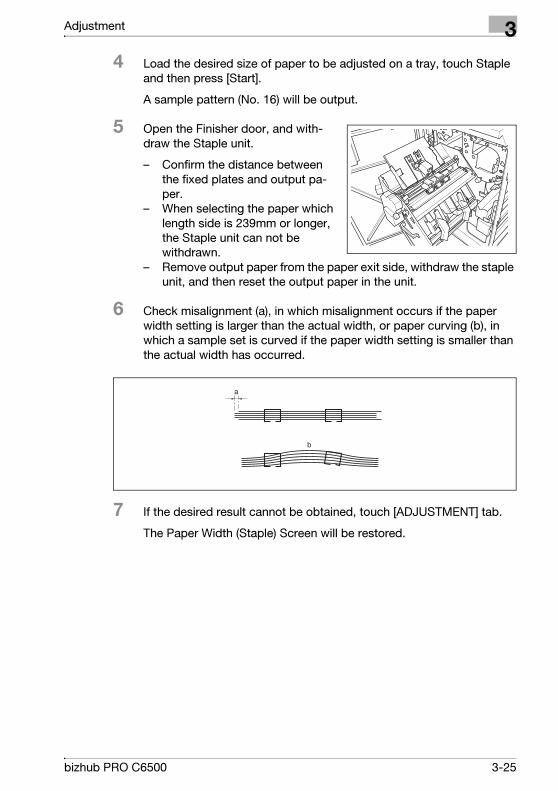
4 Load the desired size of paper to be adjusted on a tray, touch Staple
and then press [Start].
A sample pattern (No. 16) will be output.
5 Open the Finisher door, and with-
draw the Staple unit.
– Confirm the distance between
the fixed plates and output pa-
per.
– When selecting the paper which
length side is 239mm or longer,
the Staple unit can not be
withdrawn.
– Remove output paper from the paper exit side, withdraw the staple
unit, and then reset the output paper in the unit.
6 Check misalignment (a), in which misalignment occurs if the paper
width setting is larger than the actual width, or paper curving (b), in
which a sample set is curved if the paper width setting is smaller than
the actual width has occurred.
7 If the desired result cannot be obtained, touch [ADJUSTMENT] tab.
The Paper Width (Staple) Screen will be restored.
a
b
bizhub PRO C6500 3-25
3 Adjustment
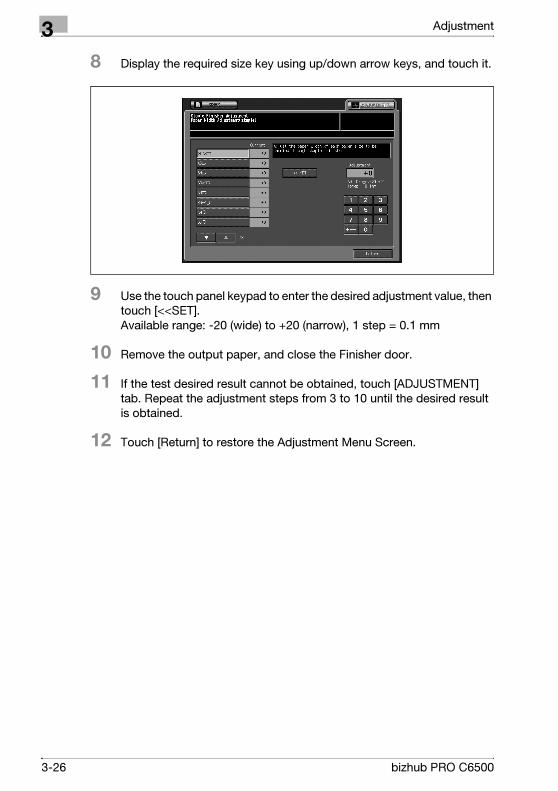
8 Display the required size key using up/down arrow keys, and touch it.
9 Use the touch panel keypad to enter the desired adjustment value, then
touch [<<SET]. Available range: -20 (wide) to +20 (narrow), 1 step = 0.1 mm
10 Remove the output paper, and close the Finisher door.
11 If the test desired result cannot be obtained, touch [ADJUSTMENT]
tab. Repeat the adjustment steps from 3 to 10 until the desired result
is obtained.
12 Touch [Return] to restore the Adjustment Menu Screen.
3-26 bizhub PRO C6500

Adjustment 3
3.4.3 01 Stapler Position Adj. \ 03 Paper Width (Straight)
Perform this adjustment if the paper for straight feed is misaligned in the Fin-
isher FS-503.
To specify Paper Width (Straight)
1 Touch [Adjustment] on the Machine Status Screen.
The Adjustment Menu Screen will be displayed.
2 Touch [04 Finisher Adjustment], [01 Stapler Position Adj.], and then [03
Paper Width (Straight)].
The Paper Width (Straight) Screen will be displayed.
3 Touch [COPY] tab.
The Copy Screen will be displayed.
bizhub PRO C6500 3-27
3 Adjustment
4 Load the desired size of paper to be adjusted on a tray, touch Staple
and then press [Start].
A sample pattern (No. 16) will be output.
5 Open the Finisher door, and with-
draw the Staple unit.
– Confirm the distance between
the fixed plates and output pa-
per.
– When selecting the paper which
length side is 239mm or longer,
the Staple unit can not be
withdrawn.
– Remove output paper from the paper exit side, withdraw the staple
unit, and then reset the output paper in the unit.
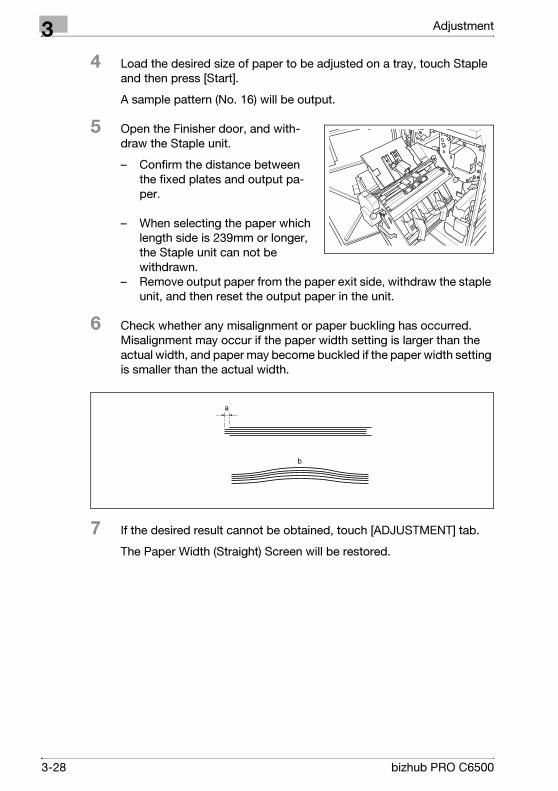
6 Check whether any misalignment or paper buckling has occurred.
Misalignment may occur if the paper width setting is larger than the
actual width, and paper may become buckled if the paper width setting
is smaller than the actual width.
7 If the desired result cannot be obtained, touch [ADJUSTMENT] tab.
The Paper Width (Straight) Screen will be restored.
a
b
3-28 bizhub PRO C6500
Adjustment 3
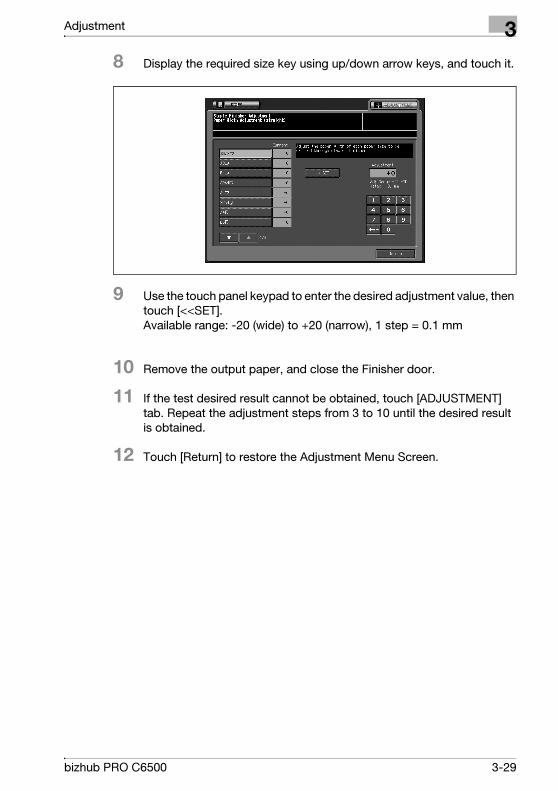
8 Display the required size key using up/down arrow keys, and touch it.
9 Use the touch panel keypad to enter the desired adjustment value, then
touch [<<SET]. Available range: -20 (wide) to +20 (narrow), 1 step = 0.1 mm
10 Remove the output paper, and close the Finisher door.
11 If the test desired result cannot be obtained, touch [ADJUSTMENT]
tab. Repeat the adjustment steps from 3 to 10 until the desired result
is obtained.
12 Touch [Return] to restore the Adjustment Menu Screen.
bizhub PRO C6500 3-29
3 Adjustment
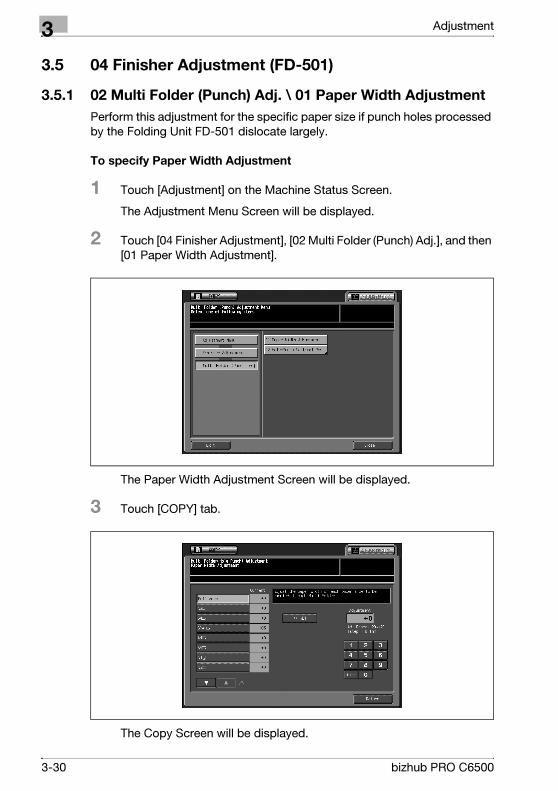
3.5 04 Finisher Adjustment (FD-501)
3.5.1 02 Multi Folder (Punch) Adj. \ 01 Paper Width Adjustment
Perform this adjustment for the specific paper size if punch holes processed
by the Folding Unit FD-501 dislocate largely.
To specify Paper Width Adjustment
1 Touch [Adjustment] on the Machine Status Screen.
The Adjustment Menu Screen will be displayed.
2 Touch [04 Finisher Adjustment], [02 Multi Folder (Punch) Adj.], and then
[01 Paper Width Adjustment].
The Paper Width Adjustment Screen will be displayed.
3 Touch [COPY] tab.
The Copy Screen will be displayed.
3-30 bizhub PRO C6500
Adjustment 3
4 Load the desired size of paper to be adjusted on a tray, specify the set
number to 10, then press [Start] on the control panel.
A sample pattern will be output.
5 Check the diameter of penetrated holes when output sheets are piled
up.
6 If the desired result cannot be obtained, touch [ADJUSTMENT] tab.
The Paper Width Adjustment Screen will be restored.
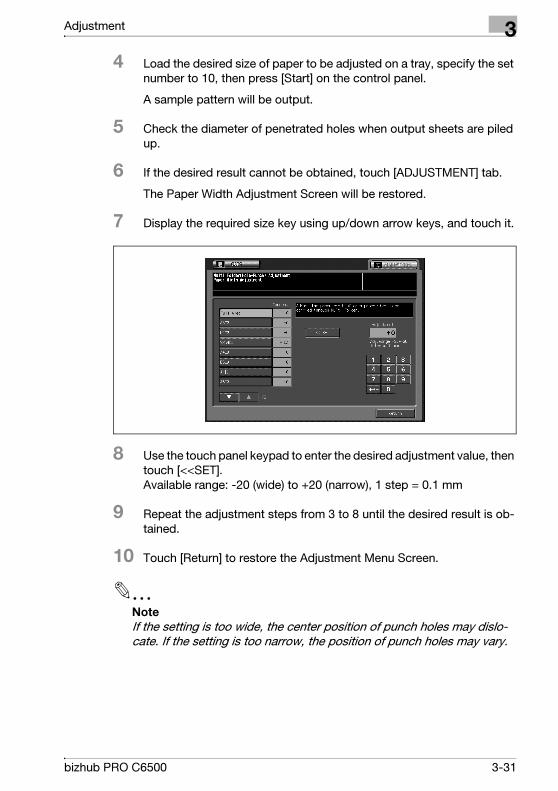
7 Display the required size key using up/down arrow keys, and touch it.
8 Use the touch panel keypad to enter the desired adjustment value, then
touch [<<SET]. Available range: -20 (wide) to +20 (narrow), 1 step = 0.1 mm
9 Repeat the adjustment steps from 3 to 8 until the desired result is ob-
tained.
10 Touch [Return] to restore the Adjustment Menu Screen.
2
Note
If the setting is too wide, the center position of punch holes may dislo-
cate. If the setting is too narrow, the position of punch holes may vary.
bizhub PRO C6500 3-31
3 Adjustment
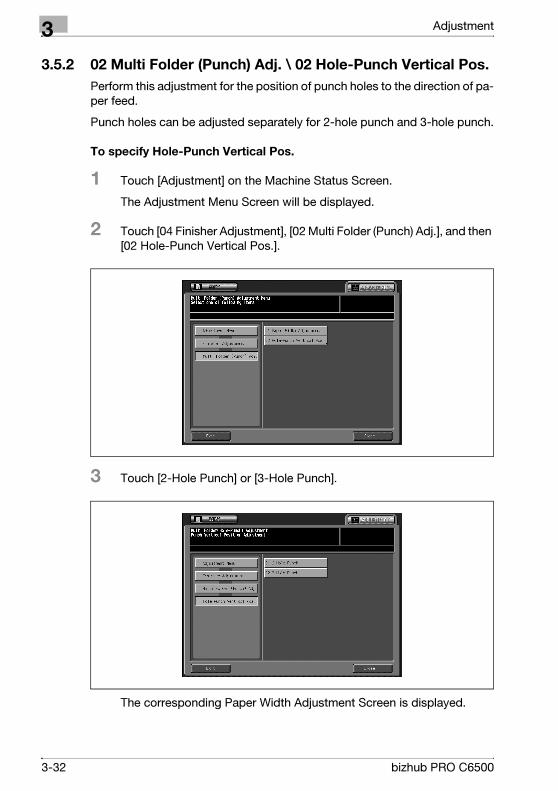
3.5.2 02 Multi Folder (Punch) Adj. \ 02 Hole-Punch Vertical Pos.
Perform this adjustment for the position of punch holes to the direction of pa-
per feed.
Punch holes can be adjusted separately for 2-hole punch and 3-hole punch.
To specify Hole-Punch Vertical Pos.
1 Touch [Adjustment] on the Machine Status Screen.
The Adjustment Menu Screen will be displayed.
2 Touch [04 Finisher Adjustment], [02 Multi Folder (Punch) Adj.], and then
[02 Hole-Punch Vertical Pos.].
3 Touch [2-Hole Punch] or [3-Hole Punch].
The corresponding Paper Width Adjustment Screen is displayed.
3-32 bizhub PRO C6500
Adjustment 3
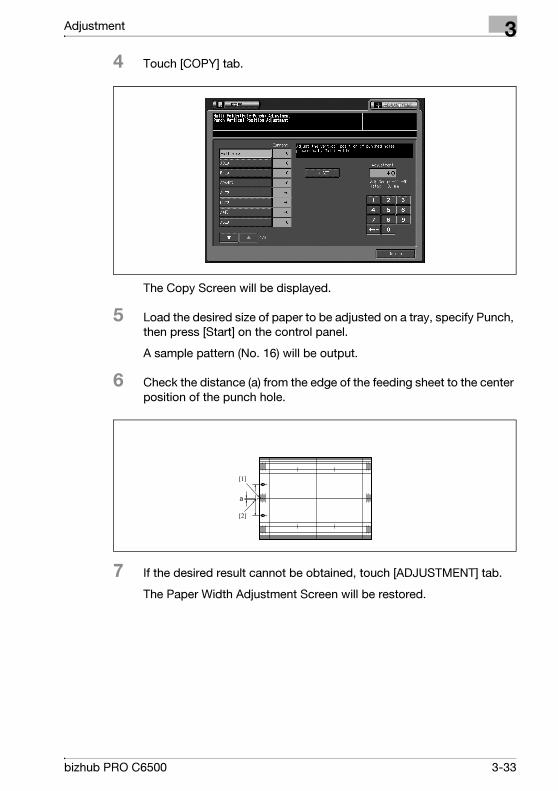
4 Touch [COPY] tab.
The Copy Screen will be displayed.
5 Load the desired size of paper to be adjusted on a tray, specify Punch,
then press [Start] on the control panel.
A sample pattern (No. 16) will be output.
6 Check the distance (a) from the edge of the feeding sheet to the center
position of the punch hole.
7 If the desired result cannot be obtained, touch [ADJUSTMENT] tab.
The Paper Width Adjustment Screen will be restored.
a
[2]
[1]
bizhub PRO C6500 3-33
3 Adjustment
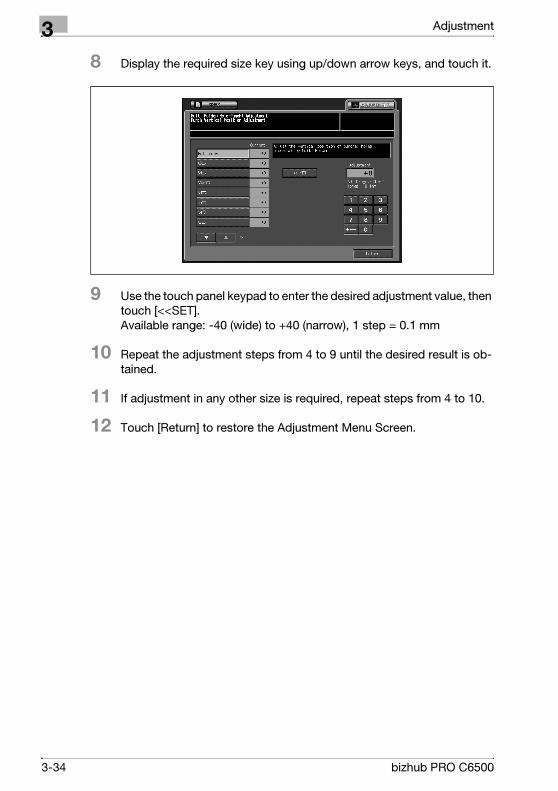
8 Display the required size key using up/down arrow keys, and touch it.
9 Use the touch panel keypad to enter the desired adjustment value, then
touch [<<SET]. Available range: -40 (wide) to +40 (narrow), 1 step = 0.1 mm
10 Repeat the adjustment steps from 4 to 9 until the desired result is ob-
tained.
11 If adjustment in any other size is required, repeat steps from 4 to 10.
12 Touch [Return] to restore the Adjustment Menu Screen.
3-34 bizhub PRO C6500

Adjustment 3
3.5.3 03 Multi Folder (Fold) Adj. \ 01 Half Fold Position Adj.
Perform this adjustment for the half fold position processed by the Folding
Unit FD-501.
To specify Half Fold Position Adj.
1 Touch [Adjustment] on the Machine Status Screen.
The Adjustment Menu Screen will be displayed.
2 Touch [04 Finisher Adjustment], [03 Multi Folder (Fold) Adj.], and then
[01 Half Fold Position Adj.].
The Half Fold Position Adjustment Screen will be displayed.
3 Touch [COPY] tab.
The Copy Screen will be displayed.
bizhub PRO C6500 3-35
3 Adjustment
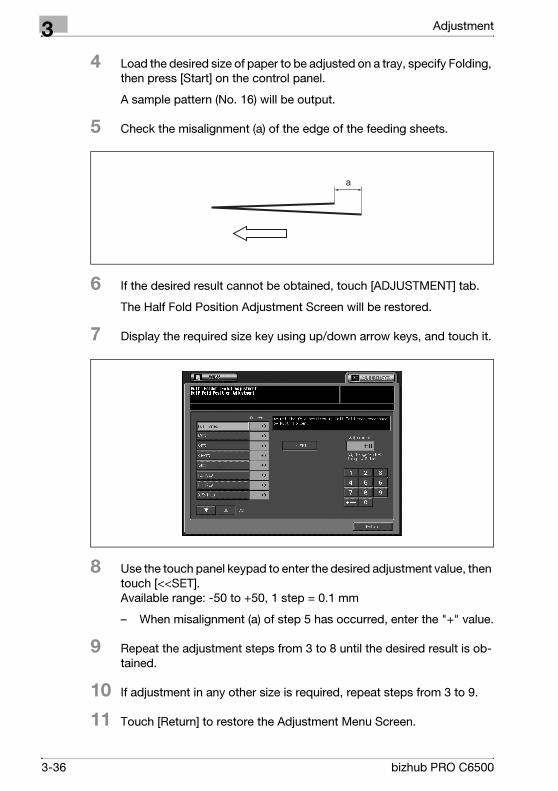
4 Load the desired size of paper to be adjusted on a tray, specify Folding,
then press [Start] on the control panel.
A sample pattern (No. 16) will be output.
5 Check the misalignment (a) of the edge of the feeding sheets.
6 If the desired result cannot be obtained, touch [ADJUSTMENT] tab.
The Half Fold Position Adjustment Screen will be restored.
7 Display the required size key using up/down arrow keys, and touch it.
8 Use the touch panel keypad to enter the desired adjustment value, then
touch [<<SET]. Available range: -50 to +50, 1 step = 0.1 mm
– When misalignment (a) of step 5 has occurred, enter the "+" value.
9 Repeat the adjustment steps from 3 to 8 until the desired result is ob-
tained.
10 If adjustment in any other size is required, repeat steps from 3 to 9.
11 Touch [Return] to restore the Adjustment Menu Screen.
a
3-36 bizhub PRO C6500
Adjustment 3
3.5.4 03 Multi Folder (Fold) Adj. \ 02 Tri-Fold-in Pos. Adj.
Perform this adjustment for the folding positions in Tri-Fold-in mode pro-
cessed by the Folding Unit FD-501.
2
Reminder
When adjusting both Single Fold and Double Fold, be sure to start with
the Double Fold adjustment.
The baseline of Single Fold is calculated from the edge of the sheet, while
that of Double Fold is calculated from the position of the first fold line,
therefore a distance (b) in step 5 will be altered by changing the position
of either Single Fold or Double Fold.
To specify Tri-Fold-in Pos. Adj.
1 Touch [Adjustment] on the Machine Status Screen.
The Adjustment Menu Screen will be displayed.
2 Touch [04 Finisher Adjustment], [03 Multi Folder (Fold) Adj.], and then
[02 Tri-Fold-in Pos. Adj.].
The Tri-Fold-in Position Adjustment Screen will be displayed.
bizhub PRO C6500 3-37

3 Adjustment
3 Touch [COPY] tab.
The Copy Screen will be displayed.
4 Load the desired size of paper to be adjusted on a tray, specify Letter
Fold-in, then press [Start] on the control panel.
A sample pattern (No. 16) will be output.
5 Check a distance (a) and distance (b) on the output sheet.
6 If the desired result cannot be obtained, touch [ADJUSTMENT] tab.
The Tri-Fold-in Position Adjustment Screen will be restored.
a
b
[2]
[1]
3-38 bizhub PRO C6500
Adjustment 3
7 Display the required size key using up/down arrow keys, and touch it.
8 Touch [Double Fold].
9 Use the touch panel keypad to enter the desired adjustment value, then
touch [<<SET]. Available range: -50 to +50, 1 step = 0.1 mm
– The distance (a) in step 5 will increase when the "+" value is en-
tered, and decrease when the "-" value is entered.
10 Touch [Single Fold], then repeat step 9.
– The distance (b) in step 5 will increase when the "+" value is en-
tered, and decrease when the "-" value is entered.
11 Repeat steps 3 to 10 until the desired result is obtained.
12 If adjustment in any other size is required, repeat steps from 3 to 11.
13 Touch [Return] to restore the Adjustment Menu Screen.
bizhub PRO C6500 3-39
3 Adjustment
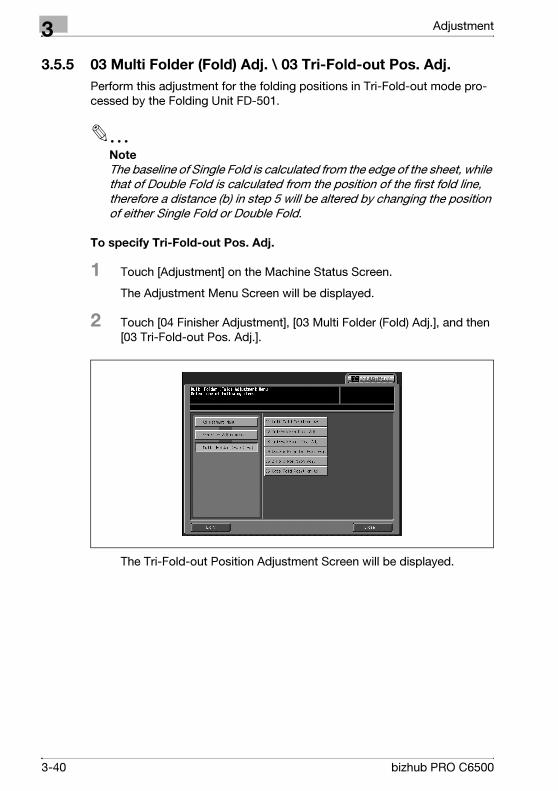
3.5.5 03 Multi Folder (Fold) Adj. \ 03 Tri-Fold-out Pos. Adj.
Perform this adjustment for the folding positions in Tri-Fold-out mode pro-
cessed by the Folding Unit FD-501.
2
Note
The baseline of Single Fold is calculated from the edge of the sheet, while
that of Double Fold is calculated from the position of the first fold line,
therefore a distance (b) in step 5 will be altered by changing the position
of either Single Fold or Double Fold.
To specify Tri-Fold-out Pos. Adj.
1 Touch [Adjustment] on the Machine Status Screen.
The Adjustment Menu Screen will be displayed.
2 Touch [04 Finisher Adjustment], [03 Multi Folder (Fold) Adj.], and then
[03 Tri-Fold-out Pos. Adj.].
The Tri-Fold-out Position Adjustment Screen will be displayed.
3-40 bizhub PRO C6500
Adjustment 3
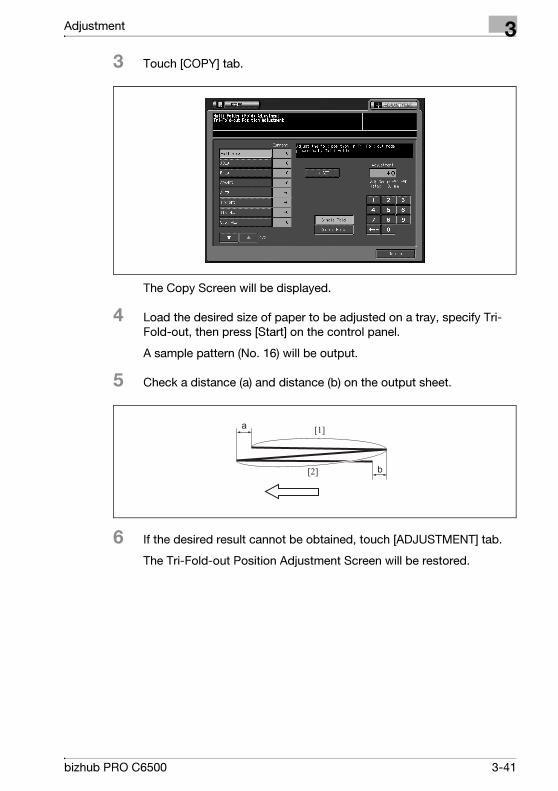
3 Touch [COPY] tab.
The Copy Screen will be displayed.
4 Load the desired size of paper to be adjusted on a tray, specify Tri-
Fold-out, then press [Start] on the control panel.
A sample pattern (No. 16) will be output.
5 Check a distance (a) and distance (b) on the output sheet.
6 If the desired result cannot be obtained, touch [ADJUSTMENT] tab.
The Tri-Fold-out Position Adjustment Screen will be restored.
a
b[2]
[1]
bizhub PRO C6500 3-41

3 Adjustment
7 Display the required size key using up/down arrow keys, and touch it.
8 Touch [Single Fold].
9 Use the touch panel keypad to enter the desired adjustment value, then
touch [<<SET]. Available range: -50 to +50, 1 step = 0.1 mm
– The distance (a) in step 5 will increase when the "+" value is en-
tered, and decrease when the "-" value is entered.
10 Touch [Double Fold], then repeat step 9.
– The distance (b) in step 5 will increase when the "+" value is en-
tered, and decrease when the "-" value is entered.
11 Repeat steps 3 to 10 until the desired result is obtained.
12 If adjustment in any other size is required, repeat steps from 3 to 11.
13 Touch [Return] to restore the Adjustment Menu Screen.
3-42 bizhub PRO C6500

Adjustment 3
3.5.6 03 Multi Folder (Fold) Adj. \ 04 Double Parallel Pos. Adj.
Perform this adjustment for the folding positions in Tri-Fold-in mode pro-
cessed by the Folding Unit FD-501.
2
Reminder
When adjusting both Single Fold and Double Fold, be sure to start with
the Double Fold adjustment.
The baseline of Single Fold is calculated from the edge of the sheet, while
that of Double Fold is calculated from the position of the first fold line,
therefore a distance (b) in step 5 will be altered by changing the position
of either Single Fold or Double Fold.
To specify Double Parallel Pos. Adj.
1 Touch [Adjustment] on the Machine Status Screen.
The Adjustment Menu Screen will be displayed.
2 Touch [04 Finisher Adjustment], [03 Multi Folder (Fold) Adj.], and then
[04 Double Parallel Pos. Adj.].
The Double Parallel Position Adjustment Screen will be displayed.
bizhub PRO C6500 3-43
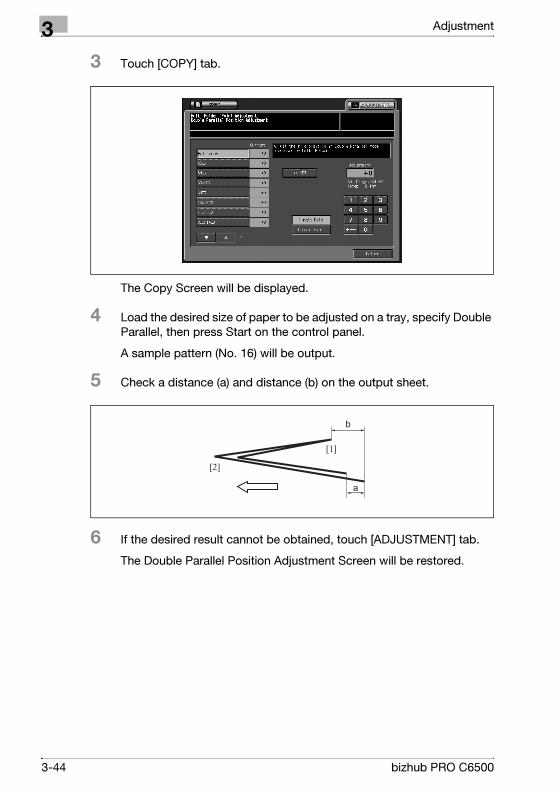
3 Adjustment
3 Touch [COPY] tab.
The Copy Screen will be displayed.
4 Load the desired size of paper to be adjusted on a tray, specify Double
Parallel, then press Start on the control panel.
A sample pattern (No. 16) will be output.
5 Check a distance (a) and distance (b) on the output sheet.
6 If the desired result cannot be obtained, touch [ADJUSTMENT] tab.
The Double Parallel Position Adjustment Screen will be restored.
b
a
[2]
[1]
3-44 bizhub PRO C6500
Adjustment 3
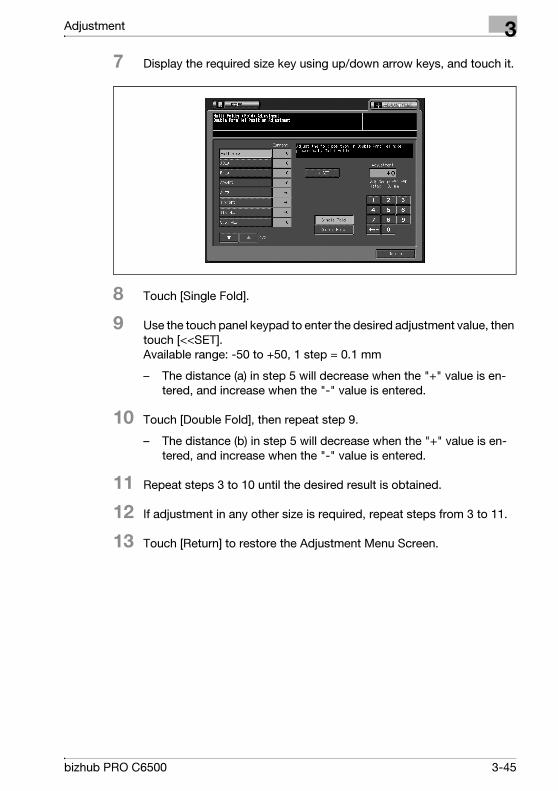
7 Display the required size key using up/down arrow keys, and touch it.
8 Touch [Single Fold].
9 Use the touch panel keypad to enter the desired adjustment value, then
touch [<<SET]. Available range: -50 to +50, 1 step = 0.1 mm
– The distance (a) in step 5 will decrease when the "+" value is en-
tered, and increase when the "-" value is entered.
10 Touch [Double Fold], then repeat step 9.
– The distance (b) in step 5 will decrease when the "+" value is en-
tered, and increase when the "-" value is entered.
11 Repeat steps 3 to 10 until the desired result is obtained.
12 If adjustment in any other size is required, repeat steps from 3 to 11.
13 Touch [Return] to restore the Adjustment Menu Screen.
bizhub PRO C6500 3-45
3 Adjustment
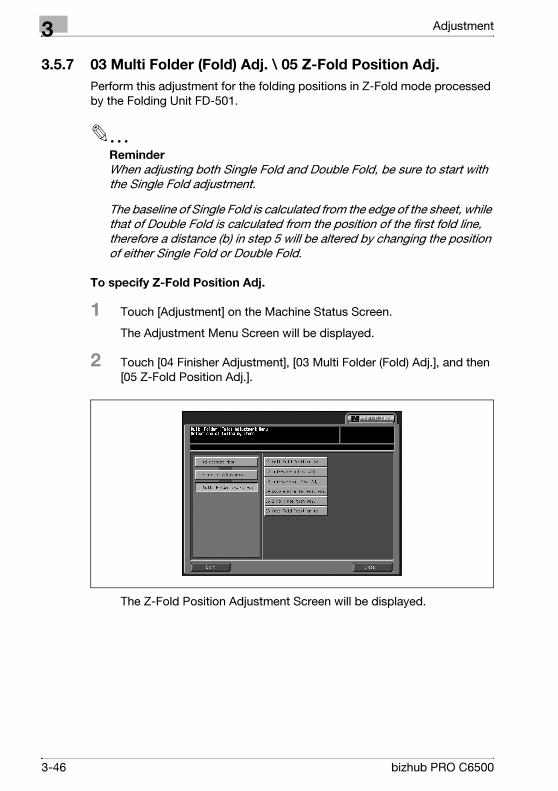
3.5.7 03 Multi Folder (Fold) Adj. \ 05 Z-Fold Position Adj.
Perform this adjustment for the folding positions in Z-Fold mode processed
by the Folding Unit FD-501.
2
Reminder
When adjusting both Single Fold and Double Fold, be sure to start with
the Single Fold adjustment.
The baseline of Single Fold is calculated from the edge of the sheet, while
that of Double Fold is calculated from the position of the first fold line,
therefore a distance (b) in step 5 will be altered by changing the position
of either Single Fold or Double Fold.
To specify Z-Fold Position Adj.
1 Touch [Adjustment] on the Machine Status Screen.
The Adjustment Menu Screen will be displayed.
2 Touch [04 Finisher Adjustment], [03 Multi Folder (Fold) Adj.], and then
[05 Z-Fold Position Adj.].
The Z-Fold Position Adjustment Screen will be displayed.
3-46 bizhub PRO C6500

Adjustment 3
3 Touch [COPY] tab.
The Copy Screen will be displayed.
4 Load the desired size of paper to be adjusted on a tray, specify Z-Fold,
then press [Start] on the control panel.
A sample pattern (No. 16) will be output.
5 Check a distance (a) and distance (b) on the output sheet.
6 If the desired result cannot be obtained, touch [ADJUSTMENT] tab.
The Z-Fold Position Adjustment Screen will be restored.
b
a
[2]
[1]
bizhub PRO C6500 3-47
3 Adjustment
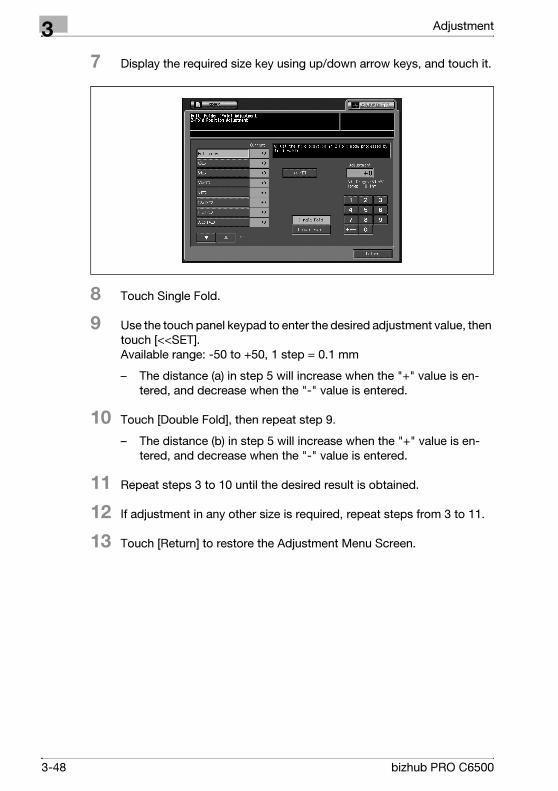
7 Display the required size key using up/down arrow keys, and touch it.
8 Touch Single Fold.
9 Use the touch panel keypad to enter the desired adjustment value, then
touch [<<SET]. Available range: -50 to +50, 1 step = 0.1 mm
– The distance (a) in step 5 will increase when the "+" value is en-
tered, and decrease when the "-" value is entered.
10 Touch [Double Fold], then repeat step 9.
– The distance (b) in step 5 will increase when the "+" value is en-
tered, and decrease when the "-" value is entered.
11 Repeat steps 3 to 10 until the desired result is obtained.
12 If adjustment in any other size is required, repeat steps from 3 to 11.
13 Touch [Return] to restore the Adjustment Menu Screen.
3-48 bizhub PRO C6500

Adjustment 3
3.5.8 03 Multi Folder (Fold) Adj. \ 06 Gate Fold Position Adj.
Perform this adjustment for the folding positions in Gate folding mode pro-
cessed by the Folding Unit FD-501.
2
Reminder
When adjusting Single Fold, Double Fold and Triple Fold at a time, be
sure to start with the Single Fold adjustment.
The baseline of Single Fold is calculated from the edge of the sheet, while
that of Double Fold is calculated from the position of the first fold line, and
that of Triple Fold is calculated from the position of the second fold line,
therefore a distance (a), distance (b) and distance (c) in step 5 will be al-
tered by changing the position of any fold position.
To specify Gate Fold Position Adj.
1 Touch [Adjustment] on the Machine Status Screen.
The Adjustment Menu Screen will be displayed.
2 Touch [04 Finisher Adjustment], [03 Multi Folder (Fold) Adj.], and then
[06 Gate Fold Position Adj].
The Gate Fold Position Adjustment Screen will be displayed.
bizhub PRO C6500 3-49
3 Adjustment
3 Touch [COPY] tab.
The Copy Screen will be displayed.
4 Load the desired size of paper to be adjusted on a tray, specify Gate,
then press [Start] on the control panel.
A sample pattern (No. 16) will be output.
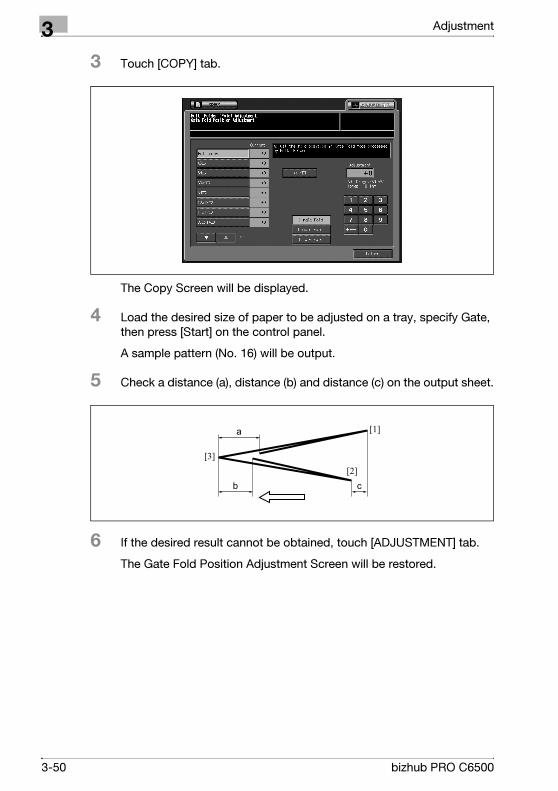
5 Check a distance (a), distance (b) and distance (c) on the output sheet.
6 If the desired result cannot be obtained, touch [ADJUSTMENT] tab.
The Gate Fold Position Adjustment Screen will be restored.
a
b c
[3]
[1]
[2]
3-50 bizhub PRO C6500

Adjustment 3
7 Display the required size key using up/down arrow keys, and touch it.
8 Touch [Single Fold].
9 Use the touch panel keypad to enter the desired adjustment value, then
touch [<<SET]. Available range: -50 to +50, 1 step = 0.1 mm
– The distance (a) in step 5 will decrease when the "+" value is en-
tered, and increase when the "-" value is entered.
10 Touch [Double Fold] and [Triple Fold] to set in the same manner re-
spectively. Repeat step 9.
– In Double Fold, the distance (b) in step 5 will increase when the "+"
value is entered, and decrease when the "-" value is entered. In Triple Fold, the distance (c) in step 5 will decrease when the "+"
value is entered, and increase when the "-" value is entered.
11 Repeat steps 3 to 10 until the desired result is obtained.
12 If adjustment in any other size is required, repeat steps from 3 to 11.
13 Touch [Return] to restore the Adjustment Menu Screen.
bizhub PRO C6500 3-51
3 Adjustment
3.6 04 Finisher Adjustment (LS-501)
3.6.1 05 Stacker Adjustment \ 01 Paper Width Adjustment
Perform this adjustment when output sheets are not aligned in a perpendic-
ular position to the direction of paper feed processed by the Large Capacity
Stacker LS-501.
To specify Paper Width Adjustment
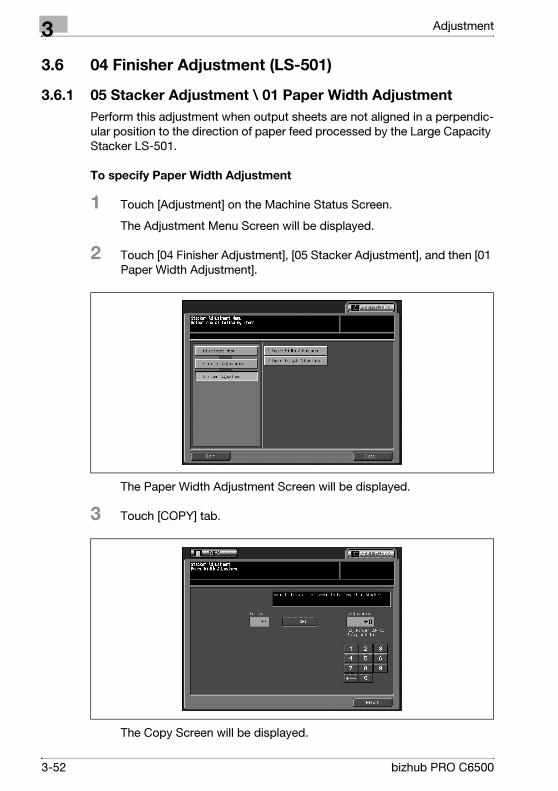
1 Touch [Adjustment] on the Machine Status Screen.
The Adjustment Menu Screen will be displayed.
2 Touch [04 Finisher Adjustment], [05 Stacker Adjustment], and then [01
Paper Width Adjustment].
The Paper Width Adjustment Screen will be displayed.
3 Touch [COPY] tab.
The Copy Screen will be displayed.
3-52 bizhub PRO C6500
Adjustment 3
4 Specify A3 then press [Start] on the control panel.
A sample pattern (No. 16) will be output.
5 If output sheets are misaligned, touch [ADJUSTMENT] tab.
The Paper Width Adjustment Screen will be restored.
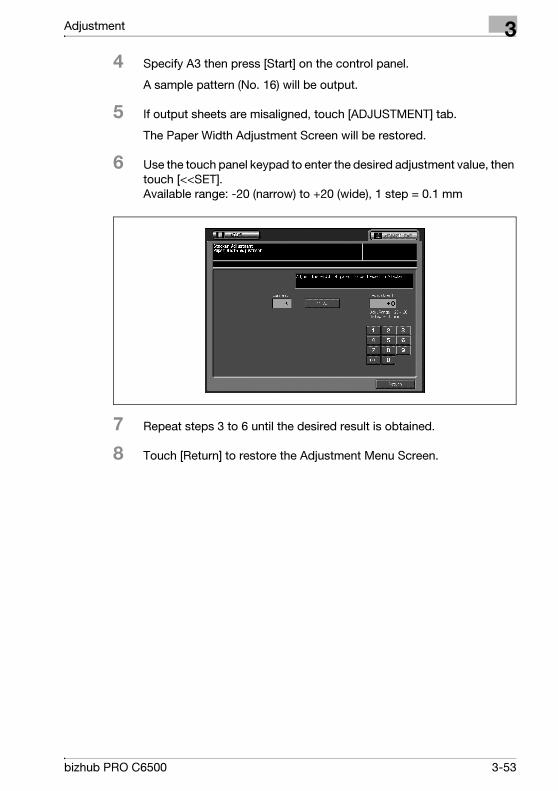
6 Use the touch panel keypad to enter the desired adjustment value, then
touch [<<SET]. Available range: -20 (narrow) to +20 (wide), 1 step = 0.1 mm
7 Repeat steps 3 to 6 until the desired result is obtained.
8 Touch [Return] to restore the Adjustment Menu Screen.
bizhub PRO C6500 3-53
3 Adjustment
3.6.2 05 Stacker Adjustment \ 02 Paper Length Adjustment
Perform this adjustment when output sheets are not aligned to the direction
of paper feed processed by the Large Capacity Stacker LS-501.
To specify Length Adjustment
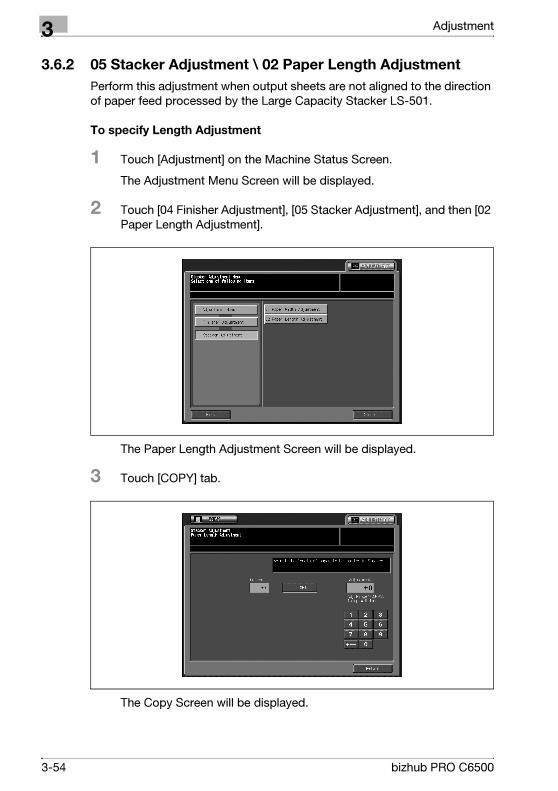
1 Touch [Adjustment] on the Machine Status Screen.
The Adjustment Menu Screen will be displayed.
2 Touch [04 Finisher Adjustment], [05 Stacker Adjustment], and then [02
Paper Length Adjustment].
The Paper Length Adjustment Screen will be displayed.
3 Touch [COPY] tab.
The Copy Screen will be displayed.
3-54 bizhub PRO C6500

Adjustment 3
4 Specify A3 then press [Start] on the control panel.
A sample pattern (No. 16) will be output.
5 If output sheets are misaligned, touch [ADJUSTMENT] tab.
The Paper Length Adjustment Screen will be restored.
6 Use the touch panel keypad to enter the desired adjustment value, then
touch [<<SET]. Available range: -20 (narrow) to +20 (wide), 1 step = 0.1 mm
7 Repeat steps 3 to 6 until the desired result is obtained.
8 Touch [Return] to restore the Adjustment Menu Screen.
bizhub PRO C6500 3-55
3 Adjustment
3.7 04 Finisher Adjustment (SD-501)
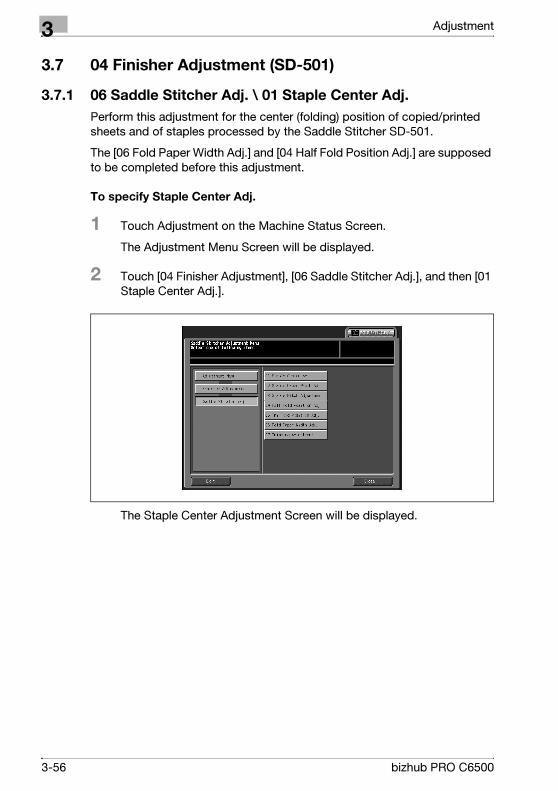
3.7.1 06 Saddle Stitcher Adj. \ 01 Staple Center Adj.
Perform this adjustment for the center (folding) position of copied/printed
sheets and of staples processed by the Saddle Stitcher SD-501.
The [06 Fold Paper Width Adj.] and [04 Half Fold Position Adj.] are supposed
to be completed before this adjustment.
To specify Staple Center Adj.
1 Touch Adjustment on the Machine Status Screen.
The Adjustment Menu Screen will be displayed.
2 Touch [04 Finisher Adjustment], [06 Saddle Stitcher Adj.], and then [01
Staple Center Adj.].
The Staple Center Adjustment Screen will be displayed.
3-56 bizhub PRO C6500
Adjustment 3
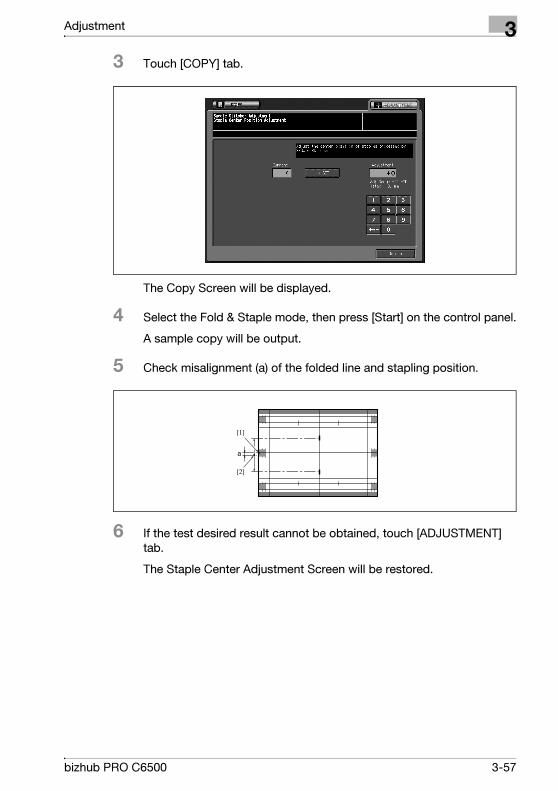
3 Touch [COPY] tab.
The Copy Screen will be displayed.
4 Select the Fold & Staple mode, then press [Start] on the control panel.
A sample copy will be output.
5 Check misalignment (a) of the folded line and stapling position.
6 If the test desired result cannot be obtained, touch [ADJUSTMENT]
tab.
The Staple Center Adjustment Screen will be restored.
a
[2]
[1]
bizhub PRO C6500 3-57
3 Adjustment
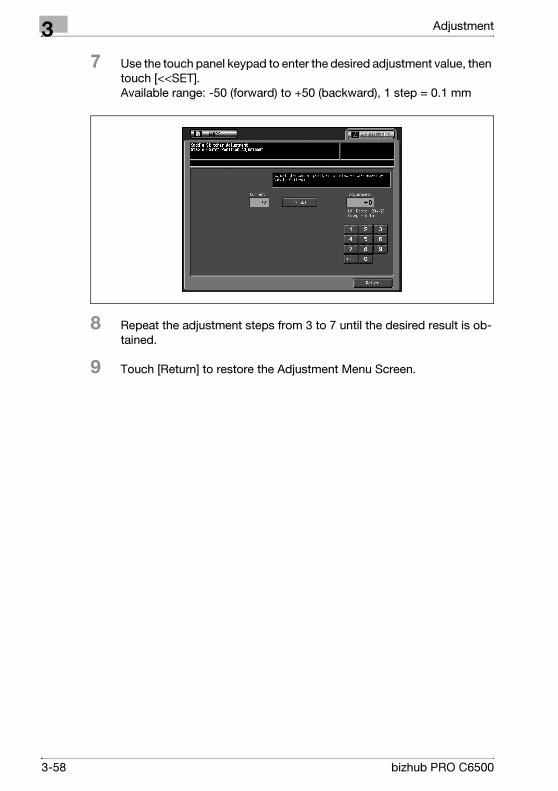
7 Use the touch panel keypad to enter the desired adjustment value, then
touch [<<SET]. Available range: -50 (forward) to +50 (backward), 1 step = 0.1 mm
8 Repeat the adjustment steps from 3 to 7 until the desired result is ob-
tained.
9 Touch [Return] to restore the Adjustment Menu Screen.
3-58 bizhub PRO C6500

Adjustment 3
3.7.2 06 Saddle Stitcher Adj. \ 02 Staple Paper Width Adj.
Perform this adjustment if stapled sheets are not aligned neatly processed
by the Saddle Stitcher SD-501.
To specify Staple Paper Width Adj.
1 Touch [Adjustment] on the Machine Status Screen.
The Adjustment Menu Screen will be displayed.
2 Touch [04 Finisher Adjustment], [06 Saddle Stitcher Adj.], and then [02
Staple Paper Width Adj.].
The Staple Paper Width Adjustment Screen will be displayed.
3 Touch [COPY] tab.
The Copy Screen will be displayed.
bizhub PRO C6500 3-59

3 Adjustment
4 Load the desired size of paper to be adjusted on a tray, select Fold &
Staple and then press [Start] on the control panel.
A sample pattern (No. 16) will be output.
5 Check misalignment (a), in which misalignment occurs if the paper
width setting is larger than the actual width, or paper curving (b), in
which a sample set is curved if the paper width setting is smaller than
the actual width has occurred.
6 If the desired result cannot be obtained, touch [ADJUSTMENT] tab.
The Staple Paper Width Adjustment Screen will be restored.
7 Display the required size key using up/down arrow keys, and touch it.
8 Use the touch panel keypad to enter the desired adjustment value, then
touch [<<SET]. Available range: -20 (wide) to +20 (narrow), 1 step = 0.1 mm
9 Repeat the adjustment steps from 3 to 8 until the desired result is ob-
tained.
a
b
3-60 bizhub PRO C6500
Adjustment 3
10 If adjustment in any other paper size is required, repeat steps from 3 to
9.
11 Touch [Return] to restore the Adjustment Menu Screen.
2
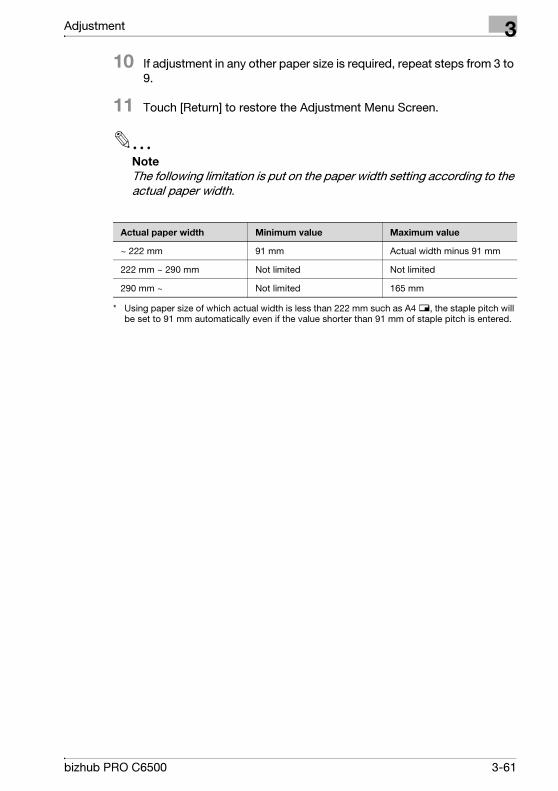
Note
The following limitation is put on the paper width setting according to the
actual paper width.
* Using paper size of which actual width is less than 222 mm such as A4 w, the staple pitch will be set to 91 mm automatically even if the value shorter than 91 mm of staple pitch is entered.
Actual paper width Minimum value Maximum value
~ 222 mm 91 mm Actual width minus 91 mm
222 mm ~ 290 mm Not limited Not limited
290 mm ~ Not limited 165 mm
bizhub PRO C6500 3-61

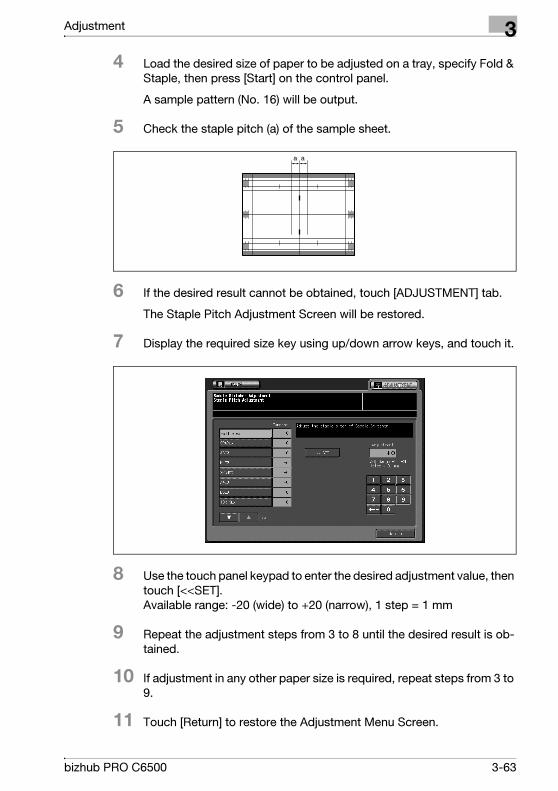
3 Adjustment
3.7.3 06 Saddle Stitcher Adj. \ 03 Staple Pitch Adjustment
Perform this adjustment for the staple pitch processed by the Saddle Stitch-
er SD-501.
To specify Staple Pitch Adjustment
1 Touch [Adjustment] on the Machine Status Screen.
The Adjustment Menu Screen will be displayed.
2 Touch [04 Finisher Adjustment], [06 Saddle Stitcher Adj.], and then [03
Staple Pitch Adjustment].
The Staple Pitch Adjustment Screen will be displayed.
3 Touch [COPY] tab.
The Copy Screen will be displayed.
3-62 bizhub PRO C6500
Adjustment 3
4 Load the desired size of paper to be adjusted on a tray, specify Fold &
Staple, then press [Start] on the control panel.
A sample pattern (No. 16) will be output.
5 Check the staple pitch (a) of the sample sheet.
6 If the desired result cannot be obtained, touch [ADJUSTMENT] tab.
The Staple Pitch Adjustment Screen will be restored.
7 Display the required size key using up/down arrow keys, and touch it.
8 Use the touch panel keypad to enter the desired adjustment value, then
touch [<<SET]. Available range: -20 (wide) to +20 (narrow), 1 step = 1 mm
9 Repeat the adjustment steps from 3 to 8 until the desired result is ob-
tained.
10 If adjustment in any other paper size is required, repeat steps from 3 to
9.
11 Touch [Return] to restore the Adjustment Menu Screen.
a a
bizhub PRO C6500 3-63

3 Adjustment
3.7.4 06 Saddle Stitcher Adj. \ 04 Half Fold Position Adj.
Perform this adjustment for the double-folding position processed by the
Saddle Stitcher SD-501.
To specify Half Fold Position Adj.
1 Touch [Adjustment] on the Machine Status Screen.
The Adjustment Menu Screen will be displayed.
2 Touch [04 Finisher Adjustment], [06 Saddle Stitcher Adj.], and then [04
Half Fold Position Adj.].
The Half Fold Position Adjustment Screen will be displayed.
3 Touch [COPY] tab.
The Copy Screen will be displayed.
3-64 bizhub PRO C6500
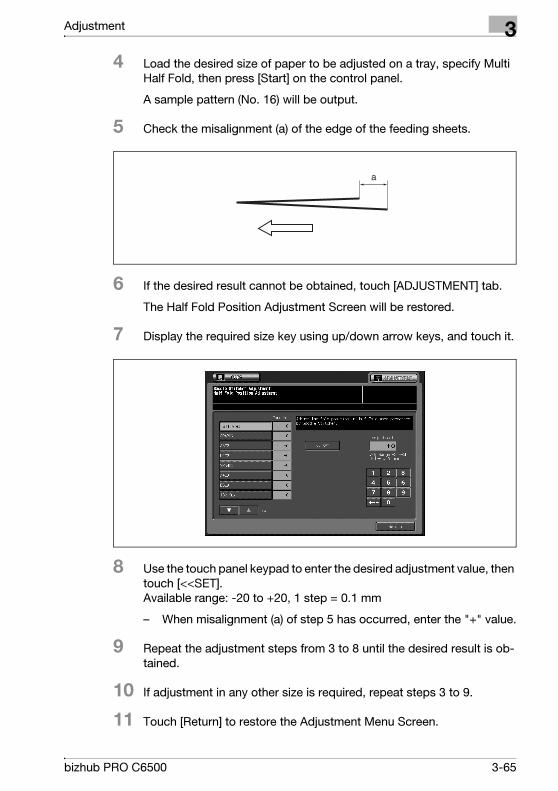
Adjustment 3
4 Load the desired size of paper to be adjusted on a tray, specify Multi
Half Fold, then press [Start] on the control panel.
A sample pattern (No. 16) will be output.
5 Check the misalignment (a) of the edge of the feeding sheets.
6 If the desired result cannot be obtained, touch [ADJUSTMENT] tab.
The Half Fold Position Adjustment Screen will be restored.
7 Display the required size key using up/down arrow keys, and touch it.
8 Use the touch panel keypad to enter the desired adjustment value, then
touch [<<SET]. Available range: -20 to +20, 1 step = 0.1 mm
– When misalignment (a) of step 5 has occurred, enter the "+" value.
9 Repeat the adjustment steps from 3 to 8 until the desired result is ob-
tained.
10 If adjustment in any other size is required, repeat steps 3 to 9.
11 Touch [Return] to restore the Adjustment Menu Screen.
a
bizhub PRO C6500 3-65

3 Adjustment
3.7.5 06 Saddle Stitcher Adj. \ 05 Tri-Fold Position Adj.
Perform this adjustment for the three-folding positions processed by the
Saddle Stitcher SD-501.
2
Note
When adjusting both Single Fold and Double Fold, be sure to start with
the Double Fold adjustment.
The baseline of Single Fold is calculated from the edge of the sheet, while
that of Double Fold is calculated from the position of the first fold line,
therefore a distance (b) in step 5 will be altered by changing the position
of either Single Fold or Double Fold.
To specify Tri-Fold Position Adj.
1 Touch [Adjustment] on the Machine Status Screen.
The Adjustment Menu Screen will be displayed.
2 Touch [04 Finisher Adjustment], [06 Saddle Stitcher Adj.], and then [05
Tri-Fold Position Adj.].
The Tri-Fold Position Adjustment Screen will be displayed.
3-66 bizhub PRO C6500
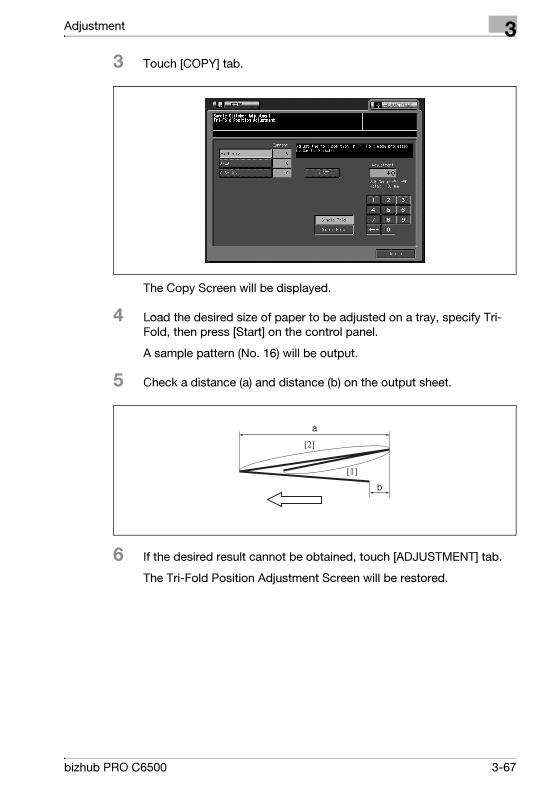
Adjustment 3
3 Touch [COPY] tab.
The Copy Screen will be displayed.
4 Load the desired size of paper to be adjusted on a tray, specify Tri-
Fold, then press [Start] on the control panel.
A sample pattern (No. 16) will be output.
5 Check a distance (a) and distance (b) on the output sheet.
6 If the desired result cannot be obtained, touch [ADJUSTMENT] tab.
The Tri-Fold Position Adjustment Screen will be restored.
a
b
[2]
[1]
bizhub PRO C6500 3-67
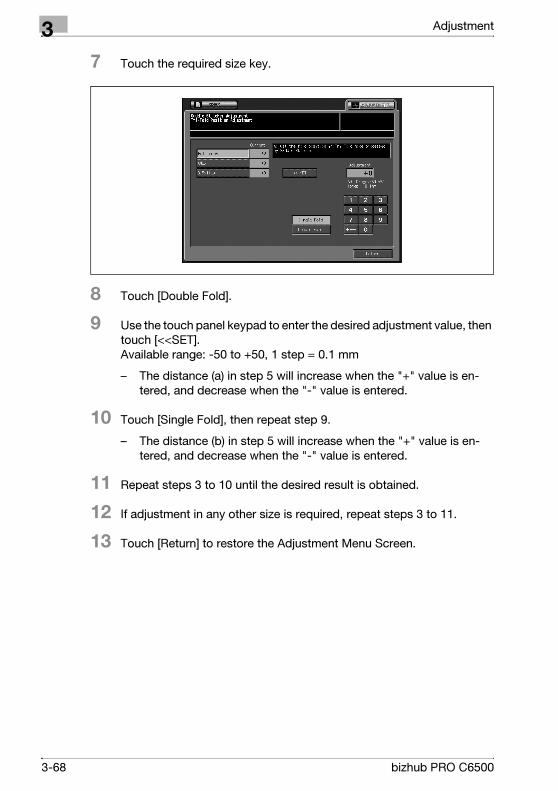
3 Adjustment
7 Touch the required size key.
8 Touch [Double Fold].
9 Use the touch panel keypad to enter the desired adjustment value, then
touch [<<SET]. Available range: -50 to +50, 1 step = 0.1 mm
– The distance (a) in step 5 will increase when the "+" value is en-
tered, and decrease when the "-" value is entered.
10 Touch [Single Fold], then repeat step 9.
– The distance (b) in step 5 will increase when the "+" value is en-
tered, and decrease when the "-" value is entered.
11 Repeat steps 3 to 10 until the desired result is obtained.
12 If adjustment in any other size is required, repeat steps 3 to 11.
13 Touch [Return] to restore the Adjustment Menu Screen.
3-68 bizhub PRO C6500
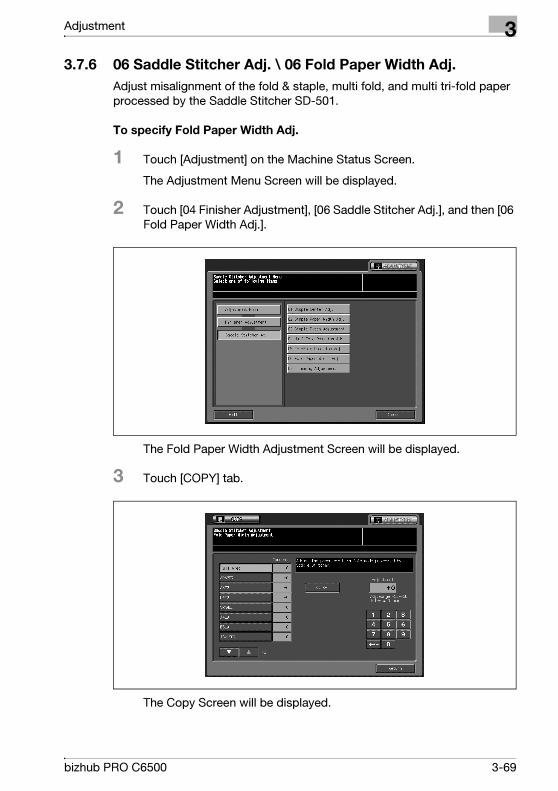
Adjustment 3
3.7.6 06 Saddle Stitcher Adj. \ 06 Fold Paper Width Adj.
Adjust misalignment of the fold & staple, multi fold, and multi tri-fold paper
processed by the Saddle Stitcher SD-501.
To specify Fold Paper Width Adj.
1 Touch [Adjustment] on the Machine Status Screen.
The Adjustment Menu Screen will be displayed.
2 Touch [04 Finisher Adjustment], [06 Saddle Stitcher Adj.], and then [06
Fold Paper Width Adj.].
The Fold Paper Width Adjustment Screen will be displayed.
3 Touch [COPY] tab.
The Copy Screen will be displayed.
bizhub PRO C6500 3-69
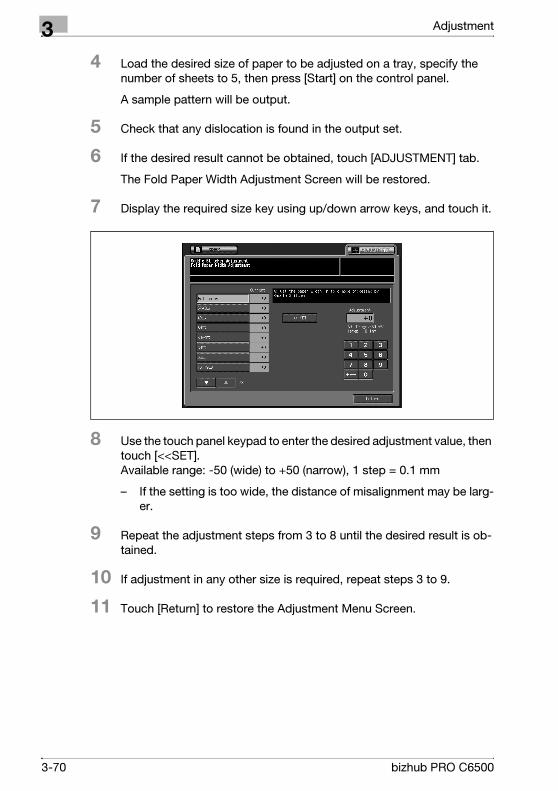
3 Adjustment
4 Load the desired size of paper to be adjusted on a tray, specify the
number of sheets to 5, then press [Start] on the control panel.
A sample pattern will be output.
5 Check that any dislocation is found in the output set.
6 If the desired result cannot be obtained, touch [ADJUSTMENT] tab.
The Fold Paper Width Adjustment Screen will be restored.
7 Display the required size key using up/down arrow keys, and touch it.
8 Use the touch panel keypad to enter the desired adjustment value, then
touch [<<SET]. Available range: -50 (wide) to +50 (narrow), 1 step = 0.1 mm
– If the setting is too wide, the distance of misalignment may be larg-
er.
9 Repeat the adjustment steps from 3 to 8 until the desired result is ob-
tained.
10 If adjustment in any other size is required, repeat steps 3 to 9.
11 Touch [Return] to restore the Adjustment Menu Screen.
3-70 bizhub PRO C6500
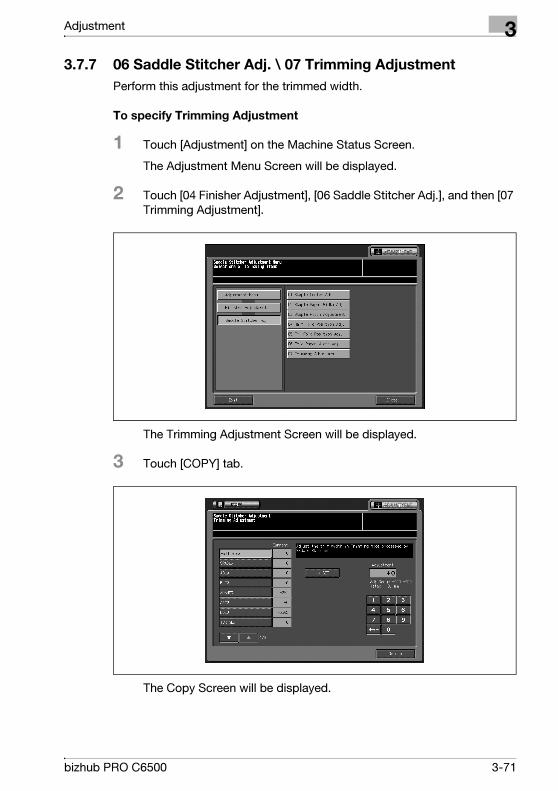
Adjustment 3
3.7.7 06 Saddle Stitcher Adj. \ 07 Trimming Adjustment
Perform this adjustment for the trimmed width.
To specify Trimming Adjustment
1 Touch [Adjustment] on the Machine Status Screen.
The Adjustment Menu Screen will be displayed.
2 Touch [04 Finisher Adjustment], [06 Saddle Stitcher Adj.], and then [07
Trimming Adjustment].
The Trimming Adjustment Screen will be displayed.
3 Touch [COPY] tab.
The Copy Screen will be displayed.
bizhub PRO C6500 3-71
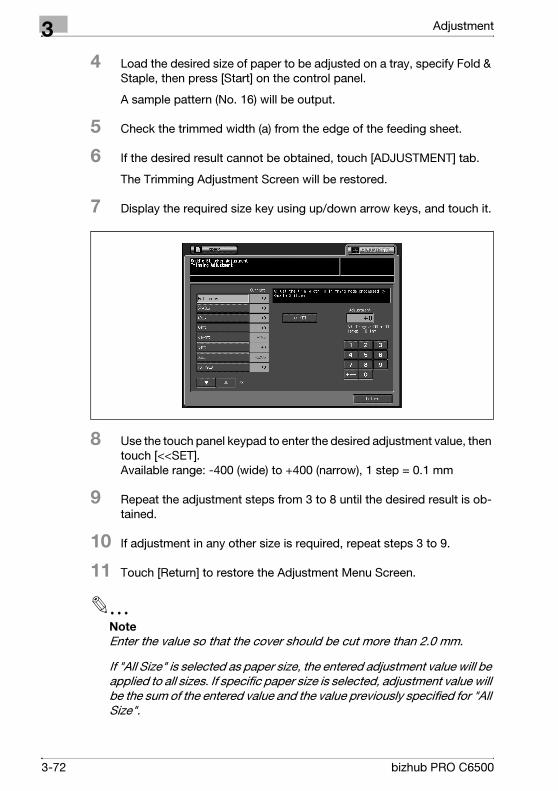
3 Adjustment
4 Load the desired size of paper to be adjusted on a tray, specify Fold &
Staple, then press [Start] on the control panel.
A sample pattern (No. 16) will be output.
5 Check the trimmed width (a) from the edge of the feeding sheet.
6 If the desired result cannot be obtained, touch [ADJUSTMENT] tab.
The Trimming Adjustment Screen will be restored.
7 Display the required size key using up/down arrow keys, and touch it.
8 Use the touch panel keypad to enter the desired adjustment value, then
touch [<<SET]. Available range: -400 (wide) to +400 (narrow), 1 step = 0.1 mm
9 Repeat the adjustment steps from 3 to 8 until the desired result is ob-
tained.
10 If adjustment in any other size is required, repeat steps 3 to 9.
11 Touch [Return] to restore the Adjustment Menu Screen.
2
Note
Enter the value so that the cover should be cut more than 2.0 mm.
If "All Size" is selected as paper size, the entered adjustment value will be
applied to all sizes. If specific paper size is selected, adjustment value will
be the sum of the entered value and the value previously specified for "All
Size".
3-72 bizhub PRO C6500
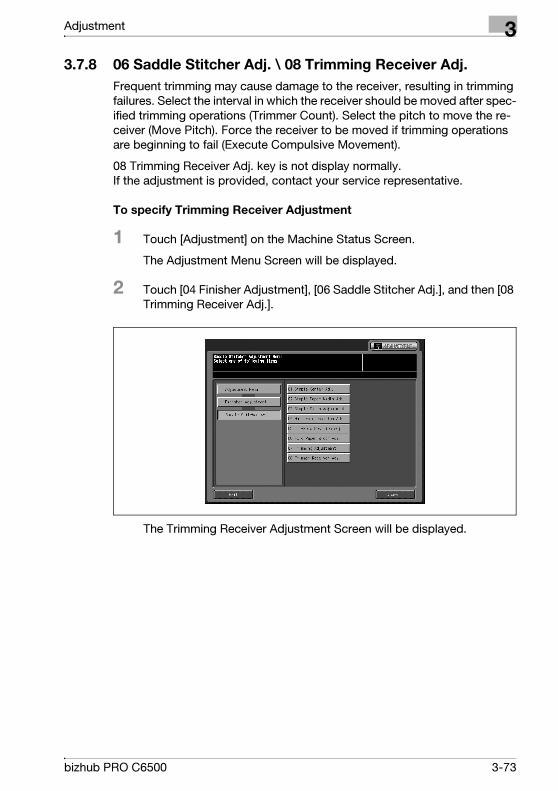
Adjustment 3
3.7.8 06 Saddle Stitcher Adj. \ 08 Trimming Receiver Adj.
Frequent trimming may cause damage to the receiver, resulting in trimming
failures. Select the interval in which the receiver should be moved after spec-
ified trimming operations (Trimmer Count). Select the pitch to move the re-
ceiver (Move Pitch). Force the receiver to be moved if trimming operations
are beginning to fail (Execute Compulsive Movement).
08 Trimming Receiver Adj. key is not display normally. If the adjustment is provided, contact your service representative.
To specify Trimming Receiver Adjustment
1 Touch [Adjustment] on the Machine Status Screen.
The Adjustment Menu Screen will be displayed.
2 Touch [04 Finisher Adjustment], [06 Saddle Stitcher Adj.], and then [08
Trimming Receiver Adj.].
The Trimming Receiver Adjustment Screen will be displayed.
bizhub PRO C6500 3-73
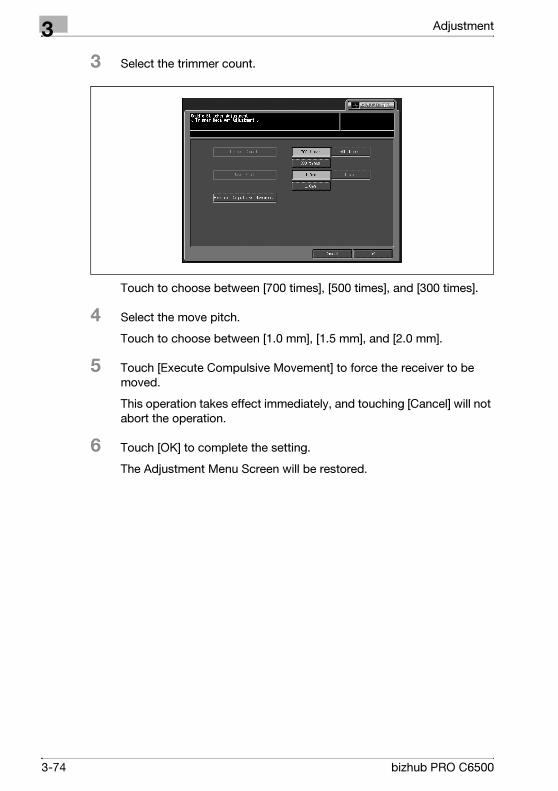
3 Adjustment
3 Select the trimmer count.
Touch to choose between [700 times], [500 times], and [300 times].
4 Select the move pitch.
Touch to choose between [1.0 mm], [1.5 mm], and [2.0 mm].
5 Touch [Execute Compulsive Movement] to force the receiver to be
moved.
This operation takes effect immediately, and touching [Cancel] will not
abort the operation.
6 Touch [OK] to complete the setting.
The Adjustment Menu Screen will be restored.
3-74 bizhub PRO C6500
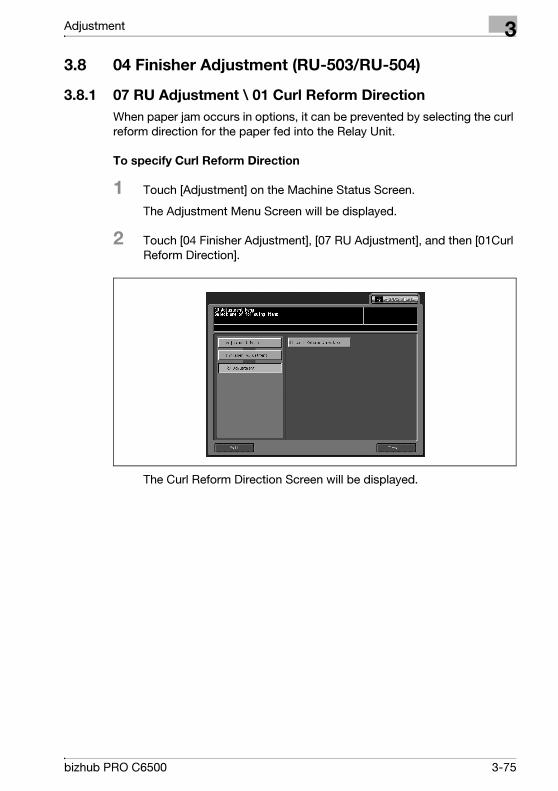
Adjustment 3
3.8 04 Finisher Adjustment (RU-503/RU-504)
3.8.1 07 RU Adjustment \ 01 Curl Reform Direction
When paper jam occurs in options, it can be prevented by selecting the curl
reform direction for the paper fed into the Relay Unit.
To specify Curl Reform Direction
1 Touch [Adjustment] on the Machine Status Screen.
The Adjustment Menu Screen will be displayed.
2 Touch [04 Finisher Adjustment], [07 RU Adjustment], and then [01Curl
Reform Direction].
The Curl Reform Direction Screen will be displayed.
bizhub PRO C6500 3-75

3 Adjustment
3 Touch to select [Upper] or [Lower]. Touch [Off] if you do not use the
function.
4 Touch [Return] to restore the Adjustment Menu Screen.
3-76 bizhub PRO C6500
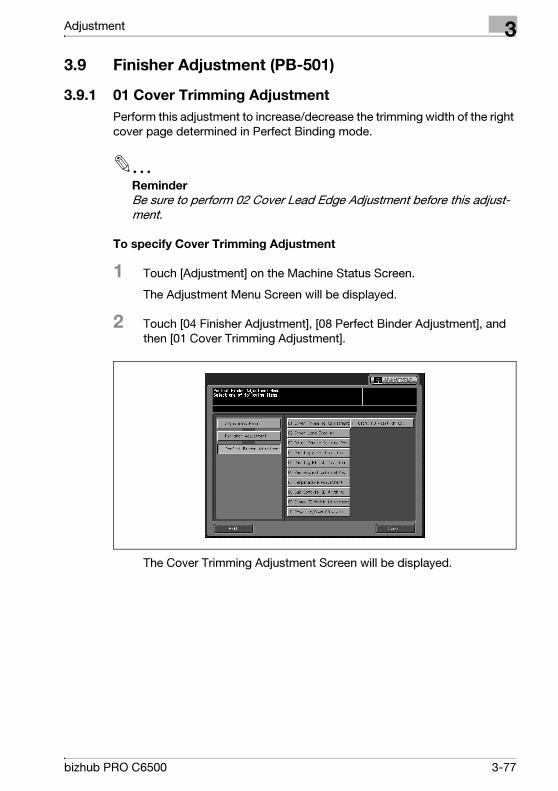
Adjustment 3
3.9 Finisher Adjustment (PB-501)
3.9.1 01 Cover Trimming Adjustment
Perform this adjustment to increase/decrease the trimming width of the right
cover page determined in Perfect Binding mode.
2
Reminder
Be sure to perform 02 Cover Lead Edge Adjustment before this adjust-
ment.
To specify Cover Trimming Adjustment
1 Touch [Adjustment] on the Machine Status Screen.
The Adjustment Menu Screen will be displayed.
2 Touch [04 Finisher Adjustment], [08 Perfect Binder Adjustment], and
then [01 Cover Trimming Adjustment].
The Cover Trimming Adjustment Screen will be displayed.
bizhub PRO C6500 3-77

3 Adjustment
3 Touch [Perfect Binder Tray] or [Except PB Tray] to select the tray (Main
Tray or PB Tray) to feed the cover.
4 Touch [COPY] tab.
The Copy Screen will be displayed.
5 Select the PB tray or desired main body tray if selected in step 3, then
press [Start].
A sample pattern of perfect-bound book will be output.
6 Check that the edge of the right cover page is neatly aligned with that
of the left cover page.
7 If the desired result cannot be obtained, touch [ADJUSTMENT] tab.
8 Touch [+ <-> -] to specify the value to be positive or negativese the
touch panel keypad to enter the desired adjustment value, then touch
[<<SET].
Available range: -128 (short) to +127 (long), 1 step = 0.1 mm
3-78 bizhub PRO C6500
Adjustment 3
9 Repeat the adjustment steps from 3 to 8 until the desired result is
obtained.
10 Touch [Return] to restore the Perfect Binder Adjustment Menu Screen.
bizhub PRO C6500 3-79
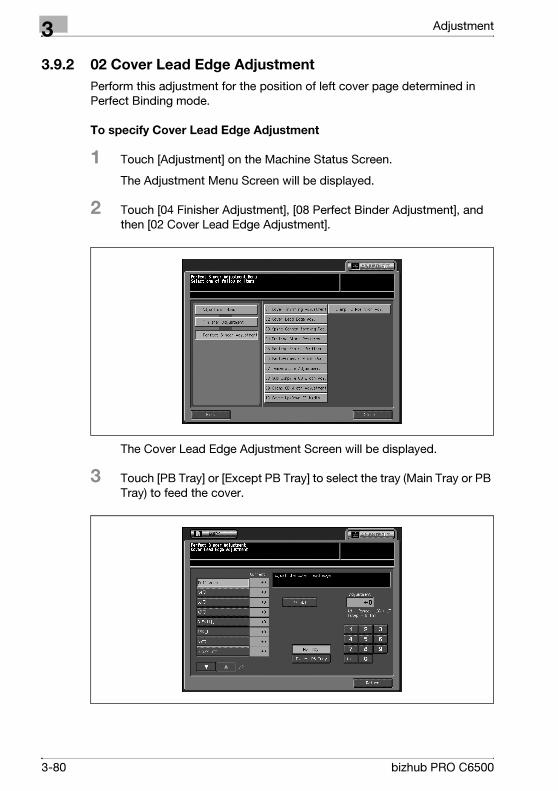
3 Adjustment
3.9.2 02 Cover Lead Edge Adjustment
Perform this adjustment for the position of left cover page determined in
Perfect Binding mode.
To specify Cover Lead Edge Adjustment
1 Touch [Adjustment] on the Machine Status Screen.
The Adjustment Menu Screen will be displayed.
2 Touch [04 Finisher Adjustment], [08 Perfect Binder Adjustment], and
then [02 Cover Lead Edge Adjustment].
The Cover Lead Edge Adjustment Screen will be displayed.
3 Touch [PB Tray] or [Except PB Tray] to select the tray (Main Tray or PB
Tray) to feed the cover.
3-80 bizhub PRO C6500
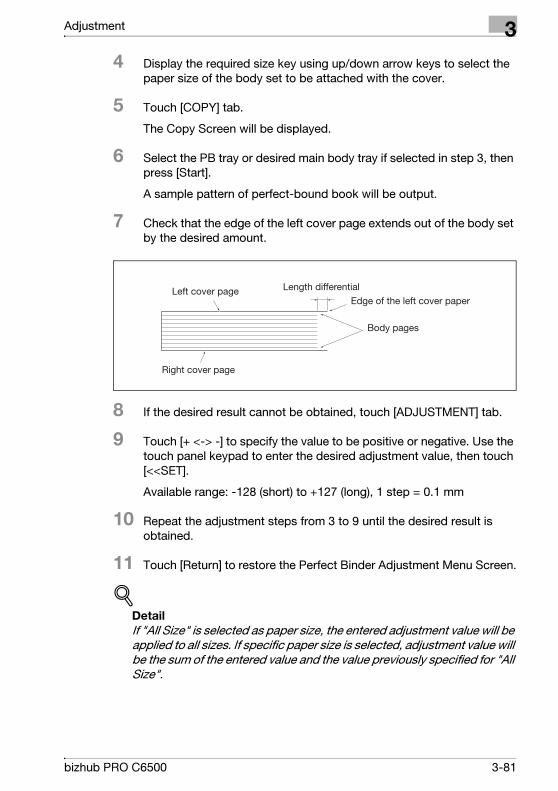
Adjustment 3
4 Display the required size key using up/down arrow keys to select the
paper size of the body set to be attached with the cover.
5 Touch [COPY] tab.
The Copy Screen will be displayed.
6 Select the PB tray or desired main body tray if selected in step 3, then
press [Start].
A sample pattern of perfect-bound book will be output.
7 Check that the edge of the left cover page extends out of the body set
by the desired amount.
8 If the desired result cannot be obtained, touch [ADJUSTMENT] tab.
9 Touch [+ <-> -] to specify the value to be positive or negative. Use the
touch panel keypad to enter the desired adjustment value, then touch
[<<SET].
Available range: -128 (short) to +127 (long), 1 step = 0.1 mm
10 Repeat the adjustment steps from 3 to 9 until the desired result is
obtained.
11 Touch [Return] to restore the Perfect Binder Adjustment Menu Screen.
!Detail
If "All Size" is selected as paper size, the entered adjustment value will be
applied to all sizes. If specific paper size is selected, adjustment value will
be the sum of the entered value and the value previously specified for "All
Size".
bizhub PRO C6500 3-81
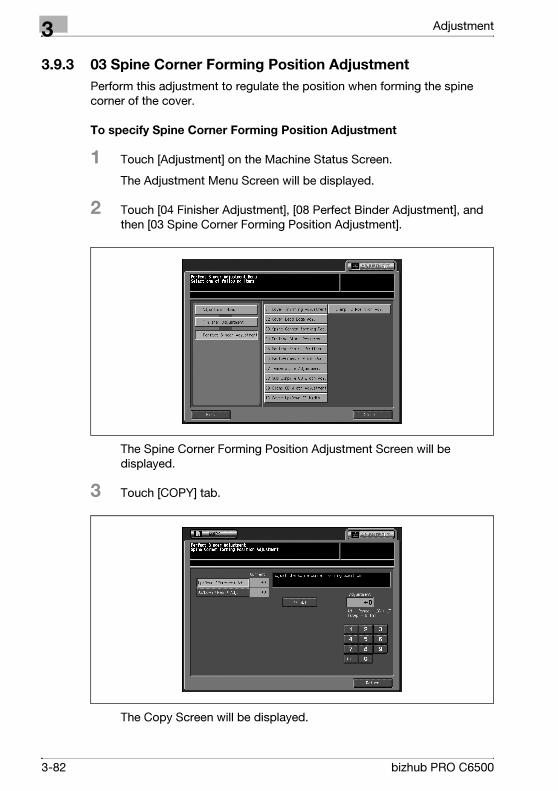
3 Adjustment
3.9.3 03 Spine Corner Forming Position Adjustment
Perform this adjustment to regulate the position when forming the spine
corner of the cover.
To specify Spine Corner Forming Position Adjustment
1 Touch [Adjustment] on the Machine Status Screen.
The Adjustment Menu Screen will be displayed.
2 Touch [04 Finisher Adjustment], [08 Perfect Binder Adjustment], and
then [03 Spine Corner Forming Position Adjustment].
The Spine Corner Forming Position Adjustment Screen will be
displayed.
3 Touch [COPY] tab.
The Copy Screen will be displayed.
3-82 bizhub PRO C6500
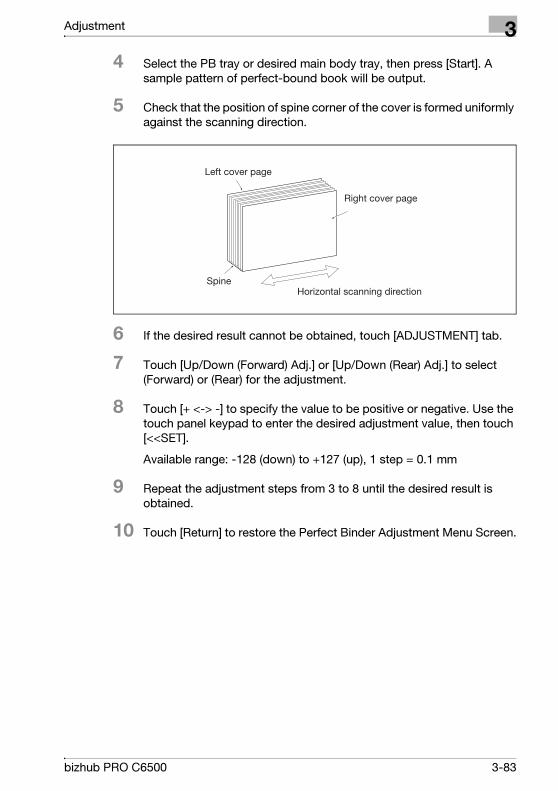
Adjustment 3
4 Select the PB tray or desired main body tray, then press [Start]. A
sample pattern of perfect-bound book will be output.
5 Check that the position of spine corner of the cover is formed uniformly
against the scanning direction.
6 If the desired result cannot be obtained, touch [ADJUSTMENT] tab.
7 Touch [Up/Down (Forward) Adj.] or [Up/Down (Rear) Adj.] to select
(Forward) or (Rear) for the adjustment.
8 Touch [+ <-> -] to specify the value to be positive or negative. Use the
touch panel keypad to enter the desired adjustment value, then touch
[<<SET].
Available range: -128 (down) to +127 (up), 1 step = 0.1 mm
9 Repeat the adjustment steps from 3 to 8 until the desired result is
obtained.
10 Touch [Return] to restore the Perfect Binder Adjustment Menu Screen.
bizhub PRO C6500 3-83
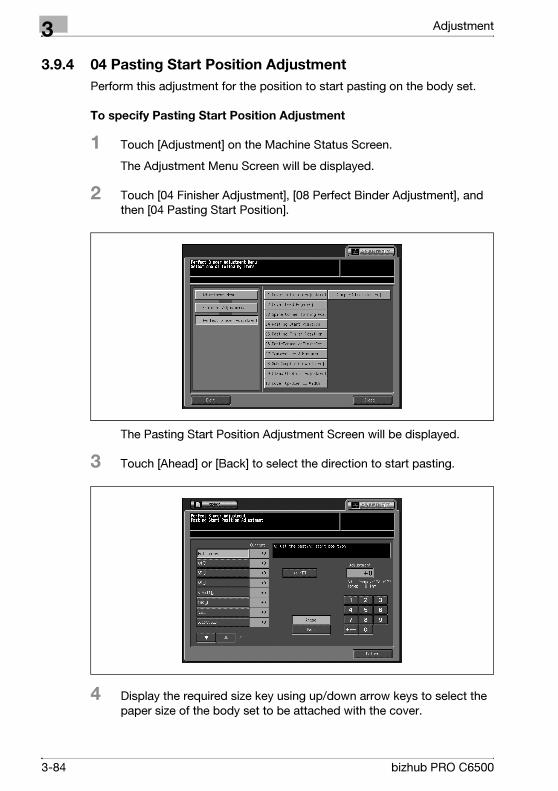
3 Adjustment
3.9.4 04 Pasting Start Position Adjustment
Perform this adjustment for the position to start pasting on the body set.
To specify Pasting Start Position Adjustment
1 Touch [Adjustment] on the Machine Status Screen.
The Adjustment Menu Screen will be displayed.
2 Touch [04 Finisher Adjustment], [08 Perfect Binder Adjustment], and
then [04 Pasting Start Position].
The Pasting Start Position Adjustment Screen will be displayed.
3 Touch [Ahead] or [Back] to select the direction to start pasting.
4 Display the required size key using up/down arrow keys to select the
paper size of the body set to be attached with the cover.
3-84 bizhub PRO C6500
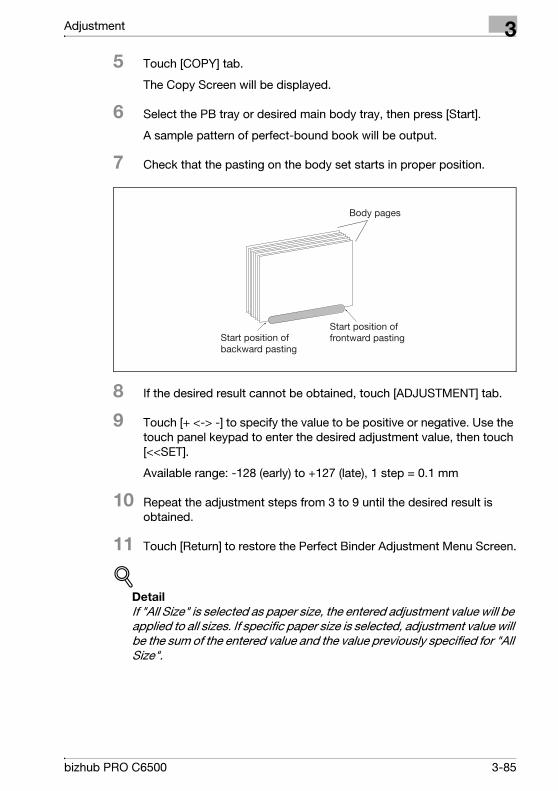
Adjustment 3
5 Touch [COPY] tab.
The Copy Screen will be displayed.
6 Select the PB tray or desired main body tray, then press [Start].
A sample pattern of perfect-bound book will be output.
7 Check that the pasting on the body set starts in proper position.
8 If the desired result cannot be obtained, touch [ADJUSTMENT] tab.
9 Touch [+ <-> -] to specify the value to be positive or negative. Use the
touch panel keypad to enter the desired adjustment value, then touch
[<<SET].
Available range: -128 (early) to +127 (late), 1 step = 0.1 mm
10 Repeat the adjustment steps from 3 to 9 until the desired result is
obtained.
11 Touch [Return] to restore the Perfect Binder Adjustment Menu Screen.
!Detail
If "All Size" is selected as paper size, the entered adjustment value will be
applied to all sizes. If specific paper size is selected, adjustment value will
be the sum of the entered value and the value previously specified for "All
Size".
bizhub PRO C6500 3-85

3 Adjustment
3.9.5 05 Pasting Finish Position Adjustment
Perform this adjustment for the position to finish pasting on the body set.
To specify Pasting Finish Position Adjustment
1 Touch [Adjustment] on the Machine Status Screen.
The Adjustment Menu Screen will be displayed.
2 Touch [04 Finisher Adjustment], [08 Perfect Binder Adjustment], and
then [05 Pasting Finish Position].
The Pasting Finish Position Adjustment Screen will be displayed.
3 Touch [Ahead] or [Back] to select the direction to finish pasting.
4 Display the required size key using up/down arrow keys to select the
paper size of the body set to be attached with the cover.
3-86 bizhub PRO C6500
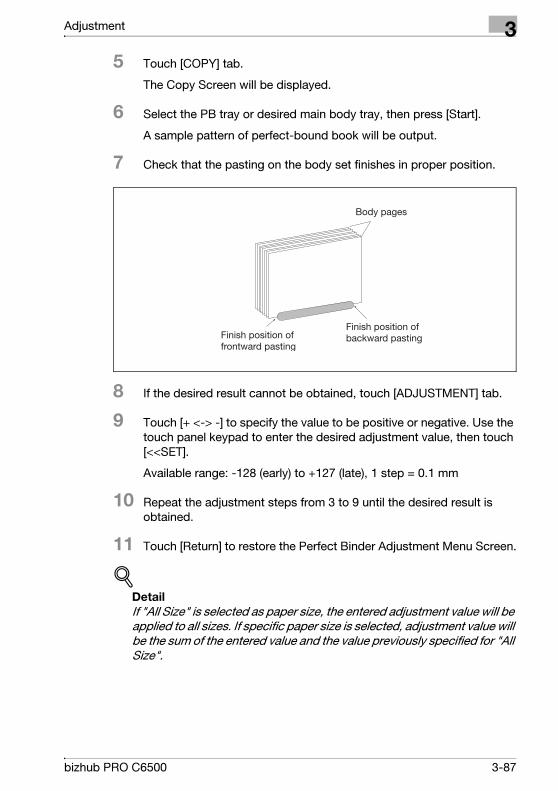
Adjustment 3
5 Touch [COPY] tab.
The Copy Screen will be displayed.
6 Select the PB tray or desired main body tray, then press [Start].
A sample pattern of perfect-bound book will be output.
7 Check that the pasting on the body set finishes in proper position.
8 If the desired result cannot be obtained, touch [ADJUSTMENT] tab.
9 Touch [+ <-> -] to specify the value to be positive or negative. Use the
touch panel keypad to enter the desired adjustment value, then touch
[<<SET].
Available range: -128 (early) to +127 (late), 1 step = 0.1 mm
10 Repeat the adjustment steps from 3 to 9 until the desired result is
obtained.
11 Touch [Return] to restore the Perfect Binder Adjustment Menu Screen.
!Detail
If "All Size" is selected as paper size, the entered adjustment value will be
applied to all sizes. If specific paper size is selected, adjustment value will
be the sum of the entered value and the value previously specified for "All
Size".
bizhub PRO C6500 3-87
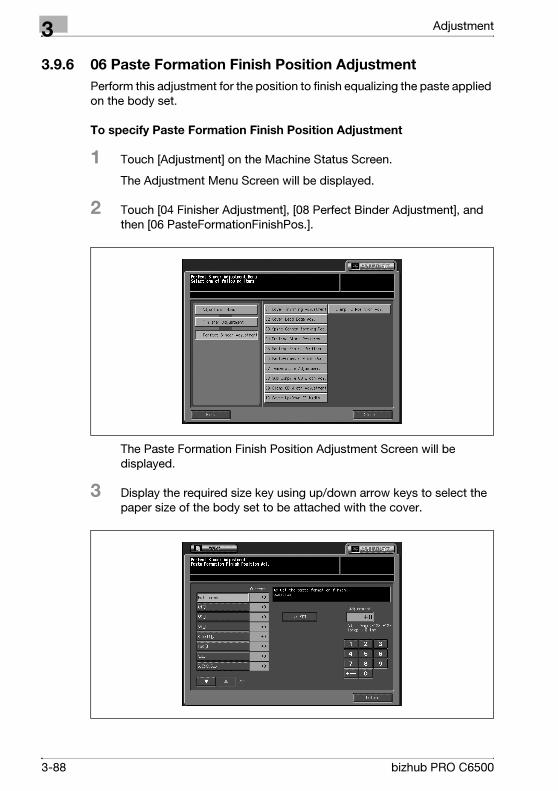
3 Adjustment
3.9.6 06 Paste Formation Finish Position Adjustment
Perform this adjustment for the position to finish equalizing the paste applied
on the body set.
To specify Paste Formation Finish Position Adjustment
1 Touch [Adjustment] on the Machine Status Screen.
The Adjustment Menu Screen will be displayed.
2 Touch [04 Finisher Adjustment], [08 Perfect Binder Adjustment], and
then [06 PasteFormationFinishPos.].
The Paste Formation Finish Position Adjustment Screen will be
displayed.
3 Display the required size key using up/down arrow keys to select the
paper size of the body set to be attached with the cover.
3-88 bizhub PRO C6500
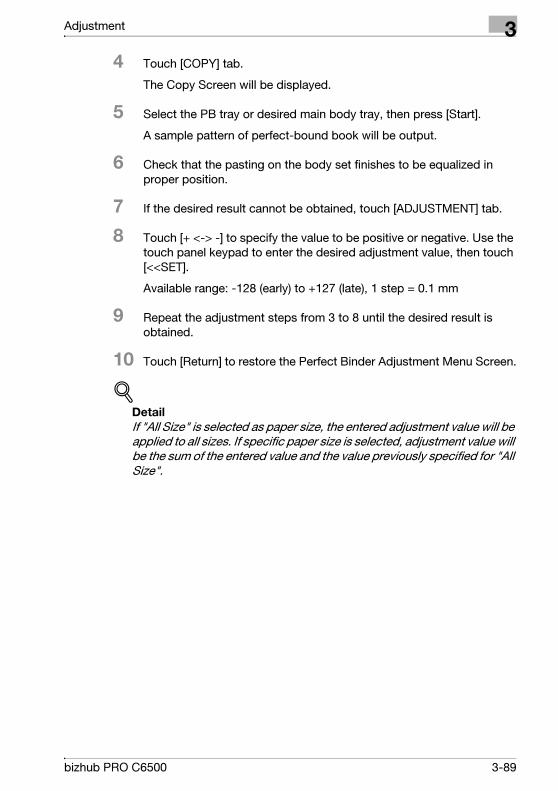
Adjustment 3
4 Touch [COPY] tab.
The Copy Screen will be displayed.
5 Select the PB tray or desired main body tray, then press [Start].
A sample pattern of perfect-bound book will be output.
6 Check that the pasting on the body set finishes to be equalized in
proper position.
7 If the desired result cannot be obtained, touch [ADJUSTMENT] tab.
8 Touch [+ <-> -] to specify the value to be positive or negative. Use the
touch panel keypad to enter the desired adjustment value, then touch
[<<SET].
Available range: -128 (early) to +127 (late), 1 step = 0.1 mm
9 Repeat the adjustment steps from 3 to 8 until the desired result is
obtained.
10 Touch [Return] to restore the Perfect Binder Adjustment Menu Screen.
!Detail
If "All Size" is selected as paper size, the entered adjustment value will be
applied to all sizes. If specific paper size is selected, adjustment value will
be the sum of the entered value and the value previously specified for "All
Size".
bizhub PRO C6500 3-89
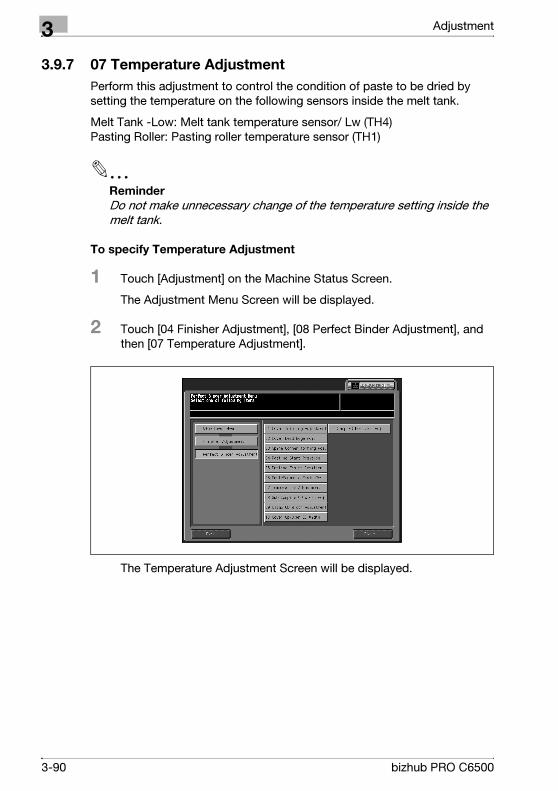
3 Adjustment
3.9.7 07 Temperature Adjustment
Perform this adjustment to control the condition of paste to be dried by
setting the temperature on the following sensors inside the melt tank.
Melt Tank -Low: Melt tank temperature sensor/ Lw (TH4) Pasting Roller: Pasting roller temperature sensor (TH1)
2
Reminder
Do not make unnecessary change of the temperature setting inside the
melt tank.
To specify Temperature Adjustment
1 Touch [Adjustment] on the Machine Status Screen.
The Adjustment Menu Screen will be displayed.
2 Touch [04 Finisher Adjustment], [08 Perfect Binder Adjustment], and
then [07 Temperature Adjustment].
The Temperature Adjustment Screen will be displayed.
3-90 bizhub PRO C6500
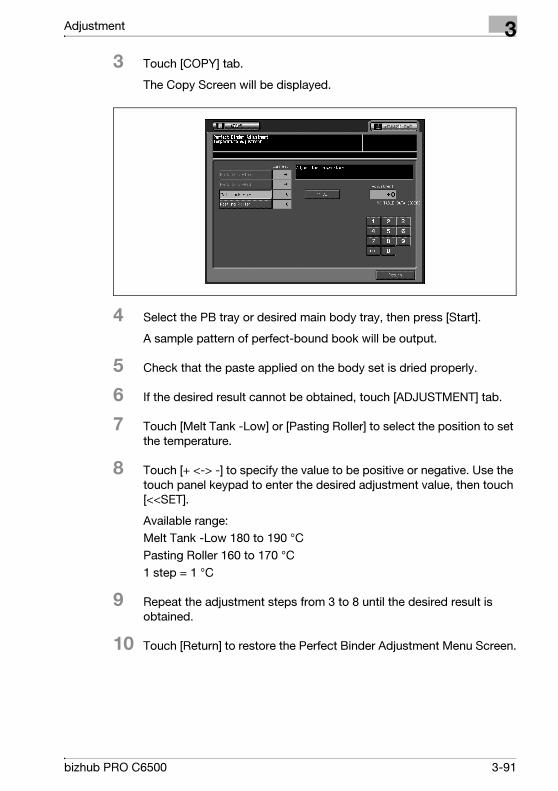
Adjustment 3
3 Touch [COPY] tab.
The Copy Screen will be displayed.
4 Select the PB tray or desired main body tray, then press [Start].
A sample pattern of perfect-bound book will be output.
5 Check that the paste applied on the body set is dried properly.
6 If the desired result cannot be obtained, touch [ADJUSTMENT] tab.
7 Touch [Melt Tank -Low] or [Pasting Roller] to select the position to set
the temperature.
8 Touch [+ <-> -] to specify the value to be positive or negative. Use the
touch panel keypad to enter the desired adjustment value, then touch
[<<SET].
Available range:
Melt Tank -Low 180 to 190 °C
Pasting Roller 160 to 170 °C
1 step = 1 °C
9 Repeat the adjustment steps from 3 to 8 until the desired result is
obtained.
10 Touch [Return] to restore the Perfect Binder Adjustment Menu Screen.
bizhub PRO C6500 3-91

3 Adjustment
3.9.8 08 Sub Compile CD Width Adjustment
Perform this adjustment for the width in horizontal scanning direction of the
body set.
!Detail
Use this adjustment if the horizontal scanning direction is unequal on the
former half of body pages when making more than one perfect-bound
book. If unequalness appears on all pages of the body set, use 09 Clamp
CD Width Adjustment instead.
To specify Sub Compile CD Width Adjustment
1 Touch [Adjustment] on the Machine Status Screen.
The Adjustment Menu Screen will be displayed.
2 Touch [04 Finisher Adjustment], [08 Perfect Binder Adjustment], and
then [08 Sub Compile CD Width Adj.].
The Sub Compile CD Width Adjustment Screen will be displayed.
3-92 bizhub PRO C6500
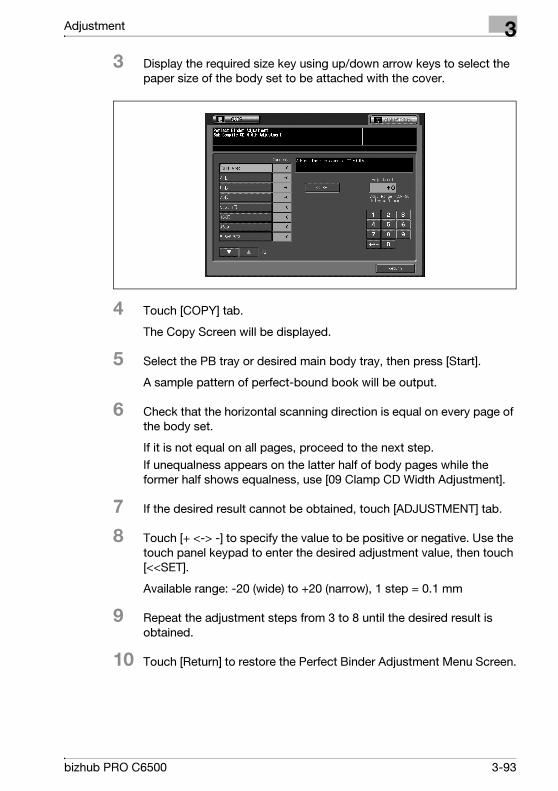
Adjustment 3
3 Display the required size key using up/down arrow keys to select the
paper size of the body set to be attached with the cover.
4 Touch [COPY] tab.
The Copy Screen will be displayed.
5 Select the PB tray or desired main body tray, then press [Start].
A sample pattern of perfect-bound book will be output.
6 Check that the horizontal scanning direction is equal on every page of
the body set.
If it is not equal on all pages, proceed to the next step.
If unequalness appears on the latter half of body pages while the
former half shows equalness, use [09 Clamp CD Width Adjustment].
7 If the desired result cannot be obtained, touch [ADJUSTMENT] tab.
8 Touch [+ <-> -] to specify the value to be positive or negative. Use the
touch panel keypad to enter the desired adjustment value, then touch
[<<SET].
Available range: -20 (wide) to +20 (narrow), 1 step = 0.1 mm
9 Repeat the adjustment steps from 3 to 8 until the desired result is
obtained.
10 Touch [Return] to restore the Perfect Binder Adjustment Menu Screen.
bizhub PRO C6500 3-93
3 Adjustment
!Detail
If "All Size" is selected as paper size, the entered adjustment value will be
applied to all sizes. If specific paper size is selected, adjustment value will
be the sum of the entered value and the value previously specified for "All
Size".
3-94 bizhub PRO C6500

Adjustment 3
3.9.9 09 Clamp CD Width Adjustment
Perform this adjustment for the width in horizontal scanning direction of the
body set.
!Detail
Use this adjustment if the horizontal scanning direction is unequal on the
body pages when making only one perfect-bound book, or on the latter
half of body pages when making more than one perfect-bound book. If
unequalness appears on the former half of body pages when making
more than one perfect-bound book, use 08 Sub Compile CD Width
Adjustment instead.
To specify Clamp CD Width Adjustment
1 Touch [Adjustment] on the Machine Status Screen.
The Adjustment Menu Screen will be displayed.
2 Touch [04 Finisher Adjustment], [08 Perfect Binder Adjustment], and
then [09 Clamp CD Width Adjustment].
The Clamp CD Width Adjustment Screen will be displayed.
bizhub PRO C6500 3-95
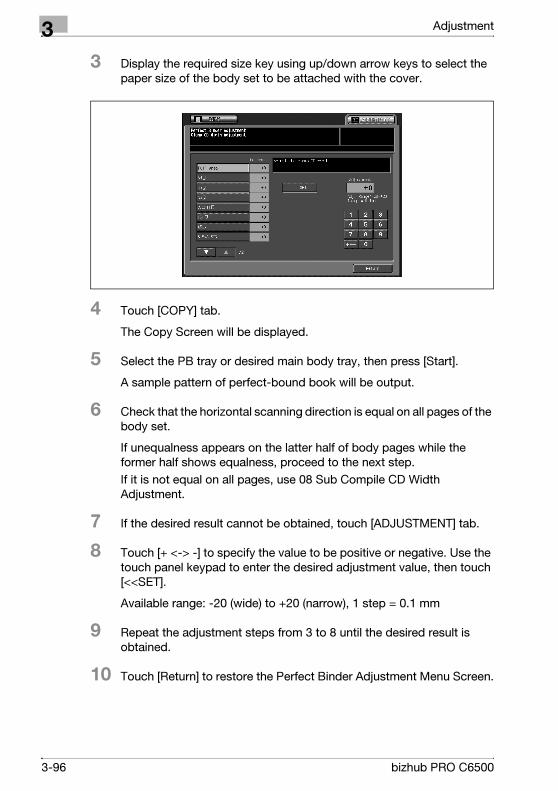
3 Adjustment
3 Display the required size key using up/down arrow keys to select the
paper size of the body set to be attached with the cover.
4 Touch [COPY] tab.
The Copy Screen will be displayed.
5 Select the PB tray or desired main body tray, then press [Start].
A sample pattern of perfect-bound book will be output.
6 Check that the horizontal scanning direction is equal on all pages of the
body set.
If unequalness appears on the latter half of body pages while the
former half shows equalness, proceed to the next step.
If it is not equal on all pages, use 08 Sub Compile CD Width
Adjustment.
7 If the desired result cannot be obtained, touch [ADJUSTMENT] tab.
8 Touch [+ <-> -] to specify the value to be positive or negative. Use the
touch panel keypad to enter the desired adjustment value, then touch
[<<SET].
Available range: -20 (wide) to +20 (narrow), 1 step = 0.1 mm
9 Repeat the adjustment steps from 3 to 8 until the desired result is
obtained.
10 Touch [Return] to restore the Perfect Binder Adjustment Menu Screen.
3-96 bizhub PRO C6500

Adjustment 3
!Detail
If "All Size" is selected as paper size, the entered adjustment value will be
applied to all sizes. If specific paper size is selected, adjustment value will
be the sum of the entered value and the value previously specified for "All
Size".
bizhub PRO C6500 3-97
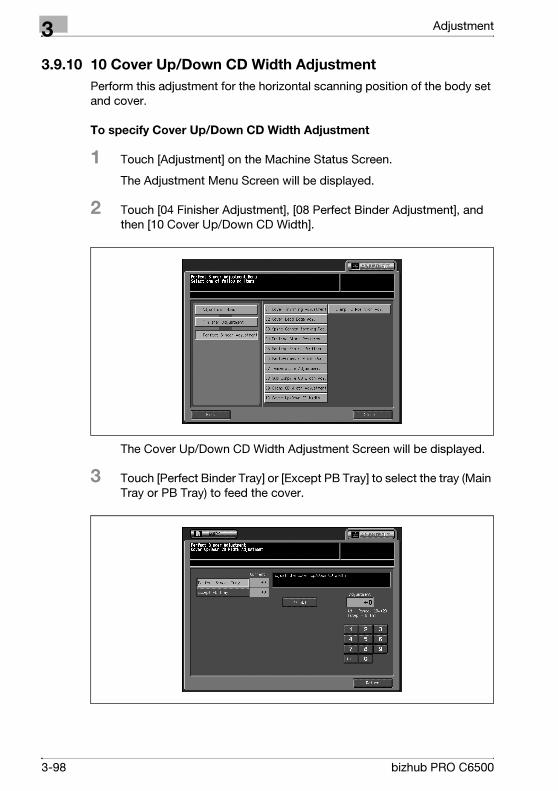
3 Adjustment
3.9.10 10 Cover Up/Down CD Width Adjustment
Perform this adjustment for the horizontal scanning position of the body set
and cover.
To specify Cover Up/Down CD Width Adjustment
1 Touch [Adjustment] on the Machine Status Screen.
The Adjustment Menu Screen will be displayed.
2 Touch [04 Finisher Adjustment], [08 Perfect Binder Adjustment], and
then [10 Cover Up/Down CD Width].
The Cover Up/Down CD Width Adjustment Screen will be displayed.
3 Touch [Perfect Binder Tray] or [Except PB Tray] to select the tray (Main
Tray or PB Tray) to feed the cover.
3-98 bizhub PRO C6500
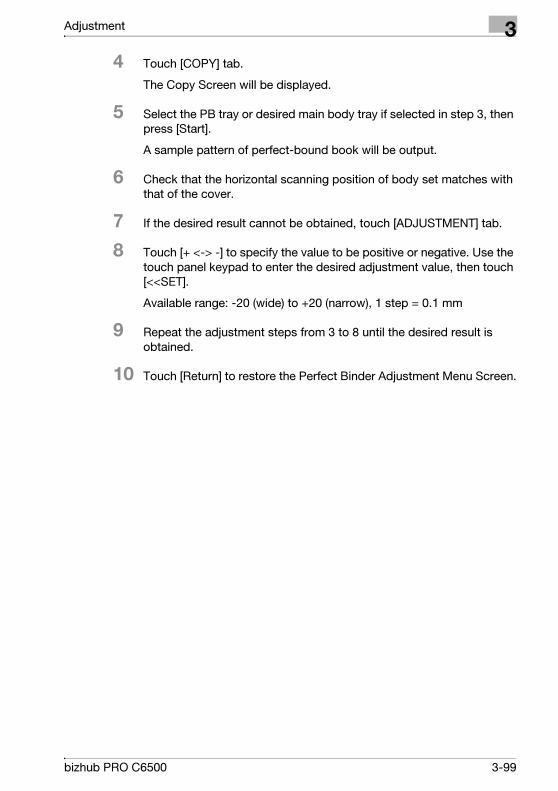
Adjustment 3
4 Touch [COPY] tab.
The Copy Screen will be displayed.
5 Select the PB tray or desired main body tray if selected in step 3, then
press [Start].
A sample pattern of perfect-bound book will be output.
6 Check that the horizontal scanning position of body set matches with
that of the cover.
7 If the desired result cannot be obtained, touch [ADJUSTMENT] tab.
8 Touch [+ <-> -] to specify the value to be positive or negative. Use the
touch panel keypad to enter the desired adjustment value, then touch
[<<SET].
Available range: -20 (wide) to +20 (narrow), 1 step = 0.1 mm
9 Repeat the adjustment steps from 3 to 8 until the desired result is
obtained.
10 Touch [Return] to restore the Perfect Binder Adjustment Menu Screen.
bizhub PRO C6500 3-99
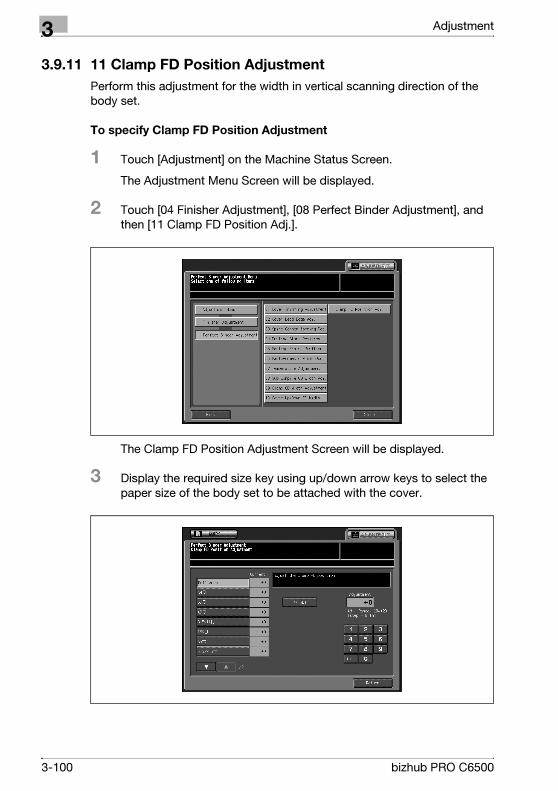
3 Adjustment
3.9.11 11 Clamp FD Position Adjustment
Perform this adjustment for the width in vertical scanning direction of the
body set.
To specify Clamp FD Position Adjustment
1 Touch [Adjustment] on the Machine Status Screen.
The Adjustment Menu Screen will be displayed.
2 Touch [04 Finisher Adjustment], [08 Perfect Binder Adjustment], and
then [11 Clamp FD Position Adj.].
The Clamp FD Position Adjustment Screen will be displayed.
3 Display the required size key using up/down arrow keys to select the
paper size of the body set to be attached with the cover.
3-100 bizhub PRO C6500

Adjustment 3
4 Touch [COPY] tab.
The Copy Screen will be displayed.
5 Select the PB tray or desired main body tray, then press [Start].
A sample pattern of perfect-bound book will be output.
6 Check that the vertical scanning direction is equal on all pages of the
body set.
7 If the desired result cannot be obtained, touch [ADJUSTMENT] tab.
8 Touch [+ <-> -] to specify the value to be positive or negative. Use the
touch panel keypad to enter the desired adjustment value, then touch
[<<SET].
Available range: -20 (wide) to +20 (narrow), 1 step = 0.1 mm
9 Repeat the adjustment steps from 3 to 8 until the desired result is
obtained.
10 Touch [Return] to restore the Perfect Binder Adjustment Menu Screen.
!Detail
If "All Size" is selected as paper size, the entered adjustment value will be
applied to all sizes. If specific paper size is selected, adjustment value will
be the sum of the entered value and the value previously specified for "All
Size".
bizhub PRO C6500 3-101
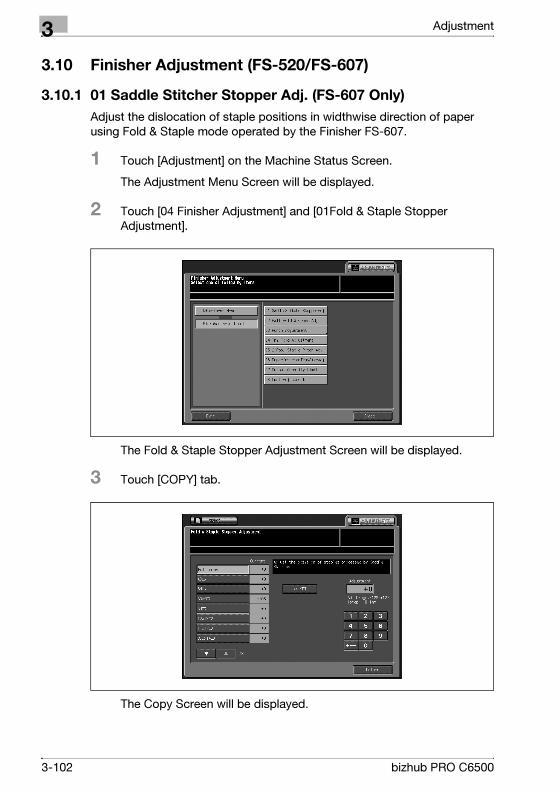
3 Adjustment
3.10 Finisher Adjustment (FS-520/FS-607)
3.10.1 01 Saddle Stitcher Stopper Adj. (FS-607 Only)
Adjust the dislocation of staple positions in widthwise direction of paper
using Fold & Staple mode operated by the Finisher FS-607.
1 Touch [Adjustment] on the Machine Status Screen.
The Adjustment Menu Screen will be displayed.
2 Touch [04 Finisher Adjustment] and [01Fold & Staple Stopper
Adjustment].
The Fold & Staple Stopper Adjustment Screen will be displayed.
3 Touch [COPY] tab.
The Copy Screen will be displayed.
3-102 bizhub PRO C6500
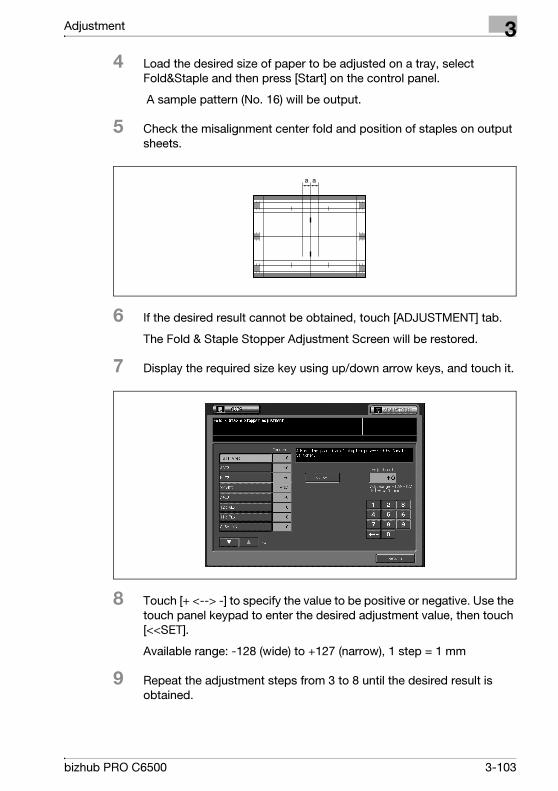
Adjustment 3
4 Load the desired size of paper to be adjusted on a tray, select
Fold&Staple and then press [Start] on the control panel.
A sample pattern (No. 16) will be output.
5 Check the misalignment center fold and position of staples on output
sheets.
6 If the desired result cannot be obtained, touch [ADJUSTMENT] tab.
The Fold & Staple Stopper Adjustment Screen will be restored.
7 Display the required size key using up/down arrow keys, and touch it.
8 Touch [+ <--> -] to specify the value to be positive or negative. Use the
touch panel keypad to enter the desired adjustment value, then touch
[<<SET].
Available range: -128 (wide) to +127 (narrow), 1 step = 1 mm
9 Repeat the adjustment steps from 3 to 8 until the desired result is
obtained.
a a
bizhub PRO C6500 3-103
3 Adjustment
10 If adjustment in any other paper size is required, repeat steps from 3 to
9.
11 Touch [Return] to restore the Adjustment Menu Screen.
3-104 bizhub PRO C6500
Adjustment 3
3.10.2 02 Half Fold Stopper Adjustment (FS-607 Only)
Perform this adjustment for the double-folding position processed by the
Finisher FS-607.
1 Touch [Adjustment] on the Machine Status Screen.
The Adjustment Menu Screen will be displayed.
2 Touch [04 Finisher Adjustment] and [02 Half Fold Stopper Adj.].
The Half Fold Stopper Adjustment Screen will be displayed.
3 Touch [COPY] tab.
The Copy Screen will be displayed.
4 Load the desired size of paper to be adjusted on a tray, specify Multi
Center, then press [Start] on the control panel.
A sample pattern (No. 16) will be output.
bizhub PRO C6500 3-105
3 Adjustment
5 Check the misalignment (a) of the edge of the feeding sheets.
6 If the desired result cannot be obtained, touch [ADJUSTMENT] tab.
The Half Fold Stopper Adjustment Screen will be restored.
7 Display the required size key using up/down arrow keys, and touch it.
8 Touch [+ <--> -] to specify the value to be positive or negative. Use the
touch panel keypad to enter the desired adjustment value, then touch
[<<SET]. Available range: -128 to +127, 1 step = 0.1 mm
– When misalignment (a) of step 5 has occurred, enter the "+" value.
9 Repeat the adjustment steps from 3 to 8 until the desired result is
obtained.
10 If adjustment in any other size is required, repeat steps 3 to 9.
11 Touch [Return] to restore the Adjustment Menu Screen.
a
3-106 bizhub PRO C6500
Adjustment 3
3.10.3 03 Punch Adjustment \ 01 Vertical Position Adj. (FS-520/FS-607)
Perform this adjustment for the center position of punch holes operated by
the Punch Kit PK-512.
1 Touch [Adjustment] on the Machine Status Screen.
The Adjustment Menu Screen will be displayed.
2 Touch [04 Finisher Adjustment], [03 Punch Adjustment], and then [01
Vertical Position Adj.].
The Vertical Position Adjustment Screen is displayed.
3 Touch [COPY] tab.
The Copy Screen will be displayed.
bizhub PRO C6500 3-107
3 Adjustment
4 Load the desired size of paper to be adjusted on a tray, specify Punch,
then press [Start] on the control panel.
A sample pattern (No. 16) will be output.
5 Check the value of misalignment (a) between the center-fold line and
punch position.
6 If the desired result cannot be obtained, touch [ADJUSTMENT] tab.
The Vertical Position Adjustment Screen will be restored.
7 Display the required size key using up/down arrow keys, and touch it.
8 Touch [+ <--> -] to specify the value to be positive or negative. Use the
touch panel keypad to enter the desired adjustment value, then touch
[<<SET]. Available range: -50 (wide) to +50 (narrow), 1 step = 0.1 mm
9 Repeat the adjustment steps from 3 to 8 until the desired result is
obtained.
10 If adjustment in any other size is required, repeat steps from 3 to 9.
11 Touch [Return] to restore the Adjustment Menu Screen.
a
[2]
[1]
3-108 bizhub PRO C6500

Adjustment 3
3.10.4 03 Punch Adjustment \ 02 Horizontal Position Adj. (FS-520/FS-607)
Perform this adjustment for the position of punch holes in the feeding
direction operated by the Punch Kit PK-512.
1 Touch [Adjustment] on the Machine Status Screen.
The Adjustment Menu Screen will be displayed.
2 Touch [04 Finisher Adjustment], [03 Punch Adjustment], and then [02
Horizontal Position Adj.].
The Horizontal Position Adjustment Screen is displayed.
3 Select the desired tray.
4 Touch [COPY] tab.
The Copy Screen will be displayed.
bizhub PRO C6500 3-109
3 Adjustment
5 Load the paper on the desired tray (main body tray or Paper inserter
tray) to be adjusted, specify Punch, then press [Start] on the control
panel.
A sample pattern (No. 16) will be output.
6 Check the distance (a) from the edge of the output sheet to the center
of the punch hole.
7 If the desired result cannot be obtained, touch [ADJUSTMENT] tab.
The Horizontal Position Adjustment Screen will be restored.
8 Touch [+ <--> -] to specify the value to be positive or negative. Use the
touch panel keypad to enter the desired adjustment value, then touch
[<<SET]. Available range: -50 (wide) to +50 (narrow), 1 step = 0.1 mm
9 Repeat the adjustment steps from 3 to 8 until the desired result is
obtained.
10 If adjustment in any other tray is required, repeat steps from 3 to 9.
11 Touch [Return] to restore the Adjustment Menu Screen.
a
3-110 bizhub PRO C6500

Adjustment 3
3.10.5 03 Punch Adjustment \ 03 Registration Adjustment (FS-520/FS-607)
Perform this adjustment for the skew of the punch position made by the
Punch Kit PK-512 in duplex copying or cover sheet feeding using the paper
inserter.
1 Touch [Adjustment] on the Machine Status Screen.
The Adjustment Menu Screen will be displayed.
2 Touch [04 Finisher Adjustment], [03 Punch Adjustment], and then [03
Registration Adjustment].
The Registration Adjustment Screen is displayed.
3 Select the desired tray.
4 Touch [COPY] tab.
The Copy Screen will be displayed.
bizhub PRO C6500 3-111
3 Adjustment
5 Load the desired size of paper on the tray to be adjusted, specify
Punch, then press [Start] on the control panel.
A sample pattern (No. 16) will be output.
6 Check whether or not the punch position is skew on the output sheet.
7 If the desired result cannot be obtained, touch [ADJUSTMENT] tab.
The Registration Adjustment Screen will be restored.
8 Touch [+ <--> -] to specify the value to be positive or negative. Use the
touch panel keypad to enter the desired adjustment value, then touch
[<<SET]. Available range: -50 (wide) to +50 (narrow), 1 step = 0.1 mm
9 Repeat the adjustment steps from 3 to 8 until the desired result is
obtained.
10 If adjustment in any other size is required, repeat steps from 3 to 9.
11 Touch [Return] to restore the Adjustment Menu Screen.
3-112 bizhub PRO C6500
Adjustment 3
3.10.6 03 Punch Adjustment \ 04 Paper Edge Detect Sensor Adj. (FS-520/FS-607)
Perform this adjustment to detect the paper edge to be used as reference
point of punching operation.
1 Touch [Adjustment] on the Machine Status Screen.
The Adjustment Menu Screen will be displayed.
2 Touch [04 Finisher Adjustment], [03 Punch Adjustment], and then [04
Paper Edged Detect Sensor Adj.].
The Paper Edged Detect Sensor Adjustment Screen is displayed.
3 Touch [Start].
The adjustment result will be displayed.
4 Touch [Return] to restore the Adjustment Menu Screen.
bizhub PRO C6500 3-113
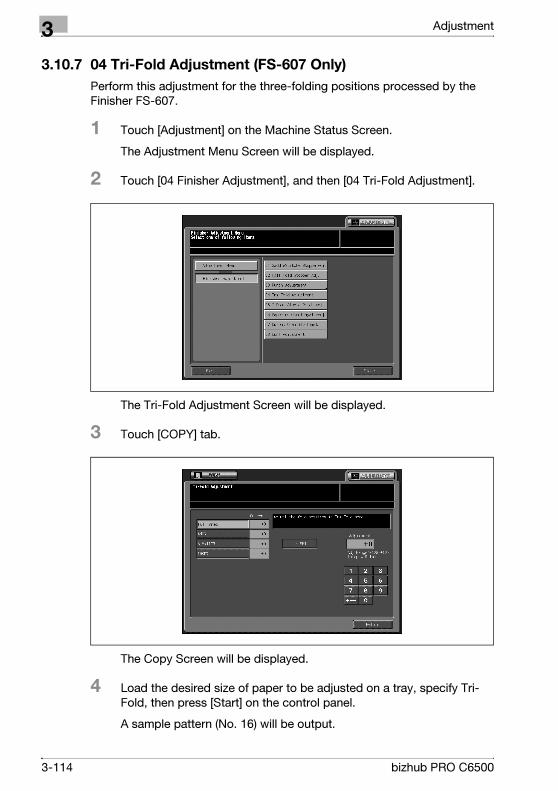
3 Adjustment
3.10.7 04 Tri-Fold Adjustment (FS-607 Only)
Perform this adjustment for the three-folding positions processed by the
Finisher FS-607.
1 Touch [Adjustment] on the Machine Status Screen.
The Adjustment Menu Screen will be displayed.
2 Touch [04 Finisher Adjustment], and then [04 Tri-Fold Adjustment].
The Tri-Fold Adjustment Screen will be displayed.
3 Touch [COPY] tab.
The Copy Screen will be displayed.
4 Load the desired size of paper to be adjusted on a tray, specify Tri-
Fold, then press [Start] on the control panel.
A sample pattern (No. 16) will be output.
3-114 bizhub PRO C6500
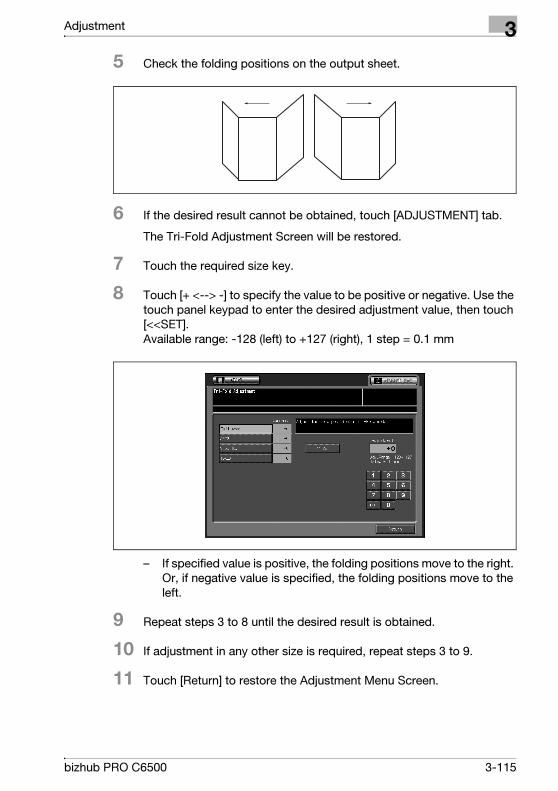
Adjustment 3
5 Check the folding positions on the output sheet.
6 If the desired result cannot be obtained, touch [ADJUSTMENT] tab.
The Tri-Fold Adjustment Screen will be restored.
7 Touch the required size key.
8 Touch [+ <--> -] to specify the value to be positive or negative. Use the
touch panel keypad to enter the desired adjustment value, then touch
[<<SET]. Available range: -128 (left) to +127 (right), 1 step = 0.1 mm
– If specified value is positive, the folding positions move to the right.
Or, if negative value is specified, the folding positions move to the
left.
9 Repeat steps 3 to 8 until the desired result is obtained.
10 If adjustment in any other size is required, repeat steps 3 to 9.
11 Touch [Return] to restore the Adjustment Menu Screen.
bizhub PRO C6500 3-115
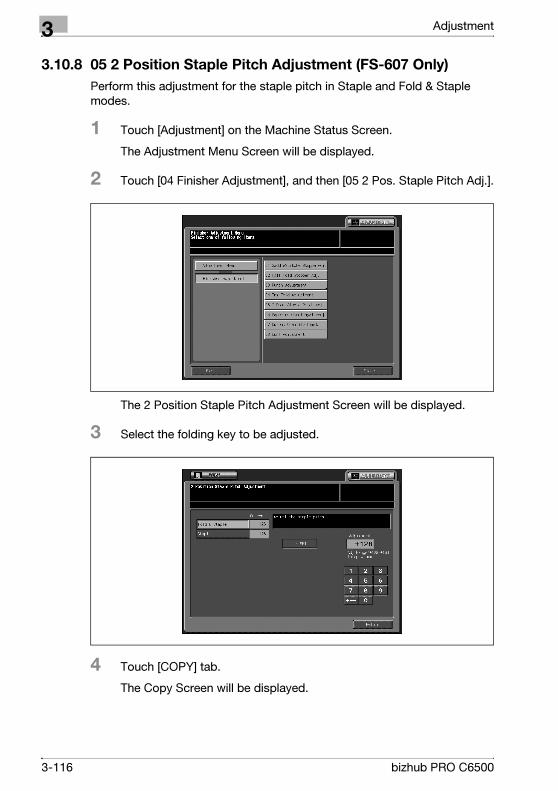
3 Adjustment
3.10.8 05 2 Position Staple Pitch Adjustment (FS-607 Only)
Perform this adjustment for the staple pitch in Staple and Fold & Staple
modes.
1 Touch [Adjustment] on the Machine Status Screen.
The Adjustment Menu Screen will be displayed.
2 Touch [04 Finisher Adjustment], and then [05 2 Pos. Staple Pitch Adj.].
The 2 Position Staple Pitch Adjustment Screen will be displayed.
3 Select the folding key to be adjusted.
4 Touch [COPY] tab.
The Copy Screen will be displayed.
3-116 bizhub PRO C6500
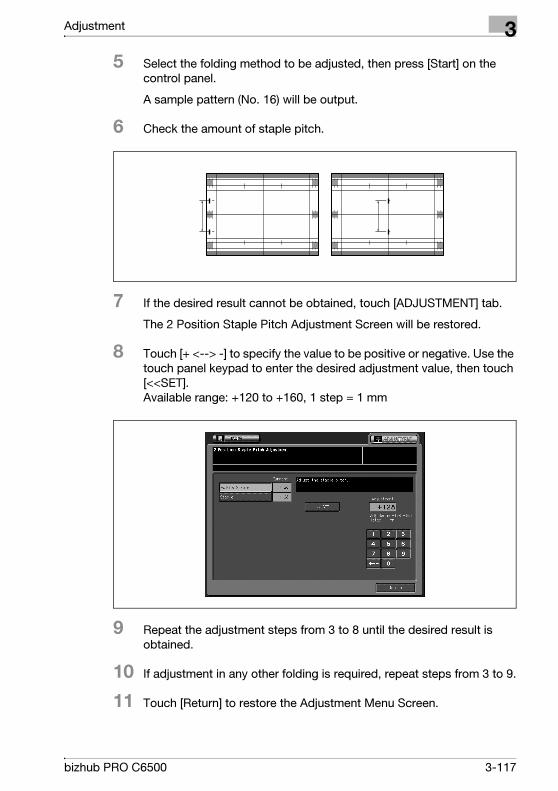
Adjustment 3
5 Select the folding method to be adjusted, then press [Start] on the
control panel.
A sample pattern (No. 16) will be output.
6 Check the amount of staple pitch.
7 If the desired result cannot be obtained, touch [ADJUSTMENT] tab.
The 2 Position Staple Pitch Adjustment Screen will be restored.
8 Touch [+ <--> -] to specify the value to be positive or negative. Use the
touch panel keypad to enter the desired adjustment value, then touch
[<<SET]. Available range: +120 to +160, 1 step = 1 mm
9 Repeat the adjustment steps from 3 to 8 until the desired result is
obtained.
10 If adjustment in any other folding is required, repeat steps from 3 to 9.
11 Touch [Return] to restore the Adjustment Menu Screen.
bizhub PRO C6500 3-117

3 Adjustment
3.10.9 06 Paper Inserter Tray Size Adj. (FS-520/FS-607)
Perform the size adjustment for the Upper tray and Lower tray of the Paper
Inserter PI-502.
1 Touch [Adjustment] on the Machine Status Screen.
The Adjustment Menu Screen will be displayed.
2 Touch [04 Finisher Adjustment], and then [06 Paper Inserter Tray Size
Adj.].
The PI 1 Tray Size Adjustment Screen is displayed.
3 Load the A4 w or 8.5" × 11" w on the Upper tray of the Paper Inserter,
and then touch [Start].
4 Touch [Next] to display the PI 2 Tray Size Adjustment Screen.
3-118 bizhub PRO C6500
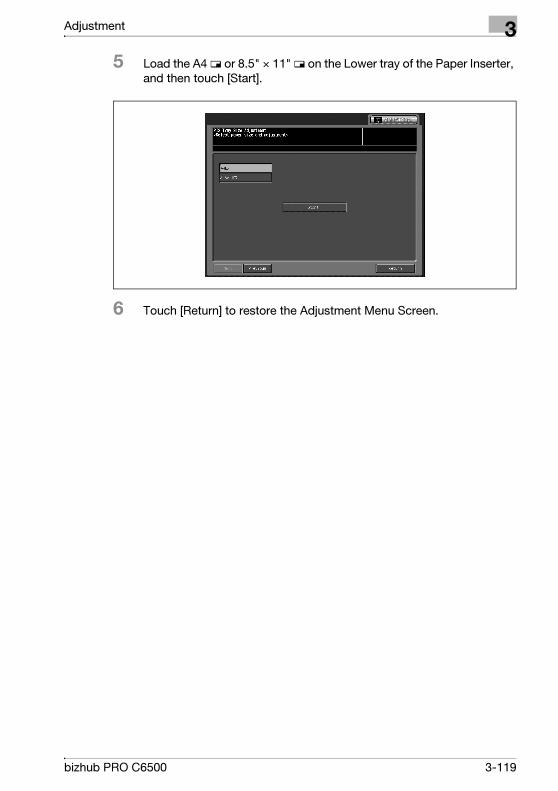
Adjustment 3
5 Load the A4 w or 8.5" × 11" w on the Lower tray of the Paper Inserter,
and then touch [Start].
6 Touch [Return] to restore the Adjustment Menu Screen.
bizhub PRO C6500 3-119
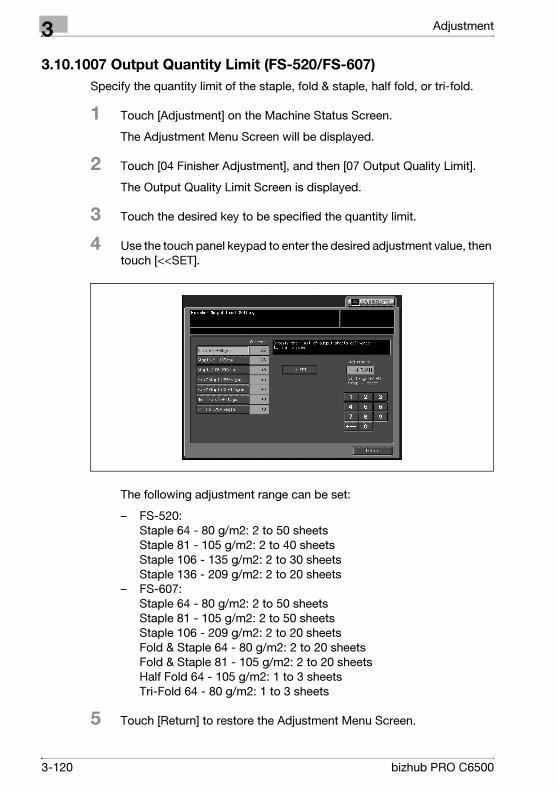
3 Adjustment
3.10.1007 Output Quantity Limit (FS-520/FS-607)
Specify the quantity limit of the staple, fold & staple, half fold, or tri-fold.
1 Touch [Adjustment] on the Machine Status Screen.
The Adjustment Menu Screen will be displayed.
2 Touch [04 Finisher Adjustment], and then [07 Output Quality Limit].
The Output Quality Limit Screen is displayed.
3 Touch the desired key to be specified the quantity limit.
4 Use the touch panel keypad to enter the desired adjustment value, then
touch [<<SET].
The following adjustment range can be set:
– FS-520: Staple 64 - 80 g/m2: 2 to 50 sheets Staple 81 - 105 g/m2: 2 to 40 sheets Staple 106 - 135 g/m2: 2 to 30 sheets Staple 136 - 209 g/m2: 2 to 20 sheets
– FS-607: Staple 64 - 80 g/m2: 2 to 50 sheets Staple 81 - 105 g/m2: 2 to 50 sheets Staple 106 - 209 g/m2: 2 to 20 sheets Fold & Staple 64 - 80 g/m2: 2 to 20 sheets Fold & Staple 81 - 105 g/m2: 2 to 20 sheets Half Fold 64 - 105 g/m2: 1 to 3 sheets Tri-Fold 64 - 80 g/m2: 1 to 3 sheets
5 Touch [Return] to restore the Adjustment Menu Screen.
3-120 bizhub PRO C6500
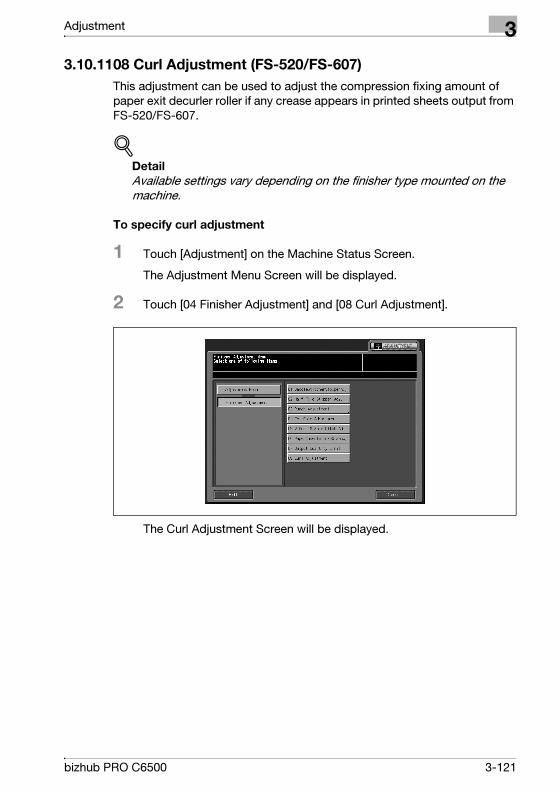
Adjustment 3
3.10.1108 Curl Adjustment (FS-520/FS-607)
This adjustment can be used to adjust the compression fixing amount of
paper exit decurler roller if any crease appears in printed sheets output from
FS-520/FS-607.
!Detail
Available settings vary depending on the finisher type mounted on the
machine.
To specify curl adjustment
1 Touch [Adjustment] on the Machine Status Screen.
The Adjustment Menu Screen will be displayed.
2 Touch [04 Finisher Adjustment] and [08 Curl Adjustment].
The Curl Adjustment Screen will be displayed.
bizhub PRO C6500 3-121
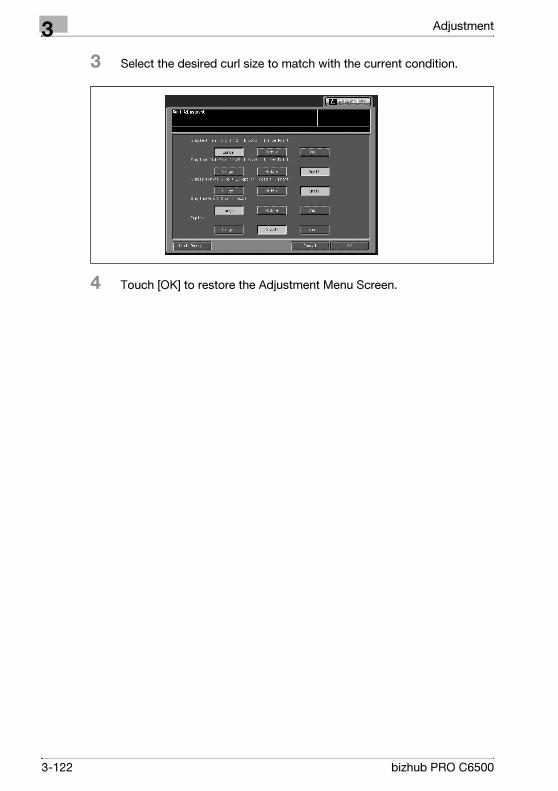
3 Adjustment
3 Select the desired curl size to match with the current condition.
4 Touch [OK] to restore the Adjustment Menu Screen.
3-122 bizhub PRO C6500
4 Utility Screen Outlines

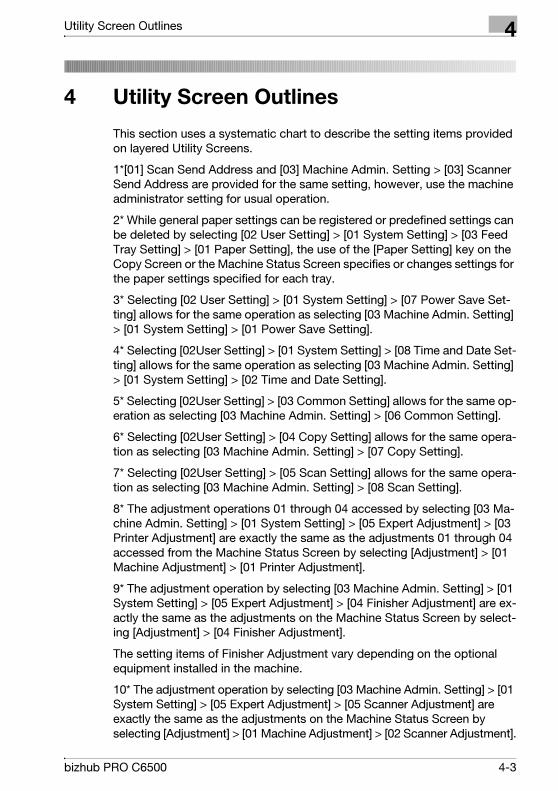
Utility Screen Outlines 4
4 Utility Screen Outlines
This section uses a systematic chart to describe the setting items provided
on layered Utility Screens.
1*[01] Scan Send Address and [03] Machine Admin. Setting > [03] Scanner
Send Address are provided for the same setting, however, use the machine
administrator setting for usual operation.
2* While general paper settings can be registered or predefined settings can
be deleted by selecting [02 User Setting] > [01 System Setting] > [03 Feed
Tray Setting] > [01 Paper Setting], the use of the [Paper Setting] key on the
Copy Screen or the Machine Status Screen specifies or changes settings for
the paper settings specified for each tray.
3* Selecting [02 User Setting] > [01 System Setting] > [07 Power Save Set-
ting] allows for the same operation as selecting [03 Machine Admin. Setting]
> [01 System Setting] > [01 Power Save Setting].
4* Selecting [02User Setting] > [01 System Setting] > [08 Time and Date Set-
ting] allows for the same operation as selecting [03 Machine Admin. Setting]
> [01 System Setting] > [02 Time and Date Setting].
5* Selecting [02User Setting] > [03 Common Setting] allows for the same op-
eration as selecting [03 Machine Admin. Setting] > [06 Common Setting].
6* Selecting [02User Setting] > [04 Copy Setting] allows for the same opera-
tion as selecting [03 Machine Admin. Setting] > [07 Copy Setting].
7* Selecting [02User Setting] > [05 Scan Setting] allows for the same opera-
tion as selecting [03 Machine Admin. Setting] > [08 Scan Setting].
8* The adjustment operations 01 through 04 accessed by selecting [03 Ma-
chine Admin. Setting] > [01 System Setting] > [05 Expert Adjustment] > [03
Printer Adjustment] are exactly the same as the adjustments 01 through 04
accessed from the Machine Status Screen by selecting [Adjustment] > [01
Machine Adjustment] > [01 Printer Adjustment].
9* The adjustment operation by selecting [03 Machine Admin. Setting] > [01
System Setting] > [05 Expert Adjustment] > [04 Finisher Adjustment] are ex-
actly the same as the adjustments on the Machine Status Screen by select-
ing [Adjustment] > [04 Finisher Adjustment].
The setting items of Finisher Adjustment vary depending on the optional
equipment installed in the machine.
10* The adjustment operation by selecting [03 Machine Admin. Setting] > [01
System Setting] > [05 Expert Adjustment] > [05 Scanner Adjustment] are
exactly the same as the adjustments on the Machine Status Screen by
selecting [Adjustment] > [01 Machine Adjustment] > [02 Scanner Adjustment].
bizhub PRO C6500 4-3
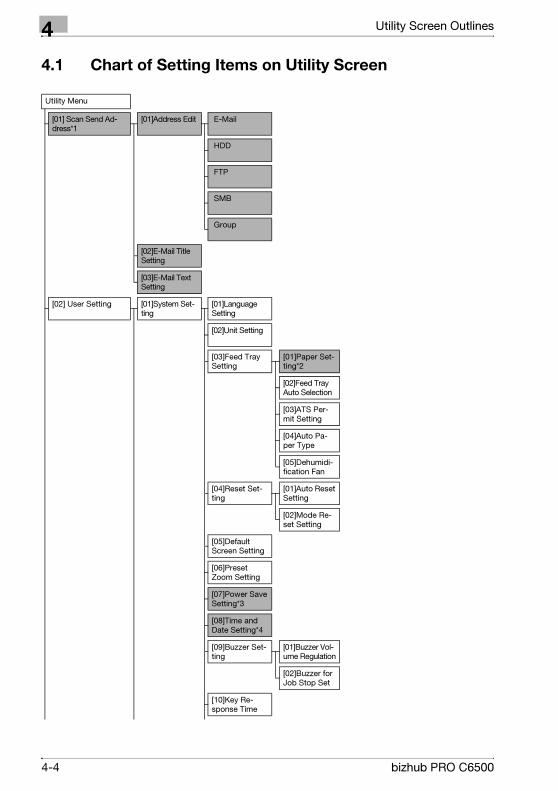
4 Utility Screen Outlines
4.1 Chart of Setting Items on Utility Screen
Utility Menu
[01] Scan Send Ad-dress*1
[01]Address Edit E-Mail
HDD
FTP
SMB
Group
[02]E-Mail Title Setting
[03]E-Mail Text Setting
[02] User Setting [01]System Set-ting
[01]Language Setting
[02]Unit Setting
[03]Feed Tray Setting
[01]Paper Set-ting*2
[02]Feed Tray Auto Selection
[03]ATS Per-mit Setting
[04]Auto Pa-per Type
[05]Dehumidi-fication Fan
[04]Reset Set-ting
[01]Auto Reset Setting
[02]Mode Re-set Setting
[05]Default Screen Setting
[06]Preset Zoom Setting
[07]Power Save Setting*3
[08]Time and Date Setting*4
[09]Buzzer Set-ting
[01]Buzzer Vol-ume Regulation
[02]Buzzer for Job Stop Set
[10]Key Re-sponse Time
4-4 bizhub PRO C6500
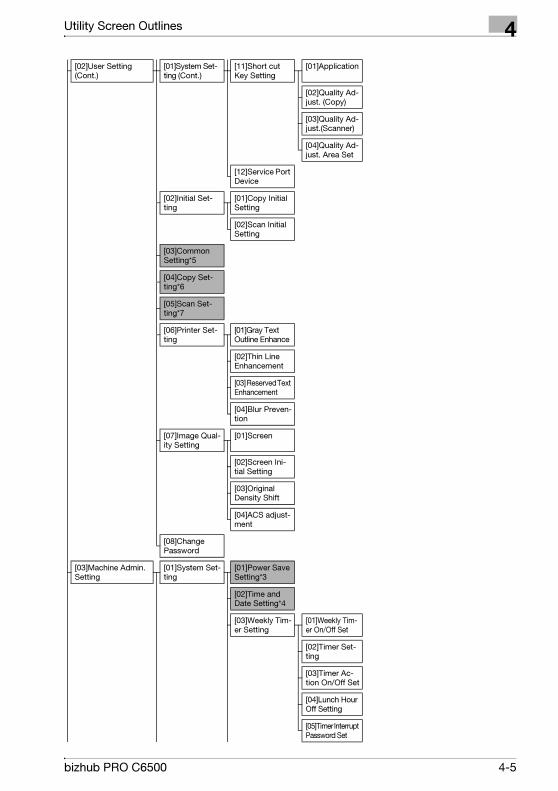
Utility Screen Outlines 4
[02]User Setting (Cont.)
[01]System Set-ting (Cont.)
[11]Short cut Key Setting
[01]Application
[02]Quality Ad-just. (Copy)
[03]Quality Ad-just.(Scanner)
[04]Quality Ad-just. Area Set
[12]Service Port Device
[02]Initial Set-ting
[01]Copy Initial Setting
[02]Scan Initial Setting
[03]Common Setting*5
[04]Copy Set-ting*6
[05]Scan Set-ting*7
[06]Printer Set-ting
[01]Gray Text Outline Enhance
[02]Thin Line Enhancement
[03] Reserved Text Enhancement
[04]Blur Preven-tion
[07]Image Qual-ity Setting
[01]Screen
[02]Screen Ini-tial Setting
[03]Original Density Shift
[04]ACS adjust-ment
[08]Change Password
[03]Machine Admin. Setting
[01]System Set-ting
[01]Power Save Setting*3
[02]Time and Date Setting*4
[03]Weekly Tim-er Setting
[01]Weekly Tim-er On/Off Set
[02]Timer Set-ting
[03]Timer Ac-tion On/Off Set
[04]Lunch Hour Off Setting
[05]Timer Interrupt Password Set
bizhub PRO C6500 4-5
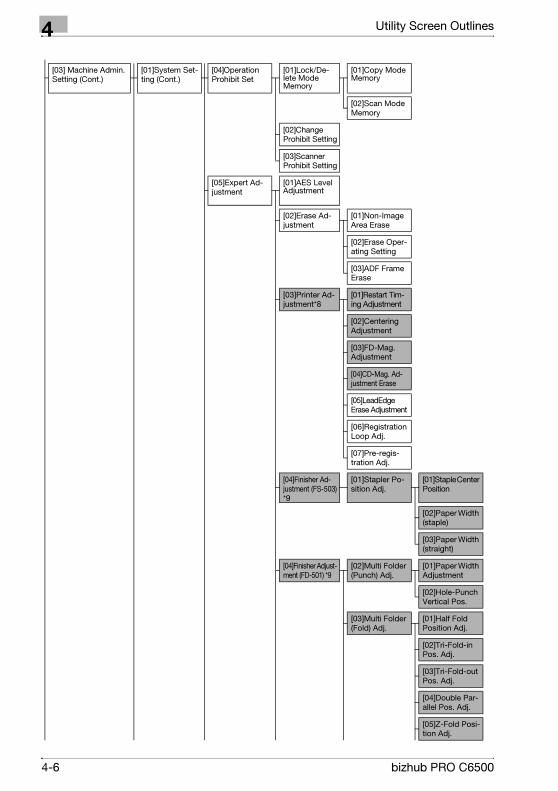
4 Utility Screen Outlines
[03] Machine Admin. Setting (Cont.)
[01]System Set-ting (Cont.)
[04]Operation Prohibit Set
[01]Lock/De-lete Mode Memory
[01]Copy Mode Memory
[02]Scan Mode Memory
[02]Change Prohibit Setting
[03]Scanner Prohibit Setting
[05]Expert Ad-justment
[01]AES Level Adjustment
[02]Erase Ad-justment
[01]Non-Image Area Erase
[02]Erase Oper-ating Setting
[03]ADF Frame Erase
[03]Printer Ad-justment*8
[01]Restart Tim-ing Adjustment
[02]Centering Adjustment
[03]FD-Mag. Adjustment
[04]CD-Mag. Ad-justment Erase
[05]LeadEdge Erase Adjustment
[06]Registration Loop Adj.
[07]Pre-regis-tration Adj.
[04]Finisher Ad-justment (FS-503) *9
[01]Stapler Po-sition Adj.
[01]Staple Center Position
[02]Paper Width (staple)
[03]Paper Width (straight)
[04]Finisher Adjust-ment (FD-501) *9
[02]Multi Folder (Punch) Adj.
[01]Paper Width Adjustment
[02]Hole-Punch Vertical Pos.
[03]Multi Folder (Fold) Adj.
[01]Half Fold Position Adj.
[02]Tri-Fold-in Pos. Adj.
[03]Tri-Fold-out Pos. Adj.
[04]Double Par-allel Pos. Adj.
[05]Z-Fold Posi-tion Adj.
4-6 bizhub PRO C6500
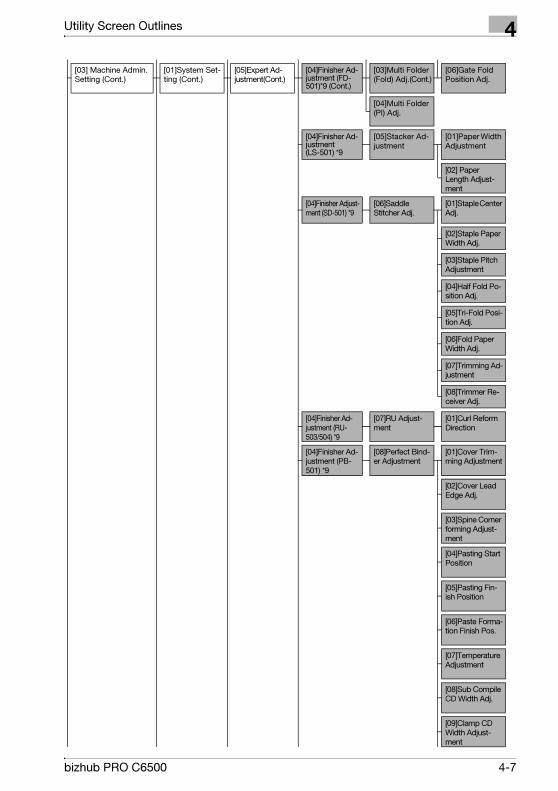
Utility Screen Outlines 4
[03] Machine Admin. Setting (Cont.)
[01]System Set-ting (Cont.)
[05]Expert Ad-justment(Cont.)
[04]Finisher Ad-justment (FD-501)*9 (Cont.)
[03]Multi Folder (Fold) Adj.(Cont.)
[06]Gate Fold Position Adj.
[04]Multi Folder (PI) Adj.
[04]Finisher Ad-justment(LS-501) *9
[05]Stacker Ad-justment
[01]Paper Width Adjustment
[02] Paper Length Adjust-ment
[04]Finisher Adjust-ment (SD-501) *9
[06]Saddle Stitcher Adj.
[01]Staple Center Adj.
[02]Staple Paper Width Adj.
[03]Staple Pitch Adjustment
[04]Half Fold Po-sition Adj.
[05]Tri-Fold Posi-tion Adj.
[06]Fold Paper Width Adj.
[07]Trimming Ad-justment
[08]Trimmer Re-ceiver Adj.
[04]Finisher Ad-justment (RU-503/504) *9
[07]RU Adjust-ment
[01]Curl Reform Direction
[04]Finisher Ad-justment (PB-501) *9
[08]Perfect Bind-er Adjustment
[01]Cover Trim-ming Adjustment
[02]Cover Lead Edge Adj.
[03]Spine Corner forming Adjust-ment
[04]Pasting Start Position
[05]Pasting Fin-ish Position
[06]Paste Forma-tion Finish Pos.
[07]Temperature Adjustment
[08]Sub Compile CD Width Adj.
[09]Clamp CD Width Adjust-ment
bizhub PRO C6500 4-7
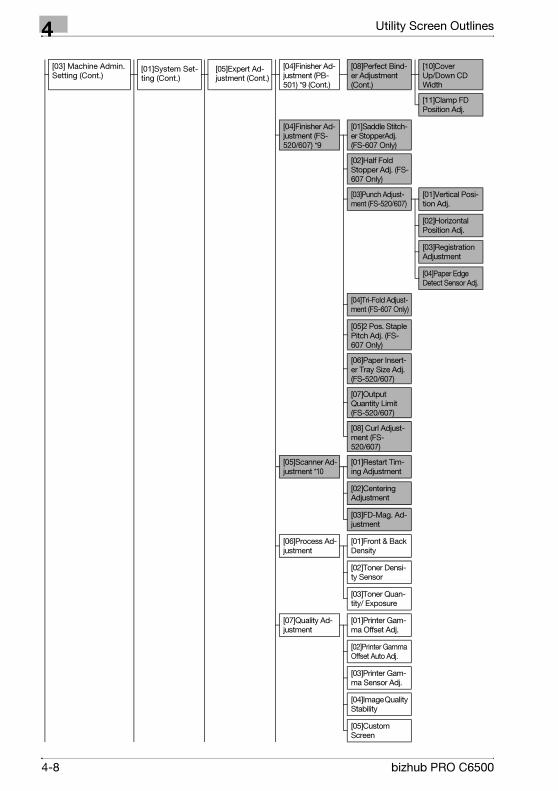
4 Utility Screen Outlines
[03] Machine Admin. Setting (Cont.)
[01]System Set-ting (Cont.)
[05]Expert Ad-justment (Cont.)
[04]Finisher Ad-justment (PB-501) *9 (Cont.)
[08]Perfect Bind-er Adjustment (Cont.)
[10]Cover Up/Down CD Width
[11]Clamp FD Position Adj.
[04]Finisher Ad-justment (FS-520/607) *9
[01]Saddle Stitch-er StopperAdj. (FS-607 Only)
[02]Half Fold Stopper Adj. (FS-607 Only)
[03]Punch Adjust-ment (FS-520/607)
[01]Vertical Posi-tion Adj.
[02]Horizontal Position Adj.
[03]Registration Adjustment
[04]Paper Edge Detect Sensor Adj.
[04]Tri-Fold Adjust-ment (FS-607 Only)
[05]2 Pos. Staple Pitch Adj. (FS-607 Only)
[06]Paper Insert-er Tray Size Adj. (FS-520/607)
[07]Output Quantity Limit (FS-520/607)
[08] Curl Adjust-ment (FS-520/607)
[05]Scanner Ad-justment *10
[01]Restart Tim-ing Adjustment
[02]Centering Adjustment
[03]FD-Mag. Ad-justment
[06]Process Ad-justment
[01]Front & Back Density
[02]Toner Densi-ty Sensor
[03]Toner Quan-tity/ Exposure
[07]Quality Ad-justment
[01]Printer Gam-ma Offset Adj.
[02]Printer Gamma Offset Auto Adj.
[03]Printer Gam-ma Sensor Adj.
[04]Image Quality Stability
[05]Custom Screen
4-8 bizhub PRO C6500
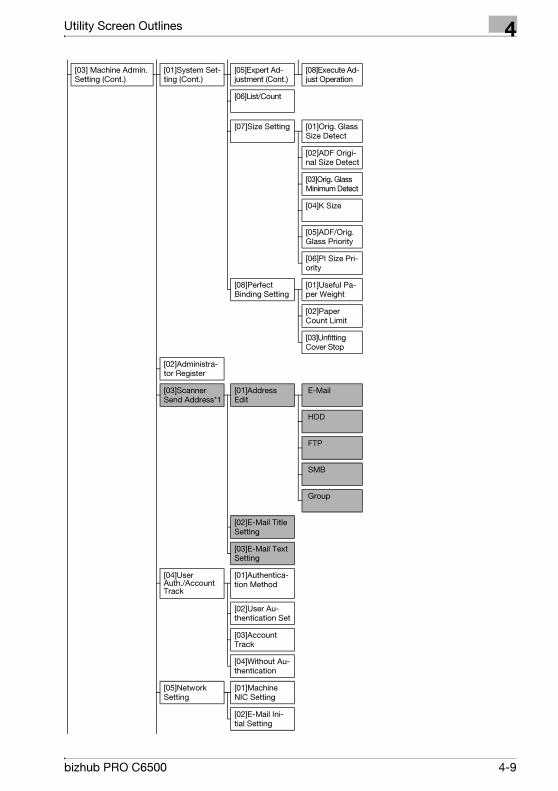
Utility Screen Outlines 4
[03] Machine Admin. Setting (Cont.)
[01]System Set-ting (Cont.)
[05]Expert Ad-justment (Cont.)
[08]Execute Ad-just Operation
[06]List/Count
[07]Size Setting [01]Orig. Glass Size Detect
[02]ADF Origi-nal Size Detect
[03]Orig. Glass Minimum Detect
[04]K Size
[05]ADF/Orig. Glass Priority
[06]PI Size Pri-ority
[08]Perfect Binding Setting
[01]Useful Pa-per Weight
[02]Paper Count Limit
[03]Unfitting Cover Stop
[02]Administra-tor Register
[03]Scanner Send Address*1
[01]Address Edit
HDD
FTP
SMB
Group
[02]E-Mail Title Setting
[03]E-Mail Text Setting
[04]User Auth./Account Track
[01]Authentica-tion Method
[02]User Au-thentication Set
[03]Account Track
[04]Without Au-thentication
[05]Network Setting
[01]Machine NIC Setting
[02]E-Mail Ini-tial Setting
bizhub PRO C6500 4-9
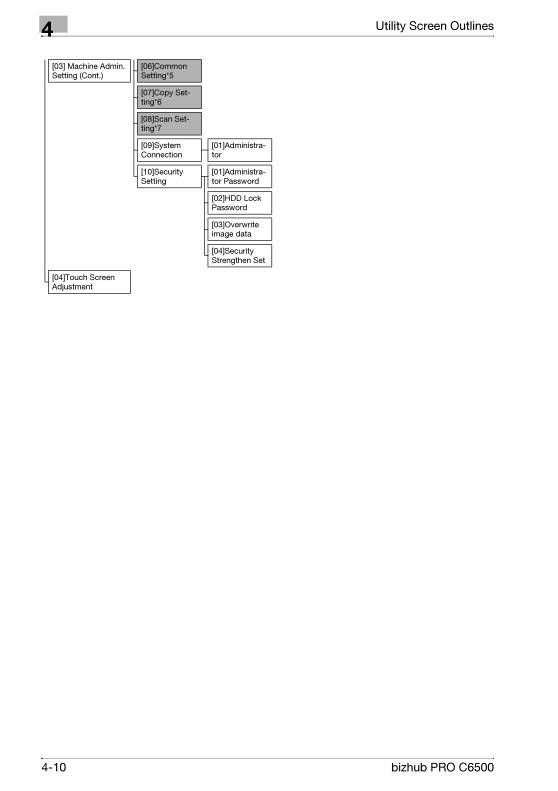
4 Utility Screen Outlines
[03] Machine Admin. Setting (Cont.)
[06]Common Setting*5
[07]Copy Set-ting*6
[08]Scan Set-ting*7
[09]System Connection
[01]Administra-tor
[10]Security Setting
[01]Administra-tor Password
[02]HDD Lock Password
[03]Overwrite image data
[04]Security Strengthen Set
[04]Touch Screen Adjustment
4-10 bizhub PRO C6500
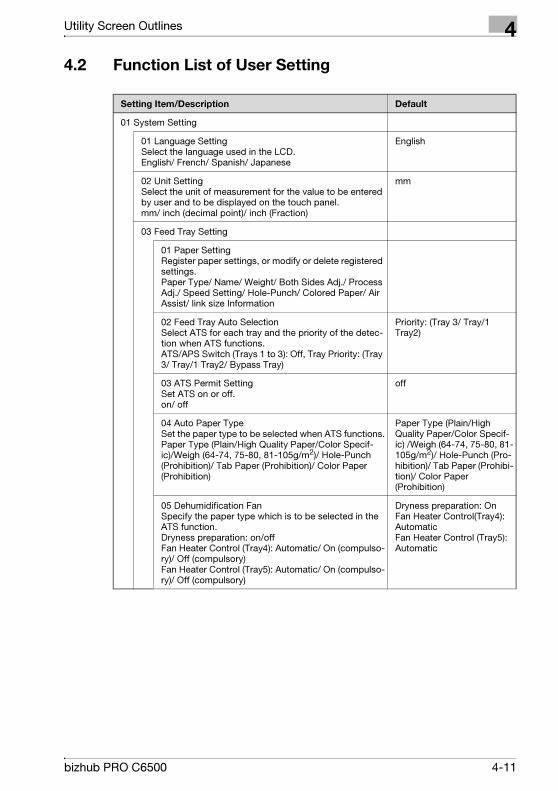
Utility Screen Outlines 4
4.2 Function List of User Setting
Setting Item/Description Default
01 System Setting
01 Language SettingSelect the language used in the LCD.English/ French/ Spanish/ Japanese
English
02 Unit SettingSelect the unit of measurement for the value to be entered by user and to be displayed on the touch panel.mm/ inch (decimal point)/ inch (Fraction)
mm
03 Feed Tray Setting
01 Paper SettingRegister paper settings, or modify or delete registered settings.Paper Type/ Name/ Weight/ Both Sides Adj./ Process Adj./ Speed Setting/ Hole-Punch/ Colored Paper/ Air Assist/ link size Information
02 Feed Tray Auto SelectionSelect ATS for each tray and the priority of the detec-tion when ATS functions. ATS/APS Switch (Trays 1 to 3): Off, Tray Priority: (Tray 3/ Tray/1 Tray2/ Bypass Tray)
Priority: (Tray 3/ Tray/1 Tray2)
03 ATS Permit SettingSet ATS on or off.on/ off
off
04 Auto Paper TypeSet the paper type to be selected when ATS functions.Paper Type (Plain/High Quality Paper/Color Specif-ic)/Weigh (64-74, 75-80, 81-105g/m2)/ Hole-Punch (Prohibition)/ Tab Paper (Prohibition)/ Color Paper (Prohibition)
Paper Type (Plain/High Quality Paper/Color Specif-ic) /Weigh (64-74, 75-80, 81-105g/m2)/ Hole-Punch (Pro-hibition)/ Tab Paper (Prohibi-tion)/ Color Paper (Prohibition)
05 Dehumidification FanSpecify the paper type which is to be selected in the ATS function.Dryness preparation: on/offFan Heater Control (Tray4): Automatic/ On (compulso-ry)/ Off (compulsory)Fan Heater Control (Tray5): Automatic/ On (compulso-ry)/ Off (compulsory)
Dryness preparation: OnFan Heater Control(Tray4): AutomaticFan Heater Control (Tray5): Automatic
bizhub PRO C6500 4-11

4 Utility Screen Outlines
04 Reset Setting
01 Auto Reset SettingSet the reset interval starting from the completion of a copying job until the machine returns to the initial con-dition, without selecting any key on the touch panel or the control panel.Off/ 60 seconds/ 120 seconds/ 180 seconds/ 240 sec-onds/ 300 seconds/ 360 seconds/ 420 seconds/ 480 seconds/ 540 seconds
60 seconds
02 Mode Reset SettingSelect whether or not to initialize the setting currently specified when the machine takes it that the user has changed, or original document is loaded into the ADF. And select the settings to be initialized each time a sin-gle job has been completed.Change user/ ADF original direction/ Reset button function/ Mode memory auto call/ Finisher Mode by Full-auto/ Initial by Key Counter Insert/ Status Hold When Auto Reset/ Next Job Staple Setting/ Original Set/Bind Direction
Change user: YesADF original direction: Not resetReset button function: Full autoMode memory auto call: OffFinisher Mode by Full-auto: None CollateInitial by Key Counter Insert: OffStatus Hold When Auto Re-set: Not keepNext Job Staple Setting: Do Not ReleaseOriginal Set/Bind Direction: Release
05 Default Screen SettingSelect the initial screen to be displayed when the power switch is turned on.Machine/ Job List/ Copy
Machine
06 Preset Zoom SettingModify predefined fixed ratios, and preset frequently used magnification ratios.Fixed/Six typePreset Zoom/Three type
Fixed/Six typePreset Zoom/Three type
07 Power Save SettingSet the interval time of Auto Low Power and Auto Shut Off modes.Auto Low Power: OFF/ 5 min./ 10 min./ 15 min./ 30 min./ 60 min./ 90 min./ 120 min./ 240 min.: 5 min.Auto Shut Off: OFF/ 1 min./ 30 min./ 60 min./ 90 min./ 120 min./ 240 min.: OFF/30 min.
Auto Low Power: 5 min.Auto Shut Off: 30 min.
08 Time and Date SettingSet the present time, summer time, and time zone.Setting Time/ Summer Time/ Time zone
Setting Time/ Summer Time (Off)/ Time zone
09 Buzzer Setting
01 Buzzer Volume RegulationSet the buzzer sound (the touch key sound) as touch-ing the screen.On/ Off, Big/ Small
On
Setting Item/Description Default
4-12 bizhub PRO C6500
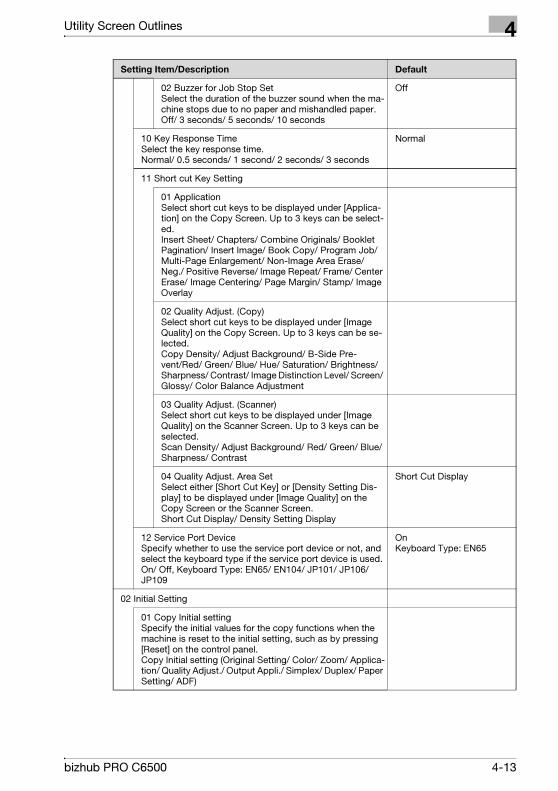
Utility Screen Outlines 4
02 Buzzer for Job Stop SetSelect the duration of the buzzer sound when the ma-chine stops due to no paper and mishandled paper. Off/ 3 seconds/ 5 seconds/ 10 seconds
Off
10 Key Response TimeSelect the key response time.Normal/ 0.5 seconds/ 1 second/ 2 seconds/ 3 seconds
Normal
11 Short cut Key Setting
01 ApplicationSelect short cut keys to be displayed under [Applica-tion] on the Copy Screen. Up to 3 keys can be select-ed.Insert Sheet/ Chapters/ Combine Originals/ Booklet Pagination/ Insert Image/ Book Copy/ Program Job/ Multi-Page Enlargement/ Non-Image Area Erase/ Neg./ Positive Reverse/ Image Repeat/ Frame/ Center Erase/ Image Centering/ Page Margin/ Stamp/ Image Overlay
02 Quality Adjust. (Copy)Select short cut keys to be displayed under [Image Quality] on the Copy Screen. Up to 3 keys can be se-lected.Copy Density/ Adjust Background/ B-Side Pre-vent/Red/ Green/ Blue/ Hue/ Saturation/ Brightness/ Sharpness/ Contrast/ Image Distinction Level/ Screen/ Glossy/ Color Balance Adjustment
03 Quality Adjust. (Scanner)Select short cut keys to be displayed under [Image Quality] on the Scanner Screen. Up to 3 keys can be selected.Scan Density/ Adjust Background/ Red/ Green/ Blue/ Sharpness/ Contrast
04 Quality Adjust. Area SetSelect either [Short Cut Key] or [Density Setting Dis-play] to be displayed under [Image Quality] on the Copy Screen or the Scanner Screen.Short Cut Display/ Density Setting Display
Short Cut Display
12 Service Port DeviceSpecify whether to use the service port device or not, and select the keyboard type if the service port device is used.On/ Off, Keyboard Type: EN65/ EN104/ JP101/ JP106/ JP109
OnKeyboard Type: EN65
02 Initial Setting
01 Copy Initial settingSpecify the initial values for the copy functions when the machine is reset to the initial setting, such as by pressing [Reset] on the control panel.Copy Initial setting (Original Setting/ Color/ Zoom/ Applica-tion/ Quality Adjust./ Output Appli./ Simplex/ Duplex/ Paper Setting/ ADF)
Setting Item/Description Default
bizhub PRO C6500 4-13

4 Utility Screen Outlines
02 Scan Initial settingSpecify the initial values for the scanning functions when the machine is reset to the initial setting, such as by press-ing [Reset] on the control panel.Scanner Setting (Original Setting/ Color/ Zoom/ Color Space/ Quality Adjust./ Scan Size/ Resolution/ Simplex/Du-plex/ Default Server)
03 Common Setting
1SHOT indication timeSelect the SHOT indication time to be displayed in the mes-sage indication area of the touch panel.3 seconds/ 5 seconds
3 seconds
Job Offset ModeSet the machine to offset the copies/ printouts of different jobs.On/ Off
Off
Continuation printSet the machine to output multiple reserve jobs in succes-sion.Copy on/ Copy off/ Printer on/ Printer off
Copy offPrinter on
STOP Key FunctionSpecify whether to pause or abort a job when [Stop] is pressed on the control panel.Job Temp. Stop/ Job Stop Function
Job Temp. Stop
Side 2 Lens Adjustment modeSpecify whether to enable the lens adjustment mode.On/ Off
Off
Tray Change TimeWhen selecting the tray which sets different paper type, specify the time when it becomes the copy possible.Short/ Standard
Short
Priority Paper TypeSelect whether to maintain the Temperature which is suited for the coated paper by turning the fixing unit roller.Others/ Coated Paper
Others
Un-compressing modeSpecify when storing to HDD is not completed with memory overflow.Off/ On
Off
Thick Paper BK ModeActivate this mode to reduce horizontal imperfections in the print quality which might appear when using thick paper in black and white printing (Black mode).Off/ On
Off
Printer Job Stacker PileSpecify whether or not to allow paper from several printer jobs to pile up in the large capacity stacker LS-501.Permission/ Prohibition
Permission
Setting Item/Description Default
4-14 bizhub PRO C6500
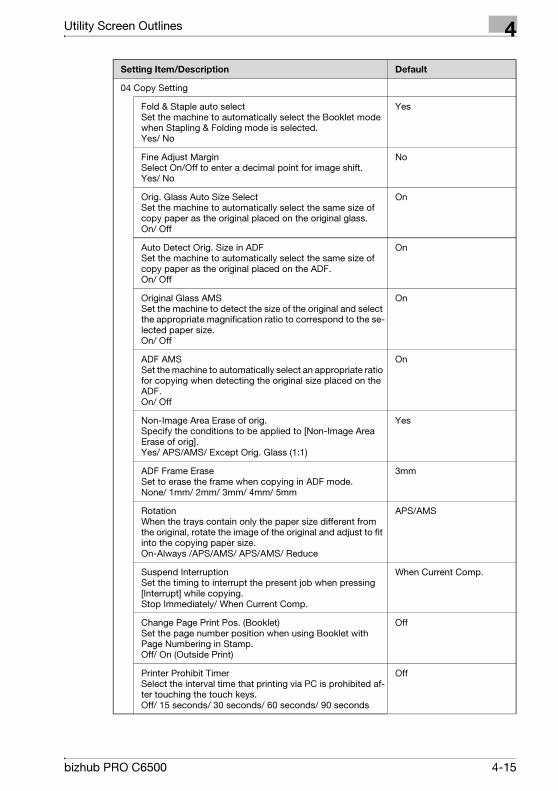
Utility Screen Outlines 4
04 Copy Setting
Fold & Staple auto selectSet the machine to automatically select the Booklet mode when Stapling & Folding mode is selected.Yes/ No
Yes
Fine Adjust MarginSelect On/Off to enter a decimal point for image shift.Yes/ No
No
Orig. Glass Auto Size SelectSet the machine to automatically select the same size of copy paper as the original placed on the original glass.On/ Off
On
Auto Detect Orig. Size in ADFSet the machine to automatically select the same size of copy paper as the original placed on the ADF.On/ Off
On
Original Glass AMSSet the machine to detect the size of the original and select the appropriate magnification ratio to correspond to the se-lected paper size.On/ Off
On
ADF AMSSet the machine to automatically select an appropriate ratio for copying when detecting the original size placed on the ADF.On/ Off
On
Non-Image Area Erase of orig.Specify the conditions to be applied to [Non-Image Area Erase of orig].Yes/ APS/AMS/ Except Orig. Glass (1:1)
Yes
ADF Frame EraseSet to erase the frame when copying in ADF mode.None/ 1mm/ 2mm/ 3mm/ 4mm/ 5mm
3mm
RotationWhen the trays contain only the paper size different from the original, rotate the image of the original and adjust to fit into the copying paper size.On-Always /APS/AMS/ APS/AMS/ Reduce
APS/AMS
Suspend Interruption Set the timing to interrupt the present job when pressing [Interrupt] while copying.Stop Immediately/ When Current Comp.
When Current Comp.
Change Page Print Pos. (Booklet)Set the page number position when using Booklet with Page Numbering in Stamp.Off/ On (Outside Print)
Off
Printer Prohibit TimerSelect the interval time that printing via PC is prohibited af-ter touching the touch keys.Off/ 15 seconds/ 30 seconds/ 60 seconds/ 90 seconds
Off
Setting Item/Description Default
bizhub PRO C6500 4-15
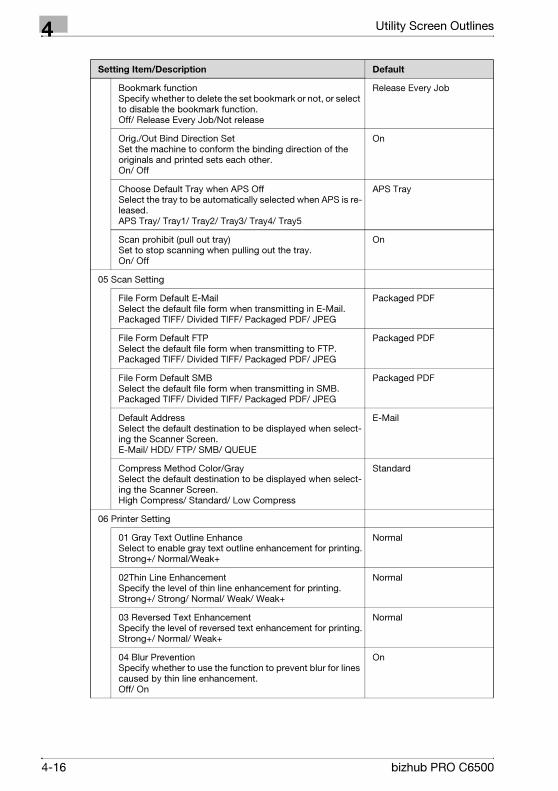
4 Utility Screen Outlines
Bookmark functionSpecify whether to delete the set bookmark or not, or select to disable the bookmark function. Off/ Release Every Job/Not release
Release Every Job
Orig./Out Bind Direction SetSet the machine to conform the binding direction of the originals and printed sets each other.On/ Off
On
Choose Default Tray when APS OffSelect the tray to be automatically selected when APS is re-leased.APS Tray/ Tray1/ Tray2/ Tray3/ Tray4/ Tray5
APS Tray
Scan prohibit (pull out tray)Set to stop scanning when pulling out the tray.On/ Off
On
05 Scan Setting
File Form Default E-MailSelect the default file form when transmitting in E-Mail.Packaged TIFF/ Divided TIFF/ Packaged PDF/ JPEG
Packaged PDF
File Form Default FTPSelect the default file form when transmitting to FTP.Packaged TIFF/ Divided TIFF/ Packaged PDF/ JPEG
Packaged PDF
File Form Default SMBSelect the default file form when transmitting in SMB.Packaged TIFF/ Divided TIFF/ Packaged PDF/ JPEG
Packaged PDF
Default AddressSelect the default destination to be displayed when select-ing the Scanner Screen.E-Mail/ HDD/ FTP/ SMB/ QUEUE
Compress Method Color/GraySelect the default destination to be displayed when select-ing the Scanner Screen.High Compress/ Standard/ Low Compress
Standard
06 Printer Setting
01 Gray Text Outline EnhanceSelect to enable gray text outline enhancement for printing.Strong+/ Normal/Weak+
Normal
02Thin Line EnhancementSpecify the level of thin line enhancement for printing.Strong+/ Strong/ Normal/ Weak/ Weak+
Normal
03 Reversed Text EnhancementSpecify the level of reversed text enhancement for printing.Strong+/ Normal/ Weak+
Normal
04 Blur PreventionSpecify whether to use the function to prevent blur for lines caused by thin line enhancement.Off/ On
On
Setting Item/Description Default
4-16 bizhub PRO C6500
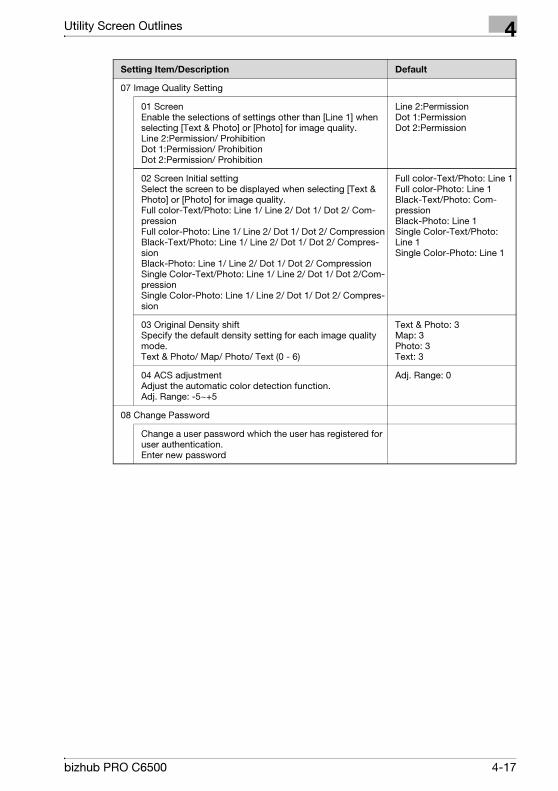
Utility Screen Outlines 4
07 Image Quality Setting
01 ScreenEnable the selections of settings other than [Line 1] when selecting [Text & Photo] or [Photo] for image quality.Line 2:Permission/ ProhibitionDot 1:Permission/ ProhibitionDot 2:Permission/ Prohibition
Line 2:PermissionDot 1:PermissionDot 2:Permission
02 Screen Initial settingSelect the screen to be displayed when selecting [Text & Photo] or [Photo] for image quality.Full color-Text/Photo: Line 1/ Line 2/ Dot 1/ Dot 2/ Com-pressionFull color-Photo: Line 1/ Line 2/ Dot 1/ Dot 2/ CompressionBlack-Text/Photo: Line 1/ Line 2/ Dot 1/ Dot 2/ Compres-sionBlack-Photo: Line 1/ Line 2/ Dot 1/ Dot 2/ CompressionSingle Color-Text/Photo: Line 1/ Line 2/ Dot 1/ Dot 2/Com-pressionSingle Color-Photo: Line 1/ Line 2/ Dot 1/ Dot 2/ Compres-sion
Full color-Text/Photo: Line 1Full color-Photo: Line 1Black-Text/Photo: Com-pressionBlack-Photo: Line 1Single Color-Text/Photo: Line 1Single Color-Photo: Line 1
03 Original Density shiftSpecify the default density setting for each image quality mode.Text & Photo/ Map/ Photo/ Text (0 - 6)
Text & Photo: 3Map: 3Photo: 3Text: 3
04 ACS adjustmentAdjust the automatic color detection function.Adj. Range: -5~+5
Adj. Range: 0
08 Change Password
Change a user password which the user has registered for user authentication.Enter new password
Setting Item/Description Default
bizhub PRO C6500 4-17
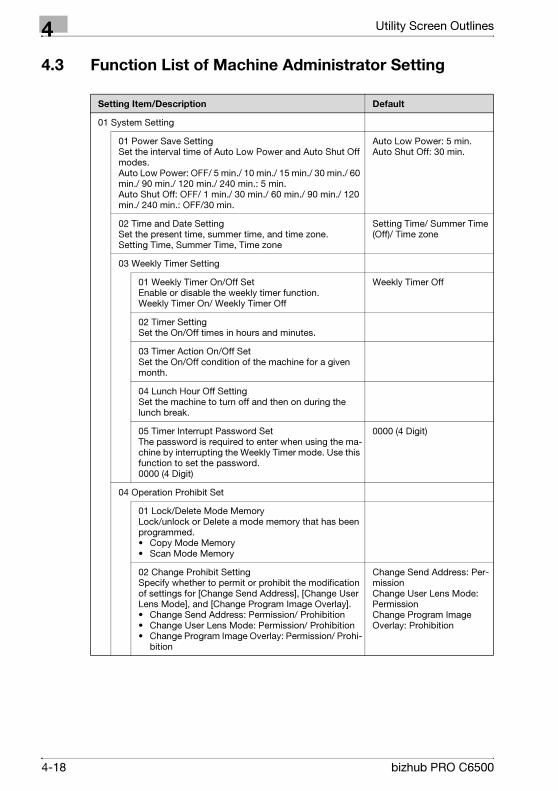
4 Utility Screen Outlines
4.3 Function List of Machine Administrator Setting
Setting Item/Description Default
01 System Setting
01 Power Save SettingSet the interval time of Auto Low Power and Auto Shut Off modes.Auto Low Power: OFF/ 5 min./ 10 min./ 15 min./ 30 min./ 60 min./ 90 min./ 120 min./ 240 min.: 5 min.Auto Shut Off: OFF/ 1 min./ 30 min./ 60 min./ 90 min./ 120 min./ 240 min.: OFF/30 min.
Auto Low Power: 5 min.Auto Shut Off: 30 min.
02 Time and Date SettingSet the present time, summer time, and time zone.Setting Time, Summer Time, Time zone
Setting Time/ Summer Time (Off)/ Time zone
03 Weekly Timer Setting
01 Weekly Timer On/Off SetEnable or disable the weekly timer function.Weekly Timer On/ Weekly Timer Off
Weekly Timer Off
02 Timer SettingSet the On/Off times in hours and minutes.
03 Timer Action On/Off SetSet the On/Off condition of the machine for a given month.
04 Lunch Hour Off SettingSet the machine to turn off and then on during the lunch break.
05 Timer Interrupt Password SetThe password is required to enter when using the ma-chine by interrupting the Weekly Timer mode. Use this function to set the password.0000 (4 Digit)
0000 (4 Digit)
04 Operation Prohibit Set
01 Lock/Delete Mode MemoryLock/unlock or Delete a mode memory that has been programmed.• Copy Mode Memory• Scan Mode Memory
02 Change Prohibit SettingSpecify whether to permit or prohibit the modification of settings for [Change Send Address], [Change User Lens Mode], and [Change Program Image Overlay].• Change Send Address: Permission/ Prohibition• Change User Lens Mode: Permission/ Prohibition• Change Program Image Overlay: Permission/ Prohi-
bition
Change Send Address: Per-missionChange User Lens Mode: PermissionChange Program Image Overlay: Prohibition
4-18 bizhub PRO C6500

Utility Screen Outlines 4
03 Scanner Prohibit SettingSpecify whether to permit or prohibit the selection of [E-Mail], [HDD], [FTP], [SMB], [QUEUE], or [Manual In-put] for scanning functions.• E-Mail: Permission/ Prohibition• FTP: Permission/ Prohibition• HDD: Permission/ Prohibition• SMB: Permission/ Prohibition• QUEUE: Permission/ Prohibition• Manual Input: Permission/ Prohibition
E-Mail: PermissionFTP: PermissionHDD: PermissionSMB: PermissionQUEUE: PermissionManual Input: Permission
05 Expert Adjustment
01 AES Level AdjustmentChange the density level to be applied when selecting [Auto] from [Image Quality \ Copy Density] on the Copy Screen.Color: -5 to +5, Black: -5 to +5
Color: 0Black: 0
02 Erase AdjustmentSpecify the conditions to be applied to [Non-Image Area Erase of orig.], the density level for erase opera-tions, and the amount of frame erase when copying in ADF mode.• None-Image Area Erase:
Erase Outside of Original/ On - APS/AMS Only/ Ex-cept Orig. Glass (1:1)
• Erase Operating Setting: Auto/ Dark+/ Dark/ Normal/ Light/ Light+
• ADF Frame Erase: None/ 1mm/ 2mm/ 3mm/ 4mm/ 5mm
None-Image Area Erase: Erase Outside of OriginalErase Operating Setting: DarkADF Frame Erase: 3mm
03 Printer AdjustmentAdjust the settings related to printing.• Restart Timing Adjustment: -60 to +60 (1 step =
0.1mm)• Centering Adjustment: -40 to +40 (1 step = 0.1mm)• FD-Mag. Adjustment: -100 to +100 (1 step = 0.01%)• CD-Mag. Adjustment: -100 to +100 (1 step =
0.01%)• Lead Edge Erase Adjustment: -20 to +40 (1 step =
0.1mm)• Registration Loop Adj.: -99 to +99 (1 step = 0.1mm)• Pre-registration Adj.: -99 to +99 (1 step = 0.1mm)
04 Finisher AdjustmentAdjust the settings related to the finisher.
01 Stapler Position Adj.Adjust the settings related to the Staple Finisher FS-503.• Staple Center Position: -20 to +20 (1 step =
0.1mm)• Paper Width (staple): -20 to +20 (1 step =
0.1mm)• Paper Width (straight): -20 to +20 (1 step =
0.1mm)
Setting Item/Description Default
bizhub PRO C6500 4-19
4 Utility Screen Outlines
02 Multi Folder (Punch) Adj.Adjust the settings related to the punch function of the Folding Unit FD-501.• Paper Width Adjustment: -20 to +20 (1 step =
0.1mm)• Hole-Punch Vertical Pos.:
2-Hole Punch -40 to +40 (1 step = 0.1mm) 3-Hole Punch -40 to +40 (1 step = 0.1mm)
03 Multi Folder (Fold) Adj.Adjust the settings related to the folding function of the Folding Unit FD-501.• Half Fold Position Adj.: -50 to +50 (1 step =
0.1mm)• Tri-Fold-in Pos. Adj.: -50 to +50 (1 step =
0.1mm)• Tri-Fold-out Pos. Adj.: -50 to +50 (1 step =
0.1mm)• Double Parallel Pos. Adj.: -50 to +50 (1 step =
0.1mm)• Z-Fold Position Adj.: -50 to +50 (1 step =
0.1mm)• Gate Fold Position Adj.: -50 to +50 (1 step =
0.1mm)
05 Stacker Adjustment• Paper Width Adjustment: -20 to +20 (1 step =
0.1mm)• Paper Length Adjustment: -20 to +20 (1 step =
0.1mm)
06 Saddle Stitcher Adj.Adjust the settings related to the Saddle Stitcher SD-501.• Staple Center Adj.: -20 to +20 (1 step =
0.1mm)• Staple Paper Width Adj.: -20 to +20 (1 step =
0.1mm)• Staple Pitch Adjustment: -20 to +20 (1 step =
0.1mm)• Half Fold Position Adj.: -50 to +50 (1 step =
0.1mm)• Tri-Fold Position Adj.: -50 to +50 (1 step =
0.1mm)• Fold Paper Width Adj.: -50 to +50 (1 step =
0.1mm)• Trimming Adjustment:-400 to +400 (1 step =
0.1mm)• Trimmer Receiver Adj.: Trimmer Count, Move
Pitch, Execute Compulsive Movement
07 RU AdjustmentAdjust the settings related to the Relay Unit RU-503/ RU-504.Curl Reform Direction: Off/ Upper/ Lower
Off
Setting Item/Description Default
4-20 bizhub PRO C6500
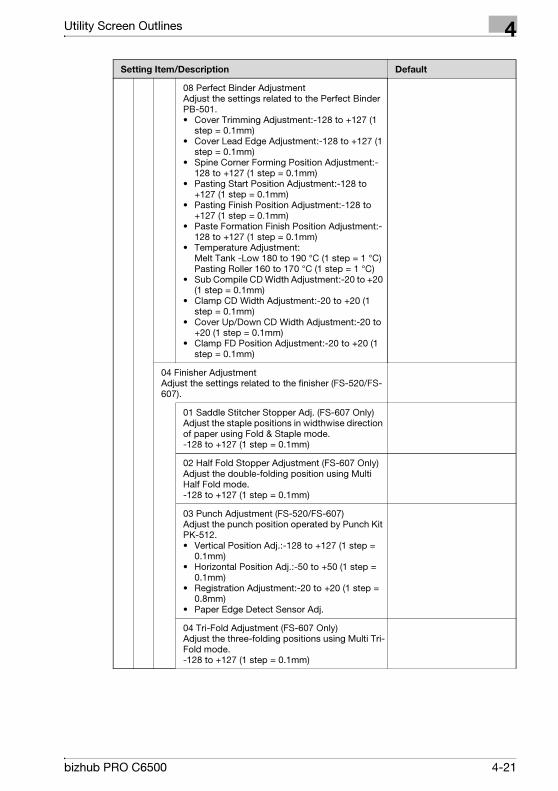
Utility Screen Outlines 4
08 Perfect Binder AdjustmentAdjust the settings related to the Perfect Binder PB-501.• Cover Trimming Adjustment:-128 to +127 (1
step = 0.1mm)• Cover Lead Edge Adjustment:-128 to +127 (1
step = 0.1mm)• Spine Corner Forming Position Adjustment:-
128 to +127 (1 step = 0.1mm)• Pasting Start Position Adjustment:-128 to
+127 (1 step = 0.1mm)• Pasting Finish Position Adjustment:-128 to
+127 (1 step = 0.1mm)• Paste Formation Finish Position Adjustment:-
128 to +127 (1 step = 0.1mm)• Temperature Adjustment:
Melt Tank -Low 180 to 190 °C (1 step = 1 °C) Pasting Roller 160 to 170 °C (1 step = 1 °C)
• Sub Compile CD Width Adjustment:-20 to +20 (1 step = 0.1mm)
• Clamp CD Width Adjustment:-20 to +20 (1 step = 0.1mm)
• Cover Up/Down CD Width Adjustment:-20 to +20 (1 step = 0.1mm)
• Clamp FD Position Adjustment:-20 to +20 (1 step = 0.1mm)
04 Finisher AdjustmentAdjust the settings related to the finisher (FS-520/FS-607).
01 Saddle Stitcher Stopper Adj. (FS-607 Only)Adjust the staple positions in widthwise direction of paper using Fold & Staple mode.-128 to +127 (1 step = 0.1mm)
02 Half Fold Stopper Adjustment (FS-607 Only)Adjust the double-folding position using Multi Half Fold mode.-128 to +127 (1 step = 0.1mm)
03 Punch Adjustment (FS-520/FS-607)Adjust the punch position operated by Punch Kit PK-512.• Vertical Position Adj.:-128 to +127 (1 step =
0.1mm)• Horizontal Position Adj.:-50 to +50 (1 step =
0.1mm)• Registration Adjustment:-20 to +20 (1 step =
0.8mm)• Paper Edge Detect Sensor Adj.
04 Tri-Fold Adjustment (FS-607 Only)Adjust the three-folding positions using Multi Tri-Fold mode.-128 to +127 (1 step = 0.1mm)
Setting Item/Description Default
bizhub PRO C6500 4-21
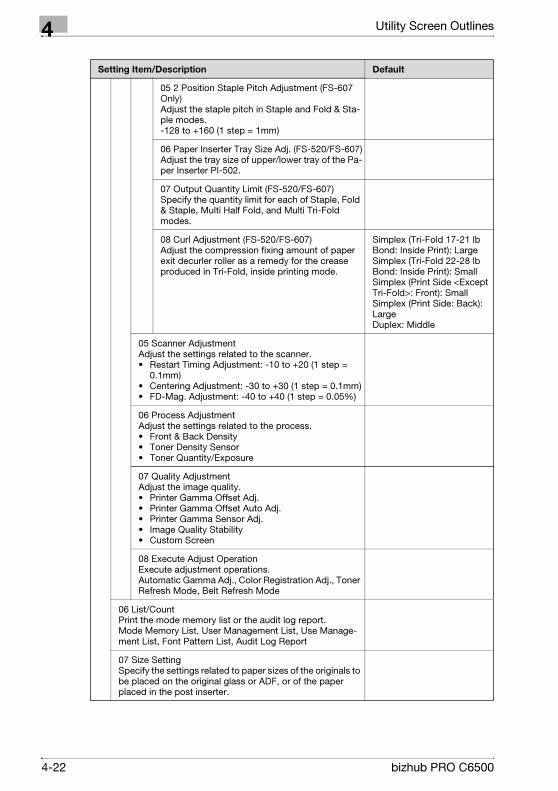
4 Utility Screen Outlines
05 2 Position Staple Pitch Adjustment (FS-607 Only)Adjust the staple pitch in Staple and Fold & Sta-ple modes.-128 to +160 (1 step = 1mm)
06 Paper Inserter Tray Size Adj. (FS-520/FS-607)Adjust the tray size of upper/lower tray of the Pa-per Inserter PI-502.
07 Output Quantity Limit (FS-520/FS-607)Specify the quantity limit for each of Staple, Fold & Staple, Multi Half Fold, and Multi Tri-Fold modes.
08 Curl Adjustment (FS-520/FS-607)Adjust the compression fixing amount of paper exit decurler roller as a remedy for the crease produced in Tri-Fold, inside printing mode.
Simplex (Tri-Fold 17-21 lb Bond: Inside Print): LargeSimplex (Tri-Fold 22-28 lb Bond: Inside Print): SmallSimplex (Print Side <Except Tri-Fold>: Front): SmallSimplex (Print Side: Back): LargeDuplex: Middle
05 Scanner AdjustmentAdjust the settings related to the scanner.• Restart Timing Adjustment: -10 to +20 (1 step =
0.1mm)• Centering Adjustment: -30 to +30 (1 step = 0.1mm)• FD-Mag. Adjustment: -40 to +40 (1 step = 0.05%)
06 Process AdjustmentAdjust the settings related to the process.• Front & Back Density• Toner Density Sensor• Toner Quantity/Exposure
07 Quality AdjustmentAdjust the image quality.• Printer Gamma Offset Adj.• Printer Gamma Offset Auto Adj.• Printer Gamma Sensor Adj.• Image Quality Stability• Custom Screen
08 Execute Adjust OperationExecute adjustment operations.Automatic Gamma Adj., Color Registration Adj., Toner Refresh Mode, Belt Refresh Mode
06 List/CountPrint the mode memory list or the audit log report.Mode Memory List, User Management List, Use Manage-ment List, Font Pattern List, Audit Log Report
07 Size SettingSpecify the settings related to paper sizes of the originals to be placed on the original glass or ADF, or of the paper placed in the post inserter.
Setting Item/Description Default
4-22 bizhub PRO C6500
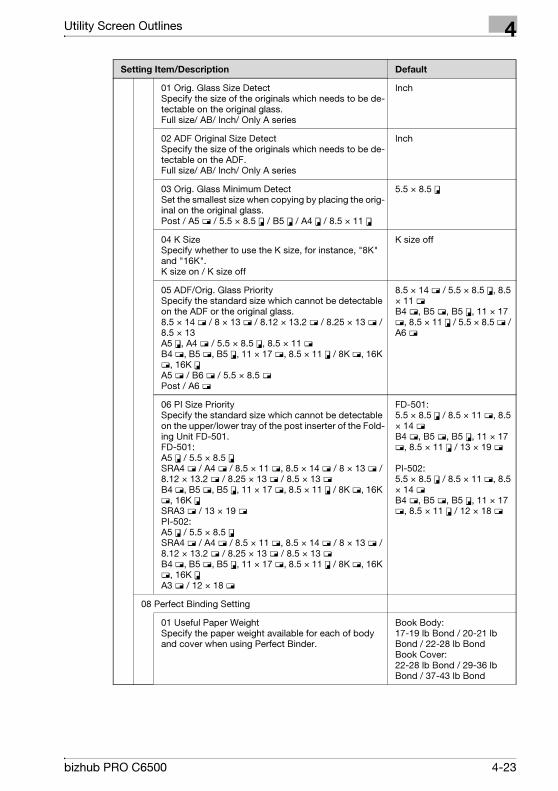
Utility Screen Outlines 4
01 Orig. Glass Size DetectSpecify the size of the originals which needs to be de-tectable on the original glass.Full size/ AB/ Inch/ Only A series
Inch
02 ADF Original Size DetectSpecify the size of the originals which needs to be de-tectable on the ADF.Full size/ AB/ Inch/ Only A series
Inch
03 Orig. Glass Minimum DetectSet the smallest size when copying by placing the orig-inal on the original glass.Post / A5 w / 5.5 × 8.5 v / B5 v / A4 v / 8.5 × 11 v
5.5 × 8.5 v
04 K SizeSpecify whether to use the K size, for instance, "8K" and "16K".K size on / K size off
K size off
05 ADF/Orig. Glass PrioritySpecify the standard size which cannot be detectable on the ADF or the original glass.8.5 × 14 w / 8 × 13 w / 8.12 × 13.2 w / 8.25 × 13 w / 8.5 × 13 A5 v, A4 w / 5.5 × 8.5 v, 8.5 × 11 wB4 w, B5 w, B5 v, 11 × 17 w, 8.5 × 11 v / 8K w, 16K w, 16K vA5 w / B6 w / 5.5 × 8.5 wPost / A6 w
8.5 × 14 w / 5.5 × 8.5 v, 8.5 × 11 wB4 w, B5 w, B5 v, 11 × 17 w, 8.5 × 11 v / 5.5 × 8.5 w / A6 w
06 PI Size PrioritySpecify the standard size which cannot be detectable on the upper/lower tray of the post inserter of the Fold-ing Unit FD-501.FD-501:A5 v / 5.5 × 8.5 vSRA4 w / A4 w / 8.5 × 11 w, 8.5 × 14 w / 8 × 13 w / 8.12 × 13.2 w / 8.25 × 13 w / 8.5 × 13 wB4 w, B5 w, B5 v, 11 × 17 w, 8.5 × 11 v / 8K w, 16K w, 16K vSRA3 w / 13 × 19 wPI-502:A5 v / 5.5 × 8.5 vSRA4 w / A4 w / 8.5 × 11 w, 8.5 × 14 w / 8 × 13 w / 8.12 × 13.2 w / 8.25 × 13 w / 8.5 × 13 wB4 w, B5 w, B5 v, 11 × 17 w, 8.5 × 11 v / 8K w, 16K w, 16K vA3 w / 12 × 18 w
FD-501:5.5 × 8.5 v / 8.5 × 11 w, 8.5 × 14 wB4 w, B5 w, B5 v, 11 × 17 w, 8.5 × 11 v / 13 × 19 w
PI-502:5.5 × 8.5 v / 8.5 × 11 w, 8.5 × 14 wB4 w, B5 w, B5 v, 11 × 17 w, 8.5 × 11 v / 12 × 18 w
08 Perfect Binding Setting
01 Useful Paper WeightSpecify the paper weight available for each of body and cover when using Perfect Binder.
Book Body:17-19 lb Bond / 20-21 lb Bond / 22-28 lb BondBook Cover:22-28 lb Bond / 29-36 lb Bond / 37-43 lb Bond
Setting Item/Description Default
bizhub PRO C6500 4-23
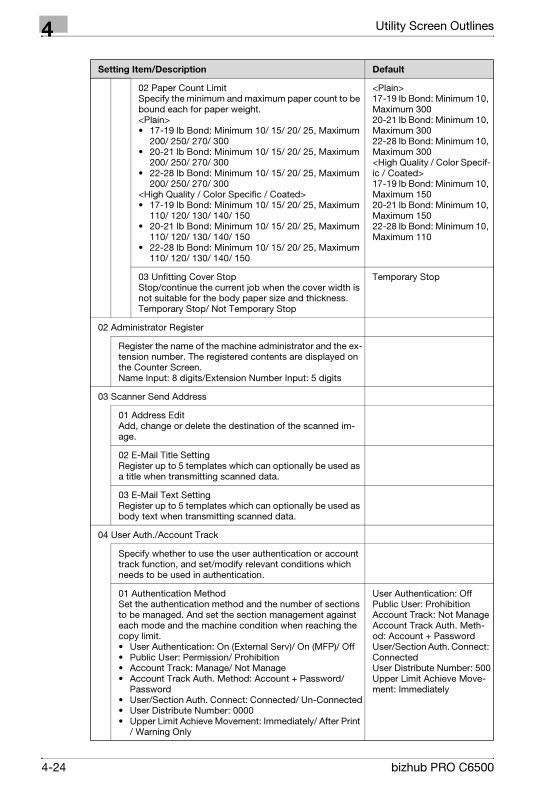
4 Utility Screen Outlines
02 Paper Count LimitSpecify the minimum and maximum paper count to be bound each for paper weight.<Plain>• 17-19 lb Bond: Minimum 10/ 15/ 20/ 25, Maximum
200/ 250/ 270/ 300• 20-21 lb Bond: Minimum 10/ 15/ 20/ 25, Maximum
200/ 250/ 270/ 300• 22-28 lb Bond: Minimum 10/ 15/ 20/ 25, Maximum
200/ 250/ 270/ 300<High Quality / Color Specific / Coated>• 17-19 lb Bond: Minimum 10/ 15/ 20/ 25, Maximum
110/ 120/ 130/ 140/ 150• 20-21 lb Bond: Minimum 10/ 15/ 20/ 25, Maximum
110/ 120/ 130/ 140/ 150• 22-28 lb Bond: Minimum 10/ 15/ 20/ 25, Maximum
110/ 120/ 130/ 140/ 150
<Plain>17-19 lb Bond: Minimum 10, Maximum 30020-21 lb Bond: Minimum 10, Maximum 30022-28 lb Bond: Minimum 10, Maximum 300<High Quality / Color Specif-ic / Coated>17-19 lb Bond: Minimum 10, Maximum 15020-21 lb Bond: Minimum 10, Maximum 15022-28 lb Bond: Minimum 10, Maximum 110
03 Unfitting Cover StopStop/continue the current job when the cover width is not suitable for the body paper size and thickness.Temporary Stop/ Not Temporary Stop
Temporary Stop
02 Administrator Register
Register the name of the machine administrator and the ex-tension number. The registered contents are displayed on the Counter Screen.Name Input: 8 digits/Extension Number Input: 5 digits
03 Scanner Send Address
01 Address EditAdd, change or delete the destination of the scanned im-age.
02 E-Mail Title SettingRegister up to 5 templates which can optionally be used as a title when transmitting scanned data.
03 E-Mail Text SettingRegister up to 5 templates which can optionally be used as body text when transmitting scanned data.
04 User Auth./Account Track
Specify whether to use the user authentication or account track function, and set/modify relevant conditions which needs to be used in authentication.
01 Authentication MethodSet the authentication method and the number of sections to be managed. And set the section management against each mode and the machine condition when reaching the copy limit.• User Authentication: On (External Serv)/ On (MFP)/ Off• Public User: Permission/ Prohibition• Account Track: Manage/ Not Manage• Account Track Auth. Method: Account + Password/
Password• User/Section Auth. Connect: Connected/ Un-Connected• User Distribute Number: 0000• Upper Limit Achieve Movement: Immediately/ After Print
/ Warning Only
User Authentication: OffPublic User: ProhibitionAccount Track: Not ManageAccount Track Auth. Meth-od: Account + PasswordUser/Section Auth. Connect: ConnectedUser Distribute Number: 500Upper Limit Achieve Move-ment: Immediately
Setting Item/Description Default
4-24 bizhub PRO C6500

Utility Screen Outlines 4
02 User Authentication Set
01 Management SettingSpecify whether to display the user list when setting the user authentication, and as select the functions available to authenticated users as well as the maxi-mum number of users displayed in the list.• User Name / Section Name List: Display/ Not Dis-
play• Initial-setting restrictions
User Name List: Display
02 User RegisterRegister, modify, add, or delete users who require user authentication.User No., User Name, Password, Belong Section, Out-put Permission (Color, Black, and their Upper Limit Set), Useable Function (Copy, Scanner, Printer), From Address
03 User CounterView or reset the count for copying, printing, and scan-ning operations by authenticated users.
03 Account Track
01 Account RegisterChange add, or delete accounts being tracked.Section No., Section Name, Password, Name, Output Permission (Color, Black, and their Upper Limit Set), Useable Function (Copy, Scanner, Printer)
02 Account CounterView or reset the count for copying, printing, and scan-ning operations by accounts being tracked.
04 Without AuthenticationSpecify whether to make functions available to users with-out authentication.• Print: Permission/ Prohibition• Pull scan: Permission/ Prohibition
Print: ProhibitionPull scan: Prohibition
05 Network Setting
01 Machine NIC SettingSet the NIC settings.IP Address, Subnet Mask, Gateway Address, DNS Server 1, DNS Server 2, Line Speed Setting
02 E-Mail Initial SettingSpecify the initial settings for e-mail.
06 Common Setting
1SHOT indication timeSelect the SHOT indication time to be displayed in the mes-sage indication area of the touch panel.3 seconds/ 5 seconds
3 seconds
Job Offset ModeSet the machine to offset the copies/printouts of different jobs.On/ Off
Off
Setting Item/Description Default
bizhub PRO C6500 4-25
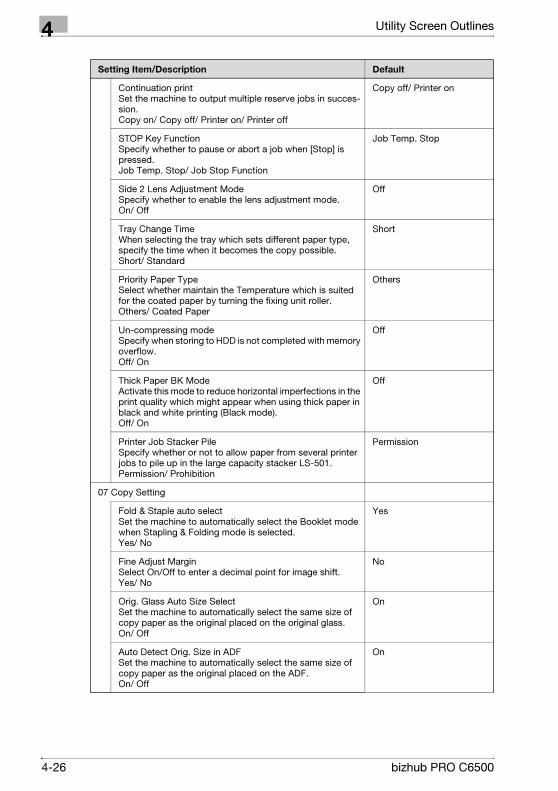
4 Utility Screen Outlines
Continuation printSet the machine to output multiple reserve jobs in succes-sion.Copy on/ Copy off/ Printer on/ Printer off
Copy off/ Printer on
STOP Key FunctionSpecify whether to pause or abort a job when [Stop] is pressed.Job Temp. Stop/ Job Stop Function
Job Temp. Stop
Side 2 Lens Adjustment ModeSpecify whether to enable the lens adjustment mode.On/ Off
Off
Tray Change TimeWhen selecting the tray which sets different paper type, specify the time when it becomes the copy possible.Short/ Standard
Short
Priority Paper TypeSelect whether maintain the Temperature which is suited for the coated paper by turning the fixing unit roller.Others/ Coated Paper
Others
Un-compressing modeSpecify when storing to HDD is not completed with memory overflow.Off/ On
Off
Thick Paper BK ModeActivate this mode to reduce horizontal imperfections in the print quality which might appear when using thick paper in black and white printing (Black mode).Off/ On
Off
Printer Job Stacker PileSpecify whether or not to allow paper from several printer jobs to pile up in the large capacity stacker LS-501.Permission/ Prohibition
Permission
07 Copy Setting
Fold & Staple auto selectSet the machine to automatically select the Booklet mode when Stapling & Folding mode is selected.Yes/ No
Yes
Fine Adjust MarginSelect On/Off to enter a decimal point for image shift.Yes/ No
No
Orig. Glass Auto Size SelectSet the machine to automatically select the same size of copy paper as the original placed on the original glass.On/ Off
On
Auto Detect Orig. Size in ADFSet the machine to automatically select the same size of copy paper as the original placed on the ADF.On/ Off
On
Setting Item/Description Default
4-26 bizhub PRO C6500
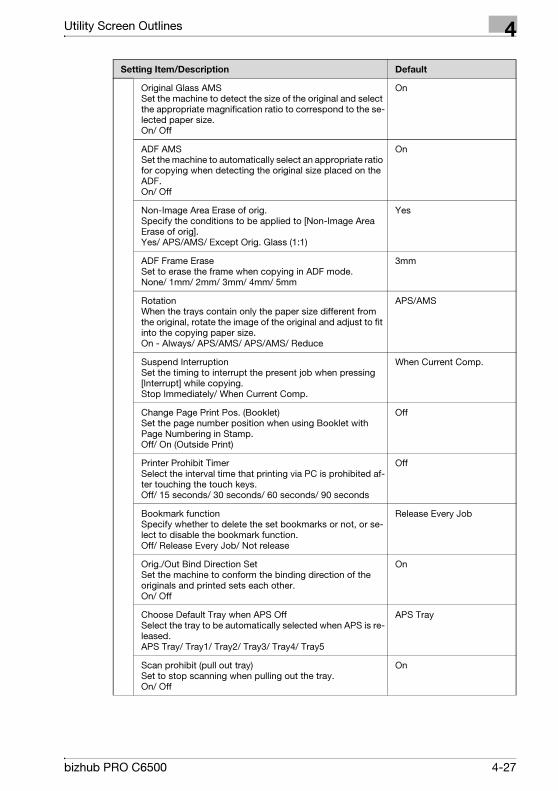
Utility Screen Outlines 4
Original Glass AMSSet the machine to detect the size of the original and select the appropriate magnification ratio to correspond to the se-lected paper size.On/ Off
On
ADF AMSSet the machine to automatically select an appropriate ratio for copying when detecting the original size placed on the ADF.On/ Off
On
Non-Image Area Erase of orig.Specify the conditions to be applied to [Non-Image Area Erase of orig].Yes/ APS/AMS/ Except Orig. Glass (1:1)
Yes
ADF Frame EraseSet to erase the frame when copying in ADF mode.None/ 1mm/ 2mm/ 3mm/ 4mm/ 5mm
3mm
RotationWhen the trays contain only the paper size different from the original, rotate the image of the original and adjust to fit into the copying paper size.On - Always/ APS/AMS/ APS/AMS/ Reduce
APS/AMS
Suspend InterruptionSet the timing to interrupt the present job when pressing [Interrupt] while copying.Stop Immediately/ When Current Comp.
When Current Comp.
Change Page Print Pos. (Booklet)Set the page number position when using Booklet with Page Numbering in Stamp.Off/ On (Outside Print)
Off
Printer Prohibit TimerSelect the interval time that printing via PC is prohibited af-ter touching the touch keys.Off/ 15 seconds/ 30 seconds/ 60 seconds/ 90 seconds
Off
Bookmark functionSpecify whether to delete the set bookmarks or not, or se-lect to disable the bookmark function. Off/ Release Every Job/ Not release
Release Every Job
Orig./Out Bind Direction SetSet the machine to conform the binding direction of the originals and printed sets each other.On/ Off
On
Choose Default Tray when APS OffSelect the tray to be automatically selected when APS is re-leased.APS Tray/ Tray1/ Tray2/ Tray3/ Tray4/ Tray5
APS Tray
Scan prohibit (pull out tray)Set to stop scanning when pulling out the tray.On/ Off
On
Setting Item/Description Default
bizhub PRO C6500 4-27
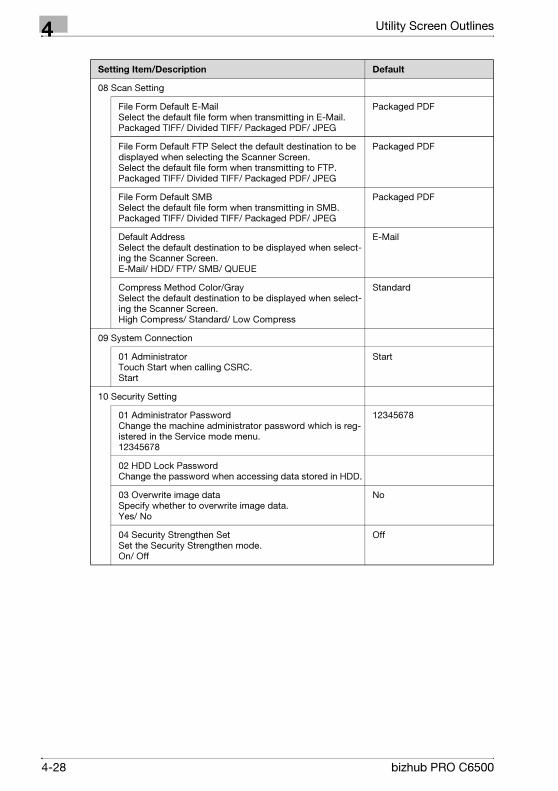
4 Utility Screen Outlines
08 Scan Setting
File Form Default E-MailSelect the default file form when transmitting in E-Mail.Packaged TIFF/ Divided TIFF/ Packaged PDF/ JPEG
Packaged PDF
File Form Default FTP Select the default destination to be displayed when selecting the Scanner Screen.Select the default file form when transmitting to FTP.Packaged TIFF/ Divided TIFF/ Packaged PDF/ JPEG
Packaged PDF
File Form Default SMBSelect the default file form when transmitting in SMB.Packaged TIFF/ Divided TIFF/ Packaged PDF/ JPEG
Packaged PDF
Default AddressSelect the default destination to be displayed when select-ing the Scanner Screen.E-Mail/ HDD/ FTP/ SMB/ QUEUE
Compress Method Color/GraySelect the default destination to be displayed when select-ing the Scanner Screen.High Compress/ Standard/ Low Compress
Standard
09 System Connection
01 AdministratorTouch Start when calling CSRC.Start
Start
10 Security Setting
01 Administrator PasswordChange the machine administrator password which is reg-istered in the Service mode menu.12345678
12345678
02 HDD Lock PasswordChange the password when accessing data stored in HDD.
03 Overwrite image dataSpecify whether to overwrite image data.Yes/ No
No
04 Security Strengthen SetSet the Security Strengthen mode.On/ Off
Off
Setting Item/Description Default
4-28 bizhub PRO C6500

5 User Setting

User Setting 5
5 User Setting
This section describes the items which the users can set on the Utility
Screen.
5.1 User Setting Outlines
The top menu, referred to as Utility/Counter Screen, appears right after
[Utility/Counter] is pressed.
The User Setting Menu Screen is the screen which is displayed by touching
[User Setting] on the Utility/Counter Screen.
The Machine Administrator Menu Screen is the screen which is displayed by
touching [Machine Admin. Setting] on the Utility/Counter Screen.
The Machine Administrator Menu Screen can optionally be set so as to be
available to only those who enter the valid Administrator password.
This section describes the user setting.
How to display User Setting Menu Screen
1 Press the [Utility/Counter] on the
control panel.
The Utility Menu Screen will be
displayed.
bizhub PRO C6500 5-3
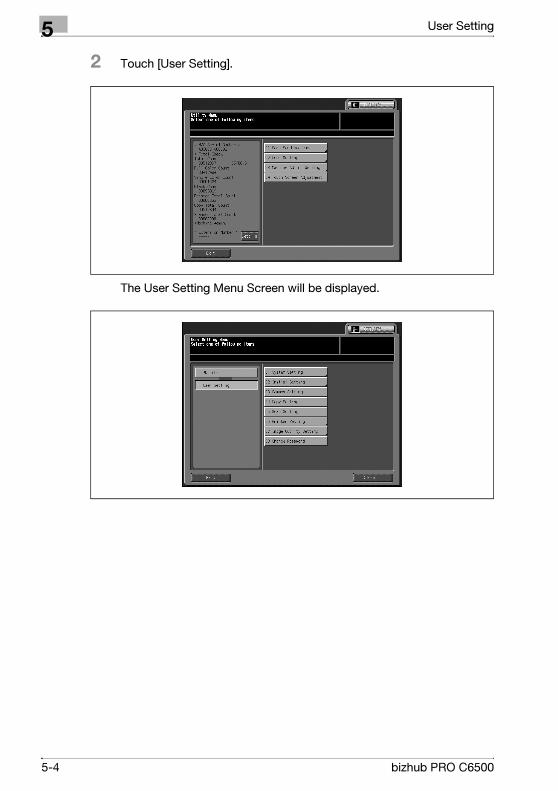
5 User Setting
2 Touch [User Setting].
The User Setting Menu Screen will be displayed.
5-4 bizhub PRO C6500
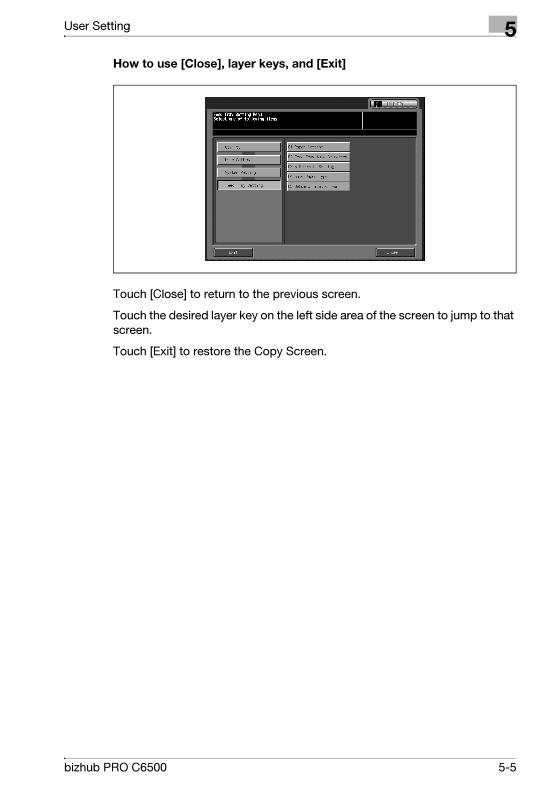
User Setting 5
How to use [Close], layer keys, and [Exit]
Touch [Close] to return to the previous screen.
Touch the desired layer key on the left side area of the screen to jump to that
screen.
Touch [Exit] to restore the Copy Screen.
bizhub PRO C6500 5-5
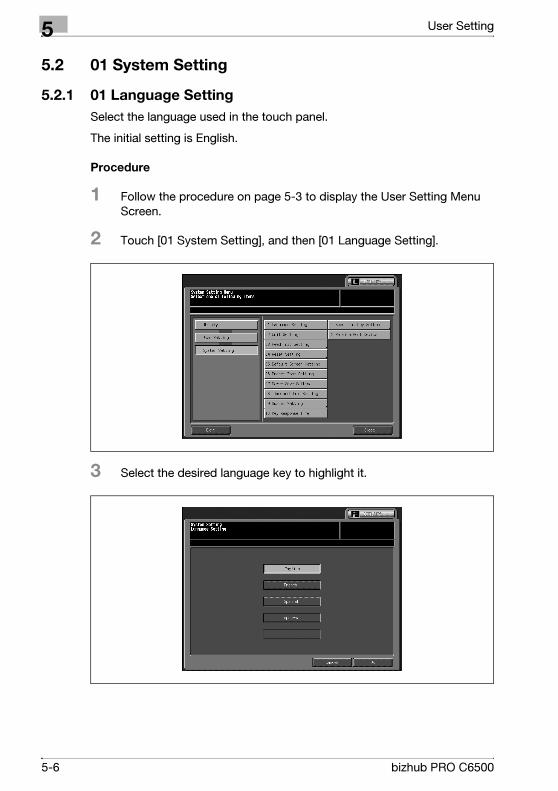
5 User Setting
5.2 01 System Setting
5.2.1 01 Language Setting
Select the language used in the touch panel.
The initial setting is English.
Procedure
1 Follow the procedure on page 5-3 to display the User Setting Menu
Screen.
2 Touch [01 System Setting], and then [01 Language Setting].
3 Select the desired language key to highlight it.
5-6 bizhub PRO C6500
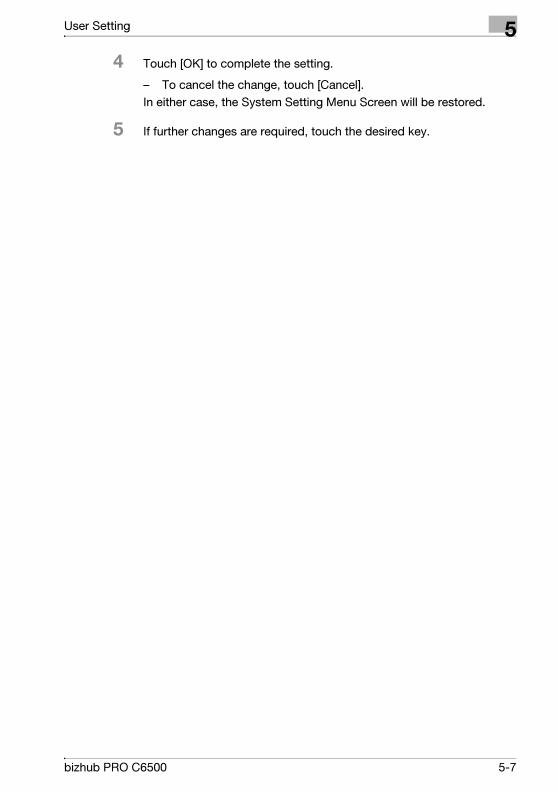
User Setting 5
4 Touch [OK] to complete the setting.
– To cancel the change, touch [Cancel].
In either case, the System Setting Menu Screen will be restored.
5 If further changes are required, touch the desired key.
bizhub PRO C6500 5-7

5 User Setting
5.2.2 02 Unit Setting
Select the unit of measurement for the value to be entered by user and to be
displayed on the touch panel.
Procedure
1 Follow the procedure on page 5-3 to display the User Setting Menu
Screen.
2 Touch [01 System Setting], [02 Unit Setting] in sequence.
3 Select the desired unit key to highlight it.
4 Touch [OK] to complete the setting.
– To cancel the change, touch [Cancel].
In either case, the System Setting Menu Screen will be restored.
5 If further changes are required, touch the desired key.
5-8 bizhub PRO C6500
User Setting 5
5.2.3 03 Feed Tray Setting \ 01 Paper Setting
Please refer to Paper Setting in Section 2 for the overview of, and instruction
on, setting paper.
bizhub PRO C6500 5-9
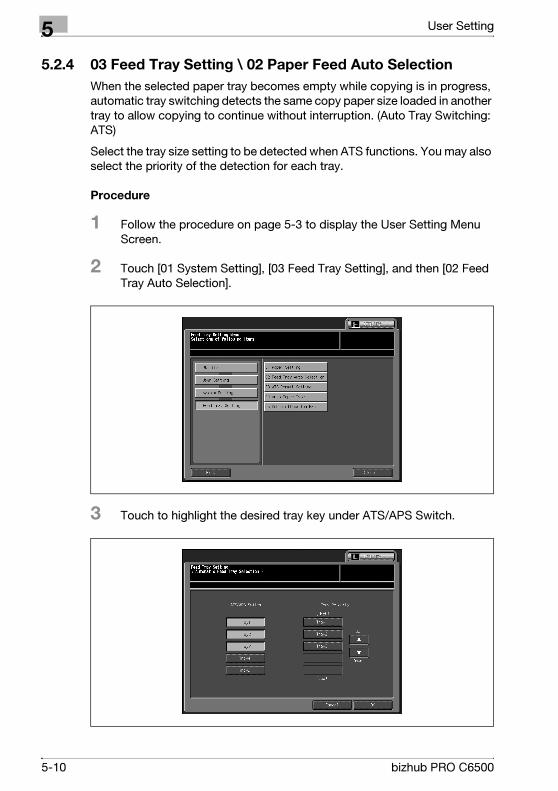
5 User Setting
5.2.4 03 Feed Tray Setting \ 02 Paper Feed Auto Selection
When the selected paper tray becomes empty while copying is in progress,
automatic tray switching detects the same copy paper size loaded in another
tray to allow copying to continue without interruption. (Auto Tray Switching:
ATS)
Select the tray size setting to be detected when ATS functions. You may also
select the priority of the detection for each tray.
Procedure
1 Follow the procedure on page 5-3 to display the User Setting Menu
Screen.
2 Touch [01 System Setting], [03 Feed Tray Setting], and then [02 Feed
Tray Auto Selection].
3 Touch to highlight the desired tray key under ATS/APS Switch.
5-10 bizhub PRO C6500

User Setting 5
The selected tray is automatically detected when ATS functions. The
trays not selected will not be detected even when ATS functions.
4 The selected tray will be displayed under Tray Priority as the tray key.
– Touch to highlight the desired tray key under Tray Priority, then
change its priority by using the arrow keys (c) and (d).
5 Touch [OK] to complete the setting.
– To cancel the change, touch [Cancel].
In either case, the Feed Tray Setting Menu Screen will be restored.
6 If further changes are required, touch the desired key.
bizhub PRO C6500 5-11
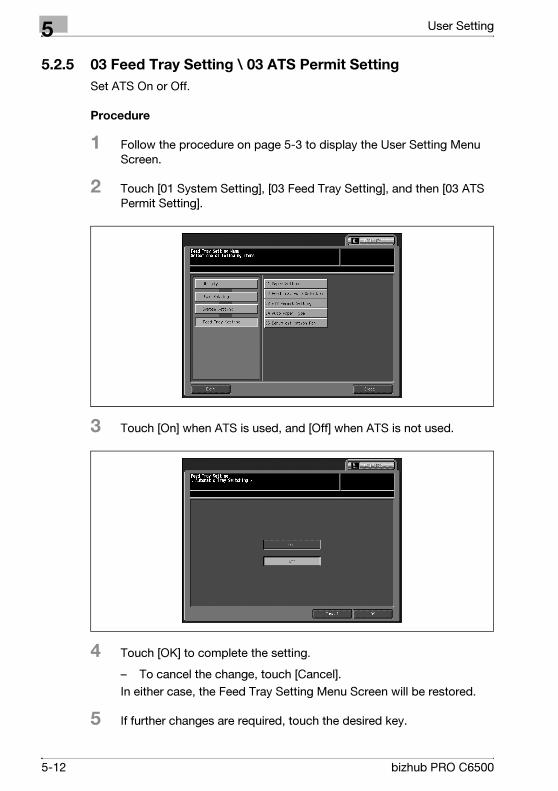
5 User Setting
5.2.5 03 Feed Tray Setting \ 03 ATS Permit Setting
Set ATS On or Off.
Procedure
1 Follow the procedure on page 5-3 to display the User Setting Menu
Screen.
2 Touch [01 System Setting], [03 Feed Tray Setting], and then [03 ATS
Permit Setting].
3 Touch [On] when ATS is used, and [Off] when ATS is not used.
4 Touch [OK] to complete the setting.
– To cancel the change, touch [Cancel].
In either case, the Feed Tray Setting Menu Screen will be restored.
5 If further changes are required, touch the desired key.
5-12 bizhub PRO C6500
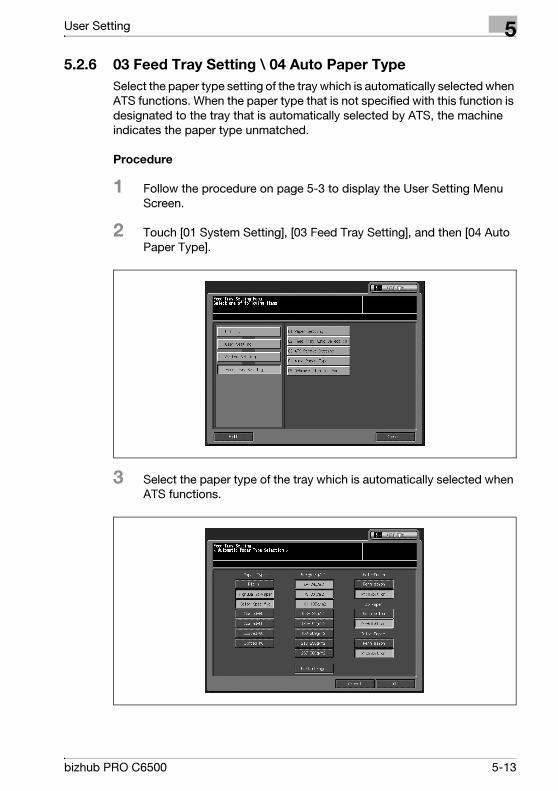
User Setting 5
5.2.6 03 Feed Tray Setting \ 04 Auto Paper Type
Select the paper type setting of the tray which is automatically selected when
ATS functions. When the paper type that is not specified with this function is
designated to the tray that is automatically selected by ATS, the machine
indicates the paper type unmatched.
Procedure
1 Follow the procedure on page 5-3 to display the User Setting Menu
Screen.
2 Touch [01 System Setting], [03 Feed Tray Setting], and then [04 Auto
Paper Type].
3 Select the paper type of the tray which is automatically selected when
ATS functions.
bizhub PRO C6500 5-13
5 User Setting
– Touch to highlight the desired type of keys under "Paper Type",
"Weight", "Hole-Punch", "Tab Paper", and "Color Paper". You may
choose more than one key for each item.
– Switch the displayed unit for weight by touching [Unit Change].
4 Touch [OK] to complete the setting.
– To cancel the change, touch [Cancel].
In either case, the Feed Tray Setting Menu Screen will be restored.
5 If further changes are required, touch the desired key.
5-14 bizhub PRO C6500
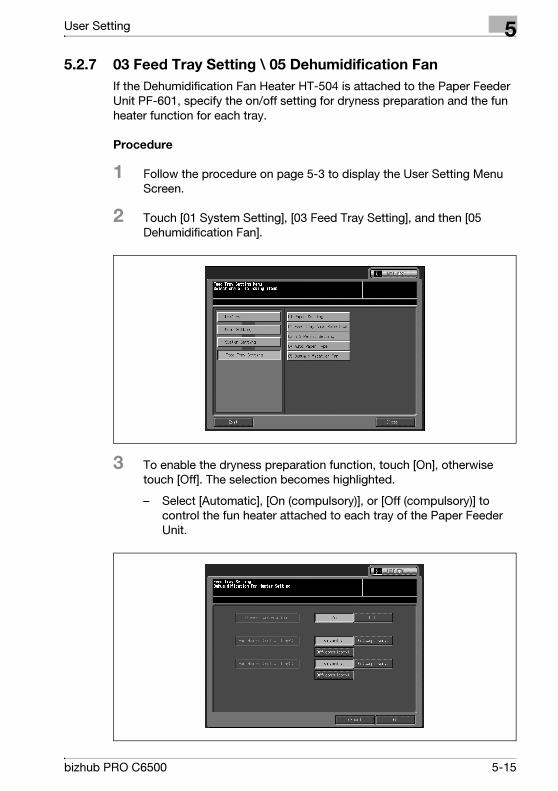
User Setting 5
5.2.7 03 Feed Tray Setting \ 05 Dehumidification Fan
If the Dehumidification Fan Heater HT-504 is attached to the Paper Feeder
Unit PF-601, specify the on/off setting for dryness preparation and the fun
heater function for each tray.
Procedure
1 Follow the procedure on page 5-3 to display the User Setting Menu
Screen.
2 Touch [01 System Setting], [03 Feed Tray Setting], and then [05
Dehumidification Fan].
3 To enable the dryness preparation function, touch [On], otherwise
touch [Off]. The selection becomes highlighted.
– Select [Automatic], [On (compulsory)], or [Off (compulsory)] to
control the fun heater attached to each tray of the Paper Feeder
Unit.
bizhub PRO C6500 5-15
5 User Setting
4 Touch [OK] to complete the setting.
– To cancel the change, touch [Cancel].
In either case, the Feed Tray Setting Menu Screen will be restored.
5 If further changes are required, touch the desired key.
5-16 bizhub PRO C6500
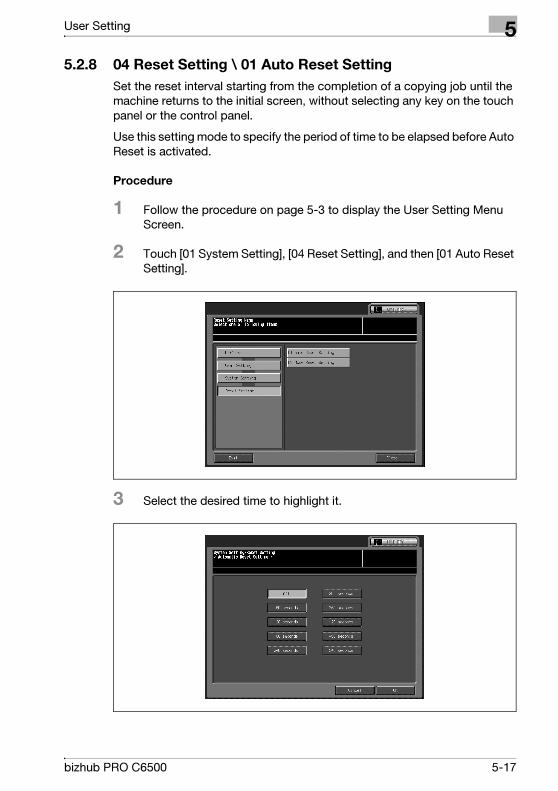
User Setting 5
5.2.8 04 Reset Setting \ 01 Auto Reset Setting
Set the reset interval starting from the completion of a copying job until the
machine returns to the initial screen, without selecting any key on the touch
panel or the control panel.
Use this setting mode to specify the period of time to be elapsed before Auto
Reset is activated.
Procedure
1 Follow the procedure on page 5-3 to display the User Setting Menu
Screen.
2 Touch [01 System Setting], [04 Reset Setting], and then [01 Auto Reset
Setting].
3 Select the desired time to highlight it.
bizhub PRO C6500 5-17

5 User Setting
4 Touch [OK] to complete the setting.
– To cancel the change, touch [Cancel].
In either case, the Reset Setting Menu Screen will be restored.
5 If further changes are required, touch the desired key.
5-18 bizhub PRO C6500
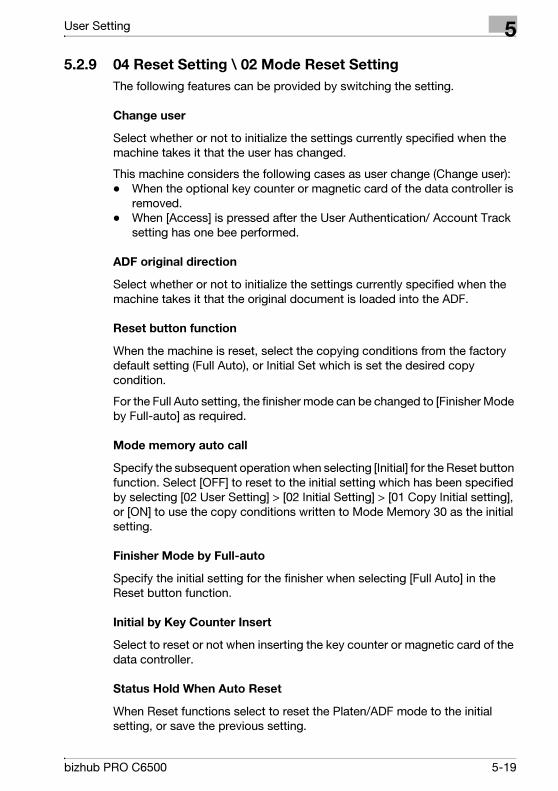
User Setting 5
5.2.9 04 Reset Setting \ 02 Mode Reset Setting
The following features can be provided by switching the setting.
Change user
Select whether or not to initialize the settings currently specified when the
machine takes it that the user has changed.
This machine considers the following cases as user change (Change user):
- When the optional key counter or magnetic card of the data controller is
removed.
- When [Access] is pressed after the User Authentication/ Account Track
setting has one bee performed.
ADF original direction
Select whether or not to initialize the settings currently specified when the
machine takes it that the original document is loaded into the ADF.
Reset button function
When the machine is reset, select the copying conditions from the factory
default setting (Full Auto), or Initial Set which is set the desired copy
condition.
For the Full Auto setting, the finisher mode can be changed to [Finisher Mode
by Full-auto] as required.
Mode memory auto call
Specify the subsequent operation when selecting [Initial] for the Reset button
function. Select [OFF] to reset to the initial setting which has been specified
by selecting [02 User Setting] > [02 Initial Setting] > [01 Copy Initial setting],
or [ON] to use the copy conditions written to Mode Memory 30 as the initial
setting.
Finisher Mode by Full-auto
Specify the initial setting for the finisher when selecting [Full Auto] in the
Reset button function.
Initial by Key Counter Insert
Select to reset or not when inserting the key counter or magnetic card of the
data controller.
Status Hold When Auto Reset
When Reset functions select to reset the Platen/ADF mode to the initial
setting, or save the previous setting.
bizhub PRO C6500 5-19
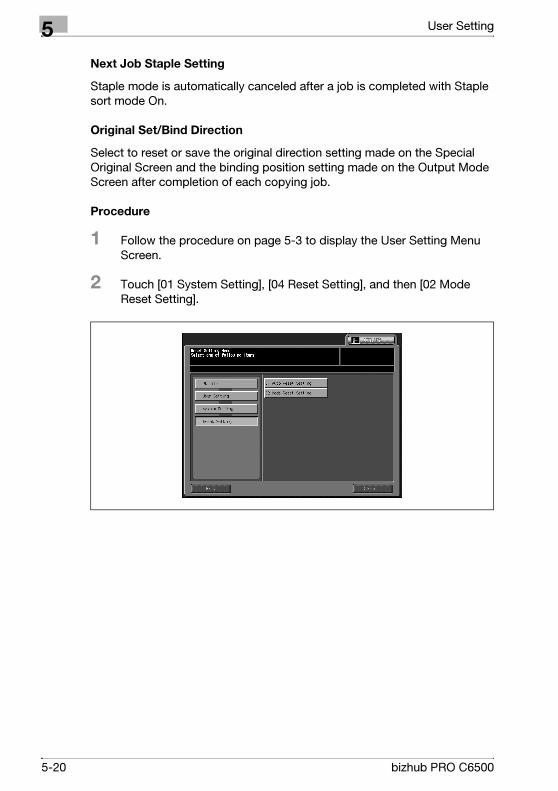
5 User Setting
Next Job Staple Setting
Staple mode is automatically canceled after a job is completed with Staple
sort mode On.
Original Set/Bind Direction
Select to reset or save the original direction setting made on the Special
Original Screen and the binding position setting made on the Output Mode
Screen after completion of each copying job.
Procedure
1 Follow the procedure on page 5-3 to display the User Setting Menu
Screen.
2 Touch [01 System Setting], [04 Reset Setting], and then [02 Mode
Reset Setting].
5-20 bizhub PRO C6500
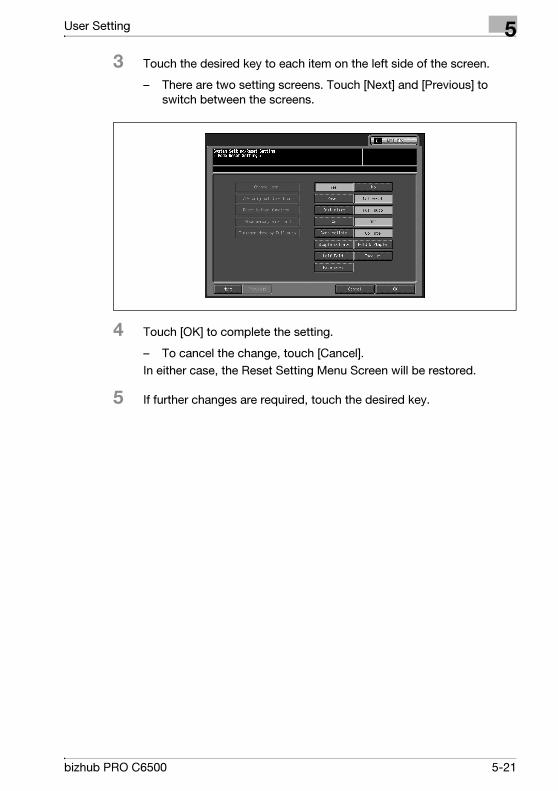
User Setting 5
3 Touch the desired key to each item on the left side of the screen.
– There are two setting screens. Touch [Next] and [Previous] to
switch between the screens.
4 Touch [OK] to complete the setting.
– To cancel the change, touch [Cancel].
In either case, the Reset Setting Menu Screen will be restored.
5 If further changes are required, touch the desired key.
bizhub PRO C6500 5-21
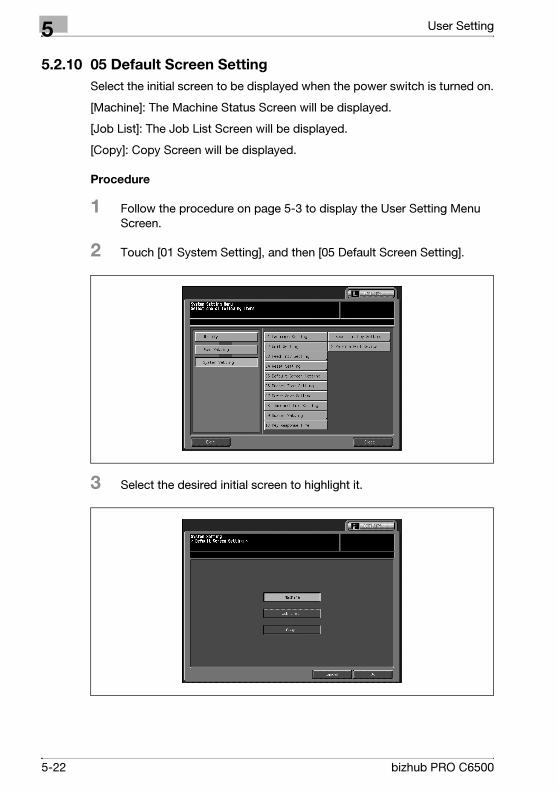
5 User Setting
5.2.10 05 Default Screen Setting
Select the initial screen to be displayed when the power switch is turned on.
[Machine]: The Machine Status Screen will be displayed.
[Job List]: The Job List Screen will be displayed.
[Copy]: Copy Screen will be displayed.
Procedure
1 Follow the procedure on page 5-3 to display the User Setting Menu
Screen.
2 Touch [01 System Setting], and then [05 Default Screen Setting].
3 Select the desired initial screen to highlight it.
5-22 bizhub PRO C6500

User Setting 5
4 Touch [OK] to complete the setting.
– To cancel the change, touch [Cancel].
In either case, the System Setting Menu Screen will be restored.
5 If further changes are required, touch the desired key.
bizhub PRO C6500 5-23
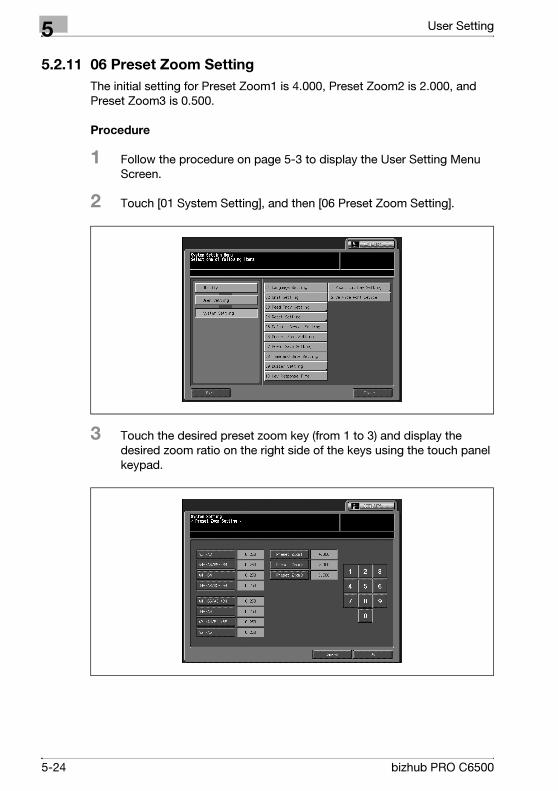
5 User Setting
5.2.11 06 Preset Zoom Setting
The initial setting for Preset Zoom1 is 4.000, Preset Zoom2 is 2.000, and
Preset Zoom3 is 0.500.
Procedure
1 Follow the procedure on page 5-3 to display the User Setting Menu
Screen.
2 Touch [01 System Setting], and then [06 Preset Zoom Setting].
3 Touch the desired preset zoom key (from 1 to 3) and display the
desired zoom ratio on the right side of the keys using the touch panel
keypad.
5-24 bizhub PRO C6500
User Setting 5
4 Touch [OK] to complete the setting.
– To cancel the change, touch [Cancel].
In either case, the System Setting Menu Screen will be restored.
5 If further changes are required, touch the desired key.
bizhub PRO C6500 5-25
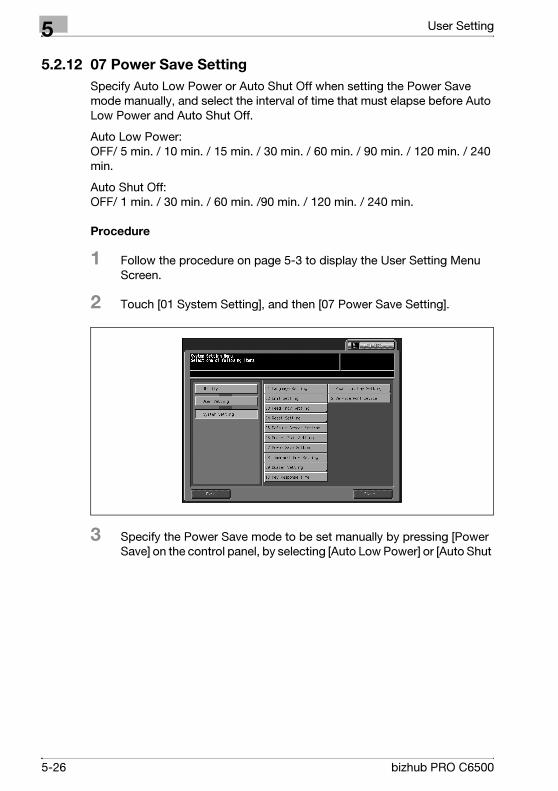
5 User Setting
5.2.12 07 Power Save Setting
Specify Auto Low Power or Auto Shut Off when setting the Power Save
mode manually, and select the interval of time that must elapse before Auto
Low Power and Auto Shut Off.
Auto Low Power: OFF/ 5 min. / 10 min. / 15 min. / 30 min. / 60 min. / 90 min. / 120 min. / 240
min.
Auto Shut Off: OFF/ 1 min. / 30 min. / 60 min. /90 min. / 120 min. / 240 min.
Procedure
1 Follow the procedure on page 5-3 to display the User Setting Menu
Screen.
2 Touch [01 System Setting], and then [07 Power Save Setting].
3 Specify the Power Save mode to be set manually by pressing [Power
Save] on the control panel, by selecting [Auto Low Power] or [Auto Shut
5-26 bizhub PRO C6500
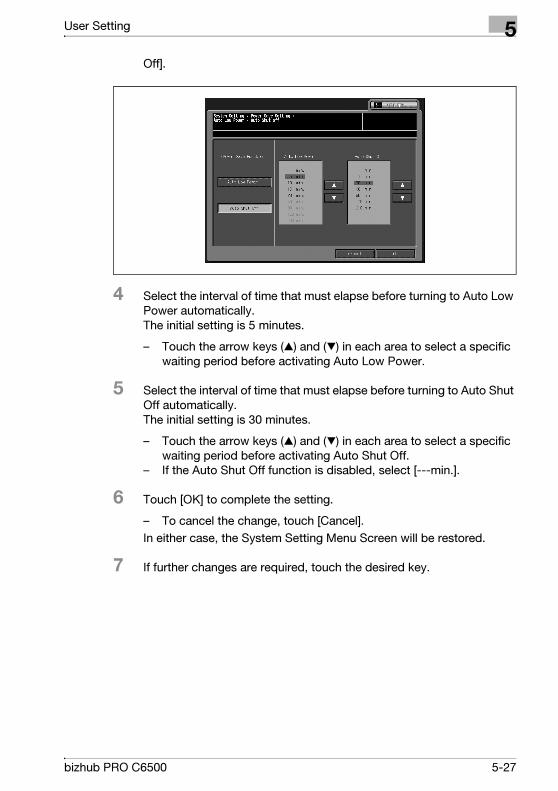
User Setting 5
Off].
4 Select the interval of time that must elapse before turning to Auto Low
Power automatically. The initial setting is 5 minutes.
– Touch the arrow keys (c) and (d) in each area to select a specific
waiting period before activating Auto Low Power.
5 Select the interval of time that must elapse before turning to Auto Shut
Off automatically. The initial setting is 30 minutes.
– Touch the arrow keys (c) and (d) in each area to select a specific
waiting period before activating Auto Shut Off.
– If the Auto Shut Off function is disabled, select [---min.].
6 Touch [OK] to complete the setting.
– To cancel the change, touch [Cancel].
In either case, the System Setting Menu Screen will be restored.
7 If further changes are required, touch the desired key.
bizhub PRO C6500 5-27
5 User Setting
2
Note
The period of time selected for Auto Low Power cannot exceed the Auto
Shut Off setting.
If the same period of time as Auto Shut Off is selected for Auto Low
Power, Auto Shut Off will function instead of Auto Low Power.
2
Note
If the period of time selected for Auto Shut Off is shorter than that of for
Auto Low Power, the period of time for Auto Low Power will be forcibly
reset to the same period of time as Auto Shut Off. Auto Low Power will
not function.
5-28 bizhub PRO C6500
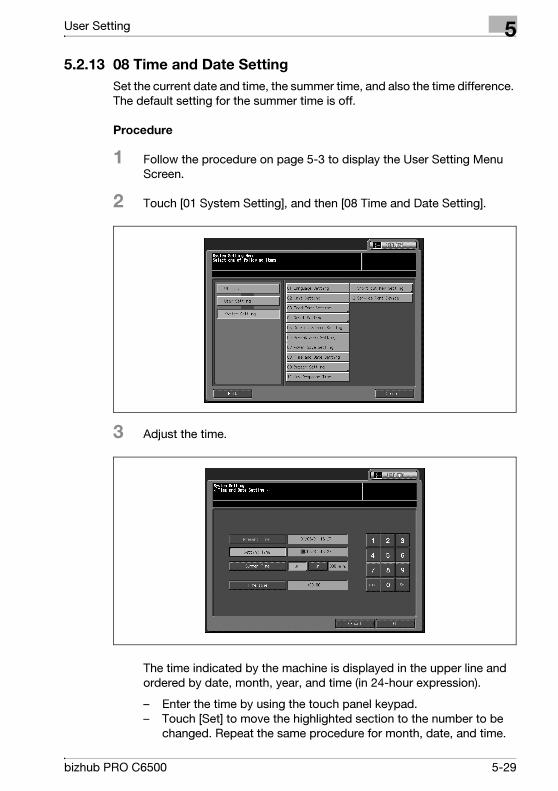
User Setting 5
5.2.13 08 Time and Date Setting
Set the current date and time, the summer time, and also the time difference.
The default setting for the summer time is off.
Procedure
1 Follow the procedure on page 5-3 to display the User Setting Menu
Screen.
2 Touch [01 System Setting], and then [08 Time and Date Setting].
3 Adjust the time.
The time indicated by the machine is displayed in the upper line and
ordered by date, month, year, and time (in 24-hour expression).
– Enter the time by using the touch panel keypad.
– Touch [Set] to move the highlighted section to the number to be
changed. Repeat the same procedure for month, date, and time.
bizhub PRO C6500 5-29
5 User Setting
4 Set the summer time.
– The summer time is initially deactivated. To activate the summer
time (Daylight Savings Time) function, touch [Summer Time] to
highlight it. The Present time will gain one hour.
5 The Difference in time setting is provided in order to give the time
difference information at the same time when an e-mail is received. The
time difference is predefined for each country or region. To set this function, follow the procedure below.
– Touch [Diff. time setting] to display the Difference in Time Setting
Screen.
– Touch [+ <-> -] to display "+" when the local time is earlier than the
Universal time, or "-" when the local time is later.
– Use the touch panel keypad to enter the time difference between
the Universal time and the local time in the machine setting area.
(e.g. Enter "-0600" for six hours later than the Universal time.)
– Touch [OK] to return to the Time and Date Setting Screen.
6 Touch [OK] to complete the setting.
– To cancel the change, touch [Cancel].
In either case, the System Setting Menu Screen will be restored.
7 If further changes are required, touch the desired key.
5-30 bizhub PRO C6500
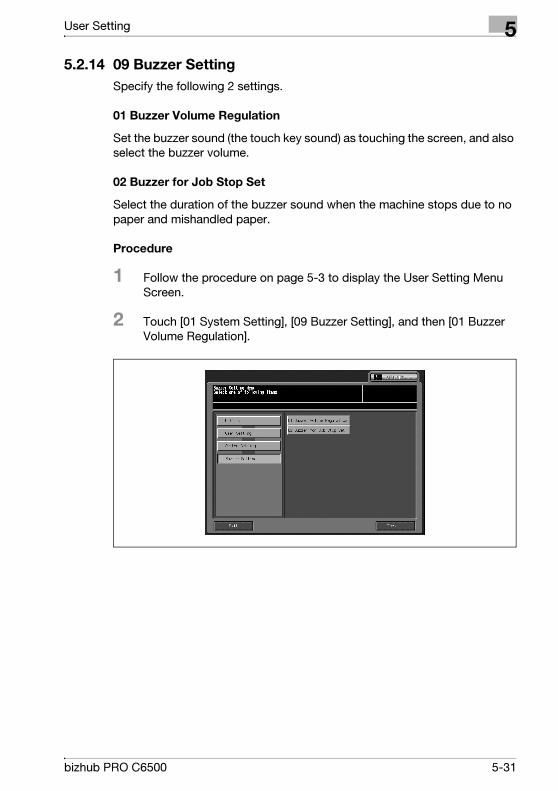
User Setting 5
5.2.14 09 Buzzer Setting
Specify the following 2 settings.
01 Buzzer Volume Regulation
Set the buzzer sound (the touch key sound) as touching the screen, and also
select the buzzer volume.
02 Buzzer for Job Stop Set
Select the duration of the buzzer sound when the machine stops due to no
paper and mishandled paper.
Procedure
1 Follow the procedure on page 5-3 to display the User Setting Menu
Screen.
2 Touch [01 System Setting], [09 Buzzer Setting], and then [01 Buzzer
Volume Regulation].
bizhub PRO C6500 5-31
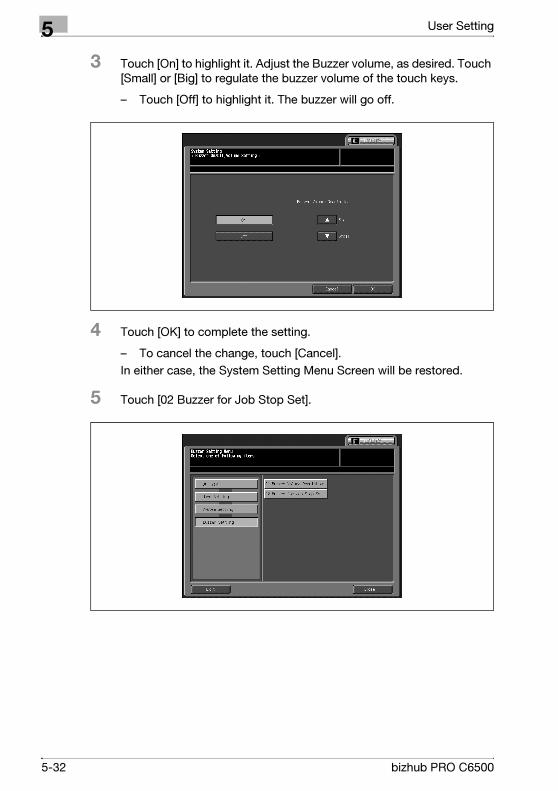
5 User Setting
3 Touch [On] to highlight it. Adjust the Buzzer volume, as desired. Touch
[Small] or [Big] to regulate the buzzer volume of the touch keys.
– Touch [Off] to highlight it. The buzzer will go off.
4 Touch [OK] to complete the setting.
– To cancel the change, touch [Cancel].
In either case, the System Setting Menu Screen will be restored.
5 Touch [02 Buzzer for Job Stop Set].
5-32 bizhub PRO C6500
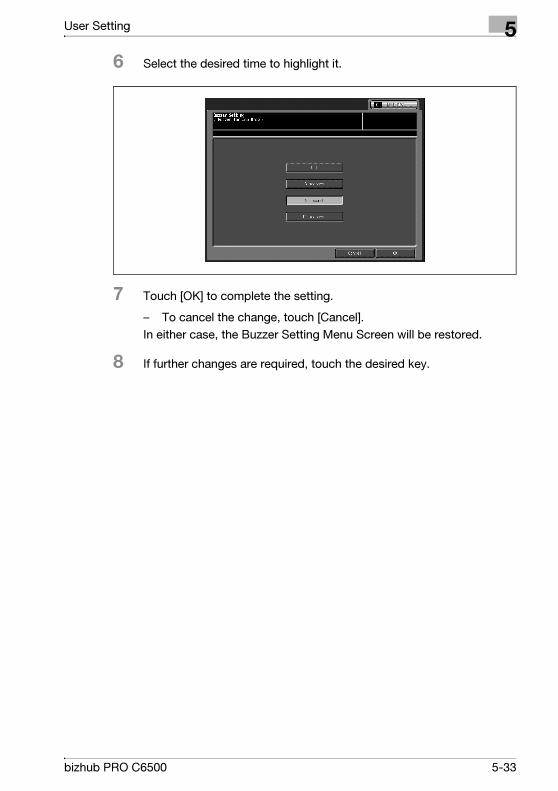
User Setting 5
6 Select the desired time to highlight it.
7 Touch [OK] to complete the setting.
– To cancel the change, touch [Cancel].
In either case, the Buzzer Setting Menu Screen will be restored.
8 If further changes are required, touch the desired key.
bizhub PRO C6500 5-33
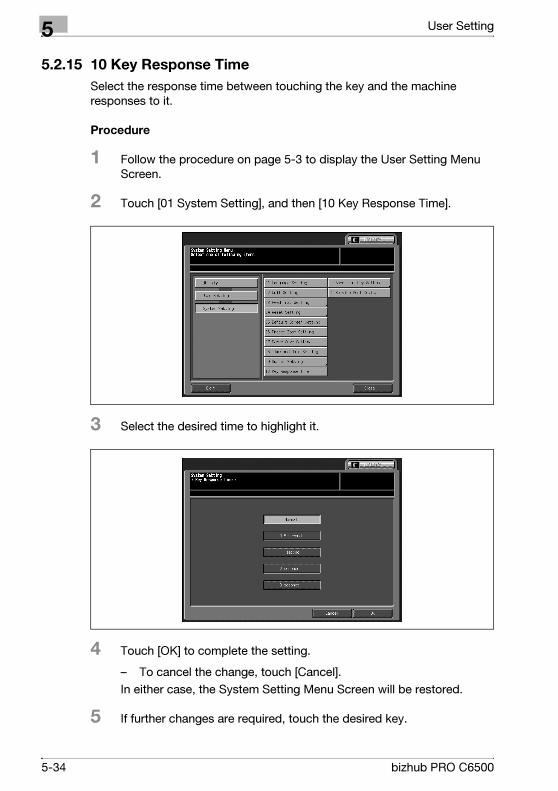
5 User Setting
5.2.15 10 Key Response Time
Select the response time between touching the key and the machine
responses to it.
Procedure
1 Follow the procedure on page 5-3 to display the User Setting Menu
Screen.
2 Touch [01 System Setting], and then [10 Key Response Time].
3 Select the desired time to highlight it.
4 Touch [OK] to complete the setting.
– To cancel the change, touch [Cancel].
In either case, the System Setting Menu Screen will be restored.
5 If further changes are required, touch the desired key.
5-34 bizhub PRO C6500

User Setting 5
5.2.16 11 Short Cut Key Setting
Select up to 3 short cut keys to be displayed under [Application] and [Quality
Adjust.] on the Copy Screen, and under [Quality Adjust] on the Scan Settings
Screen of the Scanner Screen, for easy access to the desired setting
screens. [Short Cut Display] under [Quality Adjust.] on the Copy Screen can
also be changed to [Density Setting Display].
Procedure
1 Follow the procedure on page 5-3 to display the User Setting Menu
Screen.
2 Touch [01 System Setting], and then [11 Short cut Key Setting].
3 To display the short cut keys under [Application] on the Copy Screen,
touch [01 Application] to display the Short Cut Key Setting Screen
(Application).
bizhub PRO C6500 5-35
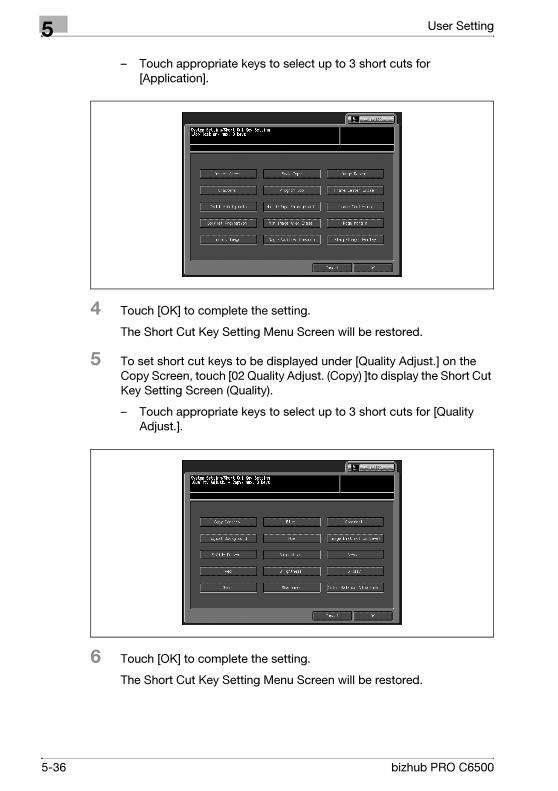
5 User Setting
– Touch appropriate keys to select up to 3 short cuts for
[Application].
4 Touch [OK] to complete the setting.
The Short Cut Key Setting Menu Screen will be restored.
5 To set short cut keys to be displayed under [Quality Adjust.] on the
Copy Screen, touch [02 Quality Adjust. (Copy) ]to display the Short Cut
Key Setting Screen (Quality).
– Touch appropriate keys to select up to 3 short cuts for [Quality
Adjust.].
6 Touch [OK] to complete the setting.
The Short Cut Key Setting Menu Screen will be restored.
5-36 bizhub PRO C6500
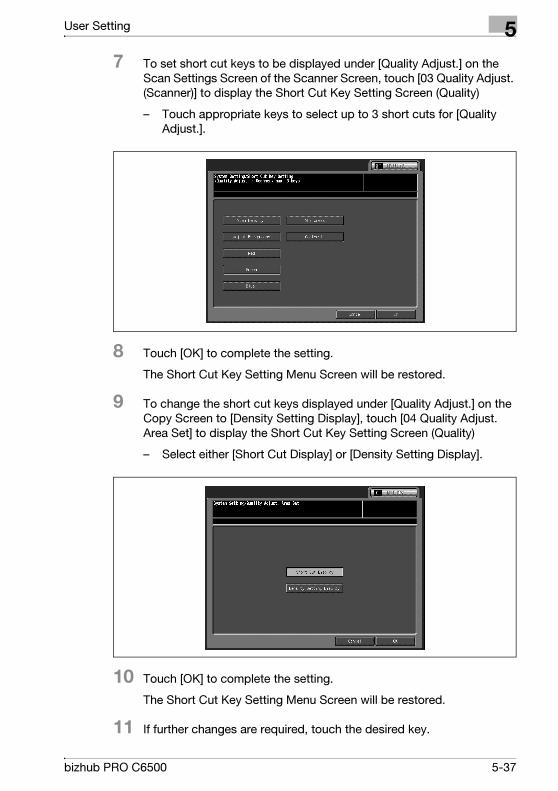
User Setting 5
7 To set short cut keys to be displayed under [Quality Adjust.] on the
Scan Settings Screen of the Scanner Screen, touch [03 Quality Adjust.
(Scanner)] to display the Short Cut Key Setting Screen (Quality)
– Touch appropriate keys to select up to 3 short cuts for [Quality
Adjust.].
8 Touch [OK] to complete the setting.
The Short Cut Key Setting Menu Screen will be restored.
9 To change the short cut keys displayed under [Quality Adjust.] on the
Copy Screen to [Density Setting Display], touch [04 Quality Adjust.
Area Set] to display the Short Cut Key Setting Screen (Quality)
– Select either [Short Cut Display] or [Density Setting Display].
10 Touch [OK] to complete the setting.
The Short Cut Key Setting Menu Screen will be restored.
11 If further changes are required, touch the desired key.
bizhub PRO C6500 5-37
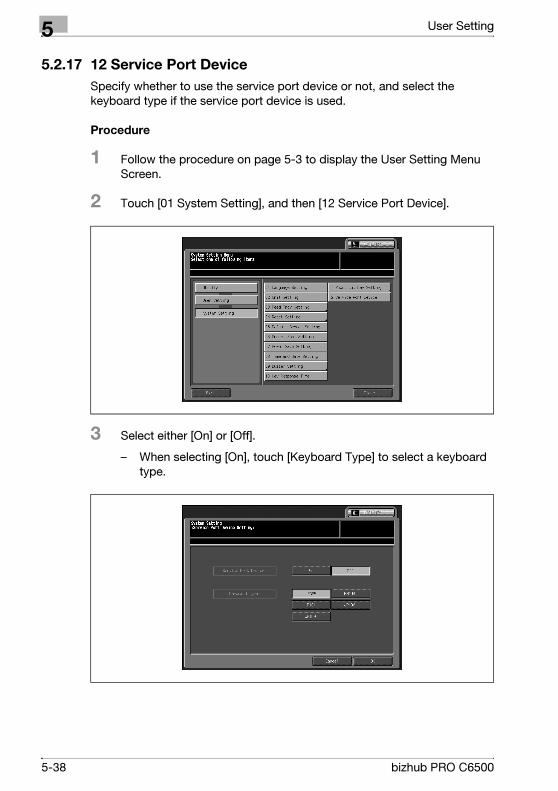
5 User Setting
5.2.17 12 Service Port Device
Specify whether to use the service port device or not, and select the
keyboard type if the service port device is used.
Procedure
1 Follow the procedure on page 5-3 to display the User Setting Menu
Screen.
2 Touch [01 System Setting], and then [12 Service Port Device].
3 Select either [On] or [Off].
– When selecting [On], touch [Keyboard Type] to select a keyboard
type.
5-38 bizhub PRO C6500
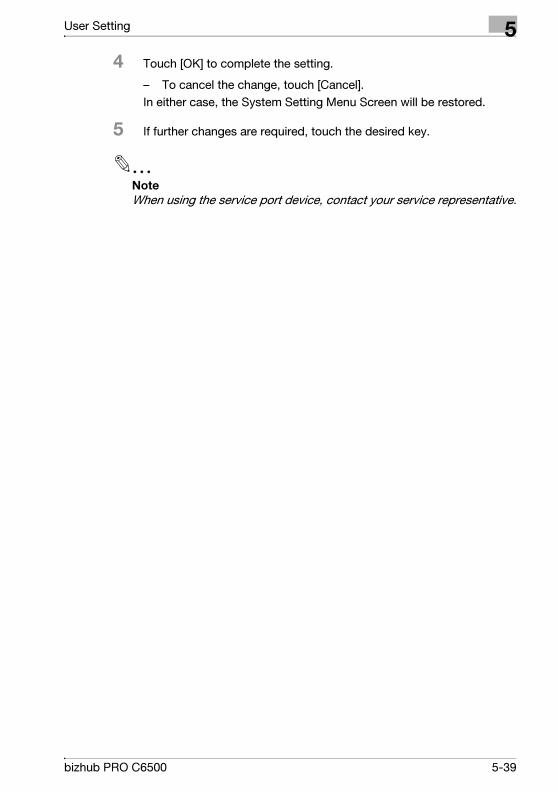
User Setting 5
4 Touch [OK] to complete the setting.
– To cancel the change, touch [Cancel].
In either case, the System Setting Menu Screen will be restored.
5 If further changes are required, touch the desired key.
2
Note
When using the service port device, contact your service representative.
bizhub PRO C6500 5-39
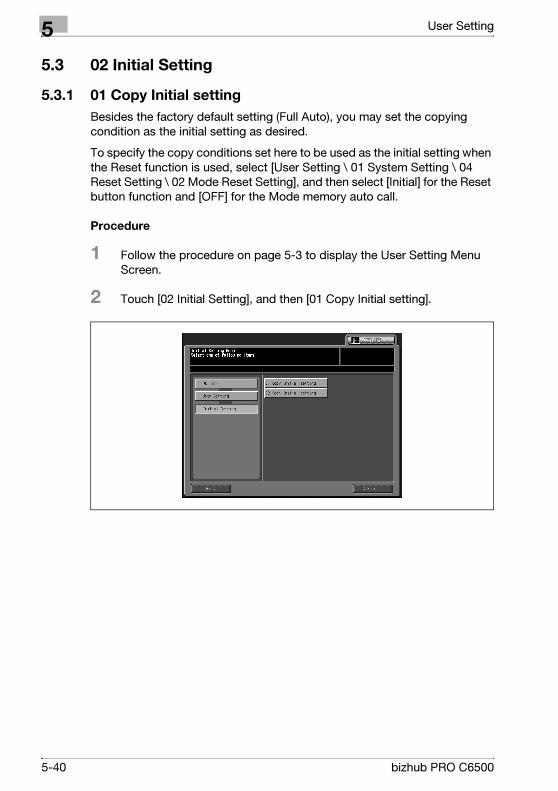
5 User Setting
5.3 02 Initial Setting
5.3.1 01 Copy Initial setting
Besides the factory default setting (Full Auto), you may set the copying
condition as the initial setting as desired.
To specify the copy conditions set here to be used as the initial setting when
the Reset function is used, select [User Setting \ 01 System Setting \ 04
Reset Setting \ 02 Mode Reset Setting], and then select [Initial] for the Reset
button function and [OFF] for the Mode memory auto call.
Procedure
1 Follow the procedure on page 5-3 to display the User Setting Menu
Screen.
2 Touch [02 Initial Setting], and then [01 Copy Initial setting].
5-40 bizhub PRO C6500
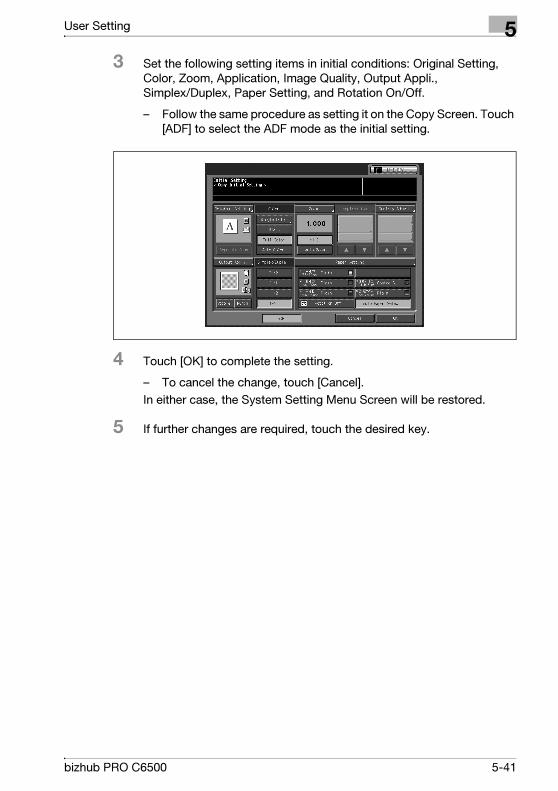
User Setting 5
3 Set the following setting items in initial conditions: Original Setting,
Color, Zoom, Application, Image Quality, Output Appli.,
Simplex/Duplex, Paper Setting, and Rotation On/Off.
– Follow the same procedure as setting it on the Copy Screen. Touch
[ADF] to select the ADF mode as the initial setting.
4 Touch [OK] to complete the setting.
– To cancel the change, touch [Cancel].
In either case, the System Setting Menu Screen will be restored.
5 If further changes are required, touch the desired key.
bizhub PRO C6500 5-41
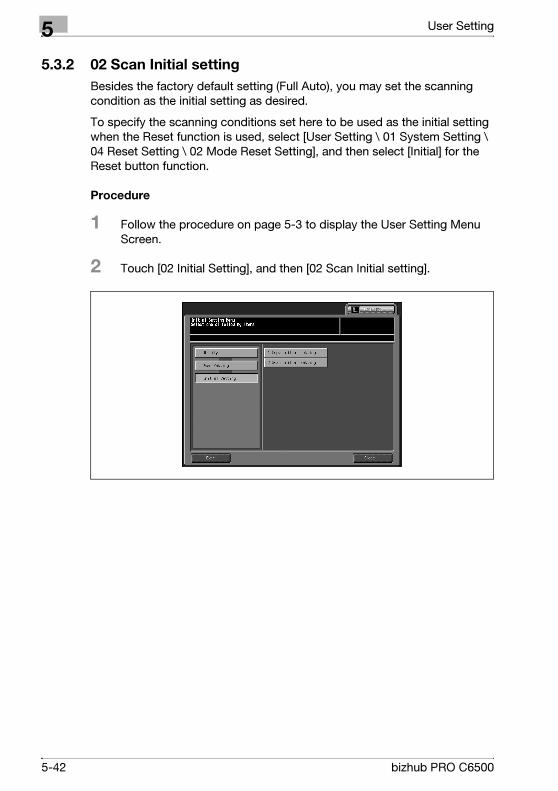
5 User Setting
5.3.2 02 Scan Initial setting
Besides the factory default setting (Full Auto), you may set the scanning
condition as the initial setting as desired.
To specify the scanning conditions set here to be used as the initial setting
when the Reset function is used, select [User Setting \ 01 System Setting \
04 Reset Setting \ 02 Mode Reset Setting], and then select [Initial] for the
Reset button function.
Procedure
1 Follow the procedure on page 5-3 to display the User Setting Menu
Screen.
2 Touch [02 Initial Setting], and then [02 Scan Initial setting].
5-42 bizhub PRO C6500
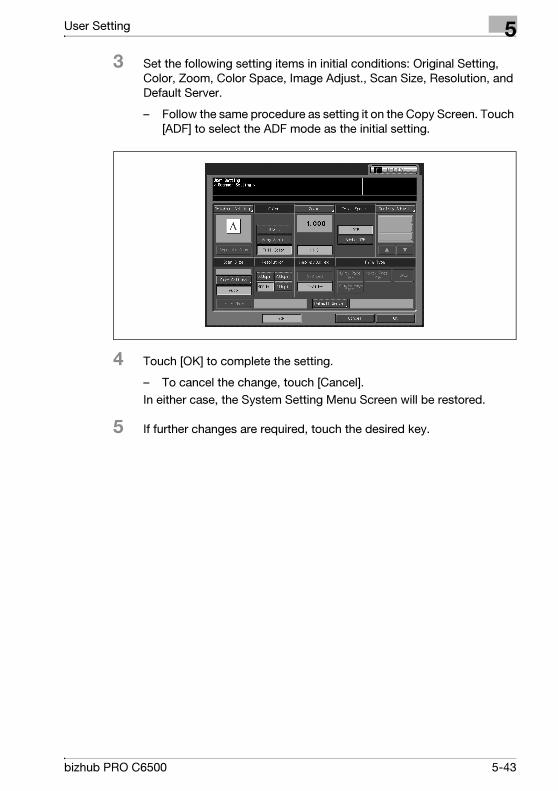
User Setting 5
3 Set the following setting items in initial conditions: Original Setting,
Color, Zoom, Color Space, Image Adjust., Scan Size, Resolution, and
Default Server.
– Follow the same procedure as setting it on the Copy Screen. Touch
[ADF] to select the ADF mode as the initial setting.
4 Touch [OK] to complete the setting.
– To cancel the change, touch [Cancel].
In either case, the System Setting Menu Screen will be restored.
5 If further changes are required, touch the desired key.
bizhub PRO C6500 5-43
5 User Setting
5.4 03 Common Setting
The following features can be provided by switching the setting.
1SHOT indication time
Select the SHOT indication time to be displayed in the message area of the
touch panel, such as "Original size 8.5×11".
3 seconds/5 seconds
Job Offset Mode
Set the machine to offset the copies/printouts of different jobs.
On/Off
Continuation print
Set the machine to output multiple reserve jobs in succession.
Copy on/Copy off/Printer on/Printer off
STOP Key Function
Specify whether to pause or abort a job when [Stop] is pressed on the control
panel.
Job Temp. Stop/Job Stop Function
Side 2 Lens Adjustment mode
Specify whether to enable the lens adjustment mode.
On/Off
Tray Change Time
When selecting the tray which sets different paper type, specify the time
when it becomes the copy possible.
Short/Standard
Priority Paper Type
Select whether to maintain the Temperature which is suited for the coated
paper by turning the fixing unit roller.
Others/Coated Paper
Un-compressing mode
Specify when storing to HDD is not completed with memory overflow.
Off/On
5-44 bizhub PRO C6500
User Setting 5
Thick Paper BK Mode
Activate this mode to reduce horizontal imperfections in the print quality
which might appear when using thick paper in black and white printing (Black
mode).
Off/On
2
Note
Thick Paper BK Mode key is not display normally.
If the adjustment is provided, contact your service representative.
Printer Job Stacker Pile
Specify whether or not to allow paper from several printer jobs to pile up in
the large capacity stacker LS-501.
Permission/Prohibition
bizhub PRO C6500 5-45
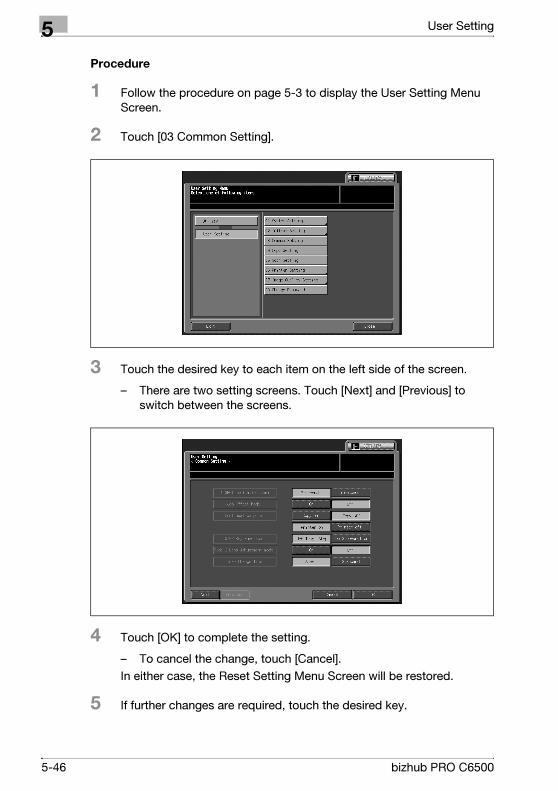
5 User Setting
Procedure
1 Follow the procedure on page 5-3 to display the User Setting Menu
Screen.
2 Touch [03 Common Setting].
3 Touch the desired key to each item on the left side of the screen.
– There are two setting screens. Touch [Next] and [Previous] to
switch between the screens.
4 Touch [OK] to complete the setting.
– To cancel the change, touch [Cancel].
In either case, the Reset Setting Menu Screen will be restored.
5 If further changes are required, touch the desired key.
5-46 bizhub PRO C6500
User Setting 5
5.5 04 Copy Setting
The following features can be provided by switching the setting.
Fold & Staple auto select
Set the machine to automatically select the Booklet mode when Stapling &
Folding mode is selected.
Yes/No
Fine Adjust Margin
Select On/Off to enter a decimal point for image shift.
Yes/No
Orig. Glass Auto Size Select
Set the machine to automatically select the same size of copy paper as the
original placed on the original glass.
On/Off
Auto Detect Orig. Size in ADF
Set the machine to automatically select the same size of copy paper as the
original placed on the ADF.
On/Off
Original Glass AMS
Set the machine to detect the size of the original and select the appropriate
magnification ratio to correspond to the selected paper size.
On/Off
ADF AMS
Set the machine to automatically select an appropriate ratio for copying
when detecting the original size placed on the ADF.
On/Off
Non-Image Area Erase of orig
Specify the conditions to be applied to [Non-Image Area Erase of orig].
Yes/ APS/AMS /Except Orig. Glass (1:1)
bizhub PRO C6500 5-47
5 User Setting
ADF Frame Erase
Set to erase the frame when copying in ADF mode.
None/1mm/2mm/3mm/4mm/5mm
Rotation
When the trays contain only the paper size different from the original, rotate
the image of the original and adjust to fit into the copying paper size.
On-Always /APS/AMS /APS/AMS /Reduce
Suspend Interruption
Set the timing to interrupt the present job when pressing [Interrupt] while
copying.
Stop Immediately/When Current Comp.
Change Page Print Pos (Booklet)
Set the page number position when using Booklet with Page Numbering in
Stamp.
Off/On (Outside Print)
Printer Prohibit Timer
Select the interval time that printing via PC is prohibited after touching the
touch keys.
Off/15 seconds/30 seconds/60 seconds/90 seconds
Bookmark function
Specify whether to delete the set bookmark or not, or select to disable the
bookmark function.
Off/Release Every Job/Not release
Orig./Out Bind Direction Set
Set the machine to conform the binding direction of the originals and printed
sets each other.
On/Off
Choose Default Tray when APS Off
Select the tray to be automatically selected when APS is released.
APS Tray/Tray1/Tray2/Tray3/Tray4/Tray5
5-48 bizhub PRO C6500
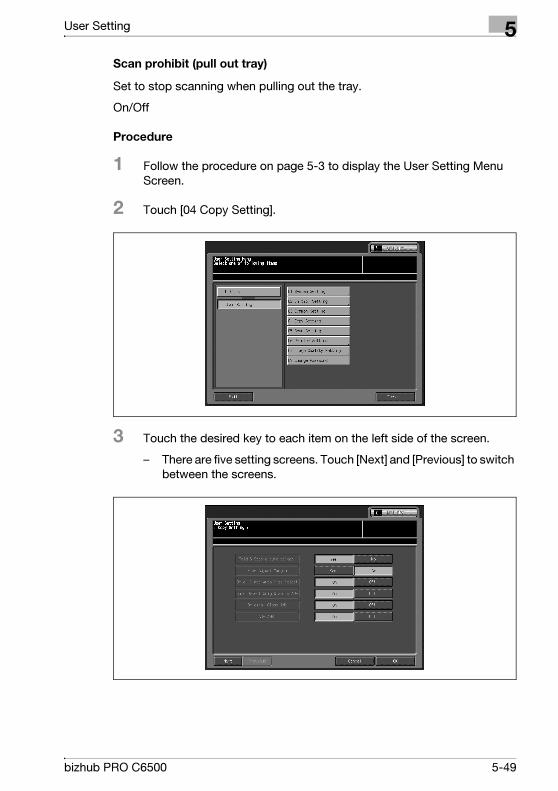
User Setting 5
Scan prohibit (pull out tray)
Set to stop scanning when pulling out the tray.
On/Off
Procedure
1 Follow the procedure on page 5-3 to display the User Setting Menu
Screen.
2 Touch [04 Copy Setting].
3 Touch the desired key to each item on the left side of the screen.
– There are five setting screens. Touch [Next] and [Previous] to switch
between the screens.
bizhub PRO C6500 5-49

5 User Setting
4 Touch [OK] to complete the setting.
– To cancel the change, touch [Cancel].
In either case, the Reset Setting Menu Screen will be restored.
5 If further changes are required, touch the desired key.
5-50 bizhub PRO C6500
User Setting 5
5.6 05 Scan Setting
The following features can be provided by switching the setting.
File Form Default E-Mail
Select the default file form when transmitting in E-Mail.
Packaged TIFF/Divided TIFF/Packaged PDF/JPEG
File Form Default FTP
Select the default file form when transmitting to FTP.
Packaged TIFF/Divided TIFF/Packaged PDF/JPEG
File Form Default SMB
Select the default file form when transmitting in SMB.
Packaged TIFF/Divided TIFF/Packaged PDF/JPEG
Default Address
Select the default destination to be displayed when selecting the Scanner
Screen.
E-Mail/HDD/FTP/SMB/QUEUE
Compress Method Color/Gray
Select the default destination to be displayed when selecting the Scanner
Screen.
High Compress/Standard/Low Compress
bizhub PRO C6500 5-51
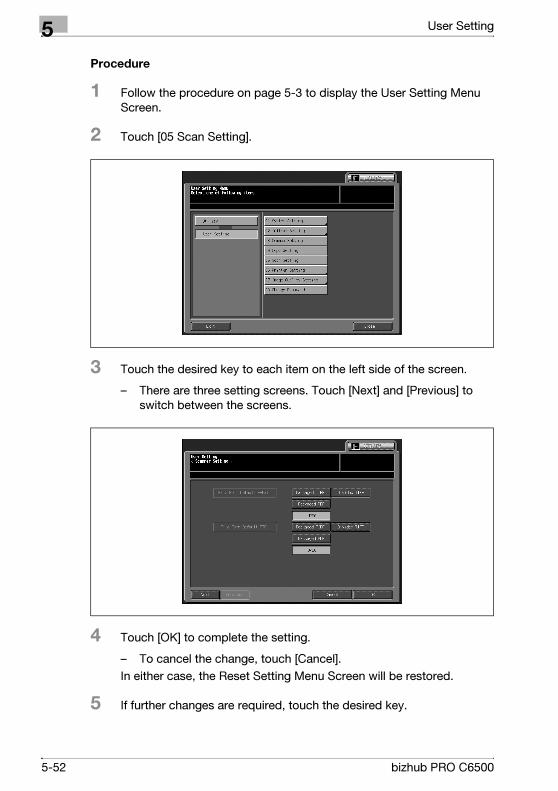
5 User Setting
Procedure
1 Follow the procedure on page 5-3 to display the User Setting Menu
Screen.
2 Touch [05 Scan Setting].
3 Touch the desired key to each item on the left side of the screen.
– There are three setting screens. Touch [Next] and [Previous] to
switch between the screens.
4 Touch [OK] to complete the setting.
– To cancel the change, touch [Cancel].
In either case, the Reset Setting Menu Screen will be restored.
5 If further changes are required, touch the desired key.
5-52 bizhub PRO C6500
User Setting 5
5.7 06 Printer Setting
Specify the following 4 settings.
Setting items to be specified varies depending on the printer controller
installed in the machine.
01 Gray Text Outline Enhance
Select to enable gray text outline enhancement for printing.
Strong+/Normal/Weak+
02 Thin Line Enhancement
Specify the level of thin line enhancement for printing.
Strong+/Strong/Normal/Weak/Weak+
03 Reversed Text Enhancement
Specify the level of reversed text enhancement for printing.
Strong+/Normal/Weak+
04 Blur Prevention
Specify whether to use the function to prevent blur for lines which is caused
by thin line enhancement.
Off/On
bizhub PRO C6500 5-53
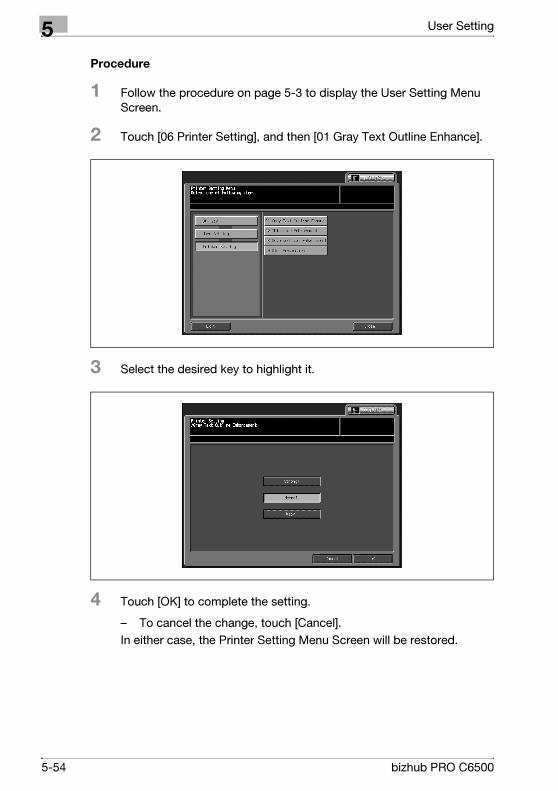
5 User Setting
Procedure
1 Follow the procedure on page 5-3 to display the User Setting Menu
Screen.
2 Touch [06 Printer Setting], and then [01 Gray Text Outline Enhance].
3 Select the desired key to highlight it.
4 Touch [OK] to complete the setting.
– To cancel the change, touch [Cancel].
In either case, the Printer Setting Menu Screen will be restored.
5-54 bizhub PRO C6500

User Setting 5
5 Touch [06 Printer Setting], and then [02 Thin Line Enhancement].
6 Select the desired key to highlight it.
7 Touch [OK] to complete the setting.
– To cancel the change, touch [Cancel].
In either case, the Printer Setting Menu Screen will be restored.
bizhub PRO C6500 5-55
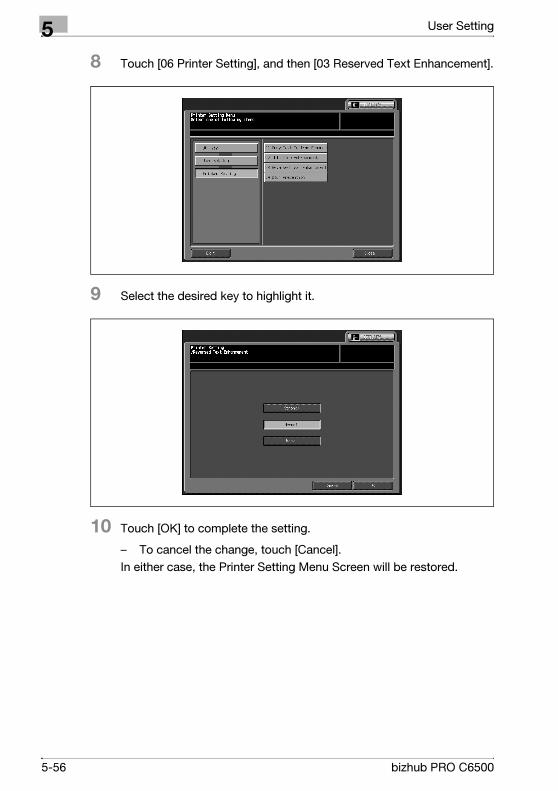
5 User Setting
8 Touch [06 Printer Setting], and then [03 Reserved Text Enhancement].
9 Select the desired key to highlight it.
10 Touch [OK] to complete the setting.
– To cancel the change, touch [Cancel].
In either case, the Printer Setting Menu Screen will be restored.
5-56 bizhub PRO C6500
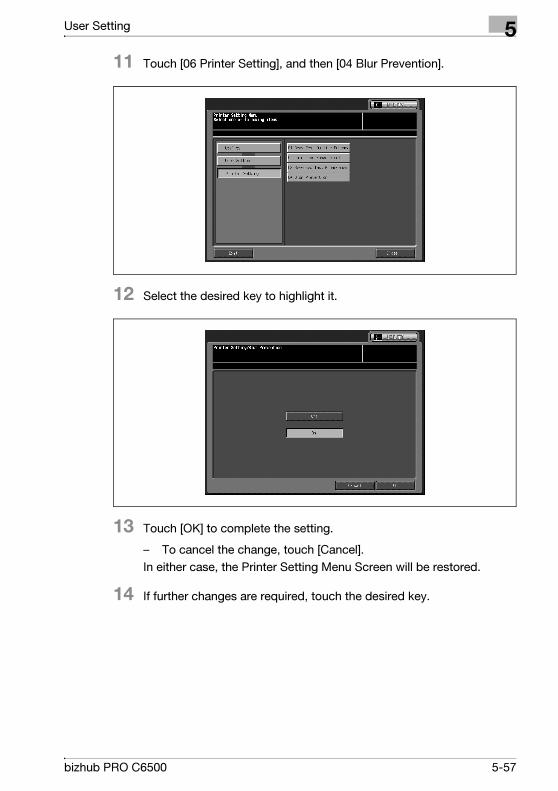
User Setting 5
11 Touch [06 Printer Setting], and then [04 Blur Prevention].
12 Select the desired key to highlight it.
13 Touch [OK] to complete the setting.
– To cancel the change, touch [Cancel].
In either case, the Printer Setting Menu Screen will be restored.
14 If further changes are required, touch the desired key.
bizhub PRO C6500 5-57
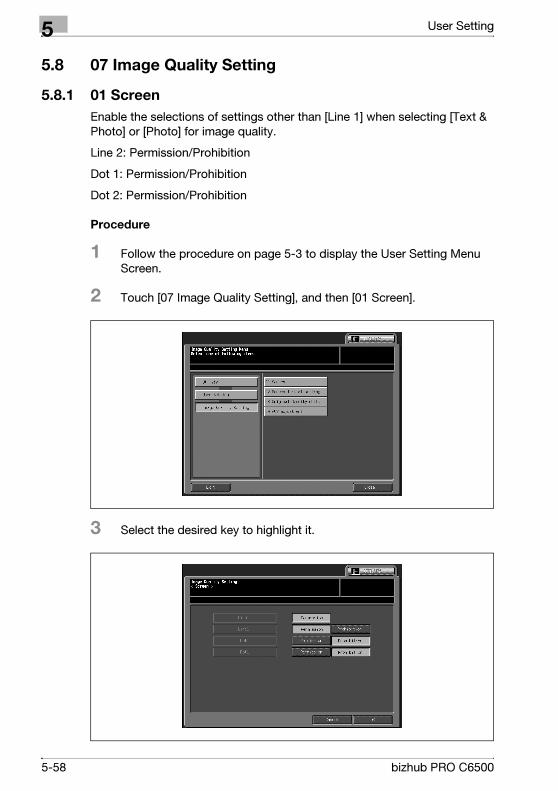
5 User Setting
5.8 07 Image Quality Setting
5.8.1 01 Screen
Enable the selections of settings other than [Line 1] when selecting [Text &
Photo] or [Photo] for image quality.
Line 2: Permission/Prohibition
Dot 1: Permission/Prohibition
Dot 2: Permission/Prohibition
Procedure
1 Follow the procedure on page 5-3 to display the User Setting Menu
Screen.
2 Touch [07 Image Quality Setting], and then [01 Screen].
3 Select the desired key to highlight it.
5-58 bizhub PRO C6500

User Setting 5
4 Touch [OK] to complete the setting.
– To cancel the change, touch [Cancel].
In either case, the Image Quality Setting Menu Screen will be restored.
5 If further changes are required, touch the desired key.
bizhub PRO C6500 5-59
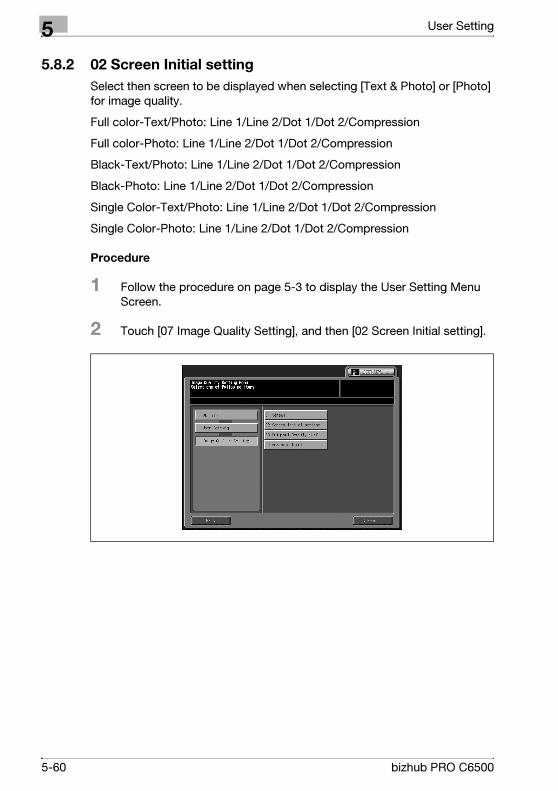
5 User Setting
5.8.2 02 Screen Initial setting
Select then screen to be displayed when selecting [Text & Photo] or [Photo]
for image quality.
Full color-Text/Photo: Line 1/Line 2/Dot 1/Dot 2/Compression
Full color-Photo: Line 1/Line 2/Dot 1/Dot 2/Compression
Black-Text/Photo: Line 1/Line 2/Dot 1/Dot 2/Compression
Black-Photo: Line 1/Line 2/Dot 1/Dot 2/Compression
Single Color-Text/Photo: Line 1/Line 2/Dot 1/Dot 2/Compression
Single Color-Photo: Line 1/Line 2/Dot 1/Dot 2/Compression
Procedure
1 Follow the procedure on page 5-3 to display the User Setting Menu
Screen.
2 Touch [07 Image Quality Setting], and then [02 Screen Initial setting].
5-60 bizhub PRO C6500

User Setting 5
3 Select the desired key to highlight it.
– There are six setting screens. Touch [Next] and [Previous] to switch
between the screens.
4 Touch [OK] to complete the setting.
– To cancel the change, touch [Cancel].
In either case, the Image Quality Setting Menu Screen will be restored.
5 If further changes are required, touch the desired key.
bizhub PRO C6500 5-61

5 User Setting
5.8.3 03 Original Density shift
Specify the default density setting for each image quality mode.
0 - 6 (Text & Photo:3, Map:3, Photo:3, Text:3)
Procedure
1 Follow the procedure on page 5-3 to display the User Setting Menu
Screen.
2 Touch [07 Image Quality Setting], and then [03 Original Density shift].
3 Display the required item using up/down arrow keys, and touch it.
4 Use the touch panel keypad to enter the desired adjustment value, then
touch [<<SET]. Available range: 0 to +6
5-62 bizhub PRO C6500

User Setting 5
5 Touch [OK] to complete the setting.
– To cancel the change, touch [Cancel].
In either case, the Image Quality Setting Menu Screen will be restored.
6 If further changes are required, touch the desired key.
bizhub PRO C6500 5-63
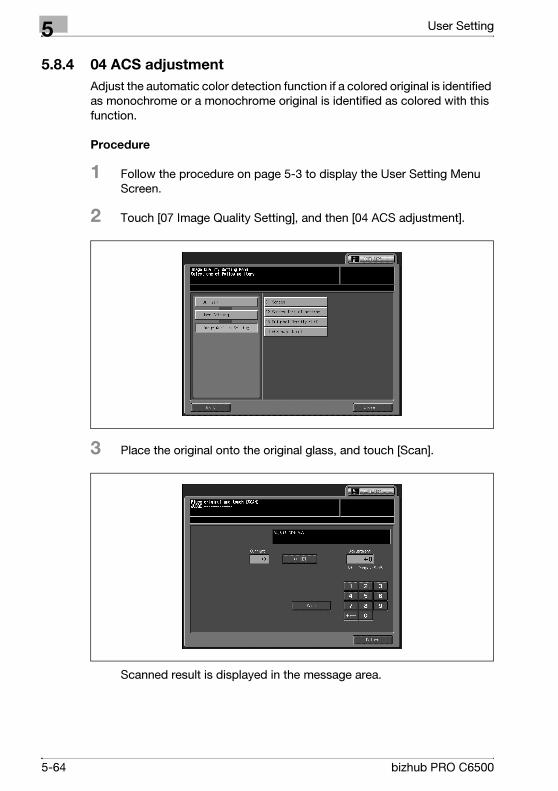
5 User Setting
5.8.4 04 ACS adjustment
Adjust the automatic color detection function if a colored original is identified
as monochrome or a monochrome original is identified as colored with this
function.
Procedure
1 Follow the procedure on page 5-3 to display the User Setting Menu
Screen.
2 Touch [07 Image Quality Setting], and then [04 ACS adjustment].
3 Place the original onto the original glass, and touch [Scan].
Scanned result is displayed in the message area.
5-64 bizhub PRO C6500
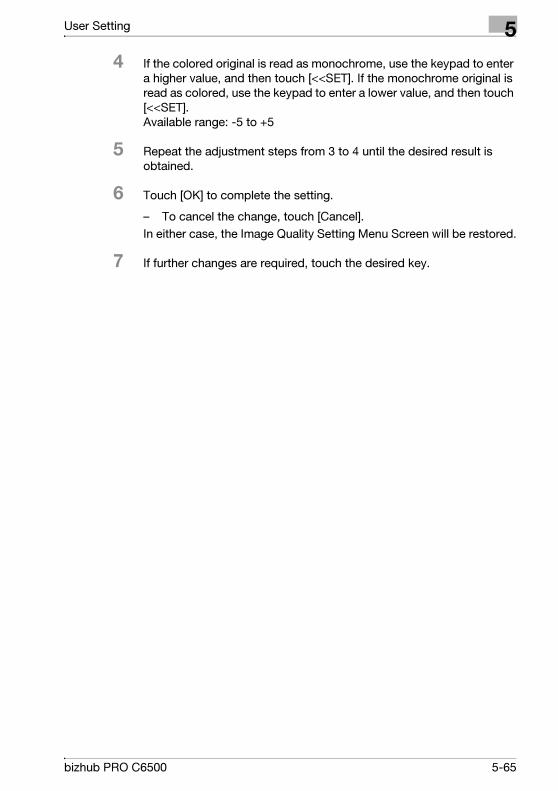
User Setting 5
4 If the colored original is read as monochrome, use the keypad to enter
a higher value, and then touch [<<SET]. If the monochrome original is
read as colored, use the keypad to enter a lower value, and then touch
[<<SET]. Available range: -5 to +5
5 Repeat the adjustment steps from 3 to 4 until the desired result is
obtained.
6 Touch [OK] to complete the setting.
– To cancel the change, touch [Cancel].
In either case, the Image Quality Setting Menu Screen will be restored.
7 If further changes are required, touch the desired key.
bizhub PRO C6500 5-65

5 User Setting
5.9 08 Change Password
Change a user password which the user has registered for user
authentication. The changed password is reflected to the user authentication
setting description.
Procedure
1 Follow the procedure on page 5-3 to display the User Setting Menu
Screen.
2 Touch [08 Change Password].
3 Enter current password, then touch [OK].
5-66 bizhub PRO C6500
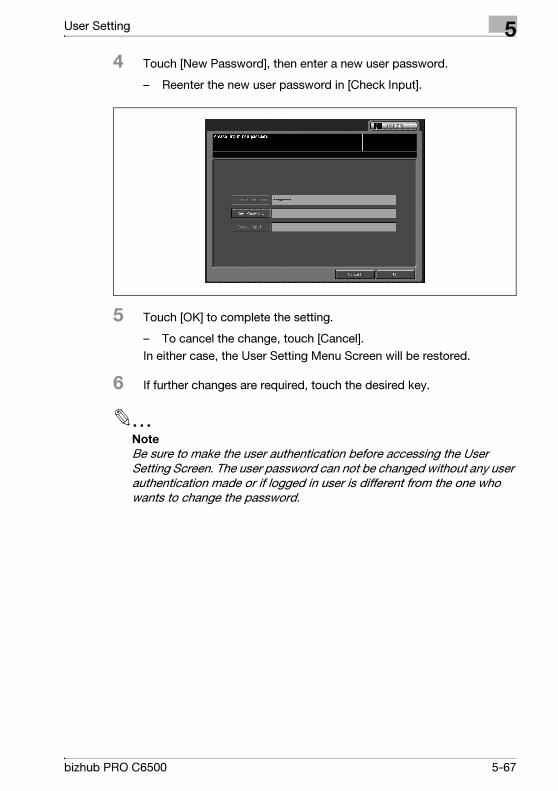
User Setting 5
4 Touch [New Password], then enter a new user password.
– Reenter the new user password in [Check Input].
5 Touch [OK] to complete the setting.
– To cancel the change, touch [Cancel].
In either case, the User Setting Menu Screen will be restored.
6 If further changes are required, touch the desired key.
2
Note
Be sure to make the user authentication before accessing the User
Setting Screen. The user password can not be changed without any user
authentication made or if logged in user is different from the one who
wants to change the password.
bizhub PRO C6500 5-67

6 Machine Administrator
Setting

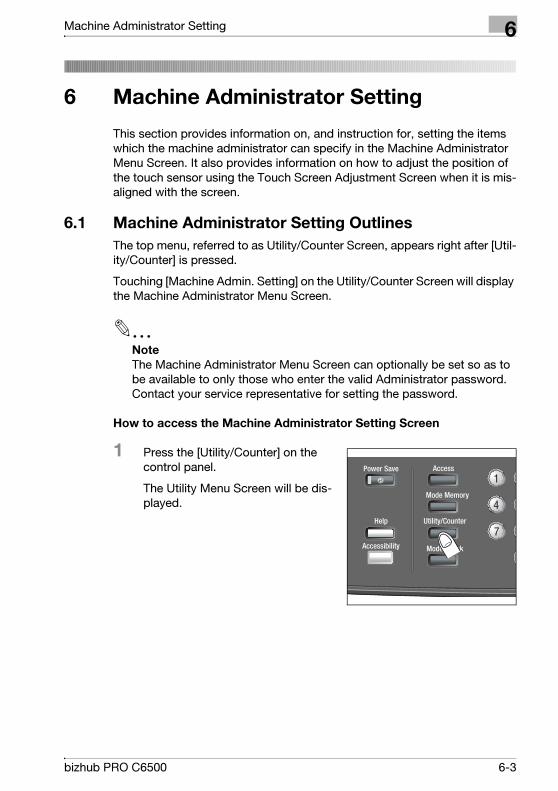
Machine Administrator Setting 6
6 Machine Administrator Setting
This section provides information on, and instruction for, setting the items
which the machine administrator can specify in the Machine Administrator
Menu Screen. It also provides information on how to adjust the position of
the touch sensor using the Touch Screen Adjustment Screen when it is mis-
aligned with the screen.
6.1 Machine Administrator Setting Outlines
The top menu, referred to as Utility/Counter Screen, appears right after [Util-
ity/Counter] is pressed.
Touching [Machine Admin. Setting] on the Utility/Counter Screen will display
the Machine Administrator Menu Screen.
2
Note
The Machine Administrator Menu Screen can optionally be set so as to
be available to only those who enter the valid Administrator password.
Contact your service representative for setting the password.
How to access the Machine Administrator Setting Screen
1 Press the [Utility/Counter] on the
control panel.
The Utility Menu Screen will be dis-
played.
bizhub PRO C6500 6-3

6 Machine Administrator Setting
2 Touch [03 Machine Admin. Setting].
– If the Password Input Screen is displayed, enter the eight-digit ma-
chine administrator password, then touch [OK].
6-4 bizhub PRO C6500
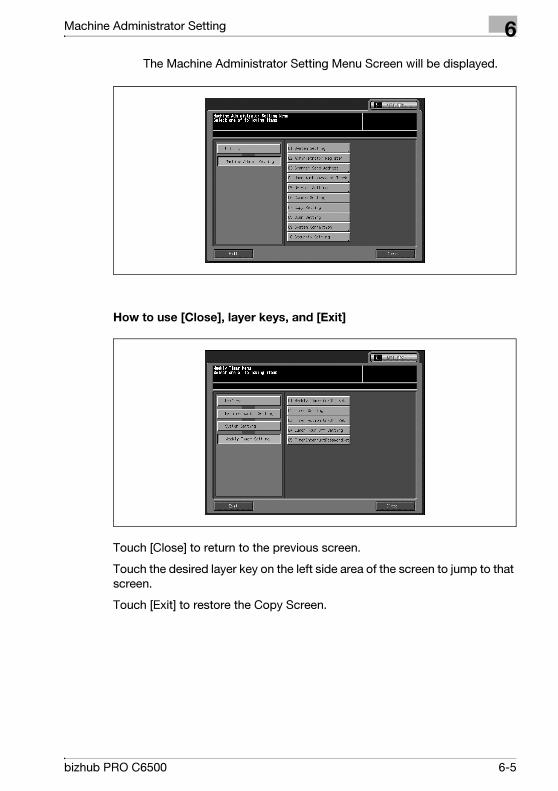
Machine Administrator Setting 6
The Machine Administrator Setting Menu Screen will be displayed.
How to use [Close], layer keys, and [Exit]
Touch [Close] to return to the previous screen.
Touch the desired layer key on the left side area of the screen to jump to that
screen.
Touch [Exit] to restore the Copy Screen.
bizhub PRO C6500 6-5
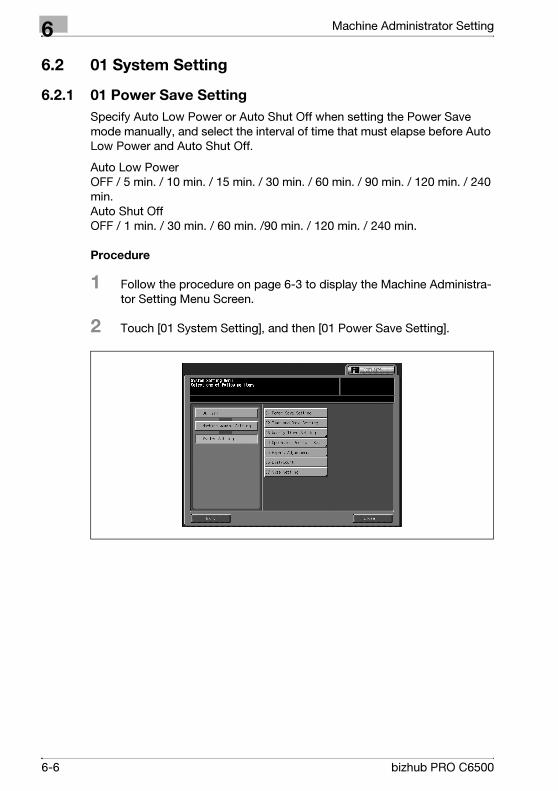
6 Machine Administrator Setting
6.2 01 System Setting
6.2.1 01 Power Save Setting
Specify Auto Low Power or Auto Shut Off when setting the Power Save
mode manually, and select the interval of time that must elapse before Auto
Low Power and Auto Shut Off.
Auto Low Power OFF / 5 min. / 10 min. / 15 min. / 30 min. / 60 min. / 90 min. / 120 min. / 240
min. Auto Shut Off OFF / 1 min. / 30 min. / 60 min. /90 min. / 120 min. / 240 min.
Procedure
1 Follow the procedure on page 6-3 to display the Machine Administra-
tor Setting Menu Screen.
2 Touch [01 System Setting], and then [01 Power Save Setting].
6-6 bizhub PRO C6500
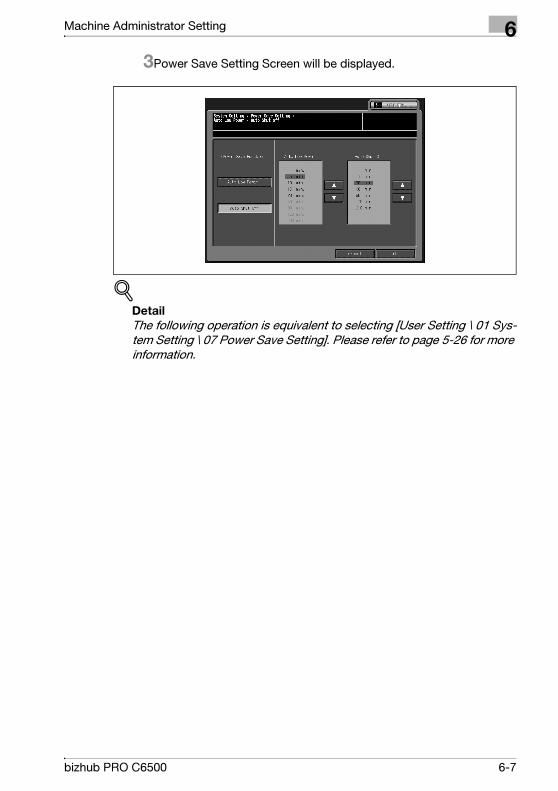
Machine Administrator Setting 6
3Power Save Setting Screen will be displayed.
!Detail
The following operation is equivalent to selecting [User Setting \ 01 Sys-
tem Setting \ 07 Power Save Setting]. Please refer to page 5-26 for more
information.
bizhub PRO C6500 6-7
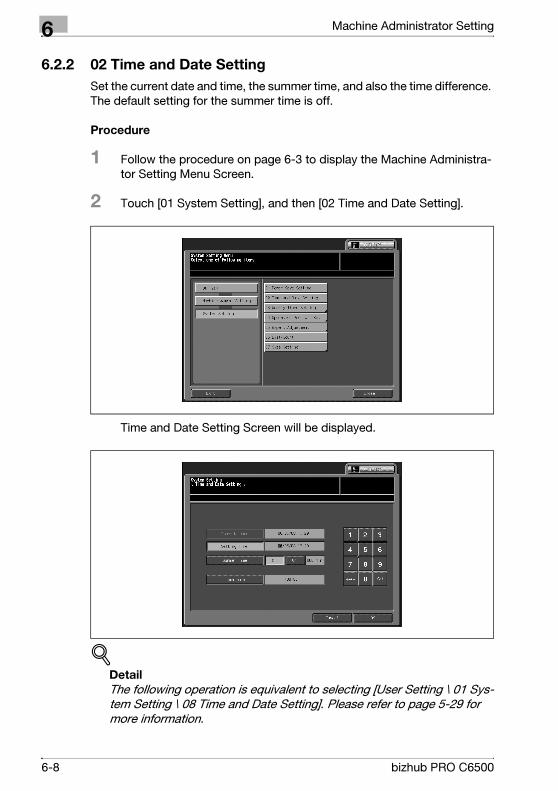
6 Machine Administrator Setting
6.2.2 02 Time and Date Setting
Set the current date and time, the summer time, and also the time difference.
The default setting for the summer time is off.
Procedure
1 Follow the procedure on page 6-3 to display the Machine Administra-
tor Setting Menu Screen.
2 Touch [01 System Setting], and then [02 Time and Date Setting].
Time and Date Setting Screen will be displayed.
!Detail
The following operation is equivalent to selecting [User Setting \ 01 Sys-
tem Setting \ 08 Time and Date Setting]. Please refer to page 5-29 for
more information.
6-8 bizhub PRO C6500
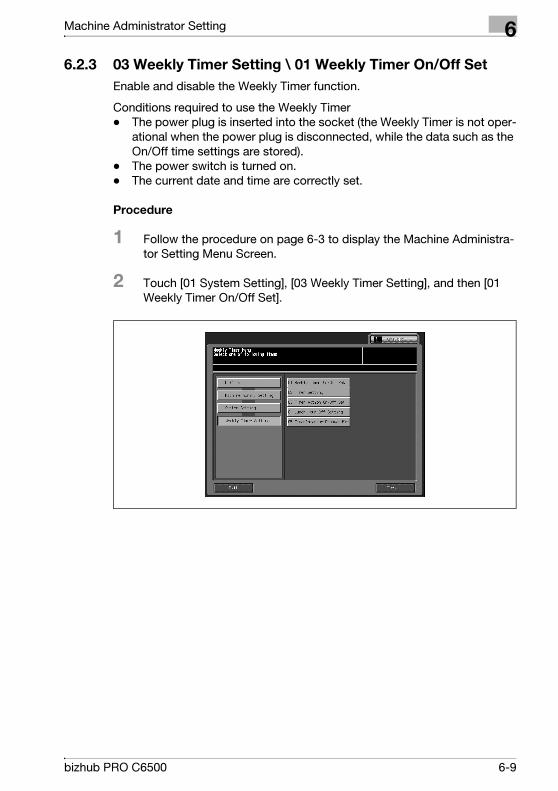
Machine Administrator Setting 6
6.2.3 03 Weekly Timer Setting \ 01 Weekly Timer On/Off Set
Enable and disable the Weekly Timer function.
Conditions required to use the Weekly Timer
- The power plug is inserted into the socket (the Weekly Timer is not oper-
ational when the power plug is disconnected, while the data such as the
On/Off time settings are stored).
- The power switch is turned on.
- The current date and time are correctly set.
Procedure
1 Follow the procedure on page 6-3 to display the Machine Administra-
tor Setting Menu Screen.
2 Touch [01 System Setting], [03 Weekly Timer Setting], and then [01
Weekly Timer On/Off Set].
bizhub PRO C6500 6-9
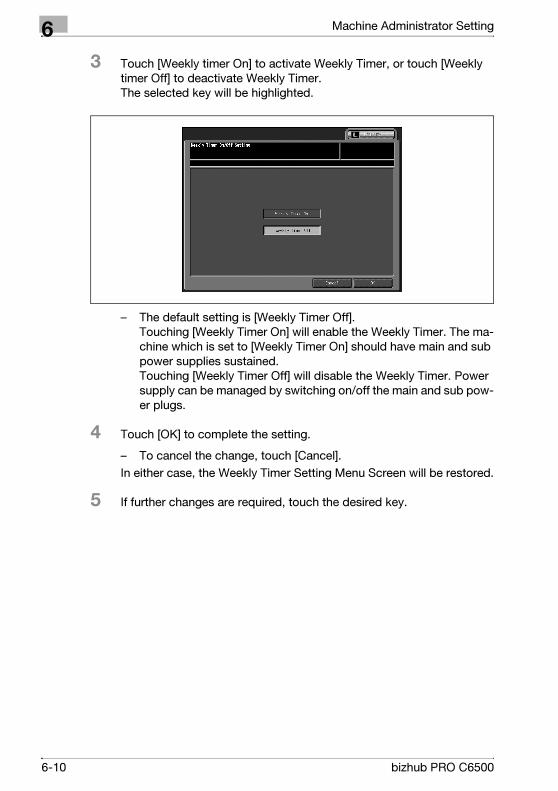
6 Machine Administrator Setting
3 Touch [Weekly timer On] to activate Weekly Timer, or touch [Weekly
timer Off] to deactivate Weekly Timer. The selected key will be highlighted.
– The default setting is [Weekly Timer Off]. Touching [Weekly Timer On] will enable the Weekly Timer. The ma-
chine which is set to [Weekly Timer On] should have main and sub
power supplies sustained. Touching [Weekly Timer Off] will disable the Weekly Timer. Power
supply can be managed by switching on/off the main and sub pow-
er plugs.
4 Touch [OK] to complete the setting.
– To cancel the change, touch [Cancel].
In either case, the Weekly Timer Setting Menu Screen will be restored.
5 If further changes are required, touch the desired key.
6-10 bizhub PRO C6500

Machine Administrator Setting 6
6.2.4 03 Weekly Timer Setting \ 02 Timer Setting
Use this function to set the On/Off times in hours and minutes for each day
of the week or set the collective time for the entire week, i.e., the same On/Off
time for a certain day of the week.
2
Note
Even if On/Off times are specified here, [Timer Action On/Off Set] (see
page 6-14) still needs to be specified in order to activate the timer, mean-
ing that, for example, setting On/Off times for holidays here will not turn
on the machine on those holidays. Specifying the identical time settings
to On and Off times will not turn on the machine even if the timer is set
operational.
Procedure
1 Follow the procedure on page 6-3 to display the Machine Administra-
tor Setting Menu Screen.
2 Touch [01 System Setting], [03 Weekly Timer Setting], and then [02
Timer Setting].
bizhub PRO C6500 6-11
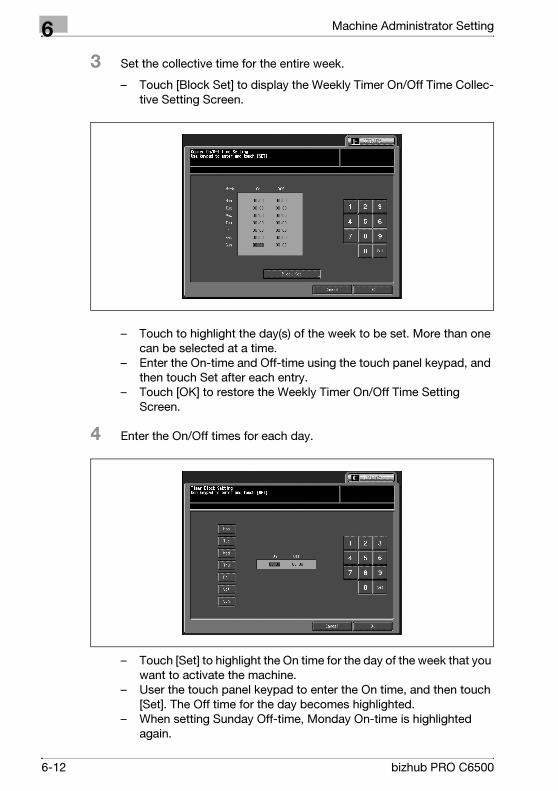
6 Machine Administrator Setting
3 Set the collective time for the entire week.
– Touch [Block Set] to display the Weekly Timer On/Off Time Collec-
tive Setting Screen.
– Touch to highlight the day(s) of the week to be set. More than one
can be selected at a time.
– Enter the On-time and Off-time using the touch panel keypad, and
then touch Set after each entry.
– Touch [OK] to restore the Weekly Timer On/Off Time Setting
Screen.
4 Enter the On/Off times for each day.
– Touch [Set] to highlight the On time for the day of the week that you
want to activate the machine.
– User the touch panel keypad to enter the On time, and then touch
[Set]. The Off time for the day becomes highlighted.
– When setting Sunday Off-time, Monday On-time is highlighted
again.
6-12 bizhub PRO C6500
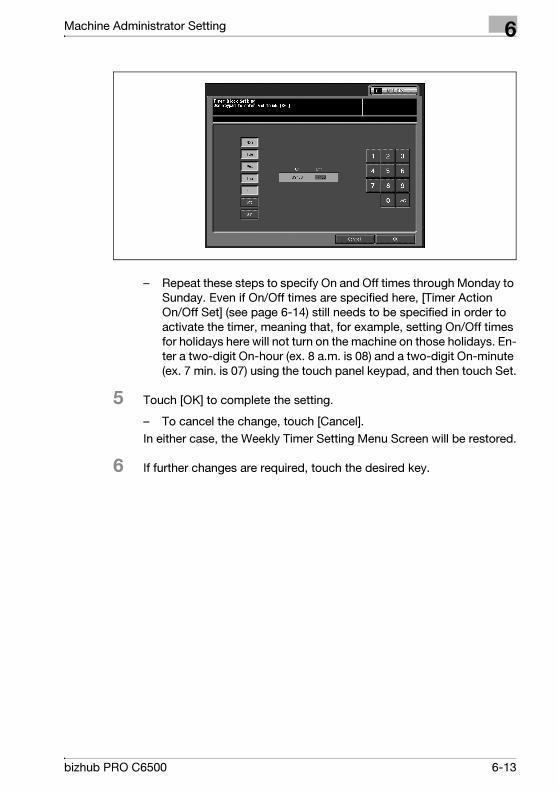
Machine Administrator Setting 6
– Repeat these steps to specify On and Off times through Monday to
Sunday. Even if On/Off times are specified here, [Timer Action
On/Off Set] (see page 6-14) still needs to be specified in order to
activate the timer, meaning that, for example, setting On/Off times
for holidays here will not turn on the machine on those holidays. En-
ter a two-digit On-hour (ex. 8 a.m. is 08) and a two-digit On-minute
(ex. 7 min. is 07) using the touch panel keypad, and then touch Set.
5 Touch [OK] to complete the setting.
– To cancel the change, touch [Cancel].
In either case, the Weekly Timer Setting Menu Screen will be restored.
6 If further changes are required, touch the desired key.
bizhub PRO C6500 6-13

6 Machine Administrator Setting
6.2.5 03 Weekly Timer Setting \ 03 Timer Action On/Off Set
Use this function to set the timer On/Off for a given day of a given month. Set
the On-Off condition for specific days individually or collectively for all Mon-
days through Sundays of the given month.
2
Note
The default setting is collective: On for Mondays through Saturdays, and
Off for Sundays.
Procedure
1 Follow the procedure on page 6-3 to display the Machine Administra-
tor Setting Menu Screen.
2 Touch [01 System Setting], [03 Weekly Timer Set], and then [03 Timer
Action On/Off Set].
6-14 bizhub PRO C6500
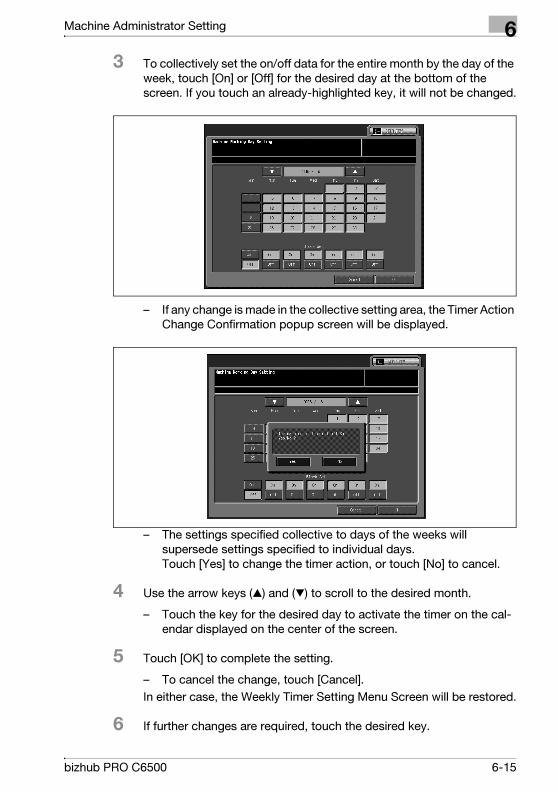
Machine Administrator Setting 6
3 To collectively set the on/off data for the entire month by the day of the
week, touch [On] or [Off] for the desired day at the bottom of the
screen. If you touch an already-highlighted key, it will not be changed.
– If any change is made in the collective setting area, the Timer Action
Change Confirmation popup screen will be displayed.
– The settings specified collective to days of the weeks will
supersede settings specified to individual days. Touch [Yes] to change the timer action, or touch [No] to cancel.
4 Use the arrow keys (c) and (d) to scroll to the desired month.
– Touch the key for the desired day to activate the timer on the cal-
endar displayed on the center of the screen.
5 Touch [OK] to complete the setting.
– To cancel the change, touch [Cancel].
In either case, the Weekly Timer Setting Menu Screen will be restored.
6 If further changes are required, touch the desired key.
bizhub PRO C6500 6-15
6 Machine Administrator Setting
6.2.6 03 Weekly Timer Setting \ 04 Lunch Hour Off Setting
Select the paper type setting of the tray which is automatically selected when
ATS functions. When the paper type that is not specified with this function is
designated to the tray that is automatically selected by ATS, the machine in-
dicates the paper type unmatched.
2
Note
The Lunch Hour Off Setting does not apply to the time during which the
timer is not set to On.
The factory default setting is Function Invalid.
Procedure
1 Follow the procedure on page 6-3 to display the Machine Administra-
tor Setting Menu Screen.
2 Touch [01 System Setting], [03 Weekly Timer Setting], and then [04
Lunch Hour Off Setting].
6-16 bizhub PRO C6500

Machine Administrator Setting 6
3 Touch [Function Valid] to activate the Lunch hour off function.
– Enter Off-time using the touch panel keypad and touch [OK], then
enter Restart time and touch [Set].
– Touch [Function Invalid] to deactivate the Lunch Hour Off function.
4 Touch [OK] to complete the setting.
– To cancel the change, touch [Cancel].
In either case, the Weekly Timer Setting Menu Screen will be restored.
5 If further changes are required, touch the desired key.
bizhub PRO C6500 6-17
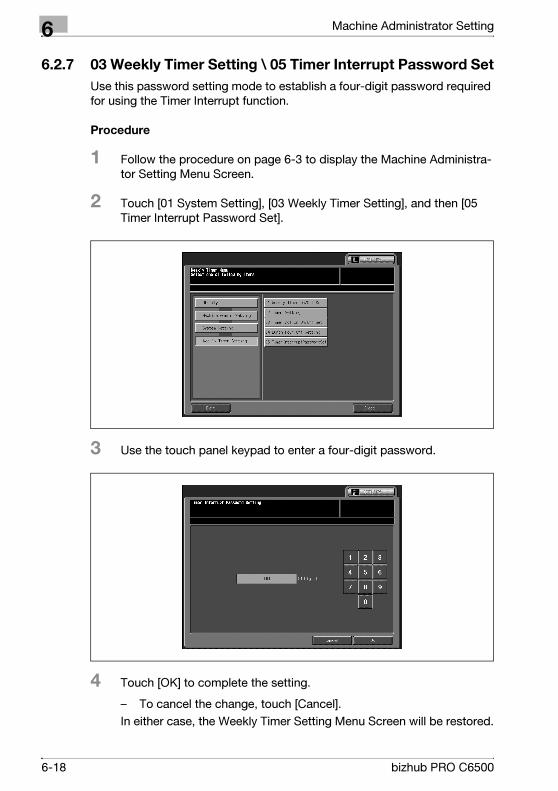
6 Machine Administrator Setting
6.2.7 03 Weekly Timer Setting \ 05 Timer Interrupt Password Set
Use this password setting mode to establish a four-digit password required
for using the Timer Interrupt function.
Procedure
1 Follow the procedure on page 6-3 to display the Machine Administra-
tor Setting Menu Screen.
2 Touch [01 System Setting], [03 Weekly Timer Setting], and then [05
Timer Interrupt Password Set].
3 Use the touch panel keypad to enter a four-digit password.
4 Touch [OK] to complete the setting.
– To cancel the change, touch [Cancel].
In either case, the Weekly Timer Setting Menu Screen will be restored.
6-18 bizhub PRO C6500
Machine Administrator Setting 6
5 If further changes are required, touch the desired key.
2
Note
When the password setting is 0000, Timer Interrupt can be used simply
by pressing [Power Save] on the control panel, then on. In this case, you
will be asked to enter the duration of use (a period of time to turn the ma-
chine power on).
bizhub PRO C6500 6-19
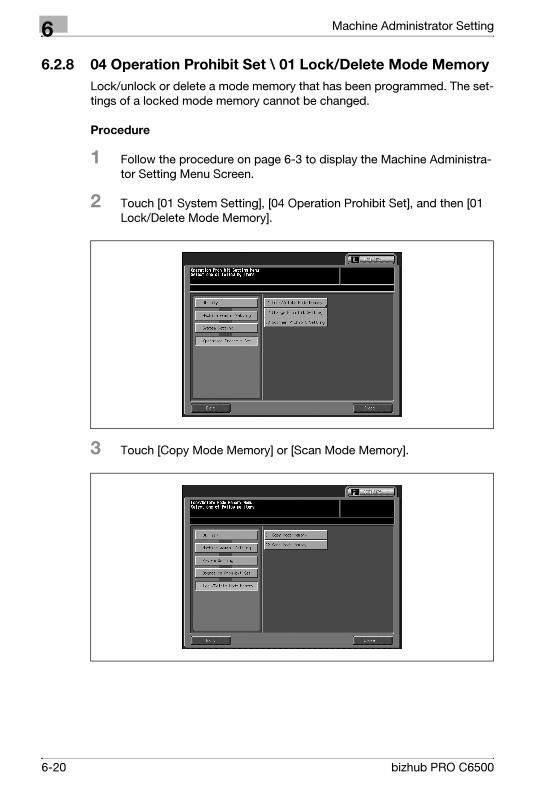
6 Machine Administrator Setting
6.2.8 04 Operation Prohibit Set \ 01 Lock/Delete Mode Memory
Lock/unlock or delete a mode memory that has been programmed. The set-
tings of a locked mode memory cannot be changed.
Procedure
1 Follow the procedure on page 6-3 to display the Machine Administra-
tor Setting Menu Screen.
2 Touch [01 System Setting], [04 Operation Prohibit Set], and then [01
Lock/Delete Mode Memory].
3 Touch [Copy Mode Memory] or [Scan Mode Memory].
6-20 bizhub PRO C6500
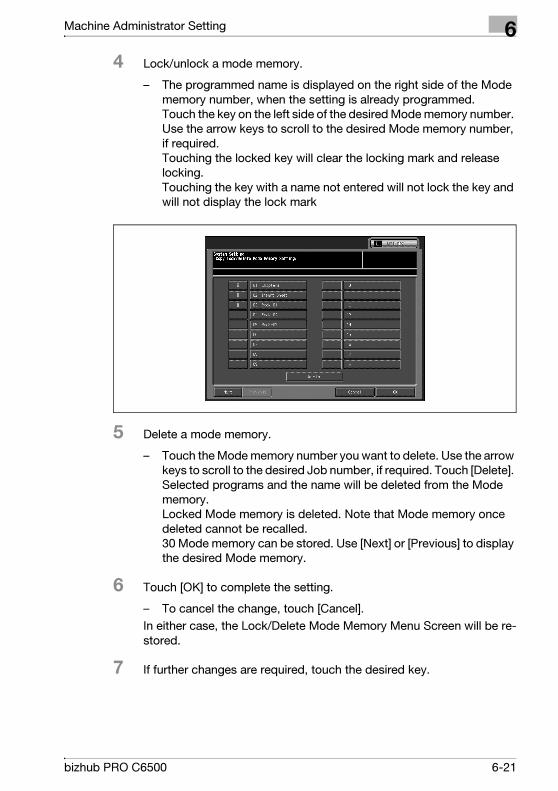
Machine Administrator Setting 6
4 Lock/unlock a mode memory.
– The programmed name is displayed on the right side of the Mode
memory number, when the setting is already programmed. Touch the key on the left side of the desired Mode memory number.
Use the arrow keys to scroll to the desired Mode memory number,
if required. Touching the locked key will clear the locking mark and release
locking. Touching the key with a name not entered will not lock the key and
will not display the lock mark
5 Delete a mode memory.
– Touch the Mode memory number you want to delete. Use the arrow
keys to scroll to the desired Job number, if required. Touch [Delete].
Selected programs and the name will be deleted from the Mode
memory. Locked Mode memory is deleted. Note that Mode memory once
deleted cannot be recalled. 30 Mode memory can be stored. Use [Next] or [Previous] to display
the desired Mode memory.
6 Touch [OK] to complete the setting.
– To cancel the change, touch [Cancel].
In either case, the Lock/Delete Mode Memory Menu Screen will be re-
stored.
7 If further changes are required, touch the desired key.
bizhub PRO C6500 6-21
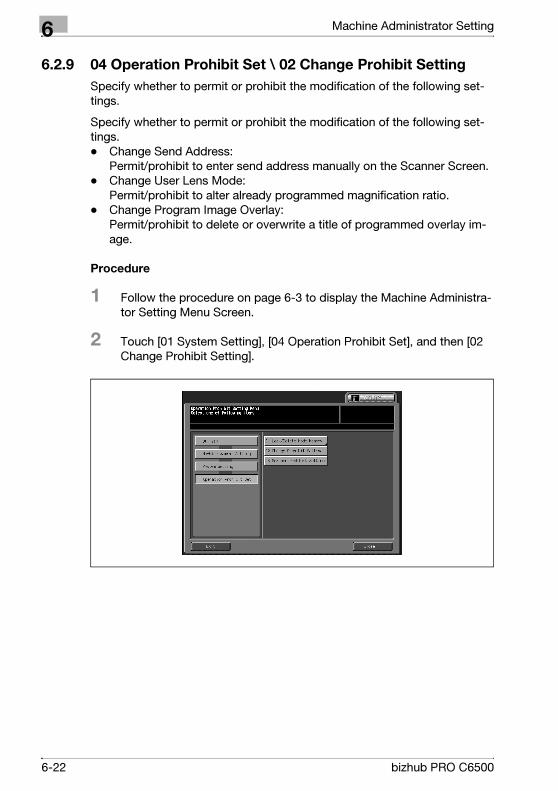
6 Machine Administrator Setting
6.2.9 04 Operation Prohibit Set \ 02 Change Prohibit Setting
Specify whether to permit or prohibit the modification of the following set-
tings.
Specify whether to permit or prohibit the modification of the following set-
tings.
- Change Send Address: Permit/prohibit to enter send address manually on the Scanner Screen.
- Change User Lens Mode: Permit/prohibit to alter already programmed magnification ratio.
- Change Program Image Overlay: Permit/prohibit to delete or overwrite a title of programmed overlay im-
age.
Procedure
1 Follow the procedure on page 6-3 to display the Machine Administra-
tor Setting Menu Screen.
2 Touch [01 System Setting], [04 Operation Prohibit Set], and then [02
Change Prohibit Setting].
6-22 bizhub PRO C6500

Machine Administrator Setting 6
3 Touch to highlight [Permission] or [Prohibition] for each item.
4 Touch [OK] to complete the setting.
– To cancel the change, touch [Cancel].
In either case, the Reset Setting Menu Screen will be restored.
5 If further changes are required, touch the desired key.
bizhub PRO C6500 6-23

6 Machine Administrator Setting
6.2.10 04 Operation Prohibit Set \ 03 Scanner Prohibit Setting
Permit/prohibit to transmit scanned data to the following device.
E-Mail HDD FTP SMB QUEUE Manual Input
Procedure
1 Follow the procedure on page 6-3 to display the Machine Administra-
tor Setting Menu Screen.
2 Touch [01 System Setting], [04 Operation Prohibit Set], and then [03
Scanner Prohibit Setting].
3 Touch to highlight [Permit] or [Prohibit] for each item.
6-24 bizhub PRO C6500
Machine Administrator Setting 6
4 Touch [OK] to complete the setting.
– To cancel the change, touch [Cancel].
In either case, the Operation Prohibit Setting Menu Screen will be re-
stored.
5 If further changes are required, touch the desired key.
bizhub PRO C6500 6-25
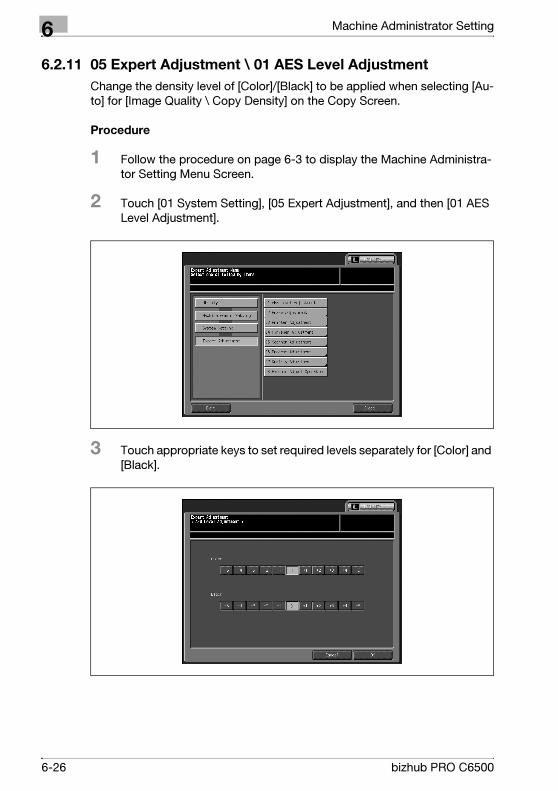
6 Machine Administrator Setting
6.2.11 05 Expert Adjustment \ 01 AES Level Adjustment
Change the density level of [Color]/[Black] to be applied when selecting [Au-
to] for [Image Quality \ Copy Density] on the Copy Screen.
Procedure
1 Follow the procedure on page 6-3 to display the Machine Administra-
tor Setting Menu Screen.
2 Touch [01 System Setting], [05 Expert Adjustment], and then [01 AES
Level Adjustment].
3 Touch appropriate keys to set required levels separately for [Color] and
[Black].
6-26 bizhub PRO C6500
Machine Administrator Setting 6
4 Touch [OK] to complete the setting.
– To cancel the change, touch [Cancel].
In either case, the Expert Adjustment Menu Screen will be restored.
5 If further changes are required, touch the desired key.
bizhub PRO C6500 6-27
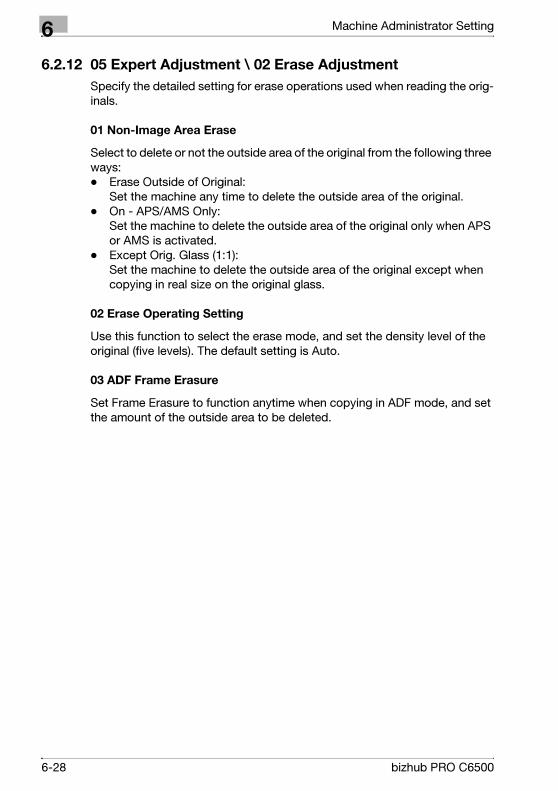
6 Machine Administrator Setting
6.2.12 05 Expert Adjustment \ 02 Erase Adjustment
Specify the detailed setting for erase operations used when reading the orig-
inals.
01 Non-Image Area Erase
Select to delete or not the outside area of the original from the following three
ways:
- Erase Outside of Original: Set the machine any time to delete the outside area of the original.
- On - APS/AMS Only: Set the machine to delete the outside area of the original only when APS
or AMS is activated.
- Except Orig. Glass (1:1): Set the machine to delete the outside area of the original except when
copying in real size on the original glass.
02 Erase Operating Setting
Use this function to select the erase mode, and set the density level of the
original (five levels). The default setting is Auto.
03 ADF Frame Erasure
Set Frame Erasure to function anytime when copying in ADF mode, and set
the amount of the outside area to be deleted.
6-28 bizhub PRO C6500
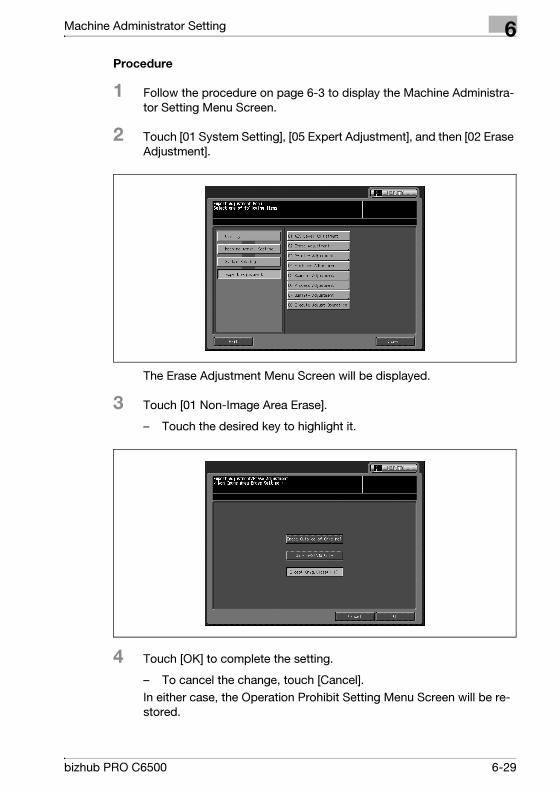
Machine Administrator Setting 6
Procedure
1 Follow the procedure on page 6-3 to display the Machine Administra-
tor Setting Menu Screen.
2 Touch [01 System Setting], [05 Expert Adjustment], and then [02 Erase
Adjustment].
The Erase Adjustment Menu Screen will be displayed.
3 Touch [01 Non-Image Area Erase].
– Touch the desired key to highlight it.
4 Touch [OK] to complete the setting.
– To cancel the change, touch [Cancel].
In either case, the Operation Prohibit Setting Menu Screen will be re-
stored.
bizhub PRO C6500 6-29
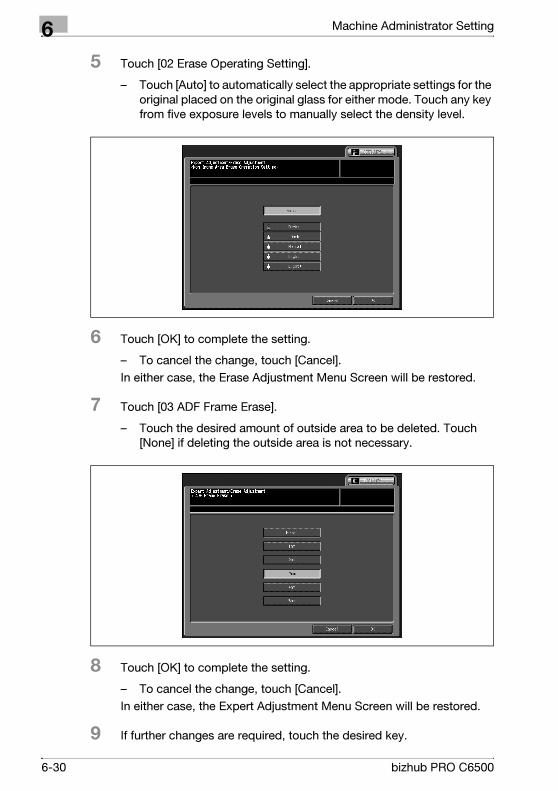
6 Machine Administrator Setting
5 Touch [02 Erase Operating Setting].
– Touch [Auto] to automatically select the appropriate settings for the
original placed on the original glass for either mode. Touch any key
from five exposure levels to manually select the density level.
6 Touch [OK] to complete the setting.
– To cancel the change, touch [Cancel].
In either case, the Erase Adjustment Menu Screen will be restored.
7 Touch [03 ADF Frame Erase].
– Touch the desired amount of outside area to be deleted. Touch
[None] if deleting the outside area is not necessary.
8 Touch [OK] to complete the setting.
– To cancel the change, touch [Cancel].
In either case, the Expert Adjustment Menu Screen will be restored.
9 If further changes are required, touch the desired key.
6-30 bizhub PRO C6500
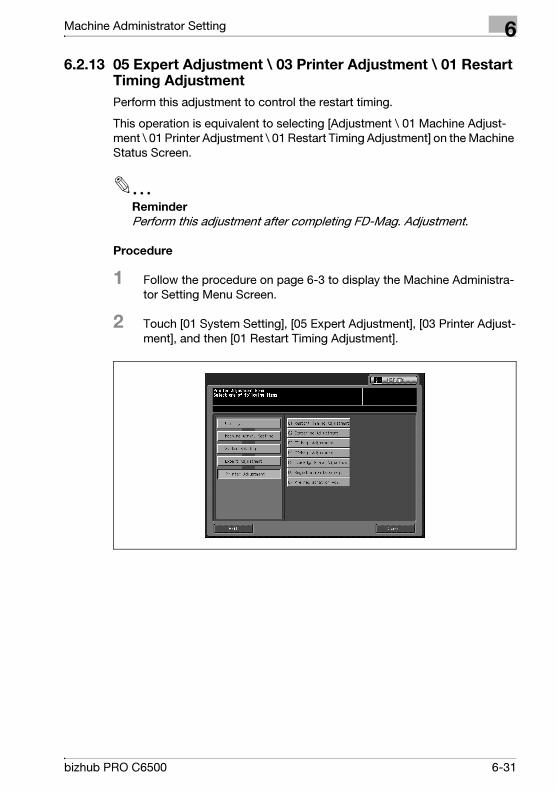
Machine Administrator Setting 6
6.2.13 05 Expert Adjustment \ 03 Printer Adjustment \ 01 Restart Timing Adjustment
Perform this adjustment to control the restart timing.
This operation is equivalent to selecting [Adjustment \ 01 Machine Adjust-
ment \ 01 Printer Adjustment \ 01 Restart Timing Adjustment] on the Machine
Status Screen.
2
Reminder
Perform this adjustment after completing FD-Mag. Adjustment.
Procedure
1 Follow the procedure on page 6-3 to display the Machine Administra-
tor Setting Menu Screen.
2 Touch [01 System Setting], [05 Expert Adjustment], [03 Printer Adjust-
ment], and then [01 Restart Timing Adjustment].
bizhub PRO C6500 6-31
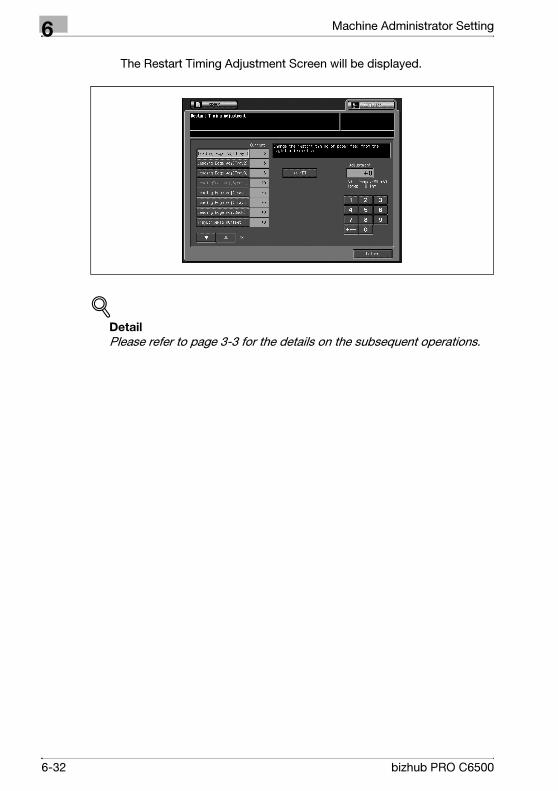
6 Machine Administrator Setting
The Restart Timing Adjustment Screen will be displayed.
!Detail
Please refer to page 3-3 for the details on the subsequent operations.
6-32 bizhub PRO C6500
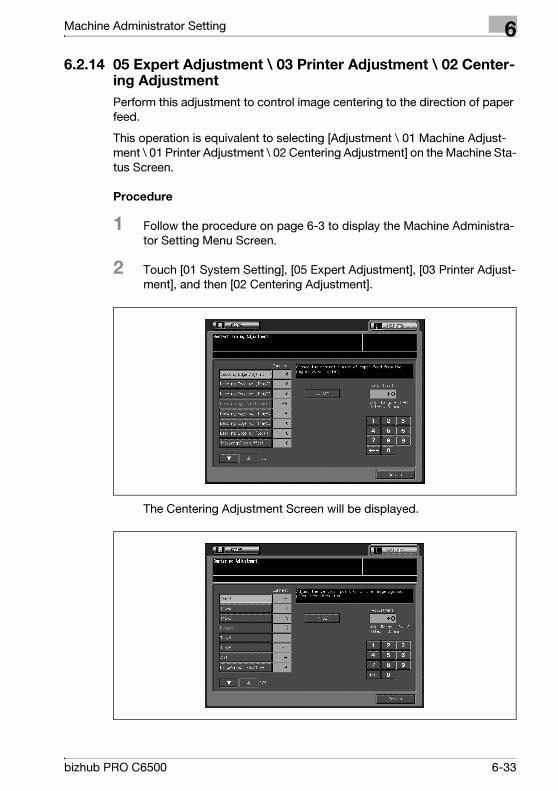
Machine Administrator Setting 6
6.2.14 05 Expert Adjustment \ 03 Printer Adjustment \ 02 Center-ing Adjustment
Perform this adjustment to control image centering to the direction of paper
feed.
This operation is equivalent to selecting [Adjustment \ 01 Machine Adjust-
ment \ 01 Printer Adjustment \ 02 Centering Adjustment] on the Machine Sta-
tus Screen.
Procedure
1 Follow the procedure on page 6-3 to display the Machine Administra-
tor Setting Menu Screen.
2 Touch [01 System Setting], [05 Expert Adjustment], [03 Printer Adjust-
ment], and then [02 Centering Adjustment].
The Centering Adjustment Screen will be displayed.
bizhub PRO C6500 6-33

6 Machine Administrator Setting
!Detail
Please refer to page 3-6 for the details on the subsequent operations.
6-34 bizhub PRO C6500
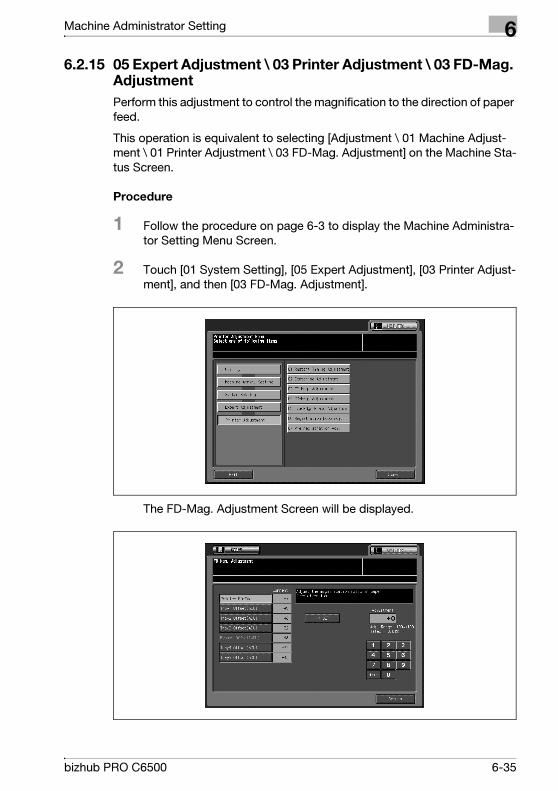
Machine Administrator Setting 6
6.2.15 05 Expert Adjustment \ 03 Printer Adjustment \ 03 FD-Mag. Adjustment
Perform this adjustment to control the magnification to the direction of paper
feed.
This operation is equivalent to selecting [Adjustment \ 01 Machine Adjust-
ment \ 01 Printer Adjustment \ 03 FD-Mag. Adjustment] on the Machine Sta-
tus Screen.
Procedure
1 Follow the procedure on page 6-3 to display the Machine Administra-
tor Setting Menu Screen.
2 Touch [01 System Setting], [05 Expert Adjustment], [03 Printer Adjust-
ment], and then [03 FD-Mag. Adjustment].
The FD-Mag. Adjustment Screen will be displayed.
bizhub PRO C6500 6-35
6 Machine Administrator Setting
!Detail
Please refer to page 3-8 for the details on the subsequent operations.
6-36 bizhub PRO C6500

Machine Administrator Setting 6
6.2.16 05 Expert Adjustment \ 03 Printer Adjustment \ 04 CD-Mag. Adjustment
Perform this adjustment to control the magnification perpendicular to the di-
rection of paper feed.
This operation is equivalent to selecting [Adjustment \ 01 Machine Adjust-
ment \ 01 Printer Adjustment \ 04 CD-Mag. Adjustment] on the Machine Sta-
tus Screen.
Procedure
1 Follow the procedure on page 6-3 to display the Machine Administra-
tor Setting Menu Screen.
2 Touch [01 System Setting], [05 Expert Adjustment], [03 Printer Adjust-
ment], and then [04 CD-Mag. Adjustment].
The CD-Mag. Adjustment Screen will be displayed.
bizhub PRO C6500 6-37
6 Machine Administrator Setting
!Detail
Please refer to page 3-11 for the details on the subsequent operations.
6-38 bizhub PRO C6500
Machine Administrator Setting 6
6.2.17 05 Expert Adjustment \ 03 Printer Adjustment \ 05 Lead Edge Erase Adjustment
Adjust the amount of image erase from the edge of the sheet.
Procedure
1 Follow the procedure on page 6-3 to display the Machine Administra-
tor Setting Menu Screen.
2 Touch [01 System Setting], [05 Expert Adjustment], [03 Printer Adjust-
ment], and then [05 Lead Edge Erase Adjustment].
The Lead Edge Erase Adjustment Screen will be displayed.
3 Touch [COPY] tab.
The Copy Screen will be displayed.
bizhub PRO C6500 6-39
6 Machine Administrator Setting
4 Select A3 w/11" × 17" w paper, then press [START].
The sample pattern (No. 16) will be output.
5 Measure the resultant restart timing.
6 If the desired result cannot be obtained, touch the [UTILITY] tab.
The Lead Edge Erase Adjustment Screen will be restored.
7 Touch [+ <-> -] to specify the value to be positive or negative. Use the touch panel keypad to enter the desired adjustment value, then
touch [<<SET]. Available range: -20 to +40, 1 step = 0.1 mm
8 Repeat the adjustment steps from 3 to 7 until the desired result is ob-
tained.
9 Touch [Return] to restore the Printer Adjustment Menu Screen.
10 If further changes are required, touch the desired key.
20
6-40 bizhub PRO C6500
Machine Administrator Setting 6
6.2.18 05 Expert Adjustment \ 03 Printer Adjustment \ 06 Regis-tration Loop Adj.
Adjust the amount of registered loop based on a paper feed unit, a bypass
tray, and ADU.
Procedure
1 Follow the procedure on page 6-3 to display the Machine Administra-
tor Setting Menu Screen.
2 Touch [01 System Setting], [05 Expert Adjustment], [03 Printer Adjust-
ment], and then [06 Registration Loop Adj.].
The Registration Loop Adjustment Screen will be displayed.
3 Touch [COPY] tab.
The Copy Screen will be displayed.
bizhub PRO C6500 6-41

6 Machine Administrator Setting
4 Select A3 w/11" × 17" w paper, then press [START].
The sample pattern (No. 16) will be output.
5 Check the sample pattern.
6 If the desired result cannot be obtained, touch the [UTILITY] tab.
The Registration Loop Adjustment Screen will be restored.
7 Display the required item using up/down arrow keys, and touch it.
8 Touch [+ <-> -] to specify the value to be positive or negative. Use the touch panel keypad to enter the desired adjustment value,
then touch [<<SET]. Available range: -99 to +99, 1 step = 0.1 mm
9 Repeat the adjustment steps from 3 to 8 until the desired result is ob-
tained.
10 Touch [Return] to restore the Printer Adjustment Menu Screen.
11 If further changes are required, touch the desired key.
6-42 bizhub PRO C6500
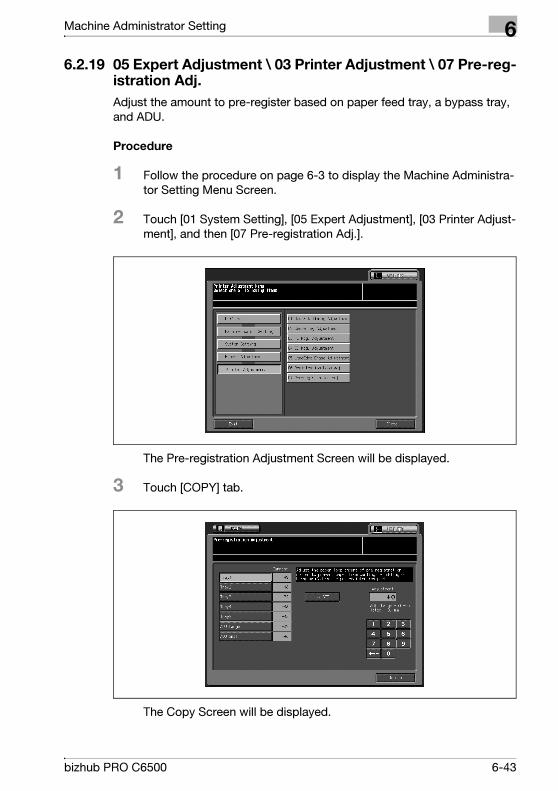
Machine Administrator Setting 6
6.2.19 05 Expert Adjustment \ 03 Printer Adjustment \ 07 Pre-reg-istration Adj.
Adjust the amount to pre-register based on paper feed tray, a bypass tray,
and ADU.
Procedure
1 Follow the procedure on page 6-3 to display the Machine Administra-
tor Setting Menu Screen.
2 Touch [01 System Setting], [05 Expert Adjustment], [03 Printer Adjust-
ment], and then [07 Pre-registration Adj.].
The Pre-registration Adjustment Screen will be displayed.
3 Touch [COPY] tab.
The Copy Screen will be displayed.
bizhub PRO C6500 6-43
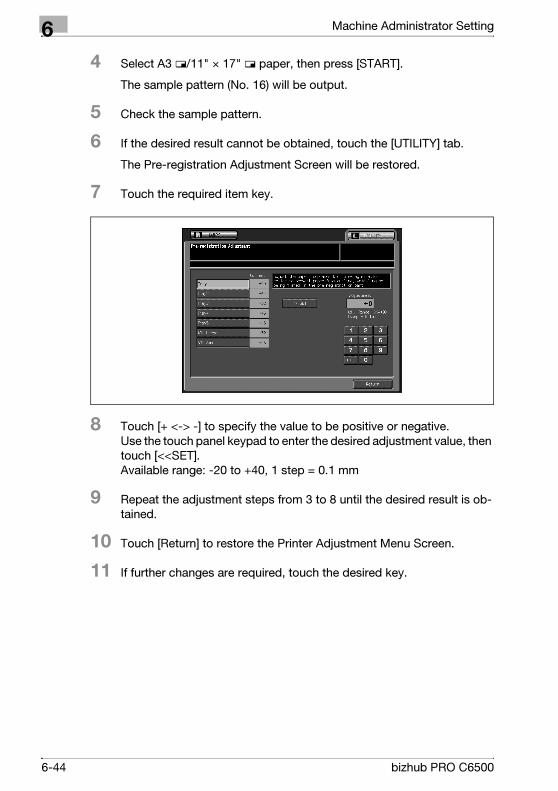
6 Machine Administrator Setting
4 Select A3 w/11" × 17" w paper, then press [START].
The sample pattern (No. 16) will be output.
5 Check the sample pattern.
6 If the desired result cannot be obtained, touch the [UTILITY] tab.
The Pre-registration Adjustment Screen will be restored.
7 Touch the required item key.
8 Touch [+ <-> -] to specify the value to be positive or negative. Use the touch panel keypad to enter the desired adjustment value, then
touch [<<SET]. Available range: -20 to +40, 1 step = 0.1 mm
9 Repeat the adjustment steps from 3 to 8 until the desired result is ob-
tained.
10 Touch [Return] to restore the Printer Adjustment Menu Screen.
11 If further changes are required, touch the desired key.
6-44 bizhub PRO C6500
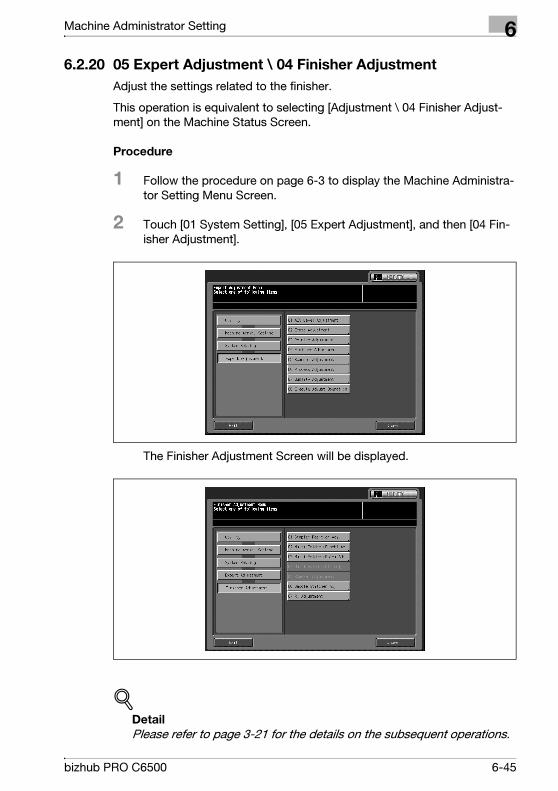
Machine Administrator Setting 6
6.2.20 05 Expert Adjustment \ 04 Finisher Adjustment
Adjust the settings related to the finisher.
This operation is equivalent to selecting [Adjustment \ 04 Finisher Adjust-
ment] on the Machine Status Screen.
Procedure
1 Follow the procedure on page 6-3 to display the Machine Administra-
tor Setting Menu Screen.
2 Touch [01 System Setting], [05 Expert Adjustment], and then [04 Fin-
isher Adjustment].
The Finisher Adjustment Screen will be displayed.
!Detail
Please refer to page 3-21 for the details on the subsequent operations.
bizhub PRO C6500 6-45

6 Machine Administrator Setting
6.2.21 05 Expert Adjustment \ 05 Scanner Adjustment
Adjust the settings related to the scanner.
This operation is equivalent to selecting [Adjustment \ 01 Machine Adjust-
ment \ 02 Scanner Adjustment] on the Machine Status Screen.
Procedure
1 Follow the procedure on page 6-3 to display the Machine Administra-
tor Setting Menu Screen.
2 Touch [01 System Setting], [05 Expert Adjustment], and then [05 Scan-
ner Adjustment].
The Scanner Adjustment Screen will be displayed.
!Detail
Please refer to page 3-13 for the details on the subsequent operations.
6-46 bizhub PRO C6500
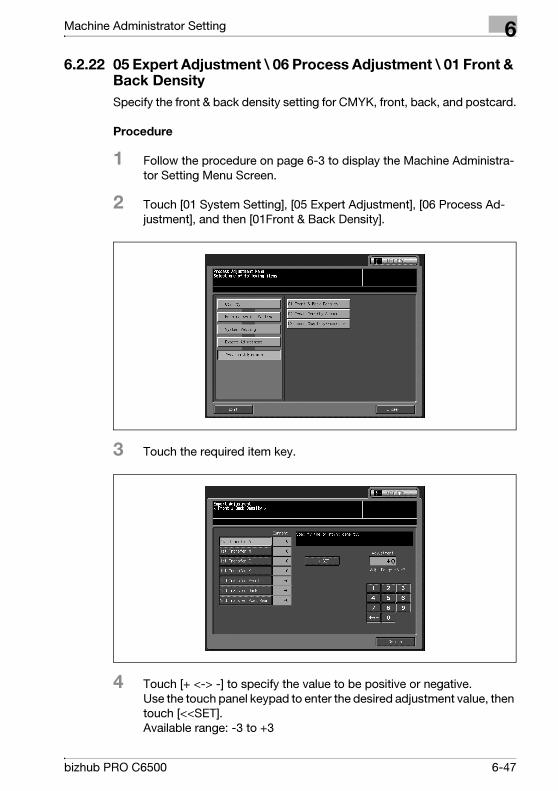
Machine Administrator Setting 6
6.2.22 05 Expert Adjustment \ 06 Process Adjustment \ 01 Front & Back Density
Specify the front & back density setting for CMYK, front, back, and postcard.
Procedure
1 Follow the procedure on page 6-3 to display the Machine Administra-
tor Setting Menu Screen.
2 Touch [01 System Setting], [05 Expert Adjustment], [06 Process Ad-
justment], and then [01Front & Back Density].
3 Touch the required item key.
4 Touch [+ <-> -] to specify the value to be positive or negative. Use the touch panel keypad to enter the desired adjustment value, then
touch [<<SET]. Available range: -3 to +3
bizhub PRO C6500 6-47
6 Machine Administrator Setting
5 Touch [Return] to restore the Process Adjustment Menu Screen.
6 If further changes are required, touch the desired key.
6-48 bizhub PRO C6500
Machine Administrator Setting 6
6.2.23 05 Expert Adjustment \ 06 Process Adjustment \ 02 Toner Density Sensor
Check the value of the toner density sensor in CMYK.
Procedure
1 Follow the procedure on page 6-3 to display the Machine Administra-
tor Setting Menu Screen.
2 Touch [01 System Setting], [05 Expert Adjustment], [06 Process Ad-
justment], and then [02 Toner Density Sensor].
3 Touch [Start] to display the value of toner density sensor.
– To cancel the sensor, touch [Stop].
4 Touch [Return] to restore the Process Adjustment Menu Screen.
5 If further changes are required, touch the desired key.
bizhub PRO C6500 6-49
6 Machine Administrator Setting
6.2.24 05 Expert Adjustment \ 06 Process Adjustment \ 03 Toner Quality/Exposure
Adjust the toner quantity and exposure for each CMYK value.
Procedure
1 Follow the procedure on page 6-3 to display the Machine Administra-
tor Setting Menu Screen.
2 Touch [01 System Setting], [05 Expert Adjustment], [06 Process Ad-
justment], and then [03 Toner Quality/Exposure].
3 Touch [Next] or [Previous] to display the relevant screen for the color
you want to adjust.
4 Touch appropriate level keys under [Toner Quality] and [Exposure] to
specify toner quantity and exposure.
6-50 bizhub PRO C6500
Machine Administrator Setting 6
5 Repeat the adjustment steps from 3 to 4 until the desired result is ob-
tained.
6 Touch [OK] to complete the setting.
– To cancel the change, touch [Cancel].
In either case, the Process Adjustment Menu Screen will be restored.
7 If further changes are required, touch the desired key.
bizhub PRO C6500 6-51
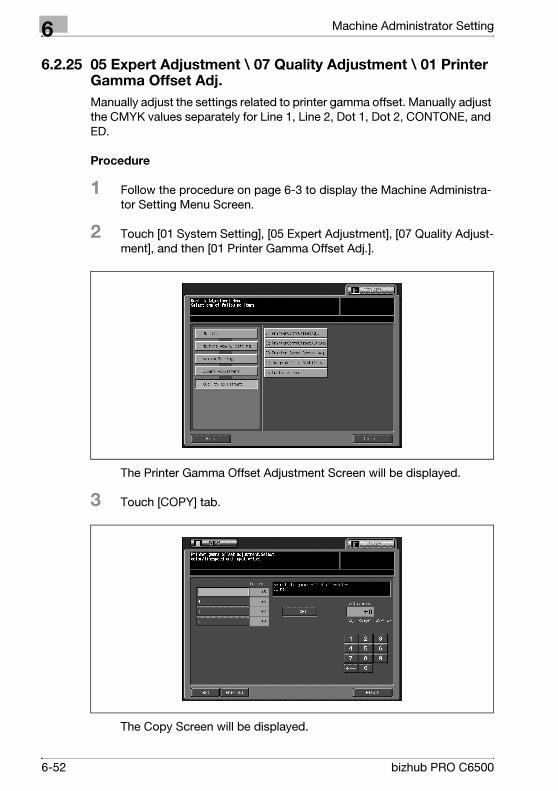
6 Machine Administrator Setting
6.2.25 05 Expert Adjustment \ 07 Quality Adjustment \ 01 Printer Gamma Offset Adj.
Manually adjust the settings related to printer gamma offset. Manually adjust
the CMYK values separately for Line 1, Line 2, Dot 1, Dot 2, CONTONE, and
ED.
Procedure
1 Follow the procedure on page 6-3 to display the Machine Administra-
tor Setting Menu Screen.
2 Touch [01 System Setting], [05 Expert Adjustment], [07 Quality Adjust-
ment], and then [01 Printer Gamma Offset Adj.].
The Printer Gamma Offset Adjustment Screen will be displayed.
3 Touch [COPY] tab.
The Copy Screen will be displayed.
6-52 bizhub PRO C6500
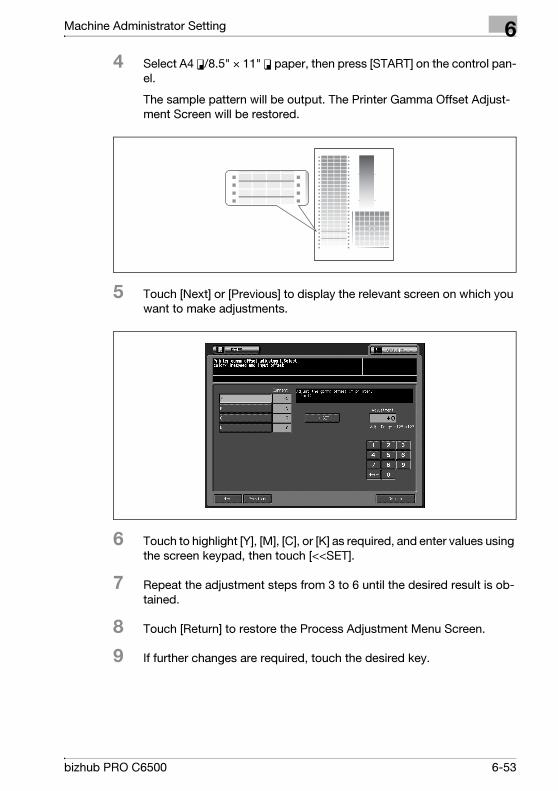
Machine Administrator Setting 6
4 Select A4 v/8.5" × 11" v paper, then press [START] on the control pan-
el.
The sample pattern will be output. The Printer Gamma Offset Adjust-
ment Screen will be restored.
5 Touch [Next] or [Previous] to display the relevant screen on which you
want to make adjustments.
6 Touch to highlight [Y], [M], [C], or [K] as required, and enter values using
the screen keypad, then touch [<<SET].
7 Repeat the adjustment steps from 3 to 6 until the desired result is ob-
tained.
8 Touch [Return] to restore the Process Adjustment Menu Screen.
9 If further changes are required, touch the desired key.
bizhub PRO C6500 6-53
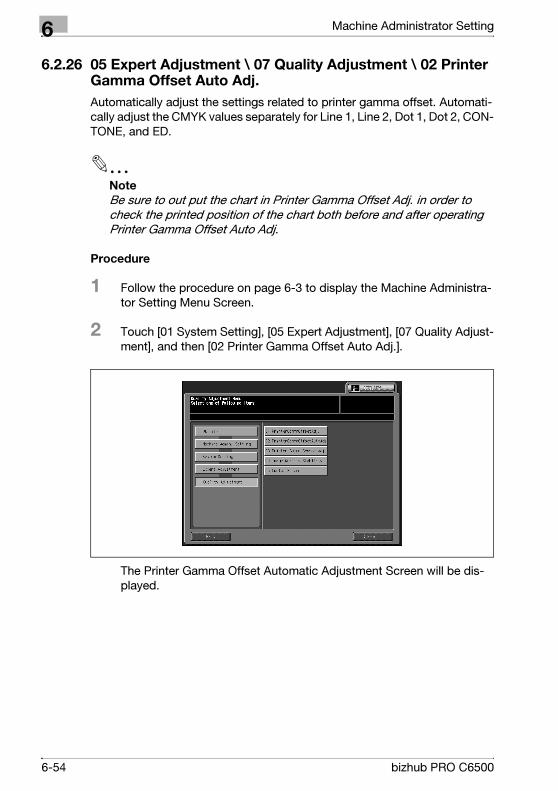
6 Machine Administrator Setting
6.2.26 05 Expert Adjustment \ 07 Quality Adjustment \ 02 Printer Gamma Offset Auto Adj.
Automatically adjust the settings related to printer gamma offset. Automati-
cally adjust the CMYK values separately for Line 1, Line 2, Dot 1, Dot 2, CON-
TONE, and ED.
2
Note
Be sure to out put the chart in Printer Gamma Offset Adj. in order to
check the printed position of the chart both before and after operating
Printer Gamma Offset Auto Adj.
Procedure
1 Follow the procedure on page 6-3 to display the Machine Administra-
tor Setting Menu Screen.
2 Touch [01 System Setting], [05 Expert Adjustment], [07 Quality Adjust-
ment], and then [02 Printer Gamma Offset Auto Adj.].
The Printer Gamma Offset Automatic Adjustment Screen will be dis-
played.
6-54 bizhub PRO C6500
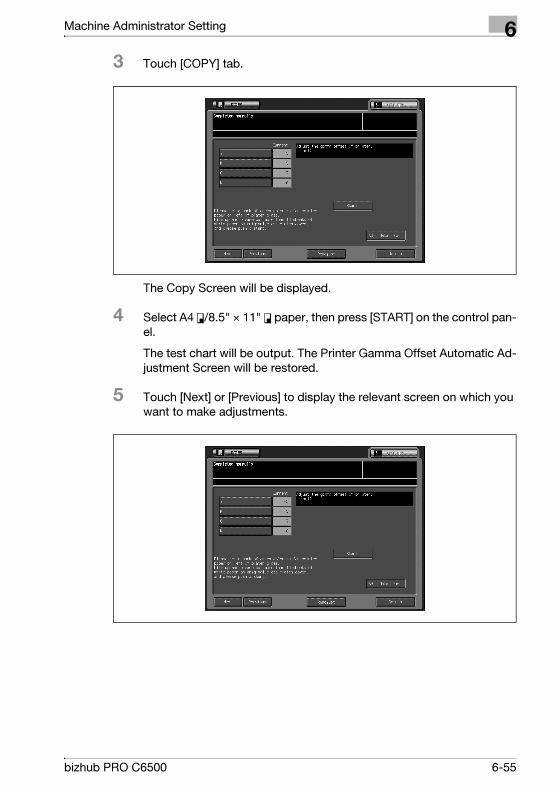
Machine Administrator Setting 6
3 Touch [COPY] tab.
The Copy Screen will be displayed.
4 Select A4 v/8.5" × 11" v paper, then press [START] on the control pan-
el.
The test chart will be output. The Printer Gamma Offset Automatic Ad-
justment Screen will be restored.
5 Touch [Next] or [Previous] to display the relevant screen on which you
want to make adjustments.
bizhub PRO C6500 6-55
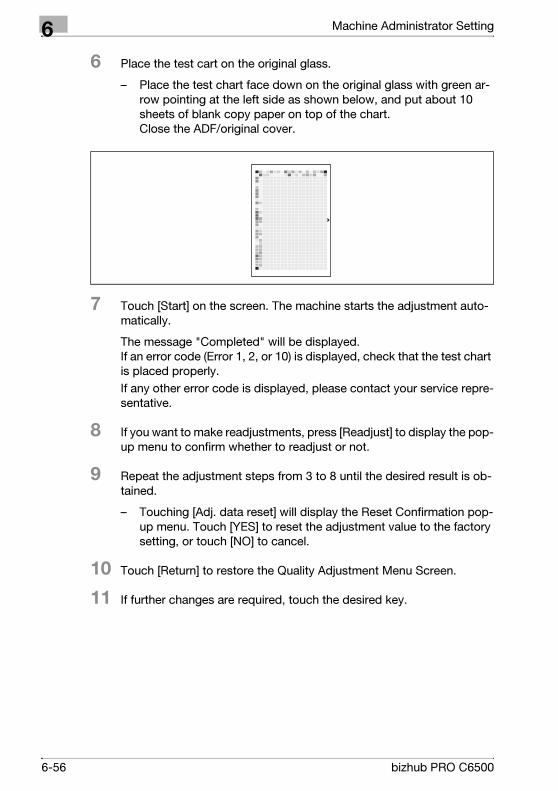
6 Machine Administrator Setting
6 Place the test cart on the original glass.
– Place the test chart face down on the original glass with green ar-
row pointing at the left side as shown below, and put about 10
sheets of blank copy paper on top of the chart. Close the ADF/original cover.
7 Touch [Start] on the screen. The machine starts the adjustment auto-
matically.
The message "Completed" will be displayed. If an error code (Error 1, 2, or 10) is displayed, check that the test chart
is placed properly.
If any other error code is displayed, please contact your service repre-
sentative.
8 If you want to make readjustments, press [Readjust] to display the pop-
up menu to confirm whether to readjust or not.
9 Repeat the adjustment steps from 3 to 8 until the desired result is ob-
tained.
– Touching [Adj. data reset] will display the Reset Confirmation pop-
up menu. Touch [YES] to reset the adjustment value to the factory
setting, or touch [NO] to cancel.
10 Touch [Return] to restore the Quality Adjustment Menu Screen.
11 If further changes are required, touch the desired key.
6-56 bizhub PRO C6500
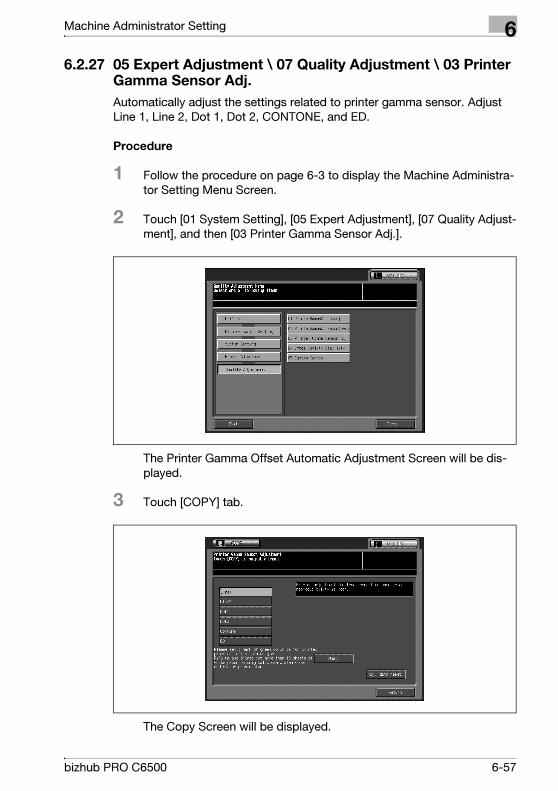
Machine Administrator Setting 6
6.2.27 05 Expert Adjustment \ 07 Quality Adjustment \ 03 Printer Gamma Sensor Adj.
Automatically adjust the settings related to printer gamma sensor. Adjust
Line 1, Line 2, Dot 1, Dot 2, CONTONE, and ED.
Procedure
1 Follow the procedure on page 6-3 to display the Machine Administra-
tor Setting Menu Screen.
2 Touch [01 System Setting], [05 Expert Adjustment], [07 Quality Adjust-
ment], and then [03 Printer Gamma Sensor Adj.].
The Printer Gamma Offset Automatic Adjustment Screen will be dis-
played.
3 Touch [COPY] tab.
The Copy Screen will be displayed.
bizhub PRO C6500 6-57
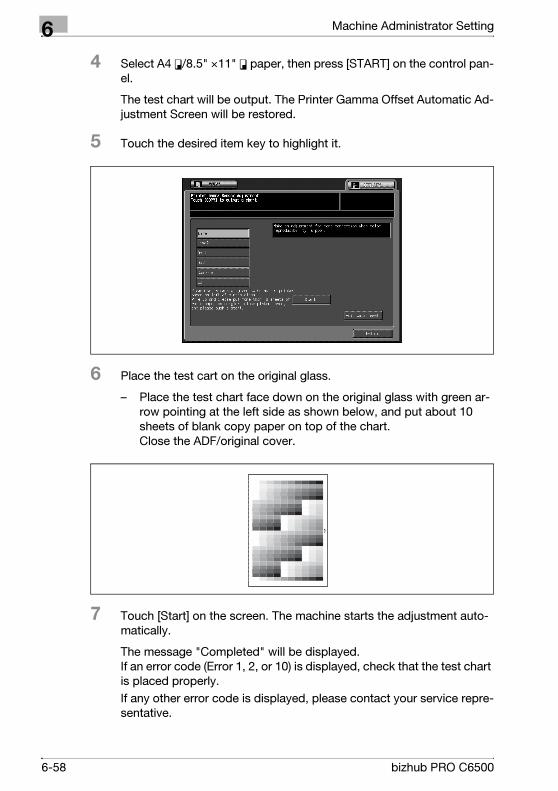
6 Machine Administrator Setting
4 Select A4 v/8.5" ×11" v paper, then press [START] on the control pan-
el.
The test chart will be output. The Printer Gamma Offset Automatic Ad-
justment Screen will be restored.
5 Touch the desired item key to highlight it.
6 Place the test cart on the original glass.
– Place the test chart face down on the original glass with green ar-
row pointing at the left side as shown below, and put about 10
sheets of blank copy paper on top of the chart. Close the ADF/original cover.
7 Touch [Start] on the screen. The machine starts the adjustment auto-
matically.
The message "Completed" will be displayed. If an error code (Error 1, 2, or 10) is displayed, check that the test chart
is placed properly.
If any other error code is displayed, please contact your service repre-
sentative.
6-58 bizhub PRO C6500
Machine Administrator Setting 6
8 If you want to make readjustments, press [Readjust] to display the pop-
up menu to confirm whether to readjust or not.
9 Repeat the adjustment steps from 3 to 8 until the desired result is ob-
tained.
– Touching [Adj. data reset] will display the Reset Confirmation pop-
up menu. Touch [YES] to reset the adjustment value to the factory
setting, or touch [NO] to cancel.
10 Touch [Return] to restore the Quality Adjustment Menu Screen.
11 If further changes are required, touch the desired key.
bizhub PRO C6500 6-59
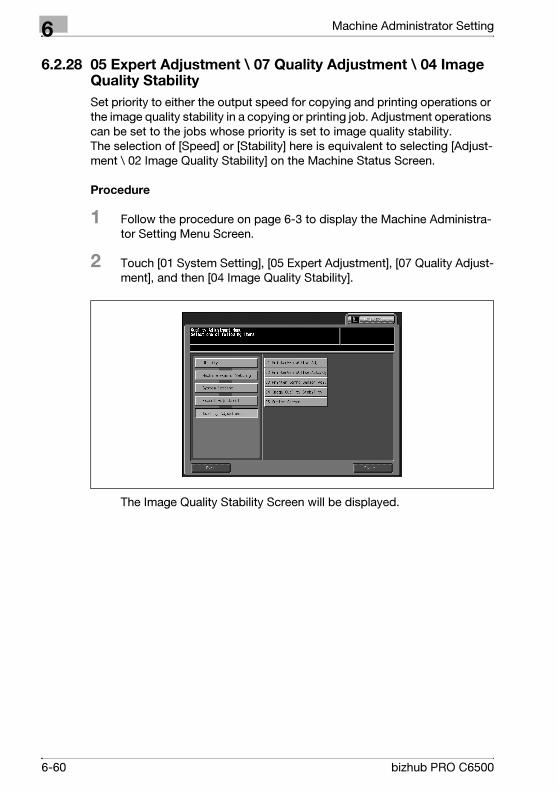
6 Machine Administrator Setting
6.2.28 05 Expert Adjustment \ 07 Quality Adjustment \ 04 Image Quality Stability
Set priority to either the output speed for copying and printing operations or
the image quality stability in a copying or printing job. Adjustment operations
can be set to the jobs whose priority is set to image quality stability. The selection of [Speed] or [Stability] here is equivalent to selecting [Adjust-
ment \ 02 Image Quality Stability] on the Machine Status Screen.
Procedure
1 Follow the procedure on page 6-3 to display the Machine Administra-
tor Setting Menu Screen.
2 Touch [01 System Setting], [05 Expert Adjustment], [07 Quality Adjust-
ment], and then [04 Image Quality Stability].
The Image Quality Stability Screen will be displayed.
6-60 bizhub PRO C6500
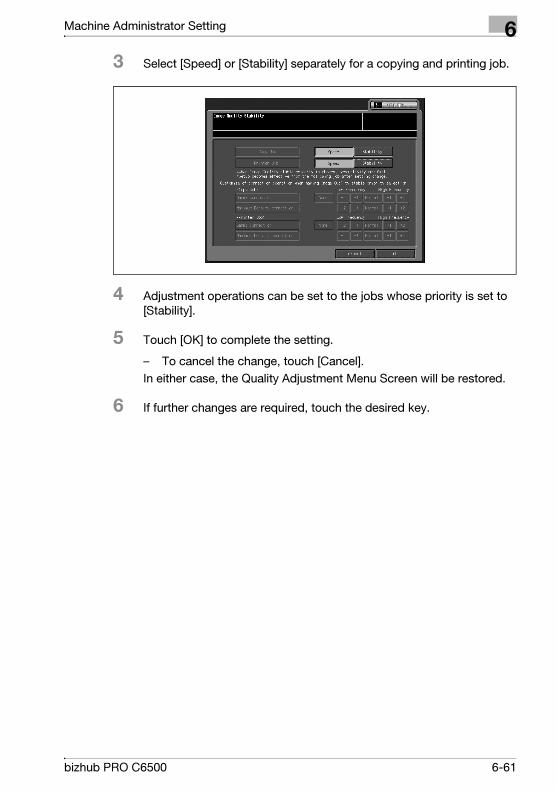
Machine Administrator Setting 6
3 Select [Speed] or [Stability] separately for a copying and printing job.
4 Adjustment operations can be set to the jobs whose priority is set to
[Stability].
5 Touch [OK] to complete the setting.
– To cancel the change, touch [Cancel].
In either case, the Quality Adjustment Menu Screen will be restored.
6 If further changes are required, touch the desired key.
bizhub PRO C6500 6-61

6 Machine Administrator Setting
6.2.29 05 Expert Adjustment \ 07 Quality Adjustment \ 05 Custom Screen
Select Line 1 or Line 2 for the Line Screen. When [Line 2] is selected, further
selection can be made for the low line screen (type 2). For the Dot Screen select Line 1 or Line 2. When [Line 2] is selected, further
selection can be made for the low line screen (type 2).
If screen type has been changed, gamma automatic adjustment will be per-
formed after returning to the user mode. After completing gamma automatic
adjustment, please perform printer gamma offset adjustment against the
changed screen.
!Detail
For details, see "01 Printer Gamma Offset Adj." on page 6-52 and "02
Printer Gamma Offset Auto Adj." on page 6-54.
Procedure
1 Follow the procedure on page 6-3 to display the Machine Administra-
tor Setting Menu Screen.
2 Touch [01 System Setting], [05 Expert Adjustment], [07 Quality Adjust-
ment], and then [05 Custom Screen].
The Custom Screen Setting Screen will be displayed.
6-62 bizhub PRO C6500
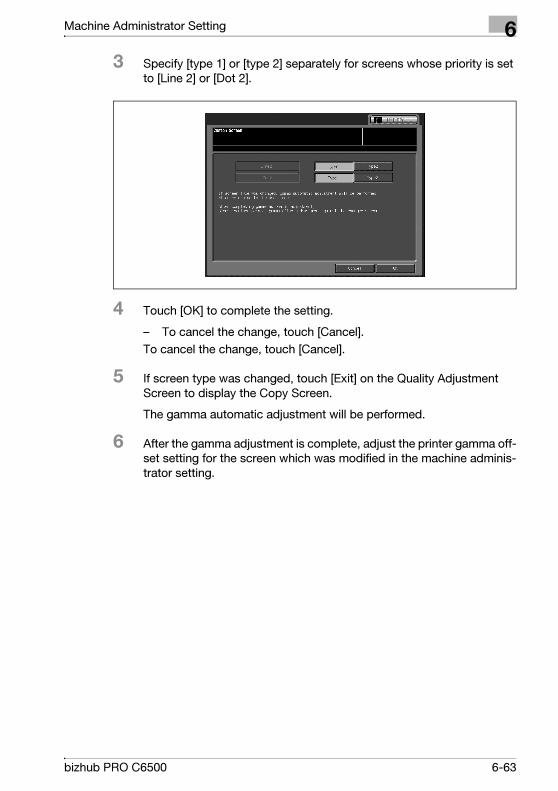
Machine Administrator Setting 6
3 Specify [type 1] or [type 2] separately for screens whose priority is set
to [Line 2] or [Dot 2].
4 Touch [OK] to complete the setting.
– To cancel the change, touch [Cancel].
To cancel the change, touch [Cancel].
5 If screen type was changed, touch [Exit] on the Quality Adjustment
Screen to display the Copy Screen.
The gamma automatic adjustment will be performed.
6 After the gamma adjustment is complete, adjust the printer gamma off-
set setting for the screen which was modified in the machine adminis-
trator setting.
bizhub PRO C6500 6-63
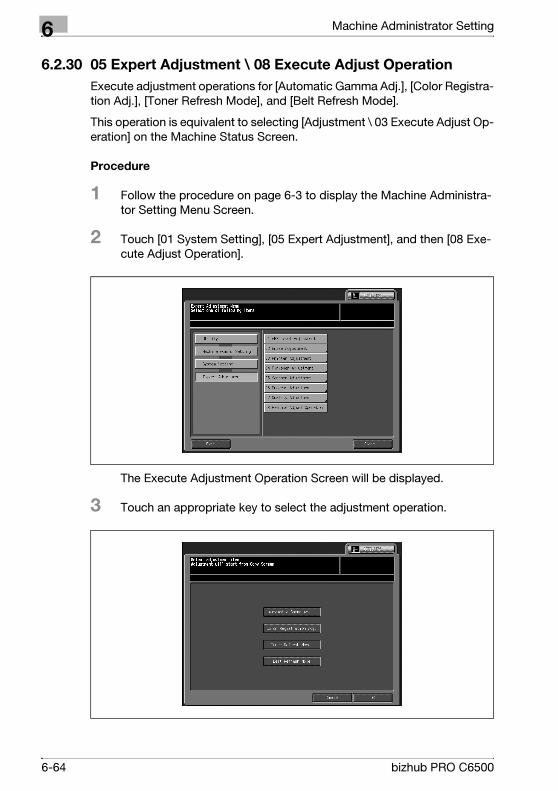
6 Machine Administrator Setting
6.2.30 05 Expert Adjustment \ 08 Execute Adjust Operation
Execute adjustment operations for [Automatic Gamma Adj.], [Color Registra-
tion Adj.], [Toner Refresh Mode], and [Belt Refresh Mode].
This operation is equivalent to selecting [Adjustment \ 03 Execute Adjust Op-
eration] on the Machine Status Screen.
Procedure
1 Follow the procedure on page 6-3 to display the Machine Administra-
tor Setting Menu Screen.
2 Touch [01 System Setting], [05 Expert Adjustment], and then [08 Exe-
cute Adjust Operation].
The Execute Adjustment Operation Screen will be displayed.
3 Touch an appropriate key to select the adjustment operation.
6-64 bizhub PRO C6500

Machine Administrator Setting 6
4 Touch [OK] to complete the operation.
– To cancel the change, touch [Cancel].
In either case, the Expert Adjustment Menu Screen will be restored.
5 If further changes are required, touch the desired key.
bizhub PRO C6500 6-65

6 Machine Administrator Setting
6.2.31 06 List/Count
Use this function to print out the list selected from the following items.
- Mode memory list: Programmed contents of Mode memory
- User management list: Home position settings selected by user
- Use management list: Information controlled by user authentication or division authentication
- Font pattern list: Font patterns used in the machine
- Audit log report: Audited log
Procedure
1 Follow the procedure on page 6-3 to display the Machine Administra-
tor Setting Menu Screen.
2 Touch [01 System Setting], and then [06 List/Count].
6-66 bizhub PRO C6500
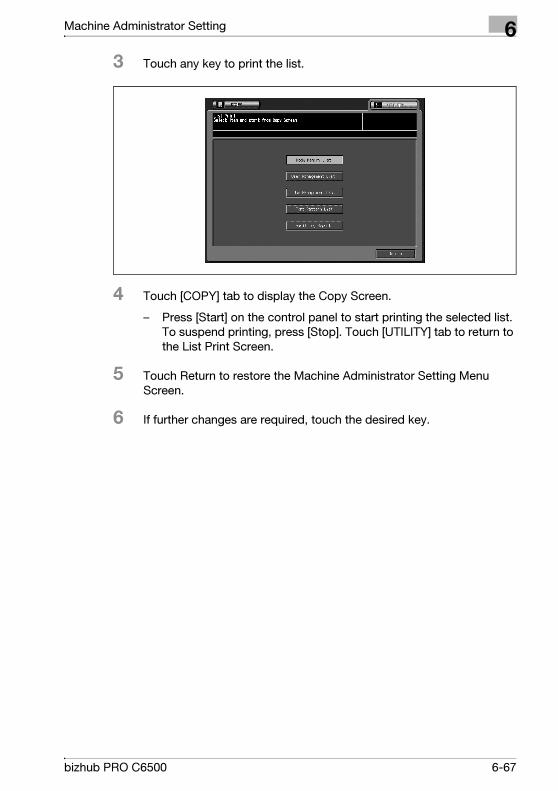
Machine Administrator Setting 6
3 Touch any key to print the list.
4 Touch [COPY] tab to display the Copy Screen.
– Press [Start] on the control panel to start printing the selected list. To suspend printing, press [Stop]. Touch [UTILITY] tab to return to
the List Print Screen.
5 Touch Return to restore the Machine Administrator Setting Menu
Screen.
6 If further changes are required, touch the desired key.
bizhub PRO C6500 6-67
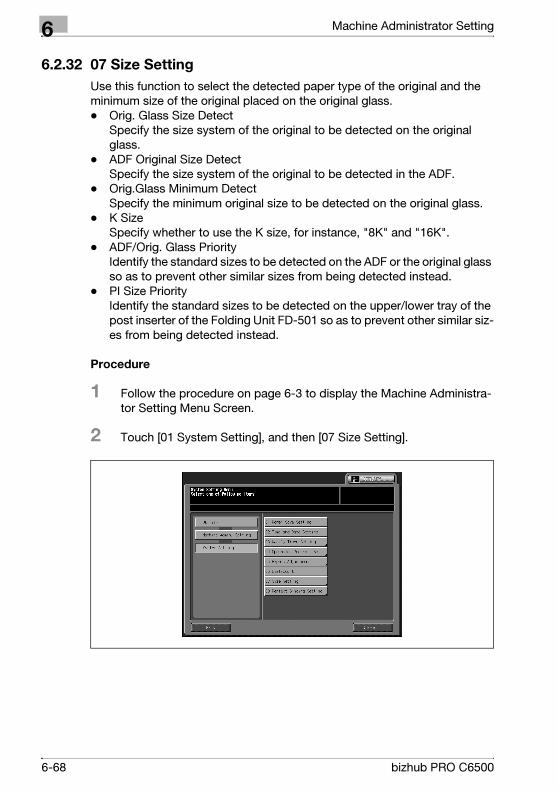
6 Machine Administrator Setting
6.2.32 07 Size Setting
Use this function to select the detected paper type of the original and the
minimum size of the original placed on the original glass.
- Orig. Glass Size Detect Specify the size system of the original to be detected on the original
glass.
- ADF Original Size Detect Specify the size system of the original to be detected in the ADF.
- Orig.Glass Minimum Detect Specify the minimum original size to be detected on the original glass.
- K Size Specify whether to use the K size, for instance, "8K" and "16K".
- ADF/Orig. Glass Priority Identify the standard sizes to be detected on the ADF or the original glass
so as to prevent other similar sizes from being detected instead.
- PI Size Priority Identify the standard sizes to be detected on the upper/lower tray of the
post inserter of the Folding Unit FD-501 so as to prevent other similar siz-
es from being detected instead.
Procedure
1 Follow the procedure on page 6-3 to display the Machine Administra-
tor Setting Menu Screen.
2 Touch [01 System Setting], and then [07 Size Setting].
6-68 bizhub PRO C6500
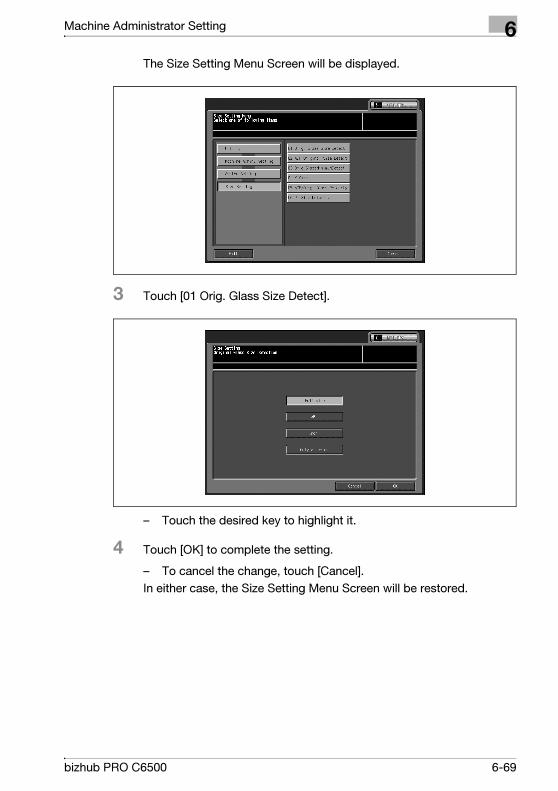
Machine Administrator Setting 6
The Size Setting Menu Screen will be displayed.
3 Touch [01 Orig. Glass Size Detect].
– Touch the desired key to highlight it.
4 Touch [OK] to complete the setting.
– To cancel the change, touch [Cancel].
In either case, the Size Setting Menu Screen will be restored.
bizhub PRO C6500 6-69
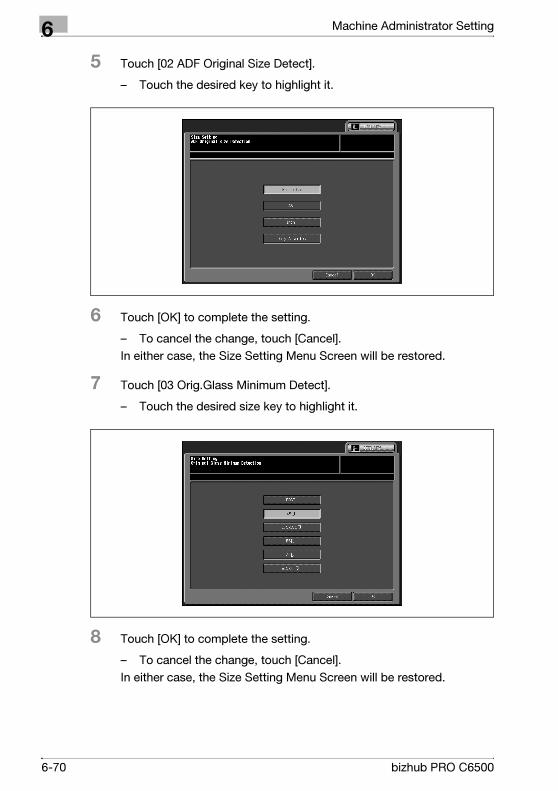
6 Machine Administrator Setting
5 Touch [02 ADF Original Size Detect].
– Touch the desired key to highlight it.
6 Touch [OK] to complete the setting.
– To cancel the change, touch [Cancel].
In either case, the Size Setting Menu Screen will be restored.
7 Touch [03 Orig.Glass Minimum Detect].
– Touch the desired size key to highlight it.
8 Touch [OK] to complete the setting.
– To cancel the change, touch [Cancel].
In either case, the Size Setting Menu Screen will be restored.
6-70 bizhub PRO C6500
Machine Administrator Setting 6
9 Touch [04 K Size].
– Touch [K size on] or [K size off] to highlight it.
10 Touch [OK] to complete the setting.
– To cancel the change, touch [Cancel].
In either case, the Size Setting Menu Screen will be restored.
11 Touch [05 ADF/Orig. Glass Priority].
– Touch the desired size key to highlight it.
12 Touch [OK] to complete the setting.
– To cancel the change, touch [Cancel].
In either case, the Size Setting Menu Screen will be restored.
bizhub PRO C6500 6-71
6 Machine Administrator Setting
13 Touch [06 PI Size Priority].
– Touch the desired size key to highlight it.
14 Touch [OK] to complete the setting.
– To cancel the change, touch [Cancel].
In either case, the Size Setting Menu Screen will be restored.
15 If further changes are required, touch the desired key.
6-72 bizhub PRO C6500

Machine Administrator Setting 6
6.2.33 08 Perfect Binding Setting\ 01 Useful Paper Weight
Use this function to specify the paper weight available for each of body and
cover when using Perfect Binder.
Procedure
1 Follow the procedure on page 6-3 to display the Machine Administrator
Setting Menu Screen.
2 Touch [01 System Setting], and then [08 Perfect Binding Setting].
The Perfect Binding Setting Menu Screen will be displayed.
3 Touch [01 Useful Paper Weight].
The Useful Paper Weight Screen will be displayed.
bizhub PRO C6500 6-73
6 Machine Administrator Setting
4 Touch the desired paper weight key for each of P.B. Body and Cover
to highlight it.
5 Touch [OK] to complete the setting.
– To cancel the change, touch [Cancel].
In either case, the Perfect Binding Setting Menu Screen will be re-
stored.
6 If further changes are required, touch the desired key.
2
Note
If one of the paper weight selected here is not specified for the tray to be
used in the perfect binding mode, the binding operation will become
unavailable with an "unsuitable" message displayed.
6-74 bizhub PRO C6500
Machine Administrator Setting 6
6.2.34 08 Perfect Binding Setting\ 02 Paper Count Limit
Use this function to specify the minimum and maximum paper count to be
bound each for paper weight.
Procedure
1 Follow the procedure on page 6-3 to display the Machine Administrator
Setting Menu Screen.
2 Touch [01 System Setting], and then [08 Perfect Binding Setting].
The Perfect Binding Setting Menu Screen will be displayed.
3 Touch [02 Paper Count Limit].
The Paper Count Limit Screen will be displayed.
bizhub PRO C6500 6-75
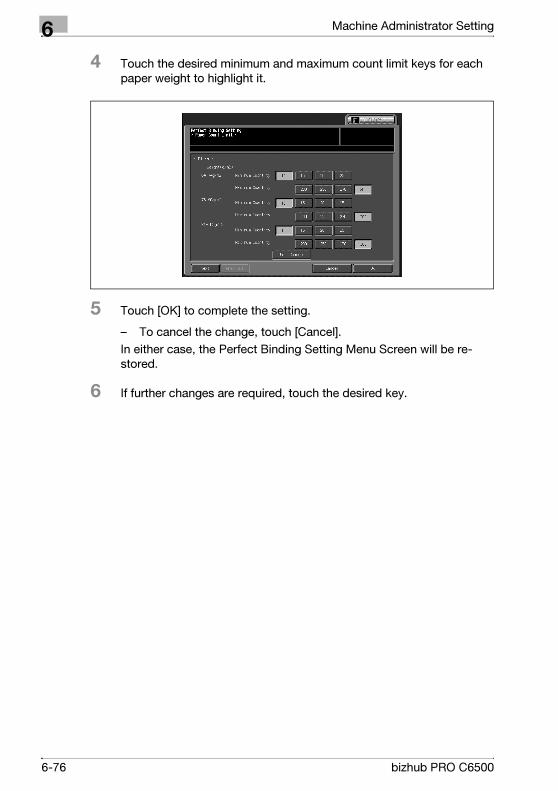
6 Machine Administrator Setting
4 Touch the desired minimum and maximum count limit keys for each
paper weight to highlight it.
5 Touch [OK] to complete the setting.
– To cancel the change, touch [Cancel].
In either case, the Perfect Binding Setting Menu Screen will be re-
stored.
6 If further changes are required, touch the desired key.
6-76 bizhub PRO C6500

Machine Administrator Setting 6
6.2.35 08 Perfect Binding Setting\ 03 Unfitting Cover Stop
Use this function to stop/continue the current job when the cover width is not
suitable for the body paper size and thickness.
Procedure
1 Follow the procedure on page 6-3 to display the Machine Administrator
Setting Menu Screen.
2 Touch [01 System Setting], and then [08 Perfect Binding Setting].
The Perfect Binding Setting Menu Screen will be displayed.
3 Touch [03 Unfitting Cover Stop].
The Unfitting Cover Stop Screen will be displayed.
bizhub PRO C6500 6-77
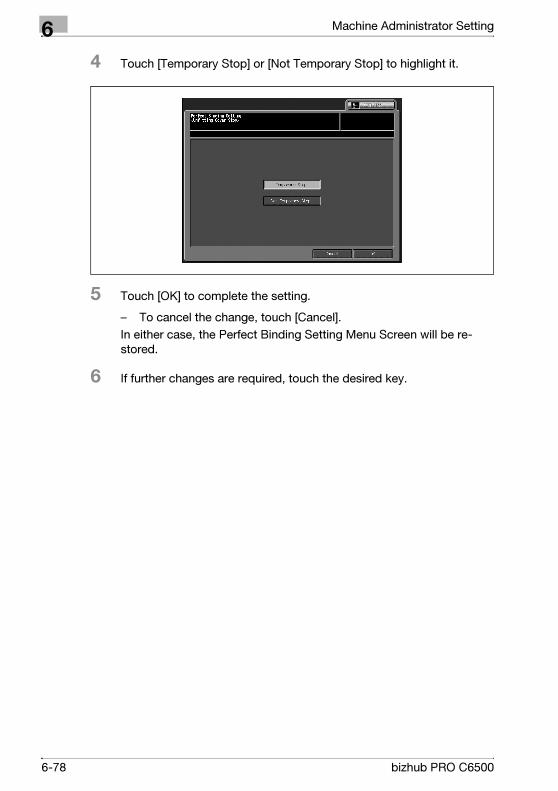
6 Machine Administrator Setting
4 Touch [Temporary Stop] or [Not Temporary Stop] to highlight it.
5 Touch [OK] to complete the setting.
– To cancel the change, touch [Cancel].
In either case, the Perfect Binding Setting Menu Screen will be re-
stored.
6 If further changes are required, touch the desired key.
6-78 bizhub PRO C6500
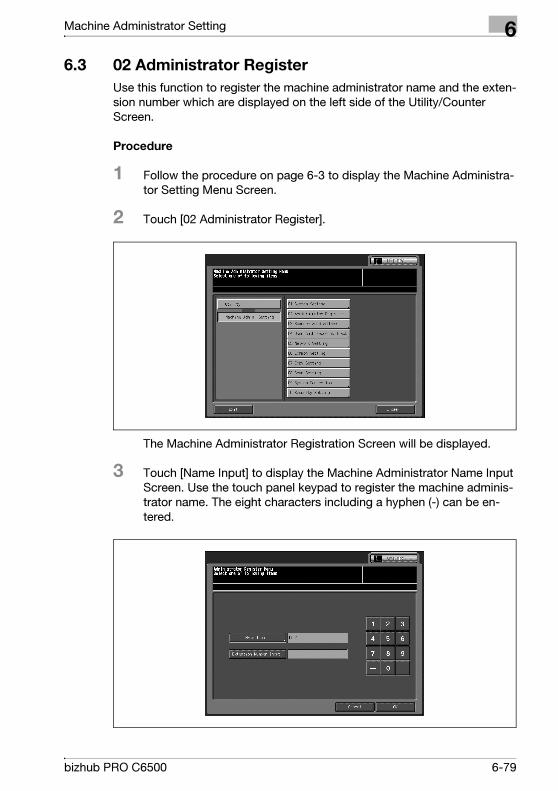
Machine Administrator Setting 6
6.3 02 Administrator Register
Use this function to register the machine administrator name and the exten-
sion number which are displayed on the left side of the Utility/Counter
Screen.
Procedure
1 Follow the procedure on page 6-3 to display the Machine Administra-
tor Setting Menu Screen.
2 Touch [02 Administrator Register].
The Machine Administrator Registration Screen will be displayed.
3 Touch [Name Input] to display the Machine Administrator Name Input
Screen. Use the touch panel keypad to register the machine adminis-
trator name. The eight characters including a hyphen (-) can be en-
tered.
bizhub PRO C6500 6-79
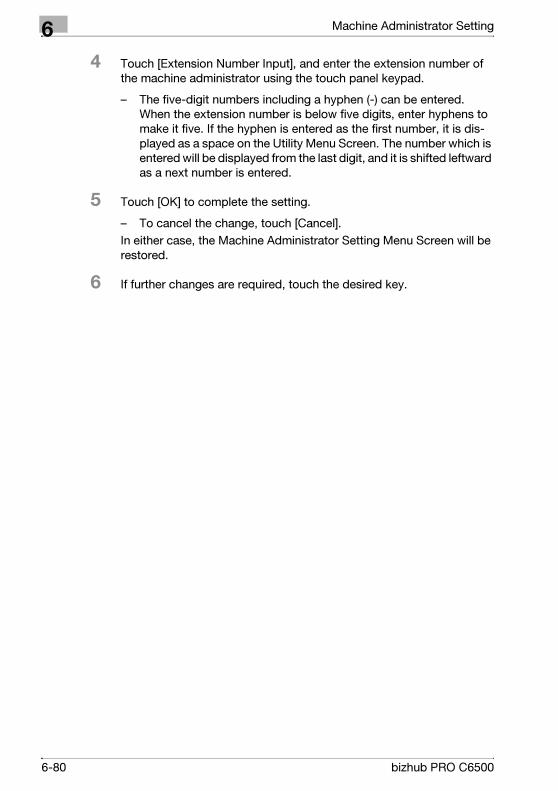
6 Machine Administrator Setting
4 Touch [Extension Number Input], and enter the extension number of
the machine administrator using the touch panel keypad.
– The five-digit numbers including a hyphen (-) can be entered. When the extension number is below five digits, enter hyphens to
make it five. If the hyphen is entered as the first number, it is dis-
played as a space on the Utility Menu Screen. The number which is
entered will be displayed from the last digit, and it is shifted leftward
as a next number is entered.
5 Touch [OK] to complete the setting.
– To cancel the change, touch [Cancel].
In either case, the Machine Administrator Setting Menu Screen will be
restored.
6 If further changes are required, touch the desired key.
6-80 bizhub PRO C6500
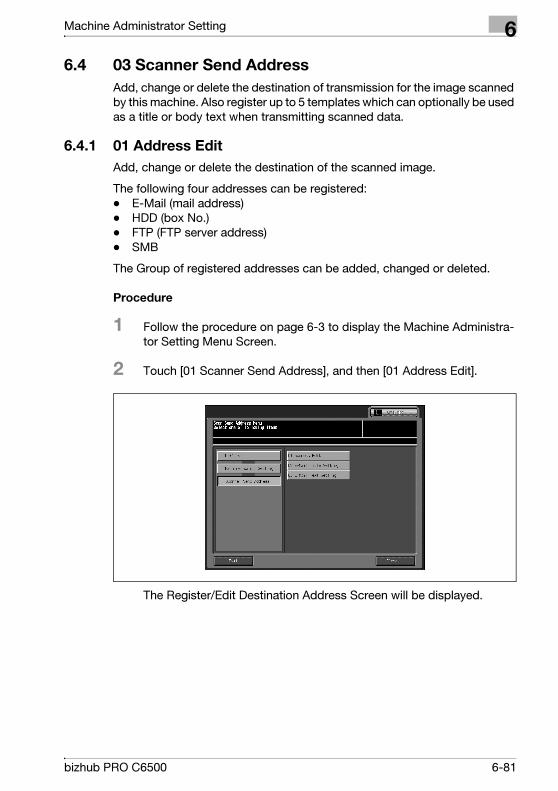
Machine Administrator Setting 6
6.4 03 Scanner Send Address
Add, change or delete the destination of transmission for the image scanned
by this machine. Also register up to 5 templates which can optionally be used
as a title or body text when transmitting scanned data.
6.4.1 01 Address Edit
Add, change or delete the destination of the scanned image.
The following four addresses can be registered:
- E-Mail (mail address)
- HDD (box No.)
- FTP (FTP server address)
- SMB
The Group of registered addresses can be added, changed or deleted.
Procedure
1 Follow the procedure on page 6-3 to display the Machine Administra-
tor Setting Menu Screen.
2 Touch [01 Scanner Send Address], and then [01 Address Edit].
The Register/Edit Destination Address Screen will be displayed.
bizhub PRO C6500 6-81
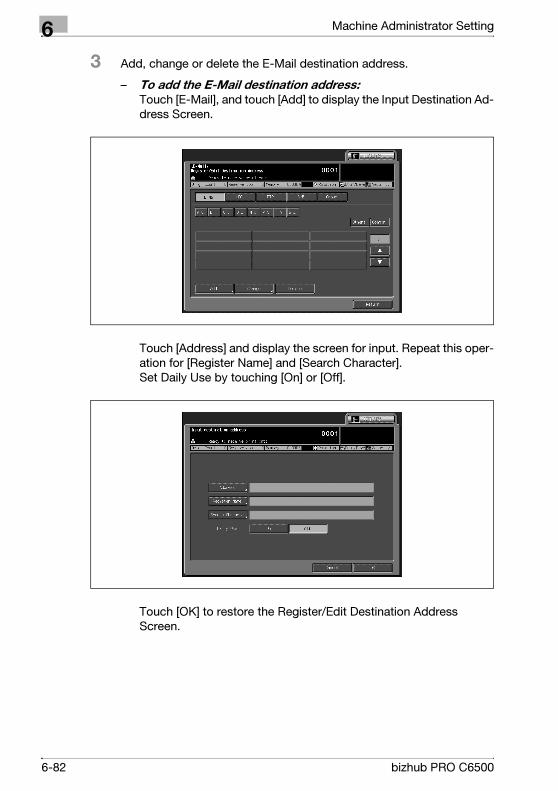
6 Machine Administrator Setting
3 Add, change or delete the E-Mail destination address.
– To add the E-Mail destination address: Touch [E-Mail], and touch [Add] to display the Input Destination Ad-
dress Screen.
Touch [Address] and display the screen for input. Repeat this oper-
ation for [Register Name] and [Search Character]. Set Daily Use by touching [On] or [Off].
Touch [OK] to restore the Register/Edit Destination Address
Screen.
6-82 bizhub PRO C6500

Machine Administrator Setting 6
– To change the E-Mail destination address: Touch [E-Mail].
Touch the search key, [Other], [Common], or the arrow keys (c) and
(d) to display the Register Name to be changed, and touch to high-
light it. Touch [Change] to display the Input Destination Address Screen. Select the changing item from [Address], [Register Name] and
[Search Character], and change it in the input screen. Set Daily Use by touching [On] or [Off].
Touch [OK] to restore the Register/Edit Destination Address
Screen.
bizhub PRO C6500 6-83

6 Machine Administrator Setting
– To delete the E-Mail destination address: Touch [E-Mail]. Touch the search key, [Other], [Common], or the arrow keys (c) and
(d) to display the Register Name to be deleted, and touch to high-
light it. Touch [Delete]. The Delete Confirmation popup screen will be dis-
played. Touch [Yes]. To suspend deleting, touch [No].
Touch [OK] to restore the Register/Edit Destination Address
Screen.
4 Add, change or delete the HDD destination address.
– To add the HDD destination address: Touch [HDD], and touch [Add] to display the Input Destination Ad-
dress Screen.
Touch [Box Name] and display the screen for input.
6-84 bizhub PRO C6500
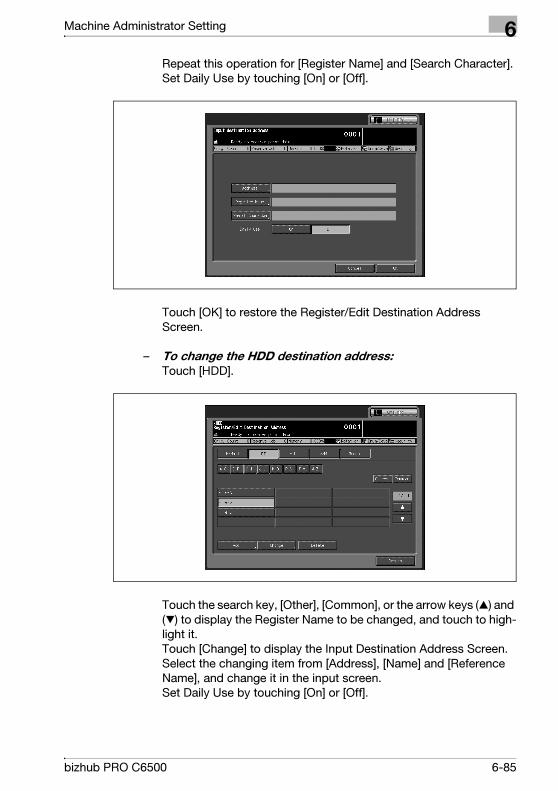
Machine Administrator Setting 6
Repeat this operation for [Register Name] and [Search Character]. Set Daily Use by touching [On] or [Off].
Touch [OK] to restore the Register/Edit Destination Address
Screen.
– To change the HDD destination address: Touch [HDD].
Touch the search key, [Other], [Common], or the arrow keys (c) and
(d) to display the Register Name to be changed, and touch to high-
light it. Touch [Change] to display the Input Destination Address Screen. Select the changing item from [Address], [Name] and [Reference
Name], and change it in the input screen. Set Daily Use by touching [On] or [Off].
bizhub PRO C6500 6-85
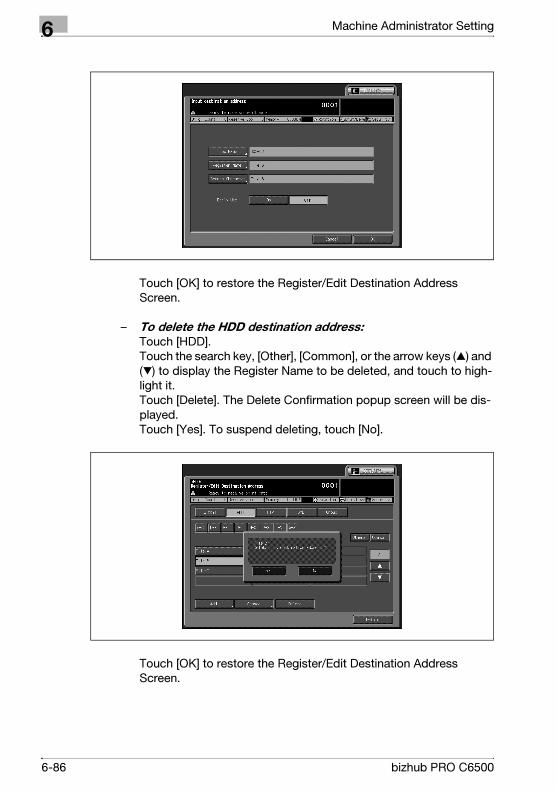
6 Machine Administrator Setting
Touch [OK] to restore the Register/Edit Destination Address
Screen.
– To delete the HDD destination address: Touch [HDD]. Touch the search key, [Other], [Common], or the arrow keys (c) and
(d) to display the Register Name to be deleted, and touch to high-
light it. Touch [Delete]. The Delete Confirmation popup screen will be dis-
played. Touch [Yes]. To suspend deleting, touch [No].
Touch [OK] to restore the Register/Edit Destination Address
Screen.
6-86 bizhub PRO C6500
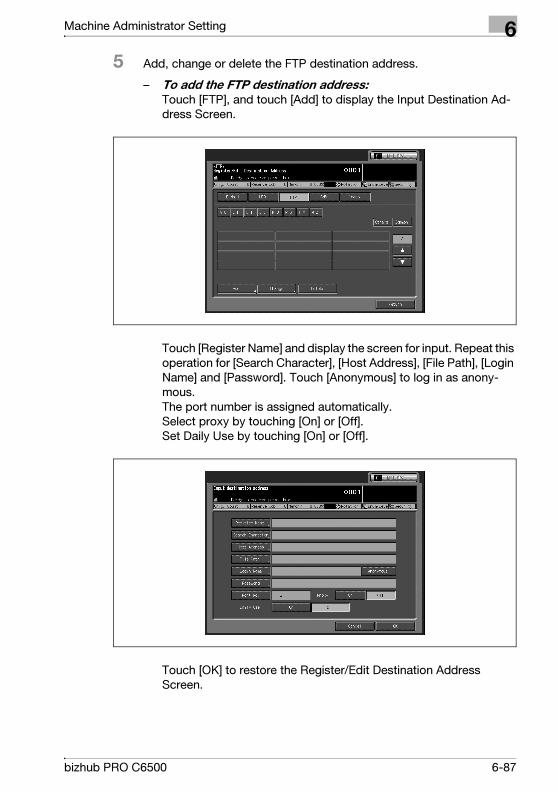
Machine Administrator Setting 6
5 Add, change or delete the FTP destination address.
– To add the FTP destination address: Touch [FTP], and touch [Add] to display the Input Destination Ad-
dress Screen.
Touch [Register Name] and display the screen for input. Repeat this
operation for [Search Character], [Host Address], [File Path], [Login
Name] and [Password]. Touch [Anonymous] to log in as anony-
mous. The port number is assigned automatically. Select proxy by touching [On] or [Off]. Set Daily Use by touching [On] or [Off].
Touch [OK] to restore the Register/Edit Destination Address
Screen.
bizhub PRO C6500 6-87
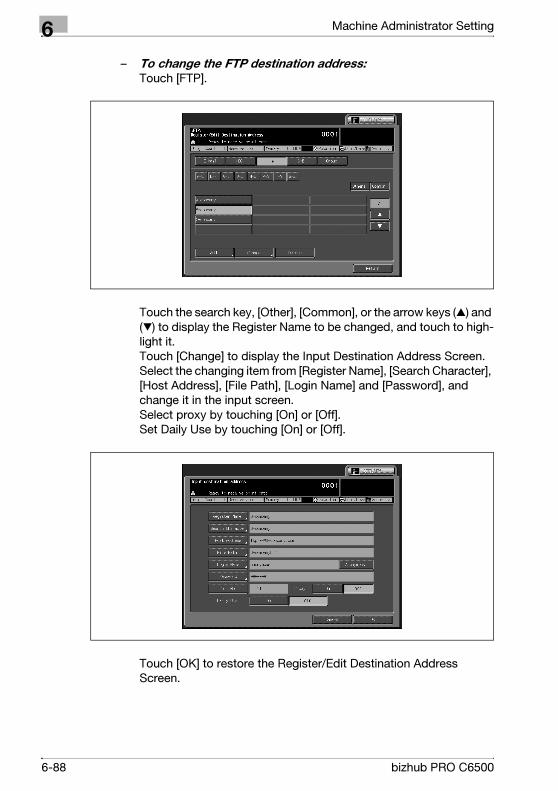
6 Machine Administrator Setting
– To change the FTP destination address: Touch [FTP].
Touch the search key, [Other], [Common], or the arrow keys (c) and
(d) to display the Register Name to be changed, and touch to high-
light it. Touch [Change] to display the Input Destination Address Screen. Select the changing item from [Register Name], [Search Character],
[Host Address], [File Path], [Login Name] and [Password], and
change it in the input screen. Select proxy by touching [On] or [Off]. Set Daily Use by touching [On] or [Off].
Touch [OK] to restore the Register/Edit Destination Address
Screen.
6-88 bizhub PRO C6500
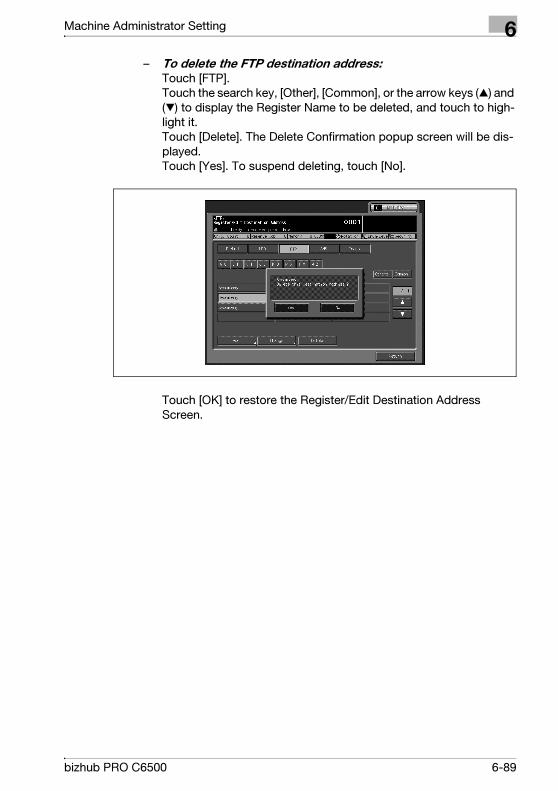
Machine Administrator Setting 6
– To delete the FTP destination address: Touch [FTP]. Touch the search key, [Other], [Common], or the arrow keys (c) and
(d) to display the Register Name to be deleted, and touch to high-
light it. Touch [Delete]. The Delete Confirmation popup screen will be dis-
played. Touch [Yes]. To suspend deleting, touch [No].
Touch [OK] to restore the Register/Edit Destination Address
Screen.
bizhub PRO C6500 6-89

6 Machine Administrator Setting
6 Add, change or delete the SMB destination address.
– To add the SMB destination address: Touch [SMB], and touch [Add] to display the Input Destination Ad-
dress Screen.
Touch [Register Name] and display the screen for input. Repeat this
operation for [Search Character], [Host Address], [File Path], [Login
Name] and [Password]. Set Daily Use by touching [On] or [Off].
Touch [OK] to restore the Register/Edit Destination Address
Screen.
6-90 bizhub PRO C6500
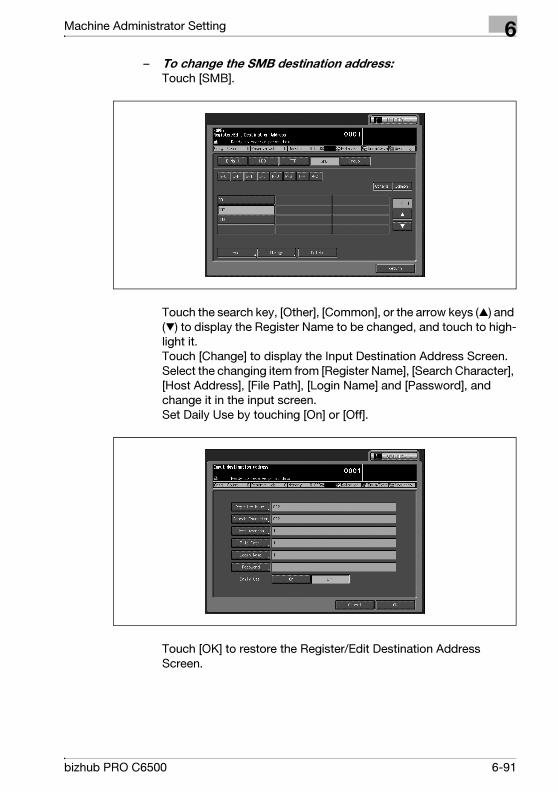
Machine Administrator Setting 6
– To change the SMB destination address: Touch [SMB].
Touch the search key, [Other], [Common], or the arrow keys (c) and
(d) to display the Register Name to be changed, and touch to high-
light it. Touch [Change] to display the Input Destination Address Screen. Select the changing item from [Register Name], [Search Character],
[Host Address], [File Path], [Login Name] and [Password], and
change it in the input screen. Set Daily Use by touching [On] or [Off].
Touch [OK] to restore the Register/Edit Destination Address
Screen.
bizhub PRO C6500 6-91
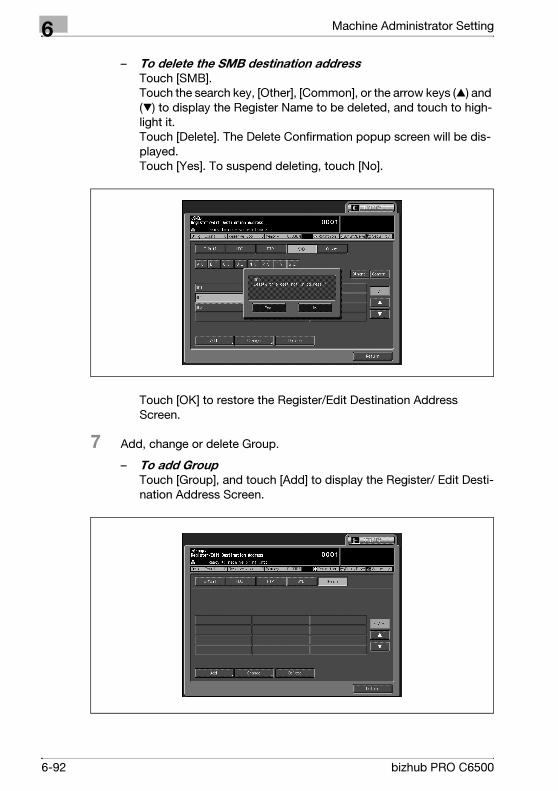
6 Machine Administrator Setting
– To delete the SMB destination address Touch [SMB]. Touch the search key, [Other], [Common], or the arrow keys (c) and
(d) to display the Register Name to be deleted, and touch to high-
light it. Touch [Delete]. The Delete Confirmation popup screen will be dis-
played. Touch [Yes]. To suspend deleting, touch [No].
Touch [OK] to restore the Register/Edit Destination Address
Screen.
7 Add, change or delete Group.
– To add Group Touch [Group], and touch [Add] to display the Register/ Edit Desti-
nation Address Screen.
6-92 bizhub PRO C6500
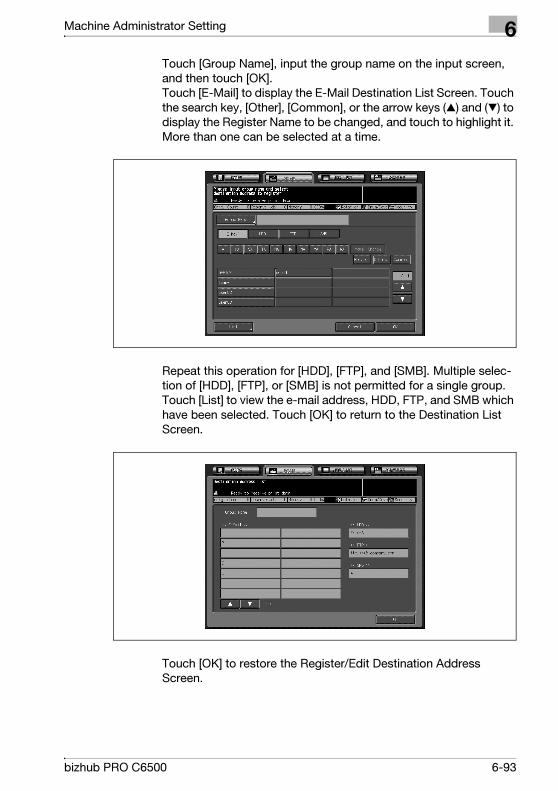
Machine Administrator Setting 6
Touch [Group Name], input the group name on the input screen,
and then touch [OK]. Touch [E-Mail] to display the E-Mail Destination List Screen. Touch
the search key, [Other], [Common], or the arrow keys (c) and (d) to
display the Register Name to be changed, and touch to highlight it.
More than one can be selected at a time.
Repeat this operation for [HDD], [FTP], and [SMB]. Multiple selec-
tion of [HDD], [FTP], or [SMB] is not permitted for a single group. Touch [List] to view the e-mail address, HDD, FTP, and SMB which
have been selected. Touch [OK] to return to the Destination List
Screen.
Touch [OK] to restore the Register/Edit Destination Address
Screen.
bizhub PRO C6500 6-93
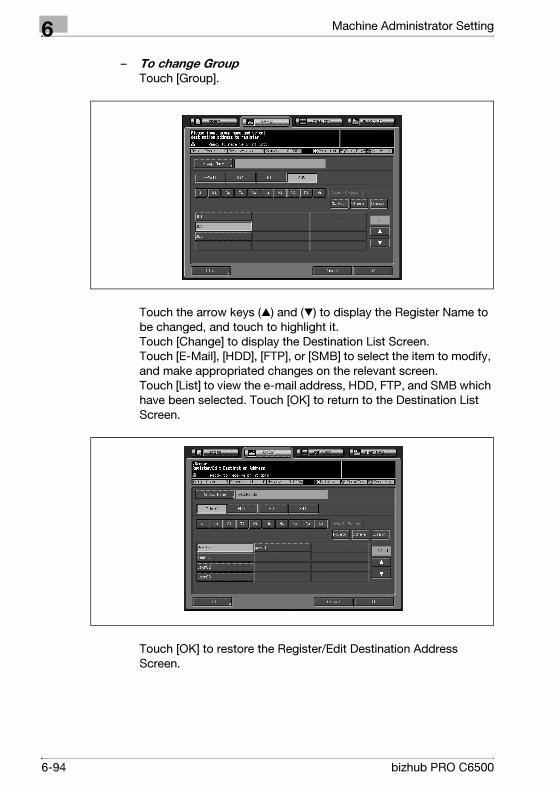
6 Machine Administrator Setting
– To change Group Touch [Group].
Touch the arrow keys (c) and (d) to display the Register Name to
be changed, and touch to highlight it. Touch [Change] to display the Destination List Screen. Touch [E-Mail], [HDD], [FTP], or [SMB] to select the item to modify,
and make appropriated changes on the relevant screen. Touch [List] to view the e-mail address, HDD, FTP, and SMB which
have been selected. Touch [OK] to return to the Destination List
Screen.
Touch [OK] to restore the Register/Edit Destination Address
Screen.
6-94 bizhub PRO C6500
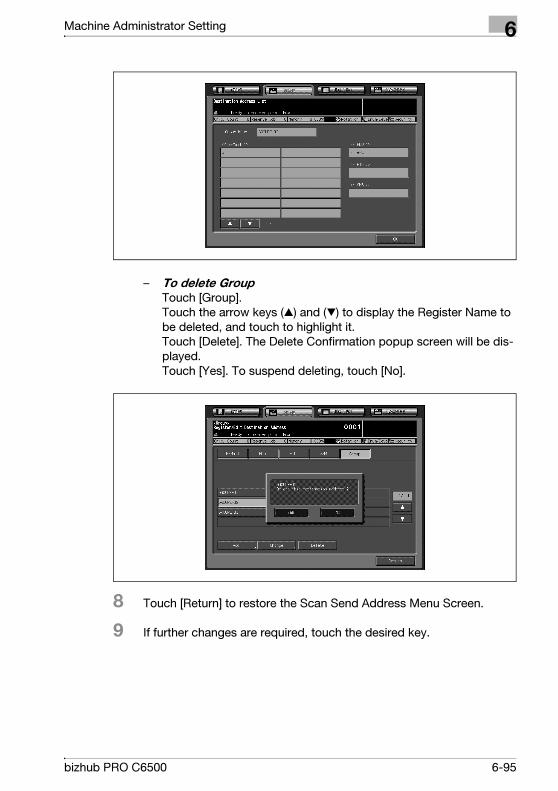
Machine Administrator Setting 6
– To delete Group Touch [Group]. Touch the arrow keys (c) and (d) to display the Register Name to
be deleted, and touch to highlight it. Touch [Delete]. The Delete Confirmation popup screen will be dis-
played. Touch [Yes]. To suspend deleting, touch [No].
8 Touch [Return] to restore the Scan Send Address Menu Screen.
9 If further changes are required, touch the desired key.
bizhub PRO C6500 6-95
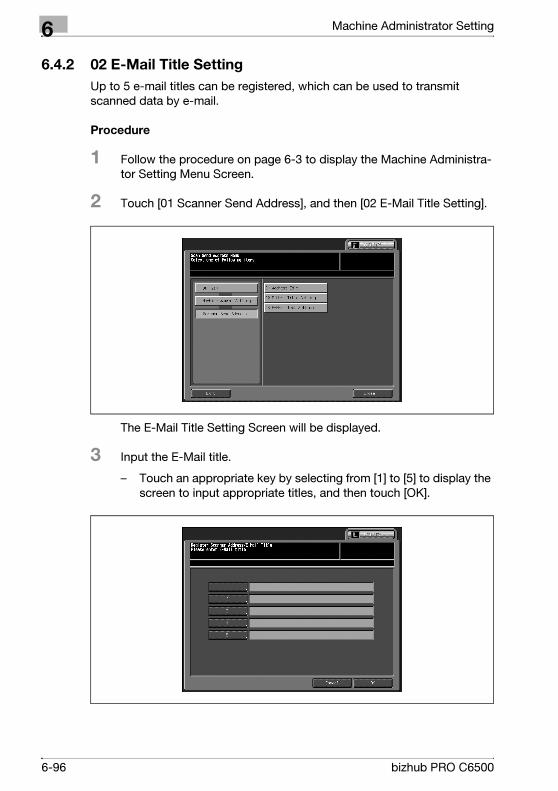
6 Machine Administrator Setting
6.4.2 02 E-Mail Title Setting
Up to 5 e-mail titles can be registered, which can be used to transmit
scanned data by e-mail.
Procedure
1 Follow the procedure on page 6-3 to display the Machine Administra-
tor Setting Menu Screen.
2 Touch [01 Scanner Send Address], and then [02 E-Mail Title Setting].
The E-Mail Title Setting Screen will be displayed.
3 Input the E-Mail title.
– Touch an appropriate key by selecting from [1] to [5] to display the
screen to input appropriate titles, and then touch [OK].
6-96 bizhub PRO C6500

Machine Administrator Setting 6
4 Touch [OK] to complete the setting.
– To cancel the change, touch [Cancel].
In either case, the Scan Send Address Menu Screen will be restored.
5 If further changes are required, touch the desired key.
bizhub PRO C6500 6-97
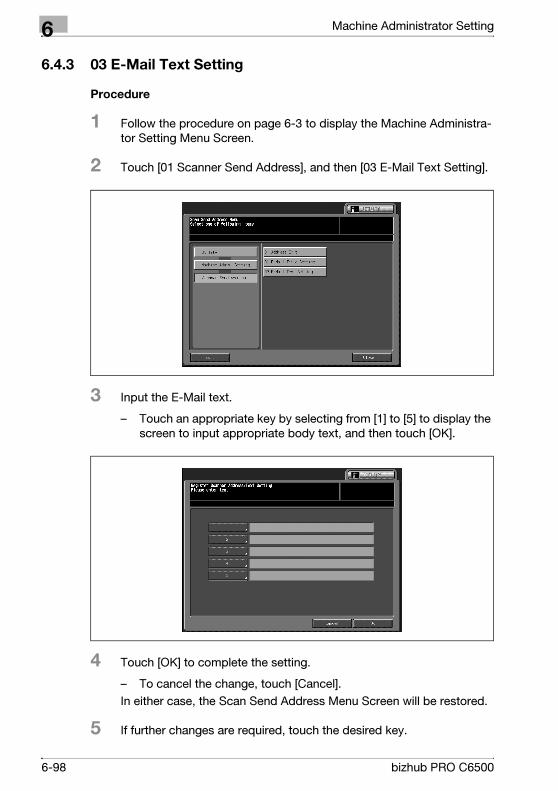
6 Machine Administrator Setting
6.4.3 03 E-Mail Text Setting
Procedure
1 Follow the procedure on page 6-3 to display the Machine Administra-
tor Setting Menu Screen.
2 Touch [01 Scanner Send Address], and then [03 E-Mail Text Setting].
3 Input the E-Mail text.
– Touch an appropriate key by selecting from [1] to [5] to display the
screen to input appropriate body text, and then touch [OK].
4 Touch [OK] to complete the setting.
– To cancel the change, touch [Cancel].
In either case, the Scan Send Address Menu Screen will be restored.
5 If further changes are required, touch the desired key.
6-98 bizhub PRO C6500
Machine Administrator Setting 6
6.5 04 User Auth./Account Track
Use this function to select any function of User Authentication and Section
Authentication settings can be altered according to the user authentication
and account track settings.
6.5.1 01 Authentication Method
Establish the authentication settings by combining the following seven ele-
ments.
- User Authentication: On (External Serv.) / On (MFP) / Off
- Public User: Permission / Prohibition
- Account Track Manage / Not Manage (Account Track cannot be selected when the User Authentication is set
to [On (External Serv.)].)
- Account Track Auth. Method Account + Password/ Password (Account Track Auth. Method cannot be selected when the Account
Track is set to [Not Manage].)
- User/Section Auth. Connect: When User Authentication is set to [On (MFP)] and Account Track is set
to [Manage] and User/Section Auth. Connect is set to [Connected], Sec-
tion Authentication is not required to enter.
- User Distribute Number: Enter the number of user authentication. The total number of authentica-
tion to be distributed is 1,000 for both a user and a section. The remaining
number from which the number of users is subtracted from 1,000 will be
distributed as section authentication.
- Upper Limit Achieve Movement Select the machine condition in which the machine stops due to reaching
the upper limit. [Immediately]: The job is immediately suspended as soon as the upper
limit is reached. In this case, copying conditions, output data, and
scanned data will not be hold. [After Print]: The machine stops after completing the job as reaching the
upper limit. The next job cannot be executed. [Warning Only]: The message "Copy limit reached" is displayed as reach-
ing the upper limit, and the next job can be continuously executed.
!Detail
It is recommended to distribute authentication for both the user and the
section, otherwise either party cannot be assigned authentication if it is
distributed to only one party.
bizhub PRO C6500 6-99
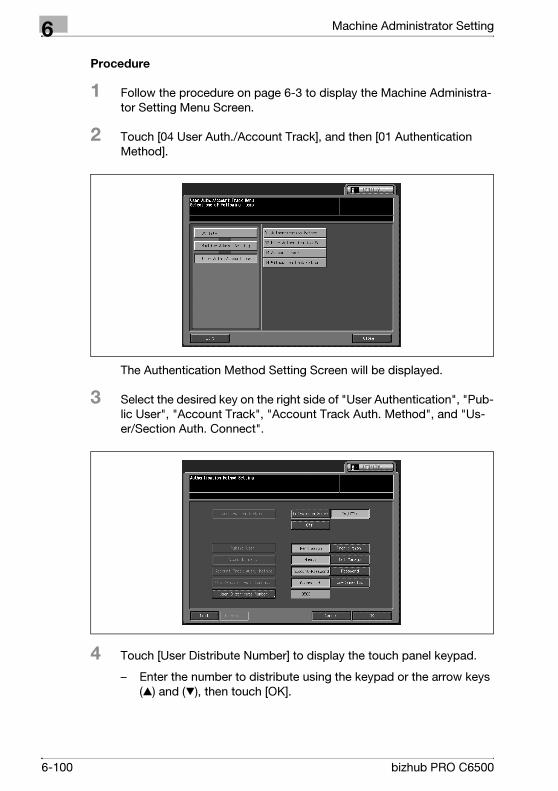
6 Machine Administrator Setting
Procedure
1 Follow the procedure on page 6-3 to display the Machine Administra-
tor Setting Menu Screen.
2 Touch [04 User Auth./Account Track], and then [01 Authentication
Method].
The Authentication Method Setting Screen will be displayed.
3 Select the desired key on the right side of "User Authentication", "Pub-
lic User", "Account Track", "Account Track Auth. Method", and "Us-
er/Section Auth. Connect".
4 Touch [User Distribute Number] to display the touch panel keypad.
– Enter the number to distribute using the keypad or the arrow keys
(c) and (d), then touch [OK].
6-100 bizhub PRO C6500
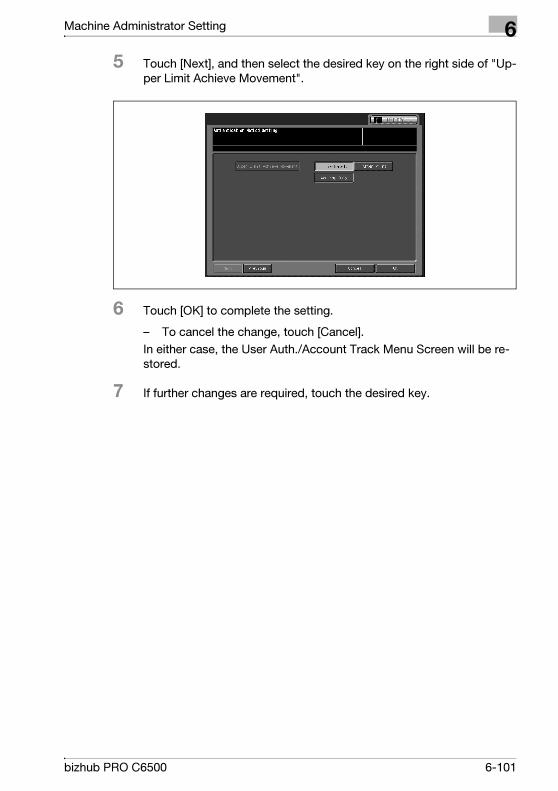
Machine Administrator Setting 6
5 Touch [Next], and then select the desired key on the right side of "Up-
per Limit Achieve Movement".
6 Touch [OK] to complete the setting.
– To cancel the change, touch [Cancel].
In either case, the User Auth./Account Track Menu Screen will be re-
stored.
7 If further changes are required, touch the desired key.
bizhub PRO C6500 6-101

6 Machine Administrator Setting
6.5.2 02 User Authentication Set \ 01 Management Setting
If authentication mode is enabled, [List] can be displayed on the User Au-
thentication Setting Screen and the User Registration Screen.
When [List] is touched, user names/section names registered in the unit will
be displayed, so you can set a user name/section name simply by selecting
from the list.
Also, the functions available and output quantity to authenticated users can
be limited.
Procedure
1 Follow the procedure on page 6-3 to display the Machine Administra-
tor Setting Menu Screen.
2 Touch [04 User Auth./Account Track], [02 User Authentication Set], and
then [01 Management Setting].
The Management Setting Screen will be displayed.
6-102 bizhub PRO C6500
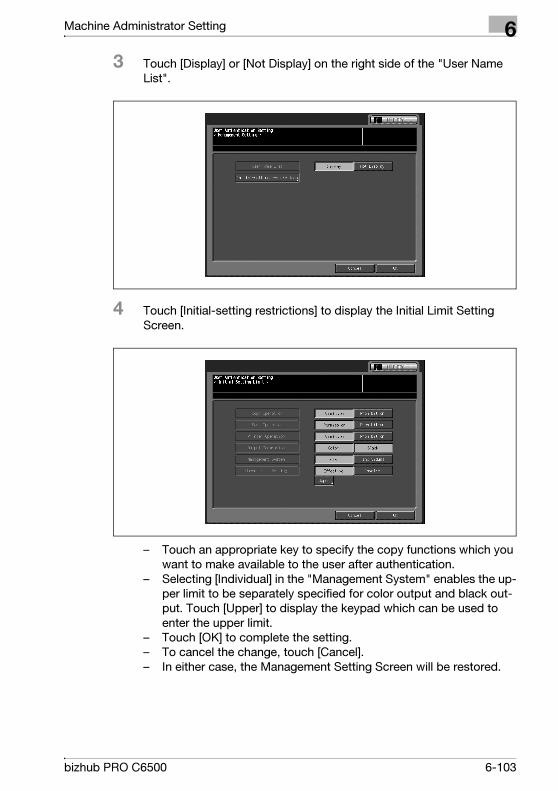
Machine Administrator Setting 6
3 Touch [Display] or [Not Display] on the right side of the "User Name
List".
4 Touch [Initial-setting restrictions] to display the Initial Limit Setting
Screen.
– Touch an appropriate key to specify the copy functions which you
want to make available to the user after authentication.
– Selecting [Individual] in the "Management System" enables the up-
per limit to be separately specified for color output and black out-
put. Touch [Upper] to display the keypad which can be used to
enter the upper limit.
– Touch [OK] to complete the setting.
– To cancel the change, touch [Cancel].
– In either case, the Management Setting Screen will be restored.
bizhub PRO C6500 6-103
6 Machine Administrator Setting
5 Touch [OK] to complete the setting.
– To cancel the change, touch [Cancel].
In either case, the User Authentication Setting Screen will be restored.
6 If further changes are required, touch the desired key.
6-104 bizhub PRO C6500
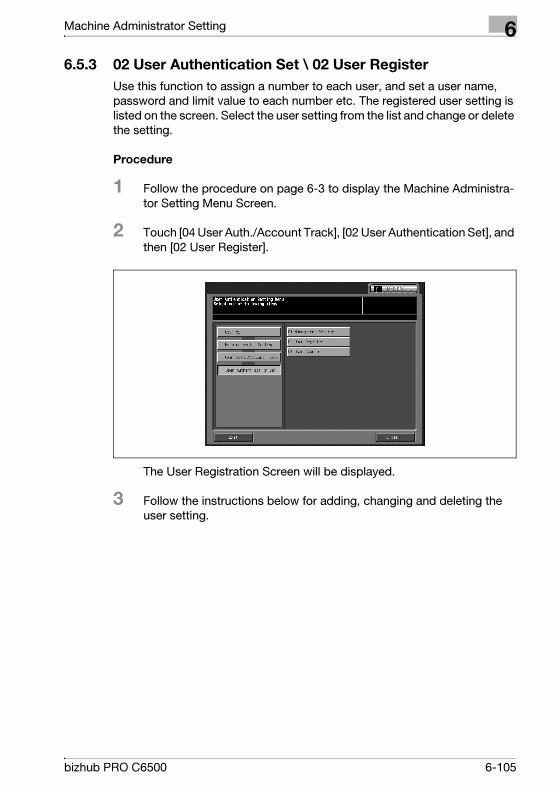
Machine Administrator Setting 6
6.5.3 02 User Authentication Set \ 02 User Register
Use this function to assign a number to each user, and set a user name,
password and limit value to each number etc. The registered user setting is
listed on the screen. Select the user setting from the list and change or delete
the setting.
Procedure
1 Follow the procedure on page 6-3 to display the Machine Administra-
tor Setting Menu Screen.
2 Touch [04 User Auth./Account Track], [02 User Authentication Set], and
then [02 User Register].
The User Registration Screen will be displayed.
3 Follow the instructions below for adding, changing and deleting the
user setting.
bizhub PRO C6500 6-105

6 Machine Administrator Setting
– To change user settings:
Touch [Next] or [Previous] to display the user name to be changed
and touch to highlight it. Touch [Change] to display the Change Registered User Screen. Touch [User Name] to display the input screen. Enter the user name
and touch [OK]. You may enter 64 letters for the user name. For the
details on entering texts in the input screen, see the appendix. Touch [Password] to display the input screen. Enter the password
and touch [OK]. You may enter 64 digits for the password. For the
details on entering texts in the input screen, see the appendix. Touch [Belong Section] to display the screen to select a section be-
long to.
6-106 bizhub PRO C6500
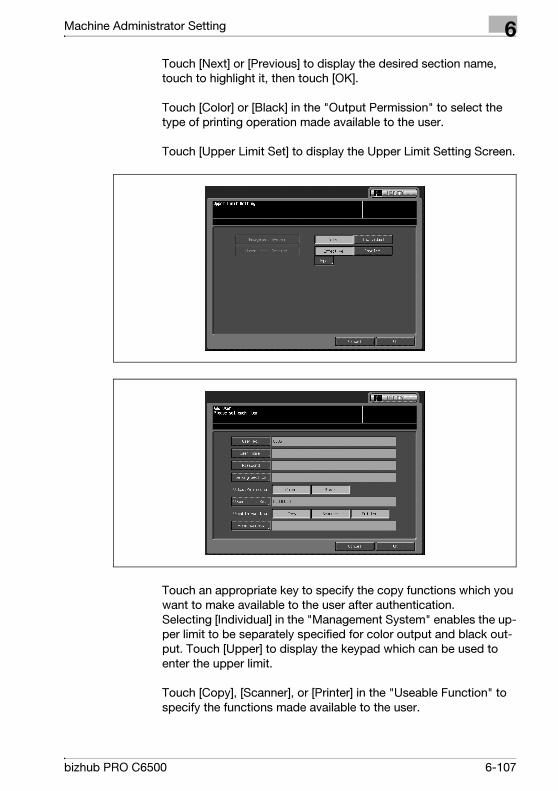
Machine Administrator Setting 6
Touch [Next] or [Previous] to display the desired section name,
touch to highlight it, then touch [OK]. Touch [Color] or [Black] in the "Output Permission" to select the
type of printing operation made available to the user. Touch [Upper Limit Set] to display the Upper Limit Setting Screen.
Touch an appropriate key to specify the copy functions which you
want to make available to the user after authentication. Selecting [Individual] in the "Management System" enables the up-
per limit to be separately specified for color output and black out-
put. Touch [Upper] to display the keypad which can be used to
enter the upper limit. Touch [Copy], [Scanner], or [Printer] in the "Useable Function" to
specify the functions made available to the user.
bizhub PRO C6500 6-107
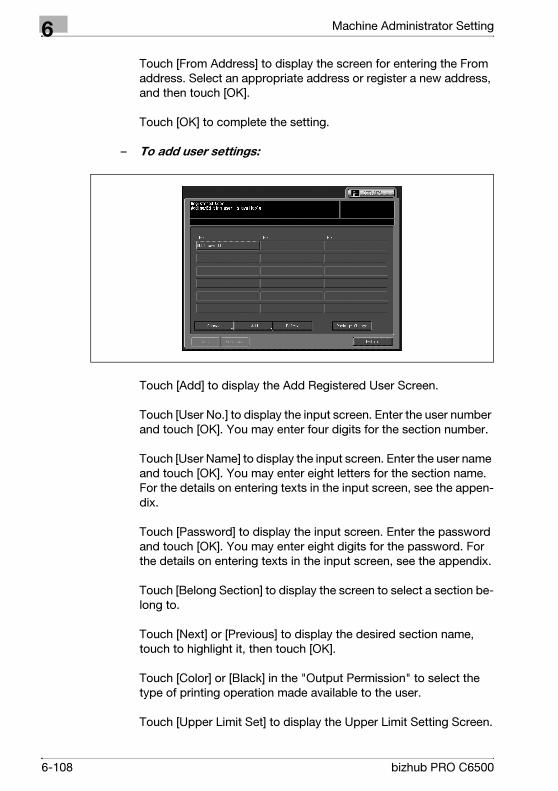
6 Machine Administrator Setting
Touch [From Address] to display the screen for entering the From
address. Select an appropriate address or register a new address,
and then touch [OK]. Touch [OK] to complete the setting.
– To add user settings:
Touch [Add] to display the Add Registered User Screen. Touch [User No.] to display the input screen. Enter the user number
and touch [OK]. You may enter four digits for the section number. Touch [User Name] to display the input screen. Enter the user name
and touch [OK]. You may enter eight letters for the section name.
For the details on entering texts in the input screen, see the appen-
dix. Touch [Password] to display the input screen. Enter the password
and touch [OK]. You may enter eight digits for the password. For
the details on entering texts in the input screen, see the appendix. Touch [Belong Section] to display the screen to select a section be-
long to. Touch [Next] or [Previous] to display the desired section name,
touch to highlight it, then touch [OK]. Touch [Color] or [Black] in the "Output Permission" to select the
type of printing operation made available to the user. Touch [Upper Limit Set] to display the Upper Limit Setting Screen.
6-108 bizhub PRO C6500

Machine Administrator Setting 6
Touch an appropriate key to specify the copy functions which you
want to make available to the user after authentication. Selecting [Individual] in the "Management System" enables the up-
per limit to be separately specified for color output and black out-
put. Touch [Upper] to display the keypad which can be used to
enter the upper limit. Touch [Copy], [Scanner], or [Printer] in the "Useable Function" to
specify the functions made available to the user. Touch [From Address] to display the screen for entering the From
address. Select an appropriate address or register a new address,
and then touch [OK]. Touch [OK] to complete the setting.
– To delete user settings:
bizhub PRO C6500 6-109
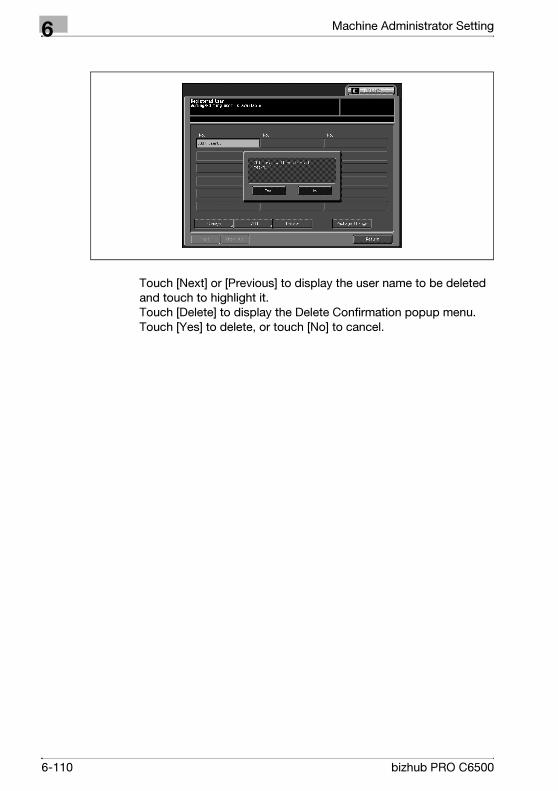
6 Machine Administrator Setting
Touch [Next] or [Previous] to display the user name to be deleted
and touch to highlight it. Touch [Delete] to display the Delete Confirmation popup menu. Touch [Yes] to delete, or touch [No] to cancel.
6-110 bizhub PRO C6500
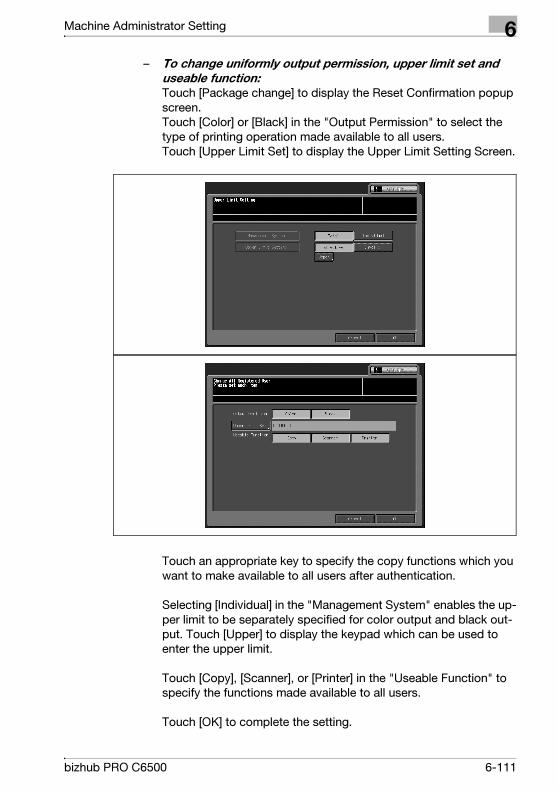
Machine Administrator Setting 6
– To change uniformly output permission, upper limit set and
useable function: Touch [Package change] to display the Reset Confirmation popup
screen. Touch [Color] or [Black] in the "Output Permission" to select the
type of printing operation made available to all users. Touch [Upper Limit Set] to display the Upper Limit Setting Screen.
Touch an appropriate key to specify the copy functions which you
want to make available to all users after authentication. Selecting [Individual] in the "Management System" enables the up-
per limit to be separately specified for color output and black out-
put. Touch [Upper] to display the keypad which can be used to
enter the upper limit. Touch [Copy], [Scanner], or [Printer] in the "Useable Function" to
specify the functions made available to all users. Touch [OK] to complete the setting.
bizhub PRO C6500 6-111
6 Machine Administrator Setting
4 Touch [Return] to restore the Machine Administrator Setting Menu
Screen.
5 If further changes are required, touch the desired key.
6-112 bizhub PRO C6500
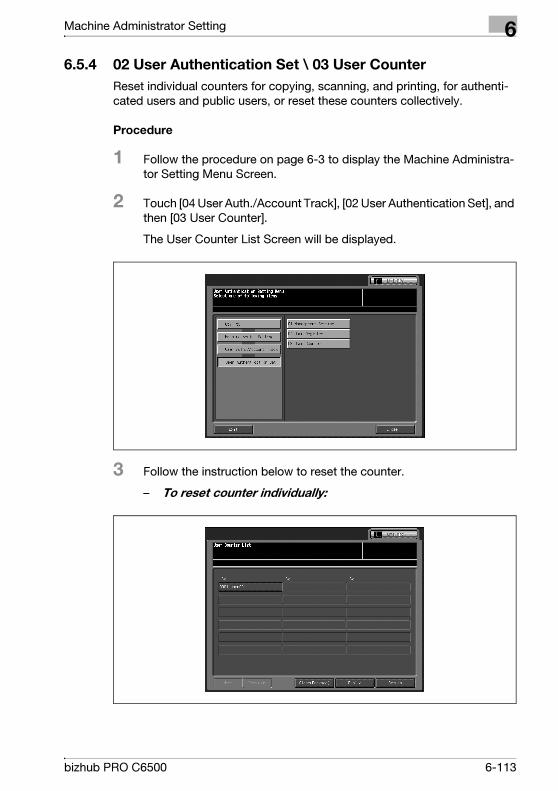
Machine Administrator Setting 6
6.5.4 02 User Authentication Set \ 03 User Counter
Reset individual counters for copying, scanning, and printing, for authenti-
cated users and public users, or reset these counters collectively.
Procedure
1 Follow the procedure on page 6-3 to display the Machine Administra-
tor Setting Menu Screen.
2 Touch [04 User Auth./Account Track], [02 User Authentication Set], and
then [03 User Counter].
The User Counter List Screen will be displayed.
3 Follow the instruction below to reset the counter.
– To reset counter individually:
bizhub PRO C6500 6-113
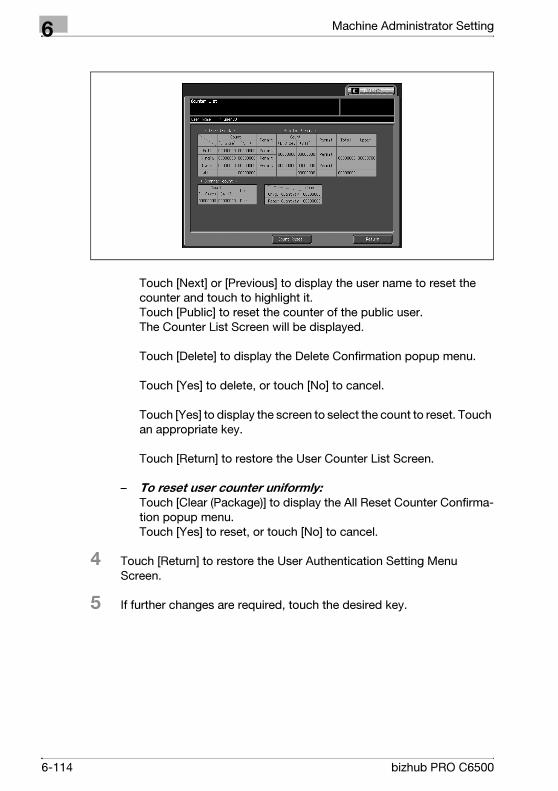
6 Machine Administrator Setting
Touch [Next] or [Previous] to display the user name to reset the
counter and touch to highlight it. Touch [Public] to reset the counter of the public user. The Counter List Screen will be displayed. Touch [Delete] to display the Delete Confirmation popup menu. Touch [Yes] to delete, or touch [No] to cancel. Touch [Yes] to display the screen to select the count to reset. Touch
an appropriate key. Touch [Return] to restore the User Counter List Screen.
– To reset user counter uniformly: Touch [Clear (Package)] to display the All Reset Counter Confirma-
tion popup menu. Touch [Yes] to reset, or touch [No] to cancel.
4 Touch [Return] to restore the User Authentication Setting Menu
Screen.
5 If further changes are required, touch the desired key.
6-114 bizhub PRO C6500
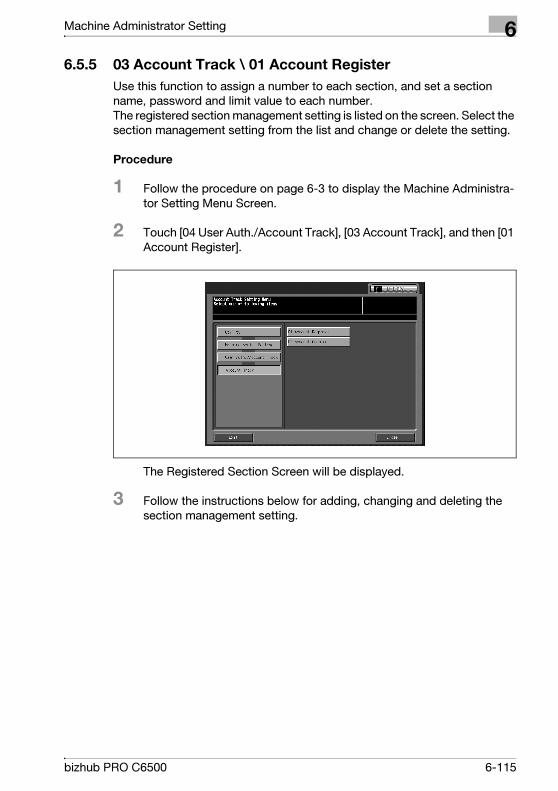
Machine Administrator Setting 6
6.5.5 03 Account Track \ 01 Account Register
Use this function to assign a number to each section, and set a section
name, password and limit value to each number. The registered section management setting is listed on the screen. Select the
section management setting from the list and change or delete the setting.
Procedure
1 Follow the procedure on page 6-3 to display the Machine Administra-
tor Setting Menu Screen.
2 Touch [04 User Auth./Account Track], [03 Account Track], and then [01
Account Register].
The Registered Section Screen will be displayed.
3 Follow the instructions below for adding, changing and deleting the
section management setting.
bizhub PRO C6500 6-115
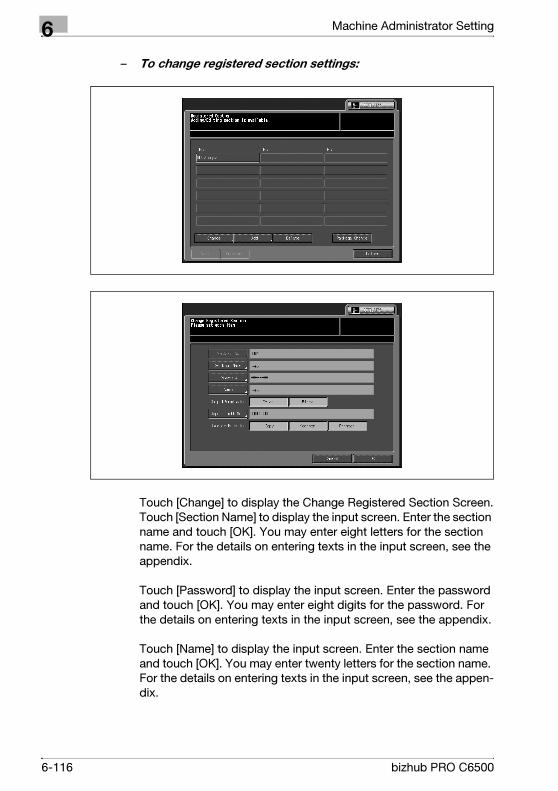
6 Machine Administrator Setting
– To change registered section settings:
Touch [Change] to display the Change Registered Section Screen. Touch [Section Name] to display the input screen. Enter the section
name and touch [OK]. You may enter eight letters for the section
name. For the details on entering texts in the input screen, see the
appendix. Touch [Password] to display the input screen. Enter the password
and touch [OK]. You may enter eight digits for the password. For
the details on entering texts in the input screen, see the appendix. Touch [Name] to display the input screen. Enter the section name
and touch [OK]. You may enter twenty letters for the section name.
For the details on entering texts in the input screen, see the appen-
dix.
6-116 bizhub PRO C6500
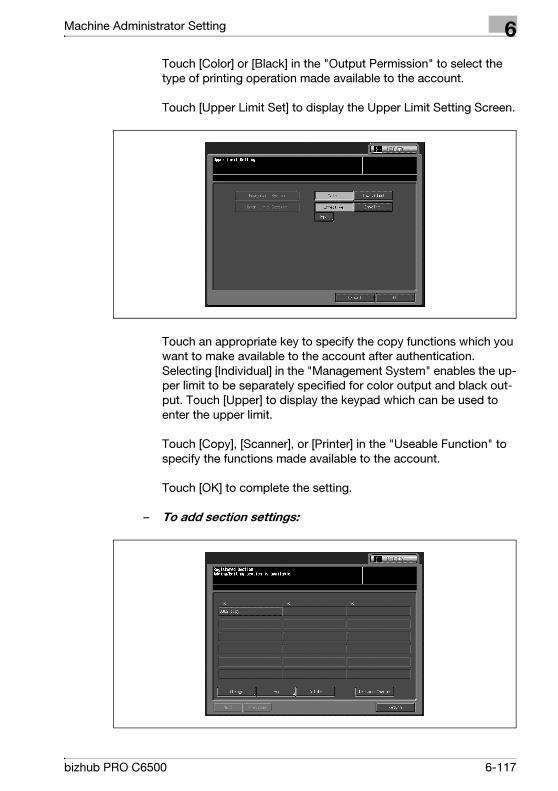
Machine Administrator Setting 6
Touch [Color] or [Black] in the "Output Permission" to select the
type of printing operation made available to the account. Touch [Upper Limit Set] to display the Upper Limit Setting Screen.
Touch an appropriate key to specify the copy functions which you
want to make available to the account after authentication. Selecting [Individual] in the "Management System" enables the up-
per limit to be separately specified for color output and black out-
put. Touch [Upper] to display the keypad which can be used to
enter the upper limit. Touch [Copy], [Scanner], or [Printer] in the "Useable Function" to
specify the functions made available to the account. Touch [OK] to complete the setting.
– To add section settings:
bizhub PRO C6500 6-117
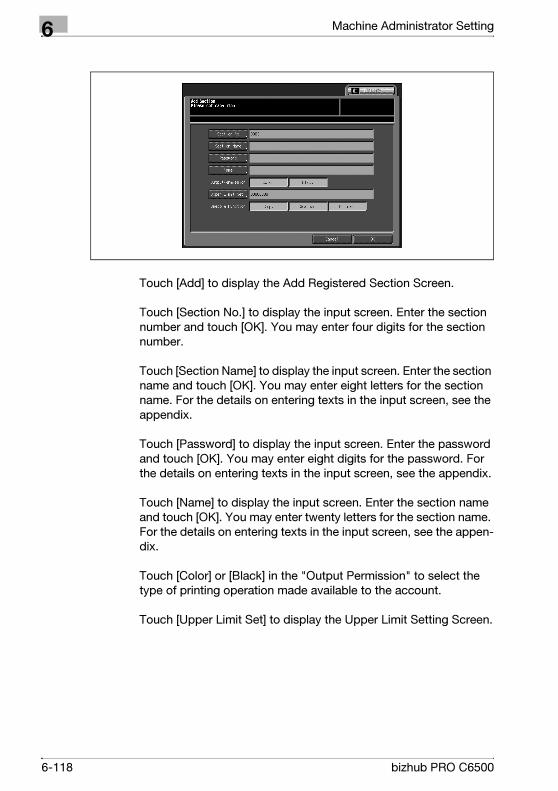
6 Machine Administrator Setting
Touch [Add] to display the Add Registered Section Screen. Touch [Section No.] to display the input screen. Enter the section
number and touch [OK]. You may enter four digits for the section
number. Touch [Section Name] to display the input screen. Enter the section
name and touch [OK]. You may enter eight letters for the section
name. For the details on entering texts in the input screen, see the
appendix. Touch [Password] to display the input screen. Enter the password
and touch [OK]. You may enter eight digits for the password. For
the details on entering texts in the input screen, see the appendix. Touch [Name] to display the input screen. Enter the section name
and touch [OK]. You may enter twenty letters for the section name.
For the details on entering texts in the input screen, see the appen-
dix. Touch [Color] or [Black] in the "Output Permission" to select the
type of printing operation made available to the account. Touch [Upper Limit Set] to display the Upper Limit Setting Screen.
6-118 bizhub PRO C6500
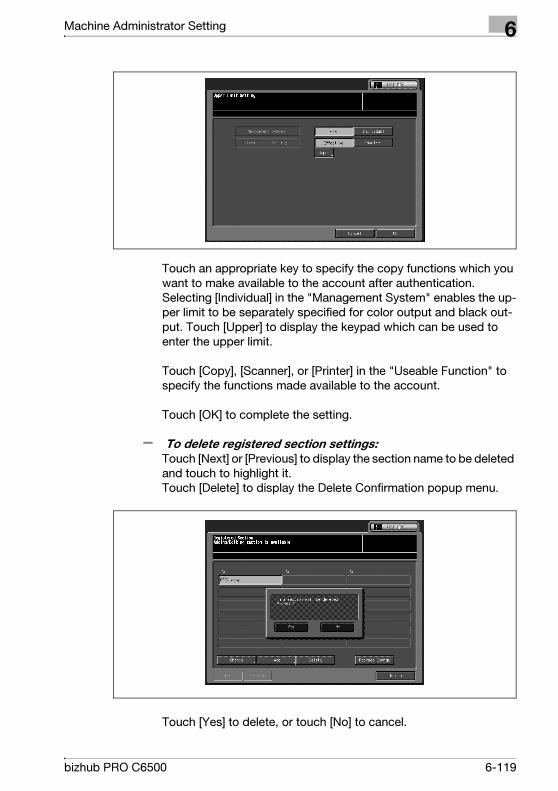
Machine Administrator Setting 6
Touch an appropriate key to specify the copy functions which you
want to make available to the account after authentication. Selecting [Individual] in the "Management System" enables the up-
per limit to be separately specified for color output and black out-
put. Touch [Upper] to display the keypad which can be used to
enter the upper limit. Touch [Copy], [Scanner], or [Printer] in the "Useable Function" to
specify the functions made available to the account. Touch [OK] to complete the setting.
– To delete registered section settings: Touch [Next] or [Previous] to display the section name to be deleted
and touch to highlight it. Touch [Delete] to display the Delete Confirmation popup menu.
Touch [Yes] to delete, or touch [No] to cancel.
bizhub PRO C6500 6-119
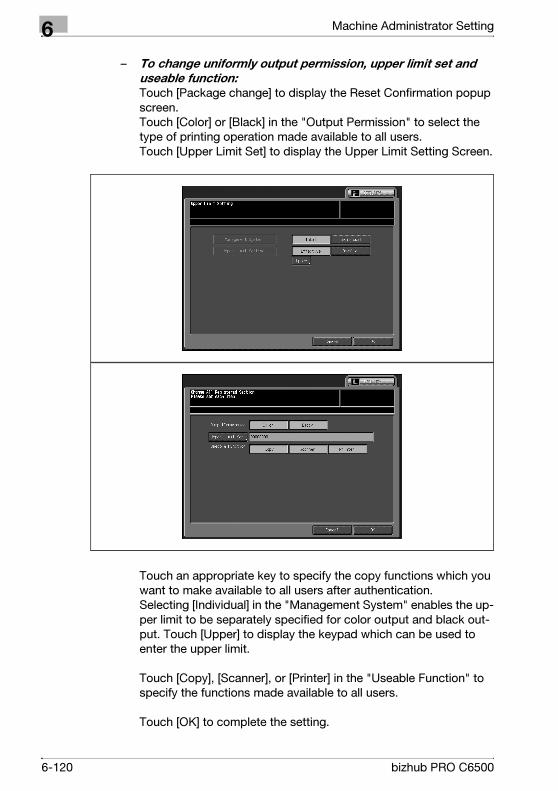
6 Machine Administrator Setting
– To change uniformly output permission, upper limit set and
useable function: Touch [Package change] to display the Reset Confirmation popup
screen. Touch [Color] or [Black] in the "Output Permission" to select the
type of printing operation made available to all users. Touch [Upper Limit Set] to display the Upper Limit Setting Screen.
Touch an appropriate key to specify the copy functions which you
want to make available to all users after authentication. Selecting [Individual] in the "Management System" enables the up-
per limit to be separately specified for color output and black out-
put. Touch [Upper] to display the keypad which can be used to
enter the upper limit. Touch [Copy], [Scanner], or [Printer] in the "Useable Function" to
specify the functions made available to all users. Touch [OK] to complete the setting.
6-120 bizhub PRO C6500
Machine Administrator Setting 6
4 Touch [Return] to restore the Machine Administrator Setting Menu
Screen.
5 If further changes are required, touch the desired key.
bizhub PRO C6500 6-121
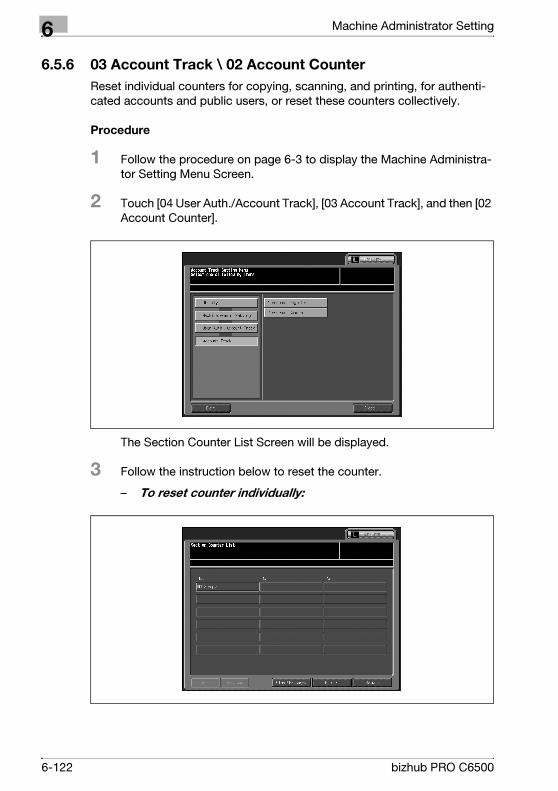
6 Machine Administrator Setting
6.5.6 03 Account Track \ 02 Account Counter
Reset individual counters for copying, scanning, and printing, for authenti-
cated accounts and public users, or reset these counters collectively.
Procedure
1 Follow the procedure on page 6-3 to display the Machine Administra-
tor Setting Menu Screen.
2 Touch [04 User Auth./Account Track], [03 Account Track], and then [02
Account Counter].
The Section Counter List Screen will be displayed.
3 Follow the instruction below to reset the counter.
– To reset counter individually:
6-122 bizhub PRO C6500
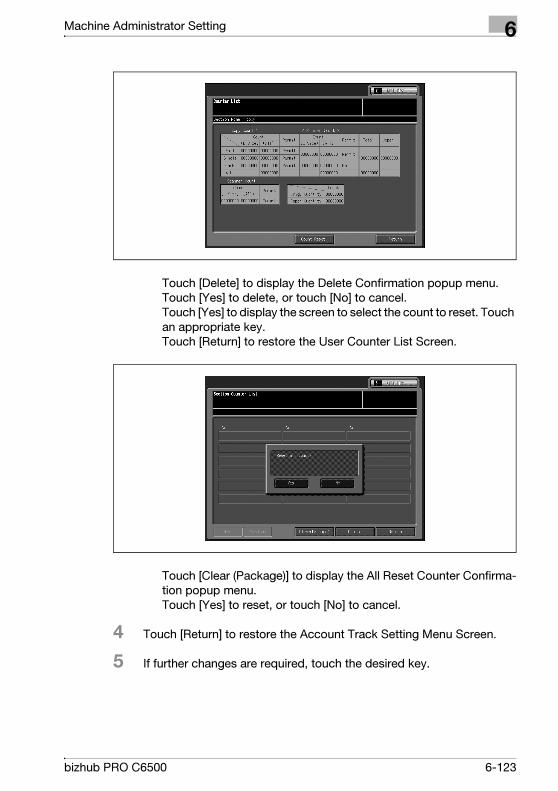
Machine Administrator Setting 6
Touch [Delete] to display the Delete Confirmation popup menu. Touch [Yes] to delete, or touch [No] to cancel. Touch [Yes] to display the screen to select the count to reset. Touch
an appropriate key. Touch [Return] to restore the User Counter List Screen.
Touch [Clear (Package)] to display the All Reset Counter Confirma-
tion popup menu. Touch [Yes] to reset, or touch [No] to cancel.
4 Touch [Return] to restore the Account Track Setting Menu Screen.
5 If further changes are required, touch the desired key.
bizhub PRO C6500 6-123
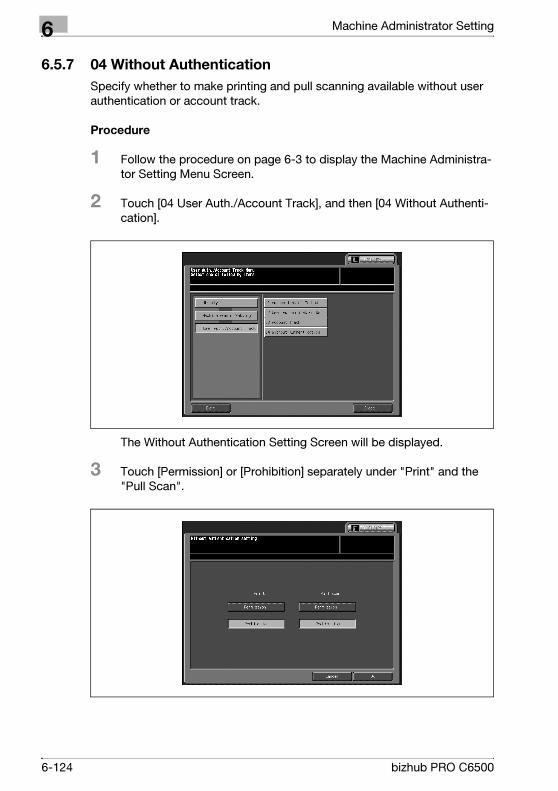
6 Machine Administrator Setting
6.5.7 04 Without Authentication
Specify whether to make printing and pull scanning available without user
authentication or account track.
Procedure
1 Follow the procedure on page 6-3 to display the Machine Administra-
tor Setting Menu Screen.
2 Touch [04 User Auth./Account Track], and then [04 Without Authenti-
cation].
The Without Authentication Setting Screen will be displayed.
3 Touch [Permission] or [Prohibition] separately under "Print" and the
"Pull Scan".
6-124 bizhub PRO C6500

Machine Administrator Setting 6
4 Touch [OK] to complete the setting.
– To cancel the change, touch [Cancel].
In either case, the User Auth./Account Track Setting Screen will be re-
stored.
5 If further changes are required, touch the desired key.
bizhub PRO C6500 6-125
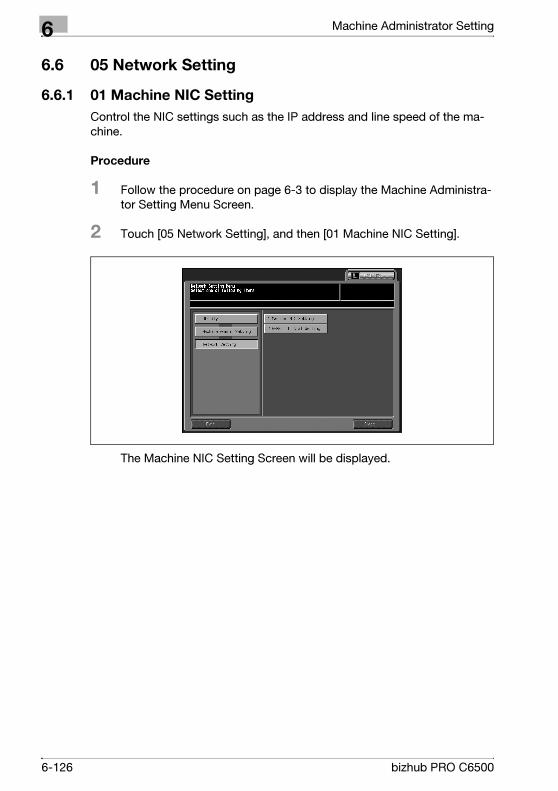
6 Machine Administrator Setting
6.6 05 Network Setting
6.6.1 01 Machine NIC Setting
Control the NIC settings such as the IP address and line speed of the ma-
chine.
Procedure
1 Follow the procedure on page 6-3 to display the Machine Administra-
tor Setting Menu Screen.
2 Touch [05 Network Setting], and then [01 Machine NIC Setting].
The Machine NIC Setting Screen will be displayed.
6-126 bizhub PRO C6500
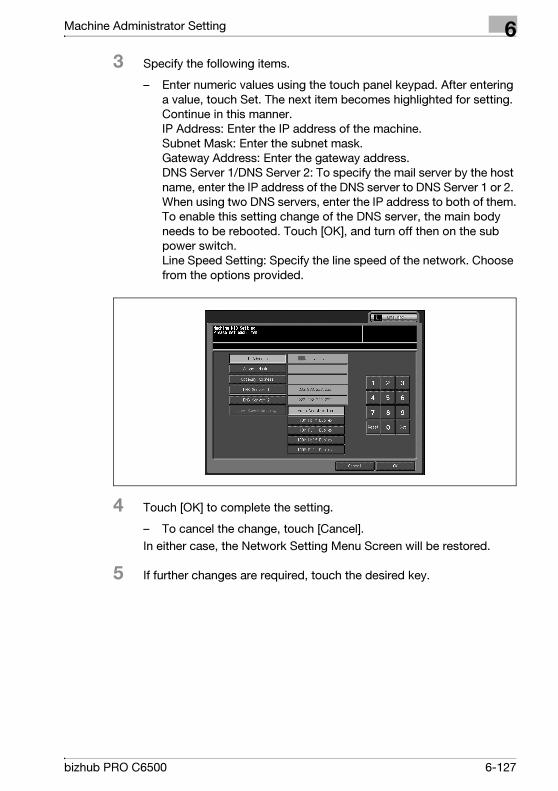
Machine Administrator Setting 6
3 Specify the following items.
– Enter numeric values using the touch panel keypad. After entering
a value, touch Set. The next item becomes highlighted for setting.
Continue in this manner. IP Address: Enter the IP address of the machine. Subnet Mask: Enter the subnet mask. Gateway Address: Enter the gateway address. DNS Server 1/DNS Server 2: To specify the mail server by the host
name, enter the IP address of the DNS server to DNS Server 1 or 2.
When using two DNS servers, enter the IP address to both of them. To enable this setting change of the DNS server, the main body
needs to be rebooted. Touch [OK], and turn off then on the sub
power switch. Line Speed Setting: Specify the line speed of the network. Choose
from the options provided.
4 Touch [OK] to complete the setting.
– To cancel the change, touch [Cancel].
In either case, the Network Setting Menu Screen will be restored.
5 If further changes are required, touch the desired key.
bizhub PRO C6500 6-127
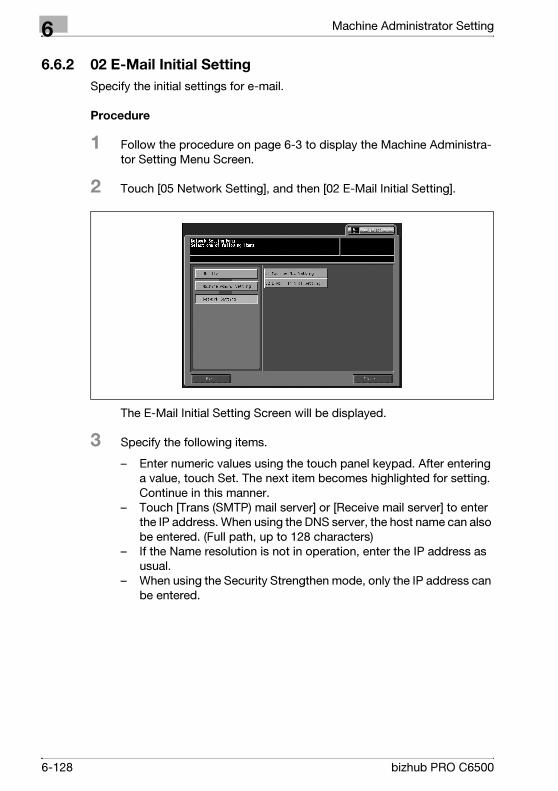
6 Machine Administrator Setting
6.6.2 02 E-Mail Initial Setting
Specify the initial settings for e-mail.
Procedure
1 Follow the procedure on page 6-3 to display the Machine Administra-
tor Setting Menu Screen.
2 Touch [05 Network Setting], and then [02 E-Mail Initial Setting].
The E-Mail Initial Setting Screen will be displayed.
3 Specify the following items.
– Enter numeric values using the touch panel keypad. After entering
a value, touch Set. The next item becomes highlighted for setting.
Continue in this manner.
– Touch [Trans (SMTP) mail server] or [Receive mail server] to enter
the IP address. When using the DNS server, the host name can also
be entered. (Full path, up to 128 characters)
– If the Name resolution is not in operation, enter the IP address as
usual.
– When using the Security Strengthen mode, only the IP address can
be entered.
6-128 bizhub PRO C6500
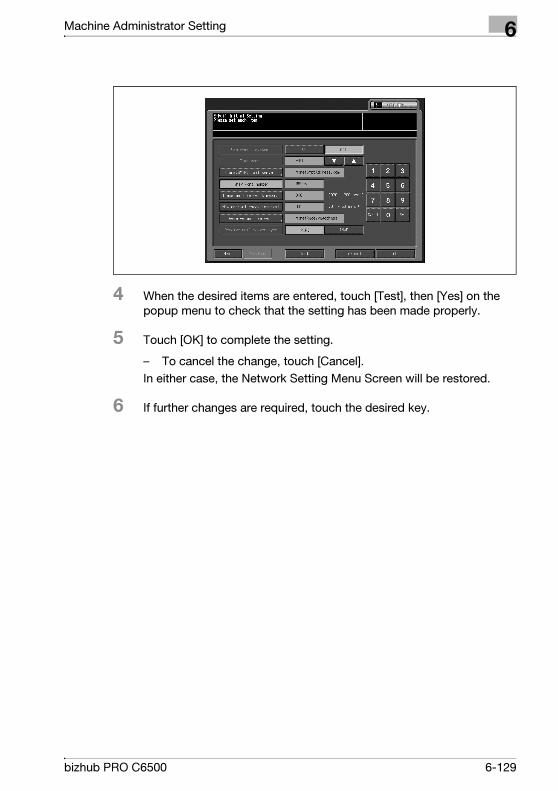
Machine Administrator Setting 6
4 When the desired items are entered, touch [Test], then [Yes] on the
popup menu to check that the setting has been made properly.
5 Touch [OK] to complete the setting.
– To cancel the change, touch [Cancel].
In either case, the Network Setting Menu Screen will be restored.
6 If further changes are required, touch the desired key.
bizhub PRO C6500 6-129
6 Machine Administrator Setting
6.7 06 Common Setting
The following features can be provided by switching the setting.
2
Note
This setting is equivalent to the setting specified in [03 Common Setting]
in the User Setting.
1SHOT indication time
Select the SHOT indication time to be displayed in the message area of the
touch panel, such as "Original size A4".
3 seconds/5 seconds
Job Offset Mode
Set the machine to offset the copies/printouts of different jobs.
On/Off
Continuation print
Set the machine to output multiple reserve jobs in succession.
Copy on/Copy off/Printer on/Printer off
STOP Key Function
Specify whether to pause or abort a job when [Stop] is pressed on the control
panel.
Job Temp. Stop/Job Stop Function
Side 2 Lens Adjustment mode
Specify whether to enable the lens adjustment mode.
On/Off
Tray Change Time
When selecting the tray which sets different paper type, specify the time
when it becomes the copy possible.
Short/Standard
6-130 bizhub PRO C6500
Machine Administrator Setting 6
Priority Paper Type
Select whether to maintain the Temperature which is suited for the coated
paper by turning the fixing unit roller.
Others/Coated Paper
Un-compressing mode
Specify when storing to HDD is not completed with memory overflow.
Off/On
Thick Paper BK Mode
Activate this mode to reduce horizontal imperfections in the print quality
which might appear when using thick paper in black and white printing (Black
mode).
Off/On
2
Note
Thick Paper BK Mode key is not display normally.
If the adjustment is provided, contact your service representative.
Printer Job Stacker Pile
Specify whether or not to allow paper from several printer jobs to pile up in
the large capacity stacker LS-501.
Permission/Prohibition
Procedure
1 Follow the procedure on page 6-3 to display the Machine Administra-
tor Setting Menu Screen.
bizhub PRO C6500 6-131
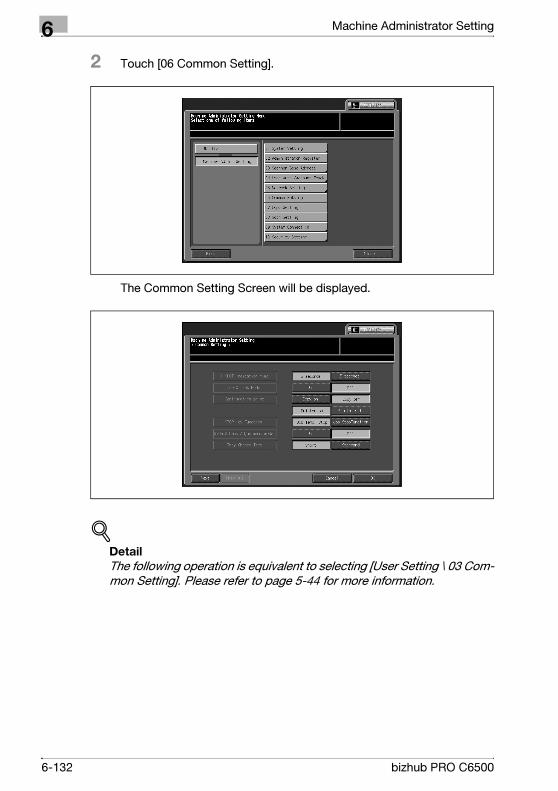
6 Machine Administrator Setting
2 Touch [06 Common Setting].
The Common Setting Screen will be displayed.
!Detail
The following operation is equivalent to selecting [User Setting \ 03 Com-
mon Setting]. Please refer to page 5-44 for more information.
6-132 bizhub PRO C6500
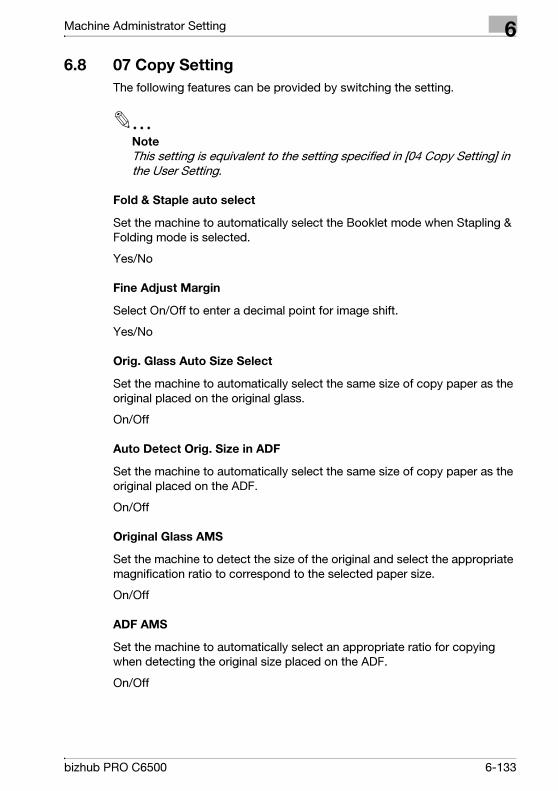
Machine Administrator Setting 6
6.8 07 Copy Setting
The following features can be provided by switching the setting.
2
Note
This setting is equivalent to the setting specified in [04 Copy Setting] in
the User Setting.
Fold & Staple auto select
Set the machine to automatically select the Booklet mode when Stapling &
Folding mode is selected.
Yes/No
Fine Adjust Margin
Select On/Off to enter a decimal point for image shift.
Yes/No
Orig. Glass Auto Size Select
Set the machine to automatically select the same size of copy paper as the
original placed on the original glass.
On/Off
Auto Detect Orig. Size in ADF
Set the machine to automatically select the same size of copy paper as the
original placed on the ADF.
On/Off
Original Glass AMS
Set the machine to detect the size of the original and select the appropriate
magnification ratio to correspond to the selected paper size.
On/Off
ADF AMS
Set the machine to automatically select an appropriate ratio for copying
when detecting the original size placed on the ADF.
On/Off
bizhub PRO C6500 6-133
6 Machine Administrator Setting
Non-Image Area Erase of orig
Specify the conditions to be applied to [Non-Image Area Erase of orig].
Yes/ APS/AMS /Except Orig. Glass (1:1)
ADF Frame Erase
Set to erase the frame when copying in ADF mode.
None/1mm/2mm/3mm/4mm/5mm
Rotation
When the trays contain only the paper size different from the original, rotate
the image of the original and adjust to fit into the copying paper size.
On-Always /APS/AMS /APS/AMS /Reduce
Suspend Interruption
Set the timing to interrupt the present job when pressing [Interrupt] while
copying.
Stop Immediately/When Current Comp.
Change Page Print Pos (Booklet)
Set the page number position when using Booklet with Page Numbering in
Stamp.
Off/On (Outside Print)
Printer Prohibit Timer
Select the interval time that printing via PC is prohibited after touching the
touch keys.
Off/15 seconds/30 seconds/60 seconds/90 seconds
Bookmark function
Specify whether to delete the set bookmark or not, or select to disable the
bookmark function.
Off/Release Every Job/Not release
Orig./Out Bind Direction Set
Set the machine to conform the binding direction of the originals and printed
sets each other.
On/Off
6-134 bizhub PRO C6500
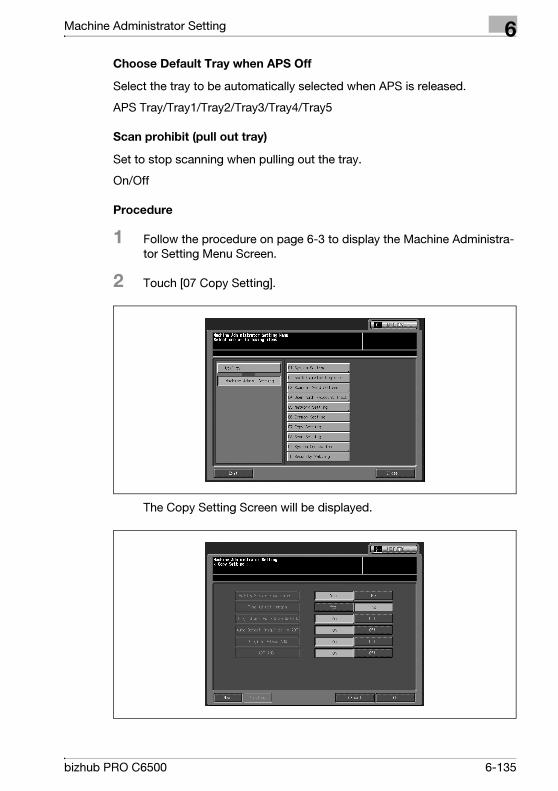
Machine Administrator Setting 6
Choose Default Tray when APS Off
Select the tray to be automatically selected when APS is released.
APS Tray/Tray1/Tray2/Tray3/Tray4/Tray5
Scan prohibit (pull out tray)
Set to stop scanning when pulling out the tray.
On/Off
Procedure
1 Follow the procedure on page 6-3 to display the Machine Administra-
tor Setting Menu Screen.
2 Touch [07 Copy Setting].
The Copy Setting Screen will be displayed.
bizhub PRO C6500 6-135
6 Machine Administrator Setting
!Detail
The following operation is equivalent to selecting [User Setting \ 04 Copy
Setting]. Please refer to page 5-47 for more information.
6-136 bizhub PRO C6500
Machine Administrator Setting 6
6.9 08 Scan Setting
The following features can be provided by switching the setting.
2
Note
This setting is equivalent to the setting specified in [05 Scan Setting] in
the User Setting.
File Form Default E-Mail
Select the default file form when transmitting in E-Mail.
Packaged TIFF/Divided TIFF/Packaged PDF/JPEG
File Form Default FTP
Select the default file form when transmitting to FTP.
Packaged TIFF/Divided TIFF/Packaged PDF/JPEG
File Form Default SMB
Select the default file form when transmitting in SMB.
Packaged TIFF/Divided TIFF/Packaged PDF/JPEG
Default Address
Select the default destination to be displayed when selecting the Scanner
Screen.
E-Mail/HDD/FTP/SMB/QUEUE
Compress Method Color/Gray
Select the default destination to be displayed when selecting the Scanner
Screen.
High Compress/Standard/Low Compress
bizhub PRO C6500 6-137
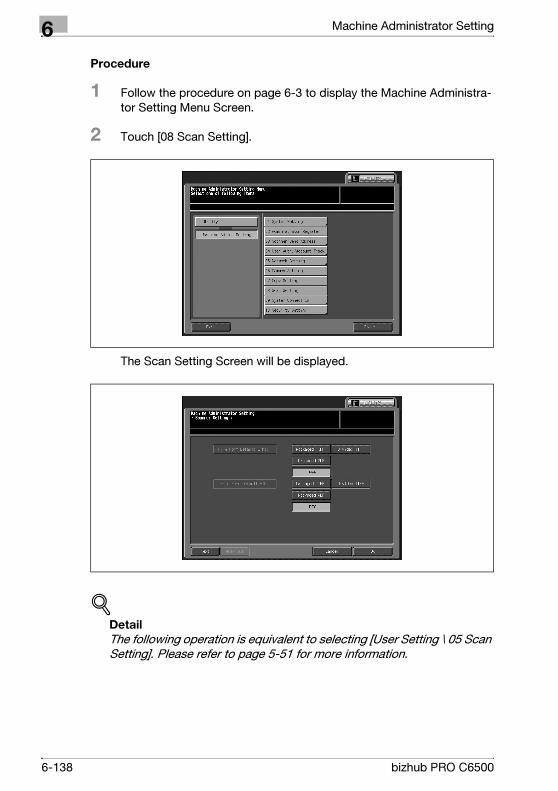
6 Machine Administrator Setting
Procedure
1 Follow the procedure on page 6-3 to display the Machine Administra-
tor Setting Menu Screen.
2 Touch [08 Scan Setting].
The Scan Setting Screen will be displayed.
!Detail
The following operation is equivalent to selecting [User Setting \ 05 Scan
Setting]. Please refer to page 5-51 for more information.
6-138 bizhub PRO C6500
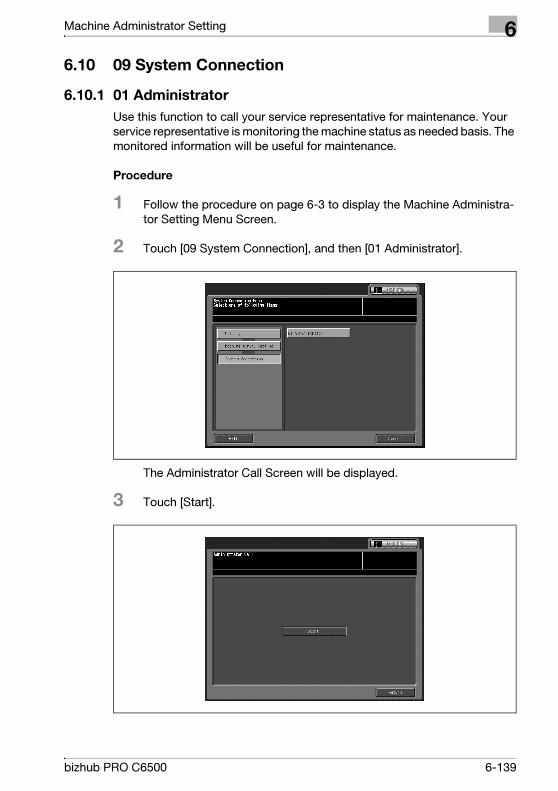
Machine Administrator Setting 6
6.10 09 System Connection
6.10.1 01 Administrator
Use this function to call your service representative for maintenance. Your
service representative is monitoring the machine status as needed basis. The
monitored information will be useful for maintenance.
Procedure
1 Follow the procedure on page 6-3 to display the Machine Administra-
tor Setting Menu Screen.
2 Touch [09 System Connection], and then [01 Administrator].
The Administrator Call Screen will be displayed.
3 Touch [Start].
bizhub PRO C6500 6-139
6 Machine Administrator Setting
4 Touch [Return] to restore the System Connection Menu Screen.
5 If further changes are required, touch the desired key.
6-140 bizhub PRO C6500
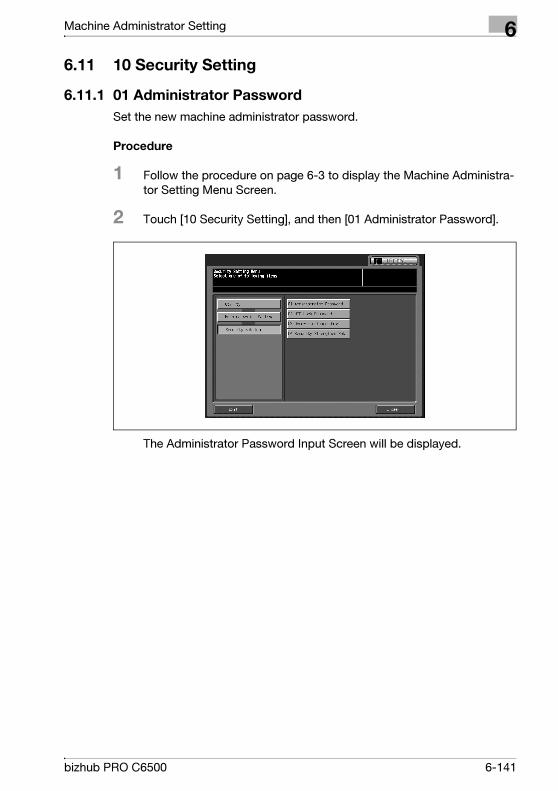
Machine Administrator Setting 6
6.11 10 Security Setting
6.11.1 01 Administrator Password
Set the new machine administrator password.
Procedure
1 Follow the procedure on page 6-3 to display the Machine Administra-
tor Setting Menu Screen.
2 Touch [10 Security Setting], and then [01 Administrator Password].
The Administrator Password Input Screen will be displayed.
bizhub PRO C6500 6-141
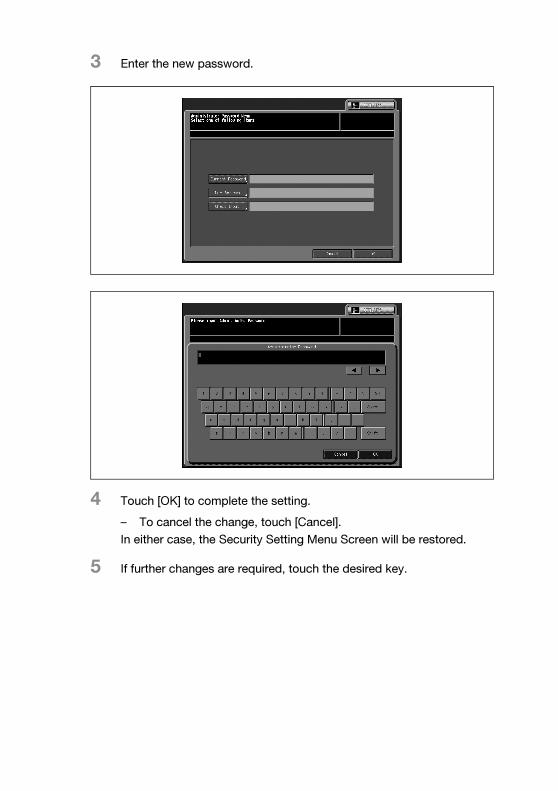
3 Enter the new password.
4 Touch [OK] to complete the setting.
– To cancel the change, touch [Cancel].
In either case, the Security Setting Menu Screen will be restored.
5 If further changes are required, touch the desired key.
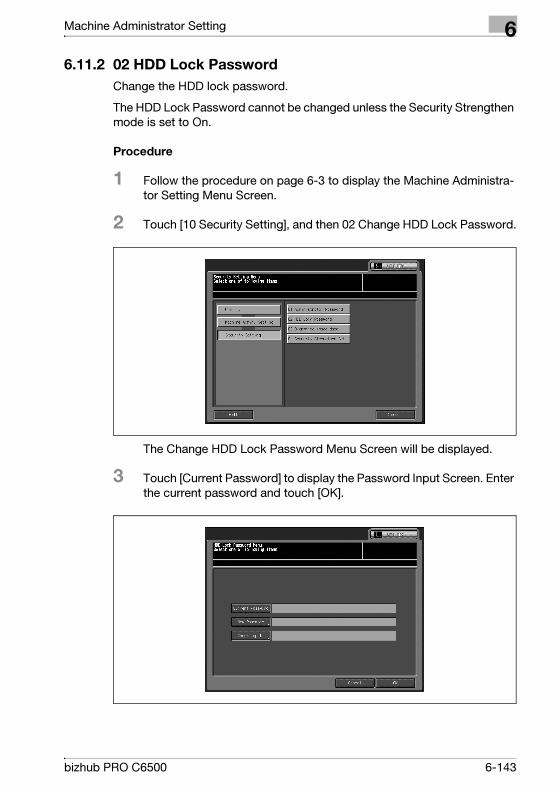
Machine Administrator Setting 6
6.11.2 02 HDD Lock Password
Change the HDD lock password.
The HDD Lock Password cannot be changed unless the Security Strengthen
mode is set to On.
Procedure
1 Follow the procedure on page 6-3 to display the Machine Administra-
tor Setting Menu Screen.
2 Touch [10 Security Setting], and then 02 Change HDD Lock Password.
The Change HDD Lock Password Menu Screen will be displayed.
3 Touch [Current Password] to display the Password Input Screen. Enter
the current password and touch [OK].
bizhub PRO C6500 6-143
6 Machine Administrator Setting
4 Touch [New Password] to display the Password Input Screen. Enter
the new password and touch [OK].
– Touch [Check Input] to enter the same new password, then touch
[OK].
5 Touch [OK] to complete the setting.
– To cancel the change, touch [Cancel].
In either case, the Security Setting Menu Screen will be restored.
6 If further changes are required, touch the desired key.
6-144 bizhub PRO C6500
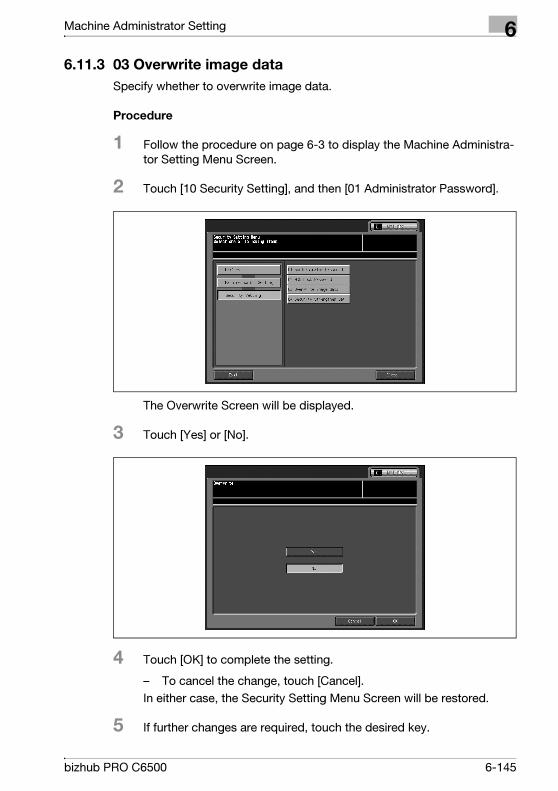
Machine Administrator Setting 6
6.11.3 03 Overwrite image data
Specify whether to overwrite image data.
Procedure
1 Follow the procedure on page 6-3 to display the Machine Administra-
tor Setting Menu Screen.
2 Touch [10 Security Setting], and then [01 Administrator Password].
The Overwrite Screen will be displayed.
3 Touch [Yes] or [No].
4 Touch [OK] to complete the setting.
– To cancel the change, touch [Cancel].
In either case, the Security Setting Menu Screen will be restored.
5 If further changes are required, touch the desired key.
bizhub PRO C6500 6-145
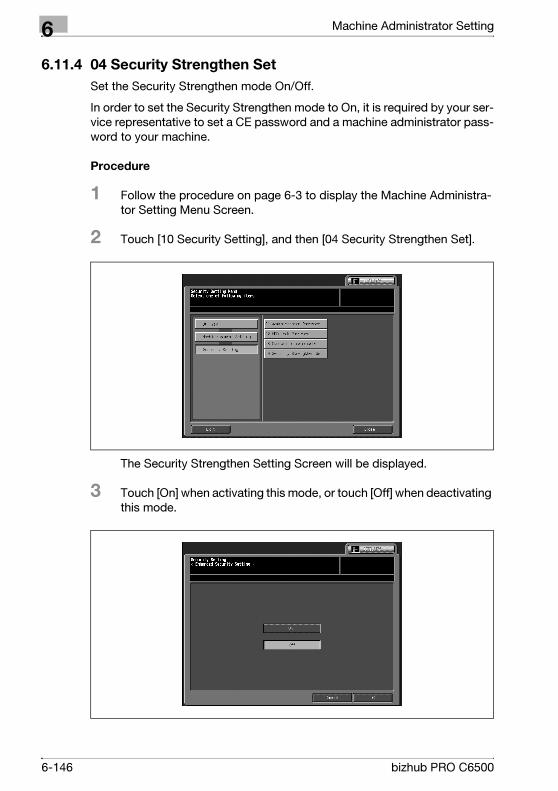
6 Machine Administrator Setting
6.11.4 04 Security Strengthen Set
Set the Security Strengthen mode On/Off.
In order to set the Security Strengthen mode to On, it is required by your ser-
vice representative to set a CE password and a machine administrator pass-
word to your machine.
Procedure
1 Follow the procedure on page 6-3 to display the Machine Administra-
tor Setting Menu Screen.
2 Touch [10 Security Setting], and then [04 Security Strengthen Set].
The Security Strengthen Setting Screen will be displayed.
3 Touch [On] when activating this mode, or touch [Off] when deactivating
this mode.
6-146 bizhub PRO C6500
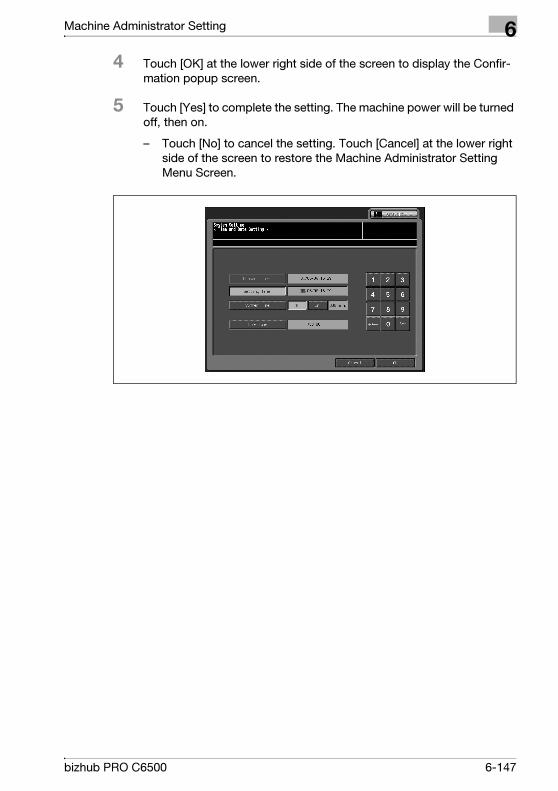
Machine Administrator Setting 6
4 Touch [OK] at the lower right side of the screen to display the Confir-
mation popup screen.
5 Touch [Yes] to complete the setting. The machine power will be turned
off, then on.
– Touch [No] to cancel the setting. Touch [Cancel] at the lower right
side of the screen to restore the Machine Administrator Setting
Menu Screen.
bizhub PRO C6500 6-147

6 Machine Administrator Setting
6-148 bizhub PRO C6500
7 Touch Screen
Adjustment

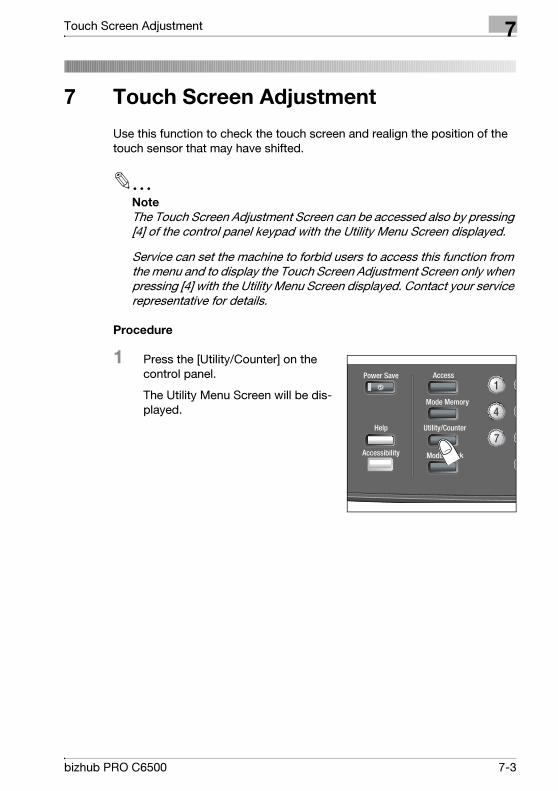
Touch Screen Adjustment 7
7 Touch Screen Adjustment
Use this function to check the touch screen and realign the position of the
touch sensor that may have shifted.
2
Note
The Touch Screen Adjustment Screen can be accessed also by pressing
[4] of the control panel keypad with the Utility Menu Screen displayed.
Service can set the machine to forbid users to access this function from
the menu and to display the Touch Screen Adjustment Screen only when
pressing [4] with the Utility Menu Screen displayed. Contact your service
representative for details.
Procedure
1 Press the [Utility/Counter] on the
control panel.
The Utility Menu Screen will be dis-
played.
bizhub PRO C6500 7-3
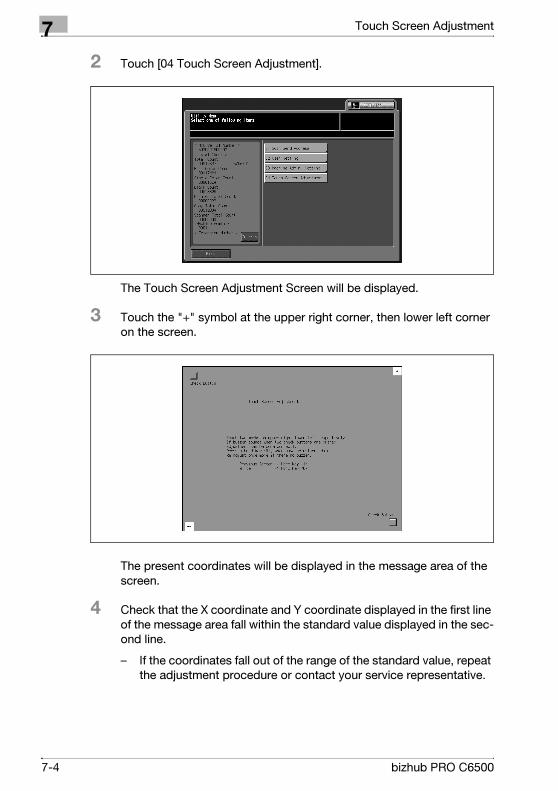
7 Touch Screen Adjustment
2 Touch [04 Touch Screen Adjustment].
The Touch Screen Adjustment Screen will be displayed.
3 Touch the "+" symbol at the upper right corner, then lower left corner
on the screen.
The present coordinates will be displayed in the message area of the
screen.
4 Check that the X coordinate and Y coordinate displayed in the first line
of the message area fall within the standard value displayed in the sec-
ond line.
– If the coordinates fall out of the range of the standard value, repeat
the adjustment procedure or contact your service representative.
7-4 bizhub PRO C6500
Touch Screen Adjustment 7
5 Touch each Check Button at the upper left and lower right corners on
the screen to check if the buzzer tone functions normally.
– If the buzzer tone does not sound, repeat the adjustment procedure
or contact your service representative.
6 Press [0] on the control panel keypad to complete the setting.
– To cancel the change, press [1] on the control panel keypad.
In either case, the Utility Menu Screen will be restored.
bizhub PRO C6500 7-5


8 Web Utilities Setting

Web Utilities Setting 8
8 Web Utilities Setting
8.1 Web Utilities Outlines
When the machine is connected with a PC over a network, the web browser
activated on the PC provides the following functions.
1. Volume Track Setting Make the account track settings concerning the administrator setting us-
ing the web browser on a PC.
2. Remote Panel Setting Make the remote panel settings to control using the web browser on a
PC.
3. Scan transmission setting Register the address for the transmission of the scanned image data
concerning the administrator using the web browser. (Available when the
machine is mounted with the optional printer controller.)
4. Setting Data Import/Export Transmit the setting data from the machine to a PC (export) using the web
browser, then return the data to the machine (import).
Prerequisites
- Browser: Internet Explorer 6.02 / Netscape Navigator 7.1 / FireFox1.0 or
later
- Contact your network manager for details on the network system, the IP
address or host name of the machine.
- The user name "admin" (for accessing to the Administrator Setting Menu)
cannot be changed. Enter the administrator password previously specified on the machine.
12345678 is initially applied. Once entered, the user name and password are not necessary to be re-
entered unless the web browser is restarted.
bizhub PRO C6500 8-3
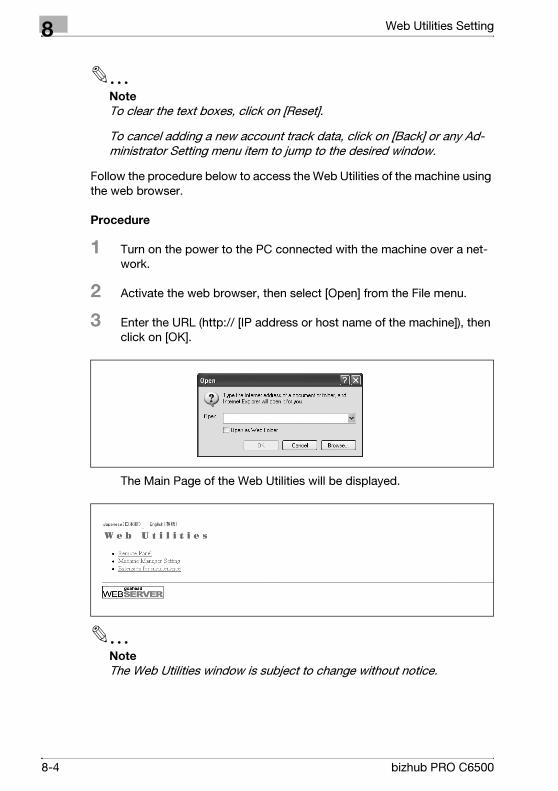
8 Web Utilities Setting
2
Note
To clear the text boxes, click on [Reset].
To cancel adding a new account track data, click on [Back] or any Ad-
ministrator Setting menu item to jump to the desired window.
Follow the procedure below to access the Web Utilities of the machine using
the web browser.
Procedure
1 Turn on the power to the PC connected with the machine over a net-
work.
2 Activate the web browser, then select [Open] from the File menu.
3 Enter the URL (http:// [IP address or host name of the machine]), then
click on [OK].
The Main Page of the Web Utilities will be displayed.
2
Note
The Web Utilities window is subject to change without notice.
8-4 bizhub PRO C6500
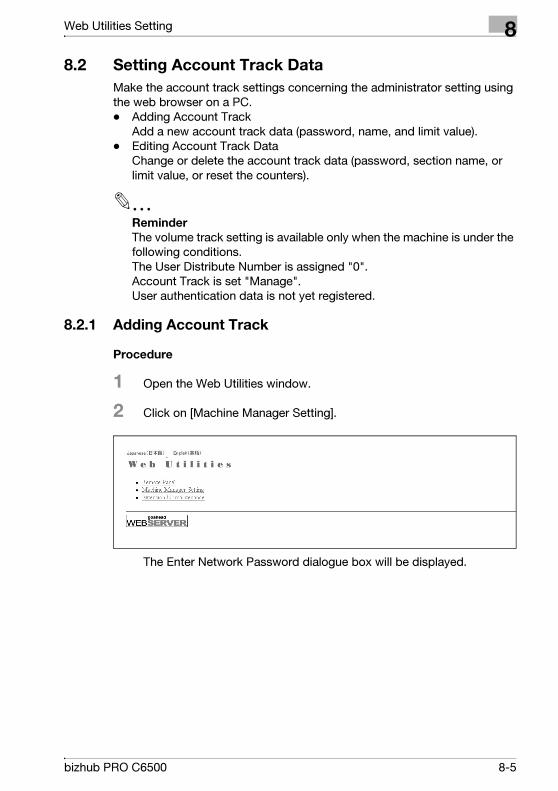
Web Utilities Setting 8
8.2 Setting Account Track Data
Make the account track settings concerning the administrator setting using
the web browser on a PC.
- Adding Account Track Add a new account track data (password, name, and limit value).
- Editing Account Track Data Change or delete the account track data (password, section name, or
limit value, or reset the counters).
2
Reminder
The volume track setting is available only when the machine is under the
following conditions. The User Distribute Number is assigned "0". Account Track is set "Manage". User authentication data is not yet registered.
8.2.1 Adding Account Track
Procedure
1 Open the Web Utilities window.
2 Click on [Machine Manager Setting].
The Enter Network Password dialogue box will be displayed.
bizhub PRO C6500 8-5
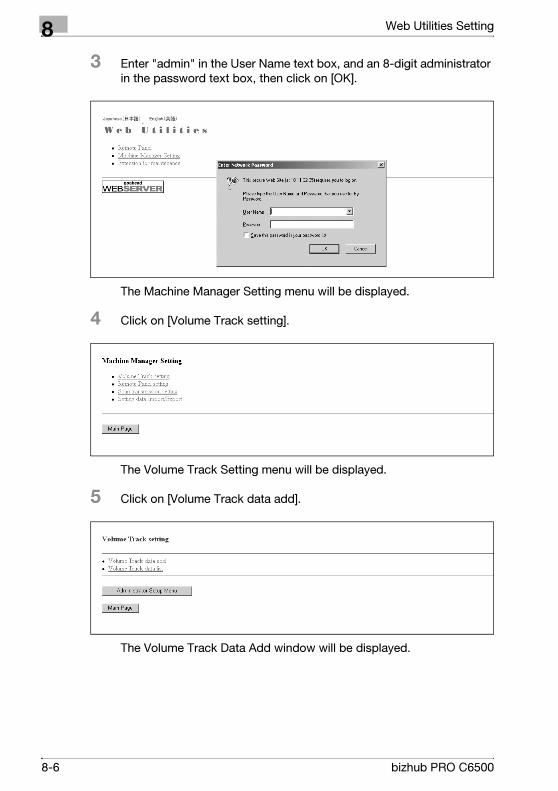
8 Web Utilities Setting
3 Enter "admin" in the User Name text box, and an 8-digit administrator
in the password text box, then click on [OK].
The Machine Manager Setting menu will be displayed.
4 Click on [Volume Track setting].
The Volume Track Setting menu will be displayed.
5 Click on [Volume Track data add].
The Volume Track Data Add window will be displayed.
8-6 bizhub PRO C6500
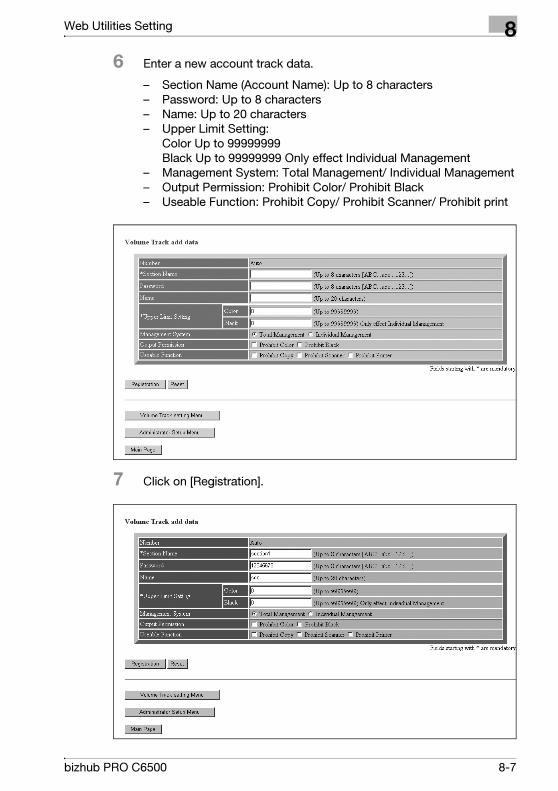
Web Utilities Setting 8
6 Enter a new account track data.
– Section Name (Account Name): Up to 8 characters
– Password: Up to 8 characters
– Name: Up to 20 characters
– Upper Limit Setting: Color Up to 99999999 Black Up to 99999999 Only effect Individual Management
– Management System: Total Management/ Individual Management
– Output Permission: Prohibit Color/ Prohibit Black
– Useable Function: Prohibit Copy/ Prohibit Scanner/ Prohibit print
7 Click on [Registration].
bizhub PRO C6500 8-7
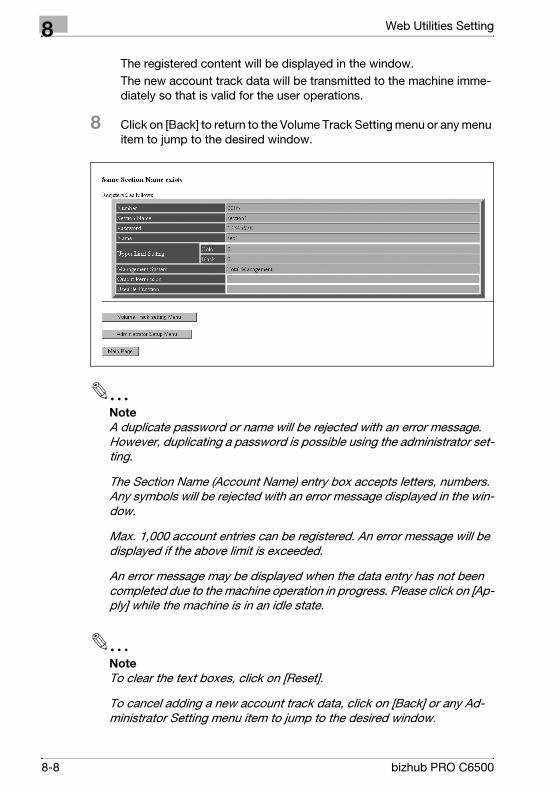
8 Web Utilities Setting
The registered content will be displayed in the window.
The new account track data will be transmitted to the machine imme-
diately so that is valid for the user operations.
8 Click on [Back] to return to the Volume Track Setting menu or any menu
item to jump to the desired window.
2
Note
A duplicate password or name will be rejected with an error message.
However, duplicating a password is possible using the administrator set-
ting.
The Section Name (Account Name) entry box accepts letters, numbers.
Any symbols will be rejected with an error message displayed in the win-
dow.
Max. 1,000 account entries can be registered. An error message will be
displayed if the above limit is exceeded.
An error message may be displayed when the data entry has not been
completed due to the machine operation in progress. Please click on [Ap-
ply] while the machine is in an idle state.
2
Note
To clear the text boxes, click on [Reset].
To cancel adding a new account track data, click on [Back] or any Ad-
ministrator Setting menu item to jump to the desired window.
8-8 bizhub PRO C6500

Web Utilities Setting 8
8.2.2 Editing Account Track Data
Procedure
1 Open the Web Utilities window.
2 Click on [Machine Manager Setting].
The Enter Network Password dialogue box will be displayed.
3 Enter "admin" in the User Name text box, and an 8-digit administrator
password in the password text box, then click on [OK].
The Machine Manager Setting menu will be displayed.
4 Click on [Volume Track setting].
The Volume Track Setting menu will be displayed.
bizhub PRO C6500 8-9
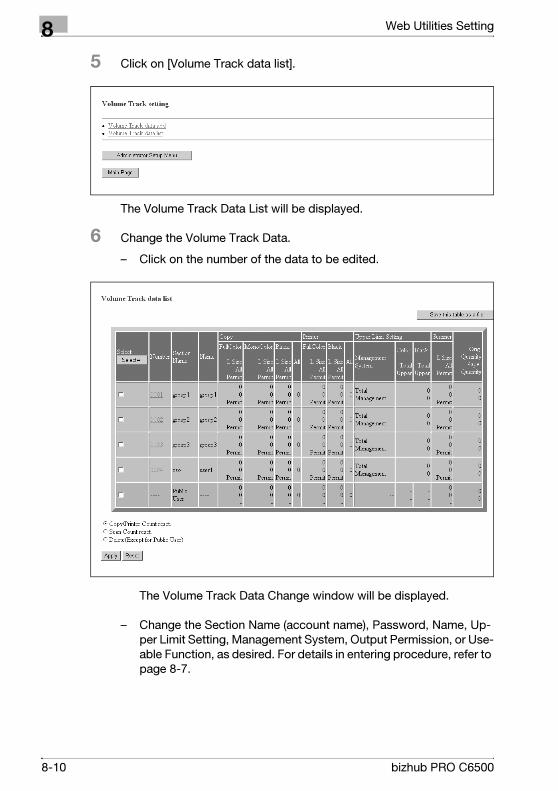
8 Web Utilities Setting
5 Click on [Volume Track data list].
The Volume Track Data List will be displayed.
6 Change the Volume Track Data.
– Click on the number of the data to be edited.
The Volume Track Data Change window will be displayed.
– Change the Section Name (account name), Password, Name, Up-
per Limit Setting, Management System, Output Permission, or Use-
able Function, as desired. For details in entering procedure, refer to
page 8-7.
8-10 bizhub PRO C6500
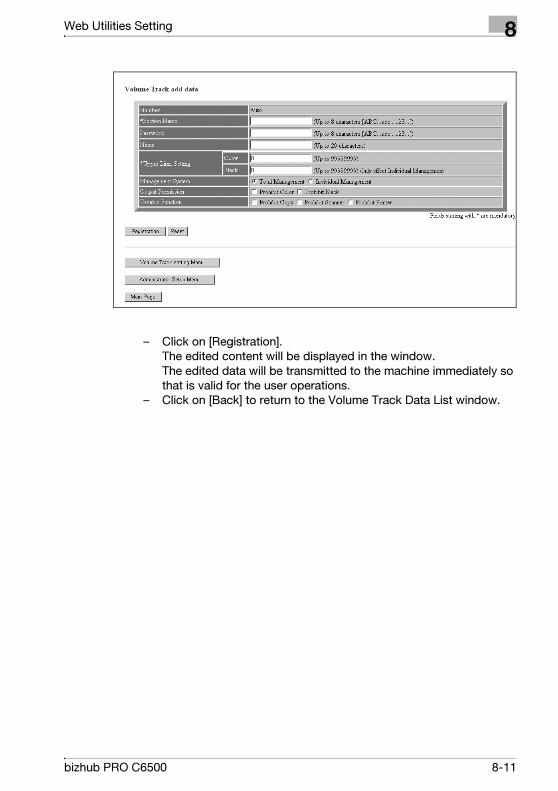
Web Utilities Setting 8
– Click on [Registration]. The edited content will be displayed in the window. The edited data will be transmitted to the machine immediately so
that is valid for the user operations.
– Click on [Back] to return to the Volume Track Data List window.
bizhub PRO C6500 8-11
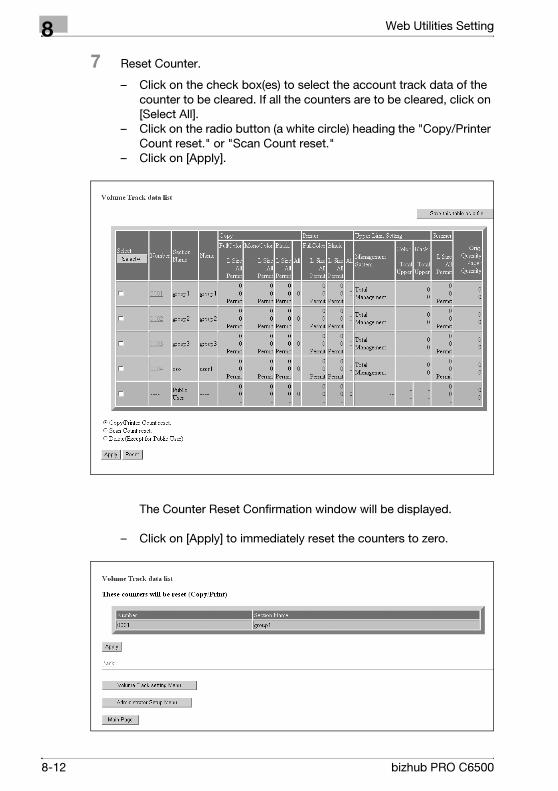
8 Web Utilities Setting
7 Reset Counter.
– Click on the check box(es) to select the account track data of the
counter to be cleared. If all the counters are to be cleared, click on
[Select All].
– Click on the radio button (a white circle) heading the "Copy/Printer
Count reset." or "Scan Count reset."
– Click on [Apply].
The Counter Reset Confirmation window will be displayed.
– Click on [Apply] to immediately reset the counters to zero.
8-12 bizhub PRO C6500
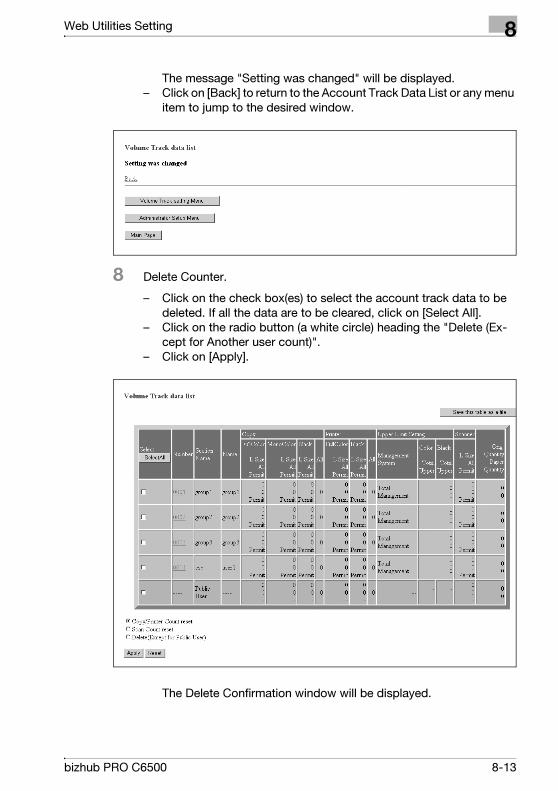
Web Utilities Setting 8
The message "Setting was changed" will be displayed.
– Click on [Back] to return to the Account Track Data List or any menu
item to jump to the desired window.
8 Delete Counter.
– Click on the check box(es) to select the account track data to be
deleted. If all the data are to be cleared, click on [Select All].
– Click on the radio button (a white circle) heading the "Delete (Ex-
cept for Another user count)".
– Click on [Apply].
The Delete Confirmation window will be displayed.
bizhub PRO C6500 8-13
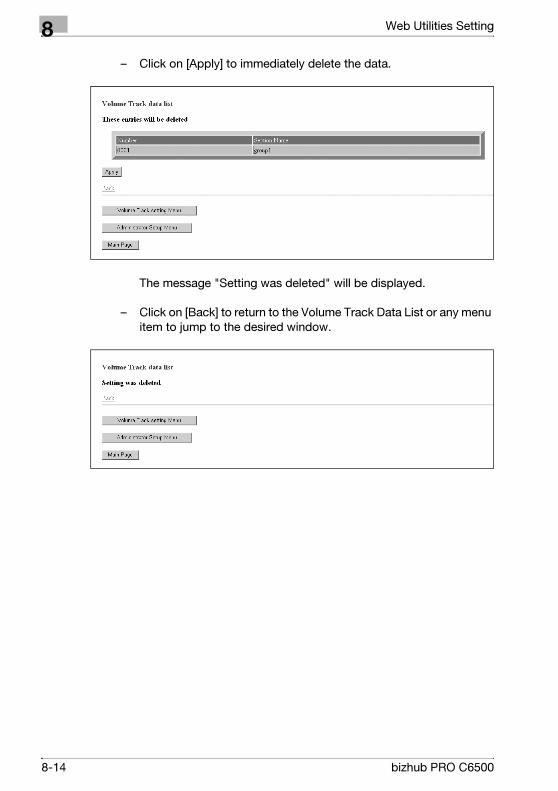
8 Web Utilities Setting
– Click on [Apply] to immediately delete the data.
The message "Setting was deleted" will be displayed.
– Click on [Back] to return to the Volume Track Data List or any menu
item to jump to the desired window.
8-14 bizhub PRO C6500
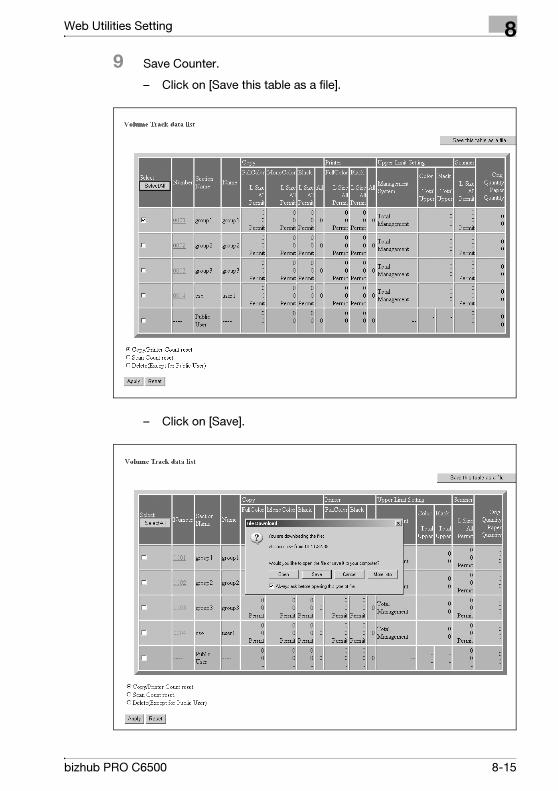
Web Utilities Setting 8
9 Save Counter.
– Click on [Save this table as a file].
– Click on [Save].
bizhub PRO C6500 8-15
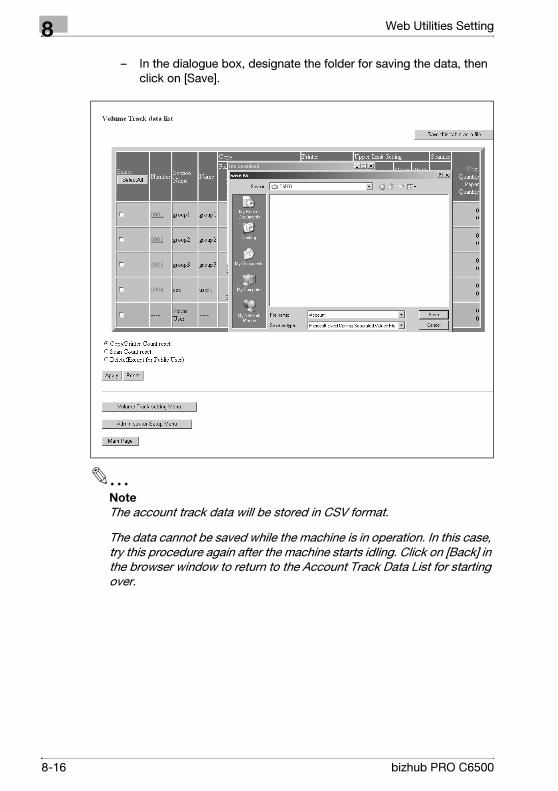
8 Web Utilities Setting
– In the dialogue box, designate the folder for saving the data, then
click on [Save].
2
Note
The account track data will be stored in CSV format.
The data cannot be saved while the machine is in operation. In this case,
try this procedure again after the machine starts idling. Click on [Back] in
the browser window to return to the Account Track Data List for starting
over.
8-16 bizhub PRO C6500
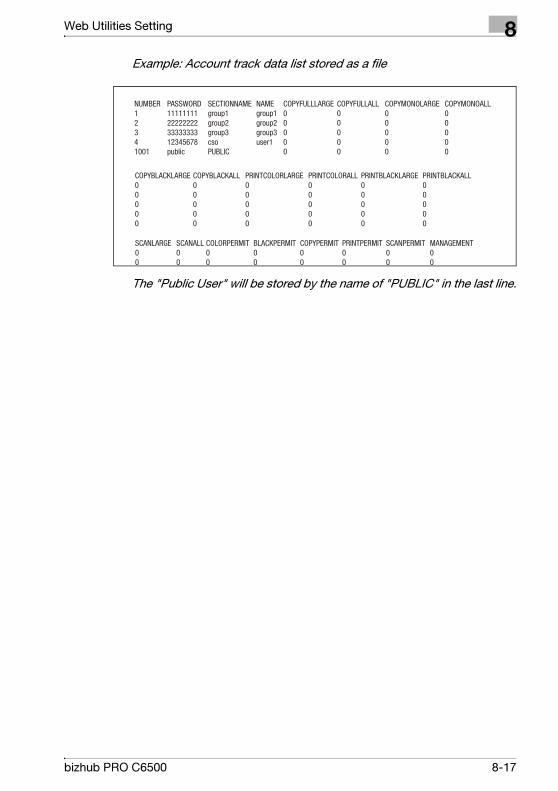
Web Utilities Setting 8
Example: Account track data list stored as a file
The "Public User" will be stored by the name of "PUBLIC" in the last line.
bizhub PRO C6500 8-17
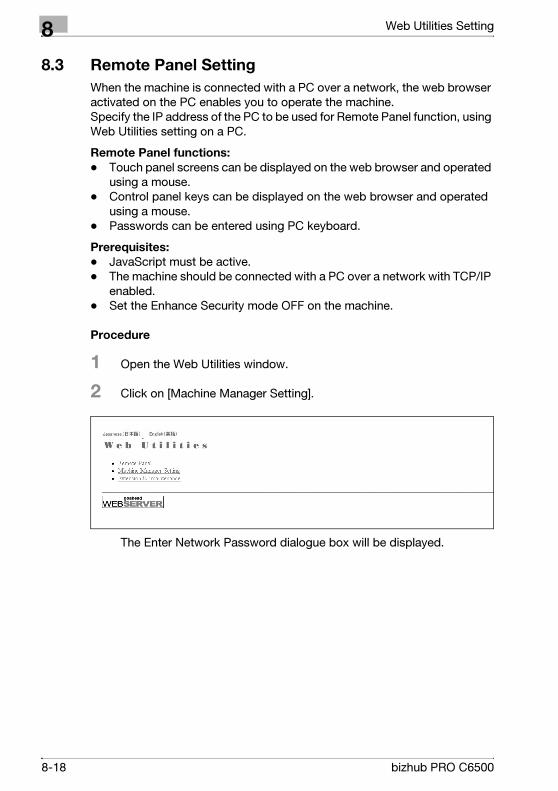
8 Web Utilities Setting
8.3 Remote Panel Setting
When the machine is connected with a PC over a network, the web browser
activated on the PC enables you to operate the machine. Specify the IP address of the PC to be used for Remote Panel function, using
Web Utilities setting on a PC.
Remote Panel functions:
- Touch panel screens can be displayed on the web browser and operated
using a mouse.
- Control panel keys can be displayed on the web browser and operated
using a mouse.
- Passwords can be entered using PC keyboard.
Prerequisites:
- JavaScript must be active.
- The machine should be connected with a PC over a network with TCP/IP
enabled.
- Set the Enhance Security mode OFF on the machine.
Procedure
1 Open the Web Utilities window.
2 Click on [Machine Manager Setting].
The Enter Network Password dialogue box will be displayed.
8-18 bizhub PRO C6500
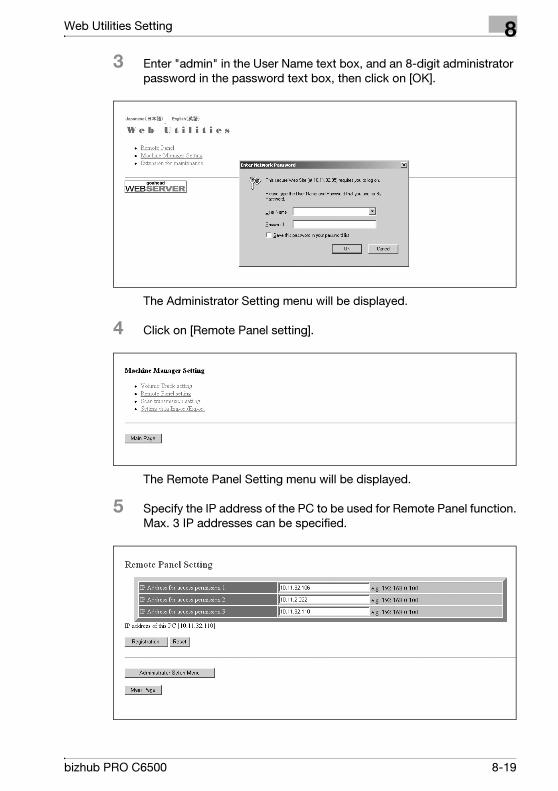
Web Utilities Setting 8
3 Enter "admin" in the User Name text box, and an 8-digit administrator
password in the password text box, then click on [OK].
The Administrator Setting menu will be displayed.
4 Click on [Remote Panel setting].
The Remote Panel Setting menu will be displayed.
5 Specify the IP address of the PC to be used for Remote Panel function. Max. 3 IP addresses can be specified.
bizhub PRO C6500 8-19
8 Web Utilities Setting
6 Click on [Registration]. The IP address will be applied to the machine immediately so that is
valid for the user operations.
7 Click on [Administrator Setup Menu] to restore the Administrator Set-
ting menu.
8-20 bizhub PRO C6500
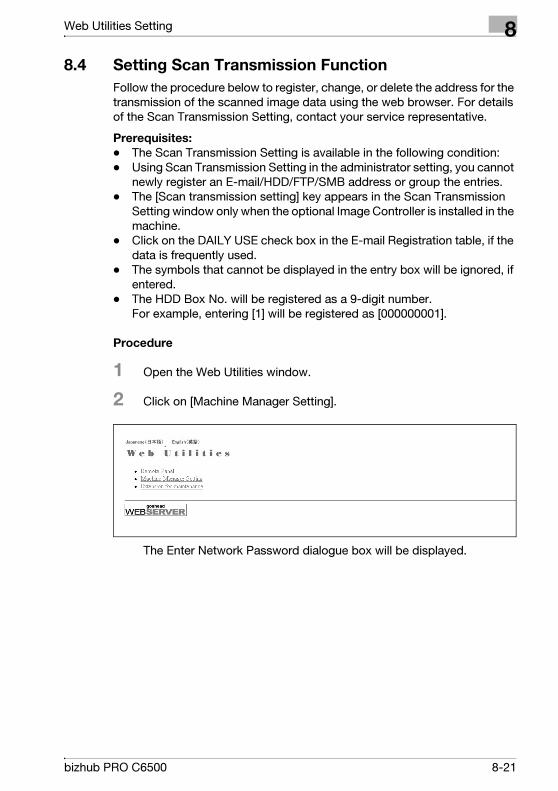
Web Utilities Setting 8
8.4 Setting Scan Transmission Function
Follow the procedure below to register, change, or delete the address for the
transmission of the scanned image data using the web browser. For details
of the Scan Transmission Setting, contact your service representative.
Prerequisites:
- The Scan Transmission Setting is available in the following condition:
- Using Scan Transmission Setting in the administrator setting, you cannot
newly register an E-mail/HDD/FTP/SMB address or group the entries.
- The [Scan transmission setting] key appears in the Scan Transmission
Setting window only when the optional Image Controller is installed in the
machine.
- Click on the DAILY USE check box in the E-mail Registration table, if the
data is frequently used.
- The symbols that cannot be displayed in the entry box will be ignored, if
entered.
- The HDD Box No. will be registered as a 9-digit number. For example, entering [1] will be registered as [000000001].
Procedure
1 Open the Web Utilities window.
2 Click on [Machine Manager Setting].
The Enter Network Password dialogue box will be displayed.
bizhub PRO C6500 8-21
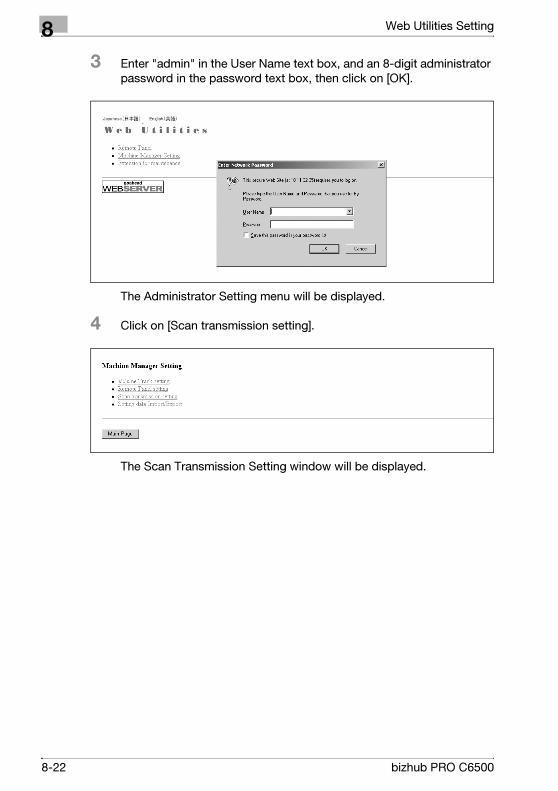
8 Web Utilities Setting
3 Enter "admin" in the User Name text box, and an 8-digit administrator
password in the password text box, then click on [OK].
The Administrator Setting menu will be displayed.
4 Click on [Scan transmission setting].
The Scan Transmission Setting window will be displayed.
8-22 bizhub PRO C6500
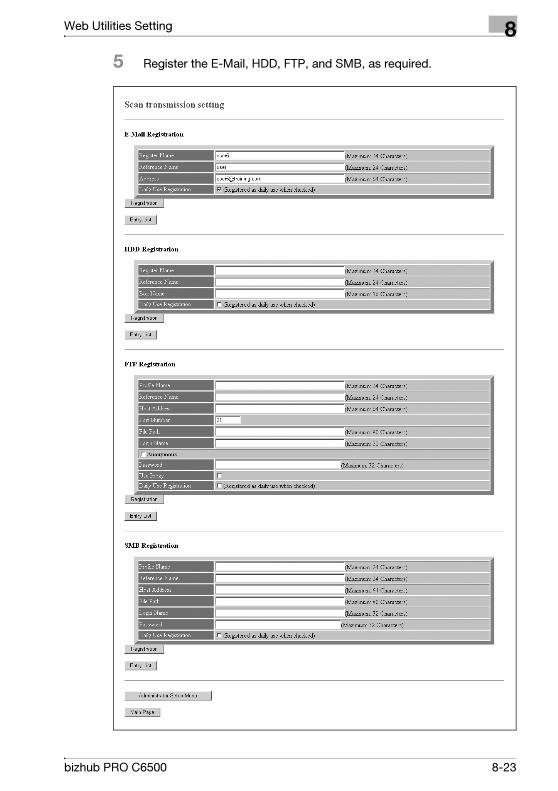
Web Utilities Setting 8
5 Register the E-Mail, HDD, FTP, and SMB, as required.
bizhub PRO C6500 8-23
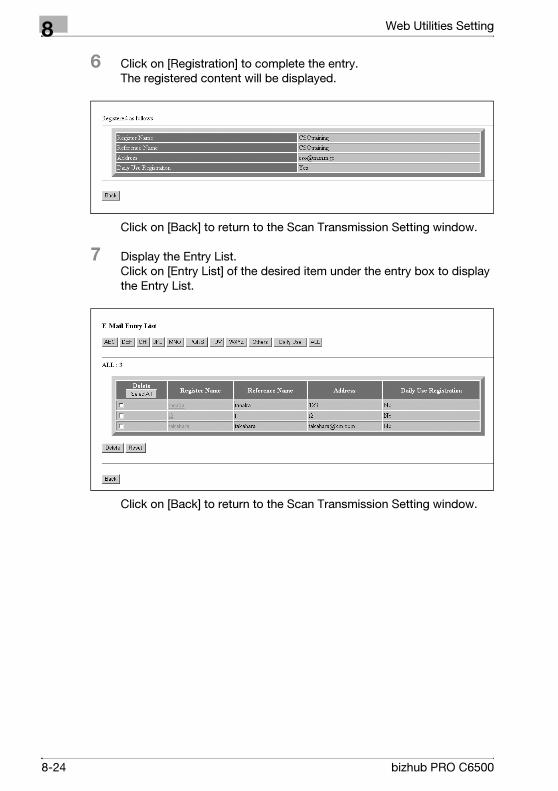
8 Web Utilities Setting
6 Click on [Registration] to complete the entry. The registered content will be displayed.
Click on [Back] to return to the Scan Transmission Setting window.
7 Display the Entry List. Click on [Entry List] of the desired item under the entry box to display
the Entry List.
Click on [Back] to return to the Scan Transmission Setting window.
8-24 bizhub PRO C6500
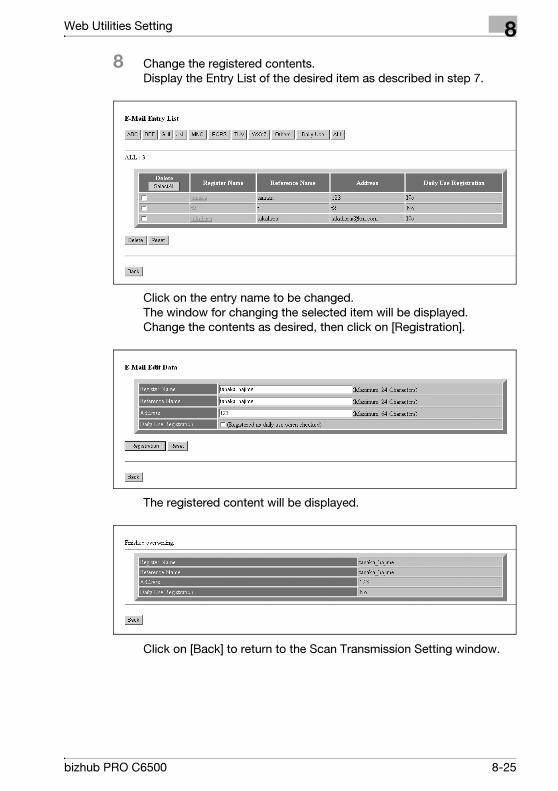
Web Utilities Setting 8
8 Change the registered contents. Display the Entry List of the desired item as described in step 7.
Click on the entry name to be changed. The window for changing the selected item will be displayed. Change the contents as desired, then click on [Registration].
The registered content will be displayed.
Click on [Back] to return to the Scan Transmission Setting window.
bizhub PRO C6500 8-25
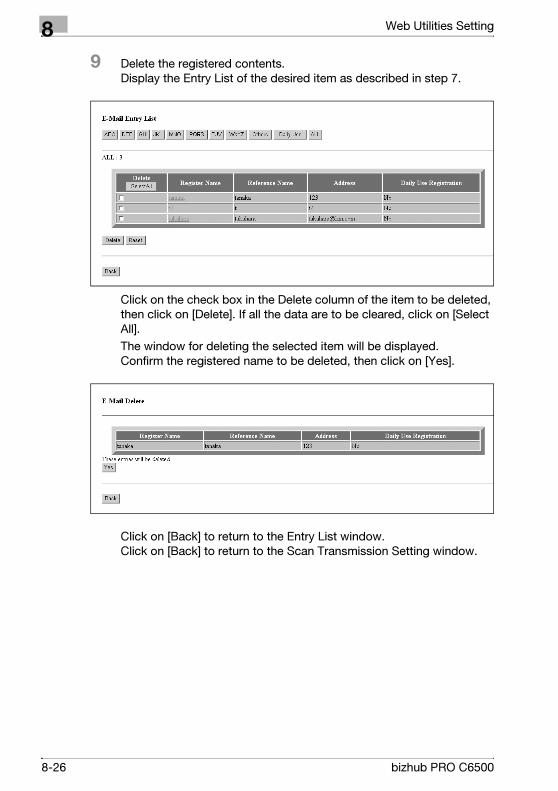
8 Web Utilities Setting
9 Delete the registered contents. Display the Entry List of the desired item as described in step 7.
Click on the check box in the Delete column of the item to be deleted,
then click on [Delete]. If all the data are to be cleared, click on [Select
All].
The window for deleting the selected item will be displayed. Confirm the registered name to be deleted, then click on [Yes].
Click on [Back] to return to the Entry List window. Click on [Back] to return to the Scan Transmission Setting window.
8-26 bizhub PRO C6500
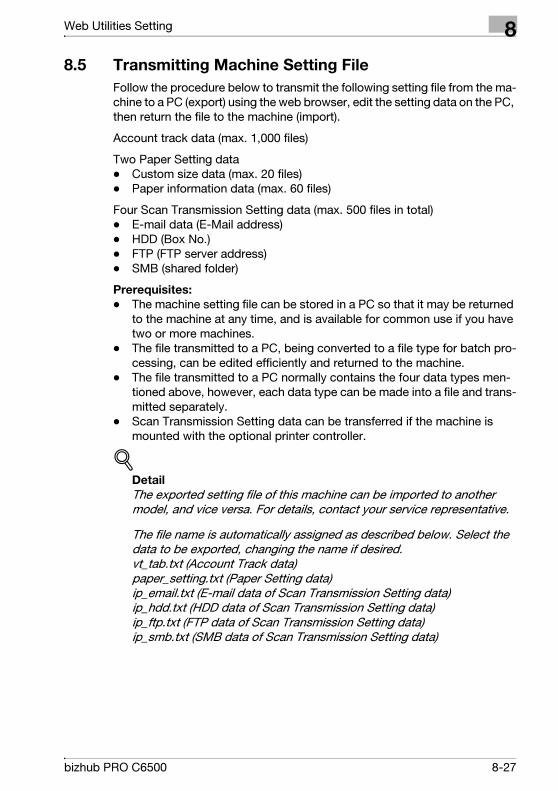
Web Utilities Setting 8
8.5 Transmitting Machine Setting File
Follow the procedure below to transmit the following setting file from the ma-
chine to a PC (export) using the web browser, edit the setting data on the PC,
then return the file to the machine (import).
Account track data (max. 1,000 files)
Two Paper Setting data
- Custom size data (max. 20 files)
- Paper information data (max. 60 files)
Four Scan Transmission Setting data (max. 500 files in total)
- E-mail data (E-Mail address)
- HDD (Box No.)
- FTP (FTP server address)
- SMB (shared folder)
Prerequisites:
- The machine setting file can be stored in a PC so that it may be returned
to the machine at any time, and is available for common use if you have
two or more machines.
- The file transmitted to a PC, being converted to a file type for batch pro-
cessing, can be edited efficiently and returned to the machine.
- The file transmitted to a PC normally contains the four data types men-
tioned above, however, each data type can be made into a file and trans-
mitted separately.
- Scan Transmission Setting data can be transferred if the machine is
mounted with the optional printer controller.
!Detail
The exported setting file of this machine can be imported to another
model, and vice versa. For details, contact your service representative.
The file name is automatically assigned as described below. Select the
data to be exported, changing the name if desired. vt_tab.txt (Account Track data) paper_setting.txt (Paper Setting data) ip_email.txt (E-mail data of Scan Transmission Setting data) ip_hdd.txt (HDD data of Scan Transmission Setting data) ip_ftp.txt (FTP data of Scan Transmission Setting data) ip_smb.txt (SMB data of Scan Transmission Setting data)
bizhub PRO C6500 8-27
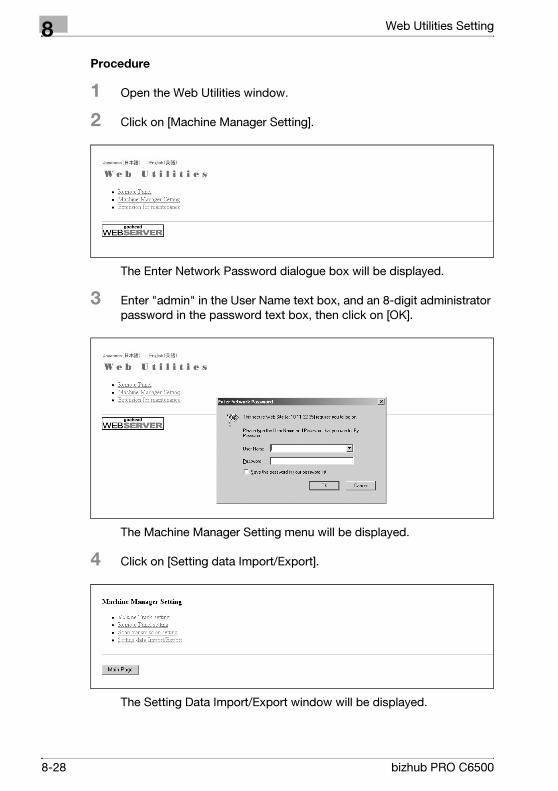
8 Web Utilities Setting
Procedure
1 Open the Web Utilities window.
2 Click on [Machine Manager Setting].
The Enter Network Password dialogue box will be displayed.
3 Enter "admin" in the User Name text box, and an 8-digit administrator
password in the password text box, then click on [OK].
The Machine Manager Setting menu will be displayed.
4 Click on [Setting data Import/Export].
The Setting Data Import/Export window will be displayed.
8-28 bizhub PRO C6500
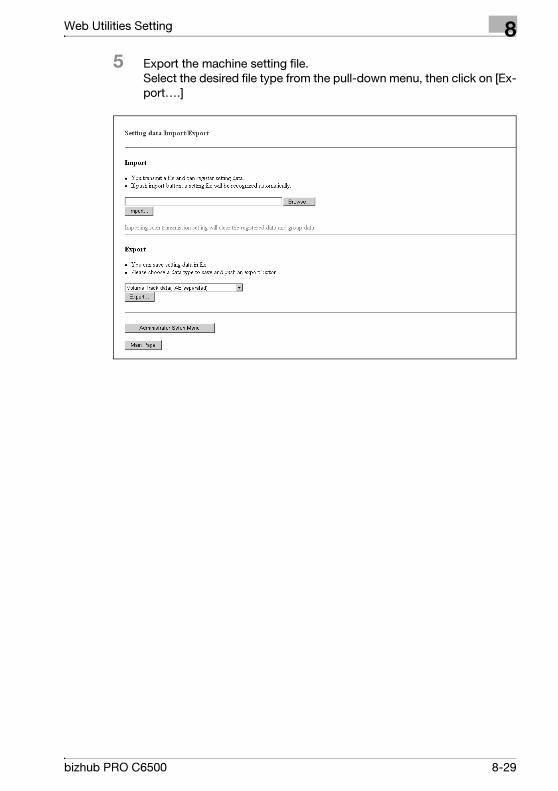
Web Utilities Setting 8
5 Export the machine setting file. Select the desired file type from the pull-down menu, then click on [Ex-
port….]
bizhub PRO C6500 8-29
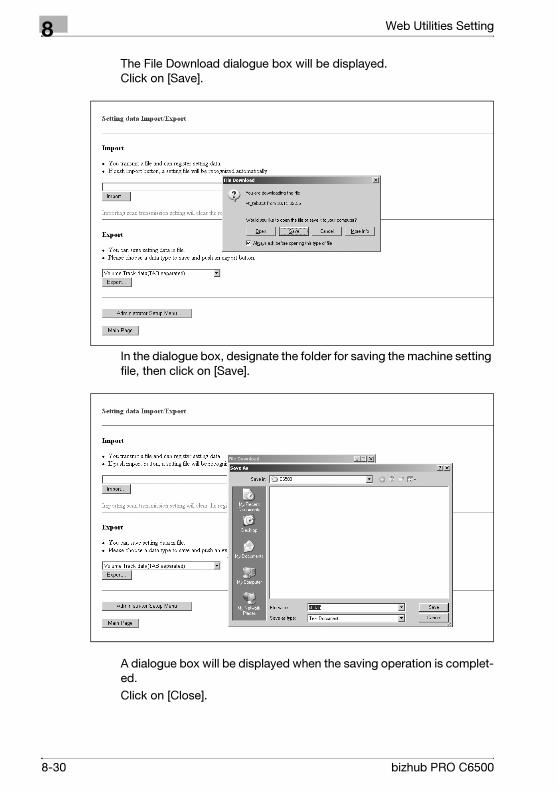
8 Web Utilities Setting
The File Download dialogue box will be displayed. Click on [Save].
In the dialogue box, designate the folder for saving the machine setting
file, then click on [Save].
A dialogue box will be displayed when the saving operation is complet-
ed.
Click on [Close].
8-30 bizhub PRO C6500
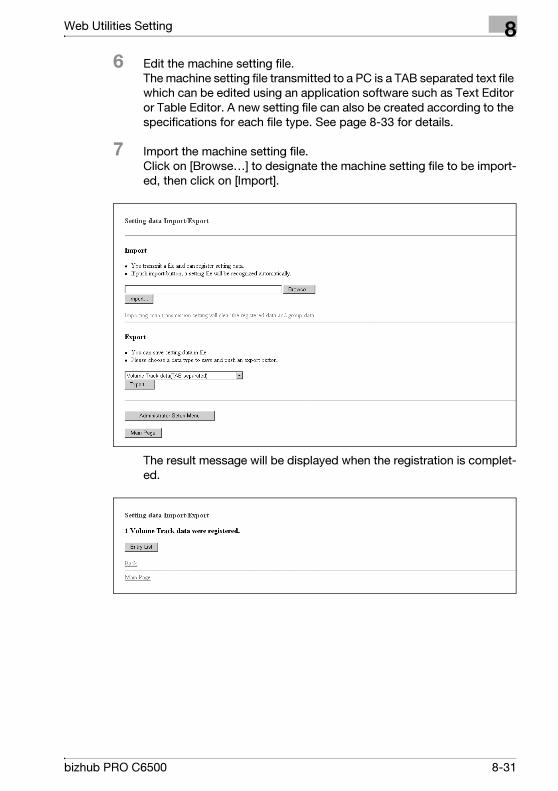
Web Utilities Setting 8
6 Edit the machine setting file. The machine setting file transmitted to a PC is a TAB separated text file
which can be edited using an application software such as Text Editor
or Table Editor. A new setting file can also be created according to the
specifications for each file type. See page 8-33 for details.
7 Import the machine setting file. Click on [Browse…] to designate the machine setting file to be import-
ed, then click on [Import].
The result message will be displayed when the registration is complet-
ed.
bizhub PRO C6500 8-31
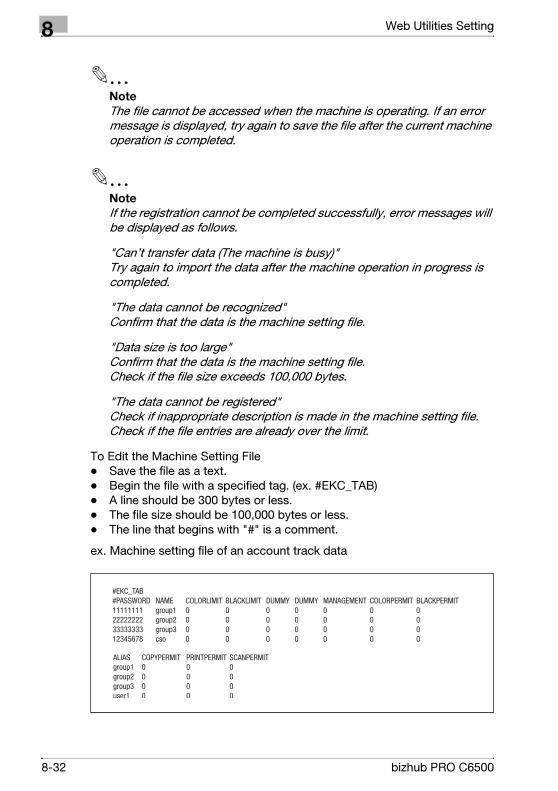
8 Web Utilities Setting
2
Note
The file cannot be accessed when the machine is operating. If an error
message is displayed, try again to save the file after the current machine
operation is completed.
2
Note
If the registration cannot be completed successfully, error messages will
be displayed as follows.
"Can’t transfer data (The machine is busy)" Try again to import the data after the machine operation in progress is
completed.
"The data cannot be recognized" Confirm that the data is the machine setting file.
"Data size is too large" Confirm that the data is the machine setting file. Check if the file size exceeds 100,000 bytes.
"The data cannot be registered" Check if inappropriate description is made in the machine setting file.
Check if the file entries are already over the limit.
To Edit the Machine Setting File
- Save the file as a text.
- Begin the file with a specified tag. (ex. #EKC_TAB)
- A line should be 300 bytes or less.
- The file size should be 100,000 bytes or less.
- The line that begins with "#" is a comment.
ex. Machine setting file of an account track data
8-32 bizhub PRO C6500
Web Utilities Setting 8
Specifications for Each Machine Setting File Type
Account track data setting file:
- Begin the file with #EKC_TAB.
- Max. 1,000 files can be edited.
- A line should include PASSWORD, NAME, and LIMIT, separated by a tab.
- Use up to 8 digits numbers (0 - 9) and alphabets only to specify PASS-
WORD.
- Use numbers and alphabets only to specify NAME.
- Use up to 8 digits numbers (0 - 9) only to specify LIMIT (0 – 99,999,999).
E-mail data setting file:
- Begin the file with #IP_EMAIL.
- A line should include NAME, ADDRESS, REFERENCE, and DAILY, sepa-
rated by a tab.
- NAME should be 24 bytes or less.
- ADDRESS should be 250 bytes or less.
- REFERENCE should be 250 bytes or less.
- Mark DAILY USE with "1" or DAILY NOT USE with "0" in each column.
HDD data setting file:
- Begin the file name with #IP_HDD.
- A line should include NAME, NUMBER, REFERENCE, or DAILY, separat-
ed by a tab.
- NAME should be 24 bytes or less.
- Use up to 9 digits numbers (0 - 9) only to specify a NUMBER.
- REFERENCE should be 24 bytes or less.
- Mark DAILY USE with "1" or DAILY NOT USE with "0" in each column.
FTP data setting file:
- Begin the file name with #IP_FTP.
- A line should include NAME, ADDRESS, PORT, FILEPATH, LOGINNAME,
PASSWORD, REFERENCE, or DAILY being separated by a tab.
- NAME should be 24 bytes or less.
- ADDRESS should be 63 bytes or less.
- Use up to 5 digits numbers (0 - 9) only to specify PORT (1 – 65,535).
- FILEPATH should be 96 bytes or less.
- LOGINNAME should be 47 bytes or less.
- PASSWORD should be 24 bytes or less.
- REFERENCE should be 24 bytes or less.
- Mark DAILY USE with "1" or DAILY NOT USE with "0" in each column.
SMB data setting file:
- Begin the file name with #IP_SMB.
- A line should include NAME, ADDRESS, FILEPATH, LOGINNAME,
PASSWORD, REFERENCE, or DAILY being separated by a tab.
- NAME should be 24 bytes or less.
- ADDRESS should be 63 bytes or less.
- FILEPATH should be 96 bytes or less.
bizhub PRO C6500 8-33
8 Web Utilities Setting
- LOGINNAME should be 47 bytes or less.
- PASSWORD should be 14 bytes or less.
- REFERENCE should be 24 bytes or less.
- Mark DAILY USE with "1" or DAILY NOT USE with "0" in each column.
8-34 bizhub PRO C6500

9 Appendix

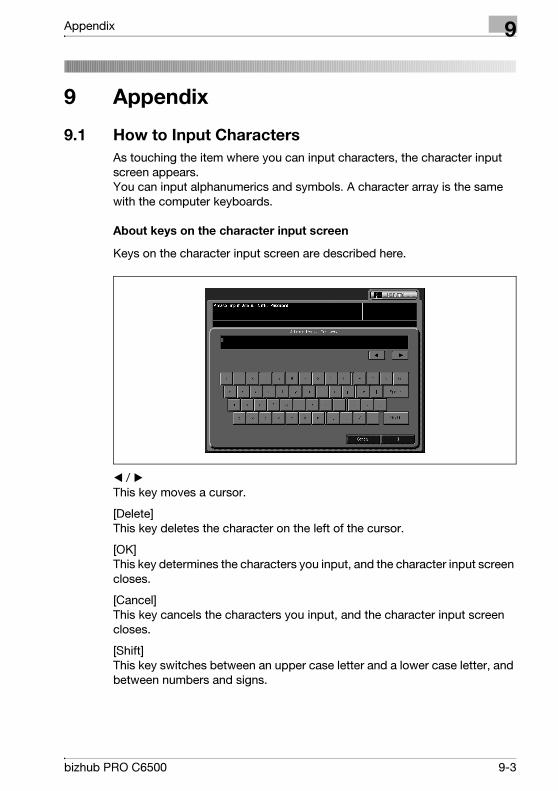
Appendix 9
9 Appendix
9.1 How to Input Characters
As touching the item where you can input characters, the character input
screen appears. You can input alphanumerics and symbols. A character array is the same
with the computer keyboards.
About keys on the character input screen
Keys on the character input screen are described here.
b / a This key moves a cursor.
[Delete] This key deletes the character on the left of the cursor.
[OK] This key determines the characters you input, and the character input screen
closes.
[Cancel] This key cancels the characters you input, and the character input screen
closes.
[Shift] This key switches between an upper case letter and a lower case letter, and
between numbers and signs.
bizhub PRO C6500 9-3
9 Appendix
About character input
The followings describe basic steps to input characters on the character
input screen.
1 Touch the corresponding key to input the desired character.
2 Touch [OK].
The character input screen closes. The input characters are displayed
on the corresponding column.
9-4 bizhub PRO C6500

10 Index


Index 10
10 Index
Numerics
1SHOT indication time 5-44, 6-130
2 Position Staple Pitch Adjustment
3-116
A
Account Counter 6-122
Account Register 6-115
Account Track 6-115
ACS adjustment 5-64
Adding Account Track 8-5
Address Edit 6-81
ADF AMS 5-47, 6-133
ADF Frame Erase 5-48, 6-134
ADF Frame Erasure 6-28
ADF original direction 5-19
Adjustment 1-7, 3-3
Administrator 6-139
Administrator Password 6-141
Administrator Register 6-79
AES Level Adjustment 6-26
Air Assist 2-4
ATS Permit Setting 5-12
Authentication Method 6-99
Auto Detect Orig. Size in ADF 5-47,
6-133
Auto Paper Type 5-13
Auto Reset Setting 5-17
B
Blur Prevention 5-53
Bookmark function 5-48, 6-134
Both Sides 1-6
Both Sides Adj. 2-4
Buzzer Setting 5-31
C
CD-Mag. Adjustment 3-11, 6-37
Centering Adjustment 3-6, 3-15, 6-
33
Change Page Print Pos (Booklet) 5-
48, 6-134
Change Password 5-66
Change Prohibit Setting 6-22
Change user 5-19
Chart of Setting Items 4-4
Choose Default Tray when APS Off
5-48, 6-135
Clamp CD Width Adjustment 3-95
Clamp FD Position Adjustment 3-
100
Common Setting 5-44, 6-130
Compress Method Color/Gray 5-51,
6-137
Continuation print 5-44, 6-130
Controller 1-7
Copy Initial setting 5-40
Copy Setting 5-47, 6-133
Cover Lead Edge Adjustment 3-80
Cover Trimming Adjustment 3-77
Cover Up/Down CD Width
Adjustment 3-98
CSV format 8-16
Curl Adjustment 3-121
Curl Reform Direction 3-75
Custom Screen 6-62
D
Default Address 5-51, 6-137
bizhub PRO C6500 10-3
10 Index
Default Screen Setting 5-22
Dehumidification Fan 5-15
Delete Paper Setting 2-16
Double Parallel Pos. Adj. 3-43
E
Editing Account Track Data 8-9
E-Mail Initial Setting 6-128
E-Mail Text Setting 6-98
E-Mail Title Setting 6-96
Erase Adjustment 6-28
Erase Operating Setting 6-28
Execute Adjust Operation 3-20, 6-
64
Expert Adjustment 6-26
F
FD-Mag. Adjustment 3-8, 3-17, 6-
35
Feed Tray Setting 5-9
File Form Default E-Mail 5-51, 6-
137
File Form Default FTP 5-51, 6-137
File Form Default SMB 5-51, 6-137
Fine Adjust Margin 5-47, 6-133
Finisher Adjustment 6-45
Finisher Adjustment (FD-501) 3-30
Finisher Adjustment (FS-503) 3-21
Finisher Adjustment (FS-520/FS-
607) 3-102
Finisher Adjustment (LS-501) 3-52
Finisher Adjustment (PB-501) 3-77
Finisher Adjustment (RU-503/RU-
504) 3-75
Finisher Adjustment (SD-501) 3-56
Finisher Mode by Full-auto 5-19
Fold & Staple auto select 5-47
Fold Paper Width Adj. 3-69
Front & Back Density 6-47
Function List of Machine
Administrator Setting 4-18
Function List of User Setting 4-11
G
Gate Fold Position Adj. 3-49
Gray Text Outline Enhance 5-53
H
Half Fold Position Adj. 3-35, 3-64
Half Fold Stopper Adjustment 3-105
HDD Lock Password 6-143
Hole-Punch Vertical Pos. 3-32
Horizontal Position Adj. 3-109
I
Image Quality Setting 5-58
Image Quality Stability 3-19, 6-60
Initial by Key Counter Insert 5-19
Initial Setting 5-40
J
Job Offset Mode 5-44, 6-130
K
Key Response Time 5-34
L
Language Setting 5-6
Lead Edge Erase Adjustment 6-39
List/Count 6-66
Lock/Delete Mode Memory 6-20
Lunch Hour Off Setting 6-16
M
Machine Adjustment 3-3
Machine Administrator Setting 6-3
Machine NIC Setting 6-126
Management Setting 6-102
Mode memory auto call 5-19
10-4 bizhub PRO C6500
Index 10
Mode Reset Setting 5-19
Multi Folder (Fold) Adj. 3-35
Multi Folder (Punch) Adj. 3-30
N
Network Setting 6-126
Next Job Staple Setting 5-20
Non-Image Area Erase 6-28
Non-Image Area Erase of orig 5-47,
6-134
O
Operation Prohibit Set 6-20
Orig. Glass Auto Size Select 5-47,
6-133
Orig./Out Bind Direction Set 5-48,
6-134
Original Density shift 5-62
Original Glass AMS 5-47, 6-133
Original Set/Bind Direction 5-20
Output Quantity Limit 3-120
Overwrite image data 6-145
P
Paper Count Limit 6-75
Paper Edge Detect Sensor Adj. 3-
113
Paper Feed Auto Selection 5-10
Paper Inserter Tray Size Adj. 3-118
Paper Length Adjustment 3-54
Paper Name 2-3
Paper Setting 1-5, 2-3, 5-9
Paper Type 2-3
Paper Width (Staple) 3-24
Paper Width (Straight) 3-27
Paper Width Adjustment 3-30, 3-52
Paste Formation Finish Position
Adjustment 3-88
Pasting Finish Position Adjustment
3-86
Pasting Start Position Adjustment 3-
84
Perfect Binding Setting 6-73
Power Save Setting 5-26, 6-6
Pre-registration Adj. 6-43
Preset Zoom Setting 5-24
Printer Adjustment 3-3, 6-31
Printer Gamma Offset Adj. 6-52
Printer Gamma Offset Auto Adj. 6-
54
Printer Gamma Sensor Adj. 6-57
Printer Job Stacker Pile 5-45, 6-131
Printer Prohibit Timer 5-48, 6-134
Printer Setting 5-53
Priority Paper Type 5-44, 6-131
Process Adj. 2-4
Process Adjustment 6-47
Punch Adjustment 3-107
Q
Quality Adjustment 6-52
R
Register Paper Type/Weight 2-8
Registration Adjustment 3-111
Registration Loop Adj. 6-41
Remote Panel Setting 8-18
Reset button function 5-19
Reset Setting 5-17
Restart Timing Adjustment 3-3, 3-
13, 6-31
Reversed Text Enhancement 5-53
Rotation 5-48, 6-134
RU Adjustment 3-75
S
Saddle Stitcher Adj. 3-56
Saddle Stitcher Stopper Adj. 3-102
Scan Initial setting 5-42
bizhub PRO C6500 10-5
10 Index
Scan prohibit (pull out tray) 5-49, 6-
135
Scan Setting 5-51, 6-137
Scanner Adjustment 3-13, 6-46
Scanner Prohibit Setting 6-24
Scanner Send Address 6-81
Screen 5-58
Screen Initial setting 5-60
Security Setting 6-141
Security Strengthen Set 6-146
Service Port Device 5-38
Setting Account Track Data 8-5
Setting Scan Transmission Function
8-21
Short cut Key Setting 5-35
Side 2 Lens Adjustment mode 5-44,
6-130
Size 2-4
Size Setting 6-68
Speed Setting 2-4
Spine Corner Forming Position
Adjustment 3-82
Stacker Adjustment 3-52
Staple Center Adj. 3-56
Staple Center Position 3-21
Staple Paper Width Adj 3-59
Staple Pitch Adjustment 3-62
Stapler Position Adj. 3-21
Status Hold When Auto Reset 5-19
STOP Key Function 5-44, 6-130
Sub Compile CD Width Adjustment
3-92
Suspend Interruption 5-48, 6-134
System Connection 6-139
System Setting 5-6, 6-6
T
Temperature Adjustment 3-90
Thick Paper BK Mode 5-45, 6-131
Thin Line Enhancement 5-53
Time and Date Setting 5-29, 6-8
Timer Action On/Off Set 6-14
Timer Interrupt Password Set 6-18
Timer Setting 6-11
Toner Density Sensor 6-49
Toner Quality/Exposure 6-50
Touch Screen Adjustment 7-3
Transmitting Machine Setting File 8-
27
Tray Change Time 5-44, 6-130
Tri-Fold Adjustment 3-114
Tri-Fold Position Adj. 3-66
Tri-Fold-in Pos. Adj. 3-37
Tri-Fold-out Pos. Adj. 3-40
Trimming Adjustment 3-71
Trimming Receiver Adj. 3-73
U
Un-compressing mode 5-44, 6-131
Unfitting Cover Stop 6-77
Unit Setting 5-8
Useful Paper Weight 6-73
User Auth./Account Track 6-99
User Authentication Set 6-102
User Counter 6-113
User Register 6-105
User Setting 5-3
Utility Screen Outlines 4-3
V
Vertical Position Adj. 3-107
W
Web Utilities Setting 8-3
Weekly Timer On/Off Set 6-9
Weekly Timer Setting 6-9
Weight 2-3
Without Authentication 6-124
10-6 bizhub PRO C6500

Index 10
Z
Z-Fold Position Adj. 3-46
bizhub PRO C6500 10-7