Embed Size (px)
Citation preview

Bird Spider 360°
Stainless steel “arms” move with the breeze, which deters birds from landing and causing damage. The wind catches the tips and spin the unit.
Bird•B•Gone’s Bird Spider 360° has a simple to attach frame. Simply press the top of the unit down onto the base and insert the locking pin!
Optional attachments make Bird Spider 360° adaptable!
Available in four widths! 2’, 4’, 6’, and 8’ diameters.Super easy to install...and maintenance free!
PH: 949-472-3122 • FAX: 949-472-3116E-mail: [email protected] www.birdbgone.com
For Customer Support, Call 1-800-392-6915
Installation Instructions
The Bird Spider 360° is ideal for:
Building MaintenanceBoatsRooftopsA.C. UnitsStreet LightsParking Lot LightsSigns
AND MORE!
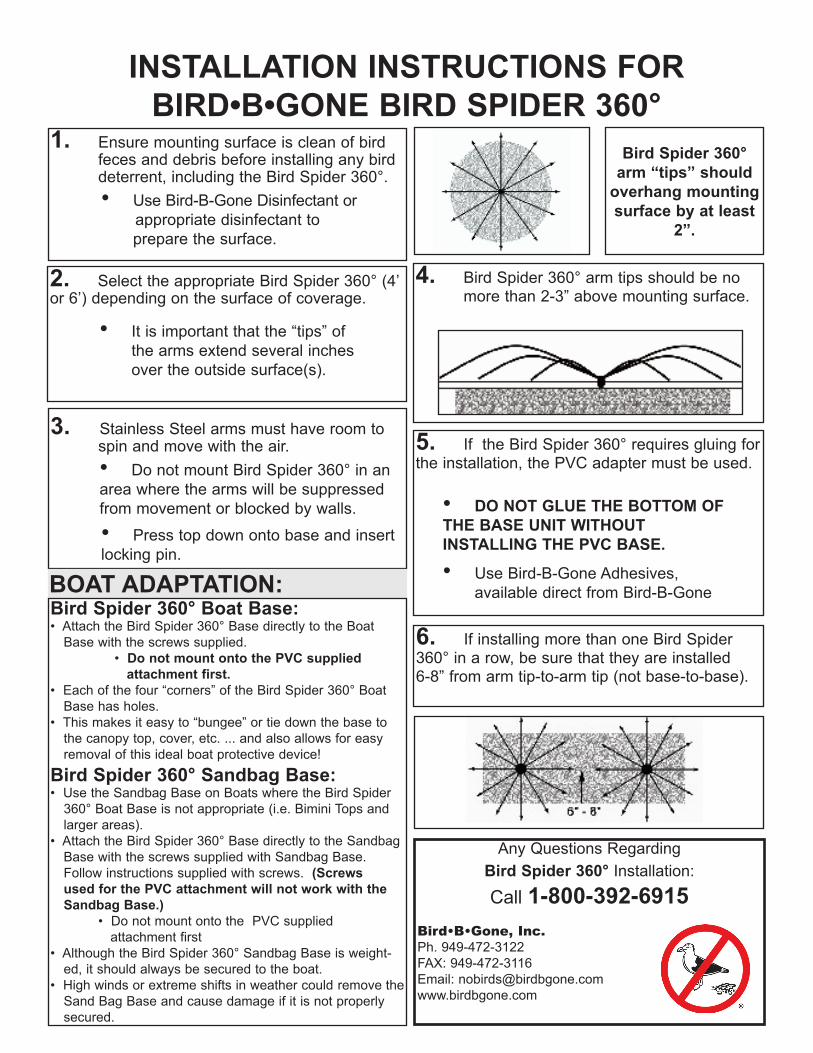
5. If the Bird Spider 360° requires gluing for the installation, the PVC adapter must be used.
INSTALLATION INSTRUCTIONS FOR BIRD•B•GONE BIRD SPIDER 360°
2. Select the appropriate Bird Spider 360° (4’ or 6’) depending on the surface of coverage.
3. Stainless Steel arms must have room to spin and move with the air.
1. Ensure mounting surface is clean of bird feces and debris before installing any bird deterrent, including the Bird Spider 360°.
• It is important that the “tips” of the arms extend several inches over the outside surface(s).
• Use Bird-B-Gone Disinfectant or appropriate disinfectant to prepare the surface.
6. If installing more than one Bird Spider 360° in a row, be sure that they are installed 6-8” from arm tip-to-arm tip (not base-to-base).
Bird Spider 360° arm “tips” should
overhang mounting surface by at least
2”.
4. Bird Spider 360° arm tips should be no more than 2-3” above mounting surface.
Any Questions Regarding Bird Spider 360° Installation:
Call 1-800-392-6915Bird•B•Gone, Inc.Ph. 949-472-3122FAX: 949-472-3116Email: [email protected]
BOAT ADAPTATION:Bird Spider 360° Boat Base:• Attach the Bird Spider 360° Base directly to the Boat
Base with the screws supplied. • Do not mount onto the PVC supplied attachment first.• Each of the four “corners” of the Bird Spider 360° Boat
Base has holes.• This makes it easy to “bungee” or tie down the base to
the canopy top, cover, etc. ... and also allows for easy removal of this ideal boat protective device!
Bird Spider 360° Sandbag Base:• Use the Sandbag Base on Boats where the Bird Spider
360° Boat Base is not appropriate (i.e. Bimini Tops and larger areas).
• Attach the Bird Spider 360° Base directly to the Sandbag Base with the screws supplied with Sandbag Base. Follow instructions supplied with screws. (Screws used for the PVC attachment will not work with the Sandbag Base.)
• Do not mount onto the PVC supplied attachment first• Although the Bird Spider 360° Sandbag Base is weight-
ed, it should always be secured to the boat.• High winds or extreme shifts in weather could remove the
Sand Bag Base and cause damage if it is not properly secured.
• DO NOT GLUE THE BOTTOM OF THE BASE UNIT WITHOUT INSTALLING THE PVC BASE.
• Use Bird-B-Gone Adhesives, available direct from Bird-B-Gone
• Do not mount Bird Spider 360° in an area where the arms will be suppressed from movement or blocked by walls.
• Press top down onto base and insert locking pin.
![complex 1: sandbag - Men's Fitness Magazine€¦ · sandbag is resting on your shins [B]. Now, explosively drive up the sandbag — as it reaches chin level, roll it back towards](https://img.dokumen.tips/doc/110x75/606aa7f87509f94d48110b4b/complex-1-sandbag-mens-fitness-magazine-sandbag-is-resting-on-your-shins-b.jpg)