Embed Size (px)
Citation preview
Binocular Indirect Ophthalmoscopy Procedures in Co-managed Care
Simon Barnard 1 , Andrew Field 2
1 Director of Ocular Medicine, Institute of Optometry and Tutor in Ocular Disease, Department of Optometry & Visual Science, City University, London
2 Research Associate, Visual Perception Unit, Department of Psychology, Essex University; formerly Consultant Visiting Clinician, City University
Introduction
This chapter deals with the use of Binocular Indirect Ophthalmoscopy (BIO) lenses for the assessment of the retinal effects of systemic disease, with special reference to those diseases involved in shared care or co-management programmes.
Much of the eye examination routine will be similar for a patient in a shared care programme as any other patient. However, in monitoring or managing eye disease there will be particular emphasis on extra diagnostic procedures and a detailed binocular indirect retinal examination under dilation is just one of many such procedures that may be necessary.
Practitioners should therefore make themselves thoroughly familiar with indirect ophthalmoscopy by routinely examining all patients with this method, many of whom can be viewed with non-dilated pupils. Recently, the latest generation of headband binocular indirect ophthalmoscopes have methods of converging the entrance and exit pupils, and this facility places the headband ophthalmoscope in the same category of usefulness as the SLM BIO. It means that optometrists, who will presumably not be needing to dilate that frequently, will be able to usefully practice their indirect techniques on most patients.Then when necessary, a dilated examination will be a familiar technique greatly facilitated by the ease of view afforded by the fully open pupil.
The current shared care procedures in the UK include diabetes and glaucoma.Both conditions require a close examination of the fundus posterior to the equator. The depth of retinal vascular lesions, disc evaluation and macular oedema are greatly assisted having a stereoscopic view of the fundus, and this is particularly suited to use of the slit lamp microscope binocular indirect method. Excursions into the far periphery, past the equator, are best observed using head-band indirect ophthalmoscopy. It is likely that optometrists will be involved in the shared care of post-surgical retinal detachments or the monitoring of suspect pre-detachment cases.Very small vascular abnormalities such as micro-aneurysms and neuro-retinal rim notching are best double-checked using the added benefit of higher magnification obtained with direct ophthalmoscopy, approximately x15 linear magnification, and comparing these with the stereoscopic view.
2
Admittedly the technique will initially require some practise before the optometrist will have gained the expertise to perform an accurate, complete and rapid examination of the fundus.
New comers to either head-band or SLM indirect techniques will derive much benefit if they also make themselves familiar with the “Imaginary Convex Eye” technique, see the section on the Imaginary Convex Eye.
From a patient perspective and their comfort, it should be borne in mind that the longer the retina is exposed to the continual bright illumination of the BIO, the greater the lingering after-effects that the patient may remember. Therefore, being fast efficient and keeping the illumination as low as possible are important.
Filters
A yellow filter offers the advantage of greater patient comfort and may possibly afford protection to the patient's retina. The elimination of the higher energy blue light is considered by many to be a sensible precaution when examining the fundus with near to full brightness illumination.However, the yellowing of the image may affect clinical interpretation. Add-on filter attachments may be a useful compromise for some practitioners.Other additional lenses can include a red free filter. This will either be green, turquoise or cyan. This aids interpretation when examining the retinal vasculature, small blood vessels and haemorrhages will appear with greater contrast, and particularly so with fluorescein angioscopy. The red free filter will also enhance the visibility of lost sectorial nerve fibre bundles caused by glaucoma for instance. The nerve fibre bundles radiate from the optic disc, and when there is a sectorial loss, the thinning of the retina removes the very slight opalescent overlay, and so the defective areas appear darker and often have a linear or striated appearance.
3
Indirect ophthalmoscopic theory
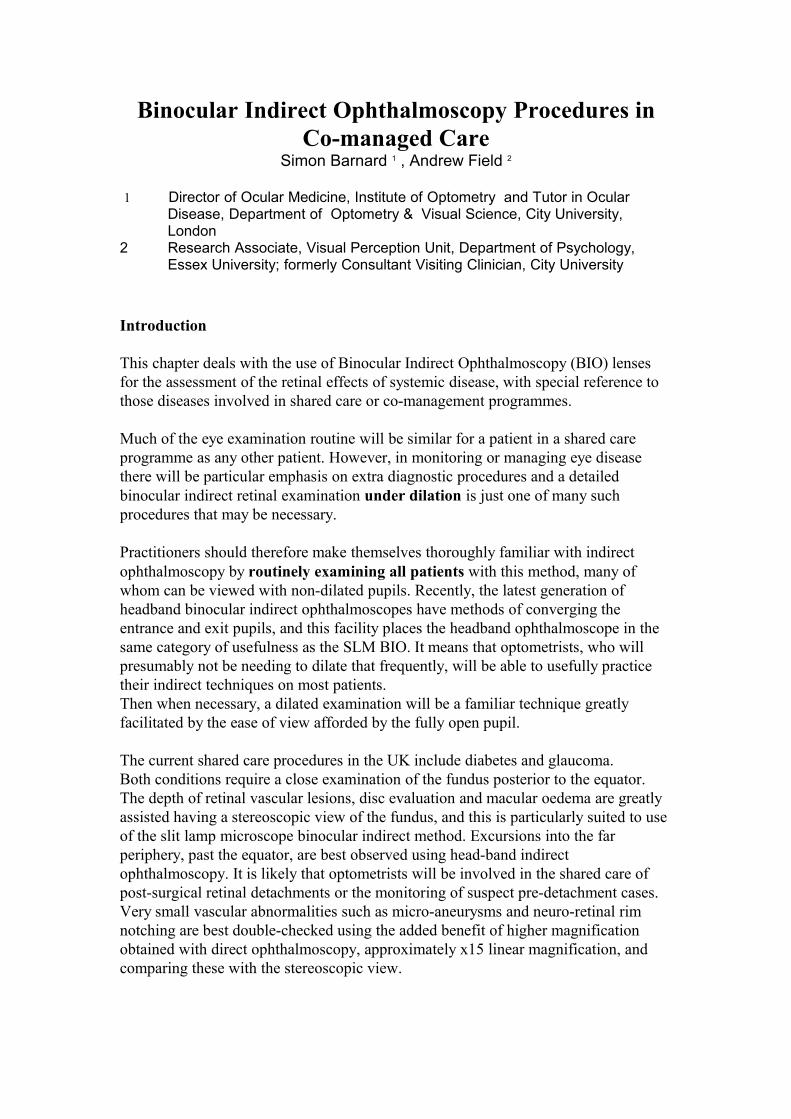
With indirect ophthalmoscopy, the fundus is illuminated by light passing through a highly powered positive lens. Returning light passes back through the lens to form a real, inverted and laterally reversed image of the fundus between the lens and the practitioner. (Fig 1). The image will be approximately at the focus of the BIO lens.Therefore a +90D lens will produce a fundus image at approximately 11mm from the lens.
Fig 1 Schematic and approximate positions of the virtual images of the inverted eye and fundus.The advantages of BIO compared to direct are the excellent field of view, the superior illumination, stereoscopic view and the ability to assess subtle diffuse fundus colour changes.Head-band or spectacle indirect ophthalmoscopes with a +20D power lens will provide a magnification of approximately x 3 and a static field of view of approximately 40º for an emmetropic eye. The total dynamic field of view can be as much as 240°. Lenses of powers greater than +20D are useful for wide field examination, but do not give enough magnification for viewing fundus detail.With the SLM BIO and a Volk lens of +120D, the static field of view can be up to 120°, and a dynamic field could be as much as 180°.
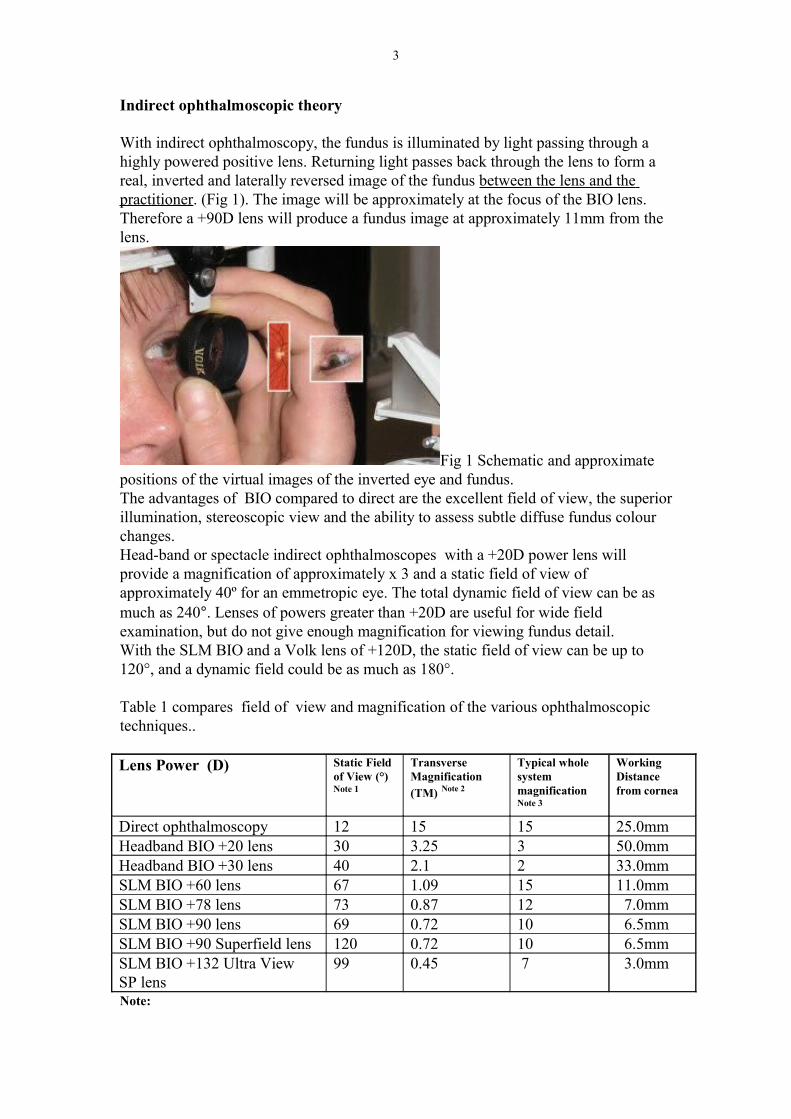
Table 1 compares field of view and magnification of the various ophthalmoscopic techniques..
Lens Power (D) Static Field of View (°)Note 1
Transverse Magnification (TM) Note 2
Typical whole system magnification Note 3
Working Distance from cornea
Direct ophthalmoscopy 12 15 15 25.0mmHeadband BIO +20 lens 30 3.25 3 50.0mmHeadband BIO +30 lens 40 2.1 2 33.0mmSLM BIO +60 lens 67 1.09 15 11.0mmSLM BIO +78 lens 73 0.87 12 7.0mmSLM BIO +90 lens 69 0.72 10 6.5mmSLM BIO +90 Superfield lens 120 0.72 10 6.5mmSLM BIO +132 Ultra View SP lens
99 0.45 7 3.0mm
Note:
4
1. The field of view will depend on pupil diameter. For example, +132 lens will give 99° field with 7 mm pupil and 85° field with 2 mm undilated pupil.
2. Longitudinal (depth) magnification ≅ TM23. The whole system magnification will include the SLM where applicable. 4. Lenses of 90 D or more are useful for patients on miotic therapy or in the presence of posterior
synechiae (Prokopich and Flanagan, 1995)
When a practitioner requires the detailed view of a fundus needed to investigate the fine lesions seen with diabetics ( such as microaneurysms, intra-retinal micro-vascular anomalies(IRMA), lipid, small haemorrhages and neovascularisation) additional SLM magnification will be required. Unless a lens of about +14 Dioptres is used, head band BIO will not give enough magnification to view small fundus detail.
1. Slit lamp microscope (SLM) binocular indirect ophthalmoscopy
In recent years high powered positive aspheric lenses, in conjunction with the slit lamp biomicroscope, have been increasingly used to examine the retina .
The advantages of these methods include the provision of (a) an excellent field of view (up to 120 degrees), (b) a stereoscopic view and (c) excellent illumination. In addition the optics of the biomicroscope offer variable magnification.
These characteristics lend SLM BIO to be the method of choice for the routine examination of the fundi of patients in shared care or co-management programmes involving glaucoma and diabetes. The monitoring of patients having suspect peripheral retinal lesions involving detachments and degenerations for example, will be better served using head-band ophthalmoscopy, described later in this chapter.
The SLM BIO technique produces a real, inverted and laterally reversed fundus image. Presently available lens powers range from +60 to +132 D. Lower power lenses provide higher magnification but offer a smaller field of view.
General procedure for slit lamp microscope (SLM) binocular indirect ophthalmoscopy (BIO)
Preparation
• Dilate the pupil. This will usually take 20 to 30 minutes following drug instillation. (see section on mydriasis).
• It will help to darken the room so that minimal lamp intensity can be used.• The practitioner should be comfortable. If available, slit lamp elbow rests can be
used.• Position the patient comfortably at the slit lamp microscope.• Instruct the patient to fixate a target straight ahead, over the practitioner’s
shoulder, stare wide and to blink normally.
5
SLM Settings.
• Commence with a low magnification, approximately x15. This can be increased during the routine as necessary.
• Set the focused beam such that the slit is approximately 1½-2½ mm wide and 5-10 mm long when in focus.
• The lamp should be set at low to medium intensity to start with.• The lamp and microscope should be aligned at 90° to the patient.
Procedure.
Method A.
• Focus the slit lamp beam onto the centre of the patient's pupil.• Interpose the BIO lens centrally and at about 1 cm from the eye (see table 1).• It is not important which way round the BIO lens is held.• The SLM should then be pulled backwards towards the practitioner until first the
surface of the BIO lens comes into focus. A further movement of about 1 cm will then bring the aerial image of the fundus into focus.
Method B.
• Pull the SLM away from the patient and laterally align the slit beam so that the blurred slit beam illuminates the centre of the patient's pupil.
• Interpose the BIO lens centrally about 2 cm from the eye.• The SLM should then be moved forwards towards the patient. The inverted image
of the patient's pupil will first come into focus followed by the fundus. If an inverted pupil cannot be obtained, you may need to have your patient move a little further away on the chin rest.
• A clear view of the BIO lens surface means that you have moved in too close.• The BIO lens should then be moved towards the patient to obtain the optimum field of
view making adjustments to the slit lamp as necessary.
Having obtained a focused image, the fundus may then be examined by scanning across the field of view in a similar fashion to the method employed when examining the cornea.The brightly illuminated slit image of the fundus is seen within a less well illuminated larger field.
Fine tuning the fundus view
• Lateral and longitudinal adjustments of the BIO lens may be made to optimise the field of view.
• When viewing finer fundus detail, temporally increase the lamp intensity and SLM magnification.
• A still larger field can be obtained by slightly moving the BIO lens and the SLM horizontally and in the same direction.
• Many practitioners have found the illuminated fixation target provided on the SLM useful for slowly scanning the more lateral aspects of the fundus. The target is
6
slowly moved laterally (or vertically), and the SLM adjusted to extend the lateral view.
• It may be helpful to move the illumination system slightly to one side of the microscope to remove disabling reflections.
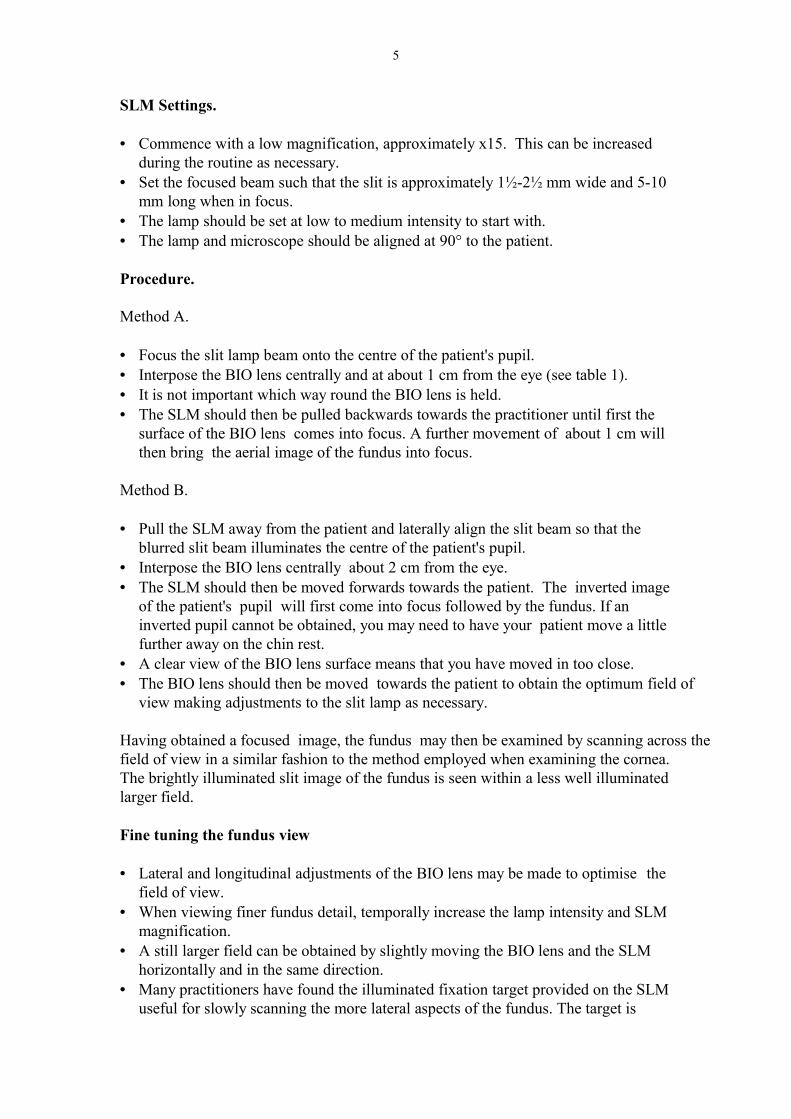
• When examining the more peripheral parts of the fundus with the patient's eye directed away from the primary position, the BIO lens should be tilted to improve definition. Tilt the lens to the left during the patient's left gaze, to the right with right gaze, inferior edge closer to the eye with upwards gaze, and superior edge closer to the eye with downwards gaze (Fingeret et al, 1990) (Figure 2). In down gaze the practitioner will need to raise the superior lid using a finger of the hand holding the BIO lens ).
Fig 2 • Because the fundus image is inverted and laterally displaced it will be helpful for the
practitioner to invert the record card whilst drawing the fundus. The card then may be turned back through 180 ° when the drawing is complete.
• A stereoscopic view of the fundus is possible down to pupils of approximately 4mm. With small pupils around the 4mm cut off point, the binocular overlap decreases and the practitioner will have to be careful to hold the BIO lens centrally between the two eyepieces of the microscope.
Hints and tips for successful SLM BIO
1. Practitioners should practise on non-dilated eyes.2. Should the fundus view become very dim or disappear, suspect that the patient has either
screwed up his/her eyes, or is looking away from the fixation point.3. If your hand is unsteady, and the image dim, oscillate the lens and move it to the
direction of best vision.4. A resting point for the elbows is essential. As previously mentioned some SLM
manufacturers provide special elbow rests.5. A +78D lens is good for nerve head evaluation, and the +90D lens will have a wider field
of view, suitable for general use.6. Depending upon the design of your SLM a +60D or a +78D lens may require the patient
to move away from the SLM to be able to focus the retina.7. Remember the Imaginary Convex Eye technique.

7
Head-Band Binocular Indirect Ophthalmoscopy
In recent years head-band indirect ophthalmoscopes have been developed that enable the practitioner to converge the entrance and exit pupils. This very important improvement means that the optometrist can examine every patient using this technique without dilating until he/she has gained enough experience. Like SLM, dilation will then provide a technique that will become a easy task for the optometrist.
The advantages of this method includes the provision of (a) an excellent field of view (approximately 40 degrees), (b) the ability to move around the patient and therefore enlarge upon the field of view, (c) a stereoscopic view, (d) excellent illumination and (e) scleral indentation.
These characteristics lend head-band indirect ophthalmoscopy to be secondary to SLM indirect ophthalmoscopy for the routine examination of the fundi of patients in shared care or co-management programmes involving glaucoma and diabetes. However, the head-band indirect is particularly useful for examining fine variations in the fundus colour that may be caused by tumours or oedema for example, and for viewing the more peripheral areas of the retina anterior to the equator, areas that cannot be viewed with the direct ophthalmoscope. The use of indirect ophthalmoscopy is necessary for investigating symptoms such as photopsia and/or sudden onset floaters, posterior vitreous detachment, suspected retinal tears or retinal detachments detachments, and high myopes. This facility may well be useful in co-management programmes monitoring post-operative detachment surgery, or the monitoring of peripheral lesions that may have a predisposition to detachment such as lattice degeneration.
The head-band indirect technique produces a real, inverted and laterally reversed fundus image. Presently available lens powers range from +14D to +30 D. Lower power lenses provide higher magnification but offer a smaller field of view, and below about +20D, the lens needs to be held further from the patient’s eye and may not be comfortable for steady positioning. Lenses above +20D may give less magnification than is desirable.
General procedure for head-band binocular indirect ophthalmoscopy.
Preparation
• Dilate your patient. This will usually take 20 to 30 minutes following drug instillation. (see section on mydriasis).
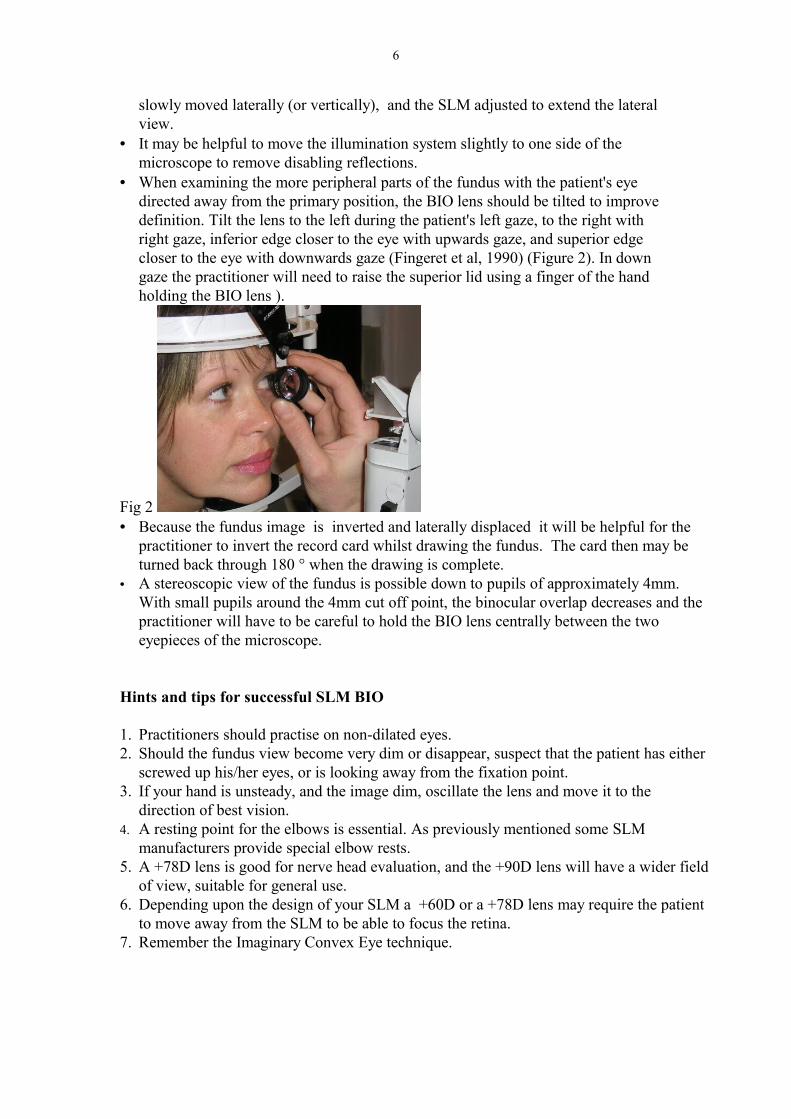
• It will help to darken the room so that minimal lamp intensity can be used.• It will be preferable to have a patient chair that fully reclines, enabling the
practitioner to move around the patient and hence gaining a full 360° traverse of the fundus. (Fig 3). If a reclining chair is not available, the practitioner will have to make more use of the patient fixating peripheral targets, and this will often mean that a smooth traverse of the peripheral fundus is not possible.(Fig 4)
8
Fig 3 Fig 4 • Instruct the patient to fixate a target in the primary position, stare wide and to
blink normally. The primary position for a reclining patient will be immediately above his or her head. For a seated patient this will be over the practitioner’s shoulder.
Alignment of the head-band ophthalmoscope.
• Place the ophthalmoscope on the head and adjust the straps for maximum comfort, and making sure that the viewing part of the ophthalmoscope can be positioned in front of the practitioner’s eyes at a comfortable angle. Adjust the wearing position so that the ophthalmoscope is not tilted in relation to the practitioner’s eyes. If worn, there is usually ample room for the practitioner to wear his/her spectacles as well.
• If the practitioner is presbyopic, there is often a +2D lens available to insert into the ophthalmoscope system
• Face a wall approximately 40 cms away, and adjust the illumination mirror such that the illumination field is vertically centralised to the observation ports.
• Move the viewing ports horizontally by adjusting the interpupillary distance to align with the illumination field.
• Adjust the illumination system to give the required field, usually the widest available. Set the illumination at a medium intensity to start with. Use the yellow lens to reduce the amount of blue light on the retina, and if available, using a diffuser may widen the field of illumination.
• If being used on a non-dilated eye, make sure the system is set with the illumination and viewing systems at maximum convergence. This setting reduces the stereoscopic separation, and so should be set to the maximum separation that is able to produce a stereoscopic image.
Procedure.
• The practitioner should first illuminate the patient’s pupil area by pointing the head and hence the illumination towards the patient’s eye.
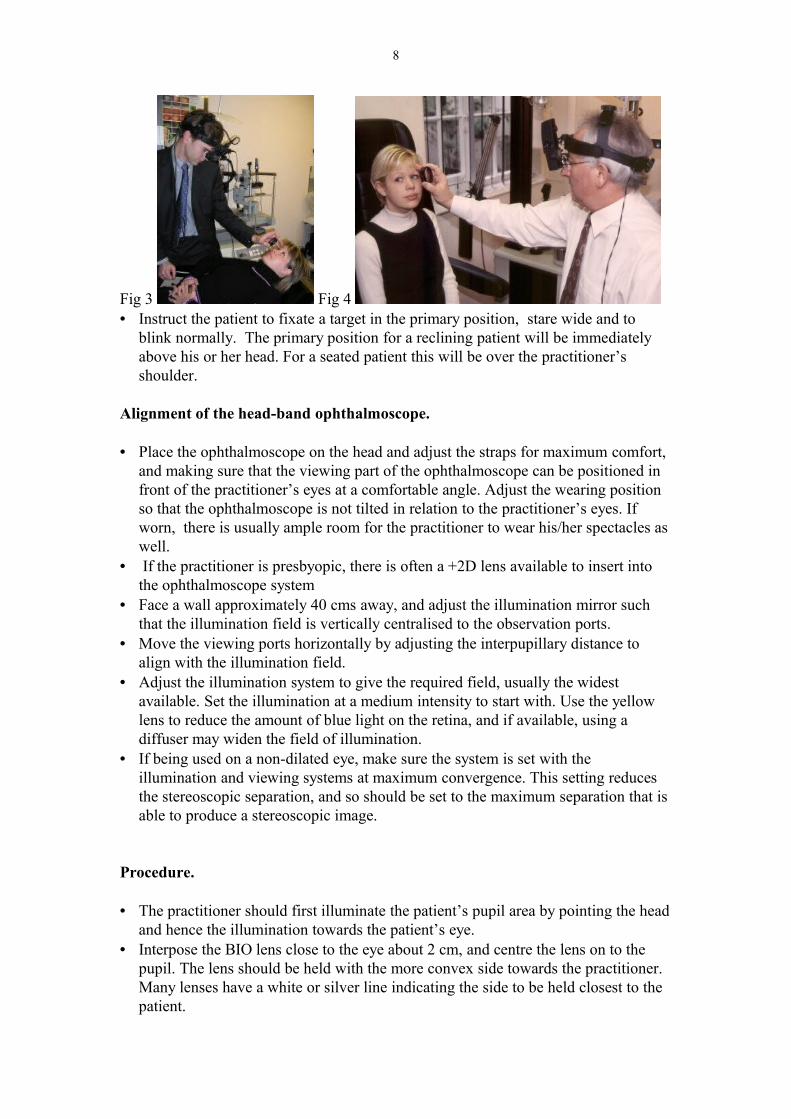
• Interpose the BIO lens close to the eye about 2 cm, and centre the lens on to the pupil. The lens should be held with the more convex side towards the practitioner. Many lenses have a white or silver line indicating the side to be held closest to the patient.

9
• Pull back the lens away from the patient’s eye, at the same time taking care to keep the illumination centred on the pupil. Whilst withdrawing the lens, the practitioner will find a distance that provides an optimum field of view. This should be approximately at the focus of the lens, i.e. 5cms from the pupil using a +20D lens. The practitioner should make sure he/she is able to rest some part of the hand on the patient’s head to stabilise the BIO lens.
Having obtained an image filling the BIO lens, the fundus may then be examined by moving around the patient if reclining, or by redirecting the patient’s fixation if seated. It is at this point that it becomes obvious that it is definitely preferable to have the patient reclining if possible.
Fine tuning the fundus view
• Tilt the BIO lens to remove undesirable reflections.• Adjust the system convergence to suit to pupil size.• It may be helpful to adjust the illuminating mirror and point the illumination system
slightly higher or lower than centre.• When looking to the peripheral retina, and hence though an oblique pupil, it will be
helpful to align the head with the long axis of the oblique pupil. This will allow a wider exit pupil for the stereoscopic viewing system, and hence help to keep your stereoscopic image. With a reclining patient this is easy to do, but examining a seated patient will when viewing the lateral aspects of the retina, require the practitioner to tilt his/her head 90°, and this is obviously not very comfortable.
Hints and tips for successful Head-band BIO.
1. Practitioners should practise on non-dilated eyes. Practical only with ophthalmoscopes that have converging systems.
2. It is essential to have a steady hand, and the practitioner must rest part of his hand on the patient’s head. This is particularly so with non-dilated pupils.
3. Remember the Imaginary Convex Eye technique.4. A better peripheral view will be obtained using a +28D or +30D lens and scleral
indentation. However, a higher power lens will reduce magnification.5. Fundus drawing should either be done from behind the patient if reclined, or with the
record card inverted if seated.
Scleral Indentation
To take full advantage of head-band binocular indirect ophthalmoscopy, the practitioner should learn to perform scleral indentation. The procedure is neither as difficult nor as uncomfortable for the patient as may be imagined. Scleral indentation will neither cause nor worsen retinal tears or detachments.
Preparation
• Have your patient ready as for head-band indirect ophthalmoscopy previously described.
10
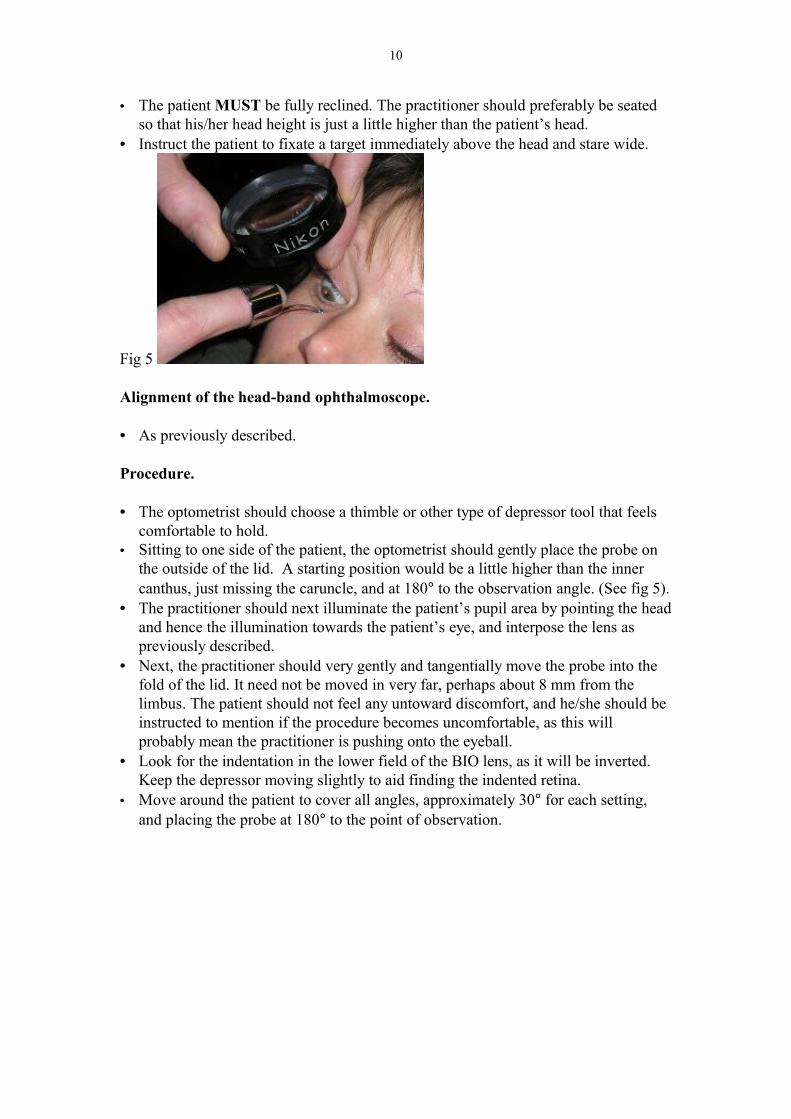
• The patient MUST be fully reclined. The practitioner should preferably be seated so that his/her head height is just a little higher than the patient’s head.
• Instruct the patient to fixate a target immediately above the head and stare wide.
Fig 5
Alignment of the head-band ophthalmoscope.
• As previously described.
Procedure.
• The optometrist should choose a thimble or other type of depressor tool that feels comfortable to hold.
• Sitting to one side of the patient, the optometrist should gently place the probe on the outside of the lid. A starting position would be a little higher than the inner canthus, just missing the caruncle, and at 180° to the observation angle. (See fig 5).
• The practitioner should next illuminate the patient’s pupil area by pointing the head and hence the illumination towards the patient’s eye, and interpose the lens as previously described.
• Next, the practitioner should very gently and tangentially move the probe into the fold of the lid. It need not be moved in very far, perhaps about 8 mm from the limbus. The patient should not feel any untoward discomfort, and he/she should be instructed to mention if the procedure becomes uncomfortable, as this will probably mean the practitioner is pushing onto the eyeball.
• Look for the indentation in the lower field of the BIO lens, as it will be inverted. Keep the depressor moving slightly to aid finding the indented retina.
• Move around the patient to cover all angles, approximately 30° for each setting, and placing the probe at 180° to the point of observation.
11
Hints and tips for successful scleral indentation.
1. Practitioners should practise on non-dilated eyes, pupils above about 4 mm will be usable. Practical only with ophthalmoscopes that have converging systems.
Yes, it is possible.2. It is essential to have a steady hand, consequently the practitioner must rest both hands
on the patient’s head.3. The 3o/c and 9o/c positions can be indented by placing the depressor slightly above on the
upper lid (2o/c and 10o/c), and sliding the probe round to move it into the inner or outer canthal positions. If this is difficult, indentation can be done applying the probe to the sclera without the intervening lid, but topical anaesthesia should be used to make your patient comfortable.
4. Remember the Imaginary Convex Eye technique.5. A better peripheral view will be obtained using +28D or +30D lenses.6. Fundus drawing should be done from behind the patient.
Imaginary Convex Eye ( Field & Barnard, 1993.)
One of the main difficulties encountered by optometrists new to indirect ophthalmoscopy is that the image of the fundus is both inverted and reversed. Difficulties will then arise when the optometrist, having observed something of interest on the fundus needs to change the angle of view to bring the point of interest to the centre of the field of view.With the direct ophthalmoscope the practitioner will, for example, move upwards in order to direct the ophthalmoscope to view the inferior fundus image. The opposite is required with indirect ophthalmoscopy and this reversal of movement does take some getting used to. However, if the practitioner uses the ICE technique, his compensatory movements will then be in the right direction.The technique is used slightly differently with the head-band BIO compared to the SLM BIO, however in both cases the practitioner should imagine the fundus is convex and on the surface of the anterior eye.
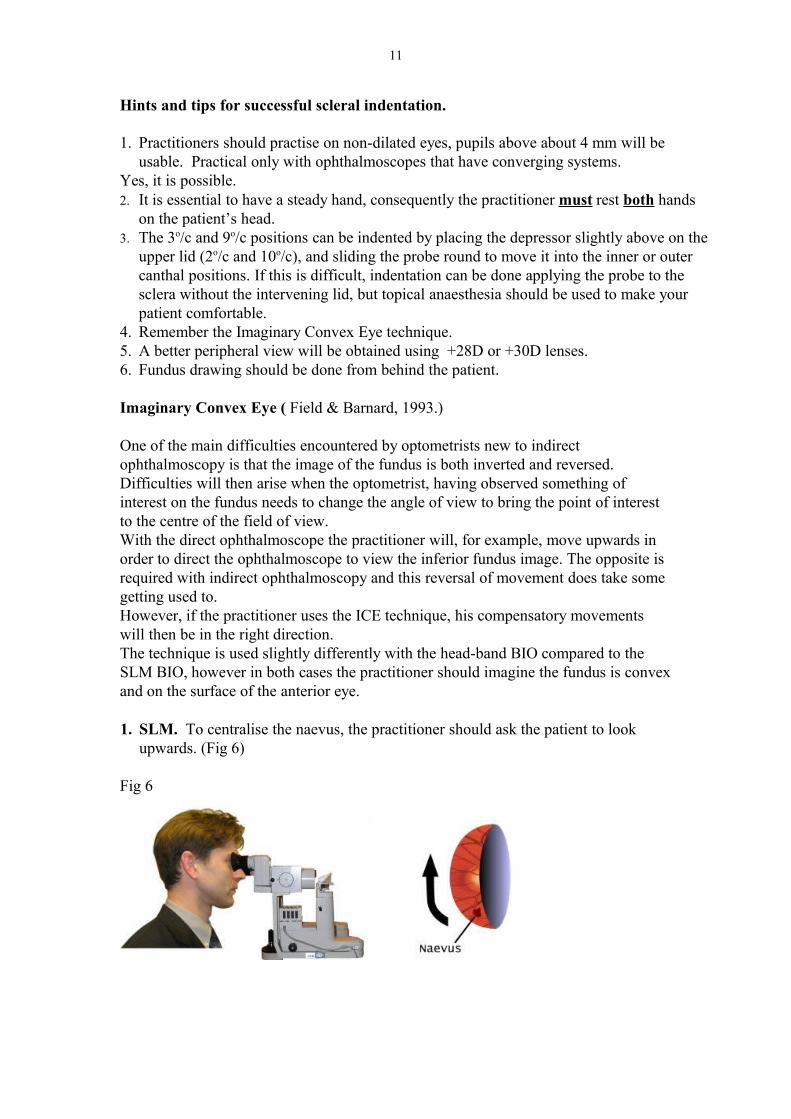
1. SLM. To centralise the naevus, the practitioner should ask the patient to look upwards. (Fig 6)
Fig 6
12
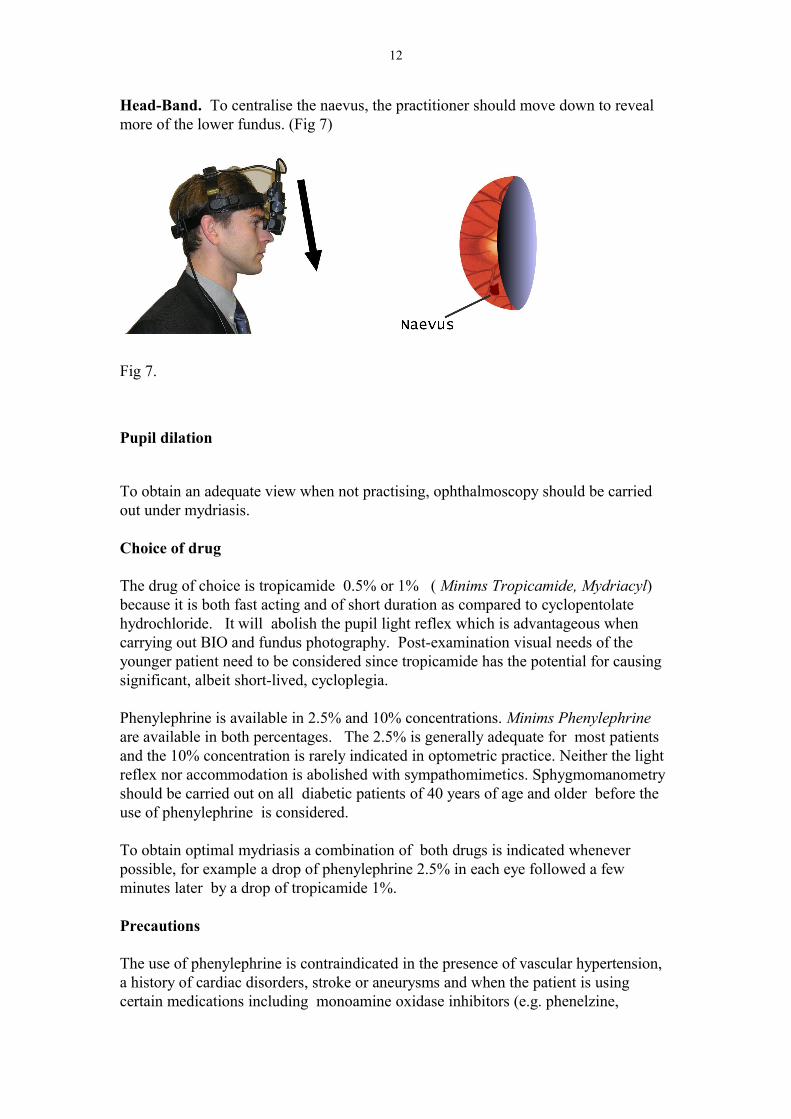
Head-Band. To centralise the naevus, the practitioner should move down to reveal more of the lower fundus. (Fig 7)
Fig 7.
Pupil dilation
To obtain an adequate view when not practising, ophthalmoscopy should be carried out under mydriasis.
Choice of drug
The drug of choice is tropicamide 0.5% or 1% ( Minims Tropicamide, Mydriacyl) because it is both fast acting and of short duration as compared to cyclopentolate hydrochloride. It will abolish the pupil light reflex which is advantageous when carrying out BIO and fundus photography. Post-examination visual needs of the younger patient need to be considered since tropicamide has the potential for causing significant, albeit short-lived, cycloplegia.
Phenylephrine is available in 2.5% and 10% concentrations. Minims Phenylephrine are available in both percentages. The 2.5% is generally adequate for most patients and the 10% concentration is rarely indicated in optometric practice. Neither the light reflex nor accommodation is abolished with sympathomimetics. Sphygmomanometry should be carried out on all diabetic patients of 40 years of age and older before the use of phenylephrine is considered.
To obtain optimal mydriasis a combination of both drugs is indicated whenever possible, for example a drop of phenylephrine 2.5% in each eye followed a few minutes later by a drop of tropicamide 1%.
Precautions
The use of phenylephrine is contraindicated in the presence of vascular hypertension, a history of cardiac disorders, stroke or aneurysms and when the patient is using certain medications including monoamine oxidase inhibitors (e.g. phenelzine,
13
Nardil), alpha-2 adrenergic agonists (e.g. clonidine hydrochloride, Catapres, Dixarit), adrenergic neurone blockers (guanethidine monosulphate, Ismelin).
The use of sympathomimetics should be avoided in optometric practice with long-standing diabetics particularly those with known marked background, pre-proliferative or proliferative retinopathy. Such patients are more likely to manifest a peripheral neuropathy which may include sympathetic denervation. These patients may show "super-sensitivity" to phenylephrine, the instillation of which may have an unwanted and exacerbated effect on the cardiovascular system.
Guidelines for dilating patients with narrow angles
1) Care must be taken in the presence of a very narrow or shallow angle which has not been dilated previously. If the practitioner is confident that mydriasis will provoke angle closure, then an ophthalmological opinion should be sought. (Van Herick et al, 1969).
2) If the patient has been dilated previously, with no induced rise in ocular tension, the practitioner can dilate again.
3) In all cases of angle grades 1 and 2, the patient's ocular tensions should be checked before instillation of the drug(s) and again 30 minutes after completing the examination. It should be noted however that there can be rises in pressure some hours later.
4) The practitioner should always bear in mind that failure to examine the fundusproperly under mydriasis may lead to serious retinal changes being missed. The risk of provoking angle closure must be weighed against this in the knowledge that, in due course, a predisposed patient is, in any event, very likely to experience a sub-acute or acute glaucoma attack at sometime in the future.
Post mydriatic management
1. The use of a parasympathomimetic such as pilocarpine to routinely reverse mydriasis is probably not indicated for most patients. The visual effects of tropicamide and phenylephrine are either very short in duration or insignificant and for most patients there is little to be gained by the instillation of a miotic. It should also be noted that pilocarpine may cause anterior displacement and steepening of the lens in some eyes. Thus there may be a very slight risk of provoking pupillary block glaucoma in predisposed eyes. Hyperopic eyes and/or eyes with shallow anterior chambers are considered to be more at risk (Doughty, 1995).
2. In the very unlikely and rare event of a significant rise (> 8 mm Hg) in ocular tensions due to angle closure following tropicamide and/or phenylephrine mydriasis, the practitioner should be aware of management strategies for the patient. Ophthalmologists differ in their philosophies and individual optometrists should discuss with their local consultant ophthalmologist what intervention should be employed in these circumstances. One treatment strategy would be to instil 1
14
drop of pilocarpine 1% or 2%. After 15 minutes (q 15 min) the pressures and angle should be checked again and another drop instilled if necessary. This procedure may be repeated until the attack is broken For some patients 1 or 2 drops may be sufficient to break the attack; in others, 4 to 6 drops might be required (Doughty, 1995). One should proceed cautiously with aggressive use of pilocarpine drops (q 15 min) if tonometry indicates excessively high intraocular pressures (i.e. > 50 mm Hg) since it has been suggested that such a use could exacerbate a pupil block; lowering the intraocular pressure with an oral carbonic anhydrase inhibitor should be the initial goal in such patients prior to the aggressive use of the miotic.
Alternatively, the local ophthalmologist may prefer the optometrist to instil one drop of pilocarpine before referring the patient (preferably under escort) to the hospital Accident and Emergency Department or even send the patient directly to A & E with no pharmacological intervention. The optometrist should ensure that there is a practitioner available to receive the patient.
References and further reading
Doughty, M. J. Drugs, Medication and the Eye, Chapter 9, Glasgow-Caledonian University, 1995
Field.A and Barnard N.A.S., Imaginary convex eye. An aid to indirect ophthalmoscopy. Optometry Today, May 31, 22, 1993
Fingeret, M., Casser L., Woodcombe, H.T. Atlas of Primary Care Procedures, Appleton & Lang, Norwalk, 1990
Prokopich, C..L., and Flanagan, J.G. Indirect fundus biomicroscopy. Ophthal. Physiol. Opt. Vol 15 (Suppl 2), S38-S41, 1995
Van Herick, W., Shaffer, R.N., and Schwartz, A. Estimation of width of anterior chamber. Am J Ophthalmol., 68, 626-629, 1969