Embed Size (px)
Citation preview

BC310 Technical Core Competence (NT/ORACLE) BC310
R/3 System Release 46C 08/10/2001
0

SAP AG 1999
BC310 Technical Core Competence (NT/ORACLE)BC310 Technical Core Competence (NT/ORACLE)
R/3 Release 4.6B 50034310 R/3 Release 4.6B 50034310
Technical Core Competence(NT/Oracle)Technical Core Competence(NT/Oracle)
SAP AG 1999
Copyright 2001 SAP AG. All rights reserved.
Neither this training manual nor any part thereof maybe copied or reproduced in any form or by any means,or translated into another language, without the priorconsent of SAP AG. The information contained in thisdocument is subject to change and supplement without priornotice.
All rights reserved.
Copyright
� Trademarks:
� Some software products marketed by SAP AG and its distributors contain proprietary software components of other software vendors.
� Microsoft®, WINDOWS®, NT®, EXCEL®, Word® and SQL Server® are registered trademarks of Microsoft Corporation.
� IBM®, DB2®, OS/2®, DB2/6000®, Parallel Sysplex®, MVS/ESA®, RS/6000®, AIX®, S/390®, AS/400®, OS/390®, and OS/400® are registered trademarks of IBM Corporation.
� ORACLE® is a registered trademark of ORACLE Corporation, California, USA.
� INFORMIX®-OnLine for SAP and Informix® Dynamic ServerTM are registered trademarks of Informix Software Incorporated.
� UNIX®, X/Open®, OSF/1®, and Motif® are registered trademarks of The Open Group.
� HTML, DHTML, XML, XHTML are trademarks or registered trademarks of W3C®, World Wide Web Consortium, Laboratory for Computer Science NE43-358, Massachusetts Institute of Technology, 545 Technology Square, Cambridge, MA 02139.
� JAVA® is a registered trademark of Sun Microsystems, Inc. , 901 San Antonio Road, Palo Alto, CA 94303 USA.
� JAVASCRIPT® is a registered trademark of Sun Microsystems, Inc., used under license for technology invented and implemented by Netscape.

� SAP, SAP Logo, mySAP.com, mySAP.com Marketplace, mySAP.com Workplace, mySAP.com Business Scenarios, mySAP.com Application Hosting, WebFlow, R/2, R/3, RIVA, ABAP™, SAP Business Workflow, SAP EarlyWatch, SAP ArchiveLink, BAPI, SAPPHIRE, Management Cockpit, SEM, are trademarks or registered trademarks of SAP AG in Germany and in several other countries all over the world. All other products mentioned are trademarks or registered trademarks of their respective companies.
� Design: SAP Communications Media
SAP AG 1999
SAP Basis Administration Training 4.6
Expert Competence
DatabaseAdministration Training
Core Competence
BC305 3 daysAdvanced R/3 System Administration
MBC30 2 daysR/3-Technical Implementation and Operation Management
Technical Core Competence
BCtcc* 5 days
BC325 3 daysSoftware Logistics
BC315 3 daysWorkload Analysis
BC535 3 daysDatabase AdministrationDB2 UDB
BC530 5 daysDatabase AdministrationDB2/390
Corresponding R/3 Basis Knowledge Product and/or SAP Expert Knowledge Book
BC505 3 daysDatabaseAdministration Oracle
DatabaseAdministration Informix
BC511 5 days
DatabaseAdministration SAP DB
BC515 2 days
BC520 3 daysDatabase AdministrationMS SQL Server
*Technical Core Competence Versions
BC310 Windows NT / OracleBC312 Windows NT / SAP DBBC314 Windows NT MS SQL ServerBC317 (Windows NT / UNIX) / DB2BC360 UNIX / OracleBC361 UNIX / InformixBC362 UNIX / SAP DBBC370 IBM AS400BC390 IBM /390
**BC350 Workplace (combined with MY301)
BC350** 3 days
TCC Workplace
BC555 2 daysLiveCache Administration
BC525 3 daysDatabase AdministrationDB2/400MY301 2 days
Workplace

SAP AG 1999http://sapnet.sap.com/TechNet
SAP‘s Knowledge Transfer Model
KnowledgeProducts
TechnicalCertifications
http://sapnet.sap.com/pa
Expert KnowledgeBook Serieshttp://sapnet.sap.com/Books SAP AG 1999 filename ( au thor) / 2
Database Administrat ionSAP DB
BC515 2 days
Core Competence Exp ert Competence
BC305 3 daysAdvanced R/3 System Administration
*Technical Core Co mpetence Versions
BC310 Windows NT / OracleBC314 Windows NT MS SQL Serve rBC317 (Windows NT / UNIX) / DB2BC360 UNIX / OracleBC362 UNIX / SAP DB
MBC30 2 day sR/3-Tec hni cal Implementation and Operati on Management
Technical Core Competence
BCtcc* 5 days
Corresponding R/3 Basis Knowledge Product
BC505 3 daysDatabase Administrat ionORACLE
BC325 3 daysSoftware L ogistics
BC520 3 daysDatabase Administrat ionMS SQL Server
SAP Basis Administration Training 4.6
BC535 3 daysDatabase Administrat ionDB2 UDB
SAP AG KTM mySAP.com for Techn. Imp l., IT Cons., Sys. Integ ra tion UH / 7
Technica l Optimi zation of Pricing
EWA10 (SD) 2 days
Technica l Optimi zation of Due Li st Processing
inclu ding Scheduling
EWA11 (SD) 2 days
Technica l Optimi zationof Batch Determination
EWA13 (SD) 2 days
Technica l Optimi zation of Credi t Management
EWA14 (SD) 2 days
Technica l Optimi zation of Text Det ermin ation
EWA15 (SD) 1 day
Technica l Optimi zation of Product Sel ect ion
EWA16 (SD) 1 day
Technica l Optimi zation of Partner Determination
EWA17 (SD) 1 day
Technica l Optimi zation of Backflushi ng of Production Orders
EWA12 (PP) 2 days
Technica l Optimi zation of the Availabili ty Check
EWC10 (SD/PP) 2 days
Technica l Optimi zation of MRP Ru n and
Long Term Pla nning
EWA20 (PP) 2 days
Technical Optimi zation of Profitability An alysis
EWA18 (CO) 2 days
Technical Optimi zationof Calculation of Prod uction Orders
EWC13 (PP/CO) 2 days
Technica l Optimi zationSh ipping and
Warehouse Management
EWC16 (SD) 2 days
Empowering Worksh ops - Application and CrossApplication
IBU specificand GlobalWorksho ps
Technica l Optimization of Conf ig urati on
o f Variants
EWC11 (SD/PP) 2 days
Empowering Workshops
Technical Training andWorkshopshttp://sapnet.sap.com/EducationServices
http://sapnet.sap.com/BasisKnProd
SAP GoingLive Check http://sapnet.sap.com/GoingLiveCheck
SAP EarlyWatch Service http://sapnet.sap.com/EarlyWatch
SAP EarlyWatchAlert http://sapnet.sap.com/EWA
SAP Consulting Services http://sapnet.sap.com/ConsultingServices
TeamSAP Support http://sapnet.sap.com/TeamSAPsupport

SAP AG 1999
Course Overview

SAP AG 1999
Course Prerequisites - Target Group - Duration
� Prerequisites:� SAP50 - Basis Technology
� Basic Knowledge of Windows NT and Oracle
� Audience:� R/3 System administrators
� Database administrators
� IT staff
� Duration: 5 days

SAP AG 1999
Course Goal
This course will enable you to:� Administer your R/3 System
� Back up your system
� Check and use the transport system
� Schedule background jobs
� Handle the spool system
� Archive R/3 data
� Monitor and analyze your R/3 System

SAP AG 1999
Unit 7 Background ProcessingUnit 8 Software LogisticsUnit 9 Users and AuthorizationsUnit 10 Spool and PrintUnit 11 SAP Data ArchivingUnit 12 System MonitoringUnit 13 SAPNet
Unit 1 IntroductionUnit 2 Starting and Stopping
Unit 3 System AdministrationAssistant
Unit 4 CCMS Configuration
Unit 5 Database Administrationand Backups
Unit 6 DB Administration:Periodic Checks
Course Overview
Conclusion
Appendix 1 Installation CheckAppendix 2 System Administration Assistant
Course Contents
SAP AG 1999
1 Introduction 8 Software Logistics
2 Starting and Stopping 9 Users and Authorizations
3 System AdministrationAssistant 10 Spool and Print
4 CCMS Configuration 11 SAP Data Archiving
5 Database Administration and Backups 12 System Monitoring
6 DB Administration:Periodic Checks 13 SAPNet
7 Background Processing
Introduction
SAP AG 1999
Introduction
Contents� Review of essential R/3 terms and concepts� Outline of some basic R/3 System steps
(as described in SAP50)
ObjectivesAt the end of this unit, you will be able to:� Explain certain important R/3 concepts and terminology� Describe the system steps triggered during an R/3 logon
or while a transaction is being executed

SAP AG 1999
R/3 System Client / Server Configurations
ApplicationApplication
DatabaseDatabase
PresentationPresentation
Database, application, presentation processes
One-tier configuration
Two-tier configuration
Three-tier configuration
Presentation processes
Database, application processes
Database processes
Application processes
� The fundamental services in a business application system are presentation services, application services, and database services.
� In a one-tier R/3 System configuration, all processing tasks are performed on one server, as in classic mainframe processing.
� Two-tier R/3 System configurations are usually implemented using special presentation servers that are responsible solely for formatting the graphical user interface. Many R/3 System users use Windows PCs for example as presentation servers. An alternative two-tier configuration (not shown) is to install powerful desktop systems and to use these for presentation and applications also (two-tier client/server). This type of configuration is particularly useful for processing-intensive applications (such as simulations) or for software developers, but due to the additional administration requirements is usually used for test purposes only.
� In a three-tier configuration, separate servers are used for each tier. Using data from the database server, several different application servers can operate at the same time. To ensure that the load on individual servers is as even as possible and to achieve optimal performance, you can use special application servers for individual application areas such as distribution or financial accounting (logon and load balancing).

SAP AG 1999
DatabaseDatabase
V E
R/3 System Logon Steps
IP: X.Y.Z.20 IP: X.Y.Z.101
Ex.: IP: X.Y.Z.102
3
4
6
5
10
9
8
7
D B S ... D V B D ...
Database processesDatabase processes
Dispatcher MMDispatcher
SAP GUIEx.: IP: a.b.c.73
� When a SAP GUI process is started on the front end, a command line parameter is sent, indicating one of the following:
� A specific dispatcher can be accessed directly (go directly to 3)
� The logon must first be sent to the message server (1) for logon load balancing
� When logon load balancing is used, the message server returns the IP address and instance number (2) of a specific dispatcher. The number of dispatchers available for a particular logon is configured in the system. Logon load balancing is useful if certain user groups are assigned to work on specific servers.
� The message server returns the IP address of one of the assigned dispatchers, for example the dispatcher that has shown the best response time during the last five minutes. Response times are stored in the collected workload data.
� The frontend process then connects to the assigned dispatcher (3), which selects a free dialog work process (4) to compare the logon user data with the user data stored in the database (5, 6).
� If the logon user data does not agree with the stored user data, no logon is allowed. If the logon is successful, the SAP GUI is established with the user (7-10). This dispatcher and its work processes are used for the duration of the session.
� If a user logs off and then logs on again to the system, logon load balancing may cause the message server to select another dispatcher for the user to work with.

SAP AG 1999
Instance A Instance B
Central Instance C
MessageMessageserverserver
B
Defining Instance and Application Server
S S ...
Dispatcher
...
Dispatcher
D V E B S ...
Dispatcher
� An instance is a group of R/3 services that are started and stopped together. Usually, an instance is one dispatcher with its work processes, although other standalone services such as a gateway can be called an instance.
� A central instance is a dispatcher offering all the R/3 System processes: DVEBMGS. In the graphic, Instance C shows all the processes except the gateway (G).
� An R/3 application server is a computer where one or more R/3 instances are running.
� An R/3 System consists of one or more R/3 instances. The instances can run on one or more computers. Each instance belongs to exactly one R/3 System.
� From the hardware point of view, however, an application server can be defined as a computer on which at least one dispatcher, also called a dialog instance, is running.
� The following restrictions apply to the number of each type of work process:
� Dialog (D): each dispatcher needs at least 2 dialog work processes (not shown above)
� Spool (S): at least 1 per R/3 System (more than 1 per dispatcher allowed)
� Update (V): at least 1 per R/3 System (more than 1 per dispatcher allowed)
� Background (B): at least 2 per R/3 System (more than 1 per dispatcher allowed)
� Enqueue (E): exactly 1 per R/3 System (only 1 E work process is required and allowed)
SAP AG 1999
Database
System Dialog Step
SAP
GU
ISA
P G
UI
Dialog work processDialog request queue
Taskhandler
Dynpro processor
ABAP processor
Database interface
User context in main memory
1
Roll in4
6
5
9
8
7
12
Roll out11
Dis
patc
her
Dis
patc
her
2
3
10
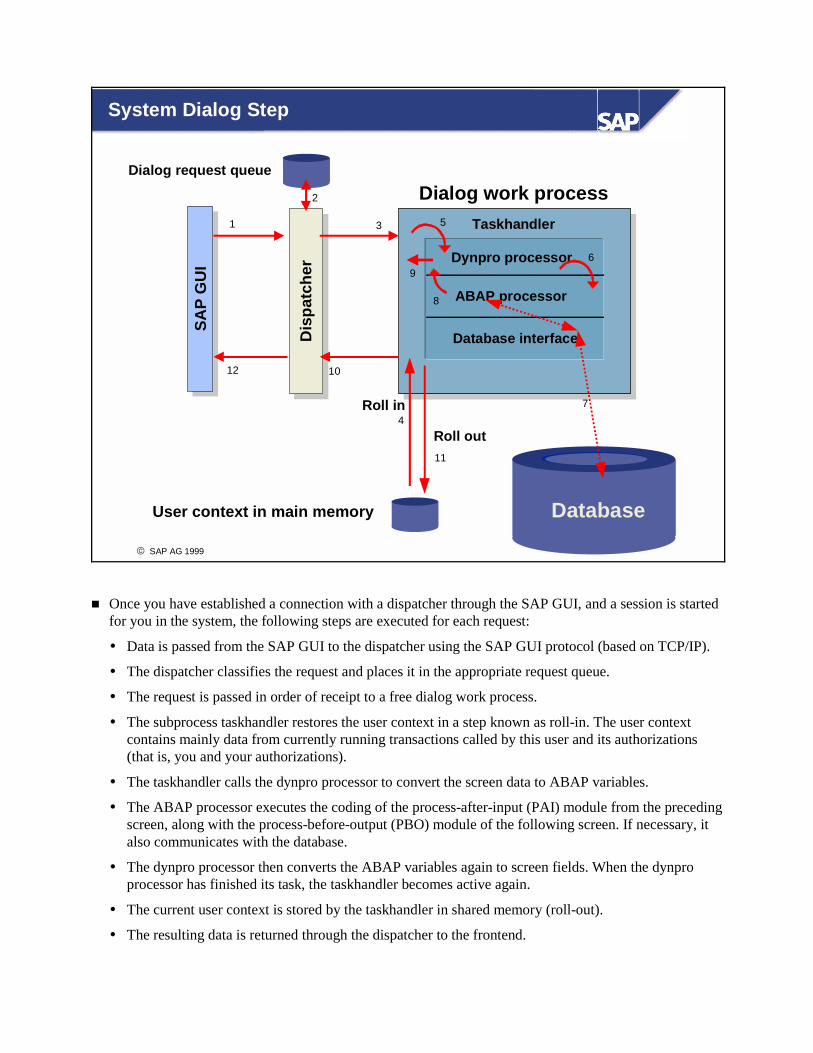
� Once you have established a connection with a dispatcher through the SAP GUI, and a session is started for you in the system, the following steps are executed for each request:
� Data is passed from the SAP GUI to the dispatcher using the SAP GUI protocol (based on TCP/IP).
� The dispatcher classifies the request and places it in the appropriate request queue.
� The request is passed in order of receipt to a free dialog work process.
� The subprocess taskhandler restores the user context in a step known as roll-in. The user context contains mainly data from currently running transactions called by this user and its authorizations (that is, you and your authorizations).
� The taskhandler calls the dynpro processor to convert the screen data to ABAP variables.
� The ABAP processor executes the coding of the process-after-input (PAI) module from the preceding screen, along with the process-before-output (PBO) module of the following screen. If necessary, it also communicates with the database.
� The dynpro processor then converts the ABAP variables again to screen fields. When the dynpro processor has finished its task, the taskhandler becomes active again.
� The current user context is stored by the taskhandler in shared memory (roll-out).
� The resulting data is returned through the dispatcher to the frontend.

SAP AG 1999
Work Process Multiplexing
Request queues
... ...Request queues
DatabaseDatabase
V E
1
5
4
9
8
7
6
D B S ... D V B D ...
Database processesDatabase processes
DispatcherMM
Dispatcher
Dynpro200Dynpro200
Dynpro100Dynpro100
SAP GUI
2 1110
12
13
14
15
16
17
18
3
� If a transaction involves the use of more than one screen, the system dialog steps shown on the preceding page are normally performed by several different dialog work processes in a dispatcher. This is known as work process multiplexing.
� Each dialog request is:
� First, placed by the dispatcher in the dialog request queue
� As soon as possible, assigned to a free dialog work process
� The work processes do not perform database operations. They pass data and commands to the assigned database processes using their own database interface.

SAP AG 1999
In this unit, you have reviewed the following:
� The steps executed in R/3 during logon
� The terms “instance” and “application server”as used in the R/3 environment
� Processing of a system dialog step
� Work process multiplexing as performed bydialog work processes
Summary of this Unit
SAP AG 1999
� SAP50 - Basis Technology
� SAP Technology InfrastructureBrochure available in SAPNet under:Information →→→→ R/3 System →→→→ Basis Technology
� SAP Online Documentation
� SAP Notes:� 39412 Number of workprocesses
� 21960 Two instances on one computer
� 5424 FAQ: enqueue/locking
� and others in BC-KRN-CST
Further Documentation

SAP AG 1999
1 Introduction 8 Software Logistics
2 Starting and Stopping 9 Users and Authorizations
3 System AdministrationAssistant 10 Spool and Print
4 CCMS Configuration 11 SAP Data Archiving
5 Database Administration and Backups 12 System Monitoring
6 DB Administration:Periodic Checks 13 SAPNet
7 Background Processing
Starting and Stopping
SAP AG 1999
Starting and Stopping
Contents� Processes and services in an R/3-NT-Oracle
environment� Start and stop processes and procedures
ObjectivesAt the end of this unit, you will be able to:� Explain the concept of services� Describe R/3 start and stop processes� Explain the relationship between database processes,
R/3 processes, and operating system processes� Start and stop an R/3 System� Analyze error situations during startup or shutdown

SAP AG 1999
Overview of Processes and Services
Operating system: Windows NT
Oracle database processes R/3 processes
Database services...
R/3 services...
Operating system services
...
� The graphic shows the structure of processes and services when R/3 is used with an Oracle database on a Windows NT operating system.
� The operating system services are implemented with the NT services concept. Oracle and R/3 also require their own services, which are installed during installation of the R/3 System package.

SAP AG 1999
NT Service Control Manager NTRegistry
SAPOsCOL ..... ServicesOracleService<SID>SAP<SID>_<Instance no.>
Operating system: Windows NT
Starting R/3: Operating System Tasks
� During startup of the operating system Windows NT, the NT Service Control Manager starts all the services in the service list that are configured for automatic startup. The information relevant to these services is stored in the registry and is read by the Service Control Manager during startup.
� Several services of type “SAP<SID>_<Instance no.>” (the SAP service) and “Oracle Service<SID>”, but only one SAPOsCOL service, can be run on one computer.
� The SAP service, SAPOsCOL, and OracleService<SID> should be configured for automatic startup.

SAP AG 1999
Logon
<SID>adm
Start
Microsoft Management Consolevia SAP R/3 Systems Snap-in
1122
33 44 55
Operating system: Windows NT
DatabaseStart
CentralInstance
AdditionalInstance
Starting R/3: R/3 Administrator Tasks
� To start the Oracle database and the R/3 System, the administrator performs the following steps:
� Log on to the operating system Windows NT as user <sid>adm.
� To start the R/3 System, open the Microsoft Management Console (MMC) using the SAP R/3 Systems Snap-in. Right-click on the system icon and select Start. The sapstartsrv.exe executable sends a message using a named pipe to the SAP Service, SAP<SID>_<instance no.>.
� The SAP service starts the database by executing an NT script that calls the Oracle Server Manager. The Oracle Server Manager executes an SQL script that starts the database if it is currently not running. Once the database is up and running, the SAP service starts the Message Server (msg_server.exe) and the Central Instance dispatcher (disp+work.exe).
� The R/3 System has been started successfully when the icon for the central instance changes color to green. The colors displayed in the MMC have the following meanings: red - the process terminated abnormally; yellow - the process is being started; green - the R/3 System has been successfully started; gray - the process is not running, status unknown.
� You can also start the R/3 System with the NT scheduler called “at”. For this kind of start, SAP provides the executables startsap and stopsap which are executed locally. Use
- startsap name=<SID> nr=<nr> SAPDIAHOST=<hostname> to start an R/3 instance and
- stopsap name=<SID> nr=<nr> SAPDIAHOST=<hostname> to stop an R/3 instance (the executables sapstart.exe, sapsrvkill.exe and sapntwaitforhalt.exe must be in the same directory)

� See SAP Online Documentation: choose BC Basis Components → Computing Center Management System → BC Computing Center Management System → Starting and Stopping the R/3 System.

SAP AG 1999
R/3 Processes
SAP<SID>_<instance no.>
Message via named pipe
Default and instance profile
Start profile
Microsoft Management Console
NT Services
MS Disp+work.exe
Starting R/3: Process Startup Sequence
Database Processes
D ...SBV E
3
4
2
56
1
� When the start command is issued from the MMC, a message is sent using a named pipe to the SAP Service via the executable sapstartsrv.exe.
� To find out which components have to be started, the SAP service reads the Start Profile from directory \\<SAPGLOBALHOST>\sapmnt\<SID>\SYS\profile. To view this profile for an instance from the MMC, right-click on the instance icon and choose All tasks → View Start Profile.
� If necessary, the SAP service starts the database; then it starts the message server and the dispatcher.
� To determine the runtime configuration for the instance, the dispatcher reads the default profile and the instance profile. The shared memory areas, work processes, and gateway reader are generated accordingly.
� Once the necessary resources are configured, the work processes connect to the ORACLE threads of the database as user sapr3.
� To view the startup trace file sapstart.trc and the developer traces, right-click on an instance and choose an option under All tasks.
� The database may be started using the MMC, the SAPDBA, the Oracle Instance Manager, or the Oracle Server Manager.

SAP AG 1999
R/3 workprocesses
Instance profile<SID>_<INSTANCE>_<hostname>
Default profileDEFAULT.PFL
• R/3 kernel
• NT system environment variables• NT Registry environment variables
Parameterread / replace
sequence11
22
33
Parameter Read Sequence
� To provide a stable startup procedure, a parameter read sequence (also known as the parameter replace sequence) is defined during startup as follows:
� R/3 processes read the appropriate parameters from the R/3 kernel, from the NT system environment variables, and from the NT Registry environment variables.
� The default profile “\\<SAPGLOBALHOST>\sapmnt\<SID>\SYS\profile\default.pfl” is read. Profile values already defined in the R/3 kernel are replaced with the values in the default profile.
� The instance profile “\\<SAPGLOBALHOST>\sapmnt\<SID>\SYS\profile\<SID>_<Instance>_<hostname>” is read. Profile values already defined in the default profile or in the R/3 kernel are replaced with the values defined in the instance profile.
� This procedure ensures that system parameter values reflect not only the instance profile but also the values in the default profile and the R/3 kernel.
� To display the replace sequence for a particular parameter, execute the report RSPFPAR in Transaction SE38 or SA38.
� The SAP service reads only the start profile and the default profile. The R/3 kernel (disp+work.exe) reads only the default profile and the instance profile. If you change the default profile, you must restart the SAP service (including the R/3 instance). If you only change the instance profile, you only need to restart R/3 using the MMC.


SAP AG 1999
Startup Logs and Traces in Windows NT
Event Viewer - … Log on \\Host1
Date Time Source Category Event
25.06. 14:22 SAP None 2405
Windows NT
SAP<SID>_<no>
Services
SAPOsCOL
Oracle Service<SID>
MMC SAP R/3System Snap-in
System log
Securitylog
Application log
EVENTLOG log files
� All Windows NT messages generated by any services, by the SAP Service Manager, or by the operating system, are recorded by the NT Event Viewer. The Event Viewer writes the event log, which consists of three log files:
� System Log This contains operating system messages and messages produced by R/3 or Oracle applications and returned by the operating system.
� Application Log This contains events that occurred in, for example, the R/3 or Oracle applications and returned by these applications.
� Security Log This contains such events as logon, logoff, and user file access, depending on the security auditing properties of the file system.
� The Event Viewer is located in the group Administrative Tools (Common) or can be called at a command prompt using the command eventvwr.

SAP AG 1999
MMC SAP R/3 Systems Snap-In
General overview of key SAP processes
Current statistics onmajor system and SAP components
Alert statistics fromCCMS monitoring
sets in RZ20
Information and errors in the
R/3 System log
Process queue statistics
Process overviewinformation
SM50
� Using the MMC, an R/3 System administrator can monitor multiple R/3 Systems and application servers remotely from a Windows NT System using the SAP R/3 Systems Snap-in.
� The SAP R/3 Systems Snap-in enables you to:
� Start and stop all R/3 instances with a mouse click
� Display the R/3 Process List (status of message server and all instances)
� View all R/3 startup and trace files
� Display the R/3 System environment
� Display alert status tree (transaction RZ20) and acknowledge current alerts
� Start analysis tools in R/3 for nodes in the alert tree
� View the R/3 syslog (transaction SM21), for both an online and offline R/3 System
� Remote logon to an application server
� Displaying the queue statistics (dpmon) and process overview (transaction SM50)
� The MMC is shipped as follows:
� Windows NT: the MMC is installed with the R/3 Systems Snap-in during R/3 installation.
� Windows 2000: the MMC is preinstalled in the operating system. Only the R/3 Systems Snap-in is installed during R/3 installation.

SAP AG 1999
\\<SAPLOCALHOST>\saploc\<SID>\<Instance><No>\work\ ...
stderr1 … 3
sapstart.log
dev_disp
dev_w0 … n
Standard error files of R/3 startup procedureexecuted by SAP service SAP<SID>_<instance-no.>
Startup log and trace files of the database, message server, and dispatcher
Trace file of the dispatcher
Trace files of the work processesTime
dev_ms Trace file of the message server
sapstart.trc Trace files of program SAPSTARTSRV
Startup Logs and Traces in R/3
� R/3 work directories contain trace files and error files for messages relating to the startup of work processes. Each R/3 instance has a separate work directory containing information that may not be found in the R/3 System log.
� The work directory files are initialized in chronological order. During startup, the SAP service executable SAPSTARTSRV.EXE writes:
� Database logs to the file STDERR1
� Message server logs to the file STDERR2
� Dispatcher logs to the file STDERR3
� To define the level of information written to the developer trace files, set the profile parameter “rdisp/TRACE” in the instance profile. The possible values for this parameter are:
0: Write only errors (no traces)
1: Write error messages and warnings (default)
2: Write error messages and a short trace
3: Write error messages and the complete trace
� You can also change the trace level for single work processes in the process overview (using transaction SM50).

� To view all startup logs and developer traces for an instance using the MMC, right-click on the instance in the console tree and choose All Tasks → View Developer Traces. To see the startup trace files, select the appropriate file type.

SAP AG 1999
Startup Diagnostics
MMC SAP R/3 System Snap-in
..... ServicesOracle Service<SID>
SAP<SID>_<instance no.>
Oracle instance <SID> R/3
centralinstance
Event Viewer
Date Time Source
25.08.14:22 SAP
<SID>ALRTora<No.>.trc R/3 trace files
c:> sapdba -startup
CMD
Sapdbalog files
R/3 System log
� If the R/3 System fails to start correctly, the R/3 System administrator should try to find out why.
� The graphic shows the possible points of startup failure, and the locations of the corresponding error messages. If the database has not been started, the work processes cannot connect to the database and the R/3 System cannot be started.
� Further reasons for startup failure include:
� The MMC SAP R/3 System Snap-ins cannot connect to the SAP service because the SAP service is not running or not properly configured.
� Services do not start, as the service executable is not accessible, Registry entries are lost or damaged, or the service is not correctly configured (for example, the user password is wrong).
� Database startup fails, for example, if environment variables are not correct, if the database is running in DBA mode, if database files are lost or corrupt, or if data files have been renamed in the database but not at operating system level.
� R/3 Startup fails, for example, if NT shares are not accessible, if a service is not correctly configured (wrong user), if there are permission problems on the file system or errors in TCP/IP configuration (hosts, services, DNS, hostname), or if no connections to the database are possible.
� R/3 can be configured to write messages both to the R/3 System log and to the NT EVENTLOG using transaction RZ20.

� If you can log on to the R/3 System, you can also use the CCMS Monitoring sets to analyze the problems (transaction RZ20).

SAP AG 1999
Logs and Traces for Database Startup
Oracle instance <SID><drive>:\oracle\<SID>\...
saptrace\background\<SID>ALRT.LOG
saptrace\usertrace\Ora<no>.trc
sapcheck\…sapreorg\...sapbackup\back<SID> \ ...
Command Prompt
Database alert file
Oracle trace information
sapdba log files<drive>:\> sapdba
� All significant system events, including database start, stop, and errors, are logged in the Oracle alert file “<drive>:\oracle\<SID>\saptrace\background\<SID>ALRT.LOG”.
� Detailed error information is logged in the Oracle trace file, “<drive>:\oracle\<SID>\saptrace\usertrace\Ora<no>.trc”.
� If the R/3 System administrator uses sapdba to start the database, sapdba writes additional log files to the following directories according to the activity performed:
� <drive>:\oracle\<SID>\sapreorg
� <drive>:\oracle\<SID>\sapcheck
� <drive>:\oracle\<SID>\sapbackup
SAP AG 1999
R/3 SystemExternal
application
Before Stopping the R/3 System
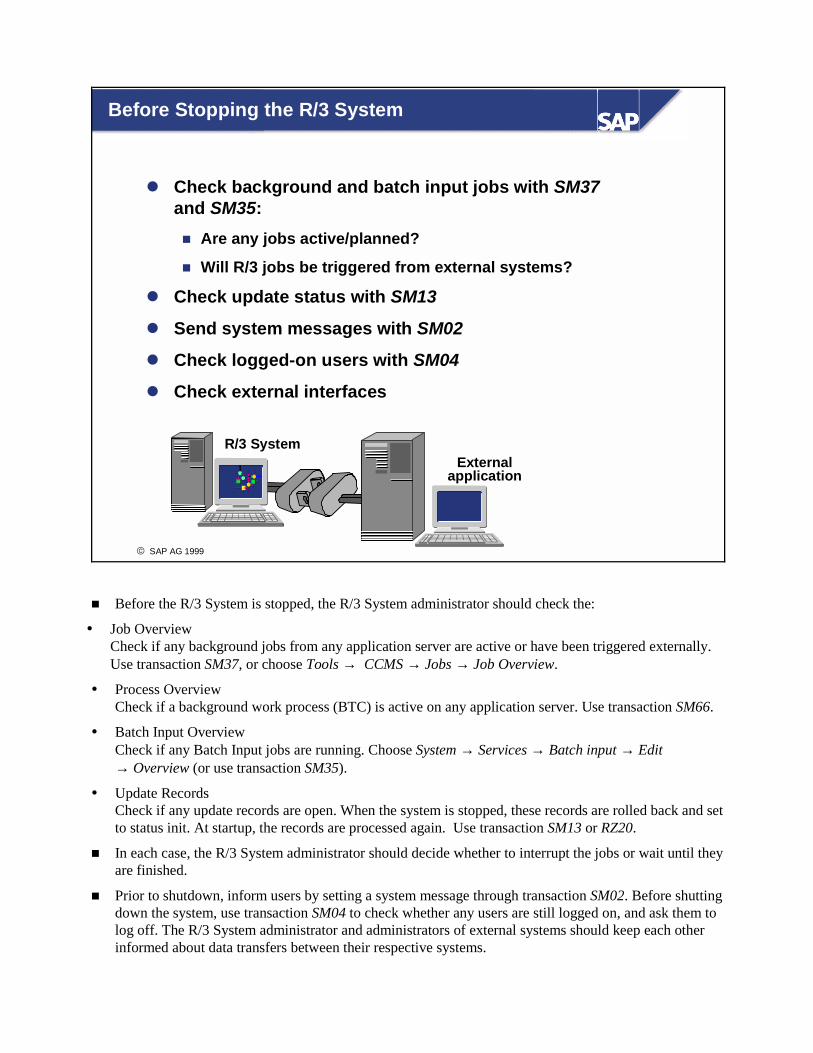
� Check background and batch input jobs with SM37and SM35:� Are any jobs active/planned?
� Will R/3 jobs be triggered from external systems?
� Check update status with SM13
� Send system messages with SM02
� Check logged-on users with SM04
� Check external interfaces
� Before the R/3 System is stopped, the R/3 System administrator should check the:
� Job Overview Check if any background jobs from any application server are active or have been triggered externally. Use transaction SM37, or choose Tools → CCMS → Jobs → Job Overview.
� Process Overview Check if a background work process (BTC) is active on any application server. Use transaction SM66.
� Batch Input Overview Check if any Batch Input jobs are running. Choose System → Services → Batch input → Edit → Overview (or use transaction SM35).
� Update Records Check if any update records are open. When the system is stopped, these records are rolled back and set to status init. At startup, the records are processed again. Use transaction SM13 or RZ20.
� In each case, the R/3 System administrator should decide whether to interrupt the jobs or wait until they are finished.
� Prior to shutdown, inform users by setting a system message through transaction SM02. Before shutting down the system, use transaction SM04 to check whether any users are still logged on, and ask them to log off. The R/3 System administrator and administrators of external systems should keep each other informed about data transfers between their respective systems.

SAP AG 1999
<SID>adm
R/3 additional instances
R/3 System administrator
MMC SAP R/3 System Snap-in
R/3 central
instanceDatabase
1a1a 1b1b 2a2a
Choose??
RefreshDetails Choose
Edit Select Monitoring Control Utilities System Help
R/3 CCMSNT ServiceControl Manager
SAP<SID>_<Inst. No.>
SAPOsCOLOracleService<SID>
Oracle Tools
2b2b33
Stopping the R/3 System
SAPDBA
� To stop the R/3 System, the R/3 System administrator must:
� Stop the application servers (dialog and central instances), by using one of the following:
- The CCMS in R/3 (1a in the graphic)
- The MMC SAP R/3 Systems Snap-in, which sends a message through a named pipe to the SAP service and stops the R/3 instances locally (1b in the graphic)
� Stop the SAP service
� Stop the database, if necessary, by using one of the following:
- SAPDBA (2a, 2b in the graphic)
- Oracle Instance Manager in command line mode
- Oracle Enterprise Manager
� Although the database is started automatically when starting R/3, you must stop the database manually, unless you have specially created your own scripts for shutdown.
� See also SAP Online Documentation: choose BC Basis Components → Computing Center Management System → BC Computing Center Management System → R/3 System Administration. Here you will also find examples of startup and shutdown scripts for the entire R/3 System, including the database.


SAP AG 1999
c:> sapdba -shutdown
Command Prompt
No shutdown
c:> oradim80 -shutdown
Command Prompt
Oracle Instance <SID>
Stopping R/3: Error Diagnostics
� Reasons why the database may be unable to shut down when the R/3 System is stopped include:
� The database is performing a rollback of aborted transactions caused by the shutdown of R/3. Depending on the last commit and the application, this can take a long time.
� An online backup is running. You should wait until the online backup is finished.
� The archiver is stuck just at the moment when you are stopping the R/3 System. You should save the archives to tape, in order to free the file system.
� If there is no obvious reason, the database administrator should check the R/3 System log (with transaction SM21) and the database alert file. The problem should be solved before further attempts are made to stop the database.
� See also SAP Online Documentation: choose BC Basis Components → Database Interface, Database Platforms (BC-DB) → Database administration (Oracle) with SAPDBA.

SAP AG 1999
Summary of this Unit
Now you are able to:
� Explain the NT services concept
� Describe R/3 start and stop processes
� Explain the relationship between database processes,R/3 processes, and operating system processes
� Start and stop an R/3 System
� Analyze error situations during startup or shutdown

SAP AG 1999
Unit Actions
� Exercises?
� Solutions

Starting and Stopping: Exercises The start and stop exercises are divided into two parts: Part 1 requires pcANYWHERE access to the remote server and should be performed first by groups working on development systems (DEV). Part 2 requires Telnet access and should be performed first by groups working on quality assurance systems (QAS). All groups should perform the exercises in both parts. No. Exercise Part 1 (pcANYWHERE) 1 Log on at your workstation at NT level (ask your trainer for a user name). 1.1 Log on to the NT operating system from pcANYWHERE as user <sid>adm.
Which services related to the R/3 System are activated by the operating system?
1.2 Using the Microsoft Management Console, check if your R/3 System is running.
1.3 If your R/3 System is active, shut it down using the Microsoft Management Console.
1.4 The Microsoft Management Console only stops the R/3 instance(s); the database is still running. Shut down the database.
2 Starting 2.1 Start your R/3 System using the Microsoft Management Console. Trace the
startup phase by monitoring the processes of your system. 2.2 Make a list of the R/3 and Oracle process types that are running at the end of
the startup phase. 2.3 Look at the log files and the trace files for errors and warnings. 2.4 Log on to your R/3 System. 2.5 Take a look at the Process Overview in R/3 at operating system level and
from the WP Table in the Microsoft Management Console. 3 Stopping 3.1 Which users are active in your system? Send a system message that you are
stopping the system. 3.2 Stop the R/3 System using the Microsoft Management Console. Shut down
the database using sapdba.
Part 2 (Telnet) 4 Log on at your workstation at NT level (ask your trainer for a user name). 4.1 Log on to the NT operating system using Telnet as user <sid>adm. To see if
the R/3 System is running, run sapdba.

4.2 If your R/3 System is active, shut it down (all instances) using the operating system command stopsap with appropriate parameters. Check the result on sapdba.
4.3 Command stopsap only stops the R/3 instances you specify; the database is still running. Shut down the database.
5 Starting 5.1 Start your R/3 System using the command startsap. If it is not already
running, the database starts automatically. 5.2 View R/3 and Oracle processes at the operating system level. 5.3 Log on to your R/3 System. 5.4 Compare the R/3 work process overview with the process list at the operating
system level.

Starting and Stopping: Solutions No. Solution Part1 (pcANYWHERE) 1 Log on at NT level (ask your trainer for a user name). Then choose Start →
Programs → pcANYWHERE or double-click on the desktop icon. 1.1 Log on to the NT operating system from pcANYWHERE as user <sid>adm.
To determine which services are active, use the NT Services Manager (choose Services or Start → Settings → Control Panel → Services). In addition to other services, the R/3-related services SAPOSCOL and SAP<SID>_<instance number> are displayed.
1.2 Using the Microsoft Management Console (from the icon on the desktop), check the icons for the instances in your R/3 System. A green icon indicates that your R/3 System has been started.
1.3 Using the Microsoft Management Console, right-click on the application server and choose Stop. A dialog box appears: choose Confirm. The instance icon fades to gray, although it may take several minutes for dispatcher to stop.
1.4 To shut down the database, use one of the following methods: - From the MSDOS Prompt, enter command sapdba
- Choose Start → Run and enter command sapdba
- From SAPDBA, choose Startup/Shutdown instance → Shutdown → Shutdown normal.
2 Starting 2.1 Using the Microsoft Management Console, right-click the application server
and choose Start. To monitor the processes, use the tool Quick Slice: choose Start → Run and enter qslice.
2.2 Using the tool Quick Slice, you should see the following R/3 work processes: oracle80.exe, tnslsnr80.exe, saposcol.exe, msg_server.exe, gwrd.exe, and multiple disp+work.exe.
2.3 Use Windows NT Explorer to check the log and the trace files in the directoryG:\usr\sap\<SID>\<instance name>\work. Pay particular attention to the dispatcher trace file dev_disp and the trace files of work process 0 and 1 (dev_w0 and dev_w1, respectively). To see these logs and trace files using the Microsoft Management Console, right-click your instance and choose All Tasks → View Trace File.
2.4 From SAP Logon, select the icon for your R/3 System. Use your desktop window (do not start a SAP GUI from pcANYWHERE).
2.5 From the R/3 initial screen, choose Tools → Administration → Monitor → System monitoring → Process overview (transaction SM50) and use Quick

Slice at the operating system level. Compare the number of work processes. At the operating system level, you can also see the work processes of the second system running on this server. For each instance, the dispatcher is also displayed as a disp+work process.
3 Stopping 3.1 To display the users active in your R/3 System, from the R/3 initial screen,
choose Tools → Administration → Monitor → System monitoring → User overview (transaction SM04). Or choose Tools → Administration → Monitor → Performance → Exceptions/Users → Active users → Users global (transaction AL08).
To send a message to the active users, choose Tools → Administration → Administration → System Messages (transaction SM02).
3.2 Review solutions 1.3 and 1.4. Part 2 (Telnet) 4 To access Telnet from your workstation, log on at NT level (ask your trainer
for a user name). 4.1 As user <sid>adm in your Telnet terminal, run command sapdba. In the
entry screen, you can see from the system information how many times SAPR3 is connected (if SAPR3 is connected, the R/3 System is not stopped).
4.2 Shut down all the instances in your R/3 System as follows: Change to drive G and enter cd \usr\sap\<SID>\sys\exe\run
To stop first the additional instance and then the central instance, enter stopsap name=<SID> nr=<number> SAPDIAHOST=<hostname>
Run sapdba again or, if you are still in, choose Instance Information → Refresh.
4.3 To shut down the database, run sapdba and choose Startup/Shutdown instance → Shutdown → Shutdown normal.
5 Starting 5.1 Start all the instances in your R/3 System as follows:
Change to drive G and enter cd \usr\sap\<SID>\sys\exe\run
To start first the central instance and then the additional instance, enter startsap name=<SID> nr=<number> SAPDIAHOST=<hostname>
5.2 To view the processes, use command tlist/t | more.
5.3 From SAP Logon, select the icon for your R/3 System. Use your desktop (do not start a SAP GUI from pcANYWHERE).
5.4 From the R/3 initial screen, choose Tools → Administration → Monitor → System monitoring → Process overview (transaction SM50) and compare with the output from step 5.2 at the operating system level. The operating system level also shows the work processes of the second system running

on this server, but you can identify the processes by their process IDs. For each instance, the dispatcher is also displayed as a disp+work process.
SAP AG 1999
System Administration Assistant
1 Introduction 8 Software Logistics
2 Starting and Stopping 9 Users and Authorizations
3 System AdministrationAssistant 10 Spool and Print
4 CCMS Configuration 11 SAP Data Archiving
5 Database Administration and Backups 12 System Monitoring
6 DB Administration:Periodic Checks 13 SAPNet
7 Background Processing

SAP AG 1999
System Administration Assistant
Contents� Using the System Administration Assistant� Maintaining the System Administration Assistant� Configuring the System Administration Assistant
ObjectivesAt the end of this unit, you will be able to:� Use the System Administration Assistant� Maintain the System Administration Assistant� Configure the System Administration Assistant

SAP AG 1999
System Administration
Watchthe system
Do daily tasks
Do tasks onuser demand
System monitoring
Daily tasks (Periodic tasks)- Checking the System log ����- Checking the last Backup- Monitoring Database Growth
Monday, October 4, 1999
Occasional tasks(tasks on demand)
System administrator
SSAA
SSAA
� The main tasks of a system administrator are to:
� Perform all periodic tasks to check system health
� Perform tasks as required (such as “Add user”)
� Watch the system for error and alert situations
� All the periodic and occasional tasks of a system administrator can be performed using the System Administration Assistant (transaction SSAA)
� The System Administration Assistant provides a single point of control for the entire system landscape.

SAP AG 1999
� Worklist� Entire view� Selective view:
� Select the function� Select a period� Display only customer tasks
� Alert view
System administrator
Daily work
Training
Tasks on demand
Find errors
Select your view
Starting the System Administration Assistant
� The System Administration Assistant features:
� Worklist
- Display only tasks that must be done today
- For use during daily operation
� Entire view
- Display all tasks
- For training
- To find an occasional task
� Selective view
- Display tasks by function or by period
- Reduce the list and display only customer tasks
� Alert view
- Display only tasks for which an alert determination is defined
- Display critical tasks after execution of all daily tasks

SAP AG 1999
� Only tasks that should be done today are displayed� Tasks that are done are not displayed when calling
the System Administration Assistant� Tasks can be flagged as done� Task status can be reset
Administer Using View Worklist
Assistant Edit Goto Utilities View Help System - xSystem Administration Assistant (SAA)
|- Running your System | |- PRD: Operations Checklist for the Productive System | | |- PRD: Daily tasks | | |- DB: Monitoring Database Growth | |- DEV: Operations Checklist for the Development System | |- DEV: Daily tasks | |- R/3: Checking the System log
System Administration Assistant (SAA)
� Worklists only contain the tasks that must be done today.
� You can reset the status of a task:
� If not all task activities are done
� If you want to start the task more than once
� You can flag a task as done:
� If a periodic task was done earlier than planned
� If more than one task leads to the same transaction and all tasks were done when the transaction was called the first time.
� View Worklist is available as of Release 4.6B.
SAP AG 1999
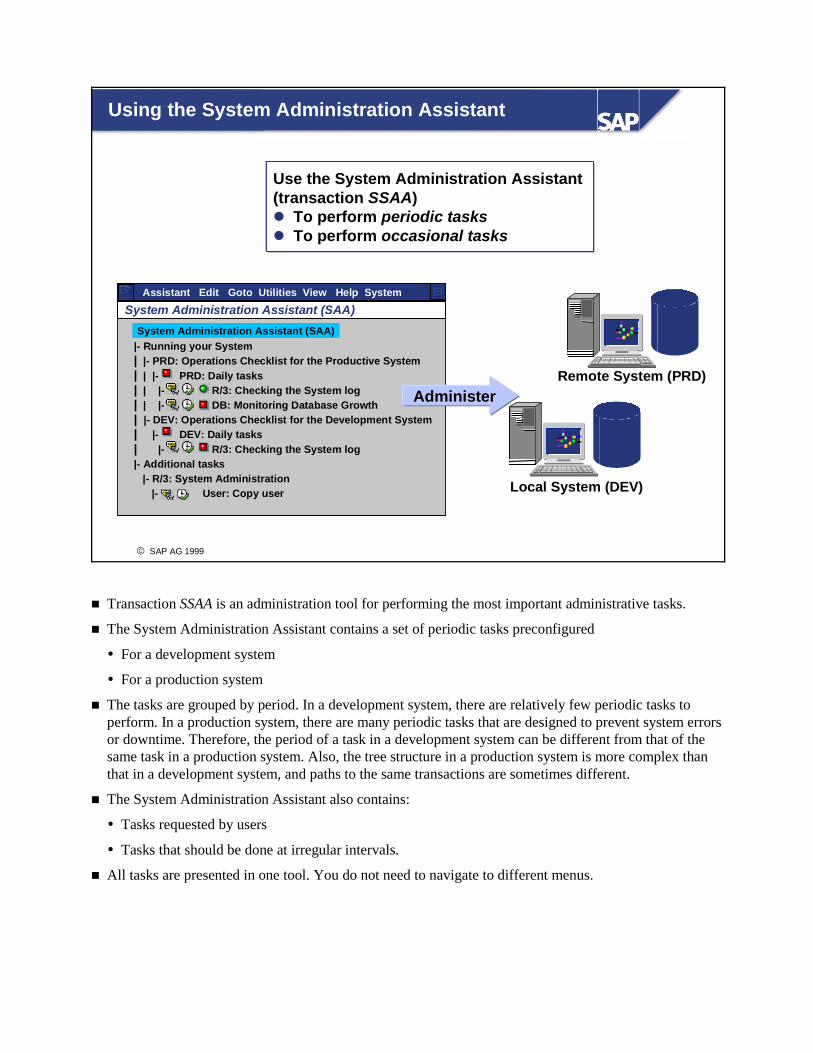
Use the System Administration Assistant(transaction SSAA)� To perform periodic tasks� To perform occasional tasks
Using the System Administration Assistant
Assistant Edit Goto Utilities View Help System - xSystem Administration Assistant (SAA) |- Running your System | |- PRD: Operations Checklist for the Productive System | | |- PRD: Daily tasks | | |- R/3: Checking the System log | | |- DB: Monitoring Database Growth | |- DEV: Operations Checklist for the Development System | |- DEV: Daily tasks | |- R/3: Checking the System log |- Additional tasks |- R/3: System Administration |- User: Copy user Local System (DEV)
Administer
System Administration Assistant (SAA)
Remote System (PRD)
� Transaction SSAA is an administration tool for performing the most important administrative tasks.
� The System Administration Assistant contains a set of periodic tasks preconfigured
� For a development system
� For a production system
� The tasks are grouped by period. In a development system, there are relatively few periodic tasks to perform. In a production system, there are many periodic tasks that are designed to prevent system errors or downtime. Therefore, the period of a task in a development system can be different from that of the same task in a production system. Also, the tree structure in a production system is more complex than that in a development system, and paths to the same transactions are sometimes different.
� The System Administration Assistant also contains:
� Tasks requested by users
� Tasks that should be done at irregular intervals.
� All tasks are presented in one tool. You do not need to navigate to different menus.

SAP AG 1999
Assistant Edit Goto Utilities View Help System - xSystem Administration Assistant (SAA)
|- Running your System | |- PRD: Operations Checklist for the Productive System | | |- PRD: Daily tasks | | |- R/3: Checking the System log | | |- DB: Monitoring Database Growth | |- DEV: Operations Checklist for the Development System | |- DEV: Daily tasks | |- R/3: Checking the System log |- Additional tasks |- R/3: System Administration |- User: Copy user
The status displays:� Tasks that are already done� Tasks that must be done today
Occasional tasks have no status information
Task must be done today
System Administration Assistant (SAA)
Task was done in time
Interpreting the Listing
� Status information for periodic tasks is displayed by a light:
� Green if the task was done in time.
� Red if the task must be done today.
� To see date and user of the last execution, select the green or red light.
� Occasional tasks do not have any status information.
� The status is set after execution of a task.
� If remote access is allowed, status information is also available for remote systems.

SAP AG 1999
Maintain the System Administration Assistant
Assistant Edit Goto Utilities View Help System - x
System Administration Assistant (SAA)
|- Running your System | |- PRD: Operations Checklist for the Productive System | | |- PRD: Daily tasks | | |- R/3: Checking the System log | | |- DB: Monitoring Database Growth | |- DEV: Operations Checklist for the Development System | |- DEV: Daily tasks | |- R/3: Checking the System log |- Additional tasks | |- R/3: System Administration | |- User: Copy user |- Customer specific tasks |- PRD: Daily tasks |- Run transaction ZABC
� Define customer-specific tasks� SAP tasks can be used as template� Customer tasks remain unchanged
after upgrade� SAP tasks cannot be modified in
customer systems
System Administration Assistant (SAA)
� You can add new customer tasks at the end of the list by defining your own customer subtree below the first node.
� If necessary, copy SAP tasks to the customer subtree.
� If tasks are added or copied, they inherit some attributes of the father node (such as period, function, operating system dependence, database dependence, and system dependence). These attributes define the structure of subtrees.
� You cannot modify SAP tasks in customer systems.
� Starting with Release 4.6B:
� A customer tree is offered automatically.
� You can define your own customer subtrees depending on customer namespaces.
� For further information on this topic, see Appendix 2.

SAP AG 1999
Administer a System Landscape
Assistant Edit Goto Utilities View Help System - xSystem Administration Assistant (SAA)
|- Running your System | |- PR1: Operations Checklist for the Productive System | | |- PR1: Daily tasks | | |- R/3: Checking the System log | | |- DB: Monitoring Database Growth | |- PR2: Operations Checklist for the Productive System | |- PR2: Daily tasks | |- R/3: Checking the System log | |- DB: Monitoring Database Growth
Remote System 1 (PR1)
Remote System 2 (PR2)
Remote access not allowed
Administer
System Administration Assistant (SAA)
R/3 connection not open
� When the System Administration Assistant is used in a system landscape, the status information for the remote systems is displayed with:
� A green light if the task was done in time
� A red light if the task must be done today
� A gray light if no remote access is allowed for the system
� A yellow flash if the R/3 connection is down
� For further information on this topic, see Appendix 2.
� As of Release 4.6B, you can use the SAA to administer your entire system landscape as configured in TMS.

SAP AG 1999
Troubleshooting Roadmap
Database
Application
Startup/Shutdown Problems
Net-work
Operatingsystem
Operationalproblems
Performanceproblems
Problem occurred:Find the solution or a hint
� The troubleshooting guide has been developed to help you administer your R/3 System. It helps you to find the solutions to some common problems as well as to analyze unusual difficulties.
� The guide offers a "roadmap" view of problems. You can use this structured roadmap to analyze the problem through a question-and-answer procedure. You can also use the technical views to go directly to the area that you suspect is causing the problem.
� To find the Troubleshooting Roadmap, choose Running your system → Troubleshooting, Service and Support → Troubleshooting

SAP AG 1999
Object Fields Value Meaning
System Admin.Assistant
(S_SAA_ADMI)Administratorfunctions in System Admin.Assistant
ADM Administrator authorization:display and execute SSAA, define and maintain new entries
PROJ Project manager authorization:display and execute all tasks in thecustomizing / development areas andclient-specific entries
USER Use authorization:display and execute all tasks in the development and Customizing areas that have been assigned to members of the implementation team.
Transaction SSAA allows you to go directly to other transactions, so you also need authorization for any transactions you want to call from the System AdministrationAssistant
Authorizations
SAP AG 1999
Now you are able to:
� Work with the System Administration Assistant� Interpret status information� Maintain the System Administration Assistant� Configure the System Administration Assistant
Summary of this Unit

SAP AG 1999
Further Documentation
� SAP Online Documentation:� Use the help icon
or
� Use the Help Assistantfor detailed informationon the main topics
4.6B

SAP AG 1999
Unit Actions
� Exercises?
� Solutions

System Administration Assistant: Exercises No. Exercise 1 Working with the System Administration Assistant 1.1 Start the System Administration Assistant (SAA). Which views are available?
Select the view that displays the complete administration tree and display this tree.
1.2 Confirm that (because TMS is configured) the SAA offers you a suggested system landscape for administration. System DEV is treated as a test system, QAS as a production system. What consequences does this have for the administration tree? (Compare subtrees DEV and QAS.)
1.3 Expand the tree of your local system. Where do you find the task SAP: Checking the System Log for systems DEV and QAS? Why is there a difference? Choose Execute. What happens?
1.4 Start the Troubleshooting Roadmap. 2 Administer a System Landscape from the SAA
In this exercise, you learn how to configure the SAA so that you can administer both systems of your system landscape from the system you are logged into.
2.1 Verify the current settings by choosing Utilities → Check system landscape. If necessary, change Test system name to DEV and Production system name to QAS. (You cannot include a virtual system such as PRD.)
2.2 Enable remote access to the remote system by choosing Utilities → Define remote access. Which changes do you see in the administration tree?
2.3 Choose Utilities → Check R/3 connection. Maintain the fields in the dialog box that appears (an RFC destination for remote access is created from this data).
2.4 Expand the subtree for the remote system and execute task SAP: Checking the System Log. What happens?

System Administration Assistant: Solutions No. Solution 1 Working with the System Administration Assistant 1.1 Call transaction SSAA. The tabs shows the available views: Worklist, Entire
view, Selective view, and Alert view. Entire view displays the whole tree for system administration. Select tab Entire view and choose Display tasks.
1.2 When you choose Display tasks for the first time, a dialog box presents a suggested configuration for your system landscape. Choose Save. Because system DEV is defined as a test system and system QAS is defined as a production system in the SAA, the tree shows different subtrees for systems DEV and QAS. Subtree DEV has fewer daily tasks than subtree QAS, and the entire subtree for system DEV contains fewer tasks than subtree QAS. The icons beside the remote systems show that no information is currently available from the remote system.
1.3 Subtree DEV:
Choose Running your system → DEV → DEV: Unscheduled/Occasional Tasks → SAP: Checking the System Log In a test system, you do not normally take a daily look at the system log. Subtree QAS:
Choose Running your system → QAS → QAS: Daily Tasks → SAP: Checking the System Log In a production system, you must monitor the system log daily (QAS is defined as a production system in SAA). Choose Execute. This takes you directly to the system log (transaction SM21). To go back to the SAA, choose Back.
1.4 Choose Running your system → Troubleshooting, Service, and Support → Troubleshooting. Choose Execute. Now you see the initial screen of the Troubleshooting Roadmap. From here, you can perform a structured analysis of problems in different areas.
2 Administer a System Landscape from the SAA To configure SAA for your entire system landscape, perform the following steps.
2.1 In the SAA, choose Entire view and Display Tasks. From the next screen, choose Utilities → Check system landscape to verify that DEV is configured as test system and QAS as production system. If necessary, use the pencil icon and Save to adapt the current settings. If the settings are already correct, choose Continue.
2.2 Choose Utilities → Define remote access and flag Remote for the remote target system. Save these settings. In the next dialog box, choose Continue. Expand the tree Running your system → <SID of the remote system> and

notice that the color of the icons has changed from gray to red (this indicates that the status has changed from No information (no remote access) to Function must be executed).
2.3 To define the necessary data for remote access to the remote system, choose Utilities → Check R/3 connection. In the next dialog box, fill in the following data: System number: If remote system is DEV, 00 If remote system is QAS, 10 Server: <hostname of your local system> (because DEV and QAS are on the same hardware installed in the training environment) Client: 200 Save these settings. A dialog box appears: enter a valid user and password for the remote system (client 200). In the next dialog box, choose Continue. Restart transaction SSAA.
2.4 Expand the subtree of the remote system and execute SAP: Checking the System Log. This takes you directly to transaction System log on the remote system.

SAP AG 1999
CCMS Configuration
1 Introduction 8 Software Logistics
2 Starting and Stopping 9 Users and Authorizations
3 System AdministrationAssistant 10 Spool and Print
4 CCMS Configuration 11 SAP Data Archiving
5 Database Administration and Backups 12 System Monitoring
6 DB Administration:Periodic Checks 13 SAPNet
7 Background Processing

SAP AG 1999
CCMS Configuration
Contents� Setting up the CCMS� Starting and stopping instances with the CCMS
ObjectivesAt the end of this unit, you will be able to:� Set up the CCMS:
� Import and maintain profiles� Define operation modes� Maintain instance definitions� Schedule operation modes
� Start and stop instances with the CCMS

SAP AG 1999
CCMS: Overview
� The Computing Center Management System (CCMS)allows you to monitor, control, and configure R/3
� It provides functions for:� Profile maintenance
� Unattended 24-hour system management using operationmodes, instance definitions, and scheduling
� Starting and stopping instances
� Processing and controlling background jobs, schedulingdatabase backups
� Automatic reporting of system alerts
� Dynamic logon load balancing
� System and network monitoring and analysis
� The Computing Center Management System (CCMS) is an integral part of the R/3 Basis. CCMS provides tools for managing:
� R/3 System and performance
� Database and archiving
� Workload
� Output
� Security
� You can use the CCMS to analyze and distribute client workloads and report on resource consumption for system components. The CCMS also provides graphical monitors and management utilities.
� CCMS provides 24-hour unattended system management functions from within R/3 through operation modes and instances.

SAP AG 1999
Create operation modes
Define instance(s)
DAYNIGHT
Maintain workprocess distribution for the
instance(s)
Maintain timetable
Import/maintain profiles
Setting Up the CCMS
Use transaction RZ10
Use transaction RZ04
Use transaction RZ04
Use transaction RZ04
Use transaction SM63
� Before you can work with the CCMS, it must be configured set up correctly for your environment. How you initially configure the CCMS largely determines the consistency and accuracy of its functioning.
� Set up the CCMS in the following steps:
� Maintain R/3 profiles. Normally, you import the profiles of all active servers after installation. They are then automatically saved to the database and activated.
� Define at least one operation mode.
� Generate instance definitions for the instances created during R/3 System installation.
� If necessary, assign instance definitions to operation modes and adapt the work process distribution.
� Define the timetable for normal operation for a full 24-hour cycle.
� If operation modes, instances, or timetable are not correctly defined, the CCMS may display incorrect data.

SAP AG 1999
System Administration Assistant (SAA)
Running your system
Overview: R/3 System administrationDEV: Checklis for the Development / Test SystemQAS: Checklist for Operationg the Production SystemAdditional Administration Tasks
SAP System Administration
Starting and Stopping the R/3 System from Windows NTPrinting: installing Additional PrintersSending System MessagesProfile Generator: Maintaining Activity GroupsUsers: Copying a UserUsers: Locking and Unlocking UsersUsers: Changing a PasswordUsers: Finding a Missing AuthorizationUsers: Checking Active UsersMaintaining System ProfilesOperation Modes: Creating a New Operation ModeOperation Modes: Adjusting the Time TableOperation Modes: Manually Switching ModesOperation Modes: scheduling Exception OperationJobs: Scheduling JobsJobs: Checking Job Status and Displaying LogsImporting Hot Packages, Legal Change Patch, ...Performance Monitoring
Database Management: Additional Tasks
Trouble Shooting, Service and Support
Use the System Administration Assistant to start transaction RZ10(Profile Maintenance)
Using the System Administration Assistant
� You can use the System Administration Assistant to go directly to transaction RZ10 in order to maintain your system profiles.
SAP AG 1999
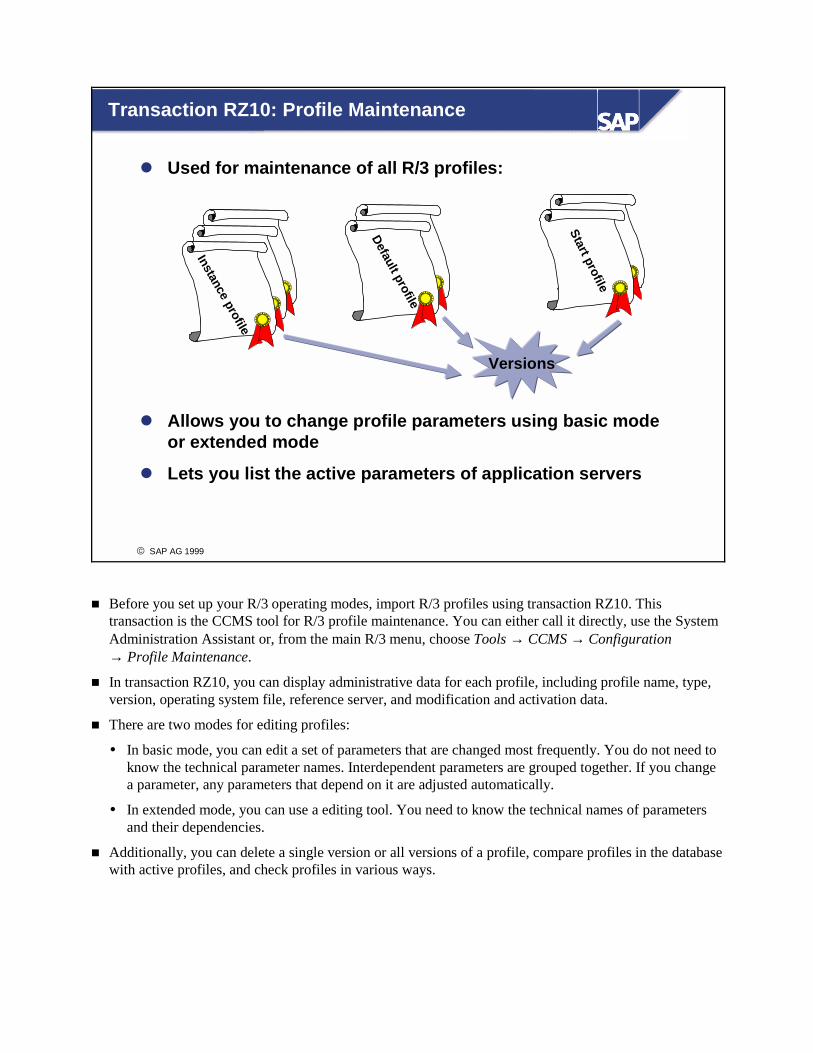
� Used for maintenance of all R/3 profiles:
� Allows you to change profile parameters using basic modeor extended mode
� Lets you list the active parameters of application servers
Transaction RZ10: Profile Maintenance
Versions
Instance profile
Default profile
Start profile
� Before you set up your R/3 operating modes, import R/3 profiles using transaction RZ10. This transaction is the CCMS tool for R/3 profile maintenance. You can either call it directly, use the System Administration Assistant or, from the main R/3 menu, choose Tools → CCMS → Configuration → Profile Maintenance.
� In transaction RZ10, you can display administrative data for each profile, including profile name, type, version, operating system file, reference server, and modification and activation data.
� There are two modes for editing profiles:
� In basic mode, you can edit a set of parameters that are changed most frequently. You do not need to know the technical parameter names. Interdependent parameters are grouped together. If you change a parameter, any parameters that depend on it are adjusted automatically.
� In extended mode, you can use a editing tool. You need to know the technical names of parameters and their dependencies.
� Additionally, you can delete a single version or all versions of a profile, compare profiles in the database with active profiles, and check profiles in various ways.


SAP AG 1999
Global profile directory
Default
profile
Start
profile
Instance
profile
R/3 installation program
R3SETUP
R/3 Profiles
OperatingSystem
� The profile parameter values corresponding to resources (such as main memory, start profile, and instance profile) are created automatically during R/3 installation by the R/3 installation program R3SETUP.
� When the first R/3 instance is installed, a default profile is generated in addition to the start profile and the instance profile. During installation of subsequent instances, the existing default profile is updated. When the installation is complete, the profiles are used as parameter files for the R/3 instances and the instances are started using the values of the parameters in these profiles.
� R3SETUP assigns shared memory on the server where the R/3 instance is installed.
� In a distributed R/3 environment consisting of application servers of the same platform type, you should set up a global profile directory in a shared file system.
� If you set parameters to incorrect values, you may find that your instances do not start. Always take care when changing parameter values and save the last version of your profiles.
SAP AG 1999
R/3 profilemaintenance
transaction RZ10
R/3 System
Operating System
INSTANCE_PROFILE
START_PROFILE
DEFAULT_PROFILE
Profiles generated by R3SETUPActive profiles
INSTANCE_PROFILE
START_PROFILE
DEFAULT_PROFILE
Change
Save
ActivateImport
Maintaining R/3 Profiles
111 222
333
444
Database
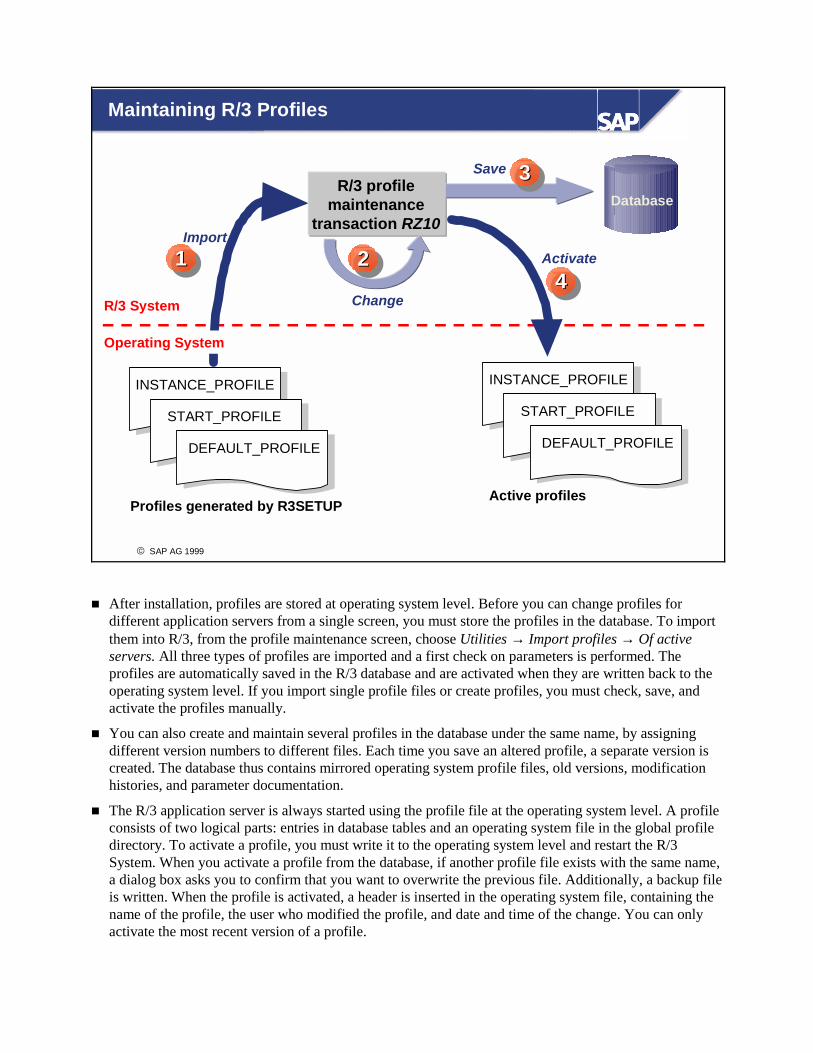
� After installation, profiles are stored at operating system level. Before you can change profiles for different application servers from a single screen, you must store the profiles in the database. To import them into R/3, from the profile maintenance screen, choose Utilities → Import profiles → Of active servers. All three types of profiles are imported and a first check on parameters is performed. The profiles are automatically saved in the R/3 database and are activated when they are written back to the operating system level. If you import single profile files or create profiles, you must check, save, and activate the profiles manually.
� You can also create and maintain several profiles in the database under the same name, by assigning different version numbers to different files. Each time you save an altered profile, a separate version is created. The database thus contains mirrored operating system profile files, old versions, modification histories, and parameter documentation.
� The R/3 application server is always started using the profile file at the operating system level. A profile consists of two logical parts: entries in database tables and an operating system file in the global profile directory. To activate a profile, you must write it to the operating system level and restart the R/3 System. When you activate a profile from the database, if another profile file exists with the same name, a dialog box asks you to confirm that you want to overwrite the previous file. Additionally, a backup file is written. When the profile is activated, a header is inserted in the operating system file, containing the name of the profile, the user who modified the profile, and date and time of the change. You can only activate the most recent version of a profile.

SAP AG 1999
R/3 profile maintenancewith transaction RZ10
Start
profile
Change instance services
Change globalinstance parameters
Change instanceparameters
Default
profile
Instance
profile
Changing R/3 Profile Parameters
� In almost all cases, you should use the standard profile parameter values proposed by the system. Before changing the standard values, you should obtain the agreement of SAP or a SAP partner. For example, the EarlyWatch service may recommend changing certain parameter settings. You may need to change the standard settings for the following reasons:
� To start or delete an additional SAP service process on a given computer, for example, a message service (in this case, change the start profile)
� To change a global system parameter that is valid for all instances, for example, if you want to move the R/3 database from one computer to another to improve performance (in this case, change the default profile)
� To change a parameter value for an R/3 instance, for example, the number of background work processes (in this case, change the instance profile used at startup)
� Before you leave either the basic or the extended maintenance mode, profiles changes are checked automatically and any errors or inconsistencies are displayed. After activation, all parameter changes are documented in the operating system file.
� When you modify profile parameters, the changes do not take effect immediately. Dynamic switching (activation of parameters without system restart) is possible only for the memory management parameters of an instance profile.

SAP AG 1999
R/3 profilemaintenance
(transaction RZ10)
Checking and Comparing R/3 Profiles
Check a single profile
Instance pfl.
Default ProfilStart
profile
Instance
profile
Check all profiles
Operating systemcompare
Database
� You can carry out extensive health checks for one or more profiles. You can check profile syntax, the spelling of parameter names, and semantics. When you run these checks, a log is generated for any warnings and error messages.
� When you check single profiles, the parameters are divided into classes. For each class, there is a separate check rule. For example, the check rule for parameter class time value reports an error if the value of a parameter in this class (such as rdisp/btctime) is less than 0.
� When you check all profiles, you can also check whether all profiles of one type used in an R/3 System are consistent with each other. For example, all start profiles can be checked to see whether exactly one message server is started, or all instance profiles can be checked to see whether an enqueue work process was configured. You can check either all profiles of active servers or all profiles in operation modes.
� After an application server has been started, an automatic check is performed to see whether the server's profile data as stored in the database still matches the active profiles at operating system level. If this is not the case, an alert is triggered in the Alert Monitor. This allows you to determine whether the operating system files have been changed manually. You can also perform this check manually.
� Parameter attributes and documentation are available in transaction RZ11.

SAP AG 1999
Dialogprocessing
Background processing12
9
6
3
11 1
7 58 4
210
DAY
NIGHT
12
9
6
3
11 1
7 58 4
210
BTC
Operation Modes: Concept
� Typically, customers require more dialog processes during the day and more background processes during the night. To adjust the proportions of the various R/3 work processes to suit different phases of system activity, you can:
� Maintain the instance profile and restart the system (for unusual changes)
� Define operation modes and use the operation mode switch (for daily changes)
� Operation modes optimize system resources for different phases of system activity. Operation mode switching reconfigures your R/3 System dynamically, so you do not need to change the instance profiles for your server and you experience no system downtime.
� An operation mode configures the use of resources for all the instances in your R/3 System based on:
� The services or work processes you need
� The time interval you choose

SAP AG 1999
D
DAY_OPERATION
Server 1 Dialog 3 Background 2
Server 2 Dialog 4 Background 2
D B
Dispatcher
BD D D B
Dispatcher
BD
Server 1 Server 2
D
Choosing an Operation Mode 1
� Day operation usually requires more dialog processes. Good response times must be guaranteed for important data entry transactions, for example, SD order entry.
� Dialog processing is used for:
� Interactive processing, such as posting documents or creating sales orders
� Sending a limited data volume to be inserted and updated in the database
� User activity with limited transaction steps
� Time-critical processing

SAP AG 1999
NIGHT_OPERATION
Server 1 Dialog 2 Background 3
Server 2 Dialog 2 Background 4
D D B
Dispatcher
B D B
Dispatcher
B
Server 1 Server 2
D B BB
Choosing an Operation Mode 2
� Night operation usually requires more background processes. Background processing resources must be available for high priority jobs.
� Background processing is used for tasks requiring database activity that is is too time-intensive for dialog processing, such as:
� Background tasks (list balances, payments, . . .)
� List processing
� Periodic processing
� Inserting and updating large data volumes

SAP AG 1999
System Administration Assistant (SAA)
Running your system
Overview: R/3 System administrationDEV: Checklis for the Development / Test SystemQAS: Checklist for Operationg the Production SystemAdditional Administration Tasks
SAP System Administration
Starting and Stopping the R/3 System from Windows NTPrinting: installing Additional PrintersSending System MessagesProfile Generator: Maintaining Activity GroupsUsers: Copying a UserUsers: Locking and Unlocking UsersUsers: Changing a PasswordUsers: Finding a Missing AuthorizationUsers: Checking Active UsersMaintaining System ProfilesOperation Modes: Creating a New Operation ModeOperation Modes: Adjusting the Time TableOperation Modes: Manually Switching ModesOperation Modes: scheduling Exception OperationJobs: Scheduling JobsJobs: Checking Job Status and Displaying LogsImporting Hot Packages, Legal Change Patch, ...Performance Monitoring
Database Management: Additional Tasks
Trouble Shooting, Service and Support
Use the System Administration Assistant to start transaction RZ04(Create Operation Modes)
Using the System Administration Assistant
� You can use the System Administration Assistant to go directly to transaction RZ04 in order to configure and maintain your operation modes and instances.

SAP AG 1999
Use transaction RZ04
Instance
profile
Operation mode:
Day
Operation mode: Night
Instance definition Choose: Settings →→→→ Based on current Status →→→→ New Instances →→→→ Generate
Instances / operation mode
Current work process distributionof the instance is assigned to theinstance definition for every productive operation mode
Operation modedefinition
Setting Up Operation Modes/Instances
� To set up the CCMS, define at least one operation mode in one of the following ways:
� Call transaction RZ04
� Use the System Administration Assistant
� From the main R/3 menu, choose Tools → CCMS → Configuration → Operation modes/instances
� If no operation modes have been defined, the test operation mode DUMMY is displayed. Operation mode DUMMY is automatically configured for monitoring system functions, and cannot be used for operation mode switching. That is, it cannot be assigned in a timetable.
� Operation modes can be of type productive or test. Only productive operation modes can be assigned in the timetable.
� Instances are created during R/3 System installation. R3SETUP automatically creates a profile for each R/3 instance.
� Before you can create instance definitions in R/3, you must at least one production operation mode.
� It is not advisable to create instance definitions manually. The CCMS offers two non-manual methods:
� If you have several servers, you can generate the current instance definition for all the active servers (shown in the graphic).
� If you have few servers or if you want to add new servers, you can create an instance definition for one server by taking current settings from an active instance.

� When generating instance definitions, the system imports the current instance data of every application server that is active.
SAP AG 1999
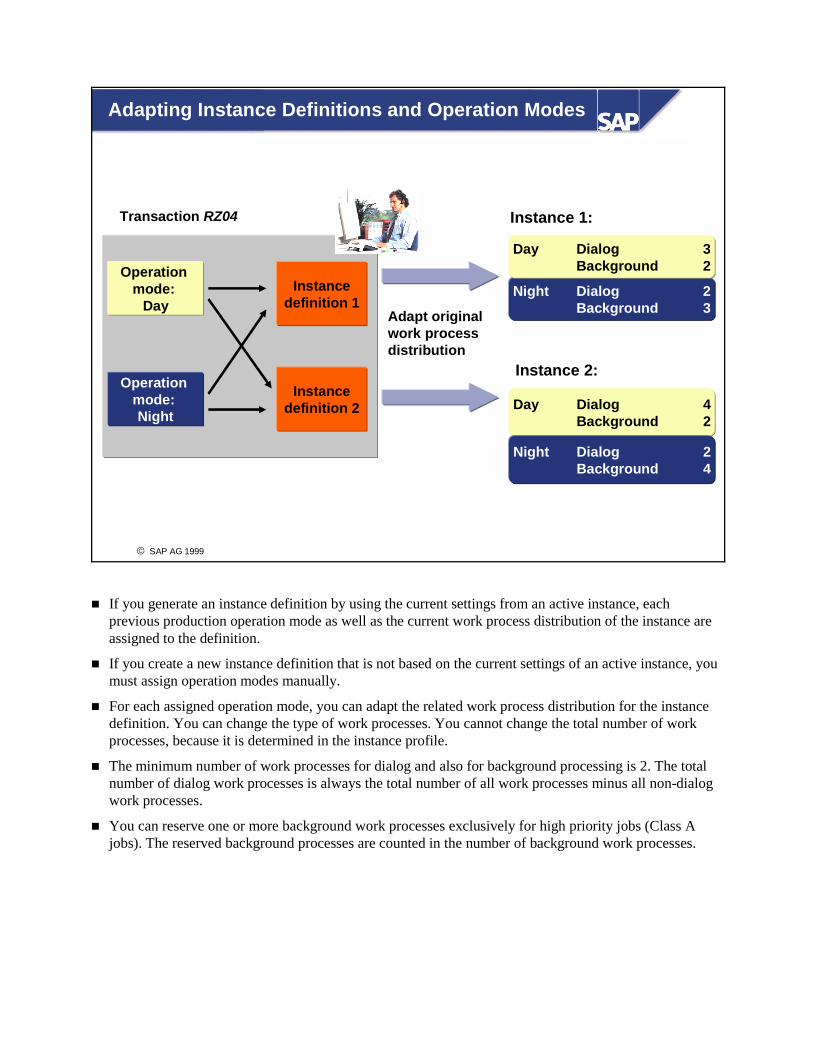
Transaction RZ04
Operation mode:
Day
Operation mode: Night
Instancedefinition 1
Instancedefinition 2
Adapt originalwork processdistribution
Adapting Instance Definitions and Operation Modes
Night Dialog 2Background 3
Day Dialog 3Background 2
Instance 1:
Day Dialog 4Background 2
Night Dialog 2Background 4
Instance 2:
� If you generate an instance definition by using the current settings from an active instance, each previous production operation mode as well as the current work process distribution of the instance are assigned to the definition.
� If you create a new instance definition that is not based on the current settings of an active instance, you must assign operation modes manually.
� For each assigned operation mode, you can adapt the related work process distribution for the instance definition. You can change the type of work processes. You cannot change the total number of work processes, because it is determined in the instance profile.
� The minimum number of work processes for dialog and also for background processing is 2. The total number of dialog work processes is always the total number of all work processes minus all non-dialog work processes.
� You can reserve one or more background work processes exclusively for high priority jobs (Class A jobs). The reserved background processes are counted in the number of background work processes.

SAP AG 1999
ShutdownShutdown
Shutdown DAY_OPERATION
NIGHT_OPERATION
D D B
Dispatcher
B D B
Dispatcher
B
Server 1 Server 2
DD/B D/B D/B
Operation Mode Switch: Advantage
� When R/3 switches between operation modes, work processes are redistributed automatically, without stopping and restarting the instances. There is no system downtime. Only work process types are changed. The total number of work processes remains unchanged after the operation mode switch.
� If processes still have jobs at switch time, they are switched one by one when the jobs are completed. Thus, normal system operation is not interrupted. No program is cancelled. System performance is maintained, as R/3 buffers such as ABAP buffers and table buffers are not refreshed.
� Operation mode switches are recorded in the system log. The old and the new process type are recorded for each switched work process.

SAP AG 1999
AMarch 28
08.00 - 21.00 Op. mode A
21.00 - 08.00 Op. mode B
March 293 p.m. - 4 p.m. Op. mode C
Timetable fornormal operation (24-hour cycle)
Timetable forexceptional operation on March 29
March 29
00.00 17.0015.0008.00 21.00 23.59
B B
AB BAC
Scheduling Operation Modes
� The automatic switching of operation modes is controlled by timetables. You must also maintain timetables for CCMS monitoring. Maintain or check the timetables in one of the following ways:
� Call transaction SM63
� Use the System Administration Assistant
� From the main R/3 menu, choose Tools → CCMS → Configuration → Operation mode calendar
� The timetable allows scheduling in terms of 24-hour days, divided into intervals of 60, 30, or 15 minutes. You can define normal and exceptional operation.
� In normal operation, the defined time intervals for operation modes are repeated in a 24-hour cycle. You must schedule a complete period of 24 hours, not just part of a day. Otherwise, problems may occur during operation mode switching.
� In exceptional operation, the defined time intervals for operation modes are activated once for a specified time period. The timetable has a higher priority than the timetable for normal operation. You can specify part of a day (without defining a 24-hour cycle).
� Only productive operation modes can be switched automatically (that is, entered in a timetable).
� If the timetable for normal operation is not defined, the start configuration according to the profile remains active and no automatic operation mode switch occurs.

SAP AG 1999
Use the Control Panel (transaction RZ03) to switch operation modes manually:
Call transactionRZ03 and selectthe server you want to switch
Before you can switch toan operation mode, youmust select one
Switch the operation mode for one or allservers
111
222
333
Switching Operation Modes Manually
� Sometimes, you may need to switch operation modes manually. Do so only in exceptional cases, for example, when automatic switching did not work correctly. Either call transaction RZ03 or, from the System Administration Assistant, choose Entire View → Display → Running Your System → Additional Adminsitration Tasks → R/3 System Administration → Operation Modes: Manually Switching Modes.
� From the control panel, you can switch to a particular operation mode either on all servers or on an individual server.
� Ensure that a manual operation switch does not disrupt system operation (for example, by providing too few dialog processes).
� Before you make a manual switch of operation modes, always test it by performing a simulation of the switch. To simulate a switch, choose Tools → CCMS → Control/Monitoring → Control Panel → Control → Switch operation mode → Simulation. A test log describes which switches are possible and which errors may occur when a real switch takes place.
� To switch the operation mode after a simulation, choose Control → Switch operation mode. The servers remain in the manually activated operation mode until the next switch time.

SAP AG 1999
Database
SAP R/3 instance
Operation mode switch failure
Operating system
gwrd
disp+work.exe
WPWP . . .
Configurationaccording to
operation mode
Inconsistencies
Start and instance profile Start and
instance profile
Operation Mode Switch Diagnostics
� If the operation mode switch fails, you should investigate the cause of the failure. The cause is most likely to be inconsistencies in the system. Inconsistencies can occur, for example, if there are different numbers of work processes:
� In the instance profile on the operating system
� On the database
� In the operation mode definition
� You should check regularly whether the number of work processes that are currently running is the same as the number entered in each of these three parts of your system.
� If you change profiles and restart the system, you must adapt operation modes as well as instance definitions to correspond to the current status.
� To check the operation mode switch and the work process switch within the system log, use transaction SM21 or, from the main R/3 menu, choose Tools → Administration → Monitor → System monitoring → Process overview.
� To check the work process switch within the process overview, use transaction SM50 or, from the main R/3 menu, choose Tools → Administration → Monitor → System monitoring → Process overview.

SAP AG 1999
Control Panel (transaction RZ03)
Start / Stop
Control instance and database started from operating system
Instance A
Instance B
Starting and Stopping Instances with the CCMS
� You can start and stop R/3 instances with the CCMS.
� When starting instances with the CCMS:
� The database and at least one R/3 instance (the control instance) must have been started from the operating system.
� You can use the CCMS control panel (transaction RZ03) to select an operation mode and start the remaining instances remotely. You can start multiple instances or special instances. The control panel enables you to check the startup log for each instance that has been started.
� On UNIX platforms, command rexec is used to start servers remotely. For this command to function, you need to define a startup user and password in the instance definition.
� On platforms without rexec, you need to use a tool with the same function as rexec. For example, to start Windows NT server instances from a UNIX server, a rexec daemon must be running on the Windows NT server.

SAP AG 1999
Object Fields Value Meaning
Check for TransactionStart
(S_TCODE)
<TCODE> Transaction Code
01 all management functions03 display authorization
Transaction Code
CC Control Center(S_RZL_ADM)
Activity
CCMS Monitoring Authorization
SAP AG 1999
Now you are able to:
� Set up the CCMS:� Import and maintain profiles
� Create operation modes and instance definitions
� Maintain operation modes and instance definitions
� Schedule operation modes
� Switch the operation mode manual
� Start and stop instances with the CCMS
Summary of this Unit

SAP AG 1999
Further Documentation
� SAP Basis Knowledge Product:System Management
� SAP Online Documentation:BC Computing CenterManagement System
� SAP Notes under components:� BC-CCM-CNF-OPM
� BC-CCM-CNF-PFL

SAP AG 1999
Unit Actions
� Exercises?
� Solutions

CCMS Configuration: Exercises No. Exercise 1 Preparing your R/3 System to start
For these exercises, you should restart your R/3 System. 1.1 Under Windows NT, proceed as follows.
Group 1 (QAS) using pcANYWHERE: Go to the global profile directory using Windows Explorer. Create a subdirectory called BACKUP and copy the existing profiles into it.
Group 2 (DEV) using Telnet: Go to the global profile directory. Create a subdirectory called BACKUP and copy the existing profiles into it. Under UNIX, proceed as follows. Use Telnet. Go to the global profile directory. Create a subdirectory called BACKUP and copy the existing profiles into it.
1.2 In R/3, to see if any profiles have been imported to the database, use profile maintenance (either call the transaction directly or navigate with the System Administration Assistant). If no profiles have been imported, what method would you use to import the profiles into the R/3 System?
2 Importing, maintaining, and activating profiles 2.1 Import all profiles at once into the R/3 System. 2.2 (Optional) Import a single profile (an instance profile) into the R/3 System. 2.3 Perform a check of the individual profiles you just imported. 2.4 Determine the number and the types of the R/3 System work processes. 2.5 Change the number of work processes that are configured in the instance
profile for your second instance, so that the new settings take effect during the next instance restart. Add 1 more dialog work process and 1 more background work process.
2.6 Check the changes to your modified instance profile at the operating system level. Can you see the changes that you made?
3 Activating your changes To activate your profile changes, you must stop and start your instance.
3.1 Group 1. Use the Microsoft Management Console to stop your instance. Once your instance has successfully shut down, restart the relevant R/3 instance. Group 2. To shut down your R/3 instance, use stopsap with the appropriate parameters. To restart your R/3 instance, use startsap with the appropriate parameters.

3.2 Use the process overview and compare the number of work process that are now running with the number that were running in step 2.4. Is there a difference?
4 Creating operation modes and instance definitions 4.1 In CCMS, create two operation modes: Day and Night. Either call the
transaction directly or navigate with the System Administration Assistant. 4.2 Create the instance definitions for your R/3 System. What is the easiest way
to create all instances in one step? 4.3 Maintain the work process distribution of your instances. Keep the current
operation mode Day for both instances and set your operation mode Night to have 4 background processes on the central instance and 3 background processes on the second instance. Configure the central instance to have 2 additional update processes for Night. What happens to the dialog work processes when you add the background and update work processes? Remember to check that, after this exercise, at least 2 background work processes are configured in all operation modes.
5 Schedule operation modes 5.1 Maintain the operation timetable. Select operation mode Night to become
active within the next hour. 6 Manual switch of operation mode 6.1 Switch the operation mode for all instances manually to operation mode
Night.

CCMS Configuration: Solutions No. Solution 1 User Profile 1.1 Under Windows NT, proceed as follows.
Group 1. In the directory G:\usr\sap\<SID>\sys\profile create a subdirectory BACKUP. Copy the profiles into folder BACKUP one by one: for XXX = DEFAULT.PFL START_DVEBMGSxx_<hostname> START_Dxx_<hostname> <SID>_DVEBMGSxx_<hostname> <SID>_Dxx_<hostname>
choose Edit → Copy XXX and then Edit → Paste XXX into BACKUP. Group 2. Change to directory G:\usr\sap\<SID>\sys\profile. To create the subdirectory, use command mkdir backup. To copy the profiles into the subdirectory, use: copy DEFAULT.PFL backup copy START_<instance name>_<hostname> backup copy <SID>_<instance name>_<hostname> backup
Under UNIX, proceed as follows. Change to directory /usr/sap/<SID>/sys/profile. To create the subdirectory, use command mkdir backup. To copy the profiles into the subdirectory, use: cp DEFAULT.PFL backup cp START_<instance name>_<hostname> backup cp <SID>_<instance name>_<hostname> backup
1.2 Check transaction RZ10 (from the System Administration Assistant, transaction SSAA, choose Entire view → Display Tasks → Running Your System → Additional Administration Tasks → SAP System Administration → Maintaining System Profiles). If you try to select a profile, you will see that no profiles have been imported. The best way to import the profiles of all active servers is all at once (see solution 2.1).
2 2.1 To import all relevant profiles at once, use transaction RZ10 and choose
Utilities → Import profiles → Of active servers. Once the import has been completed, a log file is displayed.
2.2 (Optional) Use transaction RZ10 or, from the SAP standard menu, choose Tools → CCMS → Configuration → Profile Maintenance. For the profile that is to be imported, select the instance profile name <SID>_<instance name>_<hostname>. Choose Create and enter a short description. In the administrative data path name, overwrite the capital letters in the hostname with lowercase letters. The type of profile you are importing is already known.

Choose Copy.
Choose Profile → Import and select the path of the profile you are importing. Example: G:\usr\sap\<SID>\profile\SID_DVEBMGSxx_<hostname> Choose Copy, then Save. In the following dialog box, choose Yes to activate the profile.
2.3 To perform a consistency check from within transaction RZ10, select a profile and choose Check.
2.4 Use transaction SM66 (System Wide Work Process Overview) or, from the SAP standard menu, choose Tools → CCMS → Control/Monitoring → Work Process overview. To see the processes with status wait, choose Select process and flag status wait. Note the work process type and numbers.
2.5 Use transaction RZ10 and select the instance profile of your additional instance. Select Basic Maintenance and choose Change. Change the number of work processes: add 1 more dialog work process and 1 more background work process. Choose Copy, then Save. In the following dialog box, choose Yes to activate the profile.
2.6 Call transaction AL11 and double-click DIR_PROFILE. This takes you into the profile directory. To display your instance profile, double-click it.
3 3.1 Group 1. To stop and start your R/3 instance, use the Microsoft Management
Console. You do not need to restart your central instance. Group 2. To shut down your R/3 instance, use stopsap with appropriate parameters. To restart your R/3 instance, use startsap with appropriate parameters.
3.2 Use transaction SM66 (System Wide Work Process Overview) or, from SAP Easy Access, choose Tools → CCMS → Control/Monitoring → Work Process overview. To see the processes with status wait, choose Select process and flag status wait. For your second instance, you should see 1 more dialog (DIA) work process and 1 more background (BTC) work process.
4 4.1 From transaction RZ04, choose Operation mode → Create, and create an
operation mode Day. Enter Day and a short description of the operation mode. Choose Save. Repeat this procedure for operation mode Night.
4.2 Use transaction RZ04 and choose Instances/operation modes → Settings → Based on current Status → New instances → Generate. You should see that both instances for your system have been created and that operation modes Day and Night have been assigned with the current system work process distribution from the instance profiles.
4.3 For the central instance, double-click on operation mode Day or Night. If necessary, select Other operation mode. To specify 4 background work processes at night for the central instance, select the background work

process number and click the plus sign. To add 2 update work processes at night, select the update process number and click the plus sign. Then choose Save. Notice that the number of dialog work processes decreases. This is because you cannot exceed the number of configured work processes in your profile, and the number of Class A background work processes cannot exceed the number of background processes. For the second instance, double-click operation mode Night and specify 3 background processes.
5 5.1 Using the System Administration Assistant (transaction SSAA), to access
transaction SM63, choose Entire view → Display Tasks → Running Your System → Additional Administration Tasks → SAP System Administration → Operation Modes: Adjusting the Timetable. Select Normal Operation and Change. Double-click the beginning and the end of the time interval and assign this interval to a defined operation mode (operation mode Night should become active within the next hour). Fill out your timetable completely and save it.
6 6.1 To go to the control panel (transaction RZ03) from the System Administration
Assistant (transaction SSAA), choose Entire view → Display Tasks → Running Your System → Additional Administration Tasks → SAP System Administration → Operation Modes: Manually Switching Modes. Choose Execute, select Choose operation mode, and double-click operation mode Night. Then choose Control → Switch operation mode → All servers. A dialog box appears: choose Yes. Call transaction SM50 and check the work process distribution. This should match what you defined for your instances in operation mode Night.

SAP AG 1999
Database Administration and Backups
1 Introduction 8 Software Logistics
2 Starting and Stopping 9 Users and Authorizations
3 System AdministrationAssistant 10 Spool and Print
4 CCMS Configuration 11 SAP Data Archiving
5 Database Administration and Backups 12 System Monitoring
6 DB Administration:Periodic Checks 13 SAPNet
7 Background Processing

SAP AG 1999
Database Administration and Backups
Contents� Database fundamentals� Backup strategies
ObjectivesAt the end of this unit, you will be able to:� Set up the database for performing backups� Schedule and perform database backups� Schedule and perform offline redo log file backups� Verify the backups� Verify the database structure on disk� Recognize and solve error situations

SAP AG 1999
Oracle: Overview
RDBMS Processes
Memory area
Database files
Controlfiles Data files
Online redo log files
Offline redolog files
Profile
SGASGA Database buffer pool Database buffer pool
Shared pool Shared pool
Redo log bufferRedo log bufferShared SQL Area
Configurable(init<SID>.ora)
Row cache
Oracle process:
Shared threads
AR
CH
AR
CH
CK
PTC
KPT
LGW
RLG
WR
DB
WR
DB
WR
PMO
NPM
ON
SMO
NSM
ONOracle listener processOracle listener process
Shad
owSh
adow
Shad
owSh
adow
Shad
owSh
adow
1:1
R/3 work processes
� When an Oracle database instance is started, two processes are created, the listener process and the Oracle process. Oracle on the Windows NT operation system uses the Windows NT implementation of threads. The Oracle process consists of the shared threads and the dedicated shadow threads.
� Database data is stored in 8 KB blocks in data files on disk. To accelerate read and write access to data, these data blocks are cached in the database buffer pool in main memory.
� Modifications to database data are logged in the online redo log files. This procedure ensures data security. To ensure fail-safe database operation, without using additional operating system utilities, the control files and the online redo log files of the database system should be mirrored.
� The Oracle database management system holds the executable SQL statements in the Shared SQL Area, which is part of the shared pool.
� Each R/3 work process:
� Connects to the database as one database user, SAPR3
� Handles database requests for the different R/3 System users
� Communicates with a corresponding shadow thread on the database
� Can reconnect to the database if the connection is lost due to database errors

SAP AG 1999
Oracle: Starting and Stopping the Database
Oracle process/ Oracle process/ threadsthreads::
Data files
Profile
Online redo log files
Offline redo log files
Database buffer pool
Redo log buffer
AR
CH
AR
CH
CK
PTC
KPT
LGW
RLG
WR
DB
WR
DB
WRNomount
Mount
Open
Control files
Shared pool
PMO
NPM
ON
SMO
NSM
ON
Oracle listener processOracle listener process
SGA
� When an Oracle database is started, it goes through 3 phases:
� In the No mount phase, the database instance is built up. Operating system resources are allocated using configuration information stored in the profile init<SID>.ora.
� In the Mount phase, the control files of the database are evaluated. The system reads the information about the file structure of the database. Data files and logs are not yet opened.
� In the Open phase, all files in the database system are opened. If required, an instance recovery is performed immediately after opening the database. Pending database transactions are ended.
� You can shut down the database using one of three commands:
� SHUTDOWN NORMAL: No new database logon possible. After all database user have logged off, the database is closed systematically: All files are closed, the database is dismounted, and the instance is shut down. The database is consistent after shutdown.
� SHUTDOWN IMMEDIATE: Only the current commands are executed. PMON ends all sessions and performs a rollback of the open transactions. The database is then closed systematically (as for a normal shutdown). The database is consistent after shutdown. Caution: DBWR and ARCH may require up to 1 hour post-processing time.
� SHUTDOWN ABORT: Emergency database shutdown. Users are not logged off, and a rollback of the open transactions is not performed. The database is not consistent after shutdown. An instance recovery is automatically performed at the next database startup.

SAP AG 1999
Data files
Profile
Database buffer pool
Redo log buffer
ARCHARCH
LGWRLGWR
Process threads andProcess threads andmemorymemory
Profile init<SID>.oralog_archive_start = TRUE log_archive_dest = ?\saparch\
CKPTCKPT
Control files
Online redo log files
Offline redo log files ARCHIVELOG MODE: TRUE
DBWRDBWR
Oracle: Writing Data and Log Files
� An Oracle database system has three threads that write information from the Shared Global Area (SGA) to the appropriate files:
� During a checkpoint, the Database writer (DBWR) asynchronously writes the changed blocks from the SGA to the database data files.
� To speed up the writing of checkpoints, the Checkpoint (CKPT) thread starts.
� The Logwriter (LGWR) synchronously writes the change log from the SGA redo log buffer to the currently active online redo log file.
� In a production database system, you must always run the database in ARCHIVELOG mode and ensure that the Archiver thread (ARCH) is started (init<SID>.ora: log_archive_start = TRUE). ARCH archives a completed online redo log file into an offline redo log file in the archive directory.
� ARCH determines the archive directory from the init<SID>.ora parameter log_archive_dest (default: ?\saparch\) and determines the file name from the parameter log_archive_format.
� Once the offline redo log file has been successfully created, the corresponding online redo log file is released to be overwritten with new log information.
� If there is no freespace available in the archive directory, or if a file with the same name already exists in the archive directory, the Archiver does not archive the file. After a corresponding number of redo log switches, the database becomes "stuck". Database changes cannot be committed as long as this archiver stuck situation persists.

SAP AG 1999
Storage Management: Concepts
Extent
Data Block
Segment(Table/Index)
8K
200K 150K
350KData file
Tablespace
� A database is divided into logical storage units called tablespaces. Tablespaces are divided into logical units of storage called segments (tables or indexes). Segments are further divided into extents, which consist of contiguous data blocks. A data block (normally 8 KB) is the smallest unit of I/O used by a database.
� A tablespace in an Oracle database consists of one or more physical data files. A data file can be associated with only one tablespace. You can increase a tablespace in two ways:
� Add a data file to a tablespace. When you add another data file to an existing tablespace, you increase the amount of disk space allocated to the corresponding tablespace.
� Increase the size of a data file.
� Storage parameters such as INITIAL, NEXT, and MAXEXTENTS allow you to manage space allocated to a table. In the next unit, we discuss how to manage storage with these storage parameters.

SAP AG 1999
Prefix Abbreviation ExtensionPSAP <TS_name> D (data) or I (index) Physical
layer
<TS_name>.data1btabd.data1
<TS_name>.data2btabd.data2
Logicallayer
<TS_name>_1btabd_1
Tablespacename
<TS_name>_2btabd_2
PSAP<TS_name>PSAPBTABD
Directorynames
Filesnames
Prefix Tablespace name Ext. Meaning Used bySYSTEM Oracle DDIC Oracle RDBMS
PSAP ROLL Rollback segments Oracle RDBMS PSAP TEMP Sort processes Oracle RDBMS PSAP EL<Release> D or I Development environment loads R/3 BasisPSAP ES<Release> D or I Development environment sources R/3 BasisPSAP LOAD D or I Screen and report loads (ABAP) R/3 BasisPSAP SOURCE D or I Screen and report sources (ABAP) R/3 BasisPSAP DDIC D or I ABAP Dictionary R/3 BasisPSAP PROT D or I Log-like tables (for example, spool) R/3 ApplicationsPSAP CLU D or I Cluster tables R/3 ApplicationsPSAP POOL D or I Pool tables (for example, ATAB) R/3 ApplicationsPSAP STAB D or I Master data and transparent tables R/3 ApplicationsPSAP BTAB D or I Transaction data, transparent tables R/3 ApplicationsPSAP DOCU D or I Documentation, SAPscript, SAPfind R/3 ApplicationsPSAP USER1 D or I Customer tables R/3 Applications
R/3 Naming Conventions
� The R/3 naming convention for tablespace names is defined as follows: PSAP<tablespace_name><extension>.
� The abbreviations in the tablespace name are part of the directory name and file name of each data file. Directories and data files are numbered.
� The objects located in the tablespaces SYSTEM, PSAPROLL, and PSAPTEMP belong either to the Oracle database users SYS or SYSTEM. Do not create any objects owned by other users in these tablespaces.
� The objects located in the other tablespaces belong to the SAP R/3 database user SAPR3. R/3 System users do not have a database system user.
� The R/3 System and SAP tools, such as SAPDBA, require that the naming conventions be observed. The installed system constitutes a logical unit, which you should not change. In this way, SAP can ensure that you receive fast and efficient support.

SAP AG 1999
Directory Contains File name examples
dbs SAP and Oracle profiles, init<SID>.ora, init<SID>.dba, init<SID>.sap first control file
bin Oracle executables
saptrace Background (Oracle alert file)usertrace
sapdata1 Datafiles /btabd1/btabd.data1, system.data1, . /btabi1/btabi.data1, /cntrl/cntrlDEV.dbf.sapdata<n>
sapbackup BRBACKUP, BRRESTORE logssaparch BRARCHIVE logs, Oracle archive dir <SID>00205.001, <SID>00206.001sapcheck SAPDBA logs (-next, -check, -analyze)sapreorg SAPDBA (default),
default compression directoryoriglogA Online redo log files log_tg101_m1.dbf, log_tg103_m1.dbforiglogB Online redo log files log_tg102_m1.dbf, log_tg104_m1.dbfmirrlogA Online redo log files log_tg101_m2.dbf, log_tg103_m2.dbfmirrlogB Online redo log files log_tg102_m2.dbf, log_tg104_m2.dbf
. . .
Oracle Directory Structure in R/3
� Directory and file names are standardized in the R/3 environment. We recommend that you use the following standards:
� Tablespace files reside in the sapdata<n> directories.
� The online redo log files reside in the origlog and mirrlog directories.
� The offline redo log files are written to the saparch directory.
� There should be at least 3 copies of the Oracle control file.
� The profile init<SID>.ora configures the Oracle instance, and resides in directory database.
� The profile init<SID>.sap configures the backup tools brbackup and brarchive, and resides in directory database.
� The profile init<SID>.dba configures the sapdba tool, and resides in directory database.
� The Oracle alert file is written to directory saptrace\background.
� Trace files of the Oracle shadow processes are written to the directory saptrace\usertrace
� During reorganization, export datasets are written to directory sapreorg.
� The directories saparch, sapcheck, sapreorg, and sapbackup are used by the SAP database tools.


![[1]Oracle® GoldenGate Installing and Configuring Oracle … · 2015-09-29 · [1]Oracle® GoldenGate Installing and Configuring Oracle GoldenGate for Informix 12c (12.1.2) E50195-06](https://img.dokumen.tips/doc/110x75/5e262db5781848173f1f7900/1oracle-goldengate-installing-and-configuring-oracle-2015-09-29-1oracle.jpg)