Embed Size (px)
Citation preview

Bayanihan Linux 4 Manual
Page 1 / 57
Bayanihan Linux 4 Manual
Table of Contents
CHAPTER 1 - Introduction...........................................................................................3About Bayanihan Linux..........................................................................................4Recommended System Requirements...................................................................4System Features....................................................................................................4
CHAPTER 2 - Installation............................................................................................5Installation.............................................................................................................6
CHAPTER 3 - Frequently Asked Questions................................................................13How Do I Access My CD Drive?............................................................................14How Do I Access My Floppy Drive?.......................................................................15How Do I Format My Floppy Disk?........................................................................16How Do I Burn An ISO Image?..............................................................................17How Do I Erase A Rewritable CD?........................................................................19How Do I Burn A Data CD?...................................................................................21How Do I Access Windows Shares?......................................................................23How Do I Play Movies?.........................................................................................24How Do I Configure An Ethernet Card?................................................................26How Do I Configure A Modem?.............................................................................28How Do I Configure A Printer?..............................................................................32How Do I Run Windows Applications Thru WINE?.................................................34How Do I Setup My Computer For Desktop Sharing?...........................................35
APPENDIX.................................................................................................................38Contributors of Bayanihan Linux..........................................................................39Contact Us................................................................................................ ............41Open Source Counterparts of Proprietary Software in Bayanihan Linux..............42Hardware Compatibility List.................................................................................43
CPUs.................................................................................................................43Video cards......................................................................................................43SCSI controllers................................................................................................43IDE controllers............................................................................................ ......44Network cards..................................................................................................44Modems...........................................................................................................44Sound cards.....................................................................................................45
Linux Directory Structure.....................................................................................46Shortcut Keys.......................................................................................................48The One Page Linux Manual.................................................................................49Glossary Of Terms................................................................................................54Resources............................................................................................................56
Page 2 / 57

Bayanihan Linux 4 Manual
CHAPTER 1 - Introduction
Page 3 / 57

Bayanihan Linux 4 Manual
About Bayanihan Linux
The Bayanihan Linux project started on October 2001 by the Open Source Group of the Advanced Science and Technology Institute. This project aims to provide a cost effective desktop solution to expensive and restrictive proprietary operating systems. Bayanihan Linux is tailor-made for small and medium business enterprises, government agencies and schools.
The first version of Bayanihan Linux was released last June 13, 2002. It was followed by the second version which was released on January 31, 2003.
In the development of the third version, beta versions were released to the public to obtain feedback before releasing the final version. The third version was released on February 2004.
Beta versions and release candidates were released prior to the final version of Bayanihan Linux 4. The fourth version of Bayanihan Linux was released on June 2006.
Recommended System Requirements
Pentium II or equivalent128MB RAM4.3GB hard disk spaceVGA or higher resolution(at least 800x600)Standard keyboard, mouse and monitor
System Features
Based on DebianGraphical DesktopOffice and other productivity suiteInternet ReadyMultimedia PlaybackEducational ApplicationsImage Editing ToolsImproved support for removable devices (USB)Easy to update and upgrade
Page 4 / 57

Bayanihan Linux 4 Manual
CHAPTER 2 - Installation
Page 5 / 57
Bayanihan Linux 4 Manual
Installation
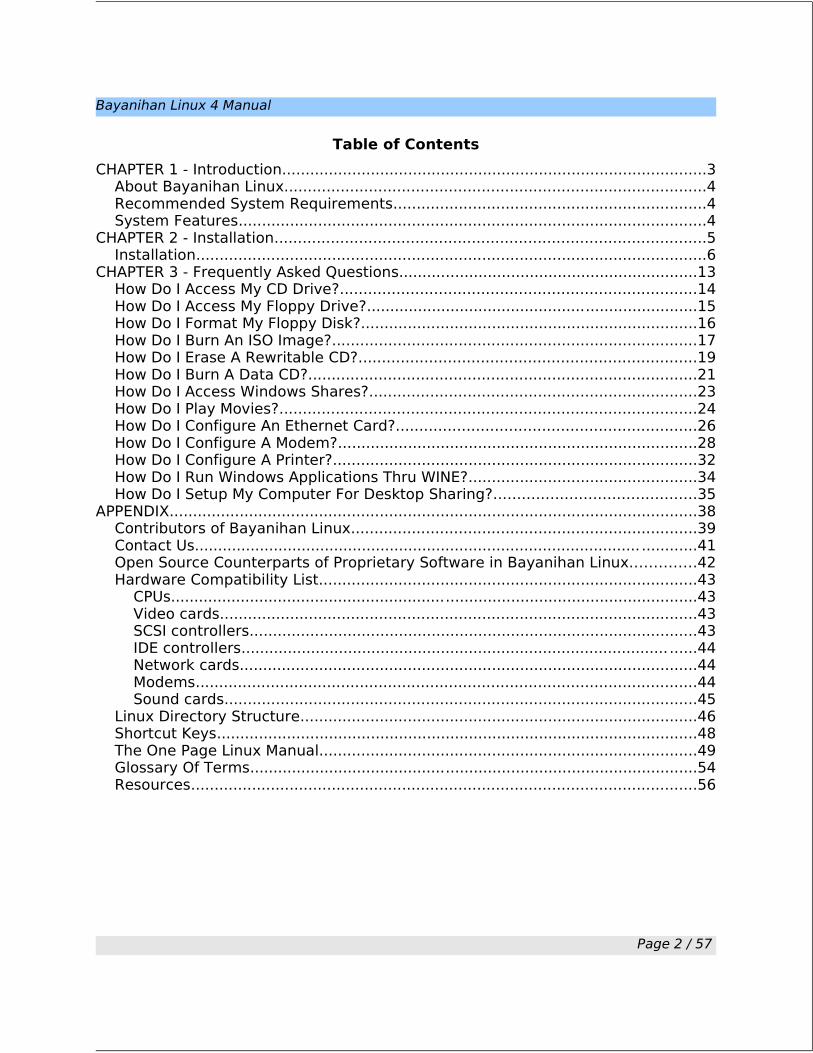
1. Configure the BIOS to boot from the CD-ROM.
2. Insert the Bayanihan Linux CD in the CD-ROM drive and restart the computer. The installation process will start and the user will be presented with the “Welcome” screen as seen in Figure 2.
Page 6 / 57
Figure 1 - Booting From The CD-ROM Drive
Figure 2 - Installer Welcome Screen
Bayanihan Linux 4 Manual
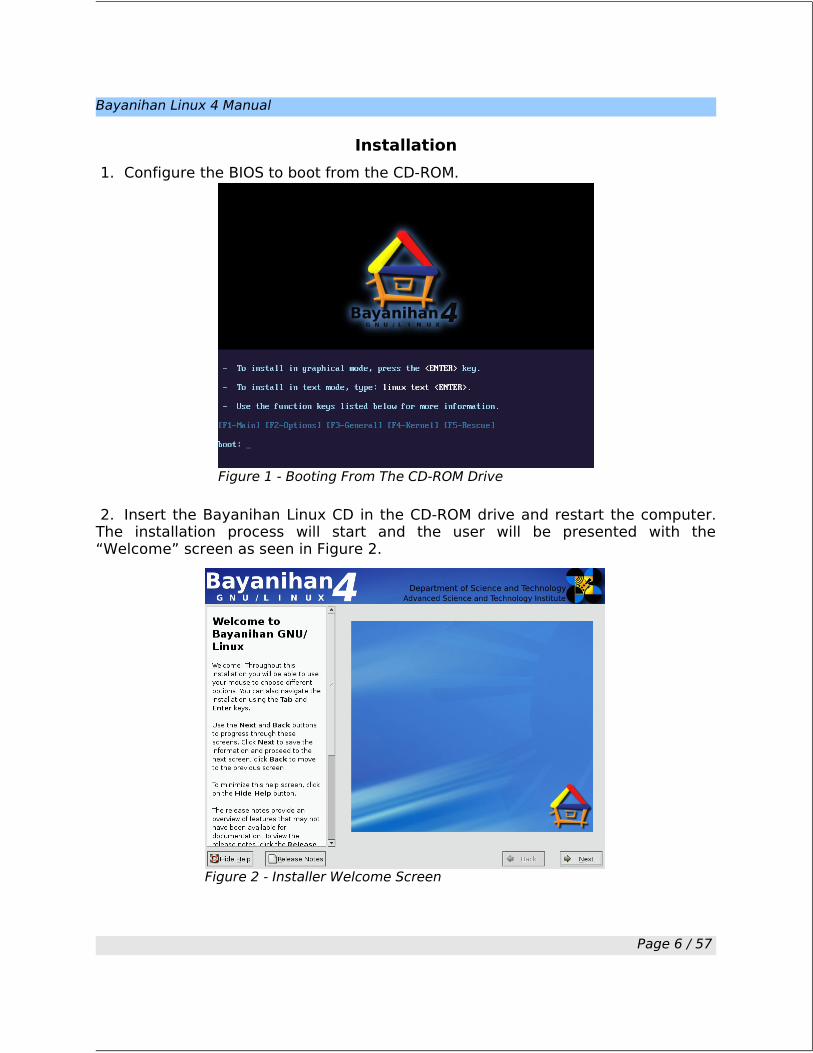
3. The next two screens will let the user select the language that will be used throughout the installation process and the layout of the keyboard.
4. The next step is to specify the type of monitor you are using. Usually, the monitor is automatically detected. If not, supply the appropriate frequency settings for your monitor. Frequency settings can be found in the product specifications of the monitor's manual or website.
Page 7 / 57
Figure 3 - Language Selection and Keyboard Configuration
Figure 4 - Monitor Configuration

Bayanihan Linux 4 Manual
5. The next step is to decide where Bayanihan Linux should be installed.
You have two choices:(a)Automatically partition
i. Automatic partitioning simplifies the task by automating the allocation of disk space for Bayanihan Linux by providing three common options: A.Remove all Linux partitions on this system
• The disk space used by installed linux operating systems in your hard disk will be erased and allocated to Bayanihan Linux. Existing Windows partitions will not be erased.
B.Remove all partitions on this system• The entire hard disk will be erased and allocated to Bayanihan Linux.
C.Keep all partitions and use exisiting free space• Unused free partitions in your hard disk will be allocated to Bayanihan
Linux.
Page 8 / 57
Figure 5 - Disk Partitioning
Figure 6 - Partitioning Automatically
Bayanihan Linux 4 Manual
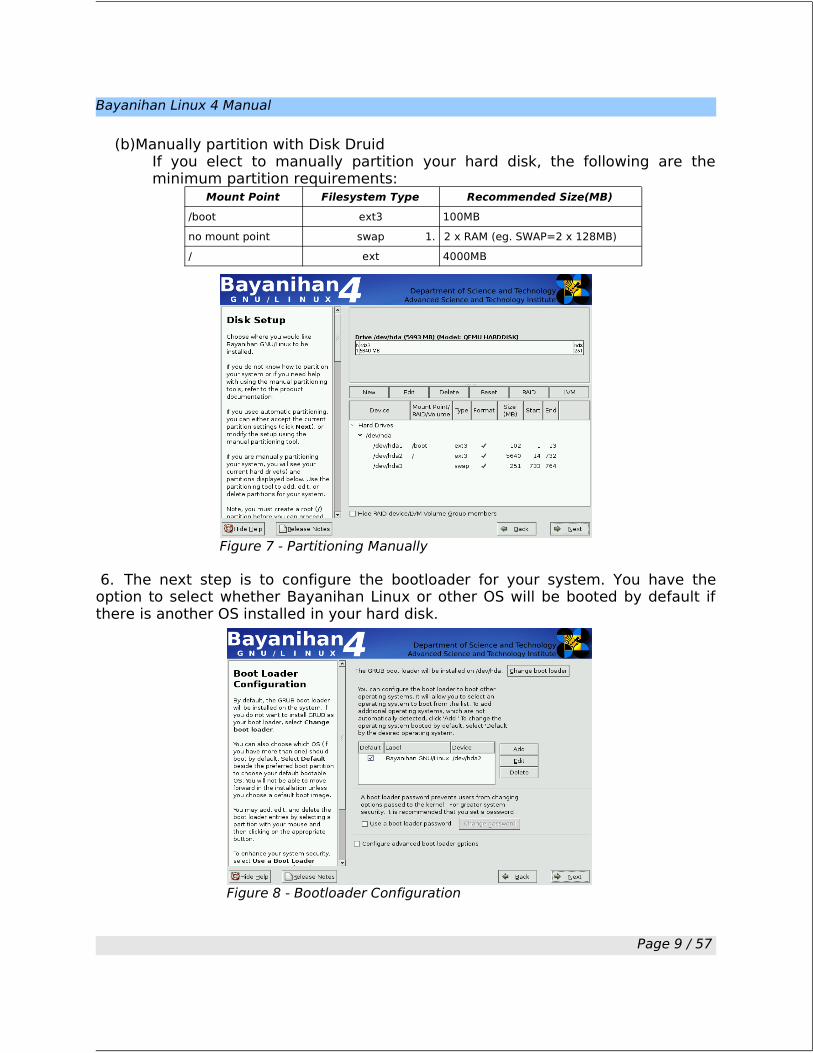
(b)Manually partition with Disk DruidIf you elect to manually partition your hard disk, the following are the minimum partition requirements:
Mount Point Filesystem Type Recommended Size(MB)
/boot ext3 100MB
no mount point swap 1. 2 x RAM (eg. SWAP=2 x 128MB)
/ ext 4000MB
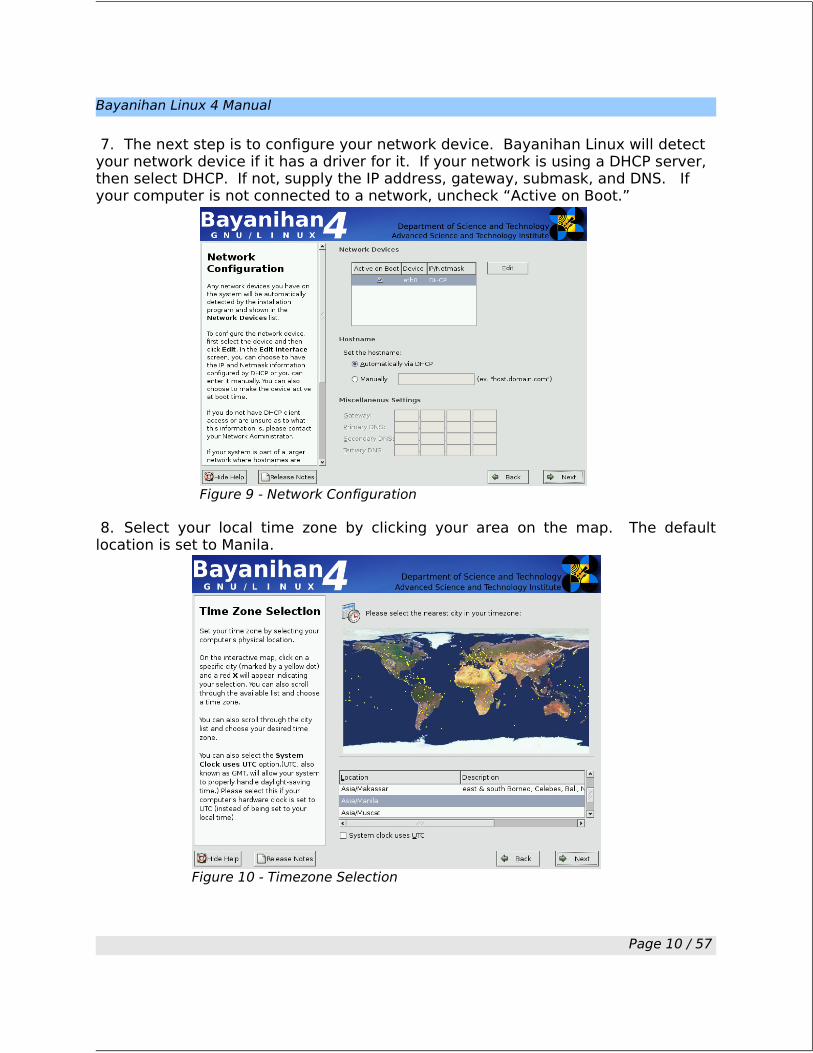
6. The next step is to configure the bootloader for your system. You have the option to select whether Bayanihan Linux or other OS will be booted by default if there is another OS installed in your hard disk.
Page 9 / 57
Figure 8 - Bootloader Configuration
Figure 7 - Partitioning Manually
Bayanihan Linux 4 Manual
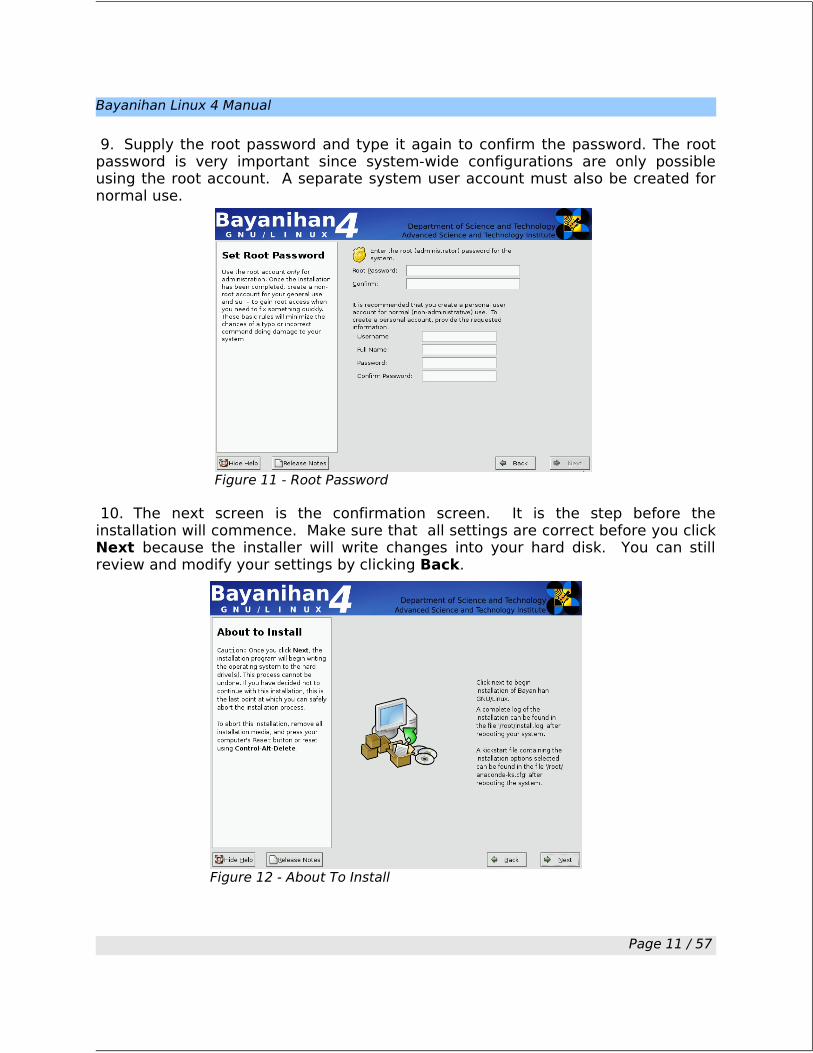
7. The next step is to configure your network device. Bayanihan Linux will detect your network device if it has a driver for it. If your network is using a DHCP server, then select DHCP. If not, supply the IP address, gateway, submask, and DNS. If your computer is not connected to a network, uncheck “Active on Boot.”
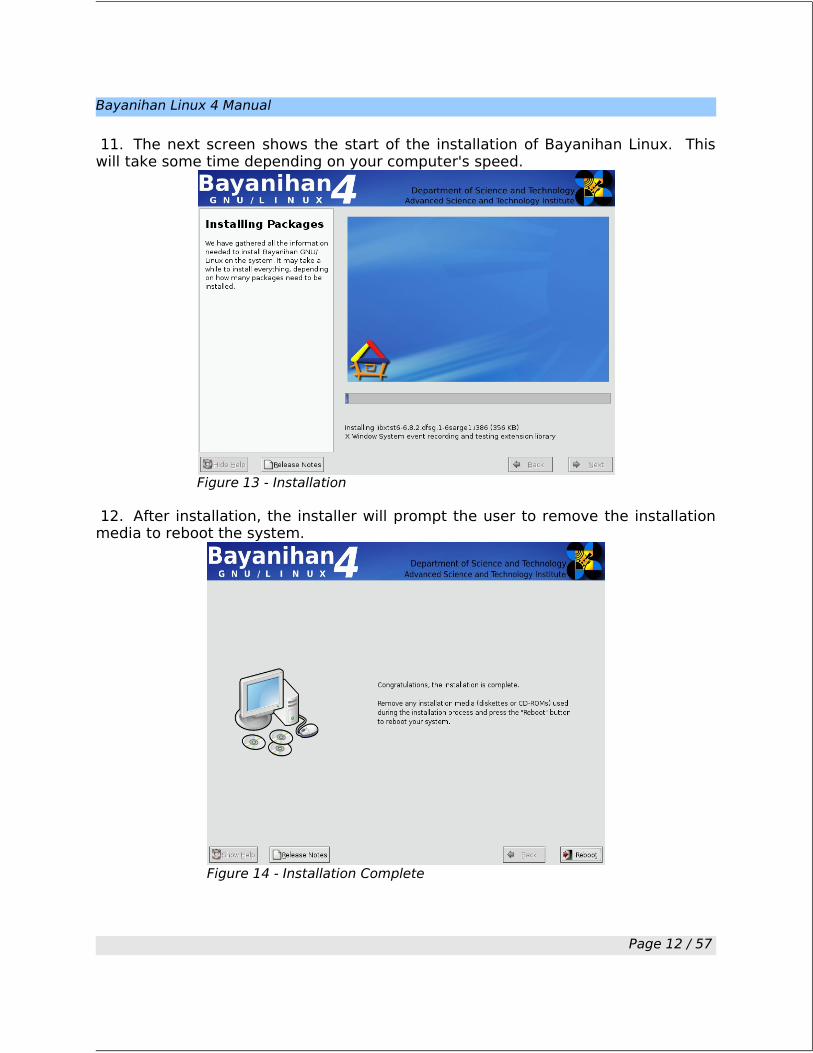
8. Select your local time zone by clicking your area on the map. The default location is set to Manila.
Page 10 / 57
Figure 9 - Network Configuration
Figure 10 - Timezone Selection
Bayanihan Linux 4 Manual
9. Supply the root password and type it again to confirm the password. The root password is very important since system-wide configurations are only possible using the root account. A separate system user account must also be created for normal use.
10. The next screen is the confirmation screen. It is the step before the installation will commence. Make sure that all settings are correct before you click Next because the installer will write changes into your hard disk. You can still review and modify your settings by clicking Back.
Page 11 / 57
Figure 11 - Root Password
Figure 12 - About To Install
Bayanihan Linux 4 Manual
11. The next screen shows the start of the installation of Bayanihan Linux. This will take some time depending on your computer's speed.
12. After installation, the installer will prompt the user to remove the installation media to reboot the system.
Page 12 / 57
Figure 13 - Installation
Figure 14 - Installation Complete

Bayanihan Linux 4 Manual
CHAPTER 3 - Frequently Asked Questions
Page 13 / 57
Bayanihan Linux 4 Manual
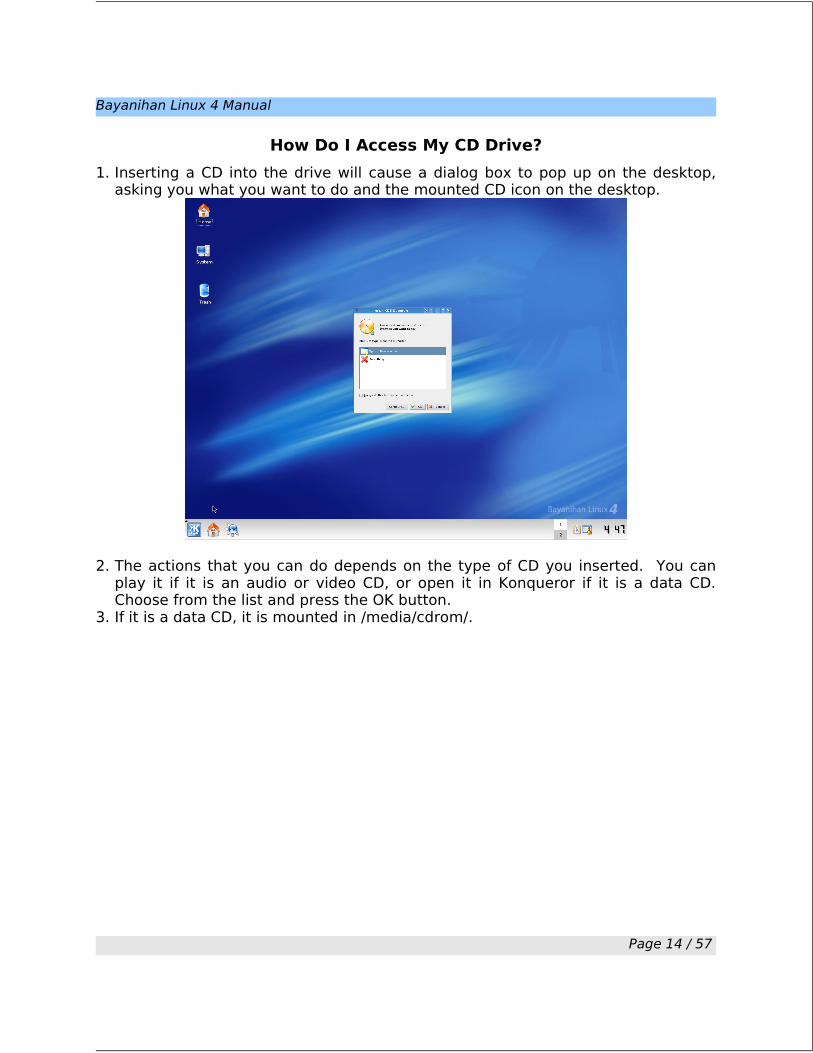
How Do I Access My CD Drive?
1. Inserting a CD into the drive will cause a dialog box to pop up on the desktop, asking you what you want to do and the mounted CD icon on the desktop.
2. The actions that you can do depends on the type of CD you inserted. You can play it if it is an audio or video CD, or open it in Konqueror if it is a data CD. Choose from the list and press the OK button.
3. If it is a data CD, it is mounted in /media/cdrom/.
Page 14 / 57

Bayanihan Linux 4 Manual
How Do I Access My Floppy Drive?
1. Double-click the “Floppy” icon from the desktop.
2. Usually, the link to your floppy disk is /media/floppy.
Page 15 / 57

Bayanihan Linux 4 Manual
How Do I Format My Floppy Disk?
1. Select Start -> Utilities -> Peripherals -> KFloppy.
2. Click the “Format” button.
Page 16 / 57
Bayanihan Linux 4 Manual
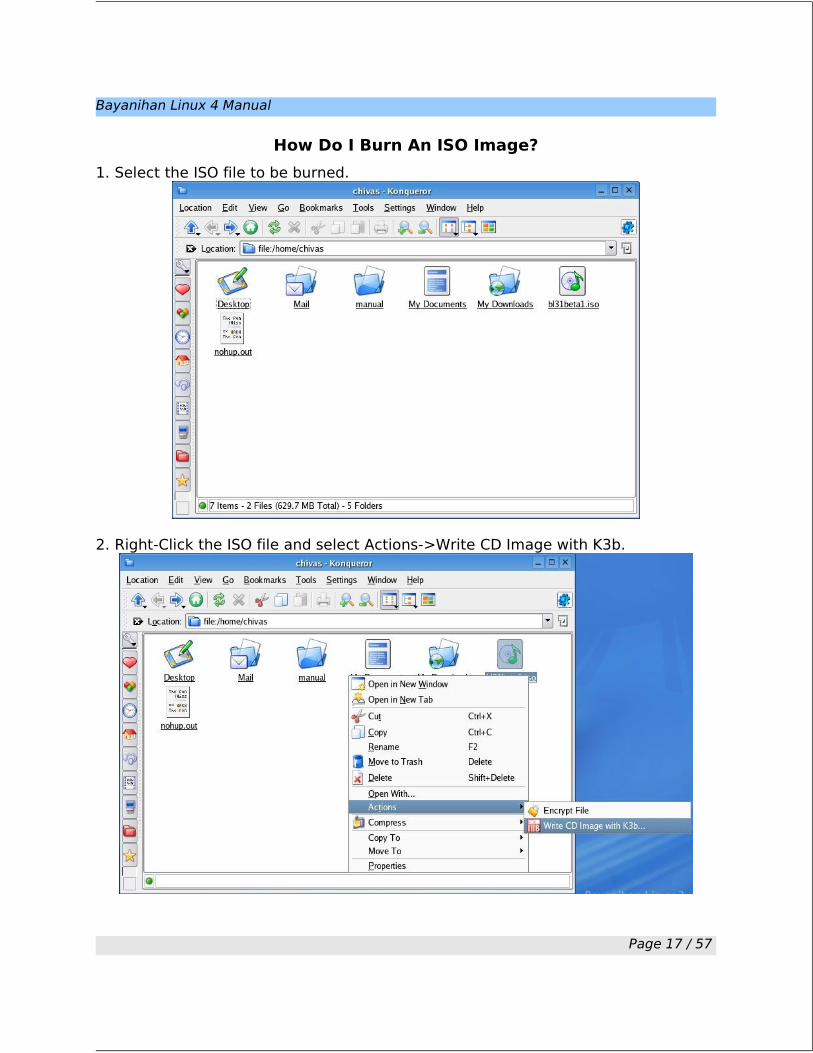
How Do I Burn An ISO Image?
1. Select the ISO file to be burned.
2. Right-Click the ISO file and select Actions->Write CD Image with K3b.
Page 17 / 57
Bayanihan Linux 4 Manual
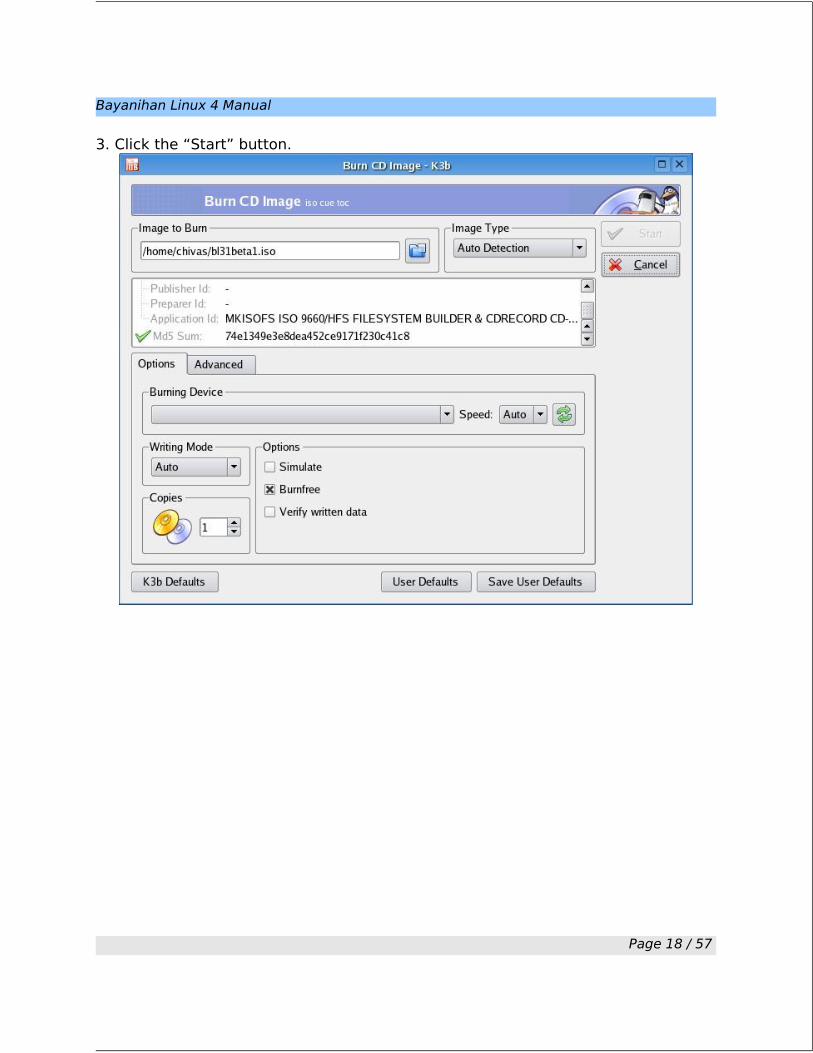
3. Click the “Start” button.
Page 18 / 57

Bayanihan Linux 4 Manual
How Do I Erase A Rewritable CD?
1. Select Start -> Multimedia-> K3b (CD & DVD Burning).
2. Select Tools->CD->Erase CD-RW.
Page 19 / 57

Bayanihan Linux 4 Manual
3. Click the “Start” Button.
Page 20 / 57
Bayanihan Linux 4 Manual
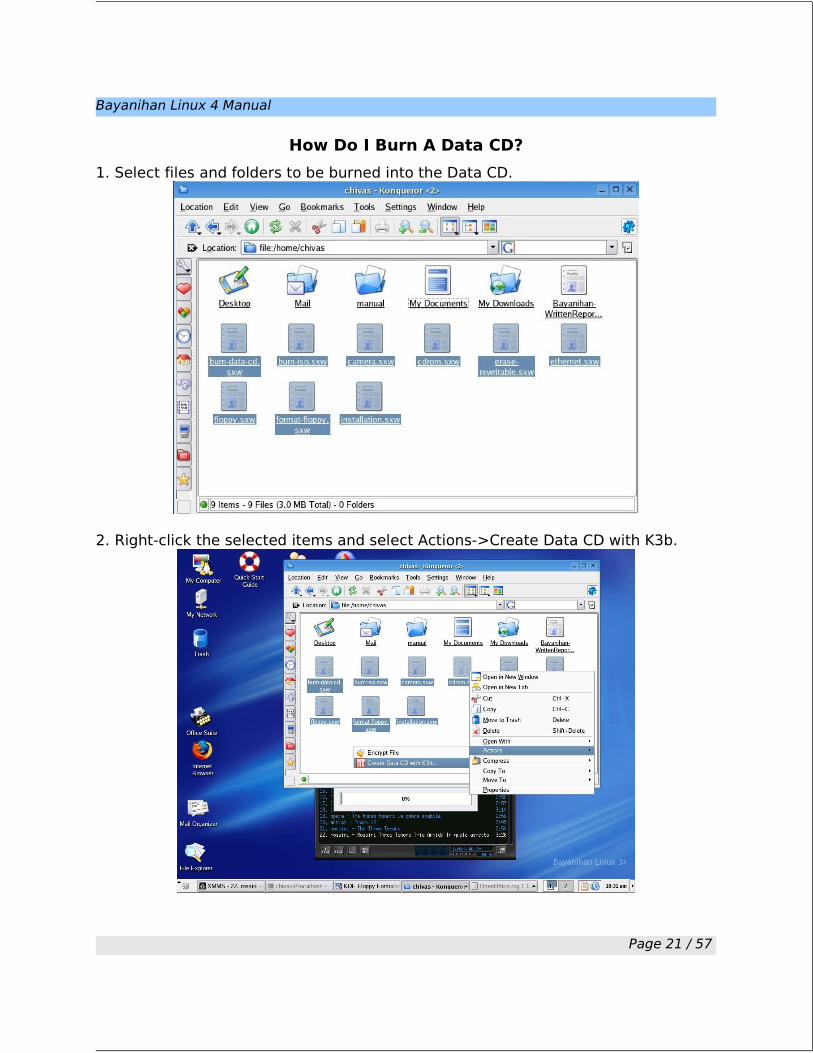
How Do I Burn A Data CD?
1. Select files and folders to be burned into the Data CD.
2. Right-click the selected items and select Actions->Create Data CD with K3b.
Page 21 / 57

Bayanihan Linux 4 Manual
3. Click the “Burn” button.
4. Click the “Burn” button.
Page 22 / 57
Bayanihan Linux 4 Manual
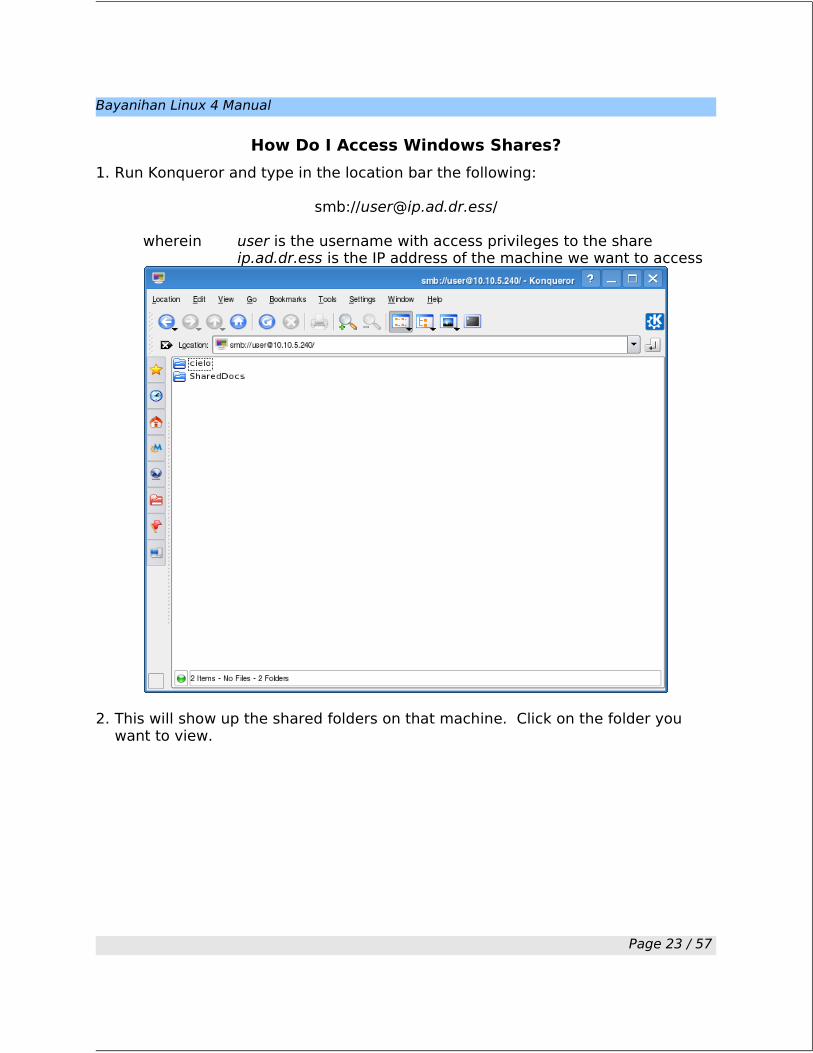
How Do I Access Windows Shares?
1. Run Konqueror and type in the location bar the following:
smb://[email protected]/
wherein user is the username with access privileges to the shareip.ad.dr.ess is the IP address of the machine we want to access
2. This will show up the shared folders on that machine. Click on the folder you want to view.
Page 23 / 57
Bayanihan Linux 4 Manual
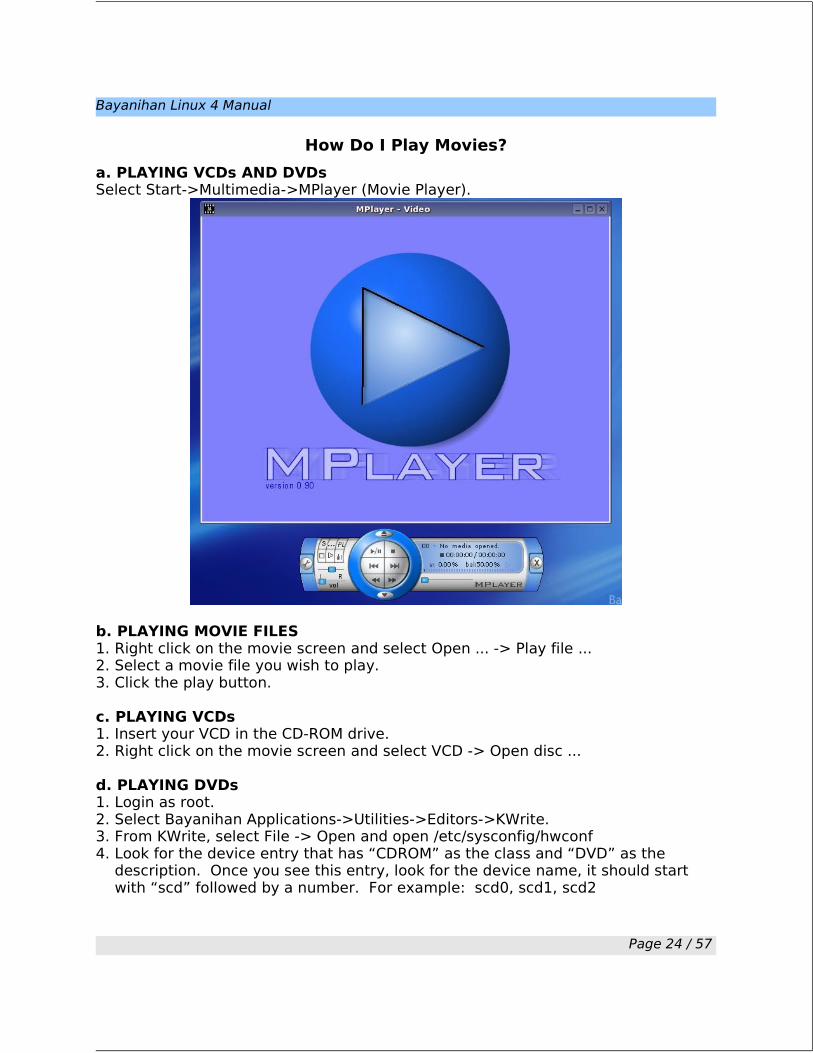
How Do I Play Movies?
a. PLAYING VCDs AND DVDsSelect Start->Multimedia->MPlayer (Movie Player).
b. PLAYING MOVIE FILES1. Right click on the movie screen and select Open ... -> Play file ...2. Select a movie file you wish to play.3. Click the play button.
c. PLAYING VCDs 1. Insert your VCD in the CD-ROM drive.2. Right click on the movie screen and select VCD -> Open disc ...
d. PLAYING DVDs1. Login as root.2. Select Bayanihan Applications->Utilities->Editors->KWrite.3. From KWrite, select File -> Open and open /etc/sysconfig/hwconf4. Look for the device entry that has “CDROM” as the class and “DVD” as the
description. Once you see this entry, look for the device name, it should start with “scd” followed by a number. For example: scd0, scd1, scd2
Page 24 / 57

Bayanihan Linux 4 Manual
5. Close KWrite without saving.6. Select System Settings->Utiltities->Terminal Program.7. From the terminal, create a symbolic link from /dev/dvd to your dvd device by
typing: ln -s /dev/scdx /dev/dvd
NOTE: replace x with the device number listed in step 4
8. Close the terminal.9. Insert a DVD in the DVD drive.10.Right click on the movie screen and select DVD-> Open disc ...
Page 25 / 57
Bayanihan Linux 4 Manual
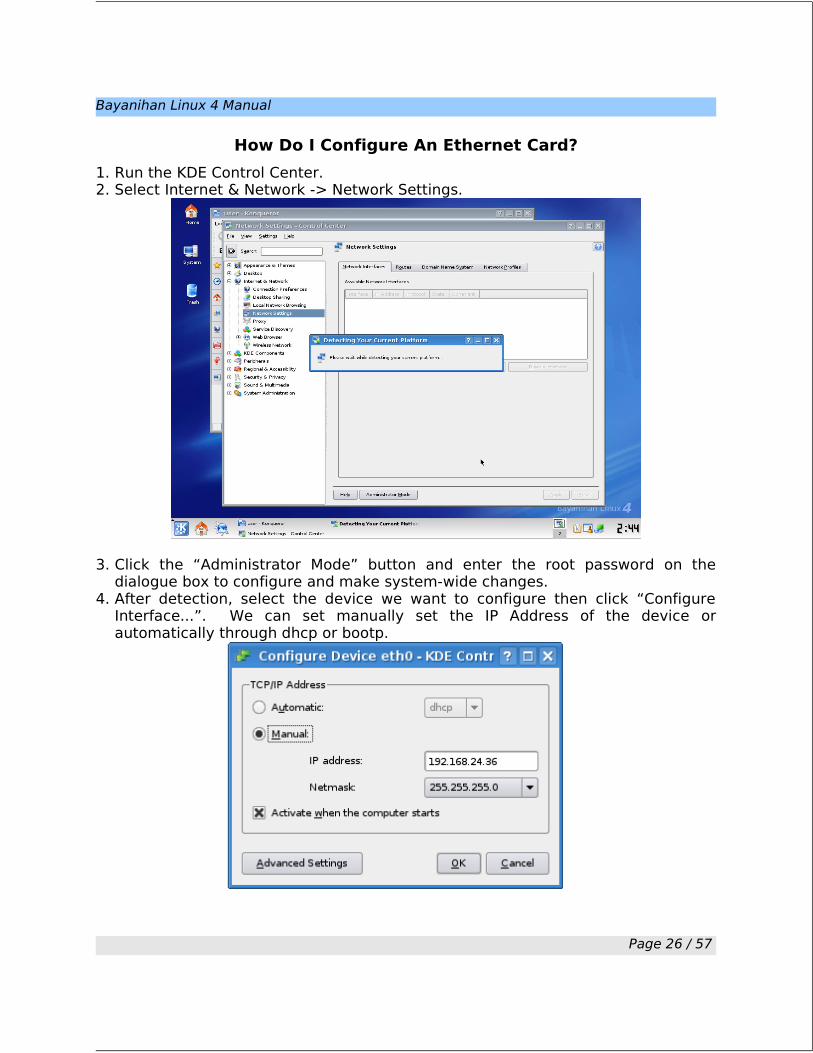
How Do I Configure An Ethernet Card?
1. Run the KDE Control Center.2. Select Internet & Network -> Network Settings.
3. Click the “Administrator Mode” button and enter the root password on the dialogue box to configure and make system-wide changes.
4. After detection, select the device we want to configure then click “Configure Interface...”. We can set manually set the IP Address of the device or automatically through dhcp or bootp.
Page 26 / 57
Bayanihan Linux 4 Manual
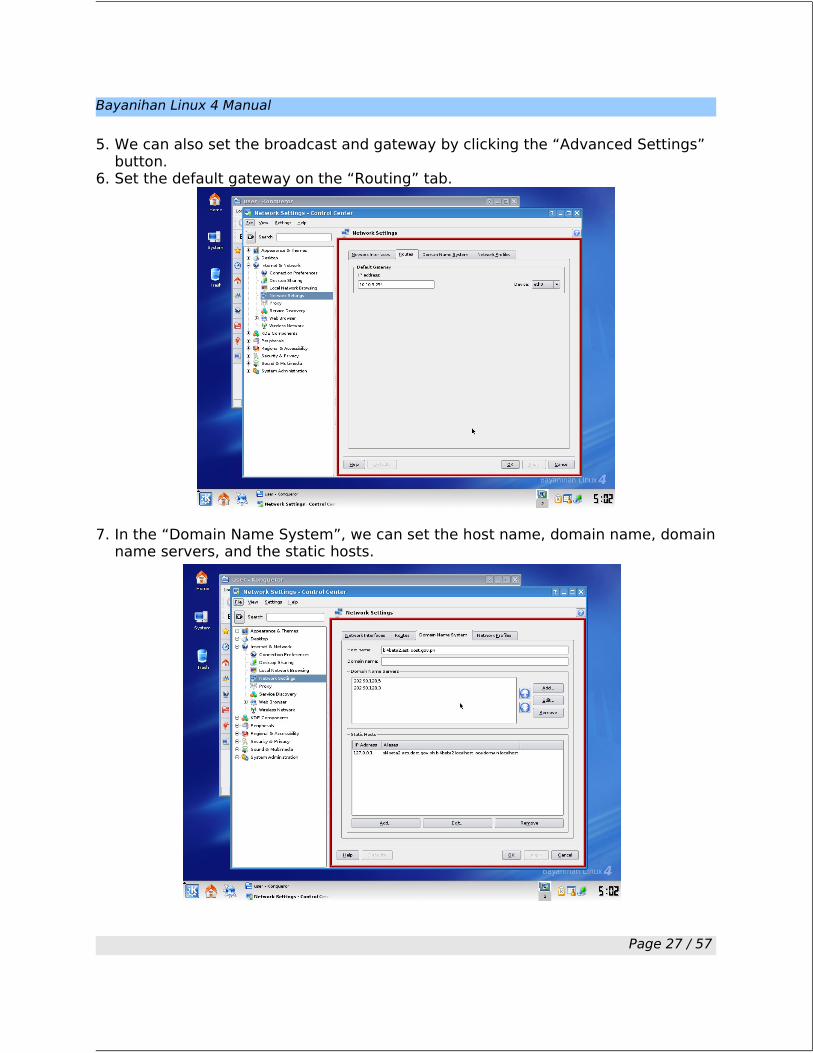
5. We can also set the broadcast and gateway by clicking the “Advanced Settings” button.
6. Set the default gateway on the “Routing” tab.
7. In the “Domain Name System”, we can set the host name, domain name, domain name servers, and the static hosts.
Page 27 / 57
Bayanihan Linux 4 Manual
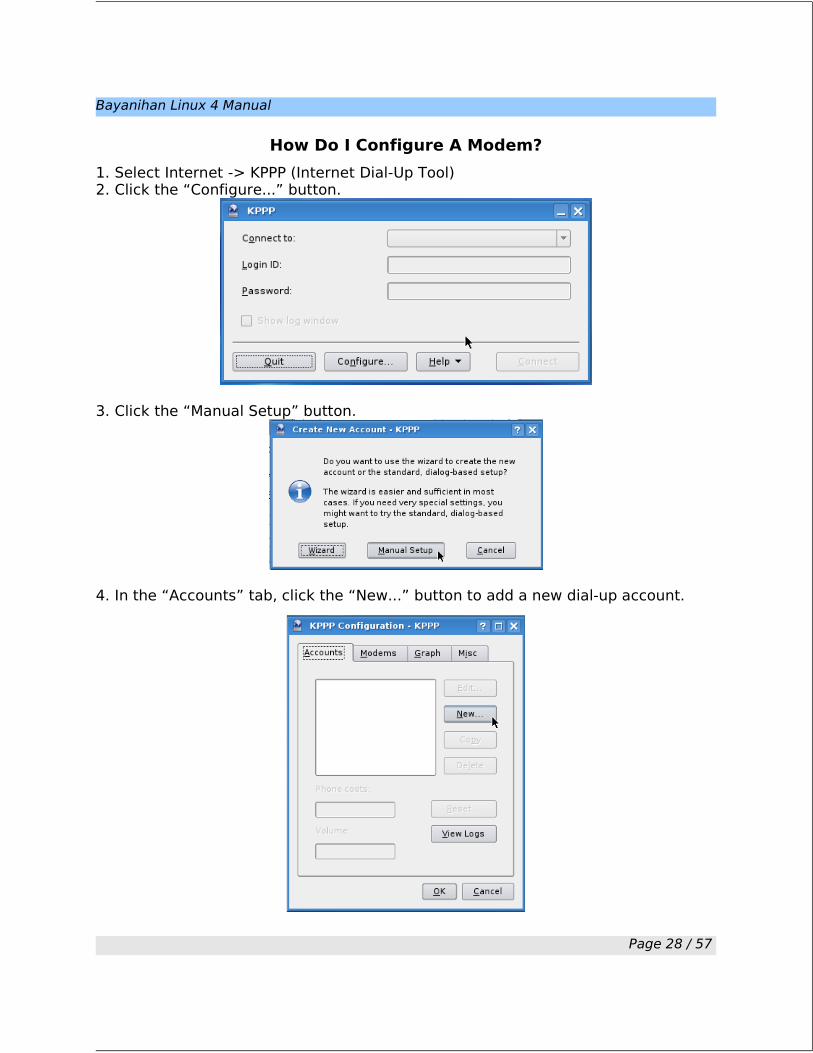
How Do I Configure A Modem?
1. Select Internet -> KPPP (Internet Dial-Up Tool)2. Click the “Configure...” button.
3. Click the “Manual Setup” button.
4. In the “Accounts” tab, click the “New...” button to add a new dial-up account.
Page 28 / 57

Bayanihan Linux 4 Manual
5. In the “Dial” tab, specify the name of your ISP provider and click the “Add” button to add the telephone numbers of your ISP. Once completed click “OK” to apply the changes and go back to the KPPP Configuration Dialog.
a. If your ISP provided a static IP address, click on the “IP” tab and specify the static IP address.
b. If your ISP provided a Gateway information, click on the “Gateway” tab and specify the gateway Information.
c. If your ISP provided a DNS information, click on the “DNS” tab and specify the dns information.
Page 29 / 57

Bayanihan Linux 4 Manual
6. Select the “Modem” tab, and click the “New” button to configure your modem device.
7. In the “Device” tab, specify the modem name that you wish to use and select the modem device. If you are using an external modem connected in the serial port of your computer, try selecting /dev/ttyS0 or /dev/ttyS1.
8. Click the “OK” button to apply the changes.
Page 30 / 57

Bayanihan Linux 4 Manual
9. Check if everything is complete and correct then click “OK” to exit the KPPP Configuration Dialog box.
10. Click “Connect” to dial to your ISP and connect to the internet.
Page 31 / 57

Bayanihan Linux 4 Manual
How Do I Configure A Printer?
1. Select Settings->Printing Manager.
Page 32 / 57

Bayanihan Linux 4 Manual
2. Select Add->Add Printer Class.
3. Configure your printer thru the printer wizard.
Page 33 / 57

Bayanihan Linux 4 Manual
How Do I Run Windows Applications Thru WINE?
Click the Windows executable file that you would like to run under Bayanihan Linux.
Page 34 / 57
Bayanihan Linux 4 Manual
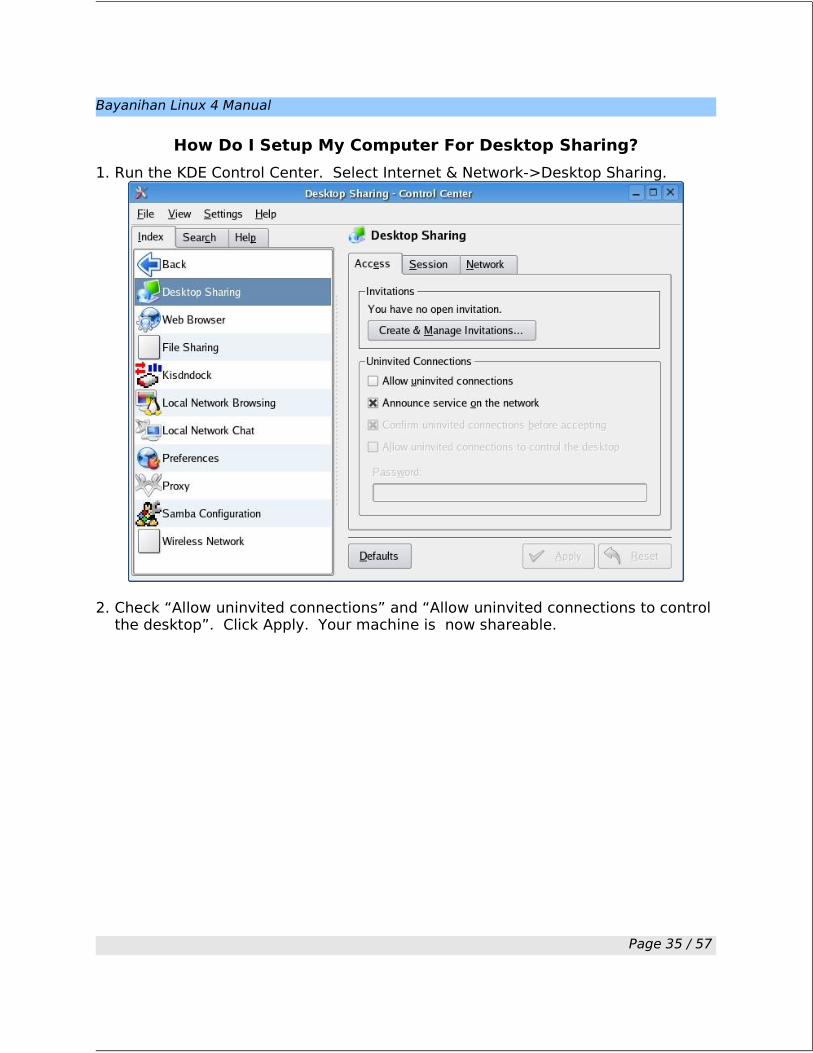
How Do I Setup My Computer For Desktop Sharing?
1. Run the KDE Control Center. Select Internet & Network->Desktop Sharing.
2. Check “Allow uninvited connections” and “Allow uninvited connections to control the desktop”. Click Apply. Your machine is now shareable.
Page 35 / 57
Bayanihan Linux 4 Manual
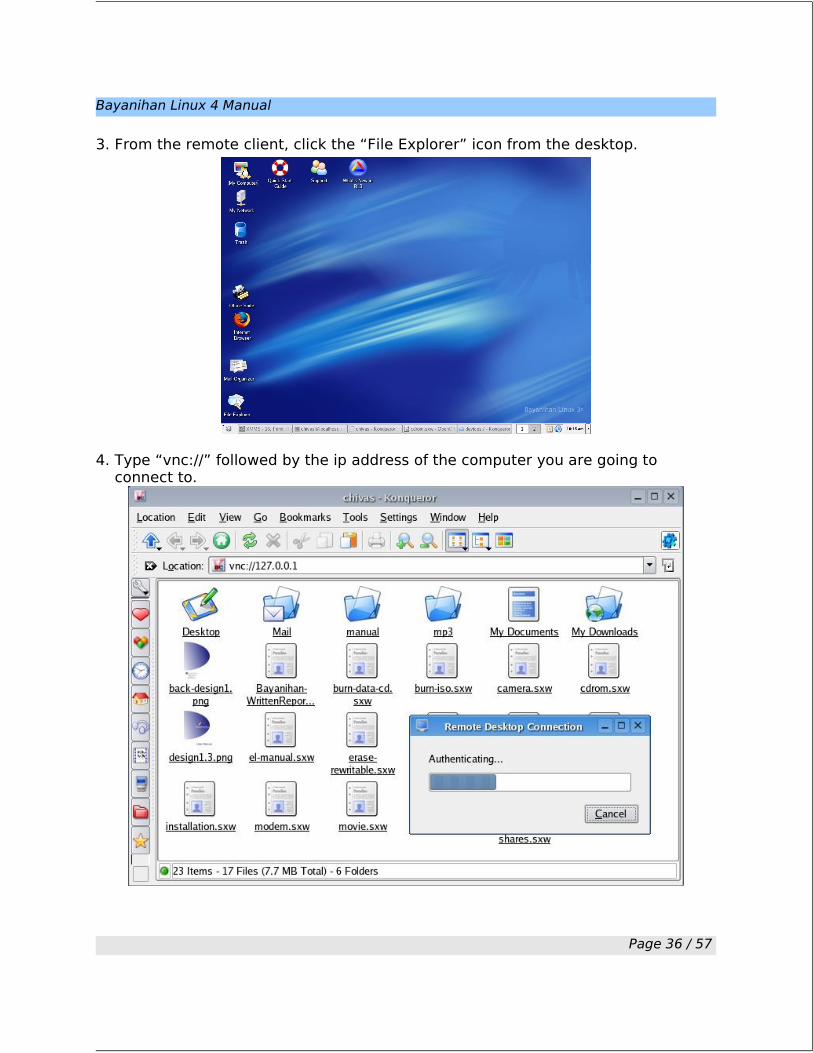
3. From the remote client, click the “File Explorer” icon from the desktop.
4. Type “vnc://” followed by the ip address of the computer you are going to connect to.
Page 36 / 57
Bayanihan Linux 4 Manual
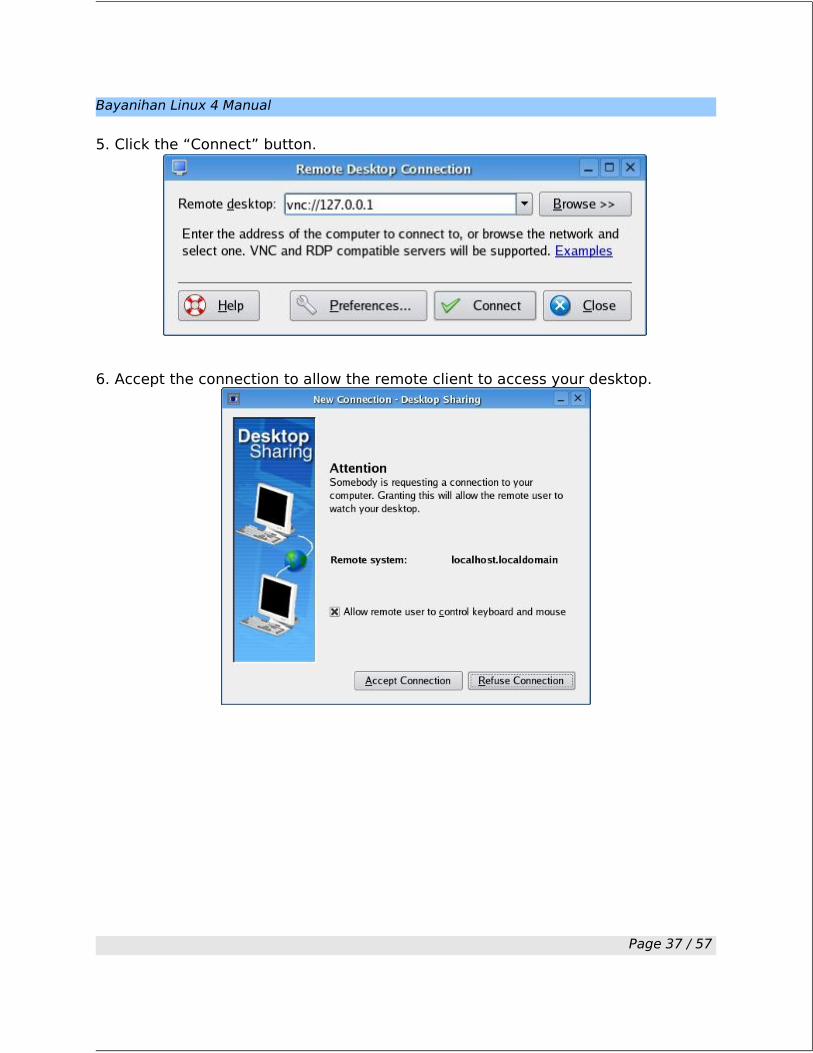
5. Click the “Connect” button.
6. Accept the connection to allow the remote client to access your desktop.
Page 37 / 57

Bayanihan Linux 4 Manual
APPENDIX
Page 38 / 57
Bayanihan Linux 4 Manual
Contributors of Bayanihan Linux
Michael PobleteA member of the Philippine Linux Users Group
Developer and collaborator of the Bayanihan Linux Users GroupContributor of the customized Plastik theme and one of the GDM Kalawakan
designers Currently studying in Mapua Institute of Technology, Manila
Worked as a student assistant in ASTI with the Bayanihan Linux Team
Mark AchanzarA member of the Philippine Linux Users Group
Contributor of the GDM Kalawakan ThemeFreelance developer and designer
Special thanks to the following individuals for their comments and suggestions:
Melvin VivasFounding president of the Pinoy Java Users Group (PinoyJUG) and still a member of
PinoyJUG
Marvin PascualA member of the Philippine Linux Users Group who also works in BIR
Dr. Ernesto DamascoAn avid supporter of Bayanihan Linux since the start of the project
Xander SolisA member of Philippine Linux Users Group and a student of Asia Pacific College
Worked in ASTI as a Student Assistant
Loreto CasalaA Batangas Open Source Society (BOSS) member and future contributor for
localization
Bert TeA Consultant from Computer Solutions Center, Inc.
Emman TeodosioFounding president of Mapua IT Center Linux Users Groups
Currently studying in Mapua IT CenterWorked in ASTI as a Student Assistant
Page 39 / 57
Bayanihan Linux 4 Manual
Eder TanCurrently studying in APC
Worked as a student assistant for the Bayanihan Linux team
KD TanCurrently studying in UP Diliman
Worked as a student assistant for the Bayanihan Linux team
Our sincere appreciation to the following professional individuals for testing our Beta release and providing us with feedback to improve Bayanihan Linux:
Ronald Tomimbang, A faculty in St. Francis of Assisi AcademyJon Voltaire Pili, A linux enthusiastRufino Mananghaya, Director of the Development Management and Governance, UPLBResmon Gonzales, IT Administrator of Veritas Parochial SchoolChristopher Baluyut, a student of UE Caloocan City
We would also like to thank Serg's Cafe for providing a venue for our Developers' Meeting. To our forum members, enthusiastic supporters and critics, we thank you for making Bayanihan Linux possible.
Lastly, to the contributors that we failed to mention, thank you very much as well.
Page 40 / 57
Bayanihan Linux 4 Manual
Contact Us
Advanced Science and Technology Institute2nd floor Computer Software DivisionAdvanced Science and Technology Institute BuildingC.P. Garcia Avenue, UP Technology ParkDiliman, Quezon City 1101Philippines
Phone: (632) 426-3572; (632) 426-9759Email: [email protected]: http://www.bayanihan.gov.ph/Forum: http://www.bayanihan.gov.ph
Text:Format [ BL [email protected] your message... ]Send to 2960
Bayanihan Linux TeamProject Leader: Mr. Peter Antonio BanzonMembers: Mr. Jaime Sebastian Sicam
Mr. Reynaldo CallaoMs. Janice CarpoMs. Katrina MurgaMr. Emmanuel Balintec
Course Developer: Ms. Janice Ballesteros
Page 41 / 57
Bayanihan Linux 4 Manual
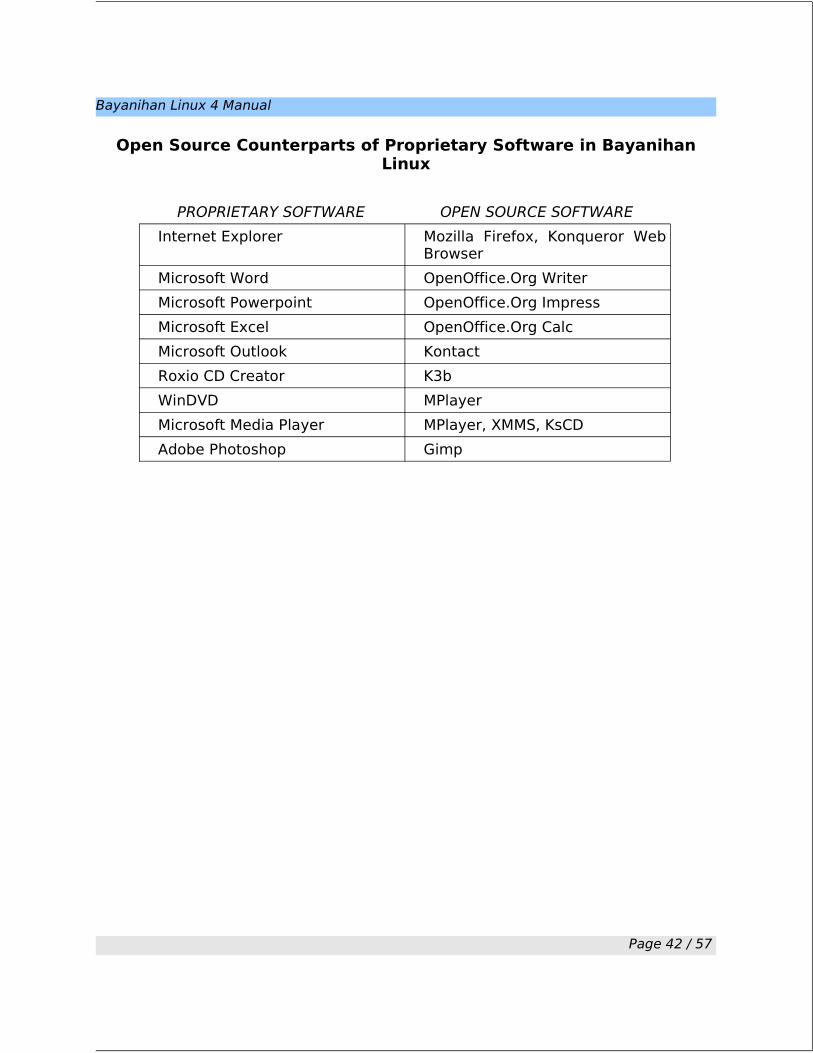
Open Source Counterparts of Proprietary Software in Bayanihan Linux
PROPRIETARY SOFTWARE OPEN SOURCE SOFTWARE
Internet Explorer Mozilla Firefox, Konqueror Web Browser
Microsoft Word OpenOffice.Org Writer
Microsoft Powerpoint OpenOffice.Org Impress
Microsoft Excel OpenOffice.Org Calc
Microsoft Outlook Kontact
Roxio CD Creator K3b
WinDVD MPlayer
Microsoft Media Player MPlayer, XMMS, KsCD
Adobe Photoshop Gimp
Page 42 / 57
Bayanihan Linux 4 Manual
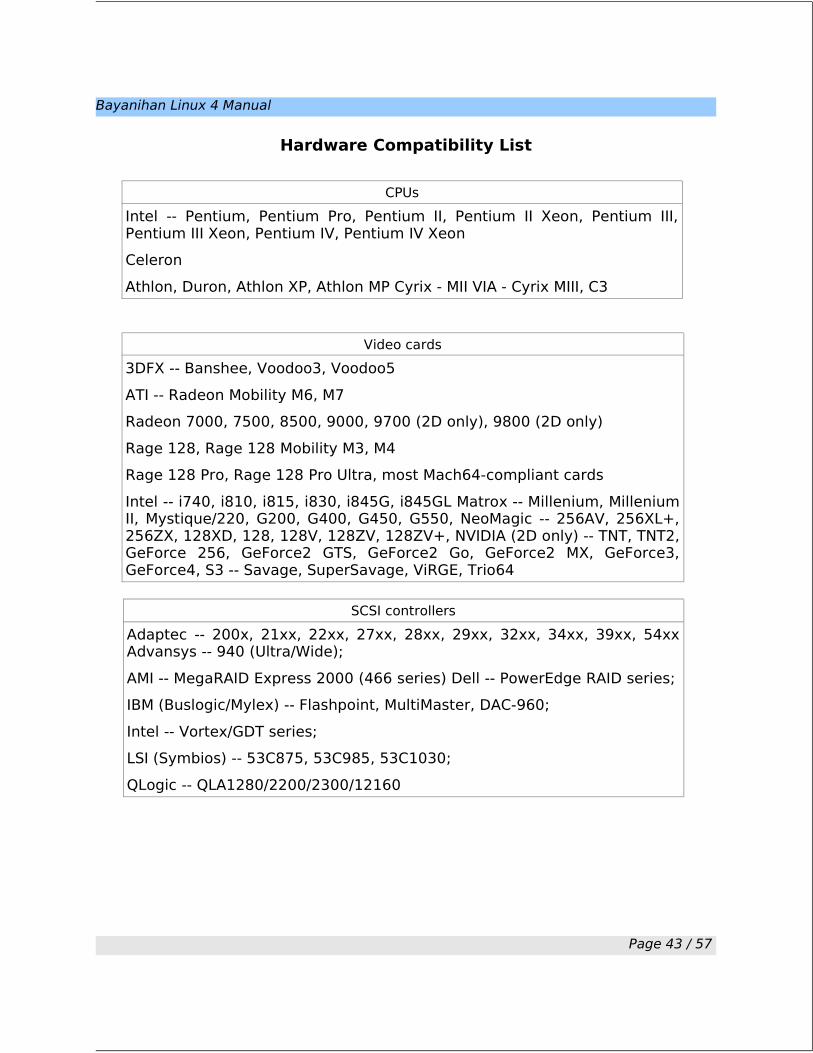
Hardware Compatibility List
CPUs
Intel -- Pentium, Pentium Pro, Pentium II, Pentium II Xeon, Pentium III, Pentium III Xeon, Pentium IV, Pentium IV Xeon
Celeron
Athlon, Duron, Athlon XP, Athlon MP Cyrix - MII VIA - Cyrix MIII, C3
Video cards
3DFX -- Banshee, Voodoo3, Voodoo5
ATI -- Radeon Mobility M6, M7
Radeon 7000, 7500, 8500, 9000, 9700 (2D only), 9800 (2D only)
Rage 128, Rage 128 Mobility M3, M4
Rage 128 Pro, Rage 128 Pro Ultra, most Mach64-compliant cards
Intel -- i740, i810, i815, i830, i845G, i845GL Matrox -- Millenium, Millenium II, Mystique/220, G200, G400, G450, G550, NeoMagic -- 256AV, 256XL+, 256ZX, 128XD, 128, 128V, 128ZV, 128ZV+, NVIDIA (2D only) -- TNT, TNT2, GeForce 256, GeForce2 GTS, GeForce2 Go, GeForce2 MX, GeForce3, GeForce4, S3 -- Savage, SuperSavage, ViRGE, Trio64
SCSI controllers
Adaptec -- 200x, 21xx, 22xx, 27xx, 28xx, 29xx, 32xx, 34xx, 39xx, 54xx Advansys -- 940 (Ultra/Wide);
AMI -- MegaRAID Express 2000 (466 series) Dell -- PowerEdge RAID series;
IBM (Buslogic/Mylex) -- Flashpoint, MultiMaster, DAC-960;
Intel -- Vortex/GDT series;
LSI (Symbios) -- 53C875, 53C985, 53C1030;
QLogic -- QLA1280/2200/2300/12160
Page 43 / 57
Bayanihan Linux 4 Manual
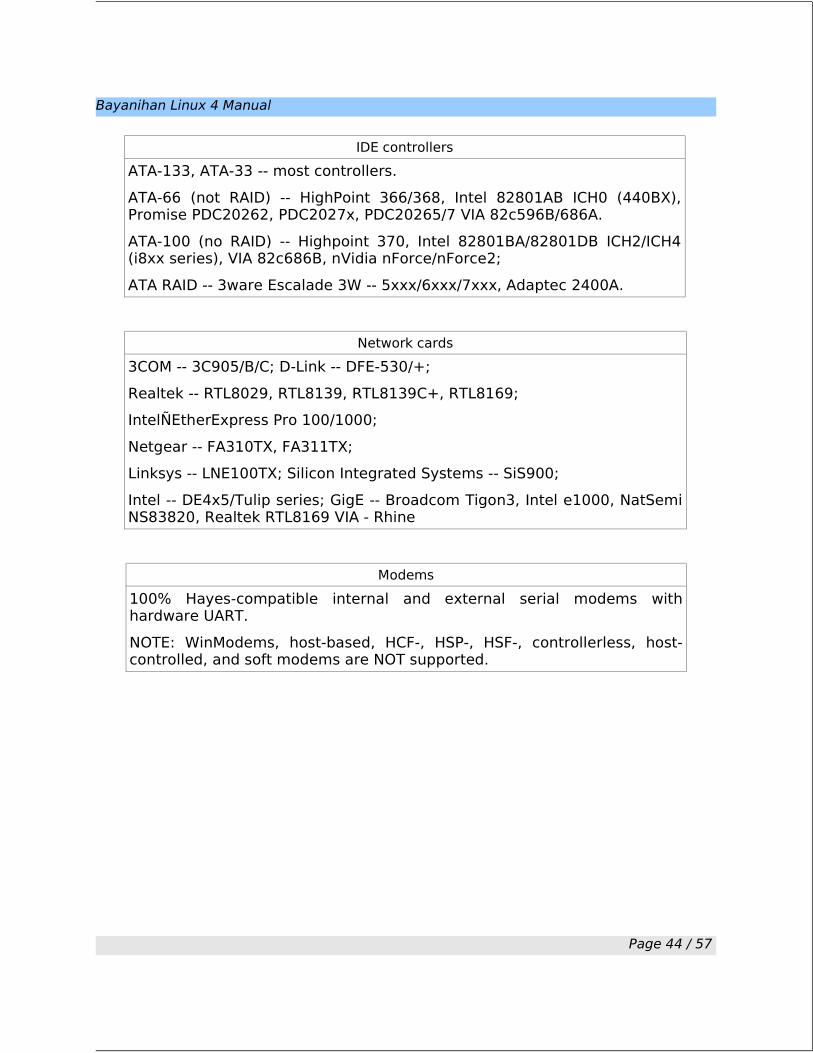
IDE controllers
ATA-133, ATA-33 -- most controllers.
ATA-66 (not RAID) -- HighPoint 366/368, Intel 82801AB ICH0 (440BX), Promise PDC20262, PDC2027x, PDC20265/7 VIA 82c596B/686A.
ATA-100 (no RAID) -- Highpoint 370, Intel 82801BA/82801DB ICH2/ICH4 (i8xx series), VIA 82c686B, nVidia nForce/nForce2;
ATA RAID -- 3ware Escalade 3W -- 5xxx/6xxx/7xxx, Adaptec 2400A.
Network cards
3COM -- 3C905/B/C; D-Link -- DFE-530/+;
Realtek -- RTL8029, RTL8139, RTL8139C+, RTL8169;
IntelÑEtherExpress Pro 100/1000;
Netgear -- FA310TX, FA311TX;
Linksys -- LNE100TX; Silicon Integrated Systems -- SiS900;
Intel -- DE4x5/Tulip series; GigE -- Broadcom Tigon3, Intel e1000, NatSemi NS83820, Realtek RTL8169 VIA - Rhine
Modems
100% Hayes-compatible internal and external serial modems with hardware UART.
NOTE: WinModems, host-based, HCF-, HSP-, HSF-, controllerless, host-controlled, and soft modems are NOT supported.
Page 44 / 57
Bayanihan Linux 4 Manual
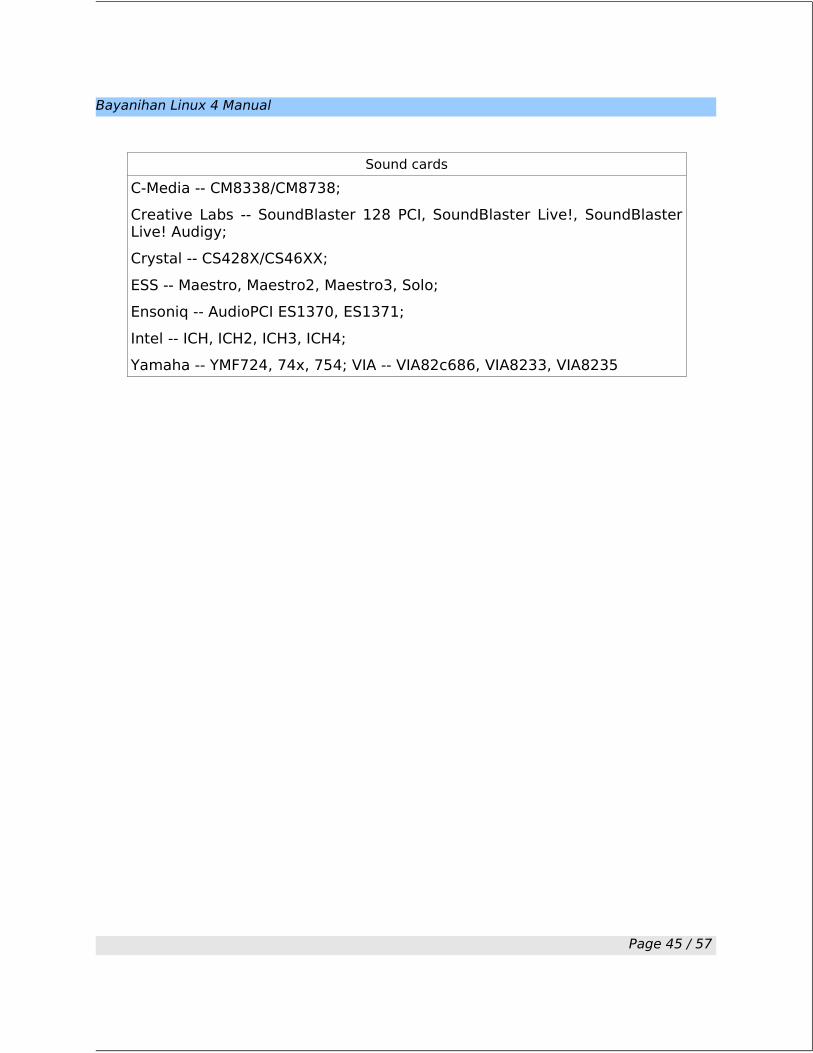
Sound cards
C-Media -- CM8338/CM8738;
Creative Labs -- SoundBlaster 128 PCI, SoundBlaster Live!, SoundBlaster Live! Audigy;
Crystal -- CS428X/CS46XX;
ESS -- Maestro, Maestro2, Maestro3, Solo;
Ensoniq -- AudioPCI ES1370, ES1371;
Intel -- ICH, ICH2, ICH3, ICH4;
Yamaha -- YMF724, 74x, 754; VIA -- VIA82c686, VIA8233, VIA8235
Page 45 / 57

Bayanihan Linux 4 Manual
Linux Directory Structure
The Bayanihan Linux Filesystem is based on a hierarchical directory structure. The base directory is the “/” or the root directory and it expands into subdirectories. In DOS/Windows, the directory structure is represented as C:, D:, etc. and there are subdirectories under those directories. Linux, on the other hand places all the subdirectories under one directory known as the root directory as shown below.
The root directory and the subdirectories under it have a particular purpose.
Page 46 / 57

Bayanihan Linux 4 Manual
Page 47 / 57
/The / directory is the parent/main directory.
bin
boot
dev
etcThe /etc directory contains system wide configuration files
homeThe /home directory contains user files
initrdThe /initrd directory contains boot information
lib
lost+foundThe /lost+found directory contains files saved during failure
miscThe /misc directory contains miscellaneous files
mnt
optThe /opt directory contains third party software files
proc
rootThe /root directory is the administrator's home directory
sbin
tmp
usr
var
The /bin directory contains programs used by user, admin and system
The /boot directory contains the linux kernel, initial ram disk and bootloader information
The /dev directory contains files that represent your system hardware
The /lib directory contains library files used by both the system and the user
The /mnt directory is the standard mount point for external filesystems such as floppies, cdroms, etc.
The /proc directory is a virtual filesystem directory that contains information about system
The /sbin directory contains programs used by the system administrator and system
The /tmp directory contains temporary files used by the system which are erased periodically
The /usr directory contains programs, libraries for all user-related programs
The /var directory contains variable files suchs as system logs, web files, ftp files, print spools, database files, etc.

Bayanihan Linux 4 Manual
Shortcut Keys
Alt-Esc, Ctrl-Esc Invoke the "Current Session" manager.
Alt-Tab, Alt-Shift-Tab Traverse the windows on the current desktop.
Ctrl-Tab, Ctrl-Shift-Tab
Traverse the virtual desktops.
Ctrl-Alt-Esc Destroy window mode.
Alt-F2 Execute command.
Alt-F3 Popup the window operation menu.
Alt-F4 Close active window.
Ctrl-F[1..8] Switch to virtual desktop.
Page 48 / 57

Bayanihan Linux 4 Manual
The One Page Linux Manual
A summary of useful Linux CommandsVersion 3.0 May 1999 [email protected] Starting and Stopping
shutdown -h now Shutdown the system now and do not reboot
halt Stop all the processes—same as above
shutdown -r 5 Shutdown the system for 5 minutes and reboot
shutdown -r now Shutdown the system now and reboot
reboot Stop all the processes and then reboot—same as above
startx Start the X system
Accessing and mounting file systems
mount -t iso9660/dev/cdrom/mnt/cdrom Mount the device cdrom and call it cdrom under the /mnt directory
mount -t msdos/dev/hdd/mnt/ddrive Mount hard disk d as a msdos file system and call it ddrive under the /mnt directory
mount -t vfat/dev/hdal/mnt/cdrive Mount hard disk a as a VFAT file system and call it cdrive under the /mnt directory
Umount/mnt/cdrom Unmount the cdrom
Finding files and text within files
find / -name fname Starting with the root directory, look for the file called fname
find / name “*fname*” Starting with the root directory, look for the file containing the string fname
locate missingfilename Find a file called missingfilename using the locate command—this assumes you have already used the command updatedb (see next)
updatedb Create or update the database files on all file systems attached to the linux root directory
which missingfilename Show the subdirectory containing the excutable file called missingfilename
grep textstringtofind / dir Starting with the directory called dir, look for and list all files containing textstringtofind
The X window System
ls List files in current directory using long format
ls -F List files in current directory and indicate the file type
ls -laC List files in current directory in long format and display in columns
rm name Remove a file or directory called name
Page 49 / 57

Bayanihan Linux 4 Manual
ls List files in current directory using long format
rm -rf name Kill off an entire directory and all it s include files and subdirectories
cp filename/home/dirname Copy the file called filename to the /home/dirname directory
mv filename/home/dirname Move the file called filename to the /home/dirname directory
cat filetoview Display the file called filetoview
man -k keyword Display the man pages containing keyword
more filetoview Display the file called filetoview one page at a time, proceed to next page using spacebar
head filetoview Display the first 10 linesof the file called filetoview
head -20 filetoview Display the first 20 lines of the file called filetoview
tail filetoview Display the last 10 lines of the file called filetoview
Tail -20 filetoview Display the last 20 lines of the file called filetoview
Installing software for Linux
rpm -ihv name.rpm Install the rpm package called name
rpm -Uhv name.rpm Upgrade the rpm package called name
rpm -e package Delete the rpm package called package
rpm -l package List the files in the package called package
rpm -ql package List the files and state the installed version of the package called package
rpm -i –force package Reinstall the rpm package called name having deleted parts of it (not deleting using rpm -e)
tar -zxvf archive.tar.gz or tar - zxvf archive.tar.tgz Decompress the files contained in the zipped and tarred archive called archive
./configure Execute the script preparing the installed files for compiling
User Administration
adduser accountname Create a new user called accountname
passwd accountname Give accountname a new password
su Log in as superuser from current login
exit Stop being superuser an revert to normal user
Little known tips and tricks
ifconfig List ip addresses for all devices on the machine
apropos subject List manual pages for subject
usermount Executes graphical application for mounting and unmounting file systems
Page 50 / 57

Bayanihan Linux 4 Manual
ifconfig List ip addresses for all devices on the machine
/sbin/e2fsck hda5 Execute the filesystem check utility on partition hda5
fdformat/dev/fd0H1440 Format the floppy disk in devices fd0
tar -cMf/dev/fd0 Back-up the contents of the current directory and subdirectories to multiple floppy disks
tail -f/var/log/messages Display the last 10 lines of the system log
cat/var/log/dmesg Display the file containing the boot time messages—useful for locating problems. Alternatively, use the dmesg command
* Wildcard –represents everything, e.g. cp from directory to the to directory
? Single character wild card, eg.
cp config.?/configs will copy all files beginning with the name config. in the current directory to the directory named configs.
[xyz] Choice of character wildcards.eg.
ls [xyz]* will list all files in the current directory starting with the letter x,y, or z.
linux single At the lilo prompt, start in single user mode. This is useful if you have forgotten your passwd command.
pskill 123 List current processes
kill 123 Kill a specific process eg. kill 123
Configuration files and what they do
/etc/profile System wide environment variables for all users
tc/fstab List of all devices and their associated mount points. Edit this file to add cdroms, DOS, partitions and floppy drives at startup
/etc/motd Message of the day broadcast to all users at login
/etc/rc.d/rc.local Bash script that is executed at the end of the login process. Similar to autoexec.bat in DOS
/etc/HOSTNAME Contains full hostname including domain
/etc/cron.* There are 4 directories that automatically execute all scripts within the directory at intervals of hour, day, week, or month
/etc/hosts A list of all known host names and IP addresses on the machine
/etc/http/conf Parameters for the Apache web server
/etc/iniitab Specifies and run level that the machine should boot into
/etc/resolve.conf Defines IP addresses of DNS servers
/etc/smb.conf Config file for the SAMBA server. Allows file and print sharing with Microsoft clients
~/.Xdefaults Define configuration for some x-applications. ~refers to some user s home directory
Page 51 / 57

Bayanihan Linux 4 Manual
/etc/profile System wide environment variables for all users
/etc/Xll/Xf86Config Config file for X-Windows
~/.xinitrc Defines the windows manager loaded by X. ~ refers to user s home directory
File permissions
owner Group Othersd r w x r w x r w x
Execute Write Read
File type d= directory l= link
if the command ls -l is given, a long list of file names is displayed. The first column in this list details the permissions to the file. If permission is missing for a owner, group of other, it is represented by -eg. drwxr-x x
Read = 4 File permissions are altered by giving the chmod command and the appropriate octal code for each user type.
Write = 2 File permissions are altered by giving the chmod command and the appropriate octal code for each user type.
Execute = 1 Chmod 7 6 4 filename will make the file called filename R+W+X for the owner, R+W for the group and R for others.
chmod 7 5 5 Full permission for the owner, read and execute access for the group and others
Chmod +x filename Make the file called filename executable to all users
X ShortCuts – (mainly for Redhat)
Control | Alt + or - Increase or decrease the screen resolution. eg. from 640x480 to 800x600
Alt | escape Display the list of active windows
Shift | Control F8 Resize the selected window
Right click on desktop background Display menu
Shift | Control Altr Refresh the screen
Shift | Control Altx Start an xterm session
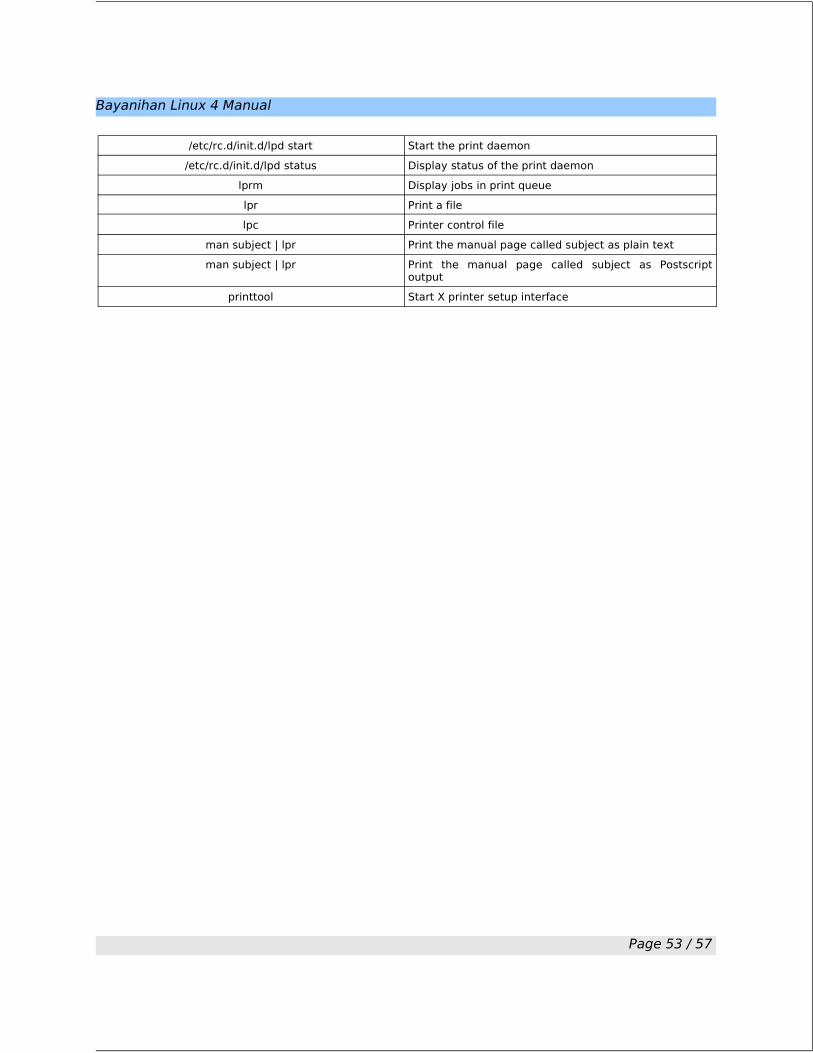
Printing
/etc/rc.d/init.d/lpd start Start the print daemon
/etc/rc.d/init.d/lpd stop Stop the print daemon
Page 52 / 57
Bayanihan Linux 4 Manual
/etc/rc.d/init.d/lpd start Start the print daemon
/etc/rc.d/init.d/lpd status Display status of the print daemon
lprm Display jobs in print queue
lpr Print a file
lpc Printer control file
man subject | lpr Print the manual page called subject as plain text
man subject | lpr Print the manual page called subject as Postscript output
printtool Start X printer setup interface
Page 53 / 57

Bayanihan Linux 4 Manual
Glossary Of Terms
Boot Loader A small program that places the operating system (OS) of a computer into memory. Also called a boot manager.
Console see Shell.
Debian A Linux distribution. A free operating system (OS) for your computer.
DHCP Dynamic Host Configuration Protocol; A protocol for assigning dynamic IP addresses to devices on a network.
DNS Domain Name System (or Service or Server); An Internet service that translates domain names into IP addresses.
ISP Internet Service Provider; A company that provides access to the Internet.
ISO image (.iso) An informal term for a disk image of an ISO 9660 file system.
KDE K Desktop Environment; A powerful Free Software graphical desktop environment for Linux and Unix workstations.
KPPP K Point to Point Protocol. The KDE Internet Dialer.
MBR Master Boot Record, a small program that is executed when a computer boots up.
Partition (v.) To divide memory or mass storage into isolated sections.
Propiertary A commercial product.
Protocol The special set of rules that end points in a telecommunication connection use when they communicate
RAM Random Access Memory; A type of computer memory that can be accessed randomly. Also referred to as the Physical Memory.
Routing The process of moving a packet of data from source to destination.
Samba An open source implementation of the SMB file sharing protocol that provides file and print services to SMB/CIFS clients.
SMB Server Message Block, a message format used by DOS and Windows to share files, directories and devices.
Shell The outermost layer of a program. Another term for user interface.(command shell); A shell is the command processor interface.
USB Universal Serial Bus, an external bus standard that supports data transfer rates of 12 Mbps. A single USB
VGA Video Graphics Array; A graphics display system for PCs.
Page 54 / 57
Bayanihan Linux 4 Manual
VNC Virtual Network Computing; Makes possible to interact with a computer from any computer or mobile device on the Internet.
WINE An Open Source implementation of the Windows API on top of X and Unix.
Page 55 / 57

Bayanihan Linux 4 Manual
Resources
• Hacking, John. The One Page Linux Manual. http://homepage.powerup.com.au/~squadron/. 2006.
• Bayanihan Linux 3.1 User Manual.
• Whatis.Com. The leading IT Encyclopedia and learning center.
http://searchnetworking.techtarget.com/sDefinition/. 2006.
• WineHQ. Http://www.winehq.org. 2006.
• Webopedia. http://www.webopedia.com .2006.
• Wikipedia. The Free Encyclopedia.
http://en.wikipedia.org/wiki/. 2006.
• K Desktop Environment. http://www.kde.org/. 2006.
Page 56 / 57

Bayanihan Linux 4 Manual
Page 57 / 57