Embed Size (px)
Citation preview
BaseballPositive
CoachingManual
By:MarkLinden
LastUpdate:Fall2016

Overview This manual can serve as a general, but fairly comprehensive, plan for structuring practices and coaching a team over the course of an entire season. Baseball Positive puts this together for that purpose - to assist coaches in their efforts. The information is presented in ‘chronological’ order. Content found later in the manual builds off the foundational content presented in the earlier portions of the manual. Using this information as a foundation, a parent and coach can go to the Baseball Positive website www.baseballpositive.com and find much more information. The experience from the fall along with the information in this manual will make consuming the information on the website much easier and more valuable.
The site will be evolving over the course of the winter and leading up to the start of the 2017 season. We hope that it is a tool that is useful in helping all parents and coaches make the playing experience a great one for every player on your team. This manual contains the following information:
Teaching Phrases* list, with ‘definitions’
Batting Drills Sheet - describes the drills we taught and serves as a guide for the kids to work on training their swing actions
at home. Also serves as a guide for coaches when training their batters in the spring.
Outlines of the 10 sessions from the fall
Drill Diagrams - included in the order they were presented and found following each day’s plan
Coaching Focus Points - these are found on the page following each day’s outline. Three are provided for each session.
Reading through these gives you a synopsis of all that we taught over the course of the fall.
Videos and Pictures to support the teaching - these are sprinkled throughout the document
* Take note of any word or statement in the manual that has “quotation marks” around it; these indicate a Teaching Phrase.

Teaching Phrases
Teaching Phrase Description Ball or Base
Reminds infielders of their responsibility when they are not playing the ball.
Ball First, Base Second Used when players are attempting to ‘stretch’ to catch off-line throws that they have little or no chance of catching. It is a reminder that stopping the ball is priority #1 for a player who is covering a base and attempting to receive a throw.
Ball, Base, Back-up Used when working with players on team defense. These are the three possible respon-sibilities a defensive player might have on any given play.
Base is For The Runner, The Ball is For The Defense
Used when players are standing on a base or have their foot on a base when covering a base, but do not have the ball. It is a precursor to “Ball first, base second”.
Cover The Base With Your Eyes Used to make clear to players responsible for covering a base, where they need to direct their undivided attention.
Feet and Wrist Used when players are working on their throwing skills. Teaches and reminds them of the aspects of the throwing action that produce power and accuracy.
Feet Wide (Feet wider than your shoulders) (Feet outside your knees) (Wide to Catch)
This statement is used constantly in youth baseball. Given the lack of strength in the pre-pubescent body, kids want to position their feet directly below their legs/body to make it easier to support their body weight. However, good fielding position, a good “Ready Position” and a good batting stance require that the feet be positioned ‘wider than their shoulders’ or ‘outside their knees’. Two commonly used clichés we want to replace with the phrase “Feet Wide” are ‘Athletic Position’ and ‘feet shoulder width’.
Teaching Phrase Description
Follow Your Head Used to remind players to maintain their momentum, in a straight line towards their target after they have thrown the ball. In our instruction for throwing technique we emphasize the importance of keeping the head still and straight throughout the action. When a player is ‘moving their feet to throw’, their head is moving (through space) towards the target (and getting closer to the target). When a player ‘Follows their head’ after making a throw, they are maintaining their momentum towards their target. This action is key to assure their full throwing action is more fluid and assures that the power and energy applied to the ball goes straight towards the target.
Look for Other Runners Used anytime a player, who has just completed making a play on a runner, continues to keep their attention on that runner, the umpire or anything else that is keeping their attention of the other runners on the base paths. Reminds players that they need to be immediately aware of the possibility that the other base runners may be attempting to advance to the next base.
Move Your Feet to Catch Used whenever players are involved in an activity that involves receiving a throw. Reminds them that throws are often off line and that they need to be prepared to move to another spot to have the best possible chance to catch (or at least stop) the ball.
Move Your Feet to Throw Used whenever players are throwing or using the underhand toss technique. Reminds them to use their feet to power their throws.
Reach Forward to Catch Used when players are holding their hands/glove close to their body when receiving throws. When a player “reaches forward to catch” they get their glove/hands, as well as the ball, in their line of sight. This greatly increases their chances of matching up their glove/hands with the ball.
Ready Position Anytime a player may have to catch a thrown ball, or ball put into play by a batter we need them to be ready to react and prepared to make a catch.


DAY 1

Day 1 --------------------------------------------------------
“Baseball is a Game of Movement” --------------------------------------------------------
INTRO Structure of the Workouts Three Rules: 1. Bat Safety*, 2. When Coaches Speak: mouth closed, eyes up, no touching, 3. Only Positive Comments
* http://www.baseballpositive.com/coaches/ - see: “Bat Safety …don’t ask Ryan Braun of the Brewers” - 8th from top TALK Defensive Player’s Relationship with a Base
“Ready Position” - football helmet / Relationship w/base for receiving a throw “The base is for the runner, the ball is for the defense” Positioning at the base - stand on the side of the base the ball is coming from
---> ‘The defensive player DOES NOT stand in a stretch position prior to the ball being thrown by their teammate’. We MUST work hard to eradicate this misconception from the game. When a player stands in a stretch position at a base, we must correct them IMMEDIATELY.
“Move Your Feet to Catch”
“Ball First, Base Second” “The ball is the key to the base” DRILL Underhand Toss - shuttle
DRILL Rollers
TALK “Ball, Base, Back-up” DEMO INF Base Coverage - brief explanation and demo using adults
DRILL Ball or Base THROW Full set of drills: Turn & Pull Snap Shuffle Shuffle, shuffle, Pull, Snap TALK Playing Catch Practice - ‘The most important part of the day’ / Demo DRILL: Playing Catch Practice - ‘A footwork drill’
- Rule: If your partner is not in a “Ready Position”, you are NOT allowed to throw the ball
Coaches: - Each has a few balls in their hands / half behind one group of kids; half behind other group —-> Flip or roll balls to kids when a throw is missed (kids are NOT allowed to chase balls) - If they ARE NOT moving their feet to catch and throw (and they won’t) they need to be reminded!
Scrimmage

COACHES 1. Defensive Player’s Relationship with a Base
2. Underhand Toss
3. “Ball, Base, Back-up”
Defensive Player’s Relationship with a Base
“The base is for the runner, the ball is for the defense” - this is a teaching phrase we preach constantly. It is important that we rec-ognize that the base is a ‘magnet’. In most instances, once a defensive player (at the youth level) puts their foot on a base, that foot will not leave the base, even if it means having little chance to catch the ball.
At the 12U level many throws are off-line. We want our players to understand that stopping the ball is priority #1; getting an out is not possible if the player does not have the ball. An important concept we need to share with our young players is that runners are safe a lot; what we want to prevent is the runner advancing an additional base as a result of the throw getting past the base.
Underhand Toss
This is a Major League Skill. Pro players toss the ball underhand many times each game. They do so because it’s a more accurate technique for making throws from a short distance and makes it easier to catch a short distance throw. Many 12U players are un-aware of this even being an option. We want to make them aware of this option and then drill them towards mastery of this very valuable skill. Keep in mind that It takes time for most kids to, grasp the concept that the momentum generated by running to-wards their target it what is making the ball go rather than their arm…..and to make it a habit to utilize this new throwing option.
We want to constantly preach the use of the underhand toss on throws that are 20’ or shorter.
The role of the arm action in the underhand toss is to ‘guide’ the ball. We also need to continue preaching to “Follow Your Head” after the toss is made. Most kids stop when making the toss. Proper technique involves the player tossing the ball continuing to move towards the target after the ball has been tossed. (Two videos are included in the manual illustrating a Major league Player executing an underhand toss the way we taught in the fall --- one is featured here in Day 1, the other is in found in Day 8.)
Ball, Base, Back-up
This is the guiding principle for defensive baseball at all levels. On every play, in any situation, each player on the field does one of these three things. When working with kids during scrimmages, this is the default teaching statement. If a player isn’t playing the ball they are headed toward a base to cover the base. If the base is covered by a teammate the player continues to a point beyond the base to back-up.


Underhand Toss Videos / Fielding: “Move Your Feet to Throw” - Video
1) Seattle Mariners' Logan Morrison executing the Underhand Toss (2015) Watch the first 15 seconds http://m.mlb.com/video/v79887183/texsea-rodney-locks-down-the-save-in-the-9th/?c_id=mlb Note, in the video clip, the following points that we are teaching this fall:
Fielding Fast to the ball Slows down to field the ball Moves his feet Fast to throw
UH Toss Technique Moves his feet (runs) towards his target to generate Power and Momentum Uses his hand/arm to GUIDE the ball toward his target Keeps arm level with the ground and extended…..AFTER he’s made the toss Continues running toward his target…AFTER he’s made the toss
2) Boston Red Sox player executing the underhand toss in a practice session Watch 1:50-2:05 Note: this is the highest level of baseball and this player is executing the action the same way we are teaching it to the kids.
Key point for coaches, much of the game is taught and practices the same at all levels; these guys don’t have some secret, high level way of working on fundamental skills….but they DO work on them a lot; it’s the REPS that makes them good.
https://www.youtube.com/watch?v=xcnITNnQVCQ
Note: The coach tosses out some ‘fancy’ sounding verbage at different points in this video...and it could be easy to get distracted, “Oh wow, what is he saying? …is that important stuff”.
…The important thing in this video clip is to see the full sequence of ACTIONS the player uses to execute the underhand toss.
————————————————————————————————————————————————————————-
Move Your Feet to Throw Video - Bosox Coach and Xander Bogaerts
Watch 0:45 – 1:11
https://www.youtube.com/watch?v=xcnITNnQVCQ
Listen closely to what the coach is saying …among other things, the Bosox coach actually says, “I like it when you RUN with the ball”

Infield Base Coverage

Infield Base Coverage Responsibilities - Explained
There are four infielders, the game is played with one ball and there are three bases. The rule for infielders is ‘Play the Ball, or Cover a Base’. Each infielder has only two possible responsibilities: 1. Ball or 2. Base. The formula for infield base coverage: 4 - 1 = 3; the three infielders that aren’t playing the ball cover a base.
The First and Third Basemen have one base they are responsible for; the Shortstop and Second Basemen have two bases they are responsible for; one to their Left and one to their Right. These two players, positioned in the middle of the field, fol low this simple rule: If the ball is hit to your Left and you aren’t playing the ball, SPRINT to the base on your Left; If the ball is hit to your Right and you aren’t playing the ball, SPRINT to the base on your Right.
The rule for the players in the middle of the field is to “Move Towards the Ball”
The Pitcher is also in the middle of the field and is responsible for two bases as well: first base on their Left and third base on their Right. The Pitcher however, is not responsible for covering a base. The Pitcher is an ‘insurance policy’ in the event an infielder is unable to cover a base. The pitcher breaks towards the base on their Left or Right (depending on which side of them the ball is hit), they “Move Towards the Ball”. In this version of the drill the pitcher stops short of the base, so to not get in the way of the infielder covering the base, developing the habit of always breaking toward the base on their Left or their Right depending on which side of the infield the ball goes to.
The Catcher also participates in this drill and has a responsibility to move. When the ball is delivered to the infield the Catcher leaves the spot where they receive pitches and move to their ‘Position’, which is in front of home plate.
Running the Drill:
1. The coach rolls a ball to one of the four infielders; not to the pitcher
2. The pitcher is instructed to NOT field any of the balls
3. When rolling a ball to an infielder, the coach calls out “ground ball to <position>”. This is important because on the Mini Diamond it is simple for more than one kid to go get the ball.
4. The player fielding the ball does not* throw the ball after fielding it
5. The three infielders not fielding the ball move quickly to their base, then turn and face the ball in a “Ready Position”.
6. The players return to their positions and the coach rolls the ball to another position
7. Be sure to rotate the players to different positions
*Later in the season, after the players have demonstrated the clearly understand their movement responsibilities, modify the drill by having the catcher call out which base to throw the ball to. The player fielding the ball throws the ball to that base using a technically sound underhand toss. If the ball goes to second the infielders can ‘turn a double play’ and if the ball goes to a corner base they can throw the ball around the horn...using an underhand toss,
IMPORTANT NOTE: When delivering the ball to the first baseman or third baseman, only roll the ball about one third of the way toward the base. This forces the player to move far away from their base making it clear to the other infielders that it is not covered. When working on movement responsibilities this clear visual of an uncovered base helps the kids recognize where they are needed.

Ball or Base Drill: 5-6, 3-4, 4-6 6-4
Full Field
SS
SS
3B
2B
2B
1B
Mix the ground balls between the second baseman and shortstop, when working with the middle group
Coach
Coach Coach

DAY 2

Day 2 Plan TALK --- Baseball is a Game of Movement’
--- ALL nine players Move the moment the ball is put into play — “Ball, Base, Back-up” (Three B’s) — “Move your feet to catch” / “Move your feet to throw” — ‘The base is for the runner, The ball is for the defense’ (“Ball first, Base second”)
DRILL ‘Ball or Base’ - four stations - review and repeat (from Day 1) for more reps and to solidify the concept and actions. DRILL OF Backing Up Ground Balls to Infielders in Front of Them DRILL OF Backing-up - “Two players in position to catch the ball” BAT Drills 1-2 “Turn Back” – front knee (no ‘Switch’ …we cover that on Day 3) The Swing: Legs Turn Fast; Head in Place. Legs create power; power is transferred to wrists/hands
THROW Full series of drills PCP Playing Catch Practice - This is a ‘Footwork Drill’
--- Rule: If your partner is not in a “Ready Position”, you are NOT allow to throw the ball
Coaches: — Each has a few balls in their hands / half behind one group of kids; half behind other group
—-> Roll balls to kids when a throw is missed (kids are NOT allowed to chase balls) — If the players ARE NOT moving their feet to catch and throw (and they won’t) they need to
be reminded! TALK Players: Mindset when every ball is hit is, “I’m going to get the ball” …when its clear someone else is getting the ball, then ‘Cover a Base’ or ‘Back-up’ TALK Batters - “Let the ball get to your feet”, “Contact Point” – demo contact point
SCRIMMAGE

COACHES 1. Playing Catch Practice - The most important part of the day: “Move your feet to catch”, “Move your feet to throw”
2. INF Base Coverage - “Ball or Base”
3. Outfield Defensive Rules
Playing Catch Practice - The most important part of the day: “Move your feet to catch”, “Move your feet to throw”
The foundation of coordinated team defensive play and defensive drills is the ability to throw and catch. When our kids play catch in practice it is critical that we enforce the ‘rules’ of Playing Catch Practice:
i. Do not throw the ball unless your partner is in a “Ready Position”
ii. “Move your feet to catch”
iii. “Move your feet to throw”
We want to establish in the mind of the kids that the activity of Playing Catch is a DRILL. The focal point of the drill is the action of the feet; this is a ‘Footwork Drill’.
“Move your feet to catch” / “Move your feet to throw” - these are new concepts and it will take the kids time to establish these habits. We need to constantly give feedback regarding the use of their feet when throwing and receiving throws. Look for every opportunity to acknowledge and praise the kids when they move their feet…and remind them when they don’t.
Unless we need to address another issue, we want to comment on the ‘move feet’ concept following each play of scrimmage.
INF Base Coverage - Ball or Base
There are four infielders and three bases. On any given play, one infielder plays the ball (goes for a ball in the infield or when a ball is hit in the outfield, ‘moves towards the ball’ into the outfield to be in position to help get the ball back into the infield) and the three other infielders cover a base. “The base is for the runner, the ball is for the defense” is a concept we want to constantly preach. Stopping the ball is priority #1 for a player covering a base (“Ball first, Base second”). We want to maintain a constant dialogue with the kids to stand at the bases in a “Ready Position” and not a ‘Stretch’ Position’ AND to not put their foot/feet on the base until they have the ball in their hands. Outfield Defensive Rules
The mindset for each player on the field when the ball first comes off the bat is, ‘I’m going to get the ball’. While backing up a base is a very important responsibility for an outfielder, their higher priorities are, first, to chase balls in the outfield and second, to run towards ground balls hit to the infielders in front of them. Note: later in the manual we will address the defensive responsibilities of the pitcher. When the ball is hit in the infield, the pitcher is responsible for the corner base on the side of the infield the ball is hit to. The outfielder on that side of the field is Not responsible for backing up the base; the pitcher takes care of that. When the outfielder is responsible for backing up a base, we reinforce that responsibility by teaching the concept: we want ‘two players in position to catch the ball’.

Ball or Base Drill: 5-6, 3-4, 4-6 6-4
Full Field
SS
SS
3B
2B
2B
1B
Mix the ground balls between the second baseman and shortstop, when working with the middle group
Coach
Coach Coach

Outfielder Backing-up Balls Hit to the Infielders in Front of Them (40’ Mini Diamond)
P
2b
RF
Coach
Parent
Helper
Objective: Train Outfielders to ‘Go After the Ball’ on ground balls hit to the infielders in front of them.
(Note: this applies mostly for LF and RF)
Outfielders Three Defensive Responsibilities
1. Go After Balls hit in their area of the outfield (this includes balls hit on their side of the center fielder)
2. Go After ground balls hit to the infielders in front of them.
3. Back up a base
Set up
Three players: Pitcher, Second Baseman, Right Fielder
Two coaches/adults: one rolling ground balls to the second baseman; one at first base taking throws from the second baseman.
Drill
Roll a ground ball to the second baseman who fields and throws to the adult at first base. The Pitcher sprints into foul territory to Back-up the throw to first base (the pitcher follows the , “Ball, Base, Back-up” rule; On they don’t get the ball, first base is covered, so they continue past the base to back-up.
*** The Right Fielder SPRINTS TOWARDS THE BALL and ends up in the area behind the second baseman where the ball would go if the second baseman
did not field the ball. This is the key element of the drill...to train the outfielder to ‘Go After Ground Balls Hit to the Infielders in Front of Them’.
NOTE: Set up another group of three players on the other side
of the field running the same drill with the
shortstop, left fielder and a pitcher
working on the third base
side. Note the positioning
of the pitcher in the
diagram.

Outfield Backing-up

Outfield Backing-up Bases, Explained p 1 of 2
Most kids view playing the outfield as ‘boring’. That is until they are trained to play the outfield properly. The Outfielder’s first responsibility, naturally, is to chase balls hit in the outfield. Their second responsibility is to back up on ground balls hit to either of the two infielders in front of their particular outfield position (they do this by SPRINTING toward the infield). Their third responsi-bility is to back up throws to bases.
Backing up throws to bases is far from boring. This responsibility takes a lot of effort and energy. In order to get to the correct spot on the field to back up a throw to a base an outfielder is often required to move 50 feet or more. Over the course of one inning an outfielder may have to SPRINT a good distance, five times or more. Once kids understand the backing up responsibilities of an out-fielder, a coach will never again hear a kids say playing outfield is boring. What a coach might hear is, “Coach, I I’m playing outfield? Gee, but outfielders have to run so much”.
When an outfielder properly backs up a base, there is a straight line from the ball (the origination point of the throw) to the base to the point where the outfielder is positioned to back-up. The distance the of the outfielder beyond the base needs to be 25’-30’. This distance provides enough time to react to a poor throw, but has them close enough to remain a threat to the runner after they recover the ball.
It is important for our outfielders to understand that their backing up position is different on every play depending on where the ball is being thrown from.
Prior to Running the Drill
Opening Statement: The mindset of each player on the field is to ‘Go Get The Ball’. The moment the ball comes off the bat each player on the field needs to make an aggressive step in the direction of the ball, ‘Move Towards the Ball’.
In many instances, following this initial action, a player will recognize that the ball will be fielded by someone else, and that player then moves to fulfill their responsibility of covering a base (infielders and pitcher) or backing-up a potential throw.
Outfielders’ Three Defensive Responsibilities:
1. (Move towards the ball) and go after balls hit in the outfield.
2. (Move towards the ball) and go after ground balls hit in front of you.
3. Back up a base when the ball is hit away from you.
Outfield Backing-up Bases, Explained p 2 of 2
Drill Description:
This drill is run using the Mini Diamond.
Mark the three outfield positions using cones, etc. These are placed approximately 20 feet beyond the baselines of the Mini Dia-mond. Have a player at each outfield position; also have a second player at each position. After the first set of outfielders run the drill and are returning to their outfield spot, the second set of outfielders go through the drill.
The coach moves to any spot within the diamond, then calls, ‘Ball or Back-up’. The Corner Outfielder on the side of the field where the coach is standing, follows rule #2: ‘go after Ball’ (the ground ball hit directly in front of the outfielder). The Center Fielder backs up second base; the other corner outfielder backs up their corner base. We need to get the outfielders to SPRINT to their required spot on the field. Those backing up a bae go to a a point 5’-10’ beyond the base they are backing-up (on a full size field the back-ing up distance in 25’-30’).
The coach then moves to a different spot and repeats the process with the next group of Outfielders.
(At a later date, when the players are familiar with their responsibilities, we add to the drill, the coach sometimes standing in foul ground between home plate and a corner base. In this situation no outfielder is backing up a ground ball, so all three would then move into position to back up a throw to a base.)
Over time the coaches (and players) will recognize that Right Field is not a place for a weak player. Many balls get past the First Baseman. When there are overthrows at first, base runners are trained to run to second base. If the Right Fielder is alert and working hard, they will be in position to stop the runner from going to second or have a good chance to throw the runner out at second base. It takes a good athlete to get into a backing up position in time and then to execute a strong, accurate throw to sec-ond.
After a couple of days of running the drill we want to expand the teaching of the backing up situation. -
1. Point out to the kids that the fence line on most fields is only 10-15’ behind first and third base. Often the corner outfielders will back up the base by playing a carom off the fence. They need to learn to run to where the carom will land.
2. The drill has the corner outfielders only backing up first and third. Point out that many throws to second base, if overthrown, are going towards left field or right field. Therefore the corner outfielders will sometimes have to back up second base as well - they are responsible for two bases. NOTE: This does not mean the Center Fielder is not attempting to back -up second on every throw. The Center Fielder, on every potential throw to second base, is SPRINTING in an effort to get into position to back up that base.
FINAL NOTE: The objective on EVERY throw to a base in a game is to have “Two Players in Position to Catch the Throw”; the play-er at the base who we want to catch the ball and a second player beyond the base backing up the throw. In theory, if the backing-up players fulfill their responsibility, ZERO runners will advance on an overthrow during the entire season. Can you imagine what a difference that would make in the final score of games???

DAY 3

DAY 3 Plan
TALK Force Out v Tag Situation
DRILL Covering a Base - Tag Play - “Cover the base with your Eyes” TALK “The three players in the middle of the field (SS, 2b, P) Always Run Towards the Ball”
DRILL Middle Infielders movement on balls hit to OF TALK Pitchers Covering Corner Bases
ball or base directional rules (L/R) same as SS & 2b The 3 players in the middle of the field (SS, 2b, P) “Always Move Towards the Ball” If pitcher is covering then the SS/2b goes past the base to BACK UP (B, B, B)
DRILL Pitchers Covering Corner Bases; 3-1 Play, 5-1 Play BAT Drills 1 & 2 (add “Switch Heels”) TALK “Let the ball get to your feet” TALK “Head Down at Contact”
THROW Receiving & Throwing PCP ‘Footwork Drill’ TALK We’ve emphasized:
Legs Power Your Swing - “Turn Fast” Head in Place
Point #3: “Let the ball get to your feet”
SCRIMMAGE

COACHES 1. “Cover the base with your Eyes” - “Look for other runners” 2. The three players in the middle of the field ‘Always move towards the ball’ 3. The 60’ game is different than the 90’ game Cover the base with your Eyes When the ball is put into play, kids are drawn to watching the ball and/or the runners. When a player’s responsibility is cover a base, we need to keep communicating that their focus be entirely on the base until they are at the base in a “Ready Position”. We tell them that once they get to their base, which only takes a second, THEN they can ‘watch the game’ from there. (See the video that comes with Day 3 info.)
When receiving a throw at a base, we know where the spot where the runner, who is approaching the base, is going to arrive: at the front of the base. Therefore, the defensive player does not need to take their eyes off the ball to look at the runner. Catch the ball, then bring the glove directly down to where the runner is headed - the front of the base. (See the video that comes with Day 3 info.)
Immediately after making the play on the runner, the defensive player gets into a “Power Position” and “Moves their feet” towards the middle of the infield, prepared to make a throw, while they “Look for other runners”. (Take note of how the same few teaching phrases are beginning to re-occur as we get deeper into the manual.) The three players in the middle of the field “Always move towards the ball” When the ball is hit in the infield to the to the left or right of the shortstop, second baseman or pitcher, those three positions break ‘towards the ball’. When they recognize they are not going to field the ball, they continue to the base on the side of them the ball was hit (left or right).
When the ball is hit to the outfield, those three players again move ‘towards the ball’. Of the shortstop and second baseman, the one closest to the ball moves out toward the outfielder who is fielding the ball. The other middle infielder, as they “Move towards the ball”, is drawn towards, and ends up covering, second base. The pitcher, in “Moving towards the ball” ends up out near the baseline. From this spot in the infield, the pitcher watches the outfielder with the ball, sees where they are planning to throw, then reacts accordingly to get into position to back-up that throw. The 60’ game is different than the 90’ game Kids playing on the small diamond have lower cognitive and physical capabilities and have had less exposure to ‘baseball lingo’ than that of older kids who play on the larger diamond. In the 60’ game the players are more bunched up, they run slower and don’t have great throwing and catching skills. Given these factors, many of the ‘rules’ for defensive play and tactics are different on the smaller diamond. Note: recognizing this difference is especially important for coaches with experience with the game on the larger diamond. Some of the solid baseball knowledge these coaches possess is not applicable to the 60’ game.
A few examples of differences in the 60’ game (some we’ve addressed, others will come up as we progress): - Base coverage and backing up responsibilities are different - Pitcher breaks towards third base on all balls hit to that side of the infield - Pitcher is the cut-relay player on all throws to home - Underhand Toss technique is used much more often (because the players are in closer proximity to each other and the bases) - The process and mindset of getting the ball back into the pitcher at the conclusion of a play has much greater significance

Receiving a Throw at Third from CF This drill requires five distinct and quickly executed movements:
1. Get to the base as quickly as possible - “Cover the base with your eyes” (Player does not look for the ball
until they get all the way to the base. If they look back before getting to the base, start the drill over.)
2. Get in a “Ready Position” facing the thrower.
3. “Move Feet” to catch (Coach intentionally tosses the ball 5’-6’ away from the base.)
4. Make tag on the ground in front of the base (If they don’t put the glove on the ground, start the drill over.)
5. Move toward the middle of the infield (Must make a couple aggressive
shuffles in a power position - ”Look for other Runners”)
3b
Coach
(Representing the Center Fielder)

SS
SS
SS
2b
2b
2b
Middle Infielders Movement on Balls Hit to the Outfield
—————————————————————————————————————————————————————————————
———————————————————————————————————————————————————————————–—--
Coach rolls a ground ball to the left fielder
Shortstop sprints out to the
left fielder
Coach rolls a ground ball to the center fielder
Second baseman sprints to cover second base
Coach rolls a ground ball to the right fielder
Shortstop sprints to cover second base
Second baseman sprints out to the
coach
coach
coach
LF RF
CF
CF
LF RF
LF
CF
RF
...the shortstop goes out to the outfield b/c at higher levels of play the shortstop will serve as the replay player on balls going from CF to third base.
Note: In this situation the ball is hit ‘between the shortstop and second base-man’. The second baseman covers the base, the shortstop sprints out towards the center fielder.
Objective: Middle Infielders develop an understanding of, and habit to, “Always Run Towards the Ball” on balls hit to the outfield; and gain an understanding that in some instances where the ball is shallow, and the base runners stop advancing after one base, the outfield-er will hand or underhand toss the ball to the infielder, who then Sprints with the ball back to the infield.
Drill Set up: Five players: 2b, SS, LF, CF, RF; position SS and 2b 15’ from second base; position LF, CF, RF 40’ from second base.
Drill: Coach tosses a ground ball to one of the outfielders (for this drill the outfielders let the ball come to them, they DO NOT charge
—————————————————————————————————————————————————————————————


Pitchers Defensive Plays to their Right
P
P
P
SS
3b
3b
1 - 5 Play Roll the ball a step or two to the pitcher’s right. We want to establish with the pitcher, the recognition that most anytime the ball is hit to their right their throw to Third Base will be an underhand toss.
Pitcher’s Actions Coach’s Teaching Phrases 1. Fields the Ball 1. “Wide (feet) to catch” 2. Underhand Toss 2. “Move feet (to throw)” 3. Follows the throw 3. “Follow your head”
Third Baseman Coach
1. Cover Third 1. “Cover the base with your eyes”
2. “Ready Position
5 - 1 Play Roll the ball a few steps to the Third Baseman’s left in order to create a enough distance from third base to execute an underhand toss from 8-10’. We want to establish with the pitcher that anytime the ball is hit to their right they sprint towards third base when they don’t field the ball.
Third Baseman Coach’s Teaching Phrases 1. Fields the Ball 1. “Wide (feet) to catch” 2. Underhand Toss 2. “Move feet (to throw)” 3. Follows the throw 3. “Follow your head”
Pitcher Coach 1. Cover Third 1. “Cover the base with your eyes” 2. “Ready Position
6 - 1 Play Roll the ball a few steps to the Shortstop’s right. We want to establish with the Shortstop the recognition that often when the ball is hit to their right an underhand toss can be used when throwing to third. In this drill the players are working as if the Third Baseman is not available to cover the bag. We con-tinue to establish with the pitcher that anytime the ball is hit to their right they sprint towards third base in case they are needed to cover the base.
Shortstop Coach’s Teaching Phrases 1. Fields the Ball 1. “Wide (feet) to catch” 2. Underhand Toss 2. “Move feet (to throw)” 3. Follows the throw 3. “Follow your head”
Pitcher Coach 1. Cover Third 1. “Cover the base with your eyes” 2. “Ready Position

“Switch Heels” – Videos: Pujols, Zunino, About Face The first fundamental action in the swing is “Switching Heels”. All batters, when initiating their swing drive their front heel back and down. While this takes place their back foot turns resulting in the back heel coming up off the ground. The result of these combined actions is energy from the legs pressing against the hip girdle, forcing them to rotate. Many of us have heard the phrase “turn the hips” in relation to the batting swing. The fact is the action of ‘turning the hips’ begins with this action of the heels. When watching accomplished batters we can see this action pretty clearly. There are a few batters where it may be difficult to see this action in the front foot/heel. If you were to take a closer look at those batters (you do not need to invest the time to do so) you would come to recognize that they are driving the muscles of the front leg against the front of the hip girdle. Finally there are batters who stride prior to starting their swing (you may be surprised to learn that most accomplished batters DO NOT stride…that is a subject for another discussion). Many of these ‘striders’, while setting down their front foot, execute the ‘heel back and down’ action. The point to recognize is that at the conclusion of their stride their front foot is in the same position as we are teaching the kids in the batting clinic. The videos below clearly illustrate the “Switch Heels” action taught on Day 1. This will be repeated in our instruction on each day throughout the clinic. “Switching Heels”, again, is one of the most fundamental actions in the swing …for ALL successful batters.
Switch Heels
Albert Pujols http://m.mlb.com/video/topic/6479266/v5570541/pujols-night-at-the-home-run-derby-in-st-louis Heel Action: Up to load (“Turn Back”), Back and Down (“Turn Fast”) Back heel Turns Up front heel goes down - “Switch Heels” Front heel (foot) initiates lower half turn Examples: 0:24 0:35 0:55 1:05 1:18 1:30* 1:52 2:02 2:10* 2:21* 2:30* Note that Mr. Pujols has little or no stride; and minimal upper body movement until after the conclusion of the turn of his legs/lower half of his body. (Note: he does use a leg kick in a couple near the end...I suspect he did this to compensate for fatigue near the end of the HR derby...this action is not something he uses in his ‘game’ swing.) Mike Zunino - 2 HRs (watch front heel; same as Pujols (and every batter to some degree …and our US Army Soldier) http://m.mariners.mlb.com/news/article/115314060/catcher-mike-zuninos-pops-pace-mariners-offense-against-giants ‘About Face’ http://www.youtube.com/watch?v=-bGvnMxPyJY&feature=related Example of a soldier using the same technique as Pujols and Zunino to turn his legs. This video is included to point out that what we are teaching isn’t some ‘secret’ action exclusive to the baseball/softball swing. We want the coaches and players to gain an aware-ness of how the human body moves to initiate the action of the swing and most efficiently generates power in the swing. The sol-dier, Albert and Mike are each using the same technique to turn their lower body as effectively as possible …they “Switch Heels”.
…only need to watch the first 10 seconds of the video.

Video Illustrating Teaching from Day 3
Covering a Base - “Cover the base with your Eyes”
...watch 0:25-0:45 - demonstrates the full drill (the rest of the video is a lot of repetitive talk/info)
https://www.youtube.com/watch?v=7CpmwFl5IUY
“Ball First, Base Second” - as demonstrated by a MLB third baseman - Yankees v Twins
http://wapc.mlb.com/play/?topic_id=11493214&content_id=28847709
1. “Ready Position” - facing the ball
2. “Move Feet to Catch”
3. “Ball First, Base Second”
Tag Play - Keep eyes on the ball, not the runner - as demonstrated by a MLB second baseman - M’s v O’s
(the defensive player MUST look at the ball as its coming to them) ....catch the ball and take the glove to the ground in front of the bag. We know the runner is going to that spot - every time.
http://m.mlb.com/video/v714017883/seabal-rickard-throws-out-smith-at-second/?game_pk=447483
1. “Ready Position” - on the same side of the base that the ball is coming from
Note: if there is a question as to which side of the base the defensive player stands
the player stands on the side that puts their glove hand between them and
the base
2. Defensive player faces the ball and keeps eye on the ball
...there is no need to look at the runner.
3. The defensive player takes glove straight to the ground in front of the bag where WE KNOW the
runner is going to be sliding.
DAY 4

DAY 4 INTRO Fielding Day… Footwork is the key
Fast, Slow, Fast “Feet Wide to Catch” “Move Feet to Throw” …”Follow Your Head” …..keep moving towards target after making throw
DRILL 20’ Ground Balls BAT Drills 1-4 Drill 2 - Switch Heels “See ball, turn back” Drill 3 - Lower Half Turn “Rubber Bands” analogy Drill 4 - Sideways Karate Chop …drill action ends at ‘Contact Point’ …‘Position of Strength’ …”Head Down at Contact” ….Reiterate “Let the Ball Get to Your Feet” …we let the ball get to our feet, so we can Contact the ball at our Position of Strength THROW fewer throwing drill reps
...we don’t need to do ‘Move Your Feet’ drills any longer
PCP Emphasize ‘pushing hard off back foot; to generate power (from the legs) and momentum for the throw. TALK Footwork for receiving a throw at first base
“Ready Position” …when preparing for the throw …you DO NOT set up in a ‘Stretch’ position After the ball is on its way and we are sure it is accurate, then get into Stretch positon
…”See the ball in the air BEFORE you commit your feet”
DRILL Infielders Throwing Across …w/adults catching up at first base TALK We’ve emphasized:
1. Legs Power Your Swing - “Turn Fast” 2. Head in Place
Point #3: “Let the ball get to your feet”
SCRIMMAGE

COACHES 1. Fielding…Footwork is the key. See video: INF moving feet 2. ALL nine players Move / Mindset when every ball is put into play: ‘I’m going to get the ball’ 3. Teach/Talk: Actions not results Fielding…footwork is the key (See videos that come with Day 4 info)
When teaching fielding, we want to direct our instruction towards the actions of the players’ feet - (Feet) “Wide to Catch”, (Move) “Feet to Throw”). When delivering balls in drills we want the pace of the balls to be such that the players can focus on their foot-work and not be overwhelmed by the thought of catching the ball. This means that we Do Not deliver balls fast and hard. We don’t want to ‘challenge’ novice players when they are still in the infancy stage of developing the movements required to be a sound and consistent fielder.
You will see in the videos that the balls are not delivered fast, even to older, advanced players. The need to deliver balls fast and hard is one of the most common misconceptions of youth coaches. ALL nine players move the moment the ball comes off the bat / Initial mindset of each player: ‘I’m going to get the ball’ ‘Baseball is a Game of Movement’ - we want to be constantly preaching this concept. Every player needs to understand that they have a job to do when the ball is put into play and they need to move, and move FAST, to fulfill their responsibility. That movement takes place the moment the ball comes off the bat. Not only must they move, they need to move at full speed: ‘Sprint to get the Ball’; ‘Sprint to cover a Base’, ‘Sprint to get into position to Back-up’.
We want to develop a mindset in each player that: ‘I’m going to get the ball’. Only when its clear someone else is getting the ball do they THEN ‘Cover a Base’ or ‘Back-up’.
It will take some time for kids to develop the ability to quickly and instinctively recognize what their role is based on where the ball is hit+. Until that time we would prefer they be overly aggressive in going for the ball, even if that means they are delayed in cover-ing a base or backing up.
Older players (ages 10-12) can develop these instincts in weeks and months. Many younger players (ages 7-9) may need a season or two to really develop the ability to identify and respond, at game speed, to fulfilling their defensive role. Teach/Talk: Actions not results
Achieving the desired results, when attempting to execute baseball skills, does not happen every time. When we are working with kids, this is even more true. Unfortunately, kids, more so than teens and adults, ‘live in the moment’ and generally judge their suc-cess strictly on results.
Our objective as coaches is to train our players to use consistent, fundamentally sound Actions when executing baseball skills. As their Actions improve they will begin achieving the desired result a higher percentage of the time.
Our approach for resetting their perspective, when working in drills, is to constantly talk about using proper actions AND, when giv-ing feedback, praise them when they use good actions, regardless of the result.
As the players begin to recognize that using good actions is how they receive praise, regardless of results, they will become more motivated to focus on using proper actions.
Note: When interviewed between games 4 and 5 of the 2016 World Series, Cubs Manager Joe Maddon, whose team was down 3 games to 1, was asked what he told his players going into Game 5, he said, “I remind them to focus on the process (actions). There is no emotion or fear in the process. When they focus on the process they give themselves the greatest chance to succeed (results).”

20’ Ground Balls
TEACHING:
Call out “Ready Position” to the player. Once the player is in a “Ready Position” roll the ball.
The player moves their feet FAST to the ball, they SLOW down to catch the ball. Tell the player “Wide (feet) to Catch” as they prepare to field the ball. After they field the ball they run FAST toward the coach. Tell the player “(Move Your) Feet to throw”.
The player runs towards the coach, returns the ball using an underhand toss, then follows their throw (“Follow Your Head”), runs around the coach and returns to the line at the ‘waiting cone’.
COMMON MISTAKES:
1. Players, especially those that are more aggressive and/or nimble, will often not slow down to catch the ball re-sulting in them losing their balance while fielding, which negatively impacts their ability to get under control to make a good throw, or they will miss the ground ball altogether (this becomes more of an issue with older players).
2. Some players will want to run through the catch using one hand as if they are fielding a ‘slow roller’. This is a natu-ral tendency for more aggressive and/or nimble players. We need to explain to them that we are rolling the ball slowly in order for them to better focus on their footwork and the ‘fast, slow, fast’ cadence of fielding.
3. Slowing down or stopping when making the underhand toss or not continuing forward movement after throwing the ball. The requirement to run around the coach is incorporated into the drill to eliminate the tendency of players to stop and help them develop the habit of continuing to “Move Your Feet” during and after the underhand toss.
SET UP:
Coach: 20’ - 25’ from the players; with a supply of 3-4 balls
One Player: positioned at a cone or other type of marker
Other Players: lined up behind a second cone or marker located 5’ - 10’ behind the first cone/marker
DRILL:
The coach rolls a ball medium to slow speed approxi-mately six feet to the left of the player. The pace of the ball should be such that the player is able to angle in while going after the ball. Once the kids understand the drill routine, the coach can roll balls to the kids’ right. Note: do not mix up the ground balls to the left and the right. Players (of all ages) learn better when repeating the action to the same side.
As soon as one player returns the ball to the coach, the coach wants to get the next player moving. Once the drill is fully in action we should only have two play-ers (out of four) ‘waiting in line’. One player is return-ing to the line; one player is executing the drill.
Coach

Fielding Workout Video / 20’ Ground Balls Video
20’ Ground Balls (BP Video ...1:56)
https://www.youtube.com/watch?v=ycKuTFm8bIM
The following video Illustrates how high level instruction uses the technique of ROLLING ground balls for fielding drills.
Infield Workout Watch: 2:22-2:52 & 5:26-5:46
https://www.youtube.com/watch?v=0M5w9AVfrPQ
DAY 5

DAY 5
INTRO Base Running Day… TALK Mindset/Rule of Thumb:
1. Ball to INF – one base 2. Ball to OF – two bases
DRILL Base Running – Through First Base
1. Eyes ONLY on the base UNTIL YOU SEE your feet touch 2. Touch the front of the base 3. Look to your right (into foul territory …Why? To ID an overthrow)
DRILL Turns & Touches - step OVER the corner of the base DRILL Sliding
1. Shoes/Cleats off - for safety 2. Sit in ‘Figure 4’ position - ’roller coaster’ 3. Practice Sliding - using throw down bases/cones in the grass
BAT Drills 2-4 TEACH “Anchor” - Centered, Stacked & Tall - Balance - - -> Video of Nelson Cruz Watch Slo-mo at 0:19 …back leg driving Down against back knee. http://m.mlb.com/video/v1184502383/seamin-cruzs-38th-home-run-travels-454-feet/?query=Nelson%2BCruz
Drill 4 Sideways Karate Chop - Contact Point - Position of Strength - Head Down at Contact
TALK Pitcher is Your Servant …make them ‘bring the ball to you’ TEACH Four Seam Grip - ‘Wrist snaps Down’ (“Fingers, evenly down through the ball”) THROW Drills - brief PCP ‘Footwork Drill’ --- ”Feet and Wrist’ (not arm) TALK Keep the ball moving until the end of the play and the pitcher has the ball at the rubber - NO standing and holding the ball: immediately after getting the ball, do one of two things:
1. THROW it 2. RUN with it
…if a player is not sure what to do with the ball they take off on a sprint toward the pitching closer the ball is the to the middle of the infield, the greater the threat to the runners
DEMO Getting the ball back into the pitcher – Demo using adults SCRIMMAGE

COACHES 1. Base Running - Mindset/Rule of Thumb 2. Throwing is Feet and Wrist …arm connects the two…takes care of itself. Teach players to focus on Feet & Wrist 3. Keep the Ball moving on defense! …don’t have to throw the ball to move it….many players don’t recognize this Base Running: Mindset/Rule of Thumb Ball hit in the infield: The runner advances one base; sprint in a straight line to the next base Ball hit in the outfield: The runner is thinking ‘advance two bases’; their route to the next base is to run to a point 5’ outside the baseline and 10’ prior to the base. From this spot, they begin the Turn & Touch process. There is no doubt in the runner’s mind that they are going to advance two bases! It is only when the defense proves that they are a threat to put the runner out, does the runner hold up and stick to advancing only one base. Note: at the lower levels of play, where the outfielders are closer to the infield, the opportunity to get a force out from the outfield IS a possibility n many instances. We want to point this out to our base runners so, when they recognize this possibility, they know to run straight to the next base. Even at the 12-year-old level of play this is a possibility to make the runners aware of.
Given this point, we First want to engrain the ‘Two Bases on Balls Hit to the Outfield’ mindset during our pre-season scrimmages. Once that mindset is in place, Then teach the point regarding the possibility of a force out being made on a ball hit to the outfield. Like most things when working with kids, we don’t want to try to jam too much info in their head at once. Teach using small chunks of info over time, even if it means leaving out some information they ultimately are going to need to execute an action properly. Throwing is ‘Feet and Wrist’ Early on we tell the players, ‘You don’t throw the ball with your arm’. Of course, this is hyperbole, but it is important that we get the point across from an instruction perspective. Kids, logically, think of throwing as an action done with the arm. Of course, the arm is involved, but its only one component of the action.
In our instruction, we want to get the kids focusing on the more important aspects of the throwing action: creating momentum and power by moving their feet towards their target and developing and strengthening their wrist snap, which plays a major role in the accuracy of a throw.
The arm is part of the action, but effectively it works to connect the actions of the feet and the wrist. Keep the Ball moving on defense! NO standing and holding the ball: immediately after getting the ball, do one of two things:
1. THROW it 2. RUN with it
If a player is not sure what to do with the ball they take off on a sprint toward the pitching rubber. The closer the ball is the to the middle of the infield, the greater the threat to the runners.
In the spring this is a concept that we want to introduce early on and to constantly emphasize in our scrimmages until it becomes habit and instinctive for each player - the ball is constantly moving on defense. This includes after a play is made on a run-ner…..immediately “Look for other runners” while moving the feet, in a power position, towards the middle of the infield.
We want to train the pitcher to go meet the player bringing the ball in; not wait for it at the pitching rubber. …from there the pitch-er keeps an eye on the runners while getting back to the rubber.
Note: if you have played or coached basketball or hockey (or watch these sports), you are familiar with this concept when a team has the ball/puck; they want to keep it moving constantly. Take that same mindset to defense in youth baseball.

X X
X
X
X
X
X
Base Running - Through First Base, Three Groups
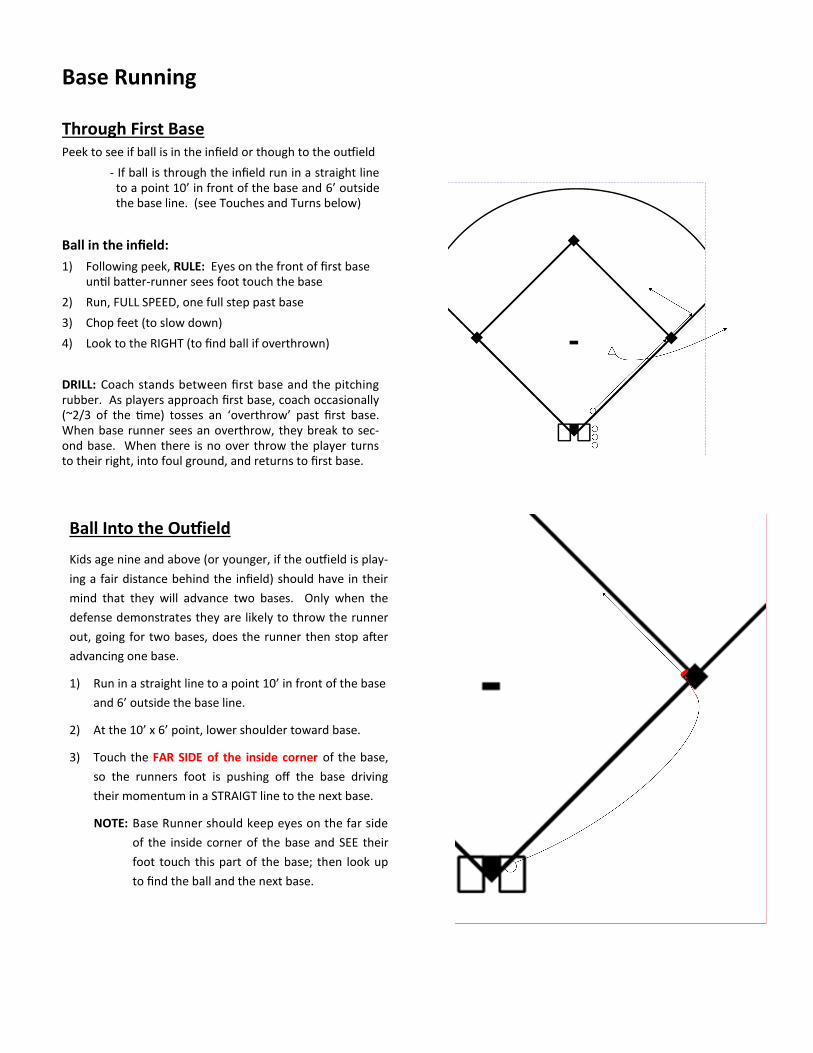
Base Running
Through First Base Peek to see if ball is in the infield or though to the outfield - If ball is through the infield run in a straight line to a point 10’ in front of the base and 6’ outside the base line. (see Touches and Turns below)
Ball in the infield: 1) Following peek, RULE: Eyes on the front of first base
until batter-runner sees foot touch the base 2) Run, FULL SPEED, one full step past base 3) Chop feet (to slow down) 4) Look to the RIGHT (to find ball if overthrown) DRILL: Coach stands between first base and the pitching rubber. As players approach first base, coach occasionally (~2/3 of the time) tosses an ‘overthrow’ past first base. When base runner sees an overthrow, they break to sec-ond base. When there is no over throw the player turns to their right, into foul ground, and returns to first base.
Ball Into the Outfield Kids age nine and above (or younger, if the outfield is play-ing a fair distance behind the infield) should have in their mind that they will advance two bases. Only when the defense demonstrates they are likely to throw the runner out, going for two bases, does the runner then stop after advancing one base.
1) Run in a straight line to a point 10’ in front of the base and 6’ outside the base line.
2) At the 10’ x 6’ point, lower shoulder toward base.
3) Touch the FAR SIDE of the inside corner of the base, so the runners foot is pushing off the base driving their momentum in a STRAIGT line to the next base.
NOTE: Base Runner should keep eyes on the far side of the inside corner of the base and SEE their foot touch this part of the base; then look up to find the ball and the next base.

Base Running , Turns & Touches - Three Groups
SET UP:
Use throw down bases for
the group that is running from
first to third in the area beyond the
Infield cutout.
Set a cone 10’ feet in front of each base
where the turn and touch is being made and
4 feet outside the base line.

Base Running, Turns & Touches - Touch Point on the Base


DAY 6

DAY 6
DRILL Pitcher’s Backing-up- on balls hit to the OF TALK Cut-Relay to Home is our focus point today
Base Running Reminder: on balls hit to the outfield the mindset of base runners is they will advance TWO bases. When there is a runner on second base and a ball is hit to the outfield, the running is thinking ‘Score’ and the defense sets up to get the ball to home plate. TALK The three players in the middle of the field (SS, 2b, P) “Always Move Towards the Ball” The SS and 2b are NOT the ‘Cut Off’ on Relay Plays to home plate ‘Get the ball back in the infield play’ vs ‘Cut-Relay’ play ….critical to understand the difference DRILL Cut-Relay Play to Home BAT Drills 2-4b
3 Keys: Legs, Head, Ball to Feet
-Anchor- -Balance-
(4b) Wrist Action; Skip a Rock ‘Accelerate’
TALK Batting is Not Fair - 9 v 1 TALK How the following two drills reduce the chance of arm soreness and injury…
THROW Turn & Pull - Power (shoulder safety) Wrist Action - Accuracy (elbow safety) TALK “Feet & Wrist”
PCP Shuffle, Pull, Snap - just one shuffle …starting to establish the habit and mindset of getting rid of the ball quickly
TALK Three Defensive Responsibilities: 1. Stop the ball 2. Stop the runners 3. Get the ball to middle of infield
TALK Keep the ball moving constantly: 1. THROW it or 2.RUN with it …NEVER STAND AND HOLD
DEMO Getting the ball back in to the Pitcher - Process and ‘Rule’ SCRIMMAGE Coaches: remind the kids to keep the ball moving …Not sure what to do? RUN towards the middle of infield!

COACHES 1. In the 60’ game the Pitcher is the cut-relay player on all plays to home 2. Pitchers Defensive Responsibilities 3. Getting the ball back in to the Pitcher - ‘Rule’ In the 60’ game the Pitcher is the cut-relay player on all plays to home A couple of sessions ago we talked about the 60’ game being different than the 90’ game. One of the major differences is how a relay to home is executed.
On the larger diamond, on balls hit to right field and center field, the first baseman is the cut-relay to home. On balls hit to left field the cut-relay player is the third baseman. On the larger diamond the backstop is a significant distance behind home plate, so the pitcher is needed to back up on throws to home plate.
In most cases, when players have progressed to playing on the larger diamond they have settled in to playing just one or two posi-tions and get the needed repetitions to learn the nuances of their position. In youth baseball, kids are still playing multiple positions. Even the most skilled players are shuttling between shortstop, pitcher, first base and in some instances, also play catcher. The younger players are working at more positions and do not practice as often, so get fewer repetitions needed in order to really know how each position is played and to establish habits that will carry over to pure instinct and reaction under the stresses of a game situation. On the smaller diamond the pitcher is the cut-relay player on all plays to home; reasons:
Simplicity - we do not have the time to give our kids enough reps at each position for them to instinctively react to an ‘either or’ decision, “Is the first baseman or the third baseman the cut-relay on this play?” The pitcher is the cut-relay player 100% of the time on plays to home plate; nothing to think about.
I have a story of watching Federal Way Little League miss out on an opportunity to play in the Little League World Series be-cause they were trying to run a cut-relay to home using the ‘larger diamond approach’. The player responsible to be in cut-relay position didn’t show up and they watched a likely victory turn into defeat and their season ended as a result. This story will show up in a blog on the BP website in the future.
The backstop backs-up home plate - most youth baseball fields are designed with the backstop about 15’-20’ behind home
plate. There is not enough room back there for the pitcher to join the catcher and umpire who are already taking up much of the available space. Also, there is not enough room for the pitcher to get far enough behind home plate to properly back up the play. Finally, many overthrows hit the backstop and bounce back towards home plate where the catcher can re-trieve the ball.
(Note: I am not a fan of trick plays, but here is one I will share with you. You need a good catcher, have a back stop built of a hard material (wood, etc.) and it requires dedicated time to practice. ---> With a runner on first base, the pitcher throws a pitch high in the strike zone or above the strike zone. The catcher intentionally lets the ball fly past them <base runners take off for second when the ball gets past the catcher in most instances>. The catcher turns and plays the carom off the backstop. They will have the ball in hand, in most instances, with plenty of time to throw the runner out. I share this, not to suggest you try it, but more so to illustrate that at the youth level, given the construction of the field, we don’t need the pitcher to back up home plate)
The Pitcher is usually one of the better athletes on the field Relaying a baseball is a complex action for a young player and can involve multiple options of what to do with the ball. In the
best interest of the team, we want to have the ball in the hands of one of the more skilled players in this situation. Note: The second baseman and shortstop are not the cut-relay player when a runner is trying to score on a ball hit to the outfield-ers (a ball hit Beyond the outfielders is a different situation). One of the most common mistakes in defensive execution, at the youth baseball level, is having one of the middle infielders run out into the outfield, receive a very short throw from the outfielder, then turn and make a very long throw to the catcher.
The role of a middle infielder in this situation is, when determined that a throw to home is not required (either the runner is going to score easily or they stopped at third base), is to ‘bring the ball back into the infield’.

Pitchers Defensive Responsibilities The pitcher position has the most responsibilities on the field, from the standpoint of how much ground they cover on each play:
Cover or back-up a corner infield base on EVERY ball hit in the infield that they don’t field - “Ball, Base, Back-up”
When the ball goes beyond the infield their responsibility changes to ‘Backing up’ the throw coming in from the outfield. …Backing up is not as simple for the pitcher as other positions. When the ball is coming in from the outfield, all the infielders
are occupied with their own responsibilities. The pitcher closely watches the actions of the outfielder and prepares move to where they are needed to back-up the player the ball is thrown to.
On balls hit to the outfield and a runner is attempting to score, the pitcher is the cut-relay player.
After each play ends (defined as ‘the runners have stopped attempting to advance to the next base’) the pitcher needs to im-mediately locate the person with the ball and quickly move (Run) to ‘meet them half way’ between that player’s location and the pitching rubber.
Getting the ball back in to the Pitcher - ‘Rule’ A situation that occurs in most every youth baseball and softball game, and in a lot of games occurs multiple times, is, at the end of the play, the throw to get the ball back into the pitcher’s hands gets past the pitcher resulting in the base runners advancing.
This can be virtually eradicated from the game with the following rule: “When the runners have stopped trying to advance, we are not allowed to throw the ball overhand”. Once the play is over we work the ball back to the middle of the infield by either running with it or using and underhand toss. (We teach, train and establish this rule in pre-season scrimmages).
Note: It is important that, early on, we explain to our players that they are Not Required to throw the ball in order to transport it. They can run with the ball ……perfectly legal ;)

Pitcher Backing-up Throws From The Outfield

Cut-Relay Play to Home - Mini Diamond Teach and train on larger mini diamond (35’- 40’ square) - refine throws on full field
.
Pitcher:
1. Get lined up - ‘Look both ways’: find the ball, look home; get in line between the ball and home.
2. Move out toward the outfielder to a point ‘half way’ between the ball and the base. This will be near the baseline between first and second. Do Not go past the baseline
3. Call loudly and repeatedly for the ball - in a “Ready Position” (with hands held above the head) facing the ball
4. Catch & Throw - “Move feet to catch”, “Turn glove side”, move feet toward catcher and throw using good underhand toss technique.
Outfielder (when drilling on mini diamond):
1. Wait for the pitcher to call for the ball (it will take them longer to get into position then for the OF to be ready to throw)
Catcher:
1. Move to their ‘position’ in front of home plate
2. Call the play: just before the outfielder fields the ball call loudly, “Four, four, four”
3. Communicate on Relay: as the ball is in the air between the outfielder and pitcher call and repeat loudly, “Cut Four”
4. Catch, tag the ground where the base runner would be sliding, then shuffle out towards the middle of the infield, “Looking for other runners”.
OF
P
C
(Coach)
Coach:
1. Mix up the location of balls to the outfield, so pitcher’s learn to line up to different spots.
2. Maintain discipline of Pitcher and Catcher on their movement and communication responsibilities

3b
SS 2b
1b
C
P
CF
RF LF
(Coach)
Cut-Relay Play to Home, Ball Hit to Right Field P - Always the Cut Player on throw to Home. Goes out near the baseline (not all the way to baseline on balls hit to CF)
1b, SS, 3b - Not playing the ball, so they cover their base. 2b - ”Moves Towards the Ball”
LF/CF - First job is to react towards balls hit in the outfield. Once they see they are not playing the ball they break towards the infield anticipating where they might be needed a to back-up a throw to a base.
RF - FAST to the ball, SLOW down to field the ball, FAST : “Move Feet to Throw” the ball to the Cut-Relay Player (pitcher).
C - Moves to their ‘position’ a step in front of home plate. Communicates that the play is going to (base #) ‘Four’, then communicates with the Cut-Relay Player re: what to do with the ball.
DAY 7
DAY 7
DRILL Throwing on the Run
TALK Runner caught between bases situation
DRILL Ambush
Actions, which are part of the play, that we’ve already been drilled in: “Ready Position” to receive a throw Continue running towards your target AFTER throwing the ball - “Follow Your Head” “Look for other runners” immediately after making a play on a runner
Ambush - 3 Rules 1.Make the runner look away - ‘Chase Them!’ 2.Receiving player: 10’ in front of the base (more when possible…easier with more experience) 3.Clear a throwing lane to the side of the runner
Note to Coaches: There are oodles of ‘rules’ taught regarding this situation. Obviously we don’t address most of them. PLEASE, if you have the slightest question or concern about what we didn’t teach PLEASE ask after the session. This is one of the most over-taught, convoluted plays in baseball/softball and we feel it is important that we address your questions.
BAT TALK Turn Endpoint* ---> “Handle of a Whip”
DRILL #2 (Turn Endpoint focus)
TALK Feet in Place …working to have this 100% of the time Feet in Place = Balance
TALK Wrist ---> TO contact point Skip ---> THROUGH contact point
DRILL #4ab (combined)
TEACH Bottom Hand ---> Definition of ‘Short Swing’ DRILL #5 (Bottom Hand)
DEMO Bottom Hand works in tandem w/Karate
THROW Turn & Pull - Power …introduce: ‘Anchor Glove Arm’ (shoulder safety) Wrist Action - Accuracy (elbow safety) PCP “Feet & Wrist”
TALK Three Defensive Responsibilities: 1. Stop the ball 2. Stop the runners 3. Get the ball back in to the pitcher
DEMO Getting the ball back in to the Pitcher - Process and ‘Rule’
SCRIMMAGE ----------------------------------------------------------------------------------------------------------------------------- -------------------------
* Turn Endpoint in Slo-Mo Watch 0:08-0:15 http://m.mlb.com/video/v25444925/fox-xmo-super-slomo-at-the-world-series/?query=super+slo+mo
Watch: 0:00 – 0:08 http://m.mlb.com/video/v36612345/the-moment-captured-in-slomo-of-the-captain/?query=Slo%2Bmo
COACHES 1. Progressing to more complex drills 2. Turn & Pull and Wrist Action - power, accuracy, arm safety 3. Outfielders Three Defensive Responsibilities Progressing to more complex drills Executing an Ambush (Pickle/Rundown) is the focus of Day 7. On the surface this appears to be a complex situation with a lot going on. Actually, we only need to teach and practice three things:
Make the runner look away (by chasing them) Create a clear throwing lane Receiving player moves to a point 10’ in front of the base
The other aspects of this drill have already been taught and drilled. Before introducing this drill (or any ‘advanced’ drill) we want to be sure the kids are fairly solid in their understanding and ability to execute the foundational concepts and actions that are part of the drill:
“Ready Position” - in preparation to receive a throw “Move your feet to throw” - the importance of running fast to power the throw “Follow your head” - after throwing the ball, keep moving towards the target, to replace the player receiving the ball. That
player may need to take off to chase the runner. (We DO NOT ‘double back’ after throwing the ball!) Get on the same side of the base as the ball - the player receiving the throw moves to the same side of the runner as the player
chasing the runner (we do not stand in the base line when a runner is running toward us). “Reach forward to catch” - a lot is happening in this situation and it is happening fast. Reaching forward to catch increases the
chance of catching the ball. “Look for other Runners” - after tagging the runner, that part of the play is over. The player making the tag immediately turns
their attention to the other runners, and does so in a “Power Position”, while “Moving their feet” towards the middle of the infield (prepared to make a throw).
Turn & Pull and Wrist Action - power, accuracy, arm safety After the players get 5-6 days of reps in the full series of throwing drills, we want to cut back on the time spent on these drills, so it can be used working on other things. There are two drills that we DO want to do every day we are at the park the rest of the sea-son: ‘Turn & Pull’ and ‘Wrist Action’.
When the kids are familiar with these drills we can get through them in about 30 seconds.
Why these two drills? Turn & Pull trains proper use of the lower body and the action of the glove elbow in the throwing action. Coordinating these actions relieves stress on the shoulder/rotator cuff (arm safety), while training the actions that generate power.
Wrist Action trains the proper movements of the wrist and fingers when releasing the ball. Developing the muscle memory in snap-ping the wrist straight down and moving the fingers straight down, evenly through the top of the ball, relieves stress on the el-bow/”Tommy John” ligament (arm safety). This action is one of the key components for throwing accuracy. Outfielders Three Defensive Responsibilities
1. Chase balls hit in their area of the outfield and the adjacent outfield position - ’I am getting the ball’ mindset. 2. Charge after balls hit to the infielders in front of them (this applies primarily to the left fielder and right fielder) - ’I am
getting the ball’ mindset. 3. Back up a base
It is important that we train the outfielders that ‘I am getting the ball’ is always their foremost priority.
Very Important Note: look at the drill diagram, ”Outfielder Backing-up Balls Hit to the Infielders in Front of Them" in Day 2. The pitcher is responsible for backing-up corner bases on balls hit in the infield. The corner outfielder (LF or RF) is responsible for going after the ball hit in front of them.

A C
A
B
C
A
“B”
”C”
B
C
C
A
A
B
B
C
“B”
“B”
“A”
“A”
”C”
Underhand Toss - Shuttle / Throwing on the Run - Shuttle
Each of these drills are run the same, just using a different type of throw. Player with the ball runs approximately half way toward the opposite base before making the throw. On the underhand toss the player with the ball may go slightly past half way; Throwing on the Run the ball may be thrown before the player is halfway. The point at which the player tosses/throws the ball will vary by age, skill, strength, etc.
Underhand Toss technique: Run holding ball near hip, in throwing hand. Momentum powers the throw, not the arm. Tossing technique: arm extends out FLAT/Level to the ground and ‘guides’ the ball to the receiving player. The arm provides minimal power to the throw. At the conclusion of the toss the arm is fully extended and palm is ‘flat’ and facing up to the sky.
Throwing on the Run technique: Run with throwing hand elbow at shoulder height and somewhat in front of throwing shoulder; throwing hand extended up above the elbow. Momentum powers most of the throw. Throwing technique: slight flexion back at the elbow, then a firm wrist snap forward toward receiving player.
Receiving Player: In a ‘Ready Position’ before the throw; ‘Reach Forward to Catch’. ‘Move Feet to Catch’ as needed.

SS 1B
SS 1B
SS 1B
Rundown Drill - “Ambush”
The situation of the drill is a batter-runner has hit a long single, is trying to stretch it into a double, but the ball arrives at second base when the runner is approximately 20’ away.
The player with the ball chases the runner towards first base forcing the runner to look away from the ball. While chasing the run-ner, the player with the ball moves slightly to the side of the runner.
The receiving player quickly moves to a point 10’ in front of first base. While moving to this point the receiving player moves to the same side of the runner as the player with the ball. This creates an unobstructed throwing lane.
The player with the ball makes a throw, so the ball arrives to the receiving player when the base runner is approximately three feet from the receiving player (judging when to throw requires a practice and repetition). After throwing the ball, that player “Follows Their Throw” and goes to a point just beyond where the receiving player caught the ball. (In a game situation this player positions themselves 10’ in front of the base to be prepared if the rundown continues and requires them to receive a throw.)
(Coach/Base Runner)
Three Rules of a Rundown:
1) Force the runner to look away BEFORE throwing the ball; chase the runner.
2) Player on the receiving end of the play comes 10’ in front of the base.
3) Get to the side of the runner while chasing. Determined by the chasing player; receiving player moves to the same side. (This
First Baseman:
SS


DAY 8

DAY 8
INTRO Fly Ball Day - Objectives/Teaching: 1. Run Full Speed 2. “Reach Forward to Catch” (keep glove extended away from the body) DRILL ‘No ball drills’: Drop Step & Drop and Go DRILL Toss Drills: 1. Going Straight Back (Drop Step) 2. Lateral Toss 3. Angling In BAT Feet in Place ---> Balance
Drills 2 (Turn Endpoint focus) 4ab (combined)
TALK Hands work in a straight line - “Half way; All the way”
Drills 5 & 6 (Hand Clap)
TALK The ‘Swing’ is actually a SNAP
TALK Swing Zone
THROW Turn & Pull - Power …introduce: ‘Anchor Glove Arm’ (shoulder safety) Wrist Action - Accuracy (elbow safety) TEACH Pitching - Stride …the stride is the ‘Control’ phase of the delivery
DRILL Stride drills: 1. Leg Lift 2. Stride to Power Position 3. ‘Foot down a slide’ Stride to Power Position - Turn & Pull (Anchor) - Snap PCP I. Pitching Practice (35’ apart) Focus #1: Glove Elbow - Up during the stride, pull straight back (and Anchor) to throw
Focus #2: Head - pointing STRAIGHT at target …Before, During and After the delivery
- Teach/Focus during this segment: “Head STRAIGHT forward; Elbow STRAIGHT back”
II. Position Player Throwing - “Feet & Wrist” ---> Shuffle, Pull, Snap...ONLY ONE Shuffle...but need a BIG PUSH (with feet) on that shuffle
DRILL Mass Ground Balls (SS & 1b) & Fly Balls - Fielding drills have TWO parts…each is equally important
TALK Defense - Three Individual Responsibilities: Ball, Base, Back-up
- Three Team Responsibilities: 1. Stop the ball 2. Stop the runners 3. Get the ball to middle of infield - Fielding & Throwing Footwork
SCRIMMAGE

COACHES
1. When a player is catching the ball (thrown, fly ball, ground ball) REACH out…
2. Fielding drills have two parts: 1. Catching the Ball, 2. Throwing the ball
3. Fielding Videos - objective in how we deliver the ball is what we are emphasizing
When a player is catching the ball (thrown, fly ball, ground ball) REACH out…
When catching a fly ball the same teaching applies as when catching a thrown ball, “Reach forward to catch” (reach the glove out away from the body). A key to consistent success in catching a ball is to get the glove and ball in the player’s line of sight so they can better coordinate the glove with the ball.
Fielding drills have two parts: 1. Catching the Ball, 2. Throwing the ball
It is important to make this clear to the players. They will miss the catch sometimes. We cannot allow them to have that impact the effort, focus and importance they place on the value of the throwing aspect of the drill. We want to be sure, in how we talk about each of these two aspects, that we convey an equal importance for both the throw and the catch. Often we (the players and coaches) look at these drills as being about the fielding aspect ONLY. We need to recognize the value of, and the opportunity to improve throwing skills in each ‘fielding’ drill rep.
Fielding Videos - objective in how we deliver the ball is what we are emphasizing
Notice in these videos the coaches are NOT delivering the balls hard/fast. We want to recognize, as coaches, that the objective of most fielding drills is to deliver balls consistently to the same spot at a speed that allows the players to work on their actions and footwork.
Most of the drills are run in a compact space, ensuring ACCURACY of the spot balls are delivered to and to maximize repetitions.

1. Drop Step from Ready Position; back to ready position; repeat ~5x (throwing hand foot back; glove up to catch) 2. ‘Drop and Go’ Drop Step and run back 4-5 steps ….Fast (eyes facing the coach - where the ball is coming from) 3. Get Behind It: ‘Drop and Go’; after players are back 4-5 steps, Coach says, ‘Catch and Throw’. Players take a
step or two forward, simulate a catch, continue forward simulating a the throwing action. ...No ball is used for this drill, so one coach can run the entire group/team at once.
Drop Step Routine
Get Behind It Coach: “Drop and Go” Player: Drop Step and starts running straight back with eyes on the coach/ball Coach: Let player get started back 2-3 steps then toss a pop fly 20’ in the air and a step or two beyond the player. The height and depth of the throw should allow the player a fair amount of time to get ‘behind’ the ball, be able to change directions and step forward to catch. The player comes forward to catch then ‘moves feet’ and finishes the throwing action while gaining ground back to the coach. At the completion of the action the player returns the ball to the coach using a proper underhand toss technique. Note: This is a skill better suited for players age 10 or older.
= position of feet
Drop Step Footwork
Drop and Go Coach: “Drop and Go” Player: Drop Step and starts running straight back with eyes on the coach. Coach: Let player get started back 2-3 steps then toss a pop fly approximately 10’ beyond the player, who is forced to run full speed in order to make the catch. Note: Be sure the player ALWAYS throws the ball back using proper throwing technique, “Move Feet to Throw”, “Follow Your Head”.
Throwing hand foot drops back.
This diagram illustrates a right handed thrower making a drop step.

Toss Drills - Fly Balls
Coach stands 10’ from player. Player breaks back, full speed, at 45 degrees. Allow player to run 10’ then toss a fly ball approximately 30’; limit height of toss to 12’-15’. The is a running and catching drill, not a high pop fly drill. In most cases an underhand toss by the coach works fine, is more accurate and easier on the arm.
Going Back: Same as above, but with player using a drop step and running straight back.
Get Behind It: Coach uses underhand toss. Stand 10’ from player, toss the ball ~20’ in the air and ~5’ behind the player.
Player Drop Steps after ball is tossed, gets to a point a step or two behind the ball , then comes forward to catch.
NOTE: Early on put emphasis on footwork, not on catching the ball.
NOTE: On all return throws require absolute adherence to proper throwing technique using legs and moving feet toward target.
Coach stands 40’ from player who breaks in, full speed, at 45 degrees. Allow player to run 10’ then toss a fly ball to a point approximately 30’ ahead of the fielder; limit height of toss to 10’-12’.
NOTE: An Underhand Toss by the coach is usually more accurate.
© 2012 Mark Linden

Mass Ground Balls and Fly Balls (Shortstop and First Baseman)
v
v
v v
This drill involves two separate groups working in the infield at the same time; one group is shown below.
A coach stands in the right handed batter’s box and delivers ground balls to the Shortstop and First Baseman. In this diagram the Shortstops are throwing fielded balls across the diamond to an adult catching throws at first base. The First Basemen are fielding balls delivering them to the adult at first base using the underhand toss technique.
The coach delivers a ball to the shortstop who throws across the diamond. As soon as the ball is caught at first base the coach immediately delivers a ground ball to the First Baseman. As soon as the ball is handled by the adult at first base the coach delivers a ball to the next player working at short-stop...then the other First Baseman...then the Shortstop, etc., etc.
The adult at first base keeps their eye on the ground ball, the throw coming to them, then switches their eyes to the other position, which will be getting the next ground ball. The adult at first base (ideally) drops ball into a bucket, or drops them on the ground. If the adult at first tries throwing balls to home plate after catching them, it slows the pace of the drill. When the ball supply is exhausted, then take the entre bunch to home plate.
While this group is working a second group, with another coach is taking ground balls at the second and third base positions. Those two positions are throwing the ball straight back into their coach who is delivering balls from the left handed batter’s box. When first learning the drill, we only work with two positions at a time. After a few days, when the players and coaches and assisting adults are familiar with the routine, all four positions can work at the same time.

Videos: Fielding Drills and UH Toss Note in all these videos the coaches are NOT delivering the balls hard/fast. We want to recognize, as coaches, that the objective of most fielding drills is to deliver balls consistently to the same spot at a speed that allows the player to focus on their ACTIONS and FOOTWORK
HS Infield – Winter Workout …outstanding example of how to run drills. All balls are delivered relatively slowly…so players can work on their ACTIONS and FOOTWORK. Most of the drills are run in a compact space, ensuring ACCURACY of the spot balls are delivered to; and to maximize REPETITIONS.
Watch: 2:22-2:52 / 3:55-4:20 / 5:26-5:46 / 6:43-6:55 https://www.youtube.com/watch?v=0M5w9AVfrPQ
TX Rangers Minor Leaguers Balls are delivered consistently to the same spot; are not delivered fast; most are delivered from a short distance to ensure accuracy.
In many instances (you can’t always see the coach) the balls are being tossed or rolled to the players. The takeaway for us working with kids is the drills run at the highest levels of ply are not fancy; they coaches aren’t ‘challenging’ the play-ers by delivering the balls fast/hard or mixing up locations of where they deliver the balls.
The drills are structured so the players can get massive, consistent repetitions for developing their ACTIONS and FOOT-WORK.
Watch: 0:46-0:54 / 1:01-1:07 / 1:35-1:45 / 1:50-2:05 / 2:58-3:10 / 3:43-4:03 https://www.youtube.com/watch?v=duJysUUo5zs
UH Toss - MLB player executing the technique This is the highest level of baseball - the actions the player uses in the video are the same as we are teaching our kids. That fact is not significant. This is simply the correct way to execute the action…..its the same anywhere you go, assuming it is being taught correctly Watch 1:50-2:05 https://www.youtube.com/watch?v=xcnITNnQVCQ

DAY 9

DAY 9
INTRO Today’s sequence of activities follows the standard Practice Routine that BP teaches (expect ‘batting practice’) I. Wiffle Ball Batting http://www.baseballpositive.com/coaching-guide/#wiffleballbatting II. Skill Building Warm-up http://www.baseballpositive.com/skill-building-warm-up/ III. Playing Catch Practice http://www.baseballpositive.com/new-pageplaying-catch-practice/ IV. Team Drills http://www.baseballpositive.com/team-drills/ V. Batting Practice http://www.baseballpositive.com/batting-practice/ VI. Scrimmage http://www.baseballpositive.com/scrimmage/
DRILL Skill Building Warm up
20’ Ground Balls Toss Drills – angling In “Cover the base w/Your Eyes”
BAT Drills 2, 5, 6
-Feet in Place-
TALK Stationary Contact Point
THROW Turn & Pull - Power …introduce: ‘Anchor Glove Elbow’ (shoulder safety) Wrist Action - Accuracy (elbow safety) PCP I. Pitching Practice (35’ apart) Focus: Pull & Snap - PULL and Anchor glove elbow; SNAP wrist
II. Position Player Throwing - “Feet & Wrist” …”Follow Your Head”
III. Skill Segment – “Cut-Relay Footwork” – Turn Glove Side
DRILL Mass Ground Balls (2b & 3b) & Fly Balls
TALK Defense
- Three Individual Responsibilities: Ball, Base, Back-up - Three Team Responsibilities: 1. Stop the ball 2. Stop the runners 3. Get the ball to middle of infield - Fielding & Throwing Footwork: ...coaches, make giving feedback on footwork a priority
SCRIMMAGE

COACHES 1. Mindset towards practice 2. The Skill Segment of PCP 3. Scrimmage - Flow of Play… Mindset towards practice
We don’t need things to go perfect in each segment. It takes weeks/months for the kids to grasp concepts and establish some level of skill mastery.
It is very important that each participant (coach, player, parent helper) understands the objective of the drill before starting the activity. Example: the primary focus of ‘Playing Catch Practice’: “Moving Feet” to throw and catch.
Maximizing repetitions is the highest priority…and keeping the kids engaged and moving. Yes, we are teaching, and want them to gain knowledge and understanding of the game, but the most impactful factor in learning and developing is re-peating the actions over and over and over.
Stick to the predetermined practice time table. Regardless of how an activity goes, stop when the time allotted is up and move on to the next thing in the practice plan. If we are not satisfied with how things went in an activity period, schedule it into the next practice and give it more time. Avoid cutting into the time allotted for the next activity.
The Skill Segment of the Playing Catch Practice routine This is only meant to last two minutes, 3-4 reps. The objective is to address an important throwing and catching skill that likely will not get the specific attention it needs in a regular drill. As we progress through the season we are sure that we are addressing these skills on a consistent basis. I like the following three activities for this segment. Rotate these throughout the season. You may choose to focus on one more than the others, or come up with a different skill that you prefer for this segment:
- Cut-relay footwork* - Catch, Tag, Power Position* - Recovering the ball^
* these drills develop habits and skills that are applicable to many aspects and actions of the game ^ important for the kids’ game …they are picking the ball up off the ground a lot Note: We did not cover all three of these in the fall. They can be found on the BP website or will be added in the New Year. When coaching below the Player Pitch level, this aspect of is PCP is optional. The time needed to train and coordinate younger kids for this aspect of practice may be put to better use if applied to another part of the practice plan.

Scrimmage - Flow of Play We are working towards making scrimmage a non-stop activity. In the spring we want to make scrimmage a part of each practice. Given the needs to dedicated time to skill development we probably will make our scrimmage period only 20-30 minutes. Given the time limitations, we want to get the most out of the activity. The key is to keep it moving and have a quick transition from the end of one play to the first pitch to the next batter.
Our objective for the flow of scrimmage: the moment the ball is back to the middle of the infield, the next batter is stepping into the batter’s box and the catcher is alerting the defense of the number of outs and where the base runners are.
In the fall we are scrimmaging with two full teams, so the numbers are there to work with multiple runners on base. When scrim-maging with a team that has only 12 players* at a practice, we may find that we can only have one player on base (having runners on base for each at-bat creates more situations and learning opportunities for the players…and increases their experience on the base paths). We always want to have an on-deck batter who is ready to step in at the conclusion of each play, so to minimize the down time between plays. * The structure of a scrimmage for a team of 12 players: have four groups of three kids. Three groups in the field covers all the positions; one group of three is on offense - one player on base, one player batting, on player on deck. At the conclusion of each play, the player who was the base runner comes in to be on deck. Depending on the time available, we determine if we will give each player one at-bat or two. In most cases two at-bats per player is will fill the time allotted for scrimmage. Note: that equates to 18 defensive plays for each player and they each run the bases four times; twice as a base runner and twice as a batter.
Below is the sequence of activity in our scrimmages: - Catcher hollers # of outs; location of runners - Complete the play (definition of ‘end of a play’: the runners have stopped trying to advance to the next base) - Quickly get the ball to the middle of the infield - pitcher meets the player delivering the ball; the pitcher Does Not stand at
the pitching rubber waiting for the ball - All players RUN back to their position with eyes and ears on the catcher as the next batter steps into the box - Catcher hollers # of outs; location of runners…
Note: Implementing the routine of the catcher stepping in front of home plate to address the defense, prior to each new batter, has a profound impact on the level of engagement and focus of a team during games.

20’ Ground Balls
TEACHING:
Call out “Ready Position” to the player. Once the player is in a “Ready Position” roll the ball.
The player moves their feet FAST to the ball, they SLOW down to catch the ball. Tell the player “Wide (feet) to Catch” as they prepare to field the ball. After they field the ball they run FAST toward the coach. Tell the player “(Move Your) Feet to throw”.
The player runs towards the coach, returns the ball using an underhand toss, then follows their throw (“Follow Your Head”), runs around the coach and returns to the line at the ‘waiting cone’.
COMMON MISTAKES:
1. Players, especially those that are more aggressive and/or nimble, will often not slow down to catch the ball re-sulting in them losing their balance while fielding, which negatively impacts their ability to get under control to make a good throw, or they will miss the ground ball altogether (this becomes more of an issue with older players).
2. Some players will want to run through the catch using one hand as if they are fielding a ‘slow roller’. This is a natu-ral tendency for more aggressive and/or nimble players. We need to explain to them that we are rolling the ball slowly in order for them to better focus on their footwork and the ‘fast, slow, fast’ cadence of fielding.
3. Slowing down or stopping when making the underhand toss or not continuing forward movement after throwing the ball. The requirement to run around the coach is incorporated into the drill to eliminate the tendency of players to stop and help them develop the habit of continuing to “Move Your Feet” during and after the underhand toss.
SET UP:
Coach: 20’ - 25’ from the players; with a supply of 3-4 balls
One Player: positioned at a cone or other type of marker
Other Players: lined up behind a second cone or marker located 5’ - 10’ behind the first cone/marker
DRILL:
The coach rolls a ball medium to slow speed approxi-mately six feet to the left of the player. The pace of the ball should be such that the player is able to angle in while going after the ball. Once the kids understand the drill routine, the coach can roll balls to the kids’ right. Note: do not mix up the ground balls to the left and the right. Players (of all ages) learn better when repeating the action to the same side.
As soon as one player returns the ball to the coach, the coach wants to get the next player moving. Once the drill is fully in action we should only have two play-ers (out of four) ‘waiting in line’. One player is return-ing to the line; one player is executing the drill.
Coach

Toss Drills - Fly Balls
Coach stands 10’ from player. Player breaks back, full speed, at 45 degrees. Allow player to run 10’ then toss a fly ball approximately 30’; limit height of toss to 12’-15’. The is a running and catching drill, not a high pop fly drill. In most cases an underhand toss by the coach works fine, is more accurate and easier on the arm.
Going Back: Same as above, but with player using a drop step and running straight back.
Get Behind It: Coach uses underhand toss. Stand 10’ from player, toss the ball ~20’ in the air and ~5’ behind the player.
Player Drop Steps after ball is tossed, gets to a point a step or two behind the ball , then comes forward to catch.
NOTE: Early on put emphasis on footwork, not on catching the ball.
NOTE: On all return throws require absolute adherence to proper throwing technique using legs and moving feet toward target.
Coach stands 40’ from player who breaks in, full speed, at 45 degrees. Allow player to run 10’ then toss a fly ball to a point approximately 30’ ahead of the fielder; limit height of toss to 10’-12’.
NOTE: An Underhand Toss by the coach is usually more accurate.
© 2012 Mark Linden

Receiving a Throw at Third from CF
This drill requires five distinct and quickly executed movements:
1. Get to the base as quickly as possible - “Cover the base with your eyes” (Player does not look for the ball
until they get all the way to the base. If they look back before getting to the base, start the drill over.)
2. Get in a “Ready Position” facing the thrower.
3. “Move Feet” to catch (Coach intentionally tosses the ball 5’-6’ away from the base.)
4. Make tag on the ground in front of the base (If they don’t put the glove on the ground, start the drill over.)
5. Move toward the middle of the infield (Must make a couple aggressive
shuffles in a power position - ”Look for other Runners”)
3b
Coach
(Representing the Center Fielder)

Mass Ground Balls and Fly Balls (Second and Third Basemen)
v v
v
v
This drill involves two separate groups working in the infield at the same time.
One group is shown below. A coach stands in the left handed batter’s box and delivers ground balls to the Second and Third Basemen. The Players are throwing fielded balls across the diamond to an adult catching throws at first base.
The coach delivers a ball to the third baseman who throws across the diamond. As soon as the ball is caught at first base the coach immediately de-livers a ground ball to the Second Baseman. As soon as the ball is handled by the adult at first base the coach delivers a ball to the next player work-ing at Third Base...then to he other Second Baseman...then the Third Baseman etc., etc.
The adult at first base keeps their eye on the ground ball, the throw coming to them, then switches their eyes to the other position, which will be getting a ground ball.
While this group is working a second group, with another coach is taking ground balls at the Shortstop and First Base. Those two positions are throw-ing the ball straight back into their coach who is delivering balls from the left handed batter’s box.
After a few minutes the coaches stop the drill for a moment and announce that the groups will switch where they are throwing. The Shortstop and First Baseman then start throwing the ball across the diamond to the adult at first base and the Second and Third Baseman throw the ball back in to their coach

DAY 10

COACHES 1. Skill Building Warm-up 2. Lower Body & Head 3. Mindset and expectations for the season Skill Building Warm-up It takes a few days for your players and coaches to get into the routine and for this to flow at a crisp pace. Budget 20 minutes for this aspect of practice for the first 4-5 days. After that, 15 minutes is enough to make this a very productive part of practice. Teams with older players can get cut back to 10-12 minutes and get in a good number of reps at each station. The benefits of doing this before the kids play catch: 1. Players need to get warmed up anyway; make the warming-up activity as productive as possible 2. This activity gets the players into a baseball mindset before they get into the most important part of the day: …Playing Catch Practice 3. This daily activity assures that base skills of the game are consistently addressed and that the players accumulate the so very important repetitions needed to maximize skill development Lower Body & Head The actions of the lower body are the cornerstone of a large percentage of athletic movements; this includes those we (or kids) might view as being exclusively upper body actions. The fact is, most upper body movements begin with and are powered by the lower body. This is true with most baseball movements: Throwing, Fielding, Batting.
It is so very critical that whenever we talk to the kids about these skills that we emphasize the lower body component of the ac-tion.
Many do not think of the head as having importance or relevance when teaching baseball skills. When instructing our young ball-players, we must make them aware of the fact that when the head moves the rest of the body follows. To achieve consistency in most athletic actions the athlete needs to manage their head movement.
‘The lower body powers actions; the head controls the power’ Mindset and expectations for the season 1. Players aren’t going to get things right away….be patient and recognize seeing significant changes in skills and understanding
of concepts requires massive repetition, over a period of days/weeks/months. Remember: focus on actions not results in our talk and when evaluating progress.
2. We won’t be able to cover everything before Opening Day…’getting everything in’ is a season-long process 3. Kids will not master everything in one season
i. Do our best to run efficient practices and get kids as many reps as possible ii. Be consistent in our teaching and encourage the players as they work through their struggles iii. Our primary goal is, at the end of the season, for each player to ‘want to come back and play again next year’

20’ Ground Balls
TEACHING:
Call out “Ready Position” to the player. Once the player is in a “Ready Position” roll the ball.
The player moves their feet FAST to the ball, they SLOW down to catch the ball. Tell the player “Wide (feet) to Catch” as they prepare to field the ball. After they field the ball they run FAST toward the coach. Tell the player “(Move Your) Feet to throw”.
The player runs towards the coach, returns the ball using an underhand toss, then follows their throw (“Follow Your Head”), runs around the coach and returns to the line at the ‘waiting cone’.
COMMON MISTAKES:
1. Players, especially those that are more aggressive and/or nimble, will often not slow down to catch the ball re-sulting in them losing their balance while fielding, which negatively impacts their ability to get under control to make a good throw, or they will miss the ground ball altogether (this becomes more of an issue with older players).
2. Some players will want to run through the catch using one hand as if they are fielding a ‘slow roller’. This is a natu-ral tendency for more aggressive and/or nimble players. We need to explain to them that we are rolling the ball slowly in order for them to better focus on their footwork and the ‘fast, slow, fast’ cadence of fielding.
3. Slowing down or stopping when making the underhand toss or not continuing forward movement after throwing the ball. The requirement to run around the coach is incorporated into the drill to eliminate the tendency of players to stop and help them develop the habit of continuing to “Move Your Feet” during and after the underhand toss.
SET UP:
Coach: 20’ - 25’ from the players; with a supply of 3-4 balls
One Player: positioned at a cone or other type of marker
Other Players: lined up behind a second cone or marker located 5’ - 10’ behind the first cone/marker
DRILL:
The coach rolls a ball medium to slow speed approxi-mately six feet to the left of the player. The pace of the ball should be such that the player is able to angle in while going after the ball. Once the kids understand the drill routine, the coach can roll balls to the kids’ right. Note: do not mix up the ground balls to the left and the right. Players (of all ages) learn better when repeating the action to the same side.
As soon as one player returns the ball to the coach, the coach wants to get the next player moving. Once the drill is fully in action we should only have two play-ers (out of four) ‘waiting in line’. One player is return-ing to the line; one player is executing the drill.
Coach

(Coach)
P
SS
1-6 Play, “Turn Glove Side” - Skill Building Warm-up (Pitcher fielding and throwing to shortstop at second)
1. SET UP:
- Pitch works from a point 20’ from second base
- Two kids at the pitcher position; two kids at the shortstop position (shortstop stands only a couple of steps on the shortstop side of the base for this drill. This drills runs so fast that there isn’t time to wait for the shortstops to run between their regular position and the base)
2. TEACH:
On a ball hit back to the pitcher, the shortstop covers the base and takes the throw, the second base-man runs to back up second base.
4 DRILL:
Coach rolls a ground ball to the pitcher.
Pitcher fields the ball with their back facing second base. Then “Turns Glove Side”, “Moves Feet to Throw” (using an underhand toss) and “Follows Their Head.” The pitcher then rotates to shortstop.
Shortstop moves to a point next to the base, standing between the base and the pitcher, gets in a “Ready Position”, “Moves Their Feet to Catch”, gets the “Ball first and the base second”, then tags the base witch their foot. After finishing the play the shortstop runs the ball to the pitching rubber, then rolls ball in to the coach, then rotates to pitcher.
3. OBJECTIVES:
This simulates a ball hit back to the pitcher with a base runner on first.
We want the pitcher to throw to second and force out the lead runner.
The pitcher learns proper footwork for throwing to second base - “Turn Glove Side”
Kids learn that the shortstop takes the throw from the pitcher and the second baseman backs up the base. Both, “Always move towards the ball” (the ball is hit up the middle, to the short-stops left and the second baseman’s right. Both Note: When kids get older (10+)
the shortstop will stand on the centerfield side of second base

6-5 Play - Skill Building Warm-up (shortstop fielding, underhand toss to third baseman, pitcher backing-up)
1. SET UP:
- One player at the pitcher position, one at the third base position and two at the shortstop position
2. TEACH:
On a ball hit to the Pitcher’s right, when they don’t field the ball, the pitcher sprints straight toward third base. If the base is covered (as it is in this drill), they break to a spot in foul ter-ritory, in line with the throw to the base.
Third baseman - “Cover the base with your eyes”; get in a “Ready Position” to prepare for the throw.
Shortstop - SLOW down to field the ball; “(feet) Wide to Catch”. Then “Move Feet” FAST in a straight line toward the target and make an underhand toss. If the third baseman is
3. OBJECTIVES:
The pitcher builds a habit of sprinting to the base when they don’t field a ball hit in the infield; recognize when to back-up.
Third baseman “covers the base with their eyes”; shortstop learns to recognize those times they need to delay their
4 DRILL:
Coach rolls a ground ball 10’ to the shortstop’s right.
Shortstop -“(feet) Wide to Catch”, then “Move Your Feet (to throw)”, then follow their throw - “Follow your head”
Third Baseman - “Cover the base with your eyes”, gets in a “Ready Position”, “Moves Their Feet to Catch”, gets the “Ball First and the Base Second”. Then shuffle a couple of steps, in a ‘power Position’ towards ‘The middle of the infield’. “Looking for Other Runners” After finishing the play, rotate to the pitcher position. Underhand toss the ball in to the coach on the way.
Pitcher sprints toward third, sees the base is covered, breaks into foul ground as far beyond the base as there is room up to 20’ - 30’.
3b
P
(Coach)
SS

SET UP:
This drill is run immediately after the conclusion of the “Move feet to catch, move feet to throw”, Position Players Playing Catch aspect of the Playing Catch Practice. The players remain in their same formation. Have them use their ball caps as bases. Have all the players positioned on the same side of their base, so that when taking a throw from their partner they are ‘on the same side of the base from which the ball is being thrown’.
The player taking a throw is not only positioned on the side of their base, they move forward so that they are positioned just a few inches beyond the front of the base.
All players in one row have a ball; their partners in the other row do not have a ball. When the drill is run, all the players in one row throw at the same time on the coach’s command. The players in the other row receive throws and go through their foot-work. At the conclusion of the repetition all players on the receiving end hold the balls and wait for the coach ’s command to throw back.
DRILL:
The coach calls “Ready Position” to the row of players on the receiving end, then calls “Move your feet” to the players on the throwing end.
The receiving players “Move their feet to catch”, then move back to the base and make a tag on the ground in front of the base, then make a couple of shuffle steps straight out toward their partners in a “Power Position” “Looking for other runners”
OBJECTIVE: Drill footwork of throwing and catching, develop discipline to put a tag down in the path of a base runner ’s slide and to develop the habit to always “Look for other runners” following each play at a base.
————————————————————————————————————————————————————————
Below is a diagram of the player movements for the drill. At the conclusion of the drill repetition all six players on the receiving end should be about five feet in front of their base, in a power position, facing their partner. At the conclusion of the repetition the receiving players go back to their base and wait for the coach’s command to throw back to their partner. Run this drill down and back 2-4 times at which point the drill is concluded. This will take about 90 seconds. Note: not all kids will catch their throws. Have parent helpers and other coaches standing by to flip them a new ball, so they can complete the ‘tag’ and ‘power position’ aspect of the drill with their teammates.
Below is a diagram of how each of the six sets of playing catch partners line up in relation to the base they are standing next to.
Catch, Tag, Power Position (“Look for other runners”)

Mass Ground Balls and Fly Balls
v
v
v v
This drill involves three groups of four players; two groups working in the infield and one group in the outfield catching tossed fly balls (not shown). The group taking fly balls is angling back to catch, then using proper throwing footwork to throw the ball back into their coach. We want to focus our outfield work on going back on balls because the return throw to the coach requires a strong overhand throw. We run this drill after Playing Catch Practice, so the kids’ arms are warm We work toss drills with the players angling in during the Skill Building Warm-up because the return throw can be made using an underhand toss and does not require a warm arm. The Skill Building Warm-up takes place prior to Playing Catch Practice.
Below we show both groups of infielders taking ground balls at the same time. One group is throwing across to an adult at first base, the other group is throwing the balls they field directly back into the coach. In this example the Shortstop and First Baseman are throwing to first base. and the sec-ond and third basemen are throwing back in to their coach.
In this example it is critical that the second baseman are positioned very deep, so to not cross the path of the throws to first base made by the Short-stops. The Second Basemen must be constantly aware of where they are on the diamond and avoid the path of the throws from the Shortstops.
vv
v
v


![L19 [Acon] Esquema eléctrico](https://img.dokumen.tips/doc/110x75/62c49c06196c397f48663d8e/l19-acon-esquema-elctrico.jpg)