Embed Size (px)
Citation preview
How to Scan, Import & Index Documents in BDM Banner Document Management
Banner Document Management (BDM)
How to Scan, Import & Index Documents in BDM
1

How to Scan, Import & Index Documents in BDM Banner Document Management
This “How To…” guide provides an introduction to the processes of scanning and importing documents for the purpose of indexing them in BDM. These processes, as described in this guide, are manual processes carried out by privileged users. There are also automated processes that can be used to import and index documents into BDM that are not included in this guide.
2
How to Scan, Import & Index Documents in BDM Banner Document Management
Table of Contents
1. Scanning Documents 4 1.1 Batch Method 4
1.2 New Document Method 9 1.3 Scanning to PDF Method 12
2. Importing Documents 13 2.1 Batch Method 13
2.2 New Document Method 15 2.3 Importing Screen Captures 17
3. Indexing Documents 19 3.1 Indexing a Batch 19
3.2 Indexing a New Document 26
3
How to Scan, Import & Index Documents in BDM Banner Document Management
1. Scanning Documents
The scanning of paper documents into BDM can only be carried out by users that have been granted the appropriate privileges. Being granted these privileges will provide them the secured access they need in BDM as well as the required toolbars and functions in the Interactive Viewer.
To scan documents, the user must be working at a PC that allows them to access both WebXtender and a scanner. The scanner must be connected to the PC the user is working from and that scanner must be supported by ISIS drivers that have been installed on the PC. When the scanner is properly configured for the PC, the Interactive Viewer in WebXtender will detect it and allow the user to scan through WebXtender directly. For more information on setting up PCs for BDM use refer to BDM Support Guide for Functional Units.
Notes: • It is the responsibility of the BDM account holder to ensure that the scanning process
captures all information on the document. • Image Quality is acceptable when all information on the original document has been
captured, text is clear and legible, and image is presented in the correct orientation on screen.
• Standards for scanning are outlined in the BDM Support Guide for Functional Units.
1.1 Batch Method
This method is to be used and favored when scanning multiple documents together as a set but they need to be indexed separately. Example, you are scanning a set of transcripts that belong to different students. You scan them all into a batch as a collection but then when you open the batch you index each transcript separately. This method is also useful when documents are being scanned in bulk knowing that they will be indexed at a later date or time.
1. Follow the steps for Launching WebXtender through Direct Login in the guide How
to Launch WebXtender for BDM. These steps will walk you through opening WebXtender from outside Banner. WebXtender will open to display the Application List page.
2. On the Application List page locate and click the Batch Import button in the toolbar to start the process of creating a new batch for scanning multiple documents.
4
How to Scan, Import & Index Documents in BDM Banner Document Management
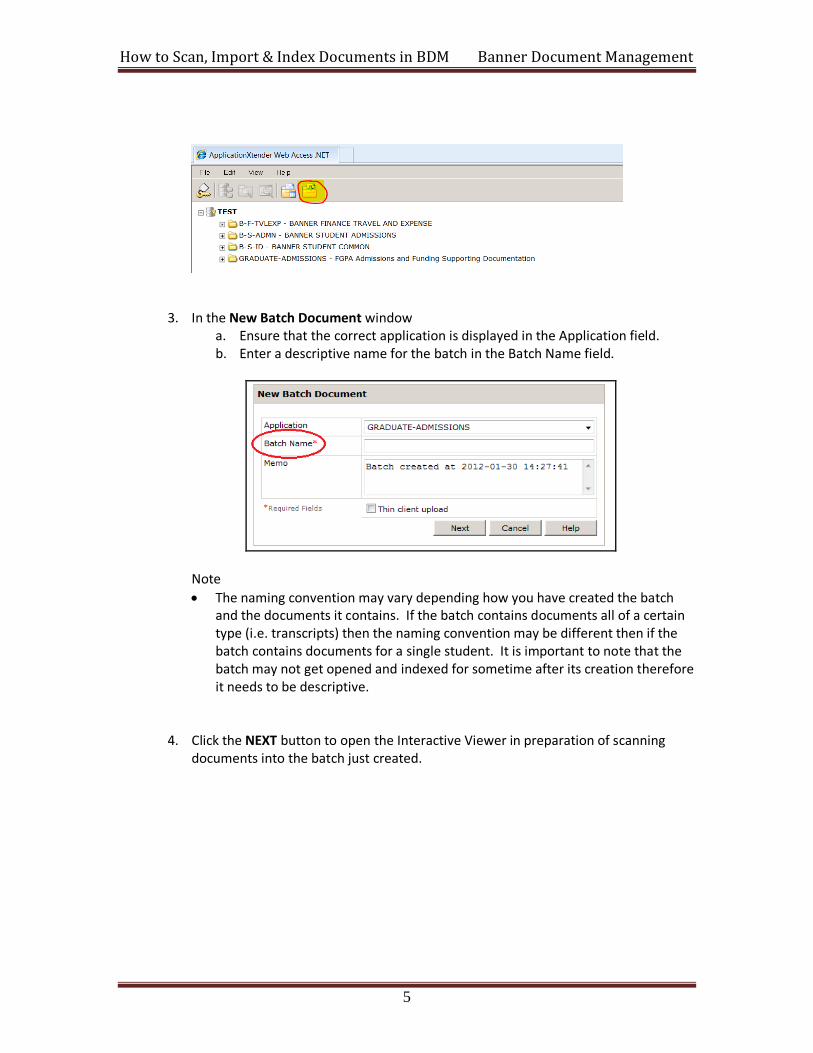
3. In the New Batch Document window a. Ensure that the correct application is displayed in the Application field. b. Enter a descriptive name for the batch in the Batch Name field.
Note • The naming convention may vary depending how you have created the batch
and the documents it contains. If the batch contains documents all of a certain type (i.e. transcripts) then the naming convention may be different then if the batch contains documents for a single student. It is important to note that the batch may not get opened and indexed for sometime after its creation therefore it needs to be descriptive.
4. Click the NEXT button to open the Interactive Viewer in preparation of scanning documents into the batch just created.
5
How to Scan, Import & Index Documents in BDM Banner Document Management
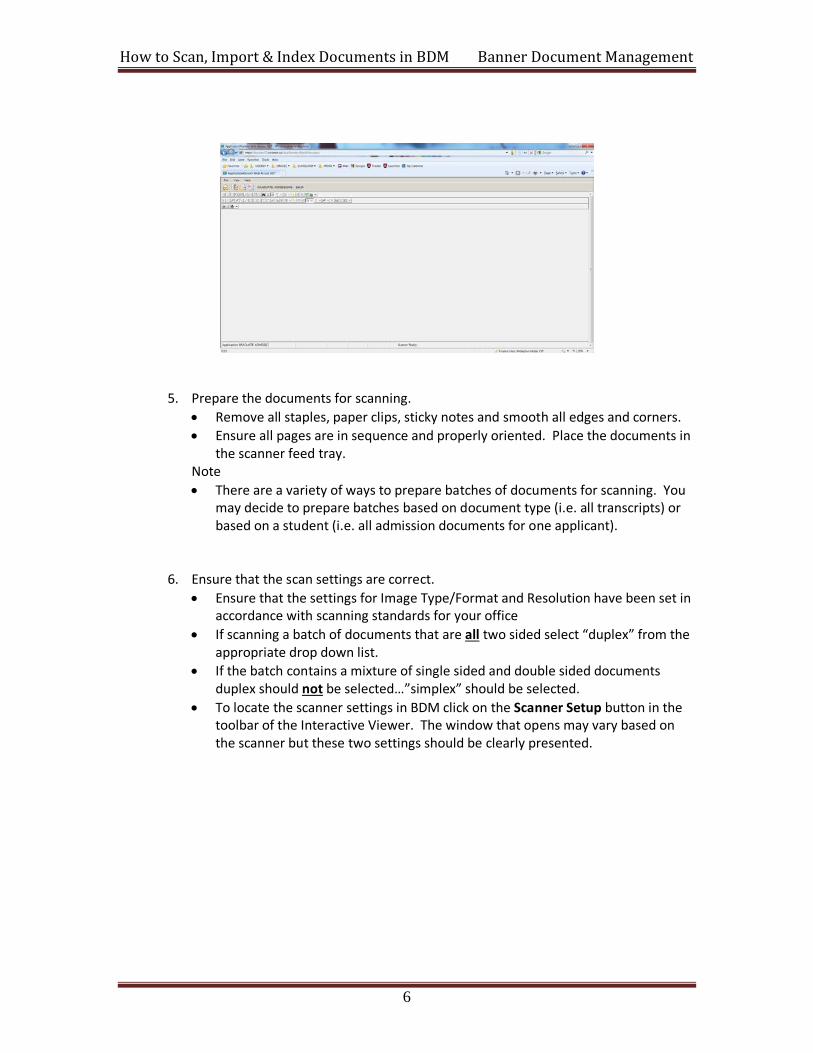
5. Prepare the documents for scanning. • Remove all staples, paper clips, sticky notes and smooth all edges and corners. • Ensure all pages are in sequence and properly oriented. Place the documents in
the scanner feed tray. Note • There are a variety of ways to prepare batches of documents for scanning. You
may decide to prepare batches based on document type (i.e. all transcripts) or based on a student (i.e. all admission documents for one applicant).
6. Ensure that the scan settings are correct. • Ensure that the settings for Image Type/Format and Resolution have been set in
accordance with scanning standards for your office • If scanning a batch of documents that are all two sided select “duplex” from the
appropriate drop down list. • If the batch contains a mixture of single sided and double sided documents
duplex should not be selected…”simplex” should be selected. • To locate the scanner settings in BDM click on the Scanner Setup button in the
toolbar of the Interactive Viewer. The window that opens may vary based on the scanner but these two settings should be clearly presented.
6
How to Scan, Import & Index Documents in BDM Banner Document Management
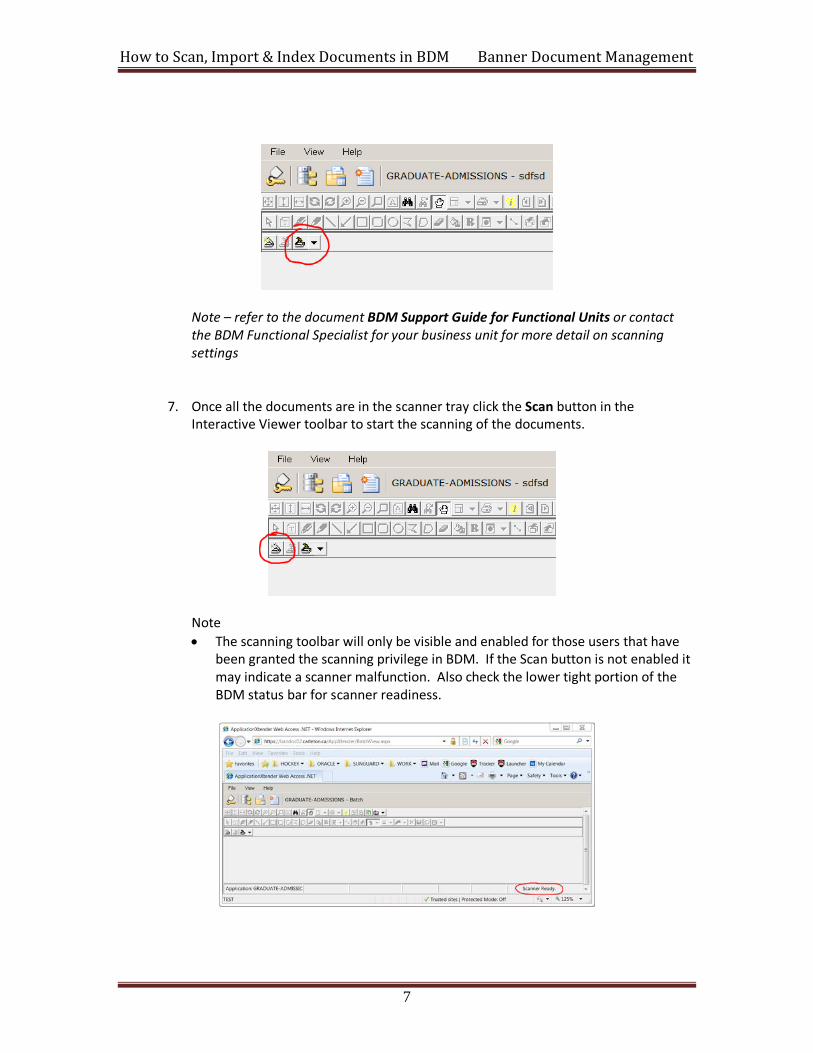
Note – refer to the document BDM Support Guide for Functional Units or contact the BDM Functional Specialist for your business unit for more detail on scanning settings
7. Once all the documents are in the scanner tray click the Scan button in the Interactive Viewer toolbar to start the scanning of the documents.
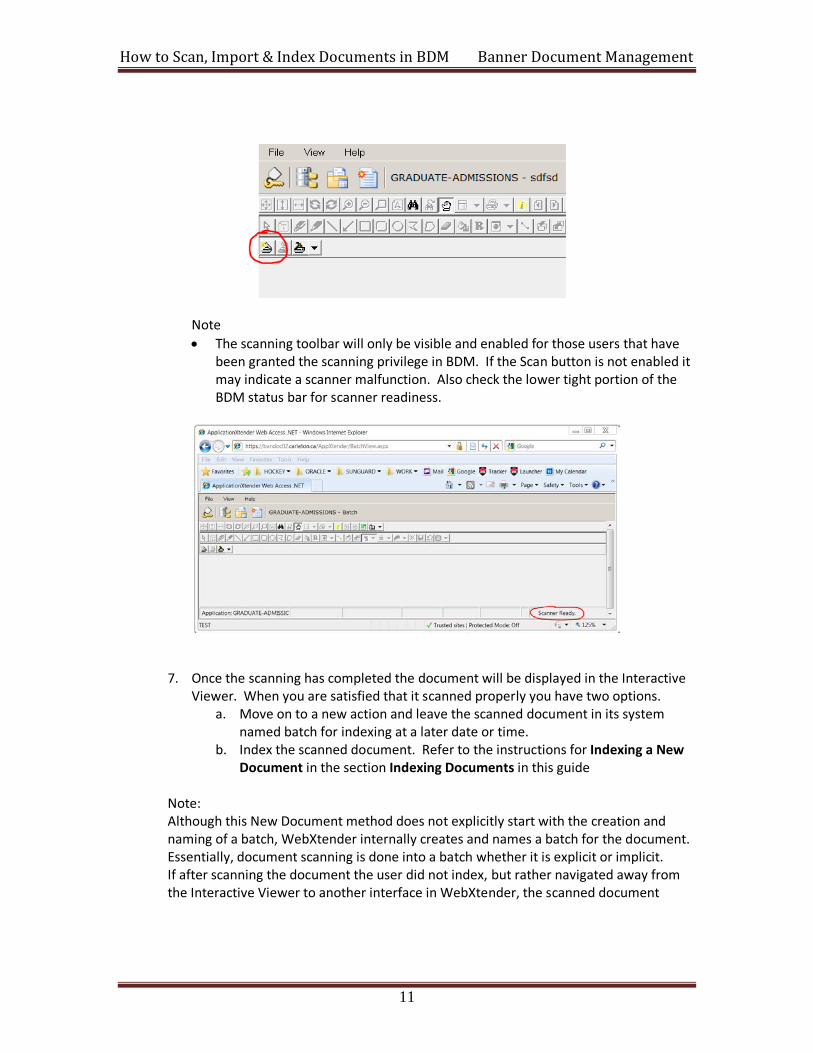
Note • The scanning toolbar will only be visible and enabled for those users that have
been granted the scanning privilege in BDM. If the Scan button is not enabled it may indicate a scanner malfunction. Also check the lower tight portion of the BDM status bar for scanner readiness.
7
How to Scan, Import & Index Documents in BDM Banner Document Management
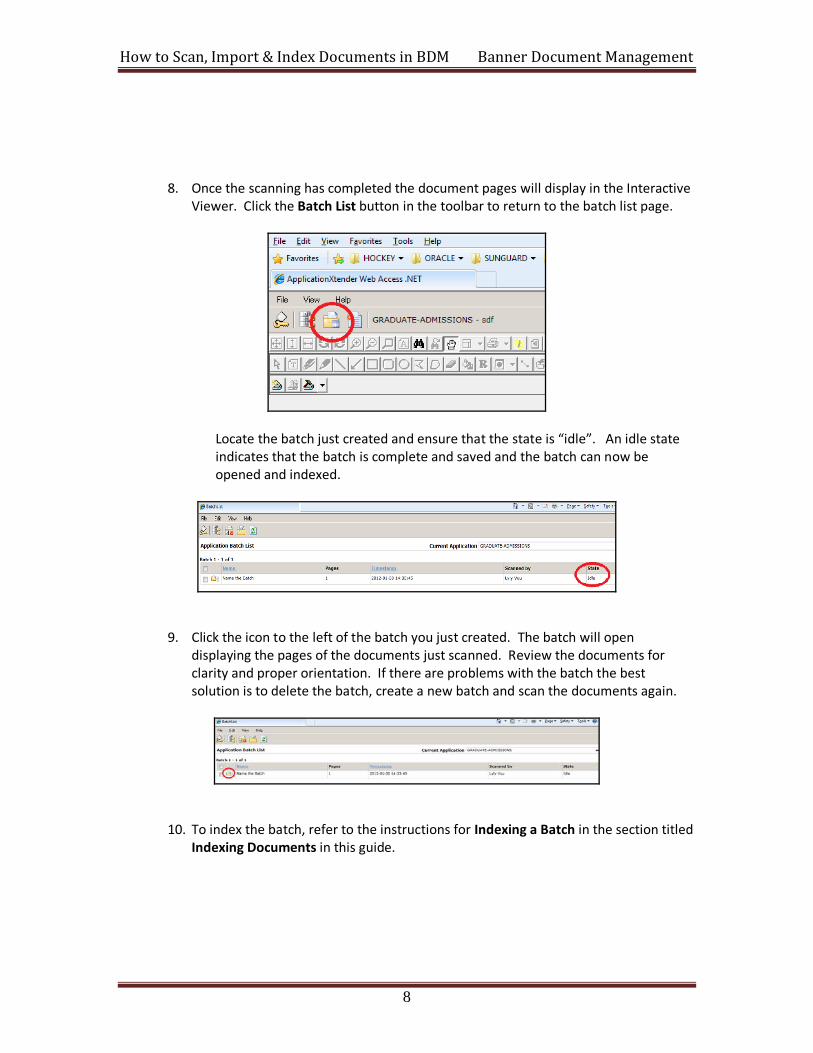
8. Once the scanning has completed the document pages will display in the Interactive Viewer. Click the Batch List button in the toolbar to return to the batch list page.
Locate the batch just created and ensure that the state is “idle”. An idle state indicates that the batch is complete and saved and the batch can now be opened and indexed.
9. Click the icon to the left of the batch you just created. The batch will open displaying the pages of the documents just scanned. Review the documents for clarity and proper orientation. If there are problems with the batch the best solution is to delete the batch, create a new batch and scan the documents again.
10. To index the batch, refer to the instructions for Indexing a Batch in the section titled Indexing Documents in this guide.
8
How to Scan, Import & Index Documents in BDM Banner Document Management
1.2 New Document Method
This method is used and favored when scanning a single document where all the pages belong together and will be indexed as a set under a single document type. Using this method WebXtender will automatically treat all the pages as belonging to the document. Thus you will be prevented from indexing the pages separately as you can when using the batch method. This is also a good method when the document needs to be indexed right away.
1. Follow the steps for Launching WebXtender through Direct Login in the guide How
to Launch WebXtender for BDM. These steps will walk you through opening WebXtender from outside Banner. WebXtender will open to display the Application List page.
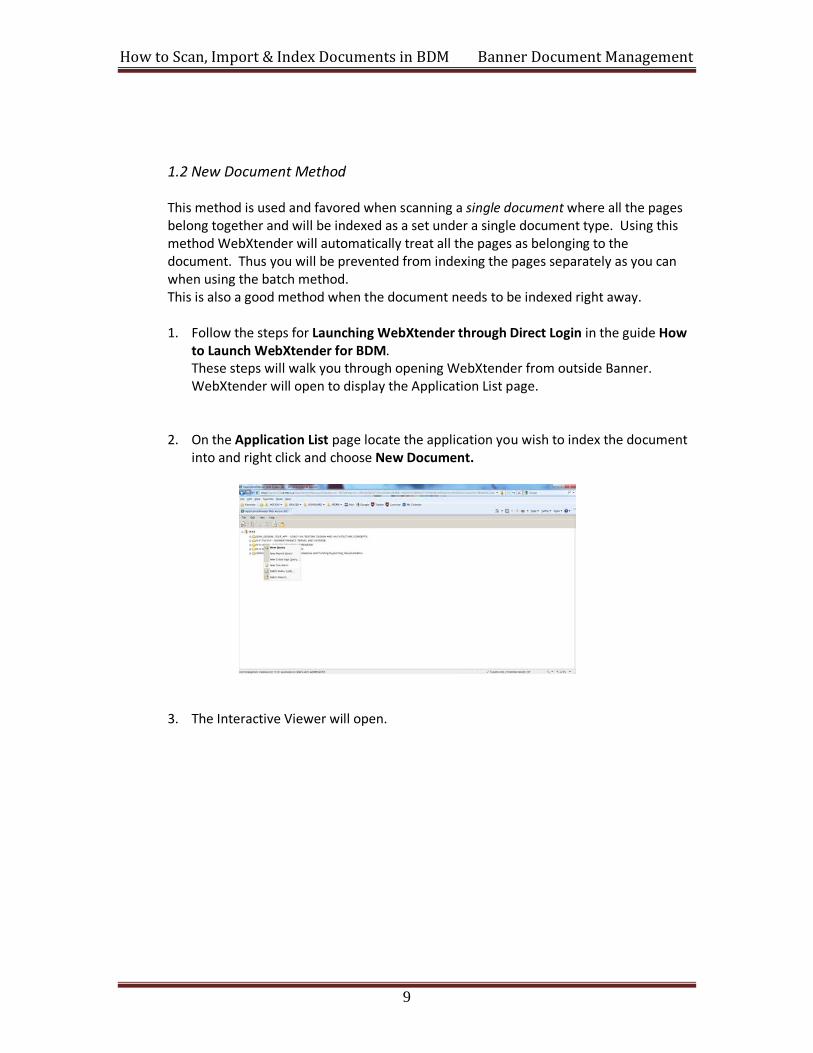
2. On the Application List page locate the application you wish to index the document into and right click and choose New Document.
3. The Interactive Viewer will open.
9
How to Scan, Import & Index Documents in BDM Banner Document Management
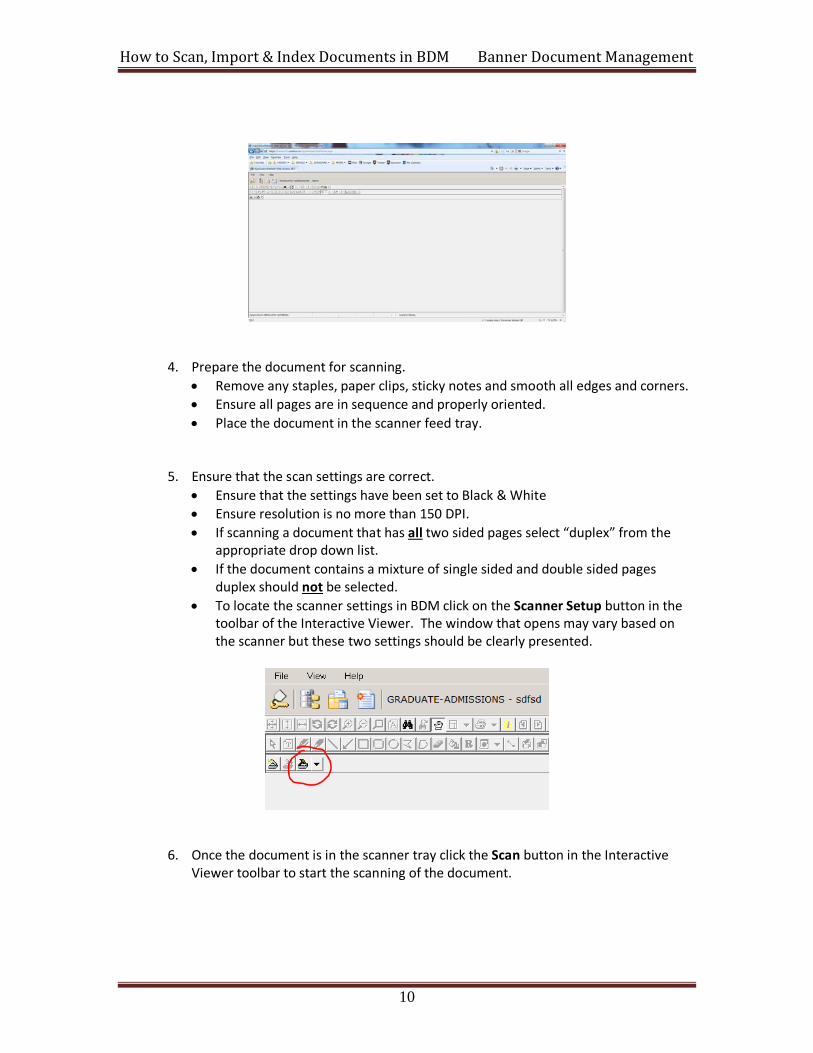
4. Prepare the document for scanning. • Remove any staples, paper clips, sticky notes and smooth all edges and corners. • Ensure all pages are in sequence and properly oriented. • Place the document in the scanner feed tray.
5. Ensure that the scan settings are correct. • Ensure that the settings have been set to Black & White • Ensure resolution is no more than 150 DPI. • If scanning a document that has all two sided pages select “duplex” from the
appropriate drop down list. • If the document contains a mixture of single sided and double sided pages
duplex should not be selected. • To locate the scanner settings in BDM click on the Scanner Setup button in the
toolbar of the Interactive Viewer. The window that opens may vary based on the scanner but these two settings should be clearly presented.
6. Once the document is in the scanner tray click the Scan button in the Interactive Viewer toolbar to start the scanning of the document.
10
How to Scan, Import & Index Documents in BDM Banner Document Management
Note • The scanning toolbar will only be visible and enabled for those users that have
been granted the scanning privilege in BDM. If the Scan button is not enabled it may indicate a scanner malfunction. Also check the lower tight portion of the BDM status bar for scanner readiness.
7. Once the scanning has completed the document will be displayed in the Interactive Viewer. When you are satisfied that it scanned properly you have two options.
a. Move on to a new action and leave the scanned document in its system named batch for indexing at a later date or time.
b. Index the scanned document. Refer to the instructions for Indexing a New Document in the section Indexing Documents in this guide
Note: Although this New Document method does not explicitly start with the creation and naming of a batch, WebXtender internally creates and names a batch for the document. Essentially, document scanning is done into a batch whether it is explicit or implicit. If after scanning the document the user did not index, but rather navigated away from the Interactive Viewer to another interface in WebXtender, the scanned document
11
How to Scan, Import & Index Documents in BDM Banner Document Management
would be retained in a batch. If the user opened the Batch List page they would see the batch in the list, named using the username of the user and the date and time that the batch was created.
1.3 Scanning to PDF Method
Both of the above methods involve the use of WebXtender as the scanning interface. The one limitation to WebXtender is that it will only scan to TIF, BMP and JPEG image formats. It will not scan to PDF.
If you are following a “PDF Only” standard for documents in BDM then scanning paper documents to electronic format will need to be done through some interface other than WebXtender. WebXtender will still be used for the importing and/or indexing of the scanned documents.
Essentially the process will require two steps:
1. Scan the paper document(s) to PDF and save the PDF to the PC 2. Open WebXtender and import the PDF for indexing following the steps in the
next section
For more detail on creating PDFs from scanned paper documents please refer to the document How to Create PDFs for BDM.
12
How to Scan, Import & Index Documents in BDM Banner Document Management
2. Importing Documents
When a user has a document in electronic format on their PC there is no need to print and scan it for the purpose of adding it to BDM. WebXtender provides users the ability to import documents one at a time into a batch in preparation of indexing.
The importing of documents into BDM can only be carried out by users that have been granted the appropriate privileges. Being granted these privileges will provide them the secured access they need in BDM as well as the required toolbars and functions in the Interactive Viewer.
To import documents, the user must be working at a PC that has access to the document(s) and WebXtender. Having a connected scanner is not a requirement for importing.
Note: • Importing is a good method for dealing with documents emailed as attachments that
need to be indexed as standalone documents • Importing can be used to handle electronic documents that arrive as feeds, downloads
or as a result of internal processes that dump data from Banner into electronic files • Importing should be done one document at a time. You can import multiple documents
into the batch but they have to be done one at time. • If your business office is following a DPF only standard then any electronic document
not already in PDF or PDF/A format will need to be converted. For more detail refer to the document How to Create PDFs for BDM.
2.1 Batch Method
This method is to be used and favored when importing multiple documents together as a set but they need to be indexed separately. Example, you are indexing a set of transcripts that belong to different students. You import them all into a batch as a collection but then when you open the batch you index each transcript separately. This method is also useful when documents are being imported in bulk as batches knowing that they will be indexed at a later date or time.
1. Follow steps 1 – 4 in the above “Batch Method” instructions for scanning documents. These steps will create a named batch in preparation for importing.
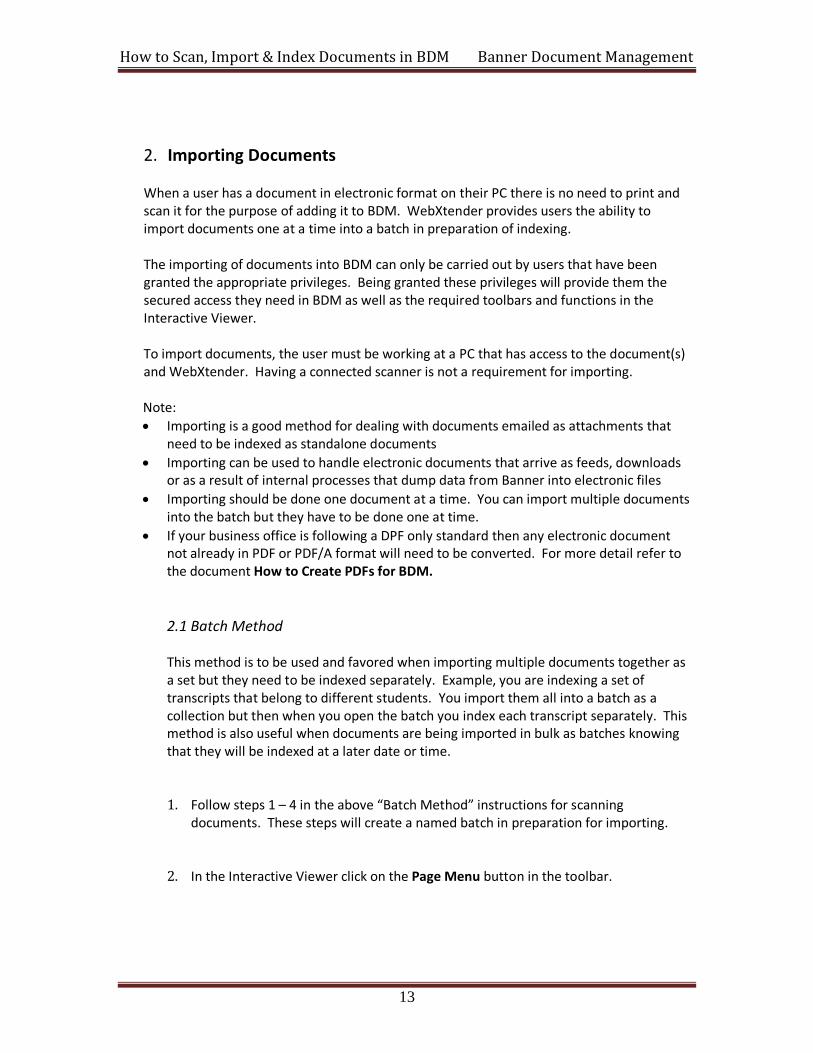
2. In the Interactive Viewer click on the Page Menu button in the toolbar.
13

How to Scan, Import & Index Documents in BDM Banner Document Management
When the button is clicked a menu will expand off the button. Select: New Page -> Import File -> Append
This may seem confusing as you are not really appending the document to anything at this stage. Selecting this option will allow you to browse your PC and network drives for the document you are importing and add it to the batch.
3. The imported document will display in the Interactive Viewer. Using Previous Page and Next Page buttons in the Interactive Viewer toolbar, scroll through the pages to ensure that they are clear and properly oriented. If there are any problems navigate to the Batch List page and delete the batch and start over.
4. Repeat step #2 to import subsequent document.
Now that you have imported the first document, subsequent imports represent “appends” to the existing pages that you have already imported.
5. When you have completd importing all documents click the Batch List button in the toolbar to navigate to the Batch List page.
14
How to Scan, Import & Index Documents in BDM Banner Document Management
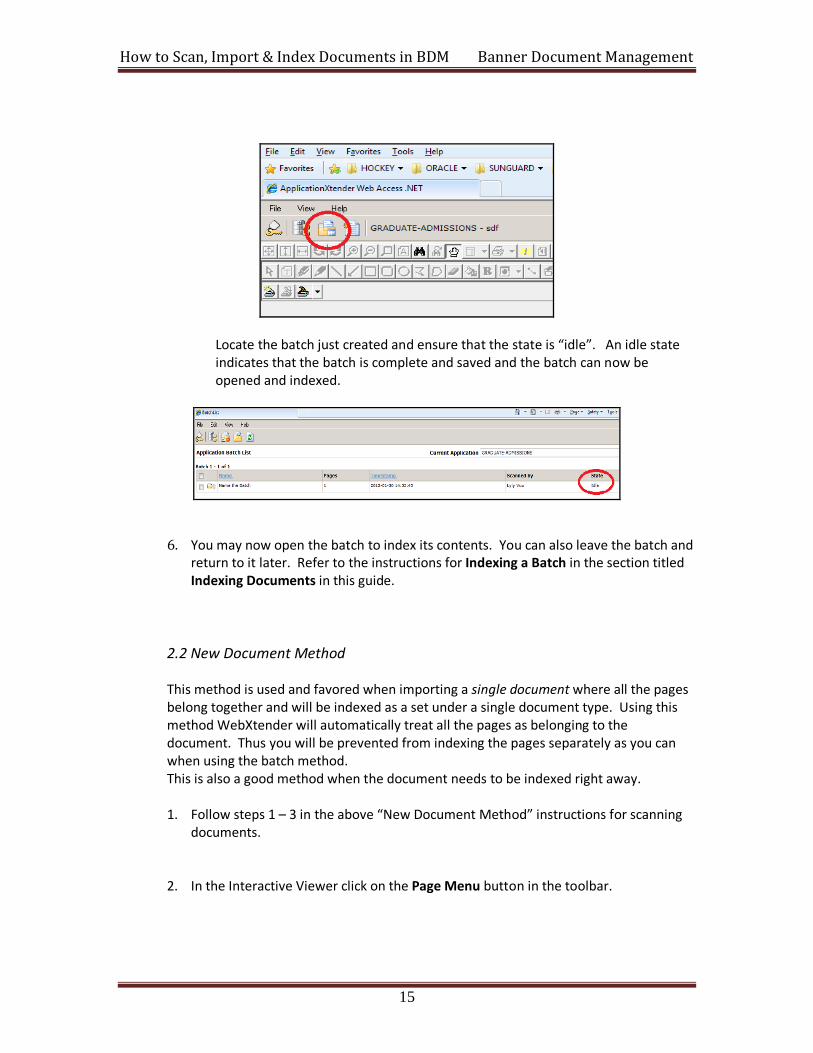
Locate the batch just created and ensure that the state is “idle”. An idle state indicates that the batch is complete and saved and the batch can now be opened and indexed.
6. You may now open the batch to index its contents. You can also leave the batch and return to it later. Refer to the instructions for Indexing a Batch in the section titled Indexing Documents in this guide.
2.2 New Document Method
This method is used and favored when importing a single document where all the pages belong together and will be indexed as a set under a single document type. Using this method WebXtender will automatically treat all the pages as belonging to the document. Thus you will be prevented from indexing the pages separately as you can when using the batch method. This is also a good method when the document needs to be indexed right away.
1. Follow steps 1 – 3 in the above “New Document Method” instructions for scanning
documents.
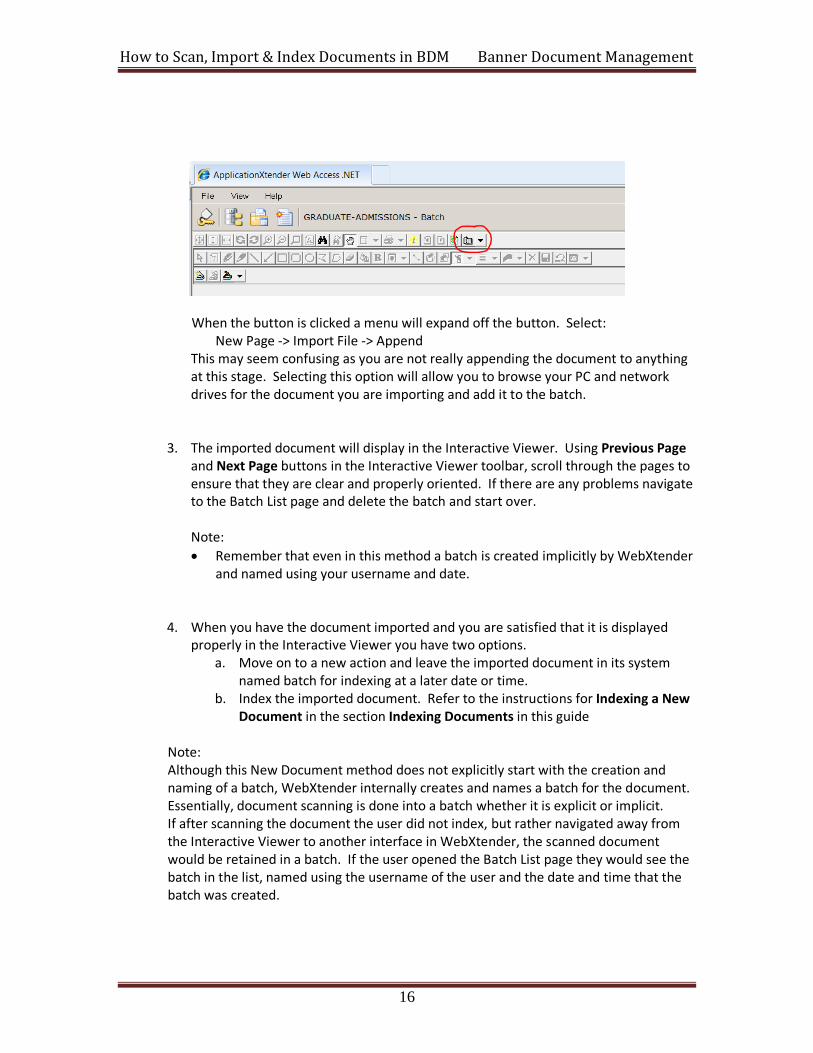
2. In the Interactive Viewer click on the Page Menu button in the toolbar.
15
How to Scan, Import & Index Documents in BDM Banner Document Management
When the button is clicked a menu will expand off the button. Select: New Page -> Import File -> Append
This may seem confusing as you are not really appending the document to anything at this stage. Selecting this option will allow you to browse your PC and network drives for the document you are importing and add it to the batch.
3. The imported document will display in the Interactive Viewer. Using Previous Page and Next Page buttons in the Interactive Viewer toolbar, scroll through the pages to ensure that they are clear and properly oriented. If there are any problems navigate to the Batch List page and delete the batch and start over. Note: • Remember that even in this method a batch is created implicitly by WebXtender
and named using your username and date.
4. When you have the document imported and you are satisfied that it is displayed properly in the Interactive Viewer you have two options.
a. Move on to a new action and leave the imported document in its system named batch for indexing at a later date or time.
b. Index the imported document. Refer to the instructions for Indexing a New Document in the section Indexing Documents in this guide
Note: Although this New Document method does not explicitly start with the creation and naming of a batch, WebXtender internally creates and names a batch for the document. Essentially, document scanning is done into a batch whether it is explicit or implicit. If after scanning the document the user did not index, but rather navigated away from the Interactive Viewer to another interface in WebXtender, the scanned document would be retained in a batch. If the user opened the Batch List page they would see the batch in the list, named using the username of the user and the date and time that the batch was created.
16
How to Scan, Import & Index Documents in BDM Banner Document Management
2.3 Importing Screen Captures
A screen capture is simply a single document in image format (i.e. JPEG, TIFF, etc.) that you created from a screen on your PC. A good example would be a screen capture of a Banner form showing data for a particular student, applicant or person.
These screen captures can be imported into WebXtender in one of two ways:
1. As an electronic document on your PC 2. Directly into WebXtender as a pasted image
To take a screen capture of any screen on your PC you simply place the focus on that screen and press Alt + PrtScn on your keyboard. This action takes a snapshot of that screen and saves it in your PC’s clipboard. You can then paste the contents of the clipboard to some image editing software as follows:
• Open the image editing software…MS Paint is easiest. • In the area of that software for creating a new image paste the contents of the
clipboard. This can be typically done by pressing Ctrl + V on your keyboard or right clicking in the image design area and choosing paste from the popup menu.
• Once you see the image in the design area save that image to your PC as an image file. Save as JPEG as it will produce the smallest file size.
• Before saving you should resize the image to reduce its size. This will help ensure that the saved image file is smaller.
Once you have saved the screen capture to your PC as an image file you can then import it into WebXtender and index it following the importing and indexing instructions in this guide.
The alternative method of importing the screen capture is to paste it directly into WebXtender. This is a quicker method and saves you having to work with image editing software and saving the image to your PC.
Once you have the screen capture in your clipboard as a result of the Alt + PrtScn keyboard combination open WebXtender and follow the New Document method of importing as outlined above. Once you have the interactive viewer open click on the Page Menu button in the toolbar.
17
How to Scan, Import & Index Documents in BDM Banner Document Management
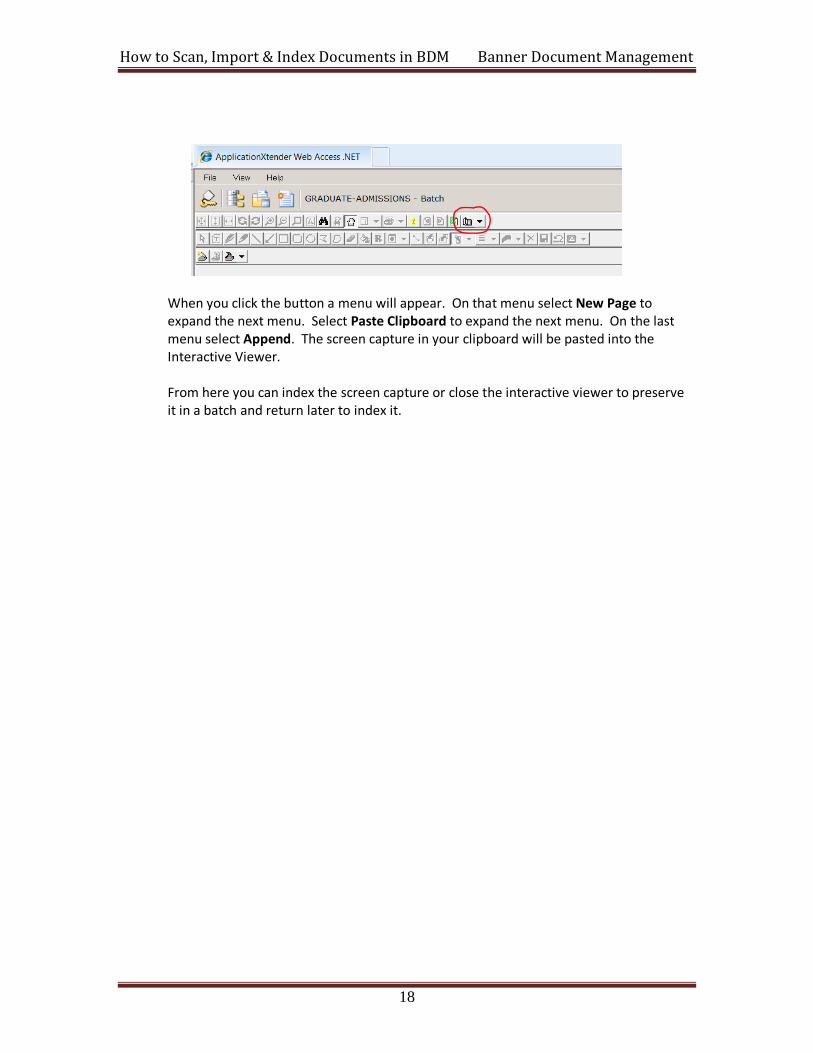
When you click the button a menu will appear. On that menu select New Page to expand the next menu. Select Paste Clipboard to expand the next menu. On the last menu select Append. The screen capture in your clipboard will be pasted into the Interactive Viewer.
From here you can index the screen capture or close the interactive viewer to preserve it in a batch and return later to index it.
18

How to Scan, Import & Index Documents in BDM Banner Document Management
3. Indexing Documents
Scanning and importing are the first steps in storing documents in BDM. Indexing is the final step, the step that files the document in the system and makes it available to users.
Only users that have been granted the appropriate privilege can index documents in BDM using WebXtender. The privilege of indexing can be separated from the privilege of scanning and importing. Indexing is considered the higher privilege of the three.
As indicated in the previous sections, indexing can be done at the time of scanning or importing documents or after the fact by opening batches and processing the documents within them. Regardless of when or how indexing is initiated the process is the same and WebXtender provides the tools and functions to make the process as easy as possible for users.
3.1 Indexing a Batch
1. Follow the steps for Launching WebXtender through Direct Login in the guide How to Launch WebXtender for BDM. These steps will walk you through opening WebXtender from outside Banner. WebXtender will open to display the Application List page.
2. From the Application List page click the Batch List button in the toolbar to display the list of batches in BDM.
3. On the Batch List page ensure that the Current Application field is displaying the application that the batch belongs to. Remember – when you created the batch you had to create it within an application.
19
How to Scan, Import & Index Documents in BDM Banner Document Management
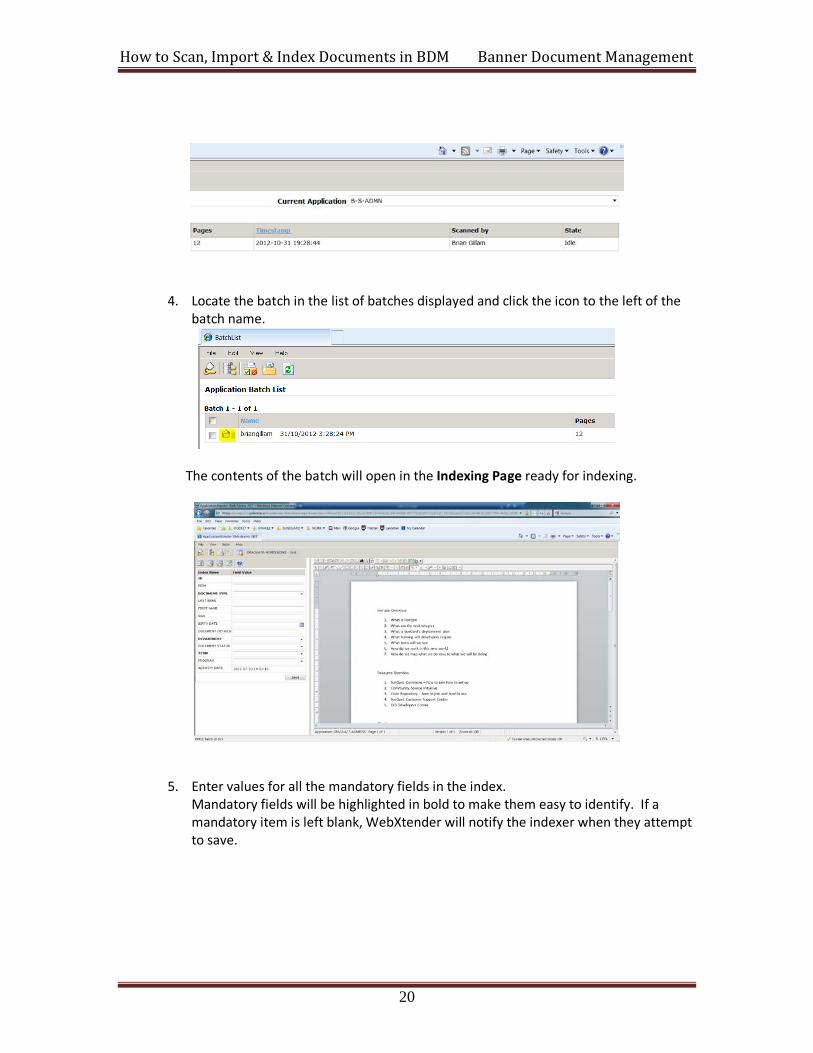
4. Locate the batch in the list of batches displayed and click the icon to the left of the batch name.
The contents of the batch will open in the Indexing Page ready for indexing.
5. Enter values for all the mandatory fields in the index. Mandatory fields will be highlighted in bold to make them easy to identify. If a mandatory item is left blank, WebXtender will notify the indexer when they attempt to save.
20
How to Scan, Import & Index Documents in BDM Banner Document Management
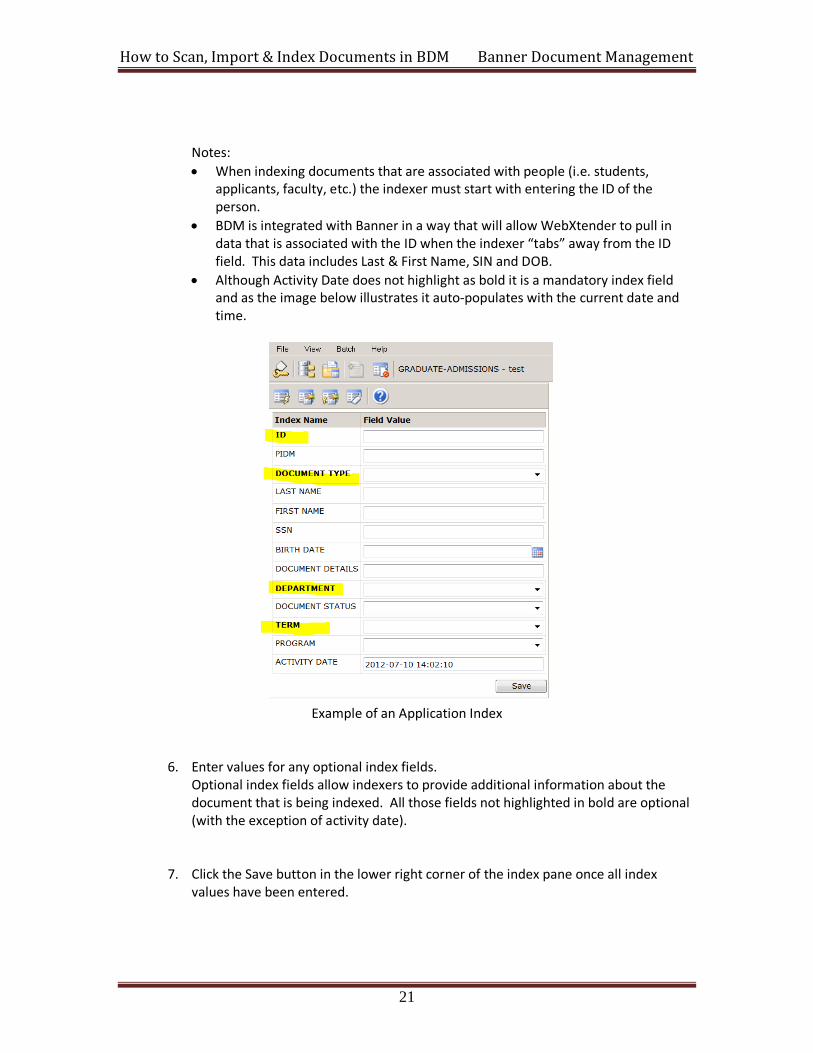
Notes: • When indexing documents that are associated with people (i.e. students,
applicants, faculty, etc.) the indexer must start with entering the ID of the person.
• BDM is integrated with Banner in a way that will allow WebXtender to pull in data that is associated with the ID when the indexer “tabs” away from the ID field. This data includes Last & First Name, SIN and DOB.
• Although Activity Date does not highlight as bold it is a mandatory index field and as the image below illustrates it auto-populates with the current date and time.
Example of an Application Index
6. Enter values for any optional index fields. Optional index fields allow indexers to provide additional information about the document that is being indexed. All those fields not highlighted in bold are optional (with the exception of activity date).
7. Click the Save button in the lower right corner of the index pane once all index values have been entered.
21
How to Scan, Import & Index Documents in BDM Banner Document Management
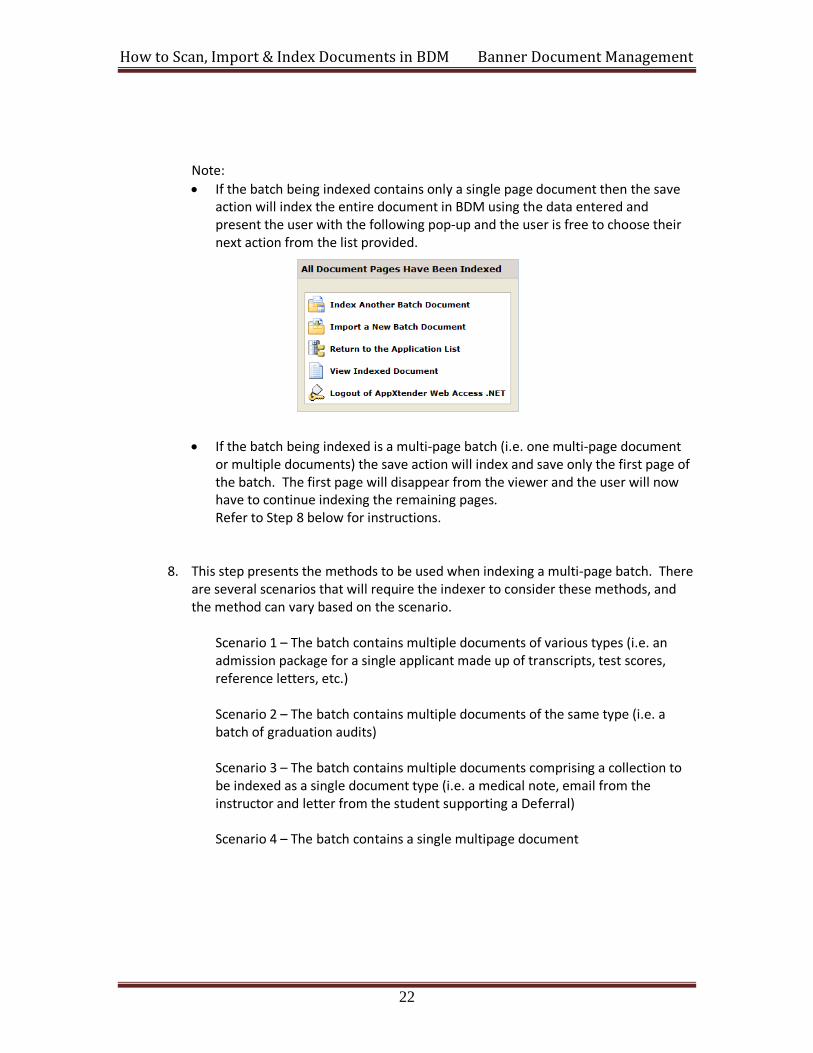
Note: • If the batch being indexed contains only a single page document then the save
action will index the entire document in BDM using the data entered and present the user with the following pop-up and the user is free to choose their next action from the list provided.
• If the batch being indexed is a multi-page batch (i.e. one multi-page document or multiple documents) the save action will index and save only the first page of the batch. The first page will disappear from the viewer and the user will now have to continue indexing the remaining pages. Refer to Step 8 below for instructions.
8. This step presents the methods to be used when indexing a multi-page batch. There are several scenarios that will require the indexer to consider these methods, and the method can vary based on the scenario.
Scenario 1 – The batch contains multiple documents of various types (i.e. an admission package for a single applicant made up of transcripts, test scores, reference letters, etc.) Scenario 2 – The batch contains multiple documents of the same type (i.e. a batch of graduation audits) Scenario 3 – The batch contains multiple documents comprising a collection to be indexed as a single document type (i.e. a medical note, email from the instructor and letter from the student supporting a Deferral) Scenario 4 – The batch contains a single multipage document
22
How to Scan, Import & Index Documents in BDM Banner Document Management
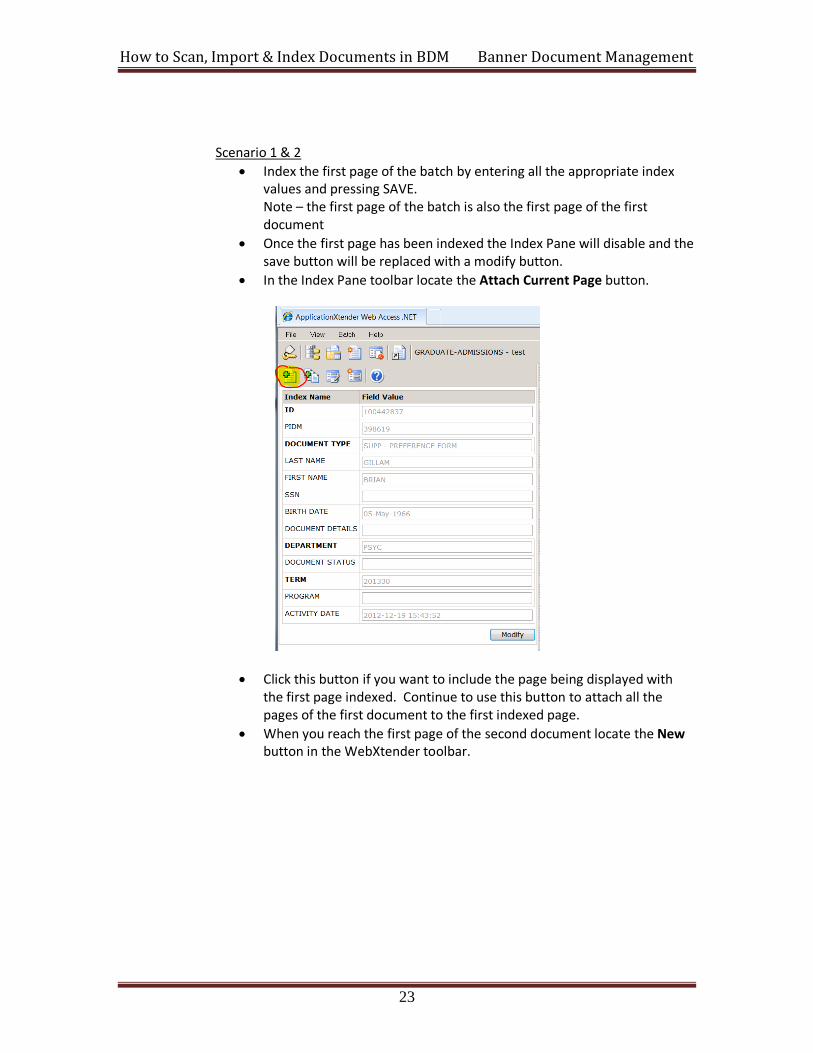
Scenario 1 & 2 • Index the first page of the batch by entering all the appropriate index
values and pressing SAVE. Note – the first page of the batch is also the first page of the first document
• Once the first page has been indexed the Index Pane will disable and the save button will be replaced with a modify button.
• In the Index Pane toolbar locate the Attach Current Page button.
• Click this button if you want to include the page being displayed with the first page indexed. Continue to use this button to attach all the pages of the first document to the first indexed page.
• When you reach the first page of the second document locate the New button in the WebXtender toolbar.
23
How to Scan, Import & Index Documents in BDM Banner Document Management
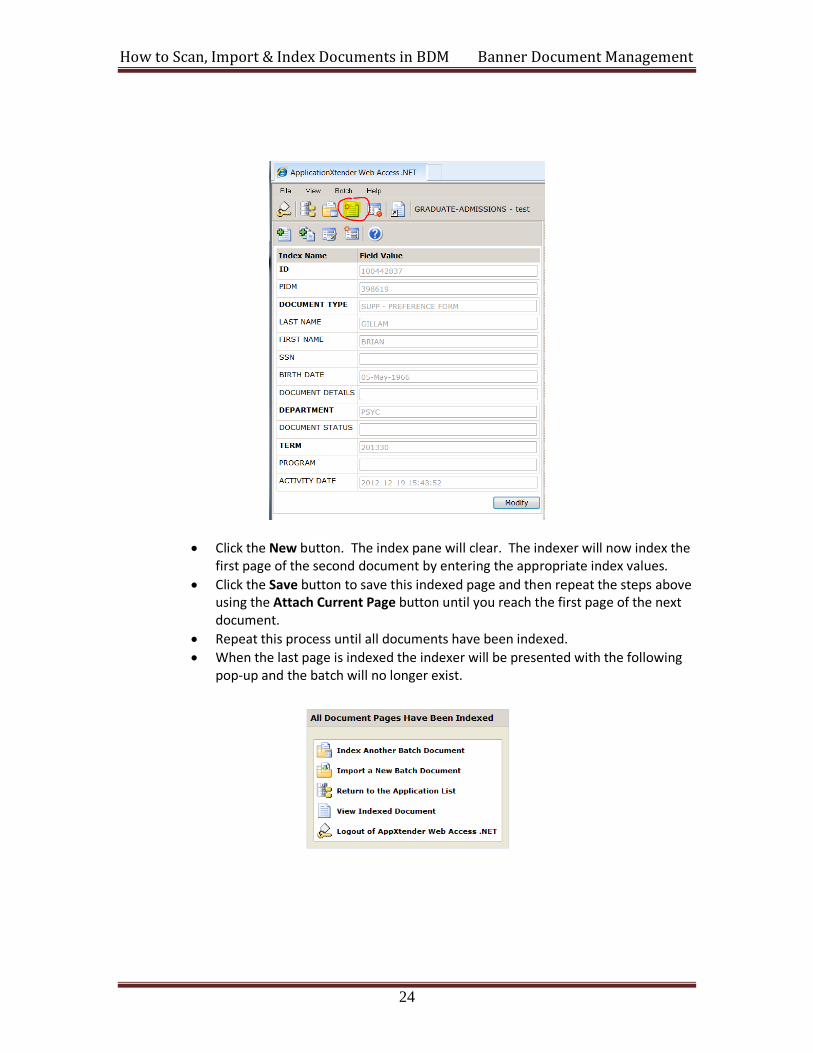
• Click the New button. The index pane will clear. The indexer will now index the first page of the second document by entering the appropriate index values.
• Click the Save button to save this indexed page and then repeat the steps above using the Attach Current Page button until you reach the first page of the next document.
• Repeat this process until all documents have been indexed. • When the last page is indexed the indexer will be presented with the following
pop-up and the batch will no longer exist.
24
How to Scan, Import & Index Documents in BDM Banner Document Management
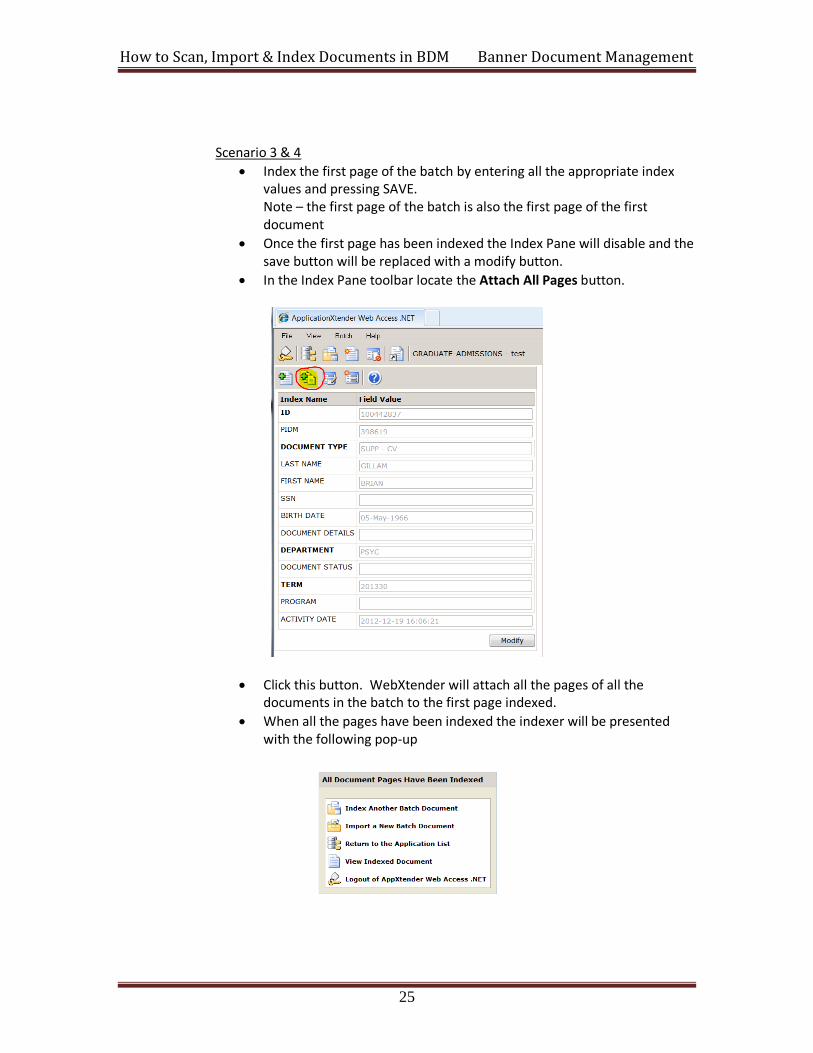
Scenario 3 & 4 • Index the first page of the batch by entering all the appropriate index
values and pressing SAVE. Note – the first page of the batch is also the first page of the first document
• Once the first page has been indexed the Index Pane will disable and the save button will be replaced with a modify button.
• In the Index Pane toolbar locate the Attach All Pages button.
• Click this button. WebXtender will attach all the pages of all the documents in the batch to the first page indexed.
• When all the pages have been indexed the indexer will be presented with the following pop-up
25
How to Scan, Import & Index Documents in BDM Banner Document Management
3.2 Indexing a New Document
1. Follow the steps for Launching WebXtender through Direct Login in the guide How
to Launch WebXtender for BDM. These steps will walk you through opening WebXtender from outside Banner. WebXtender will open to display the Application List page.
2. Follow the steps for scanning or importing using the New Document method.
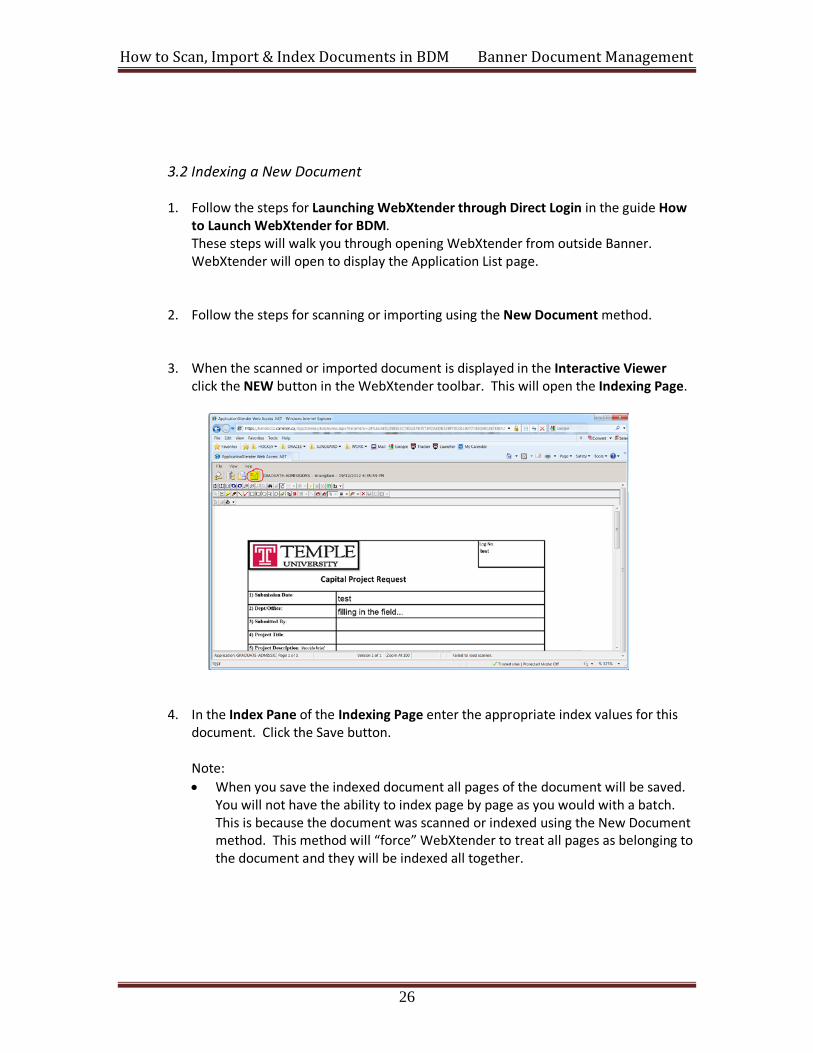
3. When the scanned or imported document is displayed in the Interactive Viewer click the NEW button in the WebXtender toolbar. This will open the Indexing Page.
4. In the Index Pane of the Indexing Page enter the appropriate index values for this document. Click the Save button.
Note: • When you save the indexed document all pages of the document will be saved.
You will not have the ability to index page by page as you would with a batch. This is because the document was scanned or indexed using the New Document method. This method will “force” WebXtender to treat all pages as belonging to the document and they will be indexed all together.
26