Embed Size (px)
Citation preview

© 2011 Treasury Software
Bank Reconciliation

Bank Reconciliation
by Treasury Software

All rights reserved. No parts of this work may be reproduced in any form or by any means - graphic, electronic, ormechanical, including photocopying, recording, taping, or information storage and retrieval systems - without thewritten permission of the publisher.
Products that are referred to in this document may be either trademarks and/or registered trademarks of therespective owners. The publisher and the author make no claim to these trademarks.
While every precaution has been taken in the preparation of this document, the publisher and the author assume noresponsibility for errors or omissions, or for damages resulting from the use of information contained in thisdocument or from the use of programs and source code that may accompany it. In no event shall the publisher andthe author be liable for any loss of profit or any other commercial damage caused or alleged to have been causeddirectly or indirectly by this document.
Printed: May 2011 in Richmond, VA
Bank Reconciliation
© 2011 Treasury Software

Bank ReconciliationI
© 2011 Treasury Software
Table of Contents
Foreword 0
Part I Getting Started - Bank Reconciliation 1
................................................................................................................................... 11 Download and Install
................................................................................................................................... 12 Create and Setup Accounts
................................................................................................................................... 33 Import GL Data
................................................................................................................................... 94 Import Bank Data
................................................................................................................................... 155 Run Automated Transaction Matching
Part II Imports 18
................................................................................................................................... 191 Importing Bank Data
................................................................................................................................... 232 Importing General Ledger Data
................................................................................................................................... 263 Entering Data Manually
................................................................................................................................... 274 Deleting a record
................................................................................................................................... 295 Deleting an import
Part III Mapping Your Data 31
................................................................................................................................... 321 Deciding What to Map
................................................................................................................................... 332 Selecting fields to represent amount
................................................................................................................................... 353 Mapping Bank Data - Bank Reconciliation
................................................................................................................................... 374 Mapping General Ledger Data - Bank Reconciliation and Bank Positive Pay
Part IV Matching - Bank Reconciliation 38
................................................................................................................................... 391 Types of Matches
.......................................................................................................................................................... 40Check to Check
.......................................................................................................................................................... 41Void to Issue
.......................................................................................................................................................... 41Alphanumeric
.......................................................................................................................................................... 42Alphanumeric 2 and 3 field matches
.......................................................................................................................................................... 43Non-Check Matching
................................................................................................................................... 442 Performing System Matching
................................................................................................................................... 443 Performing Manual Matching
................................................................................................................................... 474 Unmatching records
Part V Reports 50
................................................................................................................................... 511 List of Reports
................................................................................................................................... 522 Toolbar Buttons - Reporting
................................................................................................................................... 533 Grouping data
................................................................................................................................... 544 Troubleshooting
Part VI For use with QuickBooks 54

IIContents
II
© 2011 Treasury Software
................................................................................................................................... 551 Setup - QuickBooks
................................................................................................................................... 572 Connecting to a company
................................................................................................................................... 613 Setup - Bank Reconciliation
.......................................................................................................................................................... 61Advanced setup
................................................................................................................................... 634 Importing transactions
.......................................................................................................................................................... 66Holding and over-riding records
Part VII Reference 68
................................................................................................................................... 681 Accounts
.......................................................................................................................................................... 68Creating an account
.......................................................................................................................................................... 73Switching accounts
.......................................................................................................................................................... 75Deleting an account
................................................................................................................................... 772 Definitions
.......................................................................................................................................................... 77Mapping Fields
......................................................................................................................................................... 77Amount
......................................................................................................................................................... 78Amount_Reverse_Sign
......................................................................................................................................................... 78BAI
......................................................................................................................................................... 78Check Number
......................................................................................................................................................... 79Check Number + Description
......................................................................................................................................................... 79Description
......................................................................................................................................................... 79Date
......................................................................................................................................................... 79Filter
......................................................................................................................................................... 80Matching_Field
......................................................................................................................................................... 80Sign
......................................................................................................................................................... 80Site
......................................................................................................................................................... 81Void Check Indicator
......................................................................................................................................................... 81CheckNumber + TrailingVoid
......................................................................................................................................................... 81LeadingVoid + CheckNumber
.......................................................................................................................................................... 82General Information
......................................................................................................................................................... 82Debit versus Credit
......................................................................................................................................................... 83Changing void check indicator
......................................................................................................................................................... 83Changing debit and credit text
......................................................................................................................................................... 83Turning off check number requirement
......................................................................................................................................................... 84Turning off decimals in amount
.......................................................................................................................................................... 84Options
......................................................................................................................................................... 85Import
......................................................................................................................................................... 87Match
......................................................................................................................................................... 87Reports
......................................................................................................................................................... 87System
......................................................................................................................................................... 87BAI
......................................................................................................................................................... 87Resume Startup
......................................................................................................................................................... 87Bank Code
......................................................................................................................................................... 87Custom
Index 0

Bank Reconciliation1
© 2011 Treasury Software
1 Getting Started - Bank Reconciliation
Introduction
The goal of Bank Reconciliation is to assist you in performing corporate reconciliations of all kinds (bothfinancial and non-financial). Data from your general ledger and from your bank is imported into BankReconciliation which matches the data and prepares an exception list. In addition
In the Getting Started guide, you will learn how to download, install, and use Bank Positive Pay.
Steps
Below are the steps to begin using Bank Reconciliation.
1. Download and install the software2. Create and setup accounts3. Import general ledger files4. Import bank files5. Run Automated Transaction Matching6. Run Reconciliation Report if desired.
Next: Download and install >>
1.1 Download and Install
Download Bank Reconciliation
Download Bank Positive Pay from our website at http://www.treasurysoftware.com/download.aspx Youremail address is important because the install file password is sent automatically to that address. When prompted, save this file to your Desktop. The file is approximately 35 MB.
Install Bank Reconciliation
After the download is complete, double-click the file to begin installation. You will be prompted for theinstall password as mentioned above. Once entered, you will be able to click OK (Note: password iscase sensitive). Click OK.
Proceed through the installer by clicking Next. Accept the default settings.
Next Step
Once the installation is complete, you are ready to begin using Bank Reconciliation.
Next: Create and setup accounts >>
1.2 Create and Setup Accounts
Start Bank Reconciliation
Start Bank Reconciliation by clicking on the Start Button, selecting Programs (or All Programs),selecting Treasury Software, and clicking the Treasury Software Icon.

Getting Started - Bank Reconciliation 2
© 2011 Treasury Software
The Welcome New Users page will load. Select the Option for “Bank Reconciliation”
Create Account
Click File>New Account to create an account for your testing.

Bank Reconciliation3
© 2011 Treasury Software
Select the option to “Create an Account and Add it to your Catalog” and click Next.
Enter a name for the account. This name is strictly internal and should help you identify the purpose ofthe account. For example, if this account is an operating account, you might call it "Operating". Afterthe name is entered, click Next.
You will be prompted to select your accounting. The default is months. If you use a different method ofperiods, select it as appropriate. Once selected, click Next.
Congratulations! You have finished creating the account. Click Finish to begin using this account.
Next Step
You are now ready to import general ledger data into Bank Reconciliation.
Next: Import GL Data >>
1.3 Import GL Data
Obtaining General Ledger FilesBefore importing general ledger into Bank Reconciliation, they must be obtained from your accountingpackage. The exact process depends on the package, but in general you will run a check register reportfor a given date range and then export this report to an Excel spreadsheet or CSV file. For moreinformation or assistance in this, contact your corporate IT.

Getting Started - Bank Reconciliation 4
© 2011 Treasury Software
Importing General Ledger FileClick the the Import GL button on the main screen to start the Import Wizard. Alternatively, click ImportG/L on the left-hand menu.
Click the Open Folder Icon on the General Ledger Import Wizard.
Select your file to Import and click Open. Common file types are Excel (.xls), Access (.mdb), CommaDelimited (.csv or .txt), tab delimited (.txt), and text (.txt).
Click Next.
Mapping
The General Ledger Column Mapping screen allows you to specify the purpose of each column. Simplyhighlight a column, and select the appropriate column mapping from the drop down for the data.

Bank Reconciliation5
© 2011 Treasury Software
After selecting the Column Mapping, the section about the column names (F1, F2, F3, etc) will switchfrom Red to Green and list the selected mapping.

Getting Started - Bank Reconciliation 6
© 2011 Treasury Software
Repeat for each field that needs to be imported. Above, Date is mapped to the field containingtransactions dates. Some common fields for Bank Reconciliation are CheckNumber for check number,Amount for transaction amounts (alternatively, Debit/Credit if amount is split into two fields), andDescription for transaction description. See Selecting fields to represent amount for more information onchoosing an amount mapping field.
Once all fields are mapped, click Next.
Review RecordsThis screen will display a list of the importable rows and invalid rows. To review the list of ImportableRecords, click on the “+” sign as shown below.
If the “Amount” and “# of Records” columns are correct, click Next and go to Finish.
The grid will display the list of importable checks, and the basic check information.

Bank Reconciliation7
© 2011 Treasury Software
The Invalid Rows section will list all rows that will not be imported into Bank Positive Pay. The softwarewill automatically mark Header rows, footer rows, summation lines, and blank lines as invalid. For eachrow that is invalid, a check mark will be placed in the appropriate column indicating why the row wasinvalid. In the screenshot below, there were several footer and summary rows which were automaticallyscrubbed out, as well as several blank rows.

Getting Started - Bank Reconciliation 8
© 2011 Treasury Software
Once you have verified the importable information is accurate, click Next. If you wish to Cancel theimport process and try again, simply hit Cancel.
Click Finish to complete the General Ledger Import Wizard.

Bank Reconciliation9
© 2011 Treasury Software
Next StepThe next step is to import your bank data.
Next: Import Bank Data >>
1.4 Import Bank Data
Obtaining Bank FilesBefore importing bank data into Bank Reconciliation, it must be obtained from your bank. Each bankhas different methods and procedures for providing you this data. Bank Reconciliation's onlyrequirement is that it be in Excel spreadsheet (xls), comma-delimited (csv), tab-delimited text (txt), oreven fixed width. It does not matter what order the fields are in internally as long as one of the listedformats can be obtained. Contact your bank for more information and assistance with this.
Importing Bank FileClick the Import bank button on the main screen to start the Import Wizard. Alternatively, click ImportBank on the left-hand menu.

Getting Started - Bank Reconciliation 10
© 2011 Treasury Software
Click the Open Folder Icon on the General Ledger Import Wizard.
Select your file to Import and click Open. Common file types are Excel (.xls), Access (.mdb), CommaDelimited (.csv or .txt), tab delimited (.txt), and text (.txt).
Click Next.
Mapping
The General Ledger Column Mapping screen allows you to specify the purpose of each column. Simplyhighlight a column, and select the appropriate column mapping from the drop down for the data.

Bank Reconciliation11
© 2011 Treasury Software
After selecting the Column Mapping, the section about the column names (F1, F2, F3, etc) will switchfrom Red to Green and list the selected mapping.

Getting Started - Bank Reconciliation 12
© 2011 Treasury Software
Repeat for each field that needs to be imported. Above, Date is mapped to the field containingtransactions dates. Some common fields for Bank Reconciliation are CheckNumber for check number,Amount for transaction amounts (alternatively, Debit/Credit if amount is split into two fields), andDescription for transaction description. See Selecting fields to represent amount for more information onchoosing an amount mapping field.
Once all fields are mapped, click Next.
Review RecordsThis screen will display a list of the importable rows and invalid rows. To review the list of ImportableRecords, click on the “+” sign as shown below.
If the “Amount” and “# of Records” columns are correct, click Next and go to Finish.
The grid will display the list of importable transactions, and the basic information on each transaction.

Bank Reconciliation13
© 2011 Treasury Software
The Invalid Rows section will list all rows that will not be imported into Bank Reconciliation. Thesoftware will automatically mark header rows, footer rows, summation lines, and blank lines as invalid. For each row that is invalid, a check mark will be placed in the appropriate column indicating why therow was invalid. In the screenshot below, there was one transaction marked invalid due to a missingdate.

Getting Started - Bank Reconciliation 14
© 2011 Treasury Software
Once you have verified the importable information is accurate, click Next. If you wish to Cancel theimport process and try again, simply hit Cancel.
Click Finish to complete the General Ledger Import Wizard.

Bank Reconciliation15
© 2011 Treasury Software
Next StepNow that your General Ledger and Bank data has been imported, it is time to run AutomatedTransaction Matching to look for exceptions.
Next: Run Automated Transaction Matching >>
1.5 Run Automated Transaction Matching
Matching Overview
After importing bank and general ledger data, you are now ready to use Bank Reconciliation's high-speed matching system.
Matching your data is a two-step process. Step one is to allow Bank Reconciliation to run AutomatedTransaction Matching. It will then match as much of the data as possible based on several matchingrules. The default rules are check number to check number and amount to amount and void checks toissue checks within the general ledger. There are several other rules available off-the-shelf that willsatisfy most needs. Once that is completed, step two is to review the remaining unmatched recordsand make manual matches as necessary.
Run Automated Transaction Matching
To run Automated Transaction Matching, select "Matching" from the top menu, then select "SystemMatching (Automated Transaction Matching)". Matching will start immediately. A box will be displayedconfirming that matching has started. Depending on the amount of records, the box may not be visiblefor very long, but it will always remain visible as long as matching is in progress. Very important: oncestarted, do not switch out of Bank Reconciliation until the process completes.

Getting Started - Bank Reconciliation 16
© 2011 Treasury Software
Run Manual Matching
With System Matching complete, it is now time to look for manual matches. Select Matching from thetop menu, then select "Manual Matching".
Depending on the success of System Matching, you may have very few records or you may have quite alot. In either event, check through the data looking for matches that were missed by the system. Misses can occur for several reasons and is usually directly attributable to the cleanliness of the data.
In the screenshot above, there is 1 match that can be done manually. On the bank side is a FundingCredit on 2/19/2008 for $16,750.00. On the GL side are two records, one for $17,000 to NY #620 andthe other is an adjustment to NY #620 for -$250.00. Clearly these two sum together to equal the bankrecord and are a match. To match them manually, select the relevant records. To select multiplerecords on a side, hold the Control key while selecting records.
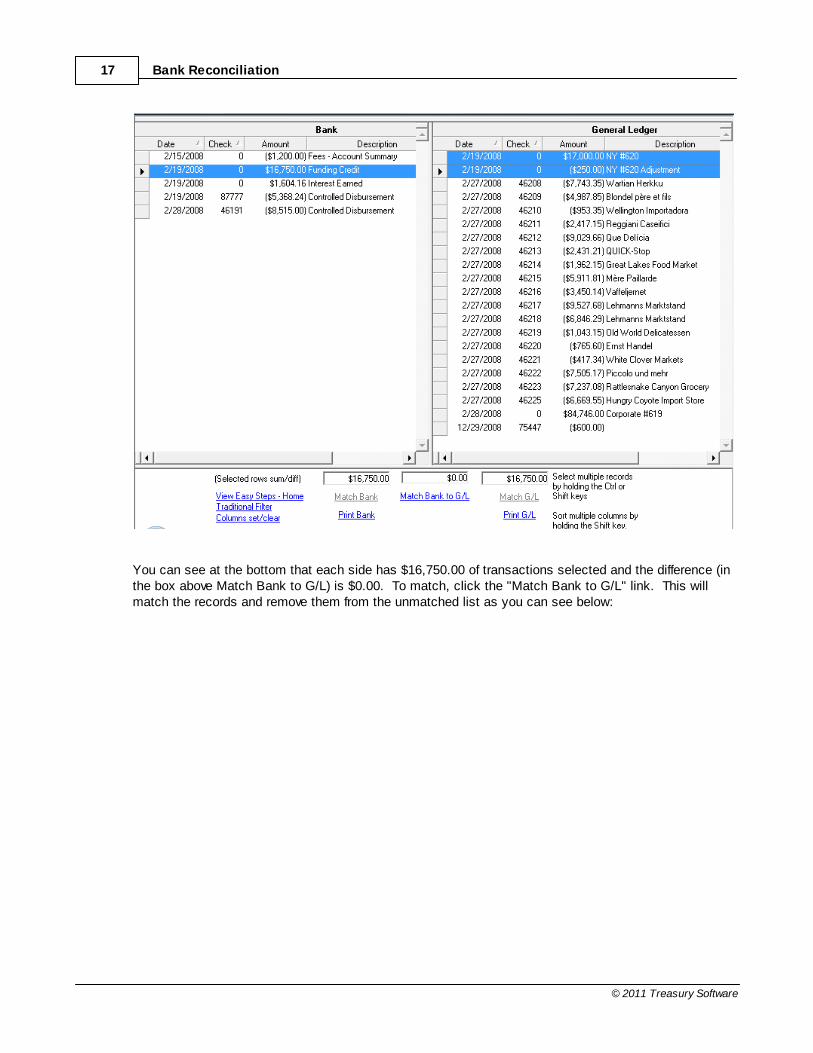
Bank Reconciliation17
© 2011 Treasury Software
You can see at the bottom that each side has $16,750.00 of transactions selected and the difference (inthe box above Match Bank to G/L) is $0.00. To match, click the "Match Bank to G/L" link. This willmatch the records and remove them from the unmatched list as you can see below:

Getting Started - Bank Reconciliation 18
© 2011 Treasury Software
At this point we can continue moving through our data looking for additional matches. Since there areno more, we have now completed the matching process. To exit this window, click the red X in theupper right corner of the screen.
Next Step
With all your matching completed, it is time to review the exception list. This will provide detailedinformation on all unmatched records to aid you in researching your high-risk items.
Next: Getting Exception List >>
2 Imports
Overview
Importing is the process to bring data into the program. For Bank Reconciliation, there will be atminimum two imports, one for bank data (or data external to your company) and one for general ledgerdata (data internal to your company). For Bank Positive Pay, you will only be importing general ledgerdata, specifically checks.
Required
Before importing it into Bank Reconciliation or Bank Positive Pay, the data must exist in tabular-formatted source files.
Importing the data
You are free to use any or all of these methods for importing data.
Importing source files

Bank Reconciliation19
© 2011 Treasury Software
Use one of these methods when all data is contained in source files.See Importing Bank Data and Importing General Ledger Data for information on each of those imports.
Entering records manually
You would import manually when you need to add transactions not contained in a file. This saves youfrom having to create a file just to import the records. By its nature, manual imports are for very smallnumbers of transactions. It is far faster to use a file import.
See Entering Data Manually for more information
2.1 Importing Bank Data
Importing Bank Data
In this section, you will learn:How to import data from your bank into Bank Reconciliation
RequiredBefore continuing, you must:
1. Have data from your bank in a file or multiple files in tabular format.2. Be working in the proper account.
Overview
Obtain a copy of your bank transactions in a usable file format - Excel spreadsheet, comma-separatedvalues (CSV), tab-delimited, etc).
Every bank uses its own format to order the data fields. Fortunately, Bank Reconciliation will handle anysource file as long as it is in a tabular format.
Steps To Import Data
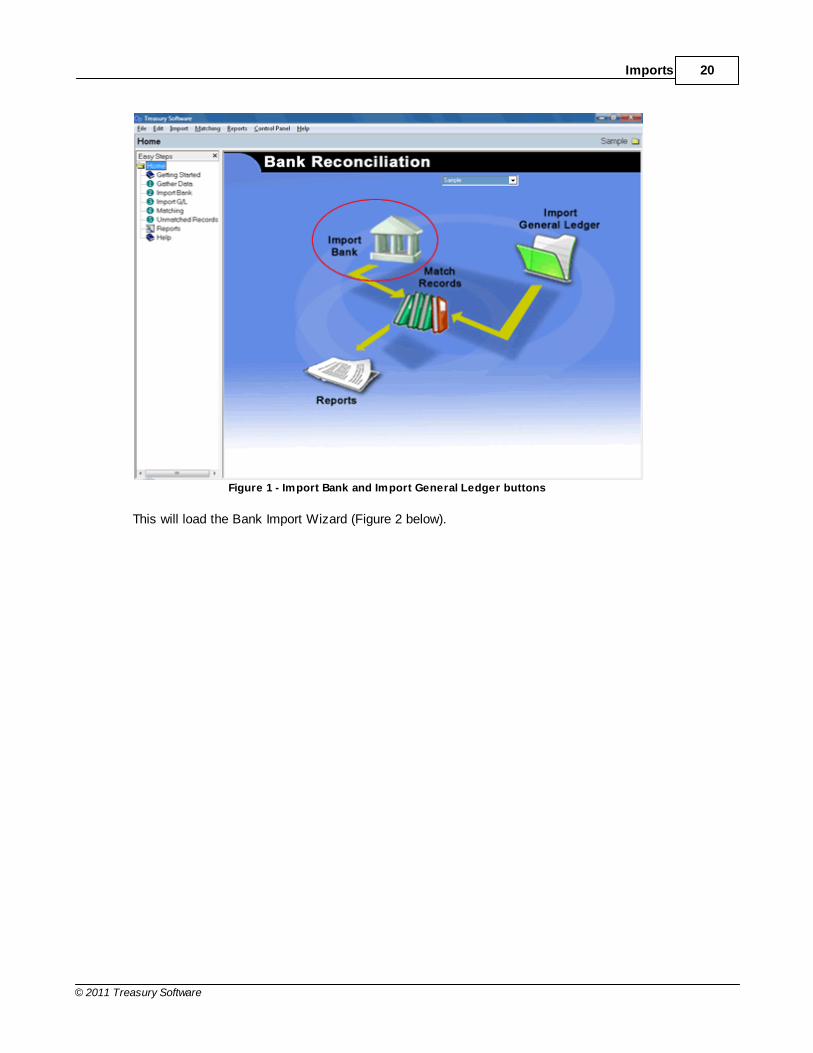
1. From the Main Screen, click the Import Bank button (Figure 1) or click the Import Bank link in the leftpane (Easy Steps).
Imports 20
© 2011 Treasury Software
Figure 1 - Import Bank and Import General Ledger buttons
This will load the Bank Import Wizard (Figure 2 below).

Bank Reconciliation21
© 2011 Treasury Software
Figure 2 - Bank Import Wizard (Select File icon circled)
2. In the wizard, you can either:Browse to a saved file by clicking the folder icon (circled in red in Figure 2 above)Copy data from Excel and paste it into the grid a the bottom of the screen.
Note: It is best practice to import a saved file.
When finished, click Next.
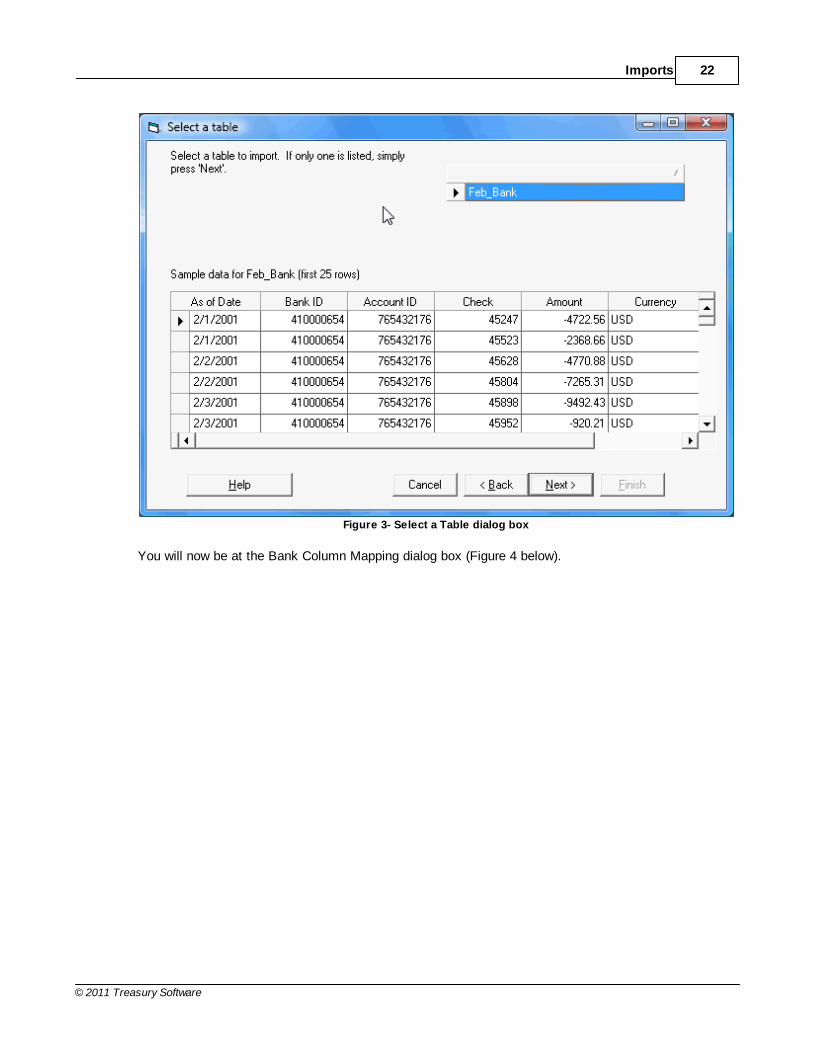
a. If the file was an Access database:The Select a Table dialog box (Figure 3 below) is displayed.
b.If the file was a multi-sheet Excel spreadsheetThe "Select a worksheet or range" dialog box would be displayed.
Choose the proper table or sheet and click Next.
Imports 22
© 2011 Treasury Software
Figure 3- Select a Table dialog box
You will now be at the Bank Column Mapping dialog box (Figure 4 below).

Bank Reconciliation23
© 2011 Treasury Software
Figure 4 - Bank Column Mapping dialog box
At this point the import process is not yet complete. The data which has been brought into BankReconciliation must be mapped to identify each field to Bank Reconciliation.
Note: The data only needs to be mapped once. Bank Reconciliation automatically remembers yoursettings.
Next StepMapping Bank Data
2.2 Importing General Ledger Data
Importing General Ledger Data
In this section, you will learn:How to import data from your general ledger into Bank Positive Pay or Bank Reconciliation
RequiredBefore continuing, you must:
1. Have data from your accounting system in a file or multiple files in tabular format. 2. Be working in the proper account. See Creating a new account or Switching to a different account
Imports 24
© 2011 Treasury Software
Overview
The general ledger contains a record of all financial transactions by a business. Everything that affectsan organization's balance will be listed in the general ledger.
This data typically resides in your accounting system. Before importing, it must be exported from theaccounting system to a tabular-formatted file. Alternatively, you can use any report writer to achieve thesame result.
Steps
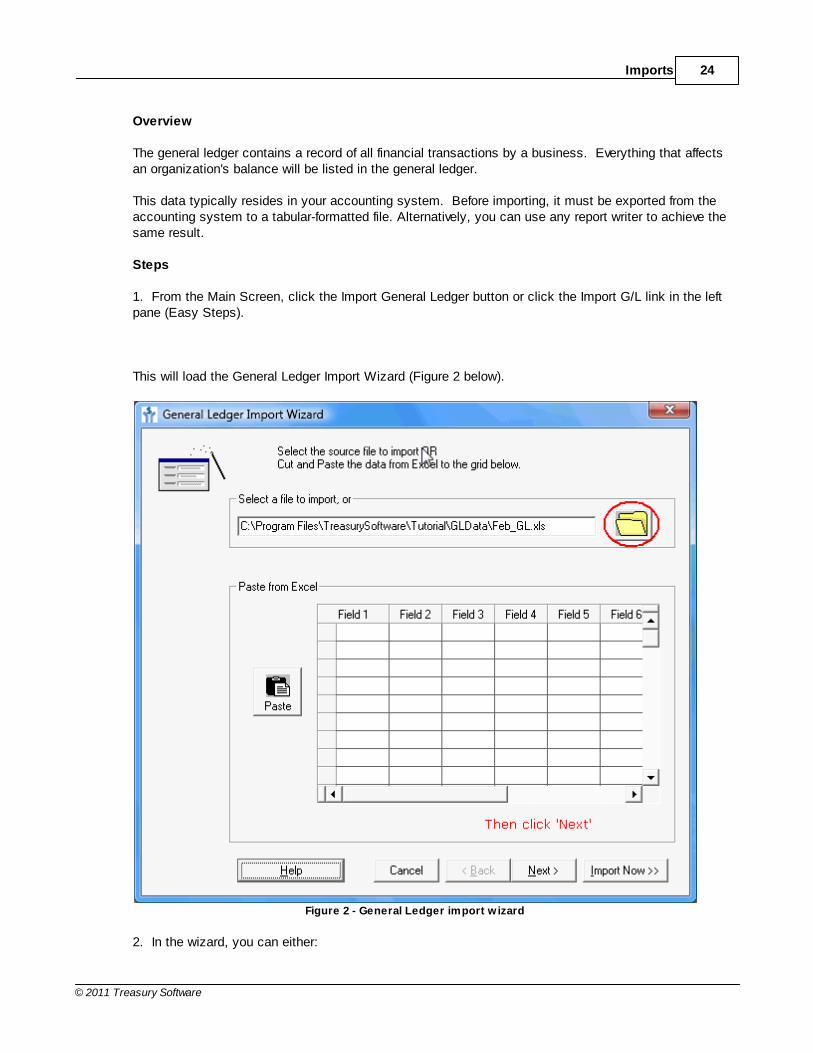
1. From the Main Screen, click the Import General Ledger button or click the Import G/L link in the leftpane (Easy Steps).
This will load the General Ledger Import Wizard (Figure 2 below).
Figure 2 - General Ledger import w izard
2. In the wizard, you can either:

Bank Reconciliation25
© 2011 Treasury Software
Browse to a saved file by clicking the folder icon (circled in red in Figure 2 above)Copy data from Excel or other program and paste it into the grid a the bottom of the screen.
Note: It is best practice to import a saved file.
When finished, click Next.
a. If the file was an Access database or multi-sheet spreadsheet:The Select a Table dialog box (Figure 3 below) will be displayed.
b. If the file was an multi-sheet Excel spreadsheet,The "Select a worksheet or range" dialog box. The intention is the same.
Choose the proper table or sheet and click Next.
Figure 3 - Select a table dialog box
You will now be at the General Ledger Column Mapping dialog box (Figure 4 below).

Imports 26
© 2011 Treasury Software
Figure 4 - General Ledger Column Mapping dialog box
At this point the import process is not yet complete. The general ledger data which has been broughtinto Bank Reconciliation or Bank Positive Pay must be mapped to identify each field.
Note: The data only needs to be mapped once. Bank Reconciliation or Bank Positive pay automaticallyremembers your settings.
Next StepMapping General Ledger Data
2.3 Entering Data Manually
Entering Data Manually
In this section, you will learn:How to manually enter records (both bank and general ledger)
Overview
The majority of the time, your data (either bank or general ledger) will be contained in source files thatwill be imported as an entire file. This is efficient and accurate as it involves no data entry and the datais obtained directly from a bank or accounting system.
In some situations, however, you may need to import transactions manually.

Bank Reconciliation27
© 2011 Treasury Software
Steps
1. At the Bank Reconciliation or Bank Positive Pay Main Screen, select Edit from the main menu.2. Select Add Record(s). You will see the screen in Figure 1 (below).
Figure 1 - Add a Record
In the dropdown box, you see listed the type of import. In this case, the check will go into GeneralLedger data. To import into Bank data, change the option in the dropdown box.
3. Fill out each of the fields with the appropriate data. Every field is required.
Regardless of importing a check as general ledger or bank:Enter voided checks as positive values (only general ledger)Enter issued checks as negative values
When finished, click OK.
4. For each check you need to add, repeat steps 1 through 3.
5. Click OK.
Related Topics
Deleting a record to delete a single record.Deleting an entire import to delete all records from a file import.
2.4 Deleting a record
Deleting a record
In this section, you will learn:How to delete a single record from Bank Reconciliation (either bank or general ledger record)
Overview

Imports 28
© 2011 Treasury Software
Follow these steps to delete a single record, regardless of whether it was entered manually or importedin a file with other records.
1. From the main menu, select Edit, then Delete record(s).2. The Report Creator will load the "All Records" report (Figure 1 below).
Figure 1 - All Records report to delete a record
Records can only be deleted from this report.
3. Once the record is highlighted, click the red X in the toolbar to delete the record (Figure 2 below,Delete button circled).

Bank Reconciliation29
© 2011 Treasury Software
Figure 2 - Delete button circled
4. A dialog box will be displayed to confirm the deletion. Click Yes to delete, No to cancel and retainthe record.
Related Topics
See Deleting an import to learn how to delete an entire file.
2.5 Deleting an import
Deleting an import
In this section, you will learn:How to delete an entire imported file from Bank Reconciliation
Overview
Follow these steps to delete an entire file import,
1. From the main menu, select Edit, then Delete import.2. The Report Creator will load the "Import Logs" report (Figure 1 below).

Imports 30
© 2011 Treasury Software
Figure 1 - Import Logs report
This report is grouped by Bank or G/L. You can see all the files imported, including date of import,location of import, number of records, and subtotal of amounts. This helps you distinguish the files toensure the correct one is deleted.
3. To delete a file, click the record to highlight it in blue. Then click the red X, the Delete button, in thetoolbar. Figure 2 below shows the highlighted file and the delete button circled in red.

Bank Reconciliation31
© 2011 Treasury Software
Figure 2 - Delete button circled
In Figure 2, all records imported in Feb_Bank.mdb on 5/21/2007 will be deleted when you click theDelete button (circled in red).
4. A dialog box will be displayed to confirm the deletion. Click Yes to delete, No to retain the records. You may perform further deletions if you wish.
Note: If any of the records have been matched, Bank Reconciliation will unmatch them.
Alternatively, you can load the same report by selecting Reports from the main menu, then selecting theImport Logs report, then follow step 4 above.
Related Topics
See Deleting a record to learn how to delete a single record.
3 Mapping Your Data
Mapping Overview

Mapping Your Data 32
© 2011 Treasury Software
Bank Reconciliation conforms to your data, not the other way around. In the mapping process, you tellBank Reconciliation what each field of your data represents. This process only needs to be performedonce for each unique layout of your data.
You can use the default template or one of the other 'user-defined' mapping templates.
Before You Begin
Required:
1. You have created your own account (not using the Sample account).
2. You have already imported your bank or general ledger data.
3.1 Deciding What to Map
Why do I need to map the data?
Mapping translates your internal data name into a name the software knows. Without this step, BankReconciliation or Bank Positive Pay will not know, for example, if a field holds transaction date or checknumber.
Choosing fields
For the majority of cases, the mappings below are suggested.
Bank Positive Pay
At a minimum, positive pay files sent to the bank will include: check number, amount, date, usually thepayee name, and sometimes a void indicator. Perform these mappings as follows:
Field From Data Bank Positive Pay field
Check number CheckNumber
Amount If amounts in file are positive and allchecks are issued checks -Amount_Reverse_Sign
If amounts in file are negative and allchecks are issued checks - Amount
If amounts in file are both positive andnegative but signed correctly - Amount
Date Date
Payee name Description
Void check indicator Void_Check_Indicator
See Mapping General Ledger Data for the steps to actually create the mapping.

Bank Reconciliation33
© 2011 Treasury Software
Bank Reconciliation
In Bank Reconciliation, you will have 2 kinds of data: bank data and general ledger data. For the mostpart, you can follow the guidelines listed above for Bank Positive Pay. However, you must pay specialattention to how the amounts are listed. In some cases, the bank data will have 2 columns, one markedDebit and one Credit, while other times the amounts are in 1 field and signed. Special care must betaken as positive and negative values have different meaning to the bank than to your company.
For Debit/Credit mappings, please see Debit versus Credit.
For amounts in one field, it is important to know that Bank Reconciliation views all negative values asbeing ones that reduce your general ledger, such as payments and issued checks, while positive valuesincreased your general ledger, such as deposits and void checks. If this is accurately represented in thebank data, map the amount as Amount. If the signs are exactly the opposite, map the amount asAmount_Reverse_Sign. See Selecting fields to represent amount for more information
More Resources
For definitions of the available fields, see Definitions - Mapping Fields
To learn how to map the data, see Mapping Bank Data and Mapping General Ledger Data
3.2 Selecting fields to represent amount
In this article, you will learn:How to choose the proper Bank Reconciliation field to represent dollar values
RequiredReview Debit versus Credit
Overview
Bank Reconciliation requires four fields be mapped for any imported data: Date, CheckNumber, andAmount. However, Amount really refers to a category of fields that can be mapped for this purpose. These fields are:
1. Amount2. Amount_Reverse_Sign3. Amount and Sign4. Debit and Credit (always mapped as a pair)
In making the selection, the main criteria is: Do these values have the correct sign? In other words, if allthe transactions have positive amount values, do all of them increase the account balance? If somedecrease the balance, are they negative values? If the answer to both is yes, Amount is probably theright choice. If no, you should explore the other options.
Amount
Choose Amount when data in a file is both positive and negative.

Mapping Your Data 34
© 2011 Treasury Software
However, the following must be true about the data: Positive increases the account balanceNegative decreases the account balance
For example, if you are mapping bank data, debit transactions (voided checks and deposits) must benegative and credit transactions must be positive.
If true, map the field as Amount
Amount_Reverse_Sign
Amount_Reverse_Sign is exactly the opposite of Amount: it will reverse the sign of the data when it isimported. This can be necessary if the transactions that should increase an account balance arenegative values in the file and vice-versa.
For example, if you are mapping bank data, debit transactions (voided checks and deposits) should benegative and credit transactions should be positive. If they are reversed, map this field to correct thesign instead of having to manually edit the data outside of Bank Reconciliation and then import it.
Sign
The Amount field includes both the value of the transaction (how much money) as well as the sign of thedata (positive or negative). In some situations, the source data will provide you with amounts that are allabsolute, but a second field will tell you the sign of the data. For example, a data file might look like thefollowing:
67.22 credit41.14 credit99.18 debit56.10 debit
Map the first column as Amount and map the second column as Sign.
In the second column, the word "credit" identifies a transaction that should be treated as a credittransaction and "debit" identifies a debit transaction. See Debit versus Credit for more information.
By default, Bank Reconciliation uses "debit" and "credit" as the text identifying those respectivetransactions. See Changing debit and credit text to enter text identifiers specific to your data.
Debit and Credit
Debit and Credit are used when the source data splits the amounts into two separate fields, one for debittransactions and one for credit transactions. This effectively splits the data into what should be positivevalues and negative values.
By default, Bank Reconciliation interprets the text "debit" and "credit" as referring to those respectivetransactions. See Changing debit and credit text to enter text identifiers specific to your data.
For more information on debit and credit as they relate to sign, see Debit versus Credit.

Bank Reconciliation35
© 2011 Treasury Software
3.3 Mapping Bank Data - Bank Reconciliation
Required:At this point, you have followed the steps in Importing Bank Data to import bank data into BankReconciliation.
Suggested:It is recommended that you have read the Mapping Overview and Deciding What to Map articles
If you need more information on a particular field, please Definitions - Mapping Fields
Mapping Bank Data
At this point, you have a screen similar to Figure 1 (data in grid will be different).
Figure 1 - Bank Column Mapping dialog box
This file contains 7 fields (columns), as listed by the column header in the grey box. They are:
Date Amount
Bank ID Currency (not visible)
Account ID Transaction Type (notvisible)
CheckNumber

Mapping Your Data 36
© 2011 Treasury Software
The topmost row has green and red headers. Date, CheckNumber, and Amount are in greenwhile the red boxes have no label. Green means mapped. Red means not mapped. In the movie below,you can see how to map those same 3 fields from start to finish.
To map:1. Click on the red header. 2. In the dropdown, select the appropriate entry
The header will turn green and the field name will be displayed inside.
To unmap:1. Click on the green header2. In the dropdown, choose "Select..."
The header will turn red and the field name will be removed.
How do I know which field names to use?
Look at the data in the movie above. Each column is labeled with internal field fields. Of these, fivecorrespond directly to a Bank Reconciliation field while the others can map to a text field if you need toretain them.
InternalField
Maps As Bank Reconciliation Field
Date Date
CheckNumber
CheckNumber
Amount Amount
TransactionType
Description
Bank ID Text1
Currency Text2
Account ID Text3
Which fields do I map?
Outside of the required fields, you are free to map as many or as few fields as you wish. Thesedecisions are affected greatly by your situation and how much data you wish to retain later in thematching process. Note that including additional fields does not guarantee increased matchingaccuracy. You should assume that any fields you include are solely for your benefit later.
Here is one way for the above data:
1. Map all required fields (Date, Check Number, Amount)2. Map all fields you wish to retain (Transaction Type as Description)
Next Step

Bank Reconciliation37
© 2011 Treasury Software
If you have more Bank data to import, or have not yet imported General Ledger data at all:Importing General Ledger Data
If you have already imported all General Ledger data and you have no more Bank data:Matching Your Data
3.4 Mapping General Ledger Data - Bank Reconciliation and BankPositive Pay
Required:At this point, you have followed the steps in Importing General Ledger Data to import general ledgerdata into Bank Reconciliation.
Suggested:It is recommended that you have read the Mapping Overview and Deciding What to Map articles
If you need more information on a particular field, please Definitions - Mapping Fields
Mapping General Ledger Data
At this point, you have a screen similar to Figure 1 (data in grid may be different).
Figure 1 - General Ledger Column Mapping dialog box
Mapping Your Data 38
© 2011 Treasury Software
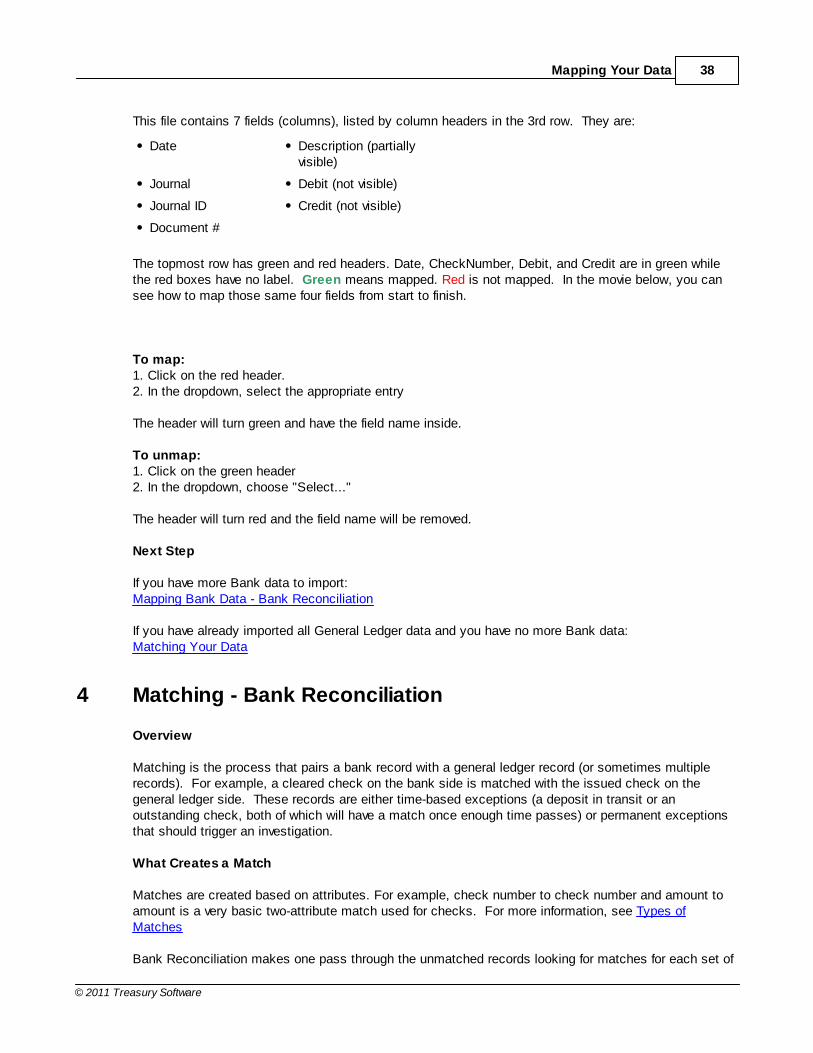
This file contains 7 fields (columns), listed by column headers in the 3rd row. They are:
Date Description (partiallyvisible)
Journal Debit (not visible)
Journal ID Credit (not visible)
Document #
The topmost row has green and red headers. Date, CheckNumber, Debit, and Credit are in green whilethe red boxes have no label. Green means mapped. Red is not mapped. In the movie below, you cansee how to map those same four fields from start to finish.
To map:1. Click on the red header. 2. In the dropdown, select the appropriate entry
The header will turn green and have the field name inside.
To unmap:1. Click on the green header2. In the dropdown, choose "Select..."
The header will turn red and the field name will be removed.
Next Step
If you have more Bank data to import:Mapping Bank Data - Bank Reconciliation
If you have already imported all General Ledger data and you have no more Bank data:Matching Your Data
4 Matching - Bank Reconciliation
Overview
Matching is the process that pairs a bank record with a general ledger record (or sometimes multiplerecords). For example, a cleared check on the bank side is matched with the issued check on thegeneral ledger side. These records are either time-based exceptions (a deposit in transit or anoutstanding check, both of which will have a match once enough time passes) or permanent exceptionsthat should trigger an investigation.
What Creates a Match
Matches are created based on attributes. For example, check number to check number and amount toamount is a very basic two-attribute match used for checks. For more information, see Types ofMatches
Bank Reconciliation makes one pass through the unmatched records looking for matches for each set of

Bank Reconciliation39
© 2011 Treasury Software
matching rules turned on. For example, by default, check to check, void to issue, and non-check areturned on. Bank Reconciliation will attempt to match the data using three separate passes. It will applythe check to check rules for the first pass, void to issue for the second pass, and non-check matchingfor the last pass.
Unmatched records remaining after system and manual matching is rolled forward to the next period.
Matching Processes
Bank Reconciliation performs two kinds of matching:
1. System Matching (also called Automated Transaction Matching)2. Manual Matching
System Matching
When activated, Automated Transaction Matching matches bank records to general ledgers in a highspeed process.
Records can remain unmatched for a variety of reasons, such as:
Unrecorded bank transactions (interest, fees)Items that have not cleared the bank (outstanding checks, deposits in transit)Disputed itemsPossible fraud itemsBank records that need multiple general ledger records to create a matchNon-check records with date outside the set rangeTransactions with site number on one transaction but not on the other
Of these, Bank records that require multiple General Ledger records can be matched manually. Theothers cannot be matched with the currently imported data and using the current date range.
See Performing System Matching to learn how to start the process.
Manual Matching
The Manual Matching windows displays a list of all unmatched records (bank records on left side,general ledger records on right side).
Using a point-and-click interface, you can match records on a one to one or many to many basis.
See Performing Manual Matching to learn how to match records by hand.
4.1 Types of Matches
OverviewThe Automatic Transaction Matching process is a series of matching passes (also called rules orsubroutines). These passes can be turned on or off to fit your particular situation.
Matching rules

Matching - Bank Reconciliation 40
© 2011 Treasury Software
From the home page - click on the matching options icon in the lower right corner.
By default, Check to Check, Void to Issue, and Non-Check matching are on and Many to Many andAlphanumeric Matching are off.
4.1.1 Check to Check
Check to Check Matching
Default: OnPossible Settings: On or OffAttributes: Records are matched using check number and amount.
The match will be a cleared check from the bank to an issued check on the general ledger.
Sign of the checks must be the same (negative to negative). A cleared check will not match a voidedcheck, even if the amounts and check numbers are the same as the signs will be different.
Exceptions Generated

Bank Reconciliation41
© 2011 Treasury Software
Cleared check on bank side without corresponding entry on general ledger is marked "Check Clearedbank, no G/L record" (Exception #310)
Cleared check on bank side already matched against the general ledger (regardless of amount) isconsidered a duplicate clearing check and is marked "Check cleared more than one" (Exception #115)
Cleared check on bank side matched an entry in the general ledger, but the amounts do not match ismarked "Bank amount differs from G/L amount" (Exception #110) on bank side and "G/L amount differsfrom Bank amount" (Exception #210) on general ledger side.
All remaining issued checks are marked as Outstanding Checks (Exception #498).
4.1.2 Void to Issue
Void to Issue Matching
Default: OnPossible Settings: On or OffAttributes: Records are matched using using check number and amount from void check to same fieldsof issued check. Records are general ledger to general ledger.
This type of matching occurs solely in general ledger data. A check number and amount of an issuedcheck will be matched to a check number and amount of a voided check.
Voided check amounts should be positive; issued check amounts should be negative.
Exceptions Generated
A voided check with no corresponding issued check is marked "Voided check, no record ofissuance" (Exception #410)
A voided check with a corresponding issuance that has already been matched (to a cleared check or apreviously voided check) is marked "Voided check duplicate" (Exception #415)
A voided check with a corresponding issuance but differing amounts is marked "Amount on issuedcheck differs from amount voided" (Exception #420/#425)
Note: All unsuccessful void to issue matches are considered to be high risk exceptions
4.1.3 Alphanumeric
Alphanumeric Matching
Default: OffPossible Settings: On or OffAttributes: Reference code in Matching_Field or Text1 and amountNote: To use Alphanumeric Matching, you must turn off Non-Check Matching. See Note at bottom.
Alphanumeric Matching uses either Matching_Field or Text1 as a unique reference field to matchrecords. Either field can be mapped for this purpose, but Bank Reconciliation will not allow you to mapboth (this would be the same as giving the same name to two entirely different things). Each non-checktransaction on the bank side is matched to a similar record on the general ledger using the referencecode and amount.

Matching - Bank Reconciliation 42
© 2011 Treasury Software
For a match to be successful, both records must have the same reference code and contain equalamounts. Both amounts can be either positive or negative. In addition, the records may not contain acheck number, and the reference code should be at least one character long.
Records with a check number are not matched using this process. Checks are matched in the Checkto Check and Void to Issue processes. Also, records with no entry in the reference field will by definitionnot be matched by this process.
Note:
Non-Check Matching must be turned off or the matching by the Non-Check pass will mark these recordsaccording to those rules and not apply Matching_Field as a match attribute. See Non-Check Matchingfor information on non-check rules. See Types of Matches for instructions on toggling the matchingoptions.
4.1.4 Alphanumeric 2 and 3 field matches
The Alphanumeric 2 and 3 matching rules operate similar to the Alphanumeric matching rule, but addadditional fields.
Alphanumeric 2 matching rule matches Bank to G/L records based on an exact match of the following

Bank Reconciliation43
© 2011 Treasury Software
fields:--Amount--Text 1--Text 2
Alphanumeric 3 matching rule matches Bank to G/L records based on an exact match of the followingfields:--Amount--Text 1--Text 2--Text 3
General notes:--It does not matter which field is mapped text 1 vs text 2, etc...--Use 'Text 1' (not 'Matching Field') to map your first field. --There must be a value (no blanks) in each of the fields text fields mapped in order for them to bematched.--If you have three text fields to match - of course use Alphanumeric 3. Do not also use Alphanumeric 2,as it would then ignore the third field, and give you unintended matches.--If you have more than three text fields to base a match on, we suggest concatenating the data prior toimporting into Bank Reconciliation.
4.1.5 Non-Check Matching
Non-Check Matching
Default: OnPossible Settings: On or OffAttributes: Records are matched using using amount, site number, and that the records are within thedata range
Transactions are grouped on the Bank and G/L by site. If site is not used, all sites are grouped into thedefault site group (0).
For each Bank record, the system looks for an equal amount on the G/L side. It then qualifies the record(s) by examining the business days (weekdays) between the two dates. See Adjusting the data rangefor information on modifying the range.
If multiple Bank transactions satisfy multiple general ledger transactions, both sides are matchedsequentially in ascending date order.
Without matching on the group number, there is a possibility of a false positive match. For example, twodeposits are made on the same day, one in the morning, one in the afternoon, each for $100. The bankclears one deposit (made in the morning) the next day, while the afternoon deposit clears two days later.Bank Reconciliation may cross match the deposits, as the general ledger deposit date was the same.
However, if the bank deposits were on sequential days the system would not cross match the recordsas the system would work with records in an ascending date order on both sets of data.
Exceptions Generated
Unmatched Bank records are marked either "Unrecorded bank deposits" (Exception #335) or

Matching - Bank Reconciliation 44
© 2011 Treasury Software
"Unrecorded bank withdrawals" (Exception #340).
Unmatched general ledger records which decrease the account balance are marked as '"General ledgerreduced, no bank entry" (Exception #230).
Unmatched general ledger records which increase the account balance are marked either "Deposits inTransit" (Exception #240) or "Missing Deposit" (Exception #220). The exact exception generateddepends on the date range.
4.2 Performing System Matching
Overview
System Matching, also called Automated Transaction Matching, uses a high-speed matching engine topair a bank record with a general ledger record.
Following System Matching, you will do Manually Matching to pair bank records that required multiplegeneral ledger records to create a match.
Steps
1. From the Bank Reconciliation Main Screen, click the Match Records button.
If you watch quickly, you will see the progress of the Automated Transaction Matching.
Alternatively, you can select Matching from the main menu, then System Matching and this will doexactly the same thing as the steps above.
You will now see the Manual Matching screen (Figure 2 below). System Matching with all imported datahas been completed. The records currently remaining are unmatched.
Next StepManually Matching
4.3 Performing Manual Matching
Overview
Following Automated System Matching, you should check the data to ensure all records are matchedthat should have been matched.
Steps
Following System Matching, you will see the screen in Figure 1 (below). The data will be different as itwill reflect your data.

Bank Reconciliation45
© 2011 Treasury Software
Figure 1 - Manual Matching screen
The left pane holds bank records, the right pane holds general ledger records. Look through the data ineach to see if there are any matches.
In Figure 1 (above), the bank side has a Funding credit on 2/19/2001 in the amount of $16,750.00. Lookon the general ledger side. There is what appears to be a deposit listed as NY #620 for $17,000.00. Right below it, there is a record for - $250.00, listed as NY #620 Adjustment. Clearly the intent is tomake the NY #620 deposit for $16,750.00. This matches the Funding Credit record on the bank side. These 3 records (1 bank, 2 general ledger), are a match. Follow these steps to manually match theserecords.
1. Select each of these records by clicking on them (to select multiple records in the same pane, holdControl). They will not be highlighted in blue (Figure 2 below).

Matching - Bank Reconciliation 46
© 2011 Treasury Software
Figure 2 - Match selected
In the bottom of the screen, notice that you see $16,750.00 in the text boxes corresponding to eachpane. The difference between the two, $0.00, is in the middle textbox. To match, click the "Match Bankto G/L" link. The system will match the records and remove them from the screen (Figure 3 below).

Bank Reconciliation47
© 2011 Treasury Software
Figure 3 - Match removed
Scan through the data again. There are no more matches. Click "View Easy Steps - Home" to go backto the Main Screen.
Next Step
The next step is to run reports on the matched and unmatched records.See Reports
4.4 Unmatching records
Unmatching records
To unmatch records, run a report that displays at least one member of the match group that you want tounmatch.
1. From the Reports window run one of the following reports:All RecordsBank onlyG/L only

Matching - Bank Reconciliation 48
© 2011 Treasury Software
2. Select at least one member of the matched group that you want to unmatch.
3. Click on the unmatch icon (looks like a light blue 'undo' circle) from the Reports toolbar.
The records are now unmatched.
If the records were matched by the system (Automated Transaction Matching)When you enter into the Reports window - or the manual matching window - the system will re-run theAutomated Transaction Matching process again (by default).
If you do not turn off the default behavior, the system will simply rematch the records - undoing the workyou've done in steps #1 through #3 above.
To turn off the ATM process, from the main menu select File > Options > General > Match tab.Change the options below as needed.

Bank Reconciliation49
© 2011 Treasury Software
Notes:
--If you turn off the ATM (per above), you can always run ATM from the main window.
--If you manually matched the records, you do not have to turn off the ATM to prevent them from beingmatched.
--If the account has reconciled periods, the unmatched records can not be in a reconciled (or earlier)period.

Matching - Bank Reconciliation 50
© 2011 Treasury Software
5 Reports
RequiredYou have imported bank and general ledger dataYou have matched the data (using either System or Manual Matching, or both)
Overview
Reporting is the last step in using Bank Reconciliation. In this step, you will run reports describing yourdata, both matched and unmatched records, to speed up the process of using the data for reconciliationand making it easier to see exceptions.
Loading Report Creator
There are two ways to load the Report Creator. You can select Reports from the main menu or click theReports button on the Main Screen. The Report Creator will load (Figure 1 below).
Figure 1 - Report Creator
In the top left corner is the report selection dropdown box. In this box you can select the report you wishto view. The reports are broken into 4 categories:
Record Listings (list all records, just bank records, or just general ledger records)Reports... (create a variety of reports on matched and unmatched data)Statements (to view bank or general ledger statements, three variations of each)Maintenance (to view Control Panel reports, rarely used except for technical support purposes)
If you are unsure which report to run, see Commonly used reports.
See Toolbar Buttons for more information on each button on the toolbar.

Bank Reconciliation51
© 2011 Treasury Software
See Commonly used reports to learn about popular reports.See Grouping data to learn how to group data on different fields.
5.1 List of Reports
Bank Reconciliation contains a number of reports available for your use. These reports include thefollowing:
All Records Show all records for a given date range
Bank Only Shows all bank records for a given date range
GL Only Shows all GL records for a given date range
Unmatched items (period sensitive)Show all unmatched items through the period ending date.Unmatched items (thru current)Show all unmatched itemsUnmatched w/o OS checksShow all unmatched items except for outstanding checksMatched only (grouped)Show all matched record (grouped by audit trail number)Outstanding ChecksShow all outstanding checksPeriodsShow period ending listings, including whether period is reconciled and the ending balance
Import Logs All files imported into the system by type (GL or Bank). Includes record counts, total importedamounts, and date range
Manually Added Records Only transactions that were manually added through the Add Record function
All Records (All Text Fields) Similar to All Records, but displays all optional text fields
Bank Statement Summary Displays bank statement for selected period
Bank Statement Detail Similar to Bank Statement Summary, but can be drilled into for more information
GL Statement Summary Displays GL statement for selected period
GL Statement Detail Similar to GL Statement Summary, but can be drilled into for more information
Balancing Entries Entries created by the system during reconciliation to correct an out-of-balance
Through a combination of grouping and filtering, it is possible to obtain a very customized report which

Reports 52
© 2011 Treasury Software
can then be exported to Excel for later use or import into another system.
See Grouping data to learn how to use different data groupings within the report (change data view)
5.2 Toolbar Buttons - Reporting
At the top of the Report Creator is the toolbar (Figure 1 below). Each button in the icon offers quickaccess to features common for working with reports.
Figure 1 - Reports toolbar
Running a reportIn the upper left, change to a different report by using the dropdown box (currently reads "Select aReport").
Changing date rangeSelect the appropriate date range from the dropdown box. Some reports are period-sensitive. If so,change the system period by clicking "Current Period - 2/29/2008" (will display current period endingdate selected, in this case 2/29/2008)
Saving a report layoutIf you will repeatedly use the same report on similarly-formatted data, you can save the exact fieldgroupings using the User Layouts menu. This will save you from having to regroup your report each timeif you always want the same view.
Loading a saved layoutSelect "Load User Layout" from the User Layouts menu.
Columns: Hide/Display, Group, Sort, Filter,Order
Select all rows
Clear selected rows
Expand groups
Unmatch records
Copy selected rows and columns toclipboard (can paste into Excel)
Export
Help on button choices

Bank Reconciliation53
© 2011 Treasury Software
5.3 Grouping data
Reports are only useful if they can be interpreted quickly and accurately. It is both cumbersome anderror-prone to be forced to scroll through tens or hundreds of records looking for certain ones. Bank Reconciliation allows you to group report data on many different fields to see a breakdown bycategory.
In Figure 1 (below), Report Creator is showing the Unmatched items (period sensitive) report, and thedata is grouped first by origin (Bank or G/L) and then by Period. This means that all the records are putinto two groups, Bank or G/L. Next, still inside the respective groups, each of the records is ordered byPeriod.
Figure 1 - Unmatched items (period sensitive)
To create or remove a grouping:
Creating or removing a grouping is as easy as dragging the column heading to the grey bar (to group) ordrag it back to the grid (to ungroup).
In the movie below, you can see the process of changing the grouping from Origin and Period to Date. First Period and Origin will be dragged to the Grid, then Date will be dragged to the gray box.
Related Topics
See Commonly used reports to learn about popular reports.
Reports 54
© 2011 Treasury Software
5.4 Troubleshooting
My Reports do not show all the records that I was expecting.I can see unmatched G/L checks on the 'All Records' report, but when I run an 'OutstandingCheck list' - they don't show up.
Please check your current period. If you imported checks dated September 2010, but are running anOutstanding Check List as of August, the checks will not show up on the report.
You can verify/change your current period by going to the Reports Menu (View, Export, Actions, CurrentPeriod). If you need to change the current period - click on 'Current Period'..
6 For use with QuickBooks
Overview
In QuickBooks®One-time setup - Create a new sub-account of your existing bank account.
On an ongoing basis - pay employees, write checks, receive deposits as usual, and use the new sub-account that you created for your electronic transmissions.
In ACH UniversalACH Universal enables you to automatically pull the transactions from QuickBooks and create an ACHfile (also called a NACHA file).
This ACH file contains the payment and collection instructions that your bank will need to carry out yourelectronic funds transactions.
ACH Universal can automatically transmit the file to your bank (FTP, SSL, etc...), or you can simplyupload it through their web site.
ACH Universal:--Never writes to your QuickBooks data file--Protects you from duplicate transactions by integrating and tracking QuickBook's transaction ID--Stores all of your customer's, employee's, and vendor's banking information

Bank Reconciliation55
© 2011 Treasury Software
--Provides you with a full audit trail of all transactions--Enables you to manage untransmitted transactions (temporary holding, permanent holding, etc...)
QuickBooks® is a registered trademark of Intuit
6.1 Setup - QuickBooks
To use ACH Universal's integration package, you will need to have installed on your computer:--QuickBooks Pro, Premiere, or Enterprise - 2003 or later--ACH Universal 2011.0.4 (build 109) or later
QuickBooks - Setup1. Create a sub-account of your Bank account2. Enable bank account selection
Start QuickBooks and open the company you want to work with.
1. Create a sub-account of your Bank accountFrom the QuickBooks main menu select Lists > Chart of Accounts.On the lower left corner select Accounts > NewSelect 'Bank', then 'Continue'
Enter the name of your sub-account (we recommend something descriptive like 'ACH', 'EFT', 'DirectDeposit', etc...), check the 'sub-account' box and select your bank account that your ACH bank serviceis with.

For use with QuickBooks 56
© 2011 Treasury Software
If prompted, select 'No.
2. Enable bank account selectionDepending on your edition, this feature may be turned on/off by default.
From the QuickBooks main menu select Edit > Preferences > Payments > Company Preferences. Clear the 'Use undeposited funds' checkbox.
Note: QuickBooks documentation has this feature listed in 'Sales & Customers', rather than 'Payments'.The location may be updated in a future release of QuickBooks.

Bank Reconciliation57
© 2011 Treasury Software
QuickBooks® is a registered trademark of Intuit
6.2 Connecting to a company
First time connection
Start the connection process by selecting from Treasury Software's main menu QuickBooks >QuickBooks Integration
If nothing appears to be happening, QuickBooks is waiting for you to grant permissions. Click on your Windows toolbar to access QuickBooks.
For use with QuickBooks 58
© 2011 Treasury Software
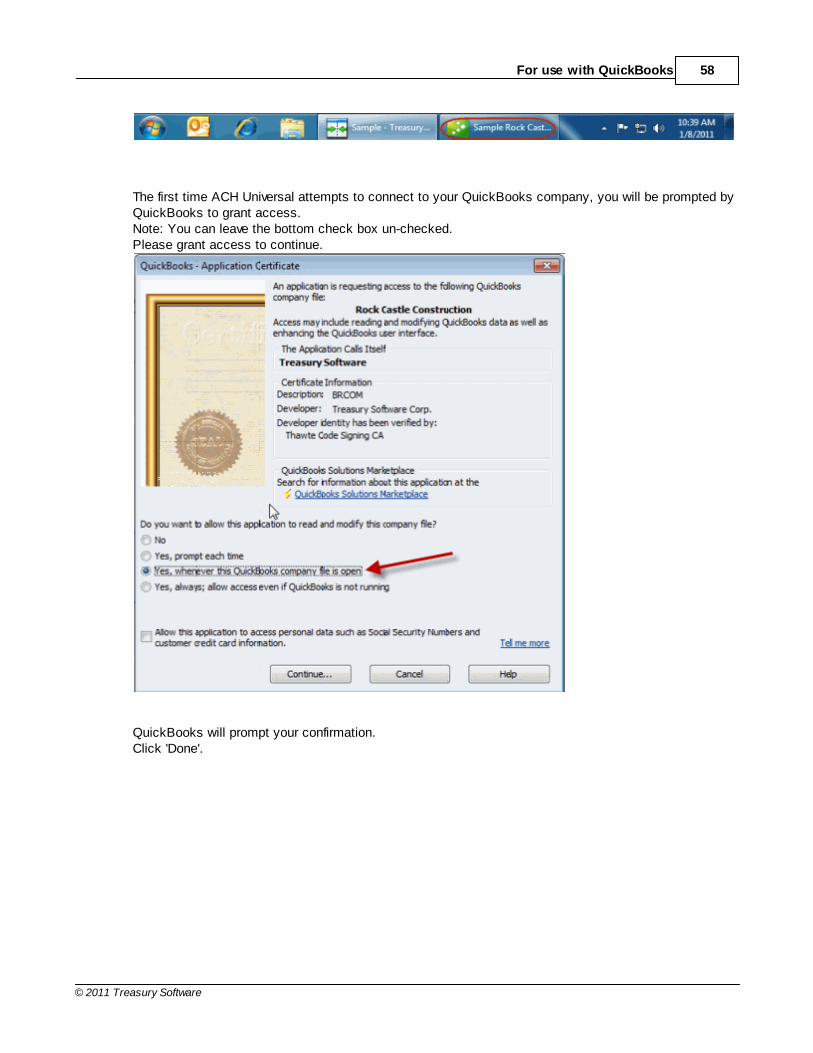
The first time ACH Universal attempts to connect to your QuickBooks company, you will be prompted byQuickBooks to grant access. Note: You can leave the bottom check box un-checked.Please grant access to continue.
QuickBooks will prompt your confirmation. Click 'Done'.

Bank Reconciliation59
© 2011 Treasury Software
Note: If you do not grant access, you will be unable to continue.
Please switchback and grant access within QuickBooks to continue.
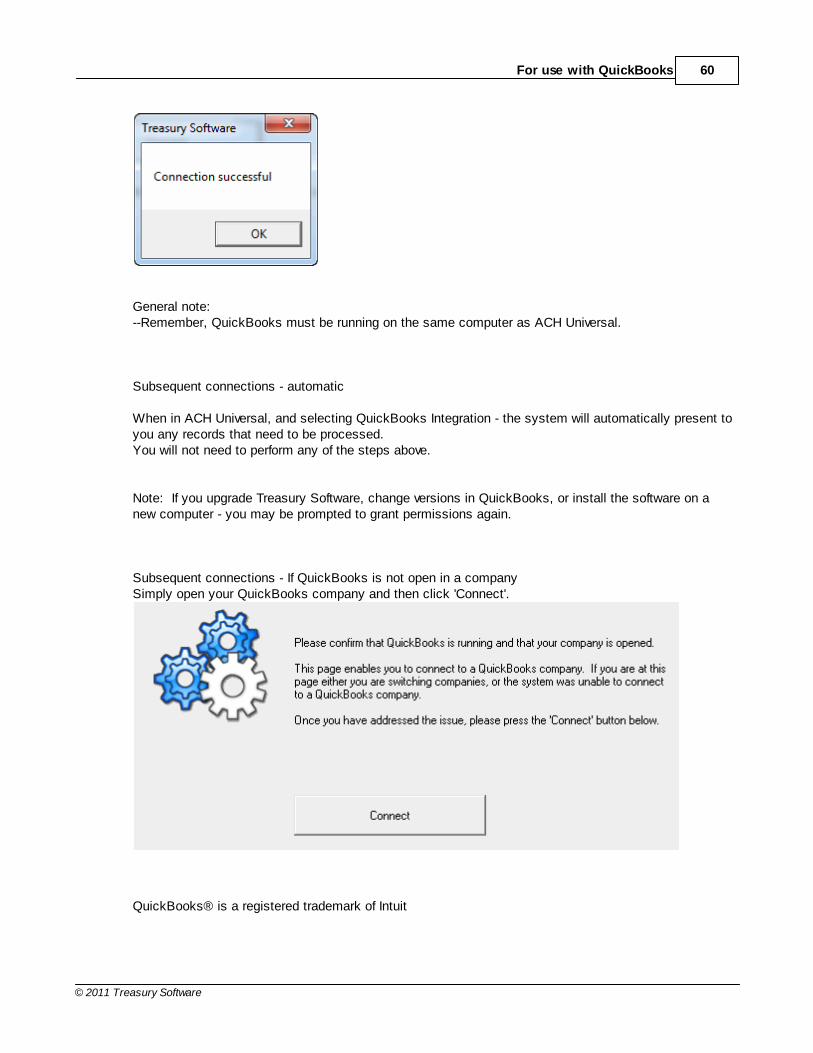
Congratulations, you have connected
For use with QuickBooks 60
© 2011 Treasury Software
General note:--Remember, QuickBooks must be running on the same computer as ACH Universal.
Subsequent connections - automatic
When in ACH Universal, and selecting QuickBooks Integration - the system will automatically present toyou any records that need to be processed.You will not need to perform any of the steps above.
Note: If you upgrade Treasury Software, change versions in QuickBooks, or install the software on anew computer - you may be prompted to grant permissions again.
Subsequent connections - If QuickBooks is not open in a companySimply open your QuickBooks company and then click 'Connect'.
QuickBooks® is a registered trademark of Intuit

Bank Reconciliation61
© 2011 Treasury Software
6.3 Setup - Bank Reconciliation
Once you have connected to a QuickBooks company for the first time, you will be prompted to selectthe QuickBooks account that has your electronic data in it.
For advanced setup, click here.
QuickBooks® is a registered trademark of Intuit
6.3.1 Advanced setup
To reach Advanced Setup, from the Treasury Software main menu select QuickBooks > QuickBooks Integration > Settings > Advanced
Typically, these settings do not need to be changed.

For use with QuickBooks 62
© 2011 Treasury Software
Effective DateAs you operate your business, each transaction date is recorded per your wishes in QuickBooks.Sometimes you pre-date or post-date transactions, which is fine.
However, when electronic transactions are sent to your bank, they are typically expecting the date yousend them to be in the future - as this is the 'effective date' of the transaction.
To minimize any chance of post-dated transactions, ACH Universal's default setting is the latter of theQuickBooks date and the next business date (as displayed in the second option).
You can over-ride this setting as needed here.
Send transactions to ACH UniversalThe default setting, and for ease of use - is to create a file once transactions are sent from QuickBooksto ACH Universal.
However, you may prefer to over-ride this setting if:--you are editing records in ACH Universal after sending them from QuickBooks--you are manually creating records in ACH Universal--there are internal control measures which require another individual to create the file--bank procedures require batch totals - which you would get from ACH Universalor any other advanced situation.
Default From/To Date The transactions page displays by default from 90 days in the past to 90 days in the future.This range should cover any post-dated entries (90 days in the past), as well as any future entries - such

Bank Reconciliation63
© 2011 Treasury Software
as payroll.
If you are constantly changing the default dates on the report, you can save yourself some time andchange the default range here.
QuickBooks® is a registered trademark of Intuit
6.4 Importing transactions
To reach this transactions screen, from the Treasury Software main menu select QuickBooks > QuickBooks Integration > Transactions
This screen is a 'Window' into your QuickBooks data. By default, it displays all records in yourQuickBooks account(s) that need be electronically transmitted.

For use with QuickBooks 64
© 2011 Treasury Software
Step #1 - View transactionsThe grid by default displays records which you have not yet processed. You can change the From andTo dates, as well as the default date range (details below).
In a basic situation, the system will display your new transactions - and all of them can be sent to ACHUniversal. ACH Universal will then create an ACH file, which is sent to your bank.
Profiles in ACH UniversalIn QuickBooks you, or a colleague, have created profiles for each of your Customers, Employees andVendors. This profile contains basic information that you need to mail checks and invoices to - such asstreet address, city, etc...
In a similar fashion, ACH Universal maintains profiles - but keeps only banking information, such as theirrouting / ABA number and account number.

Bank Reconciliation65
© 2011 Treasury Software
No Profile fieldIf the 'No Profiles' checkbox is checked, this means that you have created a transaction in QuickBooks,but ACH Universal has not created a profile on this entity (customer, employee or vendor).
In order to pay/collect from this entity, you are going to need to create a profile and complete it. ACH Universal helps you do this easily. We'll show you in Step #2.
Note: Transactions marked 'No profile' cannot be electronically fulfilled. The system 'remembers' thatyou have not electronically fulfilled this transaction and will display this each time until the profile iscomplete. At that time, the checkbox will no longer be marked and the transaction will be completed.
Profile info missing (not setup) If the 'Profile info missing' checkbox is selected, this means that the profile has been created, but youwill need to finish it.
Note: Transactions marked 'Profile info missing' cannot be electronically fulfilled. The system'remembers' that you have not electronically fulfilled this transaction and will display this each time untilthe profile is complete. At that time, the checkbox will no longer be marked and the transaction will becompleted.
Summary counts and totalsThe summary counts and totals include all transactions which have completed profiles, have not yetbeen sent and have not been marked to be held.
Step #2 - Transmit to ACH Universal
Click on the 'Send transactions to ACH Universal' button to create an ACH file with the eligible records inthe grid. You can then transmit the ACH file to your bank.
However, any records are marked as 'No profile', or 'Profile info missing' will not be included in the ACHfile.
To get these records fixed (unmarked), you will need to either create a profile for them, or fill in missinginformation for their profile. You can see at a glance the records that need to be addressed by clickingon the 'Attention needed ...' button in red text. For information on how to fix these records, please seeeither:Adding ProfilesEditing Profiles
QuickBooks® is a registered trademark of Intuit

For use with QuickBooks 66
© 2011 Treasury Software
6.4.1 Holding and over-riding records
In a perfect world, all of the transactions that you create in QuickBooks are to be sent for immediateelectronic processing.
As we know, this is not always the case. Sometimes payments are held temporarily - or permanentlycanceled and sometimes payments need to be resent.
Marking recordsACH Universal provides you with the tools to do this. Uncheck the checkbox to display your recordcontrols (circled in red).
Holding transactions - TemporarySelect the record(s) and click on 'Mark - Do not Import (temporary)'.This will mark the records as 'Do Not Import' during the current submission to ACH Universal.
The records will be automatically displayed as available to be transmitted the next time your view therecords.
Notes:--If you re-run or refresh the grid prior to transmission, this will clear your marked records. You will needto re-mark them.
Holding transactions - PermanentSelect the record(s) and click on 'Mark - Do not Import (permament)'.
If you no longer want a transaction to be transmitted electronically, you can mark the record(s) as 'Mark- Do not Import (permanent)'
Marking records 'Do not transmit' stop the transactions from being imported now - or in the future.
If in the future, you decide that you need to process this record, see the instructions below for 'Mark -

Bank Reconciliation67
© 2011 Treasury Software
Import (over-ride)'.
Mark - Import (over-ride).Select the record(s) and click on 'Mark - Import (over-ride)'.
Use 'Mark - Import (over-ride)' if you need to:--process a transaction that you previously put on a permanent hold, or--you need to re-transmit a record.
An example of re-transmission: If a bank account number that a vendor gave you was wrong - and theoriginal transaction was returned. You can then use the over-ride feature to re-transmit this.
Note: In order to select a record, you'll need to view it. However by default, previously transmittedrecords and those placed on permanent hold - are suppressed from being displayed. See the sectionbelow to display these records.
Displaying previously transmitted and permanent 'on-hold' recordsBy default, ACH Universal will suppress displaying previously transmitted and permanent 'on-hold'records. To display these records, un-check 'Hide transactions already imported'.
Why would I want to view these records?Typically, you would not want to view these records - that is why we suppress them by default.However, you would want to display these records for:--1. If you need to re-transmit a transaction that originally failed.--2. If you need to transmit a record that you placed on permanent hold.
QuickBooks® is a registered trademark of Intuit
Reference 68
© 2011 Treasury Software
7 Reference
7.1 Accounts
Overview
An account is used to contain all data imported, stored, and used by Bank Reconciliation or BankPositive Pay. Using an account organizes data around a logical point (for example, payroll records intoan account called "Payroll") and keeps it separate from the data from other accounts.
Why not use the Sample account?
Bank Reconciliation and Bank Positive Pay come with a built-in account, Sample, which is used solelyto demonstrate use of the system. You should NEVER use the Sample account for your company'saccount as it resets each time the program is started. This means that every time the program runs, theSample account has no data associated with it. You should create an account and always use it foryour data.
Valid Account Names
You should give your accounts names that make sense in the context of the data. For example, call theaccount "Payroll" for payroll data. Calling it "Data Set A" is unintuitive and is likely to cause at bestconfusion and at worst, erroneous imports.
There are only a few rules for account names.1. They can only contain letters, numbers and the underscore, no special characters or spaces.2. Do not start an account name with a number.3. Must be unique (cannot have multiple accounts named Payroll, for obvious reasons).4. You are allowed up to 255 characters for the name, but for practical reasons related to your use andto internal
storage, you should keep the name under 20 characters.
To learn how to create the account see Creating an accountTo use a previously created account see Switching accountsTo delete an account, see Deleting an account
7.1.1 Creating an account
Creating the account
1. From the Main Screen, select File, then New Account

Bank Reconciliation69
© 2011 Treasury Software
Figure 1 - Account Creation Wizard
The two choices are:Create an account + Add to catalogBy using this option, the Account Creation process will create a new account and add it to the localcatalogAdd an existing account to your catalogSelect if the account already exists
By far the most common option is to simply create the account from scratch. Leave that selected andclick Next.
2. You will now see this screen (Figure 2 below):

Reference 70
© 2011 Treasury Software
Figure 2 - Create the Account
Enter the name you wish to use for the account. Pick something that will help you distinguish theaccount's meaning (for example, Payroll for a payroll account). Bank Reconciliation will not allowspaces in account names so use the underscore (_) or internal capitalization to make the name clear.
Remember:Do not start an account with a numberKeep the account name under 20 charactersIt must be unique from other account names
After entering, click Next.
3. In Bank Reconciliation only, you will now see this screen (Figure 3 below):
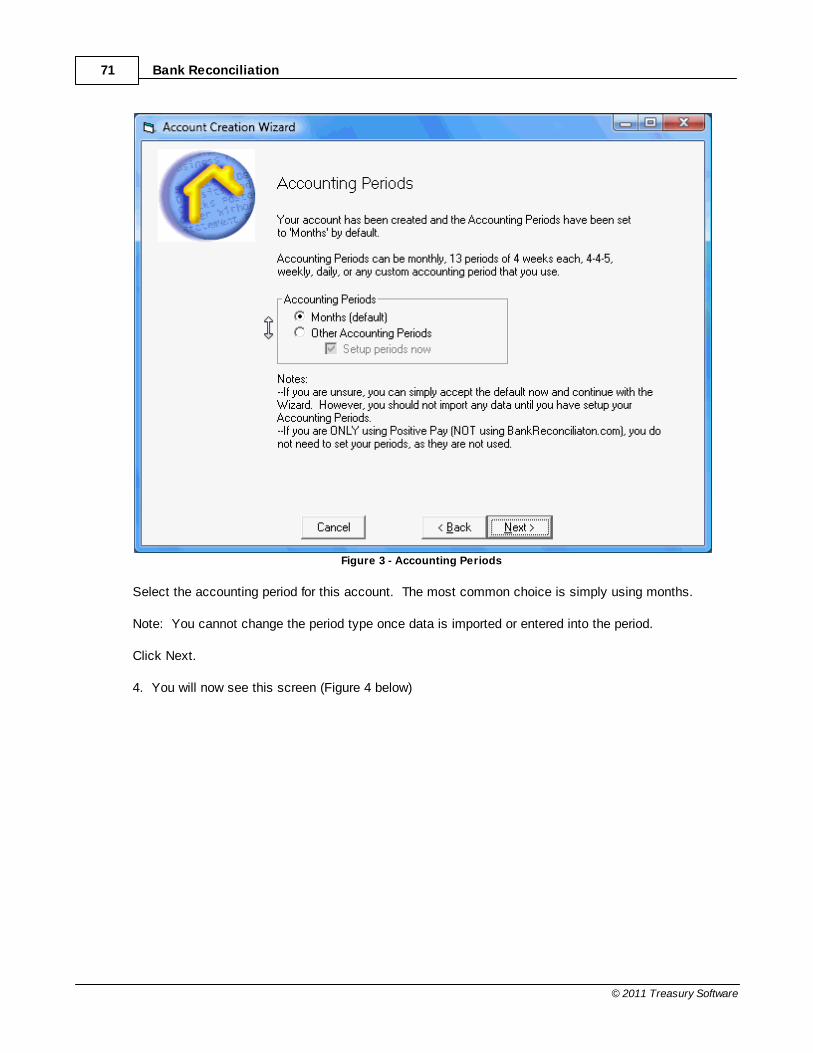
Bank Reconciliation71
© 2011 Treasury Software
Figure 3 - Accounting Periods
Select the accounting period for this account. The most common choice is simply using months.
Note: You cannot change the period type once data is imported or entered into the period.
Click Next.
4. You will now see this screen (Figure 4 below)

Reference 72
© 2011 Treasury Software
Figure 4 - Congratulations
The account has now been successfully created. Click Finish.
Bank Positive Pay only
At this point, Bank Positive Pay will prompt you to set up your account at this time. Click Yes and youwill see the screen below.

Bank Reconciliation73
© 2011 Treasury Software
Figure 5 - Account Information
The screen may be different based on your bank, but in this screen you would enter information such asthe bank account number, specific bank number as provided by your bank, or any other accountinformation. Once entered, click Next, then click Finish.
Account creation and setup is now complete. To begin creating positive pay files, see Imports
Related Topics
Switching accounts to learn how to move among accounts
7.1.2 Switching accounts
Overview
Switching accounts is necessary when you are using multiple accounts in Bank Reconciliation and youwish to move from the current account to another.
Required
It is required that you have created at least one account.
Note: The Sample account should never be used for live data.

Reference 74
© 2011 Treasury Software
Steps
Switching accounts is very straight-forward. There are two ways to do it. For either method, you need tobe at the Bank Reconciliation Main Screen.
Method One
For this example, we are in the Checking account and want to switch to the Payroll account.
Look at Figure 1 (below), a zoomed in shot of the top of the Main Screen.
Figure 1 - Account Selection box
The dropdown box with the word "Checking" is the Account Selection box. The working account isalways displayed in this box. To switch accounts, simply change the dropdown to a different account. For this example, as soon as I change it to Payroll, Bank Reconciliation will load the appropriatesettings in the background. See Figure 2 (below) for the finished product.

Bank Reconciliation75
© 2011 Treasury Software
Figure 2 - Account changed to Payroll
Method Two
1. Select File, then Open/Select Account.2. Browse to the appropriate .brd file and click Open.
7.1.3 Deleting an account
Overview
Deleting an account should not be undertaken lightly. Any data imported under that account name willbe inaccessible. Please only delete an account when you are sure the account data will never beneeded by Bank Reconciliation again (without having to be reimported).
Steps
1. At the Bank Reconciliation Main Screen, select File from the main menu.2. Select Maintenance3. You will see Figure 1 (below).

Reference 76
© 2011 Treasury Software
Figure 1 - Maintenance dialog box
Click "List of Accounts" to switch to that tab.
4. You will see Figure 2 (below).
Figure 2 - List of Accounts tab
You will see listed every account available to Bank Reconciliation. There will always be a Sample. Inthis case, two other accounts have already been created (Payroll and Checking). Click "Delete

Bank Reconciliation77
© 2011 Treasury Software
Accounts" to switch to that second level tab.
5. You will see Figure 3 (below).
Figure 3 - Delete Accounts tab
To delete Payroll, click the gray box to the left of Payroll. This will highlight the entire row in blue. Clickthe Delete button.
6. A dialog box will appear to confirm the deletion. Click Yes to delete the account, click No to cancelthe deletion.
7. Exit and re-enter Bank Reconciliation.
7.2 Definitions
7.2.1 Mapping Fields
Mapping is the process that translates your internal data field names to names with which BankReconciliation is familiar.
For information on the available fields, see the field definition.
7.2.1.1 Amount
Amount
Usage: Dollar amount of a transactionRequired: Yes (unless mapping Debit/Credit or Amount_Reverse_Sign)Restrictions: Cannot map with Debit/Credit or Amount_Reverse_Sign fields

Reference 78
© 2011 Treasury Software
Amount is used when the transaction data represents both positive and negative numbers.
For all data:Positive increases a balanceNegative decreases a balance
Bank account balance and general ledger account balance are inverses of each other. A transactionthat increases the general ledger balance decreases the bank balance and vice-versa. See Debit versusCredit for more information.
7.2.1.2 Amount_Reverse_Sign
Amount_Reverse_Sign
Usage: Used when entire import reduces balance, but the amounts are absolute (positive)Required: NoRestrictions: Cannot map with Amount, Debit/Credit, or Sign fields.
A common situation for using Amount_Reverse_Sign is when a bank transmits separate files for creditand debit transactions, but all amount values are absolute.
When imported as bank data, map the debit file using Amount_Reverse_Sign for the amount values, butuse Amount for the credit file.
For more information on meaning of debit and credit, see Debit versus Credit
7.2.1.3 BAI
BAI
Usage: Used to determine sign in modified inter-bank BAI (Bank Administration Institute) filesRequired: NoRestrictions: All data in Amount field must be positive. Do not use with Sign.
If choosing between the Sign field and the BAI field, use the Sign field as accuracy will be the same butprocessing will be faster..
7.2.1.4 Check Number
CheckNumber
Usage: There are separate CheckNumber and Description columns (typically General Ledger). Required: Yes (can be turned off).Restrictions: Do not use with CheckNumber+Description, CheckNumber+TrailingVoid, orLeadingVoid+CheckNumber
Check number can be formatted internally as:Numeric e.g. 8524Prefaced with text information e.g. Check # 8524 or #8524
If the field containing the check number also contains a void indicator, either leading or trailing, see

Bank Reconciliation79
© 2011 Treasury Software
LeadingVoid+CheckNumber or CheckNumber+TrailingVoid
See Turning off check number requirement for non-check based accounts.
7.2.1.5 Check Number + Description
CheckNumber+Description
Usage: Typically used with Bank imports when the Description field also contains the check numberRequired: NoRestrictions: Do not use with CheckNumber
This field is rarely used. Some banks used to export check number and description as one field, butseldom is that the case today. Retained for backward compatibility, but in almost every case, you will
use CheckNumber.
7.2.1.6 Description
Description Usage: Textual description of the transaction. Typically used with General Ledger imports to capturevendor name or code.Required: NoRestrictions: None
If the Description also contains the transaction's check number, see CheckNumber+Description
7.2.1.7 Date
Date
Usage: A date in any Windows-compatible format.Required: Yes Restrictions: None
By default, the system assumes you are using a date in the form MM/DD/YYYY. This also includesdates of form M/D/YYYY.
If your data uses a different date format, see Changing the default date format.
7.2.1.8 Filter
Filter
Usage: Use to restrict import based on certain criteria (example: import data into different accountsbased on a certain field).Required: NoRestrictions: Not necessary to map if only one account is present in data file.
Filter is used mainly with Bank data in situations where transaction records for multiple accounts isrecorded in one file. By using Filter, it is possible to import the data into the proper Bank Reconciliationaccount based on a filter on one field in the file.
For example, if a checking account ends 123 and savings account 456, can set the Filter text to be 123.

Reference 80
© 2011 Treasury Software
On the import, Bank Reconciliation will separate the data into the proper Bank Reconciliation account.
See Setting bank account number for more information.
7.2.1.9 Matching_Field
Matching_Field
Usage: Use when data has a corresponding field holding a unique identifier solely for purpose oftransaction matchingRequired: NoRestrictions: None
7.2.1.10 Sign
Sign
Usage: Used to hold the debit or credit text, typically for bank importsRequired: No Restrictions: Only use when all data in Amount is positive. Can only map with Amount.
Sign is used when amount values are absolute and the sign is indicated in a separate field. Forexample, the file may have data similar to:
47.22 debit68.19 debit32.40 credit101.80 debit
The first column would be mapped as Amount; the second column would be mapped as Sign.
The Sign field is Bank-centric. In other words, Bank Reconciliation will treat amounts associated with"debit" as being negative.
For more information on debit and credit related to sign, see Debit versus Credit
If your data uses indicators other than "debit" and "credit", see Changing debit and credit text
7.2.1.11 Site
Site
Usage: Used typically for depository accounts with MICR encoding on deposit slipsRequired: NoRestrictions: None
Site adds an additional attribute for the system to use when performing Automated TransactionMatching.

Bank Reconciliation81
© 2011 Treasury Software
7.2.1.12 Void Check Indicator
Void Check Indicator
Usage: Used exclusively for importing check registersRequired: NoRestrictions: None
Map when importing a check register and the void indicator is in a separate column from the checknumber. By default, Bank Reconciliation uses a void indicator of "v" (or "V", case-insensitive).
If your void indicator is in the same field as the check number, see CheckNumber+TrailingVoid orLeadingVoid+CheckNumber.
If you need to change the void indicator, see Changing void check indicator for more information.
7.2.1.13 CheckNumber + TrailingVoid
CheckNumber + TrailingVoid
Usage: Used exclusively for general ledger data when the void indicator is appended to the checknumber (e.g. 1234v)Required: NoRestrictions: Only available on General Ledger imports
Commonly used when importing check registers, mapping this field will indicate to Bank Reconciliationthat voided checks will have the void indicator appended to the check number. For example, data maylook similar to:
Figure 1 - Trailing Void Indicator
In Figure 1 (above), check 1860 is as voided check in the amount of 67.89. The other 3 checks areissued checks. The Check # field should be mapped as CheckNumber+TrailingVoid. Note: "v" is thedefault void indicator. See Changing the void indicator.
Related
See LeadingVoid+CheckNumber if the void indicator prefixes the check number.
See Changing the void indicator to set the specific void indicator for your data.
7.2.1.14 LeadingVoid + CheckNumber
LeadingVoid + CheckNumber
Usage: Used exclusively for general ledger data when the void indicator is prepended to the checknumber (e.g. v1234)Required: NoRestrictions: Only available on General Ledger imports

Reference 82
© 2011 Treasury Software
Commonly used when importing check registers, mapping this field will indicate to Bank Reconciliationthat voided checks will have the void indicator prepended to the check number. For example, data maylook similar to:
Figure 1 - Leading void indicator
In Figure 1 (above), check 1860 is a voided check in the amount of 67.89. The other 3 checks areissued checks. The Check # field should be mapped as LeadingVoid+CheckNumber. Note: "v" is thedefault void indicator. See Changing the void indicator.
Related
See CheckNumber if there is no void indicator in the same field as the check number.See CheckNumber+TrailingVoid if the void indicator prefixes the check number.
See Changing the void indicator to set the specific void indicator for your data.
7.2.2 General Information
7.2.2.1 Debit versus Credit
For any account, a transaction either increases or decreases the account balance. However, anincrease is not always a debit or always a debit. The context determines the meaning.
Bank General Ledger
Debit Decrease Increase
Credit Increase Decrease
Debit transactions include:Voided checksDeposits
Credit transactions include:Issued checksWithdrawals
For example, a file consisting solely of voided checks imported as general ledger data can be referred toas debit transactions, but if imported as bank data, those same transactions are credit transactions.
During the mapping process, you will determine what fields in the source file represent the dollar valuefor the transaction. These will sometimes all be positive, even when they decrease the balance. Youmust understand how each transaction affects the balance for that data set (bank or general ledger) inorder to determine which field is the right one. Mapping the field improperly will lead to inaccuratematching because the sign will be incorrect.

Bank Reconciliation83
© 2011 Treasury Software
7.2.2.2 Changing void check indicator
When importing a check register, both issued as well as voided checks are likely to be included. Bydefault, the system will interpret a check number ending with a "v" to be a voided check e.g. 4523v wouldindicate check # 4523 and it would be a voided check. However, not all systems use the sameindicator. Follow these steps to change the indicator for your data.
1. While working in the appropriate account, select File from the main menu2. Select Options, then General.3. In the corresponding textbox for "Void Check Indicator", type in your indicator.4. Click Close.
The system will now use the indicator you inputted to determine voided checks for all imports into thisaccount.
Not sure how to change accounts? See Switching accounts.
7.2.2.3 Changing debit and credit text
Some banks will send transactional data with all amounts as absolute (positive) values. Alongside thedata will be a field indicating whether the transaction was debit or credit.
For example, data could look similar to:
47.22 debit68.12 debit42.14 debit98.11 credit
The first column would be mapped as the Amount field; the second column would be mapped as theSign field.
By default, Bank Reconciliation will use "debit" and "credit" to represent those transactions as such.
However, what if the credit used is "d" and "c"?
1. Select File from the main menu2. Select Options, then General3. Under the Import tab, look for "Text for 'Debit' "4. In its corresponding textbox, change "debit" to "d"5. Follow same steps with "Text for 'Credit' " entry6. Click Close
When working with your data, replace "d" and "c" above with the text for your particular situation.
7.2.2.4 Turning off check number requirement
Turn off check number requirement
Not all accounts are check-based. For example, the concept of check number is meaningless for adepository account. By default, CheckNumber (or one of the fields that contains CheckNumber) isrequired. However, you can turn off this requirement.

Reference 84
© 2011 Treasury Software
1. From the Main Screen, select File, then General, then Options.2. Under the Import tab, find the option labeled "Check number mapping required?" Set it to "Off." 3. Click Close.
7.2.2.5 Turning off decimals in amount
Suppose your bank data resembles the following:
Figure 1 - Amounts w ithout decimals
In Figure 1 above, Bank Reconciliation will treat each of the amounts as a whole dollar value. In otherwords, Bank Reconciliation will handle check 1892 as being issued for the amount $42,793.00. However, that amount should actually be $427.93. Follow these steps to turn on decimal periods. Thebank and general ledger can be set separately as you will see below.
1. At the Bank Reconciliation Main Screen, Select File from the main menu.2. Select Options, then General.3. Under the Import tab:
a. For Bank data, set "Imported amounts need decimals - Bank" to "On" b. For General Ledger data, set "Imported amounts need decimals - G/L" to "On"
4. Click Close.
7.2.3 Options
Bank Reconciliation is incredibly customizable, from date formats and embedded check numbers tocustom imports and automated scheduling. Taking advantage of some of these features involves settingthe appropriate options.
Required:You must be working in the appropriate account.
Options are account-specific and will not care over to multiple accounts. This is good because it allowsyou to keep them static for data that will always be formatted the same. However, you must take care tochange them in the correct account.
All these options are found by:1. Select File from the main menu2. Select Options, then General
You will see Figure 1 (below).

Bank Reconciliation85
© 2011 Treasury Software
Figure 1 - Options dialog box
There are 7 tabs available:Import (currently selected)MatchReportsSystemBAIResume StartupBank CodeCustom
7.2.3.1 Import
The Import tab is selected by default when General Options is loaded. It looks like Figure 1 (below).

Reference 86
© 2011 Treasury Software
Figure 1- Options dialog box (Import tab selected)
Below are all the options available under the Import tab. Click the link for more information. Please note:options can be set differently for bank and general ledger data. The options below group multiples intoone link to save space. These will have an X where the option would be with the type (bank, G/L) listed inparentheses and separated by semicolons.
Text for 'Check'Void Check IndicatorText for 'Debit'Text for 'Credit'Check Number Mapping Required?Date Mapping Required?Multi-line Check FormatImported amounts need decimals - X (Bank;G/L)Custom Date Import (CDI): X (Bank; G/L; CC)CDI: Source Format X (Bank; G/L; CC)CDI: Separator X (Bank; G/L; CC)CDI: Embedded Start X (Bank; G/L; CC)X - Daily Reconciliations (Bank; G/L)X Import contains: (Bank; G/L)X Import: Search for non-check dupes (Bank; G/L)X Import: Stop import or exclude on dupes? (Bank; G/L)X Import: Use multi-period warnings (advanced) (Bank; G/L)Filter Import - X (Bank; G/L)

Bank Reconciliation87
© 2011 Treasury Software
SQL - Timeout (in seconds)# X copy and paste (columns; rows)G/L Only: Suppress Void Indicator when embeddedText for Manually Added recordsSuppress void check warning on importSuppress prompt to show file after creation
7.2.3.2 Match
Enter topic text here.
7.2.3.3 Reports
Enter topic text here.
7.2.3.4 System
Enter topic text here.
7.2.3.5 BAI
Enter topic text here.
7.2.3.6 Resume Startup
Enter topic text here.
7.2.3.7 Bank Code
Enter topic text here.
7.2.3.8 Custom
Enter topic text here.