Embed Size (px)
Citation preview

AutoVue Integration SDK&
Sample Integration for Filesys DMS
Installation Guide
Cimmetry Systems Corp.

Cimmetry Systems Corp.

AutoVue Integration SDK
ContentsINTRODUCTION .......................................................................1SYSTEM REQUIREMENTS .....................................................2INSTALLATION PREREQUISITES .......................................3
Download the Eclipse WTP 1.5.2 .................................................... 3Eclipse WTP installation for Solaris .............................................. 3
INSTALLATION .........................................................................5Install the AutoVue Integration SDK ............................................ 5Create a New Dynamic Web Project .............................................. 5
Importing a WAR File ............................................................... 6Create a New Dynamic Web Project ......................................... 9
Create Tomcat server .................................................................... 15Add Tomcat Server Runtime to the Project Library ................. 19Define Run Configuration ............................................................. 22Configure the Project .................................................................... 23
Configure the web.xml file ...................................................... 23Configure the Applet File ......................................................... 24Configure the jVue.html file .................................................... 25Debug Mode Configuration ..................................................... 25Running the Sample Integration ............................................... 26
TROUBLESHOOTING ............................................................30All Systems ...................................................................................... 30
Setting the Compiler Compliance Level .................................. 30Fixing the Bootstrap Problem .................................................. 33Fixing the localhost Problem ................................................... 34Fixing the File Not Found Problem ......................................... 34Fixing Tomcat Server Publishing Failure Problem .................. 35
Linux Systems ................................................................................. 35Installing Java for Firefox ........................................................ 35
FEEDBACK ...............................................................................37General Inquiries ........................................................................... 37Sales Inquiries ................................................................................ 37Customer Support .......................................................................... 37
Cimmetry Systems Corp.

AutoVue Integration SDK
Cimmetry Systems Corp.

AutoVue Integration SDK 1
IntroductionThis document describes the procedure for building and running a dynamic Web project in the Eclipse Web Tools Platform (WTP) IDE for the AutoVue Integration SDK and the Filesys DMS sample. To create and run the new dynamic Web project, complete the following steps:
1 Install the AutoVue Integration SDK.2 Import a WAR file or Create a New Dynamic Web Project3 Copy AutoVue Integration SDK and Filesys DMS application files in the
project workspace 4 Create Tomcat server5 Add Tomcat runtime to project library6 Create run configuration7 Run the project
This document also covers troubleshooting.
Cimmetry Systems Corp.

2 AutoVue Integration SDK
System RequirementsThe recommended system hardware configuration is:
• A system supporting the JDK/JRE listed below with at least 512MB of main memory (1GB recommended).
• At least 400MB of free disk space to install the software components and examples.
The installation instructions cover the following operations systems:
• Windows® operating systems 2000 and 2003.• Redhat Linux Enterprise 4• Solaris 10
Windows 2000 and 2003
• AutoVue Client-Server Edition 19.1• SUN JDK 1.5.0• Eclipse Web Tools Platform (WTP) 1.5.2• Servlet Engine Jakarta Tomcat 5.5.20• Mozilla Firefox 2.0 for Windows or Microsoft Internet Explorer 6.0 Sp2.
Redhat Linux Enterprise 4
• AutoVue Client-Server Edition• Sun jdk 1.5.0 for Linux• Eclipse Web Tools Platform (WTP) 1.5.2• Servlet Engine Jakarta Tomcat 5.5.20• Mozilla Firefox 2.0 for Linux
Solaris 10
• AutoVue Client-Server Edition 19.1• SUN JDK 1.5.0• Eclipse IDE 3.2.1 and Web Tools• Servlet Engine Jakarta Tomcat 5.5.20• Mozilla Firefox 2.0 for Solaris
Cimmetry Systems Corp.

AutoVue Integration SDK 3
Installation PrerequisitesThis manual assumes you are familiar with Java development and with basic Web application development concepts, such as deployment descriptors and WAR archives. Understanding XML language is beneficial, but not mandatory.
The software products listed in the System Requirements must be installed and configured on your system according to the manufacturer's instructions.
Useful commands on UNIX and Linux:
• To extract files from a TAR file, use the tar command: tar -xvk <tarfile>• To unzip GZIP files, use the gunzip command: gunzip <gzip file>• To unzip ZIP files, use the unzip command: unzip <zip file>
Download the Eclipse WTP 1.5.2 If you do not have Eclipse WTP installed on your machine, you can download the WTP-all-in-one module from http://www.eclipse.org/webtools/ and unzip it in your working directory.
The Eclipse Web Tools Platform extends the Eclipse platform with tools for developing J2EE Web applications. The WTP all-in-one module includes the complete set of software you need to start using WTP immediately. This package already has WTP combined with the complete set of prerequisites. You do not need any thing else.
Eclipse WTP installation for SolarisThere is no Eclipse WTP all-in-one module for Solaris. Take the following extra steps.
1 Download the following files: • The current version of the Eclipse driver: eclipse-SDK-3.2.1-solaris-
gtk.zip• The EMF driver used in this build: emf-sdo-xsd-SDK-2.2.1.zip• The GEF driver used in this build: GEF-SDK-3.2.1.zip• Java EMF Model Runtime driver used in this build: JEM-SDK-1.2.1.zip• The Eclipse Web Tools Platform Project used in this build: wtp-sdk-R-
1.5.2-200610261841.zip
Cimmetry Systems Corp.

4 AutoVue Integration SDK
2 Complete the installation in the following sequence:a. eclipse-SDK-3.2.1-solaris-gtk.zipb. emf-sdo-xsd-SDK-2.2.1.zipc. GEF-SDK-3.2.1.zipd. JEM-SDK-1.2.1.zipe. wtp-sdk-R-1.5.2-200610261841.zip
3 Run Eclipse WTP (<eclipse directory>/eclipse).
Cimmetry Systems Corp.

AutoVue Integration SDK 5
InstallationTake the following installation steps:
1 Install the AutoVue Integration SDK (page 5)2 Create a New Dynamic Web Project (page 5)3 Create Tomcat server (page 15)4 Add Tomcat Server Runtime to the Project Library (page 19)5 Define Run Configuration (page 22)6 Define Run Configuration (page 22)7 Configure the Project (page 23)
Install the AutoVue Integration SDKThe distribution contains three folders: wins32, linux and solaris. Each of these folders contains the installer of the AutoVue Integration SDK 19.1 for the corresponding platform:
• For Windows (2000 or 2003), go to the win32 folder and launch the setupwin32.exe file.
• For Linux (Redhat Linux Enterprise 4), go to the linux folder and launch the setuplinux.bin file. Make sure that you have the privileges to run this file. Otherwise, run the command: chmod +x setuplinux.bin
• For Solaris, go to the solaris folder and launch the setupsolarisSparc.bin file. Make sure that you have the privileges to run this file. Otherwise, run the command: chmod +x
setupsolarisSparc.bin
Create a New Dynamic Web ProjectThe Sample Integration for Filesys DMS is a dynamic web application. In this section we show you two ways to create the Filesys project. The first one consists of importing a WAR file. The second one consists of creating a dynamic Web project in the Eclipse WTP IDE.
Cimmetry Systems Corp.

6 AutoVue Integration SDK
Importing a WAR FileTake the following steps to create the Filesys web project easily:
1 Select File > Import.2 In the Import dialog, select WAR file, then click Next.
Cimmetry Systems Corp.

AutoVue Integration SDK 7
3 Click Browse to import the filesys.war file, which is located under filesys\eclipseProject\Vuelink_war.
Cimmetry Systems Corp.

8 AutoVue Integration SDK
4 Click Finish to populate the Web project.
5 Unzip the <Autovue Integration SDK installation directory>/filesys/database/fileysRepository.zip file in a location of your choice (<filesys data repository>). The <filesys data repository> is the repository that will contain the Filesys DMS data, such as documents, XRefs, markups, and so on.
6 Click Yes if Eclipse asks you to open the J2EE perspective for this project.
Cimmetry Systems Corp.

AutoVue Integration SDK 9
Note: At this stage there are still some problems, as shown in the following figure. To fix these problems, take the installation steps in the rest of this document.
If you run into complier and compliance problems, see section troubleshooting.
This concludes the first approach to creating a dynamic web page. Section Create a New Dynamic Web Project (page 9) shows a different approach; how to create a web page using the Eclipse WTP IDE.
To continue the installation, skip sections Create a New Dynamic Web Project (page 9) and Copy Filesys DMS Application Files (page 14), and go directly to section Create Tomcat server (page 15).
Create a New Dynamic Web ProjectThis section describes the procedure for creating a dynamic web project. This procedure is also documented in the Eclipse help environment and it is accessible from the Help Content window.
To create a new dynamic Web project, take the following steps:
1 Open the J2EE perspective.2 Select File > New > Project from the main menu.
Cimmetry Systems Corp.

10 AutoVue Integration SDK
The New Dynamic Web Project wizard starts.
3 Follow the project wizard prompts:
Cimmetry Systems Corp.

AutoVue Integration SDK 11
a. Open the Web folder, select Dynamic WEB Project, then click Next.
The Dynamic Web Project window appears.
Cimmetry Systems Corp.

12 AutoVue Integration SDK
b. Enter “filesys” in the Project name field, then click Next. You can choose a different location from the default one. In this case, clear the Default Use checkbox and browse to the new location.
Cimmetry Systems Corp.

AutoVue Integration SDK 13
4 Set the Java version to 5.0, then click Next.
Cimmetry Systems Corp.

14 AutoVue Integration SDK
The Web Module settings display.
5 Click Finish.
Note: If Eclipse asks you to open the J2EE perspective for this project, click Yes.
Copy Filesys DMS Application FilesTo copy the AutoVue Integration SDK and Filesys DMS application files in the workspace project, complete the steps below. All the ZIP files are in the /filesys folder.
1 Unzip the filesys\eclipseProject\Vuelink_zip\src.zip file in the <working directory>\workspace\filesys folder.
2 Unzip the filesys\eclipseProject\Vuelink_zip\jvue.zip file in the <working directory>\workspace\filesys\WebContent folder.
3 Unzip the filesys\eclipseProject\Vuelink_zip\WEB-INF.zip file in the <working directory>\workspace\filesys\WebContent folder.Note: This action will overwrite the existing WEB-INF directory.
4 Unzip filesys\database\fileysRepository.zip file in the location of your choice (<filesys data repository>).
Cimmetry Systems Corp.
AutoVue Integration SDK 15
Note:
• The <working directory> is the directory containing the Eclipse workspace directory.
• The <filesys data repository> is the directory containing the Filesys DMS data (documents, xrefs, markups, and so on.)
5 Return to Eclipse IDE, select the filesys project, then press F5 to refresh the project.
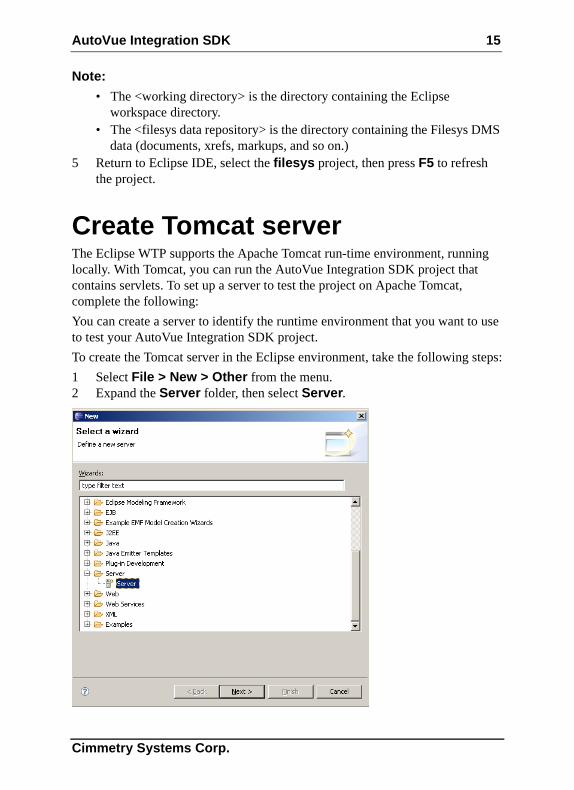
Create Tomcat serverThe Eclipse WTP supports the Apache Tomcat run-time environment, running locally. With Tomcat, you can run the AutoVue Integration SDK project that contains servlets. To set up a server to test the project on Apache Tomcat, complete the following:
You can create a server to identify the runtime environment that you want to use to test your AutoVue Integration SDK project.
To create the Tomcat server in the Eclipse environment, take the following steps:
1 Select File > New > Other from the menu.2 Expand the Server folder, then select Server.
Cimmetry Systems Corp.

16 AutoVue Integration SDK
3 Click Next. The Define a New Server wizard opens. This wizard lets you define a new server that contains information required to point to a specific runtime environment for local or remote testing, or for publishing to an application server.
4 Choose the type of server to create. Select Apache > Tomcat v5.5 Server. Enter “localhost” in the Server’s host name field and click Next.
Cimmetry Systems Corp.
AutoVue Integration SDK 17
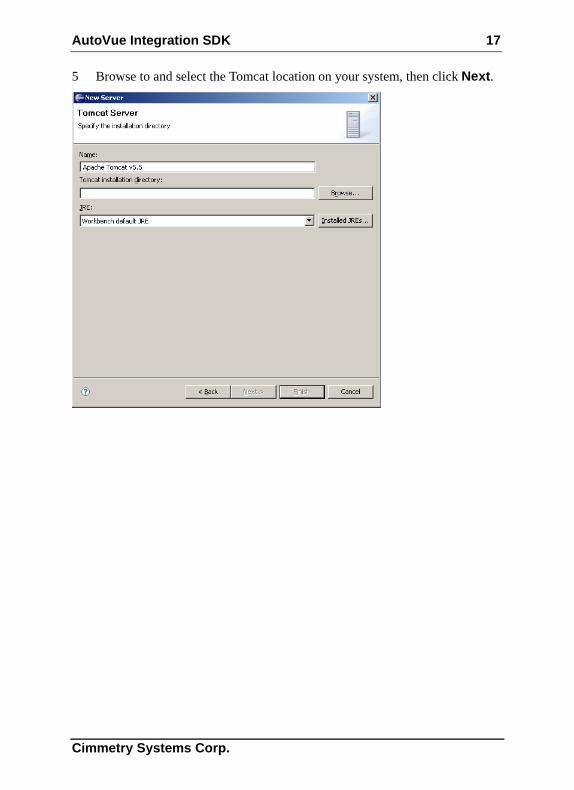
5 Browse to and select the Tomcat location on your system, then click Next.
Cimmetry Systems Corp.

18 AutoVue Integration SDK
6 Select the filesys project from the Available projects list, then click Add.
Cimmetry Systems Corp.

AutoVue Integration SDK 19
The project is added to the configured projects list.
7 Click Finish.
Add Tomcat Server Runtime to the Project LibraryTo add Tomcat server runtime to the Filesys project library, take the following steps:
1 Select the filesys project in the project view.2 Right-click and select properties.
The Properties for filesys window appears.3 Select Java Build Path from the tree.4 Click the Libraries tab.
Cimmetry Systems Corp.

20 AutoVue Integration SDK
5 Click the Add Library button.
6 In the Add Library window that appears, select Server Runtime, then click Next.
Cimmetry Systems Corp.

AutoVue Integration SDK 21
7 Select Apache Tomcat v5.5, then click Finish.
8 In the Properties for filesys window, click Ok.
Cimmetry Systems Corp.

22 AutoVue Integration SDK
Define Run ConfigurationYou can use the workbench to test the filesys project artifacts on a server.
1 In the Project Explorer view from the J2EE perspective, expand Servers.2 Right-click Tomcat v5.5 Server, then select Run As > Run from the
menu.
The Server selection wizard appears.3 In the view on the right, right-click Apache Tomcat, then select New from
the menu.
Cimmetry Systems Corp.

AutoVue Integration SDK 23
4 Enter the project name, filesys, in the Name field.
5 Select Tomcat v5.5 Server fromt the Server drop-down menu.6 Click Apply, then click Close.
Configure the ProjectTo successfully run the Filesys project, complete the following steps:
1 Configure the web.xml file (page 23)2 Configure the Applet File (page 24)3 Configure the jVue.html file (page 25)
Configure the web.xml file1 With your preferred file editor, open the web.xml file located at <working
directory>/workspace/filesys/webContent/WEB-INF and set the new Filesys DMS data in two places: FilesysVuelink servlet init-parameters and the ListDirServlet servlet init-parameters, as shown in the following steps.
Cimmetry Systems Corp.

24 AutoVue Integration SDK
2 Locate the FilesysVuelink servlet init-parameters block:
Change the location of the data repository (shown in bold) to the location you had previously chosen (<filesys data repository>).
3 Locate the ListDirServlet servlet init-parameters block:
Change the location of the data repository (shown in bold) to the location you had previously chosen (<filesys data repository>).
4 Locate the VueServlet servlet mapping block:
Change the jVueServer hostname and the set the port to 5099.
Configure the Applet File1 With your preferred file editor, open the frmApplet.html file located at
<working directory>/workspace/WebContent/jvue/.2 Locate the following block:
a. Change the _APPSERVER_HOST_ parameter and set the _APPSERVER_PORT_ parameter to 8080.
<init-param><param-name>RootDir</param-name><param-value>"Target location of the data repository"</param-value></init-param>
<init-param><param-name>RootDir</param-name><param-value>"Target location of the data repository"</param-value></init-param>
<init-param><param-name>JVueServer</param-name><param-value>"jVue Server host:port"</param-value></init-param>
<PARAM NAME="JVUESERVER" VALUE="http://_APPSERVER_HOST_:_APPSERVER_PORT_/filesys/servlet/VueServlet;socket://_JVUESERVER_HOST_:_JVUESERVER_PORT_">
Cimmetry Systems Corp.

AutoVue Integration SDK 25
b. Change _JVUESERVER_HOST_ parameter and set the _JVUESERVER_PORT_ to 5099.
3 Locate the following block:
Change the _APPSERVER_HOST_ parameter and set the _APPSERVER_PORT_.parameter to 8080.
Configure the jVue.html file1 With your preferred file editor, open the jVue.html file located at
<working directory>/workspace/WebContent/jvue/.2 Locate the following block:
Change the _APPSERVER_HOST_ parameter and set _APPSERVER_PORT_ to 8080.
Debug Mode Configuration1 With your preferred file editor, open the log4j.properties file located at
<working directory>/workspace/WebContent/WEB-INF/lib.2 In line 11, set the location and the filename of your log4j logging file. Copy
the log4j.properties to <Tomcat Directory>/common/ classes.
Note: The log4j.properties must be in the WEB-INF folder when you start the server.
<PARAM NAME="DMS" VALUE="http://_APPSERVER_HOST_:_APPSERVER_PORT_/filesys/servlet/com.cimmetry.vuelink.filesys.FilesysVuelink">
<frame src="http://_APPSERVER_HOST_:_APPSERVER_PORT_/filesys/servlet/com.cimmetry.vuelink.filesys.dms.gui.ListDirServlet" name="Directory" marginheight="0" marginwidth="0" />
10 # setting the logging file11 log4j.appender.R.File=<working directory>/<logs directory>/<logfile>.log
Cimmetry Systems Corp.

26 AutoVue Integration SDK
The sample integration for Filesys DMS uses the apache log4j package for logging. Default configurations are set in log4j.properties inside WEB-INF\lib folder of the sample integration application.
Note: You can change the level and location of output by modifying this file. The following figure shows the different levels of logging available:
For example, if you want to elevate the log to DEBUG level, then set log4j.logger.com.cimmetry.vuelink=DEBUG inside the previously-mentioned file.
For more information on log4j capabilities, refer to log4j documentation.
Running the Sample Integration1 Startup the AutoVue Server.
Cimmetry Systems Corp.

AutoVue Integration SDK 27
2 In the Servers view of the filesys project (inside Eclipse IDE), run the Tomcat server.
3 To verify that the Servlet (com.cimmetry.vuelink.filesys.FilesysVuelink) is running properly, launch your Web browser and enter the URL pointing to the Servlet alias name, which you assigned when installing filesys\eclipseProject\Vuelink_war\filesys.war into the application server.Here is an example of a URL: http://win2k3sp1sdk:8080/filesys/servlet/com.cimmetry.vuelink.filesys.FilesysVueLinkThe following figure shows a sample response if the sample integration is running properly. If you do not get a response similar to the one shown in the
Cimmetry Systems Corp.

28 AutoVue Integration SDK
following figure, verify that the Servlet is installed and deployed properly and that your application server is running and is functioning properly.
4 Launch an Internet browser and enter the jVue.html address:http://<VueApplet host:8080/filesys/jvue/jVue.html
Cimmetry Systems Corp.

AutoVue Integration SDK 29
Two frames display in the browser. The frame on the left is an interface that lets you navigate the Filesys DMS repository. The frame on the right displays the AutoVue applet.
Cimmetry Systems Corp.

30 AutoVue Integration SDK
TroubleshootingThis section involves troubleshooting for All Systems (page 30) and for Linux Systems (page 35).
All SystemsThis section addresses the following issues:
• Setting the Compiler Compliance Level (page 30)• Fixing the Bootstrap Problem (page 33)• Fixing the localhost Problem (page 34)• Fixing the File Not Found Problem (page 34)• Fixing Tomcat Server Publishing Failure Problem (page 35)
Setting the Compiler Compliance LevelTake the steps in this section only if you run into compiler compliance level problems. You can set the right compliance level of the compiler from the Properties for filesys window.
1 In the view on the left, click Java Compiler.
Cimmetry Systems Corp.

AutoVue Integration SDK 31
2 Set the Compiler compliance level to 5.0.
Check the compatibility between the compiler compliance level and the filesys project facets. You can change the version of a facet in a J2EE project by editing the facets for the project. Changing the Java compiler version of a J2EE project involves changing the version of the Java facet.
Cimmetry Systems Corp.

32 AutoVue Integration SDK
1 In the Properties for filesys window, select Project Facets from the tree.
The Project Facets window appears.2 If the Java version is set to 5, click OK. Otherwise, take the following steps.3 Click the Add/Remove Project Facets button.
Cimmetry Systems Corp.

AutoVue Integration SDK 33
The Add/remove Project Facets window appears.
4 Set the Java version to 5.5 Click OK.
Note: To indicate that you want the Workbench to perform incremental builds whenever resources are saved, select the Build automatically checkbox from the Project menu.
Fixing the Bootstrap ProblemIf you run Tomcat and there is the following error message:
Exception in Thread “Main” java.lang.NoClassDefFoundError: org/apache/Catalina/startup/BootStrap
You can fix the problem by adding two JAR files to the ClassPath Server:
• bootstrap.jar from TOMCAT_HOME/bin• tools.jar form JAVA_HOME/lib
Cimmetry Systems Corp.

34 AutoVue Integration SDK
Fixing the localhost ProblemWhen you start Tomcat server from Eclipse and then you try the link: http://localhost:TomcatPort. It may display 404 error. This is the correct behavior, because in the Tomcat server the configuration property catalina.home points to your Tomcat installation, but catalina.base points to a .metadata\.plugins\org.eclipse.wst.server.core\tmp?, which is a directory under your workspace. Thus, you are running a separate instance of Tomcat. The webapps directory under the .metadata\...\tmp? directory contains only an “empty” ROOT webapp plus any web projects you have added to the server. This is why you get the 404 error message.
Fixing the File Not Found ProblemIf you get the error message File not found when you try to view a file, check that you have done all the required modifications correctly in jvue.html, frApplet.html, and web.xml files.
Cimmetry Systems Corp.

AutoVue Integration SDK 35
Fixing Tomcat Server Publishing Failure ProblemWhen you start the Tomcat server and see the error message Publishing failure, the Tomcat server configuration at /server/Tomcat 5.5 Server @localhost-config is probably missing. To fix it, delete the Server and re-install it, following the steps in the installation procedure.
Linux Systems
Installing Java for FirefoxOn Linux, Firefox requires JRE 1.4.2 or later. Firefox is compiled with gcc 3.2.3, so a compatible version of the Java plugin must be used. JRE 1.4.2 or later contains a compatible plugin. To install this plugin take the following steps:
1 Open a terminal.2 Change to your Firefox plugins directory.3 Issue the following command:
ln -s /usr/java/j2re1.5.0_10/plugin/i386/ns7/libjavaplugin_oji.so
Note: Make sure that the link is done by root user in order to be valid for all users.
Cimmetry Systems Corp.

36 AutoVue Integration SDK
Cimmetry Systems Corp.

AutoVue Integration SDK 37
FeedbackCimmetry Systems products are designed according to your needs. We would appreciate your feedback, comments or suggestions. Contact us by fax, e-mail or telephone. There is a feedback button on our Web page that activates an easy-to-use feedback form. Let us know what you think.
General Inquiries
Sales Inquiries
Customer Support
Telephone: +1 514-735-3219
Fax: (514) 735-6440
E-mail: [email protected]
Web Site: http://www.cimmetry.com
Telephone: +1 514-735-3219 or 1-800-361-1904
Fax: (514) 735-6440
E-mail: [email protected]
Telephone: +1 514-735-9941
Web Site: http://www.cimmetry.com/support
Cimmetry Systems Corp.