Embed Size (px)
Citation preview

Author User Guide
Contents1 Introduction .................................................................................................................................... 2
2 System Overview ............................................................................................................................ 2
2.1 First steps ................................................................................................................................ 3
2.2 Navigating the document in Edit mode .................................................................................. 3
3 Text editing ..................................................................................................................................... 3
3.1 The Add Comment tool ........................................................................................................... 4
3.1.1 Using the Add Comments tool ........................................................................................ 4
3.1.2 Author list ........................................................................................................................ 4
3.1.3 Affiliations ....................................................................................................................... 5
3.1.4 Corresponding author details ......................................................................................... 5
3.1.5 Adding/editing notes to authors ..................................................................................... 5
3.1.6 Reference list/reference citations .................................................................................. 5
3.1.7 Changing section heading levels ..................................................................................... 6
3.1.8 Figure/Table citations ..................................................................................................... 6
3.2 Editing tables ........................................................................................................................... 7
3.3 Abbreviations .......................................................................................................................... 7
3.4 Editing/providing new figures ................................................................................................. 8
3.5 Equations ................................................................................................................................ 8
3.6 Answering queries................................................................................................................... 9
3.7 Copying and pasting text......................................................................................................... 9
3.7.1 Adding text form external sources .................................................................................. 9
3.7.2 Copying text to an external file ....................................................................................... 9
4 Collaborating with your co‐authors .............................................................................................. 10
5 Completing your proof review ...................................................................................................... 10
5.1 How to sign off ...................................................................................................................... 11

1 Introduction Portland Press’ online proof correction service enables authors to add proof corrections directly to their article. Because you are making real-time amendments directly to the article’s master production file, the article becomes ready to publish sooner and your work can be published more quickly than ever before. Also, by using this, you benefit from the fact that edits are applied by you and do not have to be interpreted and implemented by another party in the production chain.
This guide is intended to assist you in using the system and we would encourage you to read it before and refer to it while reviewing your proof. If you do need any assistance when using the system, the production team at Portland Press is on hand to provide any guidance: email [email protected]. IMPORTANT You will need a reliable internet connection and a supported web browser to use the system effectively (the browsers that are supported currently are listed on the system login page)
2 System Overview
The system allows you to…
Make edits to the text The system provides you with a word processer-like editing interface with familiar editing and formatting tools.
Respond to queries Queries raised for your attention during the production process are embedded at the
relevant position in the article; you can reply to these within the query itself. (see Section 3.6)
Add instructions for the publisher If you have any special instructions for Portland Press or if there are corrections that you
are not able to make directly using the basic editing functionality, you can provide these using the Add Comments feature. (see Section 3.1)
Upload files If you need to supply any files with your proof corrections, for example replacement
figures, you will be able to do this during the sign-off process when you are submitting your corrections. (see Section 3.4 and 5)
View your proof as a PDF A conventional PDF version of the proof can be viewed and downloaded via the system
There are three modes in which you can view the article:
Edit Enables you to make edits, answer queries and add comments or instructions
View Changes Enables you to see the edits you have made using a “track changes” view
PDF Enables you to view and download the proof in PDF format You can leave the article by using the following buttons:
Close Use this to leave the article mid-review; you will remain logged into the system
Logout Use this to log out of the system
Signoff Use this when you are finished reviewing the proof and are ready to submit your proof corrections to Portland Press (see section 5.1) Important: You must sign off to send to article to Portland Press production staff to continue the publication process. After signing off, you will not be able to return to the article via the system

2.1 First steps After logging into the system, and going past the welcome page, you can access your proof by clicking on the button
2.2 Navigating the document in Edit mode You will be able to move between different sections of the document using the Content Explorer feature on the right-hand side of the screen
3 Text editing The Edit mode provides you with a familiar word-processor-like interface that enables to you input text corrections to the article. Simply place the cursor at the point in the article that requires correction and edit as you would in an application such as Microsoft Word.
The toolbar at the top of the page has features that will help you to do this, many are familiar, but we would draw your attention to the following specific tools:
Use to save your edits. You will be prompted to save your changes when closing the document, signing off the document when you are completing your review, and logging off. The system will periodically auto-save the document in the background. Note that the system will automatically log off after 30 minutes of inactivity.
Use to re-order items in the abbreviations list
Use to insert Special Characters such a Greek letters, accented letters and mathematical operators
Use the Add Comments feature to provide instructions to Portland Press, including any corrections that you cannot make using the basic text editing feature (see Section 3.1))
Use to edit equations (see Section 3.5)
Use to embed text and URLs with hyperlinks to external websites
Use to paste text into the article from an external source such as a Microsoft Word file (see Section 3.7)
Use to copy content from the system and further paste it to any third party application. (see Section 3.7)
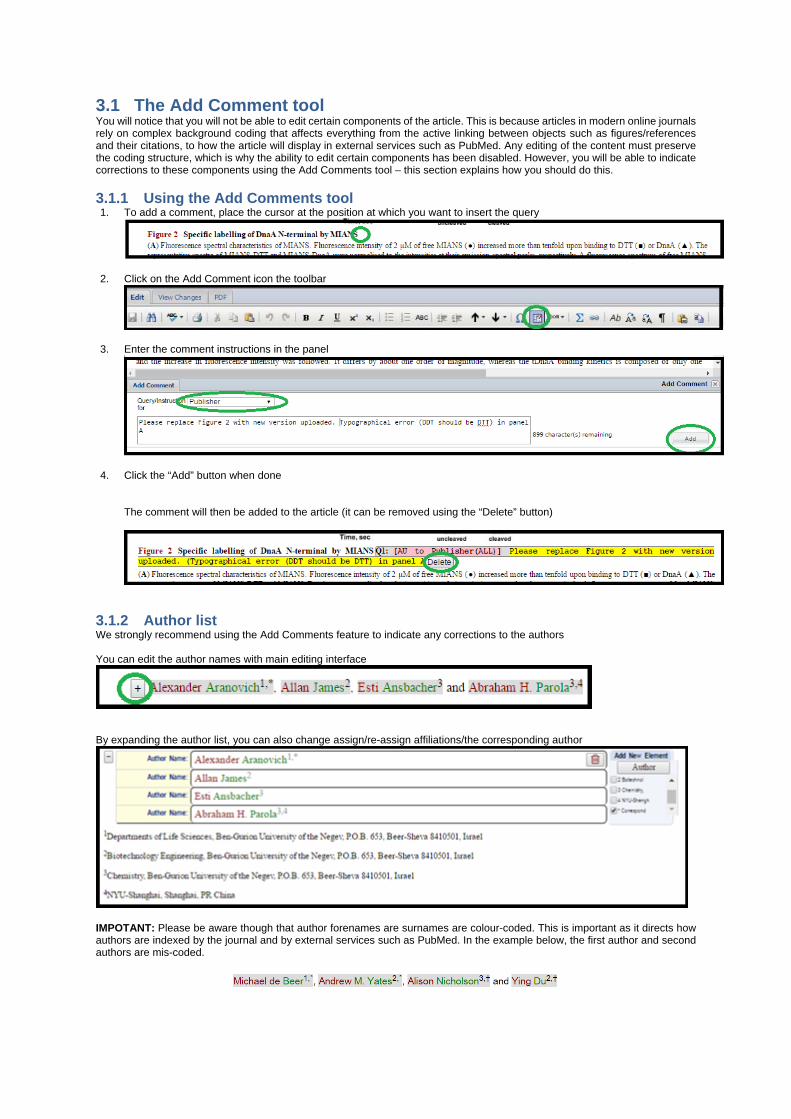
3.1 The Add Comment tool You will notice that you will not be able to edit certain components of the article. This is because articles in modern online journals rely on complex background coding that affects everything from the active linking between objects such as figures/references and their citations, to how the article will display in external services such as PubMed. Any editing of the content must preserve the coding structure, which is why the ability to edit certain components has been disabled. However, you will be able to indicate corrections to these components using the Add Comments tool – this section explains how you should do this.
3.1.1 Using the Add Comments tool 1. To add a comment, place the cursor at the position at which you want to insert the query
2. Click on the Add Comment icon the toolbar
3. Enter the comment instructions in the panel
4. Click the “Add” button when done The comment will then be added to the article (it can be removed using the “Delete” button)
3.1.2 Author list We strongly recommend using the Add Comments feature to indicate any corrections to the authors You can edit the author names with main editing interface
By expanding the author list, you can also change assign/re-assign affiliations/the corresponding author
IMPOTANT: Please be aware though that author forenames are surnames are colour-coded. This is important as it directs how authors are indexed by the journal and by external services such as PubMed. In the example below, the first author and second authors are mis-coded.
However, the fact that “de Beer” and “Yates” are incorrectly coded above as “Beer” and “M. Yates” in the above example will not be apparent when viewing the PDF
Michael de Beer1,*, Andrew M. Yates2,*, Alison Nicholson3,† and Ying Du2,† and if not corrected, both authors will be indexed incorrectly. Please check that the names of all authors correct
3.1.3 Affiliations You may edit the text of the existing affiliation addresses. However, to indicate new affiliations, delete existing ones, change the order of existing ones, or to change the linking between the affiliation and the authors, you will need to use the Add Comments tool.
3.1.4 Corresponding author details Use the Add Comments feature to indicate any changes to the corresponding author details.
3.1.5 Adding/editing notes to authors You can edit the text of the existing footnotes; however, if you want to add or delete a footnote, you will need to use the Add Comments tool.
3.1.6 Reference list/reference citations If you need to change the in-text citations we strongly advise that you do not edit them using the basic editing functionality, but that you use the Add Comments tool. By following the instructions below, you will not have to worry about renumbering or reordering the reference list even when you when you add references, delete references, or change citations. We can take care of that for you after you sign the article over to us.
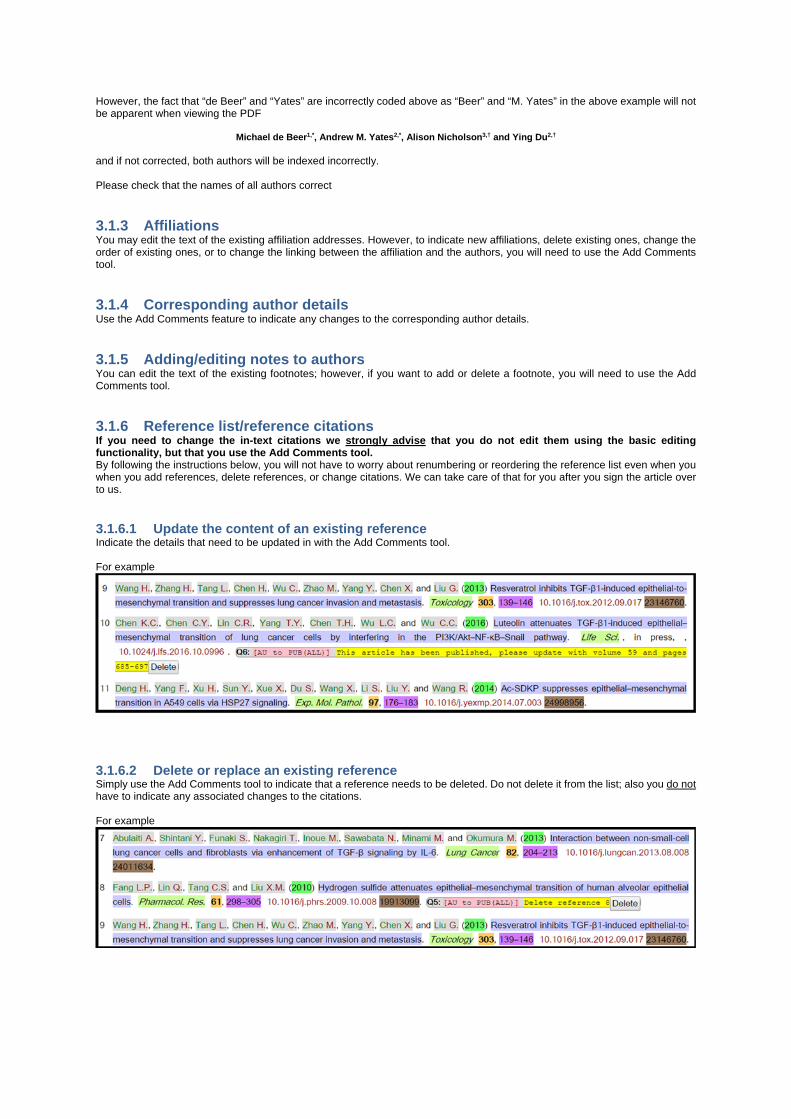
3.1.6.1 Update the content of an existing reference Indicate the details that need to be updated in with the Add Comments tool. For example
3.1.6.2 Delete or replace an existing reference Simply use the Add Comments tool to indicate that a reference needs to be deleted. Do not delete it from the list; also you do not have to indicate any associated changes to the citations. For example
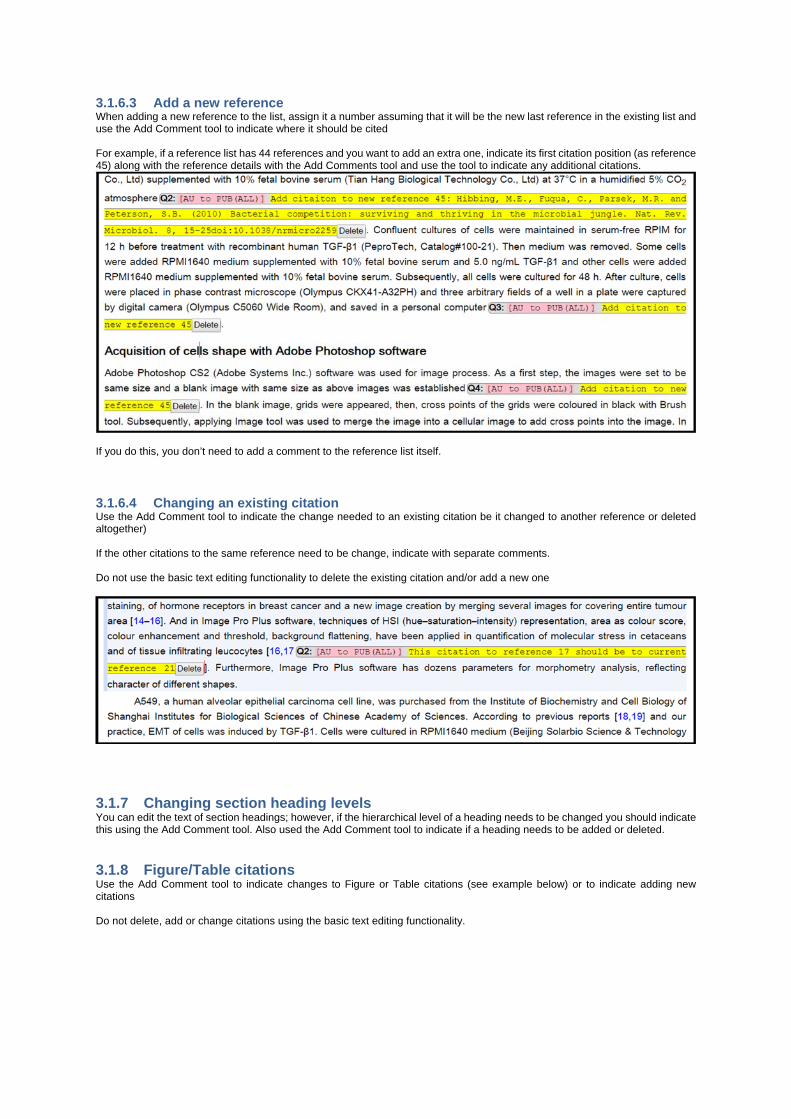
3.1.6.3 Add a new reference When adding a new reference to the list, assign it a number assuming that it will be the new last reference in the existing list and use the Add Comment tool to indicate where it should be cited For example, if a reference list has 44 references and you want to add an extra one, indicate its first citation position (as reference 45) along with the reference details with the Add Comments tool and use the tool to indicate any additional citations.
If you do this, you don’t need to add a comment to the reference list itself.
3.1.6.4 Changing an existing citation Use the Add Comment tool to indicate the change needed to an existing citation be it changed to another reference or deleted altogether) If the other citations to the same reference need to be change, indicate with separate comments. Do not use the basic text editing functionality to delete the existing citation and/or add a new one
3.1.7 Changing section heading levels You can edit the text of section headings; however, if the hierarchical level of a heading needs to be changed you should indicate this using the Add Comment tool. Also used the Add Comment tool to indicate if a heading needs to be added or deleted.
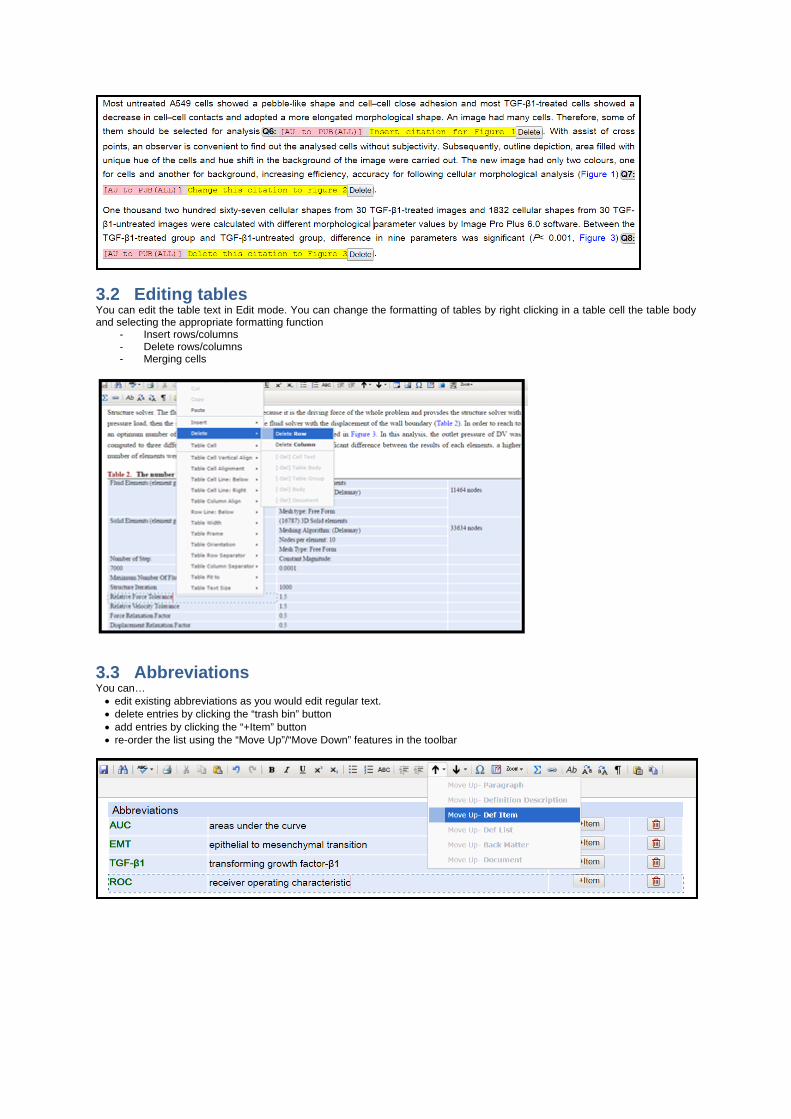
3.1.8 Figure/Table citations Use the Add Comment tool to indicate changes to Figure or Table citations (see example below) or to indicate adding new citations Do not delete, add or change citations using the basic text editing functionality.
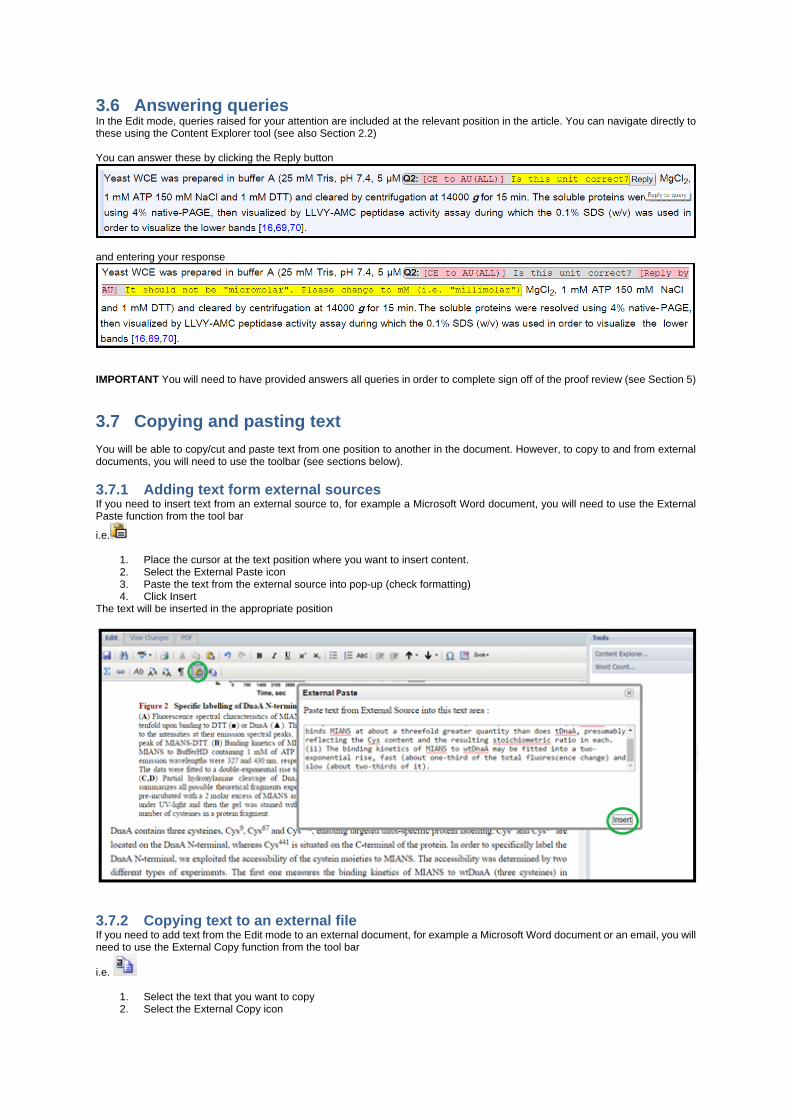
3.2 Editing tables You can edit the table text in Edit mode. You can change the formatting of tables by right clicking in a table cell the table body and selecting the appropriate formatting function
- Insert rows/columns - Delete rows/columns - Merging cells
3.3 Abbreviations You can… edit existing abbreviations as you would edit regular text. delete entries by clicking the “trash bin” button add entries by clicking the “+Item” button re-order the list using the “Move Up”/“Move Down” features in the toolbar

3.4 Editing/providing new figures If you need to replace a figure, use the Add Comments tool to indicate that it should be replaced and to provide a reason why.
You can upload the replacement files including figures during the proof review sign off process IMPORTANT; please refer to Section 5.1 before doing this.
Note that the figures displayed in the Edit mode are low resolution versions and are not an indication of the quality that will appear in the final published article.
3.5 Equations To edit an existing equation, double click on the displayed equation in the Edit mode to access the equation editor tool
3.6 Answering queries In the Edit mode, queries raised for your attention are included at the relevant position in the article. You can navigate directly to these using the Content Explorer tool (see also Section 2.2) You can answer these by clicking the Reply button
and entering your response
IMPORTANT You will need to have provided answers all queries in order to complete sign off of the proof review (see Section 5)
3.7 Copying and pasting text You will be able to copy/cut and paste text from one position to another in the document. However, to copy to and from external documents, you will need to use the toolbar (see sections below).
3.7.1 Adding text form external sources If you need to insert text from an external source to, for example a Microsoft Word document, you will need to use the External Paste function from the tool bar
i.e.
1. Place the cursor at the text position where you want to insert content. 2. Select the External Paste icon 3. Paste the text from the external source into pop-up (check formatting) 4. Click Insert
The text will be inserted in the appropriate position
3.7.2 Copying text to an external file If you need to add text from the Edit mode to an external document, for example a Microsoft Word document or an email, you will need to use the External Copy function from the tool bar
i.e.
1. Select the text that you want to copy 2. Select the External Copy icon
3. The selected text will automatically appear in the pop up. Copy this (Ctrl+C) and paste into the appropriate target document.
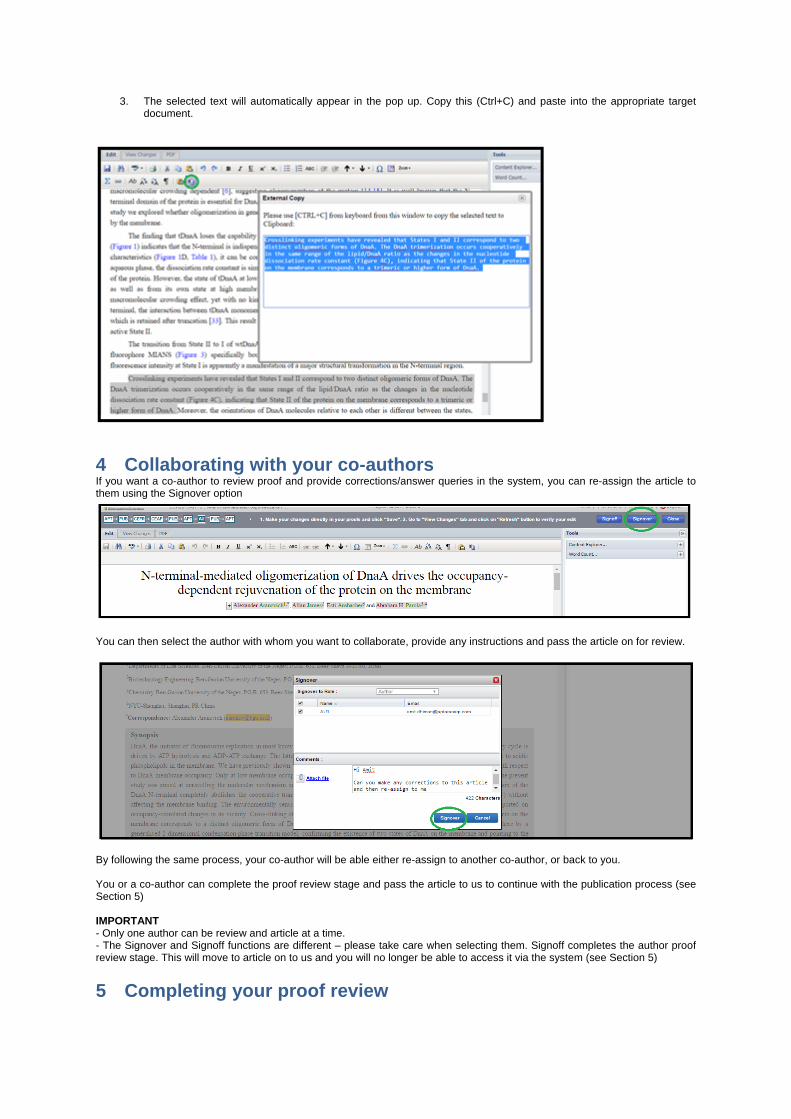
4 Collaborating with your co-authors If you want a co-author to review proof and provide corrections/answer queries in the system, you can re-assign the article to them using the Signover option
You can then select the author with whom you want to collaborate, provide any instructions and pass the article on for review.
By following the same process, your co-author will be able either re-assign to another co-author, or back to you. You or a co-author can complete the proof review stage and pass the article to us to continue with the publication process (see Section 5) IMPORTANT - Only one author can be review and article at a time. - The Signover and Signoff functions are different – please take care when selecting them. Signoff completes the author proof review stage. This will move to article on to us and you will no longer be able to access it via the system (see Section 5)
5 Completing your proof review

When you have finishing reviewing your proof, i.e. you have provided all necessary corrections either as edits or comments and have answered all of the queries, you can submit your corrections to Portland Press to continue the production process. Before doing this, please take careful note of the following You can review the edits that you have made using the View Changes mode
Check that you have provided an answer to all queries. Note that you will not be able to fully complete this review stage until
all queries have been answered
If you need to supply any files, for example replacement figures, you can upload them during the completion process.
Note that the system will only allow you to upload a single file and only the following file types: Word, Excel, PDF, XML, RAR
and ZIP. Therefore if you need to uploaded another file type (e,g. TIFF) and/or multiple file types you should package them
all in a single ZIP or RAR archive
Once you sign off the article, it moves to then next stage of the publishing workflow, you will not be able to make further
corrections via the system.
If you need to submit any corrections or files subsequent to completing, please contact [email protected]
5.1 How to sign off 1. Click on the Signoff button in the main editing interface
2. You will then be presented with a pop up that enables you to
Upload new files*
Provide comments and instructions to Portland Press production staff
*Take note of the following before uploading files
– You can only upload one file as part of this process.
– This must be one of the following formats: Word, Excel, PDF, XML, RAR or ZIP
– If you need to supply more than one file, they should be packaged in a single RAR or ZIP archive file
– If you need assistance, please contact [email protected]
3. To complete the review process, click the Signoff button the pop up window
IMPORTANT
Once you complete the sign off process, you will not be able to access the article again via the system. We recommend that
you download the PDF version of the proof before you sign off.