Embed Size (px)
Citation preview

USER’S GUIDEAudioGate 4
E 3

ContentsIntroduction . . . . . . . . . . . . . . . . . . . . . . . . 3
Switching Between Views . . . . . . . . . . . . . 4Player View . . . . . . . . . . . . . . . . . . . . . . . . . . . . . .4
Edit/Recording View . . . . . . . . . . . . . . . . . . . . . .4
The Songlist . . . . . . . . . . . . . . . . . . . . . . . . . . . . .5
Master Volume/Input Level . . . . . . . . . . . . . . . . .5
Peak/Level Meter and Clip Indicator . . . . . . . . . .5
Using the Peak/Clip Hold Function . . . . . . . . . . . . . . 6
Clearing the Peak Hold and Clip Indicators Manually 6
AudioGate Information . . . . . . . . . . . . . . . . . . . .6
Registering Files and Projects . . . . . . . . . 7Song Registration . . . . . . . . . . . . . . . . . . . . . . . .7
Registering an MR project. . . . . . . . . . . . . . . . . . . . . 7
Registering an Audio File . . . . . . . . . . . . . . . . . . . . . 8
Registering an iTunes Song . . . . . . . . . . . . . . . . . . . 8
Registering a new Recording . . . . . . . . . . . . . . . . . . 8
Selecting a Registered Song . . . . . . . . . . . . . . . .9
Removing a Song . . . . . . . . . . . . . . . . . . . . . . . . .9
Sorting the Songlist. . . . . . . . . . . . . . . . . . . . . . .9
Using Playlists . . . . . . . . . . . . . . . . . . . . . 10Creating a new Empty Playlist . . . . . . . . . . . . .10
Creating a new Playlist by Selecting a Song . .11
Sorting the Playlist . . . . . . . . . . . . . . . . . . . . . . .11
Removing, Exporting, and Writing a Playlist to Disc . . . . . . . . . . . . . . . . . . . . . . . . . . . . . . . .11
Playing Songs . . . . . . . . . . . . . . . . . . . . . 12Playing Back a Song . . . . . . . . . . . . . . . . . . . . .12
Transport Controls . . . . . . . . . . . . . . . . . . . . . . .13
Contents of the Upper Viewer Display . . . . . . .14
Direct Locate . . . . . . . . . . . . . . . . . . . . . . . . . . .15
Repeat Mode . . . . . . . . . . . . . . . . . . . . . . . . . . . .15
Shuffle Mode . . . . . . . . . . . . . . . . . . . . . . . . . . . .15
Audio Device Settings . . . . . . . . . . . . . . . . . . . .16
Input/output devices for KORG products . . . . . . . . 16
Automatic Sample Rate Switching . . . . . . . . . .17
Playing Back 1-bit Audio Files Directly . . . . . .18
Playback Volume Auto Adjust . . . . . . . . . . . . .19
Playing an Audio CD/DSD Disc . . . . . . . 20Eject Disc . . . . . . . . . . . . . . . . . . . . . . . . . . . . . .20
Recording . . . . . . . . . . . . . . . . . . . . . . . . . 21
Transport Controls . . . . . . . . . . . . . . . . . . . . . . 21
Contents of the Upper Viewer Display . . . . . . 22
Recording Device Settings . . . . . . . . . . . . . . . 23
Recording File Settings . . . . . . . . . . . . . . . . . . 24
Recording Procedure . . . . . . . . . . . . . . . . . . . . 27
Editing a Song . . . . . . . . . . . . . . . . . . . . . 28Editing the Current Song . . . . . . . . . . . . . . . . . 28
Editing the Text Data . . . . . . . . . . . . . . . . . . . . . . . .28
Editing the Picture Data . . . . . . . . . . . . . . . . . . . . . .28
Editing the Control Data . . . . . . . . . . . . . . . . . . . . . .29
Batch Editing—Song Information . . . . . . . . . . . . . . .30
Batch Editing—Multiple Songs . . . . . . . . . . . . 32
Dividing a Song . . . . . . . . . . . . . . . . . . . . . . . . 33
Combining Songs . . . . . . . . . . . . . . . . . . . . . . 34
Channel Linking . . . . . . . . . . . . . . . . . . . . . . . . 35
Normalizing . . . . . . . . . . . . . . . . . . . . . . . . . . . . 36
Using Marks . . . . . . . . . . . . . . . . . . . . . . . . . . . 36
Marks that can be Imported . . . . . . . . . . . . . . . . . . .36
Marks that can be Exported . . . . . . . . . . . . . . . . . . .36
Editing Marks . . . . . . . . . . . . . . . . . . . . . . . . . . . . . .37
Undo and Redo . . . . . . . . . . . . . . . . . . . . . . . . . 37
Reverting an Edit (Undo) . . . . . . . . . . . . . . . . . . . . .37
Re-executing the Edit (Redo) . . . . . . . . . . . . . . . . . .37
Converting Songs for Export . . . . . . . . . 38Exporting an Audio File . . . . . . . . . . . . . . . . . . 38
Optional Settings . . . . . . . . . . . . . . . . . . . . . . . . . . .42
Creating an Audio CD or DSD Disc . . . . . . . . 46
Optional Settings . . . . . . . . . . . . . . . . . . . . . . . . . . .50
Auto Update Function . . . . . . . . . . . . . . . 51Manually Checking for Updates . . . . . . . . . . . 51
Automatically Checking for Updates . . . . . . . 52
Other Settings . . . . . . . . . . . . . . . . . . . . . 53Changing the Folder where Temporary Files are
Created . . . . . . . . . . . . . . . . . . . . . . . . . . . . . 53
Resetting the Warnings of All Dialog Boxes . 53
Checking the real-time conversion processing . . 54
Switching Background . . . . . . . . . . . . . . . . . . 54
Supported Formats . . . . . . . . . . . . . . . . . 56Supported File Formats . . . . . . . . . . . . . . . . . . 56
Supported Disc Formats . . . . . . . . . . . . . . . . . 57
List of Shortcuts . . . . . . . . . . . . . . . . . . . 59

IntroductionWelcome to the Korg AudioGate High Resolution Music Player. AudioGate is an advanced music player and audio recorder, as well as a flexible file conversion application. Best ofall, AudioGate is fully compatible with 1-bit DSD audio. When Installed on your computer, AudioGate can play,manage, and convert the format of your digital audio files so that you can enjoy hearing them reproduced with thehighest levels of clarity—including direct playback of 1-bit digital audio files. Combined with certified audiodevices—such as the Korg DS-DAC Series—AudioGate allows the direct recording of 1-bit audio data.
In addition, AudioGate allows projects or files created using the Korg MR Series of DSD 1-bit recorders, DS-DAC-10R, or Nu I* to be converted into any audio file format you choose for export or to create an audio CD or DSD disc.Convenient file-editing features including cut, fade, and normalize add professional edge to your finished product.
Please note that regardless of format, each audio element in an AudioGate Songlist is referred to as a Song.
*Nu I is sold only in Japan.
3

Switching Between ViewsNearly all of the AudioGate features and functions are accessed directly from the Views. The Player View providesaccess to the features related to playing an audio file or Playlist. Controls and parameters related to editing orrecording an audio file are available in the Edit/Recording View. To switch between views, simply click on the Editbutton at the top of the screen. The view can also be changed by clicking the Menu button and selecting [View]—[Switch View]. The size of the View can be freely changed like a common window frame.
Player View
Edit/Recording View
Level Meter
Menu button
Edit/Recording button
Master Volume
Songlist
ControllerSong waveform display
Attached picture Search Window
Side barDisplay button
Context menu icon
Menu buttonClipIndicator
Level Meter
Master Volume(Editing)/Input Level (Recording)DS-DAC-10R
Search Window
Side barDisplay button
Context menu icon
Edit/Recording button
Input Monitor Settings button
Songlist
Controller
Song waveform display L
Song waveform display R
4

The SonglistThe Songlist section located in the lower half of the screen will display either information about the Songs (audiofiles) registered in the AudioGate Library (see page 7), or the Songs in the currently selected Playlist (see page 10).Click the Side bar Display button to open the Library/Playlist selection screen.
Master Volume/Input LevelThe Master Volume/Input Level sliders can be adjusted by simply dragging them up and down.
Playback/Master Volume:
In addition to the playback Gain settings saved individually (see page 29) with each song, AudioGate offers anadjustable Master Volume control for playback.
Recording/Input Level:
When the Korg DS-DAC-10R is connected, during recording (even when paused) and input monitoring this controlwill determine the input level of the DS-DAC-10R.
Input Monitor SettingsUse the Input Monitor settings to set your input levels and to monitor the audio input as you record. Click theInput Monitor Settings button when stopped to monitor the input device sound. Click the button again to cancelsetting the input monitor.
Peak/Level Meter and Clip IndicatorPlayer View:
During song playback and during export, the AudioGate Level Meter shows the peak values of the output data—following any sample rate conversion.
Edit/Recording View:
When configuring the input monitor settings and when recording (including pause), the Level Meter shows thelevel of the incoming audio signal. When using an Nu I or DS-DAC-10R and the phono equalizer for recording isselected in the recording settings, the level of the signal after going through the phono equalizer will be shown. When the incoming audio signal level is too high, clipping may occur and could adversely affect your sound. In thiscase the Clip indicator will light, and you should re-adjust the input level, or adjust the output level of the audiosource. The clip indicator is only displayed in the Edit/Recording View.
5

Using the Peak/Clip Hold FunctionThe AudioGate level meter is equipped with a peak hold function and a clip indicator hold function. This featureallows you to easily see the highest input level without constantly observing the meters. You can set hold durationof peak and clip—the length of time displayed before reset—separately.
Here's how:
1. Right-click (Mac: Control + click) the level meter.
2. Choose [Peak Hold Duration of Level meter] or [Hold Duration of Clip Indicator] and select the desired timefrom the options shown.
This function can also be accessed by clicking the Menu button and selecting [View] - [Peak Hold Duration of Levelmeter] or [Hold Duration of Clip Indicator].
Clearing the Peak Hold and Clip Indicators ManuallyClicking on the level meter when it is in use will immediately clear the Peak Hold and Clip indicators.
AudioGate InformationClick the Menu button and select [Help] to display the latest information about AudioGate.
6

Registering Files and ProjectsIn order for AudioGate to work with the audio files and MR projects (created using a KORG MR Series recorder)saved on your computer, they must first be registered with the AudioGate Library. Each registered item is referred to as a Song.
Registering a Song does not create a copy of the file in AudioGate. Instead, file information needed to work asthe Song in AudioGate is registered. Before you proceed, we recommend that projects recorded on your MRSeries unit be copied to the hard drive of your computer.
When many Songs are registered at a time, it will take time for them to appear in the Songlist. In addition, theSong waveform display requires time to be analyzed during registration, so the Song waveform may also take awhile to appear.
Song Registration
Registering an MR projectWhen registering data that was created on a Korg MR Series digital recorder, it is possible to register just the audiofile. However, it is best practice to register the entire MR project. This way, AudioGate can also access any Marksthat were added during recording, and divided audio files will be automatically joined so that they can be handledas a single Song.• Drag the MR project (the entire MR project folder) that you want to register into the songlist.
Alternatively, you can click the Menu button and select [File] - [Add Audio Files...] and then choose the MR Proj-ect by selecting the .prj file from within the folder.When the Library Songlist is displayed, the MR project is registered to the Library as songs. When a Playlist is displayed, the MR project is registered to the selected Playlist as well as to the Library.
Simply registering an MR project in the AudioGate library does not create a backup of the file. We recommendthat you make a copy beforehand of projects recorded on a Korg MR Series to the hard disk of your computer.
drag & drop
7

Registering an Audio FileAudio files can be registered as Songs for use with AudioGate. Any file in one of the many formats which Audio-Gate supports can be imported and registered as a Song (see page 56). • Drag the audio file that you want to register into the songlist.
Alternatively, you can simply click the Menu button and select [File] - [Add Audio Files...].When the Library Songlist is displayed, the audio file is registered to the Library as songs. When a Playlist is displayed, the audio file is registered to the selected Playlist as well as to the Library.
When the Library Songlist is displayed, you cannot register a Song that has already been registered. You areignored when it drag-and-drop.
Registering an iTunes SongYour iTunes songs can also be registered into the AudioGate Library.
1. Click the menu button to select [File] - [Add iTunes songs].
2. The selected iTunes song(s) is now registered into the Library.
Your iTunes songs will only be registered into the AudioGate Library when they are selected using the proce-dure described above [Add iTunes songs]. A Song already registered in the library will not registered in dupli-cate.
Registering a new RecordingWhen recording using AudioGate, as soon as recording has stopped, the new recording will be automatically regis-tered into the AudioGate Library as well as into the current Playlist.
drag & drop
8

9
Selecting a Registered SongIn the Songlist area, simply click on the Song.The selected Song will be displayed in bold.
To select multiple songs, hold down the Ctrl key (Mac: Command key) and while clicking individually on eachSong you wish to select.
Removing a SongMove the mouse pointer onto the targeted song, and click the Context Menu icon that appears on the right side ofthe Title to select the [Remove Songs] option.Alternatively, you can select [File] - [Remove Songs] by clicking the Menu button.
You can also access the [Remove Songs] option by right-clicking on the selection (Windows) or control-clicking(Mac).
Removing songs deletes the songs from the playlist. In addition, removing the songs from the playlist does notdelete the songs from the library.
Sorting the Songlist.Songs in the Songlist can be quickly sorted by Title, Time, Artist, Album, Genre or Format. Simply click on the sec-tion headings at the top of the list. The Songs will be sorted in Alphabetical or Numerical ascending order. Clickingon the heading a second time will reverse the sort order.
Selected Song

Using PlaylistsBy creating a Playlist, you can group together your favorite Songs registered to the AudioGate Library by theme,genre, artist, etc. Once you’ve created a Playlist, you can add, remove, sort and select individual songs, just as in theLibrary.
When you register a Song into the Playlist that has not yet been registered into the Library, the Song will be auto-matically registered into the Library as well as the Playlist.
When Song information is updated for a Song that's in a Playlist, the Song information will be updated in theLibrary, so any other playlists in which the song is registered are also updated.
Creating a new Empty Playlist1. Click the Side bar Display button at the upper left corner of the Songlist.
2. The Playlist bar will appear. Click the + button in the right corner.A new Playlist named “Playlist” will appear.
3. To change the Playlist name, click on the name section.If you do not change the name, new Playlists will be named [Playlist n], with n being a number that automaticallyincreases by 1 with each Playlist created.
4. Click Library above the Playlist bar to display the Songs registered in the Library.
5. Select Songs in the Library to register them into the Playlist displayed in the side bar.Move the mouse pointer onto the song, and click the Context Menu icon displayed to the right of the Title toselect the [Add to Playlist] function and register the Song to the Playlist. To select multiple songs, hold down the Ctrl key (Mac: Command key) and click.
You can also select the [Add to Playlist] function to register the Song by right-clicking (Windows) or control-clicking (Mac).
6. When you select a Playlist displayed under the Playlist bar, the Songs registered to that Playlist will appear inthe Songlist.
Side barDisplay button
Context menu icon
Side barDisplay button
Side bar
Play List bar
10

Creating a new Playlist by Selecting a SongMove the mouse pointer onto the Song in the Songlist, and click the Context Menu icon displayed on the right sideof the Title to select the [New Playlist from Selection] function.
You can also select and register the [New Playlist from Selection] by right-clicking (Windows) or control-clicking(Mac).
Sorting the PlaylistSongs in a Playlist can be sorted using the same methods used to sort the Songs in the Library Songlist (see page 9).In addition, selecting a song enables the dragging and sorting of Songs to achieve the desired order.
Removing, Exporting, and Writing a Playlist to DiscRight-click (control-click for the Mac) on the name of the Playlist you wish to remove, and select Remove SelectedPlaylist. Export and Burn Disc can be chosen as well. For more information on the other choices see page 38 (Export)and/or page 46 (Burn Disc).
Removing the Playlist deletes the registered information of the Songs in the selected Playlist only. These sameSongs will remain registered in the Library Songlist and in any other Playlists in which they appear.
11

Playing SongsUsing AudioGate, you can playback any Song that has been registered in the Library Songlist. This provides a use-ful way to playback Songs of any format supported in AudioGate (includes 1-bit audio format) in the same sam-pling frequency, to check the file contents or to set an editing point (see page 36).
The playback provided by AudioGate is a convenient feature that utilizes a high-speed filter and direct 1-bitDSD output. In order to experience the exceptional fidelity provided by 1-bit audio, please use the Korg DS-DAC Series, a certified USB audio device, or a device that supports 1-bit audio, such as the Korg MR Series.
In AudioGate, the currently selected Song title is indicated by a Playback / Pause icon to the left side of the title.The artist name, title, and album name related to the Current Song will appear in the upper section of the ViewerDisplay. The current position in the playback of the Song can be seen in the Time Information. (Refer to “Con-tents of the Upper Viewer Display” on page 14.)
Playing Back a SongDouble-click on any Song in the Songlist to make it the Current Song. Playback will begin automatically.
If you experience problems with playback—for example if there is no sound or if there are frequent clicks orpops in the playback—please refer to “Audio Device Settings” on page 16.
Play/PauseIcon
Double-click the song you want to play
12
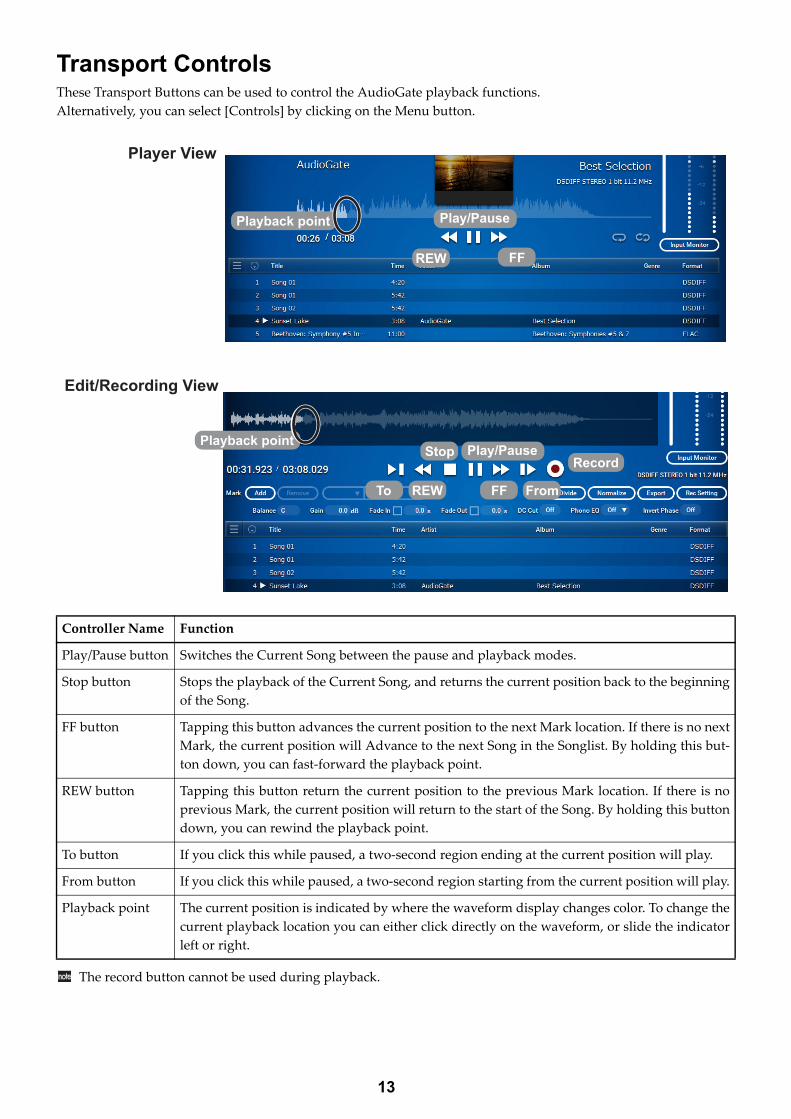
Transport ControlsThese Transport Buttons can be used to control the AudioGate playback functions.Alternatively, you can select [Controls] by clicking on the Menu button.
The record button cannot be used during playback.
Controller Name Function
Play/Pause button Switches the Current Song between the pause and playback modes.
Stop button Stops the playback of the Current Song, and returns the current position back to the beginningof the Song.
FF button Tapping this button advances the current position to the next Mark location. If there is no nextMark, the current position will Advance to the next Song in the Songlist. By holding this but-ton down, you can fast-forward the playback point.
REW button Tapping this button return the current position to the previous Mark location. If there is noprevious Mark, the current position will return to the start of the Song. By holding this buttondown, you can rewind the playback point.
To button If you click this while paused, a two-second region ending at the current position will play.
From button If you click this while paused, a two-second region starting from the current position will play.
Playback point The current position is indicated by where the waveform display changes color. To change thecurrent playback location you can either click directly on the waveform, or slide the indicatorleft or right.
Edit/Recording View
Player View
FFREW
Play/PausePlayback point
FromFFREWTo
Play/PausePlayback point
StopRecord
13

Contents of the Upper Viewer DisplayThe top half of the display (upper Viewer Display) provides important information related to the Current Song.
Item Information
Sample Rate of the Audio Device
The sample rate of the audio device is shown. The Current Song is converted to this sample rate in real time as it plays.
Artist Indicates the name of the artist related to the Current Song.
Title Indicates the name of the Current Song.
Album Indicates the name of the album related to the Current Song.
Search Window You can search the Library Songlist by All, Title, Artist, or Album.Click the magnifier Mark to the left side of the search window to search When selecting All, the search is executed using all of the items (Title, Artist andAlbum). If the Songlist data contains the searched items, the Songs meeting thissearch criteria will be displayed.
Format Indicates the file format, number of channels, sample rate, and bit depth of the Current Song. When playing files with irreversible compression, the “bit depth” icon will show the “bit rate” (e.g., 128 kbps).
Time Information The current playback position and the overall time of the Current Song are dis-played.
Sample Rate of the Audio Device
Title
TitleArtist Album
Format
Time Information
Time Information
ArtistAlbumFormat
Search Window
Sample Rate of the Audio Device Search Window
Song waveform display L
Song waveform display R
Song waveform display
14

Direct LocateThis feature allows you to accurately specify the current position directly from the keyboard.
1. While a Song is playing or stopped, click the Time Information indicator.
2. The counter will become an editable field. From the keyboard, enter the new counter position (e.g., 2:30).You may omit the colon (:) and simply enter “230” (interpreted as “2:30”) or “1204” (interpreted as “12:04”).
3. Press the Enter key on the keyboard.Note that the current position has changed.
Repeat ModeThe Repeat feature has three settings: Repeat the entire Playlist, Repeat the Current Song, and Off (no repeat). Eachtime you click on the Repeat icon, it will advance to the next setting in the order listed above.
Repeat Mode is available during playback only (Play View).
Shuffle ModeThe Shuffle feature plays Songs in a shuffled order. Click on the Shuffle icon to turn the Shuffle mode On and Off.
Shuffle Mode is available during playback only (Play View).
Click
15

Audio Device SettingsTo access your Audio Device settings, click on the Sample Rate indicator in the upper Viewer Display. If the Song does not play correctly, please check these settings to make sure that each item is configured properly. Inaddition, you can also click the Menu button and select [Edit] - [Preferences...] to display the settings of the AudioDevice. This is also where the recording input device and sample rate parameters are set.
A fast CPU is required for stable playback of 1-bit audio files directly, or real-time conversion from PCM to 1-bitaudio files. If any skip or noise occurs frequently during playback, adjusting the buffer size may help improvethe performance. To avoid errors due to CPU overload during recording, we recommend that you set this to themaximum value.
This is where input devices and the sample rate to be used for recording are set.
Input/output devices for KORG products
*1: Input devices for DS-DAC-100, DS-DAC-100m, and DS-DAC-10 cannot be configured.*2: DS-DAC-10R and Nu I are sold only in Japan.
If the device does not support the sample rate for the song, the song will be played back while being convertedin real time using the optimum algorithm, at the highest PCM sample rate for that device.
Driver type Output device name/input device name *1 Name of supported KORG product
ASIO (Win) KORG Ex ASIO Driver Nu I *2
KORG 2ch 1bit Audio Device DS-DAC-10R
KORG USB Audio Device Driver DS-DAC-100, DS-DAC-100m, DS-DAC-10 *2
Core Audio (Mac) KORG Ex Audio Device Nu I *2
KORG 2ch 1bit Audio Device DS-DAC-10R
KORG USB Audio Device Driver DS-DAC-100, DS-DAC-100m, DS-DAC-10 *2
Click
16

Automatic Sample Rate SwitchingAudioGate can automatically switch the sample rate of the audio device to match the sample rate of the currentsong.
1. Click the display section of the sample rate in the audio device.You can also access these parameters by clicking the Menu button and selecting [Edit] - [Preferences...].
2. Click the [Audio Device] tab.
3. In the [Sample Rate] section, select [Auto].If the sample rate of the Current Song is not supported on the audio device, the sample rate will be set to the high-est value of the device.
If the device does not support the sample rate for the song, the song will be played back while being convertedin real time using the optimum algorithm, at the highest PCM sample rate for that device.
Click
17

Playing Back 1-bit Audio Files Directly When using a certified device AudioGate can play1-bit audio files (DSDIFF, DSF or WSD) directly, without any PCMconversion.
You can only use this function with KORG certified audio devices such as the DS-DAC series. Please see thedevice list on our website:https://www.korg.com/products/audio/audiogate4/
Please follow the steps below with your audio device connected to your computer.
1. Click the display section of the sample rate in the audio device.You can also access these parameters by clicking the Menu button and selecting [Edit] - [Preferences...].
2. Click the [Audio Device] tab.
3. In the [Driver Type] section, select [ASIO] (Mac [CoreAudio]).
4. Select the correct audio device in the [Output Device Name] section.
5. Select “Auto” on [Sample Rate].
When playing back an unsupported 11.2 MHz file on the Korg DS-DAC Series, the file will be played back whilebeing converted in real time using the optimum algorithm at 192 kHz, the highest PCM sampling frequency forthat device.
6. Select a song from the song list in DSDIFF, DSF or WSD format to play back.
Click
Click
18

Playback Volume Auto AdjustThis feature enables you to enjoy listening to all Songs at nearly the same volume level, as AudioGate automaticallyadjusts the playback volume of every Song. The Playback Volume Auto Adjust works during playback only, anddoes not adjust the gain of the audio file itself.
1. Click the display section of the sample rate in the audio device.You can also access these parameters by clicking the Menu button and selecting [Edit] - [Preferences...].
2. Click the [Other] tab.
3. Select the setting of the [Auto Adjust Playback Volume] feature.
Off: The Auto Adjustment Playback Volume function will not be applied.
Song: Playback volume of each Song will be adjusted.
Album: Playback volume of each Song will be adjusted while preserving the volume balance between Songs inthe album.
Click
19

Playing an Audio CD/DSD DiscIn addition to playing the Songs registered in the Library Songlist, AudioGate can play back the individual tracks ofan audio CD/DSD disc.For information on how to playback a song, see “Song Playback.”
You cannot load a DSD disc using a drive that does not support DVD.
1. Insert the disc into your computer’s CD/DVD drive.If another window (a different application) appears, close that window.
If your computer does not detect a disc, the “No audio discs found” message will be displayed. Wait for abrief time, and if the disc is still not detected, check whether the drive is correctly connected to your computerand make sure that there is no problem with the disc that has been inserted.
2. If no side bar is displayed, click the Side bar Display button.
3. When Disc bar is added to the side bar, click the displayed “Audio CD” (or “DSD disc”).A list of the Songs on the disc will appear in the Songlist.At this time, no Songs are registered to the Library Songlist.
If the audio CD you're inserting into the drive contains embedded CD-TEXT data, or if the DSD disc containsembedded ID3v2.3 data, the track titles will be used as the Song names.
If you want to save each track on the Audio CD/DSD disc as an audio file, export it to the desired folder on yourcomputer. If you're registering this into the Playlist or editing it, you must register it into the Library Songlist.(Refer to “Song Registration” on page 7.)
Eject DiscSelect the Disc to eject by right-clicking (Windows) or control-clicking (Mac). Alternatively, you can select [Controls]- [Eject Disc] by clicking the menu button.
20

RecordingWith the AudioGate, you can connect a Nu I or DS-DAC-10R and record analog signals in 1-bit or PCM format.The following explains recording with the Nu I or DS-DAC-10R.
When recording using a device other than the Nu I or DS-DAC-10R, there will be limitations in recording for-mat depending on the device used.
If the Song does not record correctly, click the sample rate display area, and check the settings again to make surethat each item is configured properly. You can also access the Audio Device settings by clicking the Menu buttonand choosing [Edit]-[Preferences...].
Be sure to keep an eye on the remaining media capacity when recording many songs.For the formats that can be used for recording, see “Supported Formats” on page 56.
Transport ControlsThese Transport Buttons can be used to control the AudioGate Record functions.Alternatively, you can select [Controls] by clicking on the Menu button.
The To, REW, FF, and From buttons cannot be used during recording.
Controller Name Function
Play/Pause button During recording, use this button to pause the recording. Click the button again to resumerecording. Recording will continue to the same file until the stop button is clicked.
Record button Click this button to begin recording, and the button will lit. During recording, Click the Play/Pause button to pause the recording—the Record button will remain lit.
Stop button Click the Stop button to cease recording and to unarm the Record function.
Recording bar During recording, the white portion of the bar will extend to the right. When it reaches theright side, it will begin again from the left side.
Play/Pause
Recording bar
Stop
Record
21

Contents of the Upper Viewer DisplayThe top half of the display (upper Viewer Display) provides important information related to the song currentlybeing recorded.
Item Information
Sample Rate The recording sample rate is shown. The incoming analog single will be con-verted to this frequency/format and then recorded.
Artist When recording is paused, you can set the Artist’s name.
Title When recording is paused, you can set the Title of the Song.
Album When recording is paused, you can set the Album name.
Format When recording, this indicates the file format, number of channels, sample rate, and bit depth of the recording. When the Recording Phono Equalizer is selected, the phono equalizer type will also be shown.
Time Information The elapsed recording time and the set recording time will be displayed.The recording time can be directly edited, so that recording will stop when thespecified time elapses. The Total Recording Time can also be set in the Rec Set-ting. (Refer to “Recording File Settings” on page 24.)
TitleArtist Album
FormatTime Information
Sample Rate of the Audio Device Search Window
22

Recording Device SettingsTo access the Recording Device settings, click on the Sample Rate indicator in the upper Viewer Display. In addition,you can also click the menu button and select [Edit] - [Preferences...] to access the Recording Device settings.Please configure these AudioGate settings while the devices to be used for recording are connected to your com-puter.
1. Click the [Audio Device] tab.
2. In the [Driver Type] section, select [ASIO] (Mac [CoreAudio]).
3. Select the recording input device under [Input Device Name].
4. Select the audio device to use for playback in the [Output Device Name] section.Separate input/output devices cannot be set when using ASIO.
5. As the [Sample Rate], select the sampling rate for recording.If this is [Auto], the sampling rate of the last-played song is used.
When making 1-bit recordings, set the input and output devices to be the same device.
Click
23

Recording File SettingsThis shows you how to configure the settings for recording a file from analog signals inputted from the Nu I orDS-DAC-10R.
1. Click the [Rec Setting] button on the Edit/Recording View.The recording file setting screen will be displayed.
2. In the “Destination” area, click the [...] button and choose the output destination folder for the recording file.
3. Decide on a prefix (the characters to use at the beginning of the filename) to be used for the recording file-name.If you select "Default Prefix," the word "Recording" will be used at the beginning of the filename. If you select"User Prefix," you will be able to set whatever characters you like in place of the word "Recording".
4. Select the audio file format to use when recording 2.8 MHz, 5.6 MHz or 11.2 MHz (1-bit).The selected recording file will be created as a stereo file.
Click
Select the recording-destination folder
Click
Select
24

5. Select the file format and bit depth to use when recording from 44.1 kHz to 384 kHz.The selected recording file will be created as a stereo file.
6. Set the Input Type.This function is only for the DS-DAC-10R.
LineSelect this input if you wish to record the analog signal from the LINE OUT of an audio device.
PhonoSelect this input if you will connecting an analog signal from the PHONO output (MM cartridge-compatible) ofan analog record player to the DS-DAC-10R.
SelectSelect
Select
25

7. If the input is set to "Phono", you can choose a Recording Phono Equalizer Type.Select the curve to use when recording with a phono equalizer. RIAA is normally recommended. When selectinga phono equalizer during playback, set this to "Off".
When recording with a phono equalizer, the equalizer curve cannot be changed afterwards. Turn this settingto "Off" if you are recording a record but aren't sure of the equalizer curve.
*1. The record lathes used in the process of producing vinyl records cut a wider groove as the frequency of thesound becomes lower; this makes it difficult for the needle to accurately trace the groove during playback,and also decreases the recording time. For this reason, the record being cut is equalized to attenuate the low-frequency range and boost the high-frequency range, and the opposite curve is applied during playback. Thiscompensation is applied by the “phono equalizer.”
*2. RIAA is the standard recording/playback equalization curve for vinyl records defined by the Recording Indus-try Association of America. It became a standard in 1954, but prior to that date there was no standardizationbetween the various record labels. Since the curve is not indicated on the records themselves, it’s not possibleto know which curve was used to record a given record; however it is said that nearly all records can be cov-ered by the RIAA curve and five other curves. Try selecting different curves in AudioGate and enjoy theresulting changes in tonality.
8. Set the Total Recording Time.The maximum time that can be set is 6 hours.
9. Click the [OK] button.That’s it! You’re done with Recording File settings.
Select
26

Recording Procedure1. Click the Input Monitor Settings button on AudioGate.
The colors on the Input Monitor Settings button will invert.
2. Input the analog signal, and adjust the input level. Set the Nu I input level in the Nu I Control Panel. For theDS-DAC-10R, set the value with the AudioGate input level slider.It's crucial to adjust the input level in order to record a clean sound that contains as little noise and distortion aspossible. Before recording, adjust the recording source level so that it is as high as it can be, just before the clipindicator lights up.
When the line output of a device is connected to the DS-DAC-10R and "Phono" is selected, the sound will dis-tort, even if the clip indicator does not light up. Be sure to monitor the sound and make the proper settings.
3. After adjusting the levels, click the AudioGate Record button to begin recording.The Input Monitor Settings button will turn off, and the Record button will change to remain lit.
The artist and album columns in the upper Viewer Display will be blank, and the Song name in the title willautomatically be generated based on the recording date and time (for example, “Recording_20151121092032”).
The waveform will not display when recording. The elapsed time is indicated by the bar that extends to the right.
4. Click the Add button at any time during recording to add a Mark at that location in the Song. These “Marks” can be used during playback to rapidly find and locate a specific location in the Song.
5. To finish recording, click the Stop button.The Record button light will turn off.
When the recording stops on the recorded song, it becomes the Current Song, and is automatically registered in theLibrary Songlist and in the current Playlist (Recording). Recorded Songs that have already been registered can beplayed and edited, as with other songs.
6. Check the results of your recording.Click the Play button to listen to the recording, and to make sure that everything recorded successfully.
After recording, it will take a little time to display the waveform (depending on the song length), but the Songcan be played back or edited immediately. (Refer to “Editing a Song” on page 28.)
Input level slider
Click
Click
Click
Recording bar
Title
27

Editing a SongAudioGate allows individual Songs in the Songlist to be divided into sections, or combined into one.This allows you to export selected regions from an audio file, or combine multiple consecutively-recorded files intoa single file before you export it. You can also edit the gain, fade, and DC cut settings of each song, and edit text datasuch as the Title, Album, and Artist Name.In addition—although you can edit some part of it in Player View—you can make much more detailed changes tothe Song in Edit View.
Edits applied to a Song will be commonly reflected in both the Library and the Playlist. However, changes madeto regarding dividing, combining, and the channel link function executed in the Library Songlist will not bereflected in the Playlist.
Editing the Current Song
Editing the Text DataThe Artist, Title, and Album fields that appear above the waveform display in the Edit View Upper Viewer Displaycan be edited individually, or in groups using the Batch Edit feature.
• Artist, Title, AlbumClick on the text field to make the information editable. Type in the new information using the computer key-board. When finished, press the Enter key to finalize your changes.
• All text dataYou can use the Batch Edit feature to modify the text information for a group of Songs at once. (Refer to “BatchEditing—Song Information” on page 30 and refer to “Batch Editing—Multiple Songs” on page 32.)
The title is used as the name of the output file when exporting.
If the Song has no information about the title, the file name will be displayed in the Title field.
It is possible to enter Japanese (multi-bite text) as the title. However, you should use English alphanumeric char-acters if you intend to export the Song as an MR project.
Editing the Picture DataYou can attach a picture to your Song. The attached picture is displayed in Player View. If you want to change theattached image, click the displayed image and then select the desired image file.
Simply attaching an image file does not embed the image in the audio file, instead the link is registered in theAudioGate. This means that if you move the image file, it will no longer be displayed in AudioGate. In order toembed the picture, you must export the Song or create a disc.
If you want to delete the attached image, move the mouse pointer onto the image and click the X button.
Deleting the attached picture in AudioGate does not delete the original image file.
AudioGate can load images in the following formats:• Image files in JPEG or PNG format• Image files embedded in an AIFF, DSF, MP3, WMA, AAC, Apple lossless, or FLAC format audio files
AudioGate can embed the picture attached to a Song when exporting the following formats:• AIFF, DSF, MP3, WMA, or FLAC format audio files• DSD discs
28
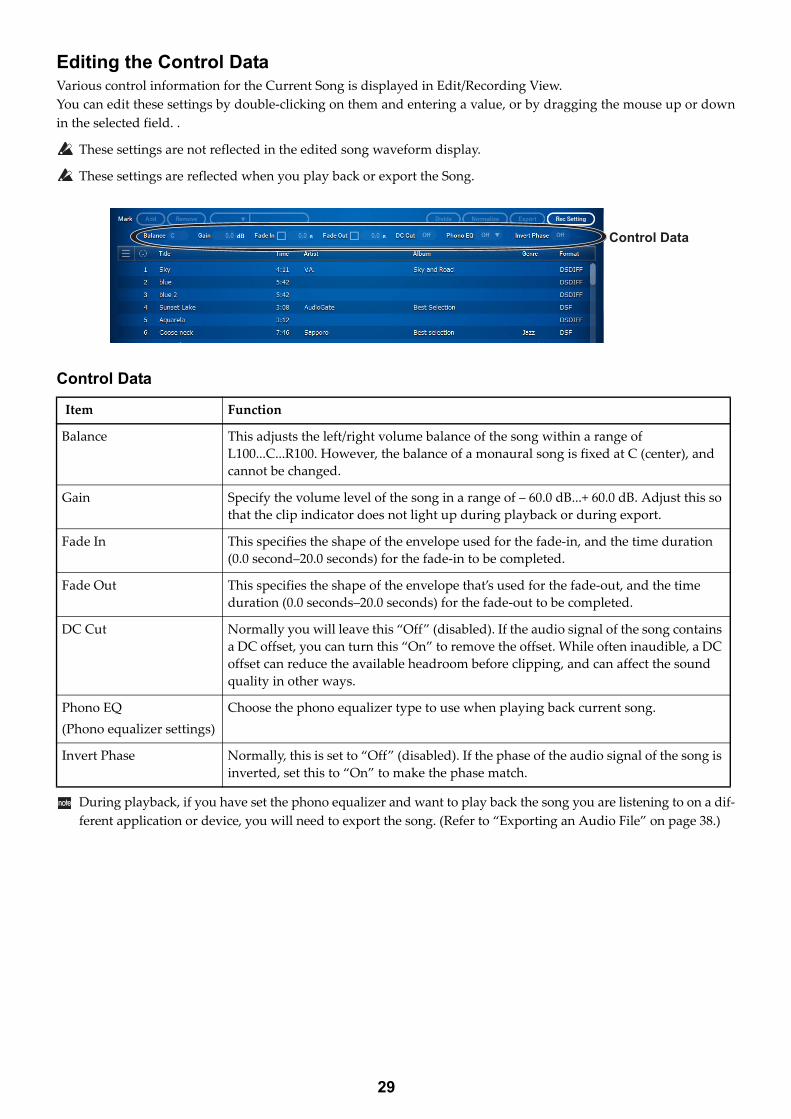
Editing the Control DataVarious control information for the Current Song is displayed in Edit/Recording View.You can edit these settings by double-clicking on them and entering a value, or by dragging the mouse up or downin the selected field. .
These settings are not reflected in the edited song waveform display.
These settings are reflected when you play back or export the Song.
Control Data
During playback, if you have set the phono equalizer and want to play back the song you are listening to on a dif-ferent application or device, you will need to export the song. (Refer to “Exporting an Audio File” on page 38.)
Item Function
Balance This adjusts the left/right volume balance of the song within a range of L100...C...R100. However, the balance of a monaural song is fixed at C (center), and cannot be changed.
Gain Specify the volume level of the song in a range of – 60.0 dB...+ 60.0 dB. Adjust this so that the clip indicator does not light up during playback or during export.
Fade In This specifies the shape of the envelope used for the fade-in, and the time duration (0.0 second–20.0 seconds) for the fade-in to be completed.
Fade Out This specifies the shape of the envelope that’s used for the fade-out, and the time duration (0.0 seconds–20.0 seconds) for the fade-out to be completed.
DC Cut Normally you will leave this “Off” (disabled). If the audio signal of the song contains a DC offset, you can turn this “On” to remove the offset. While often inaudible, a DC offset can reduce the available headroom before clipping, and can affect the sound quality in other ways.
Phono EQ (Phono equalizer settings)
Choose the phono equalizer type to use when playing back current song.
Invert Phase Normally, this is set to “Off” (disabled). If the phase of the audio signal of the song is inverted, set this to “On” to make the phase match.
Control Data
29

Batch Editing—Song InformationThe Song editable metadata information includes the text data, the image data (attached picture), and the controldata (see page 29). This information can be easily edited in the “Batch Edit Song Information...” view.
When a file is exported, this information is embedded in the header of the exported file.
Embedding to AAC and the Apple lossless file is not supported.
It is possible to enter Japanese (multi-byte text) as text information, but you should use English alphanumericcharacters if you intend to export in a format other than AIFF, DSF, MP3, WMA, FLAC file or DSD Disc. Due tolimitations in the file format, characters other than English alpha-numeric will be ignored when exporting.
You can change the text information and attached image for the selected song together here.
1. Move the mouse pointer onto the targeted Song in the Songlist, and click the Context Menu icon displayed tothe right of the Title to select the [Batch Edit Song Information...].Alternatively, you can select [Edit] - [Batch Edit Song Information...] by clicking the Menu button.
You can also select and register the [Batch Edit Song Information...] by right-clicking (Windows) or control-clicking (Mac).
2. Click the text of the desired items in the “Batch Edit Song Information...” view to enter the text.
30

3. Edit the data for the items you selected.A check mark will automatically be placed in the check box of the edited item. Removing the check mark finalizesthe edit.
Text InformationWhen you click the text editing field located at the right of an item name, it will become editable. (Refer to “Edit-ing the Text Data” on page 28.)
Attached pictureTo change the attached picture, click the displayed image and select an image file you want. (Refer to “Editing thePicture Data” on page 28.)
Control Data (Balance, Gain, Fade In, Fade Out, DC Cut)You can edit these settings by clicking the button and double-clicking the figure to enter a value (or by draggingthe mouse up or down in the selected field). (Refer to “Editing the Control Data” on page 29)
File informationThis allows you to check the file path or the type of phono equalizer that is being used during recording.
4. Click the OK button.The metadata editing window will close, and the edits will be reflected in the Current Song.
When a file is exported, this information is embedded in the header of the exported file. Depending on the fileformat, among the information embedded in the header, items that can be read or written are limited. If "AddiTunes songs" is executed, the information supported by iTunes overrides the others, regardless of the format.
31

Batch Editing—Multiple SongsYou can use batch editing to edit the metadata of multiple Songs at once.
1. Click the Song on the Songlist to select it.
2. To select multiple songs, hold down the Ctrl key (Mac: Command key) and choose other songs.
3. Move the mouse pointer onto the selected song, and click the Context Menu icon displayed to the right of theTitle to select the [Batch Edit Song Information...] function.Alternatively, you can select [Edit] - [Batch Edit Song Information...] by clicking the Menu button.
You can also access the [Batch Edit Song Information...] by right-clicking (Windows) or control-clicking (Mac)in the Songlist.
4. Click the button to the left of each item you want to edit, so that the desired buttons are selected.
5. Edit the data for the items you selected.See procedure 3: “Batch Editing—Song Information” on page 30.
6. Click the OK button.The metadata editing window will close, and the edits will be reflected in the Songlist.
32

Dividing a SongYou can divide the Current Song into two separate Songs at any point.When you divide a song, the original Song will be left as it was, and the two new Songs created by the Divide oper-ation will be registered into the Songlist with new names.
1. Use the song playback functions to move to the point where you want to divide the Song.
2. Make sure that playback is paused, and click the Divide button.Alternatively, you can perform the same thing by clicking the Menu button and selecting the [Edit] - [Divide].
You will see that the Song has been divided in the Songlist.
Text data and control information will generally be carried over into both Songs following the Divide operation.
Click
Move to the dividing point
Last half
First half
33

Combining SongsCombining Songs splices the end of one Song directly to the beginning of another Song. When you combine songs,the original Songs will be left as they were, and the new Song created by the Combine operation will be registeredinto the Songlist with a new name.
Here's how you can combine two or more Songs into a single Song.
1. In the Songlist, click a Song to select it.
2. Hold down the Ctrl key (Mac: Command key), and click on additional Songs to select them.
3. Move the mouse pointer onto the selected song, and click the Context Menu icon displayed to the right of theTitle to select the Combine button.Alternatively, you can select [Edit] - [Combine] by clicking the Menu button.
You can also select and register the [Edit] - [Combine] by right-clicking (Windows) or control-clicking (Mac).
You will see that the Songs have been combined in the Songlist.
You can use the Combine function to join recordings together that were not originally separated by the MRRecorder’s automatic split function, however a faint noise may be introduced at the point where the Songs arejoined.
You can't combine Songs of differing formats.
You can't combine Songs that are in compression formats such as MP3, AAC, Apple lossless (ALAC), or WMA.
Text data and control information will generally be taken from the top Song in the list.
Click
Hold down the Ctrl key and click
34

Channel LinkingThe Channel Link feature allows two monaural Songs to be merged into a single stereo Song. Normally you will usethis to link two Songs of the same length.When you use the Channel Link feature the two original Songs will be left as they were, and the Song that was cre-ated using the Channel Link feature will be registered to the Songlist under a new name.
1. Click one of the Songs in the Songlist to select it.
2. Hold down the Ctrl key (Mac: Command key) and click the other Song so that both Songs are selected.
3. Move the mouse pointer onto the selected song, and click the Context Menu icon to the right of Title to selectthe Channel Link button.Alternatively, you can select [Edit] - [Channel Link] by clicking the Menu button.
You can also select and register the [Edit] - [Channel Link] by right-clicking (Windows) or control-clicking(Mac).
Verify that the Songs are linked in the Songlist.
You can't link Songs of differing formats.
You can't link Songs saved in compression formats such as MP3, AAC, Apple lossless (ALAC), or WMA.
If you link Songs that are of differing lengths, the resulting length will match the longer Song.
Text data and control information will generally be taken from the top Song in the list.
Click
Hold down the Ctrl key and click
35

NormalizingWhen the Normalize button is pressed, the output level of the Current Song will be normalized to its maximum vol-ume, and a Gain value will be set in the Control Data of the Song so that the peak value may not exceed 0 dB.
The result of normalization is not reflected in the song waveform display.
Using MarksIn Edit/Recording View, you can place Marks at specific location in your Song. By placing these Marks near editingpoints—or in between movements or sections of a longer recording, you will be able to quickly return to thesepoints in the Song to perform any editing, such as dividing a track or listening to a critical passage. Marks can alsobe added during recording (refer to “Recording Procedure” on page 27).
Marks that can be ImportedAudioGate can load the following Marks.
• Marks included in an MR project• Marks included in the cue-points chunk of a WAV/BWF file• Marks (track start and index) included in the marker chunk of a DSDIFF file
Marks that can be ExportedAudioGate can embed Marks when exporting the song to the following file formats.
• MR project format• WAV or BWF files• DSDIFF files
Click
36

Editing MarksIf you click the Mark information, the Mark list will appear and you can edit any of the Marks in the list. In addition,the icons indicating the listed Marks are shown in song waveform display.
The Mark information, the checked Mark and the red icon denote the currently selected Mark.
Navigating between Marks
Undo and Redo
Reverting an Edit (Undo)You can quickly undo the most recent editing operation. Click the Menu button and select [Edit] - [Undo], and yourmost recent edit will revert to its previous state.
Re-executing the Edit (Redo)To re-apply the recently undone edit, Click the Menu button and select [Edit] - [Redo]. Now you can continue editing.
Operation Action
Selecting a Mark Click on the Mark icon, of choose the Mark from the list. The selected icon will be red, and the current Mark will appear with a check in the list. The Mark information will the number and position.
Adding a Mark Click the Add button to add a Mark at the current position. You can’t create multiple Marks at the same position.
Removing a Mark Select the Mark (see above) and click the remove button.
Editing the location of a Mark Select the Mark (see above) and click the displayed Mark time. The Time will become an editable field. Use the keyboard to enter the desired time and press the Enter key.
Removing all Marks from the Current Song Click the Menu button and select the Menu item [Edit] – [Remove All Marks].
Dividing the Song at all Marks locations Click the Menu button and select the Menu item [Edit] – [Divide At Marks].
Operation Action
Advancing to the next Mark Click the FF button to move to the next Mark relative the current position
Returning to the previous Mark Click the REW button to move to the previous Mark relative to the current position
Moving to a specific Mark Double-click on the Mark Icon; or click on the Mark information to select a Mark from the list.
Mark icon
Mark list
Mark information
37
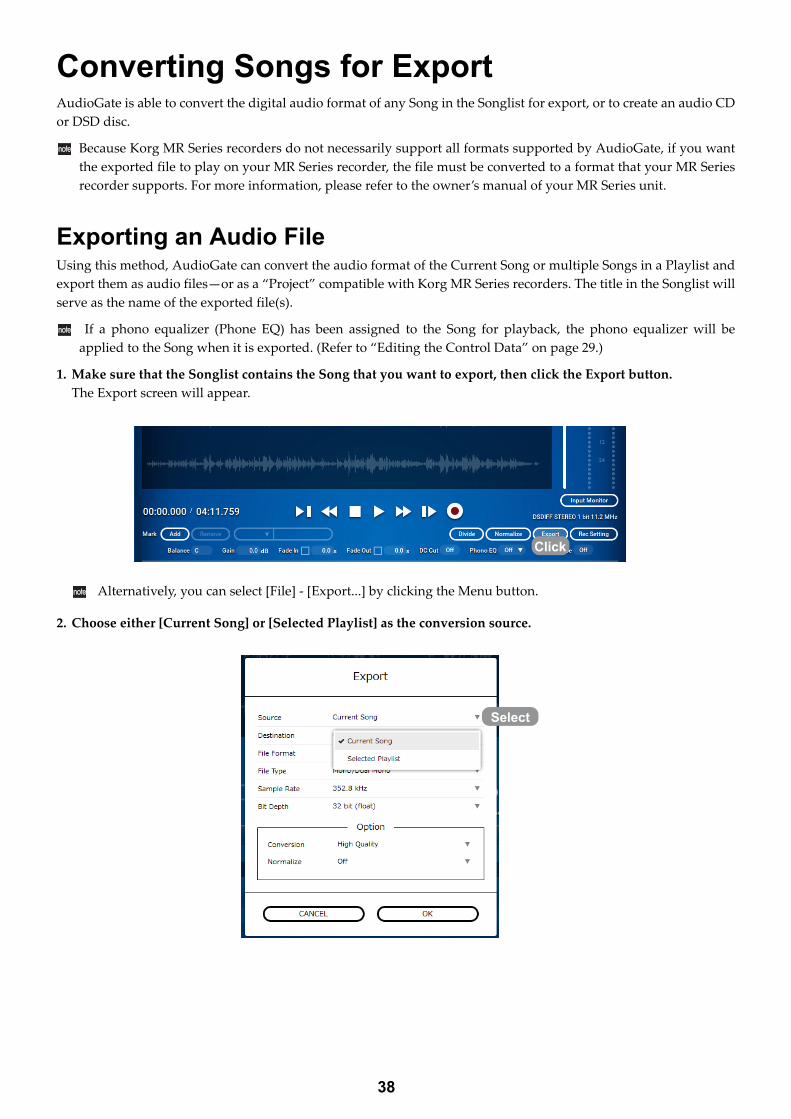
Converting Songs for ExportAudioGate is able to convert the digital audio format of any Song in the Songlist for export, or to create an audio CDor DSD disc.
Because Korg MR Series recorders do not necessarily support all formats supported by AudioGate, if you wantthe exported file to play on your MR Series recorder, the file must be converted to a format that your MR Seriesrecorder supports. For more information, please refer to the owner’s manual of your MR Series unit.
Exporting an Audio FileUsing this method, AudioGate can convert the audio format of the Current Song or multiple Songs in a Playlist andexport them as audio files—or as a “Project” compatible with Korg MR Series recorders. The title in the Songlist willserve as the name of the exported file(s).
If a phono equalizer (Phone EQ) has been assigned to the Song for playback, the phono equalizer will beapplied to the Song when it is exported. (Refer to “Editing the Control Data” on page 29.)
1. Make sure that the Songlist contains the Song that you want to export, then click the Export button.The Export screen will appear.
Alternatively, you can select [File] - [Export...] by clicking the Menu button.
2. Choose either [Current Song] or [Selected Playlist] as the conversion source.
Click
Select
38

3. In the [Destination] area, click [...] and choose the export-destination folder.
4. Specify the desired output File Format.
5. Specify the desired output File Type.
Select the export-destination folder
Click
Select
Select
39

Mono/Dual MonoMono Songs will be exported as monaural files; Stereo Songs will be exported as dual mono files.Exporting a stereo Song in the Dual Mono file type is especially convenient if the file is going to be broughtinto in a DAW after export.
Stereo Interleaved:A channel-interleaved stereo file will be exported. In the case of a monaural song, the L channel and R chan-nel will contain the same data. If you want to play back the file on the MR Series recorder, copy it into theAUDIO folder.
MR Project:An MR project folder containing a .prj file and one or more audio files will be exported. This is useful whenexporting very large audio data (exceeding the 4 GB limit of FAT32).Marks edited by AudioGate can be embedded into the MR project. If you want to play back the Songs onyour MR Series recorder, copy the file to the appropriate location in the MR_PROJ folder. Please refer to theowner's manual of your MR Series recorder for more information.
6. Specify the Sample Rate and Bit Depth that will be used for exported file.
7. Set any optional settings (see page 42) that may be required.
Select
Select
40

8. Click the OK button.File conversion export will begin.
Audio files in the 1-bit format may contain louder signals that audio files in the PCM format. When con-verting 1-bit audio files to PCM files, it may be necessary to lower the gain settings by approximately – 3.0dB to avoid clipping (see page 29).
When an audio file is exported in the 1-bit format, a minimal amount of silence may be added to the end ofthe exported file.
If the original format and the exported file have the same sample rates, and if the Control Data settingsremain at their default settings (see page 29), AudioGate may switch to the “direct exporting mode” whereunnecessary recalculation is reduced. The level meter will remain fixed at 0dB when AudioGate is operat-ing in the “direct exporting mode.”
Click
41

42
Optional SettingsWhen exporting an audio file(s), these optional parameters allow you to make detailed settings that control the con-version algorithm. The available parameters will change based on the output format you’ve chosen.
ConversionBased on your needs, you can choose the type of conversion process that will be used.
Light Load:AudioGate will use a high-speed conversion engine with particular attention to sound quality.
High Quality:This high-definition conversion engine uses additional CPU processing power to allow a greater emphasis onsound quality.
CPU utilization may run very high during the High Quality export process.
Select

2.8 MHz DSD FilterWhen converting a Song(s) from the 1-bit/2.8 MHz format to the 176.4 kHz or 192 kHz PCM format, an additionallow-pass roll-off filter can be applied.
OffThe additional filter will not be applied.
Soft Roll-off (–3dB@50kHz) Applies a low-pass filter with soft roll-off.
Sharp Roll-off (–3dB@42kHz)Applies a low-pass filter with sharp roll-off.
Select
43

NormalizeNormalization continuously adjusts the gain to its optimal value—that is, as high as possible without introducingdistortion. When you select normalization, the gain of each Song will be automatically adjusted.
OffNormalization will not be applied. The volume level after conversion will be determined by the original gainsetting.
Individual SongsEach Song will be normalized individually to its respective maximum volume. The original gain setting will becompletely ignored.
Current Songlist Selections (avg. level)The maximum peak from all Songs being exported will be found, and all Songs will be normalized while pre-serving the original volume balance between songs, as determined by the original gain settings.
When you use normalization, the automatically-adjusted gain will be indicated in blue text while the files arebeing exported.
In general, converting the sample rate will require samples to be interpolated, possibly causing the peak lev-els to be slightly higher than the original data. If the song's peak level was already close to 0 dB before nor-malization, the gain may be automatically adjusted to below 0 dB.
1-bit audio data may contain loud sounds that exceed the limits of PCM. If normalization is applied whenconverting 1-bit audio to PCM, the gain may be automatically adjusted to about -3.0 dB.
When exporting in a 1-bit audio format, normalization is applied referenced to 0 dB-SACD, but in some casesthe output data may slightly exceed the reference value (i.e., the level meter indication may exceed 0 dB).Even in this case, the signal is far lower than the theoretical clipping level for 1-bit audio, so there will be noproblem with the exported data as long as the clip indicator does not light up.
When normalization has completed successfully, and the file export (or disc creation) process has ended, a dialogbox will ask “Do you want to load the normalized gain setting to the Songlist?” If you choose “Load,” the gainsetting used for normalization will be applied to the “Control data” for each Song.
By applying the gain used for normalization to the “Control data” of each song, and then exporting with theNormalize box set to [Off], you can greatly reduce the processing time for subsequent exports. However ifyou've changed the output sampling frequency, the peak values of the output data will change slightly, soyou'll need to perform the normalization process once again.
Select
44

DitherOften part of the final audio mastering procedure, dithering is used to minimize the perception of digital quanti-zation when converting the digital format. These dither parameters are used for exporting the results ofextremely precise internal calculations as 16/24-bit data.
NoneThe results of the internal calculations are rounded up or down to 16/24-bit data. If the volume of the Song issufficiently loud, there will be no particular problems even with this setting selected.
TPDF DitherStandard white noise dithering will be applied. The noise floor will increase slightly, but distortion componentscan be completely suppressed. Choose this Dither type if you plan to continue editing the file using anotherapplication after exporting the song; such as importing the file into a DAW, etc.
KORG AQUAThis method takes into account the characteristics of human auditory perception, producing a higher-qualitymaster by limiting the increase of quantization noise in important frequency regions. Choose this Dither type ifyou're exporting a Song as the final master.
AudioGate is able to automatically detect situations where dithering is not necessary. Even if dithering is setto [TPDF Dither] or [KORG AQUA], this setting may be ignored in some cases to avoid any increase in noise.
Select
45

Creating an Audio CD or DSD DiscThe current Playlist can be used to create and audio CD or DSD disc. Each song in the Playlist will be written as an individual track on the disc.If the format of a Song does not match the format of the disc, the format will be automatically converted before writ-ing the Song to disc.
1. To create a disc that only contains the Current Song, click the Menu button and select [File] - [Burn Disc...].The Burn Disc setting screen will appear.
You can also create a disc from the Playlist. To do so, click the Side bar Display button to display the side bar,right-click (control-click Mac) a Playlist file, and select [Burn Disc...].The Burn Disc setting screen will appear.If the output source parameter is set to [Current Song], change this setting to [Selected Playlist].
46

2. Select the format of the disc that you want to burn.
3. Select the drive you’ll use to burn the disc from the list of writable CD/DVD drives.
If you're creating a DSD disc, you must select a drive that can write DVDs.
4. Insert a blank disc or a rewritable disc (CD-RW, DVD-RW, DVD+RW) into the drive that you selected in step 3.If any other applications are open, close them and exit those applications.
If you're creating an audio CD, you must insert a CD-R or CD-RW disc.
If you're creating a DSD disc, you must insert a DVD-R, DVD-RW, DVD+R, or DVD+RW disc, choose which-ever type your drive supports.
5. If you’ve inserted a previously-used rewritable disc, click the ERASE button.The Erase Disc dialog box will appear.
Select
Select
Click
47

6. Choose “Quick Erase” or “Full Erase.”Quick Erase
The disc's TOC (Table Of Contents) information will be erased to make the disc usable. While this method isfaster, in some cases more errors may occur, depending on the overwrite performance of the disc. If you experi-ence problems when creating a disc, we recommend that you use Full Erase.
Full Erase (un-check the Quick Erase check box)The disc will be completely erased to make it usable. This will often take more time than Quick Erase.
When you erase a disc, all data will be lost. You cannot cancel or undo this operation.
7. Click the ERASE button to make the disc usable.
8. Specify the disc writing speed.
9. Set any optional settings (see page 50) that may be required.
Click
Select
48

10. Click the CREATE button.
Format conversion and the disc burning process will begin. A dialog box will open to show the progress.
11. When the disc has been successfully created, the dialog box will indicate “Writing completed. Do you wantto create another disc?”, and the disc will be ejected.
12. If you want to create another identical disc, insert a blank disc and choose [CREATE].If you're finished, choose [DON’T CREATE].
Click
49

Optional SettingsWhen creating a disc, you can edit the Album and Artist name, the spacing between songs, normalization options,and the dithering type. The available parameters will depend on the output format.
Album TitleThe album title will serve as the name of the audio CD or DSD disc.This information is embedded in the disc, and can be displayed by players that support it.
When creating an audio CD, this is written as CD-TEXT.
Use alphanumeric characters if you're creating an audio CD. Certain drives may not allow you to specify thisinformation.
Album ArtistHere you can add the Artist’s name to the audio CD or DSD disc.This information is embedded in the disc, and can be displayed by players that support it.
When creating an audio CD, this is written as CD-TEXT.
Use alphanumeric characters if you're creating an audio CD. Certain drives may not allow you to specify thisinformation.
Go Between SongsThis parameter allows you to specify the amount of time between individual songs on an audio CD. For a drivethat supports Disc-At-Once, you can create a gapless CD by specifying [None] as the song spacing.
On some drives, the song spacing you specify might not be applied correctly.
When you create a gapless CD, the location of the track division (the point at which songs are divided) mightbe automatically adjusted forward by a maximum of 1/75th of a second.
NormalizeRefer to “Normalize” on page 44.
DitherRefer to “Dither” on page 45.
If a phono equalizer (Phone EQ) has been assigned to the Song for playback, the phono equalizer will be appliedto the Song when it is exported and burned to disc. (Refer to “Editing the Control Data” on page 29.)
50

Auto Update FunctionAudioGate is able to check for updates via the Internet.By keeping your copy of AudioGate updated to the latest version, you can ensure that you're getting the best perfor-mance and stability.
Manually Checking for Updates1. Make sure that your computer is connected to the Internet, click the menu button and select the menu item
[Help] - [Check for Updates...].“Korg Software Update” will start up.
2. If a newer version of AudioGate is found, make sure that the “Install” check box is selected, and then click theDownload button.Downloading will begin.
When downloading is completed, the save-destination folder will appear. If you want to install the new ver-sion immediately, close AudioGate and then start up the installer.
51

Automatically Checking for UpdatesYou can edit settings so that AudioGate will automatically check for updates when it is started.
1. Click the display section of the sample rate in the audio device.You can also click the menu button and select [Edit] - [Preferences...] to display it.
2. Click the [Other] tab.
3. If the item [Check for updates automatically] of [Auto Update] is not selected, click the check box to select it.
With this setting, AudioGate will check for updates when it is started up, and “Korg Software Update” (describedearlier) will start up if a newer version is available.
Click
52

Other Settings
Changing the Folder where Temporary Files are CreatedAudioGate occasionally creates temporary files when creating a disc or adding audio files.Here's how to change the location where these temporary files are created.
1. Click the display section of the sample rate in the audio device.You can also click the menu button and select [Edit] - [Preferences...] to display it.
2. Click the [Others] tab.
3. In [Temporary Folder], click [...] and select the desired folder.
We recommend that you specify a hard disk drive with plenty of free space as the location where the temporaryfile folder is created.
Resetting the Warnings of All Dialog BoxesSome warning dialog boxes have an option “Do not show this message again.” If this check box is selected, thatwarning will no longer appearHere's how to make these suppressed warnings appear again.
1. Click the display section of the sample rate in the audio device.You can also click the menu button and select [Edit] - [Preferences...] to display it.
2. Click the [Others] tab.
3. In [Reset All Dialog Warnings], click the Reset button.
Click
Click
53

Checking the real-time conversion processingYou can check the current status of real-time conversion processing.
1. Click the display section of the sample rate in the audio device.You can also click the menu button and select [Edit] - [Preferences...] to display it.
2. Click the [Others] tab.
3. In the [Real-Time Conversion] section, check the real-time conversion processing.When the signal is being converted to DSD in real time, “DSD Output” is displayed; and when the signal is being con-verted to PCM in real time, “PCM Output” is displayed.
Switching BackgroundYou can select your favorite background image from several different choices.
1. Click the menu button and select the menu item [View] - [Background].
2. Select the background.
Click
54

Regarding the FLAC licenseAudioGate uses the FLAC library pursuant to the following license.
Copyright (C) 2000,2001,2002,2003,2004,2005,2006,2007,2008,2009 Josh CoalsonRedistribution and use in source and binary forms, with or without modification, are permitted provided that thefollowing conditions are met: · Redistributions of source code must retain the above copyright notice, this list of conditions and the following
disclaimer. · Redistributions in binary form must reproduce the above copyright notice, this list of conditions and the follow-
ing disclaimer in the documentation and/or other materials provided with the distribution. · Neither the name of the Xiph.org Foundation nor the names of its contributors may be used to endorse or pro-
mote products derived from this software without specific prior written permission.
THIS SOFTWARE IS PROVIDED BY THE COPYRIGHT HOLDERS AND CONTRIBUTORS “AS IS” AND ANYEXPRESS OR IMPLIED WARRANTIES, INCLUDING, BUT NOT LIMITED TO, THE IMPLIED WARRANTIES OFMERCHANTABILITY AND FITNESS FOR A PARTICULAR PURPOSE ARE DISCLAIMED. IN NO EVENT SHALLTHE FOUNDATION OR CONTRIBUTORS BE LIABLE FOR ANY DIRECT, INDIRECT, INCIDENTAL, SPECIAL,EXEMPLARY, OR CONSEQUENTIAL DAMAGES (INCLUDING, BUT NOT LIMITED TO, PROCUREMENT OFSUBSTITUTE GOODS OR SERVICES; LOSS OF USE, DATA, OR PROFITS; OR BUSINESS INTERRUPTION) HOW-EVER CAUSED AND ON ANY THEORY OF LIABILITY, WHETHER IN CONTRACT, STRICT LIABILITY, ORTORT (INCLUDING NEGLIGENCE OR OTHERWISE) ARISING IN ANY WAY OUT OF THE USE OF THIS SOFT-WARE, EVEN IF ADVISED OF THE POSSIBILITY OF SUCH DAMAGE.
Regarding the libcurl licenseAudioGate uses the libcurl library pursuant to the following license.Copyright (c) 1996 - 2010, Daniel Stenberg, <[email protected]>.All rights reserved.Permission to use, copy, modify, and distribute this software for any purpose with or without fee is hereby granted,provided that the above copyright notice and this permission notice appear in all copies.
THE SOFTWARE IS PROVIDED “AS IS”, WITHOUT WARRANTY OF ANY KIND, EXPRESS OR IMPLIED,INCLUDING BUT NOT LIMITED TO THE WARRANTIES OF MERCHANTABILITY, FITNESS FOR A PARTICU-LAR PURPOSE AND NONINFRINGEMENT OF THIRD PARTY RIGHTS. IN NO EVENT SHALL THE AUTHORSOR COPYRIGHT HOLDERS BE LIABLE FOR ANY CLAIM, DAMAGES OR OTHER LIABILITY, WHETHER INAN ACTION OF CONTRACT, TORT OR OTHERWISE, ARISING FROM, OUT OF OR IN CONNECTION WITHTHE SOFTWARE OR THE USE OR OTHER DEALINGS IN THE SOFTWARE.
Except as contained in this notice, the name of a copyright holder shall not be used in advertising or otherwise topromote the sale, use or other dealings in this Software without prior written authorization of the copyright holder.
55

Supported Formats
Supported File FormatsAudioGate is able to import/export (input/output) audio files of the following formats.
*1: AudioGate 4.5 and later versions support the import of 32-bit integer WAV files. (Note that these files are inter-nally converted to 32-bit floating point data.) Export to 32-bit integer WAV format is not supported.
*2: Supported if QuickTime7 is installed*3: Supported if Flip4Mac WMV is installed.*4 Supported if Windows Media Player 10 or later is installed
In some cases, it may not be possible to correctly read files that were not created by a Korg MR Series unit or byAudioGate.
Audio files protected by DRM (Digital Rights Management) cannot be loaded.
File format(extension)
Windows Mac Number of channels
Sample rate Bit depth
In Out In Out
PCM WAV (.wav) *1 *1 *1 *1
1ch2ch
44.1 kHz, 48 kHz88.2 kHz, 96 kHz
176.4 kHz, 192 kHz352.8 kHz, 384 kHz
16 bit, 24 bit32 bit(float)BWF (.wav)
AIFF (.aif/.aiff) 16 bit, 24 bit
1-bit DSDIFF (.dff)
1ch2ch
2.8224 MHz5.6448 MHz
11.2 MHz1-bitDSF (.dsf)
WSD (.wsd)
Irreversible compression
MP3 (.mp3) *4
1ch2ch
44.1 kHz, 48 kHz -
AAC (.m4a) *2
WMA (.wma) *3
WMA Professional (.wma)
*3 2ch 44.1 kHz, 48 kHz88.2 kHz, 96 kHz
Lossless compression
WMA Lossless (.wma)
*3 2ch 44.1 kHz, 48 kHz88.2 kHz, 96 kHz
16 bit (only 44.1 kHz), 24 bit
Apple Lossless [ALAC] (.m4a)
*2 1ch2ch
44.1 kHz, 48 kHz88.2 kHz, 96 kHz
176.4 kHz, 192 kHz352.8 kHz, 384 kHz
16 bit, 24 bit
FLAC (.flac)
56

Supported Disc FormatsAudioGate supports reading and writing of audio CDs and DSD discs.AudioGate can create discs in the following formats.
Writing to dual-layer DVD media is not supported.
A writable CD/DVD drive is required in order to create audio CDs or DSD discs.
What are DSD Discs?DSD discs are a new disc format that was created as a way for an individual to record and playback DSD formatmaterial. This means that the methods used to create audio discs on CD-R or CD-RW media are now also avail-able for the world of DSD audio. DSD discs can be played on compatible players and enjoyed in their originalhigh quality.
DSD disc is a disc format that is different than the Super Audio CD. Not all Super Audio CD players will nec-essarily be able to play back a DSD disc.
* DSD discs (1-bit; 2.8 MHz) created by AudioGate can be played back on players such as the Sony SCD-XA5400ES Super Audio CD/CD player, the Sony SCD-XE800 Super Audio CD/CD player or PlayStation®3from Sony Interactive Entertainment LLC. DSD discs to be played on the Sony SCD-XA5400ES or the SonySCD-XE800 require the following conditions. AudioGate meets these conditions. (As of August 21st, 2010,confirmed by KORG Inc.)- Disc: DVD-R, DVD-RW, DVD+R, and DVD-RW, that are compatible with DVD-ROM specifications
Disc format Audio CD (CD-DA) DSD discs
Disc media CD-R, CD-RW DVD-R, DVD-RWDVD+R, DVD+RW
Approximate recording time Approx. 74 minutes (when using 700 MB media)
Approx. 100 minutes (when using 4.7 GB media)
Number of albums that can be recorded on one disc
1 1
Maximum number of tracks that can be recorded on one disc
99 99
Recording time for one track Minimum 4 seconds 0 seconds
Maximum Approx. 74 minutes Approx. 100 minutes (4 GB)
Sampling frequency 44.1 kHz 2.8224 MHz
Bit depth 16 1
Number of channels 2 2
Recordable metadata CD-TEXT format (alphanumeric only)• Title• Artist name* Not recordable for some drives
ID3v2.3 format• Title• Title (Read)• Artist name• Artist name (Read)• Album name• Album name (Read)• Album Artist name• Album Artist name (Read)• Track No.• Disc No.• Genre• Date and time of recording• Attached picture
57

- File extension: dsf- Folder type: DSD_DISC folder- Maximum size of a file: up to 4GB- Channel: 2-channel- Maximum number of playable files: up to 150 files per folder- Maximum number of playable folders: up to 200 folders per disc- Maximum number of playable layers: up to 8th layer- Sampling frequency: 2.8224 MHz* The availability of these products may vary by country.* PlayStation is a registered trademark of Sony Interactive Entertainment LLC.
Japan: http://www.jp.playstation.com/US: http://www.us.playstation.com/Europe: http://uk.playstation.com/country-selector/Please check following URL for other countries.http://www.playstation.com/country-selector/
* “DSD Disc Format” is a trademark of Sony Corporation.* All product names and company names are the trademarks or registered trademarks of their respective
owners. Specifications are subject to change without notice for improvement.
58

List of ShortcutsFunction Windows Mac
Add Audio Files... Ctrl + O Command + O
Open Folder... Ctrl + Shift + O Command + Shift + O
Remove Songs Delete Delete
Export... Ctrl + Shift + E Command + Shift + E
Burn Disc... Ctrl + Shift + B Command + Shift + B
Exit Ctrl + Q Command + Q
Undo Ctrl + Z Command + Z
Redo Ctrl + Shift + Z Command + Shift + Z
Cut Text Ctrl + X Command + X
Copy Text Ctrl + C Command + C
Paste Text Ctrl + V Command + V
Select All Songs Ctrl + A Command + A
Select All Marks Ctrl + Shift + A Command + Shift + A
Divide Ctrl + D Command + D
Divide At Mark Ctrl + Shift + D Command + Shift + D
Remove All Marks Ctrl + Shift + Delete Command + Shift + Delete
Combine Ctrl + J Command + J
Channel Link Ctrl + L Command + L
Batch Edit Song Information... Ctrl + Shift + I Command + Shift + I
Preference... Ctrl + , Command + ,
Add Mark M M
Edit Song Name Ctrl + T Command + T
Switch View Ctrl + I Command + I
Select Song Above ↑ ↑
Select Song Below ↓ ↓
Play Selected Song Enter Enter
Play/Pause Space Space
Rec//Pause Ctrl + R Command + R
Play From... F F
Play To... T T
Next Mark Ctrl + Shift + → Command + Shift + →
Previous Mark Ctrl + Shift + ← Command + Shift + ←
Next Song Ctrl + → Command + →
Previous Song Ctrl + ← Command + ←
Fast Forward → (Hold down) → (Hold down)
59

Rewind ← (Hold down) ← (Hold down)
Move 0.001 second Forward Shift + → Shift + →
Move 0.001 second Backward Shift + ← Shift + ←
Move 0.05 second Forward → →
Move 0.05 second Backward ← ←
Move 1 second Forward Alt + → Option + →
Move 1 second Backward Alt + ← Option + ←
Direct Locate (Editing of current position) G G
Function Windows Mac
2018
www.korg.com Published 09/2021
60


![SAP HowTo Guide - Unlocking User SAPStar [User Guide]](https://img.dokumen.tips/doc/110x75/544ac849b1af9f7c4f8b4bd1/sap-howto-guide-unlocking-user-sapstar-user-guide.jpg)