Embed Size (px)
Citation preview

1
ATTACHMENT 7.a
PeopleSoft Timecard System Documentation
Pages
System Documentation 2 – 51
Laborcode Load 52
Laborcode Entry 53 - 56
Creating Laborcodes in Time Entry 57 - 60
LCTC_LOAD 61 - 65
Allocate and PW Allocate 66 - 67
Allocate Discussion 68 – 71
PW Allocate Specifications 72- 74
TC Group Allocate Specs 75 - 79
RFP 1702 ATT 7 a
2
System Documentation Time Entry System
July 2006 Paula Guthrie
RFP 1702 ATT 7 a

3
Setup Tables
Standard Setup There is a set standard in which you need to enter in the information for setup. There are tables that depend on other tables so the setup needs to happen in a specific order. The order is
1. Create Timecard Group 2. Setup Crews 3. Setup Customers (default only if you are not using Project and Task) 4. Setup Tasks (default only if you are not using Project and Task) 5. Setup Project Types (only if we are going to use project types) 6. Setup Projects (different than our projects. Only used if we are going to use
project types) 7. Setup Labor Codes 8. Create Profiles for employees 9. Map Earning Codes to employee Profiles
RFP 1702 ATT 7 a

4
10. Time cards should be viewable and ready for entry
Activities This is a description field that is automatically populated upon entering in the Labor Code, Project, Task, etc. This field is used at Lane County for public works activity codes for cost accounting. We will probably never use it.
Crews The crew setup is used to setup groups of employees and the person that supervises them for review of timecard and check off.
RFP 1702 ATT 7 a

5
Customer Groups This is for grouping of customers. Doubt we will use it as Lane County uses this as part of their billing module.
RFP 1702 ATT 7 a

6
Customers This is the setup editor to create customers. We probably won’t be using this as we don’t bill to customers at Springfield.
RFP 1702 ATT 7 a
7
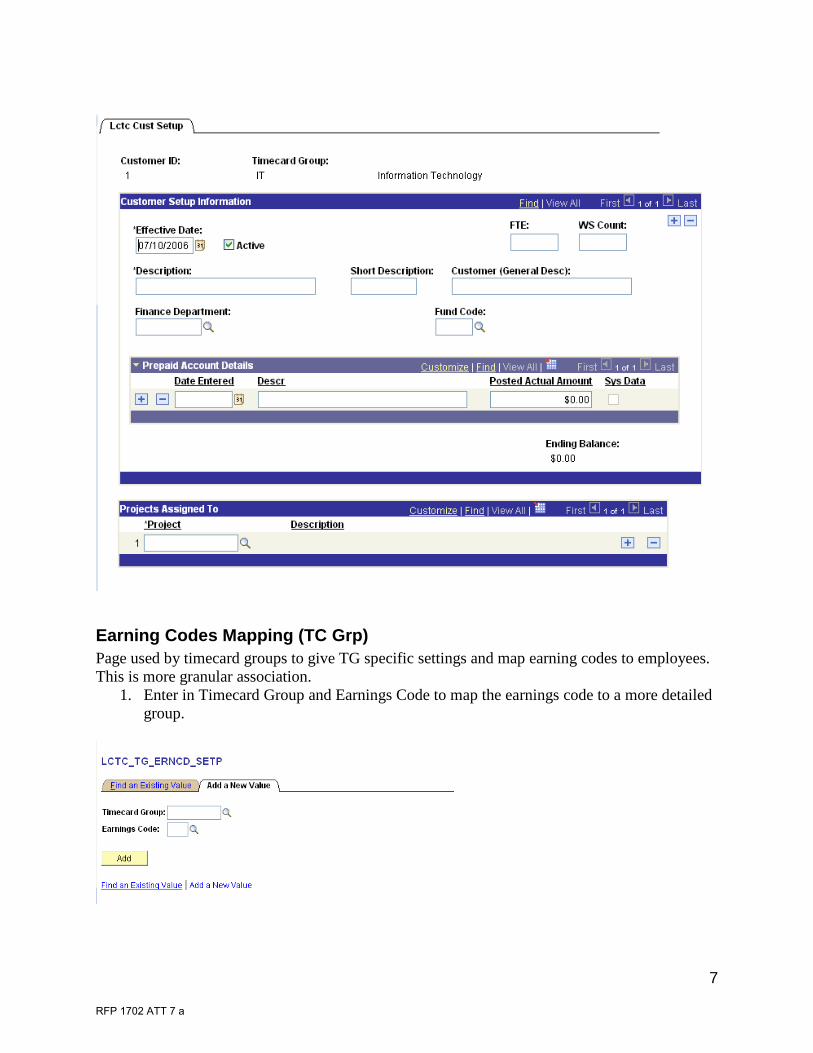
Earning Codes Mapping (TC Grp) Page used by timecard groups to give TG specific settings and map earning codes to employees. This is more granular association.
1. Enter in Timecard Group and Earnings Code to map the earnings code to a more detailed group.
RFP 1702 ATT 7 a

8
2. Associated Dept/Divisions – Enter in department or division that has access to this earnings code in this TC Group
3. Associated Positions – Enter in positions that have access to this earning code in this TC Group
4. Associated Jobcodes – Enter in jobcodes that have access to this earnings code in this TC Group
5. Associated Unions – Enter in union code that have access to this earnings code in this TC Group
6. Associated FLSA Statuses – Enter in FLSA status for use with earnings code in this TC Group
7. Associated Employees – Enter in employee ids to be used with this earning code in this TC Group (Can be used for injury leave or any special leave for an individual employee)
Equipment At LC PW they have a fleet system that they use to import the data for this component.
RFP 1702 ATT 7 a

9
Laborcodes Laborcodes is a shortcut name for the account code combination of fund, dept, account, and project. The laborcodes were setup by loading the information from PeopleSoft on what account code combinations that have been used in the last year.
1. The labor code is setup fund, dept, project id (if there is one). It does not include the account.
2. The account code piece is the whole account code combination that includes the account. 3. The description is the short description fund code, short description dept, and the whole
project description if there is a project code. 4. The laborcode short description is only the short description of the dept. 5. Each labor code is assigned to a timecard group.
RFP 1702 ATT 7 a

10
To enter in a laborcode.
1. Verify that the laborcode is not setup in the system currently. 2. Click on Add to add a new laborcode
3. Enter in the timecard group on what department that this laborcode is associated with.
4. Enter in the labor code. Make sure and put in dashes between the chartfields. (ex: Fund 100, department 23410, and account 510000 would be laborcode of 100-23410. ex: Fund 612, department 62263, account 510000, and project P10455 would be laborcode of 612-62263-P10455.)
5. Enter in the account code. This includes all of the account code combination fields including account. So by using the above examples the account code would be (100-23410-510000 and 612-62263-510000-P10455)
6. Click on ADD
RFP 1702 ATT 7 a
11
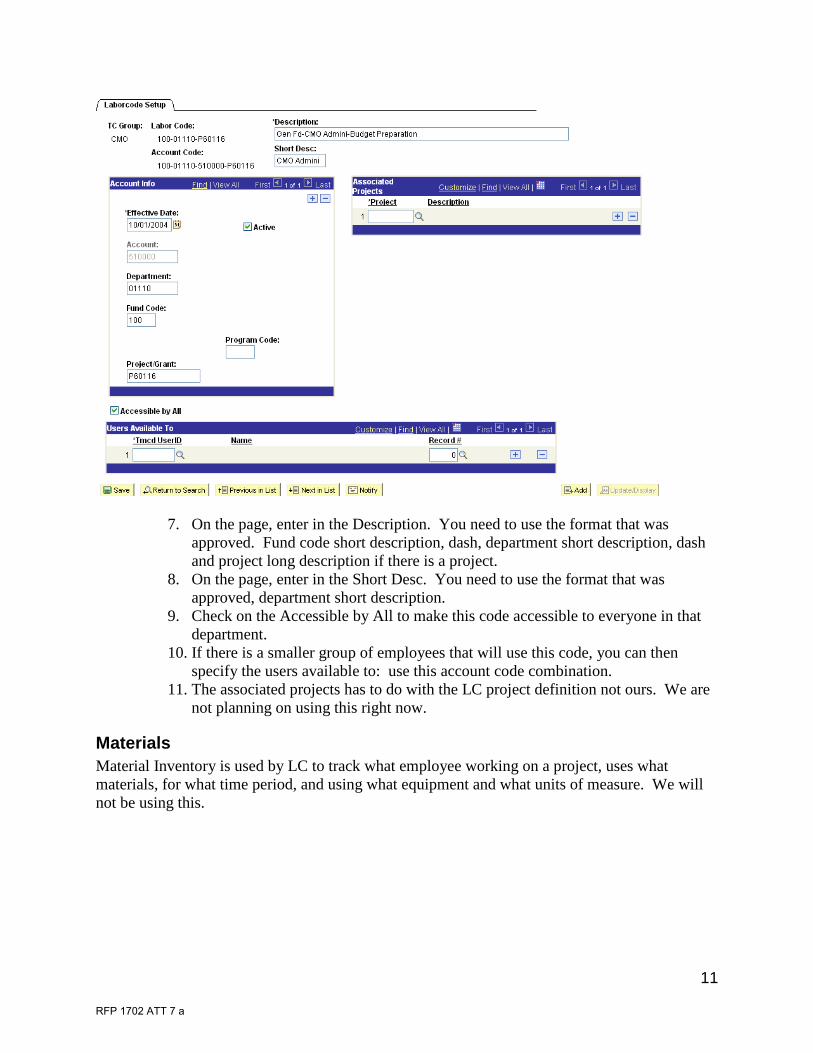
7. On the page, enter in the Description. You need to use the format that was approved. Fund code short description, dash, department short description, dash and project long description if there is a project.
8. On the page, enter in the Short Desc. You need to use the format that was approved, department short description.
9. Check on the Accessible by All to make this code accessible to everyone in that department.
10. If there is a smaller group of employees that will use this code, you can then specify the users available to: use this account code combination.
11. The associated projects has to do with the LC project definition not ours. We are not planning on using this right now.
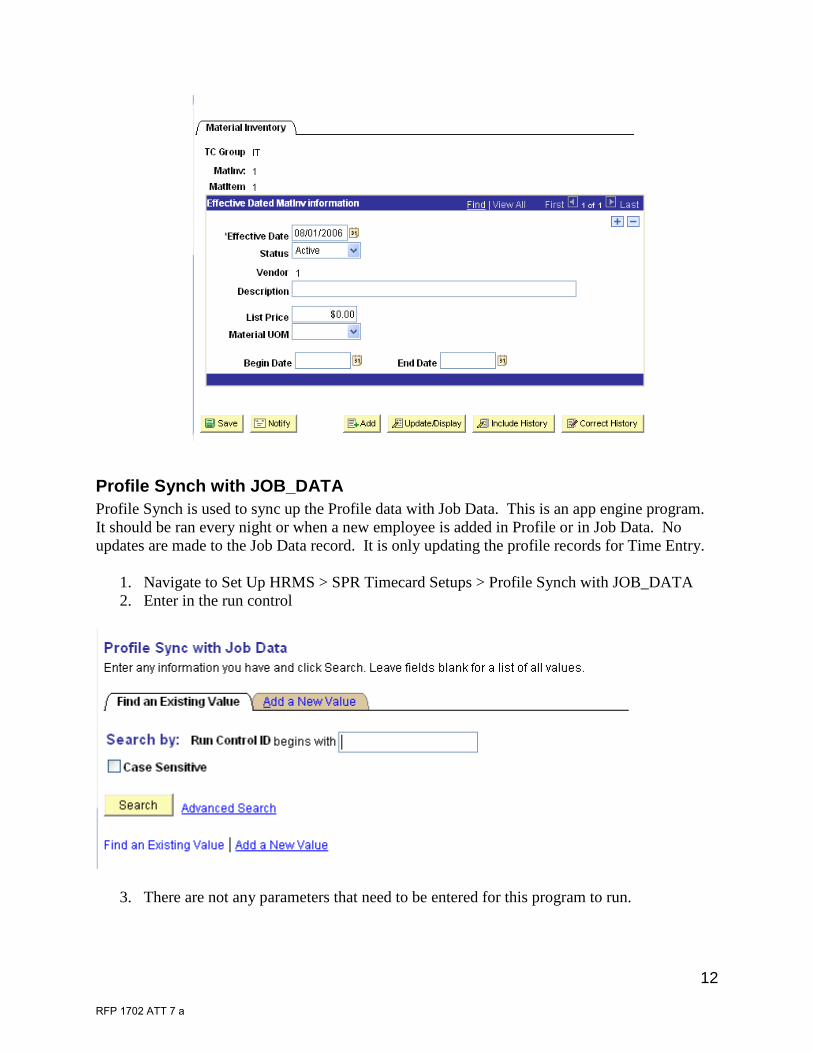
Materials Material Inventory is used by LC to track what employee working on a project, uses what materials, for what time period, and using what equipment and what units of measure. We will not be using this.
RFP 1702 ATT 7 a
12
Profile Synch with JOB_DATA Profile Synch is used to sync up the Profile data with Job Data. This is an app engine program. It should be ran every night or when a new employee is added in Profile or in Job Data. No updates are made to the Job Data record. It is only updating the profile records for Time Entry.
1. Navigate to Set Up HRMS > SPR Timecard Setups > Profile Synch with JOB_DATA 2. Enter in the run control
3. There are not any parameters that need to be entered for this program to run.
RFP 1702 ATT 7 a

13
4. Run the process LCTC_JBSYNC app engine. 5. It will then sync up the Profile to match what is in Job Data page
Profiles Profiles is the page that is used for every employee to track different information that is needed for timecards. It can also be used for contractors, volunteers, etc. Those records will not come over to paysheets but be held in timecards for tracking and reporting purposes. The effective date is very sensitive for employees. If an employee is transferred to another department, it affects their timecard displays. Make sure and put in accurate effective dates if an employee is being transferred or is taking another job. The profile sync job should be run every night to create or update the profile records. You can create a profile record if the employee record has not been created yet. Once a profile is created, you will need to add the laborcodes, crew and holiday hours for that employee. If a person cannot login, it is probably because their profile user id is not the correct user id. Go into their profile and make sure their userid is the first four characters of their last name and the last 4 digits of their social security number. If it isn’t, change it, save the record and the employee should then be able to login.
RFP 1702 ATT 7 a

14
Project Types Project Types
RFP 1702 ATT 7 a

15
Projects Projects
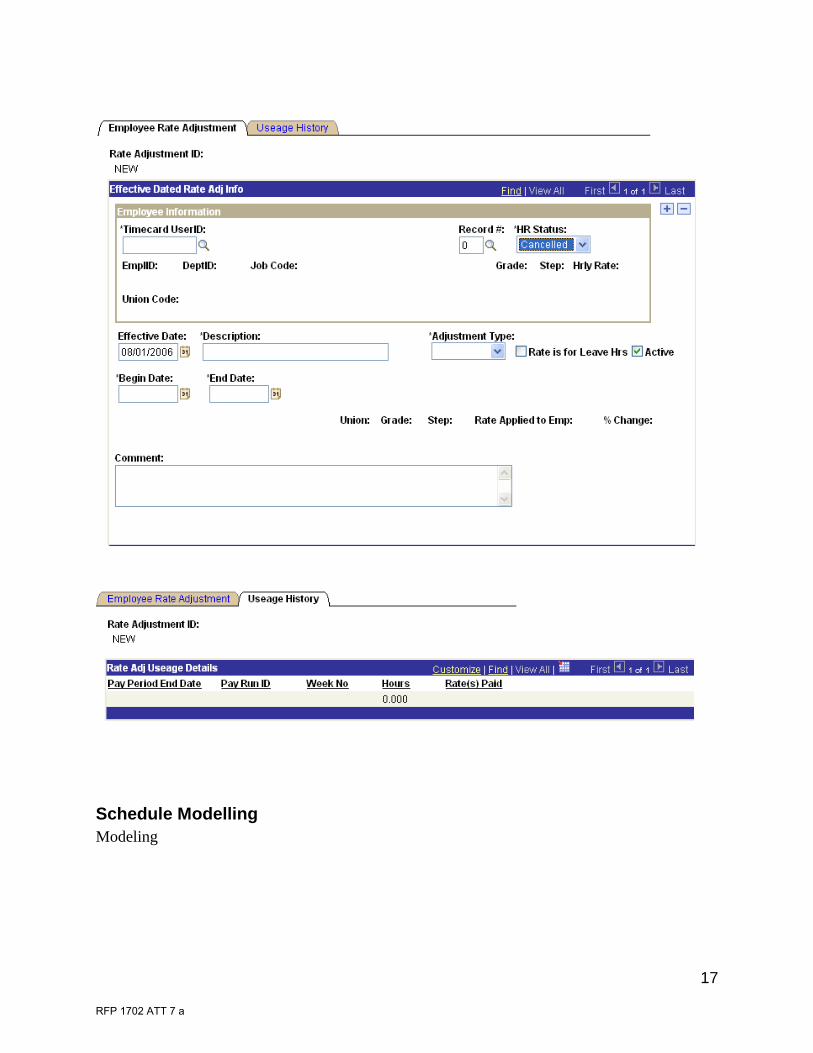
Rate Adjustment - by Jobcode Rate jobcode
RFP 1702 ATT 7 a

16
Rate Adjustment Rules Rate rules
Rate Adjustments – by Employee Rate employee
RFP 1702 ATT 7 a
17
Schedule Modelling Modeling
RFP 1702 ATT 7 a

18
Service Rates Service rates – how much worth for billing purposes
Shifts – By Union shifts
RFP 1702 ATT 7 a

19
Timecard Group Settings Tc group settings
TC Admin Filters There are several Timecard Admin Filters. These are used to select (filter) only specific records for a timecard group. The filters are used in the Administer Timecard page. Currently the filter that are there are:
RFP 1702 ATT 7 a

20
1. S1 – No Employee Approval – LC_EMPL_STATUS = ‘N’ 2. S2 – No Supervisor Approval – LC_SUPV_STATUS = 'N' 3. S3 – No Department Audit Approval – LC_DAUD_STATUS = 'N' 4. S4 – No Department Approval – LC_DEPT_STATUS = 'N' 5. S5 – No Payroll Approval – LC_PYRL_STATUS = 'N' 6. W1 – Week One Timecards - LC_WEEKNO = '1' 7. W2 – Week Two Timecards - LC_WEEKNO = '2' 8. PX – Payroll Exception Filter – All Other Exceptions that need to be identified
The Admin Filters will be created by the IT Team. It is part of a sql statement that is used in peoplecode when selecting records in Administer Timecards.
TC Group Lookups Group lookup
RFP 1702 ATT 7 a

21
RFP 1702 ATT 7 a

22
Tasks tasks
Unit of Measure Unit of measure
RFP 1702 ATT 7 a

23
Dynamic Reporting
HTML Report Definitions This is a description field that is automatically populated upon entering in the Labor Code, Project, Task, etc. This field is used at Lane County for public works activity codes for cost accounting. We will probably never use it.
TC Dynamic Reporting This is a description field that is automatically populated upon entering in the Labor Code, Project, Task, etc. This field is used at Lane County for public works activity codes for cost accounting. We will probably never use it.
RFP 1702 ATT 7 a

24
Time Entry
User Procedures Employee
• Access timecard information using the browser, Springboard or PeopleSoft HR. • Enter and maintain timecard information regularly to department requirements. • Electronically sign off on timecard weekly for submission to Supervisor.
Supervisor
• Performs all duties as an employee AND the following responsibilities. • Accesses timecard information for subordinates and verifies time. • Electronically signs off on timecards for crew and submits to Dept Audit
person Department Audit
• Performs all duties as an employee AND the following responsibilities. • Accesses timecard information for department inside PeopleSoft HR and
reviews all time. • Makes any adjustments and changes necessary. • Electronically signs off on timecard information for the department-audit and
submits to department head. Department Head
• Performs all duties as an employee AND the following responsibilities. • Accesses timecard information for department inside PeopleSoft HR and
reviews all time. • Electronically submits Department Head Approval
Payroll
• Accesses Springfield timecard information using PeopleSoft HR • Audits, adjusts and processes time for the city. • Electronically completes all high level Timecard adjustments for the pay period
and transfers information to PeopleSoft Payroll for final processing.
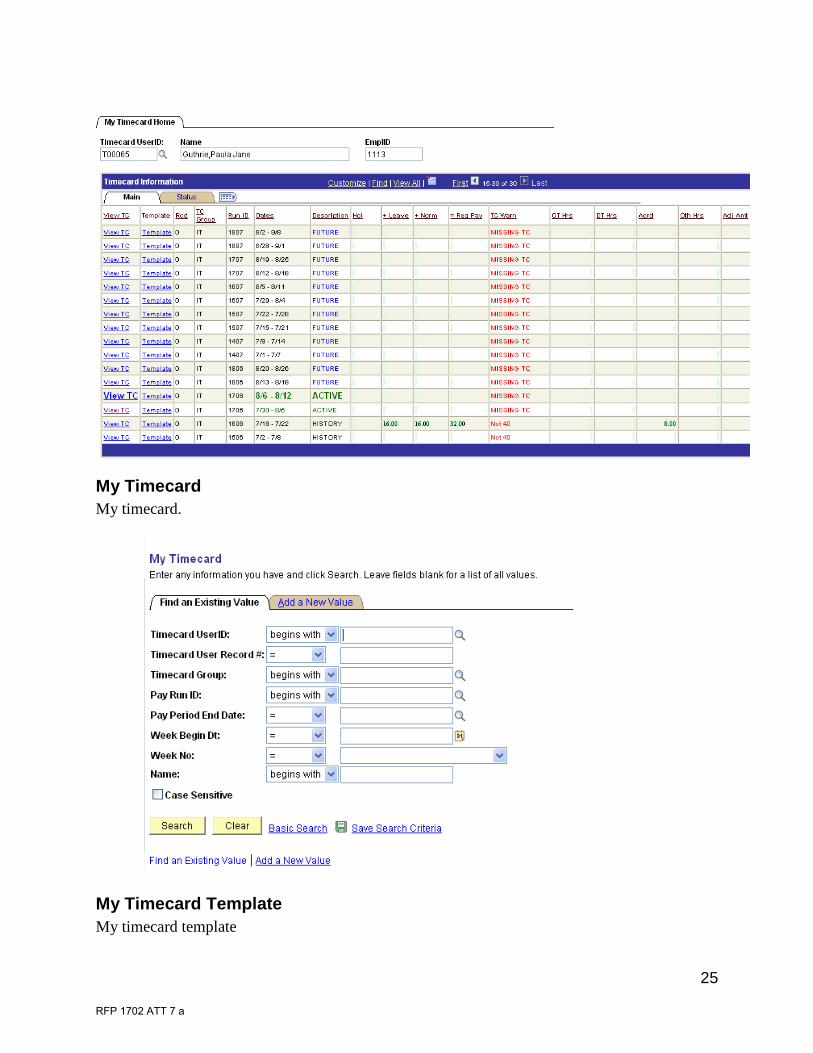
My Timecard Home My timecard home
RFP 1702 ATT 7 a
25
My Timecard My timecard.
My Timecard Template My timecard template
RFP 1702 ATT 7 a

26
RFP 1702 ATT 7 a

27
Timecard Administration
Administer Timecards Administer timecards
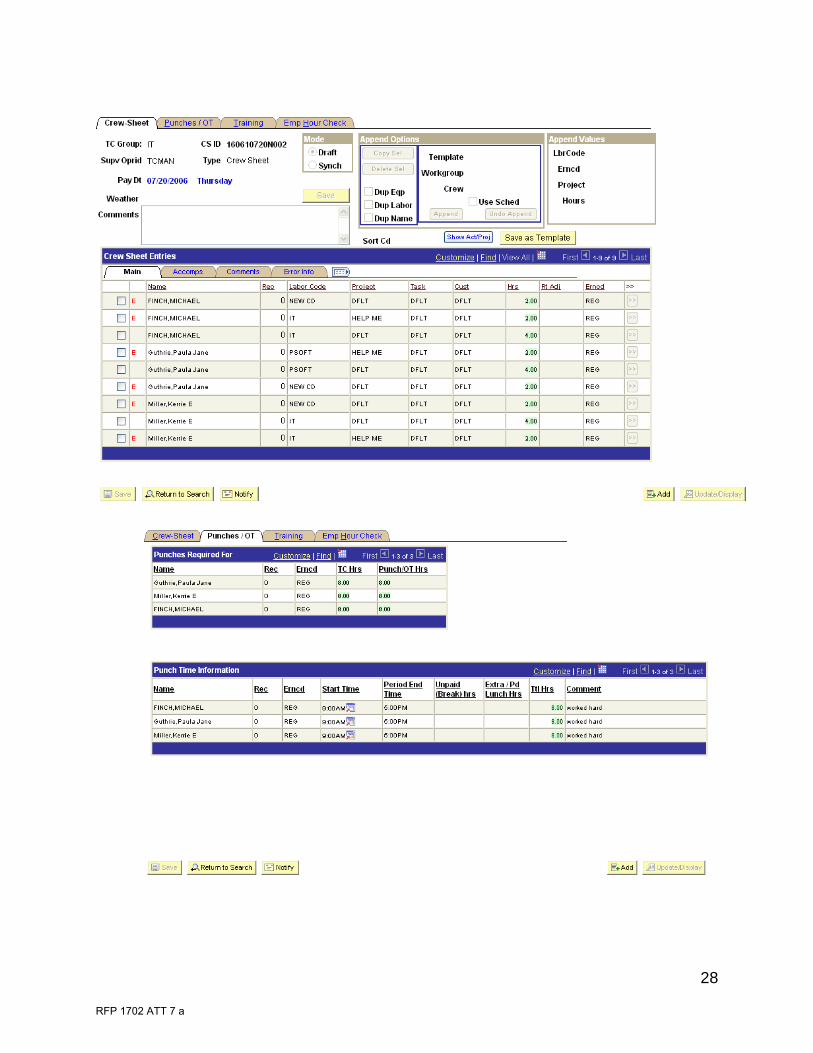
Crew Sheets Crew sheets
RFP 1702 ATT 7 a
28
RFP 1702 ATT 7 a

29
Delete a Crew Sheet Delete crew sheet
RFP 1702 ATT 7 a
30
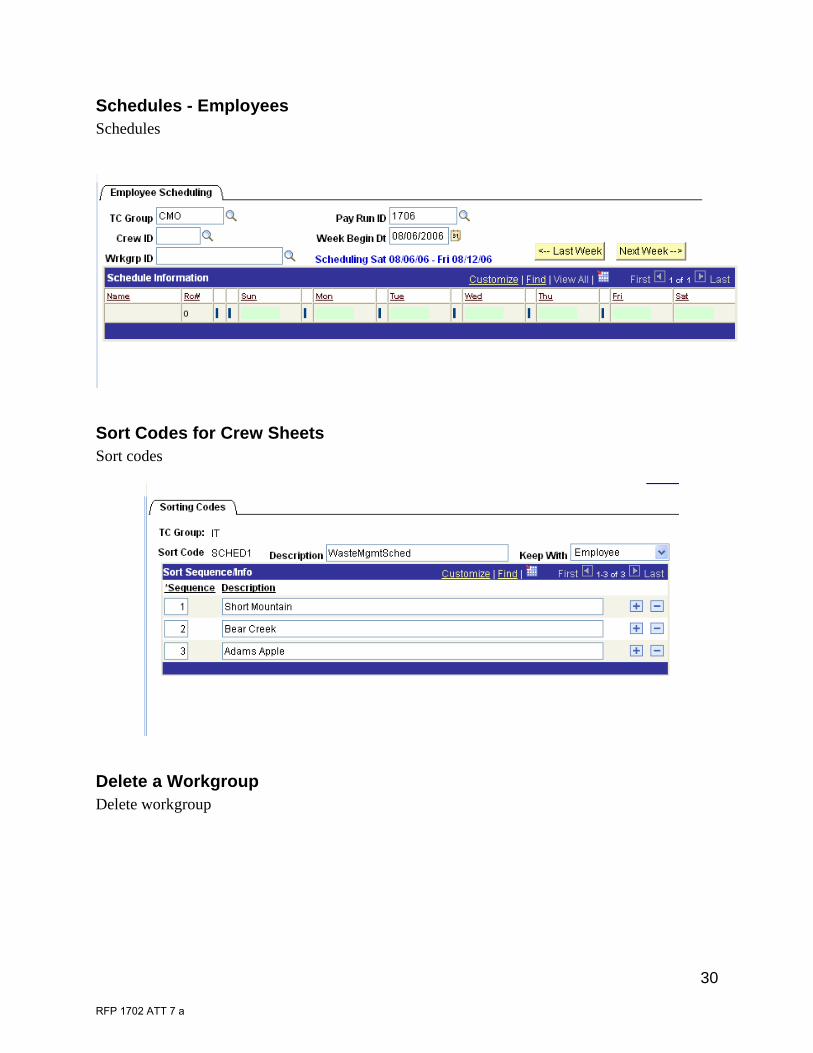
Schedules - Employees Schedules
Sort Codes for Crew Sheets Sort codes
Delete a Workgroup Delete workgroup
RFP 1702 ATT 7 a

31
Workgroups - Setup Setup workgroup
RFP 1702 ATT 7 a

32
RFP 1702 ATT 7 a

33
Timecard Approval
Administer Timecards The Administer Timecards page is used by Supervisors, Department Auditors and Department Heads to approve the group of employee timecards that they are assigned to. Using the left-hand navigation, access the “Administer Timecards” link.
Screen Control Timecard Group Enter the Timecard Group you wish to view timecards for (This defaults to your home group, and most people will only have access to one group). Crew Number Press the prompt button to select the crew you wish to administer. As a supervisor, you will only have access to your primary crew, or crews you have been selected as back-up for. This defaults to blank. Pay Run ID Use the prompt to select the pay-run you wish to administer. This defaults to the Active period. The only time you would select a Run-Id other than the active is in the brief window where the previous run is Still Processing and the new Run-Id has started. Lock Week1/2 Buttons These buttons will only be available for Department administrators, and are used to prevent new timecard creation and timecard updates for each week if desired by the department. Timecard Information Columns View TC
RFP 1702 ATT 7 a

34
You can access any of crew’s timecards by selecting the “View TC” link next to the person/week you wish to see. Browse This activates the “Browse TC” Tab and brings up the employee you select from the list. The “Browse TC” page is discussed later in this document.
RFP 1702 ATT 7 a
35
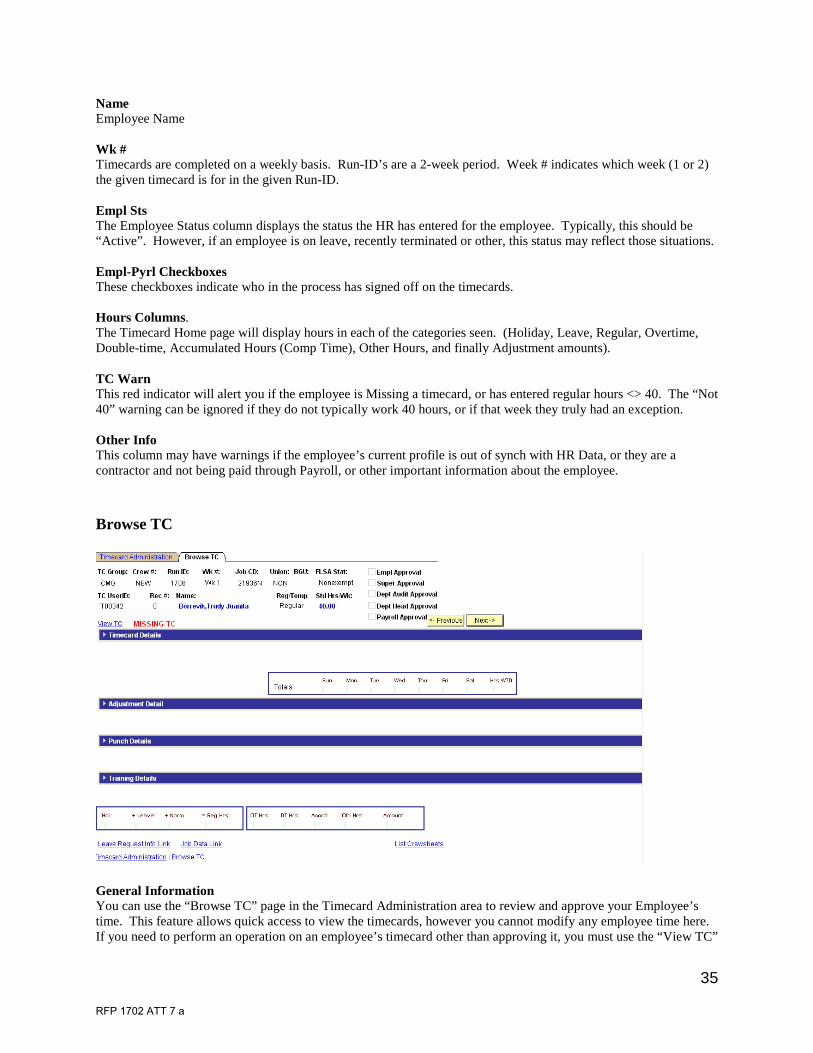
Name Employee Name Wk # Timecards are completed on a weekly basis. Run-ID’s are a 2-week period. Week # indicates which week (1 or 2) the given timecard is for in the given Run-ID. Empl Sts The Employee Status column displays the status the HR has entered for the employee. Typically, this should be “Active”. However, if an employee is on leave, recently terminated or other, this status may reflect those situations. Empl-Pyrl Checkboxes These checkboxes indicate who in the process has signed off on the timecards. Hours Columns. The Timecard Home page will display hours in each of the categories seen. (Holiday, Leave, Regular, Overtime, Double-time, Accumulated Hours (Comp Time), Other Hours, and finally Adjustment amounts). TC Warn This red indicator will alert you if the employee is Missing a timecard, or has entered regular hours <> 40. The “Not 40” warning can be ignored if they do not typically work 40 hours, or if that week they truly had an exception. Other Info This column may have warnings if the employee’s current profile is out of synch with HR Data, or they are a contractor and not being paid through Payroll, or other important information about the employee. Browse TC
General Information You can use the “Browse TC” page in the Timecard Administration area to review and approve your Employee’s time. This feature allows quick access to view the timecards, however you cannot modify any employee time here. If you need to perform an operation on an employee’s timecard other than approving it, you must use the “View TC”
RFP 1702 ATT 7 a

36
link to activate the employee’s timecard. From there, you can make any changes that may be necessary before approving the employee’s time. Approval Checkboxes If you are a supervisor, check the “Super Approval” for the employee timecard if you approve the time as entered. If you are the Department Audit, check the “Dept Audit Approval.” Navigation Buttons Use the “Previous” and “Next” buttons to scroll through the timecards you have actively showing on the “Timecard Administration” page. Timecard – Payroll
Earning Codes (Payroll Setup) The “Earnings Codes Extensions” component performs 3 major functions. Through the “Earning Code Setup” page, it allows payroll to assign attributes to Earning Codes that provide for some validation during use by employees or report and lookup filtering and it allows Earning Codes to be assigned to different leave types. The “Earning Code Mappings” page serves as a mechanism to give or deny access to Earning Codes to the Timecard Groups or unions. Earning Code Setup
1. Earncode Type: This drop-down allows you to setup an Earning Code as “Holiday”, “Regular”, “Leave”, “Holiday”, “Overtime”, “Double-time”, “Accrue” or “Other”. • Holiday – Places hours earned into the “Hol” bucket on the admin screen and is added to Leave
and Reg. to count towards the weekly 40 for warn-checking. ALSO, this selection requires
RFP 1702 ATT 7 a

37
timecard user to enter Holiday Date information for each day hours are applied to an earn-code with this type.
• Leave – Places hours earned in the “Leave” bucket on the admin screen and is added with Reg. hours counting towards the weekly 40 for warn-checking.
• Regular – Places hours earned into the “Regular” bucket on the admin screen and is added with Leave and Holiday to count towards the weekly 40 for warn-checking.
• Overtime – Places hours earned into the “OT” bucket on the admin screen. • Double-time – Places hours earned into the “DT” bucket on the admin screen. • Accrue – Used for comp-time types. Places hours earned into the “Accrd” bucket on the admin
screen. • Other – Used for on-call or other misc. hour types not fitting another bucket.
2. Premium %: This field is required for “Premium Pay” type earning codes. No-
where else in the system is the percent-over-base rate captured, so to pay a person correctly, this field needs to be entered for premium-pays such as L10, etc.
3. Accessible by All (Checkbox) – This will grant immediate access to the given earn-code to all employee timecards.
4. Attributes Checkboxes
• Is Worked Time – Check this box for earning-codes that are “Worked” hours. • Count toward FMLA – Check if the earn-code counts toward FMLA. • Count toward OFLA – Check if the earn-code counts toward OFLA. • Benefits Use Only – Check if only benefits should be using it (78, etc). • Payroll Use Only – Allows payroll person to enter the earn-code on the timecard,
but no-one else. (Use in conjunction with the “Accessible by All” checkbox.
5. Leave Types Avl To - Add entries here for each “Leave Type” that should have access to a given earn-code. This is used as a lookup by the LC Leave and soon-to-come Leave Request functionality to limit which earn-codes can be used in a given editor.
6. Validation / Audit Rules Checkboxes
• Comments Required – Check this box to require the user to select from the list of comments. (You must supply a list of approved comments when checking this!)
7. Approved Comments - Add entries here to provide the Timecard User with options
for comments. For “Comment Required” type earn-codes, you MUST specify valid comments as the Timecard User will be limited to only entering the approved comments you enter here.
Earning Code Mappings
RFP 1702 ATT 7 a

38
1. Give Earncode to employees Having- Add entries for each Union, FLSA Status and/or Jobcode. Union is a required field but FLSA Status and Jobcode are optional.
2. Associated TC Groups - Add entries for each Timecard Group that should have
access to the given Earning Code. From this point, the associated Timecard Group will have to assign the Earning Code out to employees for anyone to have access to use it.
Administer TC Groups This page is used by Payroll to monitor the status of each active Timecard Group and prepare them for payroll processing. It can be given to the department auditor in read only to see what percentage has been entered and approved.
RFP 1702 ATT 7 a

39
1. TC Group field is a list of the Departments and descriptions that were setup for timecards.
2. % Entered W1 – This is the percent that has been entered for that department for week 1 3. % Sup W1 – This is the percent that the supervisor has approved in week 1. 4. Dep % W1 – This is the percent that the Department Head has approved in week 1. 5. % Entered W2 – This is the percent that has been entered for that department for week 2 6. % Sup W2 – This is the percent that the supervisor has approved in week 2. 7. Dep % W2 – This is the percent that the Department Head has approved in week 2. 8. Payroll Status – The idea is that come Monday afternoon or Tuesday morning of the
"Processing" week, payroll will come in and see the department 100% signed off for both weeks. They can then press the "Lock Payroll" button to lock the group down from further entry (on the dept's part anyway). They will then use the "Administer Timecards" page in payroll to audit each group. Once they are done auditing, they can optionally use the "Audited" checkbox to mark the group as audited. Then they continue down the list. When they are completed done auditing and are ready to load pay-lines, then press the "Confirm all Timecards" button to fully lock down timecards, even from payroll. Then they load payroll. (They CAN "Un-Confirm" with that button, as the label will change to "Un-confirm all timecards" when they press it.)
9. Lock Group - Used the “Lock Group” button to lock each group individually for payroll processing. When a TC Group is locked, Payroll can access and update timecard records, but no-one else can modify any records. When you click the button (it is expecting the pay-run to be in "Processing" period to work properly) it will change from "Lock Group" to "Un-Lock Group". The group can be unlocked it if hasn’t bee processed yet.
10. Audited? – If there is another group that checks to make sure that the timecards are all correct, they can go in here and check the audited box to show that they have audited that department. Could be used for the department admin person.
RFP 1702 ATT 7 a

40
11. Confirm All Timecards Button – Use the “Confirm All Timecards” button to lock all timecards for import into payroll. This will make all timecards view-only to everyone. Once you have confirmed the timecards, you can Unconfirm All Timecards if you need to make changes. This button is available when the pay period is in processing mode. When it is still in active or future mode then the button will be grayed out.
12. Timecard Administration Link – Use the “Timecard Administration Link” to bring up the Administer Timecards page in a separate window. This will allow Payroll the ability to reach individual timecards in an orderly fashion. When it is still in active or future mode then the link will not be available. It is only when it is in processing mode that the link is available.
13. Load Payroll Link - Use the “Load Payroll Link” to access the application engine process that loads payroll from the timecard data. When it is still in active or future mode then the link will not be available. It is only when it is in processing mode that the link is available.
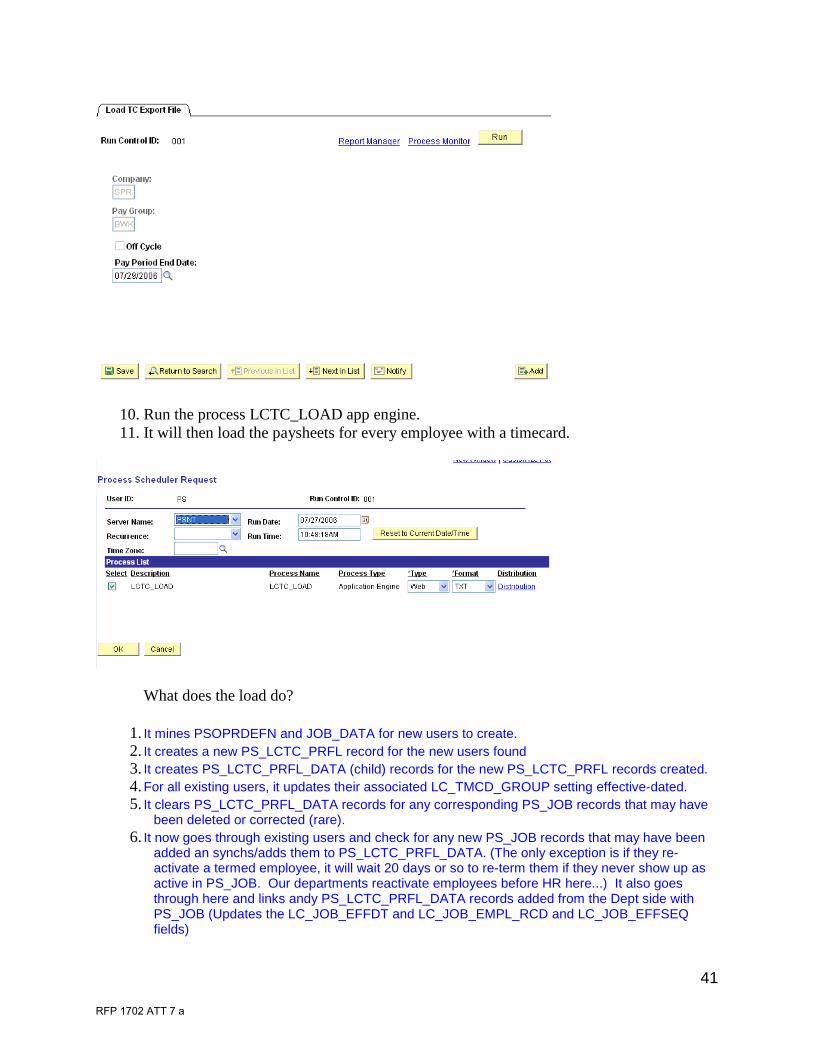
Load PSTC Data to Paysheets This is the process that takes the approved and audited timecards from the TC system to paysheets. It is an application engine program. It loads into PAY_PAGE, PAY_LINES, PAY_EARNINGS, and PAY_OTH_EARNS tables.
6. Navigate to SPR Timecards > Load PSTC Data to Paysheets 7. Enter in the run control
8. It will automatically fill in the company of SPR and the pay group of BWK. 9. Enter in the Pay Period End Date for the timecards that you are loading to paysheets.
RFP 1702 ATT 7 a
41
10. Run the process LCTC_LOAD app engine. 11. It will then load the paysheets for every employee with a timecard.
What does the load do?
1. It mines PSOPRDEFN and JOB_DATA for new users to create. 2. It creates a new PS_LCTC_PRFL record for the new users found 3. It creates PS_LCTC_PRFL_DATA (child) records for the new PS_LCTC_PRFL records created. 4. For all existing users, it updates their associated LC_TMCD_GROUP setting effective-dated. 5. It clears PS_LCTC_PRFL_DATA records for any corresponding PS_JOB records that may have
been deleted or corrected (rare). 6. It now goes through existing users and check for any new PS_JOB records that may have been
added an synchs/adds them to PS_LCTC_PRFL_DATA. (The only exception is if they re-activate a termed employee, it will wait 20 days or so to re-term them if they never show up as active in PS_JOB. Our departments reactivate employees before HR here...) It also goes through here and links andy PS_LCTC_PRFL_DATA records added from the Dept side with PS_JOB (Updates the LC_JOB_EFFDT and LC_JOB_EMPL_RCD and LC_JOB_EFFSEQ fields)
RFP 1702 ATT 7 a

42
7. Updates PS_LCTC_PRFL record to set OPRID to blank where there are duplicate OPRIDS (rare).
8. Updates PS_LCTC_PRFL to have OPRID set in PSOPRDEFN table if employee link is setup. 9. Updates PSOPRDEFN to have EMPLID if not already setup. (We here at LC setup PSoft
accounts BEFORE they are employees, so this program uses a component interface to go back an update it after. You probably don't have this problem at Spfld)
10. Cleans Timecard Template of records that no longer correspond to valid Laborcodes, project, etc.
11. Deletes future timecards for employees that may have entered them "expecting" to stay employed, but them leave for some reason...
12. Refreshes scheduling tables. 13. Refreshes PS_LCTC_PAY_DATES tables. 14. Refreshes PS_LCTC_PERIOD_STS table.
RFP 1702 ATT 7 a

43
RetroPay Retro Pay
RFP 1702 ATT 7 a

44
Leave Benefits Request
Leave Requests - Benefits The leave request page is used by the employee to apply for a specific leave request (injury, workers comp, fmla, ofla, etc). They fill out the leave request and let HR know that they have applied for it. Should benefit staff fill out the form or should the employee?? Once the request is entered it needs to go through an approval process.
1. Navigate to SPR Custom > Leave Requests – Benefits 2. Click on the Add a New Value
3. Keep the NEW in the Leave ID number and it will assign next number available 4. Enter in the EMPLID of the employee that you are adding the leave request for. 5. Click on Add. 6. The leave request page will appear.
RFP 1702 ATT 7 a

45
7. Leave type
8. Approval status
9. Packet Sent 10. Paperwork Completed 11. DLEX Letter Sent 12. Modified Release Date 13. Full Release Date 14. As of Date 15. FMLA and OFLA hours available 16. View Comp and Accrual Info link
RFP 1702 ATT 7 a

46
17. View Scheduled Hours Total link
18. Begin Date 19. End Date 20. 60th Day Date 21. Max Date 22. Accrual Election 23. Comments 24. Schedule?? 25. Employee Earn Code 26. Pay Date 27. Leave Hours 28. Comments
RFP 1702 ATT 7 a

47
Training - Administration Training is a separate section in the TC system. It allows you to track trainings that the City employees have taken. It can be implemented by departments or Citywide. There are 3 steps that have to happen to track the training.
1. Identify Courses a. New courses need to be setup in PS b. Course custom field department???
2. Allow training for the Department 3. Each employee will enter in the course in TC system under the My Training tab
a. This training tab needs to be made available to the employee b. Employee can view all the training course they have taken at any time
4. Administer training a. Finalize in TC system will dump into training in PS
We will be looking at implementing the training portion after we have been live for a while. It will not be introduced when employees go live on the system July 2007. License and certification classes and information will not be entered in the time entry system as there is another place in PS for that.
Identify Courses 1. This menu option is not currently available to production. It needs to be turned on and
made available. 2. It is through the Enterprise Learning module.
Allow Training for the Department 1. Navigate to Set Up HRMS > SPR Timecard Settings > Timecard Group Settings 2. Call up the department timecard group 3. In the Group Settings Area on the right, check the Use Training box. 4. This will allow the department employees to have the My Trainings tab available to
them.
RFP 1702 ATT 7 a

48
Employee Training Entry My Training tab (If Available)
General Information The "My Training” tab allows you to View and Track training that you have taken. In some cases, training entries will be prompted by activities and hours you have specified on the timecard, but you can enter trainings that do not correspond to timecard entries as well. Training Requirements This grid-box displays any days / activities that you have specified on the timecard that request training information be entered. Days are color-coded to make it easier to find entries in the Training Details grid below. Training Details This grid is used by the user to enter information about courses taken. Training Date - Specify the Date(s) the training occurred. Course Code - Specify the course code that you took from the list. Hours – Specify the hours of training you received. (This field is optional). Employee Comment – An optional comment about the entry. View Employee Training History
RFP 1702 ATT 7 a

49
Use this link to view all of your training tracked in PeopleSoft. It will NOT include entries on timecards that have not been processed yet.
Administer Training Once the timecards have been entered and approved, the department can export the training records from timecards to PS.
1. Navigate to SPR Timecards > Administer Training 2. Enter in the TC Group 3. Check all of the training records that were entered to make sure they are okay 4. Click on the Finalize (Export) Training button and it will upload the training records into
the employee training in PS.
Review Training Records To review the training records of all employees.
1. Navigate to Workforce Development > Career Planning > Review Career Summaries > Training ?? or Workforce Development > Competency Management > Track Person Competencies > Training ??
RFP 1702 ATT 7 a

50
RFP 1702 ATT 7 a

51
IT Stuff
Create New User for TC Entry This is a description field that is automatically populated upon entering in the Labor Code, Project, Task, etc. This field is used at Lane County for public works activity codes for cost accounting. We will probably never use it.
Overview of system - 99 tables - 125 views - LCTC is prefix - LC is also used as prefix - Started July 2004 - Built strongly on the user side - There is some hardcoding on the system but mainly table driven
Projects where TC resides
- SPR_XFER_BENLV - benefit leave - SPR_XFER_HTML_SETUP – dynamic reporting - SPR_XFER_PSTC – time entry main objects - SPR_XFER_PSTC_X1 – additional objects that are needed - SPR_XREF_RETROPAY – retro pay - SPR_XREF_W4_CUSTOM – customized W4 component for ePay using Oregon
also App Engine
- LCTC_JBSYNC – job profile sync - LCTC_LOAD – load paysheets
Records
- core tables - 3 tables for getting payroll done
o LCTC_TMCD – header record o LCTC_TMCD_DATA – enter in TC information o LCTC_TMCD_ADJMT – adjustments for time entry
RFP 1702 ATT 7 a
52
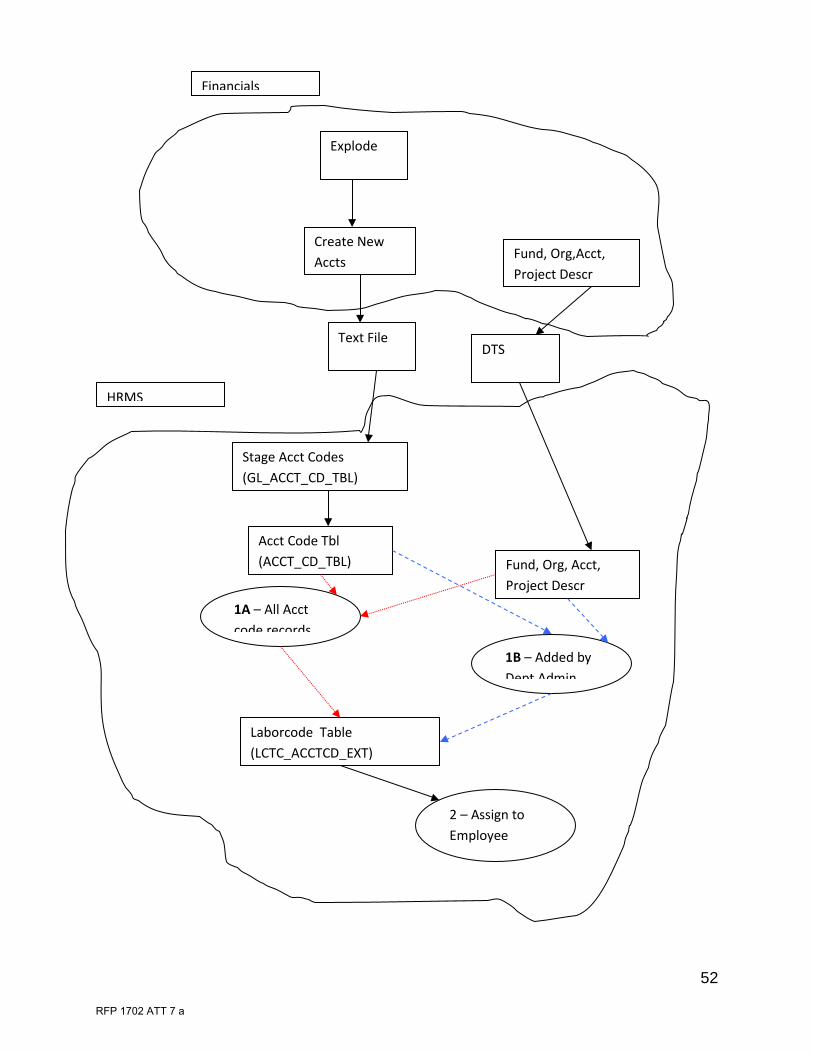
Explode
Fund, Org,Acct, Project Descr
Text File
Create New Accts
DTS
Fund, Org, Acct, Project Descr
Acct Code Tbl (ACCT_CD_TBL)
Laborcode Table (LCTC_ACCTCD_EXT)
Stage Acct Codes (GL_ACCT_CD_TBL)
HRMS
1A – All Acct code records
1B – Added by Dept Admin
2 – Assign to Employee
Financials
RFP 1702 ATT 7 a

53
How to create new Laborcodes
Tables PS_LCTC_ACCTCD_EXT PS_VALID_COMBO_TBL PS_LCTC_ACCT_TCID PS_LCTC_PROJ_ACCT PS_LCTC_PROJECT PS_ACCT_CD_TBL PS_ACCT_CD_TBL_GL
1. Navigate to MM > Setup HRMS > SPR Timecard Setup> Laborcodes 2. Enter in the Timecard Group (department) 3. Enter in the Account Code to see if it exists. When you enter in the combination code, you
need to enter in the dashes between each account code chartfield. The combination code is FFF-DDDDD-PPPPPP. FFF = fund code 3 digits, DDDDD = department code 5 digits, and PPPPPP = project or grant code 6 digits.
4. If it exists, then it can be setup to be used by an employee in their timecards. If it is not setup , continue to the next steps.
5. Click on Add a New Value in Laborcode page. The Timecard group that will be using the new combo string and the Account Code will stay populated. The account code string DOES NOT include the actual account code.
RFP 1702 ATT 7 a

54
6. Click on Add button and it will take you to the Laborcode Setup page.
7. There are 2 hyperlinks on this page. One is to assign the chartfield combination if it exists and the other is to create the chartfield combination. If you think the chartfield exists, then skip to step 9. If the chartfield combo doesn’t exist, you will need to create it in the next steps.
8. Click on the Create Chartfield Combination hyperlink and it will take you to this page.
RFP 1702 ATT 7 a

55
9. Enter in the Set ID as SPR. Enter in the GL Combination Code as FFF-DDDDD-AAAAAA-PPPPPP. FFF = fund code 3 digits, DDDDD = department code 5 digits, AAAAAA = account code 6 digits, and PPPPPP = project or grant code 6 digits. Click on the ADD button and it will go to a new page.
RFP 1702 ATT 7 a

56
10. Change the effective date to the creation of the project or grant date or leave it as today’s date. The description and short description should be Salaries. Enter in the Account, Department, Project/Grant, and Fund Code. Enter in the Class field if there is an activity code assigned to it.
11. Click on Save. Close out of this page by using the red X at the top right to return to the previous page.
12. Once the combination code has been setup (or if you are just assigning and already have an existing laborcode), press the Assign Chartfield Combination hyperlink.
13. Enter in either the individual Chartfield Detail. The Chartfield detail would be Account, Department, Project/Grant, and Fund.
14. Click on Save 15. It will then take you back to the main laborcode page. Save record.
16. Once you have linked the laborcode with the combo code, you can move on to assigning the code to a user.
RFP 1702 ATT 7 a

57
Creating Laborcodes in Time Entry
O:\Time Entry\laborcodes.xls
Insert into PS_LCTC_ACCTCD_EXT
LC_TMCD_GROUP – based on first 2 char of dept field (48 = LIB, 36 = POL)
LC_LABORCODE – fund, dept, and project
ACCT_CD – fund, dept, account and project
DESCR – blank
DESCR50– see below
LC_GRP_ACCESS_FLAG - Y
DESCRSHORT – 10 character department description
RFP 1702 ATT 7 a

58
Using FUND_TBL.DESCRSHORT (8 character field)
RFP 1702 ATT 7 a
59
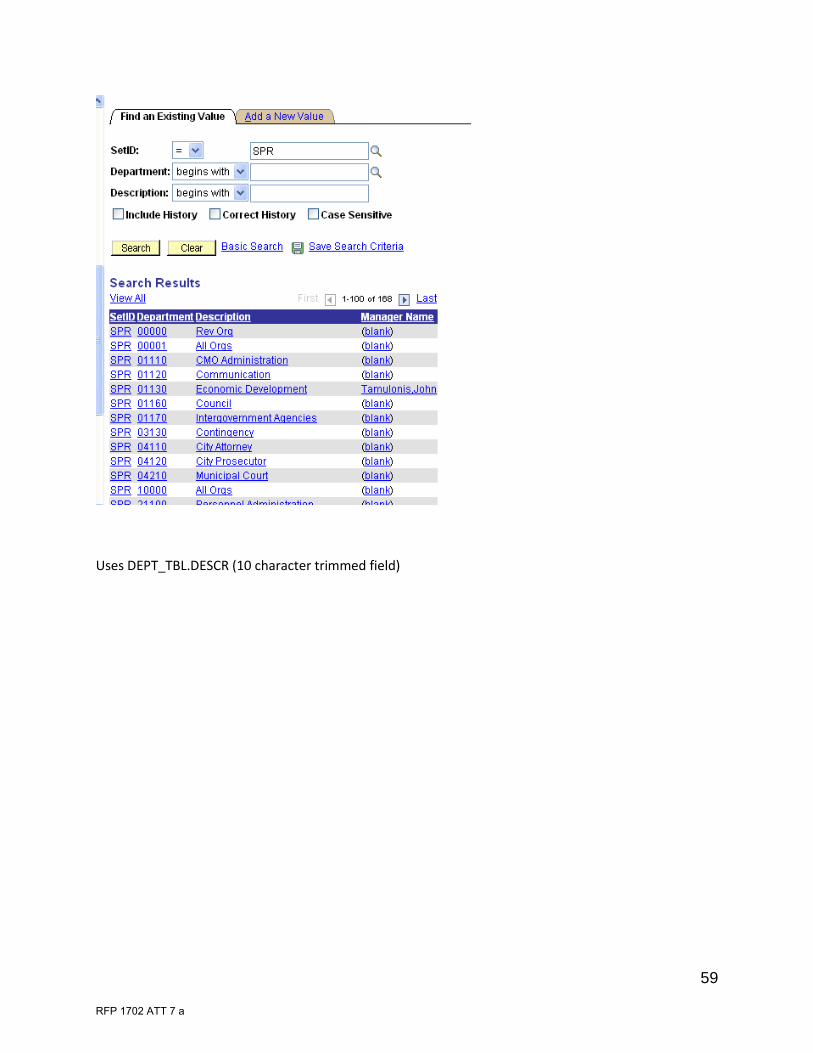
Uses DEPT_TBL.DESCR (10 character trimmed field)
RFP 1702 ATT 7 a

60
Uses PROJECT_FS.DESCR (30 characters)
RFP 1702 ATT 7 a

61
LCTC_LOAD Functionality
This document steps through how LCTC_LOAD works in loading timecards to paysheets in PeopleSoft. The load process is an app engine program. Here are the steps that it goes through to load the paysheets.
Steps in LCTC_LOAD app engine program
1. Main – Load Timecard Export Table a. Get run control data runcntl PS_RC_PAYINIT b. Delete Pay Tables – DelPyrl section reset1 c. Delete Export Entry reset2 PS_LCTC_EXPORT d. Delete Export Temp Table reset3 PS_LCTC_EXPORT_TMP e. Load Additional Pay Entries – LdAddlPy section addlpay1 f. Load Basic Timecard Info step01 PS_LCTC_EXPORT_TMP g. Compensate for Rounding – CompRnd section step01A h. Move Temp info to Export step01B PS_LCTC_EXPORT i. Update PAY_LINE key fields step01C PS_LCTC_EXPORT j. Update Premium Percentage step02 PS_LCTC_EXPORT k. Apply Hour Multiplier step02B PS_LCTC_EXPORT l. Update Rate Adjustment Rate for J Types step03 PS_LCTC_EXPORT m. Update Rate Adjustment Rate for O Types step03A PS_LCTC_EXPORT n. Update Rate Adjustment Rate for X Types step03B PS_LCTC_EXPORT o. Update Rate Adjustment Rate for X Types no JC step03C PS_LCTC_EXPORT p. Update Comprate step04 PS_LCTC_EXPORT q. Update Account Code step05 PS_LCTC_EXPORT r. Setup Page, Line, and Addl Number step06 PS_INSTALLATION s. Prepare Export Data Pages – PrepPyrl section step07 t. Insert Pay Table Data – InsPyrl section step08 u. Mark Standard PED Timecard paid step09 PS_LCTC_TMCD_DATA v. Mark Alternate PED Timecard paid step10 PS_LCTC_TMCD_DATA w. Update Line Number step10A PS_LCTC_TMCD_DATA x. Mark TMCD Paid step11 PS_LCTC_TMCD
2. DelPyrl section – Delete Payroll Entries a. Clear Other Earnings step01 PS_PAY_OTH_EARNS b. Clear Pay Earnings step02 PS_PAY_EARNINGS c. Clear Pay Line step03 PS_PAY_LINE d. Clear Pay Page step04 PS_PAY_PAGE
3. LdAddlPy section – Load Additional Pay to Adjustments
RFP 1702 ATT 7 a

62
a. Insert LCTC_TIMCD_ADJMT records step01 PS_LCTC_TMCD_ADJMT
4. CompRnd section – Compensate for Rounding a. Get rounding discrepencies step01 b. Apply rounding corrections c. Update total hours and amounts step02 PS_LCTC_EXPORT_TMP
5. PrepPyrl section – Add Pages, Lines and Additional Numbers a. Select from LCTC_EXPORT step01 PS_LCTC_EXPORT b. Manage Pay, Lines and Additional Numbers c. Update LCTC_EXPORT records
6. InsPyrl section – Insert to PeopleSoft Payroll a. Check for 300+ lines check01 b. Insert Pages step01 PS_PAY_PAGE c. Insert Lines step02 PS_PAY_LINE d. Insert Earns step03 PS_PAY_EARNINGS e. Insert Other Earns step04 PS_PAY_OTH_EARNS f. Insert Addl Pay based on earnings step04B PS_PAY_OTH_EARNS g. Insert Addl Pay based on accumulation step04BC PS_PAY_OTH_EARNS h. Update Other Earning Stats step05 PS_PAY_OTH_EARNS i. Update Earning Stats step06 PS_PAY_EARNINGS
RFP 1702 ATT 7 a

63
Notes:
I have modified the LCTC_LOAD application engine (TC to Payroll export) to load these calculated additional pay types in the following manner:
SP2/5 or other Special Accumulator based additional earning codes will load on the first line only in other earns for a given earnings record on a date. Thus, if an employee has page 3600, Line 2, Addl 1 and 2, and both are for 12/24/07, then it will only load SP5 for example on 3600, 2, 1 and not on 3600,2,2.
Earncode based additional pays (567 for example) will now only load into other-earnings if there is hours for the earncode it calculates on (OVT in this case). So if a given pay-earnings record does not have OVT earnings, then 567 will not load onto it.
These changes have been applied directly to Production, and do not exist in any other database. All changes I have made are located in project SPR_MBF1_17_08 if you wish to move them to PAY or somewhere to test them first (ya, right..). Obviously I have not been able to test these other than to run the SQL statements separately against last period to see what it would have looked like. It appeared to be correct, for example emplid 1627, the new statements would not have loaded the SP2 and SP5 records onto Addl-nbr 11.
Added an error-check in LCTC_LOAD app engine (PSTC Payroll export) that will generate a “No Success” if it attempts to create 300 or more lines in Pay-lines for a single employee. The error will list the employee(s) and the number of lines.
Paula, it looks great, you did it exactly right. It looks like you are inserting the FLSA into PAY_EARNINGS. Assuming that is so, then this should be great. If FLSA is going to end up in any record "above" PAY_EARNINGS (such as PAY_LINE or PAY_PAGE) and there is the possibility that the value might change mid-period, then you have to do it differently. But since it is going into PAY_EARNINGS, and because those rows are by day, then that isn't a concern and you did it perfectly.
RFP 1702 ATT 7 a

64
To correct the problem where additional pay splits are only loading the first line and not all lines (Example TC User T00001), Paula, you need to do this:
1: Go into App-designer and bring up the LCTC_LOAD application engine.
2: Go into the LdAddlPy section.
3: Go into the PeopleCode step (Create Adjustment Records PeopleCode).
Find the following statement:
SQLExec("Select count(*) from PS_LCTC_TMCD_ADJMT where LC_TMCD_USERID = :1 and LC_TMCD_USER_RCD = :2 and LC_TMCD_GROUP = :3 and RUN_ID = :4 and PAY_END_DT = :5 and WEEK_BEGIN_DT = :6 and LC_WEEKNO = :7 and ADJ_DT between :8 and :9 and ERNCD = :10", LCTC_LOADD3_AET.LC_TMCD_USERID, LCTC_LOADD3_AET.LC_TMCD_USER_RCD, LCTC_LOADD3_AET.LC_TMCD_GROUP, LCTC_LOADD3_AET.RUN_ID, LCTC_LOADD3_AET.PAY_END_DT, &WkBegDt, &WkNo, AddToDate(LCTC_LOADD3_AET.PAY_END_DT, 0, 0, - 13), LCTC_LOADD3_AET.PAY_END_DT, LCTC_LOADD3_AET.ERNCD, &StsChk);
Change it to be: (Difference is highlighted in blue)
SQLExec("Select count(*) from PS_LCTC_TMCD_ADJMT where LC_TMCD_USERID = :1 and LC_TMCD_USER_RCD = :2 and LC_TMCD_GROUP = :3 and RUN_ID = :4 and PAY_END_DT = :5 and WEEK_BEGIN_DT = :6 and LC_WEEKNO = :7 and ADJ_DT between :8 and :9 and ERNCD = :10 and LC_LABORCODE = :11", LCTC_LOADD3_AET.LC_TMCD_USERID, LCTC_LOADD3_AET.LC_TMCD_USER_RCD, LCTC_LOADD3_AET.LC_TMCD_GROUP, LCTC_LOADD3_AET.RUN_ID, LCTC_LOADD3_AET.PAY_END_DT, &WkBegDt, &WkNo, AddToDate(LCTC_LOADD3_AET.PAY_END_DT, 0, 0, - 13), LCTC_LOADD3_AET.PAY_END_DT, LCTC_LOADD3_AET.ERNCD, &LaborCd, &StsChk);
The protection I added to prevent the processor from double-loading adjustments in the event that the load process had to be run more than once was not sensitive enough to check the laborcode, so it was only loading 1 entry and skipping any additional ones for the same person.
I have already made this change in HRT, but not sure if that is up to date and I can't reach your production environment from here. So I recommend applying this code directly to production rather than copying the app-engine over from HRT.
RFP 1702 ATT 7 a

65
Hi Paula. I am pretty certain that UNION_CD is being sent to PAY_EARNINGS, and is part of the LCTC_LOAD/LCTC_EXPORT process/Table. I also think that FLSA_STATUS is there too, but not as certain as UNION_CD. Anyway, absolutely they can be added if they are not there for some reason..
RFP 1702 ATT 7 a

66
Allocate and PW Allocate You may have two special account code options, Allocate or PW Allocate. These are used to split out your time to several different accounts. The Allocate code is based on your budgeted time allocation that is in payroll, not everyone has this allocation. The other is a department specific allocation that is used in Public Works. This is based on your last 4 weeks of time and selects the top 3 accounts that you have charged to. This is used mainly for vacation and sick allocation. If you are a new employee, you should not use this option for the first 4 weeks of employment. If you are using Allocate, you should not be using PW Allocate. If you use PW Allocate, you should not be using Allocate.
PW Allocate
The other way that an employee can allocate their time is through the department/group allocation. Each department can use the department allocation but we only have PW setup and that department will probably be the only one that will use the Group Allocation. The way that this allocation works is identify employees that should have their entered work-hours allocated for use with leave time. Each employee in a timecard group are identified as eligible for the allocation setup and usage. An automated process will automatically determine the allocations from the prior 4 weeks of confirmed payroll.
The processor selects every employee that is actively setup for Group-allocation. Each employee is then processed one-by-one to see how many worked-hours they had in the last 2 pay-periods. If their worked hours are greater than or equal to 20, their allocations are calculated. If an employee does not qualify as having at least 20 worked hours, their records are skipped, and the department can enter/maintain their allocations manually. The “Group Allocate” labor-code selection will only be used on non-worked time.
"PW-Allocate" is setup by entering a distribution on the Timecard-profile page AND/OR by using the application engine to look at historical employee time to make an allocation. The reason the PW-allocation setup is on the Profile page is because in the case of a new-hire, they need to give them a starting allocation since the program won't have any hours with which to base an allocation on. They may also want to manually manipulate it.
RFP 1702 ATT 7 a

67
RFP 1702 ATT 7 a

68
Allocate Discussion
There are two ways in which employees can allocate their time. One is through budget allocate and the other is through previous 4 week work allocation. Following is a description of both.
Allocate – through the budget
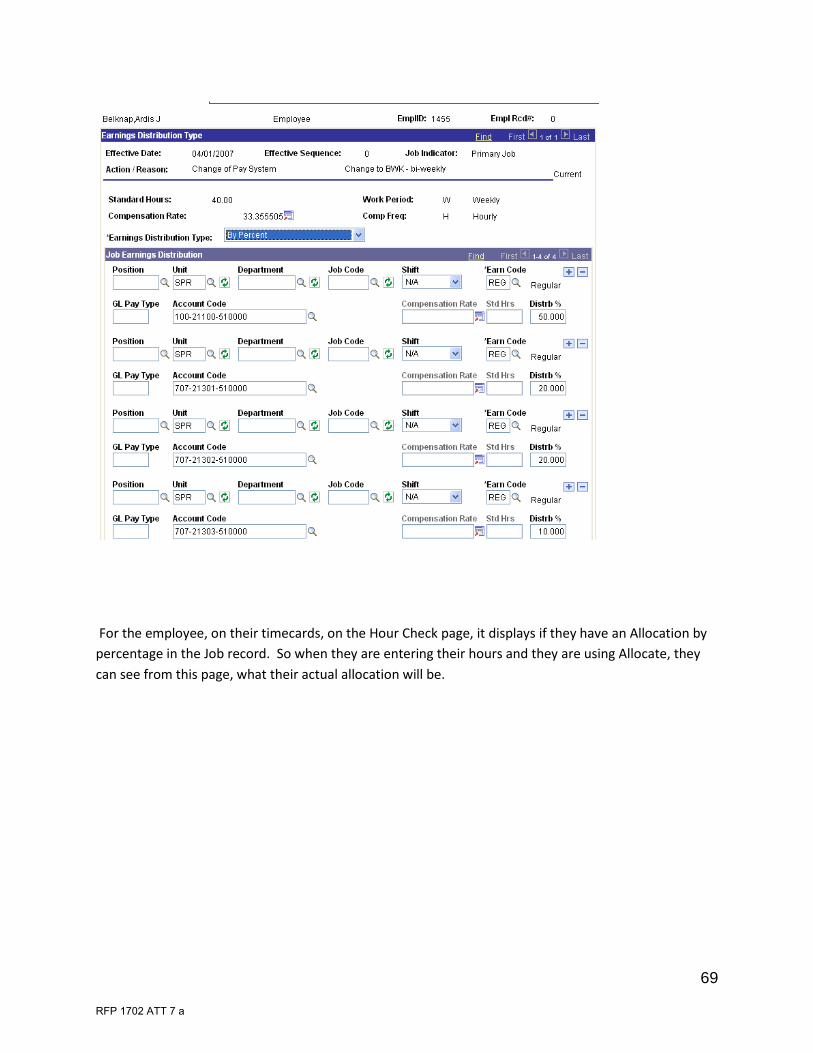
When a position is budgeted in different accounts and different funds, the employee may be required to charge their time to those funds. The allocation is by a percentage in each of the accounts. Below is an example of an employee and their allocation. The allocation is setup in the Job record for the employee under Earning Distribution. All employees have an earnings distribution type of NONE or BY PERCENT. If an employee has an earnings distribution type of none, then they don’t have the allocate option on the timecards. Sometimes there may be a budget allocation but the department chooses not to allocate through earning allocation. Their time is then manually entered into account code strings which may include projects.
RFP 1702 ATT 7 a
69
For the employee, on their timecards, on the Hour Check page, it displays if they have an Allocation by percentage in the Job record. So when they are entering their hours and they are using Allocate, they can see from this page, what their actual allocation will be.
RFP 1702 ATT 7 a

70
PW Allocate
The other way that an employee can allocate their time is through the department/group allocation. Each department can use the department allocation but we only have PW setup and that department will probably be the only one that will use the Group Allocation. The way that this allocation works is identify employees that should have their entered work-hours allocated for use with leave time. Each employee in a timecard group are identified as eligible for the allocation setup and usage. An automated process will automatically determine the allocations from the prior 4 weeks of confirmed payroll.
The processor selects every employee that is actively setup for Group-allocation. Each employee is then processed one-by-one to see how many worked-hours they had in the last 2 pay-periods. If their worked hours are greater than or equal to 20, their allocations are calculated. If an employee does not qualify as having at least 20 worked hours, their records are skipped, and the department can enter/maintain their allocations manually. The “Group Allocate” labor-code selection will only be used on non-worked time.
"PW-Allocate" is setup by entering a distribution on the Timecard-profile page AND/OR by using the application engine to look at historical employee time to make an allocation. The reason the PW-allocation setup is on the Profile page is because in the case of a new-hire, they need to give them a starting allocation since the program won't have any hours with which to base an allocation on. They may also want to manually manipulate it.
RFP 1702 ATT 7 a

71
RFP 1702 ATT 7 a
72
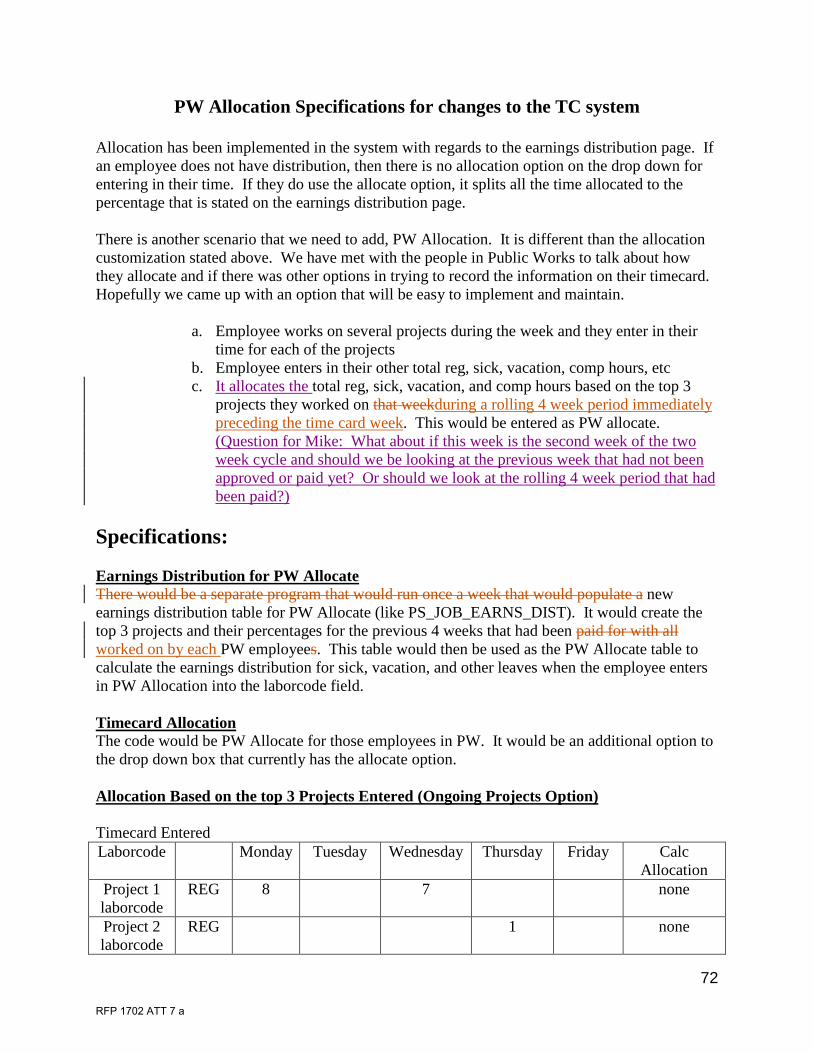
PW Allocation Specifications for changes to the TC system
Allocation has been implemented in the system with regards to the earnings distribution page. If an employee does not have distribution, then there is no allocation option on the drop down for entering in their time. If they do use the allocate option, it splits all the time allocated to the percentage that is stated on the earnings distribution page. There is another scenario that we need to add, PW Allocation. It is different than the allocation customization stated above. We have met with the people in Public Works to talk about how they allocate and if there was other options in trying to record the information on their timecard. Hopefully we came up with an option that will be easy to implement and maintain.
a. Employee works on several projects during the week and they enter in their time for each of the projects
b. Employee enters in their other total reg, sick, vacation, comp hours, etc c. It allocates the total reg, sick, vacation, and comp hours based on the top 3
projects they worked on that weekduring a rolling 4 week period immediately preceding the time card week. This would be entered as PW allocate. (Question for Mike: What about if this week is the second week of the two week cycle and should we be looking at the previous week that had not been approved or paid yet? Or should we look at the rolling 4 week period that had been paid?)
Specifications: Earnings Distribution for PW Allocate There would be a separate program that would run once a week that would populate a new earnings distribution table for PW Allocate (like PS_JOB_EARNS_DIST). It would create the top 3 projects and their percentages for the previous 4 weeks that had been paid for with all worked on by each PW employees. This table would then be used as the PW Allocate table to calculate the earnings distribution for sick, vacation, and other leaves when the employee enters in PW Allocation into the laborcode field. Timecard Allocation The code would be PW Allocate for those employees in PW. It would be an additional option to the drop down box that currently has the allocate option. Allocation Based on the top 3 Projects Entered (Ongoing Projects Option) Timecard Entered Laborcode Monday Tuesday Wednesday Thursday Friday Calc
Allocation Project 1 laborcode
REG 8 7 none
Project 2 laborcode
REG 1 none
RFP 1702 ATT 7 a

73
Project 3 laborcode
REG 4 1 none
Project 4 laborcode
REG 1 1 none
Project 5 laborcode
REG 1 none
PW Allocate
VAC 4
PW Allocate
FHOL 4
PW Allocate
SIC 8
Project 1 – would have the actual labor code entered with the 15 hours Project 2 – would have the actual labor code entered with the 1 hours Project 3 – would have the actual labor code entered with the 5 hours Project 4 – would have the actual labor code entered with the 2 hours Project 5 – would have the actual labor code entered with the 1 hours Sick – would have the laborcode of PW Allocate, earning code = SIC, and hours entered into dates Vacation – would have the laborcode of PW Allocate, earning code = VAC, and hours entered into dates Floating Holiday – would have the laborcode of PW Allocate, earning code = FHOL, and hours entered into dates PW Allocate Table – top 3 projects Emplid Project Code Total Hours for 4
weeks Percentage
1234 100-62333-P12345 100 65% 1234 100-64511-P33333 44 29% 1234 100-65888-P23456 10 6% 154 - total 100% total Sick Allocation Laborcode column Earning code column Friday Hours column PW Allocate (Highest) Sick 5.2 hours PW Allocate (Second) Sick 2.32 hours PW Allocate (Third) Sick .48 hours 8 hours total (may need to
round three above to = total) Vacation Allocation
RFP 1702 ATT 7 a

74
Laborcode column Earning code column Tuesday Hours column PW Allocate (Highest) Vacation 2.6 hours PW Allocate (Second) Vacation 1.16 hours PW Allocate (Third) Vacation .24 hours 4 hours total (may need to
round three above to = total) Floating Holiday Allocation Laborcode column Earning code column Thursday Hours column PW Allocate (Highest) Floating Holiday 2.6 hours PW Allocate (Second) Floating Holiday 1.16 hours PW Allocate (Third) Floating Holiday .24 hours 4 hours total (may need to
round three above to = total)
RFP 1702 ATT 7 a

75
Group-Allocation
Summary:
This document describes the new Timecard Group level functionality. This functionality allows a Timecard Group (PW in this case) to identify employees that should have their directly charged work-hours allocated for use with leave time. Timecard Groups have the ability to specify employees that are eligible for the allocation setup and usage. An automated process will automatically determine the allocations from the prior 4 weeks of confirmed payroll. This functionality was created by specific request for Public Works, but it is available for any Timecard Group that wishes to use it in the future.
Technical Specifications:
Records:
• LCTC_PRFL_DIST – New record added to maintain the user’s accounts and dist-percentage (Kind of like the JOB_EARNS_DIST table).
• LCTC_TG_DEPTID – Modified record to have field LC_USE_ALLC_FLAG (Y/N values). • LCTC_PRFL_DATA – Modified record to have field LC_USE_ALLC_FLAG (Y/N values) • LCTC_ACCTC_SRCH – Modified record (view) to display new Grp-Allocate labor-codes for
employees that have distributions setup. The labor-code id is a concatenation of LC_TMCD_GROUP and the word “ALLOCATE”. Thus, PW employees will see “PW-ALLOCATE” as their selection. If other groups wish to participate in usage of this functionality, such as IT, then IT employees would see “IT-ALLOCATE”.
Pages:
• LCTC_PRFL_SETUP – Modified page to have new LC_USE_ALL_FLAG control and added Level 2 grid (LCTC_PRFL_DIST) for manual user specification of allocations (for new emps, etc).
• LCTC_TMCD_GROUP – Added new LC_USE_ALLC_FLAG control to page on Level 1 – LCTC_TG_DEPTID grid.
Components:
• LCTC_ALLC_UD – New component serving as run-control for running the LCTC_ALLC_UD application engine process.
Application Engine:
RFP 1702 ATT 7 a
76
• LCTC_ALLC_UD – New Application Engine that is used to automatically update/insert LCTC_PRFL_DIST records. These records are derived from the last 2 confirmed payrolls data.
Application Engine Specific Logic:
The processor selects every employee that is actively setup for Group-allocation. Each employee is then processed one-by-one to see how many worked-hours they had in the last 2 pay-periods. If their worked hours are greater than or equal to 20, their allocations are calculated.
Their new allocation-distributions are recorded in the LCTC_PRFL_DIST table with a new effective-date of the day after the pay-end-date of the last payroll run processed (i.e. the PAY_END_DT was 1/31/07, the new EFFDT would be 2/1/07). If any entries in LCTC_PRFL_DIST are found with effective-dates later than this date, then they are updated to be the same as the new distribution amounts. A new effective dated entry is also written into LCTC_PRFL_DATA, as LCTC_PRFL_DIST is a child record of this table.
If an employee does not qualify as having at least 20 worked hours, their records are skipped, and the department can enter/maintain their allocations manually.
Assumptions:
• The “Group Allocate” labor-code selection will only be used on non-worked time.
RFP 1702 ATT 7 a

77
Usage Instructions:
Identifying employees that are participating in Group-allocation can be accomplished in 2 different ways:
Batch identification -
1. Navigate to SetupHRMS -> SPR Timecard Setups -> Timecard Group Settings
2. Select the “Use Hrs Allc” checkbox in the division settings area to identify an entire division that will use the allocations.
Individual identification – (The allocation area is still updated even if division(batch) setting is used)
RFP 1702 ATT 7 a

78
1. Navigate to SetupHRMS -> SPR Timecard Setups -> Timecard Group Settings
2. Select the “Use Hours Allocation” checkbox in the division settings area to identify an entire division that will use the allocations.
3. If the employee is selected for allocation use using the division (batch method) above, you still use the allocation grid to distribute hours manually.
Running the allocation-update processor
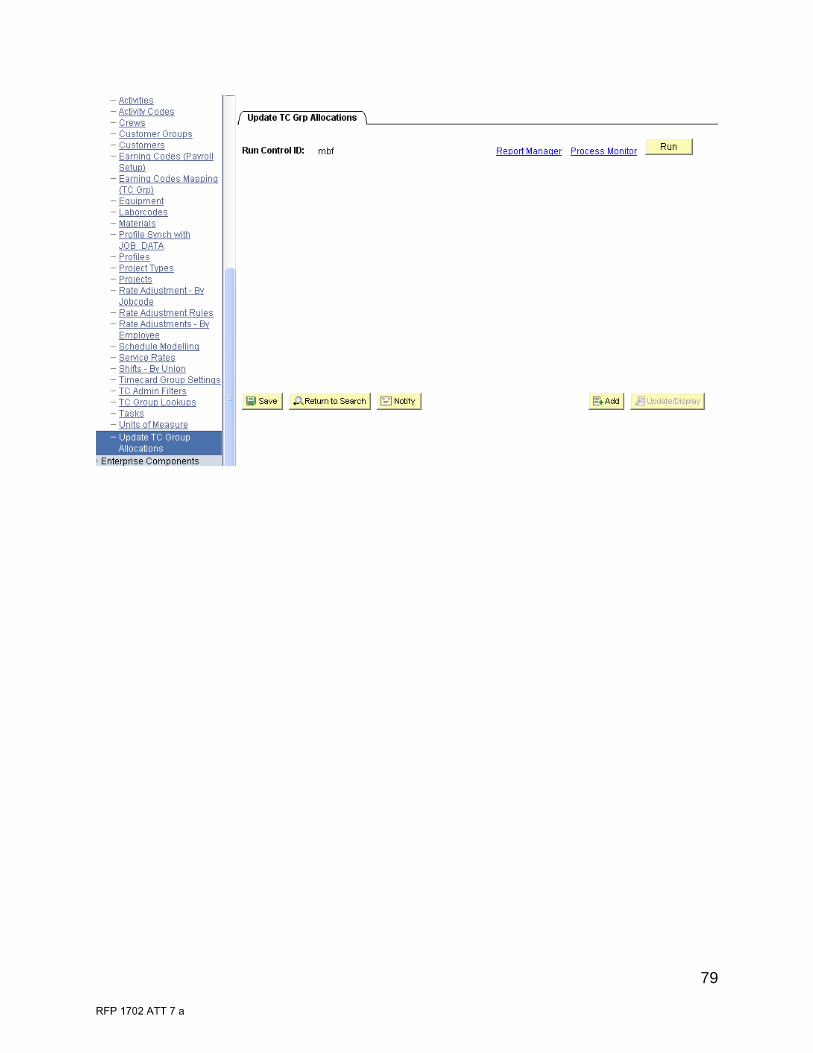
Navigate to Setup HRMS -> SPR Timecard Setup -> Update TC Group Allocations
Run the process (There are no run-control settings)
RFP 1702 ATT 7 a
79
RFP 1702 ATT 7 a