Embed Size (px)
Citation preview
Mechanical Workshop
Module 4: Hacksaws
PREPARED BY
Academic Services
August 2011
© Applied Technology High Schools, 2011
ATM-1022 Mechanical Workshop
Module 4: Hacksaws
Module 4: Hacksaws
Module Objectives
After the completion of this module, the student should be able to:
1. Describe the basic hack sawing process.
2. Identify the parts of a hacksaw.
3. Name the parts of a saw blade.
4. Identify the correct blades that should be fitted for different materials.
5. Demonstrate how to fit and remove a hacksaw blade correctly.
6. Demonstrate the procedure used when cutting materials.
7. Identify some defects of saw blades and their causes.
8. Cut a metal work piece by using a hack saw to a given dimensions
Module Contents
Topic Page No.
1 Introduction to hack sawing. 3
2 Main parts of a Hacksaw. 3
3 Types of hacksaw frames. 4
4 Hacksaw blades 4
5 Hacksaw safety 8
6 Cutting with the hacksaw 8
7 Practical task 9
8 Assignment 10
ATM 1022 – Mechanical Workshop
Module 4: Hacksaws
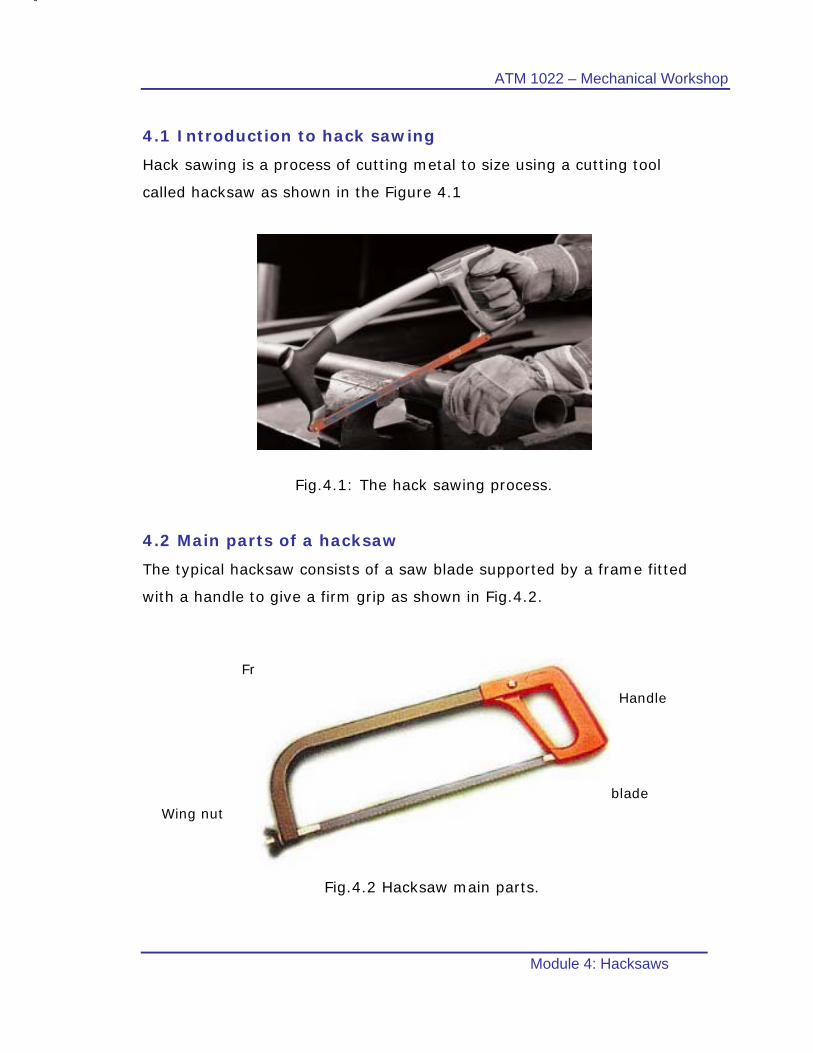
4.1 Introduction to hack sawing
Hack sawing is a process of cutting metal to size using a cutting tool
called hacksaw as shown in the Figure 4.1
Fig.4.1: The hack sawing process.
4.2 Main parts of a hacksaw
The typical hacksaw consists of a saw blade supported by a frame fitted
with a handle to give a firm grip as shown in Fig.4.2.
Fig.4.2 Hacksaw main parts.
Handle
Saw blade
Frame
Wing nut

ATM-1022
Modul
4.3 Type
There ar
frames:
1. Solid
In this
standa
used w
2. Adjust
(Fig.4.
standa
be fitte
4.4 Hack
4.4.1 Cla
The hacks
1. Teeth p
2. Blade l
shown in
Mechanica
e 4: Hacks
es of hac
e two ty
hacksaw
s type, o
ard length
with this fr
able h
3.b). In t
ard length
ed to this
ksaw bla
assificatio
saw blade
pitch whic
ength wh
Fig.4.4.
al Worksho
aws
cksaw fr
ypes of h
frame (F
only a pa
h of blade
rame.
acksaw
this type d
hs of blad
frame.
ades
on of the
is classifi
ch is the n
ich is the
Fig.
p
rames
hacksaw
Fig.4.3a)
articular
can be
frame
different
des can
hacksaw
ied by:
umber of
length be
.4.4: Hac
Fig.4.3(a) Solid (b) Adjus
w blades
teeth per
tween the
ksaw Blad
(
(
hacksaw fstable hac
r 25 mm.
e centers o
de.
a)
b)
frame.ksaw fram
of its pin h
me
holes as

ATM 1022 – Mechanical Workshop
Module 4: Hacksaws
4.4.2 Hacksaw blade pitch
The pitch of the hacksaw blades are
classified as follows:
1. Coarse pitch teeth
The coarse pitch blade shown in Fig.4.5a
has 14-18 teeth/25 mm. It is used to cut
thick and soft work pieces.
2. Medium pitch teeth
The medium pitch blade shown in
Fig.4.5b has 18-24 teeth/25 mm. It
is used to cut medium hard steel and
copper alloys
3. Fine pitch teeth
The medium pitch blade shown in
Fig.4.5c has 24-32 teeth/25 mm. It is
used to cut thin and hard work pieces.
Note: A fine pitch blade has more teeth
per 25 mm than a coarse pitch blade.
(a)
(b)
(c)
Fig.4.5: (a) Coarse pitch teeth (b) Medium pitch teeth (c) Fine pitch teeth.
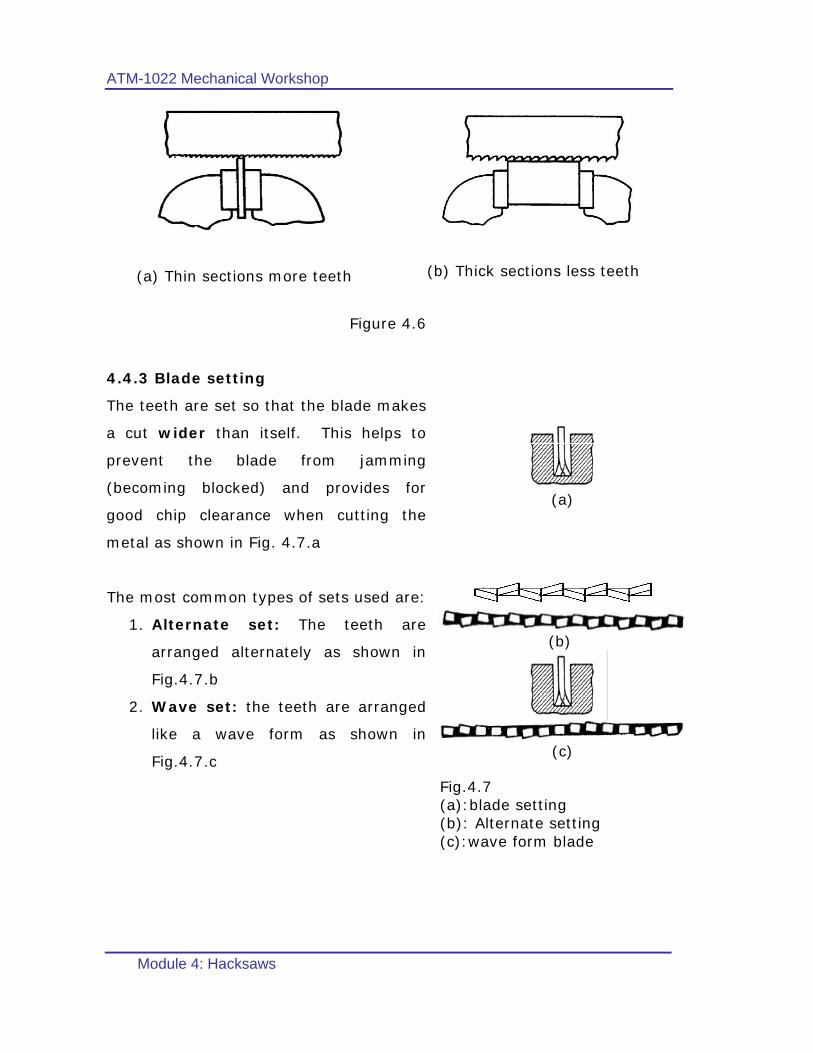
Tooth selection: Selecting a blade with the correct number of teeth
dependents on the thickness and type of the material to be cut. During
the cutting process there should be at least 3 teeth in contact. For thin
sections the highest number of teeth should be selected as shown in the
Figure 4.6 a and Figure 4.6. b
25 mm
25 mm
25 mm
ATM-1022 Mechanical Workshop
Module 4: Hacksaws
(a) Thin sections more teeth
(b) Thick sections less teeth
Figure 4.6
4.4.3 Blade setting
The teeth are set so that the blade makes
a cut wider than itself. This helps to
prevent the blade from jamming
(becoming blocked) and provides for
good chip clearance when cutting the
metal as shown in Fig. 4.7.a
The most common types of sets used are:
1. Alternate set: The teeth are
arranged alternately as shown in
Fig.4.7.b
2. Wave set: the teeth are arranged
like a wave form as shown in
Fig.4.7.c
(a)
(b)
(c)
Fig.4.7 (a):blade setting (b): Alternate setting (c):wave form blade
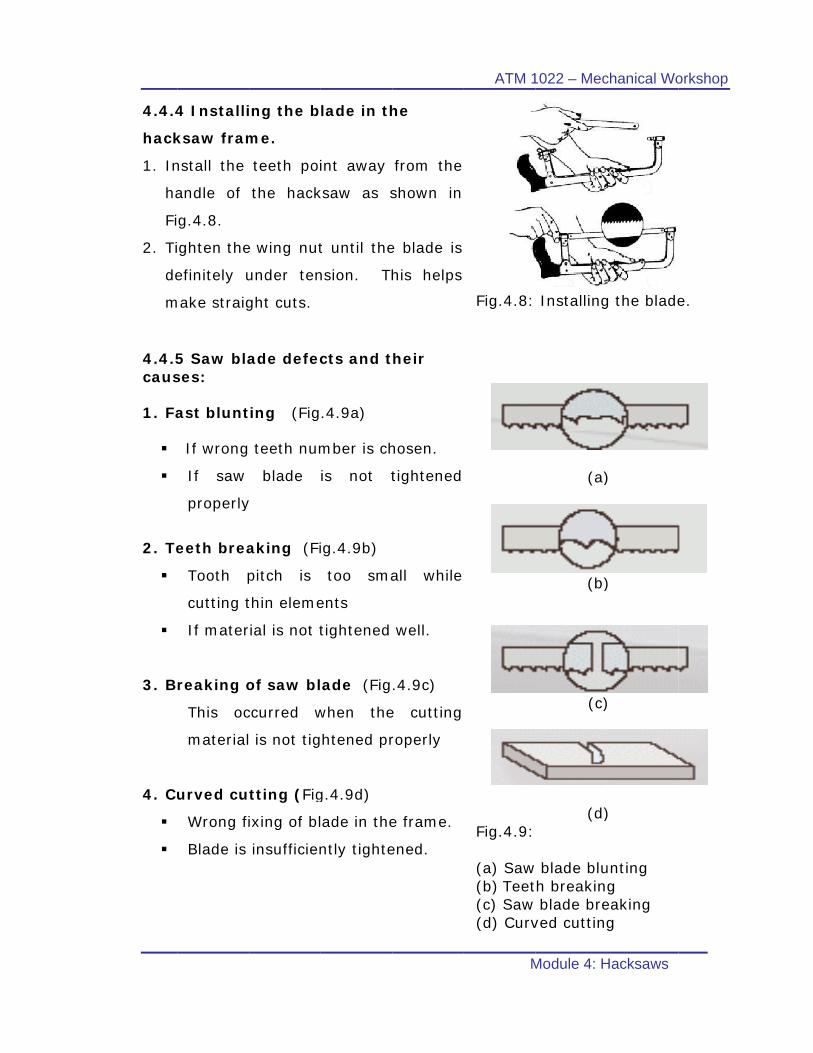
4.4.4
hack
1. In
ha
Fi
2. Ti
de
m
4.4.5caus
1. Fa
2. Te
3. B
4. Cu
4 Installi
ksaw fram
nstall the
andle of
g.4.8.
ghten the
efinitely u
make straig
5 Saw blases:
ast blunt
If wrong
If saw
properly
eeth brea
Tooth p
cutting t
If mater
reaking o
This oc
material
urved cu
Wrong fi
Blade is
ing the b
me.
teeth poi
the hack
e wing nut
under ten
ght cuts.
ade defec
ting (Fig
teeth num
blade
y
aking (Fi
pitch is
thin eleme
rial is not t
of saw bl
ccurred w
is not tig
tting (Fig
ixing of bl
insufficien
lade in th
int away
ksaw as s
t until the
nsion. Th
cts and t
.4.9a)
mber is ch
is not t
ig.4.9b)
too sma
ents
tightened
ade (Fig
when the
htened pr
g.4.9d)
ade in the
ntly tighte
he
from the
shown in
e blade is
his helps
heir
hosen.
tightened
all while
well.
.4.9c)
e cutting
roperly
e frame.
ened.
ATM 1
M
Fig.4.8:
Fig.4.9: (a) Saw (b) Teet(c) Saw (d) Curv
1022 – Mec
Module 4: H
Installing
(a)
(b)
(c)
(d)
blade bluth breakin blade breved cutting
chanical Wo
Hacksaws
g the blade
)
)
)
)
unting g
eaking g
orkshop
e.
ATM-1022 Mechanical Workshop
Module 4: Hacksaws
4.4.6 Hacksaw blade checklist
The following points should be taken in consideration before using the
hacksaw
1. Select the correct pitch for the material you want to cut.
2. Ensure that the blade has the correct tension.
3. Ensure that the blade is not twisted or discolored.
4. Ensure that the teeth are pointed away from the handle.
5. Ensure that there are no broken or blunt teeth.
4.5 Hacksaw safety tips
1. Always wear safety goggles while using a hacksaw.
2. Be sure that the hacksaw blade is properly tensioned.
3. Do not brush away chips with your hand; use a brush.
4. Never test the sharpness of a blade by running your fingers across
its teeth.
5. Keep the saw blades clean, and use light machine oil on the blade
to keep it from overheating and breaking.
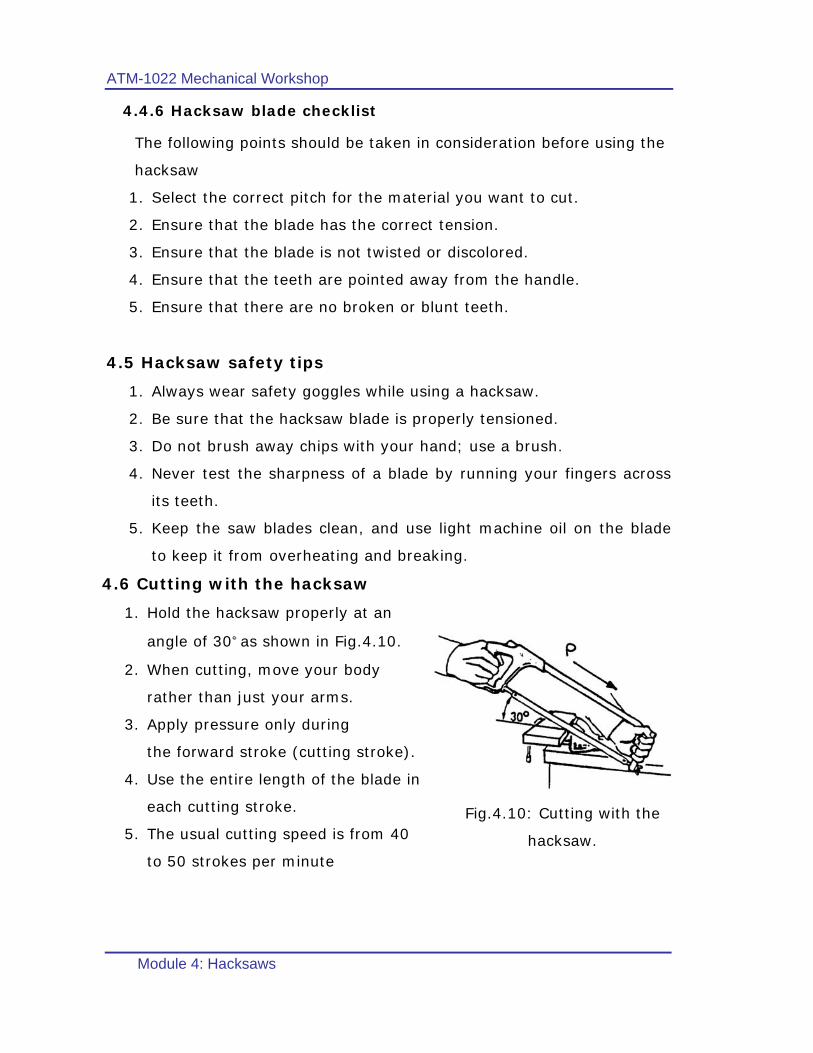
4.6 Cutting with the hacksaw
1. Hold the hacksaw properly at an
angle of 30° as shown in Fig.4.10.
2. When cutting, move your body
rather than just your arms.
3. Apply pressure only during
the forward stroke (cutting stroke).
4. Use the entire length of the blade in
each cutting stroke.
5. The usual cutting speed is from 40
to 50 strokes per minute
Fig.4.10: Cutting with the
hacksaw.

ATM 1022 – Mechanical Workshop
Module 4: Hacksaws
4.7 Practical Task
4.7.1 Objective:
The objective of this task is to cut the metal work piece in order to
produce a drill gauge according to the given dimensions. You may refer to
the drill gauge project document.
4.7.2. Required Tools
SR Tool SR Tool
1 Different hacksaw blades 4 Brush
2 Hacksaw frame 5 Vernier caliper
3 Vice 6 Steel ruler
4.7.3 Procedure
1. Wear the safety gear required.
2. Mount the work piece firmly on the vice.
3. Choose the correct blade according to the type of material and thickness
being cut as mentioned in table 4.1.
4. Install the hacksaw blade as explained in section 4.4.4.
5. Use the blade check list explained in section 4.4.6 to ensure proper
installation.
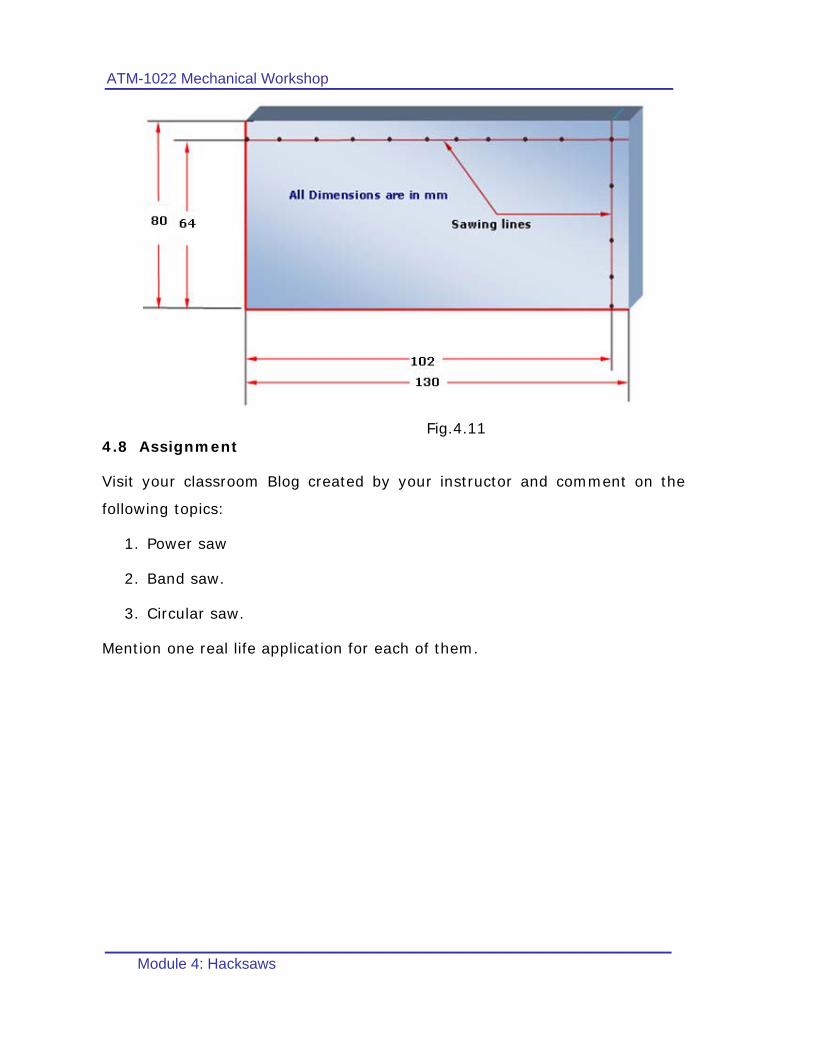
6. Use the hacksaw to cut the work piece as explained in section 4.6. Use
the marked sawing lines shown below in Fig.4.11 to guide the cutting
process.
ATM-1022 Mechanical Workshop
Module 4: Hacksaws
Fig.4.11 4.8 Assignment
Visit your classroom Blog created by your instructor and comment on the
following topics:
1. Power saw
2. Band saw.
3. Circular saw.
Mention one real life application for each of them.

ATM 1022 – Mechanical Workshop
Module 4: Hacksaws
Student’s notes
............................................................................................................
............................................................................................................
............................................................................................................
............................................................................................................
............................................................................................................
............................................................................................................
............................................................................................................
............................................................................................................
............................................................................................................
............................................................................................................
............................................................................................................
............................................................................................................
............................................................................................................
............................................................................................................
............................................................................................................
............................................................................................................
............................................................................................................
............................................................................................................
............................................................................................................
............................................................................................................
............................................................................................................

ATM-1022 Mechanical Workshop
Module 4: Hacksaws
Student’s notes
............................................................................................................
............................................................................................................
............................................................................................................
............................................................................................................
............................................................................................................
............................................................................................................
............................................................................................................
............................................................................................................
............................................................................................................
............................................................................................................
............................................................................................................
............................................................................................................
............................................................................................................
............................................................................................................
............................................................................................................
............................................................................................................
............................................................................................................
............................................................................................................
............................................................................................................
............................................................................................................
............................................................................................................
ATM 1022 – Mechanical Workshop
Module 4: Hacksaws
Worksheet
1. Circle the most correct answer:
1. Which of the following saw blades is coarse pitch teeth?
a) 32 teeth per 25 mm.
b) 18 teeth per 25 mm.
c) 14 teeth per 25 mm.
2. Which of the following saw blades is fine pitch teeth?
a) 32 teeth per 25 mm.
b) 18 teeth per 25 mm.
c) 14 teeth per 25 mm.
3. The pitch of saw blades is expressed as:
a) The length from hole-to-hole centre of the blade.
b) The material of the blade.
c) The number of teeth per linear inch.
d) None of the above.
2. Fill in the blanks
1. A hacksaw cuts best at about ______ to ______ strokes per
minutes.
2. At least _______ or _______ teeth should be cutting all the time.
3. Blade setting helps to prevent the blade from ____________ when
cutting the metal.
4. Hacksaws cut on the _________ stroke, not on the __________
stroke.
5. A _________ pitch blade has more teeth per 25 mm than a coarse
pitch blade.
ATM-1022 Mechanical Workshop
Module 4: Hacksaws
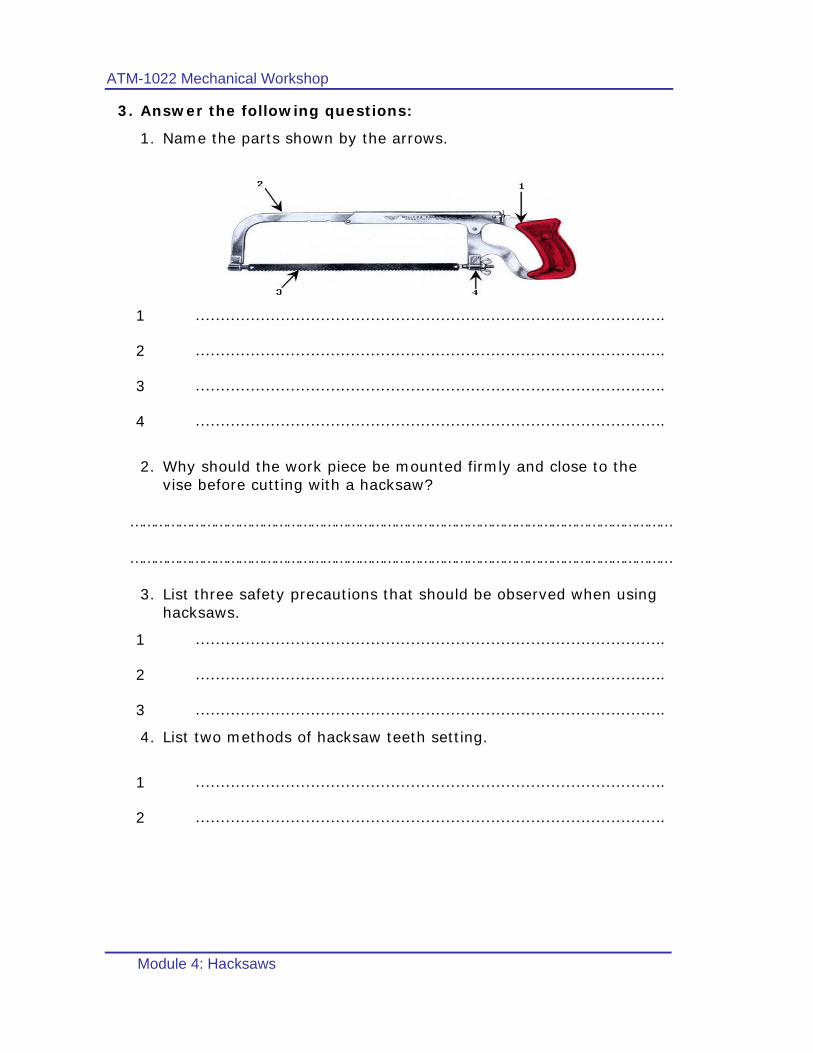
3. Answer the following questions:
1. Name the parts shown by the arrows.
…………………………………………………………………………………. 1
…………………………………………………………………………………. 2
…………………………………………………………………………………. 3
…………………………………………………………………………………. 4
2. Why should the work piece be mounted firmly and close to the
vise before cutting with a hacksaw?
………………………………………………………………………………………………………………………
………………………………………………………………………………………………………………………
3. List three safety precautions that should be observed when using hacksaws.
…………………………………………………………………………………. 1
…………………………………………………………………………………. 2
…………………………………………………………………………………. 3
4. List two methods of hacksaw teeth setting.
…………………………………………………………………………………. 1
…………………………………………………………………………………. 2