Embed Size (px)
Citation preview
www.novell.com/documentation
Asset Management Migration GuideZENworks® 11 Support Pack 2
March 20, 2012
Legal Notices
Novell, Inc., makes no representations or warranties with respect to the contents or use of this documentation, and specifically disclaims any express or implied warranties of merchantability or fitness for any particular purpose. Further, Novell, Inc., reserves the right to revise this publication and to make changes to its content, at any time, without obligation to notify any person or entity of such revisions or changes.
Further, Novell, Inc., makes no representations or warranties with respect to any software, and specifically disclaims any express or implied warranties of merchantability or fitness for any particular purpose. Further, Novell, Inc., reserves the right to make changes to any and all parts of Novell software, at any time, without any obligation to notify any person or entity of such changes.
Any products or technical information provided under this Agreement may be subject to U.S. export controls and the trade laws of other countries. You agree to comply with all export control regulations and to obtain any required licenses or classification to export, re-export or import deliverables. You agree not to export or re-export to entities on the current U.S. export exclusion lists or to any embargoed or terrorist countries as specified in the U.S. export laws. You agree to not use deliverables for prohibited nuclear, missile, or chemical biological weaponry end uses. See the Novell International Trade Services Web page (http://www.novell.com/info/exports/) for more information on exporting Novell software. Novell assumes no responsibility for your failure to obtain any necessary export approvals.
Copyright © 2007–2012 Novell, Inc. All rights reserved. No part of this publication may be reproduced, photocopied, stored on a retrieval system, or transmitted without the express written consent of the publisher.
Novell, Inc.1800 South Novell PlaceProvo, UT 84606U.S.A.www.novell.com
Online Documentation: To access the latest online documentation for this and other Novell products, see the Novell Documentation Web page (http://www.novell.com/documentation/zenworks11/).
Novell Trademarks
For Novell trademarks, see the Novell Trademark and Service Mark list (http://www.novell.com/company/legal/trademarks/tmlist.html).
Third-Party Materials
All third-party trademarks are the property of their respective owners.

Contents
About This Guide 5
1 Using the Migration Utility 7
1.1 Before You Begin . . . . . . . . . . . . . . . . . . . . . . . . . . . . . . . . . . . . . . . . . . . . . . . . . . . . . . . . . . . . . . . . . 71.2 Overview . . . . . . . . . . . . . . . . . . . . . . . . . . . . . . . . . . . . . . . . . . . . . . . . . . . . . . . . . . . . . . . . . . . . . . . 8
1.2.1 System Requirements . . . . . . . . . . . . . . . . . . . . . . . . . . . . . . . . . . . . . . . . . . . . . . . . . . . . . . 91.2.2 The Migration Process. . . . . . . . . . . . . . . . . . . . . . . . . . . . . . . . . . . . . . . . . . . . . . . . . . . . . 10
1.3 Downloading and Installing the ZENworks Migration Utility . . . . . . . . . . . . . . . . . . . . . . . . . . . . . . . . 111.4 Selecting the Migration Source . . . . . . . . . . . . . . . . . . . . . . . . . . . . . . . . . . . . . . . . . . . . . . . . . . . . . 111.5 Selecting the Migration Destination . . . . . . . . . . . . . . . . . . . . . . . . . . . . . . . . . . . . . . . . . . . . . . . . . . 131.6 Migrating Objects . . . . . . . . . . . . . . . . . . . . . . . . . . . . . . . . . . . . . . . . . . . . . . . . . . . . . . . . . . . . . . . . 15
1.6.1 Migrating Inventory Data . . . . . . . . . . . . . . . . . . . . . . . . . . . . . . . . . . . . . . . . . . . . . . . . . . . 151.6.2 Migrating Administrator-Defined Field Definitions . . . . . . . . . . . . . . . . . . . . . . . . . . . . . . . . 171.6.3 Migrating Local Product Definitions . . . . . . . . . . . . . . . . . . . . . . . . . . . . . . . . . . . . . . . . . . . 181.6.4 Migrating Asset Management Data . . . . . . . . . . . . . . . . . . . . . . . . . . . . . . . . . . . . . . . . . . . 191.6.5 Migrating Asset Management Data Only . . . . . . . . . . . . . . . . . . . . . . . . . . . . . . . . . . . . . . . 201.6.6 Migrating License Records . . . . . . . . . . . . . . . . . . . . . . . . . . . . . . . . . . . . . . . . . . . . . . . . . 221.6.7 Migrating Custom Reports . . . . . . . . . . . . . . . . . . . . . . . . . . . . . . . . . . . . . . . . . . . . . . . . . . 221.6.8 Migration Performance Guidelines . . . . . . . . . . . . . . . . . . . . . . . . . . . . . . . . . . . . . . . . . . . 25
2 Migration Console Reference 27
2.1 Menu Options. . . . . . . . . . . . . . . . . . . . . . . . . . . . . . . . . . . . . . . . . . . . . . . . . . . . . . . . . . . . . . . . . . . 282.2 Select Objects to Migrate Tab . . . . . . . . . . . . . . . . . . . . . . . . . . . . . . . . . . . . . . . . . . . . . . . . . . . . . . 292.3 Items to Migrate Tab . . . . . . . . . . . . . . . . . . . . . . . . . . . . . . . . . . . . . . . . . . . . . . . . . . . . . . . . . . . . . 302.4 Migration Status Tab . . . . . . . . . . . . . . . . . . . . . . . . . . . . . . . . . . . . . . . . . . . . . . . . . . . . . . . . . . . . . 302.5 Migration History Tab . . . . . . . . . . . . . . . . . . . . . . . . . . . . . . . . . . . . . . . . . . . . . . . . . . . . . . . . . . . . . 302.6 Migrated Objects Tab. . . . . . . . . . . . . . . . . . . . . . . . . . . . . . . . . . . . . . . . . . . . . . . . . . . . . . . . . . . . . 302.7 Select ZAM Database Field . . . . . . . . . . . . . . . . . . . . . . . . . . . . . . . . . . . . . . . . . . . . . . . . . . . . . . . . 312.8 Select Zone Field . . . . . . . . . . . . . . . . . . . . . . . . . . . . . . . . . . . . . . . . . . . . . . . . . . . . . . . . . . . . . . . . 322.9 Start Migration Button . . . . . . . . . . . . . . . . . . . . . . . . . . . . . . . . . . . . . . . . . . . . . . . . . . . . . . . . . . . . 332.10 Cancel Button. . . . . . . . . . . . . . . . . . . . . . . . . . . . . . . . . . . . . . . . . . . . . . . . . . . . . . . . . . . . . . . . . . . 332.11 Migration Queue Progress . . . . . . . . . . . . . . . . . . . . . . . . . . . . . . . . . . . . . . . . . . . . . . . . . . . . . . . . . 332.12 Migration Task Progress . . . . . . . . . . . . . . . . . . . . . . . . . . . . . . . . . . . . . . . . . . . . . . . . . . . . . . . . . . 34
A Migrating Both ZENworks 7 Desktop Management and ZENworks 7.5 Asset Management 35
A.1 Migration Order . . . . . . . . . . . . . . . . . . . . . . . . . . . . . . . . . . . . . . . . . . . . . . . . . . . . . . . . . . . . . . . . . 35A.2 ZAM Migration Utility Messages . . . . . . . . . . . . . . . . . . . . . . . . . . . . . . . . . . . . . . . . . . . . . . . . . . . . 36
B ZENworks Objects and Their Uniqueness 39
B.1 Duplicate Object Details . . . . . . . . . . . . . . . . . . . . . . . . . . . . . . . . . . . . . . . . . . . . . . . . . . . . . . . . . . . 39B.1.1 Purchase Records . . . . . . . . . . . . . . . . . . . . . . . . . . . . . . . . . . . . . . . . . . . . . . . . . . . . . . . . 40B.1.2 Catalog Products . . . . . . . . . . . . . . . . . . . . . . . . . . . . . . . . . . . . . . . . . . . . . . . . . . . . . . . . . 40B.1.3 Licensed Products . . . . . . . . . . . . . . . . . . . . . . . . . . . . . . . . . . . . . . . . . . . . . . . . . . . . . . . . 40B.1.4 Discovered Products . . . . . . . . . . . . . . . . . . . . . . . . . . . . . . . . . . . . . . . . . . . . . . . . . . . . . . 40B.1.5 Software Collections . . . . . . . . . . . . . . . . . . . . . . . . . . . . . . . . . . . . . . . . . . . . . . . . . . . . . . 40
Contents 3
B.1.6 Contracts . . . . . . . . . . . . . . . . . . . . . . . . . . . . . . . . . . . . . . . . . . . . . . . . . . . . . . . . . . . . . . . 40B.1.7 Date Notifications. . . . . . . . . . . . . . . . . . . . . . . . . . . . . . . . . . . . . . . . . . . . . . . . . . . . . . . . . 40B.1.8 Documents. . . . . . . . . . . . . . . . . . . . . . . . . . . . . . . . . . . . . . . . . . . . . . . . . . . . . . . . . . . . . . 41
Glossary 43
4 Novell ZENworks 11 SP2 Asset Management Migration Guide
About This Guide
This Novell ZENworks 11 SP2 Asset Management Migration Guide includes information to help you successfully migrate selected inventory and asset management data from ZENworks Asset Management 7.5 to an installed Novell ZENworks 11 SP2 Asset Management system
The information in this guide is organized as follows:
Chapter 1, “Using the Migration Utility,” on page 7 Chapter 2, “Migration Console Reference,” on page 27 Appendix B, “ZENworks Objects and Their Uniqueness,” on page 39 “Glossary” on page 43
Audience
This guide is intended for ZENworks administrators.
Feedback
We want to hear your comments and suggestions about this manual and the other documentation included with this product. Please use the User Comments feature at the bottom of each page of the online documentation.
Additional Documentation
ZENworks 11 SP2 Asset Management is supported by other documentation (in both PDF and HTML formats) that you can use to learn about and implement the product. For additional documentation, see the ZENworks 11 SP2 documentation Web site (http://www.novell.com/documentation/zenworks11/).
About This Guide 5

6 Novell ZENworks 11 SP2 Asset Management Migration Guide
1 1Using the Migration Utility
The following sections provide instructions on how to use the Novell ZENworks 11 SP2 Asset Management Migration utility to migrate data from ZENworks Asset Management 7.5:
Section 1.1, “Before You Begin,” on page 7 Section 1.2, “Overview,” on page 8 Section 1.3, “Downloading and Installing the ZENworks Migration Utility,” on page 11 Section 1.4, “Selecting the Migration Source,” on page 11 Section 1.5, “Selecting the Migration Destination,” on page 13 Section 1.6, “Migrating Objects,” on page 15
1.1 Before You BeginBefore you begin migrating data from ZENworks Asset Management 7.5 to ZENworks 11 SP2 Asset Management, consider the following:
If you also have ZENworks 7 Desktop Management installed on your ZENworks Asset Management 7.5 workstations, see Appendix A, “Migrating Both ZENworks 7 Desktop Management and ZENworks 7.5 Asset Management,” on page 35 to ensure that you migrate the two products in the correct order.
You should back up both source and destination databases. Turn off the inventory process on ZENworks Asset Management 7.5 before you run the
migration utility. If you have migrated inventory data with a previous version of the migration utility, you must
use that same version to migrate the asset management data. The version of the migration utility that you use must match the ZENworks Management Zone
version. The migration utility will not connect to a zone that does not match its version number. You can only migrate objects once. Network devices are not migrated. You need to migrate inventory data before asset management data. If you want to do a staged
migration, do not migrate asset management data until all staging is complete. For more information about staging, see “Staging a Migration” on page 16.
Not all custom reports are migrated. For a list of custom reports that are not migrated, see Section 1.6.7, “Migrating Custom Reports,” on page 22.
When migrating to a SQL server, note the following file size recommendations: The destination data file should be at least 1.1 times the size of the source data file. The destination log file should be at least 1.2 times the size of the source data file.
Using the Migration Utility 7
If you are migrating data installation that already contains some of the same asset management data, you might see migration errors or fail in the migration process. See “ZENworks Objects and Their Uniqueness” on page 39 for more information.
For better migration performance, it is strongly recommended that you purge the ZENworks Asset Management 7.5 database before you begin. For details, see Section 1.6.8, “Migration Performance Guidelines,” on page 25.
1.2 OverviewThe migration utility is used to migrate inventory data, which is defined by your ZENworks Asset Management 7.5 collection domains, and asset management data. This data includes the following:
Inventory data Devices (including deleted devices, if desired. See Section 1.6.1, “Migrating Inventory
Data,” on page 15) Device history Local software products Hardware/software components Administrator-defined fields (known as user-defined fields in ZENworks Asset
Management 7.5) Custom reports
Asset management data Asset management usage data Asset management custom reports Asset management administrator-defined fields (known as user-defined fields in
ZENworks Asset Management 7.5) Catalog products Discovered products Purchase records Licensed products Software collections Contracts and date notifications Documents
Network devices and contract-network relationships are not migrated. Contract-to-network-device relationships can be reestablished after a network discovery process is run within ZENworks 11 SP2 Asset Management.
Inventory data can be migrated by individual device or as a group. Asset management data is migrated as a group.
When you migrate inventory data, by default you are also migrating the following:
Local Product Definitions: Local product definitions defined in ZENworks Asset Management 7.5. These product definitions are migrated as a group; they cannot be migrated individually. If you want to migrate just the local product definitions without the inventory data, see “Migrating Local Product Definitions” on page 18.
8 Novell ZENworks 11 SP2 Asset Management Migration Guide
Administrator-Defined Field Definitions: Asset management and inventory administrator-defined fields defined in ZENworks Asset Management 7.5 (Administrator-defined fields are known as user-defined fields ZENworks Asset Management 7.5). These field definitions are migrated as a group; they cannot be migrated individually. If you want to migrate just the administrator-defined field definitions without the inventory data, see “Using the Migration Utility” on page 7.
Custom Reports: Asset management and inventory custom reports defined in ZENworks Asset Management 7.5. The reports are migrated as a group. If you want to migrate custom reports without the inventory data, see “Migrating Custom Reports” on page 22.
Migrating inventory data also migrates the following asset management data:
Usage data Custom reports Administrator-defined fields
1.2.1 System Requirements
The migration utility requires the following:
Windows XP Professional 5.1 SP 2, Windows XP Professional 5.1 SP 3, Windows Vista SP1 x86, Windows Server 2003 5.2 SP2, or Windows Server 2008 x86; Windows 2000 and Windows 2008 are not supported
Network connectivity to source and destination database servers Migration source: ZENworks Asset Management 7.5 Migration destination: ZENworks 11 SP2 Asset Management Microsoft .NET Framework Version 2.0 Re-distributable Package (x86) (Optional) ZENworks 11 SP2 Asset Management. This product is required to view migrated
asset management data.
The following combinations of databases can be used to migrate data:
SQL Server to SQL Server SQL Server to Sybase Oracle to Oracle
For migration purposes, the Oracle databases can be Oracle 9.2, Oracle 10.1, or Oracle 10.2. If you are using an Oracle database, please observe the following:
The Oracle client must be installed on the machine that runs the migration utility. For versions 10.1 and 10.2, this must be Administrator, not InstantClient.
For the Oracle 10.2 client, you must apply patch 5473334 (Doc ID 387818.1). Of the several data access components included in the patch, Oracle Provider for OLEDB version 10.2.0.2.20 is required.
TNSNAMES.ORA must contain entries for both the source and destination database services. To create these entries automatically, log on to the ZENworks Asset Management 7.5 and ZENworks 11 SP2 Asset Management databases using the Oracle Enterprise Manager Console or Net Configuration Assistant—Local Net Service Name configuration. Note that the names used for the entries must match the corresponding service name exactly.
Using the Migration Utility 9
The Oracle bin directory (e.g., C:\oracle\product\10.2.0\client_1\BIN) must be in your PATH setting; however, directories from other Oracle products and installs must not be in your PATH setting.
The user associated with the schema for the ZENworks Asset Management 7.5 Oracle database (NCSYSTEM by default) must have the “DBA” role while migration is running (by default, NCSYSTEM only has the “CONNECT” role).
1.2.2 The Migration Process
Migrating objects (inventory data, custom reports, and so on) consists of six steps:
1. Installing the migration utility. For more information, see Section 1.3, “Downloading and Installing the ZENworks Migration Utility,” on page 11.
2. Backing up both source and destination databases before starting migration and after each successful staging.
3. Selecting the migration source. For more information, see Section 1.4, “Selecting the Migration Source,” on page 11.
4. Selecting the migration destination. For more information, see Section 1.5, “Selecting the Migration Destination,” on page 13.If you have selected a destination zone previously, for example, for a pilot migration, a dialog appears asking if you want to clear the migration status data stored in the ZENworks Asset Management 7.5 source database, which is necessary if you change your migration destination. Click OK to clear the migration status data.
WARNING: You cannot reselect a migration destination. For example, if you choose a pilot migration destination, then switch to a production destination, you cannot switch back to the pilot destination.
5. Selecting objects to migrate.Administrator-defined field definitions, local product definitions, and custom reports are migrated by default the first time inventory data is migrated. To migrate them separately, see Section 1.6, “Migrating Objects,” on page 15. Some custom reports are not migrated because of database schema changes. For more information, see Section 1.6.7, “Migrating Custom Reports,” on page 22.When selecting objects to migrate, keep the following in mind: Inventory data and asset management data must be migrated using the same version of the
migration utility. You can only migrate objects once. You need to migrate inventory data before asset management data. Workstations that have not been inventoried are not migrated. In addition, if the
workstation is associated with a contract, the contract-workstation relationship isn’t migrated, either.
If you want to do a staged migration, select a subset of workstations to migrate. Do not migrate asset management data until all staging is complete. For more information about staging, see “Staging a Migration” on page 16.
6. Initiating the migration.Migration can take several hours to complete, depending on the size of the database being migrated. During the migration, the migration utility may become unresponsive at times. If migration is interrupted or canceled, it can be restarted. The migration then continues from the
10 Novell ZENworks 11 SP2 Asset Management Migration Guide

last migrated record in the migration process. If any errors are listed when the migration process is run again, you can ignore them. For more information, see Section 1.6, “Migrating Objects,” on page 15.
1.3 Downloading and Installing the ZENworks Migration UtilityPerform the following steps to download and install the ZENworks Migration Utility executable to the Windows device where you will be running the utility:
NOTE: Microsoft .NET Framework Version 2.0 Redistributable Package (x86) must be installed prior to installing the Migration utility.
1 (Conditional) If an earlier version of the utility is already installed on the device, then uninstall it before installing the latest version.
2 You can download the ZENworks Asset Management Migration Utility to a temporary location from one of the following locations by using your Web browser: ZENworks download page: Go to http://zenworks_primary_server_id/zenworks-setup/
?pageId=tools, and click ZAMmigration.exe. You will be automatically redirected to a page on Novell Download Site from where you can download the utility.
Novell Download Site: Go to http://download.novell.com and search for the ZENworks Configuration Management Migration Utility to download it.
3 Run ZAMmigration.exe to install it on your workstation.4 To run the utility on a supported Windows device, click Start > All Programs > Novell ZENworks >
ZENworks Asset Management Migration Utility.
1.4 Selecting the Migration SourceThe migration source is your ZENworks Asset Management 7.5 database. The migration utility requires that you log in to the migration source with create, modify, and delete privileges. To log in to your database:
1 Click Start > All Programs > Novell ZENworks > ZENworks Asset Management Migration Utility.
Using the Migration Utility 11
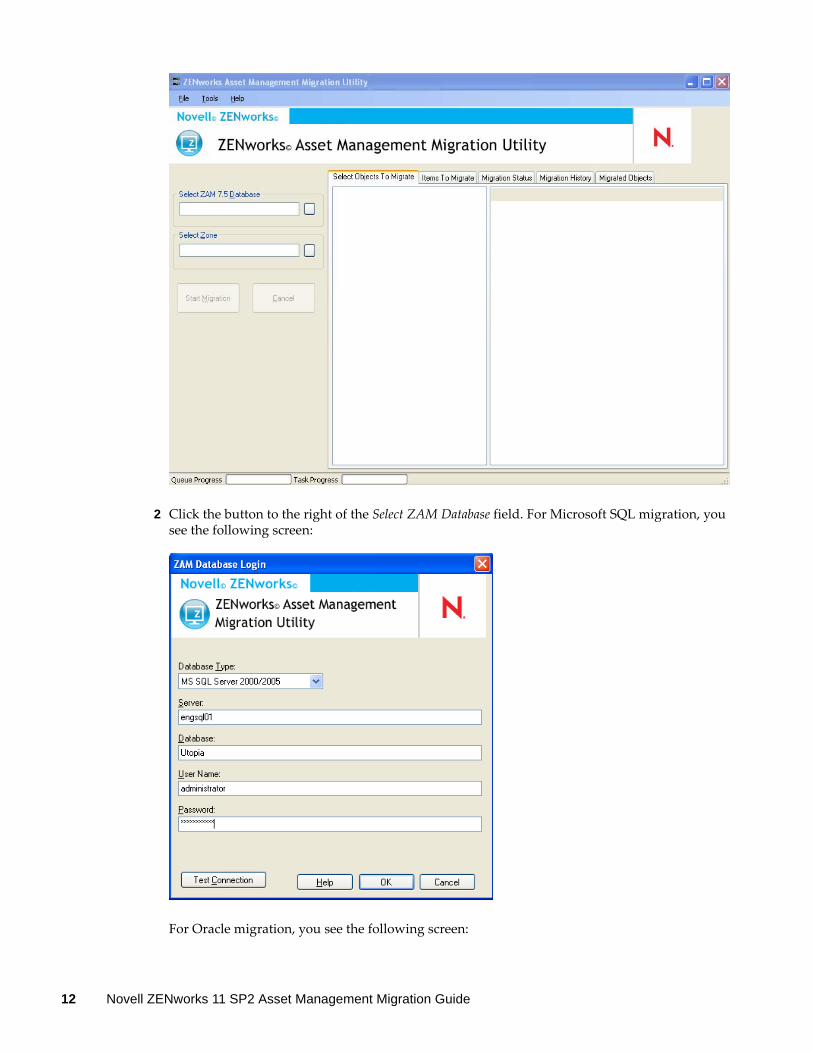
2 Click the button to the right of the Select ZAM Database field. For Microsoft SQL migration, you see the following screen:
For Oracle migration, you see the following screen:
12 Novell ZENworks 11 SP2 Asset Management Migration Guide

3 Fill in the following fields:Database Type: Specify the database type. For example, specify MS SQL Server 2000/2005 for both external and embedded MS SQL Server databases. Or specify Oracle 9i/10g for the latest Oracle database type.Server: Specify either the DNS name or IP address of the database server. Each time you use this dialog box, the last server you logged in to is displayed here.Database: Specify the database name. Each time you use this dialog box, the last database you logged in to is displayed here.Service Name: For Oracle migration, specify the service name. Each time you use this dialog box, the last service you logged in to is displayed here.User Name: Specify the username. Each time you use this dialog box, the last username you used is displayed here.Password: Specify the password. This must be specified every time to authenticate.
4 Click OK to connect. You can click Test Connection first to verify that you can connect to the database.
5 Continue with Section 1.5, “Selecting the Migration Destination,” on page 13.
1.5 Selecting the Migration DestinationTo log in to your migration source Management Zone for ZENworks 11 SP2 Asset Management:
1 Make sure you’ve selected the migration source (see Section 1.4, “Selecting the Migration Source,” on page 11).
2 In the Migration Console, click the button to the right of the Select Zone field.
Using the Migration Utility 13
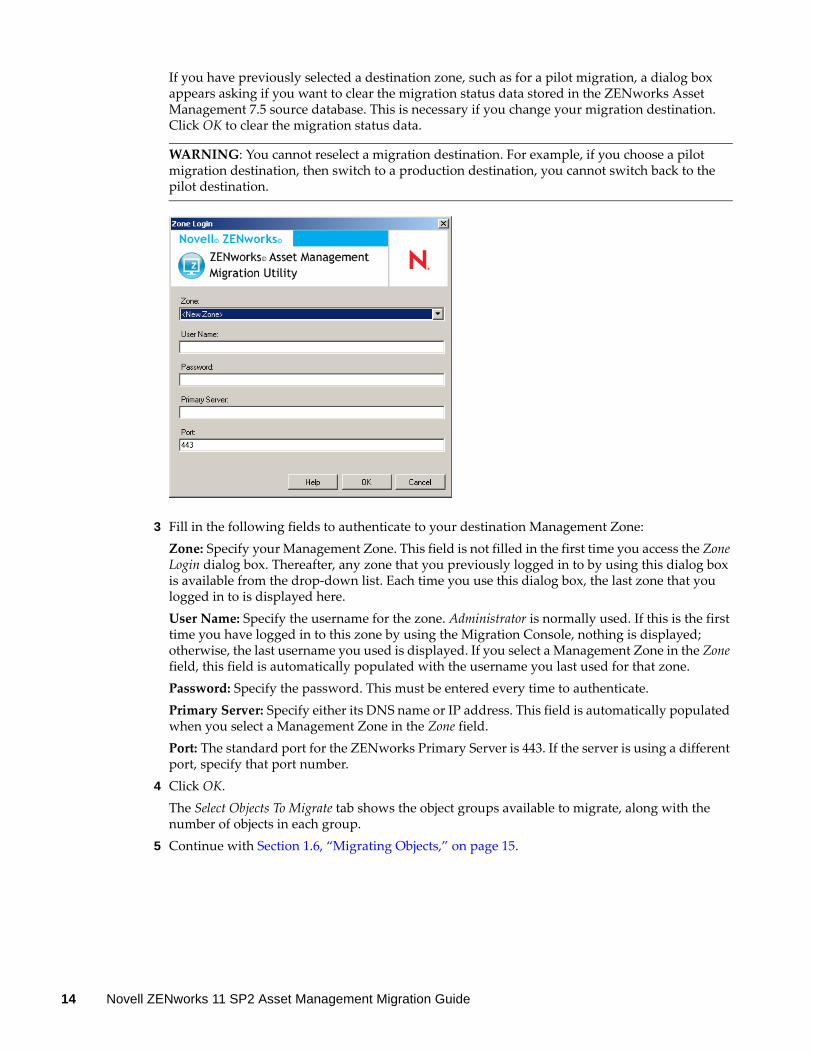
If you have previously selected a destination zone, such as for a pilot migration, a dialog box appears asking if you want to clear the migration status data stored in the ZENworks Asset Management 7.5 source database. This is necessary if you change your migration destination. Click OK to clear the migration status data.
WARNING: You cannot reselect a migration destination. For example, if you choose a pilot migration destination, then switch to a production destination, you cannot switch back to the pilot destination.
3 Fill in the following fields to authenticate to your destination Management Zone:Zone: Specify your Management Zone. This field is not filled in the first time you access the Zone Login dialog box. Thereafter, any zone that you previously logged in to by using this dialog box is available from the drop-down list. Each time you use this dialog box, the last zone that you logged in to is displayed here.User Name: Specify the username for the zone. Administrator is normally used. If this is the first time you have logged in to this zone by using the Migration Console, nothing is displayed; otherwise, the last username you used is displayed. If you select a Management Zone in the Zone field, this field is automatically populated with the username you last used for that zone.Password: Specify the password. This must be entered every time to authenticate.Primary Server: Specify either its DNS name or IP address. This field is automatically populated when you select a Management Zone in the Zone field.Port: The standard port for the ZENworks Primary Server is 443. If the server is using a different port, specify that port number.
4 Click OK.The Select Objects To Migrate tab shows the object groups available to migrate, along with the number of objects in each group.
5 Continue with Section 1.6, “Migrating Objects,” on page 15.
14 Novell ZENworks 11 SP2 Asset Management Migration Guide
1.6 Migrating ObjectsFor details on migrating objects in each group, see the topics below. Although the steps to migrate different types of objects are presented separately, it isn’t necessary to migrate one type of object at a time. You can migrate all data at once or choose what data to migrate. When you migrate inventory data, the administrator-defined fields, local product definitions, and custom report definitions are migrated by default.
When selecting objects to migrate, keep the following in mind:
You can only migrate objects once. You need to migrate inventory data before asset management data. Inventory data and asset management data must be migrated using the same version of the
migration utility. Workstations that have not been inventoried are not migrated. In addition, if the workstation is
associated with a contract, the contract-workstation relationship isn’t migrated, either.
If you want to do a staged migration, select a subset of workstations to migrate. Do not migrate asset management data until all staging is complete. For more information about staging, see “Staging a Migration” on page 16.
To migrate the definitions only, see the related topics below:
Section 1.6.1, “Migrating Inventory Data,” on page 15 Section 1.6.2, “Migrating Administrator-Defined Field Definitions,” on page 17 Section 1.6.3, “Migrating Local Product Definitions,” on page 18 Section 1.6.4, “Migrating Asset Management Data,” on page 19 Section 1.6.5, “Migrating Asset Management Data Only,” on page 20 Section 1.6.6, “Migrating License Records,” on page 22 Section 1.6.7, “Migrating Custom Reports,” on page 22 Section 1.6.8, “Migration Performance Guidelines,” on page 25
For details about the Migration Console, see Chapter 2, “Migration Console Reference,” on page 27.
1.6.1 Migrating Inventory Data
When you migrate inventory data, by default you migrate the following:
Devices (including workstations marked as deleted, if desired. For more information, see Section 1.6.1, “Migrating Inventory Data,” on page 15.)
Device history Local software products Hardware/software components Asset management usage data Inventory and asset management administrator-defined fields (known as user-defined fields in
ZENworks Asset Management 7.5) Inventory and asset management custom reports
NOTE: The Migrate All Inventory Data option is not available for Oracle database migration.
Using the Migration Utility 15
Staging a Migration
You can do a staged migration by selecting a subset of workstations to migrate. Usage and inventory data is migrated when the workstation is migrated; additional usage and inventory data accumulating in ZENworks Asset Management 7.5 after initial migration of a workstation is not migrated.
NOTE: Do not migrate asset management data until all staging is complete.
Migrating Deleted Workstations
You can migrate workstations marked as deleted in ZENworks Asset Management 7.5 to ZENworks 11 SP2 Asset Management. After migration, these workstations appear as discovered devices in ZENworks Control Center (Devices > Discovered > Devices created via ZENworks Asset Management Migration), but they are filtered out of Asset Management reports. For information on migrating deleted workstations, see Step 5 on page 17.
Migrating Inventory Data
1 Click Start > All Programs > Novell ZENworks > ZENworks Asset Management Migration Utility.2 Log in to your ZENworks Asset Management 7.5 database and the ZENworks 11 SP2
Management Zone as shown in Section 1.4, “Selecting the Migration Source,” on page 11 and Section 1.5, “Selecting the Migration Destination,” on page 13.
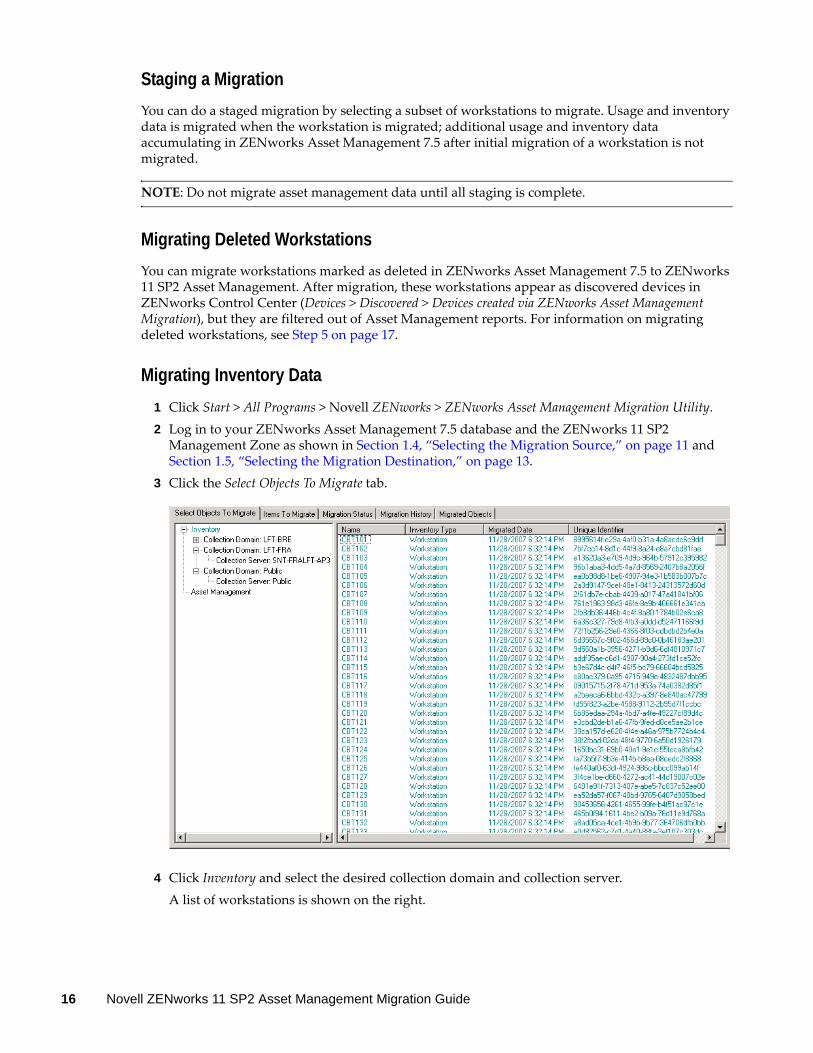
3 Click the Select Objects To Migrate tab.
4 Click Inventory and select the desired collection domain and collection server.A list of workstations is shown on the right.
16 Novell ZENworks 11 SP2 Asset Management Migration Guide
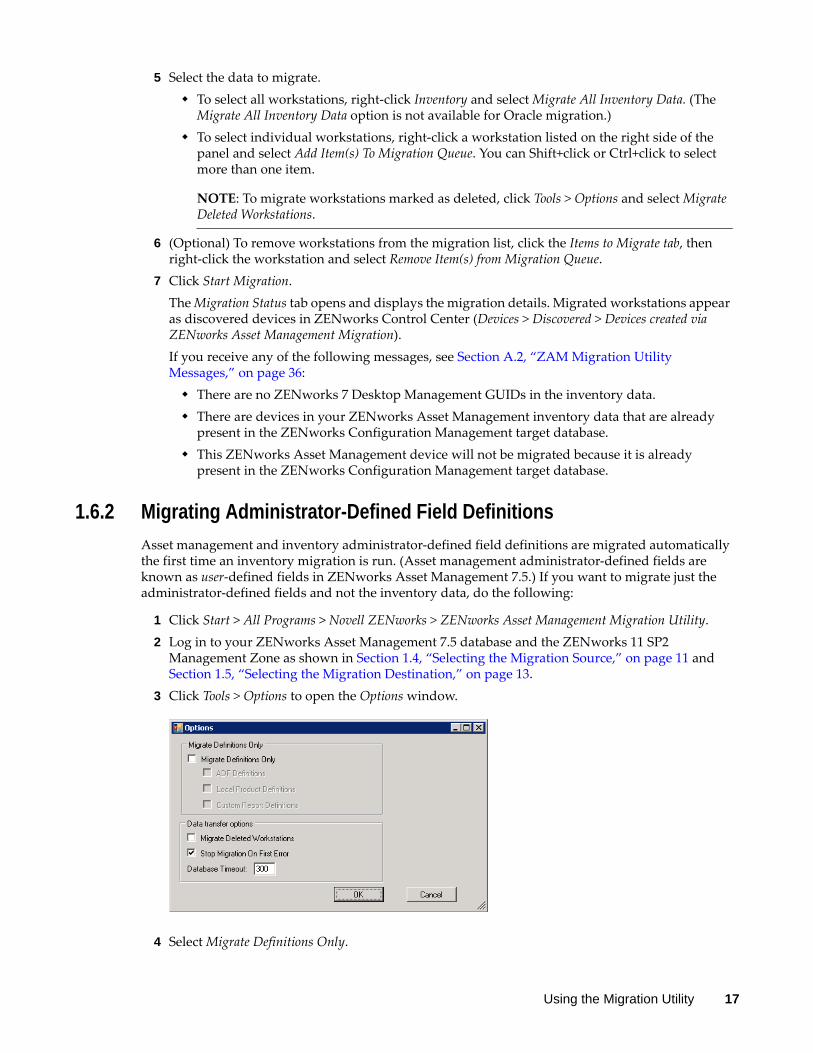
5 Select the data to migrate. To select all workstations, right-click Inventory and select Migrate All Inventory Data. (The
Migrate All Inventory Data option is not available for Oracle migration.) To select individual workstations, right-click a workstation listed on the right side of the
panel and select Add Item(s) To Migration Queue. You can Shift+click or Ctrl+click to select more than one item.
NOTE: To migrate workstations marked as deleted, click Tools > Options and select Migrate Deleted Workstations.
6 (Optional) To remove workstations from the migration list, click the Items to Migrate tab, then right-click the workstation and select Remove Item(s) from Migration Queue.
7 Click Start Migration.The Migration Status tab opens and displays the migration details. Migrated workstations appear as discovered devices in ZENworks Control Center (Devices > Discovered > Devices created via ZENworks Asset Management Migration).If you receive any of the following messages, see Section A.2, “ZAM Migration Utility Messages,” on page 36: There are no ZENworks 7 Desktop Management GUIDs in the inventory data. There are devices in your ZENworks Asset Management inventory data that are already
present in the ZENworks Configuration Management target database. This ZENworks Asset Management device will not be migrated because it is already
present in the ZENworks Configuration Management target database.
1.6.2 Migrating Administrator-Defined Field Definitions
Asset management and inventory administrator-defined field definitions are migrated automatically the first time an inventory migration is run. (Asset management administrator-defined fields are known as user-defined fields in ZENworks Asset Management 7.5.) If you want to migrate just the administrator-defined fields and not the inventory data, do the following:
1 Click Start > All Programs > Novell ZENworks > ZENworks Asset Management Migration Utility.2 Log in to your ZENworks Asset Management 7.5 database and the ZENworks 11 SP2
Management Zone as shown in Section 1.4, “Selecting the Migration Source,” on page 11 and Section 1.5, “Selecting the Migration Destination,” on page 13.
3 Click Tools > Options to open the Options window.
4 Select Migrate Definitions Only.
Using the Migration Utility 17
5 Select ADF Definitions.6 Click OK.7 Right-click User Defined Fields and select Migrate All User Defined Fields.
The number of user-defined fields is displayed in the Items To Migrate tab. To remove the user-defined fields from the list, click the Items To Migrate tab, right-click All User Defined Fields, and select Remove ‘All User Defined Fields’ from migration queue. User-defined fields cannot be migrated individually.
8 Click Start Migration.The Migration Status tab opens and displays the migration details. Click Cancel to stop the process.
1.6.3 Migrating Local Product Definitions
Local product definitions are migrated automatically the first time an inventory migration is run. If you want to migrate just the local product definitions and not the inventory data, do the following:
1 Click Start > All Programs > Novell ZENworks > ZENworks Asset Management Migration Utility.2 Log in to your ZENworks Asset Management 7.5 database and the ZENworks 11 SP2
Management Zone shown in Section 1.4, “Selecting the Migration Source,” on page 11 and Section 1.5, “Selecting the Migration Destination,” on page 13.
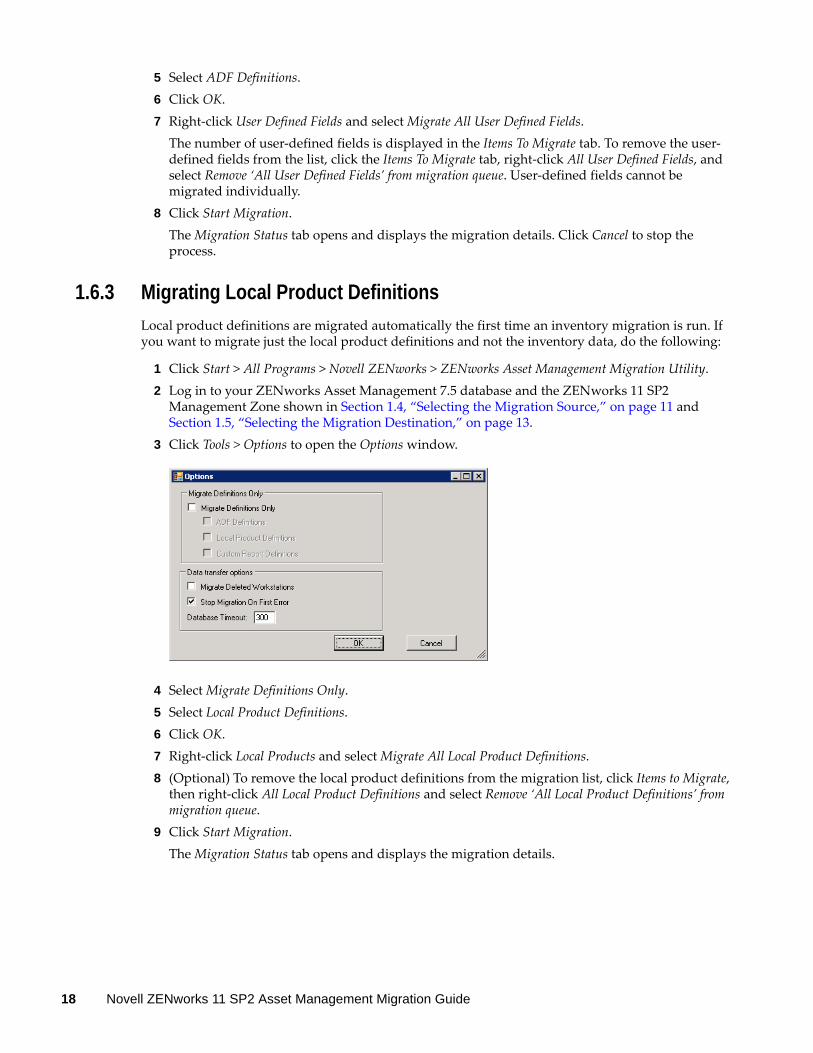
3 Click Tools > Options to open the Options window.
4 Select Migrate Definitions Only.5 Select Local Product Definitions.6 Click OK.7 Right-click Local Products and select Migrate All Local Product Definitions.8 (Optional) To remove the local product definitions from the migration list, click Items to Migrate,
then right-click All Local Product Definitions and select Remove ‘All Local Product Definitions’ from migration queue.
9 Click Start Migration.The Migration Status tab opens and displays the migration details.
18 Novell ZENworks 11 SP2 Asset Management Migration Guide
1.6.4 Migrating Asset Management Data
Migrated asset management data includes the following:
Catalog products Discovered products Purchase records Licensed products (For more information on licensed product migration, see Section 1.6.6,
“Migrating License Records,” on page 22.) Software collections Contracts and date notifications Documents License allocations, except for the following:
Allocations associated with “upgrade from” licensed products Demographic allocations associated with the demographic value of “none”
NOTE: User-defined field values for catalog products and license records that are available in ZENworks Asset Management 7.5 IR 14 are not migrated.
WARNING: Do not migrate asset management data until you have migrated all the inventory workstations you intend to migrate.
To migrate asset management data:
1 Click Start > All Programs > Novell ZENworks > ZENworks Asset Management Migration Utility.2 Log in to your ZENworks Asset Management 7.5 database and the ZENworks 11 SP2
Management Zone as shown in Section 1.4, “Selecting the Migration Source,” on page 11 and Section 1.5, “Selecting the Migration Destination,” on page 13.
3 Click the Select Objects to Migrate tab.
Using the Migration Utility 19

4 Right-click Asset Management and select Migrate All Asset Management Data.5 (Optional) Click the Items to Migrate tab to see what items will be migrated.6 Click Start Migration.
The Migration Status tab opens and displays the migration details.
1.6.5 Migrating Asset Management Data Only
If you want to migrate asset management data (see Section 1.6.4, “Migrating Asset Management Data,” on page 19) plus asset management custom reports and administrator-defined fields, do the following:
1 Click Start > All Programs > Novell ZENworks > ZENworks Asset Management Migration Utility.2 Log in to your ZENworks Asset Management 7.5 database and the ZENworks 11 SP2
Management Zone as shown in Section 1.4, “Selecting the Migration Source,” on page 11 and Section 1.5, “Selecting the Migration Destination,” on page 13.
3 Click Tools > Options to open the Options window.
20 Novell ZENworks 11 SP2 Asset Management Migration Guide
4 Select Migrate Definitions Only.5 Select ADF Definitions, Local Product Definitions, and Custom Report Definitions.
NOTE: User-defined field values for catalog products and license records that are available in ZENworks Asset Management 7.5 IR 14 are not migrated.
6 Click OK.7 On the Select Objects to Migrate tab, do the following:
7a Right-click User Defined Fields and select Migrate All User Defined Fields.7b Right-click Local Products and select Migrate All Local Products.7c Right-click Custom Reports and select Migrate All Custom Reports.
8 Click Start Migration and wait for the migration to finish.9 Repeat Step 3 to open the Options window once again.
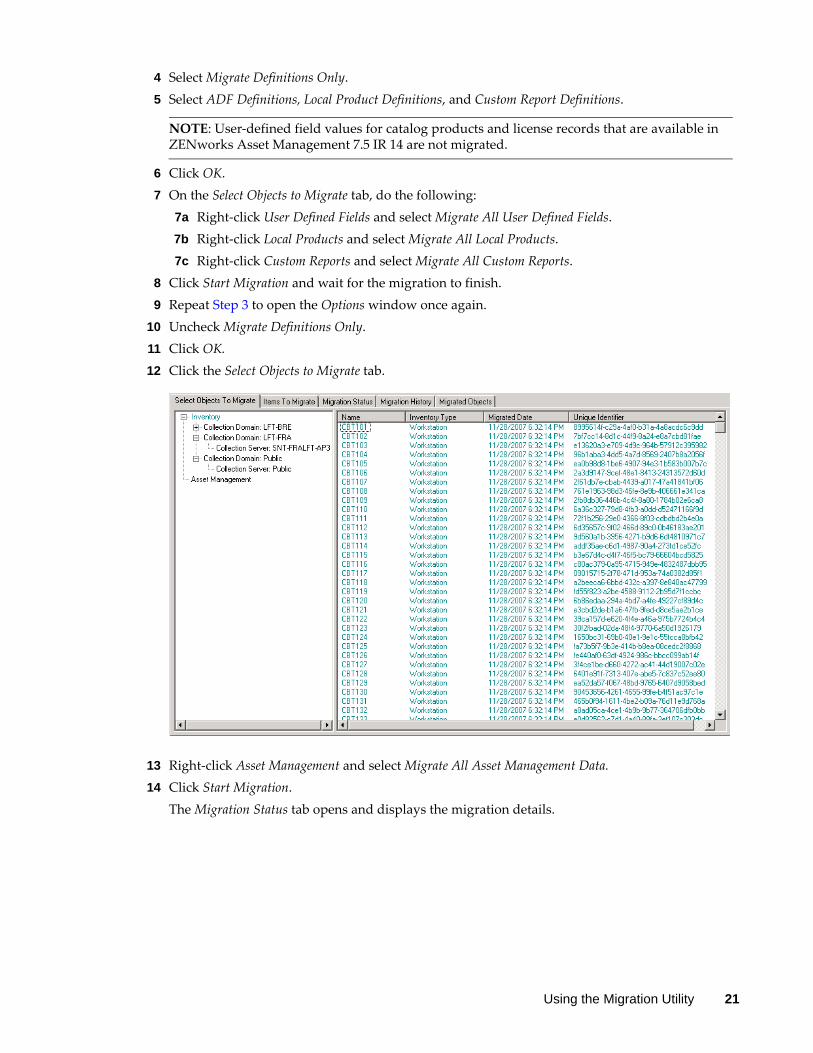
10 Uncheck Migrate Definitions Only.11 Click OK.12 Click the Select Objects to Migrate tab.
13 Right-click Asset Management and select Migrate All Asset Management Data.14 Click Start Migration.
The Migration Status tab opens and displays the migration details.
Using the Migration Utility 21
1.6.6 Migrating License Records
License records in ZENworks Asset Management 7.5 have been replaced in ZENworks11 SP2 Asset Management with licensed products, which contain license entitlements. License entitlements contain the information required for compliance and proof of ownership.
When a ZENworks Asset Management 7.5 license record is migrated to ZENworks 11 SP2 Asset Management, a licensed product with a single license entitlement is created in ZENworks 11 SP2 Asset Management. The license entitlement contains all the compliance and proof of ownership information previously associated with the ZENworks Asset Management 7.5 license record, including the following:
Reconciled discovered products Reconciled catalog products (and associated purchase records) Attached documents Associated contracts
User-defined field values for license records that are available in ZENworks Asset Management 7.5 IR 14 are not migrated.
If you have ZENworks Asset Management 7.5 license records with version upgrades, all license records in the upgrade path are consolidated in a single ZENworks11 Asset Management licensed product with multiple license entitlements, one entitlement for each license record in the upgrade path.
In ZENworks Asset Management 7.5, version upgrades can be linked to multiple sources, but in ZENworks 11 SP2 Asset Management, version upgrade license entitlements can only be linked to a single underlying entitlement. If you have upgrades that have been linked to multiple sources in ZENworks Asset Management 7.5, you need to review or modify the associated licensed products and license entitlements in ZENworks11 Asset Management after migration.
1.6.7 Migrating Custom Reports
The following topics provide more information on migrating custom reports:
“Reports That Are Migrated” on page 22 “Reports That Are Not Migrated” on page 23 “Migrating Custom Reports from ZENworks Asset Management” on page 24
Reports That Are Migrated
The following ZENworks Asset Management 7.5 custom reports can be migrated to ZENworks 11 SP2 Asset Management:
Workstation inventory reports Software usage reports Software management reports Contract management reports
In addition, Custom Report Alerts/Schedules, along with the e-mail list from ZENworks Asset Management 7.5, are migrated with custom reports. After migration, ZENworks 11 SP2 Asset Management evaluates each report to determine if it needs to be run. The option to attach the report results in CSV format is changed during migration to attach the results in an Excel format.
22 Novell ZENworks 11 SP2 Asset Management Migration Guide
You can view schedule information for a report in ZENworks Control Center by navigating to the specific report page and clicking Schedule/Notification. You can view the e-mail list by clicking Configuration > Asset Inventory.
Reports That Are Not Migrated
The following reports are not migrated:
Reports containing the following fields: Workstation Is Checked Out Workstation Checked In/Out Date Product License Count Product License ID Product License Name (Product) License Required License Platform Last Scan Date/Time Default Gateway (Workstation) Subnet Mask (Workstation) Over/Under (Summary) (Software Compliance) Any fields related to Connection Information, Collection Servers, or Collection Domains
If you want to migrate a report containing one or more of the fields above, create a version of the report in ZENworks Asset Management 7.5 with those fields removed and then migrate that version. If you don’t remove those fields, no part of the report is migrated. Keep in mind that reports can only be migrated once.
Custom reports distributed with ZENworks Asset Management 7.5. Equivalent reports are available in ZENworks 11 SP2 Asset Management. If you have made changes to these reports in ZENworks Asset Management 7.5 and want to keep those changes, make a copy before migrating the reports, and the copy is migrated.
Stored report results (Stored report results can be viewed in ZENworks Asset Management 7.5.) Report folder rights. By default, all ZENworks 11 SP2 Asset Management users have read-only
access to the migrated report folders. Reports with the following focus are not migrated:
Connection Information Component Filtering Hardware - DMI License Allocation - Demographic License Allocation - Workstation Licenses - Associated Documents Purchase/License/Inventory Infrastructure
Using the Migration Utility 23

Reports with a criteria of Workstation in Report or Workstation not in Report when the following criteria are met: The referenced report will not be migrated and the reference report is not one of the
predefined reports distributed with ZENworks 11 SP2 Asset Management. The custom report is based on a predefined report whose report definition has been
modified or deleted in ZENworks 11 SP2 Asset Management.
NOTE: A bug in ZENworks Asset Management 7.5 can cause an error when Hardware – System Board reports are imported into ZENworks 11 SP2 Asset Management. This is because in ZENworks Asset Management 7.5, both Bus 1 Slot and Bus 2 Slot columns are linked to the Bus 2 Slot column in the database. Reports containing both of these columns cause the following error message: NC_SystemBoard.Bus2Slots is not unique. To resolve this, go to the report definition and remove one of the Bus 2 Slot columns from the list of selected columns.
Migrating Custom Reports from ZENworks Asset Management
Custom reports are migrated automatically the first time an inventory migration is run. If you want to migrate just the custom reports and not the inventory data, do the following:
1 Click Start > All Programs > Novell ZENworks > ZENworks Asset Management Migration Utility.2 Log in to your ZENworks Asset Management 7.5 database and the ZENworks 11 SP2
Management Zone as shown in Section 1.4, “Selecting the Migration Source,” on page 11 and Section 1.5, “Selecting the Migration Destination,” on page 13.
3 Click Tools > Options to open the Options window.
4 Select Migrate Definitions Only.5 Select Custom Report Definitions.
Reports are migrated in a group; they cannot be migrated individually. Administrator-defined field definitions should be migrated with or before custom report definitions. If administrator-defined field definitions are not migrated, any custom report containing administrator-defined field columns is blocked from migration.
6 Click OK.7 Click Start Migration.
The Migration Status tab opens and displays the migration details. Migrated folders have the prefix migrate added to the folder name.
24 Novell ZENworks 11 SP2 Asset Management Migration Guide
1.6.8 Migration Performance Guidelines
Migrating all inventory data takes significantly longer than migrating asset management data only, unless the inventory has very few devices. The guidelines listed below are very broad, and your actual performance depends on several factors, including:
Configuration of the database server(s) hosting the ZENworks Asset Management 7.5 and ZENworks 11 SP2 Asset Management databases
Network speed and configuration Amount of Usage and History data in the ZENworks Asset Management 7.5 database
It is strongly recommended that you purge the ZENworks Asset Management 7.5 database before you begin the migration process.
“Migrating To SQL Server” on page 25 “Migrating To Sybase Embedded” on page 25 “Migrating To Oracle” on page 25
Migrating To SQL Server
Small databases (200 devices) should take less than 30 minutes Medium databases (1500 devices) should take less than 1 hour Very Large databases (30,000 devices) can take 12-24 hours
Migrating To Sybase Embedded
Small databases (200 devices) should take less than 30-45 minutes Larger databases (1000 devices) should take less than 1 hour
Migrating To Oracle
Expect 30-45 seconds per device migrated
Using the Migration Utility 25

26 Novell ZENworks 11 SP2 Asset Management Migration Guide

2 2Migration Console Reference
When you log in to the Novell ZENworks 11 SP2 Asset Management Migration utility, the migration console is displayed
Figure 2-1 The Migration Console
The following sections provide reference information to help you navigate and use the console features:
Section 2.1, “Menu Options,” on page 28 Section 2.2, “Select Objects to Migrate Tab,” on page 29 Section 2.3, “Items to Migrate Tab,” on page 30 Section 2.4, “Migration Status Tab,” on page 30 Section 2.5, “Migration History Tab,” on page 30 Section 2.6, “Migrated Objects Tab,” on page 30 Section 2.7, “Select ZAM Database Field,” on page 31
Migration Console Reference 27
Section 2.8, “Select Zone Field,” on page 32 Section 2.9, “Start Migration Button,” on page 33 Section 2.10, “Cancel Button,” on page 33 Section 2.11, “Migration Queue Progress,” on page 33 Section 2.12, “Migration Task Progress,” on page 34
2.1 Menu OptionsThe following options are available:
File: Click File > Exit to exit the migration console. Tools: Click Tools > Options to open the Options window, where you select the object definitions
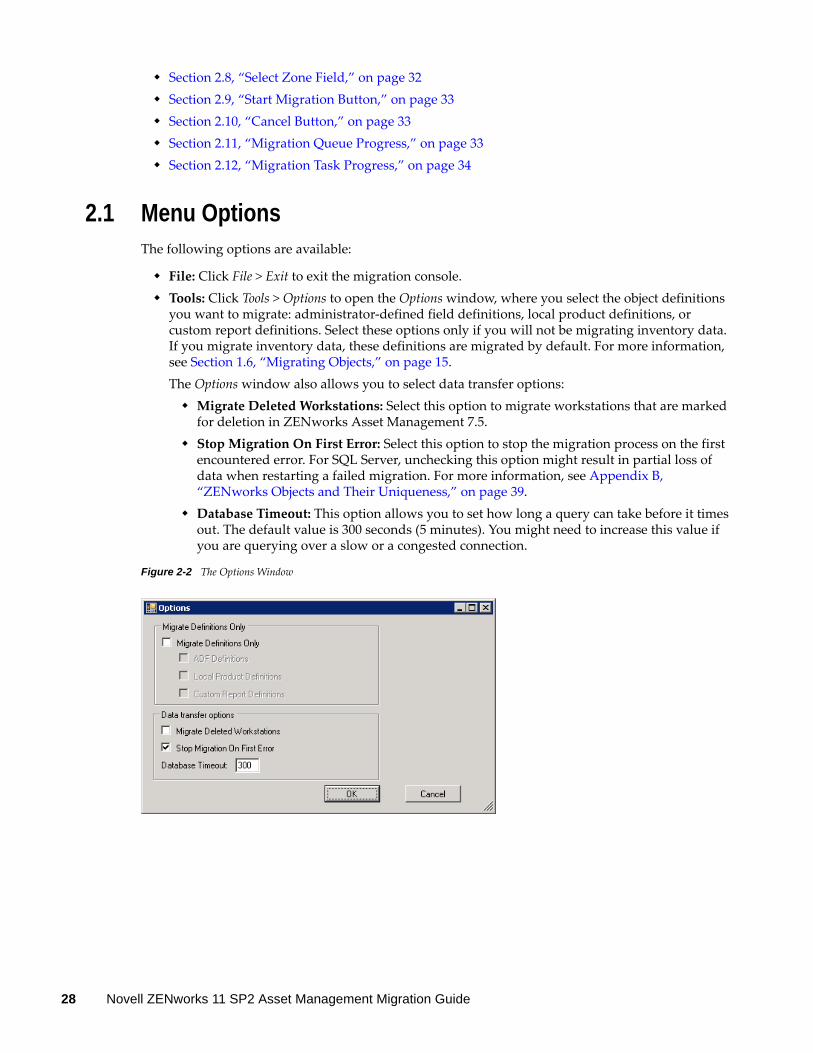
you want to migrate: administrator-defined field definitions, local product definitions, or custom report definitions. Select these options only if you will not be migrating inventory data. If you migrate inventory data, these definitions are migrated by default. For more information, see Section 1.6, “Migrating Objects,” on page 15.The Options window also allows you to select data transfer options: Migrate Deleted Workstations: Select this option to migrate workstations that are marked
for deletion in ZENworks Asset Management 7.5. Stop Migration On First Error: Select this option to stop the migration process on the first
encountered error. For SQL Server, unchecking this option might result in partial loss of data when restarting a failed migration. For more information, see Appendix B, “ZENworks Objects and Their Uniqueness,” on page 39.
Database Timeout: This option allows you to set how long a query can take before it times out. The default value is 300 seconds (5 minutes). You might need to increase this value if you are querying over a slow or a congested connection.
Figure 2-2 The Options Window
28 Novell ZENworks 11 SP2 Asset Management Migration Guide
2.2 Select Objects to Migrate TabClick the Select Objects To Migrate tab to display the objects you can migrate. For information on migrating these objects, see Section 1.6, “Migrating Objects,” on page 15.
Inventory: Inventory data for the enterprise. Use these objects to migrate inventory data. For more information, see Section 1.6.1, “Migrating Inventory Data,” on page 15.
Administrator-Defined Fields: Custom fields defined in ZENworks Asset Management 7.5. (Asset management administrator-defined fields are known as user-defined fields in ZENworks Asset Management 7.5.) You can choose to migrate just the administrator-defined field definitions or the field definitions along with the data values. For more information, see Section 1.6.2, “Migrating Administrator-Defined Field Definitions,” on page 17.
Local Products: Software products created and identified to be tracked as part of your inventory. Only the definitions are migrated, not the inventory data. For more information, see Section 1.6.3, “Migrating Local Product Definitions,” on page 18.
Asset Management: Asset management data for the enterprise. Use these objects to migrate asset management data. For more information, see Section 1.6.4, “Migrating Asset Management Data,” on page 19.
Custom Reports: Inventory and asset management custom reports defined in ZENworks Asset Management 7.5. Use these objects to migrate custom reports. For more information, see Section 1.6.7, “Migrating Custom Reports,” on page 22.
Deleted Workstations: Workstations that are marked as deleted in ZENworks Asset Management 7.5. Use these objects to migrate the workstations that are marked as deleted. For more information, see Section 1.6.1, “Migrating Inventory Data,” on page 15.
Click a collection server to display the workstations in that group in the panel on the right. Click Deleted Workstations to display the workstations that are marked as deleted in ZENworks Asset Management 7.5 in the panel on the right. The workstation Name, Inventory Type, Migrated Date, and Unique Identifier are displayed.
Migration Console Reference 29

Figure 2-3 Select Objects to Migrate
2.3 Items to Migrate TabThe Items to Migrate tab shows the name, object type, and the unique identifier of each selected object. Right-click an object and select Remove Item(s) from Migration Queue to remove the object from the migration list.
2.4 Migration Status TabWhen you migrate an object, you are automatically taken to the Migration Status tab, which shows the progress and details of the migration.
2.5 Migration History TabThe Migration History tab shows what objects have been migrated, along with the object type, status, and migration date. To see the detailed status of a specific migrated object, right-click the object and select Detailed Status. The Migration Status tab opens with details about the migration. To see a detailed list of migrated objects, right-click the object and select Migrated Objects. The Migrated Objects tab opens with a detailed list of migrated objects.
2.6 Migrated Objects TabThe Migrated Objects tab shows the objects that have been successfully migrated, including the object type, migrated date, and the object’s unique identifier.
30 Novell ZENworks 11 SP2 Asset Management Migration Guide
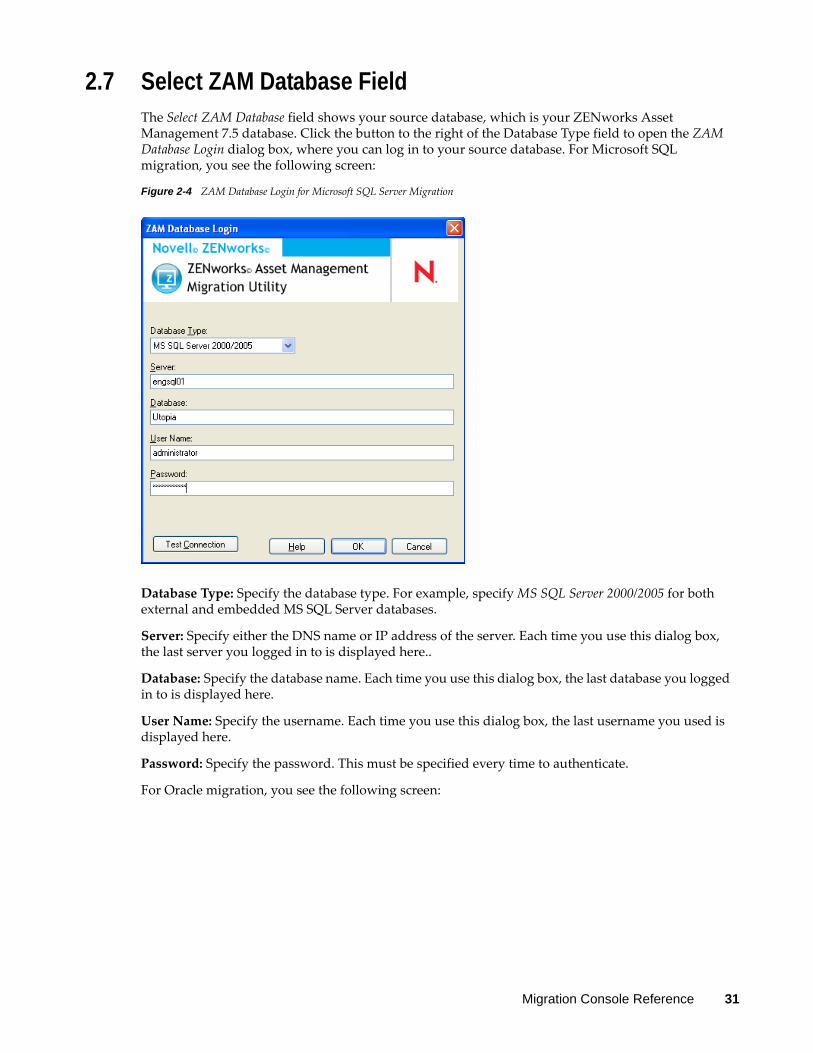
2.7 Select ZAM Database FieldThe Select ZAM Database field shows your source database, which is your ZENworks Asset Management 7.5 database. Click the button to the right of the Database Type field to open the ZAM Database Login dialog box, where you can log in to your source database. For Microsoft SQL migration, you see the following screen:
Figure 2-4 ZAM Database Login for Microsoft SQL Server Migration
Database Type: Specify the database type. For example, specify MS SQL Server 2000/2005 for both external and embedded MS SQL Server databases.
Server: Specify either the DNS name or IP address of the server. Each time you use this dialog box, the last server you logged in to is displayed here..
Database: Specify the database name. Each time you use this dialog box, the last database you logged in to is displayed here.
User Name: Specify the username. Each time you use this dialog box, the last username you used is displayed here.
Password: Specify the password. This must be specified every time to authenticate.
For Oracle migration, you see the following screen:
Migration Console Reference 31

Figure 2-5 ZAM Database Login
Database Type: Specify the database type. For example, specify Oracle 9i/10g for the latest Oracle database type.
Service Name: For Oracle migration, specify the service name. Each time you use this dialog box, the last service you logged in to is displayed here.
User Name: Specify the username. Each time you use this dialog box, the last username you used is displayed here.
Password: Specify the password. This must be specified every time to authenticate.
2.8 Select Zone FieldThe Select Zone field shows the migration destination, which is your Management Zone for ZENworks 11 SP2 Configuration Management. Click the button to the right of the field to open the Zone Login dialog box, where you can select the destination database.
32 Novell ZENworks 11 SP2 Asset Management Migration Guide

Figure 2-6 Zone Login
Zone: Specify your Management Zone. Each time you use this dialog box, the last zone that you logged in to is displayed here.
User Name: Specify the username for the zone. Administrator is normally used.
Password: Specify the password. This must be entered every time to authenticate.
Primary Server: Specify either its DNS name or IP address. This field is automatically populated when you select a Management Zone in the Zone field.
Port: The standard port for the ZENworks Primary Server is 443. If the server is using a different port, specify that port number.
2.9 Start Migration ButtonAfter you select the objects you want to migrate, click Start Migration to begin the migration process.
2.10 Cancel ButtonThe Cancel button stops the migration process at the point when you click it. Objects that have already migrated when the Cancel button is clicked are not rolled back.
2.11 Migration Queue ProgressLocated at the bottom of the console window, this indicator shows the progress of the migration queue.
Migration Console Reference 33
2.12 Migration Task ProgressLocated at the bottom of the console window, this indicator shows the progress of the migration task.
34 Novell ZENworks 11 SP2 Asset Management Migration Guide
A AMigrating Both ZENworks 7 Desktop Management and ZENworks 7.5 Asset Management
To successfully migrate both ZENworks 7 Desktop Management and ZENworks 7.5 Asset Management to ZENworks 11 SP2, follow the migration order presented below. Doing so ensures the successful migration of each ZDM 7/ZAM 7.5 workstation into one ZENworks 11 SP2 managed device and retains all ZDM 7 assignments and ZAM 7.5 data associated with the workstation.
IMPORTANT: The ZENworks 11 SP2 Adaptive Agent and ZENworks 7 Desktop Management Agent can coexist on the same workstation if the only Adaptive Agent feature that is enabled is Asset Management. Enabling features related to other ZENworks 11 SP2 products (Configuration Management and Patch Management) on the same machine as ZENworks 7 Desktop Management is not supported.
Section A.1, “Migration Order,” on page 35 Section A.2, “ZAM Migration Utility Messages,” on page 36
A.1 Migration Order1 Upgrade ZENworks 7.5 Asset Management to the IR19 (or later) release.
You can use the Novell Patch Finder (http://download.novell.com/patch/finder/) to locate and download IR19.
2 In ZENworks 7.5 Asset Management, scan all ZDM 7/ZAM 7.5 workstations that you want to become ZENworks 11 SP2 managed devices. The scan adds the ZENworks 7 Desktop Management GUID (for each workstation) to the ZENworks 7.5 Asset Management inventory database. Make sure that the scan cycle completes for all workstations you want to migrate. It might be necessary to run multiple scans to cover all workstations.For information about running an inventory scan, see the ZENworks 7.5 Asset Management Guide (http://www.novell.com/documentation/zam75/pdfdoc/am75admin/asset_management_users_guide.pdf)
3 Run the ZENworks 11 SP2 Asset Management migration utility to migrate the inventory data. The utility does the following: Creates the ZDM 7/ZAM 7.5 workstations as migrated devices in the ZENworks 11 SP2
database. The workstation's ZDM 7 GUID is used when creating the ZENworks 11 SP2 device object.
Migrates the ZENworks 7.5 Asset Management inventory data (for each workstation) to the ZENworks 11 SP2 database.
Migrating Both ZENworks 7 Desktop Management and ZENworks 7.5 Asset Management 35
For information about running the utility, see Chapter 1, “Using the Migration Utility,” on page 7.
4 (Optional) Run the ZENworks 11 SP2 Asset Management migration utility to migrate the asset management data. For information about running the utility, see Chapter 1, “Using the Migration Utility,” on page 7.
5 Run the ZENworks 11 SP2 Configuration Management migration utility. The utility adds the existing ZENworks 7 Desktop Management objects and associations to the ZENworks 11 SP2 database.When you run the ZENworks 11 SP2 Configuration Management migration utility, do not migrate the workstations. Because of the ZAM migration utility, the workstations already exist as devices in the ZENworks 11 SP2 database. Instead, migrate the objects (applications, images, policies, and so forth) and the associations.For information about running the utility, see the ZENworks 11 SP2 Configuration Management Migration Guide.
6 Uninstall the ZENworks 7 Desktop Management Agent from the ZDM 7/ZAM 7.5 workstations. This must be done before installing the ZENworks 11 SP2 Adaptive Agent.
7 Deploy the ZENworks 11 SP2 Adaptive Agent to the ZDM 7/ZAM 7.5 workstations.The ZENworks 11 SP2 Adaptive Agent is registered in the ZENworks 11 SP2 database and linked to the correct migrated device object. The migrated device object is then changed to a managed device object that has the correct ZDM 7/ZAM 7.5 associations and data associated with it.
A.2 ZAM Migration Utility Messages The migration utility generates several messages associated with migration of ZENworks 7 Desktop Management and ZENworks 7.5 Asset Management. These messages are designed to help ensure a successful migration.
There are no ZENworks 7 Desktop Management GUIDs in the inventory data.
Explanation: The migration utility did not find any ZDM 7 GUIDs for any of the ZAM 7.5 workstations selected for migration.
Cause: The workstations have not been scanned using ZENworks 7.5 Asset Management IR19 (or later). IR19 includes a modified inventory collector that reads the ZDM7 GUID from the workstation’s registry and adds it to the inventory data. This shared GUID enables the ZAM 7.5 inventory data and ZENworks 7 Desktop Management associations to be reconciled to the same ZENworks 11 SP2 managed device.
Action: Install IR19 and rescan the workstations (see Step 2 on page 35 for details). If you don’t have ZDM 7, ignore the message.
There are devices in your ZENworks Asset Management inventory data that are already present in the ZENworks Configuration Management target database.
Explanation: The migration utility found devices in the ZENworks 11 SP2 database that have the same GUID as the workstations being migrated from the ZENworks 7.5 Asset Management database.
36 Novell ZENworks 11 SP2 Asset Management Migration Guide

Cause: The ZENworks 11 SP2 Configuration Management migration utility was run before the ZENworks 11 SP2 Asset Management migration utility and the ZDM 7 workstations were migrated to the ZENworks 11 SP2 database. Because the ZDM 7/ZAM 7.5 workstations share the same GUID, the ZAM migration utility can’t add the workstations. You must use the ZAM migration utility, not the ZENworks 11 SP2 Configuration Management migration utility, to add the ZDM 7/ZAM 7.5 workstations to the ZENworks 11 SP2 database.
Action: Delete the existing duplicate devices from the ZENworks 11 SP2 database. Run the ZENworks 11 SP2 Asset Management migration utility (see Step 3 on page 35), then run the ZENworks 11 SP2 Configuration Management migration utility (see Step 5 on page 36). When you run the ZENworks 11 SP2 Configuration Management migration utility, do not migrate the workstations; the workstations already exist as devices in the ZENworks 11 SP2 database. Instead, migrate only the objects (applications, images, policies, and so forth) and the workstations’ associations.
This ZENworks Asset Management device will not be migrated because it is already present in the ZENworks Configuration Management target database.
Explanation: The migration utility found a device in the ZENworks 11 SP2 database that has the same GUID as the workstation being migrated from the ZENworks 7.5 Asset Management database.
Cause: The ZENworks 11 SP2 Configuration Management migration utility was run before the ZENworks 11 SP2 Asset Management migration utility and the ZDM 7 workstation was migrated to the ZENworks 11 SP2 database. Because the ZDM 7/ZAM 7.5 workstations share the same GUID, the ZAM migration utility can’t add the workstation. You must use the ZAM migration utility, not the ZENworks 11 SP2 Configuration Management migration utility, to add the ZDM 7/ZAM 7.5 workstation to the ZENworks 11 SP2 database.
Action: Delete the existing duplicate device from the ZENworks 11 SP2 database. Run the ZENworks 11 SP2 Asset Management migration utility (see Step 3 on page 35), then run the ZENworks 11 SP2 Configuration Management migration utility (see Step 5 on page 36). When you run the ZENworks 11 SP2 Configuration Management migration utility, do not migrate the workstation; the workstation already exists as a device in the ZENworks 11 SP2 database. Instead, migrate only the objects (applications, images, policies, and so forth) and the workstation’s associations.
Migrating Both ZENworks 7 Desktop Management and ZENworks 7.5 Asset Management 37

38 Novell ZENworks 11 SP2 Asset Management Migration Guide

B BZENworks Objects and Their Uniqueness
During migration of asset management data, most of the asset management objects (e.g., Purchase Records, Licensed Products) are migrated without checking for duplicate objects in ZENworks 11 SP2 Asset Management. This can lead to the following outcomes if there are objects in ZENworks 11 SP2 Asset Management that match objects being migrated from ZENworks Asset Management 7.5 (see Section B.1, “Duplicate Object Details,” on page 39 for what constitutes a duplicate of each object type):
If the migration process is restarted due to errors, the ZENworks Asset Management 7.5 data has already been partially migrated. Because of the partially migrated data, the already migrated objects are rejected and the migration utility reports duplicate key violations.
If you are migrating to ZENworks 11 SP2 Asset Management you can fix the duplicates and then restart the migration utility, making sure to turn off the Stop Migration on First Error setting. However, restarting migration might result in loss of data. If this possibility is not acceptable, we recommend that you restore the ZENworks Asset Management 7.5 and ZENworks 11 SP2 Asset Management database backups, resolve the duplicates, then run the migration utility again.
If the objects are duplicates and the ZENworks 11 SP2 Asset Management version of the object is not in a subfolder, the migration utility produces an error. Some or all of the duplicate objects that the migration utility was processing (e.g., licenses) are not moved to ZENworks 11 SP2 Asset Management.
If the objects are duplicates but the ZENworks 11 SP2 Asset Management version of the object is in a subfolder, the migration utility adds the object to ZENworks 11 SP2 Asset Management. You end up with two objects in ZENworks 11 SP2 with matching names, but in different folders. The exception to this is Contracts, which does not allow duplicate Contract ID’s in ZENworks 11 SP2 Asset Management, even in subfolders.
B.1 Duplicate Object Details Section B.1.1, “Purchase Records,” on page 40 Section B.1.2, “Catalog Products,” on page 40 Section B.1.3, “Licensed Products,” on page 40 Section B.1.4, “Discovered Products,” on page 40 Section B.1.5, “Software Collections,” on page 40 Section B.1.6, “Contracts,” on page 40 Section B.1.7, “Date Notifications,” on page 40 Section B.1.8, “Documents,” on page 41
ZENworks Objects and Their Uniqueness 39

B.1.1 Purchase Records
A ZENworks Asset Management 7.5 Unique Record is a combination of PO Number + Order Date. During migration, the PO number is used unless it is empty; in that case, the Order Date is used as part of a newly created PO number.
B.1.2 Catalog Products
A ZENworks Asset Management 7.5 Unique Record is a combination of Manufacturer + Product + Product Type + Version + Licenses Per Package.
B.1.3 Licensed Products
A ZENworks Asset Management 7.5 Unique Record is a combination of Manufacturer + Product + Version information. If a License is not a duplicate, but has an associated catalog product that is also associated with an existing License in ZENworks 11 SP2, the migration utility produces an error because the database does not allow the same catalog product to be associated with multiple licenses.
If a License is not a duplicate, but has a discovered product that is also associated with an existing License in ZENworks 11 SP2 Asset Management, the migration will continue. Consumption numbers for the two licenses will not be accurate because the discovered product is counted as installations for both licenses. You should remove the discovered product from one of the licenses in ZENworks 11 SP2 Asset Management.
B.1.4 Discovered Products
The migration utility will only migrate local products. It does not migrate duplicates.
B.1.5 Software Collections
A ZENworks Asset Management 7.5 Unique Record is a combination of Manufacturer + Product + Version information. In ZENworks Asset Management 7.5, if you enter duplicate values for a collection, ZENworks Asset Management increments the Product value.
If non-duplicate collections are defined in ZENworks Asset Management 7.5 and ZENworks 11 SP2 Asset Management that require the same Member Product(s), the migration utility transfers this data to ZENworks 11 SP2. This action causes both collections to count installations against the same product(s), so you should fix this in ZENworks 11 SP2 Configuration Management.
B.1.6 Contracts
A ZENworks Asset Management 7.5 Unique Record is the Contract ID. Unlike other Asset Management objects, ZENworks 11 SP2 Asset Management will not allow you to create Contracts in multiple folders with the same Contract ID. Contracts in ZENworks Asset Management 7.5 that match a Contract ID in ZENworks 11 SP2 Asset Management are not migrated.
B.1.7 Date Notifications
A ZENworks Asset Management 7.5 Unique Record is a randomly generated identifier. ZENworks Asset Management 7.5 allows Notifications to have duplicate values in all columns. ZENworks 11 SP2 Asset Management enforces a unique Notification name in each folder. If you have Notifications in ZENworks Asset Management 7.5 with duplicate Notification names, the migration fails.
40 Novell ZENworks 11 SP2 Asset Management Migration Guide

B.1.8 Documents
ZENworks Asset Management 7.5 Unique Record is a randomly generated identifier. ZENworks Asset Management 7.5 allows Documents to have duplicate values in all columns. ZENworks 11 SP2 Asset Management enforces a unique Document ID name in each folder. If you have Documents in ZENworks Asset Management 7.5 with duplicate Document IDs, the migration fails.
ZENworks Objects and Their Uniqueness 41

42 Novell ZENworks 11 SP2 Asset Management Migration Guide

Glossary
administrator-defined field. For asset inventory, a field that allows you to create custom user, workstation, component, or product fields. For asset management, you can create contract or licensed product fields. In ZENworks Asset Management 7.5, administrator-defined fields are known as user-defined fields.
asset management data. Data that includes the following:
• Asset management usage data • Asset management custom reports • Asset management administrator-defined fields • Catalog products • Discovered products • Purchase records • Licensed products • Software collections • Contracts and date notifications • Documents
collection domain. Used in ZENworks Asset Management 7.5 to organize your enterprise into logical groups.
collection server. Software that resides on a specific machine and is responsible for collecting inventory data from a selected group of workstations and loading it into a central inventory database.
custom report. An asset management or inventory report that can be tailored to a specific function.
deleted workstation. A device that has been marked for deletion in ZENworks Asset Management 7.5. A device marked for deletion stays in the database with all its attributes, history, and components until it is purged. When it is purged, it is removed from the inventory database along with all of its associated data.
device. In ZENworks 10 Asset Management, a device is a workstation or server; in ZENworks Asset Management 7.5, a device is a network-discovered device.
inventory data. Data that includes the following:
• Devices • Device history • Local software products • Hardware and software components • Administrator-defined fields • Custom reports
local product. A product that has been defined so that it can be identified in an inventory scan.
usage data. Data related to inventory, including hardware components, software components, user name, hours used, and so on.
user-defined field. See “administrator-defined field” on page 43. In ZENworks Asset Management 7.5, asset management administrator-defined fields are known as user-defined fields.
Glossary 43
44 Novell ZENworks 11 SP2 Asset Management Migration Guide