Embed Size (px)
Citation preview

� �ASM 456 interface module
___________________
___________________
___________________
___________________
___________________
___________________
___________________
___________________
___________________
___________________
SIMATIC Ident
RFID systemsASM 456 interface module
Operating Instructions
04/2013 J31069-D0162-U001-A5-7618
Introduction 1
Description 2
Installation 3
Connection 4
Parameterization 5
Diagnostics 6
Firmware update 7
Technical specifications 8
Dimensional drawings 9
Appendix A

Siemens AG Industry Sector Postfach 48 48 90026 NÜRNBERG GERMANY
Order number: J31069-D0162-U001 Ⓟ 04/2013 Technical data subject to change
Copyright © Siemens AG 2006 - 2013.All rights reserved
Legal information Warning notice system
This manual contains notices you have to observe in order to ensure your personal safety, as well as to prevent damage to property. The notices referring to your personal safety are highlighted in the manual by a safety alert symbol, notices referring only to property damage have no safety alert symbol. These notices shown below are graded according to the degree of danger.
DANGER indicates that death or severe personal injury will result if proper precautions are not taken.
WARNING indicates that death or severe personal injury may result if proper precautions are not taken.
CAUTION indicates that minor personal injury can result if proper precautions are not taken.
NOTICE indicates that property damage can result if proper precautions are not taken.
If more than one degree of danger is present, the warning notice representing the highest degree of danger will be used. A notice warning of injury to persons with a safety alert symbol may also include a warning relating to property damage.
Qualified Personnel The product/system described in this documentation may be operated only by personnel qualified for the specific task in accordance with the relevant documentation, in particular its warning notices and safety instructions. Qualified personnel are those who, based on their training and experience, are capable of identifying risks and avoiding potential hazards when working with these products/systems.
Proper use of Siemens products Note the following:
WARNING Siemens products may only be used for the applications described in the catalog and in the relevant technical documentation. If products and components from other manufacturers are used, these must be recommended or approved by Siemens. Proper transport, storage, installation, assembly, commissioning, operation and maintenance are required to ensure that the products operate safely and without any problems. The permissible ambient conditions must be complied with. The information in the relevant documentation must be observed.
Trademarks All names identified by ® are registered trademarks of Siemens AG. The remaining trademarks in this publication may be trademarks whose use by third parties for their own purposes could violate the rights of the owner.
Disclaimer of Liability We have reviewed the contents of this publication to ensure consistency with the hardware and software described. Since variance cannot be precluded entirely, we cannot guarantee full consistency. However, the information in this publication is reviewed regularly and any necessary corrections are included in subsequent editions.

ASM 456 interface module Operating Instructions, 04/2013, J31069-D0162-U001-A5-7618 3
Table of contents
1 Introduction................................................................................................................................................ 5
2 Description................................................................................................................................................. 7
3 Installation ............................................................................................................................................... 11
3.1 Mounting position, mounting dimensions.....................................................................................11
3.2 Installing the I/O module ..............................................................................................................12
3.3 Installing the terminal block..........................................................................................................13
3.4 Replacing labels...........................................................................................................................14
3.5 Removing the ASM 456 ...............................................................................................................15
4 Connection .............................................................................................................................................. 17
4.1 Setting the PROFIBUS address...................................................................................................18
4.2 Wiring connection block ECOFAST.............................................................................................20
4.3 Wiring connection block M12, 7/8"...............................................................................................24
4.4 Loop-through connection of PROFIBUS DP and supply voltage ................................................29
4.5 Connecting an ASM 456 up to functional earth ...........................................................................30
5 Parameterization...................................................................................................................................... 33
5.1 Hardware configuration................................................................................................................33
5.2 Parameter setting by means of GSD file .....................................................................................35
5.3 Parameter assignment with FB/FC 45/55 and FC 56..................................................................36 5.3.1 Input parameters for ASM 456.....................................................................................................36 5.3.2 Table of commands for ASM 456 ................................................................................................38
5.4 Parameter assignment with FB 101/116/132...............................................................................40 5.4.1 Input parameters for ASM 456.....................................................................................................40 5.4.2 Table of commands for ASM 456 ................................................................................................41
6 Diagnostics .............................................................................................................................................. 43
6.1 Diagnosis using LEDs..................................................................................................................43
6.2 Parameterization of the diagnostics.............................................................................................45
6.3 Structure of the diagnostics frame ...............................................................................................47
7 Firmware update...................................................................................................................................... 49
8 Technical specifications........................................................................................................................... 53
9 Dimensional drawings.............................................................................................................................. 55
A Appendix.................................................................................................................................................. 57
A.1 Connecting cables .......................................................................................................................57 A.1.1 Routing of standard cables ..........................................................................................................57

Table of contents
ASM 456 interface module 4 Operating Instructions, 04/2013, J31069-D0162-U001-A5-7618
A.1.2 Self-assembled cables ................................................................................................................ 59
A.2 Ordering data .............................................................................................................................. 60
A.3 Service & Support ....................................................................................................................... 62

ASM 456 interface module Operating Instructions, 04/2013, J31069-D0162-U001-A5-7618 5
Introduction 1
Purpose of these operating instructions The information provided in these operating instructions will enable you to start up and operate the interface module ASM 456 on the PROFIBUS DP as a DP slave.
Basic knowledge required These operating instructions assume general knowledge of automation engineering and identification systems.
Scope of the manual The operating instructions apply to interface module ASM 456.
Changes compared with predecessor version (Edition 10/09) Revised and extended edition:
● Addition of RF200
● Addition of STEP 7 Basic/Professional V12 (TIA-Portal)
● Revision of graphics
Position in the information landscape ● In addition to these operating instructions, you require the operating instructions for the
DP master used.
● You will find information on programming the module, and a complete description of errors/faults, in the descriptions of the function blocks FB 45/56 or FC 45/55/56 and the Ident profile function.
● The manual of the relevant RFID / MOBY/ MV family contains information on the read/write devices to be connected.
● Special information on parameterizing the RF620R/RF630R readers in conjunction with the ASM 456 interface module can be found in the "Configuration Manual RF620R/RF630R (http://support.automation.siemens.com/WW/view/en/33287195)".

Introduction
ASM 456 interface module 6 Operating Instructions, 04/2013, J31069-D0162-U001-A5-7618
Conventions The following terms/abbreviations are used synonymously in this document:
Reader Read/write device, SLG Transponder, tag Data carrier, mobile data storage, MDS Communications module, CM Interface module, IM Ident profile RFID standard profile
Registered trademarks SIMATIC ® is a registered trademark of the Siemens AG.
Guide These operating instructions describe the hardware of interface module ASM 456. They consist of instruction sections and reference sections (e.g. technical data).
The operating instructions include the following subject areas:
● Connecting the interface module ASM 456
● Parameterizing the interface module ASM 456
● Diagnostics information
● Display elements of interface module ASM 456
● Description of the firmware update
● Technical data and dimensional drawings of interface module ASM 456
● Ordering data
Recycling and disposal ● Due to its non-toxic equipment, interface module ASM 456 can be recycled.
● Contact a certified electronic-waste disposal company to recycle and dispose of your old equipment in an environment-friendly manner.

ASM 456 interface module Operating Instructions, 04/2013, J31069-D0162-U001-A5-7618 7
Description 2
Area of application The ASM 456 interface modules are slave modules for RFID readers and MV code readers PROFIBUS DP/DP-V1 on any controllers.
Figure 2-1 Interface module ASM 456 with ECOFAST or M12, 7/8" terminal block
When operating the interface module with a SIMATIC S7, convenient function blocks are available to the user.
The following RFID readers and code readers can be operated with the ASM 456 and the Ident profile:
● RF200 (normal addressing)
● RF300 (normal addressing, filehandler)
● RF600 (RF620R and RF630R)
● MOBY D
● MOBY E
● MOBY I (normal addressing, filehandler)
● MOBY U (normal addressing, filehandler)
● MV400 code readers

Description
ASM 456 interface module 8 Operating Instructions, 04/2013, J31069-D0162-U001-A5-7618
Features The ASM 456 replaces the ASM 452 in terms of functionality and provides a simplified connection system. You can continue to use the user software from ASM 452. Optimum data throughput can be achieved through acyclic data traffic on the PROFIBUS DP V1 even when using large PROFIBUS configurations. The minimum cyclic data load of the ASM 456 on PROFIBUS provides the user with the guarantee that other PROFIBUS nodes (e.g. DI/DO) can still be processed very quickly. Up to 2 readers / write/read devices (SLGs) can be operated at the same time with the ASM 456. The user can start a command at the same time on 2 readers /write/read devices (using the appropriate FB/FC).
The transponder data is accessed using the physical addressing of the transponder. In SIMATIC S7, the FBs 45/55/101/116/132 and FCs 45/55/56 are available for this purpose. The functions provide the S7 user with a simple-to-use interface with powerful commands (processing one complete transponder with one command; command linking; S7 data structures using UDTs).
Parameters for the ASM 456 can also be set so that it functions as a dialog station (only with MOBY I). In dialog mode, one reader / write/read device can communicate with another reader / write/read device. The ASM set as the dialog station behaves here like a transponder (VMDS) with 16 KB memory. The memory is accessible both from the reader / write/read device end and from the PROFIBUS end.
The MOBY filehandler is also implemented on ASM 456. The filehandler is a file administration system similar to DOS for the ID system MOBY I/U. It consists of one program which is processed on the interface module. The FB/FC 56 (S7) is available to the SIMATIC application.
Other features ● Degree of protection IP67
● System integration with ECOFAST or M12, 7/8" concept
● T functionality, that is, a component can be replaced without adversely affecting other modules with regard to bus communication and voltage supply
● Standardized PROFIBUS user interface for Ident technology with Ident profile
● Firmware update
● PROFIBUS interface module up to 12 Mbit/s with automatic transfer rate detection
● Parameterizable device-related diagnostics data with text display
● Support for I&M functionality:
A mechanism for reading out information via the module and saving system information such as function, installation date, installation location, and comments.
● Master redundancy supported when operation is on Y link

Description
ASM 456 interface module Operating Instructions, 04/2013, J31069-D0162-U001-A5-7618 9
● Operation on SIMOTION via SCOUT V4.0
You will find detailed information on this in the function manual SIMOTION, Standard functions for RFID systems (http://support.automation.siemens.com/WW/view/en/27002208).
● Support of RFID Ident profile with the associated SIMATIC S7 function blocks FB 101/116/132 (according to the PIB specification of PROFIBUS INTERNATIONAL)
Design The ASM has a terminal block for connecting up to the PROFIBUS DP which is available as an option and the ECOFAST version or M12, 7/8".
The following figure shows the basic design of the ASM 456.
Figure 2-2 Basic design of the ASM 456

Description
ASM 456 interface module 10 Operating Instructions, 04/2013, J31069-D0162-U001-A5-7618
Potential Ungrounded installation of the system is possible with the ASM 456. The following circuit shows the internal relationships of the reference potentials.
Figure 2-3 Potential isolation for ASM 456 (ground to shield)
Integration The following figure shows how the ASM 456 is integrated in an automation system.
Figure 2-4 ASM 456 configurator
The ASM 456 is integrated into the hardware configuration by means of a GSD file. The ASM can then be configured using HW Config of SIMATIC Manager or another PROFIBUS tool (e.g. operating mode). You will find the GSD file on the "RFID Systems, Software & Documentation" DVD or on the Internet (see Section "Service & Support").

ASM 456 interface module Operating Instructions, 04/2013, J31069-D0162-U001-A5-7618 11
Installation 33.1 Mounting position, mounting dimensions
Mounting position There are no restrictions regarding the mounting position of the ASM 456.
Mounting and clearance dimensions The following table shows the installation dimensions and clearance distances.
Table 3- 1 Mounting dimensions
Dimensions Mounting width 60 mm Mounting height 210 mm Mounting depth • with ECOFAST terminal block: 60 mm (without connector)
• with terminal block M12, 7/8" 54 mm (without connector)
Installation 3.2 Installing the I/O module
ASM 456 interface module 12 Operating Instructions, 04/2013, J31069-D0162-U001-A5-7618
3.2 Installing the I/O module
Simple installation The ASM 456 is designed for easy mounting.
Properties ● The I/O module should be mounted on a solid surface.
● The I/O module can be prewired (without installed terminal block).
Requirements The following table shows the screws suitable for installing the I/O modules:
Table 3- 2 Screw types
Screw type Description M5 cylinder head screw according to ISO 1207 / ISO 1580 (DIN 84 / DIN 85) Cylindrical head screw with M5 hexagon socket according to DIN 912
The minimum screw length must be 20 mm. You also need a set of DIN 125 washers.
Tools required Medium-sized cross-head screwdriver or 8 mm socket wrench.
Procedure Screw-mount the I/O module on a plane surface.
Screw the I/O module onto the panel at both mounting fixtures at the front top and bottom. Tightening torque: 3 N/m.
Installation 3.3 Installing the terminal block
ASM 456 interface module Operating Instructions, 04/2013, J31069-D0162-U001-A5-7618 13
3.3 Installing the terminal block
Properties The terminal block is used to connect the ASM 456 to PROFIBUS DP and supplies power to the device.
Requirements The base unit is already mounted.
Tools required Recessed head screwdriver, medium size
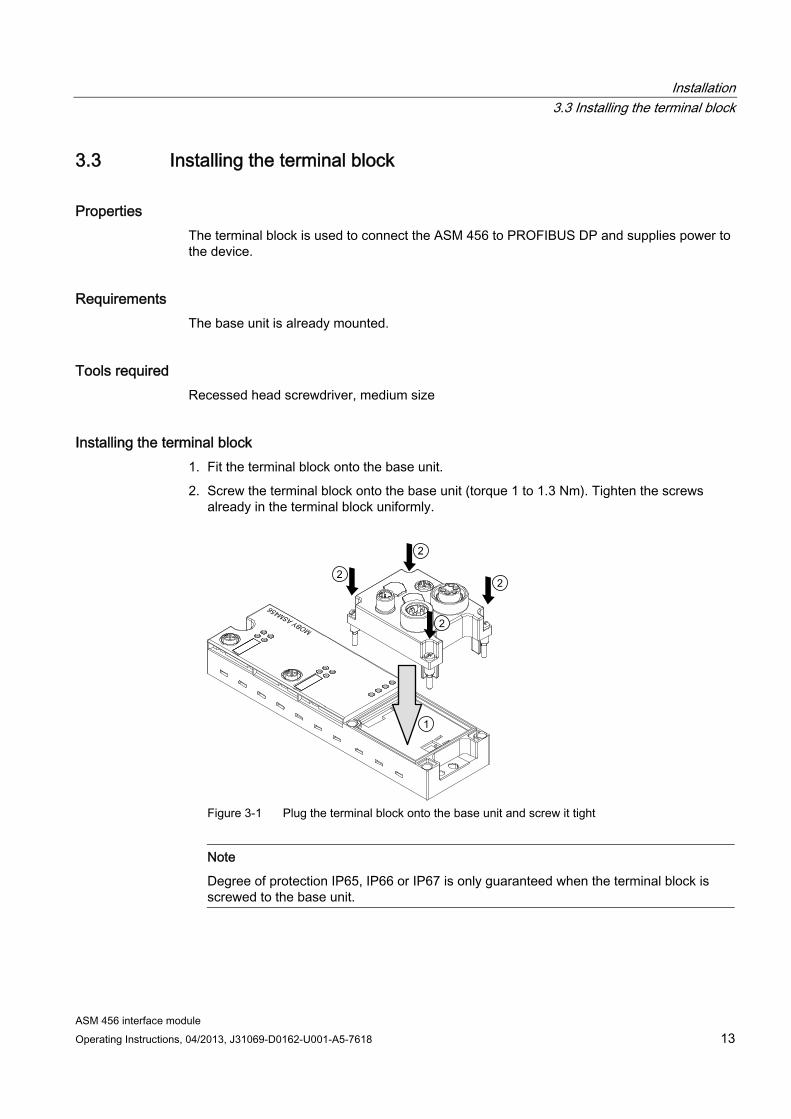
Installing the terminal block 1. Fit the terminal block onto the base unit.
2. Screw the terminal block onto the base unit (torque 1 to 1.3 Nm). Tighten the screws already in the terminal block uniformly.
1
Figure 3-1 Plug the terminal block onto the base unit and screw it tight
Note
Degree of protection IP65, IP66 or IP67 is only guaranteed when the terminal block is screwed to the base unit.
Installation 3.4 Replacing labels
ASM 456 interface module 14 Operating Instructions, 04/2013, J31069-D0162-U001-A5-7618
3.4 Replacing labels
Properties You can use the labels to identify every channel on the base unit and the terminal block. You will find the labels in the base unit when it is supplied.
● 8 labels on the base unit
● 1 label on the terminal block
Requirements You can order replacement labels. For order numbers, refer to the appendix.
Tools required 2.5 to 4 mm screwdriver
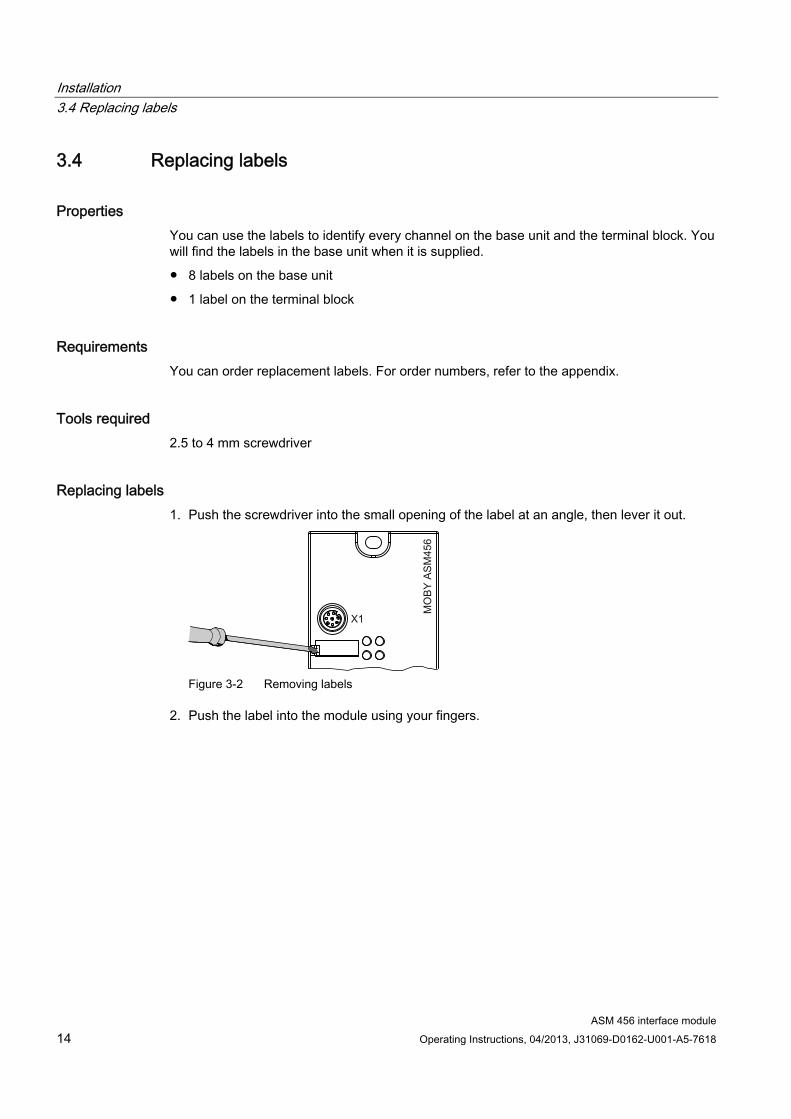
Replacing labels 1. Push the screwdriver into the small opening of the label at an angle, then lever it out.
Figure 3-2 Removing labels
2. Push the label into the module using your fingers.

Installation 3.5 Removing the ASM 456
ASM 456 interface module Operating Instructions, 04/2013, J31069-D0162-U001-A5-7618 15
3.5 Removing the ASM 456
Procedure The ASM 456 is wired up and operational. Follow the steps below to remove the ASM:
1. Switch off the supply voltage for the ASM 456.
2. Disconnect the wiring from the terminal block.
3. Undo the 4 securing screws of the terminal block.
4. Remove the terminal block from the base unit.
5. Disconnect the wiring on the base unit.
6. Undo the securing screws of the base unit.

Installation 3.5 Removing the ASM 456
ASM 456 interface module 16 Operating Instructions, 04/2013, J31069-D0162-U001-A5-7618

ASM 456 interface module Operating Instructions, 04/2013, J31069-D0162-U001-A5-7618 17
Connection 4
Proper use When connecting non-specified devices to the ASM 456, it is possible that the connected device may be destroyed.
PROFIBUS connection system You will find general instructions on setting up a PROFIBUS network in the manual "SIMATIC NET PROFIBUS network manual (http://support.automation.siemens.com/WW/view/en/35222591)".
Reader connector system An SLG always occupies an M12 connector socket on the ASM 456. A preassembled cable therefore ensures that the reader/SLG is connected up ideally. The standard version connection cable is 2 m long.
Figure 4-1 Overview of wiring

Connection 4.1 Setting the PROFIBUS address
ASM 456 interface module 18 Operating Instructions, 04/2013, J31069-D0162-U001-A5-7618
4.1 Setting the PROFIBUS address
Properties The PROFIBUS address defines the address at which the ASM 456 distributed I/O system is found on the PROFIBUS DP.
Requirements ● The PROFIBUS DP address for the ASM 456 is set on the connection block.
● Each address can be assigned only once on the PROFIBUS DP.
● The PROFIBUS address set must match the PROFIBUS address defined in the configuring software (for the ASM 456).
● Changes to the PROFIBUS DP address only take effect once the mains have been switched ON on the ASM 456.
Tools required for M12, 7/8” connection block ● Socket wrench 14 mm
● Screwdriver with 2.5 mm blade
Setting PROFIBUS DP addresses on connection block M12, 7/8” Valid PROFIBUS DP addresses are 1 to 99.
1. Remove the two seal caps from the rotary switches (if necessary, use a 14 mm socket wrench).
2. Set the required PROFIBUS address on the rotary switches using a screwdriver.
– Lower rotary switch: 1st position
– Upper rotary switch: 10th position
3. Screw the two seal caps back onto the rotary switches (torque: 0.5 Nm to 0.8 Nm.)

Connection 4.1 Setting the PROFIBUS address
ASM 456 interface module Operating Instructions, 04/2013, J31069-D0162-U001-A5-7618 19
Figure 4-2 Setting PROFIBUS addresses on connection block M12, 7/8”
Setting PROFIBUS DP addresses on connection block ECOFAST Valid PROFIBUS DP addresses are 1 to 99.
1. Loosen the screw connection of the configuration plug with the ECOFAST connection block and remove the plug.
Figure 4-3 Loosening the configuration plug's screw connection

Connection 4.2 Wiring connection block ECOFAST
ASM 456 interface module 20 Operating Instructions, 04/2013, J31069-D0162-U001-A5-7618
2. Loosen the screw connection for the cover cap on the configuration plug and remove the latter.
3. Set the PROFIBUS address using the DIL switches.
Figure 4-4 Setting PROFIBUS address on configuration plug
4. Screw the cover cap back down, plug the configuration plug onto the connection block and screw the configuration plug to the connection block.
4.2 Wiring connection block ECOFAST
Properties ● Connect up the supply voltages and PROFIBUS DP on the ECOFAST connection block
using an ECOFAST connector plug.
● You can loop the supply voltages and PROFIBUS DP through via another ECOFAST connector plug.
● The first and last ASM 456 (consumer) on the PROFIBUS DP must be terminated with the terminating resistor.
Requirements You have set the PROFIBUS address (according to your project).
Required tools Screwdriver, stripping and crimping tool for wiring the ECOFAST connector plug, if you are not using pre-assembled ECOFAST connector plugs.

Connection 4.2 Wiring connection block ECOFAST
ASM 456 interface module Operating Instructions, 04/2013, J31069-D0162-U001-A5-7618 21
Accessories required ● Pre-assembled ECOFAST hybrid cable with ECOFAST connector. The cable is available
in different lengths.
● If you are not using a pre-assembled ECOFAST hybrid cable (see table below):
– Han Brid Cu cable connector and/or Han Brid Cu cable socket
– ECOFAST hybrid cable
● Terminating resistor (ECOFAST) for PROFIBUS DP
● For order numbers, refer to "Ordering data" section.
Wiring ECOFAST connector plugs The table below contains the connector assignment for the ECOFAST connector plugs
Table 4- 1 Connection assignment for ECOFAST connector plugs
Pin Assignment View of ECOFAST connector plug (wiring end for supply and loop-through
connection) A PROFIBUS DP signal A B PROFIBUS DP signal B 1 Electronics/encoder supply (1L+)
(voltage supply for ASM 456 and write/read device)
2 Ground for electronic / encoder supply (1M)
3 Load voltage ground (2M) 4 Load voltage supply (2L+)
(unused on ASM 456)
*) You will find the assembly instructions in the packaging of the Han Brid Cu cable connector and/or Han Brid Cu cable socket.

Connection 4.2 Wiring connection block ECOFAST
ASM 456 interface module 22 Operating Instructions, 04/2013, J31069-D0162-U001-A5-7618
Connecting up ECOFAST connector plugs 1. Press down the interlock for ECOFAST connector plugs on the connection block.
2. Connect the ECOFAST connector plugs (for 1L+ and the PROFIBUS DP) into the sockets on the connection block. In so doing, note the mechanical coding of the connector plugs for supply and loop-through connection.
3. Press up the interlock for ECOFAST connector plugs.
Figure 4-5 Connecting up ECOFAST connector plugs
Connection 4.2 Wiring connection block ECOFAST
ASM 456 interface module Operating Instructions, 04/2013, J31069-D0162-U001-A5-7618 23
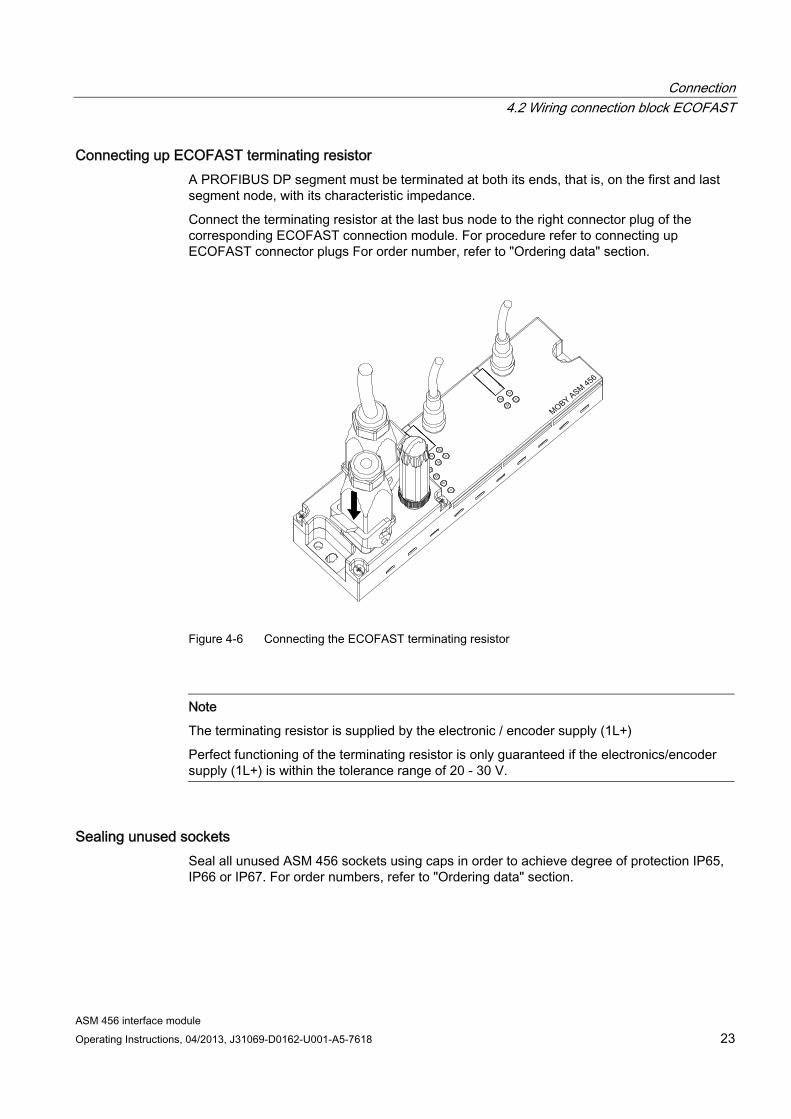
Connecting up ECOFAST terminating resistor A PROFIBUS DP segment must be terminated at both its ends, that is, on the first and last segment node, with its characteristic impedance.
Connect the terminating resistor at the last bus node to the right connector plug of the corresponding ECOFAST connection module. For procedure refer to connecting up ECOFAST connector plugs For order number, refer to "Ordering data" section.
Figure 4-6 Connecting the ECOFAST terminating resistor
Note
The terminating resistor is supplied by the electronic / encoder supply (1L+)
Perfect functioning of the terminating resistor is only guaranteed if the electronics/encoder supply (1L+) is within the tolerance range of 20 - 30 V.
Sealing unused sockets Seal all unused ASM 456 sockets using caps in order to achieve degree of protection IP65, IP66 or IP67. For order numbers, refer to "Ordering data" section.

Connection 4.3 Wiring connection block M12, 7/8"
ASM 456 interface module 24 Operating Instructions, 04/2013, J31069-D0162-U001-A5-7618
4.3 Wiring connection block M12, 7/8"
Properties ● Connect the supply voltages and PROFIBUS DP to connection block M12, 7/8”.
– M12 connection: PROFIBUS DP
– 7/8” connection: Power supply voltages
● You can loop the supply voltages and PROFIBUS DP through via M12 and/or 7/8” round sockets.
● The first and last ASM 456 (node) on the PROFIBUS DP must be terminated with the terminating resistor.
Requirements ● Wire connection block M12, 7/8” when the supply voltage is switched off.
● The PROFIBUS address is set (according to your project and assigned where applicable to the terminating resistor)
Required tools Stripping tool, screwdriver for wiring the M12 and/or 7/8” connector if you are not using a pre-assembled connector.
Accessories required ● Pre-assembled cable with connector
● If you are not using a pre-assembled connector:
– M12: 2-core cable, shielded (bus cable) and M12 connector (see "Connection assignment for M12 connector (PROFIBUS DP)" table)
– 7/8”: 5-core cable and 7/8" connector (see "Connection assignment for 7/8" connector (supply voltage)" table)
● M12 terminating resistor for PROFIBUS DP
● For order numbers, refer to "Ordering data" section.

Connection 4.3 Wiring connection block M12, 7/8"
ASM 456 interface module Operating Instructions, 04/2013, J31069-D0162-U001-A5-7618 25
Wiring M12, 7/8” connector The tables below contain the connector assignment for the M12, 7/8” connector:
Table 4- 2 Connection assignment for M12 connector (PROFIBUS DP)
Pin Assignment View of M12 connector (wiring side)
1 Supply positive (P5V2) * 2 Data line A (RxD / TxD-N) 3 Data reference potential (M5V2) * 4 Data line B (RxD / TxD-P) 5 Shield
Thread Shield
*) Can only be used for the M12 terminating resistor. Looping the voltage through to the next connector via a 5-core cable is not permitted.

Connection 4.3 Wiring connection block M12, 7/8"
ASM 456 interface module 26 Operating Instructions, 04/2013, J31069-D0162-U001-A5-7618
Table 4- 3 Connection assignment for 7/8” connector (supply voltages)
Pin Assignment View of 7/8” connector (wiring side)
1 Load voltage ground (2M) 2 Ground for electronic / encoder supply (1M) 3 PE 4 Electronics / encoder supply (1L+)
(voltage supply for ASM 456 and write/read device)
5 Load voltage supply (2L+) (unused on ASM 456)
Note
When connecting up the supply voltage, we recommend the cable specified in the "Ordering data" section (cable 5 x 1.5 mm2 pre-assembled with 7/8" connectors).
If you want to assemble the cable yourself, then the conductor cross-section should be 1.5 mm2.

Connection 4.3 Wiring connection block M12, 7/8"
ASM 456 interface module Operating Instructions, 04/2013, J31069-D0162-U001-A5-7618 27
Connecting up M12, 7/8" connector 1. Press the connector (M12 and/or 7/8”) into the relevant round socket on the connection
block. Ensure that the correct stop is provided between the connector and bush (groove and spring).
2. Use the knurled locking ring to secure the connector.
Figure 4-7 Connecting up M12, 7/8” connector

Connection 4.3 Wiring connection block M12, 7/8"
ASM 456 interface module 28 Operating Instructions, 04/2013, J31069-D0162-U001-A5-7618
Connecting up terminating resistor for PROFIBUS DP A PROFIBUS DP segment must be terminated at both its ends, that is, on the first and last segment node, with its characteristic impedance.
If the ASM 456 is the last PROFIBUS node, then you must terminate the PROFIBUS DP with the M12 terminating resistor. For order number, refer to "Ordering data" section.
1. Press the M12 terminating resistor in the right loop-through connection M12 round socket on the connection block. Ensure that it locks correctly.
2. Use the knurled locking ring to secure the M12 terminating resistor.
Figure 4-8 Connecting the M12 terminating resistor
Sealing unused sockets Always close all unused sockets using M12 or 7/8" seal caps in order to achieve the degree of protection IP65, IP66 or IP67. For order numbers, refer to "Ordering data" section.

Connection 4.4 Loop-through connection of PROFIBUS DP and supply voltage
ASM 456 interface module Operating Instructions, 04/2013, J31069-D0162-U001-A5-7618 29
4.4 Loop-through connection of PROFIBUS DP and supply voltage
Properties The terminal block has one connector for the supply and one socket for looping through the supply voltage and PROFIBUS DP. The connector for supply and the socket for loop-through connection are linked with one another internally.
Result: If you remove the terminal block during operation, other PROFIBUS nodes do not fail.
Figure 4-9 Loop-through connection of PROFIBUS DP and supply voltage
NOTICE Ensuring the degree of protection
The IP65, IP66 or IP67 degree of protection is no longer guaranteed if the terminal block is removed.

Connection 4.5 Connecting an ASM 456 up to functional earth
ASM 456 interface module 30 Operating Instructions, 04/2013, J31069-D0162-U001-A5-7618
Notes for wiring ● If you are wiring your structure, then you must take into account the impact of cable
length on supply voltage to the ASM 456.
Example of the ECOFAST terminal block:
When using a 10 m long cable with a diameter of 1.5 mm2, the voltage drop is 2.5 V with a loading of 10 A. This corresponds to 0.25 V at a 1 A load.
● The maximum supply current
– of the ECOFAST terminal block is 8 A at 1L+
– of the M12, 7/8" terminal block is 6 A at 1L+
These values must not be exceeded.
NOTICE
Damage to the device
If you do not observe the maximum supply currents and the cable cross-sections required, this may result in the cable isolation and contacts overheating and to the device being damaged.
4.5 Connecting an ASM 456 up to functional earth
Properties The ASM 456 needs to be connected to functional earth. This normally happens automatically when you mount the device on a grounded metal support. If you mount the module on a support that is not grounded, a separate grounding screw must be provided on the communications bus.
This connection to functional earth is also required to discharge any interference currents to ground and for EMC.
Requirements Always provide a low-impedance connection to functional earth. The threads of the mounting screw or the contact surface of the mounting nut on the support must not be painted in order to establish a low-impedance connection.
Tools required ● Screwdriver
● Stripping tool (optional)
● Crimp tool (optional)

Connection 4.5 Connecting an ASM 456 up to functional earth
ASM 456 interface module Operating Instructions, 04/2013, J31069-D0162-U001-A5-7618 31
Required accessories (optional) ● M5 x 10 retaining bolt and washers
● Grounding cable (copper braided cable) with minimum cross-section of 4 mm2.
● Cable lug
Connecting the ASM 456 to functional earth Standard grounding via the securing screw Optional grounding via a grounding cable 1. Mount the module on the grounded, metallic base.
① Grounded, metallic base
② Unpainted thread or surface of the nut
1. Isolate the grounding cable and secure the cable lug. 2. Screw the cable lug on to the communication module
(M5 grounding screw). The tightening torque is 3 Nm.
Connection 4.5 Connecting an ASM 456 up to functional earth
ASM 456 interface module 32 Operating Instructions, 04/2013, J31069-D0162-U001-A5-7618

ASM 456 interface module Operating Instructions, 04/2013, J31069-D0162-U001-A5-7618 33
Parameterization 55.1 Hardware configuration
The ASM 456 is integrated into the hardware configuration of the SIMATIC Manager, the TIA portal or other configuration software using the GSD file "SIEM8114.GSD". The file is incorporated into HW Config of the SIMATIC Manager using the "Options > Install new GSD ..." function. The file is incorporated into the project view of the TIA Portal using the "Options > Install device description files" function.
Figure 5-1 network view in the TIA portal
Parameterization 5.1 Hardware configuration
ASM 456 interface module 34 Operating Instructions, 04/2013, J31069-D0162-U001-A5-7618
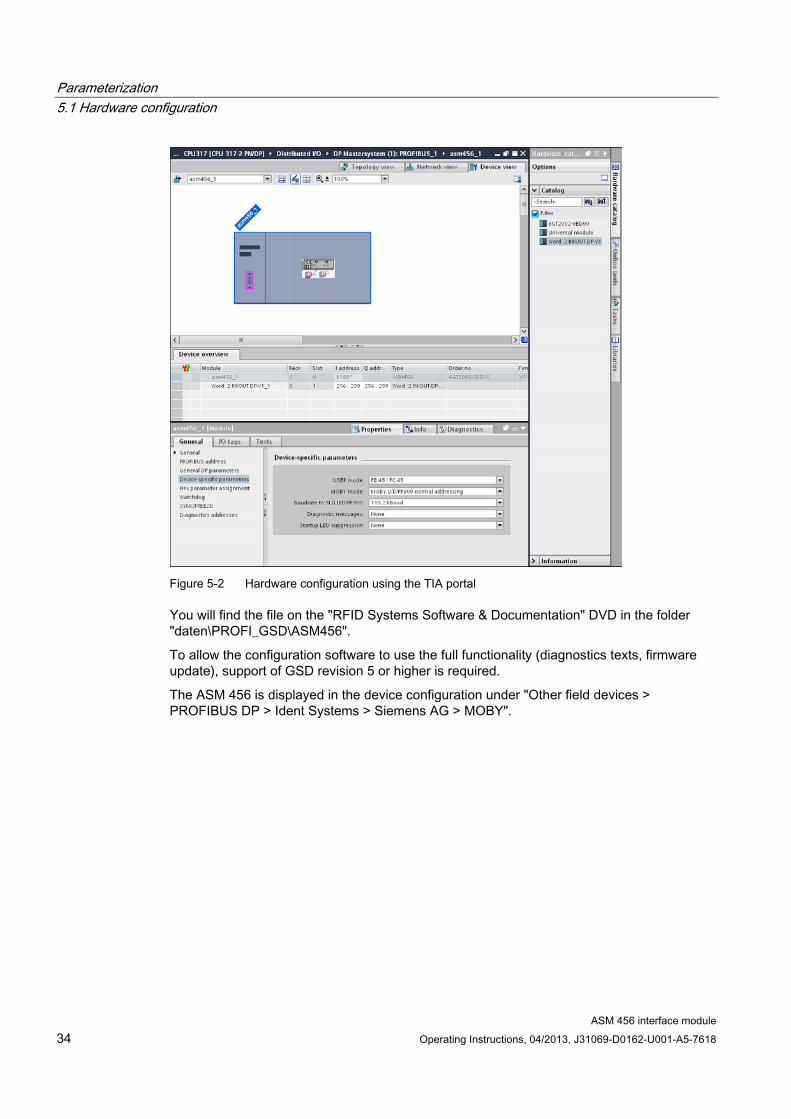
Figure 5-2 Hardware configuration using the TIA portal
You will find the file on the "RFID Systems Software & Documentation" DVD in the folder "daten\PROFI_GSD\ASM456".
To allow the configuration software to use the full functionality (diagnostics texts, firmware update), support of GSD revision 5 or higher is required.
The ASM 456 is displayed in the device configuration under "Other field devices > PROFIBUS DP > Ident Systems > Siemens AG > MOBY".

Parameterization 5.2 Parameter setting by means of GSD file
ASM 456 interface module Operating Instructions, 04/2013, J31069-D0162-U001-A5-7618 35
5.2 Parameter setting by means of GSD file In addition to the PROFIBUS-relevant control parameters, several MOBY-relevant control parameters are also defined for the ASM 456 in the GSD file. The MOBY-relevant parameters are set via the "object properties" of the slave in HW-Config. Please consult the FC 45 Function Manual for a description of the parameters. The table below shows the possible settings:
Table 5- 1 Setting of MOBY-relevant parameters
Parameter name Value Note FB 45/FC 45 Default FB 55 / FC 55 - FC 56 -
USER_Mode
Ident profile - MOBY I/E normal addressing - MOBY I filehandler - MOBY U/D / RF300 / RF600 normal addressing
Default
MOBY_Mode
MOBY U filehandler / RF300 filehandler
only with FB/FC 56 (multitag)/standard profile
19.2 kBd - 57.6 kBd 1)
Baud rate reader
115.2 kBd Default 1) none Standard diagnostics only Hard errors Hardware-related messages
only Hard/soft errors low priority All messages
Diagnostics with diagnostics messages (see section "Diagnostics (Page 43)")
Hard/soft errors high priority All messages high-priority none Default Channel 1 Suppression of startup
flashing on channel 1 if no reader is connected there.
Startup LED suppression
Channel 2 Suppression of startup flashing on channel 2 if no reader is connected there.
1) Not permitted with MOBY D with SLG D11S/D12S

Parameterization 5.3 Parameter assignment with FB/FC 45/55 and FC 56
ASM 456 interface module 36 Operating Instructions, 04/2013, J31069-D0162-U001-A5-7618
5.3 Parameter assignment with FB/FC 45/55 and FC 56
5.3.1 Input parameters for ASM 456
Input parameters for ASM 456 with FB/FC 45 The assignment is made in UDT 10.
Table 5- 2 Input parameters for ASM 456 with FB/FC 45
Address Name Permissible values Comment +0.0 ASM_address 256, 260, 264, 268, ... Each ASM 456 occupies four bytes of I/O in
the I/O area of the controller. +2.0 ASM_channel 1, 2 +8.0 MDS_control B#16#0, 1 0 = no presence check
1 = presence check +9.0 ECC_mode TRUE, FALSE +9.1 RESET_long TRUE, FALSE TRUE,
if MOBY_mode = 5 (MOBY U/D; RF200, RF300, RF600)
B#16#1, 4, 5, 6, 7, 8, 9, A, B
Special features of the MOBY I dialog (8):
• Write/read device must be type SLG4x. • The VMDS memory size is 16KB. The INIT
command for the VMDS must be specified
using 4000 hex.
+10.0 MOBY_mode
5 RF300 filehandler MOBY I: B#16#00 ... FF
+11.0 scanning_time
MOBY U: B#16#00 ... C8
A value not equal to 00 is only practical if parameters for MOBY_mode have been set accordingly. MOBY D, RF200, RF300 reserved (00)
+12.0 option_1 B#16#00, 02, 04 MOBY U (normal transmit power): B#16#05, 0A, 0F, 14, 19, 1E, 23 MOBY U (reduced transmit power): B#16#85, 8A, 8F, 94, 99, 9E, A3
+13.0 distance_limiting
MOBY D: B#16#02 ... 28
MOBY U/D RF200, RF300 reserved (00)
+14.0 multitag B#16#1 MOBY U/D, RF200, RF300 MOBY U: B#16#0, 1, 2, 3 +15.0 field_ON_control
MOBY D, RF300: B#16#0
MOBY U/D, RF200, RF300
MOBY U: B#16#00 ... FF
+16.0 field_ON_time
MOBY D: B#16#00, 01
MOBY U/D RF200, RF300 reserved (00)
You will find special information on the input parameters for ASM 456 with FB45 in combination with the RF620R/RF630R readers in the section "Parameterizing > Parameterizing RF620R/RF630R with FB 45 > Input parameters" in the "Configuration Manual RF620R/RF630R".
Parameterization 5.3 Parameter assignment with FB/FC 45/55 and FC 56
ASM 456 interface module Operating Instructions, 04/2013, J31069-D0162-U001-A5-7618 37
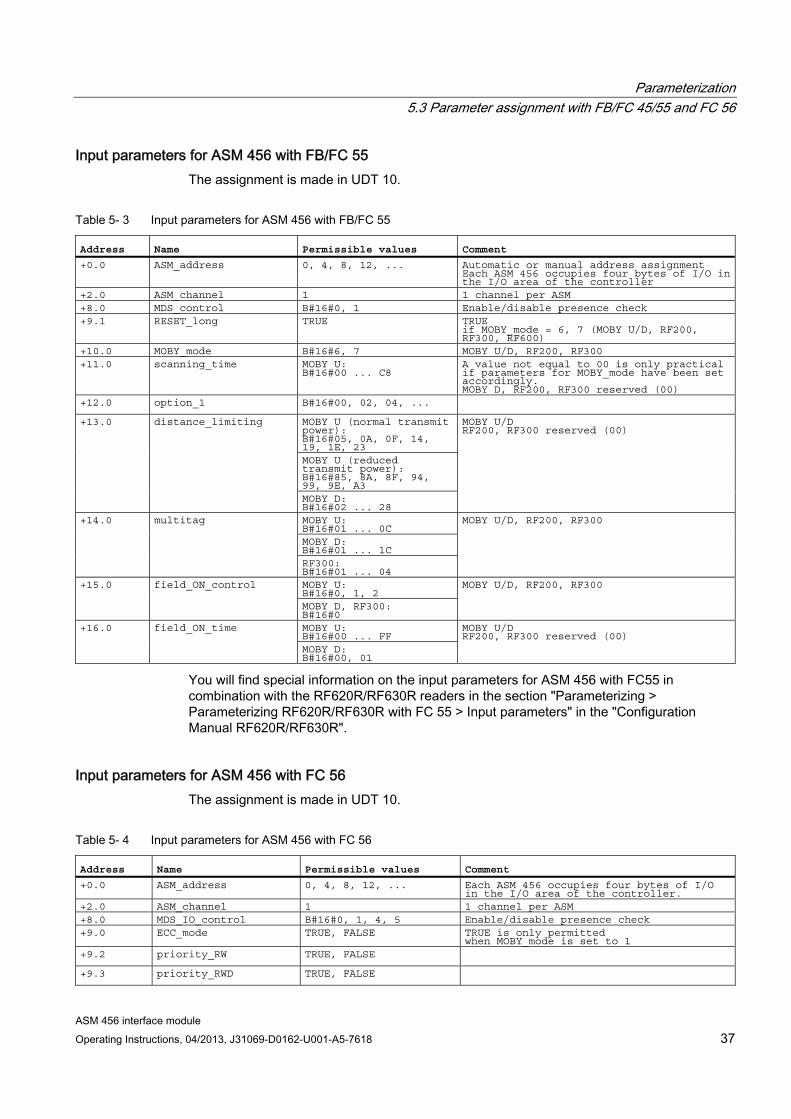
Input parameters for ASM 456 with FB/FC 55 The assignment is made in UDT 10.
Table 5- 3 Input parameters for ASM 456 with FB/FC 55
Address Name Permissible values Comment +0.0 ASM_address 0, 4, 8, 12, ... Automatic or manual address assignment
Each ASM 456 occupies four bytes of I/O in the I/O area of the controller
+2.0 ASM_channel 1 1 channel per ASM +8.0 MDS_control B#16#0, 1 Enable/disable presence check +9.1 RESET_long TRUE TRUE
if MOBY_mode = 6, 7 (MOBY U/D, RF200, RF300, RF600)
+10.0 MOBY_mode B#16#6, 7 MOBY U/D, RF200, RF300 +11.0 scanning_time MOBY U:
B#16#00 ... C8 A value not equal to 00 is only practical if parameters for MOBY_mode have been set accordingly. MOBY D, RF200, RF300 reserved (00)
+12.0 option_1 B#16#00, 02, 04, ... MOBY U (normal transmit power): B#16#05, 0A, 0F, 14, 19, 1E, 23 MOBY U (reduced transmit power): B#16#85, 8A, 8F, 94, 99, 9E, A3
+13.0 distance_limiting
MOBY D: B#16#02 ... 28
MOBY U/D RF200, RF300 reserved (00)
MOBY U: B#16#01 ... 0C MOBY D: B#16#01 ... 1C
+14.0 multitag
RF300: B#16#01 ... 04
MOBY U/D, RF200, RF300
MOBY U: B#16#0, 1, 2
+15.0 field_ON_control
MOBY D, RF300: B#16#0
MOBY U/D, RF200, RF300
MOBY U: B#16#00 ... FF +16.0 field_ON_time
MOBY D: B#16#00, 01
MOBY U/D RF200, RF300 reserved (00)
You will find special information on the input parameters for ASM 456 with FC55 in combination with the RF620R/RF630R readers in the section "Parameterizing > Parameterizing RF620R/RF630R with FC 55 > Input parameters" in the "Configuration Manual RF620R/RF630R".
Input parameters for ASM 456 with FC 56 The assignment is made in UDT 10.
Table 5- 4 Input parameters for ASM 456 with FC 56
Address Name Permissible values Comment +0.0 ASM_address 0, 4, 8, 12, ... Each ASM 456 occupies four bytes of I/O
in the I/O area of the controller. +2.0 ASM_channel 1 1 channel per ASM +8.0 MDS_IO_control B#16#0, 1, 4, 5 Enable/disable presence check +9.0 ECC_mode TRUE, FALSE TRUE is only permitted
when MOBY_mode is set to 1 +9.2 priority_RW TRUE, FALSE +9.3 priority_RWD TRUE, FALSE

Parameterization 5.3 Parameter assignment with FB/FC 45/55 and FC 56
ASM 456 interface module 38 Operating Instructions, 04/2013, J31069-D0162-U001-A5-7618
Address Name Permissible values Comment +10.0 MOBY_mode B#16#1, 4, 5, 6 MOBY I/U
MOBY I: B#16#00 ... FF +11.0 scanning_time
MOBY U: B#16#00 ... C8
A value not equal to 00 is only of any use if MOBY_mode has been parameterized accordingly
+12.0 SLG_number B#16#0001 ... FFFF With FFFF, the test function is switched on
+14.0 distance_limiting B#16#05, 0A, 0F, 14, 19, 1E, 23
MOBY U
MOBY I: B#16#1
+15.0 multitag
MOBY U: B#16#01 ... 0C
MOBY I/U
+16.0 field_ON_control B#16#0, 1, 2 MOBY U +17.0 field_ON_time B#16#00 ... FF MOBY U
5.3.2 Table of commands for ASM 456
ASM 456 instruction table for normal addressing (FB/FC 45, FC 55) The assignment is made in UDT 20/UDT 30 using the "command" variable.
Table 5- 5 ASM 456 commands with normal addressing
Command code
normal chained*
Description available in the MOBY system
01 41 Write to transponder all 02 42 Read transponder; read fixed code all 03 43 Initialize transponder RF300 / RF600 /
MOBY U / D 04 44 Reader status RF200 / RF300 /
RF600 / MOBY U / D
08 48 Turn off transponder MOBY U 0A 4A Switch antenna on/off RF200 / RF300 /
RF600 / MOBY U / D
0B 4B Transponder status RF200 / RF300 / RF600 / MOBY U
*) Chained commands are not supported by all readers. Please note the relevant information in the RFID/MOBY system manuals.

Parameterization 5.3 Parameter assignment with FB/FC 45/55 and FC 56
ASM 456 interface module Operating Instructions, 04/2013, J31069-D0162-U001-A5-7618 39
ASM 456 instruction table for filehandler addressing (FC 56) The assignment is made in UDT 50 using the "command" variable.
Table 5- 6 ASM 456 commands with filehandler addressing
Command Meaning command System Formatting the transponder "I" FORMAT CREATE Create a new file on the formatted transponder "B"
MOBY I/U, RF300 filehandler
QUEUE-WRITE Completely initialize the data carrier "Q" QUEUE-READ Read several files with one command "E"
MOBY I/U, RF300 filehandler
UPDATE Write data in file (update file length) "U" WRITE Write data in file "W" READ Read data from file "R"
MOBY I/U, RF300 filehandler
DELETE Delete file on transponder "D" ATTRIB Give file attribute "Y"
MOBY I/U, RF300 filehandler
COVER Protect transponder structure "C" MOBY I/U, RF300 filehandler
DIR Read transponder directory "G" MDS-STATUS Request transponder status "F"
MOBY I/U, RF300 filehandler
END Terminate communication with the transponder "K" MOBY U, RF300 filehandler
TRACE Absolute reading of the transponder "T" MOBY I/U, RF300 filehandler
MOVE Save system data (DIR + FAT + checksum) in data block
"M"
LOAD Transfer system data to ASM "O"
MOBY I, RF300 filehandler
GET Read out UID of all transponders "P" SET-ANT Switch antenna of the reader on or off "A"
MOBY U, RF300 filehandler
ASM/SLG-STATUS Request ASM or reader status "S" RESET Reset ASM/filehandler; this command is
initiated by setting init_run "X"
MOBY I/U
NEXT Processing of the next transponder "N" MOBY I, RF300 filehandler

Parameterization 5.4 Parameter assignment with FB 101/116/132
ASM 456 interface module 40 Operating Instructions, 04/2013, J31069-D0162-U001-A5-7618
5.4 Parameter assignment with FB 101/116/132
5.4.1 Input parameters for ASM 456
Input parameters for ASM 456 with FB 101/116/132 (Ident profile)
Figure 5-3 Input parameters for ASM 456 with FB 101/116/132 (Ident profile)

Parameterization 5.4 Parameter assignment with FB 101/116/132
ASM 456 interface module Operating Instructions, 04/2013, J31069-D0162-U001-A5-7618 41
5.4.2 Table of commands for ASM 456
ASM 456 instruction table for Ident profile (FB 101/116/132) Assignment is made in UDT 1 using the "command" variable.
Table 5- 7 ASM 456 commands with Ident profile
Command code Command
HEX ASCII
Description
CREATE 68 'h' Creates a new file. DELETE 64 'd' Deletes a file from the transponder DEV-STATUS 74 't' Reads out the status of a communication module FORMAT 66 'f' Initializes the transponder GET-DIRECTORY 6D 'm' Reads the directory from the transponder INVENTORY 69 'i' Requests a list of all currently accessible transponders within the
antenna range MEM-STATUS 73 's' Reads out the status of a transponder NEXT 6E 'n' Does not permit any more operations on a transponder PHYSICAL-READ 70 'p' Reads data from a transponder by specifying the physical start address
and length PHYSICAL-WRITE 71 'q' Writes data to a transponder by specifying the physical start address
and length READ 72 'r' Reads the data of a file READ-CONFIG 61 'a' Reads from the communication module SET-ATTRIBUTE 6F 'o' Sets/modifies the attributes belonging to a file UPDATE 75 'u' Writes data to a file WRITE 77 'w' Writes data to a file WRITE -CONFIG 78 'x' Sends new parameters to the communication module

Parameterization 5.4 Parameter assignment with FB 101/116/132
ASM 456 interface module 42 Operating Instructions, 04/2013, J31069-D0162-U001-A5-7618

ASM 456 interface module Operating Instructions, 04/2013, J31069-D0162-U001-A5-7618 43
Diagnostics 66.1 Diagnosis using LEDs
The following figure shows details of the LEDs of the ASM 456.
Figure 6-1 LEDs of the ASM 456
Table 6- 1 Status LEDs for ASM 456
LEDs Meaning ON Lights up when there is logic voltage at the ASM (is generated by the 24 V
supply voltage). DC 24 V Lights up when the 24 V supply voltage is connected to the ASM.
ACT_1, ACT_2 Lights up when the reader processes a user command. (no significance with RF200/RF300/RF600, MOBY D/U)
ERR_1, ERR_2 1) A flashing pattern indicates the last error to occur.
Diagnostics 6.1 Diagnosis using LEDs
ASM 456 interface module 44 Operating Instructions, 04/2013, J31069-D0162-U001-A5-7618
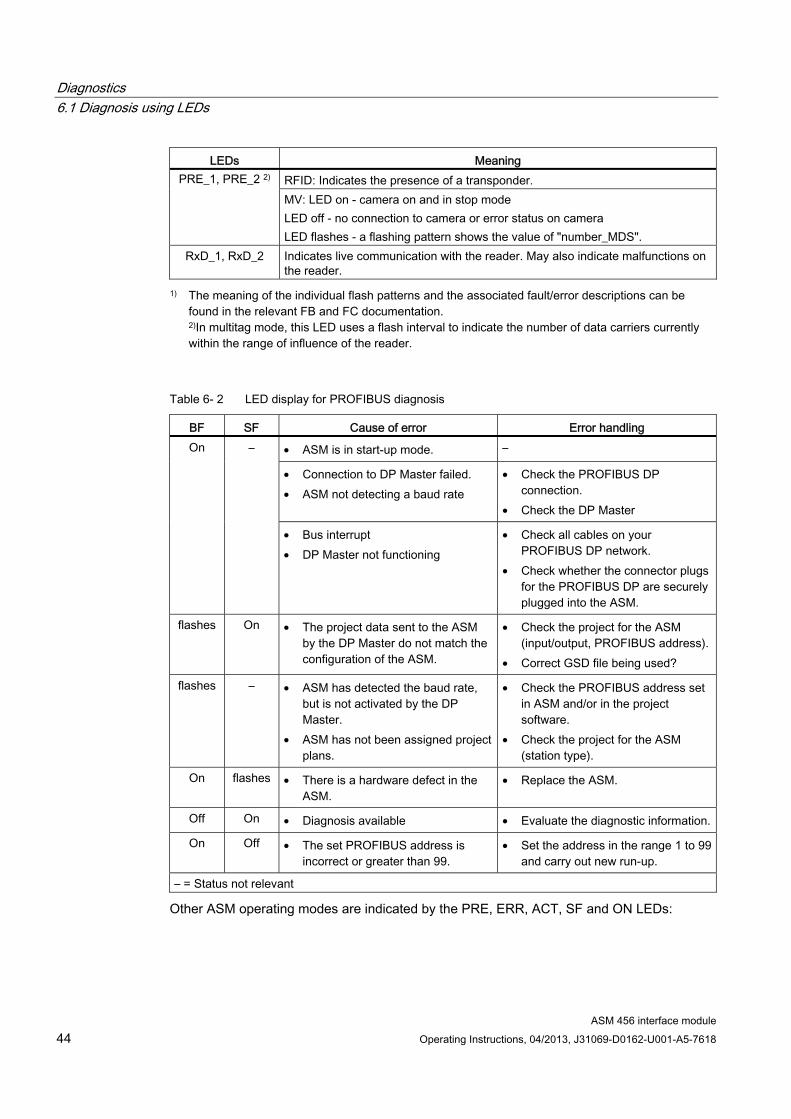
LEDs Meaning RFID: Indicates the presence of a transponder. PRE_1, PRE_2 2) MV: LED on - camera on and in stop mode LED off - no connection to camera or error status on camera LED flashes - a flashing pattern shows the value of "number_MDS".
RxD_1, RxD_2 Indicates live communication with the reader. May also indicate malfunctions on the reader.
1) The meaning of the individual flash patterns and the associated fault/error descriptions can be found in the relevant FB and FC documentation. 2)In multitag mode, this LED uses a flash interval to indicate the number of data carriers currently within the range of influence of the reader.
Table 6- 2 LED display for PROFIBUS diagnosis
BF SF Cause of error Error handling
• ASM is in start-up mode. –
• Connection to DP Master failed. • ASM not detecting a baud rate
• Check the PROFIBUS DP connection.
• Check the DP Master
On –
• Bus interrupt • DP Master not functioning
• Check all cables on your PROFIBUS DP network.
• Check whether the connector plugs for the PROFIBUS DP are securely plugged into the ASM.
flashes On • The project data sent to the ASM by the DP Master do not match the configuration of the ASM.
• Check the project for the ASM (input/output, PROFIBUS address).
• Correct GSD file being used?
flashes – • ASM has detected the baud rate, but is not activated by the DP Master.
• ASM has not been assigned project plans.
• Check the PROFIBUS address set in ASM and/or in the project software.
• Check the project for the ASM (station type).
On flashes • There is a hardware defect in the ASM.
• Replace the ASM.
Off On • Diagnosis available • Evaluate the diagnostic information.
On Off • The set PROFIBUS address is incorrect or greater than 99.
• Set the address in the range 1 to 99 and carry out new run-up.
– = Status not relevant
Other ASM operating modes are indicated by the PRE, ERR, ACT, SF and ON LEDs:
Diagnostics 6.2 Parameterization of the diagnostics
ASM 456 interface module Operating Instructions, 04/2013, J31069-D0162-U001-A5-7618 45
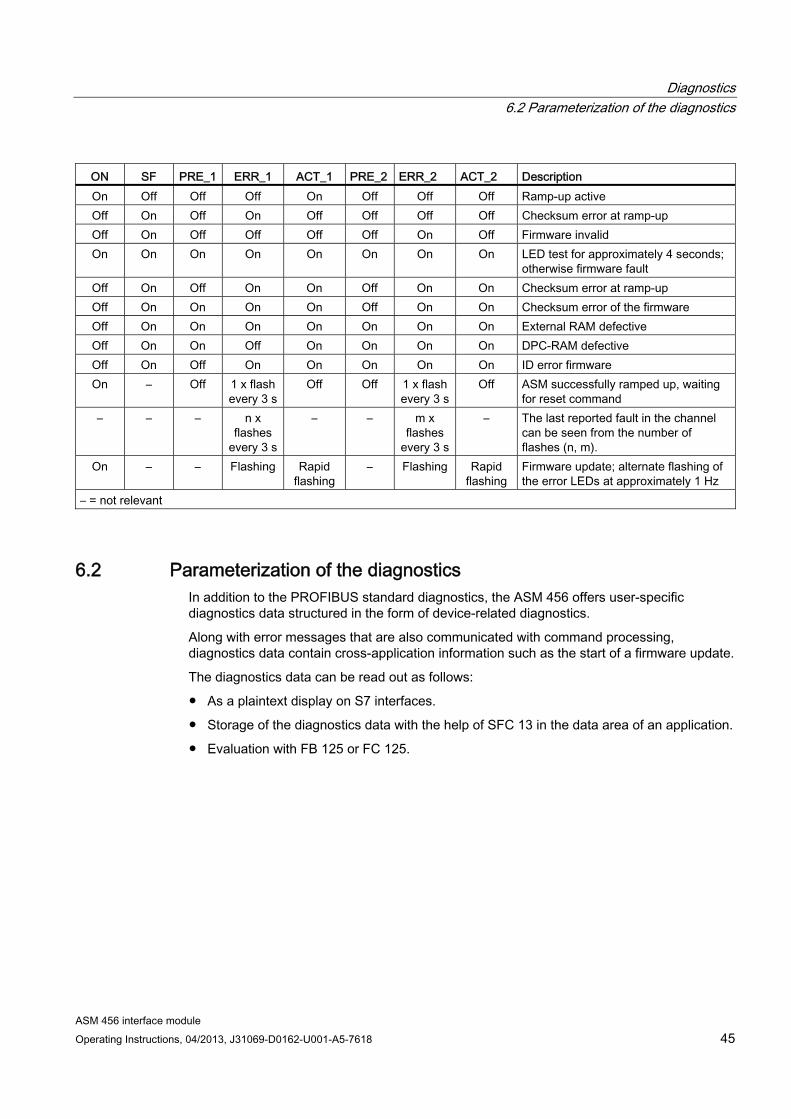
ON SF PRE_1 ERR_1 ACT_1 PRE_2 ERR_2 ACT_2 Description On Off Off Off On Off Off Off Ramp-up active Off On Off On Off Off Off Off Checksum error at ramp-up Off On Off Off Off Off On Off Firmware invalid On On On On On On On On LED test for approximately 4 seconds;
otherwise firmware fault Off On Off On On Off On On Checksum error at ramp-up Off On On On On Off On On Checksum error of the firmware Off On On On On On On On External RAM defective Off On On Off On On On On DPC-RAM defective Off On Off On On On On On ID error firmware On – Off 1 x flash
every 3 s Off Off 1 x flash
every 3 sOff ASM successfully ramped up, waiting
for reset command – – – n x
flashes every 3 s
– – m x flashes
every 3 s
– The last reported fault in the channel can be seen from the number of flashes (n, m).
On – – Flashing Rapid flashing
– Flashing Rapid flashing
Firmware update; alternate flashing of the error LEDs at approximately 1 Hz
– = not relevant
6.2 Parameterization of the diagnostics In addition to the PROFIBUS standard diagnostics, the ASM 456 offers user-specific diagnostics data structured in the form of device-related diagnostics.
Along with error messages that are also communicated with command processing, diagnostics data contain cross-application information such as the start of a firmware update.
The diagnostics data can be read out as follows:
● As a plaintext display on S7 interfaces.
● Storage of the diagnostics data with the help of SFC 13 in the data area of an application.
● Evaluation with FB 125 or FC 125.

Diagnostics 6.2 Parameterization of the diagnostics
ASM 456 interface module 46 Operating Instructions, 04/2013, J31069-D0162-U001-A5-7618
Parameter assignment options ● None
No other diagnostics data are reported, apart from standard diagnostics.
● Hard errors
Extended diagnostics messages are generated in the case of the following events.
– Hardware fault (memory test)
– Firmware problem (checksum)
– Reader connection interrupted
– Short-circuit/break, if supported by hardware
– Firmware update (message at start/end)
In the case of this diagnostics information, the Ext_Diag bit is set, that is, it is treated as high-priority diagnostics information in the PLC (SF LED is ON)
● Hard/soft errors low priority
In contrast to 2., faults occurring during command processing are also indicated here. The diagnostics information is treated like status information, the Ext_Diag bit is not set.
● Hard/soft errors high priority
As under 3. but the Ext_Diag bit is set.
With the diagnostics messages, a distinction is made between incoming and outgoing diagnostics.
Incoming diagnostics info An event occurs and triggers a diagnostics message. The Ext_Diag bit is set, depending on parameterization.
Outgoing diagnostics info The event is no longer current, a diagnostics message is output without a set Ext_Diag bit. In the case of events that are only current for a moment, cancellation is delayed by 3 seconds.
The hard errors are supported by text messages stored in the GSD file.

Diagnostics 6.3 Structure of the diagnostics frame
ASM 456 interface module Operating Instructions, 04/2013, J31069-D0162-U001-A5-7618 47
6.3 Structure of the diagnostics frame When using device-relate diagnostics, it can be evaluated using the table below.
The diagnostics frame consists of 6 bytes of standard diagnostics and 18 bytes of diagnostics extension.
For the ASM 456, the diagnostics extension is designed as a status PDU for device-related diagnostics. The structure complies with the PROFIBUS Profile Guideline (PROFIBUS Proxy Guideline, Identification Systems Proxy Ident Function Block) for Identification Systems with MOBY-specific additional information.
Byte Name Contents PROFIBUS Profile Guideline for Identification Systems
Bit 7..6 00b: Identifier for device-related diagnostics 6 sign_len Bit 5..0 010010b (18d): Length of the extension including header Bit 7 1b: Identifier for status (0 = alarm) 7 status_type Bit 6..0 1d: Type for status message
8 slot_number Bit 7..0 0d: Device in total Bit 7..2 Reserved 9 specifier Bit 1..0 00b: No further differentiation
10b: Status inactive (outgoing) 01b: Status active (incoming) 11b: Reserved
10 channel_num Bit 7..0 1d: Relating to reader 1 2d: Relating to reader 2
11 function_num See Profile Guideline 12 error_decode See Profile Guideline 13 error_code_1 See Profile Guideline 14 error_code_2 See Profile Guideline MOBY-specific additional information 15 moby_code_1 MOBY error code byte 1 16 moby_code_2 MOBY error code byte 2 17 moby_code_3 MOBY error code byte 3 18 moby_code_4 MOBY error code byte 4 19 meldecode Error code for diagnostics messages (see GSD file) 20 counter_high Continuous event counter high-order byte 21 counter_low Continuous event counter low-order byte 22 fw_version_high Firmware version high-order byte 23 fw_version_low Firmware version low-order byte

Diagnostics 6.3 Structure of the diagnostics frame
ASM 456 interface module 48 Operating Instructions, 04/2013, J31069-D0162-U001-A5-7618
ASM 456 interface module Operating Instructions, 04/2013, J31069-D0162-U001-A5-7618 49
Firmware update 7
The firmware of the ASM 456 can be updated via PROFIBUS. You have several options for updating the firmware:
● With STEP 7 Classic
● With STEP 7 Basic / Professional V12
Requirements The ASM is connected to PROFIBUS with functional DP communication (basic communication only, no application required). The firmware update can be made regardless of whether an application is running.
If the firmware update is performed while an application is running, this can slow down the update and command execution.
Make sure that the required update files (*.upd) are stored locally.
Procedure
Firmware update with the SIMATIC Manager (STEP 7 Classic)
Follow the steps below to run a firmware update on the ASM 456 with the SIMATIC Manager:
1. Start SIMATIC Manager.
2. Select the ASM 456 in HW Config.
3. Using the menu entry "PLC > Firmware", select the required "*.upd" file from ("CPU_HD.upd" or "Header.upd").
4. If required, select the "Activate firmware after download" check box.
– If this option is activated, a successful update is followed by a new startup of the ASM during which the new firmware is activated (active commands on the ASM are canceled).
– If the option is not selected, the ASM 456 continues to operate with the previous firmware version. The new firmware is activated the next time the power supply is cycled.
While you download to the ASM, this is indicated by alternate flashing of the "ERR_1" and "ERR_2" LEDs at approximately 1 Hz. With the appropriate parameter assignment, an update operation is also reported by the diagnostics (see section Diagnostics (Page 43)).

Firmware update
ASM 456 interface module 50 Operating Instructions, 04/2013, J31069-D0162-U001-A5-7618
Firmware update with the TIA Portal (STEP 7 Basic / Professional V12)
Follow the steps below to run a firmware update on the ASM 456 with the TIA Portal:
1. Start the TIA Portal in the project view.
2. Open the "Distributed I/O" folder in the project tree.
The configured nodes are displayed.
3. Right-click the required ASM 456 and select the "Online & diagnostics" entry in the shortcut menu.
4. Select the entry "Functions > Firmware update".
Figure 7-1 Diagnostics view in the TIA Portal; "Firmware update" entry
5. In the "Firmware loader" area, use the "Browse" button to select one of the three update files "*.upd".

Firmware update
ASM 456 interface module Operating Instructions, 04/2013, J31069-D0162-U001-A5-7618 51
6. If required, select the "Run firmware after update" check box.
– If this option is selected, a successful update is followed by a new startup of the ASM (active commands on the ASM are canceled).
– If the option is not selected, the ASM 456 continues to operate with the previous firmware version. The new firmware is activated the next time the power supply is cycled.
7. Click the "Run update" button to start the update.
While you download to the ASM 456, this is indicated by alternate flashing of "ERR_1" and "ERR_2" at approximately 1 Hz. With the appropriate parameter assignment, an update operation is also reported by the diagnostics (see section "Diagnostics (Page 43)").

Firmware update
ASM 456 interface module 52 Operating Instructions, 04/2013, J31069-D0162-U001-A5-7618

ASM 456 interface module Operating Instructions, 04/2013, J31069-D0162-U001-A5-7618 53
Technical specifications 8
Technical specifications - interfaces ASM 456 (normal addressing) ASM 456 (filehandler) Serial interface to the user Principle PROFIBUS DP-V1 Transmission rate 9600 Bd to 12 MBd (automatic detection) Plug-in connection EN 50170 Vol. 2 PROFIBUS
• M12, 7/8" terminal block • ECOFAST terminal block
Max. block length 2 words cyclic / 240 bytes acyclic Serial interface to the reader Connector 2 x M12 connector plugs, 8-pin Max. cable length 1000 m, reader-dependent
(2 m = standard length; for other standard cables and self-assembled cables, refer to the section "Connecting cables (Page 57)")
Connectable readers 2 x readers of the RFID families RF200, RF300, RF600, MOBY D/I/E/U Software functions SIMATIC S7 function blocks • FB/FC 45 (normal addressing
without multitag) • Ident profile with FB 101/116/132
• FC 56 (filehandler with and without multitag)
• Ident profile with FB 101/116/132
Non-Siemens systems Ident profile 1) Ident profile 1) Tag addressing Direct access via addresses Access via DOS-like file system Commands Initialize tag, read data from tag, write
data to tag, etc. Format tag, read file, write file, etc.
Identification & Maintenance I&M0, I&M1, I&M2, I&M3 MOBY I dialog • Normal station / VMDS • VMDS memory size
• yes / yes • 16 KB
• no / no • -
1) To allow this, the relevant Ident profile block is required on the non-Siemens system; according to the PIB specification of PROFIBUS INTERNATIONAL to IEC 61131-3; order no. of the specification: 3.142

Technical specifications
ASM 456 interface module 54 Operating Instructions, 04/2013, J31069-D0162-U001-A5-7618
Technical specifications – electrical details Supply voltage 1) • Rated value • Permissible range
• 24 VDC • 20 to 30 VDC
Current consumption without reader/SLG 2) max. 800 mA; typ. 80 mA Current consumption via reader connection Each 600 mA Maximum supply current • in the M12, 7/8" terminal block • in the ECOFAST terminal block
• 6 A • 8 A
Galvanic isolation Yes
1) All supply and signal voltages must be safety extra-low voltage (SELV/PELV according to EN 60950) 24 V DC supply: Safe (electrical) isolation of low voltage (SELV / PELV acc. to EN 60950)
2) The power supply must provide the required current of max. 800 mA during brief power outages of ≤ 20 ms.
Technical specifications – mechanical details Dimensions (W x H x D) • Base unit only • Base unit with M12, 7/8" terminal block • Base unit with ECOFAST terminal block
• 60 x 210 x 30 mm • 60 x 210 x 54 mm • 60 x 210 x 60 mm
Mounting position All mounting positions are possible Weight • Base unit • M12, 7/8" terminal block • ECOFAST terminal block
• Approx. 210 g • Approx. 235 g • Approx. 130 g
Degree of protection IP67
Technical specifications - environmental conditions Temperature range during operation 0 ... +55 ℃ Temperature range during transportation and storage -40 ...+70 °C MTBF (Mean Time Between Failures) in years 122 years Approvals • cULus (File E116536)

ASM 456 interface module Operating Instructions, 04/2013, J31069-D0162-U001-A5-7618 55
Dimensional drawings 9
The following figure shows the dimensional drawing of an ASM 456 with bus connection block.
Figure 9-1 Dimensional drawing of ASM 456 (in mm)

Dimensional drawings
ASM 456 interface module 56 Operating Instructions, 04/2013, J31069-D0162-U001-A5-7618

ASM 456 interface module Operating Instructions, 04/2013, J31069-D0162-U001-A5-7618 57
Appendix AA.1 Connecting cables
A.1.1 Routing of standard cables
Figure A-1 M12 connecting cable ↔ reader
● Connecting cable MOBY E / I / U
● Length: 2 m, 5 m
Figure A-2 Connecting cable/extension cable M12 ↔ M12
● RF200, RF300, RF600 connecting cable
● Extension cable for all RFID / MOBY systems
● Length: 2 m, 5 m, 10 m, 20 m, 50 m
Figure A-3 Connecting cable M12 ↔ D-sub
● Connecting cable MOBY D
● Length: 2 m

Appendix A.1 Connecting cables
ASM 456 interface module 58 Operating Instructions, 04/2013, J31069-D0162-U001-A5-7618
Maximum cable length The ASM 456 can be operated with every reader configuration with the maximum cable length of 50 m. In some situations, longer connecting cables up to 1000 m are possible. The current consumption of the connected reader must, however, be taken into account. You will find information in the relevant system manuals. Sequential connection of more than 2 sub-sections to form a long section of cable should be avoided due to the additional contact resistances.
Pin assignment
Table A- 1 M12 connecting cable ↔ reader
M12 connector (male) Write/read device connector (female) 1 2 2 5 3 3 4 4 5 6 6 1 7 –
8 7
Table A- 2 Connecting cable/extension cable M12 ↔ M12
M12 connector (male) M12 connector (female) 1 1 2 2 3 3 4 4 5 5 6 6 7 7
8 8

Appendix A.1 Connecting cables
ASM 456 interface module Operating Instructions, 04/2013, J31069-D0162-U001-A5-7618 59
Table A- 3 Connecting cable M12 ↔ sub-D 9-pin
M12 connector (male) Sub-D connector (female) 1 - 2 5 3 7 4 3 5 2 6 6 7 -
8 1, 8
Note: Readers with D-sub connectors must be supplied with 24 VDC via an additional connector.
A.1.2 Self-assembled cables A write/read connector plug with screw-on clamps is provided for users who want to individually pre-assemble their own cables (refer to the relevant system manual). Cables and write/read connector plugs can be ordered from the MOBY catalog.
The pin assignment is listed in the following table.
Cable structure You will need cables of the following specifications for self-assembled cables:
7 x 0.25 mm2 LiYC11Y 7 x 0.25
Connectors M12 connectors can be obtained from the relevant specialist dealers (e.g. Binder).
Table A- 4 Pin assignment
M12 connector (male) Pin Signal Core color 1 +24 V 2 −RxD 3 0 V 4 RxD 5 TxD 6 −TxD 7 Free
8 PE / shield
Note data sheet provided by cable manufacturer

Appendix A.2 Ordering data
ASM 456 interface module 60 Operating Instructions, 04/2013, J31069-D0162-U001-A5-7618
A.2 Ordering data
Table A- 5 Ordering data - ASM 456
Ordering data Order no. ASM 456 communications module for PROFIBUS DP V1 max. 2 readers can be connected
6GT2002-0ED00
ECOFAST terminal block 6ES7194-3AA00-0AA0 M12, 7/8" terminal block 6ES7194-3AA00-0BA0 Labels 20 x 7 mm (pack of 340)
3RT1900-1SB20
Table A- 6 Ordering data - accessories for ECOFAST connection
Ordering data Order no. PROFIBUS ECOFAST hybrid plug 180 (pack of 5) • with pin insert • with socket insert
• 6GK1905-0CA00 • 6GK1905-0CB00
PROFIBUS ECOFAST termination plug with terminating resistor
6GK1905-0DA10
ECOFAST hybrid cable (pre-assembled) 6XV1830-7Bxxx * ECOFAST hybrid cable (not pre-assembled, sold by the meter)
6XV1830-7AH10
*) These cables are available in different lengths. See Catalog IK PI for more details.

Appendix A.2 Ordering data
ASM 456 interface module Operating Instructions, 04/2013, J31069-D0162-U001-A5-7618 61
Table A- 7 Ordering data - accessories for M12 7/8 terminal block
Ordering data Order no. M12 terminal resistor for PROFIBUS (5 per pack) 6GK1905-0EC00 PROFIBUS cable with pre-assembled M12 connectors 6XV1830-3Dxxx * Cable for supply voltage with pre-assembled 7/8" connectors
6XV1822-5Bxxx *
PROFIBUS FC standard non-pre-assembled cable; min. length 20 m, max. length 1000 m
6XV1830-0EH10
Energy cable Trailing power cable, 5 x 1.5 mm2; sold by the meter, min. length 20 m, max. length 1000 m
6XV1830-8AH10
PROFIBUS M12 connector plug (5 per pack) • with pin insert • with socket insert
• 6GK1905-0EA00 • 6GK1905-0EB00
Connector plug 7/8" for voltage (5 per pack) • with pin insert • with socket insert
• 6GK1905-0FA00 • 6GK1905-0FB00
Covering caps 7/8" (10 items) 6ES7194-3JA00-0AA0
*) These cables are available in different lengths. See Catalog IK PI for more details.
Table A- 8 Ordering data - RFID accessories
Ordering data Order no. 2 m 6GT2091-4FH20 Reader cable MOBY I / E / U 5 m 6GT2091-4FH50
MOBY D reader cable 2 m 6GT2691-4FH20 2 m 6GT2891-4FH20 5 m 6GT2891-4FH50 10 m 6GT2891-4FN10 20 m 6GT2891-4FN20
Reader cable RF200 / RF300, RF600 extension cable RF200 / RF300 / RF600 / MOBY I / E / U / D
50 m 6GT2891-4FN50 RF200 / RF300 reader cable; angled connector on reader
2 m 6GT2891-4JH20
M12 sealing caps for unused reader connections (10 units) 3RX9802-0AA00 DVD "RFID Systems Software & Documentation" with FB/FC 45, FC 55, FC 56, FB 101/116/132, GSD/GSDML files, drivers, tools and RFID documentation
6GT2080-2AA20

Appendix A.3 Service & Support
ASM 456 interface module 62 Operating Instructions, 04/2013, J31069-D0162-U001-A5-7618
A.3 Service & Support
Technical Support You can access technical support for all IA/DT projects via the following:
● Phone: + 49 (0) 911 895 7222
● Fax: + 49 (0) 911 895 7223
● Online support request form: (http://www.siemens.com/automation/support-request)
● Internet: E-mail (mailto:[email protected])
Contacts If you have any further questions on the use of our products, please contact one of our representatives at your local Siemens office.
The addresses are found on the following pages:
● On the Internet (http://www.siemens.com/automation/partner)
● In Catalog CA 01
● In Catalog ID 10 specifically for industrial communication / industrial identification systems
Service & support for industrial automation and drive technologies You can find various services on the Support homepage (http://www.siemens.com/automation/service&support) of IA/DT on the Internet.
There you will find the following information, for example:
● Our newsletter containing up-to-date information on your products.
● Relevant documentation for your application, which you can access via the search function in "Product Support".
● A forum for global information exchange by users and specialists.
● Your local contact for IA/DT on site.
● Information about on-site service, repairs, and spare parts. Much more can be found under "Our service offer".
RFID homepage For general information about our identification systems, visit RFID homepage (http://www.siemens.com/ident/rfid).

Appendix A.3 Service & Support
ASM 456 interface module Operating Instructions, 04/2013, J31069-D0162-U001-A5-7618 63
Technical documentation on the Internet A guide to the technical documentation for the various products and systems is available on the Internet:
SIMATIC Guide manuals (http://www.siemens.com/simatic-tech-doku-portal)
Online catalog and ordering system The online catalog and the online ordering system can also be found on the Industry Mall Homepage (http://www.siemens.com/industrymall).
Training center We offer appropriate courses to get you started. Please contact your local training center or the central training center in
D-90327 Nuremberg.
Phone: +49 (0) 180 523 56 11 (€ 0.14 /min. from the German landline network, deviating mobile communications prices are possible)
For information about courses, see the SITRAIN homepage (http://www.sitrain.com).

Appendix A.3 Service & Support
ASM 456 interface module 64 Operating Instructions, 04/2013, J31069-D0162-U001-A5-7618


![Untitled 2 [] · /01-!." *23-!." 456-!." *+,-!7" /01-!7" *23-!7" 456-!7" *+,-#!" /01-#!" *23-#!" 456-#!" *+,-##" /01-##" *23-##" 456-##" *+,-#$" /01-#$" *23-#$" 456-#$" *+,-#%" /01](https://img.dokumen.tips/doc/110x75/5f2f2b6ad0823628e27434f2/untitled-2-01-23-456-7-01-7.jpg)